Transcripts
1. Introduction : As Vincent van Gogh go to Grid, things are done by series of small things brought together. Notice, take a small step
towards learning goes through the 70s challenge and having
fun with it. Hello artist. This RBS internal,
an artist and an art educator based out
of Bangalore, India. I started my journey of
painting couple of years back when lockdown was
a part of our life. Paintings where a trend I had initially began my
journey was watercolors. But as days pass and as new
trends came up in the market, war shows all the
beginning, I was curious, confused, and anxious whether
to try this medium or not. The most beautiful medium. No wonder why,
Because in height, I'm fascinated with this medium. I love our childhood days, but I had started this as my side joining from
couple of years. I have shared most of my painting tutorials on
Instagram and YouTube. You can check me
on that as well. Coming back to grow washes such a forgiving medium that
is opaque and water-based. It acts like an acrylic
as well as water follows it as y being
compared to our watercolor. Mistakes can easily be covered up and it is so
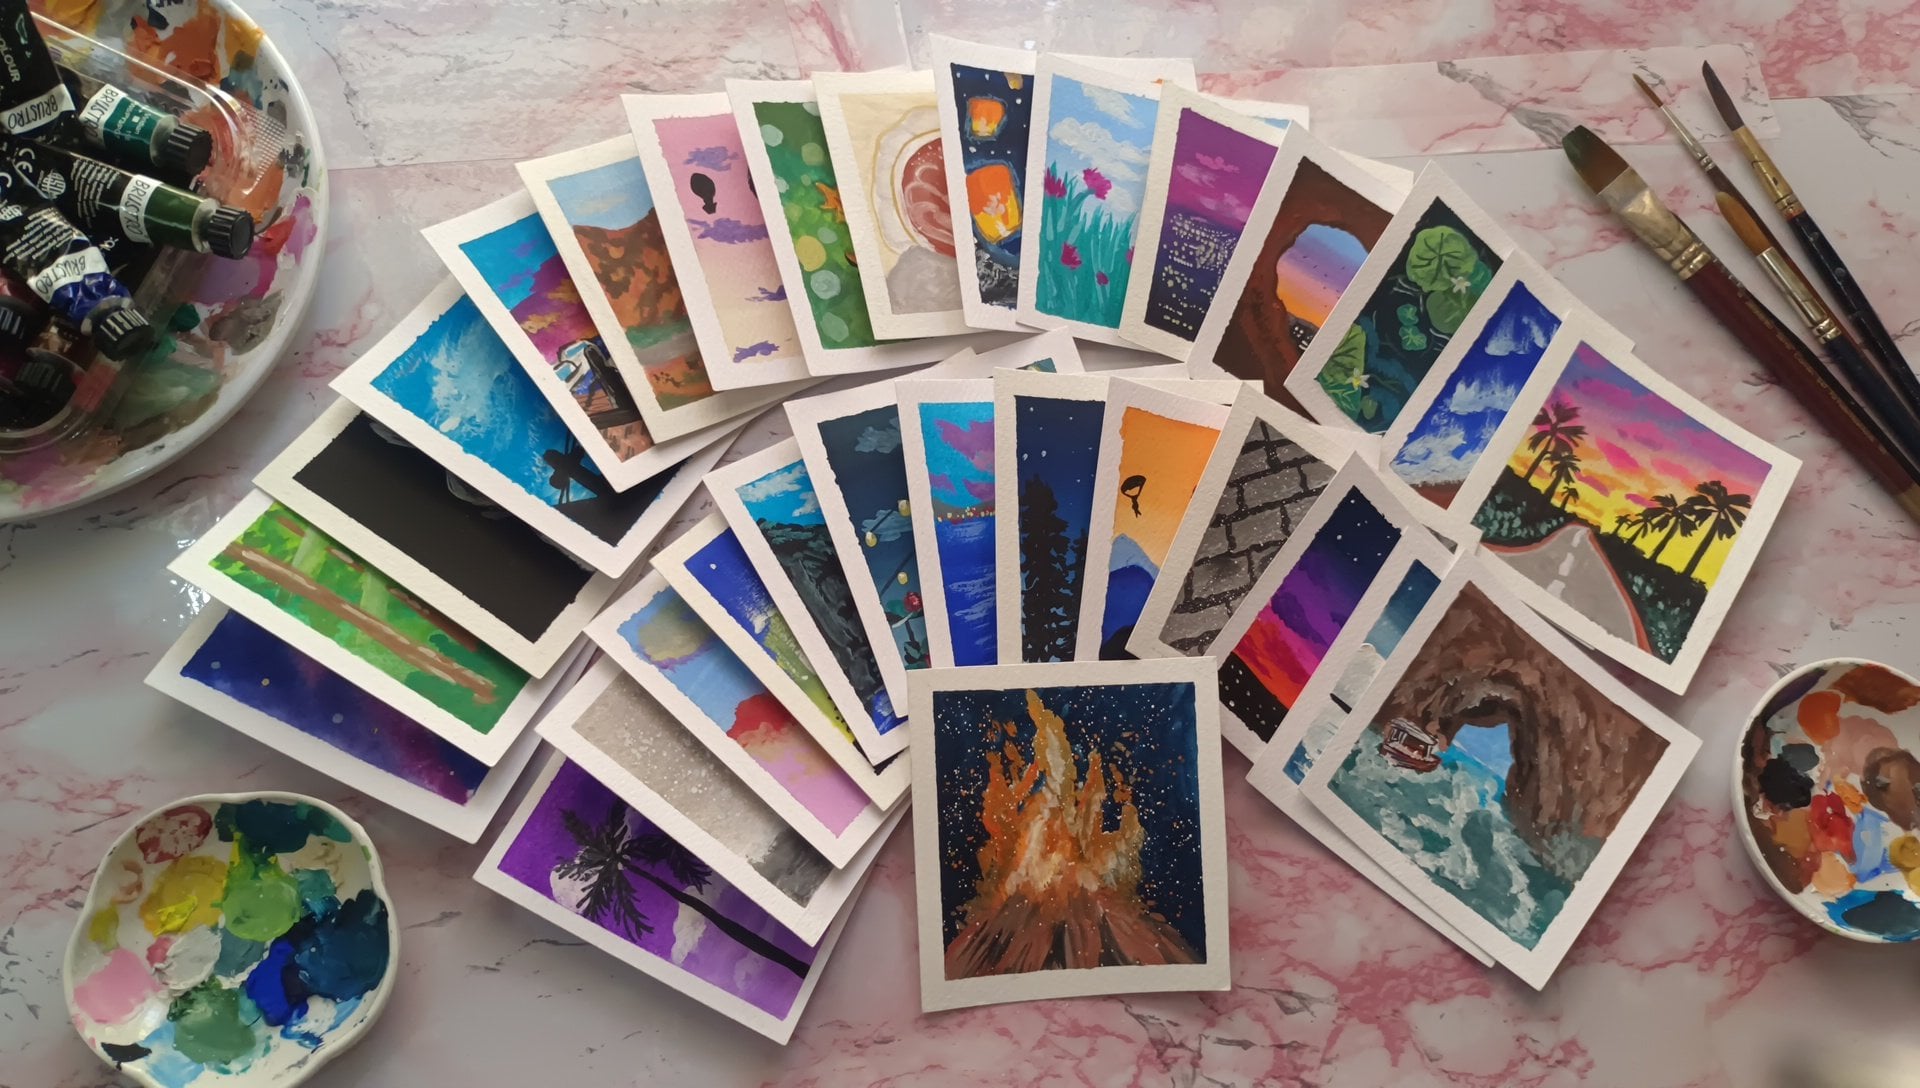
creamy consistency. In this course, you
will be learning seven different
types of paintings. We will learn each
day new painting. I have chosen each painting with keeping some idea in mind, which will be aesthetically
pleasing, easy to print. And most important,
it could be relaxing. One painting has always
been the meditation. After a stressful day. When I had asked
my students about, some of them express the same failings and some were passionate
about learning. So here I am with this course. In the next video, we will look at the materials that are ideal for this course. It is beginner friendly. Any artist who was passionate about learning can
join this class. Before we actually paint. There will be a class
all you on some tips and tricks the colors and
techniques require. Get ready to grab your supplies. See you in the next class.
2. Materials Required : Let me show you what all materials are
required for the class. Firstly, I'll be using 300 GSM cold press
watercolor paper. You can use 200 GSM paper. I'll be using coming
to the brushes, I'll be using flatten
brush size ten, rounded brush size eight, liner brush and brush. The colors I'll
be using are from rural stroke, participate
goulash colors. Along with that, I'll be using masking tape, mixing palette, or cotton cloth or tissue, or jar of water and
ruler and a pencil. The in detail Carlos
and takings will be shown as we proceed
with those challenges. Grab your supplies,
and let's get started.
3. Day 1 - Part 1: Thank you for
joining this course. In today's class. You will be learning simple, yet beautifully curated
painting in ten to 15 min. Let's begin with the
colors required. I'll be using ivory black, along with that two
shades of blue, one cobalt blue or blue. Instead of cobalt blue, you can also use
ultramarine blue. But I'll go ahead
with cobalt blue. Long with that titanium white. Yes, with just four colors will be creating this
wonderful painting. The brushes I'll be using for this painting is
flattering brush, round brush, and a liner brush. The techniques
used, your blending that Sweetwater and
dabbing for clouds. And also we'll be using dry brush technique
or the clouds. The blending can also be
done with white gouache, but here I'm using more water. The next part of this painting
is a real time painting, so you would enjoy it. While myself painting.
4. Day 1 - Part 2: Let's begin by painting this
beautiful, easy painting. After applying the masking tape, I'll go ahead and start with cobalt blue on the top and
Lynn blue at the bottom. You can also use ultramarine
blue for the top one as you can go ahead
and do a graded wash, which means upper part of the painting is the
darkest and lowpass. As it goes down, it gets
light with the same color. I'm actually keeping
it on the scene. Consistency that does
the darker shade top and bottom and left. And not going not graded
wash the top bar. Once you have painted
both the Carlos, I'll be leaving space
as you might have seen. And then I'll go ahead
and blend it with water so that the two
colors blend each other. The center part of the painter. You can use white gouache
at the center and then blend it from top to
bottom or bottom to top. As you can see, this is
one more way of blending. It. Grabs in blue and then just start painting from bottom part of the
paint to the top. This altar and chosen blending, just keep going until you find that it has
blended properly. Move your brush from left to right for an even
distribution of thing. While I'm blending
as the center, you can do small
vertical strokes are. And then you can just go from
left to right for blending, if that seems easy for you. Satisfied with the
blending parts, let's warn the clouds. I have decided to do
something unique. So I have painted to heart connected to each other
just like occurring inside. For making those,
you can sketch out the heart design and
then paint over. Since I'm short and I know
how I have directly started it by dabbing method
using a round brush. As you can see, if you have
all Wriston apart brush, you can use that as well. I will begin by dabbing from
one corner of the heart. You can also be uneven edges. To look more realistic, just make sure that our
design doesn't get affected. Go ahead and paint over and
over until you're satisfied. Just make sure you leave some
lighter part of Cloud as well to show some depth into
the heart shaped cloud. Next door or other clouds, I'll be painting in Northland manner using
dry brush technique. Dry brush is when the brushes 90% by and fully
loaded with paint, you will get to know
and fluid is dry or not when you run the 10% when rush on back of your hand and bid doesn't leave a
nice shiny surface. You will redness
but it's not too wet to the surface of the
water onto your skin. As you can see, dry
brush is so satisfying. You can apply the brush I
take off spot or the center, and then just drag your brush so that it leaves some
lighter strokes, which means like clouds
which are far away. Let me add some
shadows to the cloud. Specific. Just like I have done, links a bit of black
with white and use the grayish mixture. If you want to add shadows
to the other Clouds as well, you can go ahead and I'll
just do for this hot clouds, just inside, but not overall. Next, using a liner brush, we'll go ahead and paint. As you may notice, I have used board instead of sticking the
paper onto the desk. This is because I want to
relax my hand while painting. When painting trees
and branches, it. You may notice that I'm resting
my wrist onto the board, holding the brush
perpendicular to the people. And almost at the lower
middle part of the brush. And gradually painting. This is because it gives us thin strokes and helps
and controlled painting. You can practice this onto a paper or onto the side
of the masking tape, and then go ahead and
paint over the painting. Factors, breakfast, head back. This makes you think, if you can paint
some thin strokes, you can also use black pen
or marker to make a tree. That's an easy method. Paint as many trees as you want. Some smaller ones and
some longer ones. But make sure you
make enough branches. I will go ahead and paint
some grasses. Small one. That's all for this painting. Let's remove the masking tape. And a more diverse plant or 45-degree mammals use load
dryer to make the tape. If it is sticky. You can add extra detailing and finish and make the plus three. I would love to see your
progress paintings. Do share it on project section. If you have any doubts, don't hesitate to ask in
discussion box below. See you in the next painting.
5. Day 2 - Part 1: Welcome to the tune of seven
days goulash challenge. In today's class, we will be learning how to
paint caustic water. This is one of the
most easiest painting, satisfying one and
the most relaxing. When we see caustic water, we always think it's
difficult to reproduce it. But here I'll show you how to
paint it in an easier way. Let's check on the colors
required for the class. Video using cellular
and blue, cobalt blue, ultramarine blue, black,
and titanium white. The brushes here
I'll be using as a flattened brush,
a liner brush. You can also use
a rounded brush. So let's just dive
into the class. See you all there.
6. Day 2 - Part 2: Thank you for joining
today's challenge. I have already taped
down the paper. If you haven't taped down, let me just tell you
some tips and tricks. Firstly, make sure when
you tape the paper, the opposite sides are
parallel to each other. And if you want irregular edges, there's no need to
tape down the paper. Just make sure you have
something in backgrounds so that the extra paint doesn't get
stuck to your background. But for anything important. Also, after taping
down the paper, make sure you run your
fingers over the teeth so that there's no leakage
of paint or the people. Now, let me explain you the process of this painting
so that you can take your own time and paint very beautifully and
in a relaxing manner. For the background, I have used cell in blue and cobalt blue. Wherever you want dark spots, you can just apply cobalt blue. And wherever you
want lighter shade, you can go with surrealism. Blue, micro, you run your pain from left to
right with pattern brush. And I'll make sure
the edges aren't left covered up with the paint. Blend the colors
properly and smoothly. If you clean it's not blending. Make sure you use a
little bit of water. And as you know, washes a ticker medium. And if you add lots of water,
attacks like watercolors, and it becomes lighter
and tumble to quash, retails lighter in color,
very translucent type. So make sure you do it
in an opaque manner. Play more of paint and blended properly so
that it looks opaque. I feel there's too
much of light Carlo, so I'll go ahead and add some
more spots of cobalt blue. You can blend it or
and just leave it. Just make sure though upcoming linear blending them properly, gently blend still makes
a lot of difference. So I'll be blending them. Now. I'll be using
ultramarine blue with a tinge of
black mixed with it. And I'll be making the shape
or photo being reflected. For the first
layer, I'll go with ultramarine blue with
a pinch of black. Make sure for the next layer, I'll be adding white
into the same mixture. And for the last one
direct titanium white. Now sent you all
know how it is done. So I just stopped. You authenticate.
Every now and then. You can just relax and
paint on your own. For making such
irregular shapes, you can choose a particular
size of square you want, and then draw irregular lines. Dislike how I'm doing it. And wherever the lines meet. And make sure you
make it thicker. As you can see somewhere, it is tunnel and somewhere. Pick up some boxes small
and some bigger ones. Just keep going and enjoy
the process of painting. Just don't make one
particular size boxes because that will look calm. Fuel want realism, add some
small and some larger ones. And you can view a
lot of space as well. In between the boxes. As I said before, make the corners ticker
and in Middle Tennessee. Once it's dried, now let's add our mixture which is lighter
than the previous shade. Ultramarine blue, black. And now with white,
titanium white. You can go over it
or you can just make another layer which is smaller or larger than
the previous one. This makes sure
that not every line as matching those lines, which is previously done, you can do it in between
that look more better. You can stop on this layer
and News Wipe, home, upset or pencil or
wide glass Benson and just shade wherever the
whiter shade of blue. And that's it didn't look good. But here I'll be adding
an extra layer of white paintings with
just taken consistency. This whites god has given a lot of effect on the painting. As you have noticed. For making the boxes or whichever shape
you're drawing it, you can give the
player a huge space. And then the second layer. The third layer, monitoring screens all day
enhance the painting. I'm doing it in a random way
just to make it look good. You can use this type
of texture painting on to painting the painting. Water float or
something like that. During summer painting. Look gorgeous. Yellow. I'm just
teaching you how to bring this type of gift. This looks so pretty,
isn't it beautiful? You can use the same texture painting to paint
something like this. Here I have used the white
pencil as well. Making that. Secondly, you can
add the stones, water floats,
anything on to that. Make sure you add shadows
as well when you paint. Water flowed in touch painting. That's it for this class. Let's remove the
masking tape. Again. Remove the masking tape in a planned manner of
what phi degree. And if it is too sticky, use a hairdryer
or hair blue wall to remove the stickiness
from the tape. Just Google the tape. And then after some time, just remove it and remove
the masking tape or live in the painting is dry and don't
worry if the paper buckles, just keep it under
some heavy thing.
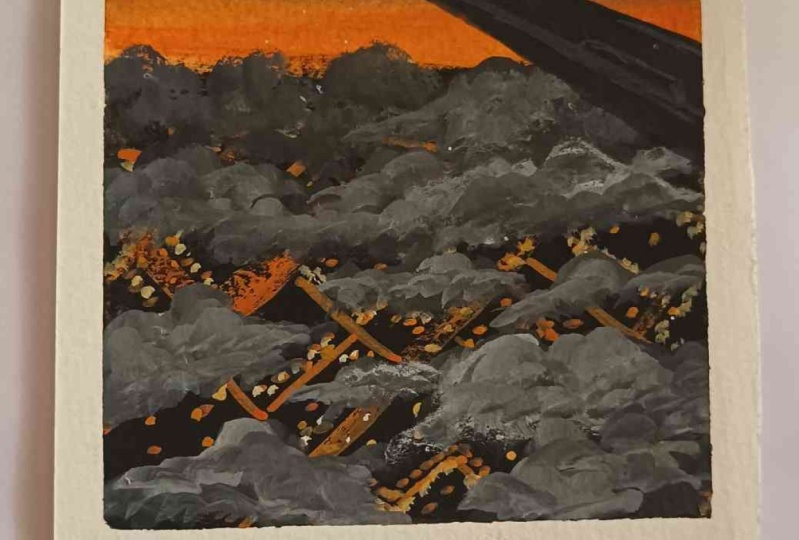
7. Day 3 - Part 1: Welcome to day three
of seven days. Gross challenge. I'm so glad to see you all here. If you have watched the
previous two challenges, make sure you post your progress paintings
in the project section. I would love to see them in
today's challenge or class. We are going to
paint this night sky painting with roll-off crackers. We are going to learn
the reflections and also how to paint the
crackers in the sky. Gets ready to grab
your supplies. The two most essentially Carlos, are required for
this painting as ivory black and Titanium White. Alone with that, I'll be
using cobalt blue and roles. Always remember gauche. Gauche, the lighter
colors, dry, dark color. So whenever you're
painting on black color, the first layer will
always be invisible type. So don't worry, once it's dried, it will come out properly. So being the layers
only when it has dried completely to enhance
the painting even more. For this painting, I'll be using a flattened brush and
also a liner brush. Now of course, mixing palette, a jar of water, and rest other
materials which I have discussed already in
the material section. The technique you'll
use just simply for making the background would be using ivory black and white. Ivory black will be occupying the upper
and the lower part. And white will be blending it. And for the buildings
and water will be using opaque black and for reflection broken line and
also dry brush technique. And for the lightings, again, we'll be using opaque color. For the crackers really be using straight line
or a curved line. Let's begin with the class. See you in the next video.
8. Day 3 - Part 2: Let's begin by painting the gorgeous night sky
filled with crackers. For this, always remember, if you want to paint any landscape painting or
something which is far away, you have to either
draw it and one-third of the horizontal line or two third of the
horizontal line. That will enhance the painting even more and give
you perspective. So for now, I'll go with
the upper and lower part of the paper with black color and blend both the colors
with white in-between. For this painting, I have used the second and third part of the pink bar for the buildings. So the water as well as the sky looks equally in the painting. Just paint the
black color evenly. It's not a graded
wash. Graded washes something which is our
darker at the top. And as you go down,
it gets lighter. You don't have to do that. You have to just keep adding
black everywhere and leaving a space in-between the
two blacks so that the white can blend in and
give you a gray color shade. Why we need a gray color shade? I'll tell you later. Blend the colors evenly
so that there's no space left out or there's no
brush markings left out. And the gray color is
because we want to show the crap course and
lighter as well as in the down copays and
also the buildings. You can just paint
black over black. So we need something lighter
to show something black. And we are going to
paint black color of the links into the
white or gray shading. Renting buildings is very
simple and flatten brush. It's either your
drag it down or take it to the top using the end. No flatten brush. Once I'm done with
the buildings, I'll go ahead and
add more black to the bottom so that
it looks opaque. For the reflection. I'll be using white color. I'll just stop not
mix it completely. I'll just take the
white color and then directly go over
the black color. It does not completely dry. It gives you like
half and half shade. So you can do this with dry
brush technique as well, but you're, I'm
directly doing it when the paint is not
yet completely dry. Just make sure you blend the
darkest white colored spots. Won't make it completely gray. Just rename the lines as you can see to the bottom left.
Something like that. If you can do it, it's okay. Even I haven't got
that properly again, will mourn the Carlos and
we'll do it with those colors. Will go with Rose
and cobalt blue. I have added a tinge of
white to the rows mixture. And with this we
are going to print, we're going to make
them round the spine. And then we'll go ahead and
make some curved lines, straight lines, broken lines. As you can see how I'll make the crackle first you
see and then print that. You can experiment with
other colors as well. But initially, you just take some rough paper
and then paint it on that exact color and
do it your amusing or normal brush around the
brush just to blend the edges. You can do this with the liner
or platinum brush as well. Don't use flatten. Just use the liner brush.
I'm sorry for that. Yeah. You can go with
rounded brush as well. See as you can see when
it's blended completely, the color gets lighter. Don't worry, as it gets dried, the color will come out properly
and in a beautiful way. I'm using the same
mixture rose with a tinge of white and
starting with the center. I'll go ahead and
make some sparks. It is semi dried. You can do it when it has
completely dried as well. As you can see, I'm doing it from the center and
going far away. And keeping though, I'll
brush perpendicular papal, you can do the dry brush
technique as well here. But here I'll go with some
satin finish to the crab cost. That is, we are having Olivia
metaphor till as well. While the crackers are drying, we'll go ahead and make some
reflection in the water. I'll be using the
second type finish. You can go with dry
brush technique as well as you can see. And we'll go ahead and
paint the reflection onto the glasses
of the buildings. We are going to bring the same fallow wherever
they'll crack could color that building will
have that color of paint. Don't worry if the paint
is not showing up. As I said, lighter
colors dry, darker. You can start adding white
to the Windows as well. And we'll use a
little bit more light into the mixture of rows and white and paint the next layer
of crackers. That Carlo. You can do this step
as much as possible. It's up to you.
It's so satisfying than the diamond dries. We'll go ahead and
take some other color that is cobalt blue
and paint our class, you have to paint
with white color. So it will get lighter. And again it can get doubt call. It happens again and again.
You have to roll on. Using the same method, me go ahead and do
it with cobalt blue. The same techniques, the
same method, everything. Now for the rest of the buildings will go
ahead and paint white. Don't meet all the links
with same Carlo pinned. Use white also. Master this painting. You don't know where
the horizontals so defined it with
the same white. And also you can add
some street lamps and Jordan for painting them. In Britain, the buildings. The street lamps does enhance
the look of the painting. Adding some more reflections. That's it for this painting. Let's remove the masking tape. I don't know, but something
is feeling empty. Yeah, we'll paint with
some white colors and then of course, let's paint the edges and
not leave them alone. It's up to you if you want
to add sparklines or not. I'll go ahead and add
some dots in between and also some dry brush
strokes to the crackles. In your journal is done. I hope you enjoyed the
process and let me see your paintings posted in the project section or
tag me on Instagram. I would love to see that. And coming down, how beautiful are just painting
that feel like.
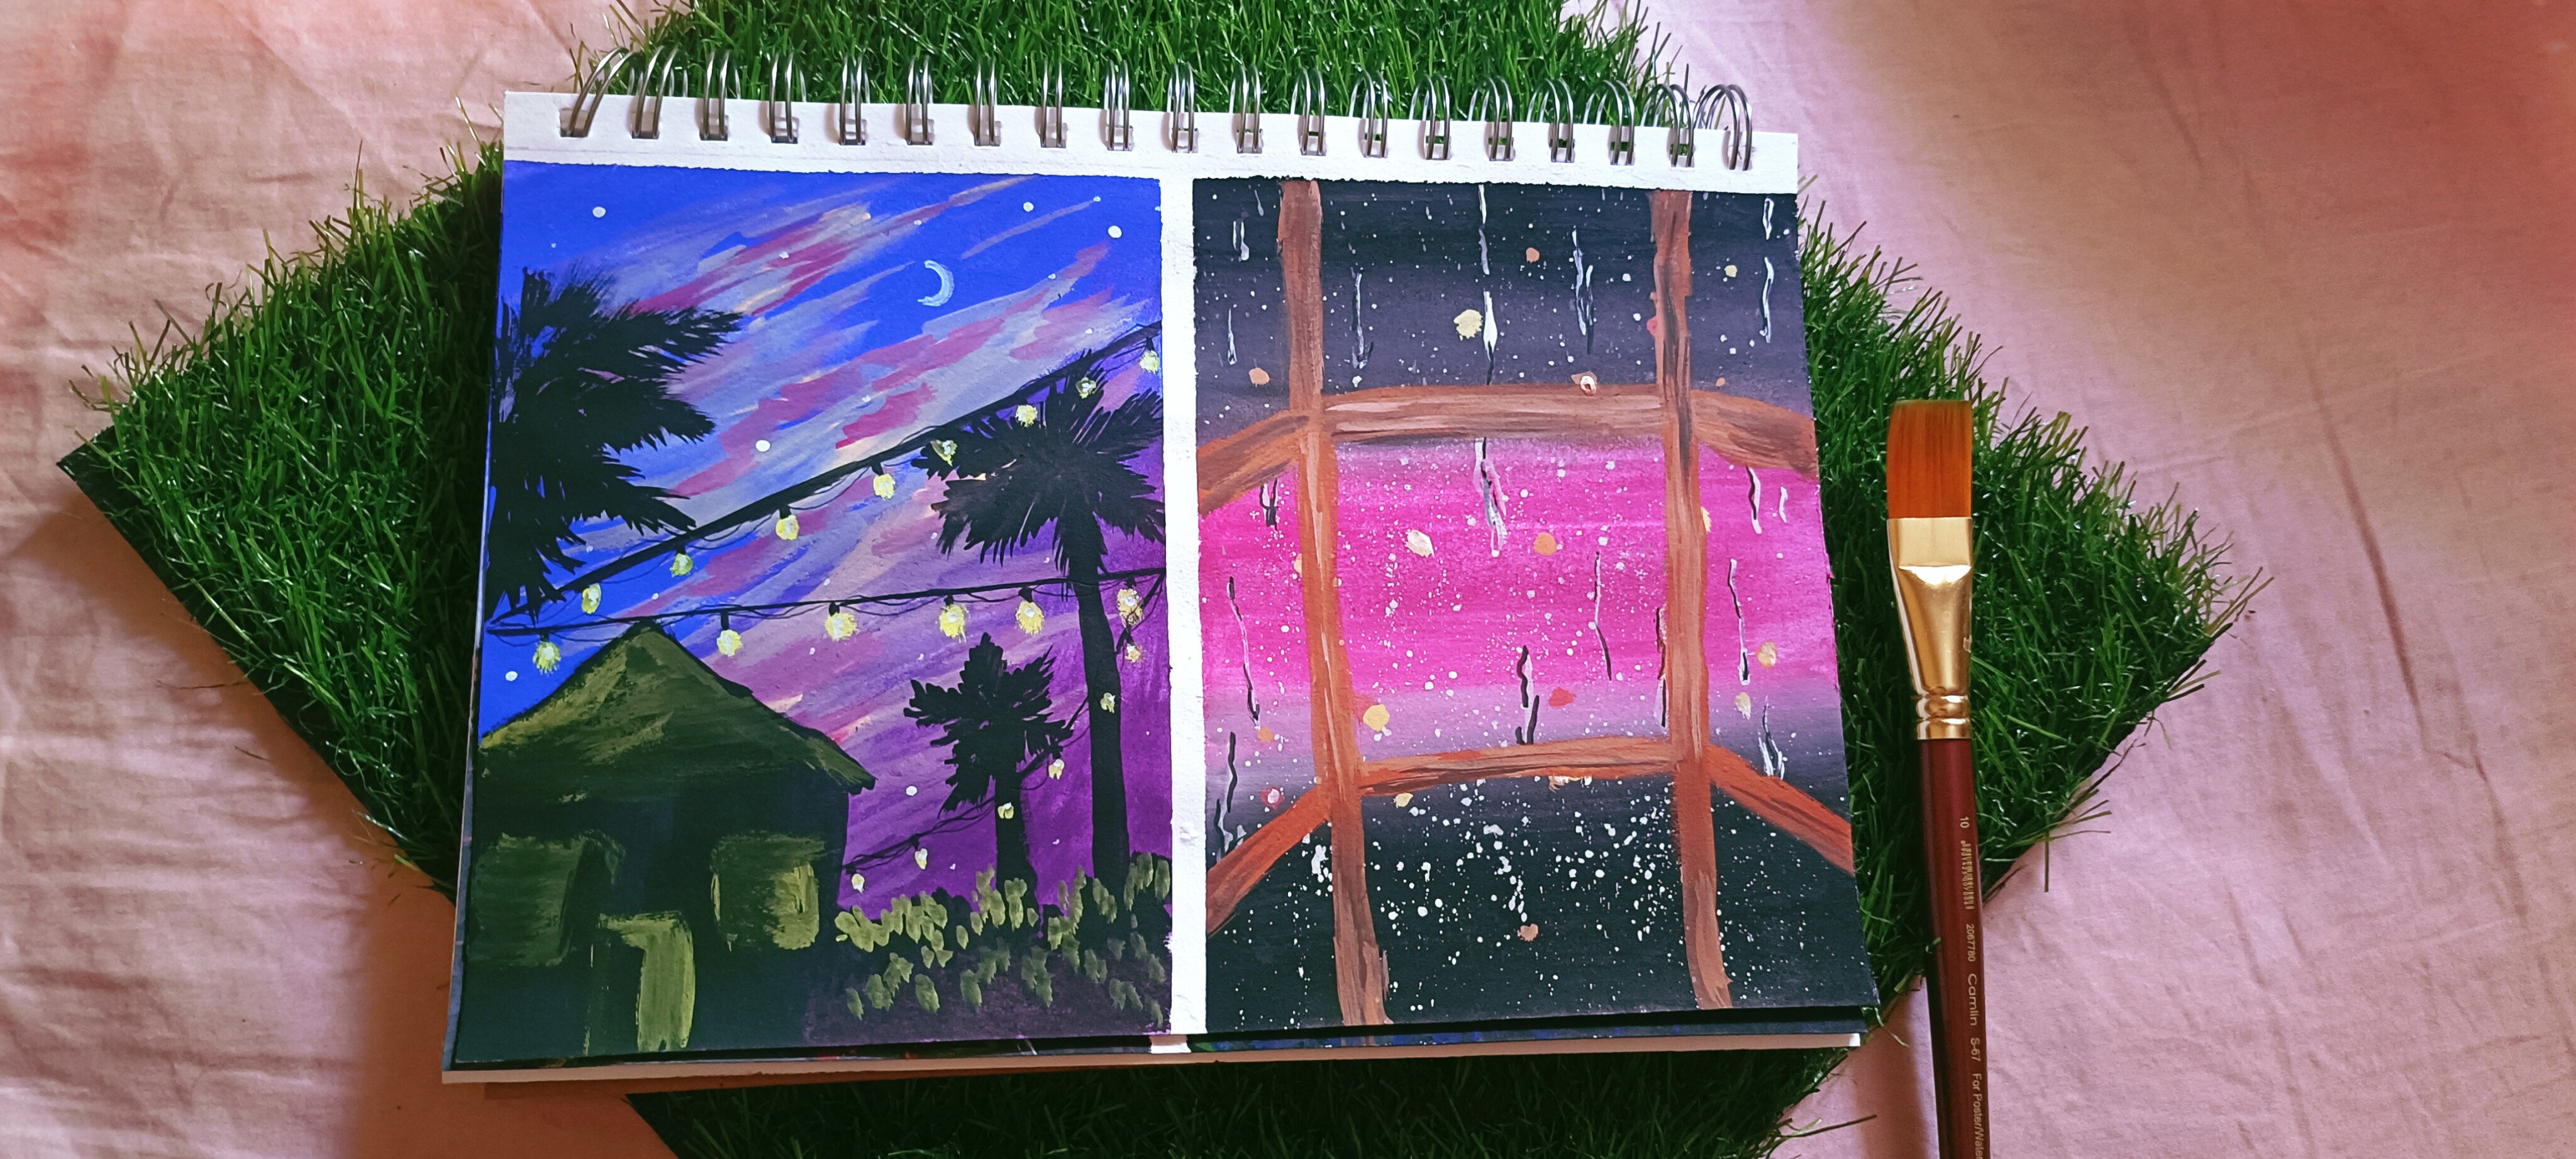
9. Day 4 - Part 1: Welcome to day for seven
days, gosh, challenge. Today we will be painting an
evening's five at sunset. The wives painting. The colors we will
be using Hill is sadly not so bright and
something like a cool, right? So let's look at the Carlos
required for this class. Firstly, I'll be
using cell in blue. Next, we will be using pink, mid can know black, and of course titanium white. You can also use lemon
yellow instead of the major technique and
the most important one used hill as a graded
wash. For more details, we'll look into the
class. The brushes. Use your flatten brush, brush and around thin brush. Grab your supplies, and let's
get started with painting.
10. Day 4 - Part 2: Let us begin with the painting. I have told many a times
what a graded wash is. So we'll be using graded
wash for the sky painting. So firstly, I'm using the direct selling
blue onto the paper. That is the first part. And then as we go down, we'll be mixing it with titanium white and
making it lighter. Cover up the edges
and also the paper. And blend in
properly and gently. Add little by little
titanium white, enter the mixture and use it. You can either add blue into white or white
intracellular Andrew. But the most preferred
method as adding little titanium white and
blue and using it. That doesn't create a lot
of difference in the sky. I hope you get my point. Blended properly and
cover the edges. Brush is too dry. Then just dip the
brush into the water. Don't immerse it into the water, just the edge into the water. The perspective line, as I said, you can use either one-third of the pizza as the
horizontal line, or two third of the people. Here I'm using the two
third of the paper as my horizontal for making
the road or pathway. I haven't washed my brush. But Ted Lynn blue, I'm directly using some of
the black with some white. As you can see, the
mixture of color as something like bluish gray. Painted like a partly
as a starting from the horizontal and ending at the
edges, something like that. You can notice how I'm dragging the brush to the corners and not covering up everything
from side-to-side wash, blended properly and
cover up the edges. And also the papal. Don't leave any white space. Now let's paint the clouds. You're amusing hot pink
with a round brush. And really be going ahead
and making clouds will get if you have already disposed some gouache onto the palette and it's dry. You can add one or
two drops and make it into mixing
color, consistency. And as you can see, I'm just going
from left to right and not dabbing or anything. I'm just dragging it. And using only the tip. Wherever you want
to make clouds, you can go ahead
and make clouds. Make sure the upper part will be thicker and as you go down, it will be tunnel. It mean to say about the
width of the clouds. You can use a screenshot
of my painting and keep that as a reference
picture and then change it. Now, I'm mixing a lighter
shade of hot pink with white. And then painting the clouds. As you can see, it
doesn't look in much more beautiful depth into the painting by going over with the
lighter shade at the top. Dislike I'm doing it. You can also use a dry brush
technique onto the cloud. Now, let's mix some yellow
with white and use it onto the Cloud as the sun is shining somewhere
which is not seen. You can add a local Adele center or at the bottom of the clouds. Because the sun is setting
an evening swiping, then you can use orange color
instead of a low as well. Now, let's make some links,
pathway and everything. I'm using a round brush. You can use a flattened brush as well by using the technique
that you learned. And D3 class. The buildings which
I have painted the horror as a pure black. And there's no mixture
of any paint in it. And we'll go ahead and make the pathway as well
in black color. To refine the edges of
the pathway will mix black with some wife and draw some lines which converging from the bottom of the people. Building area. One is the pathway is done. Let's add some trees. I'll be using a
liner brush here. Make sure you follow the first vector as
well while painting, because perspective
does make a lot of the nearby painting, you can draw a larger
one, which is five. You can draw a smaller one. The main trunk of
the tree should be taken out, whereas
the branches, you can use the brush
perpendicular manner to get ten lines. The side path still
looking empty. So let's add some last bar plot or property, which is that, I guess now it's making
sense and looking beautiful, but the role is still empty. Let's go ahead and
paint some cars. The full painting cars, I'll be using call
shade of white and gray to define the road. Now for making a car, you can paint all squared force and then a rectangle
below the squared. And then some small adult in-between the rectangle
leaving some space. As you can see, it's very tiny. Let's make another car. Just like how we did. Square first, rectangle Second, and then tires are
small circles. If you want to add
the side mirrors, you can go ahead and make it again using a small
dot or round tokens. This guy looks dull, so let's light pink
mixture onto the clouds. You can use dry brush strokes, as I have already told. Just a smooth line. You can add the
corner of the clouds. The clouds until
you're satisfied, but make sure you don't cover up the background with clouds. Now, let's add some
headlights to the car. I'm using some white mixture, or you can use first a
load onto the black color. Then use a mixture of white
on top of that color. Once it's dry, you see just tiny little drops
and then dragging lines. You can go from left
to right, tiny lines. Well I just a straight
line as well. Let's add same Carlo for
the building windows. Now for the next
layer will make a low-end white and then
go ahead and add it. This will brighten up the
painting in one more. For the headlights, you can add a tiny dot into the painting. Now, using the gray mix show, we'll go ahead and
clean up the card. And also if you're on
the layers and ties, but the tie you can't see
with the headlight forelimb. So let's do the screen. Now. The third layer of headlight
would be the all white. As you can see, the smell
brighten up even more. Doesn't it? Looking so gorgeous? Let's remove the tape. I said before, remote and
a slant nano 45-degree. And don't tear the
paper up a little more. When the painting
is completely dry. You can add boards as well if
you want or straight lungs. It's up to you to
show your creativity. Looking at the border, they are so defined and parallel to each
other though this enhances the painting even more and brings up the
painting to light. That's it for this
painting class. See you in day five.
11. Day 5 - Part 1: Welcome to the five or seven
days squash challenge. Today, we will be learning
a waterfall scenery. At nighttime, there
are some lighting coming from the moon as
well as from the streets. As you can see,
not everything is like full and not
everything is dark. Carlos will be using
your hands, of course, ivory black portion
blue, yellow, green, and also titanium
white and bonds here. Now, if you don't
have a yellow green, you can always mix your colors. Yellow with some sap green. Plus is a very important column. So make sure you have that. The techniques we'll be using as a graded wash and
dry brush technique, stippling technique,
and many more. The brushes we'll be using
as a flattened brush, rounded brush, a liner brush. This painting indeed
looks complicated, but it is very easy to clean. I'll show you the easiest
method how to paint water for. Grab your supplies,
and let's get started.
12. Day 5 - Part 2 : Waterfall is one such
amazing language Nature has gifted us. Waterfalls has such
an melodious voice, yet it folds and evenly
but continuously. So here we are
painting once in G, that is from waterfalls. And for this I'll be
using portion glue and going with a graded wash.
As I have already said, waters graded wash is basically the upper
part being the darkest and as we go down in the shade
of the color gets lighter. And I'll be using white to
lighten up the Persian blue. As we go down. Blend each layer properly, go from left to right, cover up the edges, and be gentle to
the paper as well. And if the paint dries
and the brushes dry, just the edge of the brush into the water and use
it with the paint. I'll be using black
color as an underpinned. So you can see how I'll
be painting black color, that is from left to right
and then right to left. And also the foreground
will be different or wash. So make sure your brush
strokes in such a way. By running the brush in Solomon gives you
an idea of what, what will come in that place and what will come
in another place. As you can see at
the right side. The left side, there
are bumps which I have created that looks
like some mountain. I'll be using some
grayish mixture to give some depth to
the background. And also for the foreground, I'll be going from left to right stroke instead
of top to bottom one. The British mixture is done by mixing white and
just some black. Now, I'll be painting a
tree with a black again. This is again an underpin well, which we'll be painting layers. This will give the shadow. I'm using my liner brush
and as you can see, I'm just dabbing
it, putting dots. And also waking lives by pressurizing the
distance onto the paper. These low median key and
cover up this thing. So let's just give
some background to show up in between the paint, especially at the
corner of the tree. Now for the extreme corner, you don't have to make
the stippling method. You can just fill
it up with black. I'll be continuing painting with black to the trunk
of the tree as well. Now for the foreground as well, I'll be adding some
kind of shapes. As you can see, I
have added grayish. Make sure just so that the foreground materials which I'll be adding with
blackness, Sean. Now, let's add
some sky elements, that is moon and stars. For this, I'll be using titanium white and the
background has dried. They don't smudge the pain. And really add the
stars and the moon. You can blend the edge of the
moon with the round brush. And again, paint over the
moon to make it into layers. I'll be doing that in a
little step once it's dried. Let's wait for couple
of minutes and check if the lower half
of the painting has dried on not making
the waterfall will be using dry brush
technique here I've used flatten brush for making
the dry brush technique. You have to hold your
brush thoroughly and check if it has dried
completely or not. You can check it by running
the brush behind her hand. And if it leaves some water or shiny surface onto the hand, then it's not completely dry, so patted on the
cotton towel or onto the tissue and run
it behind the hand. It feels right but it does not
It does not contain water. So that's the correct
brush we are using. For this technique. I have in the white paint at the edge of the
flatten brush. And now I'm gently dragging
it from top to bottom. I'm not going to use
it again and again. We'll be filling out with
paint after a few strokes. This will not cause the
blending of the bag down. And now I'm going to have
loads of white color. As you can see, this dry
brush technique has driven as uneven white layer where it shows the water is
falling and for the splash, I'll go from bottom to top. Slant manner as you have seen. And for the foreground, just let some left to right. This is all done when
the brushes dry. Now, let me add some pine
tree for the background. I'm just drawing
one straight line and going from left to right. As many fine please as you want. Does that don't go
over the waterfall? Now, let's paint some
grasses or have used a login mixture mixed with social glue to make
the dark green. As we have made the
tree the same way. Neither stippling method or the lifo method that is pressing the brush
onto the paper. Like that. We'll make some
greenery around the waterfall. Since the greenland still dark, let me add some white into the mixture that you
do as like grief, but not too light green.com. So we'll be using that to
create some more leaves. Let's add some to
use at the corners. This I'm not going to
explain at self-explanatory. It's how you use your brush to run from left to
right, like that. Let's loved the tree with
the same mixture of paint. I'm leaving dark spots and going ahead and painting
with this shop. I'm not going to cover
up the black completely. I'll be leaving
some urine death. As you can see. Again, we'll
be using stippling method. Stippling method is basically putting dots onto the paper. Let's add some more
white into the water. Make it more beautiful
as you like you are. I'll be adding some
splash and gods. Now, let's have green and
white mixed children. Go ahead and paint
over the beans, which we have already painted. Now it's looking more
bright and now I get it. For lower power. I'm
using it just randomly. I'm running my brushstroke, showing up the
background color and also adding up the new color. So it completely depends
on your practice on how you use. The brush. Really loved this
lighter shade of mixture everywhere
where the greens. Let me add some
motion to the moon. The moon and still take I don't think it's the
right consistency. So he already blend
the moon completely and then paint over
it with layers. Now using burnt sienna, I'll go ahead and paint
the trunk of goods changed since it's
dark with fancy. So we'll go ahead and
paint bonds here now. We can use burnt sienna
with white mixture as well. So as you can see, I'm
just going from top to bottom with broken lines and
not completely filling it. Make some branches as well. Painting is almost done, but let's add some more stars than light of the tree as well. This is one way of
splashing the column, which was unsuccessful because the paint was in that place. This is the second method of
painting it ritual, again, I'm successful because we wanted this platform just to be on the upper part and not
cover up the pink. And the third method is
completely doing It's like dust, which is easy and fun to do. Now using the even more
lighter shade of green, we'll go ahead and cover up
the tree and the grasses. This looks even more beautiful because it's lightened
up the tree. That's it for this painting. If you want to add
some more details, you can go ahead and add one to check if they just have
covered properly or not. Just remember the masking tape and removing the
masking tape and assign 45-degree grim world once it's dry and use a blow dryer that
the taste is too sticky. You can use scotch tape as
well instead of masking tape. Something new for
you on removing the masking tape.
Tips and tricks. Isn't it looking so
glory and gorgeous? That's it for this class. See you in the next one.
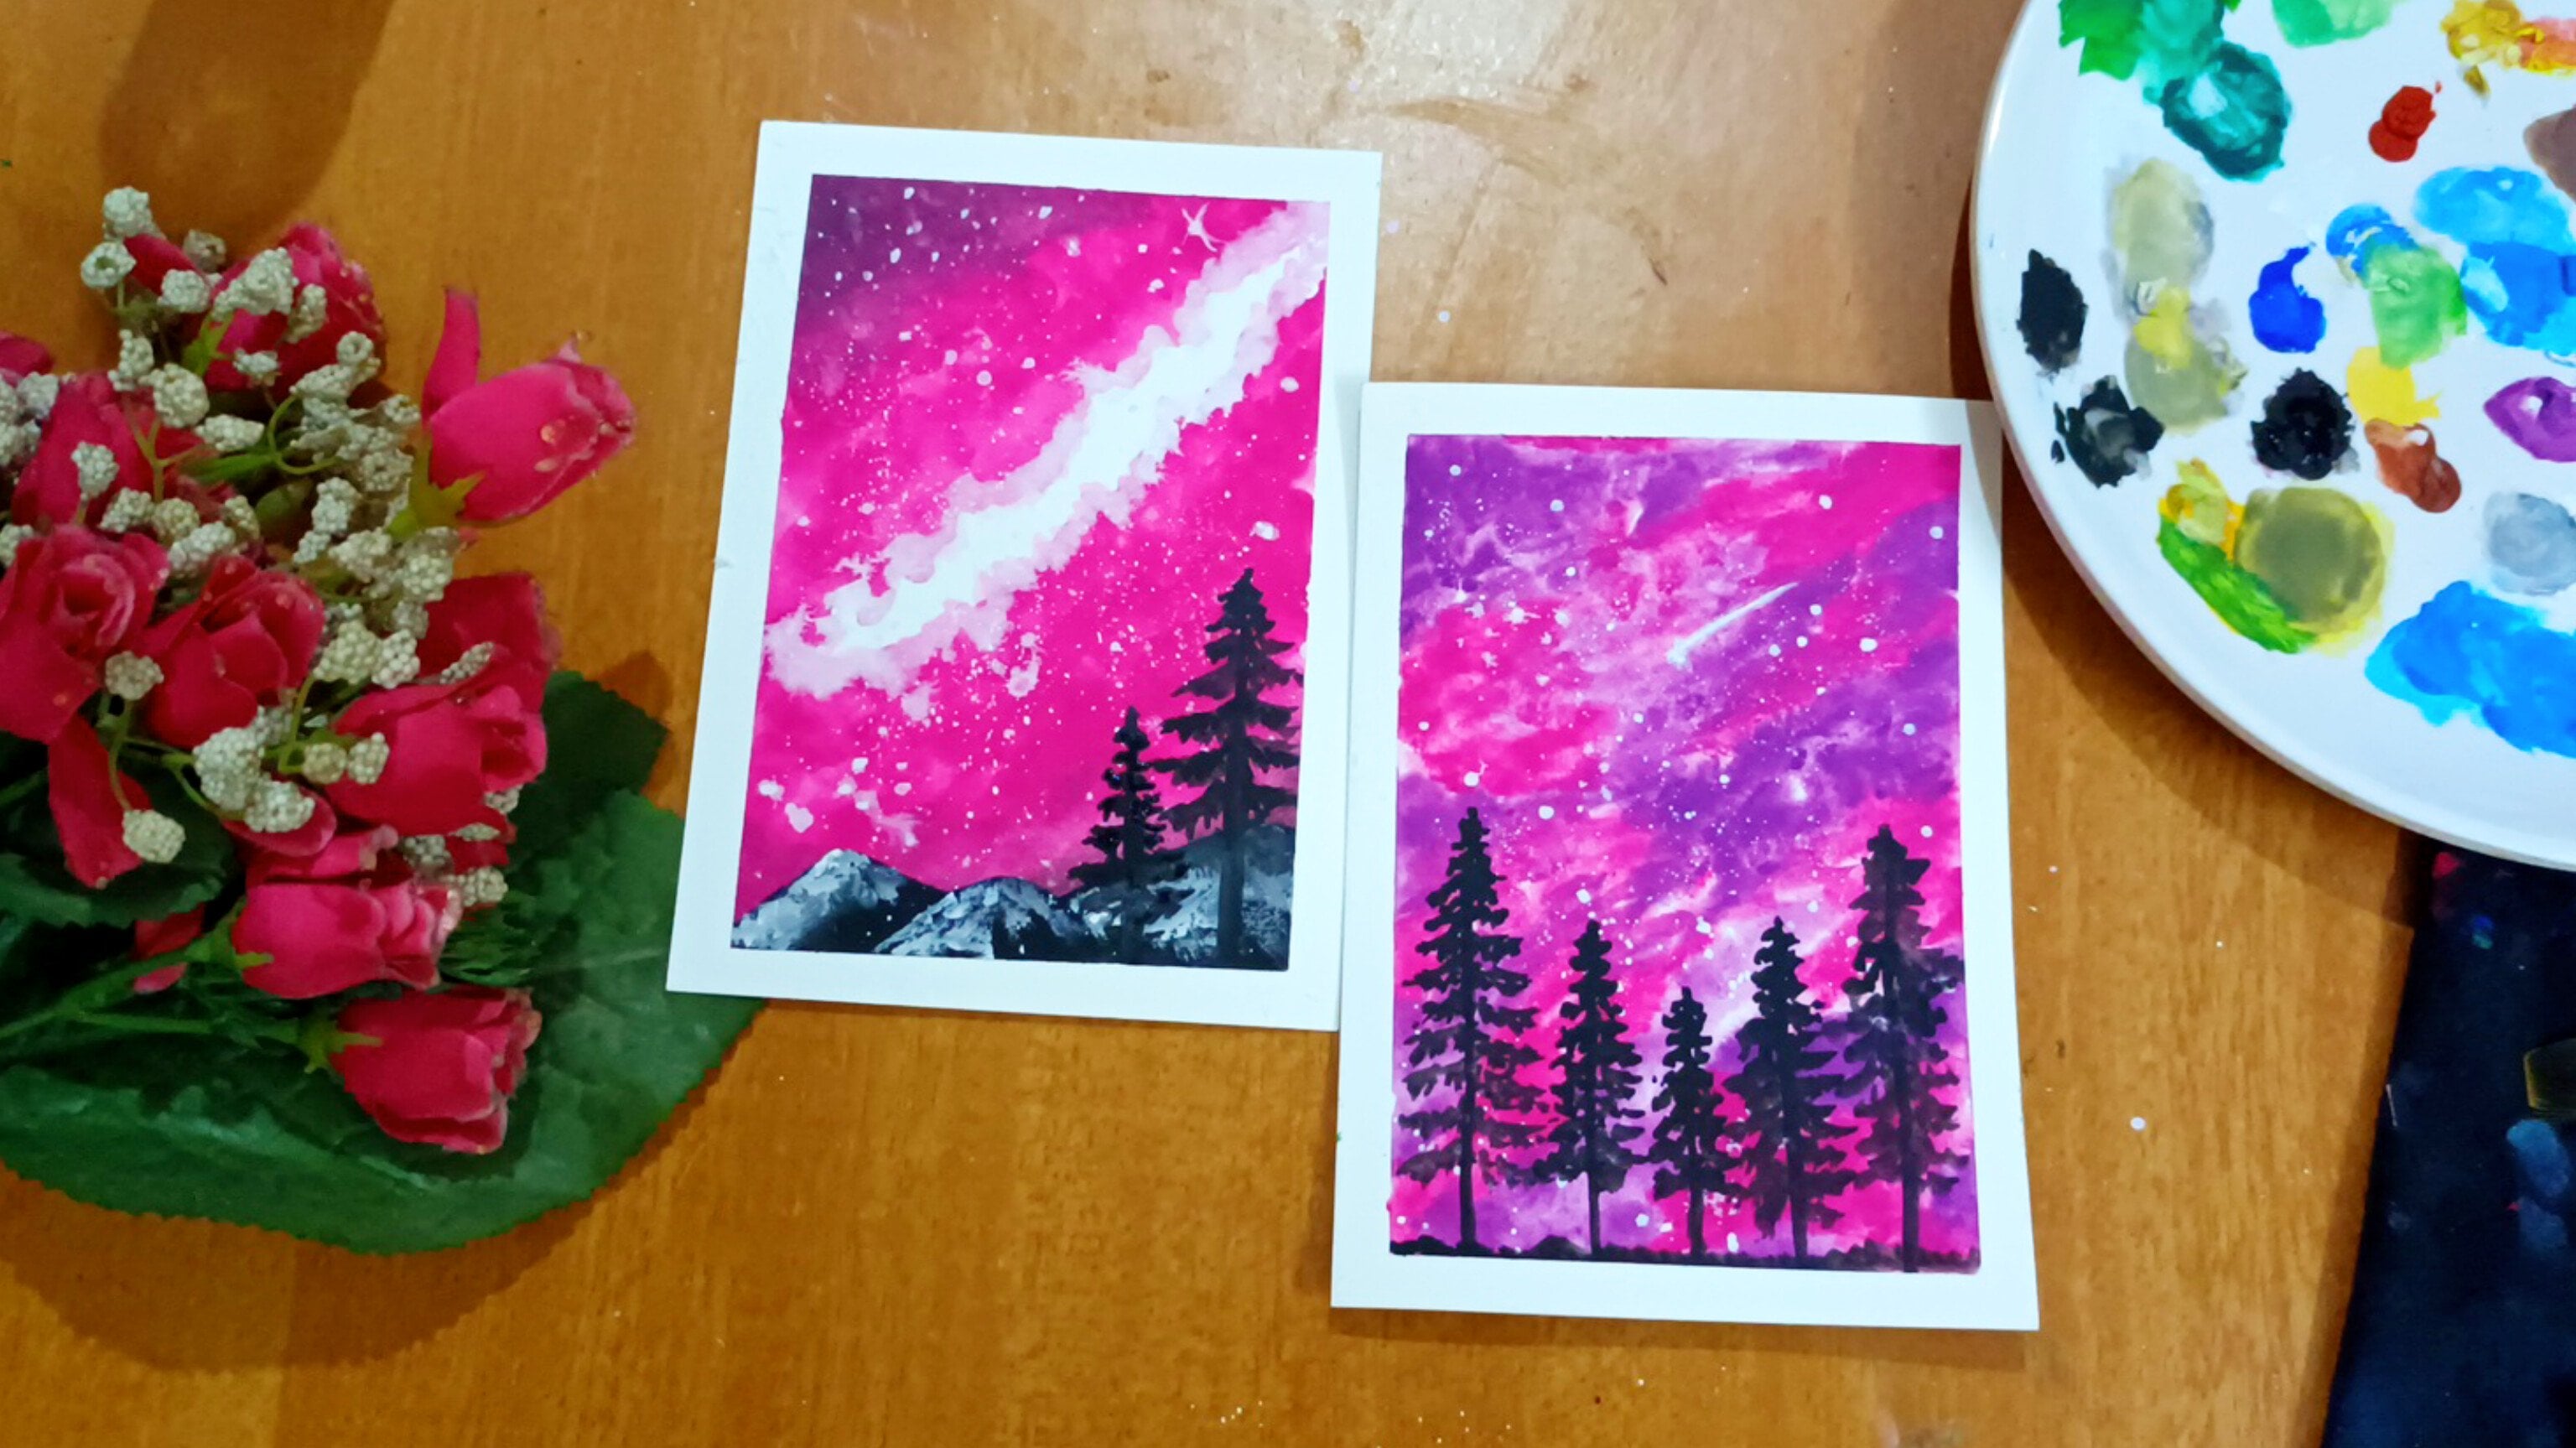
13. Day 6 - Part 1: Welcome to D6 of seven
days squash challenge. Today we will be learning how
to paint sunset painting. It is one of the most
wonderful, gorgeous painting. Hope you enjoyed the process, the colors which we require for this painting as
ivory black portion, blue, hot pink, lemon yellow, sap green, and
also violet color. You can even use the rose color from the same
brand, Bruce, true. Sap green is just for the
highlights of the trees. If you don't have sap green, you can just mix Bush in blue with lemon yellow and make it as light as you want and
use that same mixture. The brushes which is required for this class as
a flattened brush, round brush, and
now liner brush. If you have a filbert brush that is well and good
for making clouds. If you don't have, I'll show
you another way of using it. The techniques which we will be using here as a variegated wash, stippling and Ponto
Cloud making. And we'll also paint pine trees. I'll explain you in the class
what already gated wash. Grab your supplies
and let's begin.
14. Day 6 - Part 2: Hello everyone. I'm pretty sure you must be wondering what a
variegated wash, if you're a beginner. Variegated wash is basically a flat wash with two
or more colors used. And we have to blend all
these colors together evenly. So the background
wash looks even. So. The colors which
I'll be using for making the background is
lemon yellow, orange. For making orange,
we'll be using mid L0 and hot pink together. Look at the mixture. It gives such a
beautiful bright orange. If you want to pay still one, you can add little bit for
titanium white as well. But here, I'm okay with
this bright orange color. So we'll go ahead with this. I'm starting from bottom of the paper and moving
ahead towards the top, you can go with four sides
when blend the colors evenly. There shouldn't be
any line like that. Blend them as much as possible. I know what variegated
wash it does not possible, but you can use white
gouache and blend them. I'm trying to avoid void gosh. With water. I'm blending it. Mixing hot pink portion blue. We'll go ahead and
paint the mixture. This is very light, so I'll be using rose color. Again, blend the colors properly and make sure the
edges are covered. Run your brush strokes in one direction that
is left to right. Don't run from top to bottom. These create a different brush
stroke and leave a line. After putting the rows Carlo, I'll be moving on and painting
it with portion blue. If you don't have Persian blue, you can use blue or cobalt blue and
attention black in it. Your, I thought I'll paint
with Sarah Lynn blue, but the Persian
blue is perfect for it because it's sunset and
it's giving us dark vibes, as we'll see, from left to right and right
to left and no up and down. Blend each layer properly. I'll be going ahead and adding some more orange. The papal. Wash your brush
thoroughly when adding colors because it might
give you a muddy color. Multicolor is basically
or dark or brownish shade color in-between
bright colors. So wash properly the advert
in the paper towel and unit. The variegated wash
background is ready. Now, let's add some
elements to this painting. We'll add some grasses in the same way like
previous paintings. We will go ahead and add leaves. That is, you can either
put dot or just press the brush to the paper and
create some leaf structure. And for this I'll be using
portion blue with black. And also I'll be adding this
element with liner brush. You can just show the edges of the silhouette as
having some spikes, leaves kind of structure and the rest you can fill
with a flat wash. Take your time and paying
the steps at your own pace. Now let me show you how to
paint clouds with two methods. One is by using a
liner brush itself. You can also use round brush. If you want a thick cloud. Your follow clouds
and rose color. I'll go ahead that role. Entertain. You have to always use a darker shade
of the color mixture. If you apply only one
color that is rows, then make sure it has thicker
than the background shade. By ticker, I mean to
say that the color is take inconsistency
and not what tree. Now, I'll be using hot
pink to make the clouds. You can either run your brush in a round shape manner to make the clouds are from
left to right, leaving some spaces in between. As you have seen the
two different clouds. How I mean, that was one way of painting
clouds with a liner brush. Now we'll move on with painting. With filbert brush. Filbert brushes
useful for making clouds is just that we are
using the edge of the brush. And here for the low am
going with orange color. And also for the orange. And we can use
orangeish pink as well. That is orange mix
red, hot pink. Although it is a
mixture of yellow and pink, the oranges mean. But orange and hot pink is
giving our differentiate. You can always experiment
with the colors. As you can see, I'm just running from left to
right and right to left. By dabbing it. You can add
as many clouds as you want. Just make sure you
leave some space. And the bottom
ones will be this, ten, and the top ones
will have a bit thicker. You can also mean the
dolphins container as well. Now, let's move on with
painting pine trees. For this, I'll draw
or paint or line, which will be thinner at the top and thicker at the bottom. You can just press the
bristles of the brush from bottom to top and
slowly lifting it up. And that will give you, ought
to know top and bottom. And for making the
branches and leaves, you can just run from left to right by making just a line. After making a line, you can go ahead and add some more branches into
that. Look at that. I'll show you what 1 mol pine tree if this
is not being seen. And just dragging, making
circular motion as we, as I drag from left to right. And as we come from
top to bottom, it should follow a
triangular shape. The tip of the
triangle should be at the top and the
broader area should be at the bottom or the
middle of it. The same way. I'll go ahead and paint
under the pine tree. Now you can notice how I'm running the brush
and how I'm using the circular motion as I go from left to right,
practice this. And then painted for the bottom part, I'm just going and
blending it with the black color as well. And to add a little
bit of green, I'll be using some portion
blue and yellow mixture. I'm using serverless in blue, you can also use sap
green or Persian blue, although it's a dark green, you can get the same shade from potion blue and yellow color. And I'm not adding everywhere, I'm just adding where
the sun is hitting the tree that is at the
bottom and at the corners. The green color will
initially not be seen, but once the painting dries, it will be clearly seen and brighten up the
painting as well. Let me add some
boards as well to this painting you can add at
the top or at the bottom. I'll go ahead and add at the
bottom are very tiny one, because it's ready for painting. I always like to keep the
paintings hiring perspective. If you don't want to
have a perspective, It's up to you, but I love
to keep the perspective. And let's remove
the masking tape. So I again say remote
in a diagonal manner. You can use a blow dryer to remove the tape
is too sticky. And you can also
use scotch tape. Masking tape or painter's
tape is not available to you. One more tip. Before applying the masking tape onto the board. You can always put it
on the gene span or any clot and then put it
onto the edges of the paper. This will remove some
stickiness. The tape. But I would prefer directly applying it and then removing. That's one way of putting
the masking tape. Now next we'll be learning
the night view from the top, that is from the aeroplane. So let me catch you up and
the next day's challenge. I'm very excited
for this painting.
15. Day 7 - Part 1: Welcome to day seven of
seven days squash challenge. Today we are going to pin
this I placing painting, which is so beautiful
and gorgeous. We have already come to D7. We have painted so many
paintings already. So this one, I have
kept it special and our class because I
love this painting. So mesmerizing that whenever you paint this view
will definitely imagine yourself sitting
in the aeroplane and watching from the
window this view. The color palette is simply, the technique is also
very simple to paint. For this, you will
required of Latin brush, round brush, liner brush, and also the most
important ones as well. But gosh, why I have used a full board brush and
get to know in the class. And there's colors which we
require for this is okay, let me show you how
I paint the Cloud. That's why filbert
brushes, very important. As you have seen, how
easy it is to paint a broad brush the Cloud. You can also use round brush, which I'll explain
you in the class, and coming to the colors. Finally, we will be
using ultramarine blue, mid or low hard things, and low black, and of
course titanium white. The techniques required
for this class. We'll be using variegated
wash technique for ultramarine blue and orange. And also how to make the clouds
around clouds this time. And for the land, it's
really easy and simple. I hope you are
excited to painless. I'm very excited to teach
you see on the class.
16. Day 7 - Part 2: Hello everyone, Welcome to the last day of seven
days squash challenge. Today's class is very
much interesting. As you might have seen. And imagine yourself
being there. Today. We're going to paint a night view from
the aerial view. Hope you got my point. That is from the aeroplane, we're going to see how
the life in the world. So we are going to
paint such painting. So we will start
off this class with all variegated wash
for the background. As you can see, I have used ultramarine blue and
orange for the sky. For making orange. I'm using a low and hot pink. As I have said earlier, the horizontal will be
either at one-third part of the paper or to third
bark of the people. Here. The reason is at
one-third part of the faithful, since it's night view, the top sky will be dark. I'll mix a shade of ultramarine
blue with a tinge of black and use that after the
feeding of orange color. As you can see how bright
and beautiful little locate. It does kind of sunset, while the top part of the sky
will definitely be darker. So I'm mixing ultramarine
blue with a pinch of black. And we'll be using that for
the top part of the sky. Blend properly. And I won't be blending
the two together. I'll be using the
pure ultramarine blue and combining
all the three shades. You can also use titanium white, but titanium white will make
it more pasted and lighter. So I want something bright. So I'll be using
ultramarine blue itself. Blend all the three
colors properly. Make sure the edges are covered. As you can see how
bright and how beautiful little
ultramarine shared. Firstly, I'll move
the restraints toward the top, the brush. And now we'll go slowly
towards the bottom. Not completely. Just one stroke will be fine. You can also go from
dawn to talk as well, just so that you
can avoid mixing of ultramarine blue to orange
and making it muddy. The paint is still water. You can go ahead and
add more layer and make it blend in the Carlos crop. Believe. I'm saying
properly again and again, that's because blending
is very important here. Now for lower half of the paper, that is low war to third
part of the paper, I'll be using black
opaque Carlo. Run your brush stokes
from left to right and make sure they'll
color as tic. Color consistency is tick. I will not be blending
black with orange. That's because you'll get to know that clouds will
be coming over there. So wide, blending
orange with black and make sure that they just have
their own leave any space. And the black colors
pick as well. Once the lower part is dry. Go ahead and make
some pathway and street lights for
making pottery. I'm using the same orange
color and going ahead and making slant lines as you
can see, how I'll make. First you see, and
then you can paint it. I'm using a bright orange. You can put some
white into it and make it be still that
we'll also look better. You can use dry brush
technique also, but then we can use already
thin to thick line. But ten line is much better. As you can see, I'm
going from us land. Jade. Once we are done with the street
and slant line, we can go ahead and
divide them into fat. You can do as
puzzles or anything. As you can see how I'm
giving a shape to each box. It's not squared, it's not
a triangle. It varies. Every every property will be in a different shape from if
you see from an aerial view. So we'll be doing
something like that. Look at that puzzle means
is looking very beautiful. Now coming to the lights, I'll be using the
same orange color. You can go ahead and add
some white as well too. That makes sure I'll
be adding dots. That is light.
Next to the lines. I'll be leaving some
space but not completely. Go ahead, take your time and
add those dots. Small dots. Left side also and
right-side also. Use a fine liner
or a liner brush. This looks so pleasing
and relaxing. You can take your
own time and paint those lights around the pathway. I'll be adding more light
towards the bottom and not towards the horizontal because the clouds will be covering up. Don't overcrowd the light. One particular species smell background is not
visible at all. The black and orange line does show or purpose
in this painting. Now using lemon yellow, we'll go ahead and
paint over the orange, but also leaving some
orange in between. As you can see, I'm going
to alternate manner. One orange.n1n node or
something like that. Or you can go ahead and now
go over the orange dots. But leaving some orange to
see as well as black. Lucy. Once I'm satisfied
with the yellow color, I'll go ahead and add
white lights as well. As you can see, there is orange color saying
there's a local scene, there's white colors in
this black color scene. So it should be
something like that. And concentrate more
lights towards the bottom, not towards the horizontal. Has entered looking like or complete lit up city
from the aerial view. Now, let's make the white
goulash liquid bubble that is enough flowable consistency
so that we can add stars. And we'll be using splattering
technique to add stars. This is one of the most
satisfying thing to many stars, is not too many. But eventually we have to stop so that it
looked beautiful. Now let's add some
clouds towards orange fallow and also
in the black one. I'll be using a hot
pink shade and I'll go over the orange color
and blending here. Black color. That though paper is
completely covered up, there was some part of
paper which was left out, so I was covering up. And now we'll add some hot
pink clouds to the orange sky. It is kind of orangeish pink, but more of the pink
color are seen. As you can see, I'm
just dragging and not making the Cloud. Ready ten clouds. And yet it's sloping, so gorgeous and beautiful. Now for the clouds or the city. We'll be using filbert brush. Filbert brush is because
it has a round shape and the breast shells and it's
very easy to make clouds. I'll be your mixing white and a little bit pinch of black. Fear don't have filbert brush. You can go with round brush
and in circular motion, make sure you don't blend the background color
while doing so. But using filbert brushes, so easy, you'd have
to just dab on that. First row will be
covering up the horizontal by some clouds. And later we'll be
covering those city, but we are not going to cover
up the whole city will be leaving some space
so that the light, our scene from the EDL new ones, the top part forms the Cloud. The lower part being T-shaped, if you might notice. So we have to just
drag on so that it will be like a straight line or at least a curved line. We'll add some more clouds. We will go ahead and now
mix some white shade into the same mixture and
go, Oh, weirdo clouds. I found one towards
left as necessary. You have to decide how many clouds you have
to add and where to add. It depends on your painting
and your perspective. I believe at the horizontal
it's very necessary. And in middle you
have to use it if you have to paint it
according to your painting. Now I'll go ahead and add some more white clouds,
whitish gray clouds. This is to give
depth in the Cloud. You can do it according to
your perspective again, where to add clouds
and where not to, and where to add highlighted
clouds and we're not. As you can see as I'm adding
more and more clouds. The same white color without washing is getting
lighter and lighter. We need that kind of Carlo
and all this white cloud. Again, we'll dilute that. How do we dilute? We'll use some black color or grayish black and
gold top of it. As it acts like an acrylic. We can use like an acrylic. I hope now you can see
the down part gets a C shapes all you have to drag
your brush left to right, so it gets us straight line
and the bottom of the cloud. Now let us figure out, read though, wings of
the aeroplane comes. Before that. If there is any
detailing your own to do, you can go ahead and do it. And you can also use a
liner brush if necessary, for completing the
details in the Cloud. Once the painting
is completely dry, Let's draw the wing
of the airplane. That is the two diagonal
lines which are converging and they took place at the center
of the painting. You can use a ruler
or just draw roughly. Now slowly go ahead and
paint with a liner brush or around the brush and fill
in the space of those rings. I'm using black color
to fill up the space. You can go ahead and use
white color as well. For making some depth
in the ring will be using some grayish
mixture as well. Since the stars have dried, we can go ahead and add some bright stars using
the tip of the brush. As you see it's
more highlighting. You can also add a small moon. For this painting. We can add some details
if you want to. Let's remove the masking tape. Running on with the eccentrics. Remove the tape only when
the painting is dry. Go ahead and use a blow dryer to remove the stickiness
from the tape. And also remote and a
slant man or 45-degree. You want to remove
those stickiness from the table before you
apply it onto the paper. You can go, you can
add the tape onto the plot and then use it onto
the pink bar afterwards. This will remove
some stickiness. Feel there's too much
of white and black. Clouds will add the detailing, eliminate some, will cover
up some of the clouds. Again. It's up to you how satisfied you are
with the painting at the end. So, yeah. Look how easy it was
using a filbert brush. I'm just dabbing and then x1. Thank you all for
joining this seven days. Wash CDs, and hope
you enjoyed if you have any queries coming
down in the discussion box.
17. Thankyou : Aesthetics is a
branch of philosophy that describes the beauty
and taste of nature. Using the seven days
squash challenge CVs, I tried in cooperating
aesthetics as much as possible with loads
of tips and tricks, which I hope you liked it. Thank you so much for
joining this class. I know most of the
beginner sworn get a perfect painting as
they have imagined. But I want to share
you the famous quote, art and creativity as designed by the artist and not by others. And also Baptist
makes you cough. After long time, the
wolf becomes good fun. I wanted to give you a
reality check as well. So you don't lose
interest in this good. I hope the artist and
new has learned lots of tips and tricks than the seven
days gosh, can see these. Lucia your review so that
I can look into myself and improve any mistake so
that I can make it better. And also, this review will help artists to join the class. By now, I believe you have painted or practice
this painting. I would love to see them. Your process picture
of painting pixels. Please do share in
the project section, as well as in the
Instagram story. Don't forget to tag me. This is because I would be motivated to create
more awesome classes. And other budding artists might love to join this
painting series. If you have any thoughts
of doubts or questions, I'm available to you, post your questions in
the discussion box and also what you want to know next. Let me know in here. Thank you so much once again, for being such a great
audience who's so much skillful and moan
to build more talent. Until next time, keep learning, keep creating and keep painting, signing off. That'll be awesome.
 Arbia Sultana, Art Educator