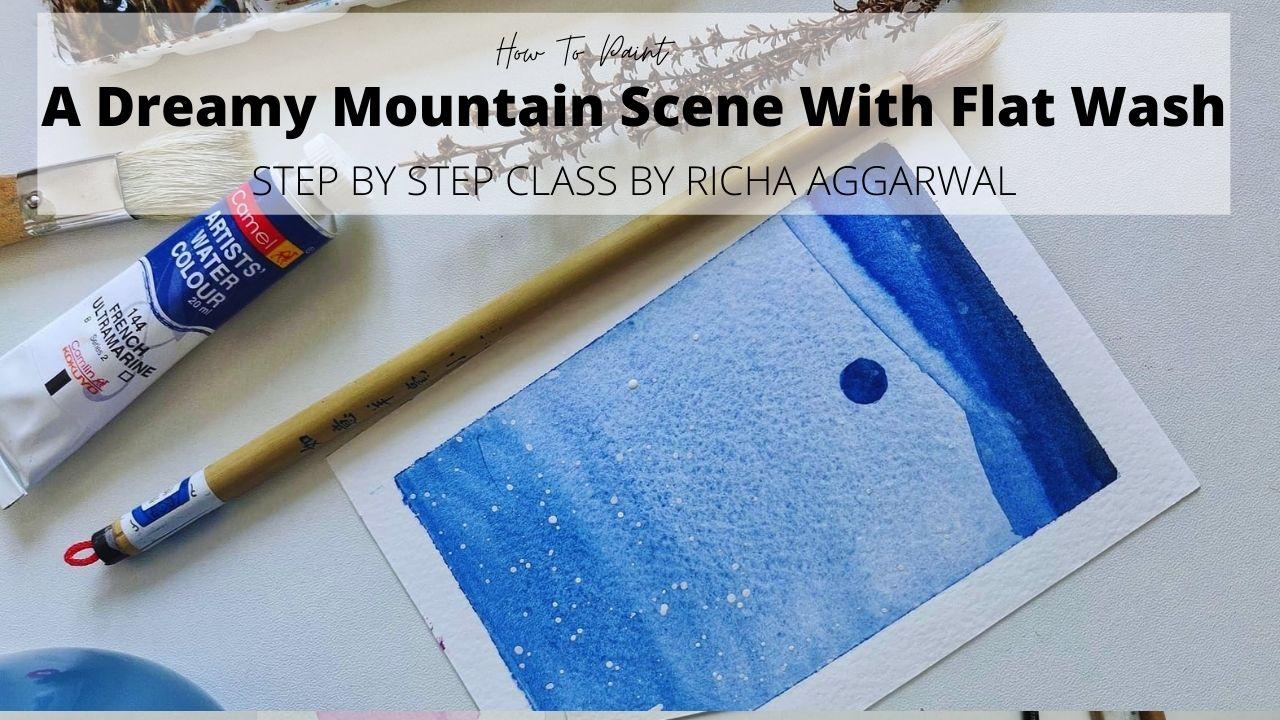
Transcripts
1. -INTRODUCTION: Hello, I'm Liz job. I would dream up with
drinks on making everybody, not just to start to go to school with
some sweet memories. And for all the
watercolor enthusiast, I'm bringing up another
class in which we will be learning
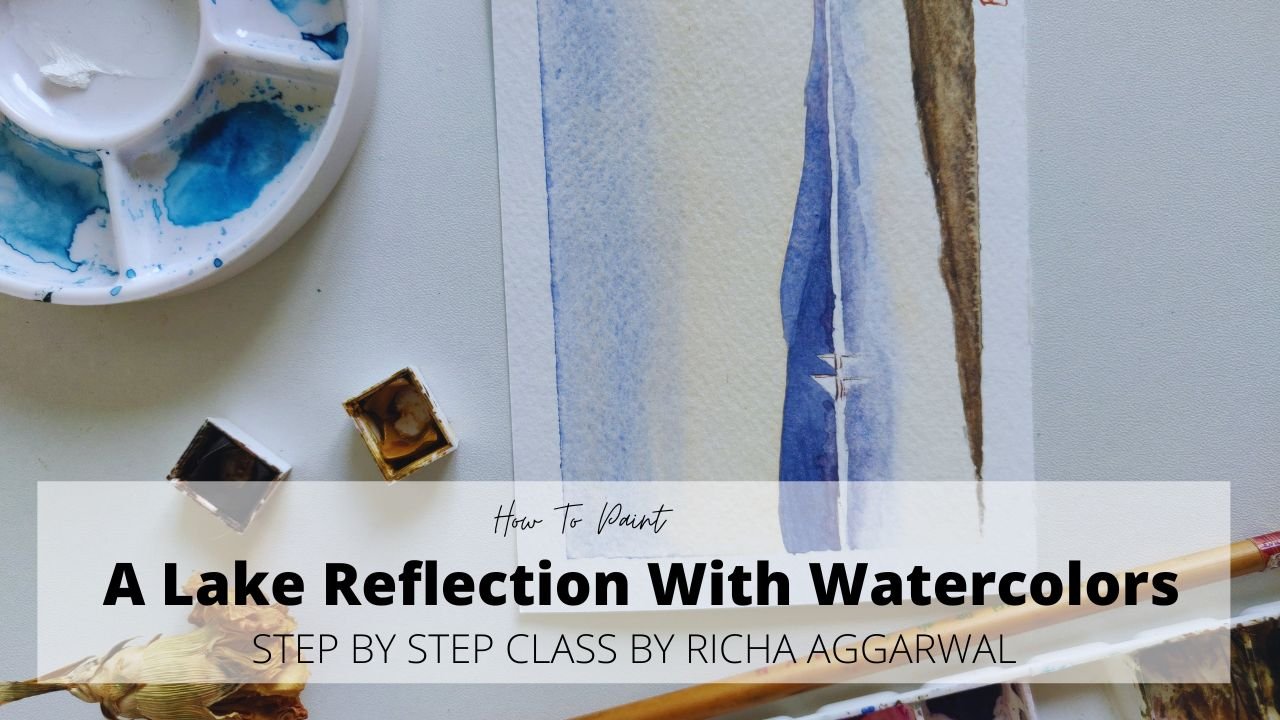
about flat wash. Flat wash. It is a beautiful, I'm one of the basic
washes which again, is used to paint a weird
idea of paintings. Once you master
the flight Bosch, you can feed any
background like Bro, you can see how I have used plant wash and barriers
of my paintings. So today I will be
deceiving to you all the secrets of flat
wash. And after that, we will be painting a
dreamy mounting painting. This is a very simple and a
very beginner friendly class. And I'm very much
sure that after this class you will
master flat wash like anything and ready to create those beautiful, amazing washes. So without any further ado, let's dive in into
this beautiful planet. Nicholas.
2. - ALL ABOUT FLAT WASH: Let's start with a technique
called flat brush. Even need a paper masking tape to tape it
down from all the sides. Abroad or any kind
of books sheet. Few brushes. One brush is enough. Watercolors and three,
and mixing palette. And I recommend two
jars of water gans, one for dirty water and
one for clean water. And few tissue paper. That's all in the
materials V on it. Now next comes to our setup. In watercolors, table
setup is very important. Always, always. Keep in mind that if you
are a right-handed person, keep all your materials, like your trees or water gans, your watercolors, mixing
palette and brushes. On the right hand side. Why we need to have such a
set so that we can be fast. Watercolors are
very fast medium. We have to work fast
in watercolors. So this setup is really important so that you can
walk fast in watercolors, the layers before they
dry up completely. This is a very, very
important tip which you should always keep in
mind and always follow it. If you are a
left-handed person that keep all your supplies
on the left side. We are done with the setup. We are done with a materialist. We are done with the setup, and we are done with
our materialist. Now, let's dive in into the
technique for flat wash. I have taken a sheet of paper and tape it from
all the four sides. You can do the same as. Now. Let's look at the
steps very carefully. Tap it. To start with, I will take a brush, I'll take my brush
and I will let it. So the first step is to
wet your brush nicely. Then I will take
my color and make a mix of column C. This step very carefully
of mixing of color, as this is a golden
step of flat wash. The mix which you are doing
has to be a juicy mix. Observe how makes it a very juicy mix means it
has lot of water in it. It should it should
not be our techniques. Can you see? That is a second step, which is a very important
step to have a juicy mix. You can mix asthma that color, as you think is required
to fill this whole box. Once you feel you're ready. After mixing your color, the next step is to load your brush completely
with the color. Keep in mind that your
brush is fully loaded with the color so that we don't have to go again and
again and pick a color. And a very important step
before we dive into painting, our first flat wash is
to tilt your board. I have kept a masking
tape under my vote. You can do theme as well or any bowler anything you can
keep your boat. In this way. What is the
importance of tilting your vote board is important because then
we do a flat wash. All the water will
drip down on its own. And we will have a smooth wash. That is a basic requirement. Enter existed flat wash. The tilting board
is very necessary. Now let's check all
the requirements before putting our
color on the paper. I have a juicy mix. Yes, I am. My brush is fully
loaded with the color? Yes. And my board is tilted? Yes. All these three are checked. Now, what I will do, just take a deep breath, relax and put it on the people and don't think while you're putting it on the paper. Just one tip to have a smooth flat wash is
to tilt your board. More. After you are done. You can see my board enables all the water to
get collected at the edge and I'm
getting a smooth wash. I don't have to make any effort. The swash is completely
smooth on its own. So we will tell the board till the time all the
water seeps down. Once all the water comes down the edge and my
wash is completely, completely smooth,
I'll take a brush, which I call a thirsty brush. I'll take a fresh brush
which is completely dry, and I just soaked
the extra water. But this brush, now look
how I'm soaking it. You just have to hold your brush where the water
is and just soak it up. We have a lovely,
lovely flat wash. One more thing to
keep in mind, always. Always. Which is very important. That's why I'm giving it a special node and
telling you after the technique that whenever
you are doing a flat wash, always use the
body of the brush. I will use the body
of the wash brush. You can rewind the video
and see how I'm doing. It. Never use the tip of the brush. So this is the body of
the brush while doing flat wash. You always have to
use the body of the brush. Let's keep it aside. When it is completely dry, you can unzip it and preserve
it to have a painting. Flat wash is a
beautiful wash for all the backgrounds
of any painting. I will show you how to make a beautiful painting
on the squash. So after removing the tape, we will preserve it, and in the end, we will see how to make
a painting out of it. Let it dry completely. Don't try to remove
the masking tape. Now. Once the paper
is completely dry, Only then we have to
remove this masking tape. Okay, now let's look at
some of the challenges we will face during the flat wash. So the first challenge is if
my mixture is not too juicy, if I make sure it's not too
juicy and it is very take, then what will happen? You can see while doing the
flat wash there will be no water dripping and
it will not be smooth. You can observe these
lines, these hard edges, which will be formed on and
off during the flat wash. So you'll have any challenge like this in which you
have these hard lines. That means you have to make
your mixture more juicy. The second challenge,
which you can faith is that your mixture is juicy, but still you have hard lines. This is because my
board is not tilted. And when I end, then some water beads
I left in-between, which may lead to the
formation of hard edges. So do check that your mixture is completely mixed properly, a juicy mix and your board is tilted so that all the
water can flow down. And let's see the
third challenge. If I use the tip of my brush and not the
body of my brush, then what will happen? It will take a lot of time. And again, it will not be smooth and I will have
lot of hard lines. So these three challenges, if you'll face, then
check with your basics. Check the tutorial again, Find the reason behind
it, and practice again. So we can include the major
challenge we can face in flat wash while doing flat
wash is these hard lines, which can be easily deal by following the
correct technique. So let me revise all
the steps for you. One more time. You have to make a juicy
mix that is very important. You have to tilt your board. That is second one, which is very important. Then third one, load your
brush fully with the color. And the first one, your board is tilted. And then just relax and Hauer. And in the last you have to tilt your board for a
beautiful flat wash. And I guarantee you
will have a beautiful, beautiful flat wash if you
use all these techniques. Okay, so our paper is dry. Let's remove our tape. For removing the tape. Always keep in mind that
you are removing it at an angle approximately 90 degree and away from the people. If you are having any difficulty
removing your people. You can also use a blow
dryer or removing the chase. And see our beautiful
flat washes ready. Preserve it for a
painting later. The more you can practice, the better you will get. So keep practicing and enjoy. Have a lovely day.
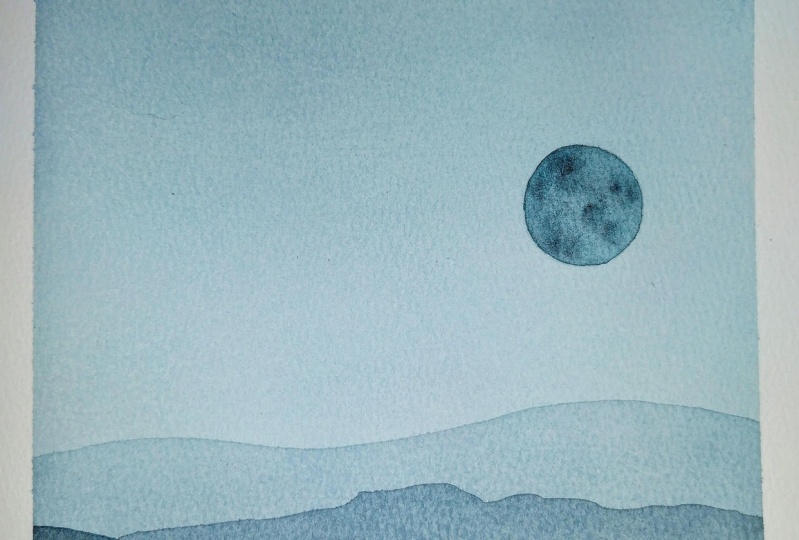
3. -Flat wash Mountain Painting: In this lesson, we'll be
using this flat wash and creating a simple bounding seat. So we can always
lightly draw mountains, but make sure that
they're very light. And just little marks
for you to guide you. Now the next step is
to make a light mix of your view using cobalt
blue and ultramarine blue. Very light mix. And then you can
make it mountains. Now let this layer dry. Only after that,
we will be doing our second layer of mountains. Okay, so Madison is dry, so I'm good to go
for my second layer. I'm mixing, ticker mixed
and my first layer, ultramarine blue and didn't
cover senior months. You can. The third layer is going
to be the darkest snare. Simple, using just the
flat brush technique. Let this layer dry. And by the time we'll
be mixing our colors. When it is right, then only they will be giving on lastly,
for the last layer, I'm using ultramarine blue and red to make it a
very dark color. This layer has dried completely
and you're good to go. Third layer of mountains. And that's it. You're
done with the mountains. We can always make a moon
and make it more sturdy, nice outline of them. Stay in the box. I would lift the color and
make it more interesting. Okay. Similarly, if you
want to fill color, I'm yeah, mountain and
make little interesting. So beautiful style
and it is ready. Let's make it a little
bit, some sprinkles. And that's it. Don't overdo it. And
just beautiful mountain with a flat brush is red.
4. Final thoughts for you: Remember, Rome was not built
in school and mustard, but I can assure you, is an 100% not in Egypt. Even I pick up my brushes
after 15 years of long gap at the age or
the more you practice, the better you'll get. And keep practicing is equal to e to be your
until you master it. And do submit your assignments in the project section
so that I can do. You can find me on Instagram at the rate of transfer my
ten, keep practising. Have you been doing since Bye.
 Richa Aggarwal, Watercolor artist, educator and designer