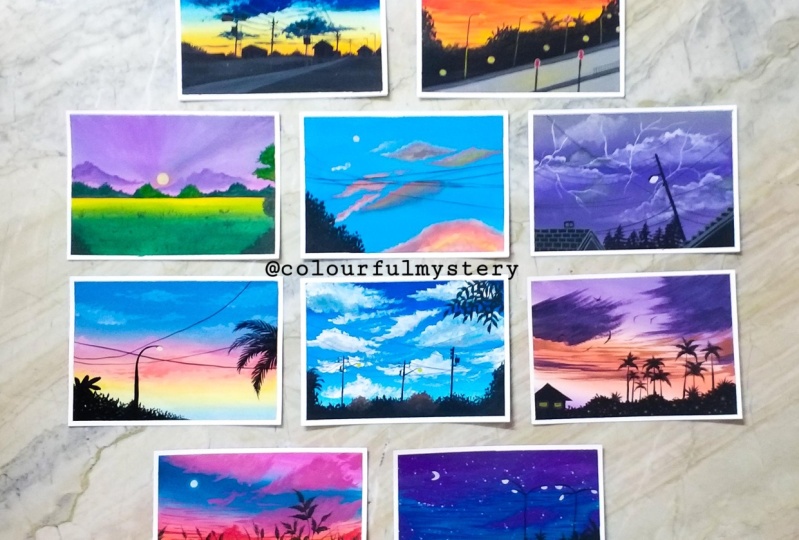
Transcripts
1. Hello & Welcome Back: Do you have a lookup
to the sky and find the clouds dancing
to their own tune. I'm looking them dance. You feel like dancing along
with them to their tool. At times when I
look up to the sky, they seem to be spray
painted by an artist. Hello everyone. I'm a marshy the barrio, a chartered accountant, and
an artist based in India. It has been teaching us
for more than a year now. And it's the best relaxation and best thing
that I love to do. I vote majorly with gouache and watercolors and randomly
explore acrylics at times. You can follow me on
my Instagram handle, creating from the heart
where I share all of my other words pertaining to gouache, watercolors
and acrylics. This ten day paint expresses
sky and cloud class. We are going to be painting in ten different aesthetic skies. I'm going to be guiding
you through all of the different kinds of gouache
colors that are available. What you can begin with the as a beginner and how
to even be wet your brush beans or
get them back to their perfect consistency
using in some basic tools. I will even be
guiding you through the other materials that
we will be using for the class and also
the color mixing part for each of the
class projects as we move ahead into this ten
day class, right? Understanding the rewriting
of the gouache paints. We're even going to
understand how you can use them and
for what Deming's, we are also going to learn in the perfect blending of the squash and also the
perfect consistency, how it is to be used
easily and smoothly. As we will be progressing
through the class, I will be guiding you through all the basics about gouache, from the blending to creating in the tonal radiations and
of blending of two colors. And how to avoid certain colors being formed because of
blending of the two colors. I'm going to be guiding
you through each step in detail before beginning our
class projects for the one. Along with blending, I
will even be guiding you step-by-step through creating in the tonal variations of
colors with gouache, using in water and using in the white gouache and
understanding what works better. Since this class is more
focused on clouds and sky, we're even going to be having an aseptic technique
section for discussing in the different kind of
basic plots that you can use for adding
into your paintings. And also understand
the blending of ten using indifferent tools
such as flat brush, round brush your fingertips, as well as learning to add in some filler clouds and
some rough clouds as well. I'm sure by the
end of this class, you would love
painting in skies with quash and creating
the perfect loads. The data further ado, let's dive into the class
and begin painting in these pretty erratic sky
with those beautiful clouds. See you into the next
lesson of this class.
2. Materials Required: So before moving ahead, let me discuss with you all the materials
that I will be using in I will be using in this
Ba Hong hot pressed people. This is approximately
five inches by seven to eight
inches in size. This is hot press that is, it has a very soft
surface, as you can see. It does not have much green or texture and it's perfect for the gouache paints
because gouache paints glide smoothly on such surfaces. Next, you would be needing
in a set of gouache paints. I have discussed much detail about the gouache paints
in the next lesson that will help you
decide on the type of gouache paints you
wish to go ahead with. Next, you would be needing in a palette for mixing your paints and two jars of clean water for each of the class project. Apart from that, you
would be needing it some draft towels or some
tissue papers for dabbing in some pilot as well
for taking out the colors I will be using
in a separate palette for the whitewash because
we will be needing in whitewash for almost each
of the class project. You will be needing in masking tape to tape down your paper. You can go ahead and use any masking tape that is
available at your end. Next, you would be needing
in a few brushes of you, of the round flat and
some detail brushes. Through each class
project I will be guiding you through the kind of
brush that I'm using in, I will be using in this
boils round brush a lot for adding in the
greenery details easily, I will show you in
the class project how you can use them
to your advantage. These are all the
materials that you need for these ten day class project. In the next lesson,
we will be discussing much more detail about the
gouache paints available.
3. Let's Know Gouache : Now let's dive a little
more deeper into the different kinds
of quash that are available and that you can use. First one that we
will be discussing about is this set from the
band neighbor palette. This set comes in a set of 1612. These are 20 ML bottle each, and the colors are in a
jar format in this brand. You can simply use a spray bottle and wet
the paint if the paint is dry inside the button and they are much easier
to store and use. This also helps and as useful and you want to
use in a lot of color, or you don't have to save the
colors and keep them safe. Again. Among the 16 sheets, there are two sets
of light photon in this set because
you need a lot of white when it comes
to gloss for blending purposes and for creating
and different tonal values. Unlike watercolors, you need
black color here as well. Plus, you need a lot of white
because unlike watercolors, you cannot use in
water March to create the lighter consistency
of the color you need byte worth to adjust
the tonal values. Let's move on to the next set. The next set is this hemoglobin, which is by the brand Mia. He meet. It comes in different sets in it
comes in sets of 182456. Your isn't set off to an add-in
colors that I'm using in. These are similar
like the False run. That is, you don't leave that in Jelani Cobb format
for this also, you can simply use in a spray bottle and
re-read the paints again, if the paints are drying, in both of these formats, that's the bottle and
these Jenny cups, it's very easy to be wet the paints and use them
again if they've dry, which is not the
case when it comes to the tube, it means you are, you can simply be
with them easily and I believe in further be
showing you how you can, you know, get the
perfect consistency against by using in water. This set as well has two
sets of white again, because as I told you, you need a lot of
white when it comes to watch for feeding in the
tone and variations. So these were the first two
sets and these are very student-friendly
and even economic benefit anyone to
buy and move ahead. The court said that I have
is this premium gouache set, which is a little
costlier as well. Plus it is very premium when it comes to the pigments
of these colors. These colors are into format. There are a lot more details. Denote your visa, 15 ML tubes each that are pigment
colors. You didn't. This is a set of 34 and this set does not have a
white and a black gouache. You can simply use a white gouache and a
Blackboard separately. There are different brands will have the white and
the black wash available separately in tubes as well as in bottled format. This premium set, you can
see all the port cities also asked to get the price or details from their side as well. These are the three sets that
we are comparing in today. One being in the border format, the second one being
in these Jenny cards, and the third one
in the tube format, you even get student
grade paints or lesser, of course, Neo pains in
the tube format as well. The only issue when it comes to the tube paints is that once
the GI inside the tube, you cannot rewrite them or get them out or use it in any way. That's one benefit when it comes to these pains
in the button, the jelly cup format. Now we're going to see
how you can easily get the perfect consistency
of these paints again. And you can see in the
portal format the color or a little jive samples just going to spray in
a little water and let it sit for a little
while so that the paints getting a little wet and the
water seeps in a little. When it comes to these
jelly caps as well, I'm just going to spray
in a little water over it and wait for
it to settle in. And then using an
a palette knife, I'm going to get
these paints back to their original consistency. Now, I'm just going
to be using in this palette knife and I'm
just going to mix these paints again into this button
and get them back into their original
consistency and they will be very good and
perfect to use again, in-between you will
notice that there will be a few lamps that will be formed because the
Sabines trained in. But once you keep mixing
it with the palette knife, you will see the lamps
disappearing and getting in a perfect smooth
paint to use it again. Again after some
time these paints may dry and because
of the, you know, why should it around
or because of keeping in the button open or
not tightly packed. But again, you can
simply adding water and get them back to
their consistency. In the same way,
the jelly cap on which we split the
water, then we kept it. We are going to get this as well into its
original consistency. Suggest using in
the palette knife, I'm going to mix this as been, the water a, dives a little
deeper when you get to set the link part a little
time after spraying in. This makes it easier to
blend the colors again. So this is the benefit
about using in the flash in these
cup and water format. But the problem with this is that they are not
high-quality pigments. Hence, they are suitable for practice purposes or for big nose and they are
economical as Ben. Another important
tip to remember while reweighting these
planes or getting them to their perfect consistency is that do not add a lot of water. Because if we'll add
in a lot of water, the paints will lose
they are or opacity. And it will be very
difficult to get them all to have an opaque
look on paper. Now the third way, when
you have paint leftover onto your palette or onto
your palette as well. On those also, you can
simply be read them using in little water and they are
also perfect to reuse again. So you can see I have a few of the gouache paints
out on my palette, which I'm just going
to simply leave it, I'm going to use it. But I recommend using
in this palette pins again only for
detailing purposes. Because for the BCR, if you are looking in for
having perfectly opaque layer, it's very important to have the color with very
less of water. Some pigments still will stay opaque like
this orange you can see it is still a big despite using it by the
re-weighting technique. But you are, if you see once
I leave at the green color, it will not be
that a bit because of pigment contested
in this green color. Accordingly, depending
on the opacity of the paint if you're
using from your palette, you can decide whether to use them for the base layer
or for detailing, depending on the opacity of your details or the
BCR that you need it. Make sure for
anything you do not use a lot of water when
it comes to watch. Otherwise the opacity will
be lost and it will be very difficult to get these paints back to their natural obesity. That is about the details
of the different gouache, how you can be with them using a spray bottle brush
or a palette knife, and how you can get them back to the original consistency
and reuse them easily. If you are someone who's just beginning with gouache
and just wants to invest a little and go
ahead and practice it. The human core set
and the neighbor palette set or the profit
investment for you. Let's move on to the
next lesson now.
4. Technique - Creating Tones with Gouache: So before moving ahead, let's understand how you can get different tones and values
when it comes to guage. So there are two ways. One, you can keep adding in little water to
the paint seconds. You can use invite guage. So let's try with both the methods and
see what suits better. So I'm using in the
city Lynn blue color. And first method I'm going to
keep adding in little drop of water with each stroke that
I keep adding in to this. I didn't do color
out on the edge. I'm just keeping him
adding a little, little drops off photo and trying to get in
different tonal values. Let's see five to six
different bad news by adding in water with
each stroke out to you. It comes to using in the
tonal values with water, you can see with every stroke the color is stoning lighter, but you will also notice
that the underneath the paper can be seen as the strokes are
going in light up, the tonal variation is visible. But along with that, the opacity of the paint is also going down because of
the water content, pink increased into these pins. Now in the next one we are
going to be testing in the same method using invite
wash instead of water. I'm going to use in
the same setting in Luke colors so that we can see a notable difference
in-between the methods. Now, first I will against watch the color did
I believe without adding in March of water just enough forgetting in the
perfect consistency. Now with every stroke, I'm just going to keep adding in white quash little
violet into it, just as we kept adding in water. With each stroke, you will
notice that you are getting in a different tonal variation to the base blue color
that we're using in. But along with that, you will also notice that
we do not lose the opacity of the base when we do it
with the whitewash method. That is why in the
beginning when we were discussing in the
different types of gouache sets available, I told you that having in
a white gouache is very important because to get into
different tonal variations, plus forgetting in the perfect
blends in-between colors without farming in muddy tones or any thoughts I can recolor. Now you can see as I'm keeping on adding in
more of the white, the color is going lighter
as compared to what it was going when we were doing
in with the water method. Plus we're not losing onto
the opacity of the paint. The bottom paper is not visible
and the paints stay open. Hence, I always recommend and I would recommend
to you as well, to go Ahead for using invite
gouache when it comes to getting into different
tonal variations for the gouache paints, because with water you
will lose the opacity and the variation will also be
very little less seeds. But when it comes
to white gouache, the opacity will
also not be lost. Plus you will get
better results and better blends between the colors by using in the white brush. I'll always using whitewash or blending as
well as forgetting in the different
tonal variations by using in this squash beans. Now in the next lesson we
are going to be discussing in about blending wash in
the right consistency.
5. Technique - Basics of Blending: Now that we have seen the
different kinds of gouache set, let's understand the consistency of the gouache or
using them perfectly enough being things I am using
in this set of hemoglobin. So I'm just going to show you the different consistencies
that you can use them in. How to understand whether the gouache isn't
right consistency. I'm just picking up
some of the pink color. Now first I'm directly
using it from the palette you can see
on the pallet itself, I had tried to leave it. But the first tool, the color becomes a little
harsh to spread and it's very difficult to get
into this mood spread easily. Now next I'm going to just
add in a little tip off water onto this palette where I have fording
the pink color. Now you will see that when I add in just little trouble photo, the color consistency becomes much better and
easier to spread. And with every stroke you
can see it's much easier to blend in and get this
smooth spread of the color. Now next I'm just going to
dig in a little of the color from the palette without even dipping my brush into water. Now, you can see the paints are not
spread in ease and eat. You are getting in so
much of the white and the dry brush which
you do not need when it comes to adding in or
blending in the wash into the false base layer or creating NPV skies and blends
between the fellow. So it's very important
to get the gouache in the perfect
consistency so that it spreads easily and smoothly. Now in the same way, let us blend two
colors and see how easily you can blend into
colors in different techniques. The first fellow that I'm using is the city
needs new color. You can see the
perfect consistency, the beans as threading
on easily and they are very easily having
the perfect layout. And they are opaque as bell. When you, whenever you want to spread in the gouache paint, you have to make sure that
they are opaque enough. The bottom white people
shouldn't be visible only then it will have
an opaque consistency. Now you're, I'm blending in the blue and the pink
color in-between. You can see I have not
used in any white. So automatically there
is a little bit of the violet color that
gets formed out here. You can see the violet
color been formed because of the blending of
the pink and the blue color. To avoid this, if you do not
want in the violet color, you can simply use whitewash in between which we will be
discussing out your next. So I'm going to be using in the same two colors that sensitive in blue
and the pink color. But the only difference in-between we are
going to be using in a little white for blending that we do not form
the purple color. Instead, we will be having in the tonal variations of the
blue and the pink color. Now, again, I will
repeat whenever you are taking out the
paints onto your palette, make sure you do not
add in a lot of water. Because the water
content will be more, the paints will not be affected and they will act
as watercolors. Forgetting the paints and
the right consistency. You need little
droplets of water, but not excess of water. Otherwise they will not
act as gouache colors. Now you are in-between, you can see I'm using in the
white wash for blending. So you can see we do not
have the purple color form as we had in the first part
out you're on the left side. In fact, we have in the tonal variations of
the blue and the pink. That's the sky blue and
the baby being sort of a color that is formed because
of using in the whitewash. Now another way that you can follow is adding the blue color then you can a bit off your
white to your blue color. It says Getting a little of a lighter blue tone
and addict next. And then you can
even add a little of the pink column mixed in with white next to this
light blue color, and then shift onto
the dark pink color if you want the blending to
be in a different pattern. So it depends onto your
practice and your easiness, which method to till the petal of your I am using in
the pink color directly without adding in
little right now I will add in just a little right
onto the pink color directly, A2, A2 as to avoid
the purple color. Again, there are different
methods, different ways, how you can do these blending
and get the same result. So at the top and the
bottom you will see the only difference is that
you have a little more part of the light blue color
because we added it separately than what we
added it at the top space. This is how you can get in different layouts,
different tonal variations, and blending your different
skies depending on the type of sky or the background that you
are looking forward to. You can either mix, invite to the base color P8 and lighter tones
and then blend. You can simply just go ahead, lead onto colors and add white
in-between and blend them. This is about the basics
of blending with gouache. So let's move on to
the next lesson now.
6. Techniques - Clouds: Now after seeing in the
consistency of gouache and also understanding in the
opacity and the tonal values. Let's focus on to
adding in the clouds. This time, I'm using in the same city even
blue color that we use for understanding
the opacity and the tonal variations. The first and the
most easiest way of adding in the clouds is using a round brush and just adding in simple strokes closer
to each other, creating in the cloud effect. I'm not adding in any
basically are out you're just adding
in directly Cloud. The second one is
you can just use the pointed tip edge of the
brush and keep adding in very smaller half C
kind of strokes closer to each other in
Farmington clouds in this method or in any
method you can use in more than one colors
in this methodology. And let's use another color and try blending them as well. So I'm going to use the
same pink color which we are using in from the
beginning practice exercises. And just went to arrive in the similar strokes
in-between our tour. Now in case if you want a perfect blending between
the blue and the pink, you can simply even using your smaller fingertip and just blend them like this
while they are still wet, but you need to be very gentle. Now, next, It's adding a few of the cloud effect using in
a smaller size flat brush. You can use in a blender
brush or a flat brush, whatever is available,
but in a smaller size. Now in this method, we're just going to fall
out little cloud strokes from the edges using the
tip of the flat brush. I'm just given little
diagonal cloud effect. So you're basically our
sky can be of any color, but these are different ways
of adding in the clouds with whatever color
combination you are going in. Now next, even using
the tip of the brush, you can add in the
similar clouds as we were adding in the first layer
using the round brush. In the same way, you
can even use the tip of a flat brush and adding very simple basic
clouds like this. Disclose it to each other, creating and simple
random lines in-between. You need to leave
in little gaps. So that basically follows that you will be adding still be visible in-between these
cloud ranges that you added. Next, you can even add in simple cloud ship that is creating those
fluffy cloud effect, filling in with the
fallow in this also, you can use Intune to see
different color variations, like you're used in the purple and the pink color
and in-between, you can even use a little bit of white for blending it
with the background. Now for creating and
fluffy blended Cloud, you can even add in the color. And then while
this is still wet, using in the tape, you can blend the edges into
the background. So imagine a white sky and you just adding
in this blue cloud, you can see the color and
the cloud looks blended with the paper and has
in the soft edge because of blending it
using in the fingertip. Now using these smaller
and you can even use these lines as the fellow clouds in your bigger paintings. And you can even
using a mix of two or three of these cloud patterns
for filling in your Skype. We will be practicing almost each of these in the
coming ten days, creating and fluffy clouds using in the cotton
candy colors. Creating and simple cloud effect using in the first
kind of stroke. So do not worry, we will
be working on each of these methods in detail in each of the coming
class projects.
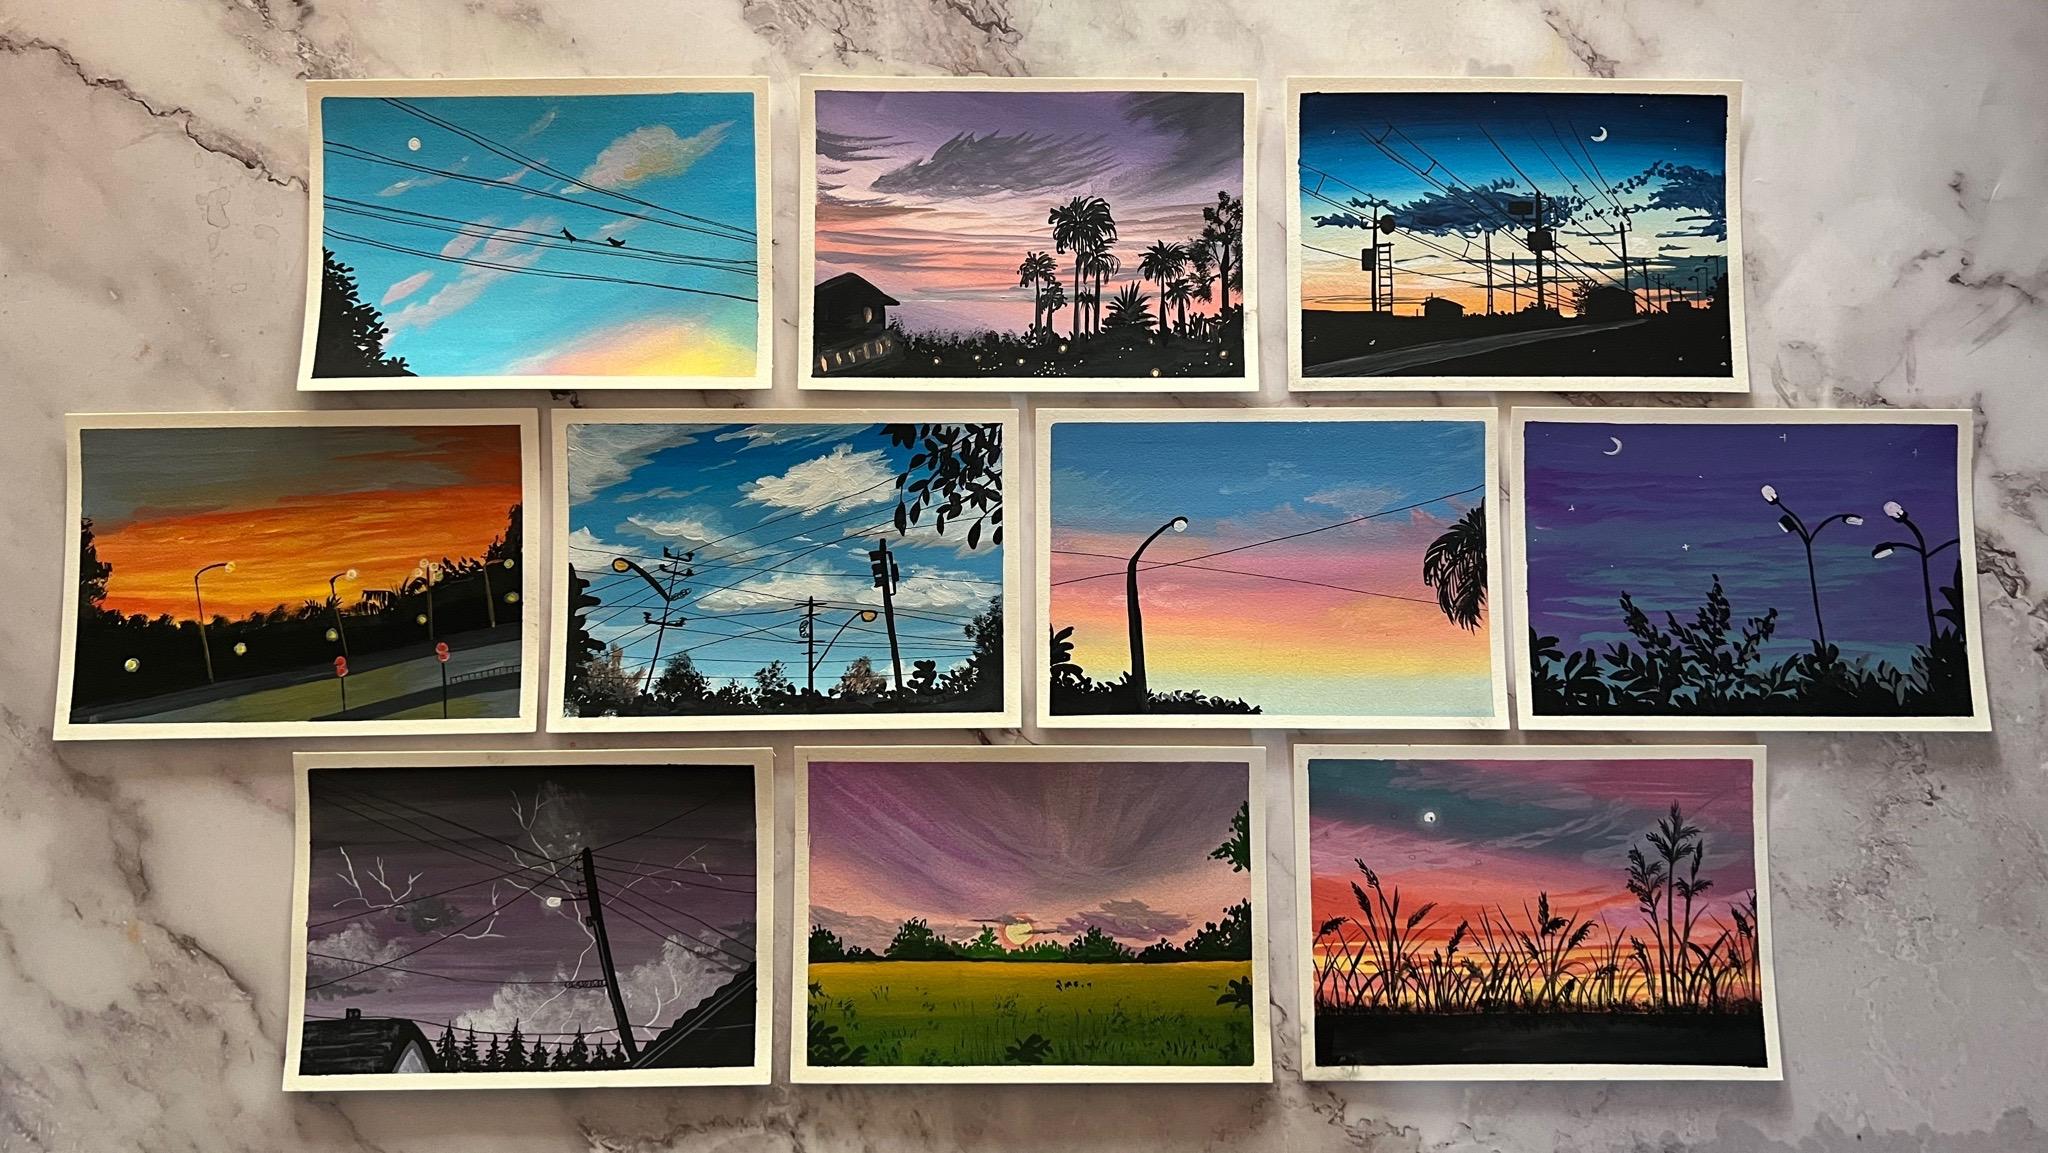
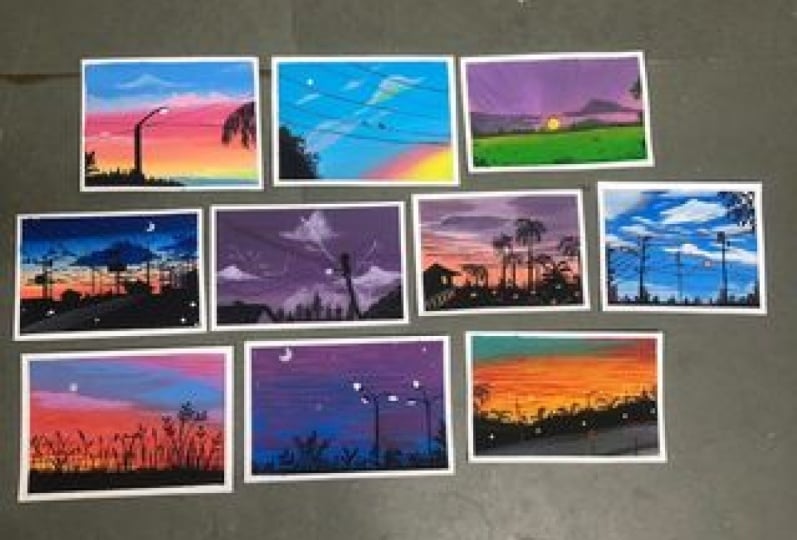
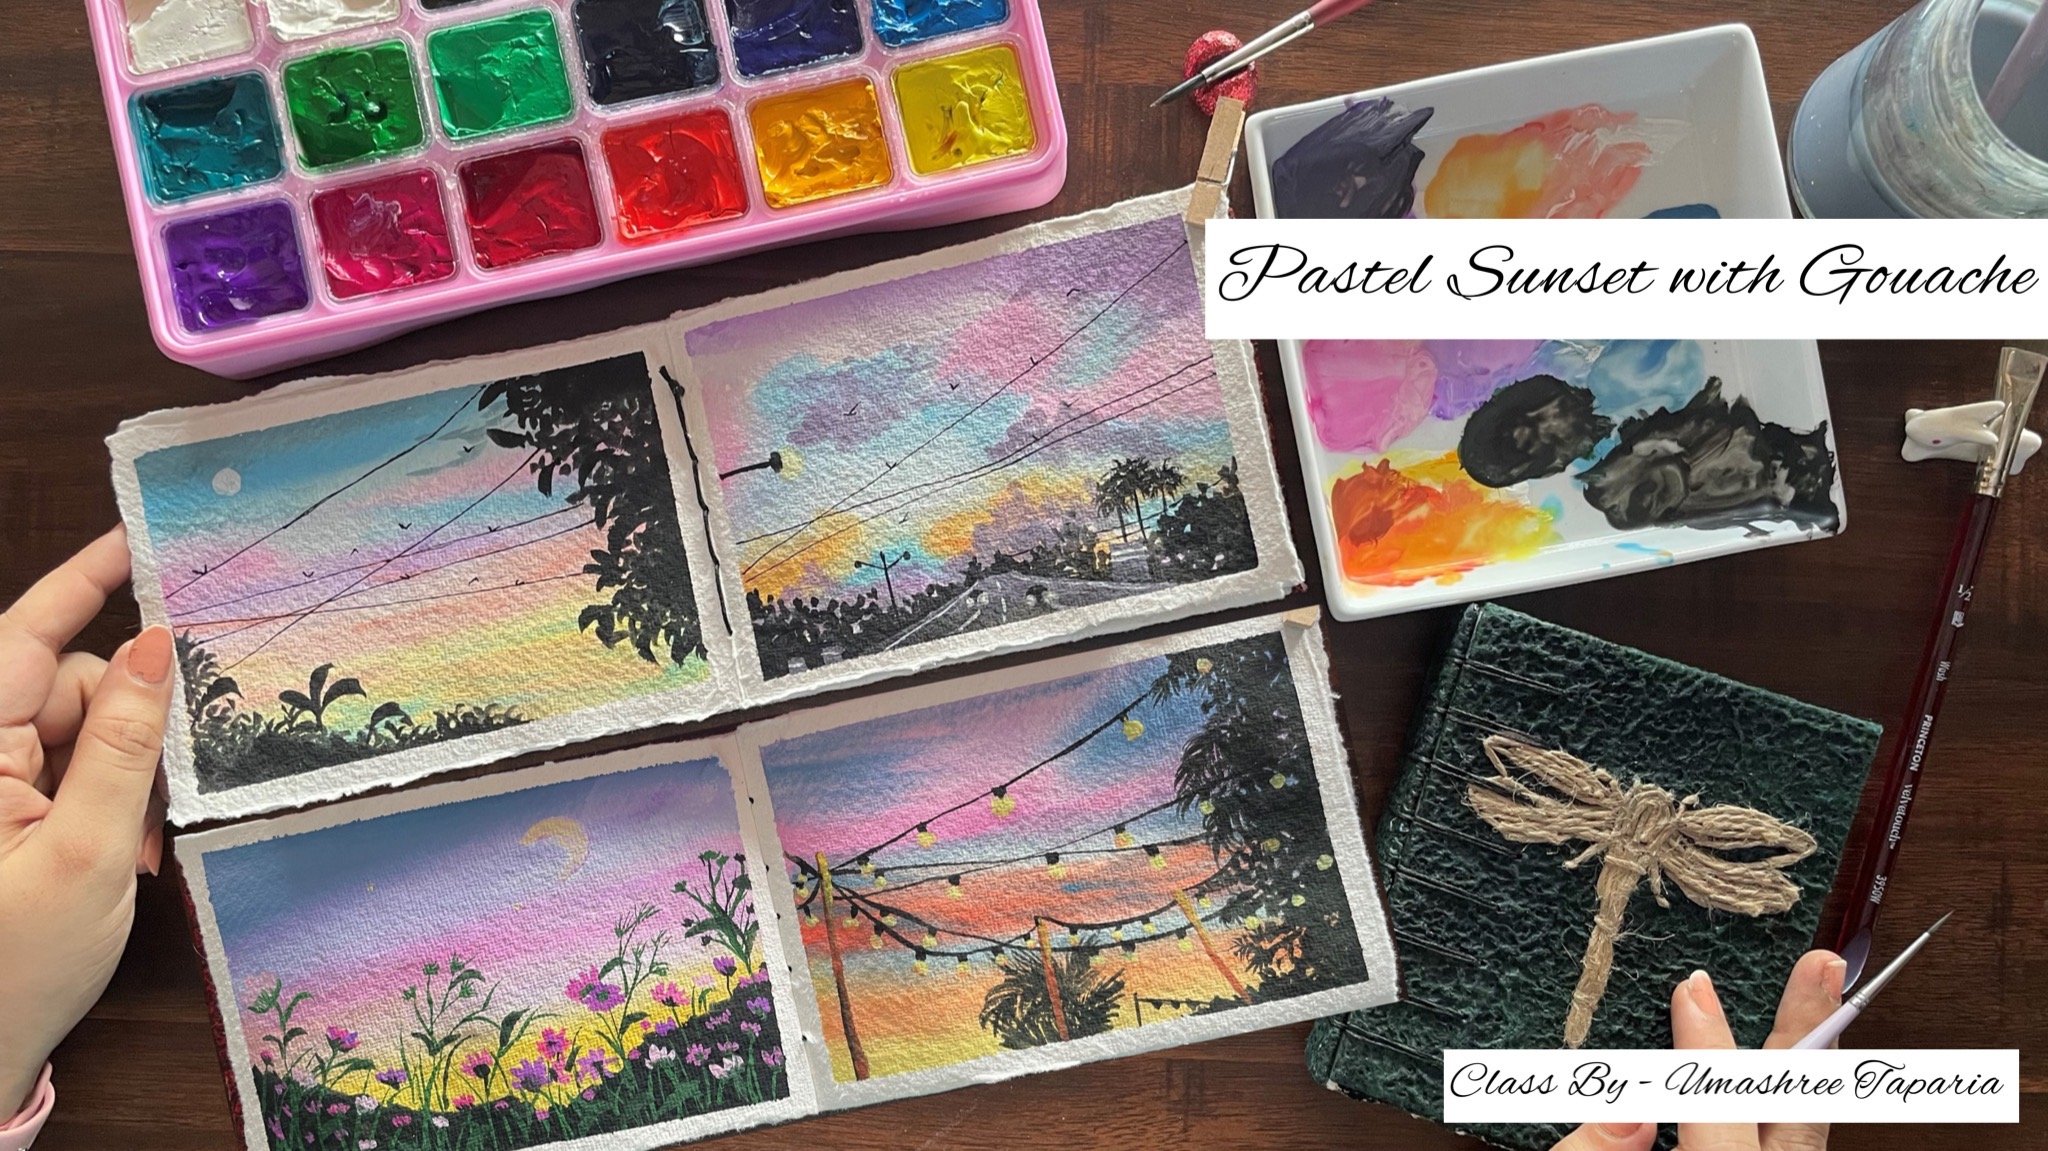
7. Day 1 - Pastel Sky: Let us begin with the day
one class project for today. I have my paper taped down
on all the four edges. You can use any masking the, which you are
comfortable with and mask it onto all the four edges. Now before moving ahead, I'm going to be removing
in all the colors that we will be using for this
guy onto my palette. Using an a flat brush, I will begin removing
the colors one-by-one. This time they're going
to be painting in a pretty evening
sky, sunny window. So the carlos that
I'm removing is the new color I will be adding invited to all of
these colors later on. The next color that
I'm getting out on my palette is the modality red. It's sort of a pink color. So you can go ahead with the crimson tone or any
other pink tone that is available in
your palate if you do not have the exact same set. I'm just removing
in very little of these base colors because
we are going to be adding in a lot of
white for feeding in the pastel colors for painting
in the sky this time. And then we will be adding
in little cloud details. The other colors that
I will be removing is the orange and
the yellow color. For the orange color I'm using in this red color from the set. So this is more towards the orange side instead
of being on the red side. And I will add in a
whitewash to this. It will be like a
pistol orange color. And the last color
that I will be removing is the yellow color. We are going to have in a good transitional sky using invite watch
as well in-between, using in the pastel colors, we will be beginning with
the blue color at the top, moving towards the pink, orange, and the yellow. I have all the four
colors out on my palette. Now to each of
these four colors, I'm going to be mixing
in whitewash and keeping all the colors ready so that when
they begin to paint, I do not have to wait for mixing the colors
because that will make the blending
a little difficult if the false near
dries completely. Though, you can
div at the entire falsely ER and get
it perfectly done. But that increases
the task hands I prefer keeping
all the colors on my palette ready
beforehand before beginning to paint
in each of these, you can see I'm adding in
more of white gouache much more than what the base
pigment we have picked up. Now I'm going to keep mixing each color and keep adding them onto the paper so that the paint on my brush
to not get wasted. Now the blue color seems
a little extra light. I'm just going to add analytic, pinch off the brush and
blue palette again to get a little tint of the
darker blue inside this. So this is how you
can even adjust the color tones depending on the tone that you are
looking forward to. I've just added in a little bit of the Prussian
blue color again, and I've got a pretty
good sky blue color. Now I'm going to begin with
this color at the top space. I'm going to run it to our
little delta center line. Then I will shift into the mix of the pink
and the white color. That's the modality thread color mixed in with the white gouache. Now you can see the consistency
of gouache is forfeit. The paints are spreading
smoothly and they are gliding on the paper because of the smooth surface of the paper. Although we do not have
sharp edges in-between the stroke because of the perfect consistency
of the paint. I'm done adding in
the blue color. I've cleaned my brush and now
I'm mixing in the pink and the white color
and going to lead near to the blue color
and blend it well. Make sure that every time
you pick up any next color, you clean your brush well, otherwise the colors that
will still stay on your brush will get mixed with this and you may get
in a third color. Instead of getting in
the fellows that we are looking for with gouache, it's very important
that you keep cleaning your brush in-between, that you do not have
any pigments left in. Now in-between the blue and
the paint you can see I've left a little space because I do not want purple color there. If you're using invite
worst separately. And I have just mixed
in a little hint of pink to this so you can
see that color variation. And now I'm going to blend
it with the blue color. Now you will see
that I do not have any fulfill color
formed in-between. Rather, I have a
fallback transition from blue to a lighter pink
and then the pink color. Now just below the pink color, I'm adding in the
orange color directly. I'm not adding invite out
your because the orange and the pink are not
forming any portfolio. In fact, you're just
going to have in a perfect transition
between them. Now just underneath
the audience, I'm going to add in the
yellow color at the bottom. I'm still going to add in a little touch of
the blue sky again, it's going to be much
lighter than the blue what we have used
at the top space. This is just the BCR
of this guy onto this, we are going to be adding in very little clouds with
the same colors itself, and then a little silhouette
to complete the painting. Now for the bottom
most layer of blue, I've added more of
white and got a, a light piece of blue
color and I'm just going to add it near
to the yellow Palo. Made sure that when you blend
the yellow and the blue, you have more of
white on your brush, otherwise you will get green
color formed in-between. So in order to avoid
the secondary colors being formed when you are
laying down the primary colors, it's very important to use
byte with quash that you get the perfect blends and transition from one
color to the other. We are ready with
the base, the sky. And you can see how
pretty the sky looked and the blending between
the colors is so smooth and it's looking
like the perfect base still and that Yummy
Candy Cloud sky. Now onto this, Let's
pick an adding in some clouds to have
picked up more of white, added it to the pink and got
a much lighter pink color. Now I'm using a very
smallest detailer brush, so I'm using a flat brush. I'm just going to
begin adding in the Cloud using in
this flat brush, suggest using the tip. I'm going to lay down very small half C strokes
closer to each other. The blending point of
the blue and the pink, going to add in little
clouds are there. Next I'm picking up the orange color and with
the orange color as well, I'm going to add
in little clouds, add the blending point of
the pink and orange color. Now you will have to
adjust the pilot tones depending on your PC or
color that you have used in. The color of the cloud
has to be such that it has to be visible
on the base layers. You can either use a lighter
tone for the clouds or the darker tone depending on what you are looking forward to. Now I added the yellow color on the orange color and I want this cloud to be a
little settled one. So I'm just using a damp
brush and trying to blend in this yellow color
onto the orange color, giving you that rough
edge chipped so as to get it into that
perfect cloud shape. You can see how easily you can add clouds when
it comes to watch and also blend in
very easily with the business just
using a damp brush. Now next I'm going to shift
into the blue color and going to add little clouds
with the blue color as Ben. All of this you can see
I'm just adding in with a very small flat
detail of flat brush. You can add this even
with a round brush or with the US smallest
size flat brush. Now again, you can see the
blue color clouds are of the lighter tone as compared to the basically a blue color, hence they are visible. You can even use
a darker tone in the coming class projects
we are even going to be creating in clouds
with the darker tone. Then off the base layer. This is how we are
going to learn in ten different composition, adding in clouds
and different ways, creating different blends
for this guy as well. So you will notice you are, I'm adding in clouds very slowly and not
adding much of them, just trying to create the
perfect balance into the sky. At places you will notice that I quickly use my finger to that the colors into the
background and blend them so as to get that soft and, or, you know, smokey
look to the clouds. It's very important to learn different techniques of adding in and then use the best
that suits for you. So you can either use a
brush or damp brush or another bigger
size flat brush to blend in audio fingertips, just as I use it to create that little dabbing effect and giving you to sit and look. We are ready with our
very simple sky with some little cloud details
into this post-class project. Now I'm going to begin
adding in the further silhouetted this
which I'm going to be adding in with
the black color. I'm just willing to remove
in little black gouache out, you're onto my palette. Now using it. A smaller sized round brush
which has a pointed tip. I'm going to begin
adding in the details. So we are going to add in one simple street lights
out your on the left side. So first I'm just adding in the poll for
the street light. And then we're just going
to give him little of the bush detail at the bottom space with
the black color itself. Now since the only
elements in our painting is going to be this
pool and the bushes. I'm making sure the pool is all looking good enough
and looks perfect. At the top, I've given
it a thin line and at the bottom I'm making the
ball a little teacup. Now if you're not
confident about adding this with
a brush directly, you can even use a
marker or offensive, given a pencil sketch or an
outline first to the pole, and then fill it with
the black color. Or you can even
use a thick marker and add the fall
directly with the motto. But adding in with the paints make it look more natural and, you know, in line
with the painting. Hence, I prefer adding in these details using
in the black cohosh. You can see the bottom pole. I have made it thick enough and add the top where the
light will be there. I have made it little thin one. Lastly to this poll, I'm just going to add a little of that Lyft
compartmental to your, and then we will be adding in the light effect with
the whitewash later on. Then, since we are walking
in with the black color, I will add in the
rest of the details. In the black color we
are going to add in little bush detail at the
bottom most left side. Make sure for this you
use a black gouache in a good thick consistency so that you get the opaque
look to the leaves. At the top you will
see I'm just adding in little detail look
to this bushy area. Suggest using the
tip of my brush. I'm adding in little
leaf shapes at the top. Now again, you are also, you will notice that
I tried to read in the height of this bush area, somewhere taller,
some are shorter. Before you begin adding
in this ball and the bushes makes sure that
your VCO is completely dry. And also when you begin adding in this Leo with
the black color, make sure you do
not add a lot of special because since we are walking with
water-based gouache, gouache colors will
get reactivated in the bottom layer if you will be adding in a lot of
pressure out here. So go ahead with a
very gentle hands. Now at the bottom space here, I'm just going to
fill this space with the black color completely. You're on the edge.
You can see I'm just giving you a little
detail leaf peeking out from the left side now onto the right side
of the pole as well. I'm just going to add in little
of the same bush detail, but I'm going to make it a little more
smaller than height. As I'm moving towards
the center space, you can see I'm reducing
the height because I am not going to take it the
complete right side. On the right side, we are
going to be adding in two to three families
speaking out on the left side only I needed that effect of the Bush
from the ground space. Just giving it that little
finishing touch out, you're making it go
lifted more smaller. Now, on the right side
I'm going to begin adding in two to three
palm leaves peeking out. So the main g is not visible, just a few leaves using the same black color using a round brush which
has a pointed tip. I'm just going to
begin adding in very simple palm
leaves peeking out. Make sure you add the leaves quite thin enough so
that you get the perfect didn't look to the details that we are adding in
into this building. As I told you, I'm
just going to be adding in two to three
of the palm leaves. So I'm just adding in the
second one and you will notice the second one
overlaps the first one, uh, places and make sure you
make it go overlapping so that it gets the
perfect natural look as it should have been. Now I'm just adding
another one or two or at the top of the first
one that we added in. So after this, I guess we will almost be done with adding
in the families as well. I do not want to add much
profit or overdo anything because their main
focus is the Cloud and the skies that we
have created in. After this, we will just
be left to adding in the white gouache
for creating in that street light
effect out there. Now I'm picking up some
white gouache and I'm going to begin creating
in that light effect, makes sure that you clean
your brush completely. You can see my brush hard little black pigment at the bottom space
despite cleaning it, hence, the white color
was turning grid. So it's very important to clean your brush
and clean it from the bottom space completely only the fellows will
be off from your brush. Now using in the whitewash, I've added in the light
effect as you can see. Now lastly, before
removing the masking tape, I'm just going to be using
in my point of fifth pen. I'm just going to add in two
to three lines into the sky, crossing through
the street light and the palm leaves on
the right side as well. So just two of these you can see a pretty simple
aesthetic sky with the perfect cotton
candy colors and very minimal detail yet
It's beautiful depreciate. So now let's remove the
masking tape very carefully. Remove the masking tape that you added last that will
be removed first. Removing very carefully
and against the paper. Make sure the details that
you added on the edge are completely dried before you begin to moving
into masking tape. Your Is are pretty
expressive sky for day one of this
Tandy challenge. I hope you guys enjoyed
painting this and learn to create your
own pastel colors and blending them very smoothly without forming any other color in-between and adding in those perfect simple
clouds in this one. Just one more thing. I'm going to form a little grids on by mixing
in the black and white. I'm just going to add the
little green leaves out to show the light effect following onto
these black leaves, you can skip this step
or adult who has to show that reflection of the
light and the shadow of it. That is it for the day one
of this ten day challenge. I will see you guys tomorrow
into the D2 class project. Thank you so much for
joining me into this class.
8. Day 2 - Pastel Clouds: Hello everyone, Welcome back
to D2 of the ten days of painting expressive skies with wash and painting in
those aesthetic class. Today in the second
class project, we are going to be painting in a similar sky as compared
to the first one. But today we are going to
be adding in the Cloud with the pastel colors
instead of this guy. The first color
that I'm beginning width is the city didn't
blue color again. And the base tie
is going to be off a very light sky blue color to this
setting in blue color, I'm going to be mixing
in a lot of white, creating in a very
light pasted blue fallow to begin adding
into the skies piece. Next for the Cloud, I'm going to use in the same tones that
we used previously. So for this class project I'm using in the set by
the Miyagi miigwetch said because I wanted to show you using in both of the colors. That's the jenny kept
the watercolors as well. I'm going to use the pink color, tone of orange color, and tone of yellow color
to these three colors. I'm going to be
creating in the basal collaborating in the
pay scale cloud. So this time we are
going to add in the Cloud with leaving
in the white gap and then blending it
with this guy with the help of the white and
the blue car electrons. So fast I'm removing all the base year fellows onto my palette and then
do each of these. I'm going to keep adding in the whitewash and mixing and
create the pastel tones. We have to add in right
through all of the fellows, including the cloud
colors and the BCR Skype. Hello. I've added in the white color
to each of these, you can see I've
added closer to them. Now, I will first
begin blending in the blue color and begin
adding it directly to my sky. And then I didn't see blending one calligraphic time and keep adding them
to the painting. The blue color, I'm
going to add in much more of the white and
very less of the blue. Because I want a very
light sky blue color for my sky this time as compared
to the last time that we still had a little darker blue
door because we were going to have in the other pastel
colors into the sky itself. Before I begin painting the sky, I just want to show you a rough pencil sketch
for the Cloud area. So at the bottom right corner, approximately a big space. You have to leave it white
so you do not have to add in the blue color out
your final painting, the sky. Meeting that space. I'm just going to
begin adding in the sky blue color
that we created. And now you can see so much of white I added into getting
the sky blue color. Hence, in the beginning, when we were discussing the
different kinds of gouache, I told you when
it comes to wash, you need a lot of white color. That is why these
sets that come with the two buttons or two jars
off the white color is one reason because you
will still be out of the white flash despite the other colors still
being there filled up. I'm just having a perfect blend into the sky with
the blue color. Make sure you have to leave the bottom Brightspace blank only. Now I'm just mixing in little more white to the blue color. And I'm going to use
the lighter tone of the blue color and add it to
the rest of the bottom sky. Again, make sure at the
bottom-right corner, you do not forget to
need the whitespace for the Cloud area and
make sure to bend. Blend the light blue
and this darker blue taught very smoothly
using invite, watch all the ****
brush quickly. I've got a perfect blend
into my sky and I've left that bottom space white for adding in the Cloud
detail out there. So we are ready with
the BCR for this type. Again, this class
project is also going to be a very
simple, easy one. You're the main focuses
adding in that cloud, leaving in the white piece and creating that cotton candy
effect into the sky. Now I'm shifting into a
smallest size of flat brush. So again, this is our
smallest size blender brush. You can use this one and
say it's flat brush, or you can even use a
round brush if you'd not have a flat brush
and a blender brush, I'm going to mix
in the white and the pink color force and begin
adding in into the whites. This suggests closer
to the blue color. I'm going to lay down
this pink color. Now when the blue and the
pink will blend together, you will notice little
violet color being formed, and that's perfectly okay. That will add to the
beauty of your sky. We will later on be blending the blue and the pink very well, using in white gouache
and the blue color. So you can see I'm
using little white already at the meeting point of the blue and the pink color so as to get the perfect
blend and transition. Now next to the pink color, I'm adding in a mix of the Bastille orange color by mixing in the orange
and the white color. If you do not have
the orange color, you can use a vermilion color or adding little bit of the
skeleton yellow color. Now you can see this is just
a very small cloud patch, hence you need and
very little color, so make sure you mix them
very little colors for this. Now at the bottom space, I'm going to add
into a yellow color. You can see
in-between lending of each of the color
I'm using more of Y directly from my palette so as to get the perfect
blend and transition. Now beyond to do careful on
the rightmost end because the yellow and the blue mixing together forming a green color, which we do not want.
The purple color. It would have been as
a transitional color. Now at the top for blending in, I'm going to use in literal
of the whitewash directly. That is the cloud
and the blue space. So just on the
margin I'm adding in the white paint and
blending it well with the blue and the
yellow color and the orange and the
pink color in-between. If you need at the blue space, you can even add a
little blue color to get the perfect
blend as well. Now this was just
the one base cloud that we added in leaving
in the whitespace, we're going to be adding in the other Clouds
diagonally moving from the bottom left to the top using the same
pace, teal colors. So I'm first going
to begin in with the pastel pink color
that we have created in, and going to begin adding
in very simple clouds. I'm using in the
same blender brush and just using the tip, I'm adding in loose tool. I'm going to blend
all of these using in a damp brush or the
fingertip late it on, just adding in the
color patches. Now on top of this
and for that again, one more lighter tone. So basically when you add in two to three tones and make
all the tones visible, it helps and adding in little shadow effect
as well to the clouds. Now on the top right
side out here, I'm going to add in a bit Cloud using in this
space that pain pallor. And I will add in little
orange touch to this as this big cloud out here, I'm going to blend it
using in the fingertip and show it perfectly blended into
the background of the sky. On top of the pink color, I'm just adding a
little yellow strokes as well before
beginning to blend in. Now next underneath the yellow, I'm going to add in little of the white gouache
as well so as to make my blending mode easier and get a perfect transition. I'm just going to add little
more pink at the top side because the pink seems a little less as compared
to what we needed. Now before beginning
to blend in, I'm just going to add in some smaller clouds with
a very light pink thin, very little cloud effect out. You're randomly into the rest of the sky space giving him
those tiny cloud details. Now using the tip of my finger, I'm going to blend this cloud completely into the background. Now the difference,
if you notice this cloud looks
a little dull as compared to the
bottom-most right cloud that we added directly
on the white paper. Hence, I wanted to add in that bigger focus
cloud at the bottom by leaving the space white and then blending issues with
the blue color easily. Now the other clouds
that you see we are adding in with
the pastel colors. They seem a little
done because of the blue color background
that we already have it. Though, you can still turn them right by adding in
more and more layers. But the effect of the Cloud on the whitespace will still
stand out differently. After blending it,
I just added in little of the effect with
the light pink color again. Now you're again,
I'm just blending these small clouds
into this tight, giving them the soft edge. It using a damp brush. Even if the clouds die in, you can simply using
the damp brush and add these Cloud details
and blend them. I'm just giving little more
highlights for the clouds. And then we're just going to add in very simple board Zillow hit with some violence
into this class project. Now for adding in
the further details, I'm going to be using
into technical pen in two sizes that I'm going
to be using is 0.30.5. I'm going to just tilt
my paper a little and using in the 0.3
brush pen first, I'm going to begin adding
in fine lines into the sky space to act as
the white lines out. Now make sure your painting
is completely dry. Otherwise, if you will
rest your hand anywhere, the pain may get lifted. Also, the black pen may not work smoothly through a
paints are still wet. You can use for the fine
tip if you wish to. I'm going to use in this
0.3.5 poison, pick a light. I'm just adding into the
three lines very close to each other and just meeting at a single point and very
fine line or living in very gaps are very minimum gap in-between these
lines out to you. Now shifting to
the 0.5 size pen, I'm going to add in a few
off to pick our lines in-between these violence
that we have added in. Again for this also makes sure that your base layer
is completely dry. Also a benefit when you tape down your paper on
a moveable surfaces that you can simply rotate your paper according to
your hand comfortability. And that makes adding in all of these details much more
easier because you can tilt the paper according
to your convenience and angles so as to get
in the perfect strokes. Now, lastly, using
in the black brush, I'm going to be
adding in a few of the board sitting
onto these via lines. So for that I'm going to
use in the blackboard. If you want, you can add these as values in a technical pen. But adding them with the color, we'll give it a
different vibrant look. Hence, I preferred
adding it with the black brush instead of
adding it with the pandemic, I'm going to add in a few birds sitting onto these guidelines vary randomly and in
different angles and shapes. Now using the Blackboard
at the bottom left side, I'm going to provide in lifting off the book details just as we added in the last class
project suggest very simple, leaves the day in a
little detail manner. So you can see I'm just
using the tip and adding in very random leaf chips
closer to each other. As I'm moving downwards, you will see that I'm increasing the area of this bush space. And on the leftmost
side I'm this building, this piece with the black color. And on the right side that
is included spy space, where the leaves
are popping out. I'm adding in the
detail leaf look. Toyota at the bottom space. You can see how I've ended in the bush details such as embodied in using
in the black color. Yet it adds so much beauty to the painting and giving it
the prophet detailed look. Now lastly, using
in the white brush, I'm going to be
adding in a moon on the top-left sites I'm
using in the whitewashing, not take classes and leave
without adding in macro photo, adding in a very small moon out you're in-between
these violence. It, we're ready with our class
project as belly for d2. Another simple produce sky with those aesthetic
candy clouds, but completely
different manner and approach than what we did
in the first-class project. Let's remove the
masking tape and CFI and I'm painting
with those clean edges. Also, you would notice the vibrancy of the
bottom cloud looks completely different and makes the sky look more aesthetic. Your final painting for D2 of this ten day paint
expressive Skype. Plus, I hope you guys
enjoyed painting this and loved creating in the blend in the
bottom most sky, using in the blue color again, for blending it
well into the sky, you can see how clean
and clear the blends, despite adding them later on and blending them later on using
the same base your colors. I will see you guys tomorrow
into the D3 class project. Thank you so much to each one of you for joining me
in to this class.
9. Day 3 - Purple Sky: Hello everyone. Welcome back to D3 of the
10-day paint expressive skies. We are going to begin with
a very light pencil sketch. So I'm going to mark
the horizon line, little below the center line. The top area is going to be the sky area in which we are going to
have in some low-lying, darker clouds closer to the
horizon right out here. I've just marked in rough
pencil sketch so that we do not have them visible
when we paint them. And the bottom media is going
to be a simple field area. But this time the sky
that we are going to be painting is going to be
with a different technique. That is, we are
going to pull out the strokes from the
edges creating in that cloudy while painting the sky itself in the previous
class projects, if you remember,
we went ahead with a very simple sky with very
simple layering and blending. This time the blending and the Cloud techniques are all going to be a little different. So the first color that I'm picking up is the
bright violet color. To this violet color, I'm going to be adding in white further to create
a lighter tone. This is going to be the
top area of the sky, and we're going to
begin adding the Skype directly from the edges
moving in, diagnosing. The next color that you
will be needing in is going to be a little bit of the orange mixed in with white. Now remember, orange and violet did not go
well with each other. They create muddy
tones in-between. But that is what
we need to learn, how to avoid them and how
to still get a blending is perfect with such to come
to secondary colors. Now I will mix in the violet and the white color and begin
painting with it deliberately. I have the orange color
also already on my palette. Make sure you do not add
much of photo otherwise, the paints will begin to act as watercolors and they
will not stay open. Now, as I told you from the
left side or the right side, whichever side you
wish to begin, we are going to begin diagonally moving to the center space. I'm going to mark
out the strokes as well diagonally like this. I'm using a flat
brush, half inch size. You can use whichever
flat brushes available depending on
the size of your paper. Now to this mix, I'm just going to add in a
little tinge of the black color to make it look a little greenish violet color. Do not add much of
the black color. Otherwise it will turn
to you all you can see, despite me adding in
just a little tinge, it has turned in a
little extra dark. So I'm just going to add a
little of the violet and the black white
color again so as to make it go a
little 12b1 lighter. Now in the same way, I'm
going to begin in with the similar strokes from
the right side here. And then I'm going
to blend in both of these torques coming
till the center point. From the left side you will see the sky moving till the center. And from the right
side you will see the sky moving till the center. At the bottom, you can see I've left enough space or closer to the horizon line because
there we will be adding in the orange color and
blending these two. Let's shift to the
orange color now and begin blending in
these colors as bent. It's going to add a little
more of byte because they seemed that the orange
is still, don't DACA. And what I needed, I'm
going to begin with the orange color closer to the horizon line first and
giving us treat stroke. When they reach towards the
purple color for blending, we are going to be using
in much more of the white and then shift to the
diagnosis strokes again for blending. Now from the bottom you
can see I'm pulling out the diagnostics till
the violet color. I'm not blending both of
these colors at the moment. I'm just teaching, making it
reach till the white gap. We will blend it later on. Now if at any moment
you'll feel that the violet color has been
picked up on your brush, then make sure you clean your brush because
otherwise you may get the violet color being laid onto the orange
color completely. Now slowly, I'm beginning to blend both of these add points. And for blending, you can either take more
of a white color, use a damp brush, or using the VCO
colors depending on the properties of the
followers that you need, which color you wish to make them look much more stronger. I'm using ingested
**** brush and little of the white
gouache, very little touch. Again from the top I'm blending till the center point
of the orange color. You can see slowly the
blending is building up. But still we have the
perfect stroke visible. And what we needed in
especially try using invite for blending at the meeting point of the wildlife and
the orange follow. So automatically you will have a thin transition
between the fellows. Now I'm just using
a little more of the orange color to get
the blends perfectly. Do not worry, as I told you, we're still going to lay down some darker clouds
at the bottom space. So if you know you have any of the other species which have gotten more of the purple color on the orange or the
blending hasn't won when you can cover them up with the clouds that we
will be adding in. But as far as possible, a white such situations and try to get the
blending forfeit. It may take little
time and practice, but it's quite easy to get this easy blending because of the white gouache
that we're using. Now I'm going to begin
adding in the clouds. For the clouds, I'm
going to use in a darker mix of the violet, white and the black color. First, I will begin with
a lighter layer maybe, and then move on
to the DACA Leo. I'm using a size 0 mop brush. You can use a round
brush as well, which has a little pointed tip. Now majorly towards
the orange color part, we are going to be adding
in these low line clouds. And also majorly we
will be adding clouds on the right side at the
meeting point of the violet, violet color so as
to get into perfect, you know, if you have, if you do not have blending
at the right endpoint, you can cover them up using
in these clouds strokes, buttons by blending
seems perfect. I'm just going to add the
clouds naturally out. Now to this mix. I just added in little more of the violet color, and now I'm going to begin
adding in the second layer. So just as we discussed
in the technique section, adding in clouds with two colors using in
the half ses troupes. You can see very simply, I'm just adding in a blend of different kinds of clouds and with two different
tonal variations to get the perfect
balance into the sky. The reason being the
top area of the sky has the violet and the
violet critically boot. Hence, by now adding the
clouds at the lower part, I'm using a mix of
both the fellows to ask to strike a
balance and perfect or, you know, transition into the
sky and the clouds aspirin. Now I've just added
in little more white to this and I'm
just going to give him little strokes
at the top area of the sky and add a little of
the Cloud effects out there. But it's going to be
quite less as compared to what clouds we have been
adding at the bottom space, using in a very light
gray color tone by mixing in the violet
black and the white color. It's very much more of white
as compared to the violet. And immediately from the left
side you can see I've just given in simple and long
strokes to act as the Cloud. And I didn't that abstract
and that you don't little rough kind of a batch to the sky giving
in that cloud effect. Now closer to the horizon line, I'm going to add in a very beautiful settings on view so far die for
the false layer. I'm just mixing
in more of Phi to the orange color that's
already on my palette. And I'm going to create a
small circle out you're in the centers based almost
in-between these clothes. Then to this, it will
further be adding in more detail and Laos and creating in that
bright warm loop. So for the first
layer, just a very small circle with
the light color. Now, I'm going to use the orange color directly
and add a border to this and blended with the
white color very gently, some picking up the
orange color without adding in any white or
March of water to this. And just onto the
edge of this circle, I'm going to be adding in a very thin stroke of
the orange color forced. Now using a damp brush, I'm going to blend
in the edge of this orange color line on
the outside with the sky, suggest using a damp brush. You can simply begin
blending it very carefully. And then we will blend it
a little on the inside as when using in the white
color from the palette. You can even use the
white color on the edges of the outside area
as well to blend it, if you do not find it easy to blend it with the
water directly. So basically it
will be such that the edge that is the
route orange color that we have added in will have a different globe but still a blended look as you can see now. That is it for the first layer. Now let's begin
painting in the field falsely until the sky
drives and begin adding in further details
later on for the field and post when to pick up
the yellow ocher color. I'm not going to be adding in
any white to it as of now. Just going to pick up the yellow ocher color in
a good tip, Kansas City, so as to get an
opaque look and begin painting in the field area
closer to the horizon line. So half of the film
media is going to be off the yellow ocher color
and the bottom half is going to be with
the sap green color. So first closer to
the horizon line, I'm running in very carefully
so that I do not run into this guy space and trying to get that perfect line at
the horizon line. And the bottom half
is going to be filled in with those
have been fallow. And I will blend both the sap green and the yellow
ocher color when, while adding in the green color. Now since I do not have a
direct sap green color, I'm mixing in the two
medium tone green on my palette to get a
medium tone green color. So it works the lightest
being under dark is green. I'm mixing both of that to
get a medium tone of green. I'm adding it at
the bottom space and moving towards the top area, I'm going to blend it with
the yellow ocher color. Then the yellow ocher
Pavlovian majorly be only visible closer to the
horizon line in-between, you will have a blend of the yellow ocher
and the green at the bottom more space you will have to be in column E journey. Now you're, you can see
whenever, while blending, if you feel that
the calories less, you can pick up the BTO color. Or if you feel the
courageous enough, then just for blending, you can use a damp brush. I have been using a mix
of both the techniques. That is, I picked up a little of the yellow ocher color as
well at the top and rest, I use a damp brush
for blending in. Now next, I'm just going
to mix in a little bit more of the darker
green color to the green that is already on my
palette because we are going to begin adding in the bush
effect on the horizon line. It doesn't have to
be completely dark, but it doesn't have to
be completely like using a sap green color or a
medium bones have been color basically directly. A smallest sized round brush. I'm going to begin adding in the bush effect on
the horizon line. Now I'm going to begin
adding in the bush effect in such a way that I do not
cover the clouds completely. And it's going to be on the horizon line at the
top of the gouache. I'm going to give him
the detailed look using the tip of the brush. But as I move towards
the bottom side, I'm majorly going to be filling it with the green
color directly. Also throughout the horizon line variable will be adding
in this bush effect. I'll make sure that IVD the height of this
bushy area and not keep it one street light
and closer to the sun area. Be a little careful
that you do not cover the sun with
these bushes for now. Now as I'm moving closer
to the sun space, I'm going to use in a
further lighter green. I'm just mixing in
more of the light green because I wanted to show the sunlight effect
on obesity space as well. And hence adding in this
medium green tone that is much lighter than the green that we're using on the edges. You'll get notice at the edge, that is the left edge, I had a big bush. Then I added in the bush
in a very small height, then again increase
the height and again, moving closer to the sun space, I have reduced the
height so that we do not cover
the sudden space. Now as I'm moving much more
closer towards the sun, I have for those picks up
only the light pink color. So asked to show that
light effect out there. Now made sure repeating
it again that you do not cover the sun
space with these needs. And make sure that near to the sun space you
have these leaves. Are the bushy area
smaller so that they are just under the
sun on the horizon line. On the left hand
right of the sun, you can see I used in
the light green tone. And now again, as we
are shifting onto the right side much far
from the sun space, I have shifted into the
darker green color again, just in the center space closer to the sun
area is where I used in the light pink color to show a little of
the light effect, we are still left to add one more layer to
the sun as well. So do not worry, that's not the detailed look
of the sun's still. Now as I'm moving further
towards the right side, as you can see, the green color, tonal variation or stone further darker just as it was
on the leftmost edge. Now I'm going to quickly, I didn't the remaining Bush effect onto the right side out. You can notice
only at the top of the bush I given the
detailed look using the tip of my brush
and as I move towards the bottom closer
to the horizon line, I correct me, fill it with
the color complete the I'm almost done adding in the bush effect onto
my horizon line. Now the next detail
that I'm going to go ahead adding is the
DDL to the sun. So the first year of
the sun is completely dried and now I'm going to begin adding in
some warm colors. I'm going to pick up
the yellow color. I'm going to add
in a little after yellow color to the
center of the sun, mixed in a little pinch
off white because I want a good warm look under center loop with the
rest of the sky. The outside ring of the sun, you can already see we've given enough good orange color
blended with the background. Now we're going to add this yellow color into
the center space and blended well again with the outline of the Sun
that we have added in. Now you can see I'm
adding in one more color, a bright color into
the center space. The sun is standing out so
differently and vibrant. Now I'm just going to pick up a little darker
green color and give some finishing strokes onto the horizon line with
the darker green color. The next detail that we are
going to be adding in is, is going to be the DDS
into the field space. In the field area
we're going to be keeping in the
details very minimum. Because our main focus
was this guy's piece. The TPMs are just to make it a complete painting altogether. In the field area I'm just going to use in the
darker green color. I'm just going to add in
very simple brushstrokes closer to each other
and very limited of it, not going in with
the much detail. Look for the grass, just
a simple far afield. The minimum grass details
that I've added in. Now onto the leftmost edge, I'm going to begin
adding in the detail of the detail knockoff the class just by pressing in my brush, adding in some leaves detail
closer to each other, creating in a bunch of leaves out they're closer together. In the same VM just
going to be adding in some limited leaves out two
are in the center space, suggest to give him
little deviance. I'm adding in the
leaf details from the bottoms piece trying to show some popping out
leaves out to you. Now on the right
side of the sky, I just feel like pulling out this bush ADR a little taller. I'm just going to increase
this DDL out. With gouache. You can see how easy it is to keep adding in details
and little by little. And then whenever you
feel that, you know, you need to add a particular
detail a little more. You can simply just
go ahead and add it. It can be the lighter tone
on the darker tone or the darker tool or
the lighter tone it will not make into and
you can easily add in the detail step-by-step
little violated. Now using in this
lighter green color, I'm just going to add a
little more grass strokes randomly in the
field space as well. Now I'm going to shift
into my round brush, does coiled round brush, which I always use for adding in the green details and using
the tip of this brush, I'm just going to add in little more detail
into the field space. Make sure your brush
is completely done. Do not dip it in water directly. Pick up paint onto the
brush so that you get these dry brush
grass details and simply just holding the
brush perpendicular, you can add in little
bush and grass details into your il area when you want to feed the
details minimalistic and not much of
the detailed view. That is it for the grass did in very minimum as it will do. And medially towards
the button site, you can see I have not added much be there on
the yellow ocher. Now lastly, before
removing the masking tape, I'm going to quickly add in a little cloud crossing
the sun as well, using that same color mix
off the bright violet, black and white color that we use for
adding in the Cloud. I'm just going to add in little cloud crossing
the sun space. So be very careful. Do not add too much of pressure. Otherwise, the San
Carlos will get activated and blend
in with this color. Just to add a little
more of the black dot so that you get those
darker cloud effect out. You're just adding in very minimum and
little small clouds or they're crossing through
the sun's peace. That is, it just added
in to small clouds, one at the top side of the sun and one at
the bottom side. And we are ready with
our class project. Let's begin removing
the masking tape. The masking tape that
you added last will be removed post be very careful by moving in the masking t
and also makes sure that you remove the masking tape against the paper so that you do
not tear off the edges. Your final in 1943 of this ten-day paint
explicit sky to dv learned adding in the cloud effect while painting the base year sky itself and moving from the
edges, moving and diagnose. I hope you guys enjoyed
painting this with me today. I will see you guys tomorrow into the default class project. Thank you so much for
joining me into this class.
10. Day 4 - Bold Blue Clouds: Hello everyone, Welcome
back to deep or of the pen they paint
expressive Skype class. Today we are going
to be painting in a pretty night sky kind of a view and adding in
those PLC dark clothes. And along with that, we will be adding in
a small cityscape kind of facilitate. Let's begin with
the pencil sketch. So at the bottom of the paper, I'm giving you a very rough
marking for the horizon line. And on top of that you
can see I'm adding in random been very dark
cityscape, cityscape sketch. This is just a very rough sketch because as soon as you will
begin adding the colors, all of this will begin to
get it enough into the sky. We are going to add in some
power lines and symbiosis. This is just again,
for your knowledge, where things will be
pleased that I'm getting in this pencil sketch because
with painting with gouache, all of this will get hidden because of the
opacity of gouache. Now let's begin
picking up the colors one-by-one, false for the sky, I'm picking up the pollution
group color to the top of this guy is going to be
a very dark one directly. It shouldn't look palette out. I'm directly going to begin
adding and keep adding one color at a time as soon
as I have them on my palette, because the rest of the
colors are going to be the same that we have
been using so far. So I have similitude on
my palette has been. Now next closer to this
darker blue color. I'm going to be adding in little of the night
a blue stroke. So for data and picking up the city and in
Luke hello and to this OL tag not mixed in white directly using in this
color from the palette. Just going to give in one
line of this color as well. And then I will move
on to the white color. Now, when I'm adding
in this scholar, I will blend it with
the dark blue color since the top space as well so as to get the
perfect transition between the followers. Now next, shift onto
the white color and just below the
light blue color that we have added in, I'm going to be picking
up the white color and directly adding some
white color and then blend it till the
top blue color so as to get the perfect transition
between the followers. Now while writing the paints, if you find this a
little difficult, just pick up a little
damp brush suggests are dropping the tip of
your brush into water and then use it
backprop blending. And that will make
your blending game much more smoother and easier. You are, you can see
moving from the bottom. I'm moving till the
top color makes sure you move from one
edge to the others. Do not leave it in between. Otherwise you will get some cuts and patches in-between
in which we do not want. Also from the top layer or after you list
the darkest color, make sure before reaching
the bottom right again, you clean your brush. Otherwise, the dark blue color that's listed on your
brush will get laid down at the bottom space has been now closer to
the horizon line. I'm just picking up little
up the orange color. I'm going to add it closer to the horizon line and blended
with the right in-between. So you can see between
the blue and the orange, that is a lot of white space
that we have painted in. Using in the orange
color, I will blend it. And this is going to be
the BCR of this guy. So we'll just pick up
little white color and blend all of this. And then we will begin adding
in clouds into this guy. Before blending,
I'm just adding in little bit of the
yellow color as well, just about the audience color so as to give a little more of the sunset light effect suggests little touch of the
yellow as you can see. Now just using a little right, I'm going to begin blending
all of these quickly. So you can see even after laying down the paints,
you can simply add, invite and try to get
in the perfect blends and transition between
different color tones. Now I find the right
space a little more than I'm going to
pick up the **** brush and we're going to move from
the audience color of the bottom space
and move it below the top layer of vital death. So automatically you can
see with the wet brush, little orange and
yellow gets lifted and laid onto the white stuff
that I'm adding in. The reducing the white effect
in the sky and turning it into a transitional sky off
light blue to light orange. And then the base neurons
that we have used in. Now using the blue color that we used at the
topmost area of this guy, I'm going to begin
adding in the clouds by adding in the snout
I'm using in a mop brush. This is a size 0 mop brush
which has a pointed tip. You can simply
using a round brush or a flat brushes belly. And they just went to begin
adding in the half-sister. We are going to be having it a major leader clouds onto
this lighter part of the sky. We are going to have one
big cloud or tear in the center space and then most of them onto the right side. You can see I'm adding in
rough patches of Hep C strokes closer to each other out your to form
the Cloud Shell. You can see at the edges I'm using the tip of
the brush giving in that draft cloud shape
edge and in the center majorly filling it with the
color directly in the center. Now, I'm just giving it out
to your very small cloud. Didn't just using the tip because I'm going
to be connecting this cloud till the cloud onto the left or right side as well. Also at the bottom out, you are giving in some
rough edge to the Cloud. Now using the same technique
I'm adding in the cloud out you're onto the right side is going to be another
bigger cloud. Half of it is hidden and
not visible in our view. Now the Sandberg cloud and
this cloud on the right, I'm going to be
connecting both of these together using in some smaller
cloud details in between. If you remember, we had learned adding
interstellar clouds. So again, just using
in another time of the filler cloud that just dabbing in the tip of the brush, adding in some fine details
in between to show little or connection or filling in those gaps in between these
two big plows out here. Now for the next year of clouds, I'm going to mix
in the nation WHO and the civilian blue
color out you are on my palette and going to create a medium tone of the new follow. When do we using in
this medium blue tone, I will begin adding
in the Cloud. At the bottom side of the staff are clouds that
we have added in there. If you want, you can
even add in a pinch of black color to
get a 3-inch stone. I have also added in a lifted into the black
colored very little. Now I'm going to begin
adding in the clouds out here onto the orange
column, Italy. So again, you are also
going to be using in the simple straight straw
surviving in the Cloud. So you can see very rough
random strokes that I'm losing in to fill in the clouds out
here at the bottom area. In-between, I will just add bigger participant
in this piece. And then again for
the keep adding in some smaller clouds
to fill in the sky. So we are done
adding in the middle clouds now in between
them this going to be adding in some filler
flowers using in some simple straight lines of this color that
we have mixed it. This is a mixed of
the Prussian blue, black and the city
even blue color. You can see just
using the tip I'm adding in very rough
random lines to given some filler
details in-between these bigger clouds
that we already added. Now before moving on in this sprint to use Lipton
of the whitewashing. Just going to add in
little highlights to these clouds out here
at the bottom side. Just very fine line of
the white gouache and closer to these flouts to
add in little light details. So just in between
these filler clouds, adding in little
light cloud effect using the whiteboards, but the technique is the same, just using simple strokes
close to each other. Now next we're going to paint in the bottom cityscape
to the bottom space. We are going to fill it
completely with the black color. Make sure to pick up the black gouache in a
good thick consistency. So I'm going to shift
into my flat brush. I'm going to pick
up some black wash and beginner adding it
at the bottom space. You can see I've defined
the horizon line quite well and given a
perfect straight line with the black color. Now on top of this, I'm going to be adding in a few of the building
details what we were adding in with
the pencil sketch. Then we're even going to give
them lifted off the road details onto this black color
that we have painted in. So we will be using in a mix
of black and white that's forming in a three color and
giving in some light effect. It's some good effects. And then some light effect
has been on top of it. We are going to be adding
in some buildings, some violins and
power lines as well. Let's begin adding in
the details one-by-one. So I'm going to pick up a
smaller sized round brush now. And using this brush, I will begin adding in the details with a
black brush itself. So first let's begin adding
in the cityscape details on top of the horizon
line to vary randomly. I'm just going to begin placing in some rough buildings on top of this and fill them completely with the
black color itself. You have for using a blend and mix off
different sizes and different shapes of the
buildings out here so that you get the nutshell
view in-between. You will even see
I will be leaving little gaps because
there I've been given some grass detail
or bush details later on using in
this point brush. Then let's begin quickly add in the rest of the cityscape
the in-between, I'm going to leave
a little space for the green details again, in the center area,
as you can see, I've left a major space
blank for now because there, or I'm going to add in much
detail with the bushes. Plus I'm going to be adding
in the power lines as Ben, Do not overdo your
entire horizon line with just the buildings
that we are adding in. The leftmost side,
your I'm giving injustice of flat
lean long it out. You're just a little highlighted as compared to the horizon line. Now next I'm just going
to mix in a little bit of white to this black
gouache, as I told you, and farming in a
light gray tone, I'm going to begin adding in the pleadings onto the
black space at the bottom. Media suggest mixing in very little right
to the black color. Now I'm going to mark in a very dark detail for
the road we are not going to be adding
in much detail view because our main focus again, what is this guy areas when we will be adding
details out there, they will be little more
detailed as compared to what we are adding
out your diagonally. I'm going to add in the road and the road is just going to reach in a little towards the
right side in the center, but a little more
towards the right side, not completely filled
the right edge. You can see how simply
just using in a gray tone, you could directly get
in that role effect onto a black patches when
using the gouache colors. So as we always see with flash, It's very easy to give in the lighter details as
well on the darker color. And in fact, it's
much easier to add lighter details on darker
color with gouache and get the perfect
effect rather than adding in the darker tones
on the lighter colors. So I'm just giving it the other little more
perfect blending and adding in little
more lighter strokes. Who asked to get the perfect
or defects out here? Now next, using in
the white gouache, I'm just going to add in, lifted off the light effect out. You're just using the
tip of my round brush. I'm going to add in
very simple dots or some smallest quiz. Ensure as some of the light peeking out from
this pieces as well, wherein we have more
of the cityscape which is not defined out, you're into a painting. Leader light peeking out is what we are giving
in the new off. Next I'm going to begin
adding in the Bush detailing the spaces on the horizon line that we have left it blank. For the bush we are going to
be using in the same food to three different
techniques that we have kept using it so far. One is using the tip
of your round brush. You can see on the edge
I given the detail loop of the leaf and then fill the rest of the space
with the black color. Today's same way out, you're in the center space. I'm going to begin adding in some bush detail using
the black color has been you'll get noticed throughout I'm trying to really the height of the booth and not keeping
them off one single height. I'm trying to 3D
them and give them all the natural loop as well. Now, you can add in a
little of this bushes peck flossing your of one or two
of the buildings as well. So you're on one
of the buildings on the right side In see, I'm just adding in
very simple branches, just touching to the Bangla
effect and giving them a little more or branch effect popping from behind
of these houses. I'm just using the
tip of the brush, adding in very fine branches close to each other
to create this loop. Now next let's begin adding
in some power lines out. You're going to add in
new offer power lines. So you can either watch where I'm placing them,
the power lines, or you can have
your own placement, then it not be at the exact
same placement as mine. I am using in the same
insights to round brush, which has a pointed tip pens. I'm able to achieve these fine powerline medial
and the state lines. Do not worry if you are not
confident about adding these, do they clean using
in the Blackboard, you can post them with a
pen and using a scale. And then given the detail look using in the brush
and the color, you can even directly using a little thicker marker to add in such thick looking like. Now, I am adding in
the power lines onto the right side of this bigger
power line that I added. And as I'm moving
towards the right, you can see the height of the power line diminution and Boeing one smaller than smaller. Now towards the left
side I'm going to add in little more bigger
anticoag power lines. So basically the left side view is much more closer to you. And as you are moving towards the right side of your painting, W is going far away
from your hands. Everything is stoning smaller. That is the understanding of the perspective
for this painting, from which angle you are
viewing it accordingly, the size and the
placement of the details will be under this center power. If you can see, I'm adding in
very much more detail loop. So I gave him little outdoors
or board DBAs as well. And now on top of this as well, just trying to give him little more detailed look at it. Another power line out here on the left side and
to this as well, I'm just going to add in little details are what I'm going to do is the
center pole that I added in. I will append to the
data as, you know, that billboard kind of thing or are those
advertisement boards. And we will try to give him little more detail out there using different
colors need to learn. And rest of the 9th, we're going to consider
them as power line. The one that I've added
out your on the left side, this, I'm going to even consider
it as this cheap light. So you can see I've given
them the steep polyfit and got the street light
handlers well out. To that we will add in the light effect using
the white color later on. We are done adding in
all the pole details and other billboard and all
the street light deviance. Now I'm going to shift into my smallest size
technical pencil. This is a 0.1 tip technical pen so that I get
in very fine lines. And now using in this pen, I'm going to begin adding
in the violin details out. You're going to connect the bigger folds
out you altogether. Now since I have my people deep down on a movable surface, it becomes quite easier
for me to just tilt my paper and easily
getting those mood lines. Now in-between, I just added in one more fine line out your two given little
morph and action. Basically put this
advertisement board, I'm giving you a stamp PSD, so as to give it more
realistic view if you have ever noticed on those
advertisement wards as bell. Now, same VM. Just going to add in
few more details. Now, you know the problem out your is you have to be
very careful before you lay your hand onto
any faster because if the pallor is wet by any
chance it will get lifted. And then if your hand
gets lead anywhere again, the colors will get
transferred out there, spoiling in the space. So it's very important to
make sure you lay your hand. Now using the pen itself, I'm just adding little
more details to these advertisement boards
that I have added in Europe. And the left side board
also I converted it into a steak is instead of
using it as a TIF lamp, I completely forgot about adding that for
the Street class. I just added in that stamp
is so that's perfectly okay. Now this green to add
in few more lines, you can see just
little more disease. Now, just going to add in further details using
the black color itself, but the smallest size pen. These rightmost poles out your, I'm adding in the
street light effect using in the black pen itself, you can see the poll
as well as the, a steep lamp I'm adding
and using the black color. So as you are moving from the center towards
the left edge, you can see the height
of those folds up, Kevin pleasing for
the steep late. Now, the major thing let's do add in are the
power line bios. So let's begin adding
them one by one. Now again, these wires, you can add them vary randomly
and according to your risk because there is no
specific pattern or specific method
of adding these. I'm going to be adding in a few, moving out your from the top
to this bigger fall and then connecting them to the smaller falls moving towards
the right side. For this, I'm going to use in the smallest size and
the thinner pen so that I get those perfect tense dropped and make them
look more natural. I'm using in three different
size of pens in between. So this is a 0.5 pen I am using in a 0.3 as
well as 0 find one. So there are three
different values of this tower lines
that you will get. The ones that are
closer to our view. I'm keeping them tickets. So for that I'm using
in the 0.5 pin, then the ones that are little more closer to our view
for that I'm using in the 0.3 pen and the ones that are far most from
our view for that I'm using in the 0.1
pen and adding in the details one-by-one
growing one-line appetite. Now, from the top left side, I'm adding in a
few more violence cross me and all the forth. You can see how easy it becomes when you're P4
is on a movable surface, you can simply just still good
for adding in the details, making the task so
much more easier. I'm just going to add in little more connection to
these violins out your, which are the closest
to our view to just some current connections
that I'm trying to add it. Now I'm going to add in
another thin line closer to this bottom most line that
we have added so far. Now a few more lines
moving out from your, you can see how simple
details can make the painting look so much more natural
and so much more realistic. If you have ever
happened to witness such an evening
Sunset Street View, you can delete and resonate
with it and conceal the natural beauty of the painting coming
out through this. That is it. We are done adding
all the wireline revealed using the different size of fan and adding in
little details. Now one last thing
before we moving in the masking tape is adding in this small moon at
the top right side. Sephardic in the moon I'm
going to use in the whitewash. So using a round brush and fresh whitewash without adding
any color and water too. I'm going to use it in a thick consistency and
going to quickly add in a small moon on the
top right side of the sky onto the
darker blue tone. So make sure you do not add
much water to your whitewash. Use it in a thick consistency so that you get an opaque look. I'm adding a half-moon out. You are instead of a full moon so as to give it, you know, every time I keep adding in
the full moon for I prefer adding in the half-moon this
time I would say that is it. Let's remove the
masking tape and see your final painting for day
four of this ten-day class. Those limited light effect
that we added on the pathway are in the flat
areas you can see it creates a completely
different field. If you want. You can even add in a little more light
details using in the yellow and orange
squash as well. To give it more detail view. Your final painting for day four of these ten
paint expressive sky. I hope today you guys
enjoy painting in these dark and gloomy clouds
closer to each other, creating in that
depth into the sky. And then painting that roadway. I'm just going to add in a few styles using the
white pen directly. Just going to drop
a very small study deals very roughly only at
the top area of the sky. I didn't see you
guys tomorrow into the D35 class project. Thank you so much to each
one of you for joining me in this class and
painting along with me. I will see you guys tomorrow. Thank you so much once again.
11. Day 5 - Thunder Night: Hello everyone. Welcome back to day five of the attendee paint expressive skies. Today we are going to be
painting a long night sky kind of look with a little thunder and
some clouds as well. Let's begin preparing
the colors first. We're going to go ahead
with the purples, dark sky for the
night sky effect. I'm picking up the
color to this. I'm adding in a little
bit of the black color, and I'm going to add in
little Writer as well. So it's going to be a little, a dark purple gray kind of a tone that we're
going to go ahead with. So I'm going to mix all
of these three colors. In these three colors, the violet color is going to
be in the major proportion, and black and white are
going to be lesser. Black is going to
be the least as compared to the popular
invite as well. I've mixed the color and now
I'm going to begin applying this color from the
top space in-between. I will follow the even
lighten the tone by adding in little more white to us to get the gradient
to the night sky. False beginning in
with this darker mix off the wildly black
and white fellow at the top and moving
downwards will get little lighter
values as verified, adding in more of
violet and white. As you can see, 1 third
of the paper I've covered up with this mix
up the color they do, this color makes itself. I'm just going to add
in little more violet. I'm going to go ahead with a bright violet tone into the
center space of this guy. So we get the perfect
transition in this guy to get the
perfect night view onto. This time, we will be adding the clouds in a very
different manner, creating a little panda look. As you can see, I've added more of
pilot and easily the color variation
is visible, right? Clearly, even on
the paper as well, if you see, I'm going to blend both of these
colors well enough. Now further the bottom space, I'm going to add in more of
white to this mix itself. I'm just going to add
in more white now, I'm going to mix it well and create a photo lighter tone and add it at the bottom space and blend all the three colors. Now at the bottom most space, we are going to have a
little black silhouette on their hands and not valid much about laying
the colors did properly. Now at the moment, if you see my blending between the
colors is not that great. And there are so many
different patches visible which we do
not want in the sky. I'm going to go ahead
and blend all of these, either using a damp brush or
little of the white color. Picking up little white, I will begin blending from the bottom and move
till the top space. And at the top of this thigh, I'm still going to add a little more darker tone
just using the black color. You can see how just using a
damp brush or white color, you can simply get
the blends right. And the blending goals
are so much smoother and easier and look perfectly blended without
those sharp edges. It's picking up, lifted
off the black color. I'm just going to blend
it at the top space and get more darker
space at the top. I'm done with the
basically out of the sky. That's a night sky look
using in the violet color and the black and white to get different tonal variations. Now onto this, I'm going
to begin adding in lifted off the thundercloud effect
using in the white gouache. So for that I'm
going to be using in this down brush with the
tip of which is spoiled, which I use majorly for bushes. But this time we are going
to create clouds using this suggest using
the tip of the brush, I'm going to begin adding
in the clouds again. You're again, the
thing is that you do not have excess
water on your brush. And I'm holding my
brush perpendicular, as you can see, I'm adding in a very rough halves cloud out. You're at the top space. And then using the
same white color, I'm going to add
little of the cloud our tour at the bottom areas. Now you will see
that at this moment the white cloud is
a little dull one. So I'm going to add little of the brighter effect as well. Because I wanted to
make it and give it a look of the time the
sky hands on one to have a blend of both a little of the dial clouds and the
bright clouds as Ben. To give them little
bright effect. You can see I'm adding
in white gouache again on layer of the
falsely of clouds. Now, you will also notice that I'm adding in the
clouds vary randomly. And how easy it is to add the clouds just using
an ACE pointed brush, getting in those imperfect
shape to the clouds, that gives it more
of the natural loop. My people was a little wet
after the base layer blending. Hence automatically you will see the base of the cloud
looks perfectly blended. Now using it, it off the grave, violet color I'm going
to add didn't let it off the darker
cloud effect as well. So the policy into little
extra light to just add in little tinge of black to get it a little more on
the darker side. Just going to add little effect with this and blended win. You would notice the
darker cloud effect is quite less as compared to the light clouds that
we have added in because I want a really
good panda loop. And not much of the darker
class because we already have the dark night
sky in the base layer. Hens just started to get a little balance in between
the clouds as well. Now just adding little smaller
effects you're in there. Now to list those in, I'm going to begin adding in the silhouette detail
at the bottom space. I'm going to use in
the black color. And we are going to add in a very simple cityscape
kind of facility. I will just begin mocking
out directly with the color. If you are someone
who's not confident about adding these with
the fellows Today clean, you can have a rough
pencil sketch for it, or you can even given
some MCA outlines. Now, on the right
side out to her, I'm adding in just
a big group that is visible to the
top of the roof. I'm giving up on
little triangular a cheap so as to give
a little detail, look to the edge of this roof and the rest
of the bottom space. I'm going to directly be filling
it with the black color. Now I'm filling up this
entire bottom space with the black wash.
Make sure you use the black washing a
good thick consistency so that you get the
perfect opaque loop. Also do not add a
lot of pressure. Otherwise the BCL
Carla and black will get mixed up
and you will not get the bright black color look that the bold effect for the
silhouette that we needed. Now moving towards
the left side, I'm going to change the shape of the fluids that we
will be adding in. Just added in one big out. You're on the right side. Now beginning from
the leftmost edge, I'm going to add in
differentiates to give him the cityscape look out. You're on the left side again, I'm adding in the
top roof space, but in a very different
shape as you can see, after all of these drive, we will even given little highlight effect
with dark gray color, the violet gray color that
we used for this guy. Now, this time if you want, you can even change the cityscape cell ahead and
add your own cityscapes. Hello, hey, instead of following the same silhouette
that I am adding in, it's completely onto you and your choice and according
to your salary, you can even give
them highlights with the violet gray color
that we have formed in. From the top space you're
taking in a little slant line. I'm going to add in
the Powerball details. I'm adding in these lines
are lifted slant or so as to give them a little tilted
angled view from our spot. Always make sure that
you treat tilted line. Again, if you're not confident about adding this
directly with the color, you can use a pencil scale for the outline order black
market for dollar plane, and then fill it with
the black color. I'm going to add in a
few of the pine trees in the center space of the bottom layer in-between
these two roofs. If you want, you can add more of the silhouettes.
As I told you. I'm going to go ahead
with the pine tree silhouettes out here to give
it a little different tasks, then the regular cityscape, that peaky padding in. So quickly I'm just using a smallest size brush out you are using in the
black color itself. I'm just adding very
simple pine trees. I'm not making the details
look much sharper, clear or margin the
detailed manner, starting it very randomly, giving it the shape,
the buying cheap. I will try to read
it the heights of the pine tree
throughout driving, not keep them all off
the exact same height. Some very little taller, somewhere a little shorter
so as to get the perfect, don't follow space out here. As I told you, if you want, you can even add in adult cityscapes instead of
adding in the pine tree. Or you can even add in
the bush effect using in this file brush or the round tip brush that we
have been adding so far. It's again, a mix of all the techniques that we
have learned or other details that you can use out to
either go ahead with more detailed
cityscape or adding in the bush effect using in the round brush
orders point brush, or adding in the pine trees
or any other kind of tree on any other details that you would like to go ahead with. Feel free to add it or ask for your own creativity and asked
for your own wish out here. I'm done adding the
pine trees out here. And you can see
I've tried to vary the height in-between
of these pine trees. Now I'm going to begin adding in further more detail to this
poll that we have added your. After that, we will be left
to add in the time that effect using the
white color plus some violins from this
pole to show that perfectly Street View
during the night sky. This point, I've given
this small extension where we will be adding
one street light effect. We will add the street light using in the white
quash later on. Now using the whitewashing
a thick consistency, I'm just going to add
the street light out. Make sure you do not add a
lot of photo TO whitewash, otherwise you will not
get the opaque law. And make sure you're using a smaller sized round brush and not add a lot of pressure, otherwise, the paint from the bottom layer will
begin to spread again. What I will do is I will
first give it a little of the dialogue so as to make it act as the background
light effects. So you can see I'm just blending the outside of it with
the bottom layer. In our studies, Dr. Stevens
given the light effect again onto this using
in the bright color. Now next using in this
violet gray color, the darker tone,
I'm adding it to your out to the roof
on the left side. The space that I had left blank and not added in
the black color that was to give them little
highlight using in this darker tone of
the violet gray color. Using in this color, I'd say if I'm going to add a little details
onto the roof out, you're onto the
right side as well. You can see how to
simply adding in little highlights or with
the sky color onto the roof or the other cityscape
details that you are adding creates another level of
D-Day look to your painting. So basically this
shows a little of the sky color effect onto the
bottom silhouettes that you are showing in the
perfect balance between your sky
and other details. Instead of keeping
the silhouette just simple black color. Now next I'm going to begin
adding in the tundra detail. So for data I'm going to use
in the white gouache and I'm using in our size double
0 detailer brush, which has a pointed tip and
will give me very fine lines. I'm going to add little
of the time that he didn't near to
the pole first, make sure that you can
either read and watch all the thunder details that I added and then add accordingly, or you can create your own time. They affect the yard as well. Now I'm going to show a
little of the thunder at the bottom side
cloud here as well, from behind the pine trees. And a luteal out from behind this house roof
that we have added in. You can see how
slowly I'm adding in the town that
effect at places I'm giving it a little
dull white effect to the condo to get the perfect balance in the thunder lightning
luke as well. I would not recommend using in a white gel pen your because one you would get in thick lines using in
the white gel pen. Secondly, you will
not be able to really the tonal variations
of white colors when using a white gel pen
O'Bannon with my new brush, you can create little
dashed lines in between to give a balance effect to
your Canva lightning as well. Somewhere it is very
dull because of the clouds and
somewhere it's bright. So accordingly you see you can vary if you are using
in the white gouache on the left side yard, you can see I'm giving
in the tundra effect, peeking out from that dark
cloud that we had added in. Now to the pandas, you can
see just very simple you, as we kept adding branches in the same way you
have to keep adding in these lightnings and you don't make smaller
linings go from the bigger one and keep them all attach outlet on the left side. As you can see, I'm
trying to show that this standard lightning is from behind this cloud out here. Just a little more of the lightening
effect and then we will shift to the
folder details, make sure you do not add a
lot of conduct also uncover the entire sky so
you'll have to strike a balance because we are still left to add
in little detail. Those details are going
to be the light effect to the street light that we have added some violent
as I told you. So next we're going
to begin adding in the street light for that also we are going to use
in the white gouache, but we are going to use
the white gouache and a good thick consistency so
as to get a opaque lookout, you're only in the center of this white circle
that we created. I'm adding in this white color
to get the light effect. Lastly, I'm going to shift into my technical pen for adding
in the wireline details. You can again use a fine liner brush and the black color and
add in these details. But I prefer using an append to ask to add them
quickly and smoothly. Now I'm adding in
three of the lines coming in from the
top left side. You're coming in until the poll. And then we will connect it from behind the pole till
the right side. As you can see when you have your paper taped down
on a movable surface, It's so easier to just tilt your board according
to your hand or comfortability and adding
the details source smoothly by just
tilting your paper. So I'm just going
to be adding in a few more of the lines. I'm using a 0.3 pen. It's not completely
a fine tip and not ticked applied the 0.51, it's in-between, which is perfect for adding
in the details. Just adding a few of these
violin details or cure at the bottom medias
bell in-between the roofs and from behind
the pine trees as well. Just adding little details
to these polls before or, you know, moving on ahead. So I'm adding one of these, the deal using in the
black pen itself, it becomes much easier and quicker to add in these details. Just adding in one last while I know tour and to this wire line, I'm going to give him little
of the trombone via lookout, you're at the rightmost
side near to the fallout. Be given little
highlight details to the roof of the houses
that we have added in. I'm just going to add a little highlight to
this poll as well. So a very fine line out here on the left
side of the bowl to give it the effect of the
sky onto the fall as Bill. Now the street light, if you see I'm finding it a little smaller, so I'm just going to spread
it a little and make it a little bigger as compared
to what I added previously, that it gets a perfect
treat light lookout TO. Now before removing
the masking tape, just adding little
more highlights to just added for the light or light effect highlight onto this roof out you
are on the left side. And on the leftmost
side of this roof, I'm just going to give them little dry brush effect
on the roof area has been and blend it a
little bit the black so as to give it that
darker effect itself. Now before removing
the masking tape, just giving you the
finishing line out here onto the roof area, your Asbell. And then that is it. We will be ready with
the class project four day five of these
ten day challenge. Now let's remove the
masking tape and see our final painting with those beautiful
clean white edges. Make sure you remove the
masking tape once everything is dried and move it
against your paper? We are almost done removing
the masking tape as well. And your is our final
painting for day five of these ten day
paint expressive skies. I hope you guys enjoyed
painting this and learned another technique of adding in those pretty loud so easily. So I will see you guys into the next class project tomorrow. Thank you so much
for joining me.
12. Day 6 - Farm House Sky: Hello everyone,
Welcome back to D6. Off the attendees
paint expressive sky. Today we are going to paint in another beautiful bold sky. Let's begin picking up
the colors for this. So the first column
that I'm picking up is this violet color
from the palette. Said it's not exactly a
dark while lift column, but it's on the lighter side, So it's more on the
pink side, violet. So you can pick up
a medium tone of pink if you do not have
a violet and add in a little bit of blue to it to get a little more
towards the violet side. So I have just added in
a little touch of blue, if you can see on my
palette to get it more on the violet
side part to this, I'm going to even be adding in little off the
white gouache as well and mix all of these
three to get a pasting violet, lavender disorder for color. So you can see how easily, by mixing in the colors that are available
in your palette, you can create your own colors. This mix I'm going to add in a little touch of black as well. You can see the
black color seems a little old boundary and the column mixture is quite less as to what I will be
needing on the paper. So I just started little more of the violet color and now just dive in adding a little more
of the white colorized well. And using this face still a little grayish touch because we added in
the black color, so it will get that little
grayish touch as well. We'll be painting the
sky with two colors. One is going to be this space
will mix of two or violet, black, blue, and
the white color. And the one is going to be the orange color mixing
with the white color. Also in-between is
going to be using in a lot of white to keep
the blending easy. Because if you will blend the violet and the
orange together, it will begin giving
you muddy tones, which we do not want. I'm almost ready with
my violet color. I already have the orange color on my palette to
which I will mix in a little more widely to run while painting itself directly. This time I'm going to begin adding in the sky diagonally. So on the left side
you can see it's smaller and underwrite
uncovering major part. It's going to be
diagnosed Skype. Now underneath
this violet color, I'm going to add a
little white color and get a lighter
tone to this color, then they will shift
to the orange color. So I will quickly just
clean my brush and pick up the white color and begin adding it just below
the violet color. This is because we do not want muddy tones as I
told you previously. So make sure you pick up the white color
with a clean brush. You can see how I have blended the white color
till the top space. So automatically you get the perfect transitional
radiations as well between the colors plus it gives in a little
more pleasing effect. Now next time I'm
going to pick up the orange color mixing
with the white gouache. Again, pick it up
with a clean brush so that you do not have the
violet color on your brush. Otherwise you will already get the muddy tone on your palette. I'm just reactivating this color with a little tip of water and I'm going to use in white later on as better
for blending this, your eye will just begin
adding in this color. Now, I'm at the top of this and at the bottom of this orange layer that I added, I'm going to use
in the white color as I told you for blending. Picking up the white color
directly on my brush, I will false blend the top
space with the violet color. In this way, you will see this fight violet
and orange being, you know, creating muddy
tones when blended together. Your, because you are using
in the white in-between. It's not creating in
those muddy tones. I'm going to add a little
white at the bottom of the audience piece because
now the bottom was based. I will fill it again with the violet color and
blend all of these. We are ready with the
base layer of this guy. This time we've gone in with very different color tones
for us sky as you can see. Now till they settled in, I will just create
the colors that we will be using for
adding in the clouds. We are going to add
in the clouds with the grayish violet tone of
a Doctorate of consistency. So in that, the
black component will be a little more to get
that little darker. It won't be extra dots, so make sure you do not
make it a black color completely to this mix of the violet color that
I have your I'm just adding in little black and
I'm going to blend it. You can see at the top area I had that little lighter tone. That is the tone that
I'm going to use, not the bottom darker tone. If you feel that your tone
has turned out too dark, you can simply just add in a little more of the
violet and bite again, because you need a
grayish violet towards darker than the base layer
color that we have used it. Now using in this smallest size, flat brush, I'm just going to
begin adding in the clouds. Basically, I'm
just going to keep pulling the clouds
from the edges. Now again, when you begin to apply the colors
on the paper, you will begin to notice whether the color is visible
on your sky or not. And accordingly,
you can be a little off the fallow
radiations again so that you'll get the perfect blend and profit look with your
sky colors as well. You can see for blending at the bottom space
of the Cloud, I use it a little
lighter colors well, to make it look
saddled with the sky. Now again, using in
this darker color, I'm going to add in
some clouds out. You're at the top
left side as well. So you can see I'm
adding the clouds very roughly just giving in
very rough random stroke. I'm going to try
and connect both of these clouds through
this MATLAB, like placing them almost
closer to each other. Also in-between these
clouds you can see little lighter tones because at that case has been an
add too much pressure. The clouds get blended
with the bottom layer, creating a balance into
the space as bell. Now, I'm just going to mix in
a little tinge of black to my orange color mix to get the little or
grayish orange tone. And using this color, I'm just going to add in
very little effect to the clouds that out you're
going to be quite less, do not add excess of it, going very slowly,
otherwise you may ruin it. And then going back
will be a little difficult correcting
in all of the details. Now I'm just adding
in little more white to the violet color mix. And using this lighter color, I'm going to add some
of the clouds out. You're at the bottom space
on the orange color. As I told you with
the orange color, we added in very less
details for the clouds. Now again, shifting into
this lavender color, I'm beginning to
add in the details out here at this phase. Now you can see I'm just using simple straight lines using
the tip of the brush. Adding in these details, again, you're in
this class project. You can see how we've used in different kinds of clouds
to fill in our sky as well. Now just dabbing
little bit whiteout here to give a
little more effects. And that will be
it for the cloud. We will begin adding in the silhouette at
the bottom space. Celebrate with that we will be adding is going to be again, a little kind of
a cityscape view that we will be
going ahead with. That we will mainly be using in black color and then
adding in highlights using in the sky colors later on in one of the previous
class projects as well. That is the D5 class project. We added very little
highlight, if you remember, same Livia going to add in little highlights
this time as well. First, let's begin with
the black color and begin adding in the silhouette
details one by one. So you can see at
the bottom space, I haven't added much of the Cloud details
for this reason. Now again, I'm going
to add in a mix of the bush details and little
building details out your, you can either have your own cityscapes elevator
at the bottom media, or you can simply go ahead
with only adding in Bush details of grass details
or only cityscape detail. That's everything depending
completely undo your choice. So go ahead and you know, as you wish, you can
add the details. So first at the top space, you can see I've filled in with the detailed look
of the bushy area using in the proposed
the round brush. And at the bottom space, I'm going to fill this
completely with the black color. Now you're on the leftmost side. I'm going to add
in one big house. Given that to the view or
light onto this house, we will add in little
light effect later on the highlight effect
using in this guy Carlos, this house for the first layer, we are going to fill this as well with the black
color completely. And then once
everything dries in, now I've shifted into a
bigger size brush and now I'm just going to fill
in all of the spaces, the bottom space with the
black color completely. This is how you can
just given the outline using a smallest size brush
to give it all little detail. Then for the rest of
the bottom spaces with the black palate directly making your task a little quicker. We are still left to add in
much more details into this. This is just the first layer of videos that we are
beginning in width. I'm done filling the entire
space with a black color. Now I'm going to add in little
palm tree effect as well. So again, I'm shifting to my
smallest sized round brush. I'm not going to
add in much detail, look up the palm trees. It's going to be very simple
one with the black color itself popping out from between these bush details
that we have added in. Just make sure about
one thing that you really the height
of the bush and you're not at
places make it go a little smaller and
then it is taller. So this is kind of a seem like a farmhouse
view at the end. So basically your farmers
on the left edge and then all the greenery or the
bush details out your, It's a silhouette
with a black color. So simply you can see
I'm adding the pumps. You also very roughly not
much detailed by now. So I'm going to add two to three of these in different heights. So accordingly, you
can go ahead and add a few smaller ones and
then one or two taller ones, depending again on the
size of your paper and the placement that
you are going ahead with this boundary out you are, you can see I've
taken a taller than the other palm trees
that we added already. So again, for the
Friday she then you can see I'm not going
ahead with much. Did they look very
simple details, very easy for any one of you to follow along and
I didn't easily. Now I'm further shifting for the smallest size
brush because now I'm going to add in
Baltimore up AMT, just closer to this biggest
palm tree that we added in, but it's going to be smaller
as compared to this big one. And the strokes out you're
going to be much more fine. After this, I'm
just going to add in little more grass detail and I'll see if I need to add in another one or two families, depending on the grass
details that we added. Now randomly at places you can see I'm just increasing
the height of the bush and now I'm
just going to add in little more of grass detail out. You're very simple
grass strokes closer to each other while making them pull up towards the sky space. In-between these two trees, I'm adding another very
small pump g out here. You can see it half the
size of those trees and very simple strokes
to act in as the foliage. So this G basically maybe
a far-off key which is just visible in-between
both of these out your, I'm just going to add
in further more detail. Just adding in little
more detail out. You're on the right side. So another palm tree, a smaller one as compared
to the bigger ones that we added previously and very
simple pilot detail. Now I will just add
one more palm tree out your and I guess that would be enough to get into perfect farmhouse
kind of overview. After this, I will be adding in one big three on
the rightmost side, but that won't be a
palm tree exactly. It's going to be our simple, basic tree with a lot of
branches popping out. Now in-between
again, you can see I didn't need to grass detail to maintain the natural
look out here since we are making it look
like the farmhouse view. And of course, over the
summer sitting in who wouldn't love to stay at such
a farmhouse view, right? Since all of us cannot
travel, of course. Why not paint one out? You're just adding in simple branches out to
her as you can see. Now using this point brush, I'm just going to add in the foliage detail to this
tree that we added last. So I have not dip
this brush in water. I'm just going to pick up little black color and holding
my brush perpendicular. I'm just going to simply add in the foliage details quickly. Now using this brush itself, I'm just going to add in little more of the foreign HD deal out. You're on the left side
closer to the house as well, giving it more of
the natural loop, blending it too well with the bass note that we
have already added it. After this, we'll be left with very less details
to be added in. You can see already
the painting looks so beautiful with those
perfect or live sky. And then there was
dust clouds and this farmhouse view
that we are adding in with so much of the
trinity sort of details. Now using this mix
of orange color, I'm going to begin
adding in the highlights onto the house that
we have added out. You're using a round brush. We are going to add
in little details, giving him little
random highlights. So I'm just going
to go ahead and add in very random highlights. There is no specific or image or reference that I'm
following our tour. I may even correct a little bit later on if it does not
seem perfect to me. But for now, just adding in first or small patch to show him the lighter
effect our tour. Now till this settles in, I'm going to create
a mix of the yellow, orange and the white color. And I'm just going to add a little light effect into the greenery space
that we added in. So you can see my brush had a little of the
black color still. And it's mixed in with
door of yellow palette, creating it a muddy,
yellowish color, which we do not want
for the light effect. So I'm going to quickly
clean my brush again, pick up some fresh yellow color, fresh orange color and mix
it with a little bit of the fresh white
fellow for adding in the light effect
in the bush space. So basically those small lamps that we have in-between the
Trinity Walking fields. So that is a little
effect that we are going to give
him very randomly. I've mixed in the yellow, orange and the white color. And you can see it's more of
an orange tone that is fun. So very randomly you
can see I'm just adding in the light effect
in-between these bushes. So between the green fields having the perfect light effect. Very little of the details, as I told you, I'm not
going to add in much. What are these quickly
do is I'm false, blending them a little
into the background so as to give them a little
blurry effect as well. Once the citizen, I will further add bright
light effect to this. Basically you will have
that glowing light as well look or because of these blended lights
that we are adding. Just going to add a
few more of these on the right side
as well quickly. Now on this patch out, you're going to add
in little simple, a lighter strokes
of the orange color again to give a little light
effect, your eyes bent. So again, as I told
you in the beginning, this is very random
or patch that associated on the house to
give him little highlighted, showing a separate space or side area or offense detail out your very roughly with
some white details on it. I'm just quickly
blending the edges a little into the background
with the black color again, because I feel this patch
is looking a little reward, suggest keeping those
offense details in SAS with the orange color that we added into actin
as defense piece. And just going to add in little light detail at the
top area of the house. So now basically you can
get a clear understanding. Those are straight lines
that we have added at the bottom of the house are
the fence lines out there, or just with little light
effect in the background. Now, again, using in the mix of the yellow
and orange color, I'm just going to add
in the light effects to the other small dots that we have added at the bottom space. You can see quickly
I added little more of the light effect
now just going to give him little more
detailed look to these fence details
out your as well, showing that these pens are the ones with
little light effect into giving you
that perfect effect to the vacation at
Sandhaus right? Now, I've added much
more light effect, as you can see even in the bushy area to give
it that glowing effect. That is it. We are ready with
our class project for D6. Let's remove the
masking tape and see your final painting
with those clean edges. I'm absolutely in love with
this class project and it's by far my favorite class
project from this class. Make sure you remove
the masking tape once your edges are
completely dry it and move it against
the people so that you do not
tear off the edges. Your final painting for these
six of these ten day paint explicit skies. I hope you guys enjoyed
painting with me today and loved painting
this farmhouse view with this pretty sky. I will see you guys tomorrow
into the D7 class project. Thank you so much for
joining me into this class.
13. Day 7 - Bright Blue Sky : Welcome back to day seven of the ten D paint
expressive skies. Today we are going
to be painting in a pretty blue sky that was
a bright white clouds. Let's begin by preparing
the colors first. The first color that
I'm going to pick up is this Prussian blue color. And to descend going
to be mixing in a lot of fights to get a very
light pasted blue color. I'm just speaking in
very little touch of the base layer color. As you can see, I've
hardly removed a little of the blue
color to this. I'm going to be adding
in lots of fights out this blue color. Now I'm just going to
mix into whitewash. Now make sure about
one thing that you mix in enough color because
we are going to be painting the entire
Skype forced with this a blue column mix
that we're creating. And then on top of
that we will be adding in the white
cloud separately. So depending on the size of the paper that
you're using in, make sure you have
enough column mixed in for the entire paper
to get filled up. I'm this way to mix in both
the colors now and see it. This guy loop sort of a
shade for the sky area. This color still
teams staff to meet. So I'm still going to add in furthermore white
because as I told you, we want a very bright blue sky. We don't want a dark one. That we have the
bright cloud effect as well onto the bright sky. Just going to mix in a little
more white to this now. And then you begin
painting the sky area to this mix of the Persian
blue and the white color. I will mix in a little. Think of the civilian blue
color because too much white with the Prussian blue is giving me a little
dull blue shade, which I do not exactly, or one for my Skype suggest to give them that little
bright component. I'm going to add in just a
little tinge of the city in, in blue color from
my other sick. Now my blue color
is almost ready. What I will do is
I will give him one stroke of this darker
mix at the top of the sky. And then for the add-in
little more white and go ahead with the lighter
tone at the bottom spaces. So first I'm just beginning
in with one darker tone. I'm directly using
the city didn't blue color for this top
layer from the palette. You can see this color does
not have them mix of white, do not use pollution Lou Your, because it will be
very tough to go ahead with a medium tone of
blue for the top layer, That's a dark layer to get the transition value to the
blue background sky as Ben. And now towards the
entire bottom spy, I'm going to use the mixed that we created off the
light blue out here. I'm going to lay down
the entire sky with this color and blend it
with the dark color as Ben, make sure you do not
add macro photo, otherwise your
paints will not act opaque and B will
act as watercolors. Also for blending, you can use a damp brush or little
more of white in-between. You can see I'm running my brush completely from left
to right so that I do not have any strokes in-between or any sharp
edges in-between. With every stroke, I'm
trying to make the previously as better
blended easily. I'm going to quickly
finish adding up the blue and then
move ahead further. Now in this last flee
or I'm just going to clean my brush
and pick up thresh white and begin
blending white with a blue color to get
for the lighter tone. So basically you will have three tonal variations
in your sky. At the top you have this
area in blue in between, you have a little
mixed with white. And at the bottom
space you will have a very bright sky blue color
because of more white. So I'm just going to blend it with the blue at the top layer. So automatically
this will also have an a little of the blue
touch to it, as you can see. I'm just moving my brush from the bottom till the
top so as to get the perfect blends as
you can see and law having any sharp
edges in-between, even if you will have
little since we are going to add in a
lot of cloud system, you can easily cover
up your mistakes as well as much as
possible to improve. It's better to try to not have sharp edges or unfinished
blending in-between. This is a father base
layer of the sky and I want to this we are going to
begin adding in the clouds, so it's further clouds. We are going to use it to
defend total radiations. One will be of a grayish
tone and one will be off the white color to add in the bright
clouds over it. So that grayish tone cloud
would only be acting in, as you don't immediately
the shadow to the bright white clouds
that we will be adding. Picked up a little
white to that. I'm just mixing in a little
tinge of the black color. You have to mix in very little black because
we do not want a very dark greens when it has to be more of
or less of blacks. Now for the first
layer of clouds and beginning ahead
with the gray tone, I'm using my smallest
size blender brush so you can use this fallacy
is flat brushes balance. You do not have the blender
brush and just using the tip, you can see I'm adding in the patch of this
color creating in little cloud sheets and onto
the edges of this cloud. I'm giving it very thus
edge, as you can see, time to just pull out the color giving indoors or
rough Cloud sheets. Now in the same way, I'm going to keep adding
in a few of the Cloud. So you will see some of the clouds coming
in from the edges. Just as we added out your one
at the top most left edge. This is again just
the base year, as I told you, a False New York, I'm adding in with a
little more of white and very less gray that I'm
including right now. Again, you will see
that the first layer blends a little bit of
background layer because, you know, we leave
a little harsh on our brush by adding these
two given those dark edge. Until this, we will
still be adding in more colors to get into
the brightest thing. For now, just using the
white color directly. If adding in the first layer, then we will move
to the next video with the gray color and then the writer effect with one more thick layer
of the white color. So you can see and
notice I'm just adding the clouds vary randomly
and closer to each other, trying to maintain
distinct sheets of clouds. As you can see some
way some clouds are thick or somebody
or longer but tin from the edges as well and
pulling out the clouds and especially towards the edges of the clouds if you see, I'm trying to give them
a very rough shape. At the bottom here,
you can see I've given on a very big cloud
effect out here. Now just using the tip, I will give them very
small cloud effects in-between these bigger
clouds that we have added in. So these are kind of the
funnel cloud effects that we're adding in. So you need to add in
a balance and not just keep adding in only
bigger and bigger clouds, you have to strike a balance between different
sizes of clouds. Now again, I have picked up little white color in
March, teacup consistency. And I'm just going
to begin adding in layer onto the
false clouds that I've added in so as to give in that bright white cow
defect that places. But again from the edge
I will try to pull out and give those
dark sheep as needed. So it's kind of a dry brush
detail that I tried to give in on the edge so as
to give it that rough look. You can see the bright cloud
at the top in the center and the other cloud effect look a little dull and settled one. I'm not going to add in this thick white clear to
all of the clouds. I will strike a balance
between that as well. Now I have picked up
the gray color and just under the whitespace
of the clouds, I'm going to add in little
effect with this gray color. And then on top of this we will add in the
bright white effects. What will happen is this
gray color on top of white. When we will add in
this gray color, we'll begin to act as the shadow to the white
clouds that we will be adding in giving in a shadow
balance to your sky area, which is very important. Hence, just adding
in the gray colors, as you can see only at the
bottom edge majorly two, given the shadow effect. At the bottom most
part of the sky, you will notice I
have not added much of the clouds because
we are going to add in little silhouette out there and then some street lights as Ben, I'm keeping the lowest piece
a little empty only for now. We will see later on
if you need to add more or out depending on the
silhouette that we added. Now I'm going to pick
up the white again. I'm going to add in
the finishing touches to the rest of the
clouds as well. So I've picked up the white. Now, these clouds, I'm going
to add in the white color in such a way that the
Greek alert bottom layer be visible underneath
the white color might vary randomly
and graph mean you don't have to follow
a set pattern or a set cheap for this
gray color to be visible. Now you will see how beautifully
the gray color or will act as the shadow to these clouds just
onto the sky space. I'm quickly adding in the white details to almost all of the clouds to
make them bright. But you can see I'm adding in such a way that the
bees daphnia is still visible or pleases and the bottom gray
acts as the shadow. Then this is how
you can add shadow to tone clouds are given this into a tonal variations
to the Clouds as well. By walking on layoffs and
building the clouds in layers. Now wherever I feel the need to, I'm just going to
add in listing of the funnel clouds to make
my SPY look perfect. I'm sure your Skype
placements or your clouds placements would be a little different than mine. So you can accordingly
adjust the pillow clouds or using different methods
to add in the filler clouds. So at the bottom,
I've just given it. It's two o'clock dal plots
blended into the sky. Now to this, we are going to do one more thing
using a damp brush. You will notice I'm just
blending the top of the white sky of white cloud
out you're into the sky. You can see how beautifully the sky is looking blended
into the background, having a little smoky
effect in the background. Not necessarily to all of the clouds that you
have to do this, but to a few plots you
can give them this, you know, Smokey blended effect into the background
using a damp brush, blending it very
easily like this. The smoky effect using a
damp brush and for blending, I just use the tip of my finger, the smaller finger, and automatically blend it
a little into the sky. So these are multiple techniques that you can use in what, two to the best and accordingly. Or you know, with practice, you will be able to
achieve the results and understand what works better for you and how it
should be working. Now, just going to add in little cloud effect at the
bottom side because what I will try to show your clouds from behind the silhouette
that we will be adding it. So just adding in Von
Cloud or two or at the bottom space
which is going to get half or more than half, just cover up to the silhouette. But peeking from
behind the solute, it will give a good effect. Suggests the last
Cloud or you are at the bottom right
side as well. And then we will begin adding the silicate with
the black color. Again, you will notice the right side cloud is more
right and the left side thought looks more blended into the background and more
settled into the sky. That is it for the
clouds part for now. Now let us begin adding the solo hit with
the black color. You need to make sure that
everything dries completely solvated for a minute or two
for the clouds to settle in. And then begin with the
black color silhouette part. Now my sky and clouds
are completely dried and I have some black color
picked up on my brush. So I've picked up
the black color, no good tip consistency so as to get the
perfect opaque loop. And using the black color, I'm going to begin
adding in the solar heat for the silicate part. This time I'm just going to add in simple Bush and then we're giving in a mode of this cheap
light details this time. First I'm just creating
in the top area. You can see just using the
tip of my brush giving him the bidding look at the thoughts space
and at the bottom, filling it with black color. In the same way, I'm
going to quickly add in the silhouette detail to
the entire bottom space. This bush details basic Bush, what we have learned so far. Again in these also, you can see we've known so many different techniques
of adding in the bush deep in you or we are adding in directly using the
round brush at the top, you'll give little
detailed look by just dabbing the tip of your brush, giving him Listen leafy
top and bottom species, you'll fill it with
a black color. This bushy area,
I'm not making it go too much height it
because as I told you, we will be adding more of
the street light effect, which will go taller
and be covering the half of this guy
species at places. So this, I just want to keep
it low lying so as to give the finishing edge to the details that we will
be adding in photo. Now from behind this brush
you can see that cloud speaking at the bottom
piece, look so beautiful. Look much better and blended. I have almost reached the end of this bottom space bushy idea. We are still left
to add in a lot of other details as well. We're going to add in leaves popping out from the
top right side as well. Then we will be adding in, in a little more detailed view. You're at the right side. You can see I've taken
the class details are a little more taller
and towards the top. I'm using the black
color itself. I'm just going to give it a little more detail view
at places where I feel I need to add little more detail at the top of these Bush areas. Just simply the same technique
that we use somewhere. I'm adding in little
taller ones out here. Now on the left side as well, I'm going to add in
little more detail moving towards the top space, giving a little
more detailed view. So you can see how slowly
step-by-step we are building in the details
so that we do not overdo, overdo the details at any spot. That is very important to go in very slowly with
the detail In part. Now, if you'll notice
on the left side, I'm adding in much more
detail looking leaf than what we have addict
in that space completely. So that is how you need
to build in DDS layers on layers giving you a little
more detailed view at places. On the left side you
can see we've taken the details almost in
the center of the sky, but very thin not to take one. Now seeing from the
top right side, I'm going to add
in detail leaves. The leaves are going to
be much more detailed. And even what we added at the
bottom left side right now. So I'm going to add
little branches as well inbetween and from those
pop out very random leaves, but in the Detail View, so I'm going to go in very
slowly and keep adding the leaves one-by-one
along with the branches. From the smaller branches. From the bigger branches, you can pop out the leaves and adding little smaller
branches as well. And purple for the leaves
from them as well. You can see how I'm building in the details of
the leaves out, you're popping out leaves
closer to each other, adding some of them
in a bunch as well. Now, crisscrossing this and overlaying on to this post-meal
that we have added in, I'm going to begin adding
in the photo leaves. So it's going to be at the top right side
only and it's lifted. You're not literally
take all that is moving little towards
the center space. And I'm going to keep
adding such needs almost till the center of the sky
on the rightmost side. But I'll just going to try and add them
in such a way that the background sky
is still visible at places in-between
these leaves. You can see how I added in a few of the branches
popping up from the branches that we added all your and adding in
leaves to them. As we move towards the
bottom right side, I did use the length and tried to make them go shorter
and give it the perfect and out they're very randomly variable.
I feel the need. I'm just going to pop
out a few more leaves and branches so as to
get the perfect view. After this, we will be left to add in little off the street light effect and the violin
details at the bottom space. To complete this
perfect looking sky. I absolutely loved the white
clouds popping out in this, having in that soft background with the lighter tone
and the gray tones at places giving it the perfect shadow and
the bright details. Now using the black color, I'm going to add in
the street lights out. So when I'm adding O2, you're on the right side. As I always tell you, if you're not
confident about adding these poll details directly
with this last color, you can first add a small
pencil sketch or use a backup for adding the outline and then fill them with
the black color. To these, I'm going to begin
adding in little details on step-by-step to this poll out your I'm trying to given
the traffic light effects, hence I'm just adding in three simple blocks out you are to act as the traffic light. Now next onto the left side, I'm going to add in a street
light effect has been, this cheap light is going
to be a little dip. So I'm going to add it tilting
in towards the right side. The street light is
going to be towards the left of this
pole and this ball is going to be obtained as compared to the traffic
light pole that we added in. Now on the left side, I'm creating the hand in for this cheap light that we will
be adding it and creating in this space for
the lighters bend the light details we will be
adding in later on ahead. Now next I'm going to add in
one more detail out you're in-between both of these
polls that we added so far. So this one is again
going to be steep, but the smaller one to this one, I'm going to add
the light effect towards the right
side this time. You can see this time we are
adding in the light effect. It falls quite differently. Or taking the handles a little slant and a
little longer one as well. And do the bullets just
randomly going to add in the other details that I
added for the previous one. Then we are going
to be adding in some violence
moving across these falls into the sky space so far starting in
these bottom medius, then we'll shift into the
byline details has been. Now I feel these much details add enough because
I do not want to overdo the space out here and
cover the sky completely. I'm just going to pick
up my spoil town brush. I'm going to add in
little more bush detail at the bottom space using in this coil
brush to give it little more pleasant
view out there. You can see I have not added the detail with this point brush onto the entire space
in-between as lifted spaces without a naturally look as bad but little detail with this brush
you can see create such a different
effect and creates much more naturally effects then using a simple round
brush every time. So you can use a blend of
both the techniques to get the perfect blend and the
effect for your Bush space. And so easily you can fill
in the videos as Ben. Randomly you can see at pleases just using
this technique, I've increased the
height of the bush. Now next I'm just
going to shift to my round brush again and
using the black color, I'm just going to add
in little details to the traffic light pole and then leaving adding the light
details for those. So I forgot to add these
little details or the member, it's these little details that gives your painting much
more detailed look. So do not worry if you miss two, add them all at one go. In fact, it's always
better to keep adding them step-by-step so that you do not overdo add
any space because then it's very difficult to
go back to the previous step. Now next, using in the mix of this yellow and orange color, I'm going to add in the light to both of these cheap lights. I already have the yellow
and the orange color on my palette out to or
from the previous exercise. I'm just going to mix
both of these and quickly going to add in the first year
to the street lights out. Fill the center space very
carefully so that you do not activate the black
color around it. Otherwise, it will
get mixed up with the audience and the yellow mix and create a muddy
tune out there, which we do not want. Onto this, we will
still be adding in a bright light effect using
in the white color later on, once the first layer dries in, I've just picked up some
fresh yellow palette again, and I'm just going to add a little bright yellow
effect to the street lights. After this, we will add
in little effect on the street lights on the bottom
Bush effect area as well. And then at the
white lines and BDD with our painting
for D7 as well. So you can see quickly how I added the second layer
of the galaxy alone, making the Lightboard
more bright. I purposely did not go with
the white color light out here because it
would blend in with the Cloud and not
give that right. Now, using in the black fellow mixed in with the
orange, spell it out. I'm going to create
a muddy brown color by mixing in both of these and just going to give
him little effect onto the bush just underneath
these whitespaces. Make sure one thing
you do not have excess water may adapt your
brush onto the last issue, if you feel there
is excess pigment because we weren't
very simple Bush effect suggest on top of this just where the
light is falling. I'm giving him little of
the detail and light effect onto the bush underneath
both of these feet lights. You can see, again,
very simple detail, but it makes your painting go one more step closer
to the realistic view. Now before removing
the masking tape, Let's quickly pick up a technical pen and quickly
adding the violence. So for that I'm
using in the 0.1 pen and I'm going to add in a few of the details with the 0.3 pins. So first I'm adding the fine
lines using in this pin-pin. Now these guidelines are very last thing
that I'm adding in. You can go ahead and add them
a little defendant mind is perfectly okay and ASPE of composition that
you wish to add it. But I'm just going to
add him a blend of some thicker and
thinner lines to maintain the balance in my sky. I'm not going to add much of them at the top of the skies. It's going to be more of
them at the bottom space. Reason for that being that if
you notice the top video of this guy is majorly filled up with good enough
amount of clouds, but the bottom space behind the bushes is not filled
in with much cloud. So to get the focus
out there as well, I'm going to add in more of
these are violins effect at the bottom space and not
much at the top speed. You can see how quickly
I added in all the lines very roughly connecting to
defend false different places, different angles, giving
in the perfect view. Now I'm just going to add in little more detail randomly
wherever I see the knee. And then we will remove the
masking tape and we'll be ready with our class
project for D7 as well. Now let's remove the
masking tape finally. Again, the last class project was by far my most favorite. But after today's class project, this happens to be my most
favorite one because of the bright sky and
the clouds look so perfect and so
realistic in this one. And I even know if the silhouette
detail in this one out. Be very careful by removing the masking tape so that you
do not tear off the paper. It's very important otherwise your entire painting
may go for a toss. Your final painting for these seven of this ten-day
paint expressive sky. I hope you guys enjoyed
painting with me today. I will see you
guys tomorrow into the day each class project, we are just three more days away from closing this
ten-day challenge. Thank you so much to each one of you for joining me
into this class.
14. Day 8 - Sunset Field: Hello everyone, Welcome
to the eight of the ten day paint
expressive Skype class. Today we are going to
paint a simple middle kind of painting with a
beautiful sky and clouds. Let's begin preparing the
colors for the sky first. The first color that
I'm picking up is the shade off occlusion blue, which I will be mixing
with a lot of white to get it into a
little lighter tone. Along with that, I
will be using in pasted tones of pink and
orange for the Skype. This time also the sky we are going to be painting
in diagnosis. And I'm going to keep mixing
in the white color to the base Leo colors so as to get into pastel
colors to them. I'm just going to add
a little white to the blue color that we've
picked up out here. Along with that, I'm even
adding in a little tinge of the black color to
this as well so as to get it into a
little greenish tone. Today we are going to be
painting a very evening sky and then giving it a middle with little
details at the bottom, we won't be adding
florals in the middle. Rather we will be
going ahead with a very simple grass
field kind of a look. Let's begin adding
in the details. Now. I have my blue color ready. You can see it's a
grayish blue fallow or a steel blue color
that you can call that we have fun by mixing
in the Prussian blue, black, and the white color. Next, we will be needing an orange color to the
orange gallery as well. I'm going to be mixing
in the white color and a little pasted think
kind of a color for which I am using the
metallic red color from the Naval palette set to
go these colors as well. I will be mixing in whitewash, getting in the paste in
colors to both of them. So I will just add on the
right and keep it out here. And then we will begin painting once we have all the
sky colors ready. Now first let's begin with the blue column mix
that we haven't. Now I'm going to begin
diagonally from left to right. But at the top right side I'm going to leave a
little space white, because there I will be adding pink color as bell at
the topmost space. So you can see I'm
going diagonally with the blue color
that we have formed, leaving little space at this
top area right outside, wide step for the pink
color to be added there. Now mixing in the white with
the metallic red color, I've got a pastel pink color. And using the space,
that pink color, I'm going to be adding
it at the top of the blue color and
at the bottom of the blue color and blended well. When this blue and the modality that will begin bending
with each other, they will begin to form in a little bit of a popular
shade in-between. If you want, you can avoid that by adding in
white in-between, but I'm not going to add invite
in-between because I want that little violet color
automatically being formed to get that
perfect evening sky look. You can see how beautifully the pink and blue have blended. And even to the right of
the blue I've given in the pink stroke speaking in
and blending it all well. Now next I'm going to mix in the orange and the
white color and follow a pistol orange color and added below to the pink color
at the bottom space. Then also I won't be using invite for blending
because pink and orange going well together
and they're blending would also not be forming
in any muddy tones. So we can simply go ahead with blending of both
of these colors. Now the next color just below the orange colors
and I'm going to be adding in is going to be the yellow color to
the yellow color. I'm not going to add
in white because I have a bright yellow
color already. And that's perfect to
given the sunset view. If you want, you can add in
white to your yellow as well. If your yellow is too dark, just underneath the orange, adding in the yellow
and blending both of these well together as bell, you can see how step-by-step, you can easily go ahead
with blending one color. And even if the
previous near driving, you can still simply get
in the colors right. Now, we are still left to
add in the clouds onto this. If at any point you feel that
you're blending hasn't gone right or were unable to cover up the mistakes
of your sky. You still have the clouds
to cover up the mistakes. Now at the bottom,
more space I've just added in a little touch of
the orange color again, just below the yellow color. And I'm ready with a basically
offer the sky onto this. We will be beginning
to add in the clouds. Now. Now for the clouds, I'm adding invite to the
pink color that I use and creating in a photo lighter
tone of the pink color. Using this pretty BB
being sort of a color, I'm going to begin adding
in the clouds now. Basically we are
just going to be using in a smallest
size flat brush. Or if you do not
have flat brush, you'll be using round brush. I'm just using the tip of my smallest size
blender brush and just beginning dividing very
simple Cloud strokes closer to each other. Now again, make sure that
you do not add in a lot of pressure on your brush going
with very gentle strokes. Otherwise, the base
year colors will begin to get activated
and that will begin creating rough patches and make the colors blend and will not give you the
opaque Cloud loop. I'm going to roughly
add in clouds wherever I feel that I need to cover up little spaces or to give them little
lighter effects. Now I'm just going to
add one clouds out here. On the left side you can see how smoothly I'm
adding in the clouds, just using the tip and
adding in simple strokes. It's very simple to keep
adding in little details, just getting to know
the techniques. It's very important, I
will repeat again to control the pressure on your brush while
adding these layers. Otherwise the basically your
colors will get activated. Now next, I'm going to
pick up some orange color. I'm going to add in some bright orange cloud at
the bottom space of this guy. So I'm going to pick in
fresh orange color again. And you know, I didn't
false bolt skies. And then using a little of
the pasty loadings color, I will blend them with the
bottom layer and get them into a little lighter
or Cloud range as well. So now just using the
tip of the flat brush, I'm going to begin adding in simple strokes from left
and right side board, almost in the center of the sky spaces and begin
blending in the clouds. Now I'm going to mix
in little bite to the orange color out your and using a smallest size brush, I'm just going to pick
in a very light shade of the orange color that is
orange mixed with white. I'm going to begin adding in some little low-lying
clouds out. You're into the sky, just blending them with the darker orange sky
that I have added in. Further using this
lighter color mix, you can see I'm adding four the smaller clouds moving
towards the bottom side. So the bottom media, we're just going to have very small and
simple field it is. And you know, these profit low-lying
clouds will come from behind of those grass
details that we will be adding and
give a perfect loop. That is the reason I'm
adding in the Cloud still such bottom of
this guy space this time so as to give them the perfect begin loop from
behind those grass details. Now you are, you can
see I've tried to use a mix of both the darker and the lighter orange sheets to get into details into the clouds. I'm just going to add a
little of the orange clouds at the top space as
well on the pink color, so as to get a
perfect transition between the cloud
colors as well. Now using the black color, I will begin adding in
details for the field area. First using the black color, I'm just going to add a small patch out you're
using in my flat brush, one straight line to fill
in the bottom space. Now from this black space, I'm going to pop
out the grass and afield details that we are
going to add in The first, just adding in a black
space at the bottom, filling in the bottom
area for the fee. I'm just going to give
the top space or perfect filling so that I do not have
any rough ships coming in. Now onto this black space, I'm just going to give them little orange touch to
reflect on middle of the sky. Adf suggests using in
this pastel orange color, I'm going to add it
in the center of the black space and blended
with the black color of Lean, letting little orange
spaces be visible. As I told you, just knit and highlights that we added
in the center space. You can see with the light
orange mix that we have. Now under this, let us begin
adding in further details. So I'm going to shift into my round brush to
begin adding in the further details into the
middle at the bottom space. If I have picked up
my spoil round brush and I haven't dipped
my brush in water. I just picked up
black color and adapt the excess paint as
well onto the tissue. And now at the bottom, just about the black color
line that we filled. I'm just giving in the
photosphere of the grass detail. Now you can see how the
black color is looking more detail than what it was looking in a
street fill light. Now when you are
beginning to add in the grass detail on top of this, you can see this is beginning to look like a field area already. This entire line I've given in this detail using in
this point brush. Now we will begin adding in
little detail leaf details using in our smallest
sized round brush or a pointed tip round brush. Now I'm going to use in my pointed tip round
brush and begin adding in the detail leaves
on top of this piece. I'm going to try and VD
the height of the leaf and the different kind of leave details that we begin to add in. But far I didn't in
the leaf details, I'm going to use the
black color itself. Now just using in the pointed
tip brush and beginning to add in simple glass tubes
crisscross to each other. Coming out from
this black space, you will see the grass strokes are moving in different angles. Some of them a little street, some tilted towards the left and some tilted
towards the right. At places I'm even adding
in bunch of them together. We are going to be adding a lot more details
into this field space. This is just the beginning with little details of
simple grass troops. Completely from left to right. I'm going to add in this
kind of grass tool. Now again, you can see
I'm trying to vary the heights of these
grass troops somewhere. I've taken them a lot taller, almost in the center of the sky. In-between, I take them
shorter and then again taller, trying to really the height and make them look more natural. Now again, you can see I'm
taking in such bigger strokes, even bigger than the
previous strokes that we have taken so far. So it makes sure you do not add much of the biggest tools, just little of them, that you let the sky and the clouds halls
will be visible. And as I told you, you can see the audience
clouds from behind. These brushstrokes look so
beautiful and perfect and give the Buffett field a sunset kind of a view that we are
trying to paint out too. Now moving to the next
detail of the field to some of these bigger
strokes that I painted, I'm going to give
them little of the between kind of a detail, making them give details like the wheat grass just
at the top of them. I'm pulling up little the
strokes from both the sides, giving them look off
the wheat field. I'm going to do the same to
some of the bigger strokes. And some of the smallest
stroke says very quickly. Again, you always Bell, I'm just using in
the pointed tip of my brush for adding
in the details out your strokes
that I've added. I'm adding in this detail, this side what I'm
doing this from one of big old rusty deal, I'm pulling out four to five
of these smaller branches, giving him those are little
minute leaf details. You can see how such
a simple painting, and we are making it
look so much detail with just very simple details
of the field area. Even without adding
in any flowers. And the sky looks at
the perfect sunset sky that one would love to
witness on a field visit. Adding this detail
of glass may be a little tedious or
tiresome for some of you. So you can show me take
a break in-between and resume back again because since we are working
with gouache, it's quite easy to resume even if you're
painting is completely dried at any point and keep
adding the details later on. I'm just going to add
a little more details in the grass field. Now wherever I feel the need of adding in more of
the grass details, I'm just going to begin adding
them slowly one by one. Now if you want, you can give it a little highlight streets
using in the brown color as well to reflect the
sunset sky color effect onto this grass area as well. But I'm going to keep it simple black for now and just adding in little more detail slowly wherever I feel it is
important to add in, make sure you do not overdo
any one kind of detail, going very slowly, adding details little by
little at all spaces. You can always come back and add more details wherever
you feel the need to. Now you can see from these smaller class
strokes as Barry, I'm trying to pull up little
of the wheat grass detail. I'm just pulling little of them are a little
taller as well, so as to give him a perfect
transition from smaller to bigger and bigger to
smaller ones getting in the perfect balance
in our entire fields. 5th. Now in-between, I'm just going to
call up little of the simple grass strokes that
we began with again better, but I feel that is little gap or little of
the strokes are needed in between to balance the
field space very randomly. You can see I'm adding a
few of these drugs again. Again, this is very
important that you do not add one kind of
strokes altogether. You can see in the first year I had left enough gap species. Then we added the
wheat field space. And then again, as
we felt the need, we added the simple
strokes again. Now next using in
the white gouache, I'm going to add in a moon
at the top left side. So I'm going to add in a
glowing moon kind of a detail. So first using the white color, I'm going to create
a glowing space. And then once that
dries a little, I will add a moon just in the
center of a growing space. So for creating the
growing space first, I'm going to add in a
small patch of fight. Then using a damp brush, I'm going to blend this
white into the bottom layer, making it go a little dull
white kind of a batch. Suggest now using a damp brush, I'm going to run at the edges of this white color and begin blending it into the background. You can see how beautiful
this growing spaces looking for the mood. Now once this dries, I'm going to add
in the moon just in the center of
this whitespace. Using the whitewashing, not thick consistency without adding in much of the water. I'm just going to add in a small moon in the
center of this face. And you can see how bright
the moon is looking. Because if the background
blowing space that we added in, that is it for our easy, simple, Pretty Class Project for it, Let's remove the
masking tape and CF final painting with
those clean edges, make sure you remove the
masking tape at an angle from your paper so that you
do not tear off the edges. Removing the masking
tape after painting is the most satisfying part compared to the whole
painting. Put together. Your final painting
for the eight of these 10-day paint
expressive skies. I hope you guys enjoyed painting this beautiful field
detail with me today. You can change the color
combinations for the field, or we make a floral middle
kind of a detail and add the clouds in the different
techniques that we have learned for your own
experimentation purposes. Thank you so much once again to each one of you
for joining me. I will see you guys into the day nine class
project to model.
15. Day 9 - Evening Sky: Hello everyone. Welcome to D9. We are on the second last day of the attendee paint
expressive Skype class. Today we are going to paint a pretty blue and
violet sky with against simple leaf the
deals with the black color. I'm picking up the
pollution blue color and adding it to the mix that
we already have in your. And I'm going to use
this violet color. So this is the violet light
color from the palette. Say bye to this. I'm going to add
in little blue to make it go more towards
the violet side. As you can see, this is more towards the right side for now. To both of these, I'm
even going to add in the white gouache to get
in the pastel color look fast mixing in the
blue color and the white color out here from the previous
class projects, I already had little
off the blue color out, which are the little
tint of black has been. So if you want mixing
in separately, you can even add in a
little tent of the black to this color mix to get in a
steel blue kind of a color. Now using this color in
the perfect consistency, I'm going to begin adding this color from
the bottom space. So I'm using in our
half-inch flat brush out, you have to begin adding in
simple stroke of this color. I'm going to blend
this simple color out. You're onto the entire space. Almost two-thirds of the page. I have covered it up
with the blue color, as you can see at the top space. Now, I'm going to add in the
mix of the violet color. I'm going to mix in this
White and violet light color. And the BCR already
had little blue color. If you're busy or just not
having the blue color, you can also add in little bit separately as even I'm adding in separately to get
the violet column more towards the blue side. Now, In this color, I'm going to add it
at the top space of this guy wherein we have
in the whitespace lifting. And I'm going to fill this color completely and blend it with
the blue color as well. You can see the
two colors look so pretty together and
they look perfectly blended at the
center point or at the point actually where we've blended both
of them together. Now. And you feel that the blending or there
are some rough lines, you can simply just run a damp
brush from top to bottom, moving left to right completely. So I've just given in another
layer of the wash. Now on this we are going to be adding in a lot
of Cloud details. Very simple one. Let's wait for this to
settle in a bit and dry out. And then we will begin
adding in the clouds. Now for adding in the clouds, I've just mixed in a little more of the violet light
color to this mixture. And now we are going
to add in the clouds. This time we are going to
add in very simple clouds. In my smallest size, flat brush. And using the tip of the brush, I'm going to be adding in very simple rough lines
closer to each other, trying to form in
very rough clouds. You can see I'm
adding the clouds in quite different sizes as well
as quite different angles.
16. Day 10 - Pathway Sky & Thank You: Hello everyone, Welcome
back to the VR. On the last day of this ten-day paint
expressive skies and clouds. Today we are going to paint
a cityscape kind of abuse. So it's going to be more of a roadway view that we
are going to be painting. Let's begin with the
simple pencil sketch. So at the bottom of the paper, I'm going to mark out the pathway that we are
going to be adding. I'm adding in the past we
diagonally out, you're from the left bottom. I'm taking it towards the
right, Moving up diagonally. As you can see, the bottom area is going to be the pathways piece
and the top space is going to be the sky and the other details
that we will be adding in for the cityscape. If you want, you can
even use a scale to mark out this pencil
sketch so that you get that perfect
straight diagonal line at the bottom space for
marking out the pathway. Now at the bottom again, I'm going to make
it a little split. Again. I'm going to
split this path we as bird into two
spaces in the center, we will be adding little
highlight details. Now at the top of this as well, I'm just giving you a little
at the highlight space, this small line that
we've drawn in. And at top of this we're
going to have little of the bush detail or
little cityscape detail. I'm getting a rough marking
for this area as well. And rest of the top space is going to be the
complete skies piece. Now if you want
along this pathway, you can add in a
perfect cityscape with doing building detailing, simple Bush details
as I have added in. So let's begin preparing the
fellows for the sky first. So I'm going to be using in
this yellow light color, the orange color,
blue color mix. Exciting for us. Begin all
the three colors out on my Padlet and then begin mixing the colors to form
the different tones. For the orange
color I have picked up to their chief from
my neighbor palette, which is more towards
the audience site. For the blue color, I'm picking up this
lesion blue color, very little to this
ambling to be adding in the black and white
gouache to create a steel gray blue
kind of colors. Let's add a little
sense of the black and the white wash and mix up
this color for the sky space. I have all the
color mixes, daddy, now I'm going to pick up the yellow color to the
yellow and orange color. I haven't added in
anybody this time because I want to create
a kind of overview. First beginning with
the yellow color, just about the bush space. Now I'm going to try and
maintain the bushy area. If a literal goes inside,
It's perfectly okay. Now, next slide top
of the yellow color. I'm going to begin adding
in the orange color. I'm going to blend
both of these colors. At the top of the sky you can see and have the whitespace, meaning where we will be
adding in the blue color. So make sure you do not cover the entire space just with the yellow and the orange color. Now, I am using a damp
brush for blending in and making the blends between the yellow and
the audience mood. Now this time you can see I have moved from the orange
to the yellow, giving in the orange highlights
onto the yellow color. I forget the 4
fifth evening view of dawning into the night sky. Now I've just
picked up little at the white gouache
and I'm going to die you a little off the
bottom yellow color and create little lighter tone. Plus this will help me in
getting both the yellow and the orange color
easily with each other. Now at the topmost space, I'm going to apply the
steel gray kind of a color that we have formed by mixing in the patient blue, black and white board. You can see the
perfect gray kind of a color tone that
we have gotten. Now I'm applying this at the remaining space
offset of chi. Now I'm going to blend this with the orange color using a little
white gouache in-between. Or if you want, you can
directly blend it as better so as to get little
brown shade being formed, then blending it without
adding in the white. So you can see a little of the brown color being formed
because of this blending. Now to make the blending mode, I'm going to pick up
little white gouache. I'm going to blend all of
these together again using the white gouache at
the points where I feel my blending is in
going through that, the yellow, orange point
and at Orange tree point, both phases I've used
in lethal white and blended both the top
and the bottom says, after blending of all of these, we are still going to
add in for the clouds, make sure your paper is
taped down well enough and hold it carefully for that even your book does
not move in like this. Now let's begin adding in the
Cloud details into the sky. So for adding in the clouds, I'm going to use in the same red color that
we use for this guy. Shifted to my smallest
size blender brush. And using the tip of this brush, I'm going to begin adding
in simple Cloud details. So as we have been
adding clouds in the last class project
seem in a similar way. We're going to be
adding in clouds in this class project has been. So you can see I'm
just using the tip of my brush beginning to add
in the clouds quite slowly. At places for blending
of these clouds, you can even use in yellow and white gouache if you want to give in soft
edges anywhere. First time beginning to Eigen simple cloud effect
with this orange color. And then I will see if I
need to blend it anywhere. At the moment. If I feel like creating in lighter
tones at certain places, I'm running my brush
a little harder, so it's automatically blending
in with the base name. Make sure when you're
adding in these clouds, you are gentle on your
hands so that the color in the base New York is not good reactivated because we are
walking in with brush. You can see our entire
cloud effect for now is created using the same red
color that we used in the sky. Now I'm going to begin adding in further detail as this
looks incomplete. As for now, I'm going to
pick up the gray color. I'm going to begin
adding in little clouds and blending with
this along with the orange color at
certain places where the orange clouds are meeting
with this gray color. And that space is, I'm adding in this
gray color blending the Cloud with the
top layer of the sky, as you can see, running my brush in
little circular motion, giving it a little
more Cloud details. Now next, as I told you, I'm going to use all of the yellow color and begin blending in the orange clothes. So I'm going to pick
up the yellow color and losing in this yellow, I will begin blending it with the orange cloud effects
that we have given in. You can see simply in-between
the orange cluster, I'm adding in little of the yellow cloud and
blending them all together. Now, do these bottom clouds, you can see I'm giving
it the soft edge by blending it with the yellow
color into the background. So I'm trying to blend this orange color into
the background, giving it that soft cloud
look as you can see. Again, it's onto you. The mix of clouds that you
want to add in if you want to let them be bold enough or if you want to get them
little blended, I prefer going ahead with little soft loops and blending
these clouds a little. So you can see the shape of
the cloud is still visible, but still it is
blended having in the soft edge into the sky. Now next for the pathway, I'm just going to add
a little more black to this gray color mix that we have and get a darker gray color. I'm going to paint the pathway with this dark color first. Now you can see just
about the pathway, that ten line I haven't painted with this
dark tree color. And even though thin line
space below this pathway, I haven't added this color, but the bottom-most piece out, you're going to
fill this as well. So these two are the
pathway and in-between we have the dividers or
the edges of the road. As you can see, I won't do this role we as where we
are going to give him little highlight of
this tie colors to be a window using the yellow
and the orange yellow meets, I'm going to add little in
the center of the pathway and blend it and give the Gutai
effects onto the roadway. I'm mixing yellow and
orange color together. And now you can see in the center I have
added little color and blended it on the edges with the gray color
of the roadway. So you can see the effect of the sky that we are trying to show on the pathway that is
the light effect of the sky. Although these are
little details that will further given more details, beauty of painting in color
blending is not good enough. Or if you need to add
in little more detail, you can simply pick up the same gray color that we used him and
given little highlight. Now I have formed in
a darker color mix. That is by adding in
more of the black color. And I'm going to paint
the center divider of this pathway. Suggests by adding in the black, you can see we've got one bone dapper fellow and now
simply just adding it out, you're giving in
the divider disease in-between off this pathway
using in this darker color. Now with the same color, I'm even going to paint
the top side out. Make sure you do not use the black color
directly out here. Because the top space
of this status, the bush details we are going to be adding in with
the black color. So to keep the validity, it shouldn't make
sure you're using in this darker tone of three only and not the black color directly for filling
in these spaces. I'm almost done filling
in this piece as well. And you can see I'm
trying to be very careful and going in very
slowly so that I do not. And how the propulsion
after this, I'm going to shift into the
black color and going to fill in the rest of the
whitespace of the paper. You can see how beautiful
this guy is looking right now with those little
blended orange clouds and the blending of the
plots using the yellow and the gray color so
as to give them the little soft certain loop. Now I'm going to shift into a bigger size brush and pick up the black color in a foot
thick consistency and begin adding it at the whitespace
just below the sky for the bush and the city light DTLs that we will be adding later on. Make sure you do not add much of water to your black wash. Otherwise it will be
into access watercolors, which we do not want. At the bottom of this bush AD. And you can see I'm
running in very carefully. The perfect margin so
that I do not run into the road details because I'm
filling this space quickly, going slowly, fill in the details step-by-step
so that you do not ruin or mess up any of the other details that you
have already added in. Now using the same black color, I'm going to begin
adding in little off the grass and families
detail from top of this black color
places I'm just going to begin adding in simple palm
leaves and bumpy effect. I'm just going to go
with very simple. It is not going to add much
of the detail view out. You're just simple families closer to each other
trying to form an answer to the bark of the tree
is not visibility, just the leaves that
are visible because the rest of the space is
already covered with black. Now make sure about
one thing that you do. If your pathway is still wet, you do not rest
your hand on that. Otherwise, the fellows will get lifted from
there and it will get to win by any chance
that it's still wet, then wait for it to dry
completely and then begin adding in these
leafy spurge shifted to a size 0 brush so
that I can add much fine leaves instead of adding
them with the round brush. You can see how simply I'm
adding in the families. And just with that black color, it is giving him the perfect
cityscape view that we need. The perfect pathway view
that you can call it. Now just closer to this families that
I've added in-between, I'm just adding
simple Bush detail using the black color dabbing
in the tip of my brush, meeting very rough and loose
Bush details out there. Now Father left side detail. I'm going to shift into
my spoil round brush. I'm going to using the black color just
with this round brush. I'm going to begin adding in the bush details
on the left side. Now make sure if you're using
an ACE pointed round brush, you would not dip
the brush in water, otherwise you will not get
this dry brush. For detail. You can see how simply
you can add in details using one's pointed
round brush as well. If you want, you can add such detail across
the entire line. Or if you want, you can add in the family details as well
completely on the entire line. I'm just going to tend to my paper and across the pathway, the divider details
that we added in not clearly
visible on my paper. This way we're given one
more layer of the detail, dark gray color, that they
are visible, perfect leaps. So that's the benefit of having a paper tape down on
a movable surface. You can simply just tell
your paper while adding in the details to suit and
adjust as per your hand. Now shifting, it was
quite round brush again, I'm just going to add a
little more bush detail on the left side and take it a little towards the
top of this type. You can first have
a look how I'm adding it and then
add according to your placement or your of
creation that you have created. And if you have followed
only the palm leaves, then you can add in some
families dropping out from the left side is the
lifted left corner only. Or if you've gone ahead with
the Bush didn't like me, then you can simply add little taller book details
like this as well. Let's begin adding in the
street light details for that, I've picked up the orange color. So as to get it a highlighted
view on the black color. On the black color part
of the bush space, though all steep light pole will be with the orange color. And in the spice piece, I even add the connecting
phone with the black color. You can see how the
audience palette swapping out on the black color. So that's the best thing
about gouache that even the lighter colors stand
out on the darker tones. Now out from your, I'm going to connect it with
the black follow-up because in the sky the orange
color will not be visible. So that is how you have to go ahead with defend, you know, follows so as to make them look for FAPE and given
the highlight is better. So the reason of adding the fall with the orange follow is so as to give the effect of this guy colors on
the fall as bell. Now in the same
way, I'm going to add improves smaller poles out. You're on the center
divider liners that and adding with
the black color directly the light
effect we will be giving in-between
the black Bush space, which will make this
look as the street life. Then. For now you may seem all that just a simple
black line in-between, but when we add the details, it will give you
the perfect mute that we are trying to create it. Now again, at the top side
using in the orange color, I'm adding in three more poles. Now it may seem to
you that this ball is connected to the bottom
Blackpool that we added PVC, but note they are not connected, they are separated
from each other. At the bottom board, we will be adding
different light is. Now when we will begin
adding in the light effect, all of these will
stand out separately. Now to these, I'm
just swapping out the handle for adding
in the light details. So you can see whenever
it is in the sky space, you have to use the black color. When it isn't in space, you have to use the highlight
color that is going to be the sky color that is in
this case the orange color. That will be easier for you to understand where you
need to use which color while joining the
pools or adding in the hand effect for the
street lights as well. Now let's begin adding in the light details and
temperate all of these. First using in the orange
color I'm creating in the background light effect
to these bottom two poles. You can see now that
these are separated and they were not in one
straight line at all. Now on top of this, I'm just going to add
in little white color and blend it well
and lighten this up, then we will be adding in the final light effect once this background light
effect grazing. Now using the white color, Let's begin adding in the
light effects through these tough Leo street
lights as well. This very simply,
I'm going to add in the light now to
one of the pole. That's the code poll. I'm going to add in four to five light effect
times a shortcoming barred from this same
street light area out here. Then we are going to
even be adding few of the Lights peeking out
from the bush space that our tours a small steep nights across the bottom
of his teeth that we have in the
full light kind of DBS using in the
white quash itself. I'm going to add in
those details as well. The bottom disk adding in four to five of
the white circle. Now I'm going to
force blend all of these white patches as well and we add them as a
blurry background. Then once this dries, I will add the light he did so automatically
you will have little glowing light effect in the background of this as well. So using a damp brush
now I'm just going to blend all of these
lights into the background. Those dries, I'm going to pick
up the orange color again. I'm going to add
the light effects at the bottom falls out there. We already added
in the patch all you're going to add too wide, too orange dots in the center of the circles that we did
at the bottom space. Now these night DBAs out your I'm adding in using in
the yellow gouache. Consistency makes sure you add this software only in the
center of the white patch. And make sure that your
yellow gouache isn't a good thick consistency so that it stands out right and OB, creating it, that light
effect out there. To the top folders
when you can see I'm adding in little
of the yellow effect, but very little
letting the white, It's please be visible more because if you add
lots of yellow, it will get mixed with the
sky and not sand out, right? So make sure you add more of white light at the
top space out there. Now, before removing
the masking tape, I'm just going to add in little more detail using
in the black point. It depends so as to give little of the divider details
onto the road. Now if you want, you can
add these details using in a fine liner brush and
the black color as well. But adding them
with a black pen is quite easier at the
top area as well, just giving a little
black details on the dark blue color line
that we have added it. That is it. We are ready with our last class project
for this class. As you can see, how pretty the sky looks with those lovely sunset colors
giving in the night sky. So let's remove
the masking tape, make sure your edges
are completely dry them before you begin to
remove the masking tape. It is a final
painting for the ten of these trendy paint
expresses sky and clouds. I hope you guys enjoyed painting this final class
project with me today. I will see you guys very
soon in my next class. Till then, thank
you so much to eat. Let us know for joining
me into this class.
 Umashree Taparia, Artist, Art Instructor, Entrepreneur