Transcripts
1. Hello and Welcome Back: Have you always wanted to paint with gouache onto a black paper and see how it turns out to be. Then how about learning to paint this beautiful rules middle by the garden view onto a black paper with quash. I am an artist and an art educator from India. You can find me on Instagram under the handle, creating from the heart. Today we will be painting this beautiful meadow look by the garden wall with quash medium. And in case if you do not have course, you can pin this along with us with the help of acrylics, all poster Kahlo's. This painting and look too complicated. But trust me, it's quite easy to pin this composition. I will be guiding you through all the elements that you will be needing to paint this painting. And I will show you them in DD and how to pin them to make the painting process quite easier together. I will also be discussing all the materials that you need for painting this, all the alternatives that you can use, even including the color sheets. And then we will begin painting this painting step-by-step together. So without further ado, let's begin this beautiful meadow look together. And I would love to see you all join me and pin this along with me and have fun exploring the medium. Gosh. I hope to see you join me into the next lesson.
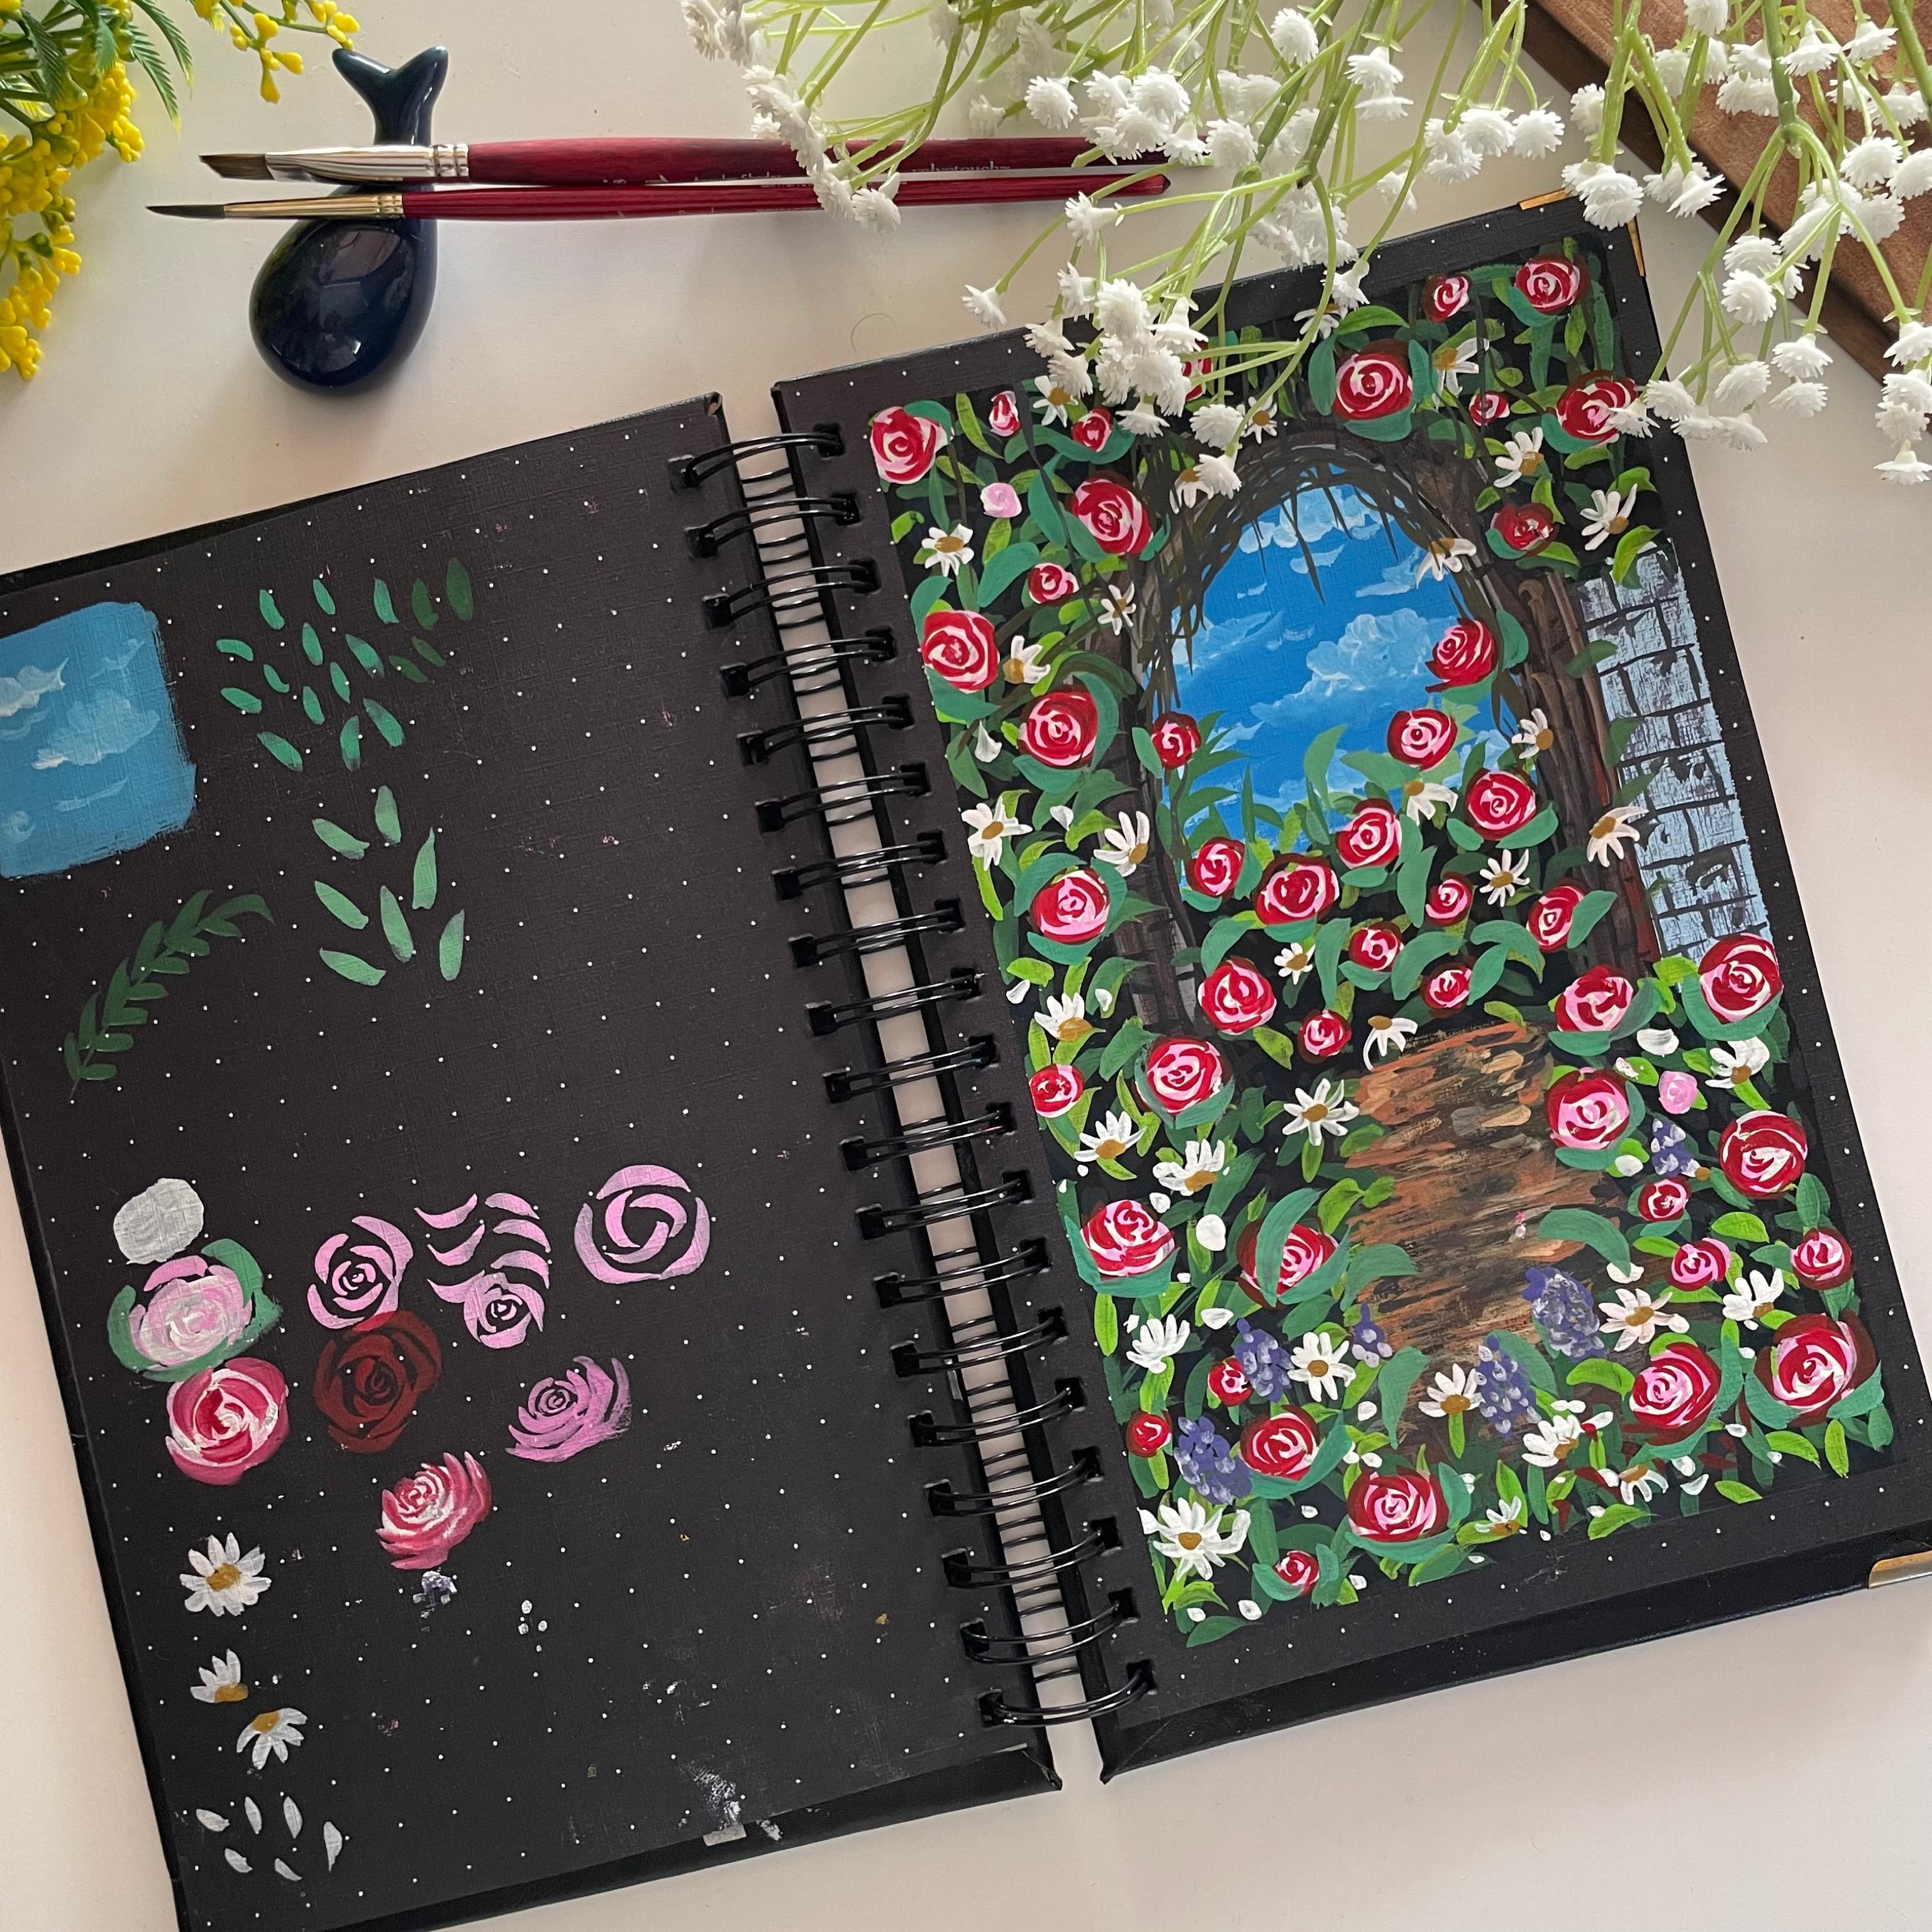
2. Materials Required: So let's have a look at the materials that you will be needing for painting these rules middle, by the way, firstly, you will be needing a set of quash colors. I will be using the set of 34 sheets from the brand Magellan Mission. Don't worry, I will not be using all the colors. I will guide you through the colors that you will be needing. Next, you will be needing a few brushes. I will be using these three brushes. That is the angular brush, the round brush, and a rigger brush. So these are the only three brushes that I will be using for painting this entire painting. In case if you do not have an angular brush, you can just use a simple flat brush. Next, I will be needing a jar of clean water. Apart from this, I will be needing the black and white goulash, which is not there in my SEC hands. I'm using them separately. Next, you will be needing masking tape to tape down your paper. You will be needing the rough clot or some tissues for dabbing your brush. For the dry brush, you will need a pallet to mix down your colors. I will be using this clear acrylic sheet has my palette. And now lastly, you will be needing a Black people ordered black sketchbook to paying this composition. If you do not have a black paper or a blank sketchbook, you can do so on a white sketch book also. So this is a sketchbook that I will be using. I have painted the cover myself. This sketchbook is a dot grid sketch book, so this has some dotted lines. So I will be using this sketch book. It is a little bit God and the E5. So these are all the materials that you need for this painting. Go grab them and join me in the next lesson.
3. Understanding the Components of the Painting : So let's have a look at some of the basic techniques that will be helpful for you to pin this pin thing easily. So the first thing is painting the sky for the sky IDB using the city in blue color mixed with a lot of fight quash. And I will use this color off sky blue, which is formed after mixing the two colors as the Beasley offer this guy. So this is how I will be adding the base layer. Now onto this layer, while it is still a little wet, I will begin adding the clouds with the white quash. So I didn't using the white quash today without waiting for the LEO to dry in. So using my round brush size three, I will add the clouds, very simple clouds into the sky area. So I'm just moving my brush in circular motions to add these clouds and some veggies, smaller clouds using the half C strokes and very small shapes. So that is about the sky, how we will be adding. The next thing that we will be needing to add is a lot of leaves into the middle AD as you can see. So for the leaves, you can see, I'm just dabbing the tip of my brush. So basically I'm just dabbing and the belly of my brush to get these leaf shapes automatically. Know since my brush has a pointed tip, so at the top area, I am able to achieve that pointed leaf look. So I would recommend to use a brush which has appointed deck. Next, we will even be adding some leaves, branches like this. So you take out a stem or a branch and then add the leaves like this to the entire stem and meet some branches very randomly. Though they may not be clearly visible anywhere in the, but we will be adding some of them varied randomly because if you will have a close view, you will understand. Then next we will even be adding some bigger leaves like this. So for adding these leaves, you place the tip of your brush, then press the belly and lift it up after you are satisfied with the length of the leaves. So these are the different leaves that we will be using into a painting for today. And we will be adding these leaves, but different shades of green color. The next thing is how we will be adding the roses. So for the roses, v will be 0 adding the rules in teleost. So the first layer is going to be of the white quash, simply like this, adding the base shape. I'm just increasing shapes to show you the tree Laos separately so that you can understand. So the first layer is going to be of the whitewash. Then on to the second layer, we will be adding all the petals without pay. So pink color. So I will mix it my pink color with a lot of fight and get a pasted pink tone and begin adding the detailed leaf. Look to this white quash Leo that we added. So let me show it to us separately, how we will be adding these details lease. So it's basically the half C strokes arrange into a spider look like this. So you can see in the center I have a very small leaves. Then as we are moving outwards, I am adding this half C stroke shapes like this. So you can see the detail shapes, how it is looking in both the direction. I'm trying to show it to you. So it's an unlit Calvi mannose so you need to move your brush analytics ocular manner. And the Santo ADR is going to be the smaller of, you know, Covey's strokes. Then around that you need adding these half C strokes. So when you move from the first layer to the second level, so the second Neo petals are between the false two petals of the first layer. So it's basically that you begin from the center of all. You pick up any one pattern. You begin from the center of that like this, and move to the center of the next one, then you are painting the next layer like this. So I hope you are able to understand how you will be adding the rose petals. Now, in the third layer, we will be having the pink callow already there. And after that, we will pick up the shade of rules colors. So you can pick up either carmine or Scarlett or any pink tone that as data in your palette. And we will be adding the same way how we added the pink layer. We will be adding the layer with the darker tone to give depth to our rules. So for that, we'll have to wait for our rules to dry. They'll then we will be adding some daisies. So the two types of disease that we will be adding, this one is this complete DZ look. The second one is the petals popping towards the top. And the third one is the petals popping towards the bottom area. And someday we will be just adding a few petals like this, the CMV, how we added the leaves to depict the flowers blooming stage. Then undo that buds off these disease. We will be adding the yellow ocher. So after all the rules has been a drive even, even be adding some leaves surrounding do these roses to show as if the leaves are attached to the roses. So like this surrounding the roses, we will just be adding a few leaves at the end of the day. So now let me show you the third layer of the roses that we will be adding. So I have picked up the rule sheet and using the same half sea's tools in the CMB, I will add this legal, but it may just be in such a way that it's neither overlapping the pink completely, not all overlapping the right completely. So it's going to be in-between both of them, such that my rose has the t columns visible, that is the white, pink, and the red color that we are adding right now. And the reason for adding the 4s two layers is because if you see, if I add the rows directly with this pink color, it's not popping out rightly. So to add them right, look to the roses. We add the forced to leave us so that it has a light beam and then the darker color pops out. Now, these were the roses with the overview look. I will show you one of the Roses with the side view. So for that also the false Neo will be with the white gouache. The second Neil will be the dark pink color in the CMV, how we painted before. Then for the third layer that we will be adding, I will show you directly. So for the third layer, the same idea we will be adding at the top instead of adding it in the center. And then bigger petals will be at the bottom area. So you can see this has a side view. So the central idea of the overview rules moves to the top and the big O patterns that we add move towards the bottom. And as you move towards the bottom, the breadth and the size of the petals also keep increasing. Simon showing you how IMC, so forth. You add this small area at the top and downwards. You keep adding these patterns and normal big patterns onto the top of that small AD on the door. So like this, you keep adding doll big operators as you move downwards. So these are all the basics that you need to know before painting this composition. The rest of the things are quite easy and can be done when the painting alone. So now let's begin painting the composition together into the next lesson without any further delay.
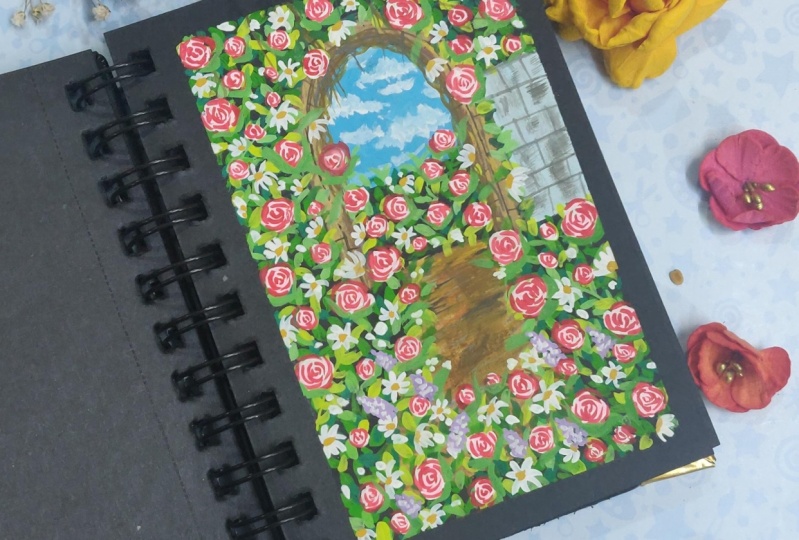
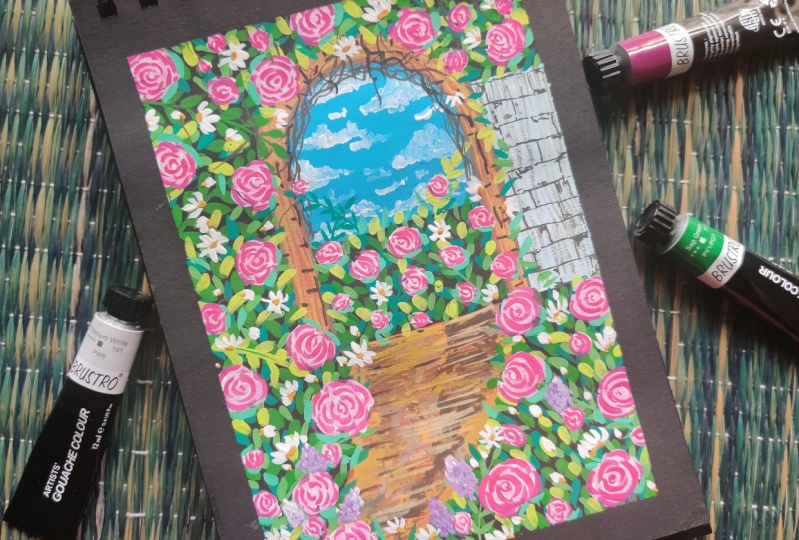
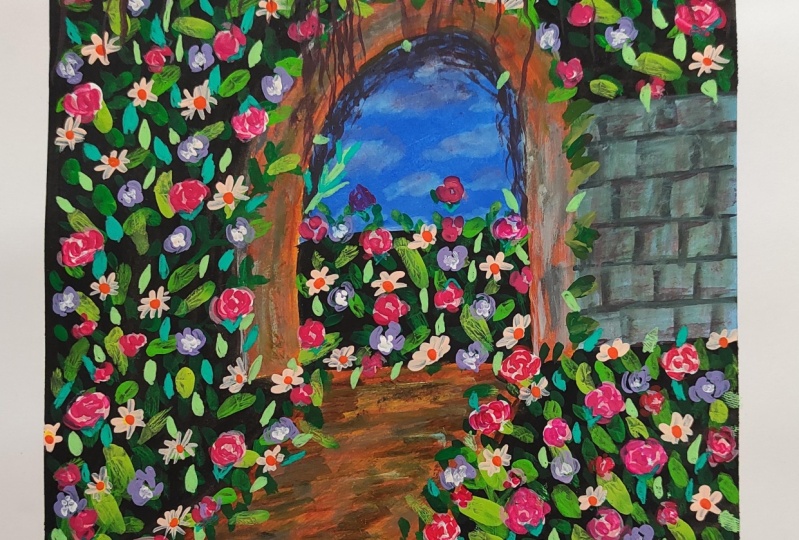
4. Rose Meadow-Part 1- Taping the Paper and Pencil Sketch: So let's begin with the painting. So the first step, we'll begin masking, don't are people onto all the four edges. So I'm using this half-inch masking tape and using this tape, I will keep it on my paper onto all the four edges masking. Now, I'll just have a very rough pencil sketch of the painting that we are going to be. So I'll be using my right Mark fencing for me. Cloud depends on sketch on the black people. In case if you do not have a white pencil, you can just use your normal pencil, even that will still be visible. So first, I'll mountain or Utah or EDR. From there, we'll be showing the entry to the garden ideas or look. So this is the mean broad area that we are trying to depict here. And now at the bottom, this ADI is going to be the mud area and add the edge you're on the right side. I will be having a wall. Now your eye will again distinguish a little. So the bottom media will be, the idea will be the sky area and the bottom here again, there'll be part of the field area. Now around this spins, I will just be adding up another Bordeaux marking out some wooden structure. So approximately one centimeter area that I haven't tried to depict as a good idea there when VP8. So that does it for our pencil sketch. Now we'll begin painting into the next lesson.
5. Part 2- Color Blocking and Sky: So now let's begin painting. I will first begin by painting the sky area. So for the sky area, I will be using the shade of civilian blue mixed with a lot of byte. So just to think of the city in blue color, and next I will just pick up some white quash. So by this set of 34 sheets does not have a whitewash. So I'm using the separate white tube that I have. Now. I'm mixing in a lot of white quash to my blue color that I have. And I'll try to make it look like a sky blue color because this adenine blue-collar in itself is a too dark for the sky. So just adding invite wash, enlightening it to a sky blue color look. Now with this shade of blue, I will just fill it into the sky area completely. So I'm using my angular brush. So, you know, it will help me in getting the perfect smaller area finished that I want. One was done filling the sky blue color. I've got a clean blend or throughout. Now, next what I will do is I will pick up my round brush, that aside three round brush which has a pointed tip. And I will use my white gouache to add clouds in the sky. I know my sky is not where our dried completely and I don't even want it to dry. So I need it in a little wet dough consistency. So I'm just moving my brush in circular motions and trying to get that cloud shape for the white color. So now since my base layer was bad, so you can see when it's blending your, it's automatically beginning to turn into a little sky blue shade. So in the same way, I will just keep adding some clouds into the sky, leaving gaps and some that are even, even be adding very small low clouds to depict or you know, some very tiny clouds into the sky. So you can see very randomly just using the tip, I'm just dropping a little bit of that Hofstede's troops at pieces to get that little cloud shapes. Now just a little more smaller clouds you are at the bottom and all blended into the sky so well. So one or two clouds are bright enough and the ADOS look perfectly blended into a sky blue color with the sky even. Now next I will give the force BC. Oh, that is the color blocking for the little wall that I have on the right side. So for that I will just be using my white gouache and it has a little tinge of the blue color. That's perfectly okay, but its major leave more of the white quash. I'm using this, I will just apply the first layer of the volume drawn. We will be giving dry brush and the brick detail to the wall. So that is it for this one area also will have to read for this to dry. And then given the details, now till then, I even give the color blocking for the rest of the area. So the area underneath the sky, I will given the color blocking with the black color forced. Because there then we will be adding the leaves and the rules flowers there. So for the first thing, I'll just pick up some black wash. So even the black color is not there in my set. So I'm using this from the brand name of a pilot. And I will just add a layer of this black gouache very simply your at the bottom. Now, again, you know you're meeting since we're using a black people already, let's avoid adding the base layer of two black. If you want, you can show only do that. But since my oh, people has those grid lines, I don't want those grid lines to be visible. And plus adding this black layer, we'll add in a level of more depth because of the shine that the color will have. So now next we will do the color blocking or for dog park area, that is the signed area and the area that is trying to show the entry to the Florida middle. So then I will be using this shade of bonds sienna, and I will simply just lay down on to the entire NP area border that we have and onto the sand area. So I'm just extending that a little bit of the sand area to the right and not going as per the pencil marking. Later on all your, when we add in the leaves and the flowers, all of this will automatically begin to take shape. So that's perfectly okay right now, if even you are not following this same shape, although you will still be able to achieve a pretty looking Rosemead or kind of a look. Now with the same one sienna color. I will do the color blocking on to dawn or NGT, that is the one centimeter border that we have left. So using the same shade and noted consistency, just give this Leo. Later on we will be adding details to the sand EDI and do this wooden area also. So right now we're just doing the palate blocking. That is, after adding the details, the background should not look plain or just a black color. Or in case if you're using a white sheet, it should not just look white. So this is called fallow blocking method. Type is you blocked the base Leo's with some color. So you know, anywhere where you do not have the details this be CEO Carlos will be visible. Now the last color blocking is on. Do the rest of the remaining area, just pick up your black color and do the color blocking. So everywhere you're at the bottom right corner, at the bottom left corner, and onto the top area around the sky. Everywhere I will be giving in this layer of the black color. Later on onto all of these areas, we will be adding leaves with different tonal values of greens and then paint the roses and the daisy flowers. That is how our rules meadow entrance is going to look like. So you can see very simply, I'm just adding in the black color and nothing in detail and I'm not even worried about the blending your, um, even if a Ledoux gap is left, it's perfectly okay. It will all get covered up. It's just a very Beasley or blocking that we are doing right now. Only the sky we have painted completely. But just be a little careful that you do not run into that wooden area of the top side entrance at we are trying to depict. So now let's meet for all of this to dry and then begin painting the details on to these.
6. Part 3- Painting the Mud Pathway: So my color blocking is completely dry. And now I'll begin adding the details onto the sand area first. So I have some yellow ocher and the raw sienna color onto my palette. So first I have picked up a little bit of Tom, oh, yellow ocher color. And I'm just adding little details vary randomly on to the 0 sand area. Don't worry how you are adding all of these, because once you keep adding all of them, it will all begin to look nitrogen. And in case if you know, you begin to feel that you've gone wrong somewhere, you can just simply add in the raw sienna, oh sorry, the bone sienna color again and again, do the color blocking and add this layer. Now, just mixed in a little bit of white to my burnt amber color. And I'm just adding a little bit of this lighter tone. Now next to my this very light blue column mix which I used for the wall, I just added in a tinge of black color to get a little grayish looking tone. So in case if you do not have this tone that you can just mix it, pinch off your blue, black and white color to get a grayish tone and just add some great details. You're onto the sand area. Again, see nothing in specific. I'm adding these details to depict damage to the ground. Now next time picking up the bond that is a darker brown tone. So you can pick up any dog bone which is data into your palette. And using the dark brown tone either to begin adding some highlights into the sand area again. So medially onto the edges you are, I'm adding those little drivers kind of a structure with this OH, bond amber color. The edges of the assigned area. I haven't painted much. I will still add the yellow cartoon there because most of it is going to get covered with the roses and leaves later on. Now to the remaining burnt umber on my palette, I'm just adding in white and using this so very unit-based tilde tone of brown color and adding some highlights. So now this time we even onto the edges, I will take this color. Now next to this mix of 3, I will add in a little more white to make it a little lighter gray tone. And using that light agreed to own, I will add the detail or to that window Verdun log area where I wish to make it look like a wooden table. Now using this very lighter tone of gray, I'll just add a little detail onto the mud EDI, you're onto the right side. And now with this green, I will add, adding details to this wooden area here. So just giving the borders to the brown area that we've been dead. Now, even onto the outer border, very randomly, you can see I'm adding this line. You can see I'm breaking this line in between. I'm adding it in a little curvy strokes. So all that will add the natural look to the word. Now I'm using the yellow ocher color and I'm just adding some dry brush in the center area here. That is, you know, that little window that I'm trying to show into the field area from where the sky is visible. So this is kind of a ruse middle wherein this is the wall EDI actually. And from there, you know, you have that little who holds in-between from vein, the other part of this pie is visible. So that is a kind of a scene that I'm trying to paint here. Now to this. So ADR around the sky, I added the dry brush with the yellow ocher shade. Now, I'm using the yellow ocher mix with random colors that is onto my palette. And I'm just adding some dry brush with all of these colors on to the rest of the muddy area. Now, after this, I will even be adding the dry brush details to that little wall area on the right side. So I'll first pick up the green color that I have on my palette. And using this gray tone, I will add the dry brush. So you can notice every time that I am picking my beans to add the dry brush, I am dabbing my brush forced onto the draft clot at the site so that ONE, I don't have excess paint on my brush and that spreads and give me patch low. Now next I will pick up a tinge of purple color. You can pick up any violet tone or a pople stone that is in your palette. And I'll mix it to this gray color. And I'll use this color to add the dry brush you're on to the wall area. That is it onto my wall area. But from a signed area, I'm still not a little satisfied. So I'll just mix a little bit of yellow or white to my yellow ocher mix here. And I even use this lighter tone and add little lighter tone. You're in the center of the sand area. Now, in the next lesson, we will begin painting the alleles of the leaves onto the black areas.
7. Part 4- First Two Layer of Leaves: Now let's pick up the shades of green onto a palette. So the first shade of green that I'm picking up is the sap green color. You can pick up the normal sap green color which is available in your palette. Or you could pick up a darker green, don't, maybe if you do not have a sap green. The next tone that I'm picking up is the yellowish green. In case if you do not have a yellowish gene, you can just mix in a little bit of yellow to your sap green to get the yellowish green. The next shade is this shade of bamboo green. Now, in case if you do not have the bamboo green color, you can pick up either the emerald green or the VD didn't green color. So these are the three greens that I have picked out onto my palette. Now, I'll begin painting the leaves first with the sap green color, suggested using the sap green color directly for the first layer. And I'm just dabbing my brush as I have shown you into the technique section and adding the leaf Leo, leaving gaps in-between and onto the entire black area all throughout the beach. I even asked the CEO of leaves first. So this may seem, or tedious task may be to add so many leaves by just dabbing, but at the same time, it's quite Kirkpatrick to keep adding these leafy patterns by just dabbing your brush. Now you're at the bottom. I'm just adding a little bit more of the black color to cover the sand area or LinkedIn. And onto that also, I will be adding in the leaves just as I was adding onto the right side. So keep adding these fees on the entire black area now. And even, you know, some leaves overlapping onto the Sandia and popping out onto the sand. So you can see my knees are moving in all direction that this Sunbelt, they're tilting towards the right, somewhere towards the left. Some videos. I have just speed up this video a little because you know, adding these EFS takes a little time. So you can either pause the video and add all the leaves and then continue, or you could just paint along like this quickly along with me. Now you are onto the left side. I will just be adding into branches filled with leaves. I know they will still get covered at places. Oh, when I begin to overlap the leaves because this is just a fourth layer of leaves. And after this, we will still be adding the leaves with different tonal values of green and different shades of green. So hence, I'm not worried right now how these leaves are going band. They're going just leaving gaps, fill this area completely. And I am using my size three brush which has a pointed tip pens. I'm able to achieve these leaf-shaped more. Now onto the wooden area near the windows, I will just add some big detail with the black color. So using the same round brush, I have just picked up some black color. And again, I'm adding some very rough lines and then some sleeping lines in between to depict the as the brick details Your onto the wood area. So you know, and so kind of a wooden log of brick detail that I want to add you. Cmv, even onto the left side, just added those two to three black curvy lines. And randomly I'm adding all these black lines are also not, you know, matching in the same areas. Now, even under the mud EDI just giving a little touch of the black color. Now, oh, I forgot to add the green leaves. You're in the center area near to the window. So on. Do this also using the sap green color, I even add the fourth layer of the leaves and some where I will just add a little branches popping out into the sky and a few leaves also popping into the sky. And in the remaining area, just simply keep adding the green leaves. Now, after this, I will begin with a second layer of leaves, that is with the bamboo green color and the same V, how I did the first layer of leaves. I will add this again, DO using this bamboo green color. You can use a VD and green or an emerald green. And now just adding these, so this time the leaves are going to be less as compared to the previous Neo. But, uh, you know, David, some may be overlapping the first one somewhere onto the black ones. So just simply keep adding overlapping all of these and onto the entire surface like this better when we painted the first layer of leaves, we will keep adding the Leo's with this bamboo green color. So in-between places you can even add the branches of leaves. And Your Honor could top area you can see I'm adding some of the leaves overlapping onto Dom 0 wooden window look there and some even on to the mall area, look onto the right side. Now you're in the centroids. We're just adding the leaves with the bamboo green color. Now let's wait for these folds to Leo's to dry. And then we'll add the third layer.
8. Part 5- Adding the Further Layers of Leaves: So now my first two layers of the leaves are completely dried and I'll begin with the third layer of leaves. So for the third layer, I'm mixing in a little bit of sap green to my white quash, and I'll get a little sort of a light pink color. Now the same V as we have been adding the force to Leo's, I will be adding the layer of leaves with this shade of a light beam tune. In case if you have this bright green don't already into your palette, you can directly use the bright green color instead of mixing the sap green with the white quash. Now in-between you can see I'm adding some bigger leaves and some web branches of the leaves. Also, I have again speeding up this EDI into Lake, a little speeded process so that you do not have too much, spend much time seeing the same thing again. So it just simple adding the leaves onto the entire area with this lighter tone. So it's in such a way that the bottom leaves us to exhibit. So don't cover out all the bottom layer of leaves. Now this layer of leaves that we are adding is comparatively less as compared to the first two layers because, uh, you know, the force to Laos were much in the quantity y is as adding the leaves. Now we are adding fewer leaves. After this, we will be using the yellowish green tone that we saw earlier. And that will, that tone we will be adding even more fewer leaves. So with the FE Leon, we'll keep on reducing the number of leaves so that the bottom layers are also visible and not get covered up with the next layer that we are adding. So I'm done adding the leaves with this bright green tone. Now till this layer is drying, I'll add the detail to this volume. So I'll just pick up a shade of gray color, not too light, not too dark. And I will just add some detail to the wall so fast I'll add someone is under nine and then some vertical lines trying to depict some bricks with which this wall is made up. So you can see how I'm adding these vertical lines between the top two vertical lines to get that big detail. Now, I'll just add a little touch of this gray color urine there onto the break. And we're done with this wall area. You're now next time we'll pick up the yellowish green color that is your onto my palette. In case if you do not have this yellowish-green color, you can just mix in your yellow but your sap green, that is a little more of yellow and get this yellowish-green color. And now with this yellowish green color, I will begin adding more layers of these leaves. So now when I'm adding this again, it will be very less compared to the first three layers. And you can see just by coming onto the fourth layer, we have got so much depth into the painting. And even if you leave this painting, you're with just the Neves. It will look such a beautiful meadow without the roses also. So adding this bright color dodge is adding so much more brightness to your painting automatically. And with the black paper, it's turning out to be more beautiful. Just as CMV, I'm adding the layer of leaves onto the entire area of the, of all that I'm trying to show. And the most important thing, I'm just adding a mix of four units on their branches and some leaves overlapping onto the wooden area that I've depicted and even onto the right wall that I have. So even your indice enter ADI, I'm adding the leaves with this yellowish-green color. Now, I'll just add a few leaves popping into the sky area here. So I'm using this basal being done that is the sap green mixed with white. And just adding a few leaves are moving into the sky area. I'll just type it into sap green more because they feel it's a little too light. And just add a few more leaves. You are moving into my sky. Now with this base pseudogene, I will just add a little more of the leaves you're ready randomly, very limited or very less by just randomly adding this new node at the top to depict more depth of my leaves and doodle vol. Is it with the leaves on the wall area? Now, I'll just mix a little danger of black to this rhombus which is already onto my palette and get burnt umber kind of a tone. You can directly use any darker brown tone that is available in your palette. And using this tool, I will just add some branches falling into the sky area from that window look. So just some more curvy strokes to depict as those twigs and branches which are growing near to the wooded area and popping out from the of all middle area looked at I'm trying to depict here. So you can see I'm just adding some very curvy lines into wind with each other to depict the twig look and the branch look, twisted branch look. So that is inside the area that I added. Now with the same color. I'm just adding this little tone you're into the Medea also to depict more detail to this muddy ED onto the right side. Now I'll just add a few of the branches popping out from the leaf area. So just simple, you know, curvy lines again to just pop out from the field ADR to this guy. So your from the top you can see it's just reaching to the sky. And very naturally you can just add a few of them roughly urine there. Now let's meet from all of this to dry and then begin adding our flowers.
9. Part 6- Painting the Base Layer for the Roses: So now all of the leaves are complete E-Trade and I have some white quash out onto my palette. And I'm using this white quash. I lead on the force background Leo for the roses. So just oh, I'll be dropping some patchy areas with white color to paint roses onto this once this is dry. Now in case if you will detect keeping the roses or you know, without adding this white patch, they won't stand out dot print out onto this because of the green Leo's. And the colors won't pop out that when, hence I'm adding in these forced or widow bite kwashiorkor. So random VM just dropping some graph edge shaped, oval shape and some brown shapes and onto the entire field the area leaving gaps. Just add o dispatch better way you wish to add the roses. Now in case if you want to ask are just fewer roses, you can just add little patches. And in case if you wish to add Moses, you can add more of these patches. But you can see I'm adding them quite distinct from each other. Also, all fours to add them in one size almost. Then I will be adding some smaller patches need to run. And then just a few petals here and there. So didn't the top your, I'm adding all the layers of the white patches for now. I'll just quickly pick out some more white wash and then I will add some smaller patches to depict some smaller roses which are just in their blooming stage. I have just bloomed by, suggest some smaller budgets compared to the PV signs that I have added. Now after this Eigen be adding these white patches in the same way in the sky. So quick, just to add a few more smaller batches, your badges underneath the sky. So now let's add these batches underneath this guy in this video until you can see I have added the badges in different sizes. Now the last thing left to do is just adding some very small patches urine day to depict some of the Roses which are distinct from our view, or maybe just in their initial stage kind of looming, suggest some dab, dab, very small and white patches. You're in there onto the entire area, but you can see they are very limited and very randomly placed. Let's wait for this layer to dry and then add the second new for the roses.
10. Part 7- Layer 2 of the Roses: So now my photosphere of the ruses, that is the white patches, it's completely dry. And now I'm picking up this pink sheet. This is a violet pink tone from this set. You can pick up any pink tone. Oh, maybe an opera pink, bright pink, rose pink. Or if you do not have any of the pink sheet, then just a little touch of the crimson color or, you know, like 10 percent crimson and 90 percent white color that you're going to have to pick up. And just mixing in the pink color with this. And now I'll just zoom in and begin adding the layer of roses 0 to this. So as we discussed in the technique section, the CMB I will begin to add in all these videos to the rose petal. So in this pink color is a little light, so I will darken it before adding it to the next video. So I've just added a tinge of the pink color again. And as I have shown you in the detail when that techniques like adding these Nios, overlapping, Oh, you know, from the center to the center of the other layer again and again. So that we will keep adding the Leo's like this with this base still pink tone onto all of the rows patches that we have. So it's very simple, just adding these lines in Spider look as I have shown you in the technique section. So just to adding the false neither of this spiral with this piece still being taught. So keep adding them onto all the patches that we have added. Now, I am using a brush which has a pointed tip, which is my size three Princeton heritage round brush. So I may even do a team even the smallest, smallest paths and appointed edges to the Leo's that I'm adding. So in case if your brush does not have a pointed tip, you will sell a detailer brush for the center area and then paint the other petals around it like this. So in case if you want, you can even change the color of the Roses and you could use any shade of yellow or maybe a mix of a yellow, orange rose, or you could even go ahead with the yellow and pink rose mix. I know it can be a tedious thing to add so many roses altogether. So what you could do is you could take a peak and then come back and paint all of these together. Squash is such a medium that you can take a bleak in between and resume from exactly where you left off, which is not the case in watercolors if you want painting wet on wet. So that's the best or you don't feed them with wash again. So if you have noticed by adding these off the pink color, I am just adding it in our simple you right now. Up to this needle still be adding allele o with the rule sheet that is a very dark and bright, or do these roses. So when I begin to add that layer, I can give different angle to my roses. And you know, some are trying to show blooming overview of view of the rules and somewhere the normal view. So right now this New York, I'm just adding it in this simple way that we learned in the technique section. So you can see I'm almost done with adding this layer of pink onto all of mitosis. Now, didn't my first year of roses dry? I will just pick up a little mix of the yellow coat color with some whitewash. And I've been just add some light shadows onto the marked area near to the roses, just a login. You can see nothing much in detail in case if you want, you can skip this if you're satisfied with your mark. Now let's think for this to dry completely and then we'll begin adding the second node to our roses.
11. Part 8- Final Roses: So now my first layer of roses is completely dried, and now I'm going to pick up the shade of rows from this set. It's near Scarlett and crimson mixed color. So you can either use directly optimum skin color, orange colored Kano, or you could even use a need bright red or bright pink color. Now, using this column, I will begin to add the second neuron, which will be more definite. And you know, more detailed ones. Major knew all of the Roses will be kind of the overview look that is a few seeds from the top how it would be looking. But a few roses I will be adding in from the side view. So in the technique section, how I had shown you, that is, you know, adding those smaller details on good at Pop side of the rows. And then these big old Leo's only in the bottom media and not at the top saying giving it a side view look. Now again, adding the second layer of roses may be a tedious task for you. So you can again take a break in between and then begin to add these. So now your, you can see I added a rose from the side view. So if you are going ahead with C, the other color combinations, you could pin some bruises, but this color combination and a few roses with a combination of orange and yellow to add more color blink to your painting. Now when we're adding these, Secondly or with the Docker tool, make sure that a little of the lighter tone, that is the white and the pink border visible urine they randomly, maybe some rows more pink may be visible, and in some of the Roses more bite may be visible. That is perfect Naoki, but make sure that, you know, you don't paint it in such a way that the base near loses. The reason of adding these base Leos was so that the final layer is highlighted. So keep adding these Nios onto all of the Roses. And in case if you want, you can change the flower. It is. You could just go ahead with any ADA. You could go ahead with the lavender field or peonies poppies in case if you want. I'm almost done adding the second layer of roses and very randomly in few of them, I have added the side view just randomly majorly at the bottom media more, I have added just the last T2 for roses are left to fill in this second layer of the petal. And after this, I even wait for this to dry and then begin adding the disease on to some of the areas to add another flower blink to our painting.
12. Part 9- Adding Daises: So now my middle area is completely dried. All the roses have tried completely. Now, I will be adding in a few days with the white quash. So very randomly in between the roses, I will be placing these disease. So for painting these daisies, I will be using my rigger brush that I had shown you into the material section. So I will be using that rigger brush and white quash to add these daisies. So you can see, I'm just adding some very small daisy somewhere. I'm adding the complete easy. It also can shade some venom. Adding the daisies half popping up words some better. I will be adding them blooming downwards. So when it randomly just have these small disease in different shapes to add a little more beauty to this middle area. Now, I am using the rigger brush in case if you do not have this rigger brush, don't worry, you can use your smallest sized round brush and add these daisies. And even in the center area, I'm adding a few of them. So very randomly just keep adding them. So if you notice, I have been adding these daisies, even overlapping the wooden area a little. So it adds the natural beauty to this middle ADR because the flowers actually do not have, they do not actually know where there is wood and where they're supposed to grow our web not so to make it look natural, good. Some of the flowers overlapping onto that wooden area near that little window of the wall that we are trying to depict. Okay, So I'm almost done adding the daisies. Now, after this, I didn't pick up the yellow caution and I didn't add the center of the flower, just a bad area to all the disease. So there I'm done adding all the daisies into my middle area. Now I'll pick up the yellow coat color, which is already onto my palette there. That much will be enough for me to add all the buds to my flowers. And using this color in a thick consistency, I will add the buds. So if you have painted the entire flower, you add it in the center. If you've painted the Flavell popping up what? That is, the petals are at the top, you add the bird at the bottom area. If you've painted the flowers blooming downwards, you add the band at the top area. So in this way, keep adding the buds to all the daisies that you have been dead. So I'm done adding the buds to all of the daisies that I have been 10. Now the next thing is, I will just correct a little of my mug area because I still feel a little unsatisfied. So I've just picked up a little tinge of the red color and some white and some ground color. And I've got this paste, so kind of a bone CNR tone. And I will just add a little highlight of this bright tone onto the edges of my middle of sand area actually, in case of us had despite again, I would say you need not add this layer, but I just want a little dry touch. So I have created this orangeish kind of image shade. You can just mix in a little bit of your bond CNR, red and white quash to get this detail. Now again and pick up some gray color and add some gray highlights onto the mud area. Now the next thing to add on is I will be adding some petals to the roses, in some leaves to the roses. So what I'll do is I'll prepare a shade of green, Eigen mixin, my sap green, white, and a little of the bamboo green color That's onto my palette. So you can mix in a little bit of your viridian green sap green and white color and get this greenish tone. And using this greenish tone, as I have shown you in the technique section, I will be adding a few often leaves, just Neon Tudor roses that is trying to show that the leaves are attached to the rose flower that are blooming. So I have to color shade of green ready? And now using this tone and using my round brush size three, which has a pointed tip, I'm just adding in some leaf patterns around the roses. So you can add all, you know, these leaves randomly to a few of the roses. You need not added to all of them. So very randomly, I'm adding them somewhere. I'm adding the two leaves or 21 rows, some that I'm just adding one leaf. Also, these leaves can be a little overlapping onto the roses. That's perfectly okay. So be, you know, free and let yourself free while adding all of these leaves your I'll take you know, des by just adding that dodge off, the bamboo green color is different from all the greens so far that we have used. So try it again so that it will again add one more color, attach into your middle area and make it look more natural. So I'm almost done adding the leaves with this bamboo green color. Just a few more urine there and a few popping into the sky and the sand area like this. Now again, I'll pick up some bright mix of this yellow ocher and white color and just add a little dry brush to this wooden area. You're very likely a little touch. Now lastly, I will just shift to my black wash. And using that, I will just add some highlights to this twisted branch look that we have added your and some branches again popping out from the field area, that is the one. So just a few urine there from popping out from the top into the sky area. So that is it. We are done with the details, just some last few details which we will add in the next lesson. And then we'll be done with this middle for today.
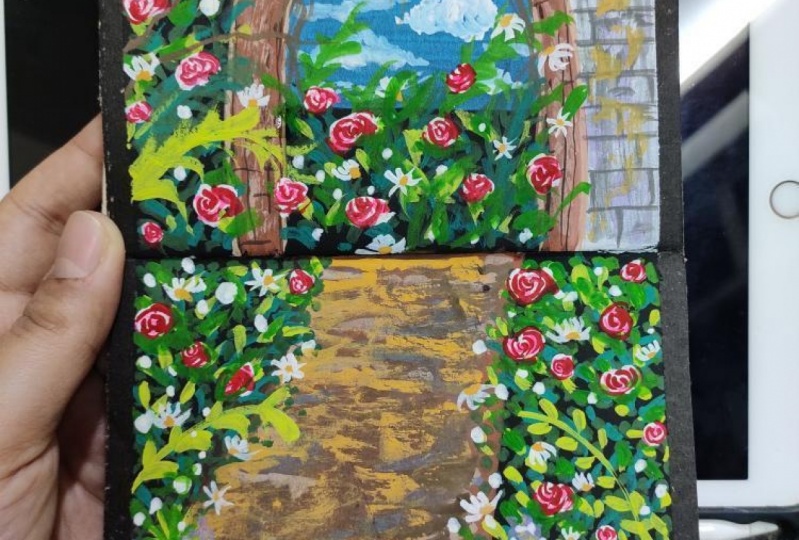
13. Part 10- Final Painting : So now one last detail that I would be adding in, I have mixed in my violet color with a little bit of white to get a little lavender color. And using that, I will just be adding flowers into the bottom of my feet just for 25. You're new to the sand area. So first I'm dabbing it into an oval shape with appointed edge at the top. So just dabbing it in little circles out there. And then I will add in more white to this and get a piece to the tune of the violet color and add the second row to add some detail to these 11 does. Now I'm picking up some white gouache to add the detail to this lab window. So now I'm just dabbing the tip of my brush and adding small so at random places to the window to add detail and highlight to this lavender flowers. If you want, you can skip to add these little lavender flowers here at the bottom. But I just felt like adding a little color touch. You're at the bottom media to make the composition look a little more better. Now let's remove the masking tape and CFI NLP. Be careful by removing the masking tape and make sure that your edges are completely dry so that you get those clean edges. So this rule is medial on the black background, looks so perfect and so beautiful, isn't it? I hope you guys enjoyed painting this with me today. Thank you so much to each one of you for joining me.
14. Thank you: Thank you so much to each one of you for joining me into this simple class of building these rules middle onto a black April. I hope you guys enjoyed painting disparate me, and loved exploring, wash, or do a Black people. I would love to see all of your creations into the project section of this class. And I would love to know your genuine feedback for this class into the review section. So don't drop it into the review section. How you found this class. Also, if you have any other suggestions for the upcoming classes, do drop it into the discussion sections, and I would love to try them out. Thank you so much once again, to each one of you for joining me today.
 Umashree Taparia, Artist, Art Instructor, Entrepreneur