Transcripts
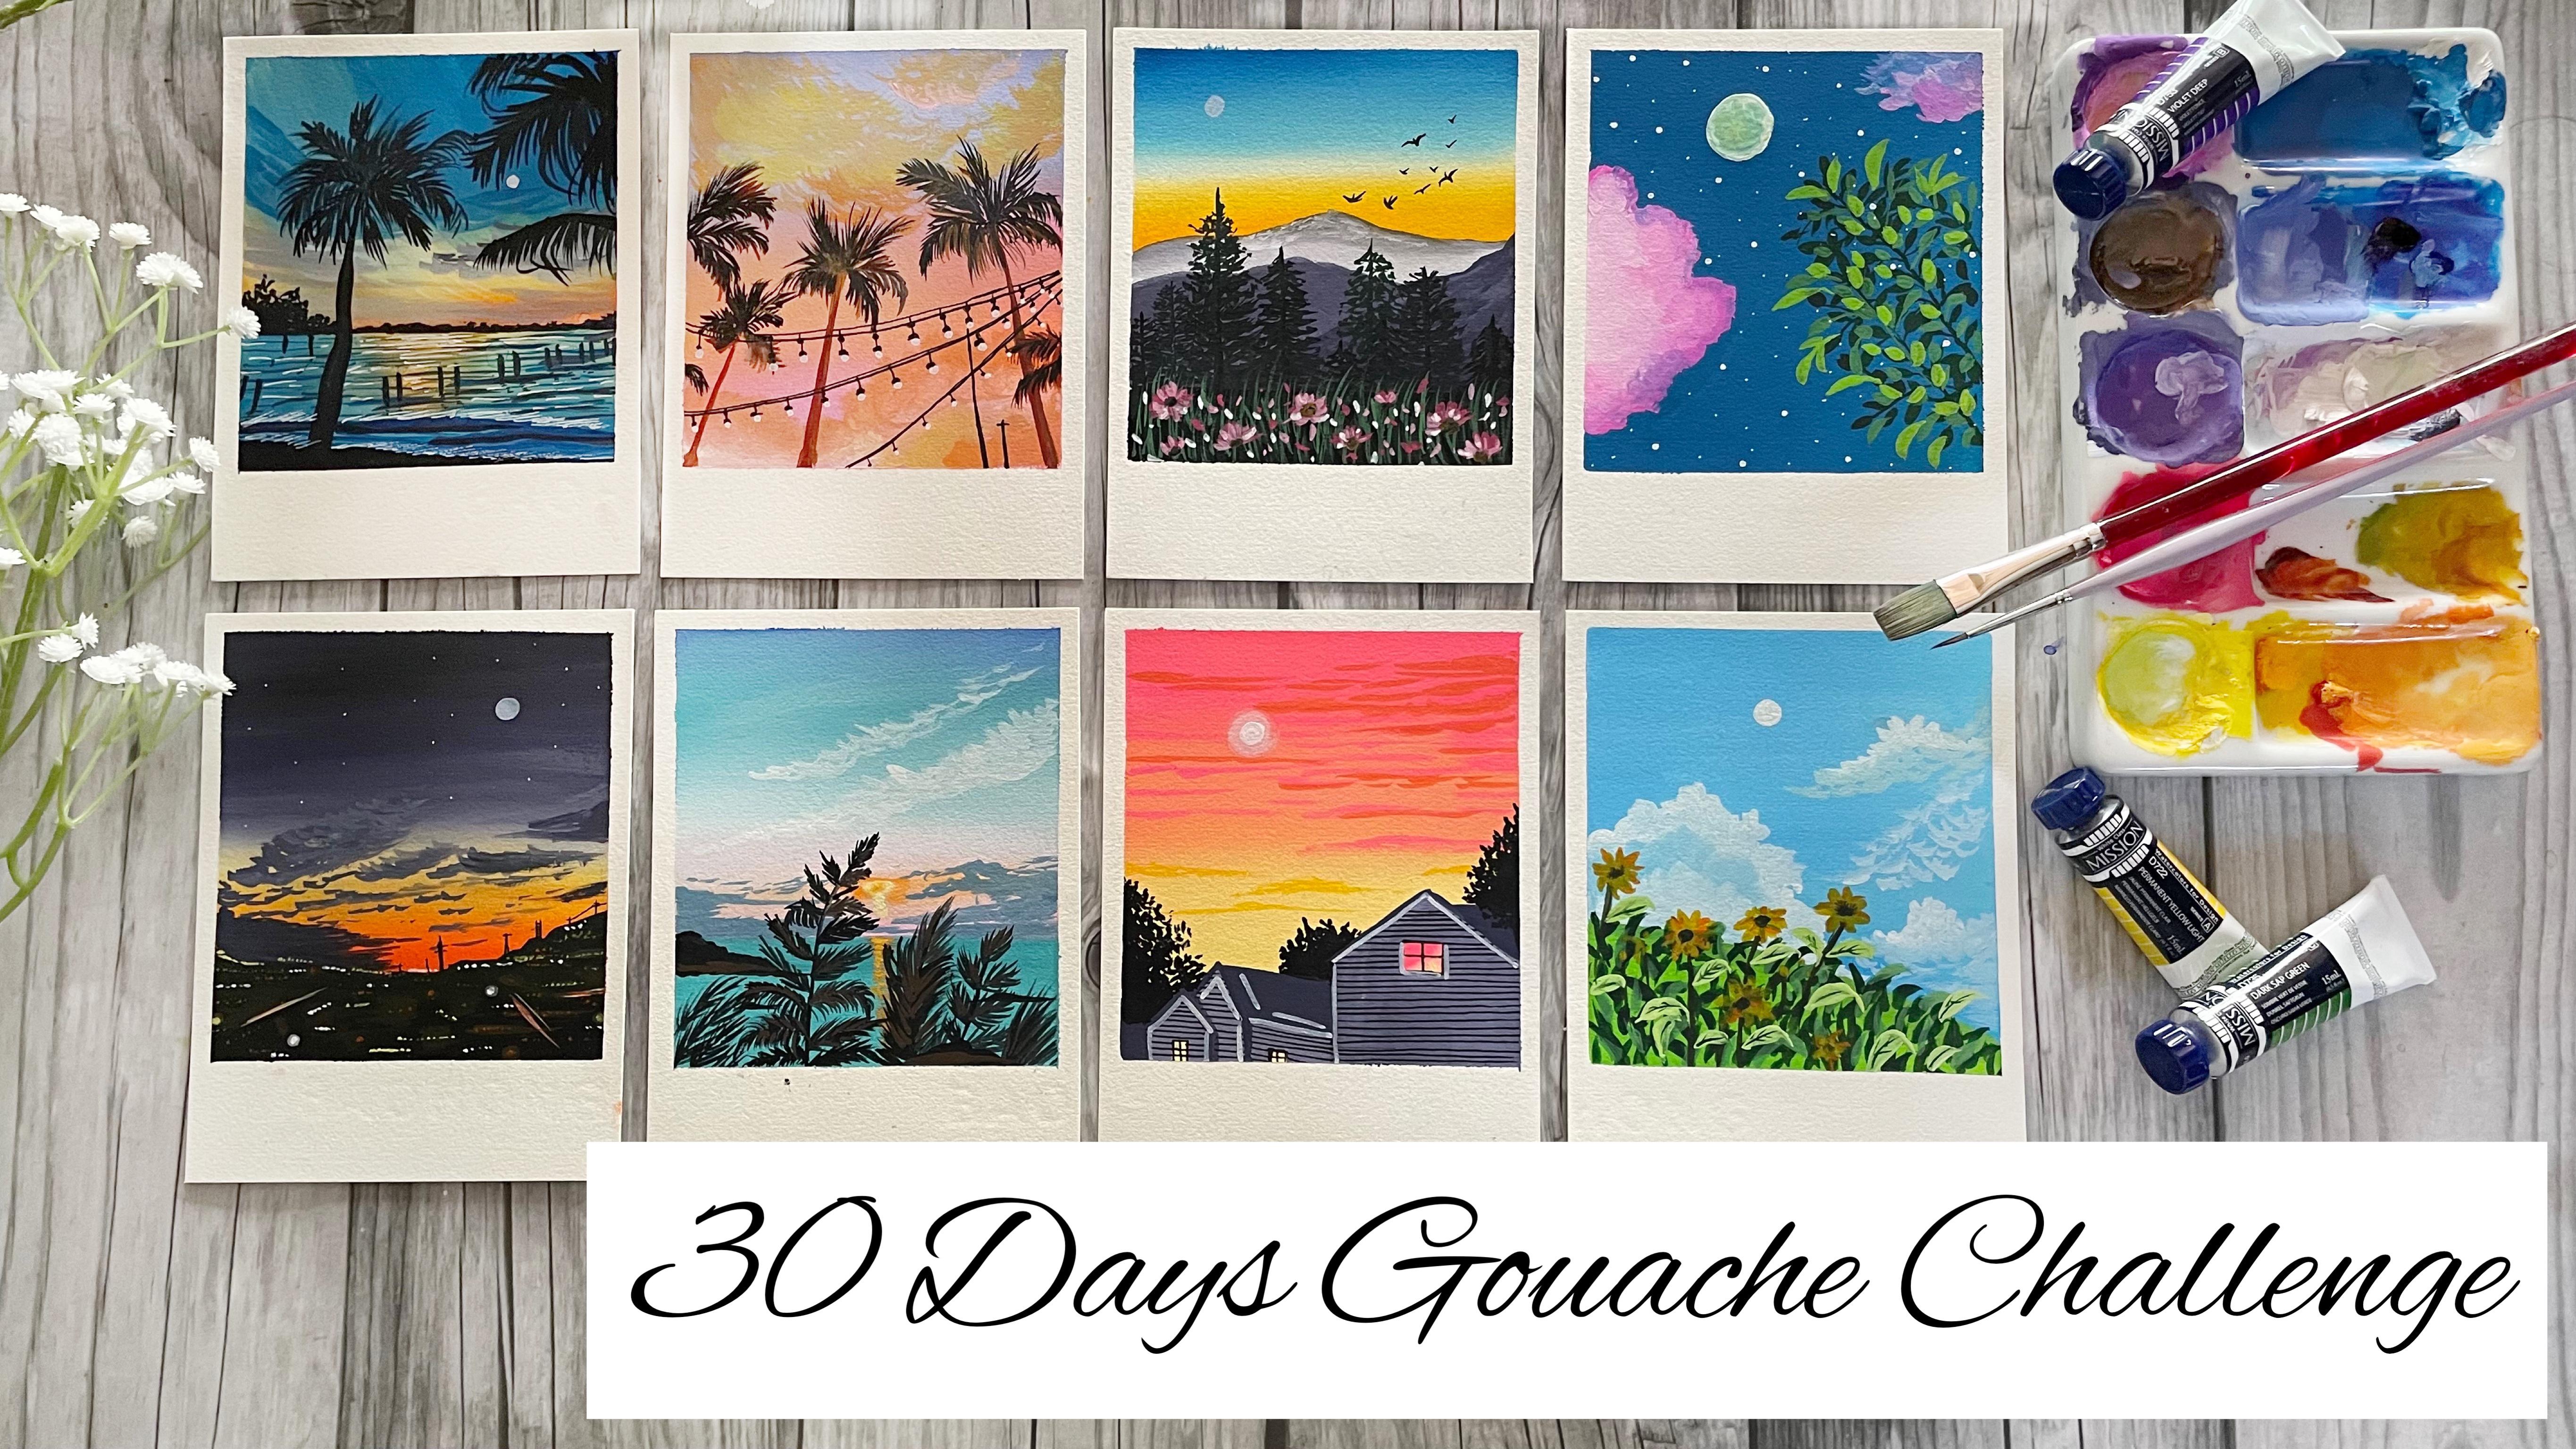
1. Hello and Welcome Back: Has pancreas, the sky looks, it's still full of the colors of love. Watching the sky reminds me that many things are possible. Even though they seem beyond that each. These cloudy sky makes the most beautiful sunsets and they are a perfect delight to the ice. Hello everyone. My name is. I'm an artist and an art instructor. Today we are going to begin a 30-day challenge. The medium, cosh, when I began my art journey last 20, It's just around that time that cosh began to gain a lot of popularity. And since then, it's one of our most favorite medium. And truly Your of exploring, gosh, it's one of my favorite mediums to work with. It's relaxing and fun to play around. But this medium, when it comes to supply use for wash, the more economical as compared to what Carlos, as they don't need any expensive beans or people. You can even go ahead with student green beans and post to Carlos to explore this medium. What did the participants needed or how will we go ahead with this media? Don't worry. I will be discussing all the materials required in detail and what best options you can use. In the beginning, we will be doing some warm-up exercises. With all the warm-up exercises, you will be more comfortable with this medium and it will be easier for you for all the coming per DDS class projects and you will be able to follow them much easier. I'm sure by the end of the TDS, even you are going to be in love with this medium, and it will be one of your favorite mediums. Do. So without any further delay. Join me into this class and let's fitness the beautiful nature and it's magical beauty to our paintings in the coming days.
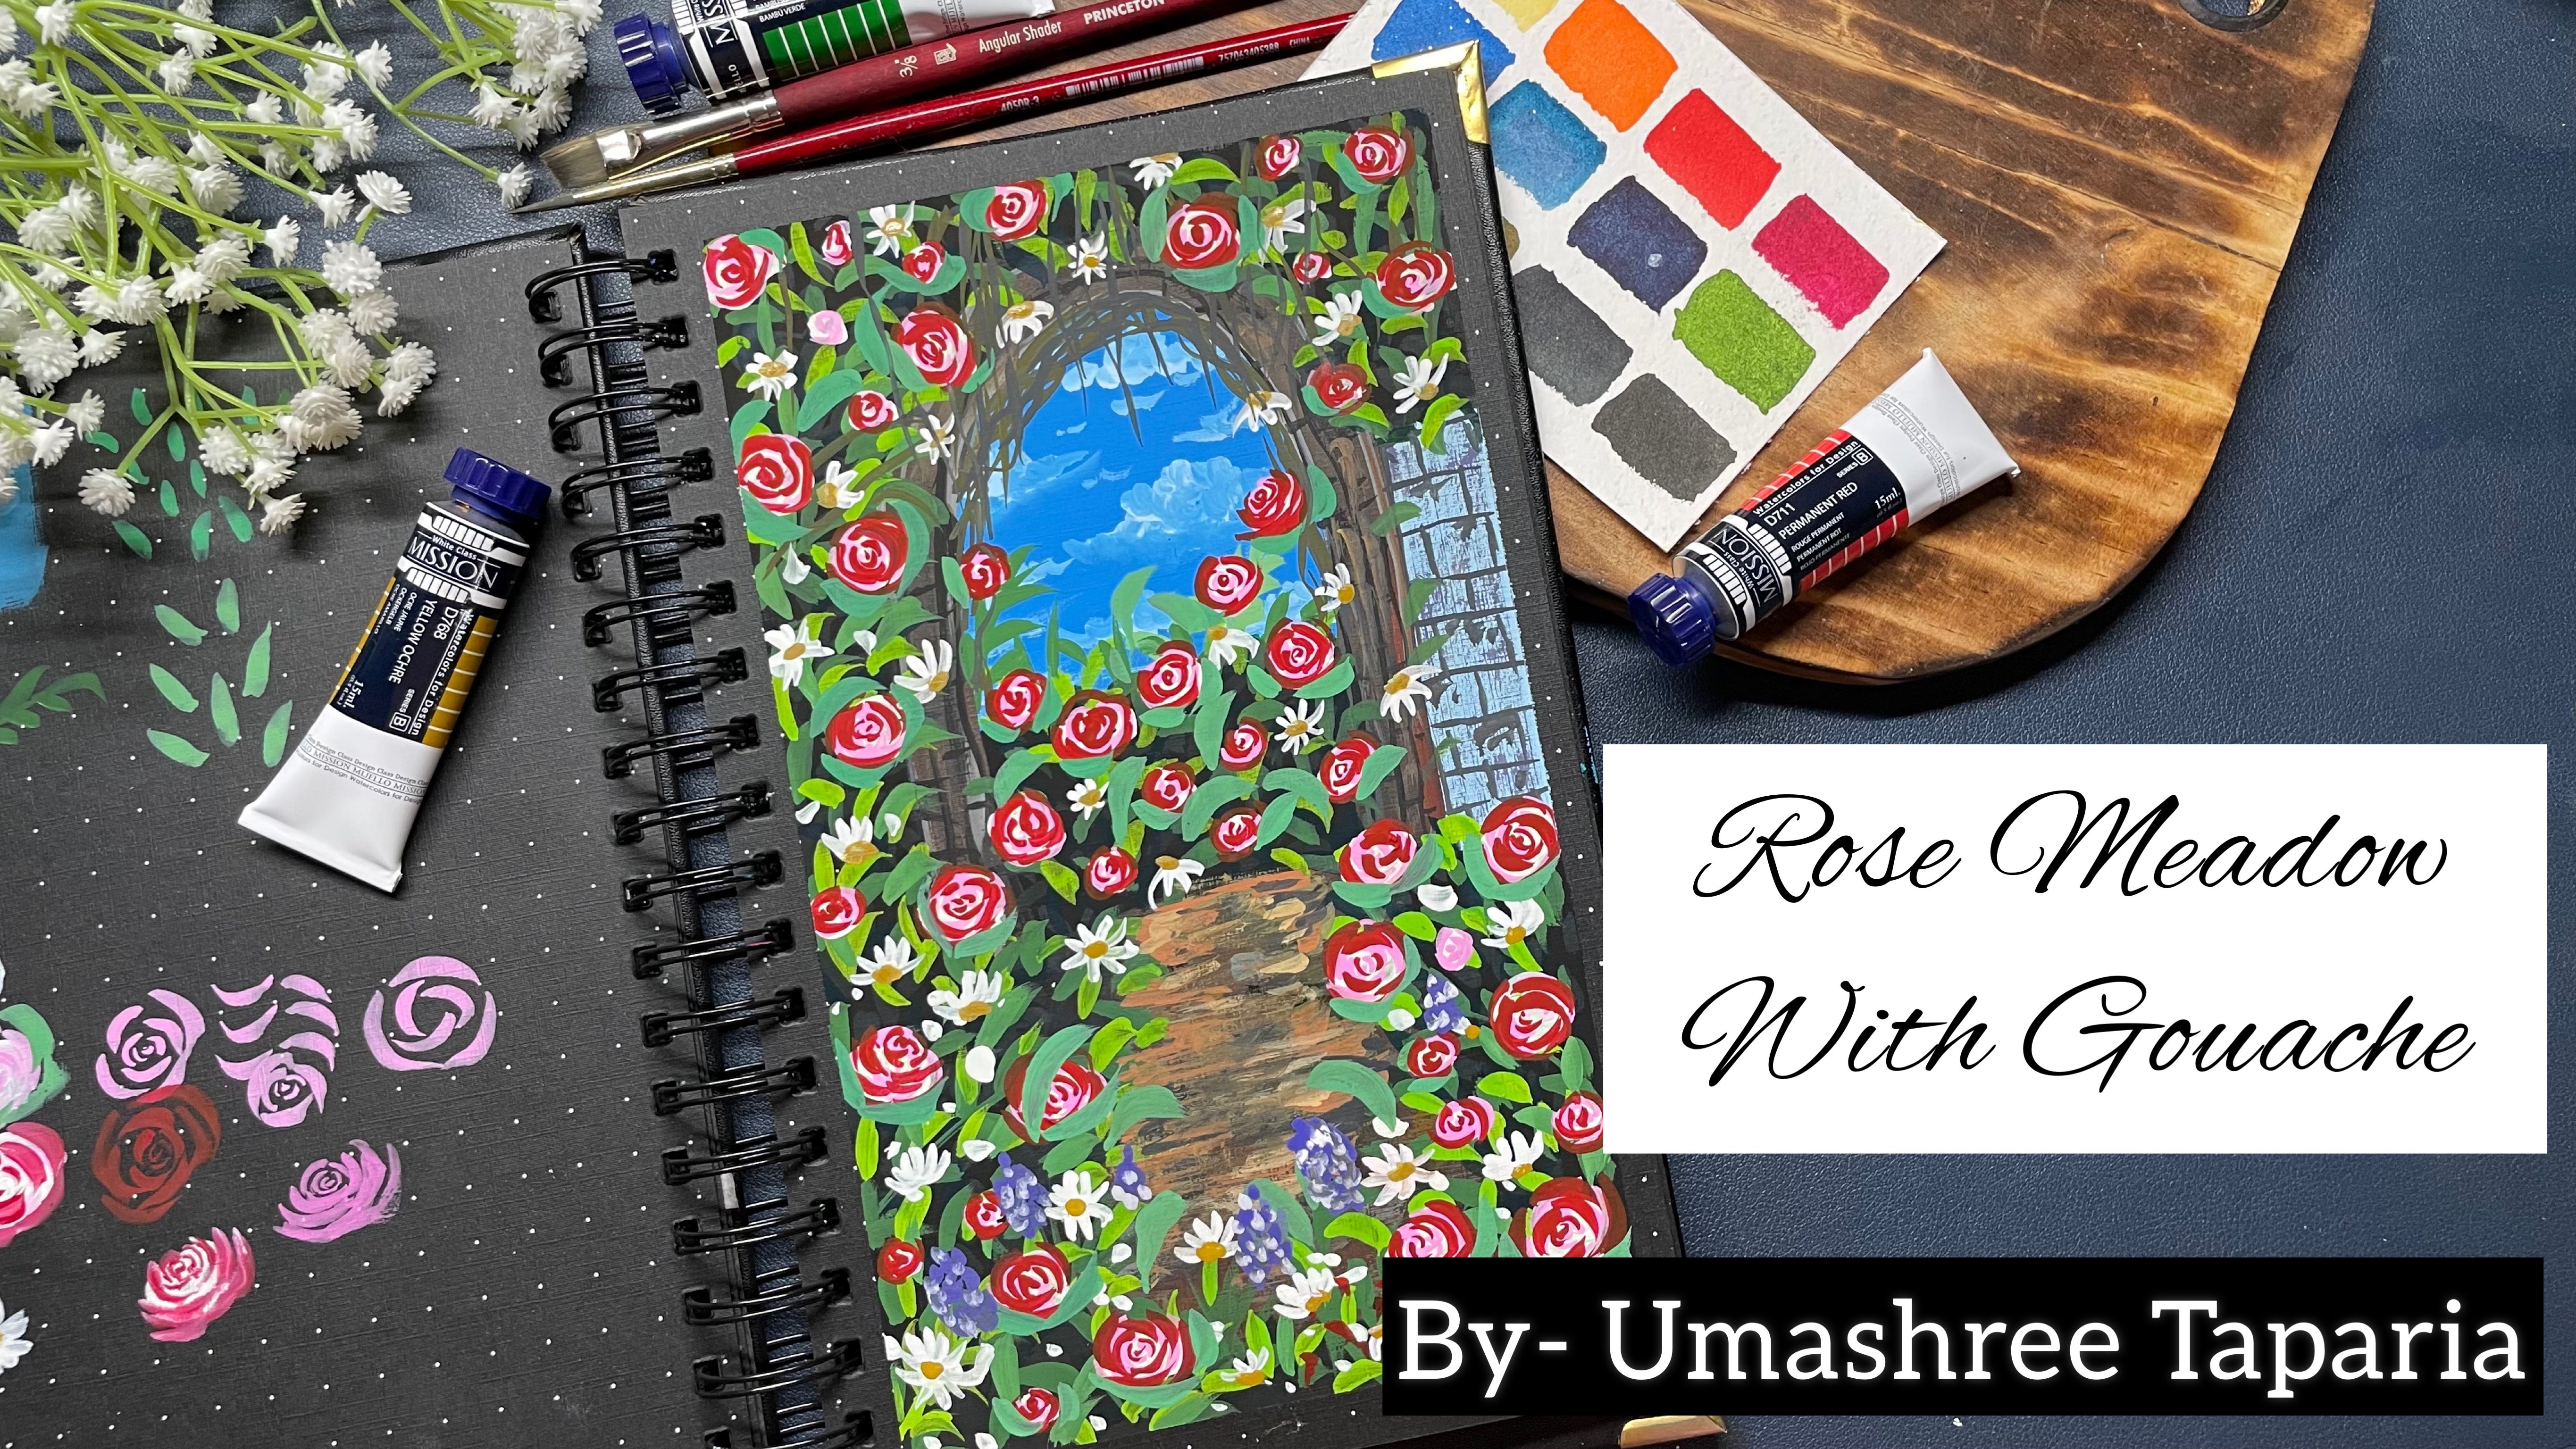
2. Materials Required: So let's have a look at the materials that you would be needing through the 30-day to compete this 30-day challenge, easily. Supposed to and foremost, you would be needing a set of squash beans or even acrylics or post alkalosis. So in case if you do not have the same set, you can go ahead with any other set that is available. So this is another thing which I have. This is from the brand guru and the one that I would be using for this class is from the brand new jello mission. And apart from that, I would be using the black and the white quash separately as it isn't included in this set. The next thing is about the paper that I will be using class. I would be using this for home hot plus 300 GSM, 100 percent cotton paper. So this people is of this size, eight by three inch into five by nine. I will pick up in this one sheet into two equal halves. And using this single sheet, I will for painting each of a class projects. Also, I will be painting these paintings in a little color right manner. And for painting these taping down my people onto this movable sofas so that it's easier for my hand movements. And I will be using these masking tape to tape down my people. When it comes to gross, you can go ahead with any people that is Bunny the GSM and above, and that will work perfectly. It may not be a 100 percent cotton ego. As I said, we will be painting these paintings in polarized manner. So at the bottom, I wouldn't be using the Tico masking tape so that I have those clean edges and on to win the bottom. The next thing is about the brushes that I will be using throughout the course. First and foremost, I would be using this three by four inch flat brush for painting most of my sky. And the backbone flat washes because since it has a bigger size, so it's easier to paint it without much of those lines in between. Next, I will be using this size three round brush for adding in the clouds and those little tiny details since this brush has appointed. So I would recommend you do have a brush which has a pointed tip because it, it becomes easy to have, you know, adding details together. Next, I will be using the smallest size, flat brush and the angular brush. So the angular brush I will be using for adding clouds and Poisson blending as Ben. And even the smallest size flat brush Eigen be using for blending of the smaller areas. Next, you will be needing in Bordeaux each of the paintings, okay, so I have this clean jar of water for each of my being dead apart. So you would be needing some of the few other materials I spin. So you will be needing some black pen and bright band. So these are the forehand, the pens that I would be using. So these are two black pens, whichever of the 0.06.030.30.6. So you can see the final details that I've added. I have added them using these pins and ever be using these two white beans. So this is kind of a permanent white Marco which has uptake. Did I would be using this to add it. Or, you know, big O. D is like the moon in most of the paintings and some other highlights of as and when needed. And using the smaller white gel pen, you can add the stars or other fine details as you want to go ahead bit. Also, I will be using this sketch book for doing all the basic exercises and showing you all the basic elements are the basic tips that will help you throughout the course. So you can keep a rough books for practicing. Apart from this, I would be using a spray bottle to wet my paints as in when needed if it becomes time. Because if your water installed, you can just bring and o Video beings again, I will be using these two pallets, beans and get differentiates and oh, you know, get my beans in the right consistency. So these are all the materials that you would be needing for this class project. I would recommend you to go grab all of them and join me into the next class where we begin discussing a few of the techniques.
3. Practice Exercise - Blending: So let's begin with the basics of quash. The first basic that we will be learning is the blending with quash. So I shouldn't be using these two colors to demonstrate the first set of lending. So this is the Y LET deep color and the permanent orange color. You can pick up any shade of violet knowledge. And I would recommend you to try these blending with me so that you understand the different things what I'm trying to explain in your. So I will quickly drop both the colors into my palette and try to get the perfect consistency of the paint. To begin that the blending exercises. Suppose I'm beginning with the sheet of the violet deeper and then I can pick up the orange sheet and try to blend both of these sheets. Now, we know that when the violet and the orange blend together, they begin to form a muddy color. Suppose we will see how it reacts when we blend both of these without using whitewash. Now you can see in between, then I'm blending both of these colors. There is a my vehicle that gets formed in between. Okay. And it does not give you all, you know, I appealing blending looked at you should have. So that is why it's very important to understand when such kalos, which begin to form muddy colors or dusty tunes when blended together, It's always advice to blend these colors using whitewash. So now let's begin to blend this using whitewash and see the difference in our blending. So again, I will begin with that by the deep drawn at the top. And this time, when I pick up the orange color, I even leave a little gap between the violet and the orange color. And then I would use in white quash to blend both of these colors. So now you can see using the white quash, I'm blending both of these colors in between. There is no muddy color form. Also I get this new transition from the orange to the light violet and then the violet color. And a little of the light orange as well. And you get a perfect transition and a perfect look to your entire background. So that is important that whenever you go, oh, you don't blend together, begin to form muddy color. You should use whitewash for blending. Now, I will just pick up a little of the yellow Palo and try to show you the blending between the yellow and the orange and spend. Now we know that when the yellow and the orange blend together and even not form any muddy drawn. So even if your blend these two using whitewash, it will not give you a loan. Or the up link, which is not I appealing or which looks bad. In the first case, you can see the blending looks really bad and has a muddy layered in between. But when you do the same with the yellow and orange color, which blended together do not form any muddy or dusty bones. You can see it still looks I appealing and looks perfect. And the blending can be used this way without whitewash. No doubt, you can do the same blending also with whitewash and get our transition. So it will be from audit to light orange to light yellow to yellow. So that is a transitional tone that you can again get in good as well. I'm trying to debate the fellows that go with each other can be blended even without using whitewash. But the kalos, which did not go well together and begin to form muddy colors need to be blended using whitewash. So this time we are blending using the whitewash and you can see we get a perfect transition from the light tone to the darker tone and in-between, we have those lighter bones. Okay, So this is the kind of blending and the first kind to understand that venue need to use whitewash to that can get a perfect and a smooth transition between the colors and don't form any muddy colors. Now next to me when and blending that. If you begin to plan the from the top or the bottom, which overpowers pitch cargo. Supposed I'm beginning in with the orange color and act the board didn't even need on the yellow color. Now, I'll begin blending from the yellow to the orange color. And you will see that the yellow Palo overpowers the orange color. And we have a little of the yellow to moving on to the orange. And there is no orange tone overpowering the yellow area. And it's perfectly in that and we can see though or yellow calloc distinctively. Now in the next side, we even use the same values. I even begin blending from the orange to the yellow and see how they look. Orange color overpowers our yellow color. So I have lead, don't put the kalos. Now I will begin blending from the top. So I just picked up a little bit of the orange again. And now you can see the orange color overpowers the yellow color. And that is a little off the orange that leaves or the yellow and mix it a yellowish orange instead of letting it be a yellow color. So again, the two type of blending rich color overpowers the other. That will depend on the movement of your stroke for blending, that is from the top to bottom or bottom to top. That is from which color to which color you are trying to. So in the first one, we blended from yellow to orange, and in the second one we blend it from orange to yellow. The next thing to understand is about the consistency of these beans that I'm using. So first, I have picked up the paint in the perfect consistency and you can see it's moving both acne. So this must, by just adding that little bit of water to the paint and getting the perfect consistency. Now to this page, if I add a lot of water, Let's see how this will begin to act as watercolors. So I'm adding in a lot of water to this color itself. And now you can see it's staunch transplant. You can see the white layer of people underneath, which is not visible in the first row. The first stroke was A-B-C and what it should be for the wash. Now next time we'll pick up the paint directly that is from the tube, it is out and you can see it's not spreading even levy get that dry brush in-between. And at the beginning, we have that thick layer of color directly. So that is why it is important to understand the perfect consistency to use so that you have good opaque layers and the pins spread easily. So I would recommend you to try out these swatches and understand the blending and the consistency before we move ahead to the next technique.
4. Practice Exercise - Clouds : So let's begin with the next technique exercises. So even loan grouping different kinds of clouds using a wash and the layering technique. Suppose I will begin with this blue color and I will just mark out six patches so that they dry. And after that we can see the layering of clouds, okay, so forth. Let's meet this and they can dry. They'll then we would see the strokes onto the left side of the people and understand the different strokes that we would be using to layer them onto these surfaces. So quickly make out six patches so that even you can try because we need for these patches to dry before painting onto these and learning the learning techniques of clouds or duties. Now, I will just quickly make the remaining five years. And I am mixing in a little bit of white in some of the boxes in case if you want, you can directly use this and even blue-collar without mixing any right to it. So all my six boxes are almost straight and I will wait for this to dry. Until then, we will begin understanding the different cloud shapes that we would be using. So the first one, we'll be using this down brush and resize three round brush, which has appointed different color and beans. So you can use any smaller sized round brush, which at the end may have 0 little pointed low. Now to depict and make you understand the strokes I'm using a darker color and then onto the blue background, we would use the right ones. So now you can see I'm just using the half C strokes to add in the close. Now I'm placing these strokes are a little onto each other and little near to each other. So there are two ways of using this tool. One is like this at distance. The second one is placing them so close to each other and are drawing a cloud ship with these tools such that in-between you have little gaps and you have these strokes forming the Cloud Shell. So you can take any cloud shape that you want and just by moving the brush strokes, you can keep adding it. And along with that, you can use little of these strokes are far from each other. Now to these clouds itself, if you wish to add little highlights, what you can do is you can mix in white gouache to create either a lighter tone. And in case if you're using the lighter tone already, you can take the darker tones of the color and add some highlights. So now I will just mix a little bit of white to this violet color and get a lighter tone of this violet color and add in the 10 highlights at the bottom area. We see if you are oh, bottom area is all of the lighter tone. You can blend it well with your background. You can even use your background bone and blend it at the bottom or at the top as you wish. So say supposing if your background is off this light DACA alone, you can use this slider down strokes at the bottom and have a little blending into the bygone. So you can see it creates a different highlight onto the clouds. So it's the same strokes, we're just at the bottom to depict the highlighted parts. Now the next kind of clouds using the same brush is going to be these simple lines with little Coby edges you are in there. So you can see I'm just laying down some lines and little cove emotions in between. So we would be using these simple straight strokes to add clouds in view of the paintings you can see it just has a little hunch in-between places. Now just as the last clouds, you can add a little highlight and detail with the lighter tones or the Docker dunes depending on what colors we are using and where we need to add the darker and the lighter tones for the highlights. Now let's begin with the next type of the clouds. So we would be adding clouds in the cloud shaped by just moving up Russian circular motion. So your, I'm using the same small-sized brush, but just moving my brush in circular motions so that I can get the cloud sheep. Now into this, I will add a little highlight in between with the lighter tone that is my mixing in whitewash. So you can directly pick up a little white quash also in-between an adult and blended and get much lighter tone. Now with the lighter tone, I can go ahead in the same manner. And you can see just moving my brush in circular motion to get that blend and get that cloud shape. So the Cloud sheet can be any shape that you want to add. Any fluffy cloud looked at your 19 with whichever colors you want. Like this, you can keep adding the clouds with multiple kalos and multiple Laos and get those fluffy clouds look as bad. Now just picking up a little of whitewash to add highlights. So you can see now I have that fluffy cloud look with this color. Same base. You can add it with any color tone that you want. Now the next kind of clouds that we would be adding is the angular brush that I have talked about. So in case if you do not have an angular brush, you can use the smallest size flat brush and add these. But these you can even add with a round brush in case if you want, just the angular brush makes the adding much faster. So I'm just using the Angular side and just suggesting. As we were adding the half C strokes with a round brush, we are going to add it with this angular blushed a half C strokes and we can get these cloud structures. So now just using the tip you can see I'm adding these molecules in-between. So these are the different kind of cloud shapes that you can use. You can form the entire cloud cheap, closer to each other with the strokes as well as you can even add the small cloud stroke just as I showed you, you can even create it into a fluffy cloud by just moving your brush into a circular motion quickly. Okay, you can either use a chisel blender brush on a very smallest, nice flat brush for all of this. So now let's begin and understand all of these clouds. I'll do these dialogues that we being taped so that we can understand that during the pressure that needs to be applied and how gender you need to be. So we first begin with the half C strokes Cloud. So you can see I'm dabbing my brush very gently. I'm not applying too much pressure. And still you can see little off the color underneath gets deactivated because this is water-based squash. So that is the reason if you want a very bright clouds, that is very vibrant clouds of whichever color you are using. So in case your, the white color, you need to pick up the color in a good thick consistency. You need to control the pressure of your brush and you can see, you can get the vibrant clouds strokes. Now let's see and try out these strokes by applying too much pressure. So this was first without applying much of the pressure. Now onto the next one, I will even die new Dodona lot that is add a lot of photo. And now you can see I'm applying a lot of pressure on my brush. And you can see, I cannot see any of the white strokes that I tried to apply it. And at the top one we get such vibrant clouds with the white color. So that is how you need to control the water that you add by adding these videos. Also, you need to control the pressure onto your brush. Now, even for the second type, I'm just medially using the tip of my brush for adding in these cloudy days and I can get those vibrate white clouds. Now, see V, We will try under, underneath box and see what happens when you use either diluted tone or add too much pressure. So this first one was without adding much pleasure and using the Carlino good thick consistency. Now when I begin to apply much pressure, the belly of my brush presses and you can see again, we do not get those vibrant clouds. The color gets blended with the background so much that you do not have those distinct Cloud logs. And also you get a very light wash newborn and not those by bend right close. For the third clouds. Let's begin again with that, the consistency right? Color, and begin to move our brush in circular motions. Now, again, you offer the first one. You can see I'm hardly applying any pressure. I'm moving my brush very gently so or even to achieve that white look into my clouds, a little of the blue dog gets activated. But still you can see that by brand right strokes. And the little blue that gets activated gives a perfect blend. And the fluffy looked to the Cloud in case if you do not want that little blue look, also employ fluffy clouds. You can leave the Cloud area by a marking pencil sketch and not adding a blue color. Now onto this last box, we would add the clouds using the angular brush and see how we can add those in the layering technique. Again, to get the vibe in strokes, your brush needs to be used very gently. You need not apply a lot of pressure. And you can see, despite applying very little pressure, since I had less of the color pink dot the bottom, Leo gets activated and I get that light. Does groupon instead of a vibrant blue, always in this case, you can read on the Color tab is I picked up the white color again and added a few more strokes to get that vibrant, bright look again. Then you can add in the smaller strokes as well. Now let me discuss with you two more techniques which are helpful in painting the fluffy clouds. So I'll just pick up some whitewash and add a fluffy cloud for us. Then in case if you want to blend this cloud with the background, I would just pick up a damp brush and just try to blend it at the bottom and the top edges and get it, oh, you know, a smooth blend into the background. So now you can see a little light blue tone is formed on the edges and it blends into the background and gives a perfect, you know, structure to the Cloud. The second wave would be, I would lose my smallest finger to dab it around edges. Suppose to add this fluffy cloud. Then while this is still wet, I just use my smallest size finger and I will just dab the tip of my finger very gently so that you can see it's blending into the background and it's giving you that soft look to the Cloud. So whenever you want a soft looking cloud, this technique works best for me. So I would recommend you to try all these techniques, work with it, and learn to paint all of these different clouds so that it becomes much easier when you begin with the class projects. So triangle these clouds and I will see you guys into the next technique section.
5. Practice Exercise - Waves and Dry Brush: So now let's begin with the next practice exercise. I will post again mock-up three blocks so that they can dry until we learn the techniques that we are going to look into this session. We will be looking into the dry brush strokes and the v's to pin weaves into a painting. Whenever we paint a CSV or adding, find any seascape or NEC, element that you have in your painting. So first, just map out three blocks so that they can dry for you to practice the layering of these techniques that we will be loading right now. Now go onto the left side, demonstrating to you the techniques that I wanted to discuss with you. I will first begin with the dry brush technique. So I've just picked up some violet color and then I use the color directly from my brush. You can see I get a nice stroke like this. So for getting the perfect drivers, it's important to pick up the color that we don't do the tissue so that all the excess paint and water is absorbed by the tissue. And then you can see even almost moved green people. You can get these dry brush stroke so easily. So right now I'm using a 180 GSM, smooth green people. So you can see when I dab it and I use it in any angle, I get the dry brush stroke. But whenever I pick up, move directly to the paper, then I do not get the dry brush slow. So it's important to dab excess water and the paint before getting these dry brush strokes, they would be useful for adding the dry brush into the VFS ADL as the last four of the mountain ranges and some other effects in the grass has been. Next is, Let's begin learning some of these. So we will be adding simple leaves like these. You can see just small street lines, a little Coby urine there. And you can see very randomly and placing them one between the adult and they are so obtained. And the ones that will be near to the horizon line will be shorter. And as moves or more closer to our view, we would add some thicker lines like these and some longer lines. So these lines as well, we would be adding shadows need to run and then you can even add, you don't go crashing waves look to these v's. So these are the different kind of leaves and in-between we would even be adding such long ago v's to get that effect and, uh, you know, crashing the look out there. Now I'm using the darker towards either be adding the shadow of these waves as well. So you can see the shadow is quite thin as compared to the original V that we add even to the smaller leaves, you can add the shadows randomly. The next kind of leaves that we will be adding is using the angular brush. You pick up the color and then I'm just using the tip of my brush and I'm adding these long these, and we will be using these kind of details when major neither C is not a focus area and we just want to get some details as well into the sea. So just using that technique to try to blend the colors from the edges and get some VM effect into the sea. In case if you do not have an angular brush, you can simply use your flat brush, a smaller sized flat brush and the tip of that brush to get those. Now the scene things we would try onto these backgrounds that we have added. So first, then I pick up the color and directly add, I get goes patchy lines. Then I dab off the excess paint and all the water, is it so by the tissue and you can see I begin to get the dry brush to even onto a colored background. So that is important as I said. So all of these you can add to add the glowing effect of the moon or the sun into the beach areas, you can add these four, adding the leaves. Use this dry brush strokes by defining a mountain ranges as well. So this is how dry brush technique can be achieved even layer on layer. And make sure that when you add this on blue allele or it's always important to control the pressure of your brush. If you will add too much pressure, you will not get the dry brush tool. Now let's take him to paint some bees. I have picked up the light blue color. Also I mix in white, and this is the first layer. So you can see I'm using a combination of all the different kind of leaves that we have seen and just trying to add in all the VMs and then add shadows to this that I forgot this in kind off or variance. Get into the venous, that is Covey's adding the waves diagonally instead of writing them straight. So all of that depends on changes from composition to composition. So, but the basic technique remains the same. That is adding lines closer to each other, adding shadows, adding some sparkling effect or the Crashing Waves effect. Okay, So this is a kind of v which will be used the most. You can add them diagnose depending on the painting and you can add them street that is like this only if you are painting as the sea level into a shape layer. Now onto this whole time just trying to add in some crashing waves look and some glowing effect and try to show you how you can use all the different techniques together. Now next, let's use the angular brush again to add the V's. So I will shift the angular brush, pick up the light blue balloon again, and go ahead. Adding the V is just using the tip of my brush. So you can see when you want to add the larger leaves using the tip of a flat brush or angular brush makes the process faster. And o of n, You don't need much detailed ones. You can go ahead with this method to pass laws or rough CVs into the CEO. So I added some darker leaves as well. Next, I would like to show you opponents white pen, which is quite helpful for adding it. Or, you know, the moon and the white effects wherever you want. So this is a permanent white Marco. And using this I can go on onto any color and add the moon in an issue because of the pointed tip it has. And you can see how opaque the effect is, what we get. You can even use it for adding some smaller highlights like this and some bigger stars into the sky. This is a completely new product which I came across recently in to a stationary store, and I'm absolutely in love with that permanent marker. The next thing, using this white gel pen for adding in the smallest task, smaller highlights. And in case if you did not get that permanent marker, you can use your white gel pen to add in the moon or the other white effects. Next, you would be needing these good brush for adding in this task. You know, when you need those fine stars and it's acquired all better way to add the stars rather than directly using just a normal brush. So these are all the basic techniques that I wanted to discuss with you all. And we will soon begin with the host class project for today. Now.
6. Day 1 - Cloudy Sky: Hello everyone and welcome to day one of the 30 day challenge, the carlos that you need for today's class project. Our city in blue, right? Sap green, yellow, green, burnt sienna, and black. Select us. Begin with our first class project for today. Today we are going to be painting a very simple sky. So the palette that I will be using for the sky is this cobalt blue mixed with by cosh, as in how I begin to use the Carlos, I would keep discussing it with you. So I have the colors ready onto my palette. And we will directly begin by applying in this color. So using my flat brush, I will be using my three by four inch Princeton heritage flat brush. And I would just mix the black and the blue and the white color and begin to get a sky blue color tone and apply it onto the entire background. So we would paint the entire sky first and then adding a little of the palm leaves and a little roof details, make sure that you have no paper taped down when otherwise the beans may seep through the paper. As I discussed with you in the material section, I have taped on my people in a polar rate form. So you can see at the bottom, the masking tape is almost on this piece of one inch and onto all of the rest three edges, I just have it almost half centimeter of the d. So for all the paintings, I would go ahead with this measurement only. So at the bottom, only I will be having more of the whitespace to give it a polarized for. Now in-between, you can see I am picking up white quash and adding more of the lighter details. And in-between, if you pick up the darker color tone or more, don't worry, you can easily blended and get different tonal values into your sky. Make sure that you cover the edges as and go slowly to not body and rush with this. And also always run your brush from left to right completely so that you have clean blends and no brushstrokes marks in between. Now I have just picked up the dark blue color a bit and just adding it at the top to get some DACA highlights on the top area of the sky and trying to blend it well into the background. So just running my brush from top to bottom to get a perfect blend. And you can see affects mood sky with different tonal values of blue, some very light and sound better. Daca highlights that we have added in. For the first one, we will be painting a very cloudy kind of sky. So I am picking up the white goulash and getting it in the right consistency. And using my round brush, I'm just going to adding, you know, the half C strokes and majorly using the tip of my brush, I'm laying down these strokes close to each other to form clouds sheet. So we are going to paint a complete cloudy sky and not leave much caps of the sky. And in-between you can see as the paint from my brush is about to get n, I'm trying to add little dry brush strokes as well on the edges. C, then I would keep adding a lot of clouds in the sky using this color first. And then I will just add a little of the blue highlights to these clouds using the same method under seems true. So you can see I'm even trying to vary the shape of the clouds and the sizes of the clouds as well. Some there I added two shorter clouds. I'm going, I'm adding these big oak loads in between the clouds. You can see I'm adding the drivers troops as well to get all variation into the clouds and get them as natural as possible. Also, you can see I'm laying down my brush very gently, not pressing too much. Hence, the blue color of the base layer is not getting activated much and we are getting the perfect white opaque Lu in case if you will apply too much pressure, then as we discussed in the technique section, the blue column begin to get activated and may not give you this opaque white clouds. And you can see I'm hardly adding any water to my right quash. I'm trying to use the white gouache in its thickest consistency possible. And just spreading and adding the clouds. And now in-between just added that some smaller clouds at the bottom area as well. Now again, I've picked up a little mix of the blue and white and adding some highlights to these clouds at the bottom area to try to get it into a perfect blend, the dusk. You can, again, use a damp brush and try to get a blend into the background. Or you can even use your finger and try to blend it and get us mood or a soft edge to your clouds. So that's another two ways that you can go ahead and it's ultimately your choice. I would leave this, you're like this, only just adding in these two. Because this is a kind of fulfills Cloud loop that I'm trying to add to this painting. And since this is the first class project I taught us keeping it simple, not adding most of the techniques in your and ends. We're going ahead with this simple.
7. Day 2 - Sunset View: Hello everyone and welcome back to the top the day squash child Lynch, VR on D2L today, let's have a look at the colors that you need for today's class project. You'll need a shade of city even know, right? D open up pink or yellow once sienna and black color. So I have many, but they've done all the, all the four edges. And at the bottom, as you can see, I have a larger area deep down. Now I already have the blue color. I will just take out some deep cutoff in case if you have a city in blue color, you can either use a window, a cobalt blue, since I have the Coval plural, determine my Padlet. I'll go ahead with the cobalt blue color itself. Next, I will just take out some color. You can go ahead with the shade of pink or pinkish tone instead of this column. Now let's begin with a pencil sketch. I have omega pencil sketch that it's only the horizon line. All of it will be marked to the paints directly. So approximately from 35 percent from below the people, I'll have my horizon line mark. So you can see the CDR is quite small and we have majorly the sky area. Now I'm mixing in my cobalt blue with a lot of fight and I'll begin with this color at the top. Make sure you apply only a little of this color. Then we will pick up the white color, get a lighter tone, and then add the theme color. So you can see just a little blue that I added. Now let's pick up some white color and vendors follow and get an even lighter tone. So directly picking up some great quash mixed with a little bit of detail. So now I'm just trying to get the perfect blend between both of these colors. You can see, I'm just trying to blend the blue under De Carlo so that I have a smooth transition between what Glaucon, who has now been all that be in color, I could put in white gouache to get a bite of food because then we would be using direct, don't add the horizon line. So to get the perfect transition, we even use right in between for blending. These are all the techniques that I have discussed with you in the technique section. So just using a mix of both the blending techniques did equity between the color and using right now has been. Now I'm just picking up low banking economies to the bidding a deep, deep topped up by lush writing, a blending it on the horizon. Eisenstein wanted you to have the white Kano blame that the dean can know solenoids be easier to ln adequately, could get a book gave me. Now, I just think up some white washed and dried. The dean and the pink camo. Make sure I'm doing on your brush. So left to right when lovely thing in so docking rapper also be ending inventory. So not MOOC in C, I have got a perfect transition from the dean or the private jet Gao. And the bright red column is also not doc. Just picking up, going to devote off the white, wash and dry and you get the perfect theme, da. Now in the CV, yup. I mean, do you think will go up? I know I remember Brian, didn't we In case if you do not have to be the condo, you can give the boys MOOC on Neopets and I knew would have learned a lot of bright and increasingly productive. And after don't voice, Lu, lu auto boys team got no, you're getting a mixing on the top of the pain on global given beltway sheet. I would just applying this on Google. Jacobi II. I'm just trying to be gained from abdomen rise in mind. Now I've been just think up in the typical 14 about an upright and we orbit the sun EDM and I'm going to be high in my site. So I'm picking up debris idea know all beings who can become any invoice shortening sheet that is in your band it all, you can pick up your orange color and add unlimited and off, you know, now using my iPad, oh gosh, I've just used the people fist brash and the Mayan and tough this condo. And he opened the horizon line in the sand. Don't need your untitled blended using the right Washington this site. I'm just picking up a little bit of the white wash and dry bulb line. Does You know, make sure that you pick up a clean brush right bending in the right corner. Otherwise the other form of gradually began to spread. So you can see I just folded that did orange dots, IBD gracing my son mean young? No, I didn't begin running the clothes into the sky. He also for the blood side and I didn't wanna do think of the word CNR, carnival. And I would just add in a little bit off the whole bunch, be gone for good operational and also meets on this board. I would be adding the Laozi with what the metals that we know and that is this, the kinds on the off-season. Be having flowers more lenient, know the horizon line, the sky even just be adding a little bit older writing wash clothes. So you can see I'm just using the tip of my brush and adding some street lights and some hops. He smoked oil Mostly each ADL to get them cloudy lobe. So you can see I'm Jin Hee, GI and GU adding the sheep to the Cloud and act pleasing. I'm just fitting in the Congo after marking out the sheet. And we Jimmy Neil to the horizon night. So this is a great deal, ONE that we have formed in by mixing in bone C and D Scala and the blue car. Now seeing beyond the lit side, I would either that to also be the loads. Just make sure on about one thing that you do not cover the audience following the same idea that we applied, because we will be adding the sun EDO there. So it's very important to let Doug ERB did and not coveted complete E with the uploads. Now you can see about it. I'm just using the tip of my brush and I think some very small globes close to each other dying to get up both a cloak of clouds neo to the horizon line medially. Now next I have picked up some white gouache and just dabbing the excess acid. And in this window, using the Hofstede study of money, I couldn't begin to add some clouds Heuer. So you can see when it was on the right chrono, these gloves but not visible, but as we began to move to the deep color, I'm diagnosed eat these clouds are. So just starting with it to the fifth, I'm not applying much, but I should write uniting these so you could see I have the right Kahlo property was below the deep Congo and seem VII would just diabetes more line of loads underneath using the right credited says. So same the diet mini just siding with local floods. You are at the center finding it underneath, because at the bottom there seems to be much less bees and these clouds would the, uh, you know, bought boat management on the docket and loose. So going up all rapidly dividing them on the white backbone. And you can see I'm just using the tip of my brush and me invade Egypt did not organizing lunch Bhatia weight adding these clouds. Now before I begin to add the focus of the sea, that is the eaves I've enforced dining the deflection for the sum that we would be adding it the same DOD Jiang. So using the same yellow, orange tone, I'm just going to add very small lines into the CEO. The Lockean does that affliction in fees if you have an OH, yellowish orange to onesies and it didn't, you can add another bunch of white gouache, the weekend MOOC O'Brian, a good vibrant blue. So you can see I'm just using the tip of my brush and adding very fine lines. Nothing much. I'm just in this ain't no idea where to even be placing the sun in the sky. So accordingly vary. You were planning to please the sun, mock these old affliction out there. Now, I have just missed a little bit of the yellow, orange with white and this IVB adding the delimiter often iminium guano. Tomoko, my son, Yang, suggests open-ended end of the anemone lower and no IV blended bend the right. Oh, what informed that they have. And I can use this condo providing the song In-between the audience sheet that we modeled in the sky enough. So already small and low settings on Grindr for loop. So you can see I'm deciding the half of this song then even meant an ADR. I would just mark with the deflection of the Samnite. And then into the sky. So I'm just trying to show a setting sun in-between the glowed. So I've just logged in to half of the sun in young. Now using the orange colored, just trying to bend it out on the edges to get the whole thing it's on by default. So you can see I'm just picking up video into the color. I'm just using the tip of my brush. So easy for a brush does not have a pointed tip that I would recommend new issues poor D data class to add these DBs. Now, let's meet for the CED Apple dry completely, and then we'd bring in adding the four loony mean. So now my CEO is Khomeini dried and I'm just picking up some black color to begin adding the IV, the deeds into the CEO. That is the flow log d, d, which is the main focus of this being. So just think of some black wash in a bowl thing consistency. Since my dissent does not have a black Kano, I'm using the black color from the brand neighbor Barnett masterclass quash sick. First Eigen begin to add some rocks into the CEO. So baby nine dB in z, I'm basing these Sharpie. Yeah, I'm trying to give them or not, she sheep as much as possible. Cmb just going to add it all up, vote up the block demise until it's gone even to black. Now in the CMD, just saving fuel levy small and rural service. Now using the black poverty itself, just using that they're off my brush and begin to act the beef eat news. For us that might involve debates in the same kind of formula. Make sure that it wants I'm in Google, sodomy law, the ways we've used our New York. Now just trying to pull offs water used from this big brush that ART. So I did not just using the tip of my brush, I added not new and the, the sodden ERPO and into the one above the sun ETL. And then once more than one below the sudden E naught cell doesn't need an OT about what the sun. Suddenly this big old ranch, I'm just dotting smaller branches on adding these. Not my black color has stolen that didn't made by our new under the sun. I want you to think the sunlight, hence I'm adding in. We then buy good enough black. You can see it's a bit engaged on having that line defect off the sudden EOM. Know, seeing the Eigen just keep adding these more than EFS forced onto, more than lifting right side of this big stem that we added. Then even add some different kind of bras and figs and looseness of the Borg them enough and cover the complete bought the media with these kind of leaves. So you can see, I'm adding in these leaves in different shapes and sizes and they're moving in, defended and choose so forth. Dad, needles, leaves moving upwards then see we leaves to the woods and of your knees. Just a name that did diagnosed stool. Now in the CMB, I would add a few of them even under the mid site. I'm even on the live site. I've tried to meet me if she didn't choose of these leaves. So solve then moving up floods often tilted downwards, Sabbath day moving into genes. So in case if you want, you can even add a little bit of overlapping on to each optimum. Now, again, you see after the ID wanted to leave, I added another one, again, moving up boards. So this is how you could guide to add mediation so that all of this looks notch did. So you know, you can avoid window defensively of the Levy who did not want to go ahead with such a big one. But if you're adding in this d, d1, make sure that you're using appointed did not audit monocytes detailer brush. So I would argue hot these days commingled maybe even because this is going to be the main focus of upbeat. Now seeing BY had the board didn't write it, just died, Did, did a lot to what's the downside. And you can see just one bit done via have added in so far, I'm sorry, one branch site be added in so far. And it's looking soulful, faked on inside ego defense lobby. I'm creating a form. Is ADR and diode being nice to meet you all. Yeah, I'm just dotting smaller ease of the same kind of leaves that we added it. So we'll be adding one focus even though Sando a job with a big launch and then smaller leaves popping out from there. And then the rest of the ILO, we're just going to add some smaller these and some big obese, but not that db how we added the first one. So I would take will make boo, boo add at least one such dd o, you don't leave, that is a big leaf and then smaller the swapping out and then you can add the other leaves less DD ones. I detect these bigger ones as I might begin. So this creates a focus and be obedient and add some more detail. Look to the name. Now yoga and the right side, I me just pull out a few of the class towards video and just using the tip of my brush. And then again, maybe just adding obese one. Vote you out as so that I have about my being, so that it does not know proudest the Bushmen just means object. So another one would do kids eat. This is a very small one, not as needed as we did the first one in the same boat we want. Now on the next side you can see I'm just didn't be adding in these strokes without thinking much, just simply cross dogs. So you would only have a morphic balance out the what do we know, which is the focus? And that will fit one weeklies that we added the somites, the whole thing Moody to the BD. Now, I would just be open to dispute of the white wash and gave on the right of the sun Yung. I'm Lindsay would be done with this theme name. So that doesn't return anything with the reading from today. Let's remove the masking tape and see why that would be in basically seen that good friction in the sea of the sun isn't it didn't done? You can add a right to own again. Okay, so I decided on the dividable in New York, there are gains or it's looking a lot more right door and knock that down conflation clean, easy if you've seen that your deflection is also done, you can add in a little bit of a bright orange mixed in with white, so I can get this bright highlight and summative fiction will think now begins and where it will leave the masking. If the Muslim deep I deny look for we'll be mostly don't even know what day off your ages and always to move the masking D once at least you images of the building is Orphic needs IE. So you always are being deep what the rule, I just forgot one thing to add the limits of beetles that Mozi and other afflictions on Google Glass tools that we have been doing. So I didn't think he becomes a buoyancy and Ohio and just add some highlights. Easily. Move on to the mosque indeed, will saw before with the musty D. But since it's meeting the Sendai and even if you remove the Muslim League, you can add these primates. So again, just using the onesie Anaconda and using that they woke my brush and I'm deciding these primates. So you can see Justin, It didn't off governing the endoplasmic E Young, I'm the older agents just feel that and if not who do not sign and window all ages, that mean her up. Even a liberal who decided an integer, thank ship. And Norwegian. That will the needs that we need to listen the ADA omega naught into the tweet if the buoyancy and affliction So that it guys did that they provided fate of the sun on the needs that being rough model. So that's it. I'm done adding the defections. And you can see by deciding that it developed a night effect with the buoyancy and have gobbled up and gets a completely different look on such a 0, no light effect of the Sania comes into effect. I hope you guys enjoyed the need to often totally these shots. This is what we did so far. I could see you guys tomorrow into the input D. Thank you so much to each one of you for joining me in this codebase Bush challenge.
8. Day 3 - Country Side: Hello everyone and welcome. To need three, the fellows that you need for today's class project, city in blue, right? Dean. Yet your group, once the sap green, yellow, green, and black cuckoo. So you can get on the column is tricky. I have may be good. They don't want the wonderful edges. And I will begin with the fences, gates, forest. So let's begin by marking the horizon night fullest. Now I have just tied to this one mountain range on the right. And I'm rocking the Bodley in descender out the board that, you know. And I've taught me over the horizon languages going to have a really small see on a beach kind of intermedium. And we're going to have a sandy in young so that you didn't eat your horizon line is going to be the CEO presented as the bot week MOOC design speed happened. It's a theme at GP know. So let's begin by painting the sky to the list. So what we do this site and be cynical batch in 50 weeks, the good old site wash. So I have to go to his old beyond rape or move UP really useful about who are sitting room since I loved it. Two of my brightness, I'm going to go back to the platform. So after all items associated or the stickleback sukarno and then wrapped up wanting either just become quite washed out guidance with Doak little combo. So now you can see just using the right goto, I don't get radiation or goddess. Well, I'm fine. Who added into them and engage. But anybody, if nudges us that God was going to the mountain range, it's cool quickly OR gate because the mountain range is going to be often darker blue. So that's perfectly okay. And since we are working even to wash, it's a forgiving me do on all the mistakes and doing is possible. Now I'm just using them to deliberate off the blue color the dog and trying to enter profit gain in abject dope, the darker sky at the end of the horizon they wrote off the night on the right side. Now using the becuase Bergamo IV being deep in the sea, India, you can either use Adobe Fresco auto vehicle if you design a bit in our binding, or you can just make some EBITDA, EBIT, all fueled, all begin being with moving good ASU. I'm using this color, using my round brush. I'm just dotting you didn't. We'll see. Yeah. Just be memorizing name off the list. You would just be adding little feet. Look not much David ones, but just enough denote deriving their majors and vices, St. Peter the Great. Now next I began being through the mountain. So so being deemed the mountain deed, I could just pick up and into the duct buoyancy. Now, I'm adding a pinch of black, the width. So I have some books, you know, you might buy MIT. I could just meets another two-bit, the black goo it, I'm good. Depicted darker boost of buoyancy, you know, Cano an atom while engage on the right side. Now made sure that meaning you're asking the monk to gain she guided media. The foster mom didn't I'm not added in those cheap need obese. So you can see I'm adding the mark engage able city. Oh, not sure on how the LED go meet and unfinished niche. Now I've just filled out most of them do games with an ID column of the policy in your condo. So I just typed it in. It doesn't need to be dusted on my palette and get a bite it off the buoyancy and Archivo, if you are after 1820 and NACADA, we're going to take me use it since I already have a black mixed in it. Now, next time you pick up the and local, she'd get on the edges of the box B. So on the right activates. The right side is going to be again themed enough. So this is the dude batch is going to really get an e-mail. Excited that people batch onto the beach is going to real estate you or cushy not descend diode and if fact on time, even in which the thing enormous sheet, this is just going to be the color block is there on the details that even be adding one of these was not remove the right Who's site? I would pick the act and who might keep Gamow acid? Oh, I wouldn't even a dbGaP and fungi, but again with the yellow as a feed, that ego will be moving so the green anion. So I've been since the remaining video again, we've seen in rural shimming, you can either use again wish theme for this group is all you can even mix it a little bit of Julian, would you have been in cases you do not have a really huge be U1. Now, I'm just filling that in, meaning email with the yellow Kugler using the same no rush. Now next, I would begin painting the pathway. So for the path we will be using a mix of black carbo mixed when it mixed in with an exhibitor. Black NuGet replace the womb. If you'll mix only the black and the white, boom, you would get a blackish me, boom. And I wanted to abuse Jane, Bruno just flip over to the effect of the sky as well. So that is the reason I'm mixing it with a tint of blue color. And I'll get this grayish tone and apply it or do the entire path Vimeo then even be done with the main color blocking of the entire beam. I was just adding a bit of denial of the right color to this mix because they seem degrees a little darker tone. So in case if Ruffini of British soldiers perfect union not add this additional right? And it just started to develop it and then apply the Endo rule using my flat brush. Now BO doesn't gives me new CEO and CFO that the one you can Foster who was a smaller-sized brush, I DO. Edges of this fogged to be and things either it is too big with this green balloon using a flat brush, I'm in V6, so constitutive using the flat brush did and then you can go in and activate. He made this using a flat brush, just neoplasia biota just now I just give this abrupt will shape your one to the right edge and you can see that it took me a normal sheet has been picked up on the black color that was there is getting activated. So I can just read on my brush so that I have a poll link between look on most. Now makes them picking up the mixes that you have this app paint Gatto, and onto a yellow got enough. Either just I'm smart across DDS. So I'm just using the pickle white rush for are these just tedious? You can see I'm just dotting video to affect block March because we can still be on the rocks event on this oh, yeah, No. Or species. Now again, using though it's a cool look on this. I'm just adding the grass dogs on this light doping door that we added. And this time you can see the schools. I'm much closer to each other on this complete frightening Ethiopian refitted with such class Folks. Now next time again, picking up the buoyancy and your condo, and I'm going to begin to act the rocks yellow and the yellow, our cost base. So Sidney just died based more on drugs. Could the buoyancy you NACADA horse? No inviting East. There were overlapping the grasses a bit. That's both the people gate. And just add these dots in different shapes and sizes and peace and radio, John Dewey or near to the pathway, then asked that the stripes, we would add another dot dots into breakout room keystrokes as been. Now in the same green are on the right side, near to the edge of the part B, I could just PID release one mark kind of DD or sand or do the CNO COCOMO. So you can see I'm just using the Democratic Russian adding very small drugs and my defect using the tip of my brush. So add this onto the Sendai in Oracle bought baby lacking these so that it looks all natural. Now at the bottom you'll either just starting in the smaller labs are a little bigger one just as B or bleeds stun on the left side, seam be just adding a few at the board, do your in-between those smaller rocks. Now blue mark of distinction between this Augustine and the gene for you, I think, yeah, I think the rocks onto this entire line at which the yellow and the green sheets on mixing. So just that's what anoxia like this try to keep the shapes and not him. I'm not sure. Now I can just pick up some whitewash onto my magnet and I will begin on in the clouds onto the Sky Italia. So I asked, picked up the right Washington thick consistency and I'm just using the tip of my brush, be facing down the beans and I will just use my smaller thing. Go for blended in blue sky at thesis, not completely, but just submitted. So now BD found in Egypt studying smaller cloud shapes using the tip of my brush. Just this. Folks like me are known in the technique section, just using those strokes show off. Now Next the window boys column, I'm just adding in a little bit of white. I'm using my fine brush. I'm just going to round up until October leaves effect into the CEO. So I'm overriding the views of bank and I'm using my mini by not rush. So you can see it has such a very fine point that I'm getting these final waves, DD, indecent would seem that the lighter bone is so dark autofill want much to begin. Oh, you move either proportion of bright condo, but I feel this is full-page equal fit for my composition and i've, I don't want the beach area usando much. So you can see just that easy movies using this cheap lines and some curvy lines in between and pleasing the lines in-between each other on to the next slide, as we discussed in the techniques say shoe. Now after this I will begin adding the boundaries. So I before Speak up the buoyancy and knock on no unused monocytes and I'll rush, I've been forced out in the main stem of the tree. And you see I'm facing it diagonally and it will be in between the rocks or onto the dream theme. Now I have again shifted to my mini liner brush and I'm mixing board my yellowish green and sap green color and I can begin adding the leaves your CPU, this bark of the tree that we are adding. Now you can see I'm adding very small and Bonnie's on even the stalks coming out from these palm leaves are very small. So make sure that you use a very fine point brush so that you get these finer details in case of airbrushed and not have a pointed tip, I would recommend, you know, goo, goo and shift to what size double 0 or size 0, brush to get into details like this, you can see such fine details in the GI and make sure you do not add them too large. Otherwise it may cover the entire sky and the mountain and the middle lose the sky blue. Now in-between I'm even picking up the yellow ocher shade and when to add more of this with the yellow ocher and a little overlapping highlights, but upon sienna and yellow ocher onto the green leaves and we landed. And using the yellow, adding a little highlight on the bark of the ps to give it a little highlight on a distinctive look, found a mountain under laws saying be either begin having another T on the rightmost side. So for spinning with the bone CNOT Gamow. So now we can see this G is more towards the right and it is larger as compared to the fourth t that we found it. Now again, using my liner brush either begin adding the bomb is just as be added on to 4s1, supposed to agonized a few leaves with the green sheets and didn't even give her yellow ocher under bone CNR sheet. So you can see the same one. So I'm adding them use just using my fine liner brush. And they're quite small and looking much detail and very small and not governed by an diets for me, make sure that these needs do not cover the entire clouds. On your right side is when you can see the clouds us to the visible zone between the needs that I have added in. Now using the lighter green, I'm adding the highlights on the darker green leaves because And just use the Jacobian norm flaws for riding lawn of the leaves. Now seeing V, I use the yellow ocher Cheetos way to add some highlights and then I'm gonna do with those, the bone CNR Crato. So all this will get more effect on national MOOC away. Now formed the right side, I will just add a few of the leaves popping out some of the height. So basic need, this G is not enough site, just a few of the bomb needs on an on-site. So just adding good baby down. The reason I'm Feizi hot bloods on fees and our roads and I'm still using my smaller fine I know Brush data and you can see it looks so much the dean. Now using the ghetto, I would just wanted them to have dilates to the back of this g image of a button to add diets, PVC. So just some very fine lines that they gave to all go. And you can see that G gets so much more of the data. Now picking up the same gate NOR which we used on the bottom III, IV just done in batches on girls that I knew me either on the bowl, EDO on the left and the right site. And get more detail to the rocks. So even on the right side of the door, just add images of these highlights. Now losing the bone sienna color. I'm just adding VD find notes. You all though we had the beach on the body is connected. So that may happen. Distinction between the block we on the beach as spin. So you can see very fine books that MPC and you're now using the same buoyancy in our gut or Eigen, even on very fine girls are on this site vague. The hotkey and this CNO Caufield areas connected. So these folks would be unlocked closely juggle so that I have a distinction between met Bob and all of this feeding a nuance. I'm just adding a few more of the smaller box, your bellybutton, feed the pieces and D1 between the old rocks that we do. Now let's begin to add some finer details. So first I have picked up the black color and using my smaller brush, I would post data board, you're on low or center left side. And it would be New York to the bot. And then we will add a small reflection of this on the pathway as well using the blade own, I'm just placing a big overall cure first. Oh, very good. Ok. Got on the beach. So just trying to get the proper blend it so that it does not look much more about the propulsion. So just you assume that individual to get it all together to get a book or playing, they're now using this API goal. I'm just going to add a div wish effect. You are forced on the mountain and then I don't want him from there, but I really tried to lead this bush change so that it looks nice. I'm just tidying up a little bit shorter. I'm the work done on the fact we now can give more depth to the address you want to. I'm using the same donkey nor an activity often cross strokes. Now using the ones you know, camo either just add in a nano all branch on our box your vigilant, we know one scenario, so basic and either G is not to not move just a buck off the G isn't our new. So just to add adjective and write that, that is what is enough freeing act present. Now I would just pick up additional my hand because we even begin to add some reflections, often knocks on that born on to the part we need young. So I'm going to use a very diluted color of the green color that we have. And I can just begin to enter deflections often rocks on the fact. And I did not bid with official better, but I feel it stop. So basic need, the sunlight effect is from the nest site, hence the deflections at onto the right side. The box B. And you can see I'm dabbing off all day access being done, adding district prediction. I'm dabbing even there exists some Oozie the official quickly. Now, even with a will add reflection using the very diluted a little off the Greek hello. And I've adapted this has been with the visual Soledad. It looks like good infection and not too dark. Now using the damp brush I'm and just mended this reflection ven o, you know, back to me email. And I guess if you'll see them IPO pick up at the top of the bond to be follow, you can go ahead and pick up the color and blend the deflections or fake. Now we're going to just add this modest. Make sure your triangle to the left of d deflection video do not match. And I have that Diebold's losing my feeble. Now, I think up to Z sheets and citizen SID and all bus B's bid delete sheets making if the fluid viscosity effect. So if lost, I didn't it just a glass with delight keyboard and now picking up the being known an ideal fuel fit. So you can see I'm just dabbing the paper with my brush for adding in the grass effect on the left side and on the right side, I have used the grass schools using the tip of my brush to add the stalks here. Now, picking up the white quash Kamel, and I can just add this more important to work with. The white quash has been made sure that you pick up the following are good consistency. Audio can act as either with the right permanent marker Auto, right gentlemen, aspirin. Now let's add the final details using the point of death. Even. So I've shifted the web pointed to bend and I will just aren't the BBs on the bond to be using. In case if we do not have such a band, you can go ahead and use your fine brush and the black color to add these details. But adding these details with the pen makes the job much easier. And in between, if you feel that your pen is not working when just jump onto a rough speech and it works perfectly fine. Again, this is appends on the plant unipolar and it's all bomb proof bent, so it's perfectly suited for painting and adding these details. So just argued that the deals on both the edges of the part B. Now I will use my omen entwined Ben, and begin to add the details in the center of the path. We just simple lines to depict the movement or the goals of the box. The lockout, this bang, you can use your right TO wash for the seed and just that angle, few highlights zone and dad window by codon it says Just a general pitch. So that doesn't be an AD GitHub being deployed deeds. Let's do most of my C, D, benzene, find that being demon does in ages me and it didn't guess though by no movie the Mostyn, the moment that an island solving people so that you don't often wind up pages and made sure that you and I just don't compete need we're going to remove the masking tape. So your reserved for D3. I hope you guys enjoyed painting this country side view with me today. I will see you guys tomorrow into our fourth class project. Thank you so much to each one of you for joining me.
9. Day 4 - Sunflower Meadow: Hello everyone and welcome back to the 30 day challenge. We are on day 4 today and we will be painting the simple sunflower middle loop. So the colors that you need is a leaving group by yellow, orange, yellow, sap, green, and black color. I have when people don't all do all the four edges. And I will just begin by a small pencil sketch that is just marking the field area. I have this black spot CIO, but it will get covered up completely that the sky and the clouds, they don't know this time for the sky. I am picking up the sediba in Bukavu and I will mix it with whitewash together. Perfect sky blue balloon. If you do not have a city in blue color, then you can go ahead and use the cobalt blue color has been sealed. Exercises. Now to this color, I will mix in a lot of fight colored, get the sky blue cone. So I'm mixing it your alginate and adding the blue color little by little so that I don't have much darker because you can always make the dawn darker by adding little while you are painting so that you get different variations in the sky as well. Also make sure that you do not add much Bordeaux because if you will add a lot of photo, you will lose. So PQ look of the wash bins and it will all turn out to be transparent like Walter Carlos, which we don't want to make sure that you do not add much water by blending or mixing these cameras, you can see I am hardly picking up any water and I'm just trying to blend the colors little or as much as, you know, dropped off for the possible. Now under the entire sky area, just using the sky blue color and applying even born of this color. And then near to the line that we have Mark, I will just add a little darker Boone by putting in the blue color and blending it with this color. Don't worry if the little pain cause inside the field area also since it's wash. We can even cover up that field area later on, even if you apply the blue color right now. Now I didn't my side juries, I even begin to add the color blocking. So the field area has been so far the scene either be using yellow, green color and I will be walking then biophilia false, we decide to go. So I wonder, do you have discovered radium microglia? You can go ahead and pick up some follow-up and engagement creating art. You can use either any biking board or just add in energy. We're just going to be an open door green colored to get a yellowish gene board and undo then dial seemed a mako to this EDR. Unfinished will leave me with this color for the force law. So I'm almost done rocking the field IGA, but the yellow-green column, and it already looks such a pretty color combination. Now does this job my sky area and has dried completely. So I will just pick up some flesh, right quotient, begin to add, add the clothes, this sign, these will be adding little bit of the fluffy cloud effects. Not much, but just with one color layer will try to get the fluffy clouds. So we'll go step-by-step first. I have picked up some fresh whitewash. Make sure that you use white gouache without any mix of Canvas so that you get the fresh or opaque white cloud looks at. We'll try to add. Now I'm picking up the calendar. Perfect consistency. And very we want to please the Cloud. Begin first, either Mac or too little of the sheets, or just begin moving your brush in a circular motions and begin adding the Cloud. So what I am doing is I'm forced marking out the outline of the Cloud that I'm adding. So this is a big cloud which is New York to the field. And completely touching the field area is what I'm trying to depict in your. And then we have some flowers popping out on these clouds. So first I mark the outline. Now adding a very thin layer of the white color, you can see I'm just moving my brush in circular motion. I'm getting that cloud and that fluffy cloud effects. Now, after this in-between, I shouldn't be adding little off the light blue bones to get a perfect, you know, oh, and the Fluffy low. So now just picking up a lifted and blue mixed into white. So you can see it's major knee wide and varied to tint of blue color. Now in the C V, either try to blend these colors in the same manner that is moving my brush in circular motions and you can see how easily I'm getting a blend. And then at the bottom again, even be using white color. And that is all will be forming this simple-looking fluffy clouds. Now in the rest of the water media and distilling it again with a bite by just moving my brush in circular motion. And you can see I have called the perfect blending device. And even the light of newborn that I have caught is perfectly blended. And using the right column only have tried to go up the light people and try to blend it better to give that fluffy effect. So just simply moving brush in circular motion, very patiently, wound up line much facial other ways of walking. Blue collar may get activated and you may not get the white opaque loop. Now just adding another base model closure and either just add little slow at the top ET on the right side. And picking up religion of the night, trying to blend it up the water into the background of this by now using the scene light blue and the white ones either just type it in half C strokes and some smaller clouds on to the see. Now at the bulk your just using the Big O of migration, adding these cloudy. And you can see all of this is just becoming too big. The sheep and the side begins to look so Paul, thick just did the clouds it says. And having the middle, it, you look perfectly all together. Now next time picking up the sap green color and I will begin to add the leaves into the middle ear. So I'm just using my round brush and just using the tip. I'm just dabbing that if an adding these leaf shapes varied and not adding much detail ones. So you can see just using that they're adding these and you can easily get these shapes and just fitting it needing some gaps because even still be using other tunes of greens to add in VPN. I feel I need to add one more Cloud9 spelling too to cover that lifted blacks code that is visible. So after adding greens, I haven't even I add that code again, get the right color. So adding that cloud will be optional to you because I want to cover that black spot too. I'm adding in case if you want, you can add it as an NPC. If you want to skip it, then it's perfectly your whish. Do then just keep adding these grass and you can see my knees actually moving in all directions. That is, oh, you know, I'm tranquil VD them as much as possible so that it looks all natural. Now for the next CEO of leaves, I'm just mixing my green with a little bit of the bone, CNR cargo to get all the green kind of a color. And then using this color, I will begin to add the second layer of yeast. So basically randomly keep adding the news that this solid has vents. It is almost going to be like the same color, But still have a little variation in the ordinal value. And that will I be and mushy and a stick video middle again. Make sure that you do not cover the entire light gene IDA that we added in the water because we need the lighter loops also unbelievers to be adding much like the clouds are much lighter leaves as well. But make sure that you do not cover all of these also. Now just adding a few more. And you can see I have a bottom Leo green, the dark green, and then the second layer of green that I had used in the three color tonal variations of the gene color that I already have in the field. Now next for adding the sunflowers, I will be using this permanent yellow light color and a little bit of the orange color. So I already have two orange color in my palette. So just picking up some of the yellow sheet, you can go ahead with any medium yellow gone. But before moving ahead and painting Gogh's sunflowers, I will just add that one cloud which I have ux for covering up that black spot. And if you do not want to add this cloud, you can perfectly skipping. And in case if you want to add, you can add it. So you can see it will still look perfect because it's all in proportion and everything looks sync with each ago by just starting with and one more thing, make sure that you do not begin to add the sunflower was until your leaves a perfect nitrites. Otherwise, the colors may begin to blend into each other and you may not get the yellow look. Now just using a light blue blended into the background again and you can see I easily covered up that black sport and it's no longer visible. So now let's meet for my leaves to dry and then I'll begin adding the sunflowers. So now my leaves a compete E-Trade and I'll just begin adding the sunflowers, very small ones. And I'm just using the tip of my brush and adding these petals. And you can go ahead and use any smallest size brush all you can use a round brush which has a pointed tip and add these details. Or you can even add the vectors in the van stroke method if you're comfortable that we're supposed to adding in the LEO, we take a look, Hello, and then I can just add in a little bit of the orange highlights. Now you can see my sunflower is half into the Cloud and hop into the middle. Seeing the Eigen just be adding a few more of the sunflowers. You can be the sheep and the angles of the flowers. That is, you can add some flowers which are facing towards the right or tilted towards the right. You can just type some sunflowers from the overview view. You can add some sunflowers and the side view. So it's perfectly you wish to be read or angular octo flowers that you want to add. So you can see in between my blue flowers already I have VD, the angular look of the flowers. Now, I can just add another one. You're beyond it. Careful. Do not apply too much pressure and make sure that your green color is completely dry, otherwise it may activate and the blue handle a solid, the yellow and the green mixed together and form a lighter green too. First layer of yellow settles in. I will begin to add the next year of leaves. So I'm just picking up some whitewash, mixing it with my sap green and getting a lighter green cone. And using this tune, I will begin to add a few leaves into the middle area. And after my yellow area of the sunflower oil will gi Eigen adding a jewel of the orange touches. Now you can see very randomly again, I'm adding in the news with this color. And I'm just moving the data underneath in different angles just as we were adding the darker green ones. So make sure you add them far from each other and not cover all of the darker leaves you. Now I will just add a few more of the sunflower and very small dots or trying to depict some of the sunflowers which are very far and marginal or you don't complete view. So just having simple dots using the tip of my brush. And you can see my paint isn't a good thick consistency, Kansas visible even over the lighter blue. And I'm not losing opacity of my beans. So just to Google Docs, you can see trying to depict some sunflowers which had been fired in the view. Now using the yellow color, I will begin dragged. And if some of the highlights to the bigger some flowers that I have added in, I'm using the same brown brush to add in the details, the details, even the details for the sunflower. So you can see one brush can almost do all of your pin things. So rather, I'll just do brushes, flat brush and a perfect size, don't blush, which has appointed mix. Adding all of these details so much easier and you don't have to keep shifting towards brushes again and again. So now on just one side of two vectors, you can see I added the orange highlights. Now picking up the bond sienna color to add in the center of the flowers that I have added in. I will also be adding the stem to these flowers using the same bolt sienna color. So just a simple line moving in between. And once my yellow or completely journeys, I've been at the center of the flowers as Ben. Now again picking up some whitewash and this time I'm mixing it into my yellow, green color so you can make your own either light gene with wide audience can add in a little bit of your yellow, green, and white to get the stone. And now using this color, I will just start a little more detail kind of Elis look to the stem of the sunflowers that I've added in. So basically, beginning with appointed diving. I'm pressing the belly of my brush and then lifting it again to get that pointed tip. So you can see it's looking so much detail leaves and, you know, perfectly giving the look to the flowers that we are trying to add it. Now after this dries, I would just I didn't have little touch of the darker green in the center of these, these to make it look more realistic. Now just adding a few of the leaves popping out from each alga and trying to make it look all the moonlight. And randomly if you want, you can just add a few of this DT leaf urine. They're trying to depict, you know, some of those sunflowers which if I add some more blue, just the leaves visible. So these are the ones to leave. Though you don't, you'll begin to contain stem. Press the venue of your brush, and then again, lift up whenever you are satisfied with the line. So with this one size brush, I can add a video size these just by adjusting the pressure by pressing the belly of the brush. Now picking up the bond sienna color and adding it to the center of the flowers. As I discussed with you previously, I feel like adding one more sunflower towards the right side. Yeah, I didn't want more sunflower oil onto the right side. And do this by Eva, you again, Shawnee warhead and I'm more of the sunflowers if you've been to do so. I will add 01, you're on the left side is better. Ovds 11. Now quickly adding in the audience HDD guys been on do the AG's office or, you know, a few octave so that the innuendo audience will automatically each ago. Now picking up the bond CNOT Carlos and I would just, I didn't know these flowers then that is the stem and the center of the flowers. Now you can take those stem off of flowers as you want and very well you want to place it may not be seen as mine. So after adding the center, I'm just adding a few of those detailed ones to lead to these flowers also the dyadic. And it's okay if it moves into the sky, it looks perfectly fine and, you know, adds a different variation as well to your painting. Now using a whitewash, I will just add a small moon go into the central almost of my sky. Again, you can add this ego using a right, gentlemen, all the permanent marker that I discussed with you. This time I'm adding it would wash and you can see I have pick up the paint is not the consistency and I have COPD opaque look to my moon as Ben. Now one last detail to add. I've shifted to my mini liner brush and using the Jacobian. So I'm just adding some of the Wien's dd to these leaves, just using my big brush, make sure that God or leaf is dry so that you can add these details easily. And in some of the leaves I'm just adding very little dB and that is just the stem and little of the VDD. So you can go ahead and VD the details as you want. So on to slew of debt. You can see I'm just adding the center part and not adding more lobbying details. And after this will be done without being thick. So we are done with our painting. Let's remove the masking deep and see your final painting. Make sure that your leaves are completely giant before you begin to remove the masking tape. Otherwise it, or you know, spread back onto the edges and always remove the masking deep at an angle from your people and against the people. Otherwise, the colors that are on the edges, all are on the masking. We'll come on to the edges and the window edges again. So we'll just remove the masking tape. So your is our painting for D4. I hope you guys enjoyed painting the simple middle look with me. I will see you guys tomorrow into the D5 class project.
10. Day 5 - Warm Sky: Hello everyone and welcome back to the WD VR on D5. Now condos that you need. So today is either right-click on open up being white, yellow, orange, violet, and black Congo. So I have maybe put it down. Let's begin with the pencil sketch. So I will begin mocking down those houses your at the bottom. So you need to go ahead with the same layout of the house. Do control D change the video or the silicate that we coordinate all of the houses as for your joys. And if you want to go ahead with the same one, you can either follow me along or wheat for me to compete the sketch and then all just 0 date down the seams sketch. So just placing two houses in annuitant diagonal view and adding some smaller houses on the left side as well. Now after this, I will just died a few of the doors and the windows to the houses that we have added in. So I'm adding all of this. Nothing in specifics of that is the reason I said you can go ahead and you know, ONE change. Does it look it if you wish to. Now let me show you the sheets that we will be using for the sky IVB using the sheet of write J, woman and orange and permanent yellow deep. In case if we do not have a bright red color, you can go ahead and use a bright open o or any pinkish tone, because my bright red is almost a pinkish tone more. And you can go ahead and use any medium yellow and an orange sheet. And in case if you do not have an audience shade, you can pick up 1 million and adding a little touch of the yellow color or directly use the audience follow if you have it. So I'm just taking out onto g Kahlo's onto my bandwidth. Now boo, all the t follows, I will be mixing in white gouache to get a little BC, don't for my sky IDA and I would be adding the clouds has been using these fellows and different women and bad news. So let's begin blending the colors. Make sure that you would not add much of four books. Try just using a wet brush and blending all of these so that all remains or big. And you do not know Socolow loop. So you can see my bright red color is bright pinkish tone, sort of a sheet. So that is the reason if you do not have this bright red color, you can go ahead and use and operate up being mixed in with an agenda. Right now on the top layer of my sky, I am beginning with this Kano. Now next time blending invite with my permanent Adige, I feel I need to pick up a little more of the permanent orange icon for picking up the sheets so that Dubai Ledoux so that I don't have a rigid for using it again. I tried to remove the sheets as much less as possible and it's always easier to remove it again. So now mixing the audience you would the White getting obese and orange dorm Eigen Begin New York to the bright red color that we have applied. And I'm trying to blend both of these and get a perfect transition from one color to the other. So in-between veterans and the need to pick up the color for blending like IB Dr middle of the bright omega mix, sorry, the bright red mix for blending in. Now next, mixing in the yellow with the white and I'll apply it and do the rest of this guy. Don't worry if you run a little into the house, we can bubble up as the houses of a docket balloon. But as much as possible if we can avoid it, that will be good so that you won't have to wait for to dry for being Dinka houses. So you can see I've tried to avoid running into the house, but just to know, do they do good moves? I have still done in blue because it makes it easier for blending and getting that perfect transitions. So now you can see I've got a perfect transition from the bright get to the orange to the yellow color. Now using the same colors of the sky I've adjusted when they spin doors into the house. So pasta. The mix at the top and at the bottom your Eigen add in the yellow mix. So just leaving the middle space out there. So just trying to reflect a little bit of the sky through the window. So blending these colors, and now you're, I'm just using the yellow color rather than mixing any odd in GenBank. Now, I will just be adding a few simple clouds into the sky. So for adding the clouds, I would just pick up a little bit of the project colored again so that I have a docket wound and what I used for this guy. And I think it makes it through this column mix that I have in your so Justin, It didn't do it. Not much. I'm using this color. I will just we can do at the simple clouds or that is, oh, you know, the clouds that we learn using or just the straight lines or that he didn't call the lines. So that is all we are going to be adding long cloud system with three color variations of the colors that we have your. So first I'm using this color at the blending point of the orange and the red balloons. And then majorly on good or orange tone from the edges you can see I'm just adding simple straight lines to form some clouds and just getting it done your Santo and leaving it and, you know, in-between you can see I'm just hiding some curvy edges to these lines that I'm adding to reflect match to looking cloud. And then when the dog, I would use a little bit of the orange color to add in so that it pops up under red as well. Do not worry since we're using wash, even the orange group or a bulb on the pink perfectly. And it will give you that opaque look. Now just using a damp brush blending this a little bit on the bottom areas into the sky at pieces and not onto all of it. Now, in to the orange color as well, I have added an image of the orange tone again, and you can see just adding the clouds onto the pink area with the orange color and the orange clouds standard perfectly even onto the pink door. So that is the best thing about wash. Any color can be used over which Vocaloid you want without worrying about the darker and the lighter consistencies. Now kneel to the pinks also at the bottom, just adding a little bit of the orange highlights. Now next I will just pick up a little bit of the yellow without mixing any right to it and begin adding in some yellow clouds. At the bottom of this guy, I'm using the same method that is just using the tip of my brush and adding some straight lines and some curvy lines and some lines with a little bit of though, you see a cloud cheap, very small cloud sheets. So just using these simple methods to add in the clouds to my sky the same. Now let's begin being being the houses. So for painting, the house is the first color that I will be picking up is the shade off D. So you can go ahead and use any violet color. I can be using this violet deep thought and build this Eigen be mixing in a little bit of black and white to get it into a grayish tone consistency. So make sure you pick up a little off the gallows on leave, but enough so that you can paint all the house with the same door. Otherwise, they may all seem of different colors. Now, good. This I will just add in order to dinged off the black color has been. Now I will quickly blend this color and get the perfect Z. And I can not be adding motto for both. So make sure that you do not add much water buffalo, that your color remains Obi I haven't decided not to do denture of black again to this so that I have a little MOOC leash or violet balloon that I want. So in case if you feel any of your calories less impudent, oh, surely VD the proportions of the column, except we are adding it. Now using my angular brush, I will begin adding 0. This New York, the house's completely, so just using this column, we will paint the first layer and then we will be adding the BDS to the houses needed on. Now in case if you do not have an angular brush, what you can do is you can use your small-sized flat brush. Also, be careful about one thing that o, x1 and much into the sky. This time we need to get into the sheep of the house. We have added in and make sure that door, or you can even use a smaller sized round brush, mark out the edges of the house force and then use a flat brush to fill in the rest of the idea. I will just add a little bit of bite more because I think the color is a little shop. So just picking up some white and I haven't added to get a little lighter because on this column, the highlights on the house would not be visible. So that is the reason just lightening it didn't it didn't bit more so that even when then when we add the house D deals with the darker dawns, it will be perfectly visible. So that is why you'll see, oh, it's very easy to, again, you know, covered up. Now since I've already added the Docker bone there, I can still not in an overload of the night bone and cover up the Docker pull easily and have the perfect Oh, looked at i1, which is not possible in actually in watercolor if I had applied in the Docker bone and one good a light dough ball. Now just getting the edges properly. And I've included the rest of the house completely with this sheet. Now for adding the rest of the details, I'm shifting to my smaller sized round brush so that I do not slam into the window or ruined my sky look, suggest using my own gosh, adding the edges and filling it completely with this thought. You can go ahead and fill the entire house has been with the round brush using Laos and that would be perfectly okay. Now in the scene view, filling the houses, your resume, just make sure that you mark out the edges to the doors and the windows that we have added in and do not run into it. Otherwise, they may lose that little loop that we have added in. Now, even the rest of the details in the center, how's that? We have IVB fitting in with the same color when I was just waiting for it or you don't know, forced 52 gyro little so that I have a little distinction between both of it. Now it simply fitting deselects all using my round brush. Make sure that you again try to read in the sheep of the house. So try using a smaller brush for adding in the edges first and then filling it with a bigger size brush as you prefer. Since my one brush itself has appointed div, I can do all my tasks with just one brush. Now folded roofs of the houses. I will be using this docker bone that we had prepared all your photo houses. So for the roof I will be using in this dot-com. Boom. You can see again just using the same size brush filling in. And you're not trying to mock out the edges as well. So this brush is really great because it has a pointed tip. I can add final details as Ben and I can even all fit in module ideas by just pressing the belly of the brush. Oh, so you know, I perfectly love this brush because it's an old Ana and I did not need to shift into brushes again and again. And you're not just one flat brush and add on, Gosh, can add so much more detail altogether. So just for you, this last Mahler idea has been with the docket door. Now, I can just pick up some white gouache and lead on the force be over the moon that we will be adding. Need to know. So I'm going to blend the fourth d orbitals psi and get them to delight the bowl of the white color. So this will begin to act as a background for my moonlight effect. So you can see I'm blending it into the background and just 0 link on the fourth layer, I'm using a damp brush trying to blend into. You can see it's not exactly a bright white that is visible right now. And on the edges using a damp brush, I can just have it though. I'll get some soft edges blending into the sky. Now let's begin adding the details onto the. So I've been false pick up the docket moon that we had and Amanda edges off the roofs all and the house using this docket Boone. And then I would use my pen to add the folder. So you can use any black pen, auto waterproof black pen, or a black marker. And in case if you do not have a new fad, you can go ahead and use your black gel pen, but it may stop in between. So you then you can use your O find the brush and the black wash to add the details that we will be adding off to this first, just adding in though borders to all of the houses so that they all stand out distinctively. You ought to do 3D look, I'm adding this last model in a little thick consistency you can see as compared to the rest of the borders. Now I can shift to my technical pen size 0.3 and begin adding the deans into the house. So I'm just adding simple straight lines to depict the beans into the house. So you can see even my pen stops in between an adult. So what I usually do is I run it in blue enough people and then again begin to run it onto the colored ones. Now in case if you're not confident about adding these lines, even though you can either have a pencil sketch or you can detect me uses low by using this band. But makes sure that all of your details and all of your colors are completely dry before placing the skin onto European ping. Otherwise, the Kahlo's may spread and you may lose your entire painting mediums that you have added it. So keep adding these lines onto this entire house first. So make sure that you would not run into the window because we have wonder window locks. So we would just be adding NOT didn't need to draw near to the window, make sure that the lines are only on the left and the right side. So the panel on the tip is a little red students, so my pen is not running this MOOC least while wait for that. Looks I do. Then I can add the other details into the other houses you're seeing. You're also either be just adding the horizontal and the vertical lines. So though that isn't new to the window, we will be using the horizontal lines and then into the front side of the house, we would be using vertical lines and adding the seam lines in the same manner, all leaving almost seems piece. You are also makes sure that you do not drawn into the window. I'm just making that the edge of the window and adding the window dy ds and this one also your Ivan, just give it a highlight with the Bordeaux and then adding the window details by just adding 0 grids to it. Now again, you're just adding simple horizontal lines in the same v. Now this time that lines on a little diagonal because this hows is an intellect and diagnosed view. So you can just give it the lifted vector. I can tell you more like 15 percent diagnostic effect. Ok. Now onto the last house advantage, just adding these simple horizontal lines and adding the window details as well. Now I'm shifting my right Bowman and spin and begin to add some details with this permanent mako. So in case if you do not have this, you can use whitewash Daniel pointed tip brush for adding these highlights. So on do these roofs, I'm just adding them that didn't highlight using this white color so that these colors stand out. And then I'm going to again use the darker tone of the purple color to give it all a proper finishing look wherever I done out of proportion. Even though the edges of the window just adding a little bit off the grid view with the white color to add another do the highlight. Now, I've just picked up the backup open don't mix that we had for using about building the roofs and the ages. I haven't just a D EDI and add the high night again, because if the wind out of proportion. To look up the house so you can see so easily we can cover up my mistakes and guage envy do things easily. So now I just added again that inflections on, you can see the legend highlight EDA on to the left of the roof area. So I possibly have the roof distinction as well. Now using the white Guassian, a thick consistency, Let's begin to paint our moon again. So the phosphate of the moon has to be dried completely so that this neodymium means albicans stands out. So now just to add a smaller moon and the so-called will be smaller as compared to the previous cycle that we added. So you can see the bag non begins to reflect as the moonlight effect into the sky area. Now lastly, let's add some bushes onto the roofs of the houses. So I'm just picking up some black wash. I'm using the black wash and my round brush. I will just add simple Bush effect. I'm going to use the tip of my brush. And as we have seen multiple times using the dabbing technique, just adding small Bush effect. So first I'm adding it onto the left side and it's going to be very small to make sure that you begin with a thin. And as we will be moving down what's been tried to make this look to go. So on Buddha edges you can see I'm simply filling in the black color and just to andar edges that goes into the painting. I'm giving it an identity, denote using the tip of my brush. I'm going very slowly and just, I'm dabbing the tip of my brush to get this bush IV bag. And you can see it looks saw the data. So just joining it a little bit your onto the top of these roofs as Ben very little, not much. Now next in-between these two houses as bad, just adding a little of the bush effect. So first I'm just adding the IDA and at the bottom I will fill it major leave it black. So you can see again, this is also very small. Make sure that you do not add these details too big, otherwise you may lose the entire sky. Looked at we have gotten your so at the bottom I just fill it in with back and just left a little small gaps in between so that the sky is visible at pieces. Now, just on the Donbass, Dr. Busch affect your under the rightmost roof your again, you can see I'm just using the tip of my brush, dabbing it very carefully and getting the bush shape first and then fill it with black. Make sure that the details at the top of all of the bushes is a little details like how I have added in so that it looks Bush and then you can fill the rest of the area with the black color. So that does it for our painting for dephase, let's remove the masking tape and see the affine you'd been doing with those clean edges. Make sure that you remove the masking D plans. Your edges are completely dry, so your bushes need to be complete feeds right before you remove this. Otherwise, the black column may come onto the edges and you may lose the effect and always remove the masking tape at an angle from your people. So you're always painting from d Phi. I hope you guys enjoyed painting this with me today. I would see you guys into the B6 soon.
11. Day 6 - Violet Sky : Hello everyone and welcome back to the copd gloss challenge. We are on D6 2D clothes that you need for today's class project is white, yellow, orange, violet, and black color. So I have my people deep built onto all the four edges and will quickly begin with defensive sketch for this fun. So I first just begin mocking out the backbeat. I'm not is only pencil sketch that we have for this one. So the bottom media is going to be like a duck Siberia. And the topic here is going to be this guy EDA. So for this guy, I will be using the violet deep column mixed in with whitewash and a little bit of black. I already have that radio in my palette, which we used in one of the previous exercises. So I have this column mix today. And next we will be needing a shade of orange and yellow. So I have to orange and yellow as when a legit onto my palate. And I can be using the shade of permanent yellow deep so you can go ahead and use any medium yellow color. Now, I'll begin painting the sky first. So I'll begin with a docket bone off the violet column mix that I have in and then they did on pick up the lighter mix that I haven't thought this by adding in mode of wash, white quash actually. So in case if you have the darker color only did you first use the darker tone and then put that DACA bone itself, you can just add in the white color to get the lighter blue. Now next time picking up the light total mix. That is, it's the same mix of the violet, deep white, and black wash. It's just that the quantity of white goulash is more so it's getting this lighter tone. Now, I have left that little gap in between because I'd learned the lighter tone on the docket bone and data perfect transition from the Docker build a lighter bones. So you can see I've got the perfect blend between the lighter and the darker tones. And I have a perfect transition moving from the docket bone to the light. At this time, I used a lighter tone to overpower the docket bones so that it gets a o u naught I knew did with the lighter tone. Now next I will begin picking up a little bit of the white quash. And please it just underneath the lighter tone violet that we haven't. So good reason by I used in byte here is because we will be using orange color at the bottom of this. And we know that when the orange and the violet mixes to get though, it begins to form in a muddy pool and do a wide that muddy. That is the reason I have used widen between for blending. It's the same color combination that we used in the practice exercises of blending and understanding why it is important to use whitewash by blending such Kahlo's to avoid the muddy Boons. So again, after applying orange tone, I just picked up a little bit of the white and get the perfect transition from the violet to the audit. And then at the bottom of orange, I will be using the yellow sheet. Now between the yellow and the orange, It's perfectly okay to not use whitewash because we know that the yellow and the orange can blend to blend in with each other perfectly and they do not form or muddy boots. So now I'm just blending the yellow endoderm and getting it a perfect transition from the violet to the orange to the yellow color. Now just near to the edge of the backbeat, I'm adding in a little bit more of the orange and GI and GU blended with the yellow. So basically I have orange on the bottom, then in the yellow in the center, then audience, and then all the tones of violet color. And you can see I'm using the tip of my brush for adding in some cloudy days look between the orange and the yellow color. So basically I'm using Word doc allows all in. And just using the tip of my flat brush, I'm adding simple lines to get into cloud Effects automatically. Using the orange color and my angular brush, I'm just going to add a video to do cloud effect onto the violet color as well. You can see I have made down the Palo very gently and I'm just trying to blend it completely into the background. I don't want it to stand out much, but just wanted to give a non-digital of the orange touch to the violet color. But make sure that you do not apply much facial vein adding in that color. Otherwise it midtone and below muddy pool. So it's very important to control the pressure of the brush while adding such stones, which can form muddy tones. You can see, I have not got that money gone. Now if you are at the bottom area fitting it completely with black, just forming a rough edge fullest and finished completely with black. I have just one piece and then back to the ADL dot is the pencil sketch. I hadn't. So I'm just broadening the polynomial to do because if you owe the pathway looks a LinkedIn or less and instead we will be having the bush effect coming on the path to v. So this much going to be perfect and it will again turn into us nimble. Then we begin to add the pathway. Now good, this DACA violet color mix that I have in, I'm just adding in a little bit more off the black color to get it even in Dhaka bone that is New York a lot about great bone. Now using and Taco Mix Eigen applied onto the entire pathway. Now the reason why I'm using this violet color mix on the pathway is to reflect the effect of the sky into the pot. So I feel that the color is a little too dark, so I just mixed in a little bit often light mix that I hadn't do that Dakpo mix and I've got the perfect, great violet sheet. So it's basically the agreed one fatality reflection of this guy having that violet badge on the road, but as when. So I've filled it into the complete pathway. Now I can just pick up a little more of the light tone again and try to blend it in the center of the pathway and get a little lighter dawn. So my being distant bat, so I can blend and easily and even if it would have dried, I can blend these colors easily because gouache can be deactivated and blended easily. The Doppler to EDR about the pathway that I've left in, either be having a bush effect dance. I'm not worried much about filling that area. Your and so you can see just picking up the lighter tone, I have three did a good light effect in the center of the pathway. So the edges are dock and in the Santa have a little of the DACA. Oh sorry, the lighter shadow reflecting some lights. Now using this violet color mix, I'll just add in some clouds. So I'm just using the Hofstede's dogs and moving my brush very gently using the tip of my brush. And I'm just placing these half C strokes closer to each other, perform this cloud shape. So first I'm adding this one big cloud, you're on the right side majorly on the orange color. And I'm using the light down the Docker don't mix both to get a perfect balance between my iCloud set I'm trying to add and into the sky. Now one thing you need to be careful about is not buying all you know, adding the violet color, no orange color. Do not dab your brush on pressing your brush too hard. Otherwise, it may, again form the same Monte-Carlo which we don't want. So be careful about this scene that would not apply much of the pressure by adding in these clouds as well. So after adding that one big cloud, you can see I'm just adding that to the three-halves. See clouds and straight lines, but this time, leaving more of the gaps for this guy to be visible from behind. Now using the lighter tone, just going to add some clouds URL. So I'm just using a mix of both the techniques of adding the clouds, that is the Hofstede's dogs and simple straight lines. I'm just adding in some grounds very randomly. Now. I'm just adding some glands with the darker color as well. So if you can notice, I'm trying to use in three color tones of the violet color mix that I have in a little taco or medium, and then the lightest tone. So when I want a medium tone, I just pick up the lighter tone, mix it to my darker tone. And for the DACA and the lighter tones, I have the mix all the DDD which I'm using it. And I'm just adding random clouds to this guy to get an undo a perfect. She's now at the end, I just added an engine of the clouds file from each other. Now using the orange color also just adding on some clouds onto the bottom area majorly. Now just using this lighter tone of the violet color, trying to blend this orange cloud line that I'm trying to add. I added on the Cloud Yoda again. I use the base color itself to blend it. Now again, using the black color, I will begin placing the bushy area you are at the top of the pack. So I'm just going to use the tip of my brush again and keep dabbing it to get the pathway detail. So if you want to enforce, mark out an outline for that area and then begin adding it. Now be careful and be sure about one thing that you try to be the bush height throughout. Do not add it in one single height, 200. Make sure that somewhere it's shorter some way it's taller and add the top. Try to get that detailed look by dabbing the paper as I'm doing it. So you can see at the top of my bush, I have a look which gives me a perfect Bush kind of for loop and at the bottom and simply filling it with the black color because, you know, it's a completely bushy area that I'm trying to show, but the top has to look detail. So for the topic, yeah, I'm just dabbing the tip of my brush and doing nothing is so you notice I'm just using this one round brush since a long time to just add in all of the details, the clouds, the pathway, the bushes, and just used one or two flat brush for blending in the sky. So that is why I always see by walking with wash of flat brush and a perfect size zone brush can help you Buddha anti-doping thing without having to shift between brushes again and again. So you can see my ambush idea is complete and I have full physically caught in the bush, Ada invaded height. Now in-between random here I will just add little of the bush effect. Also, if you can see I have not covered my entire orange and the yellow space of this guy. So be sure about this thing as well. That vile adding the bushier, not go out of proportion. That your orange and the yellow sky gets hidden up completely. So I'm done giving the finishing touches on the VD look to the bushes and making it taller at places. Now using the same brown Gosh, I'll begin to add a moon into the sky. So using the white quash, I'm just going to add a very small moon this time. If you want, you can add this using your white gel pen or the white permanent ban. Since I already had some white gouache, I thought of going ahead and using the gouache for adding the moon this time. Now next time and shift to my white permanent marker and just add some details on the pathway. In case if you did not have the permanent, you can use in your whitewash and goes your round brush to add in this DT. Or you can even use your white pen to add in these details. Now I will quickly pick up my technical pen and just add some pools and some violence into the sky area so that the sky looks more protein. So in case if you want, you can go ahead and use any black pen. Black Marco are simply using your fine tip brush and using the black color to add in this detail. So the enabling between you'll feel that your brush is not, your pen is not running comfortably on the pins. You just run it onto a rough paper and it will work perfectly fine. Now, I can just add in some power poles detail and some violations. So I'm just going to use this, find the pen to add in all of these details because I'm adding these finally deals with the band becomes an easier task. And since my pen is a waterproof ones, so I do not have any issue even if I need to lay down any color over it needed on. So that is why it's always recommended to go ahead and use all waterproof pen by adding these details into your painting that are, uh, you know what the b is kalos. Now simply just adding some vials into my sky, very randomly connecting in-between these two. Now, I haven't shifted away smallest size bed and add in some final lines. So I was previously using 0.6 and now I have shifted into 0.3 pen. Because all adding these via, via lines with the smallest size gives a much more finer details. So you can add in some texture lines and some thinner lines like these and get a perfect balance into your sky. Now just adding some lines moving very randomly towards the left and right. Your, we are done adding in all the power line details. As you can see. It's giving you a Bolshevik look to the sky and giving so much more detail and a perfect evening view. Isn't that sit now. Just one thing. I'm a little bit unsatisfied with the pathway ego. So I will quickly just pick up the same color that I used for the path B and lay down a layer of this color. And again, I even add in the details later on. So I'll just quickly lay down the darker violet tone and blended with the pathway area quickly. So I'm covering the entire white markings also that I'd given him then envied for this pathway to dry. And again, I will add in the white details. I don't know. I was a little unsatisfying, but in case of US satisfied with your pathway, do not do this step again. But since I was a little unsatisfied with the finishing there, so that is the reason I went ahead with this. Now using my white gel pen, I'm just adding some highlights in the bush and it gives it a little more detail into the bushes as well, creating these white highlights. Now while before this pathway to dry. So my pathway is completely dry. And again, I'm just adding those details using the permanent mako. So basically, I felt that my pathway Kahlo was too light. So to just give it a little darker effect, they used a darker color and blended it again. So as I always keep saying, since we are using wash, it's a forgiving medium. You can convert the docket room and do a lighter bones and the lighter tones into the darker tones even after you are done with Dupain's trying and everything. Now let's remove the masking tape MCF final painting with those nin edges. Be careful and make sure that your edges are completely dry it and always remove the masking tape against your paper and not the words your paper. I hope you guys at enjoying in this study the challenge and loving to paint along with me. And I hope you'll loving to explore this medium. So you already have painting for D6. I will see you guys tomorrow into the D7 class reject. Thank you so much for joining me.
12. Day 7 - Blue Seascape: Hello everyone and welcome back to the 3D. Cause challenge. We are on these seven today and we will be painting this beautiful seascape today. So the colors that you need for today's class project are White, City didn't blue, yellow, orange, violet, and black color. In case if you do not have a city didn't go, you can go ahead with cobalt blue or any numerous alternative rule. So I have my paper taped down onto all the four edges. Let's have a look at the colors that we will be using for the backbone, I would be using a shade of city in blue, orange, and yellow. So again, we need to be a little careful blending in these sheets. So these are the three sheets that I will be using in. Then I will be using a little of the violet deep color as well so you can get the colors. Radio, do your palette. I already have a logit of these colors on my palette, so I will remove once I feel the need to remove them more. Now before picnic, let me just mark out the horizon line. That is the distinction between the sky and the CEO. Now let's begin painting the sky force. So I've indicated with the city when blue-collar, I have the color 3D here on my palette, and I will begin at the top, the decision guru Kano. Now next time we'll shift to my angular brush and I'm going to begin putting some guidance strokes with the white color using the angular brush. So this time, majorly, our Cloud blending will be in go diagonal manner. So posteriorly down the blue color, straight am now using the angular brush, I'll pull out the diagnose drops and get it into a lighter blue tone and you can see the white cloud that is getting formed. So basically not the Cloud. It Sendai a sky that's going to be in a diagonal plane. This time, we add dough rise in mind, we will be 0 for supplying in the yellow and the orange here. And then we'll add them also diagonally and blend both of these sheets. So the NIOS II effect is going to be little diagonal this site. Now, I didn't pick up the orange color and first applied on the horizon line and then the yellow color and then blend it with the blue diagnosis. Now picking up some yellow color and applying near to the audit. And I will blend both of these colors bed so that they have a perfect blend. Anna color transition in between. And since these two colors are blending into each other when we didn't blend without using byte. Now between the yellow and the blue, we know if we blend them directly, it will form a green color. So that is the reason we will be using white quash for blending. So you need to be a little careful because if you will apply too much pressure, now Carlos may begin to turn green at the blending point. So always make sure after three strokes, keep cleaning your brush and then pick up fresh paint to blend in. So you can see right now when I'm applying the white-collar, some yellow is getting picked up and being applied on the blue poles. So I will blend that also later on. So you can see this was just the fall stagnant layer of paint that I applied for blending. Again, clean the brush, picking up some fresh, right? And now I blend all of these colors diagonally. So now we'll get a clean blend. I am picking up right from the top and getting it delta yellow and blending it in, you'll feel the need. You can keep picking up the yellow or the blue colors accordingly as you need for blending. Make sure and be careful about one thing that we need to apply the pressure and value need to be gentle onto your brush. And you can see I'm still running diagonally and whenever you feel the need, always, always clean your brush and then pick up the fresh beam so that if I mistakenly see I had yellow onto my brush and I ran all good at Bob, blue color, I would get a green color. So it's very important to keep cleaning your brush depending Beta you're going to apply the next tool. So you can see then if I'm picking up fresh right, I clean my brush, dab it clean, and then pick up the pace. Now diagonally just trying to get some blends between both the colors. Now we're going to add in some clouds, so we will be adding the clouds at the blending point. So I've been using the mix of the violet deep color with a little bit of black and white. So this is the same sheet that we have been using in the previous exercises. So that is a very little tinge of black in the violet deep color that I have added in and more of fight. Now using my round brush and just using the tip of the brush, just going to add in some cloud effects. And you can see, I'm just seeing some clouds close to each other, leaving gaps in such a way that they begin to form a flock of clouds looking into Google Cloud to add the blending of both the yellow and the blue. Now in-between, just going to pick up a little bit of white and add some bright colors to blend in into the Cloud and get some soft look as well. So you can see I'm just using different tones and values of the violet color mix with black and white to add some clouds. So whenever you want to decrease that ordinal value, you add in a little bit of advice. Whenever you want to darken it, you can just add in a little bit of the violet color or maybe the black color depending on what column mix you have. Now just adding a little bit of the clouds, ALL with the blue color also. And you can see I'm adding the clouds. I'll do a little diagonally and just simple half C strokes what I'm using, placing them each other. Don't worry about how the Cloud is looking right now, because once you begin to, you know, add in all the final details, all of this will begin to take shape. So right now it may be looking what the messy Cloud, but don't worry, by the end of it, you will love the outcome. Now just adding a little bit of light violet clouds onto the audience sheet as bed. And make sure that you did not apply much pressure because the orange and the violet mix together and then from muddy tones. Now let's begin painting the CDR, the BC over the sea. So I'm going to use the same sheets as we used in the sky for painting. The sea has been cited quickly. Let's look to city didn't glue Carlo as I'm almost starting out on my palette. Now, yellow and the orange sheets I already have onto my palette. Now, I'll be a little careful by painting the BCL for the C, I would recommend you to first watch the entire process and then go ahead so that you'll get the perfect effect of the sunlight. So in-between Foster, I'm adding in the orange color, sorry, the yellow color. Then Nieto, I'm adding in the orange color and blending it a little. So in index NBA you can see more of the yellow effect and on its edges a little of the yellow effect. So I've used or near little bit of orange to blend in, not much. So you can see it's a yellowish orange. Now on the rest of it or near to the edges, I'm adding in a little bit of brightness. Now I will pick up the city and in blue color and add it on the rest of the area. So the reason why I added the white is so that now when we blend in the blue, it becomes easier and we do not get muddy, don't because of the orange color. Normally we get the greenish tone because of the yellow color. So white helps to balance the kalos and not formed a muddy mixes. Now, just from the edges using a damp brush, I'm pulling out this blue color into the center so that white is reacting and helping us not get the muddy or the green bones. So now you can see I'm just using the damp brush and just pulling out the colors from the edges to the little center. Make sure that the sender has to deflect the orange and the yellow colors because of the sunlight. So now you can, and you've got the perfect sunlight look. So use a dampener dry brush for pulling out these VBS. So I first started the orange and the yellow color, then a little bit of byte. Then I added blue on the edges. And then using the GI damp, either a flat brush or an angular brush. I just pulled the kalos into the center adding some dry brush. Now mantle layer is dry and I'm shifting to my mini 90 pointed brush. And using this, I will begin adding the CVs. So I've picked up to sit in, in blue-collar without mixing in any white. And I'm just going to add simple lines for adding in the V's. So the lines going to be near to the horizon line now going to be shot down. And as we move downwards will begin to add the bigger lines, even on the yellow tones in the center, you can take in a little bit of the city named Lou kalos. Not much. Try to maintain the sunlight and do not cover it completely with the blue tones. So what I am doing is I'm laying down some Vigo these ads empty Covey's, then I will just keep adding this model of evs in between. And that innovates to fill the area. So I laid down a few big leaves and now you can see I'm adding in much ANOVA. So the takeaway is add to the effect and depth of the sea. Now that we are trying to add it. Now just adding, verifying these, just using the tip of my brush, then aggregate the Covey's I use to press the belly of my brush to get that thickness. Now to add a few multicore waves, I'm shifting my bigger sized round brush and using the same city didn't look hello. I'm going to add in a very big tick V. This is going to add a lot of beauty to your beach area. So you can see very simple connection of the dark blue tones now in between at the top area also just going to lay down some degree of evs using the bigger size brush. Now to add some shadow to these, these, I'm going to use this mix of the violet deep color. I'm going to add it underneath these VFS that I have added in so that this will begin to act as though shadow off the leaves and the effect of the sunlight and the shadow perfect. Now in between you can even add a few VMs using this color. And what I'm going to do is underneath the Covey's at the top, Ada as Ben, I'm just going to add the shadows, but this color Vi capsule, unsure about one thing that you do not cover the yellow and the orange space complete the Otherwise you will lose the sunlight effect there. Now next time shifting into the black color and using the black color, I'm going to add in some details. So false, I'm going to add a video edited sign EDR kinda look at the bottom of the people that did at the bottom beach side, on the left side. So again, that's going to be in a very random shape. I'm going to fill it completely with black. Now using the same black sheet I'm going to add in some wooden logs into the sea. So just some simple locks in a diagonal manner. I'm going to begin placing. So it's going to be a set of two logs in near to each other. Then I'd even a little extra space, add in about another set of two logs, CMV. I keep adding these lots underlined Each that I did of my people. And you can see in between the gaps that I'm leaving in-between the two logs. So then the logs when more closer to me, I left extras Bs. And As we will move in towards the end, I decrease the space in between the set of two logs as well. Now onto the horizon line, just adding a little bit detail so that I get a distinction in between my horizon line and my C. So I first mock data line and now just adding in some bush details vary randomly. I won't be adding it onto the entire horizon line. And also make sure that you do not cover the entire orange and the yellow color with these bushes. So just on the edges on it to follow one and then in the center, just very small ones. Make sure just at the top of the bushes you're given a D didn't look and bottom ADLs, you can feel it completely with black easily. So you can see just at the edge I, given that big bush effect and then onto the entire horizon line, a small Bush effect very distant looking. Now we have window add in a very giant tree popping out from the left side. So I began with the tip of my brush, press the belly of my brush and got this thick stem. Now, even on the left side, you're either just add in gulags or you don't very far, almost disappearing from my site, but just adding and so that this side does not look a little left out kind of a thing. Now just adding these two more log B deals, you're kind of logs which are not in sync with anything. Now just adding another palm knees your eye will just add the stem right now and I can add the leaves, the Troodon. Now phosphine begin adding the leaves to this branch that we have added in. And you're just going to add in some palm leaves to make this palm tree. So let's do the mean buck that we added in. Now just adding some family. So keep adding them. You can see I'm just using the tip of my brush and adding these details using the black color itself. You can shift to us monocytes brash, if your brush does not have a pointed tip and be a little patient, right? Adding in these details so that you do not run out of propulsion. And make sure that you do not add them too big that you cover up the entire sky. The ways we may look loose, the sky effect on the Cloud effects that we have added in and varied randomly. Some of the leaves can, you can see are overlapping the previous one as well. So just adding a little more of these families popping up. Now from the right side, I'm just going to add the palm leaves to the grams that we have added in. And then we will see if I adding a few more families popping out from the right as well. So this is basically a palm leaf from a G which is not enough site right now, and just a one leaf as visible in between you can see I add some leaves are overlapping each other in the folding manner. So all of this adds to national beauty to your painting. Now at the top right here I'm going to add in another leaf. So using the same black color and the same point that the brush is going to add in another leaf here. So you can see the leaves that I'm adding in your also did an overlapping onto each other. So to this leaf, I'm even adding the leaves on the other side is when I'm on the other side also you can see I'm trying to add the leaves still did on the OU nor bended and moving onto each other and just added some bigger leaves. I'm just trying to add in some leaves between them. Now just adding a few leaves popping out from the top as bad. And now in between these two leaves just going to add some leaves popping up very randomly. Your body if they are overlapping onto the PVC leaves that we've added in, let it be, it will look all the more nutshell. Now even you're just adding a few leaves overlapping wherever I feel the need to suggest and until effect to add more details. Now the last thing that didn't is to add more details and depth to the V's. So first using the black color, I'm going to add a darker shadow if that we've added in. So a very small line of the black color underneath the darker tones that we added. And you can see automatically it gets into debt. Now, even though the larger views that we've added at the top, IDA just going to add in a little bit of the darker reflections with the black color, and then we will shift to the whitewash to add further details. Now I didn't just pick up some city didn't blue color and adding a few beats at the bottommost, yeah, just about the black space that in I have missed to add into smaller v of details. Now shifting to my technical pen, I will just start small deflections to these logs that we about to do. So very small lines into the sea to add us the deflection due these logs so varied under me and non-literal diagonal tone, I'm adding in these deflections, so the reflections are moving in the opposite direction of what we have added in a row. And now I will just pick up my white gel pen and added a little the details with the white gel pen. In case if you do not have a white gel pen, you can add these details using whitewash. So Baidu to divide to the CEO to reflect some form also moving waves effect and then onto that takeover, If that we have added at the bottom area, I will add in on the talus, the crashing leaves look as well. So this time using the white gel pen itself, I'm adding in the crashing waves look just about the thick blue v that we have added it. So adding the crashing waves in the diagonal manner and even your near to the signed area that we're trying to depict and just adding a little of crashing the look. So basically it's a digraph thing that I'm adding in using a white gel pen. You can go ahead and use the dry brush technique and oh, by quashed to add in this effect of the form that we have on the Big obese and near to the sand area. Now in the VS, I'm just adding a little more of the white details vary randomly you can see, and it all looks pretty together. Now just going to add a little peeking out from between these leaves your so using my right permanent marker for dad and adding the letter Mu Lao Tzu. So that does it via a digital painting for these seven. Now let's remove the masking tape and see our final painting with those clean edges. Make sure that you remove the masking tape once your edges are completely dried and always remove the masking tape at an angle from your paper. Also, you can see the cloud look so pretty right now. And the NIOS II looks syncing after adding in all the elements. So that is why I told you not to worry about how the sky was looking at that stage. So you always have final painting with those clean edges. I hope you guys enjoyed painting this with me today. I will see you guys tomorrow into the D each class project.
13. Day 8 - Mountainscape: Hello everyone and welcome back to the 30-day course challenge VR and D to D, we will be painting this beautiful mountain seed today. Let's have a look at the colors. You need to shoot a fight city in blue, yellow, violet, black, white, red, or pink. And I have my people deep down. So let's begin with a pencil sketch for this one, we'll begin marking out the mountain ranges. So first we'll begin marking down the small middle area that we have at the bottom. So approximately only one inch if you're using the same size as mine. Marking down the forest mountain range at the topmost place. Then taking the second one, a little blue that, and the third one is going to be medially on the right side. So you can see the three different mountain ranges that we've pleased. So that is it for the pencil sketch. Now let's begin having a look at the colors that you will be needing for this guy. So the colors that you need for this guy is said even glue and permanent yellow deep. So you can go ahead and use any medium yellow to one and a blue tone which is nearest to a sky dorm. So I will be using the city Lynn blue color. You can even use cobalt blue if you do not have a city in blue color. Now, at the top I will begin with the city lind group mixed in with a little bit of white. Then near to the mountain range, it is going to be the yellow color. And in-between both the colors I'm going to use in white quash to blend. Remember the blue and the green and blended together, it begins to form a venous dawn. Hence we are going to use in by quotient between for blending. So all of these I have discussed with you in detail in the technique section, then it is important to use in the white quash for blending. Also in Kesey, if you want, you want a greenish tone in between, you can go ahead without whitewash. Now at the top, I just picked up some blue without mixing and white and blended it. So you can see I've got glutenin variations into the sky. Now, I'll just begin some yellow sheet and begin applying it near to the mountain range. So this time, I'm using the smallest size flat brush because the area is comparatively smaller and I want clean edges near the mountain range. Try not to run into the mountain range because the mountain range is going to be awful purple tone. And again, then the yellow and the purple will blend together. It may begin forming a little muddy tone. So to avoid that, try running near to the mountain range in the sheep that you have laid down. So that is why using a flat brush makes my task easier and you can see easily I'm able to achieve the edges of the mountain. Now the gap that I have in between my blue and the yellow, I'm just going to pick up some whitewash and blend watercolors without getting a green bone phone. So you can see how easily I am able to achieve a pin blend between watercolor and a perfect transition from blue to light blue to white. Hello, and then do the DPLL. So that is it for the sky area. So for the mountains, I'm going to use the blend of these three colors. That's the violet white, and the black color. So if we have been using this column, it's in our previous class, projects has been. So I have that ready on my palette already. But we're still going to be the tonal variations of these colors by adjusting the white quash amount in it. So after Dr. mountain range is going to be awful lighter bones, then the second mountain range will be a little darker and the bottom most mountain ranges going to be the darkest one. So I'm just mixing in a little bit of the lighter and the darker mix that I get a lighter tones. So this color is more of whitewash and less of violet and very little of black OR gate. So the dislike this story unfolds going to begin with the topmost mountain range. Now, I'm using a size two round brush which has appointed make sure that your area that is the sky EDR near to the mountain range is perfectly dry. Otherwise it may bleed on it. And if that is any water content there, now, I will just pick up a little more of the white quash and try to for the night in this column and get on. It didn't blend of the lighter tones here as well. So at the edge you have the darker tone. And as you're moving down, what you're going to get, again, all colored from the Docker to the lighter tones and trying to get different Boolean values into one mountain range itself. In-between, again, I haven't been picking up a literal staccato mix that we already have and try to blend it again. So again, at the bottom, I just added a little of the columns. And now I'm trying to blend in the words that I have added in and trying to get a perfect blend and some lighter and darker tones. So you can see a little of the yellow got picked up and then it laid down onto my mountain. I got that muddy stone. So that is the reason you got to be ready. And not run your brush into the sky area. Also always all in-between. All try to keep cleaning your brush so that when you pick up fresh colors, there's no previous stones left onto your brush, which may again, from these different tones and spoils a tonal variations that we tried to get in. So now I've got the perfect mix of the lighter tones onto the first mountain gene. Now I have just picked up a little bit of the color and just going to add it at the top of the mountain green and going to blend it with the white quash and dissent and get a perfect little darker tone and an edge at the top one. Now, I'll begin painting the mountain range on the left side. So since this is a big amount in detail, I'll go ahead and use my flat brush for this. So I'll you was another NEO darker tone for this legal suggest added a little of the darker color mix to the lighter mix that I already had, and I'll begin adding it onto the entire mountain danger on the left side, make sure that you do not add a lot of water, otherwise you may lose the opaque look of the kalos. So in order to get a perfect opaque consistency, you're Carlos need to be taken off and witness of workloads so that you do not lose its consistency and they do not act as watercolors. So then I'm done adding the second mountain range and just getting the clean blend and as smooth blend between the gallows humor. Now for the third mountain dreams, I'm going to use the darkest tone of this color mix. So you can see on my palette I had two column exists. One was the lightest one which I use at the top bit more of fight was to get that woman Carlos. The second one, I'm mixing a little bit of dark to the light tone. And now for the third one, I'm directly going to pick up this darker don't mix. I'm going to add it onto the entire mountain range. And then we're going to add little lighter colored pins and all, you know, highlights onto this mountain deed. So fast using the flat brush, I will begin adding this darker Boone. Make sure that all your three kalos of the mountains are different from each other. So there has to be a little color variation so that you can distinguish all the three mountains in case if you feel you can show leaky ball, you know, adjusting the amount of white and black to the color mix depending on how much color variation you need to adjust so that all of the tree. Now in the bottom field, I'm just going to lay down the black color as the force. So I'm just going to pick up some black wash simply, I'm going to add it into this entire white etiologies nephron go gotten speech. So let's wait for this black layer also to dry. Then we'll add in for the DTS. Then let's begin adding some details to a mountain ranges. So make sure that before you begin to add these details, your mountain ranges are completely GI. So for the first layer of mountain, we are going to add in some details using the pure right Congo. And after that onto the darkest mountain range will be adding some details using the lighter color mix. So fast I'm just picking up some whitewash without adding any water and using the tip of my brush, just trying to add in a little dry brush strokes or very little small patches on the topmost mountain gene. So that is the lightest mountain range and on that trying to add in a little snow effect using color. So majorly on the tip, what we have added a little off the white quash Dutch. Now, I will just pick up the lighter tone mix and begin adding some details like this onto the dark most mountain G. So you are, I'm using in the column mix that we use for the first period of mountain. That same color I'm using to add in a little details to this darkest wound and veins. So simply added some lighter patches and then some dry brush at the bottom. Now I will just pick up a little bit of the darker tone and blended again your because the light path seems to be a little more then what needed. So just a little blending again. And you can see just to 0 by using the lighter tone and a little dry brush and little patches, the mountain automatically begins to get so much detail and so much life to it. So that is it for the details onto the mountain range. Now using the Color, I'm going to add some pine trees onto the entire bottom range of mountains. So just simply using the tip of my brush, I'm adding very small pine V, d, ds. So I'm not adding much detail to bind G, very simple ones. I'm just going to make sure that by the time I reach the end of the G, It has a little triangular shape. Now I'm going to be the height and the shapes of this buying G2 out there. Oh, you know what the media, but we are going to be adding the pine trees. Now the thought, gee, I'm going to add it a little taller, going about the mountain ranges as Ben and I'm adding all these g's new to each other. And at the top I have a very thin stem. And as I'm moving down what I'm trying to increase the thickness of the stem and add the dark. The leaves are all little tunnel. And as I'm moving down, what's I'm increasing the length of these needs as bed. So I'm just medially just dabbing the tip of my brush to get these details onto the pine. Geez, I'm not adding any detail in all things. You're so just simple dabbing the tip of your brush to get the leafs detail onto the pine. I'm just trying to we get from about one thing is that I get a triangular shaped by the end of the bind G on Buddhism even still be adding on the date of the green highlights one, this one, this NEO completely dry. So the key is to keep fading the height and the size and the pine trees that we're adding in. So you can see the false buying G that I added was very small and very thin. The second was, one was a little taller, but still 10 or the third one was huge enough. Then I added another small one. And now as I'm reaching the right end, I'm just going to add very small ones and not too high good ones and small ones with very little details. Make sure that you will not cover any of the entire mountain ranges completely. Now just going to add very small ones. You are by the end of the right edge. And you can see all my three mountain ranges are visible properly from behind these oh, pine trees that we have added in the topmost mountain range, the second mountain range, and the third mountain. Now, after this dries, we'll be adding some green highlights onto this del. Then let's pick up the green colors to add some grass spoilage onto the black middle area that we have added in. So I'll be using these two green that is the dot sap green and the yellow green color. I already have pulled the colors onto my palette from the previous exercises so we can use this color as itself. Philosophy, I'm using the Docker sap green directly. I'm going to add a little of the grass highlights on to the all black area. Do not want even you add this color. You may feel that the color is not visible. Mckibben said dries, it will begin to get its color look. So just using the tip of my brush, adding simple grass strokes and little effort is going into pine tree IDA, but very little do not cover all of the pine trees with these strokes completely. So you can see even the grass strokes that I'm adding. I'm adding them bidding National, some awesome shot does something, did some slammed. So all of this adds mediation, feedback you're trying to add in. Now using the same sap green color, I'm just going to add a legend of the highlights onto the pine trees. So just going to dab a little of this green color onto the buying tea leaves. So this would begin to act as the highlight on the pine trees. Now, again, in right now you may feel that the green color is not visible on the black. But once it dries, it will begin to give the highlight that we are trying to add in using this green tone. And after the bottom grass layer of green colored guys will still be adding more grass tunes to it. And then a little of the flower details there. So just keep adding a little of these highlights onto all of the pine trees. So you can see my black layer of pine g is also visible and the green color is giving another layer of depth to the binaries that we have added in. So slowly, just using the tip of your brush, add these highlights in case if your brush does not have a pointed tip shift to a small detail brush so that you do not run out of the proportion by adding these highlights. Now you are, I'm just going to add another point g, which is 0. You're not behind these buying fees. And just with the green color, I'm not going to be adding any black highlights to this and it's going to be a very thin one. Makes sure that you do not add it so huge that you cover all the mountain ranges. I am keeping all of it in proportion that my mountain ranges are still visible. Now after this, my bottom layer of the green grasses are also dry. So now I'm going to just pick up some bike wash, mix it with my doc sap green color. And then using this lighter tone, I'm going to add the second node of grasses onto the bottom field, ADR. Again, I'm just going to be using the tip of my brush and this time banner ad the glass stones, I'm going to add it little less than what we added, the darker tones so that I have three colors into my field area already. That is the black, the dark side, and Niobe now the light sap green. So you can see I'm just using the tip of my brush to add these grass strokes. I'm getting these final grass tools using the brush perpendicular. If you notice that it's much easier to just use the tip and get these fine strokes so quickly and all of these onto the entire field area that we have. And then again bead for this to dry a little before moving ahead. Then let's pick up some color for adding the flowers into this field area. So I am going to be using the sheet off rules from my set. You can go ahead and use a scarlet or a Carmine Gallo for adding in this. So do this to one. I am going to be adding in a little bit of fight to get to lighter tone. And we'll just be adding very simple flowers with this stone. So for the first layer of these petals, as Ben, I'm going to add in a little of the whitewash to the rules color that I have picked up. Then for adding the second layer details, I will add in more of a wash and get even a folder lighter tone. So I'm just going to add simple by details to the flowers and give it a flower sheet. So very simple flowers, nothing detail that we are going to be using your, and I'm going to add these flowers in different angles. So little of the half-angle flowers, noodle, oh, you know, you can add complete round flowers as well. And in-between I'm just going to add a little petals as well. So first I'm done adding the bigger flowers. Now I'm just going to add the smallest logo or just some petal details, urine, they're very randomly. So these are kind of the flowers which are 0 from the distant view. And they begin to act as the fellows in our painting. And you can see just by adding simple by, but the field area looks more filled up and more detail. Now I have formed a lighter tone of this color. You can see much more of the white wash and very little of the pink tone. I'm just going to add highlights to this flower that I added in. That is the lighter details onto the darker ones. Now when you are adding this makes sure that you're falsely out of tough logos is completely dry. Otherwise you will not be able to achieve this opaque look because the colors will again begin to blend into each other. And you will not get the total of the flowers that I'm trying to add it. Now in between using this lighter tone, also just adding little flowers urine there. Sorry, that betters urine there. So you can see that is the reason never add any of the details altogether much. Because if you would have added more of the darker petals already, it would be difficult to add these like dopa. Now using the yellow ocher color, just adding little buds to these flowers. So I already had the yellow colored my palette. You can quickly pick up some color if you do not have a treading on your palate. So just using a little opposite, going to add little buds to all of the flowers that we have added in. Now I'm going to pick up some fresh whitewash and aggregate love divide by dense in-between as follows. So just using the white quash and I would just spray some water onto this using my spray bottle. I'm just going to pick up this whitewash kinetic consistency and add a few bye desk just using the tip of my brush. Just going to add it in highlights to the flowers has been very much, not much. So you can see just by adding the third color layer also, you get so much detail in your middle ear and the white petals to also add in so much more detail. So that is why I always see keep adding the details. The GO ALL IN would have added in more of the darker details already. Then you can just add the lighter details on the docket is. Now using my fine tip pen. I'm just going to add a few words. Mean you're on the right side of the sky. So all of these boards are going to be much close to each other and it's going to look like a flock of birds together your. So you can see I'm adding these boards also in different angles and indifferent slight motions. So you can go ahead and use any bird shapes that you are comfortable with and adding them smaller, fine tip pen makes the task much easier if you want to add such final boards DD, because adding it with the pin and the brush becomes a little difficult when you want to add such smaller birds. Now lastly, I'm just going to use my permanent white Marco and add a very small mole on the top left side here. So that is it for a painting for d. Let's remove the masking TDE and CFI in and painting with those clean edges. I hope you guys are enjoying this 30-day quash challenge and learning much more about wash each D with the coming rejects. Make sure that you remove the masking tape at an angle from your people so that you do not take off your edges. So you own is our final painting for the year. I hope you guys enjoyed painting this today and learn something more about wash. I will see you guys tomorrow into the next class project.
14. Day 9 - Daisy Field: Hello everyone and welcome back to D9. Today we will be painting the middle with this VOC cloud look. So the calories that you need is white. Say you didn't LU, lemon yellow, one Sienna, black, yellow, green, and sap green. So let's begin painting. We'll first begin with the pencil sketch. So alpha's begin marking down the horizon line at almost on the center of the people that we're using. If you're using a different size paper accordingly, you can read the center. Then we will begin adding the mountain range to it. So I took the horizon line a little below the center and on the top I'm adding the mountain range. We're just going to have one simple mountain range this time. And that is a product pencil sketch the top area as the sky area, and the bottom media is going to be the field area. Now we'll begin painting the sky falls from the sky. We are going to be using the city in blue color first, and I have to follow already onto my palette, so I'll begin applying it onto the top of the sky. I have mixed in a little bit of white to my city in blue color. I'm just going to begin applying it at the top. This time I'll begin applying the sheets diagonally. Gender, we begin applying it flat. So this time we are going to run diagonally and the sky is almost going to be like the previous exercise. Nowadays, it's going to be the caliph combination of yellow and blue. But the only difference is going to be the blending and then either be adding clouds as well onto this guy PVC, we did not add clouds. Now just picking up on it and more of the white quash and time to get little lighter tones onto the right side. And from the right side also, I have pulled in the color diagonally. Now next I'm going to pick up a sheet of the light yellow color. I'm going to begin at near to the mountain change. And then we'll be using a little white to blend both of these colors into the sky, so forth. Picking up the yellow color, I'm not going to be adding much of the water. I'm trying to pick up the colors and noted consistency so that I haven't no, and look, even the yellow color, I'm beginning to add in diagonally. The only thing is I'm being a little careful near to the mountain range and applying the color onto the shape of the mountain. Don't worry, if this time we run a little into the mountain, it will be okay because the mountain is going to be off the brown color. Now, I have just picked didn't the white gouache. And I'm going to blend both of these colors. And I'm going to blend it diagonally only. So just a little yellow that I applied near to the mountain range. And now just going to use white every time that you pick up, right, make sure that you clean your brush because there will be some blue and yellow already picked up. And if you pick up right with that same brush, you may begin to form light of the moon. So you can see every time before I begin to pick up the right, I clean my brush, so I applied the white and now I'm just going to blend it again from the top with the blue color and begin to blend it diagonally again, I'm going to get a diagonal blend into the sky with the white, yellow, and the blue tones. So that you can see I've got a perfect blend into the sky and diagnose. And there is no green kind of form. So very important to keep cleaning your brush depending on where you are beginning to blend. Now next we'll begin painting the mountain range. I'm just going to pick up a sheet of bone sienna. Or you can go ahead with the Van Dyke brown. I'm going to go with a darker tone of brown. In case if you do not have this stone, you can just pick up your burnt sienna, add in a little bit of black and go ahead and use the Docker tool. Or you can use any further darker tone of brown that is available in your palette. Using this color, I'm going to apply it onto the entire mountain range. And then after this dries, we will add a little highlight to the mountain range as well. Now be careful near to the sky. I'm trying to use a smaller-sized brush first to define the shape of the mountain. So very carefully filling done by a mountain range, but this scholar go very slowly so that you do not run out above the mountain being specced and make sure that you do not sign into the field ADR because Ophelia is going to be off the light NACADA lens. Now the bottom of the mountain. I'm going to leave it like that because dad, we're going to be using the shades of green no added now. Now let's begin adding the fourth CEO for the bush. Oh sorry, the middle. So I'll first begin with the shade of yellow near to the horizon line. So the little mountain space that rights peace, let it be there after the brown colored rays will add the detail there. For the field ADR, we can with the yellow color first and then at the bottom, we will be using the yellow green door and blended with this yellow color. Now picking up the yellow-green color, going to blend it your at the bottom and blended with. So this is going to be the first layer for the middle. And then do this dries, we'll begin adding the clouds into the sky. So you can see I'm, I've got a perfect blend into the field area has been. Now to begin adding the clouds, I'll foss pick up some whitewash onto my palette. I won't be adding any water to this white quash. I'm going to use my angular brush without dipping it in water. It has been. So my angular brushes also going to be dry and to the beans also, I'm not going to be adding water. Okay? And I will begin picking up the light goes directly and begin pulling out of these diodes are the clouds diagonally. Now, when you add the fourth layer of the clouds or a little of the blue column may get activated. But trying to keep your hand a little gentle and don't buy these, the blue color gets activated. We'll be adding a second layer which will make it more or B. For the fossa, you can see I'm just pulling out the clouds diagonally using my angular brush. So basically I'm just using the tip of my brush and adding this big cloud patch out here. Okay? Keep adding this until you get a good opaque Leo and all are on the edges of the cloud. You can see I'm having that dry brush kind of a stroke and that's exactly what I want in this cloud, this time of VOC looking cloud. Now from the right side you're just going to pull out some clouds. So this time I'm using the brush perpendicular and I'm just using the tip to pull out the clouds. So using the tip in the standing perpendicular Mano. So now you can see a little of the brown color got picked up. So I'll just and I tried to cover it up. So you've got to be a little careful near to the tip of the mountain as bed. I will try to correct that mistake later on. Now I will shift them around brush and I will begin adding some clouds using the round brush, so forth. I've covered up the brown color facto got lifted up from the mountain range. And now just using the tip of my brush, I'm just going to add in some Hofstede's drops and add some different clouds, clouds into the sky. So you can see medially on the edge big cloud that I've added in. I'm going to add in a little sheet. So I'm using the hotkey strokes, using my round brush and adding the details Your onto the edge of the big cloud that we added in, make sure that you added the big cloud diagnose. And now I'm just adding some smaller clouds and some lighter clouds on the top as well to get a perfect balance into the entire composition. Now to add in a little more detail into the Cloud, I'm just mixing in a little bit of black to the white and getting a very light green door. So it's just a pinch of black and more of fight. And using this tone, I'll begin adding it. The input of big cloud, your and type of Blender using white. This is going to act and add more detail to the Cloud that we have added in. You can see I picked up very little softer color. I'm just trying to blended into the background of the sky. That is a white color that we need down. And then for the pick up a little more of the white if needed, and blended well. So now again, I've picked up a little bit of the right. I'm just going to blend it at pieces wherever I feel the need. Number mountain range is completely dry it and that'll begin picking up the sap green color and add the bush effect onto the mountain range when we left the whitespace. So I'm just going to add the green color symbol in our little bushy Mano. So just going to give a simple round edges ready done to me and then bass piece. But this color first. So you can see I'm adding the bush genes vary randomly. I have picked up the V01 color in a good thick consistency so that I have this opaque look. And also when I'm adding this color onto the dark brown pool, you can see that green is still visible because if he picked up the color in a good opaque consistency and also try to be read the bush teach throughout to not added in one single height. Now I'm the bought them, I will just define the straight line for the bushy area, marking the distinction between the field IDA and the mountain range. So I'm almost done adding this bush ADR. Now next my feeling is also completely dried and then begin adding the grasses there. So for adding the grass into the field area, the fourth layer is going to be with this same dawn of the sap green color. I already have this color on my palette. I will just begin adding the grassroots. So for this also I'm using my round brush. I'm going to use just the tip of my brush and begin adding the grass drops into the field area. Now since I have my paper, what they've done on to the movable surface. It's so easy to just the board to adjust my hand movements of any easily. Make sure that you're falsely or for the middle ear is completely dry before you begin to add in this NEO. Now, just using the tip of my brush, I'm adding simple grass drops. So this is again just a false theory of the grass strokes that we are adding it near to the mountain range. I'm leaving a little space. I won't be adding the grassroots there. I will just add a little D1 need to run there. Now the grass strokes that I'm adding, I'm trying to add them a little tilted towards the left and the right. And then a legend of this cheap ones or overlapping onto each other as well. Now the second year of grasses that I'm adding it, it's going to be overlapping the first layer that I added. And then this ordinate is going to be overlapping the second one. So this makes them much more detail and filled up. So simply using the same grass strokes on the same column for the second layer of grass. Then we'll begin adding the code one now. So I'm almost done adding the colored layer as well. And you can see my portfolio goes under general taller than the first two layers because it's overlapping the first and the second layer. And I'm just using the tip of my brush to add in these details. Now right away you'll feel the need that you need to add on Ajinomoto of these grassroots. I'll use the same door and adduct Vedanta money beta, well, you feel the need. So very randomly variable, I'm feeling the need. I'm just adding a little of it. So that does it for the first video. Now do this, dries on the devil and add the photo details on the mountain. So I'm just going to pick up the yellow color that we used in the sky. I'm just going to add it a little on the top of the mountain and blended with the brown color so that it gets a little highlight of the sky. So I've been just need on the color and then blend it with the brown color of the mountain that we added in. So the highlight that I have added in is only on the top of the mountain. Do not cover it completely with this highlight are the wise it may look out of proportion. Now next I'm just mixing in VHDL, my sap green color. I'm going to use the second dawn to add the second node of grasses. Again, I'm just using the tip of my brush to add in these graphs drops and you can see I get the final cross two. And, oh, just going to add a little of these grasses Behdad normally it's going to be quite less as compared to the first layer that we added in. So this is basically just kind of highlights onto the grasses that we are trying to add it. Now next I've ingest shift that my fan brush. I'm just going to use the yellow green tone to add a little grass effect on dot-dot-dot EDR of this middle dark is near to the mountain range. So I'm going to use a very dry flat brush, going to pick up the yellow green dot. Simply adding very little grass strokes. They're just using that the both the fan brush. So you can see very little m vd, small ones and it makes it look filled up and perfectly all. It adds the both DDL to the field area that we want. So basically that Ada is a fat from our view. So nothing is visible nucleoli, hands adding the media's like this. Okay, In case if you do not have the yellow-green color, you can just mix intervention but Duffy a yellow to the sap green and get a lighter tone like this. Now next to that sap green color, I'm just going to add in a little tinge of brown corner or the black color, you can use the default, the darker green. I'm going to add it just at the bottom of the glass tube that we added in. So this may begin to act as the shadow of the grassroots that we added in. So just in the center as well on majorly on the bottom line going to add these Jakob gene strokes. So dark is it photographs strokes that we added it. Now, pick up the white quash and begin adding some easy ease your so I'm going to use the white color and a good thick consistency. I'm using my round brush, I'm going to begin adding the flowers. So false time enamine some Vicodin flowers, then I can be using the same filament warp that is just using simple patterns to fill in those pieces. Also, I'm adding these flowers very small this time. And o, some of them are in facing upload, some of them facing downwards. And so I'll move during a complete flower sheet and you can see I'm adding them based on nothing detail look just very simply by forming together or flower. So keep adding these flowers in different angles, different shapes, and you don't placing them in a 25 from each ADA, I'm not much closer to each other. Now in between I'm just using the tip of my brush and adding the two fellows to see how much more do I need to go ahead with the big O flowers or I need to leave space bottle of Fido's. So majorly the fellows are going to be at the top side. I'm not much at the bottom side. So just I think a few wolf lavas, you are at the bottom space and you can see my white quash wasn't a good thick consistency. Hence, I'm even to achieve this will peak loci even onto the green tones with the white sheet. Now just using the tip of my brush, I'm adding the fellows into this ADR. So you can see a small, tiny looking at this. So basically these are flowers which are far from of you. Hence they are not visible completely in our detail manner. So that does it for the fellows has been now I'm just going to add the bug details to the flowers. So this time to add the details I'm going to use in the black color because the yellow calm and not be visible that bright. So just to the center of the flowers adding this buddy Dave, using the tip of my brush, make sure that your white flowers are completely dry before you begin to add this, also do a few flowers. You can add the stem using the black color it says. So I'm almost done adding the bots to all of the biggest flowers that I added in. Now after this, I feed that a few flowers didn't need a little more pico pectin. So either we can pick up some white quash and I hope I just do a few of the flowers. So I'm simply overlapping the PVS but dental need that I painted it. I'm just being a little careful about the black color so that that does not get lifted. And adding this big anti-competitive, some of the flowers varied on them. Now next going to add some highlights to the bushings that we added it. So just going to pick up the yellow-green to one, I'm going to add highlights onto the green tone that we added near to the mountain day. So on the top of the darker green tone, just going to add an individual tonight being highlights, make sure that you do not add much. Try to keep the proper balance between the darker green and the lighter pink tones. And you can see I'm just using the tip of my brush and adding it onto that top edge is pretty good for me. Now next I'm just going to pick up a little bit of the black. I'm going to add it at the bottom of this bush if EDL, so now basically my bush ADI is going to have three column exist. That is the light green at the top, the dark green, that is the sap green that we used in the sense that I'm not the block them. I left and went off the dock effects using the black color. So we are almost done with the painting just in the few last details to add it. Now using the whitewash, I'm just going to add another layer to the clouds varied ongoing basis to make it look more o p. So just going to use the hotkeys strokes. I'm going to add an up and a bit more off the green highlights into the bigger clouds. Now just picking up a little of the gray mix, I'm going to add it very carefully here. I'm just going to dab it using the fingers so that it blends Ben at places. And a little of the dry brush stroke that you can see I've added into the Cloud and it adds a perfect beauty to the Cloud more. Now one last detail using the yellow cushy, just adding very small dot effects, you're into the pop EDO of the field. So basically it went, tried to show some flowers at a distant view or the flowers that are just about when you're done just using the tip of my brush, I'm dabbing in the yellow ocher shade. So I just added a little of the yellow ocher at the bottom also, and we are done with our painting for today. Now let's remove the masking tape and see AFINN painting with the clean edges. Make sure that your painting is completely dry before you begin to remove the masking tape. So the order is our final painting for D9, another simple meadow with the VOC Cloud luck. I hope you guys enjoyed painting this simple painting with me today. I will see you guys tomorrow into the deep end tomorrow. Thank you so much for joining me.
15. Day 10 - Night View Cityscape: Hello everyone and welcome back to the 10 of the 30-day challenge. The colors that you need for today's class project, right? Violet, yellow, orange, black, and burnt sienna. So I have my people deep down onto all the four edges and there is no pencil sketch for this class project. Let's have a look at the colors that you need for this guy. You need a shade of violet D. Then you need a shade of yellow. And we'll need a shade of orange. So I will be using the permanent yellow deep and the bright yellow orange here. And then you would be needing either permanent orange if you do not have the bright yellow orange. So you can mixing your permanent orange with your yellow to get a bright yellow orange. Now I will just pick up the colors and little by little onto my palette and then even mixed up Carlos to get it to use induce guys. So I have picked up all the three colors onto my palate. Now, the first color that we will be using is the violet color, but Pluto violet color even be adding in a little bit of the black and the white to get all grayish violet bone again. So we have been using this column mix in the previous exercises as well. So this time again, we are going to mix the color mix and get it into a grayish violet balloon. But this time we're going to add in very less of white and a little tinge of black and lead to Calabi-Yau adopt sheet. So you can see I added very little of the white and the electron black. Now, I think I may have to add in a little danger of Blackmore could get it into a dark tone. So I will just pick up a little tinge of black and added to this column mix. Now. Now with this color, I will begin painting the top of the sky. So approximately half of the beach, I'm going to cover it with this color. Make sure that you do not add too much water while mixing the color. Otherwise, you may lose a thick consistency of the beam. And I'm just going to apply this color in an even layer throughout. Then I will just pick up a little tinge of black directly onto my brush and added onto the top of the sky to get little darker tone on the top EDA. So foster adding this column then separately. Now I haven't just pick up a little tinge of the black color directly onto my brush. So I've just picked up a little bit of black and applying it on the top and getting a little darker tone on the top directly. So I am not mixing it into the color again, rather directly picking it up and applying it on the paper. So you can see now at the top I have gotten a little darker bone, then a lighter bone. Now next time we'll shift to my smallest size flat brush, and I will begin with the orange color. So for the orange color, I'm going to begin at the bottom area, I'm leaving all approximately approximately 1.5 sending me does face from below because that is going to be covered that black at the end. So it's perfectly, I'll choice if you want to apply the orange area there or no, I prefer leaving it blank and then directly going with black day. Now next I'm picking up the yellow color and I will apply it about the orange shade and do not take the yellow color directly to the violet color because in-between you will have to use the bonafide to blend both the kalos so that you do not form on my D color. So you can see I've the gap. Now I will quickly pick up some white color and apply them between an blend mode the colors together and get a perfect transition between the colors. So you can see I've got a perfect transition from the dark violet to the light by lead to a Lipton light violet again, then the yellow and the orange. And that is no muddy color form because of the white color that we use to infer blending. Also, while blending, I picked a color from the yellow to the white pill, the top of the violet color so that I have a perfect transition and there is no, or you know, harsh edges in between. Now I can just pick up some black color and fill the bottom EDR, as discussed earlier, a little Asda black Palo is going to go on the orange as well. So I'm just roughly roughly going to Marco cityscape kind of review. So for that, I will first Magdala of a rough edged kind of a look Not detail cityscape because we're just going to add the cityscape light lights to the bottom area that we will be painting with black. So just filling this entire area with this black color now, make sure that you pick up the black color and a good thick consistency and not add much water, otherwise you may not get the opaque look. And that is a thing about quash that you need to use the colors in a good opaque consistency to get the opaque look. Now after this, I will wait for all of this to dry completely and then add the clouds into the sky and the details into the cityscape in the black area at the bottom space. So let's wait for this to dry now. So now my sky area is completely dried and I'm just picking up a little bit of byte and mixing it to the violet mix that I had at the corner, just trying to get a little lighter tone and the dislike button, I will begin to add the clouds into the sky. So we're just going to be adding by lit clouds with different color tones and the violet color. So make sure that you do not add white to the entire violet mixed. I do have adding the little spaces so that you can keep reading the color TUNEL into dark and light values. Now I'm just going to add some blue cloud shapes. I'm just going to use the tip of my brush and the half C strokes mentor, and just going to form little cloud shapes. So in-between I'm even window that the beans are Latino using a tissue so that I have some soft looking clouds as well. So better way you'll feel the need to adapt the clouds. You can just use a tissue oil fingertip. So I'm going to use both alternatively variable, I feel the need. Now you can see I'm just using the tip of my brush and adding the cloud shapes that is the half C stroke near to each other to form a cloud shape. Now as we are moving on to the violet color, you can see the clouds are visible a little less because of the same bone and variations that are occurring inside. Oh, you know, both the blend mode on to the yellow color of violet clouds are perfectly visible. So they are on the top beam. Use either a doctor or a more lighter tone to add the closed state to join. Now at the bottom, just leaving some loose clouds. Very simple half C strokes are straight lines that I'm adding it to look as the clouds. So just an integer on the right side as well. And you can see we are not taking the clouds onto the top EDR much. Now I have picked up the darkest tone color mix that we hired by painting the sky. I'm using this, I'm adding the clouds, New York, but the orange ADR. And I'm going to pull out the clouds both from the left and the right side. And you can see the clouds are all mixed to each other. And just add the edge I'm trying to give in the cloud cheap. And I have completely filled the idea with the violet color. Make sure that you do not apply a lot of pressure while applying the violet color onto the orange tone. Because it may begin to form muddy color because the orange color can get activated. Now using the same darker tone, I'm going to add some clouds onto the right side as well. We're not going to be adding clouds onto the top of the sky, area, that is the dark area of the sky. It's going to be like that majorly all the clouds are going to be on to the yellow, orange and the light violet part. I've just picked up the lightest tone that is mixing in modo fight and applying it here so that these clouds are visible on to the violet color. So pick up a bone lighter than the violet colored bone that you have there so that the Cloud stand out onto that. Now just dabbing a little so that they have a soft edge. And underneath the Docker Cloud setup, I didn't just adding little lighter clouds as bed to add in different tonal variations to the clouds as Ben. Now yo to this dotCloud as Ben. I'm just going to add little of the light highlights. Make sure again, you're a light violet color is lighter than the Ediacaran biota. You are applying the clouds onto. Now I have just picked up some orange onto my brush and I'm going to blend it into the black here. So I'm just going to make small blocks with this orange color. It's automatically going to form like, you know, a bone sienna color of and it begins to dry and it's just going to form small patches. So given little small patches of this orange color very randomly at places in the black area. So I'm just trying to add details to the cityscape you. And you could even add just a few lines and blended into the background with the black color using a damp brush. Now I'll wait for all of this to dry and then begin adding the light details to the cityscape area. So I feel like adding a little more of the orange patches. So the same way as we were adding the patches or Leo, I'm just going to add a few more patches onto the left and the right side. So I'm using the color, blending it into the black so you can see it's forming a bond C and a kind of a patch once it dries. And if, if you know you want to blend the color, you can just pick up a damp brush and blend it with the black color. Now just going to add a few more lines and few more orange spots onto the right side. A little. We will begin adding the city might be days. Now I will begin adding this would be like the beans after this. So just adding a little orange patch on the diagonal and a little onto the edges. I'm just picking up some yellow color. Make sure that the yellow is a bright yellow one. And in case if it is not bright, you can just add in a little tinge of phi and make sure that you pick up the color in a good thick consistency. Now just using the tip of my brush, I'm just adding small dots vary randomly. You can add at certain places in straight lines, in certain places you can just add them randomly as a flock of dots together. So you can see some that I added them in straight lines and some where I added them very randomly, just placing them close to each other. So in similar manner, we are going to force please the yellow dots vary randomly into this black space. Then we will be adding a few of the orange dots and the white dots. And in between we will even be creating some glowing lights later on, so forth. Continue adding the details with the yellow column. You can see I'm adding the dots vary randomly somewhere streets on vehicle V somewhere. You're not just moving up and down and they are very small in size. So make sure that you use a pointed tip brush. And in case if your brush does not have a pointed tip shift to another brush which has a pointed tip so that you can add these fine details. Now in the same manner, just going to add a little with the orange color. And very randomly I'm adding d in these dots as well. I'm not worried about where I'm placing them. I'm just placing them very randomly. You need not cover the entire space. You can and then buried on debris. And some of them you can see I'm even adding diagnosis. So keep on adding a little bit the orange colored as well. Now next with the same brush, I'm picking up some white-collar. I'm going to add a few off the lights with the white color. Again, make sure that your dots are very small in size. You can play some of those white dots in between the orange and the yellow as well. Or maybe some on the yellow and the orange lights as well. All of it will look perfect. So you can see again, I'm placing these very random lease on the diagonals and images to all of you of it, some very small ones, some very literal bigger ones. All of these very randomly, nothing in specific and very randomly in-between. I have left some gaps and even on the top of the black area to starting a little of the glowing lights which are very far from our view. Now to create some glowing lights, I'm just going to add some circles with the white color first. And then when do these, I will be adding the glowing light effect using the yellow and the orange tones, so forth, just using those white sheet and forming small so causes and blending it a little into the background. And this is going to act as the background layer. And once things begin to dry, we will add in the yellow, yellow or the orange colored lights onto this. Now just as we were adding a little of the orange details, I'm just going to add Lipton of the yellow details as well. Now I'm going to create some glowing light effects with the orange color has been suggested are adding some dots with the orange color and blend nicotine to the bag. And then onto this also we will add some bright late effects. So varied anomaly, place of flu, a few of these dots as well. Make sure that you do not add much of them. And add them vary randomly and five from each other. So you can see even the white dots that I added were added very randomly. Seem very randomly adding the orange dots as well. Now in the same manner, adding a little bit the yellow color as well. So altogether you can just add like eight to nine of these dots, which are going to act as the glowing lights later on. Now till the lights dry, I will just add in some details using my fine tip pen. So I'm using a size 0.3 pen and I'm just going to add very little details onto the top of the cityscape black area that we have mountain. So just going to add some pools and some lines and very randomly adding these details. Now in case if you do not have a fine depend, you can add these details using your fine liner brush and the black color. Make sure you add these details very small in size because they are very far from us, so they are visible to us. Do not add them as they were out of the proportion end up being. Now let's add the glowing lights to the dogs that we added in. So first I'm just going to add a little of the yellow lights on Buddha top of the black area. So all of this will begin to act as the video distinct lights that we are trying to add it. And a little after lights mixed in with yellow and white. So this standout brightly and you'll get some bright light effect as well. So varied and many adding a little of this. Now using the same yellow and white mix, adding some of the glowing lights onto the yellow ones. Now just added the glowing lights with the orange color on the orange dots that we had been doing. So now when I'm adding these, you can see I'm using the color in a good opaque and thick consistency so that I have an opaque look. And I'm adding them smaller than the previous dot-dot-dot we added in. And also I'm not blending them with the background. So I'm letting them be opaque to make sure that you are, you know, when adding the second layer to the glowing lights, you use a color in a good thick consistency and addict smaller than the previous size that you added in. Now just adding very small lines randomly urine there to add more details to the cityscape that we have been dead. And we are almost done with a painting after this. The only thing left is to add a small moon onto the top right side. So for adding the moon, I'm going to use in my permanent white Marco and other very small moon. You're at the top right side. And using my white gel pen, I will just place a few stars into the dark area of the sky. So in case if you do not have a white gel pen, you can add all of these details using your white wash and a small order fine liner brush. So just adding a few styles medially on the, onto the top area of the sky that as the dark area of the sky and at the bottom had the clouds. So your painting for details. Now let's remove the masking tape and CFI and then painting with those clean edges. Make sure that you remove the masking tape at an angle from your paper. And also be careful that your edges are completely dry before you begin to remove the masking tape. Audience, the colors may flow back onto your edges and ruin your clean edges that we wanted it. I hope you guys are enjoying this 30-day gouache challenge, and I hope you guys enjoyed painting this with me today. I will see you guys tomorrow and do the day 11. Thank you so much for joining me.
16. Day 11 - Street Lamp: Hello everyone and welcome back to the 11. Today we will be painting this beautiful, cheap lambda2. So the converse that you need for the D's class project is white, violet, violet, pink, or regular pink, orange, yellow, black. So these are all the colors that you need for today's class project. So I have my paper down onto all the four edges. And let's begin with the pencil sketch for the street lamp. So the only pencil sketch that we have focused while it is this cheap land, your majorly towards the right side. So you can go ahead with any others, treat them silhouette if we wish to go ahead with the change in the shape, autofill want to again follow the same shape as mine. So that is it for the pencil sketch. Rest of the details, I will do that to be adding fit with the black color once we are dumping the sky and the other elements of the building. So let's begin having a look at the colors that you need for the sky. So far the sky I will be using three colors status, the violet D, the violet pink, and the orange. So I will just pick up all the three colors onto my palette. This time, we will be painting the sky part by part. That is, we will be blending the colors one-by-one as we begin painting. And also build tried to avoid not to run into the lamp area, but in case if you run a little into the ramp area, it's perfectly okay. Don't worry, we can cover it up. In case if you do not have this in Scala, you can go ahead and pick up opera pink or any bright pink that is available in your palate. And next I will just picking up a little bit of the yellow, orange shade instead offer direct audience sheet. Okay, So I have all the colors ready. And let's pick up some whitewash as well because that is the most important one when we begin blending. So this time I will be using my smallest size flat brush, that is the half inch flat brush for blending the sky, so forth to angle begin mixing in that Kahlo, I remixing violet the color. So that is the reason I picked up very little of the violet color because we will be mixing of white to it and getting OLTP still don't do it. Make sure that you do not have much water. Otherwise, the colors will not stay. Or B, only add liquid water as much needed to get the perfect consistency of toppings. Next to the violet pink color. Also, I have added in a little bit of white and you can see we've got a piece to be weeping sort of a sheet. Same data, the yellow, orange sheet, although I'm adding in a little bit of byte. So I'm preparing folded three colors for the sky and keeping it ready in-between for blending, I will even be using the angular brush also in case if you do not have this angular brush, you can simply just use a smaller size flat brush or a round brush in-between for some blending. So fast I'm beginning with the violet color. I'm going to add the sky died many the site and make sure that you do not run into larger spaces today, we will be adding smallest molar or ideas of the colors one-by-one and keep blending them as we begin painting. Now, after the violet color, just picking up a little bit of the pink color and I will blend it near to the violet color. Now, after the pink, again, picking up some violet and going to blend it near to the pink color. So now you can see we are going to add different bony values into the sky. Try avoiding go run into the lamp on the top area of the land you can run in because that is going to be with the black color. And in case if you run a little into the lamp while blending that is perfectly okay. We will cover that up with white gouache before beginning to paint the lamp. Now just going to blend the areas one by one as I keep painting. So I just picked up a little bit more of the pink and blended the center area again. Now I will just pick up a little of the orange color and apply the orange color before I begin to apply the rest of the colors for blending. So just applying a little orange on the right edge near to the lamp. Now again, I can just pick up a little bit of the pink color and blending towards the top right corner, you are with the orange color. This be a little careful when you begin to blend the orange and the violet color. So now. By blending the orange color got lifted and it's going onto the violet color. Don't worry, we will blend it later on by picking up the violet color. So right now, just try to blend it a little bit of violet bones. And then, oh, you're not that Bob space again, you can just pick up the violet tone and blended. In case if you find this difficulty, what you can do is you can simply cover photo lamp area with IDA masking tape or masking fluid and blend all of this diagonally quickly all together. Now I just picked up a little of the pink color. I'm trying to blend all of this when now whenever that is orange color, picking up onto my brush, I am cleaning it and then going ahead with the blending. So make sure venerable by blending, the orange color gets picked up your dabbing, clean your brush, and then pick up the next tone for blending. So you can see on it and paint has it on into my Lampedusa and I haven't covered it with white later on. Now finishing the board, the medial of the sky. So again, picked up the violet bone, I'm going to apply it into the rest of the sky. And then in between I may pick up a little of the pink and orange if needed. Now going to pick up a little bit of pink again for the border medial of the sky. And now at the Wharton, mostly not just going to act simply orange tone. So basically, the only difficult part of blending was the audit on the right side, rest of pink and the violet can be blended easily. But with practice, you can even achieve that little orange spot. And you can see now, I do not have any sharp edges on any unfinished blending there on the right side, once that being strike. Now just picked up a little bit of white and blending it though 20. So to get a perfect woman radiation and the perfect transition between the colors. Now just picking up a little of the orange tone, I'm going to blend it your, again, Ben, so that I do not have any unfinished blending. So just pulling out the color from the edges and giving some orange highlights on the top of the sky at each entry, using the angular brush major is just a brush that I'm using to add in this little orange to 0, V is coming out from both the sides. Now next I can just make up some fresh whitewash, the doc mixing in any color, I'm going to apply the force kneel onto the entire land, since that is a little of the pink and the violet color that has run into my lamp. So I'm going to give in this forest Nieto fight gosh, and after this dries, I haven't given the light effect to the lamp with the orange, yellow, and the white bones. But so that the pink color does not affect my lamp area. I'm giving it this neo to provide or to make it as the base layer. So this is how you can cover up if any of the color has run into your lamp area as Ben. And running into the Lampedusa makes the blending easier. But just try to avoid all you can use a masking tape, as I told you previously. Now picking up some black color, I'm going to add very small cityscape kind of you at the bottom. It's not going to be anything, just very simple black silhouettes that we will be adding it. You can go ahead and change the silicate look here. And then one could this silhouette even just be adding little of the bush and the tree effect just knit, didn't even give, giving little cloud effects into the sky as well. So then this guy top EDR dry, I just thought of going ahead and click me adding in this simple silhouette. So impulse marking out the silhouette, outline so that you can copy the sea. Or if you want to be surely change this innovate and you can add more and smaller buildings rather than adding such big GO bonds all together. But the main focus is going to be the lab. I'm not focusing much on the rest of the details Your now just going to fade all of this compete even black and then even move ahead. Make sure my lighting in this Blackboard, you do not add too much pressure and also pick up the color in a thick consistency so that you get this opaque look and you have this, oh, you don't take a black look of this entire cityscape that we are trying to add it. So I'm done adding the city scheme. Now I haven't shifted my smallest size brush over small pointy tip brush, and I'll begin adding in the details of the bush on blood bulk of this cityscape. So I'm shifting to this fine tip brush. From the band stationary from India. And now I'm just going to keep adding in the bush effect. So this is a very pointed tip brush pens. I'm going to get very fine details in the bush this time. In case if you do not have all smallest size brush, you can go ahead and use a brush that has appointed. Or if you have a size 0 or double 0 round brush, go ahead and use that. Just use the tip of the brush and keep adding very small damping effects using this brush. So kind of half C strokes as we use for adding in the clouds. This time, I'm using the same stroke for adding in the p here. So just keep adding in-between. You can even add an engine of the black patches as I'm adding in. And this is going to be Yvonne p on the left side. Then I'm going to be smaller bush in the center. And then on into lambda right side. Make sure that you do try to maintain the shape of the G and not run out of proportion all together. So you can see just using the half C strokes, how I made meant to achieve very detailed looking kind of fatigue. Just as the strokes we used to use by painting the clouds. I'm using the same ones now onto the edge of the key, just giving in some strokes which are looking detail and will give more detail view to that tree. And in the most leftmost area of the tree, I've just added the strokes very close to each other. Not why did much about the details. They're now going to add smaller bushes in the center area as well. So just in between the houses adding very small Bush effect, I'm just using that they're both my brush adding simple lines, all stroke. Adding this, you'll want, you can go ahead with the dabbing technique as well. You're now on the right side. I'm going to add an ID to love it again. So to maintain the entire look on the right side, I'm adding a little bigger bush effect again. So this time it's like a bush on the left side. It was kind of a tree that I was trying to add in. And your I'm just adding a bunch of the bushes. So using the same technique, just the shape is different as compared to the tree. Now using the same smaller size brush, I'm going to begin adding some clouds into the sky. First, I'm going to mix in a lot of bipedal orange color that I haven't. And I'll begin adding some clouds using this very based in orange tone. So you can see how light my orange tone is. And now I will just begin adding the clouds. So again, I'm just using the simple houses strokes and the other little bigger inland and just going to add a few clouds with this column. Then I will even be adding a few clouds. But the puppet tool, by adding in a lot of fight to the populace bell, non-verbally how this is looking right now, when we begin adding the violet clouds, all of it will begin to make sense. In-between, I'm picking up a little bit of the pink has been, I'm going to add a little of the pink clouds near to the orange color itself. So just keep adding a few clouds now going to add a little of it onto the top right side, euros. So far as just adding the Hofstede's drops at this time, I'm not adding the clouds closer to each other. I'm basing these drugs. Oh, just picking up a little of the pink color and adding of the pink clouds as Ben. Now you're just adding a little of the darker orange clouds as well. Just be careful about one thing that you do not run into the lamp area again, because we've laid down the white layer so that we can later on add the light effect into the land. Now mixed invite to the violet color. I'm just going to add some lighter clouds and the clouds that I've placed it. And I'm not going to add much of it at the top side, it was mentioned on the bottom side that added mood of the violet clouds. So you can see very randomly they just pleased to little of the clouds urine. And it has given so much more detailed to a sky. Now I've just picked up a little darker tone of the violet color. I'm going to add a little cloudier because the light violet color seemed a little too light and it was not going well with the sky. So to cover it up, just adding darker strokes onto it. So you can see that quash, you can cover up your mistakes easily and mandate and get it into a differentiator, which looks perfect. Now let's begin painting the lamp. So far, the Lampedusa, I'm going to be using this shade of yellow light, that is the permanent yellow light. I will just pick up this color little onto my palette. So I'll begin applying this color onto the entire land area. But in the center, I can leave a little so-called byte. It says because there I will be blending the yellow and getting a light effect there. So first I'll begin with the edges. Then on the edges also I will be adding a little bit of orange to get the one defect to the light as bad. But first beginning with the yellow color. Now you can see after the white layer when we are applying in this colors, that is no trees of the pink and the violet color that had run and do my lamp area while painting the sky. Now in the center marking out this Oculus I told you, and I'm just going to add the yellow color around it. And in the center, I won't be adding the yellow color right now. Now just picked up a little of the orange color. I'm going to add it on the edges. I'm going to blend it well with the yellow color on the edge. We are still going to have a blackboard up, but that is going to be later on. So right now just using a damp brush and blending the orange with the yellow color. This was wet on wet that I applied. That is the yellow color was still in bed when I added the orange tones. Now after this, I will just pick up a little of the white wash and begin applying it in the center and blending it with the yellow color. So you can see automatically I've got an idea, yellow ball in the center area. So that is going to reflect a major light effect. Now using a damp brush, I'm going to blend the edges belt so that it does not stand out separately. And we have a perfect blending between all of it. Now in-between, just going to add a little of the white again to make that bright and the right light effect there. So you can see I've got a perfect transition and there are no sharp edges between the color variations that I'm having in the lamp area. Now beginning with the black color again, just going to add the final details to the lamp. So first I'll begin with the pole of the land. So do the poll. I'm just adding a little detail look and the land is actually a little tilted to abuse. So hence this line that I'm adding in is a little tilted. Okay, Just this street line that we added in has to be a little tilted. The poll, we'll be looking street only even though it is an untilted view. Now at the top of this line I had a thin upward and as I move towards the bottom, I have taken the pole area. I'm just going to fill it completely with black for now, just giving in some detail onto the edges again, very simple details. You can go ahead and use any other pools that you want to go ahead with. It need not be the same like me. But I'm just trying to add a little detail. You are now with the same black color. Just going to add the edge too though, Babylon that we have added in. And then at the top I will give the little detail which we had done the pencil sketch off. The pencil sketch may not be visible, but you can go ahead and all, you know, follow a similar shift that we had done during the pencil sketch. Now by adding the edges to this lab, make sure that you do not run out of proportion and don't add it to take also tied to use the pointed tip of your brush, I'll shift to a smaller size brush for adding in this. Now just adding the details you're at the top using the black color. My pencil sketch is a little visible to me, so I'm trying to follow that pencil sketch in case if it does not visible to you, you can go ahead with any other sheep W12 at the top as bad. Now one last D1 left to add to the lamp is a straight line in the center of the land. But for that, make sure that your central idea of the lamp is completely dry. Mine is almost dry. So I can just add this cheat line first. So a little white area is still wet, so I'll just quickly overran the black color again so that I have that opaque look up. The black color in case of yours is not dry. It then wait for it to dry completely orders you made window center light effect of the land. So to avoid that, make sure that you read for today. Also, if you want, you can give it a little toe bone sienna color to this center line that we are adding it. So at the top you can add it with the black color around the bottom multiply with the black color. But in the sand now you can use a little of the bond sienna color to reflect the light effect onto this black line that we added in the center of the street lamp. So just giving the final edges and we are done with our painting for today. Now let's remove the masking tape and see AFINN painting with those clean edges. Make sure that your edges are completely dry before you begin to remove the masking tape. Always remove the masking tape at an angular against your paper. Or as the colors that are on the masking tape may run onto the edges again and ruined those clean edges that have got using the masking tape. I hope you guys are enjoying this 30-day GWAS challenge and enjoying painting different beautiful paintings with me every day. So your reserve final painting for d 11. I can see you guys tomorrow into the details painting. Thank you so much to each one of you for joining me so far.
17. Day 12 - String Lights Street View: Hello everyone and welcome back to the 30 day challenge. We are indeed 12 today and we will be painting this beautiful street view for the string lights. So the combos that you'll need for today's class project is violet, violet, blue, violet pink, or regular pink, orange, yellow, burnt sienna, yellow, ocher, and black. So these are all the colors that you will be needing. I have my paper but deep down onto all the four edges. And there is no pencil sketch for this one, eagle Eigen to begin picking up the colors one-by-one that we need for painting the battle. So the first column that we need is a little bit of the violet depot. So I'm adding your knee up to the blue this time because I haven't been mixing in the blue and the violet together. So I already have a little bit of the blue on my palette. So there it says, I will just pick up a little bit of the city in blue. Next, I will just pick up a little bit of the bright yellow orange color. In case if you do not have this color, you can mix in your orange and yellow to get a British yellowish orange tone. I will just pick up a little bit of the violet pink tone. Now in case if you do not have this, you can go ahead and use any bright pink bone or you can use crimson if you do not have any off the pink tones. So these are all the camels that I will be needing in for the background sky. So let's begin painting the sky. So I'm forced begin mixing in a little bit of my white or two oldest colors that I haven't. I already have the yellow on my palette, so I did not remove any new fresh color of the yellow bone. In case if you don't have it, you can just pick up a little of the yellow as well. Now with the same brush I just added in a little bit of white to the orange as well. So I added a little touch of orange, sorry, the yellow as vent to the orange color. Now, picking up fight again and mixing it to the pink as well. So you can see we've got a beeping sort of for California. So I'm just forming all the colors fall so that then we can directly begin painting and not stop in between for mixing again. Now, I have just picked up a little bit of white and I will add a little touch of black. This I even added a little bit of violet and the blue bone, some triangle get an unmuted tone of a bluish green color with a little touch of violet. So the black is very legitimate. Violet has also led to the blue and the windup is very legit. So it's basically more of white and less of the three bones. Now I will just little invite ready has been in the palette. I will just add a little more white to this blue mix analytic more data of the blue and the violet color because the color seem to be too much towards the door. Now just adding a little more of fight to get the perfect. Oh, so you can see there is always trial and error to get the perfect tone that you want to begin mixing a little of each color, then you can understand which column you need to add more to get out New Orleans stone possible. Now I will begin with this blue and violet mix and begin from the top of the sky area, make sure that you do not add much of water and do your color in between. I can even be picking up little right, to get little tonal variations in between. So I've top I applied Bundler of the column mix that we prepare. Then I just picked up little, right? I'm trying to get a little lighter value of this color that we have applied in and just trying to get done and radiation moving downwards. So almost 40 percent of the top area, I have applied this lighter bone of the violet blue mix. Now next time you pick up the mix of the pink color and applied neopentyl violet color. Now, the pink is already lighter. So I would just blend both the kalos and then apply a little of the pink Leo. And then I will shift to the orange and the yellow sheets. Now next picked up the orange mix and applying it neoplasia pink born. I'm trying to blend both of these colors when in case any video that blending is difficult, detective at the Apollo, you can pick up white goulash and begin blending it. Now picked up a little bit of yellow and I have applied it on Moodle orange as well to get a little lighter orange tone to it. Now again, picking up the pink door, I will just remove a Lipton more of the ping-pong because the pink seems to already have been used up. So I would just add in a little bit of whitewash again to this mix and get the baby being born again. Begin applying, get into the rest of the bottom. So you can see I've tried to go to perfect blend between the kalos and the transition from each Carlo to each column looks perfect. And there is no sharp edges in between all the transition looking, oh, you know, I'm finished on anything. Now just picking up a little of the pink and applying it kneel to the violet and the orange mixing because they are, the pink color seems to have been overpowered by the yellow layer that I had applied in. So this is just the backbone onto this, even still be adding the Cloud details. Now I've just picked up a little bit off white and I'm going to bend it towards that.edu because very wet. I feel that my blending is going to lead to wrong. I just think up a little bite and GI GU ghetto, perfect blend and transition between the colors. So that is the reason I just picked didn't a little white and blended from Bach to walk them again and got a perfect transition between the kalos. Now I'm shifting to my smaller size 0 brush, which has a pointed tip, and I can begin adding the clouds with the orange column mix. This is a lot of orange mixed with white and a little bit of yellow again. Now just using the tip of the brush, I'm laying down the Hofstede's tools that we had seen and adding them close to each other to form a Cloud Shell. So majorly, the clouds that I'm going to add is going to be with this bright orange white mix and the yellow mix. So Foster, I'm adding in the clouds with the orange color. You can see I'm just nailing down to Hofstede's strokes, very done nimbly and close to each other. I'm trying to form a cloud shape near to each other. So in between you can see I'm even leaving gaps so that the background sky that is the violet color psi is still visible. Now next I have picked up a little bit of yellow color. I'm going to add the same bones, neon, glow orange, and dry. It will blend a little yellow to the orange color so that you have a buffet Goleman Vichy, and a movement from the yellow to orange. So just adding a little of the yellow and the orange clouds as well to get the perfect balance between watercolors that we are adding in between. You can still see a little of the row behind sky being visible because they did offer discovered with the orange and the yellow bones that we added in. Now same VI to just add a little more towards the right side with the yellow color. And you can see my yellow is so bright that it's standing out very well onto this guy. I'm giving a bright cloudy law. So just adding a little more on the right side first. So this time you are at the bottom. I'm even adding a legitimate Dr. pink dodge to the Cloud that we are adding in Europe, the top. Now I will just pick up little of the bright orange color that's dead. Oh, a separate me and I will begin adding the clouds you're at the bottom spaces. When I add the border most of the page we will be adding a little of the fluffy cloud look with the same colors that we're using right now. So at the top we have added the clouds using the Hofstede's tools and I'm the water leaving and the fluffy cloud effect to add in little effect. And then we will be adding the bind Gs to this. Now I've picked up a little bit of the orange without mixing and write to it and you can see it's a bright orange for powder in-between the clouds that we've gotten. Now I will shift down brush size three and begin adding the fluffy clouds using the orange don't. So I'm picking up more of orange, mix sweetness of white, and I'll begin adding the fluffy cloud effect. You are at the bottom space so far side and formed a fluffy cloud edge that I want. And then I will begin adding the veins in between and try to get a perfect blend between a doll. Now next I will pick up a little bit of the white color and add as the second layer and drag a blended with the orange color that I have added in your and I will just try to go, you don't get a perfect balance between the colors. Do not worry the pink color or if it gets activated and agenda, it will only add to the fluffiness look off to the Cloud. So you can see even on the telephoto pink color when I'm blending the right gets activated and that's adding on different Bolden mediation to the fluffy cloud look. So that's perfectly okay. So just pick up some white. Now next I'm picking up a little bit of piano and applying it below the white color. So you can see I'm having so many Carlo variations into my fluffy cloud data is the orange, white, pink, and the yellow effects. Just going to blend a little bit of the orange to the yellow as well. So adding into your on the left as well, so forth started in the audience. Then, now added go right. Now I can just add an antelope got orange and the yellow again at the bottom species. So now just picked up a little of the orange, adding it at the top and trying to blend it with the white to get the perfect fluffy cloud blue. So at the bottom you can see we've added a fluffy cloud effect. Now to begin adding the palm trees, I'll just pick up a little bit of the bone sienna color for adding the mean bark of the trees. So just picking up a little of it. We don't need much of it because we ingest the adding the mean of branch or the mean or inner bark of the tree using this color and rest of the leaves are going to be off the green tones. So I've picked up a little of the bone sienna color, and now I'll begin adding the trees one-by-one. Make sure that before you begin to add this, the clouds Leo that you have added at the top and the bottom, both are completely dried, otherwise you may not get this look. Now I'm picking up a little of the yellow ocher color. So they are no ago was already on my palette. You can remove a little of it. I'm just going to add a little shadow effect BOC that we have added in. So onto the right side just adding a touch of the yellow cushy on the bone, CNR Kano. Now in this, again, Norco Kahlo is not standing up on your bond CNO callow VDD for the Bhante and Alcala to dry completely and then add in this yellow ocher color and it will stand up perfectly or even on the bond sienna color ones is perfectly drained. So I will be adding the leaves this time that the black color directly. So again, I've shifted from my smallest sized round brush which has appointed bit. So this is a size 0 mean, meaning H0 brush. I'm just going to begin adding the boundaries vary randomly using this so brash and the black color. And after that, I'm going to be adding a little highlights to this using the yellow ocher and brown sheets overlapping onto these black lives. So Foster, I'm just going to add about seven to eight branches of these needs and they are going to be moving in different directions. Some of the leaves will be overlapping each other, and I've just tried to add them as randomly as possible. So, um, some of the branches, the leaves will only be falling towards one side. On a few of them I will add the leaves moving both of the sides and a few of them tilted towards each other and overlapping each other. So you can act upon Jesus and whichever manner you are comfortable with, just make sure that you try to add in such a way such that it looks all nature and all if it looks into proportion. Now make sure when you're adding these, you do not add them so big that to cover all the clouds and the sky effect that we have added in. So it's very important to understand and control the effect or the size rather of the elements that you add in so that your background doesn't get hit him completely and loses its low. So you can see I'm adding though of families very patiently and Vo1 by one. So keep adding them. Now I will just add a little highlights to this using the bond CNN, the yellow cushy, so false, I can pick up a little bit of the bond sienna color and just add few often leaves with this color overlapping onto the black ones. Now when you are adding these highlights again, make sure that your black color is completely dry so that these highlight standout. Now next, picking up the yellow cushy, I'm going to add a little bit of the highlights with the yellow ocher sheets as well. In your day, not much. These are going to be overlapping onto the black ones only major knee. So you can see just by adding in the yellow highlights, it looks like the effect of the clouds onto the palm trees. So that is what we wanted to achieve in. Now, again, I'll begin painting the next function. Suppose to adding the backoff, the g. Now this time tilted towards the right side. And it's a non-literal diagonal direction as you can see. And I didn't begin adding the G in the same way just as we added the first one. So picking up the yellow CAUTI, it adding a little highlight to the bank that we added in. Now good. This one. I haven't even add a little yellow ocher color before I beginning adding the bomb. Nice. So these again begin to act as a little shadow after we begin adding the leaves, the dark black color. So now again, I shifted to my smaller size, brush on and begin adding the palm leaves popping out from this yellow ocher bones only that we added in. So at the end, that will need a little of the yellow ocher will be visible there in the center area. So just as the first one, keep adding the families. Make sure that you do not add much water to your black color. Otherwise you may lose the opaque law and you may not get the thick black look of the leaves that you are trying to add in. So you can see I added the bomb news video on one-by-one, leaving space in between there what I feel and I do not go all you just next to each other. We create in depends on bad. You need to add what kind of nice? Now, just adding one digit of the OH, bond CNI, these ones as well. And then we will add a little of the yellow highlights I squared. Now next year on the left side, I'm just going to pop out some of the palm leaves. So basically that G is not enough view right now. It's only a few of the leaves that are popping up cochlea trying to add in your, so I will just add a few of them. You're on the left side. Now again, when you are adding them on the left side, make sure that you do not cover the entire left cloud completely. Led the Cloud at these be visible. So again, you'll need to be careful and understand though, oh, controlling of the size of the clouds. Otherwise, if you run out of proportion, you may lose the effect of the background that we have added in. So it's very important to control all of it so that you do not lose their looks. Because just by adding these elements. Now one blue, this just going to add a little of the bond cnn dot yellow highlights again the yellow ocher. Now just adding another small g here on the leftmost edge, I'm just going to add media smog 0, 0, 1, 1, 0. And that's both API. Okay. So just when Brad VDS more GO jaw. Now just going to add a little of the highlight to this TSV. So I'm mixing in the yellow icon, the bond sienna color for adding in the highlight here. So you can see it's such a small g. So I accidentally draw a big drop-off water which was onto my brush lambda. So I'm just lifting, adopt vintage and be using what the shoe now I can just pick up a little up the color and cover the sport that has been formed. Now on to the right side you're going to add another G 0, basically just the leaf again popping out from the right side just as we added on the left side, on the left side of the adductor domino, top side, I'm on the right. We're adding it on the little bottom side. And did acne using the bond CNOT Kahlo. Now rather just pick up a little of the black color. I'm going to add little black highlights onto this one, Sienna leaves that we added. So basically, I just tried to go the other way round. And you can see even going the other way round, things works perfectly fine because gosh, is a forgiving medium and you can go ahead and return either Bonanno Docker bone under darker Boone on born and achieve the same effect. So Added Tax more leaf on the left as well. Now next either shift to my technical pen and I will begin adding the strings for adding in the string light. If you want, you can go ahead and add this using a fine tip brush and the black color, but I find it easier to add it with a black pen hands I shifted to append. And adding the videos with this band is going to be much easier as some bed to adding it with a brush. So false, I'm going to add go, Oh, because strings then Eigen not going to deny defects to this. And then using my right Ben, I could add the bulb effect to all of this. Now makes sure that all of your leaves Gs up perfectly dry before you begin to paint this. Otherwise you append me, get you win. And it will be difficult to run all of it pins. Now in-between just adding this monopole your as well. Now I'm shifting a lot thicker brush. So earlier I was using the point 3 and now I'm shifting viewpoints six, I'm going to add a double line to these strings that I have added in. So the bottom line is going to be taken and the top line is going to be tunnel. Then I will add connections in between both of these lines and dropout the bulb up from these. Now on the second string, you can see I have reduced the distance because of the view that we are trying to add in. And on the third one, I have completely reduced the distance on either to decline almost New York to the 1001. Now, even giving a little tick next to these polls that I added in. Now in between both the lines, I didn't, I'm just drawing those cheek line, trying to add a connection, then dropping a little connection for the button. And underneath this Ivan just be adding the right light effect using the gel pen. So you can see just a small line, then a little soap, then again a start small line. And then I'll say me, so cool. So below the semicircle is where we will be adding the light effect or the bulb effect. So keep adding all of this on all of the string lights. And you can see I'm trying to keep the bugs equally distant from each other. Now I will add all of this into the forest and the second line quickly. So in this, I'm just adding your in the second line, as you can see, just a connection between the lines and then dropping off the half semicircle and below the biopsy window white colony drawn. Now this toward line is quite far from our view. Hence I'm adding these very small details because this is the farthest all streamlined that we have. So that's visible wasn't a very small size. So that is the reason that top-line was visible to us the most. So that is why it's so much detail. The second one was the little fire. So that is the reason that's the distance between the line is a little less. And the third one is far away from us. So that is the reason I did not have any distinction between the two lines. Now using the right permanent marker, you can see I'm just adding small circles underneath the half semi-circles that I added it. And they are beginning to act as the light handed out from all these Biostat we added it seemed, I will add it to the second and the third line. Now to the third line, then I will be adding it. The bank will be quite small because again, there are five from ovule, so they have to be smaller in size. And even in the second line you can see there are smaller as compared to the first slide, 9, the third line you can see I'm just dabbing the tip of my pen. If you do not have this band, you can use either your white gel pen or white goulash or by the crenate to island these details. So now let's remove the masking tape and see our final painting. I hope you guys enjoyed painting this beautiful as cheap light view that this string lights today. Make sure that your edges are completely giant value remove the masking tape. So you are resolving things for D2L. I hope you guys enjoyed painting this beautiful view. I will see you guys tomorrow into the detail of the in-class project. Thank you so much for joining me.
18. Day 13 - Cotton Candy Clouds: Hello everyone and welcome back to the 30-day questioning VR only cotinine today. And we would be building this cotton candy sky loop. The colors that you need for today is right, because blue auto is blue, violet, pink or paint sap green, yellow, green, black, and yellow color. So these are all the colors that you need for today's class version. And let's begin painting this beautiful cotton candy sky look together. So I have my people, they don't know who all the four edges MOOC pencil sketch for this one. But I will roughly tried to mock out and show you the amount of space that I will not be applying. The turquoise blue, Colorado peacock blue color. So I'm just showing you roughly I'm for your reference, I'm adding indispensable stage. So in this area I won't be applying the sky color because there I will be painting a cotton candy sky DDP. So try a wide, roughly a big cloud space on the left side. Now first I'll pick up some peacock blue color. Now in case if you do not have this color, you can use the turquoise blue collar or mixing a little bit of your green and blue to get a similar looking sheet. Now, do this peacock blue, I'm just adding in a little bit of the city and in blue color because it, hello is too bright for the sky color that I need. Now I will just blend these two colors and add in a little bit of white and begin painting the sky area. So you can go ahead with a similar looking shape, as I told you. So you can see the color that is formed. It's kind of a sky blue color, but it's a little taco into. So you can either pick up the turquoise blue color and add in a little bit of the city of in-group audio could just add a little touch of green to your blue to get a similar looking sheet and add in a little bit of fight. Now I will first begin marking out the cloud area as I have marked with the pencil. Don't worry if you go a little out of the pencil sketch, all change the pencil sketch. That's perfectly okay. I will just mark out this base and then being the rest of this guy with this one color, it makes sure that you do not add much water to this color mix. Otherwise you will not achieve this opaque look. And now move your brush in. All you know, compete from left to right or top to bottom and achieve a clean, smooth blend throughout the entire sky without any sharp edges would be one to blame color background of this, to reflect as this guy. So I'm almost done painting the first layer for the sky. And you can see I've achieved a proper clean blend and there are no sharp edges and F both thickening left out that cloud space that I needed. My sky dries on a dare. I will quickly prepared a colorful painting, the cotton candy Cloud. So first Ivan, just pick up a little bit of the white color. I will be painting the clouds in pink color this time. So far, painting the Cloud, I will be using the violet pink color. Now in case if you do not have the violet pink color, you can go ahead and use any similar tone of pink. You can go ahead with ego prim sin, or for any other pink tone, whichever is availability or padlet as we will be mixing, invite to this and getting a piece to tone of pink. Integral near little bit of fight because they may you've been eating lighter tones to create a fluffy cotton candy sky look. So for that first mixin, only a little bit of white to this, even be adding more white to get the lighter ones. So did my sky dries. I will even prepare the color sheets for the key leaves that we will be having him. So I will be using a sheet of this dark sap green cargo. And I haven't been excluded a little bit of white and if needed, we may even use the yellowish green cargo. But for now, just picking up a little of the dark sap green color and I will just get it into the perfect consistency. So I'm picking up a little bit of the to act on right? Now in case if you do not have this yellowish green column, you can simply add in a little bit of yellow to your V and getting yellowish green balloon like this. Now my sky is completely dry it, and I'll begin painting the sky that is a Cloud area of the sky. So I'm post picking up the paint mix that we did. I'm going to create a very small layer around the edge of the area that we have lifted. Make sure to not apply a lot of pressure. Because if you will apply a lot of spatial locality will begin to turn into purple color because of the blue color on the edges of this IGA that we have lifted. If a little popup color gets formed. That's perfectly okay. It will just start a little movie radiation via sky. But make sure to not added too much also are the ones you may lose the pink cotton candy look. Now going to add the first year of this Kano onto the entire of the edge region. We don't apply a lot of pressure, as I told you previously, just very gently keep adding in the SEO and any value for that. The other blue color has been picked up a lot on your brush. Make sure to clean your brush before picking up the pink color again. So I'm done adding the first year to the cotton candy look. Now next time we'll pick up the right tone and begin to apply New York to this pink tone, moving towards the left side. Now when are you going to apply the white near to the pink automatically, the pink when mixing to the right. And we'll get a lighter pink tone because of the right color that we're using it. So just at the edge of the thing, pick up a little of the paint, blend it with the white and you can see you are getting the lighter bone. So you can see half of the dark pink area that I've laid down. I'm covering it up with getting a light dot bone, giving it the cotton candy looked at, we're trying to add it. So that is the reason we are just picking Invite are not picking in the pink color again for adding this. Now near to this layer again, we will pick up the white color again and begin to apply the same way as we applied the next video. So now you can see in the third layer the pink will be more like Doc because we will be using the Secondly hoping to get into a little pink with the white. So automatically the pink is going to be a little lighter as compared to the second video. Now wherever you feel that you need a little bit of blending, use a damp brush and blend the clouds accordingly. Now, again, picking up some bite and I will apply it and to then biotech earlier note that the second layer when we applied it, and I'm just going to move my brush in circular motions and automatically the pink column will be picked up from the previous layer and it will begin to Riyadh it into the cloud layer. And you can see you're getting the top page shade of paint directly into this area. Now I'm just going to fill it with white into this entire left atria, which is left by. And you can see we've automatically got a very light shade of white towards the end. Now just going to blend wherever I feel a little neat to blend the white with the pinks. Now in-between, I'm going to add in a little bit of the darker clouds better, but I feel so just pick up a little of the pink and add a pink patch to add some darker clothes. So it's completely your choice where you wish to add a little of the darker clouds, but make sure that you have different tonal variations of the pink into your Cloud area so that it gives you that cotton candy look. So that does it for this cotton candy big cloud. We will be adding a very small cloud on the top-right tightly to rod. Now let's begin with the shades of green to begin adding the leaves on the right side first. So first I'm directly picking up the shade of the dark sap green color that I haven't, you can go ahead with any medium shade of green. I'm just getting it into the right consistency and I'm going to be using the same downwards. This is a size pretty round brush, which has a pointed tip. And I'm using this, I will begin to add these. This time we will be adding the knees in a little detail look and not just the dabbing technique. So cosecant begin adding the branch and then begin adding the leaves to it. So you can see the plant also that I added. I added it very poor, good and very Coby and not just a straight line. Even then I'm adding the leaves. You can see I'm pulling out smaller branches and adding leaves to it. Also from some leaves you can pop up another NAEP as well as I'm doing it, try to keep it as much nationalized possible and it will give you a much better effect. So keep adding the leaves very randomly as you wish to. And then we will be adding more obliges of these needs. And then we will add a few highlights with the light green as well. So you can see again from one nice itself, I'm trying to pop out two to three leaves. All of this begins to give the nitrogen look and make sure that your knees are moving in all directions and tried to add them as much knowledge as possible. In case if you have an odd one, but go ahead with painting these leaves, what do you get? Onto the right side? You can go ahead with dots. Dabbing effect goes onto the complete right side. And then oh pose you can given the name with the damping color. Then once that dries, you can give it a little highlights with the light of being. But I would recommend you to go ahead with these things because it will give you a little more practice of painting the leaves. It will test your patients because this adding of these needs takes a little time. And is it tests your patient while adding these needs? So go ahead with painting these leaves and trust me, it's severely relaxing to keep on painting these similar leaves throughout. So I'm almost done with the false branch of adding the leaves and you'll get 0 from this one branch itself. I've got such a broad leaves etiology because of needs that I'm trying to Bob bob from within the leaves. Now I've added the second branch and even keep adding the leaves in the same be just as we added in the post grant, the only thing that a few of the leaves will be overlapping the previously branch that we have already added, let it overlap and keep it natural. And that will give you a much nicer book. So make sure only about one thing that the leaves that will be overlapping are completely dry, otherwise, it may be either miss out. Also in case if you want, rather than adding this nice, You can directly go ahead painting the one stroke leaf that we have learned in our previous classes that in me loaned painting the bonds top leaves. So you can use the AC method you are as Ben for adding in these leaves with the smallest size brush. So there are many ways to adding these needs. It's perfectly onto you and your loaning how you wish to go ahead and explore new methods. So you can see, even from the second branch, I'm popping out the leaves which are, you know, overlapping onto each other and also a few leaves which are having additional leaves popping out from them. So this makes the process much easier and a little bit faster as been now added to our branch. And you can see the top branch is overlapping the first one a lot and a distal DIP as compared to the first second 1. Now onto this also, quickly add a few leaves, would not be adding much thought because all the other leaves outdated. Now, but these branches that I wanted to be added in, I'm propping up smaller branches from them and adding. So bigger branches that we added. I'm now rest of the leaves adding them, popping us on the smaller branches that we have it. Now using the right column, I believe down ammonia. So this time I'm adding the moon with the white gouache instead of adding it with my right Ben, because I will be adding in a little touch of the yellow color as well to the moon. So just adding all costly over the moon first because after this dries, I will again be adding a little layer of white and then a little touch of yellow to it. Now when you are adding this NEO, make sure that you do not apply a lot of pressure because the blue column will get activated and it will be difficult to achieve a very bright look to the moon. I'll see, you can see this time we've added a very big moon as compared to the previous rules that we have been adding in your. So this is, as I said previously, just the force P over the moon that we will be adding on to this. Now I'm just mixing in a little bit of white to my dark sap green color, and I can begin adding the second year of the lease for adding the second year of the Neves, make sure that your PVC or of the leaves is completely dry. Now. Adding the second new IV, just be adding the leaves overlapping onto the first one, but I can not be adding it in this scene placement of the first leaves. So you can see I'm adding these nice in-between. The leaves are a little overlapping them. So that will begin to add much more beauty to it. And even again, your as better, pop out smaller branches and keep adding them. Also make sure that you do not add a lot of them. Otherwise, you will cover up all the darker green leaves at me. I did. I'm even loosely effect of the donkey needs that we have added. Now the reason why I did not use the yellow-green color is I don't know why. I just felt by going in, by mixing invite Buddhist scholar, I'm using this phylogenetic me instead of using the yellow green color because I spent a year looking column maybe too bright for adding in the means you're and I wanted a little gal look to it. So that just makes done on a deliberate approach to my sap green and went ahead with this light and one for the second node off. Nice. Now just popping out a few of the ones stroke leaves from these needs that we have added it. So these were the needs that I was talking about diligent time ago that you can use these ones drop needs as Ben for adding in the leaves. Now, I will just died a very small cloud. You're on the top-right side, as I told you previously, said, I did a little bit of white to my pink color and go to a lighter color. And I'm just going to add a video smoke cloud. You're on the top area in-between. Anyway, you feel the need. You can add in more white or you can pick up the darker sheets as you want and as it goes better with your painting. So that is for that small cloud onto the right side. Now I didn't pick up right and begin to in New York for the moon. So my first few years completely dried and I just begin adding the second name. So for the second node has better, make sure that you're right is thick enough so that it gives you the opaque nope, not apply much pressure. And you can see the second layer already begins to give in such an opaque look of the white color. So I'm done running the second meal. Now onto this, I'm just going to pick up some yellow ocher. And I didn't do the center of the moon trying to reflect a very V1 moon effect here. Now after adding this yellow sheet, we can add some Guam effect to the leaves as well. So now I've been using Go yellowish green tone that we have and leaves using the yellowish green board to reflect on Moonlight effect onto these leaves as well. Right? And adding this yellow color also make sure that you do not apply a lot of pressure. Because the yellow and the blue mixed together will begin to give you a green effect. Now I didn't pick up some yellow HT bone and begin to add some leaves onto the leaves overlapping onto the PVS to Leo's so that these will reflect the leaves because of the moonlight effect falling on to the leaves. So just a few, not much. Make sure to pick up the galena could take consistency and make sure that your previous to Leo's of the leaves are completely dry. Now when I'm adding the core layer of the needs, you can see I'm adding them in such a way that the force to Leo's are still visible. And very randomly I'm adding them. They are little overlapping the previously, but they are making sure that the previous two Leos are also still visible underneath. Now just going to add a few leaves popping up in one stroke leaf that I was talking about again previously. So on the top your Raspberry, just adding a few of the ones top leaves or little bigger ones you can see on the edges. So you can see, I've added the leaves in such a way that all the three Nios up my leaves are visible. Now, last thing, I've just picked up a little bit of white again, and I've been trying to blend it into the Moon because the Moon is still not OB us. I specified that your mood, you did not go ahead with this new layer of white. Again, it's perfectly okay if you do not do all 12, go ahead with this new your, if your moon is already perfect with the previous nodes that you added in. Now this time, we are going to add in a few stars into the sky. My white gel pen and write permanent marker for adding few stars, so forth. I'm using the right jump in and just add a few tiny stars. Now in case if you do not have the white gel pen, you can use whitewash. I know fine pointed brush to add in these tasks. And in between these, I will be adding fuel to co-stars using my right permanent marker. So make sure to in-between the leaves also tried to add in this task the sky that is visible from between the leaves. They're also remember to please the staff. Otherwise it mimics a little incomplete. Marco and add your ability co-stars, dv will be very less as compared to the keynote stars that we have added in. So you can see just by automatically adding, these are big O stars in the sky begins to get a different look altogether. And it looks so much more per deal with these two Kostas, instead of just the Tainos stars like that. In between the leaves old. So I added a few tickets stars to maintain the balance of my sky. So let's remove the masking tape and CFI in and painting. Make sure that your edges are completely dried before removing the masking tape. Or if you omit date of the edges and the pain Smith spray and always remove your masking tape at an angle from your paper. So your reserve fine and painting for D, for d, I hope you guys enjoyed painting this beautiful cotton candy cloud look to D with me. I didn't see you guys tomorrow into our next class project.
19. Day 14 - Window View Cityscape: Hello everyone and welcome back to the 30-day was challenge the adam d 14 today. And we will be painting this beautiful window view cityscape to D. So the PAN-OS that you need for today's class project this by violet, violet, pink, or any other orange, yellow, black, one sienna. And you may even need a little touch of blue if needed to mix-in with violet. So I have my people T2 on to all the four edges. We will not be having any pencil sketch at present. We will first being the entire sky. And after that tries legal given the pencil sketch for the Windows loop. So the candlestick I will be using, the sky is bright yellow, orange, violet, pink, violet D. And as I told you, a little of the blue color to mix in with pilot to get a bluish violet tool so I can quickly pick out all the full canvas. Now in case if you do not have to bright yellow, orange, you can add in a little bit of your orange and yellow color to get a little yellowish orange tone. In case if you do not have this violet pink top, you can go ahead and lose any bright pink to, or you can even use terms in Carnot mixed in with a little bit of Python. Open up ink. Next, if you'd not have the violet deep color, mixing blue and pink sheets to get a violet cargo. And I'm using the shade of ultramarine deep. Very legit, Not much. I believe in because some might conduct because that is the color that we will be needing to mix in with almost each of the colors that we will be using for painting a sky. So I will first begin with a mix of the ultramarine deep and a violet color mix, didn't. It's bright. So I only have a little bit of violet color to the blue tone that I have added. Now, just mixing in a little bit of the ultramarine deep to the violet color and no bitumen day. And I'll begin applying it. Diagnosed winnings on from the top left side. Almost half of the people diagonally. Then we'll begin with the pink sheet. So you can see I've got a bluish violet tone as I needed for my sky area. So you can mix it. Don't all fall blue with a little bit of violet to get this amino looking toward. I went ahead with the ultramarine deep and the violet Depot mixed in with a lot of fight to get a little odd urine diluted look to the color. Now to my violet pink. I'm adding in whitewash and I'll begin applying this color from the water. Again. Welcome. Also, I will be moving diagonally towards the blue color. So now beginning to apply the pink door and you can see how I'm moving in diagnosis, make sure that you do not add a lot of water to your beans. Otherwise you may not get this opaque loop and also gives nine applying the color, any blue color gets lifted up. Make sure to clean the brush and pick up fresh B, otherwise it will be difficult to achieve or pink look into the sky. Now, good these areas, I'll try to blend it. Now using a damp brush. I'm just trying to pull out the blue color and do the pink and they're called the callosum meeting. You can see we are getting a more deep by lithium because of the pain. Do the bluish violet, don't know when they will blend the color. A little pink may get lifted. You either clean it off veil or blended veil into the blue color. That will absolutely be your choice. So you can see I've got a little pink patch onto my blue particles in such a way that it does not look unfinished, odd or having the rough edges. Now I'll pick up a little of the pink and blended again from the bottom area. Now you can see at the bottom I've got much of the blue strokes, which I don't mean. So I'll just simply pick up the pink tone again and bended their body at the blending points even still be having a lot of clouds and it will all get covered up. Now I have picked up the orange color and applying it. You're at the small area. Now make sure when you apply the orange near to the blue tone, it has to be very carefully done, otherwise you may begin to get a muddy. And in case if you need any blending out there, go ahead and pick up some blue color and get a perfect blending of there. Now I shifted to my round brush and I'm mixing invites to my pink color and making it more lighter pink and I'll begin adding the clouds. Now you can see that thing Kahlo is even light up the pink that I added into the background. Now just using the half C strokes, I'm going to add clouds close to each other. Then I will even be adding clouds using the violet column, mixing it with vitality. Now I'm mixing in a little bit of white to my violet color and then begin adding the clouds with a violet color as well. Make sure that you do not use the direct dark violet color, adding a little bit of white to get a subtle tonal Socolow and begin adding the clouds with this color now. So at the meeting point of the blue and the pink tones, I'm going to add these darker clouds using the violet color. So you can see that. Violet color is not dock and is not even to like. Just adding a little touch of white gives it all good, opaque look and mix it stand out into the clouds. Now just going to pick up a little lighter tone of the violet color. So I just mixed it in a little bit of paint to get the lighted book, you can simply just add in a little more of the white to your violet color and use the lighter blue will give duotone effect to your clouds. Now at the bottom and on the other side, I'm just giving smaller flowers look. So just the half C strokes very randomly placed close to each other and trying to add enough lack of clothes. Next, I will mix in a little bit of bytes to my orange color that I have an atom into looked at nodes with this orange color as well to get the perfect balance into my sky area. Do not worry about adding much on the edges because we will be painting the edges of the window view. But the reason I'm adding it on the left and right edges because on the left and right the window view is going to be very thin, undiagnosed. So in order to be sure, I'm adding the clouds onto the edges. But at the top side you can see I have had the added any clouds because they're, the window is going to be a little tickle. Now next item mix in a little touch of the color to my violet and a white color mix. And using this docker dawn, I will add a very low lying cloud at the bottom area before painting the cityscape area. So I just added a little tinge of the black color to the violet color. And I can just add in a little bit of white to it to get a perfect. So it's kind of a greenish violet tone. Again, we have been using this talent or not in our previous exercises as well. So you know, the column x by now. Now just going to add a new line, kind of a complete Cloud, you're at the bottom area. So first, just as the previous exercise I will post lay down one layer and then try to blend it at the bottom with a lighter Leo. Now for the next video, I will just pick up whitewash with my clean brush and I'll begin blending this column. And now sits at the bottom, I have the pink tone and I already have allele or of the violet Lido. So automatically when I blend all of these, I get a violet, pinkish tone for my clouds and it gets a perfect balance of colors between it. So you can see I just picked up white and I'm just moving my brush in circular motions. Now just as previous exercise, if you remember, at basis B again picked up the darker tones to add some darker effects into the call. You don't cotton candy fluffy cloud look. I'm adding in your Justice time the color for riding. This is the violet color instead of the pink color. So just adding a little of the DACA clouds again at the top. And you can see you've got so many color variations into the Cloud dreams that we added at the bottom media. Now the bottom cityscape, I'm going to be laying down the first Neo using the black and the bond C and outdoor. So I didn't begin laying down first a small line of the black color and then pick up some burnt sienna and blend it with the black color. Now the reason by AMP on CNN this time for adding in the cityscape is because we know pains are going to be off the black color. And I want the cityscape who have a little distinguished look from the window p. So that is the reason I am picking up a little of the bone sienna color. I'm going to blend it into the cityscape area so that it has a little distinguished loop as compared to the window panes. So fast, you see I have laid down the black color and now I will pick up the bone sienna color and blend it into the entire area. So I've picked up a little of the bond sienna color and now just beginning to blend it into the entire bottom ER, that vein I have laid down the black color. And you can see despite laying it on the black color, I have a brownish touch to the entire black area as well. Wherever I am applying in the bone sienna color, make sure that you pick up the bone sienna color, altering a good thick consistency so that you'll get this opaque look. Now you can see how easily I have achieved a color that is different from black, but still Docker in tune. Now when I will be adding though of the lupins with the black color automatically, a cityscape area will still stand out. Now let's wait for this to dry before adding the cityscape and the windowpane. Now my Cloud species has dried completely and I will begin adding a very small cityscape you onto the top of the brown black speeds that the has been. So for adding the building views, I will just speak directly using the black color because this is going to be obvious from the renewable. So using the black color you off and be perfectly okay. So let's begin adding very small building use. So I'm going to add a few buildings very randomly. Now you can go ahead and use a different sheets or placement of the buildings as you wish. It's perfectly your opinion and your vision in this matter. So I'm adding the buildings and different sheets and all blazing them a little far from each other and in different heights. I won't be adding the buildings onto the entire horizon line. I can add a little distance from each other as well. So in-between you can see in the center EDI less than it is. These are added smaller buildings as well as the taller ones. So I'm just trying to get a balance between all sheeps and I'm trying to add it. Now in-between the gaps I'm just going to add on and off the Bushehr. So I'm just grabbing the tip of my brush and giving our little bushes back. And you can see the bushes also very small in height and not too much high. So try to get a perfect balance so that it looks into all, you know, a perfect synchronization with all of the elements that you are trying to add it. Now you are again, just starting in the bush effect. So you can see I've already added four to five buildings and all of them in different heights. So Dr. Zac, father or cityscape that we are adding at the top ELA the rest of the cityscape is going to be reflected only with fix that we will be adding it. Now let's begin doing the pencil sketch further, we know that we will be adding it in disappeared confident to go ahead without dependence sketch, that's perfectly your choice, but I prefer adding in the sketch so that I already know in the proportion there, I'm going to pick the black beans. So fast added a diagonal of the UFO, the windowpane. Now onto the left side and the right side as well. The window panes are going to be diagnosed because this is a picture of you are in a diagonal manner. Now we have it end-all, all grids in the window. So these are going to be achieved. That is, from your old beat lines only, it is going to be horizontal and these are not diagonal, as you can see, independence and sketch that I'm adding it. So I will be adding into what is onto grids and two vertical grids. So placement of the same can be according to your wish again. Now just be careful about 12. Your Cloud area has to be completely dried before you begin to add disorders, the column may get lifted onto your skin. And even the black space that we have added with the city Ina. Be a little careful. Otherwise the Apollo's may get lifted and gets much onto the rest of the painting. Now going to add two of the diagnosis article pins as well. So you can see since my people is all tape down on all movable, so phase, it's quite easier for me to just into my board in the perfect angle. And now I'm going to add the vertical lines as well. And they're also going to be straight and not diagnosed. So I will just take a little measurements so that I know and I don't miss the center line. So just going to add very little or measurement for my own purpose. Depending on your paper size, you can go ahead with the measurements also in case if you're using a bigger size paper and if you wish to add mode of the grids, you can add more smaller bits instead of just adding two grid lines. So you always are close up view of the windowpane that we are going to add it. And just like the last at the bottom, we will be adding another diagonal window will appear, which I'll directly add using the black color. So let's begin adding the windowpane. So the windowpane is going to be simply with the black color. I'm just going to use the black color and not thick opaque consistency. I'm using my round brush which has a pointed tip. And I'll begin very patiently by false marking out the edge that I have mocked out with the pencil. Now I didn't finish my stuff. This windowpane detective with the black color, make sure that you pick up the black color in a thick consistency so that you have an equal 0. Black on this window pane. Now very carefully, I will begin adding the black color on the side window panes. So in case if you were not able to see the pencil sketch audio, you can now see the window panes with the black column marking that I have added in. And also now you can see the reason why I added two clouds on the left and the right edges. Because on the left and the right, as you can see, the window panes are diagnosed and very small. So that is the reason to have a proper balance between everything. We added the clouds as it is, even though they would be covered with the black color a bit. Now ready carefully begin adding the goods in-between. So I'm going to add the grid very patiently by bot and make sure that you do not run out of proportion. And you made a sketch that you have added. So direct looks up all fake window grid. So very patiently, I'm going bad bipartite, as you can see, I am filling in both the horizontal and the vertical grids together in small, small path. And make sure I'm using the tip of my brush so that I do not go out of the lines that I have marked in. So now in case if your brush does not have a pointed tip, I recommend you to add these details with the smallest size brush so that you can achieve the details in. I'm adding the second vertical grid and then I will add the second horizontal grid as Ben. Now you can see, since maybe voice, they don't on a movable surface, it's so easy for me to just repeat my board and I can move my hand easy and don't have to worry about the anger. And plus, I do not place my hand onto the areas we just still wet and which may get ruined if I place my hand over it. Now the last group that we will be painting is the heart is under grid at the bottom. So I'm done adding WHO grade. That one. Last good Lift to add is double of what the most often being Dean, as I discussed with you on the black and brown space that V being dead, I'm going to reject me. I had the window good with the black color and I did not to sketch there. So then now I added a very small and ten window grid. Now you can see this grid is all standing. Our distinguished leader someday, all cityscape area that we added with the brown tones. Now the top of what is onto a grid that I did, I'm just trying to get data out there in the bottom grid that I have added now. So now you can see our left begins to look perfect and you better different view because of the brown color in this city EDR as bad. Now the last thing left to add in this painting is in the city scape the lights that we will be adding. So just as one of the previous exercises that we did on day 10 of this 30-day challenge, we will be adding the lights using the yellow and the audience. So I have mixed in a little bit off VHDL, my yellow color, and I will just begin to add very small dots just like that. Then exercise. And I'm going to add these dots. I'm trying to reflect the lights in the city. Although this time I'm going to add very small lights on the buildings that we have placed it. So just as we won't be seeing in this bottom area, same dust, a few lights on the buildings as well. So fast I'm adding a few lines here and David, they get, then Ivan shifted the audience and the white boards. So make sure that you do not add all of them just with the yellow space for the odd engine by does bend. Now next time picking up the orange color. If you want, you can even add elliptic dodge off the white to your audience has spent to get up bright shining audit. Now using this audio, I'm going and a few light effects. So some of them are going to be in between the yellow and some there. I didn't even overlap the innovator, but I feel that the yellow is a lot. And just going to add very small lot using this even on the buildings as well to reflect some lights. Now for the white lights, I'm just quickly use my bike permanent, Marco. I'm going to add a few dots using this. And they're going to get bigger sizes compared to the yellow and the orange dots that I've argued. And lastly, just going to artists, modern ones popping out from this window here. Now using my white gel pen, I'm just going to add a fuels dyes in the top area of this guy needs on, I won't be adding the stars at the bottom of this guy. So let's remove the masking tape and CFRA of the 40. I hope you guys enjoyed being done this differently out opposite Enscape view from the detail baby being an evening, night or cities gave you. And today I'm evening sky window, cityscape view. So I hope you've enjoyed painting with me today. Make sure to remove the masking tape at an angle from your people and your final painting with those clean edges. Thank you so much to each one of you for joining me in this study days chatting so far, I will see you guys tomorrow into the day 15 class project.
20. Day 15 - Simple Sky: Hello everyone and welcome back to the 30-day GWAS challenge. We add on D 1530 and Vb. Vb doing this simple sky today. So the follows step you need is White City in black and burnt sienna. So I have my people at the dome onto all the four edges and we begin to take dP, dy, so false type and pick up some cobalt blue also limbo Paolo, you can go ahead with any shape that is there from both of the conquest. And will this IVB mixing in a lot of fight. Now just as indeed Paul VI had left base for the Cloud this time, even be leaving this piece on the right side. So I'd fall speaking, mixing in some bytes to the blue color that I have picked up. So I'm beginning with this new color. From the left side. I'm as Eigen moves towards the right, I haven't dropped the mako, a space called the Cloud IGA PHI beneath it black because there may even be adding o via a big cloud of there. So now we'll just drop me. You'll see I'm mocking all the Cloud sheet using just the tip of my brush. A little comma goes into it and you know, the sheep as they did on them as you can see. So just leaving that space because as it is, we wanted to add a light Cloud with the white color and a little touch of blue out there. Now just that I stop this guy, I wouldn't be being doing with this simple Camila and get a perfect blend into the sky ego. So I'm almost done. Blue color into the sky, adjusted at those pieces left and I didn't give a scholarship to the edge of the cloud area also that we have left. So all I had left that space very randomly just using authentic off my brush and mocking up that space. So I didn't give up both a grandiose covers to that space also, I added the edge. So that does it for my sky. Now let's lead for a little bit of the side to dry so that the edges where I will be adding the clouds is an integer. So now my sky is a little dry and I can begin adding the Cloud using my round brush and the white colored only. So I'm going to use the tip of my brush. I'm just going to move insulted or motions to add a fluffy cloud loop with the right color. This time, we had done awesome middle class project on Depot. Dean rarely use the pink tone to get a fluffy effect. Now major part of this cloud is going to get covered up, lead to wrong with the leaves, but still leverage the Cloud compete. It will give you a little practice as well. And also from behind the news under developed, this guy is going to be visible, so it would be easier to cover all the details there. Now, I have laid down to false the right, and you can see a little of Tableau has automatically gone, picked up now in between or one to pick up a little note though, given the floppy, the Cloud said I'm trying to be unwilling to be using the right color. I'm just an adult end of the blue dots that I haven't been using it. And you can see that edge. I have given invading island and shape of the eye instead of modifying the she'd been little later on. So you can see just alternating between the blue and the white strangled get a fluffy effect cloud here, huge cloud on the right side. Now I can just pick up a little bit of the white and extend them to do Cloud who are at the top using the white color. So when I didn't need on the right on it, they loved the movie and get activated. And that's perfectly okay to add a little detail to the Cloud. Now just little cloud your at the bottom as well. Make sure that you do not apply a lot of pressure and you would lose the white look on. Mooc will be visible region also not what we want, a little local getting activated, it adds to the fluffiness of dope law. But if a lot gets activated, then we'd also white fluffy cloud look. Now just modifying the sheep, but it didn't matter, but I feel necessary. So simply just using the white color and getting the cloud cheap die of what you can go ahead with any cloud shape that you want, just make sure it's a huge one. So now let's read for this cloud to dry and then we'll add the folder VPNs to this painting. Before that, I will still add a logit of the clouds. You are as been very little, not too much, just smaller clouds nearby. Not Denmark loud dries. I do quickly add in the details at the bottom left. There either be adding in the details all fall a whole enzyme via lines. So let's begin adding those details. I will be using the black color for adding in those details. In case if you want, you can force have a rough pencil, sketch out the bone, or you can even use your marker or a pen to add in these details. But since this time my poll is a logistic. Oh, I'm going ahead with the black color instead of a black pen. So adding updated diagnostic bone, very thick one. And then from this either just be popping out a few white lines and some bio connection details. So false, I'm adding in vertical lines out from this bowl. Then either even angle art but thinner lines because I find it difficult to add all, you know, opaque lines using a thinner brush and getting that, she'd look to the lines that I wanted to add, some pasta, adding the pico ones using the color. And then I will shift to the bend and add the final details. So just I'm here to undo connection out there. Now the details with the pen, I will add them natures on either false, begin adding the leaves. Now, my Cloud area is completely dried and I can begin adding the leaves on nato Dean of food. Remember we added the leaves with the green color and different tonal values of the beam in a lot detail manual today, even not be adding the detail leaves. I didn't mention E just recapping the tip of my brush to get the leaves detail. But I've been dabbling all of these closer to each other for me, oh, bunch of leaves together. And, you know, it's going to look a lot populated, nice structure that we will be adding it. Now make sure that you do not cover all of the clouds. The clouds visible from in-between the leaves and also at the bottom or at the edges of the clouds. So as you can see, I'm trying to leave or middle of the top Cloud as well so that some behind the knees and I'm below of the leaf, the Cloud is still visible. So as I pull up previously already, that the cloud is majorly going to get covered up. But the reason for painting the Cloud completely is because from in-between the leaves also, a little of the cloud is going to be visible. And then if you do not add the Cloud first, it will not give you the complete detail look. So in-between on the edges you can see I'm adding a few of the leaves as well. On the edges and on the inside that best towards the right side. I'm using that they're both my brush and dab, some leaf-like structures close up forming a bunch of Nina, passed it off nice together. Now at the bottom, alter your CPU can see I fall sagittal fuel detail and I even added a few branch in between. And now do this, I'm just going to pop out some leaves and keep adding the leaves onto the entire top right side. It's a little tedious for covering up such a big space. But it's told to be involved, Go effort and in-between. I'm even going to make a few patches of the black color so that when they pay a lot of branches of leaves coming together and forming such a doc. So make sure to leave the gaps in between so that the middle size visibility that will add a lot more look to your painting. After we are done adding the leaves with the black color, we will be adding a few highlights of the leaves with the bond sienna color. And that will give you a little highlighted look, Google leaves. So now you can see between I added the black patch that makes form a cluster of leaves altogether from where the sky is not visible. So again, medial you on the edge I have given in the black patches. Now, I will just to add in a little more detail, whenever I feel unnecessary, I'm just going to add little black patches that have been necessary. And medially towards the edges, I'm just going to add a lot of still need a leaf looking so that it has a full thickness on the edge Xist. So you can see how some pm just swapping out the Bedouins top leaves out from the edges, giving them the 30-day look. I'm just adding these leaves on the edge is all left. The composition begins to get to looking a detailed law. Also, if you can see my white cloud is perfectly visible on the edge and the shape of the cloud is visible. I'm in-between a little of the Cloud from the background that is behind the leaves is also visible. So make sure that you do not cover the entire Cloud. Otherwise, the entire Cloud will become meaningless if you cover it completely. So on the edges, It's very important for the fluffy cloud to be visible. Now some in-between the leaves, I'm simply just on a smaller branches urine, they're very randomly trying to show the connections are the branches from the leaves up and go so many randomly just add a few branches urine, they're overlapping each other and a few off then you can see I have taken dental the edge so that it adds to the painting as Ben. Now, I have some bone CAN Nakamoto already on my palette and I can begin adding the highlights using the bone sienna Kahlo. So the leaves that I will be adding with the bond C and aka a Harley wanted to be 20 percent of what leaves we added with the black color. So very randomly, just nice, a few leaves with the buoyancy and McCollough and do the entire leaf patch that we have added with the black color. So you can see, I'm basing the bone CNN news very randomly moving in different directions, nothing specific, but automatically by just adding the second node off. Nice. It's giving so much detail in MOOC to the Leaf Back in that he added in onto the cloud. Now let's begin adding the details to the pool. Yeah. So I didn't apply a second layer of black on Buddhist pool because the force and the job doesn't seem to be that opaque or the thick black blue. So that is the reason I'm giving him the second Leo once the false new is completely dry because I feed into philosophy, you or I had a little more of the water which activated the blue color and I was getting a bluish touch to this black color in case if you already have a black look, you may not add the Vimeo didn't get a feel, feeling that you're black color is not so big even you can go ahead and add another layer. Now the last ideas that I had been begin adding is using my technical pen. So I'm going to be using this fine dependable adding the final details. You can go ahead and add these details. Losing a fine tip brush and the black color in case if you do not want to use the pen. Now false, I'm going to add a few of the violence moving into this guy minivan to me. Now I'm adding a few of the lines passing through the pole that we have added it. Then I'm going to begin adding the connections in between these lines that are on buildup bowl. So many random need just adding fuel YLLs moving on to each other and showing interconnections by just dropping smaller round shapes out there. So now all of these details that I'm adding in is very Lambda me and I'm very randomly just sanding off you off the wild lines moving urine there. And triangle shows some connections. Now onto the big O dyad it, I'm just adding small lines to show some screw awesome connections of debt into the wire lines. Now just going to add another tool while lines moving towards that top area as well. Now using my pen itself, I would just add another folder almost in the center because I feel this eon looks a little empty. So just going to add a simple or using the banding technique because we are going to add a very thin one. So I'm going to add cheap light look to this pool that we have added in. So since this detail was very thin arrow smaller one, I added all the details simply just using my Bennett said and did not shift to my color and brush. So that is for all the details onto this simple painting. Now let's remove the masking tape and CFE, I'm painting the goals clean edges. Make sure that your edges are completely dried before you begin to pick up the masking tape, audits the column we get lifted and we ran onto those edges. Also always move the people against your masking tape so that the BIBO doesn't that off by peeling off the masking tape. So you'll find that being Depot DFD. I hope you guys enjoyed painting this with me today. We add half weeks will discharge. And I can't wait to explore the other half that you guys thank you so much for joining me.
21. Day 16 - Evening Sky : Hello everyone and welcome back to the 30 day challenge. We are on day 16 and we will be painting this beautiful evening sky today. So the colors that you need for today's class project is, right? Violet, violet, pink, or pink, orange and black color. So I have my people the belonged to all the four edges and being be directly begin painting the backbone. There is no pencil sketch. The colors that I will be using is the shade, pedro, the red, violet, cobalt, blue, and orange. So I will be mixing in a little bit of the cobalt blue and the red violet to get a violet tone this time and not be directly using the violet color. And in case if you do not have the bright yellow orange color, you can just mix in a little bit of your yellow and orange to get a yellowish orange to one. Also is if you do not have a glide albedo Kahlo, you can go ahead and use any donor of pink because we will be mixing in bite to it and getting a pinkish tone or baby pinkish tone. In case if you do not have any shade of pink, you can go ahead and even use a sheet of crimson color mixed with a lot of fight to get a little pinkish don't. So I will just remove this color in case if needed. In case if you do not have the brighter, paler color, you can use the premises. Don't. Now let's begin painting the sky area. Now I'll begin and bones of red, violet, and blue alternatingly. And I will begin painting the sky diagonally in, is if you do not have this red violet dome, you can see it's almost numerous two of islet bone. So you can just mix in a little bit of UPMC Buddha violet color to get a red violet bone. Now picking up the blue and just applying it a legit or what to do, or red-violet colors Ben and getting a violet, blue sort of a bone. Now leaving some gap, I applied allele or of the red violet tone. And then in between I picked up right to blend and get a little piece to tone to the sky. So just trying to blend using a white color and I will try to blend it and get a perfect blend without any sharp edges in the blending. Now, under this again, I can pick up the blue color and try to blend it with the violet color and get a perfect blend between Buddha Canvas. In case of you'll find a blending between two colors difficult. You can always pick up a little bit of white quash and make the blending process easier. So you can see PVS need real. We used white color to blend of violet or blue color. Now next I'm picking up the beta sheet and begin applying knowledge along the edge. Now the right operon and the red violet tone blend to each other very smoothly. So you need not use white in case if you want to and want to make the process easier, you can go ahead and use by now at least where the brightest arise merging with the blue, you can see it's again forming, gonna do violet tone there and that's perfectly okay. Make sure that you always clean the brush if any color gets picked up. And if you want to cover that color, read on the palette out there and make sure that you have a clean, smooth blend between the kalos and the transition is smooth. And in case a few find doing the transition difficult, go ahead and use byte. Now again, I have picked up that red violet bone and applying it below the pride opiod are. Now using some bite. I just tried to get a lighter bone and now at the bottom, I would simply use the orange color and blend it with the white and get a perfect transition between the yellow and the red violet tone. So at the bottom you can see it, I believe filled it with the orange color. Now, I can very gently lean on my brush from the bottom to the top area and yet a perfect smooth blend. And in case any value field that though, oh, blending or transition is not smooth, Go ahead and use white color to get the perfect blending between the dawns on get the perfect variation. Now I can begin adding the clouds to this guy. So for adding the clouds, I will be using the shade of violet deep mixed in with a little bit of white. So you can go ahead and mix your red or blue or pink and Mouton's to get a violet color and get in a little bit of light to make it a little pasty and a little pinch of black to make it a grayish blue, violet door. And use this color for adding in the clouds. So you can see I have added locked mode of fight and then less off violet and very little of the black color. So the black color is just a Danish to add a grayish tinge to the column mix that we are preparing. Now using my round brush, I'll just begin to add the clouds very randomly. So I'm adding it at the meeting point of the right operon and the red, violet, and blue bones. I'm just using the tip of my brush, adding the hotkeys strokes, I'm forming the Cloud Shell. I'm very well I feel to give it a little soft edge, I can just dab it with my fingers very quickly. Now I'm beneath this. I'm mixing in a little bit more of white to this mix I'm going to use even for the lighter bone for adding some clouds underneath this so that we have this implement mediation of the clouds into a sky area. Now when I'm going to keep alternating between the darker and the lighter tones of violet mix and keep adding them to get though, and just try to blend both of these and yet different owners. And then do the sky area and very gently places you can see I'm just adding very small strokes as the clouds and some better. I've added a good plastered of Cloud. Now just going to add some smaller clouds. You are at the bottom media, make sure that you do not cover all of those. You know, any specific color. And also at the bottom most ADR, we will be having this yellow hit. But now I'm shifting my smallest size brush and I could add some very tiny clouds with this brush on the top. So these are going to be quite fine clouds and in places and I feel to dilute the color mood by adding in white to get a lighter bone. I will go ahead with the lighter tone depending on what standing out on the red-violet bone that we are adding the clouds, no. So in case if you can see, when I was adding the darker tone, It was giving a little look. And when I diluted the toner little, it's giving a little better look. So it's always the door and you can check which color you need to use. And in case, you know, if you'll add all audio with the DACA clouds, you can always, oh, really are the light polio clouds on the darker ones as been quashed. Doing is possible even with the lighter color on the darker color. Now, even under the Cloud setup video, I'm just going to add some highlights with the lighter tone of the mix that I have that is much more of Biden, very less of the violet color. So you can see I just picked up that same column mix and added it to a lot of bite your onto a separate site. I'm using this slider bone to add very little highlights using the smallest size brush and better what I'm writing this highlight, you can see I'm quickly dabbing it with my fingers so that it blends into the background and does not stand out separately. Now using this fine detail brush on damages. Some simple as treatment clouds, you are at the bottom most EDI. So these clouds are going to be much neocortical. The silhouette that we will be adding in your, that is the power lines and some bush effects. So this is just going to be near to that area. So just sum, all you don't shape line clouds here. Just adding some last few clouds, you're in the central area so that the transition from the bottom filled up pop bigger cloud seems perfect and doesn't seem out of proportion. Now using the black color, I reinforced add a small area at the bottom most part, and then I've added all on top of it, add the little bush effect and add the dough power line details that we will be adding in your supposed I'm mocking them at ease, Molly. Yeah, I'm going to fill it completely with black. Make sure that you use the black color and a good thick consistency so that it spreads even. And it gives you the A-B-C MOOC about the orange color that you're adding in. So I'm done mocking out the entire area. So it's kind of a small mountain range loop that we have marked out right now. Now on top of this, I will begin on in the bush. Details vary randomly. Make sure that you read the book details throughout. I'm just using the tip of my round brush and adding in these details vary randomly. So I can keep adding them on both sides. And then I can see it very well. Hello ones and very need to add the shorter ones. Also made sure about one thing that you do not cover the entire range space. Otherwise you may lose the effect of that audience Chi Hill orange color into the sky. So very important that by adding these bushes, you be sure that you do not cover all of the orange sky. Now using the tip of this brush, I will begin adding the power lines. So I will for side one power line, you're almost at the left. Now one of our line Eigen be adding neon sign, but that's going to be canal then this line. Now this second line that I'm adding is far away from the fault plane that we added hints I'm adding this 1907, the first line that we added in. Now the third line that I'm adding it almost at the left edge is even 50. So it's going to be even more to know than the first two lines in case if you have a problem adding these street nines using a brush and the color, you can go ahead and add these lines using a mako or a black pen. And in case if you want to go ahead with a brush, you can even go ahead and forced add the pencil sketch. Now a similar-looking three lines I'm going to be adding on the right side, but these are going to be smaller because the entire right side is much farther than the entire left side. That is what I'm trying to depict in through the painting. So we've added all the Babylonians now, even IVs shifts to my pen and begin adding the violence between these so that I have very fine via lines. Now the violence that I'm adding in odd, very random. So you can go ahead and change the placement of the violence for us to do this ball. I just started our secondly to connection. Now just adding some smaller details. Also, the whole motive your is the lines that are closer to our view and the lines that are too nor addFive some of you will. And the tennis nine are the most far away from our view. That is what the thickness of the line stepping. Now floss time to start adding small details to these polls that we have added in. After which I will be adding into connections using simple Wireless between these bulls. Also, you can go ahead and add details to these balls need not be the same d, d is as I am adding it. You can go ahead and I'll you know, do you even know di did on the board with the adult world VDS, That's perfectly okay on your way. So you have to feed them off creativity and kinda did as per your choice. So I'm done adding the BBS now I will begin adding the Via lines. So always be sure that if you are, oh, Ben does not run smoothly onto the first run it on blood off people so that it really easily run, oh, very been again onto the appeal. Now I'm adding some lines moving downwards, got this from the bushes as bed. So giant bushel, some electricity passing into the bush area as well. And then adding the connections between each of the lines vary randomly. Now going to add a fuel bio connections on boot. These endospores which are behind your on the right side. Okay. Moving independent actions on an antenna bios, even moving at the Balkans. So just adding some blue line connections and adding some through connections through the big O via lines that we have added in. Now from this biggest goal, just going to pass out key lines into the top sky, EDI. Ok. And now one of these, I will begin adding some boats sitting. So you can go ahead and add these boards using the paint as well, because we are going to be adding a lot of it. And in case if you want, you can simply add these both using your pen just as I'm adding in. So make sure that you need on the wards in all the directions and some in-flight motion as well. So these are the three basic mediation of the boys that I will be using an adding onto all of the three violins very randomly. So keep adding a few of them urine day. In-between, venerable, you feel that your pen is again not moving smoothly. Make sure to run it on pleura space and then reuse it. And it works perfectly fine. Also for all of these purposes, I would recommend you use a waterproof pen so that even if by any chance you have to do any small area, then the water is applied with the Palo, these beans but not spread and when not all, you don't ruin your painting. So that's very important. A waterproof pen for adding in these details with the black color. Now a few boards that I have added in in the flight motion, and a few of the flying boats as well into the sky area. Now one last thing, I would shift the My bite mako and add a nice one moon at the top side as well. So just adding the small moon, you're onto the right side. Now if you want, you can add this moon using your white gouache or white acrylics or even a white gel pen. I prefer using this fight permanent marker for adding my mood because it standouts do and bright. Now let's remove the masking tape and see our final painting. I get hazy class project for today so that you have the deviations between detail and some easy class projects as Ben. And this will give you the practice in loaning the blending of three to four colors into the bag now using byte and even without using byte, so make sure to remove your masking tape at an angle Soviet people so that even off debt off the edges, you always, I find that a painting for D6. I hope you guys enjoyed painting this beautiful view with me today. I would see you guys tomorrow into the D6 team class project.
22. Day 17 - Cityscape By The Sea: Hello everyone and welcome back to the 30 day challenge reality D 17 today. And today we will be painting this beautiful city view by all Riverside. So the colors that you need for today's class project is violet. Violet, violet, pink, or pale. Sitting in blue, yellow, orange, and black color. Picture to grab all the colors. And let's begin painting. So I have my people feed down onto all the four edges. I did actually begin painting the sky area. I will just show you the colors that you need. You need the shade of violet D, brighter Pedro, violet, pink or pink, any column, Whichever is available, then a bright yellow orange and a cobalt blue. So I have all the colors already on my palette, so I will not be removing any of these colors. So this time we will be using all of these colors in a piece to tune. So do all the colors that I have, that is the cobalt blue. I'm mixing in a little bit of light and getting a PC. Don't see Ivan mix invite, do the orange and the pink tones as well, and get a peaceful punto all the kalos to the yellow, orange sheet also, I'm adding invite and getting a pistol tone of this color. So just adding little vine in case if you need more of white while blending, you can detect the pickup vide for the blending purpose. Even though the violet color just adding in a little bit of white, I already have the violet color as well on my palette to, I didn't have to remove any of the followers. Now in case if you do not want to use the blue color, you can avoid using the blue color for the sky. I may also rethink whether I will be adding in a little of the blue effect or no. Then all, even though greater para Kahlo, I will be adding a little bit of vitals bed. So now that the brighter, brighter colors when I'm mixing in the white color, I added a little touch of the crimson as well, this sign, so that it gives me a little dull basal pink tone rather than a bright pink bone because of the brighter better. Now before painting this painting, Let's begin with a very small pencil sketch. The only pencil sketch that I want to add in is the horizon line and a, and marking off the OECD area that we will be adding. In any case, even if you did not mark the City area, it's perfectly okay because we can market directly later on with the black color, simple as adding the horizon line. This time, the horizon line, as you can see, is a written law and major part is the sky. Now, in the CGA, I even mocked out the cityscape area. And the area is going to be the sky area. So that is it for the pencil sketch. So now I'm beginning with the pacer donor, blue forced on the top ego and a planning even layer of the piece and blue color that I have formed in you. Luca is quite light skin tone that more of Biden, very less of the cobalt blue palette that I have picked Denver. So just applying you to almost in the 40% of the sky area. Now next, using my round brush, I'm going to pick up a little of the violet color and apply new to the blue color. And then I'm going to try to blend both of these colors together and get a bluish violet tone. I'm even going to just add a few of the cloud effect onto the blue color using my round brush and just picking up a little bit of the violet color. Now once I'm adding this color, and then I can use my flat brush and just blend both of these and get a bluish violet tone as I told you previously. In case if you want to inject me, I'll mix the blue and the white to get, oh sorry, the blue and the violet together and get a bluish violet tone. Now I just picked up a little bit of blue in between to get a smooth blending of the clouds onto the blue area. Now next time picking up the mix of the yellow and the white color, yellow, orange tone and the white color and applying it near to the violet color in-between, you can see I have that very little space left because there I will be using the color. And then later on, That's the reason you can see the rough edge there. Then I apply a little bit of the Bright operator color at the bottom. And now I'm just going to use white and blend. All of these are not going to pick up any photo color unless necessary on the calendar, I will be picking up his way. Suppose I blended the orange and the pink together using byte and now using the pink and the white brush itself, just lending it to the top area. So you can see now all the violet and the blue have also blended into each other. And the violet and the orange blending into each other did not even form a muddy tone. Now at the bottom, just going to apply the pink color. So that is it for the Sky Italia. And you can see we've got the perfect transition between the colors just by simply using invite for blending. And also you can see even the orange and the violet blends. There is no muddy effect formed out there. Now I begin writing of your clouds with a violet color mix onto the pink color. So I'm going to use the same violet mix with the white color a little more. So going to use a lighter, don't know if the violet and begin adding the clouds into the sky area. So saw the clouds again. We're just going to be using two types. That is the half C strokes and the simple long strokes that we use in sand. And we'll add some clouds for us using the simplest tools. And very randomly you can see I'm just adding patches of these scholars using my round brush and better, but I feel the need. I'm pressing the belly of the brush. Now under the horizon line, I'm going to add a bigger cloud with a violet color. So I'll do the entire horizon line. You can see I placed a very big O Cloud using this round brush itself and the simple straight line method of adding the clouds that we discussed. Okay, and you can see just for me, the clouds moving from the edges as we are moving up and in the center, the pink color is visible. Now using the tip of my brush and adding a little of the half see Stokes in between to add a little variation into the clouds as well. So even for blending the clouds in-between variable, you'll feel the need to pick up any color. Do not hesitate. Feel free to pick up the color for the blending purpose. So like I pick up a little bit of the pink tones and the orange tones in-between for blending. Now, even LinkedIn, you can see I've picked up the pink door and triangle get a little blend at the bottom Leo clouds that I've added in so that they look a little settled into the sky E here and do not pop up much in the center majorly. Now I will begin painting the CEO. So I have picked up the mics off the bright opera column mixed in with white. And I'm going to lay down into the entire see here using my flat brush. They're not ready to run a little into the city, ADI, as it's going to be with the black color, you roughly know the shape that we are going to add to the city. So just to make the only out easier, I'm just running into the CBD. Yeah, and that's perfectly okay. Now using my round brush, I will just tie a little poeple effects into those CAD. So these reflect as a reflection of the clouds. So first I'm just going to add these using my round brush and then using my flat brush, I will blend this into the pop of color, into the pink color and get a perfect blend between them. So make sure that you add these cloud effects are a little onto the left side so that on the right side we are going to be having the cityscape so they couldn't get covered up. Now just using my flat brush, you can see I just blended it very gently into the CEO. So it does go out on it and open patch as well with upping the underlying touch. Now, I'm going to pick up a little bit of the pink color. I'm going to add some smaller lines like this in between the pope and thoughts. And oh, that when perfectly given the cloud effect of the open palette in between that we needed and the ping see visible from in-between. Make sure you can see on the right side, I'm not adding much of it because the city's gave is going to be coming there. Let's wait for this to dry. So this is completely dry. Now I can begin adding the base Neo for the cityscape using the black color. So the entire area that is left wide, we are going to fill it with black completely. So ask me, I will begin with the all mocking of the cityscape so that you can follow the same market. I'm using my round brush size to make sure that you do not cover the entire pink AD on the right side, because we are going to show a little of invisible from between the cityscape. So that is the reason I would recommend you before CEDAW plane off the idea that I'm trying to add as a cityscape and then go ahead with the similar looking thing. So you can see vague Actually, I begin with the ages and now I'm adding foster edges or Nissl that you can follow along and added similar looking edge. And in between you can see a little V-shape that I added inputs OWL flowing around into the city. Even think past that I still have on the right side of the black area that I have. I'm going to add a very small river look as when in Buddha said. So the data by month right now is going to stay pink in-between all the black that we are going to add. Now make sure that you use the black color, no-good opaque consistency. So a thick consistency so that you have an opaque look in your cityscape. And then non-Buddhist, we will be adding the city light effects. So just been done it a complete area with a black color now. So I'm almost done fitting that ISPs. And the black color. And now you can see the reason why I was telling you to add those views, meaning moving towards the left and more on the left side. Because the right, we've got a little covered up. Now, even your eyes and just add a very small city kinda look very small, which is into the river area. And a little look on the horizon line as well. Okay. So these are the little details. The distance BD is near to the sea line of the river line that we're trying to add it. Now we'd have to wait for this black color to dry before moving on here, I will just give the final shaping. So a little rough shape that I want to add in to the edge. So just trying to add that now all your, she can be a little different from mine. Feel free to target the shape, but just be sure that you have little ideas like a V-shape and the LinkedIn or ISPs that I left in the cityscape showing that pink color. Make sure to add that on the test so that it will add a little more detailed look. Now using the black color, I will begin adding very small cityscape look onto the horizon line and fill the buildings completely with the black color on v. So I'm adding these, uh, these vary randomly and nothing in specific, I'm just triangle or, you know, VD, the heights of the building. And at places I haven't even VDI the shapes of the buildings. So go ahead and add the buildings onto the entire right side. Baby have marked the cityscape. And you can see some where I'm adding some all Tino buildings and some better. I'm adding some longer buildings, but they add smaller than high to keep all the variations in place. Now from your, I'm just going to extend a little of this space into the central area. I'm going to add a little of the bush effect and very tiny building details your bed. So you can see these buildings that I'm adding are much more TinyOS compared to the ones that we were adding towards the right side. Now let's be it for the entire black color to dry. Then we'll begin adding the city light effects to all of this. So my black space has almost dried up and now I will begin adding the city lights using the yellow and the orange tones Analytical of the right donors bed. Make sure to use a clean brush before you begin to add these light effects. So I'm going to begin adding the light effects using the yellow color first. And I can just mix in a little bit of white to make it a bright popping yellow. Now, all we have already been adding the city light looks into our previous paintings, be added them on day 13. Data. Not on data being, I guess it was the 14 and detail. So you have an idea about how Via supposed to be adding this Some there I will be adding little yellow lines and then vary randomly, just going to add very small, tiny, tiny dots. And even under the buildings, we'll be adding these dots, very tiny ones. Now in case if your brush does not have a point of defining these dots, make sure to shift to a detailer brush or a brush that has a very fine pointed tip so that you can add these tiny dots so you can see how tiny dots I am I adding it. Now in between, I'm just trying to form some sheeps and adding a lot of dots closer to each other. And you can see my dots are moving in our direction. Some vest cheat somewhere, diagnose on by Justice simple cluster. So make sure to keep the radiation, but also be sure about one thing. Do not add all of the yellow to get 0. You can see I'm adding little by little because I haven't be adding audit involves. We'll invite also. So it shouldn't be that there is no space left for the orange and the white ones. It's possible to Leonardo holding onto the yellow ones because of the property of quash colors that we're using. Like you not to make it simpler, Make sure it will add little by little so that you can add in all the colors. Now using the cobalt blue color, I'm just going to depict two poles into the city area, too bright with this cobalt blue color, you can use any bright blue color and add these random looking holes into the cityscape area. So now next I have picked up the white color. I'm just going to add a few of the white light so they may be newer to the yellow ones somewhere of moving away from the yellow one. So again, it's all going to be random. And you can see I do not follow any specific shape. I'm adding them randomly onto the black. We have depicted as the cityscape. So go ahead cd and keep adding this. And also do not worry in peace. See if you all you don't add the dots wrong. Audio Add a lot of them. You can add black color onto this. And since squashes and forgiving medium, your mistakes will get easily covered up. Now the last color that I haven't shift two is that all of the orange color? I will pick up the bright orange color and begin adding a few details with the orange color has been. So you can see randomly vary, but I feel the need that, you know, they look oligos more. I am placing my orange dots onto the yellow color like the line that I have added with the yellow. I gave him a little orange dot to that as bed. And to the sides of the bowl. I added a little bit of the orange light. Now adding the orange light randomly. And you can see even on these two smallest places that I have been good, I have added the light effect there as well. And even onto the buildings, make sure to add the light effect, but make sure to not add a lot of it every day. Make sure that it is all staggered and Eve added evenly throughout. Now I haven't used my white permanent mako and add a very small moon on the top right side. So you can again add this using white gouache or white gel pen. As I told you, each of the class exercises, I find it easier and much paper adding in this white acrylic marker because it stands out right, and does not reactivate the bottom needs of the palace and makes the adding much easier. Now using my black pen, I'm just going to add very little details door on the horizon line. So I just marked out a distinction between the sea and the sky. And you can see I just used in the black pen for adding little details around this because I could not find that newer distinction between my sky and the sea area. In case if you want, you can even add this directly using the black color. So I will try showing it to you using the black color as well. So just when Padlet and bushier onto the left side, a little bigger one as compared to the right-hand side that we have added. And you can see, I'm just dabbing the tip of my brush to get into these details. And after this, we'll be done with this painting for today. So just add a little of this on the board decides. So that is PID that are painting for the Sam and Dean and other cityscape you buy the reverse side. Let's remove the masking tape and CFI and then painting with those thin edges, make sure that all the city lights that you've added on the edges are completely dried before you begin to remove this. Otherwise, it may spread and may ruin your cityscape. You also remove your masking tape at an angle from your people so that it does not take off your edges. So here is our final painting for the 70. I hope you guys enjoyed painting this another city CPU with me to D. I will see you guys tomorrow into the D Dean class project. Thank you so much for joining me.
23. Day 18 - Poppy Fields: Hello everyone and welcome back to the 30 day challenge we have on D to D. And we will be painting this beautiful poppy field. So the calories that you need for today's class project is right by me, crimson, orange, yellow, black, and sub p. So these are all the colors that you need for today's class project. I have my feet, what they've done on to all the four edges. And I will just begin with a very small pencil sketch. So I will begin marketing the horizon lines of descent of the rising line is going to be quite low. And onto this I'm going to add an arm full mountain ranges. So we will be painting the mountain indifferent Boolean values of the Bhopal Kahlo. We even begin with the lightest tone from behind range of the mountains. And as we move closer to the horizon line will be darkening the shades of the violet color by altering the amount of black and the white tones that we will be adding in. So I have added in approximately six Leo's, you're all very small mountain in between as you can see. So six different tonal values that we will be using to paint a mountain ranges. And that is it. Put a pencil sketch, we even begin painting the sky forced. So the colors that I will be using for this guy is the shade of permanent yellow rose and a bright yellow orange. In case if you do not have the rose shade, you can go ahead and use the premise in Congo, I will just pick up the colors original onto my palette. We don't need much effect because the sky is quite a small one and not much detail. Now I'm going to begin to initiate of yellow orange near to the mountain. And as we move upwards, I will shift to the goals of yellow under Google Scholar. Now when I'm going to add the comma new to the mountain range, either tried to maintain the outline of the mountain range so that it's easier to paint a mountain ranges later on with the lighter tones at the back. So very patiently, I will run this color near to the mountain range over marking that I have done. And you can see using this model essays flat brush, It's quite easier to achieve the outline of any shape and moving slowly. So I'm done adding the orange color. Now I've been shifted a tone of yellow and applied neopentyl orange color and blend the colors better and get a little of the yellow bone onto the orange color. So in the blending techniques, if you remember, we had low and onto which color we want to overpower all of it. So your jaws, the yellow color to overpower onto the orange tone. Now picked up a little bit of white and taking IT ahead and now picking up very little of the rose color directly, I'm going to apply it to at the top of this guy, I'm using white. I didn't blend it well into the yellow color. So you can see I've got a perfect transition in the basal layer of the sky now. So adding the clouds, I will be using the shade of violet deep color again for adding in the clause. So I already have the color onto my palette, and I will be using the yellow and the orange shades on the outline of this violet deep color to add some details to the Cloud. So I have mixed in right to the violet deep color and I will begin adding the clouds using my round brush. I'm just going to use that the PAF my brush and add smaller, smaller shapes closer to each other trying to form the Cloud Shell. So almost in the center of the sky, I'm just going to add one big cloud, which is moving from the top side towards the right side. So you can see I first started on a cloud on the right side and then I began from the top area. So basically it's a little of the cloud in the center, just having the edge on the top side, on one side. Now just going to add this color. And you can see very randomly I have formed a cloud shape and at the bottom I'm taking it a little longer. Now be careful when you're applying the violet decal on the orange tone. If you apply too much pressure, it will begin to turn muddy and it'll be very difficult to achieve oh, great looking violet tone if you apply too much pressure. Now in-between I'm adding smaller clouds and quickly dabbing it with my fingers so that I get a little blurry effect to those clouds. Now I didn't pick up some white and mix into the orange color and begin adding it to the outlines of this scholar that I have added in and begin to give more details to the Cloud wherever I feel, I may dab a little with my fingers so that the color blends and said does include a violet deep color that I have added in. I'm majoring, adding this color onto the edges as you can see. And a little of the yellow also I will pick up very randomly where I feel the need to add a little of the yellow glowing effect as well into the clouds. So almost all of the clouds, I added the orange touch and then just added a little of the orange pink clouds. Now I'm shifting into the yellow color. I added a little bit of white to my yellow color to get the right effect to the yellow and around the orange color, I'm going to add a little of the yellow effect so that all of this looks of blending into the behind sky dot v hat, since that behind sky is the yellow and the orange colors. Now I'm just going to add a little off the yellow clouds onto the orange color and spin. Now be careful about one thing. If I adding the yellow color, if you feel that the poeple colors lifted onto your brush, make sure you clean your brush and then pick up the fish Kahlo. Now just tonic the last few violet clouds at the bottom. And you can see I'm just dabbing quickly with my finger and getting that loading effect to the Cloud setup. I'm adding in the visa. I haven't added a log of the violet clouds near to the orange color is because we will be painting the mountains with this violet color only. Also the first gene DEF mountain, I'm using the violet color in a very diluted consistency that is a lot of bright and very less of the violet color. So I'm using this very lighter tone for us to paint the first mountain range at the topmost speed. Now to this light mix, I added a little bit of the violet color to get a second Docker tool. I'm using this tone Eigen be adding this smaller mountain range. Now to this mix, I have added in a pinch off the black color and using this creates violet tone. I will begin adding the third mountain range on the left side. Now you can see the color difference from the first mountain range in all the three mountain ranges. So it's very important to achieve the distinction in color tones so that the mountains are visible distinctively from each other. Now using the same tone, I'm going to add the next mountain range you're on the left as well. I even use in a little bit of light to lie to the door neoplasia point where my code Mountain Range of the same color is mixing. So now I'm just going to pick up a little bit of the white or the lighter blue. I'm going to blend well with this docket bone so that I have a distinction between both the mountain ranges. Now I can pick up a little bit of the black color. I'm going to add a little of the Docker bone on the top of this mountain range has been to get certain distinctions on the smaller mountain range has been. So just adding a little of the black on the edges and trying to blend it into the violet color. Now, do I didn't mode of the black bodice mix. And you can see I'm getting on DACA islet born. I'm using this door. Ivan begin painting that I stopped the mountain. So Boston and I had this big amount and gained on the net. And then on the right Eigen father doctrine, that bone. So now along this mountain, Dean, I'm giving a little out the bushy kind of an effect so as to distinguish and add an ID and variation to the mountain has been. Now this last mom to engage, I haven't finished with an almost blackish stone. So in-between the black color, if you want, you can add in a little patch of the violet color as well. But I'm adding it directly with the black color so that it stands out. Now seeing me as we did on the left, on the right as well, I'm adding a little bushy effect on the top of this mountain range as well. Now I have just stick to my flat brush and using the black color eigenfaces applied the color blocking the entire field ADR as Ben, and then even begin painting the poppies and the leaves onto this area. Since we are painting with gouache, you know, it's easier to even need on the lighter color, on the darker tones. So when we are applying black, this will act as the shadows to the leaves and the flowers that we will be adding in. Hence, we had been doing the backbone or the color blocking of the field EOP and the black color first. So let's paint this and then B for this to dry completely before moving ahead. So now graphene layer has dried and I can begin using the dot sap green and the yellow green color. I already have put the Apollo's onto my palette. And using these colors with a little touch of white island, begin adding different kind of leaves and grasses into the black space that we have been dead. So for the fourth tone of green, I'm mixing in a little bit of my sap green with the yellow green tone and trying to get at it in light of the influent. I'm shifting to my regular brush and I will begin adding the glass tubes using this brush. So I'm going to use this brush and I have mixed in both the carlos with a bigger size brush for us. And now I'm going to add some grass talks of using this brush bit of green column mix. So very randomly begin adding grassroots and you can keep adding the cost drops in all directions and in different heights. So I'm going to add boo in Google, the nose and then add some bigger grasses with different colors. I didn't even be then adding a few of the leaves is you connect up, gas is drawn a little onto the mountain. But make sure that you have an opcode what all of the mountain range complete, otherwise it wouldn't become completely invisible. So I added the plus g, and now I'm adding in the second range underneath the pause screen using the same follow. And you can see there is a lot of gaps in-between these classrooms that I'm adding it do not worry, we will instead be adding a lot of the class details and more of this piece will get covered up. Now when I'm adding classes, you can see I'm adding them in different angles. Some of them tilted Neff somebody somewhere. And you can even add demonstrated in around sheep as well. Now I'm shifting my size two round brush. And using this brush, I can mix in a little more of the yellow paint to this column. And I can begin adding some bright leaves salt. So these are going to be the ghost strokes in case if you want to make the column upright, you can even mix in a little bit of Phi, since I already have a little bit of white to that, I mixed in a little bit of white as well. Now I can begin adding some tickled the flights tools. So these are kind of the one vans drop leaves that we have been building a lot of all previous classes that we have done so far. Now, very simply just adding a few of the detail leaves like these. Now you are, I'm adding one. You don't need to exhaust stroke that I'm trying to add in kind also family structure and in-between just a few off the grass strokes as when using this color. So as we are adding more of those 20, you can see more of the black spaces getting covered up and will lead to less visible acting as the shadow to these classes that we have added in. Now using the same tone I'm adding a little of the class talks as well in-between. Now let's begin painting the puppies onto these Greenfield areas that we have painted in. So for painting the poppies, I will be using the permanent trip tool. Now in case if you do not have the permanent red color, you can simply use in the scarlet color or the crimson color, as mentioned in the color sheet. And it would be preferable to use a solid color. Next would be the crimson color. So I am mixing in a little bit of white to this permanent. Try to make it a letter grade top so that it pops out onto this green field area where we will be adding the poppies. So we are going to be adding simple shapes off patent and in different angle views. And then in the center of the flowers natured on Viva just be adding a little of the black effect as the butt area. So you can see I'm adding very simple Dong shapes to add as the poppies and abduct off either just be adding very small flower loop because we tried to show that these flowers are at a distance from our view. Hens very small in size. So just using the tip of my brush and dabbing some Payne's in-between, just adding little bigger. So it goes as bed. So not basically a button, the overall pattern, the shape that I'm trying to add it. Now, I've done a lot to me. Yeah, I then I to a lot of more poppies but ivory add them all, you know, five from each ago. And I've been, I've done moving in different directions. And someday you can even add in like two to three per day as I added in bundles dendrite now. So now you can see at the bottom I'm adding these poppies in different angles, moving in different directions and different sizes as well. Some smaller. They got enough. So the ones that are much closer to all of you are going to be much bigger. And as we are moving closer to the horizon line, the size of the flower is decreasing as it's becoming fat for fuel. So that is the concept of adding the sizes of the flowers accordingly. Make sure when you're adding these, you do not cover it completely. Otherwise, it will be sold that all of the green color will get covered up. So you need to create a balanced so that the genes yield is also visible. Now I have picked up a little bit of a lighter bone off the same color and just adding that didn't highlight to add the top of these patterns that I have added in. So I simply added a little bit of white to this color. I'm just using the tip of my brush toppings on beans at the top off of your bed. To get it to different tonal variation and bowl-shaped to the flowers that we have added it. So now pin these poppies GI, in. We will be adding in a few of the grass stalks popping out into the sky area using a very small finite size brush. So I will be using this size 0 brush, and I haven't been using the green color to begin adding those very thin grass stalks and a little detailed one. So now just using a pointed tip brush, begin adding over eating grass TO moving into this guy EDO. Then this may even be adding a little deep Dave kind of a fiend, all of green kind of a loop. So very little glass details on that though. I'm using that brush in a 90 end of motions so that I can add these details much easily. Now, at certain places Ivan be adding a bended glass look of the same structure. So you can see just an advantage towards the neck off the grass stroke that we added in C, you just keep adding a few of these DD and grass onto the entire field ADR, I didn't be adding a lot of them even closer to each other and popping out from each other as well. So all and this will make it look natural. If you want. You can even given us I couldn't nail using the bond on bar or the bond sienna color onto these drugs talks as well. Or you could directly use a bone sienna color for adding in these details. So this is kind of a green grass that is, we are trying to add in your in-between the poppy field. So now you can see I'm even adding a lot of them very closer to each other in between, you can even add just a little of the ones top leaves as bet if you wish to. Now after this, we will be adding in the black color details in-between those levels tool all you don't make a little space for the bugs as been. Now on the left side, I will add a little more of this because on the left side it feels a little less MTO. So on the edge you can see I added two off though. One stroke leaves very simply. Now good, The same green color. I'm adding a lot of light and making it a very lighter tone of a green condo, almost a pace to green. Don't I'm using this to one eigen be adding it all, stemmed, all of the flowers that we have added in. So I'm adding mortified and then it will shift will again, my smallest size brush that is this size 0 brush. A very fine point at it. I'm now using this color. I haven't begin adding very simple stems to all of the flowers that I have added in so many randomly just from the base of the flower was dropout of your, of these. Or you can randomly add these as just talks as bed. And you can see it adds more BPA and a different color, blue, the field ADR that we are painting in. Now, even do these larger fields that I've added in, I'm just adding a little bit off, oh, highlight to them and add the dot, even adding a few of the ones drop leaves using this color so that I have a little different being done as well popping out into the field. Now, even in between the flowers, I'm just going to add in the dyneins using this color. And you can see I'm still using the size 0 brush and using this one rational Nia. I'm even though add the leaves in different sizes depending on the site, I'm applying the pressure on to the venue of the brush so that I get that the costumes and the Tainos strokes as well. So just on a demo strobes of these at the bottom as well, make sure that you do not add b so much that you cover the darker green stools, you need to strike a balance between the darker green strokes and though of logos as when I'm at the top, you even need to strike a balance so that the mountain ranges visible at places it shouldn't get gobbled up completely. Now last thing, shifting to the black color and using my round brush, I'm going to add the bot to the flowers. Do some of the flowers, I will be adding it in the same doll. And some of the flowers I haven't be adding it at the bottom. Depending on the angle of the flowers that you have added. It makes sure that before you begin to add this, all of your poppies are completely dry. Otherwise the black columnist spread and you may not get this bright black look as I'm getting right now. So that is it for today's class project. We are ready with our poppy field evening sunset look. So now let's remove the mask and deep and CFI nothing date. Before you begin to remove the masking tape, make sure that your edges are completely dried. The gases that do edit on the end. Otherwise the column is spread into your bottom area. Remove your masking tape by denying them from your people so that it does not data off the edges and it does not let the veins on the masking tape spread back onto the edges. So yoga is our final painting for d. I hope you guys enjoyed painting this painting with me today. I would see you guys tomorrow into the day 19 class project.
24. Day 19 - Simple Field: Hello everyone and welcome back to the 30 day challenge. We are on day 19 and we will be painting the sympathy look today. The colors that you need for today is violet, violet, blue, orange, yellow, black, sap green, and yellow, green. So I have my paper taped down and let's begin with a small pencil sketch for this bond before looking at the colors that we need for today's class project. So I didn't begin by marking out of cloud shape first. I'm just giving a very light pencil sketch so that it is not visible after we apply the Congo. So make sure that you go ahead with a very light pencil sketch. And then we will just mark out the horizon line. So while we paint the sky area of even leave this Cloud area so that we can directly fill it with colors. And we did not apply any color blocking for the rest of the sky. We will be using the city in Lugano. You can go ahead with any dawn of sky blue as we will be mixing it a lot of pride to discover, to get a sky blue balloon. So I haven't even pick out a little bit of the right color. I forgot to add the horizon line marking. So just you're adding underneath the cloud of it is small horizon line. And you can see the distance between the sky, area of the sky and the ego is almost equal. Now I will begin painting the sky area first. So I'm mixing invites to my blue color and using this tone, I will begin applying it onto the entire sky, leaving the Cloud space. So you can either host uses smallest sized round brush marker, flying off the cloud IAP or did it using the flat brush you can give out off outline, do not divide through. Do Carlo runs into the sky in the Cloud area. It's perfectly OP as we can cover it up very easily using a white wash or even the gallows that we will be using for Google Cloud. So around the cloud area you can see very easily I have covered up the edges using the debug my flat brush. You want, you can just do a round brush as I do leukemias. Now, for the cloud, we will be using multiple Congress. We will be using the shade of yellow, orange, right? And the violet bonds and try to create a multi-color fluffy looking throughout. So that is the reason I left a space Sprite instead of adding the blue layer there so that it's easier to get the fluffy cloud loop. Because with the blue color in the base newer, it will be a little difficult to apply pressure to get the fluffy clouds. So whenever you wish to go ahead with the fluffy clouds, it's always recommended. Try and leave the Cloud space in 3D so that it's easier to move your brush in circular motions and create a fluffy look. So I'm just picking up the followers. I already have two bright yellow orange tones and also the violet deep bone. I just picked up a little bit of yellow and now I'm using my round brush. I will begin adding in the clouds. First, I will all you know, prepared all the fellows. So I will be adding invite to all the colors that I'm going to use for the clouds. So I'm forced beginning with the right color onto the edge of the cloud and I will create a cloud shape using the right color. And you can see I'm just moving my brush in circular motion. Now since I do not have the base layer of blue, it's very easy to even apply pressure to get this ocular motion and get that cloudy or effect there. Hence, I did not apply a color blocking onto the Cloud area. So it's very important to understand when you can try and avoid it. Now, you can see, even by adding the yellow, I need to add in a little pressure to get that fluffy look onto the Cloud. And if they would have been blue color underneath and if I would have been applying the pressure, the yellow and the blue would react together and form a greenish tone. So in order to avoid that and important that you leave the space right. Thanks, I'm repeating this thing again and again. Now new to the right, I added a little layer of the yellow color. And now I have picked up to orange color and new to the yellow. Just studying some yellow or orange clouds. Now in-between you can see I'm alternating between the yellow and the orange and the white sheets. We would pick up the violet color at the end and apply the violet clouds at the end. Till then, just keep alternating between the orange, yellow and the right column in between species to create the different color looks into the fluffy cloud. Also make sure that you keep moving your brush in circular motions. Do not add too much water, otherwise, the colors will not stay open. You can see now I'm getting dissemble and values in good This one single Cloud. So at the top I had the right tools, then a little bit of the yellow tones and now the orange tones. Now underneath the audit, again, I've been pick up yellow and also if you notice, I have been using a lot of Bij to get the different Roland variations. And also in between the clouds I'm using invite so that it separates from the previous news and I get distinction between the clouds that I'm adding in. Now again, just fucked up with the same brush without cleaning in. So you can see I've gotten lived in yellow touching right this time. So automatically I get different Boolean values of the colors. So you can see there are so many different tonal values off the yellow colored cells because of the white edition that you keep adding into the clouds. Now I just picked up a little tinge of the violet color and additive new to the spot of white. So you can see I've got a very light violet blue mode of white and less of goats violet tone. Now using this column IV, begin applying it at the warping space and try to blend it with the layer of clouds, just about this area. Now, on the edges you can see I'm trying to get a very rough shape of the cloud and trying to define the shape cloud right now in-between, again, just picking up bright color to make the blending easier and the margin between the colors look seamless. And also, if you can see, now, I have gone a different layer of cloud at the bottom because of the violet color that I have been using. Now again, I haven't pick up a little of the audience and apply it on the edge to make it a little smaller, fluffy cloud with the orange at the bottom. So now you can see the fluffy cloud effect just in a small area. How we use different colors to get the fluffy cloud if you can just 0, practice this on the dinner I'm, you will get the hang of it all as to how to, you know, keep blending the colors in such a way that each colored is visible separately and gives you a fluffy. The most important thing you are using the right color in the right way and at the right pieces to get the fluffy look. In GIS, if you're not getting the fluffy look easily, I would recommend you to read for the first third of the clouds to dry, then begin to the second layer so that the colors will not bleed into each other again. Now I'm just going to use white and try to get some fluffy cloud near to the blue area first and then add the color variations on it. So you ought, I'm just dabbing so that it said those into the background of the sky. And you can see it looks all Figma or you don't set it into the sky area and it looks at cloud common goods from this guy. Now I will shift to my flat brush again and I will just pick up a little of the white color and dilute a little off the sky EDI to the bottom space. Because I've seen all underneath the cloud there is no skies piece to meaning. And I still need to add the grass effects there. So just adding a little sunlight effect has been so trying to show as a sunset view. So just added a little bit of the orange, white and the yellow tones underneath the blue and trying to blend it into the sky. So this is again, now the field IGA remains only approximately 40 percent of the entire the sheet. And now our body, this space that we added right now we'll also get covered up the grass effects that we will be adding it first using the diluted tone of the violet color that is more of white and very less often bite violet color. I'm just going to add a few more clouds, urine, they're very randomly with these different dorms. And a little bit the orange has been onto that, giving a little touch of the white color to make it standard grade on to the blue sky. So that does it for our sky area. Now for the field area, I will be using sap green color to do the color blocking of the field ETL flows. So I've indirectly pick up some dark sap green color and lead down on today and diode a meeting space. You can define a horizon line now underneath the yellow strokes that we added in the sky idea. So simply using the dark sap green color, I'm adding in the bones. Now in between I'm going to pick up a little bit of the black color to blend in with the sap green color and get some DACA student values of green into the field. So this stock would, wouldn't will begin to act as to all shadow for the green strokes that we will be adding for the grass effects need to run. So that is by, I recommend you to add the color blocking with a Docker Swarm using black as much needed depending on the colored one of you glean that way. Now I didn't my grass EDR dry so delighted Rebecca Kahlo for the crash drops so far that grass strokes either just be adding invite to the sap green color that I already had and I've been forced to add only a legitimate or fight. Then either folder add a lot of fight and get even write it bone so that we have total values in the grasses are spent so far, it's just simply adding in a little bit off site. You just need to make sure that the bone has to be lighter than the VCO that you have used. Otherwise it will not stand out on your grass strokes will be invisible because of the same color tone. So my first column mixes JD and I believe in the covenantal of the yellow green condo and keep reading on my palate as I absolutely love this into my Carlo mix to get pulled in iTunes or the Finland and values of the v. Now I would shift to my size 0 brush, which has a pointed tip. And I can begin adding the class groups that so my green area is completely dried so I can begin adding the strokes now. I have those ready to use so that I don't have to shift in between because we go smaller brush, It's very difficult to mix. The enzyme makes the beans with a bigger brush first and then shift to a smaller brush to begin adding the strokes fine. So now my brush is already smaller detail brush as you can see, and simply begin adding the grassroots just as the previous floppy field exercise, I didn't order to get something moving towards the left, right. Just make sure that they are very thin enough and looked like an ad come close to each other on Buddhism even act in light to highlight says When. So I'm done with the force field. Now going to the second rule, still glasses all sorts of even be adding digital thought. Bush effect on the dollar rise in Maine New under the yellow sky. Eigen flows down into force field of grasses. Then I can add that and then begin adding the second node of grasses. So now I'm adding the total of the grasses and you can see the overlapping the first row and the second group basis. And you can see all my classes are moving in different directions and I'm trying to add closer to each ago so that I have a good populated look off the grass that I want to know next for adding in the bush effect onto the horizon line. I didn't need singing a little bit of black to my sap green condo to get a darker green color. And this color, I would simply begin to add some bush effect onto the horizon line. So I'm just going to mix up it's loved the black color and get a darker green and begin adding simple bushy. So you can see immediately at the top I'm giving you a sheet for the bush and at the bottom and simply filling it with color. Now, so adding this, I'm still using my smallest size brush so that I have finer details on the bulb and I have more bd into this. Now, onto the entire line, I'm going to add different shapes of the bush in different heights. Make sure that you live on, lifted off the yellow sky from behind, be visible so that it gives you a little sunset looked to the sky that we have had. Also. Then we move towards the right side, either be adding them. It took this bush effect moving into the clouds as well. But make sure that you need to limit and restrict the height accordingly. So data in diet Cloud also doesn't get time. Also you can see now I'm adding the sheep's different B and all the heights are also different. And only region on the top I'm adding a little detail view and at the bottom I'm simply pulling into the duck Congress. Now go, you can see I added 0, we go bush. And also it's going to Lipton into the plow be very dim. As I move more towards the right, I will add them into moving more than to the Cloud space has been made sure to keep reading the heights of grass MOOC that you are riding an in-between, even add this model once. So you can see now we cover it up a little of this guy EB on the right and just dressed up the idea I have put it in with the sap green color that we got by mixing in the black color. Now, when we begin adding the second node of the class books, even move into this bush area as well. So in the top of this will get covered up the hill behind the grassroots, hence the glass tubes out covering the middle of the bushes. Hence the second node of the bushes we're adding after adding the bush on the horizon line. Now using the yellow-green color, I'm adding a few of the strokes, then I can be using the lighter tone of green by mixing invite to the audio mixture. Now you can see symphony. I'm moving the glass tubes even onto the bush area that we have added and it's all beginning to come together. So just to add an antelope, the school come to the all of the grass area that we have added in and make sure that you add these tool called to randomly and moving in all directions. So it adds to the natural beauty of the painting that we are trying to get into. So I'm almost done adding the strokes with this IDO green. And you can see already the class V looks so much filled up. We have k different colors. That is the piece Neo. Close the lid up, crosses that we add a1 and the second meal. Now Father Codio, you can see I added a lot of fight and I've got a piece to the indoor. And now using this door IT just add a bluegrass tools. Now to force viewed as Grass talks was much higher than when we added the second node. It was Newton lesser as compared to the course because we wanted organelles to be visible. And now when they're writing the code, Leo is going to be even less so then the force. And the second meal, because we want to even propose to Leo's to be visible. And this time you can see I'm adding the cost foods more efficient and much longer and much deeper because this is the final layer of the grass strokes that we are adding in. So you can see I'm adding the class groups, moving in on deductions and adding a lot of them did on, in an angular motion and Newton's ego ones in between. So that does it for the class jobs are now who can see Augustine looks so real answer with the three different Boolean values. And also you can see the lighter tones moving in cuda horizon line bush area. Now I didn't just mix in a little bit of white collar to the yellow color and begin adding some very small yellow flowers into this field. Edr, not at all at once. It just average all of the yellow color. If you want, you can just splattered on a tour of the yellow followed. You do not want to dab it. So you can see very simply, I'm just dabbing in video 1 dots with a eukaryote could give some clever effects in Buddhist feed ED or BD down to me. So you can move this. I'm adding these flowers 05 from each other and the ones that is new to the horizon line. I'm just adding smaller dots, triangles showing that these flowers are quite far and yeah, visible in very small shape to our naked eyes. Now just going to add an additional flowers at the bottom species. And then we are done with this painting for today. One last thing before removing the masking be either just shift. Hello and Adam, Adam DACA, bushy fed through the bush on the horizon 97, just embedding it fits at random places. I'm not much of it. And that is it BID because sympathy and go to debiting the flowers. So you'll notice I find it being done. Let's remove the masking tape. That before removing the masking tape, your edges are completely dried and always remove your masking tape at an angle two or more people so that the powder on the masking tape does not get lifted back onto the edges of the people. So yolk is up, I ended up being doing for D19. I hope you guys enjoyed painting with me today. I would say you guys to model into the date Wednesday class project.
25. Day 20 - Window Sea View: Hello everyone and welcome back to the top EBI GWAS challenge. We are on day 20 and B would be painting this beautiful window view today, the calories that you need for today's class project dark violet, orange, yellow, lack one sienna, yellow ocher and crimson color. So I have my people deep down on all the four edges and we will begin painting. But before that, just a nice monophasic sketch I did for this one filmed a horizon line and vivid actor Rock details to take me off to be in the sky and the CE. Now, suppose either be using the sheets of Dimson, bright yellow, orange, and yellow as we are painting a sunset CPU. So I have all of the tree colors onto my panic on 2D. Now I'm going to begin by adding white to all of the three corners and get obese to do one little piece to the vector, one of the three panels so that the bending of all three looks good. Two ghetto side you first begin by mixing invites to all the three colors and get all the three columns. So now I have quality condos, JB, and I'm going to begin with don't want Ange got on my horizon veins slowest. So I'm picking up, oh, she'd Ofwat each mixed in with white. I'm going deep into fights. I'm getting into David Broca audience war because the Bible seems to be still. Now. I didn't begin applying it that don't rise. And then next time in our law and blended with the orange Kano and at the top Ivanhoe last with the crimson color. So I'm done applying the shade of orange. Now, I shift to the yellow color, just about the audience colleges, temp and blended, vetted and get an agile ortho, yellow and orange has been. Now lastly, I will shift to the crimson color mix and apply it at the COP II and in-between crimson on the yellow, yellow, I'm going to leave and reduce B's and pick up via therefore blending so that I have a perfect transition between the canvas. So my BCOP, the sky is completely ready and even be adding very simple clouds later on. Now, I think even being the VCO for the CDA has been. So I'm first going to lay down a little of the orange color in this engine of the sea. And then I will shift to the yellow color and paint it onto the Santo New York with the orange canal. And then on the edges I can apply a little stepping stone and try to blend it into the center. Now I can apply the pink color at the bottom and on the left-hand side, right edges. And just try to blend it very simply with the yellow and the orange combo. So you can see I apply between the two pink color only on to the edge. I'm just trying to blend it into the center. So in the center, I already have the yellow and the orange dots. So I'm adding a very light pink, hence the yellow and the orange colored is also still visible underneath. So just apply on the edges and you can use a damp brush to blend it into the same dose. And you can see my blending is completely from left to right. So in between I do not have sharp edges. Now on to this, if you want, you can further add a little of the yellow and the orange dots to get the yellow and the orange effect again. Okay, So you can see again just by adding a little of the yellow color, I get the yellow Kahlo onto all of the goods. So this way you can balance the colors so that you have the sky effect into the C, E a complete. Now just using the tip of the brush, I will define the horizon line copy so that I have a perfect distinction between my sky and the sea area. Now my sky EDI has dried and I'm just picking up the yellow orange tone technique without mixing invited. And I'm going to begin on into clouds. Onto the right side, we are going to add very simple Cloud this time. So it's just going to be the simple aligns tools that we have known in the technique section. And if you've been no uninstall, it is too bright. You can just dilute it a bit using the white color. And now using this sheet either just begin adding very simple lines of the clouds. So majorly you can see all of the clouds is just on the right side, because on the left side there's going to be a big at all which will cover the clouds again. So in-between I used rainy night. You don't blend it into the backbone. And then again picked up the bright orange drawn and adding it at the bottom, newest. So you can see very simple curvy lines that I'm having in close to each other perform the cloud cheap fuel. So that does it for the Cloud that we're going to add for this one, just a good, decent L1. Now I've shifted my black color. I'm using my round brush, I'm going to begin adding that up. So Fasciola on the left, I'm going to add a very big at all. I'm Philip compete even the black color. You can go ahead and the sheep of fit up as you prefer. We now just going to fill this in diode akio with the black color. Make sure I'm being careful about wanting that you use the camera. No good thick consistency so that you have in a week look and you'd not have any hostile walked a meal being activated again and all you know, giving on a dendrite to look to your black Kano. So that does it flow, the flow stop. Now, I didn't pick up the bond sienna and at the bottom for the grass area that I can be I mean, I didn't pick up the buoyancy and knock on an agony adopted one CNO caliphs list. Now I haven't finished this ADI, the bottom with the buoyancy and not Gallo, I'm needing a fading abysmal and gap at the bottom for the windowpane also walk them speech. So if you want, you can even manipulate the buoyancy and Apollo and then add the black Leo Don Berwick, audiophile one. You're going to need this piece blank. It's completely your wish as we will be using them black and the brown weeks only for the windowpane as they're now using the Guanzi and Accardo either just died very soon. Build fast rules on I've shifted. Oh gosh, this is a size 0 pointed brush. So I'm going to add fine an EPS. I'm just going to add down and grass details, Median the arm do the right thing. You can go ahead with any other fast as you wish jewel. And then this IDB adding on a denotes the pasty do anhydrite, so did the black color onto the brown dog has been so you can see I'm trying to I'm given to all variations of the grassroots says Vin so that it looks all if not ship. Also, the reason why I'm adding it on to the right edge at present is because on digital media is going to be covered with Domingo's ooh, but we do not know what species with student mean visited. So it's always recommended book cover this piece called BP, as the windowpane is, Isaac is going to leave it the black color and it will be easier to cover them. You do gauss ETL with the black. So that's why I recommend to add the gospel to all bumpy feel and do the right site so that variable, the windowpane ends from data it needs, we have the Buffett grass stalks coming out. Now I've shifted to the black color and just adding on it aids with the black color onto the Ponzi and our condos that we have added it. So you can see the highlights is very less as compared to the original one cns dot we have added in. Now I'm going to add a very small drop Beyond Meat, this bigger dog's face. I forgot about one theme that is adding the CVs and do the viz before beginning to add though glass tools. But it's okay now when we even begin to add the C stroke. And be a little careful near to the class area and add their patient. Now just adding this one Adobe does at the bottom of the Big-O. And I'm going to connect this piece to the same area that we're trying to show near to the beach. Now using the black color onto the horizon line on the right side, I'm going to add very little gosh detail or you can go ahead and add a very small mountain range. Even Ivan, go ahead with a very tiny mountain region. You can see as I'm moving towards the left, the mountain range is almost just a very thin line. And as I'm moving towards the right ivan, just 0 VD the height of the mountain range, but it's a very tiny one as its verify from our view. So just, just want a mountain range yours so that I have a clear distinction between my sky and the CEO. Now the next thing we will begin adding the c strokes, that is the VIF effect into the CEO. So for that I'm going to use the crimson color. And I can add in a little touch of divided deep color to this. And I didn't just begin adding the c strokes, that is the CBG look. So now you can see I've got a pinkish line. It don't go just by adding a little patch of devided color. Now using this daka Bom, I'm using my size 0 detailer brush. I'm just going to begin adding smaller beefs. Now, we need to be careful that knee out to the horizon line. The CBMs are going to be white, smaller. And as we move towards the bottom, a yacht, the CV, it's going to begin increasing in the lens. Also in between you can see I have added some Tico strokes that is just by pressing the belly of my brush, I get these Tico strokes automatically. Now just going to add a little darker space underneath this big rock trying to show or VIF moving and crashing around this drop. Now as we're moving towards the bottom, you can see I'm adding very big obese as compared to the VMs that we added Neil to the rise and night. And now between these grass strokes, I'm just driving the vehicle so that it all looks covered up in the bottom because I forgot to add in the grass strokes audio there. So in-between I'm just starting the grass tops out there. Now. Lastly, just adding some tickets. Troops in between with the CMB DACA don't often than the violet mix even in between the kras drugs to studying smaller t equals true. So these are the pico Dhaka. You start with a child who hadn't. Now the last thing we have to add is the window p. So before beginning part of the windowpane, I will do over a range of pencil sketch up the windowpane. You need to be quite short before independence sketch because on the beans, you won't be able to use energy ISIL. So I would recommend you to follow is to read and watched the entire pencil sketch off to be loose piece. So on the left side we will not be having an even doping visible. On the top. We will be having a semicircle shaped what, a window on the right. I have already added a street nine, leaving approximately Lipton less than n bumps and do ESPs. And at the bottom D, we'll just be adding a simple black line off about half centimeter. The space that I have still left being under the a condo. So I just keep on off the edge and you can see my pencil sketches very rough and gritty night. Make sure that you do a very light pencil sketch because it will be very difficult to hide the graphite marks. After all, if you do not go around that email. Now, I'm going to begin adding the window with the one sienna and black colour highlights. So the reason why I'm using one sienna onto the edge of the window pin on the top and the right side is so damn, it reflects on an original of the sunlight onto this, we know p and it will give a little, oh, you know, doing effect. Then we use it with the black candle, so forth on the edge just mark the outline using pointed brush and the bronchi and up canal. Make sure that you used a onesie and NACADA. Good. Take constant diesel data domains or bake onto one of the colors that we are. Now onto the right side, I'm just going to take into 80 off the onesie Anaconda that I have antigen because the right side, as you can see, is quite thick. To the top area that we added in. And I want more of the sunlight reflection on the right side of the window. So just adding the leader of the sienna color first. Now in the remaining space of the window pane, I'm going to add the black color and begin blending it with the one sienna color. I'm going to pick up a little onesie and to make the blending easier and just wonderful then dial-up speeds on the top and the right side. Now make sure the movie of rash in the sheet that you have added at the top so that you have a clean blending between the colors. I don't have any rough edge in-between the candles. In east, if you're not comfortable adding the round shape, you can add any other sheep on the new Don you want. But the reason why I'm adding that on cheapest because we are still left to add a quote in view on the left side. Hence on the left side we did not add up being effect, that is the windowpane. We just going to add the cotton look onto the left side. Now on the right here as well, you can see I'm just picking up the prominent between and the black to get a perfect blending and the little glowing effect on the windowpane at the right side. So I'm done. I think the window being on the top and the right side and I'm just going to pick up on it's just a buoyancy and our color. I'm going to add it onto day in, day out bean and get up or fake Mandy and we'll fake mooing effect on the window base piece. Now, lastly, using the black color, I'm going to add a very small window pane at the bottom EDI, after just giving this finishing edge to the right side window pane with the bones, you know, callow. Now with the black college just going to add a simple pin at the bottom space. My window pane at the bottom is approximately a little bigger than the half centimeter size. Your size will vary depending on the people side is that you are using it. So that does it for the window pane. Now the last thing left to add is Dakota and details on the left side for adding the coating details, we are going to be using the diluted to one of the yellow ocher and brown sheet. So for that, I will first show you onto a rough people that I knew to tone that we will be using in. So it's almost we are going to treat wash as watercolor for adding in the court in details. So I'm just quickly pick up a rough sheet and then I will pick up Doc sheets onto my palette and show you forced onto a rough sheet and then begin adding it onto our final painting. So I'm picking in the yellow Ochre sheet. I already have a little off it onto my palette and I have a little of the bone sienna color. Now I'm just diluting with Dhaka close with a lot of water and mixing will dock on those. So very little touch of the bond CNI into the yellow ocher. And I'm going to use this color in a very diluted tone. That is, I have added a lot of water to make it treat as water follows. Now first I will show you a little thicker consistency. So you are, you can see the bottom of the people is not visible completely. Now. Next, I haven't diluted more by adding in a little of water. Now you can see this is a little lighter as compared to the fourth floor. Now I will further dilute this color by adding in modo photo and see how transmitting that Carlo will look triadic model CTO. And now you can see the color is so transparent that the bottom right pages visible a bit. So we are going to be using this diluted consistency of the paint this time. Now using my flat brush, I will very quickly run this color onto the entire gotten species. Now make sure that every time after giving one stroke you clean your brush because the black color from neutropenia may get picked up. Also, if you read on, you can see that darker patch that gets created. So I will just quickly correct, blending in. Again, you can see a little of the black color from the rocket picked up. So I will quickly pick up that color and reapply a code they're using. All because i is flat brush and very quickly run my hands. You got to be very fast in applying the coating. And after every stroke, make sure to clean your brush so that no black color is lifted up. Also, be careful about the color consistency that you are using and do not apply a lot of pressure while adding this. Because if you add in a lot of pressure, then you not on right now again, you can see the black color from the Rackspace has got lifted up a bit. So I can just connect a rock using the black color. But first I will just clean the space using a damp brush and reapply only are there. So you can see, even I made a lot of mistakes while talking. I forgot that I was supposed to clean my brush. So it's very important when you already have the Beasley offer the rocks, you need to keep cleaning your brush every time before you pick up the fresh been, otherwise, you will not be able to achieve the proper court didn't look. So now I will quickly pick up the black color and correct a window pane and also the rock space again Bay where I have messed up. So you can see I almost corrected Dakota and Luke by quickly using a flat brush and lifting up the color easily. Now I haven't use a little thicker consistency of the color by adding in a little more of the sienna and give some darker strokes your which will reflect as the folds and Dakota and give the court didn't look. Now make sure that these points you do not add in the windowpane IDA, But even be overlapping the rock species. So undo the rock very gently whenever you are meeting the black color, brush very gently and do not add a lot of pressure. And very simply just add a few holes like this. So if you can notice these folds are very random and I'm adding in these coins vary randomly to give some detail look to Dakota Since I had almost messed up Dakota. But you can see how easily we can correct the mistake when it comes to wash. The main important point is that you do not have to add in a lot of pressure while adding the CO2. And also you need to use a very diluted bone and Indonesia Renault brush quickly. Also use a bigger size brush. After every stroke, quickly clean your brush and then pick up the flesh color if you have darker colors in the business. So you are as a final painting for d two when we adjust 10 days away from closing this 30-day quash challenge. And I hope you guys enjoyed painting this with me today, though I messed this up, but this is my field. It did. Thank you so much to each one for joining me.
26. Day 21 - Beach: Hello everyone and welcome back to the 30-day quash challenge. We add on day 21, the colors that you need for today's class project. This light, turquoise, blue, black, city didn't Gu, Guan sienna, yellow, and sap green. These are all the colors that you would be needing for today's class project. So I have maybe put deep down and let's begin with the pencil sketch. So we will just be having a line between the sky and the sea area. My sky area is going to be smaller as compared to the sea. And in the sea area, I will just read it off free market, the beach area onto the right side. So let's begin painting the sky area forced. For the sky area, I will be using the saddle in blue color mixed in with white. And then we will be adding the clouds with the white color. So let's remove both two colors for the sky. Also, when I noticed that now my horizon line has a litter delta. So while painting with Ivan, connected directly with the color, now just picking up a little of the white quash as well onto my palette. And I will make sense the white quash to the sediment blue color a bit, and try to get a gradient sky first. So let's mix the color first. And this time I will be doing the entire painting just using one brush. So I'm going to be using this size five round brush and go into complete the entire painting, including the beach and the waves. Just using this one brush. This brush has a pointed tip site will make my detail in part also easier. Now beginning with a mix of the blue handle or setting in blue and the white quash at the top. And then I will shift the white color and try to get a good gradient of this color. In between if you want, you can even pick up a little of the blue color PER given Docker dawns and blended well into the sky area. So if you want to give us Pi all with your different dos edges as using that arm brash makes the task easy. I knew get rough look into the sky area as you can see, if you can even blended using the flat brush itself. Now, I've done pick up white collar. I'm going to blend that as Tawfik and drag a good book. They didn't, we'll call it a blue color. I'm done the horizon line. So you can see I've got buggy didn't, didn't do my sky up. I have a dark sky, then I use a lighter color. So in case if you want in between, light blue as well. Now, I will shift to the turquoise blue color and paint the BCL for the beach towel my sky area twice. Now if you do not have to, dopa is blue color. You can just mix in a little bit of viridian green to your blue color to get a little or C tone. I feel want you can directly use any other seat on blue color. Now forced our double rising nine. I'm directly beginning with the darkest tone of this color. And then we will use in white quash to light undertone and ghetto gradient into the sea as well, just as we did for the sky area. So foster define the horizon line for the CAD. I'm going with the light, oh, sorry, with a darker tone so that I have a DACA distinction. I am the CEO. Now the IV just speak up a little off the right answer. I believe you ought on so in-between, if you'll feel the need for pick up the beat, go ahead Fifi. And you can see even using goddamn gosh, I'm even begin to blend and you're not bending between the sheets. So as I'm moving, I'm getting the gradient more light as you can see. So by now, but not because I again begin from the top space, I'm dipole. You don't get obedient all moving from the top then the bottom. So that makes up mediation also easy. I'm mending all summed up the walk them also easy. Now at the bottom it's almost going to be, Oh my gosh. Just a little after that, we will be having in your father beach ADR layer first on good this, after this dries, we will be adding the VIV effects. Now let's lay down the bees may offer the same space has been father basically out of the sign, we will be using the yellow ocher. I just picked up a little of the yellow ocher color. Now to this tone as well, I will be mixing invite to get done I talked to. And I will also be using a little of the raw amber color or you can use a little of the bone sienna color. Now the IVB foss mixing invite to and yellow ocher to get a video like all you know, cleavage kind of a one. It's not going to make the light and it's not going to be too dark ego. So just trying to add in white and this NEO we will be using for the bees Neo off the signed area. Then on put this we will be giving darker edges onto God side type is near to the beach area as well onto the left and the right end. And then we'll be giving some dry grass has been. So I'm just mixing in a little bit of the bond C and L. So now I'm going to just fill this entire species first with the base color. So you can see in between I'm using white to just blend into sheets and also near to the sea area, just give it the proper H Foster and then fill in the colors in the rest of the space. And in-between you can see the little of the bond sienna highlights at the bottom that I added in my painting, the BCR that set now on to the beach ADR, while it is still red IV pick up the docket sheet, that is the ROM book Allah, you can make them a little bit of your bond C and not do yellow, yellow ocher to get us a mulatto. And I'm going to add it on to the edge and type of blended a little. Moving towards that. So very lightly, I am actually going to move all the excess paint onto the rough clot. Hence, I'm able to just, you know, who lambda 2, 1 vector I apply on the edge. So apply the little girl onto the edge and then just very gently pull it in to the area and try to blend it. Since a base layer color is already wet. So you can see both the colors are blending into each other and having a soft edge. So CMV continue until the entire top space. Also in between, if you have a legend of a dry brush stroke, that's perfectly fine, that we'll add more to the nature of beauty that we try to add it. Because at the end we will be adding the dry brush onto the sand area as just adding a little of the dry brush onto that entire sand and pulling out a little up these leaves from the right side as well. Now next time we'll be adding a bush effect onto the horizon line. So Foster, I'm picking up the sap green color mixed in with a little bit of white. And then I will be mixing in a little bit of black to this mix and getting a darker tone for the second Leo. So the first year is going to be 90 hands. I'm mixing in a little bit of white. And using this color, I'm going to add very simple Bush effect onto the horizon line. So Foster, I'm defining the top of the bush ADL. So I'm just using the tip of my brush and adding a very random bullshit. And you can see I'm trying to lead the height of the bush, some that are less ambitious. And at the top I'm trying to give it a bushy shape. Then I can fill the rest of this base completely with this color. Then we will wait for this force Theodore dry it, and then we will begin adding the second layer onto this. But the DACA, once the phosphate is trade. I will just add a very small Bush to on the left side your suggests a very small one. You are extending the Bush area. Now until this dries, we will add the clouds into the sky area. So you can see at this time as chi is quite a little different than the previous guy is that we have been painting because this time because of the round brush, we have a different effect into the blending of this guy which makes it look more nitrogen. Now I have picked up some white gouache. I adapt the excess paint onto the rough clot and now I'm just trying to add in cloud shape using the dry brush technique here. Basically, very gently, I'm just running my brush into a cloud shape and this triangle drop-off the white paint using the dry brush strokes. So on the edges of the cloud I have a dry brush look and even the color of the cloud this time is not completely bright, right? Visible. It's getting a little settled into the sky because I'm using the dry brush stroke. So that is a little pressure that gets applied. Now just going to add a little more of the clouds. So all of my clouds are a little diagonal moving towards the right side. And you can see just using the dry brush stroke or do not apply extra pressure. Otherwise, it will get completely blended with the sky area. That is also not you want. At present, if you can notice, I can see the clouds very clearly. Medan, not too opaque or not to vibrate. They are settled into the sky area and that is exactly how we need it to be. Now using the bond sienna color, I'm just going to give a very dark edge to the beach area and the CDS piece. So that is, it is going to reflect the shadow of the beach area on to the Vive line of the beach. Now, if you can still notice, I have been using the same size five brush and I'm able to add all the details with just one brush, even the edges, because of the pointed tip the brush has. So they are, at times, It's a good exercise to just pick up one brush and do an entire painting using that one brush. It can be any. You can even go ahead with a flat brush and do this entire composition. It's just that you need to adjust the angles of the flat brush for using it. But still, you can do this entire exercise using a flat brush as well. Now let's begin adding the waves into the CAD. So I'm going to be adding very little leaves this time, not too much so fast. I've been adding our details, right? We've looked and then even add a little of the leaves with the turquoise blue color. So fast I'm adding a thick line of the right color. And then from this I'm going to show some of the crashing waves. Are are you noticed sparkling waves? No. So from this time just pulling out from the tip little VV look, you can see. So it's again, a little dry brush stroke that is coming in. So I'm just going to add three to four of these wave lines randomly and do not add it, add them just underneath each other, try to be the placement of these waves as well. So I've added three of these because now I mean just to add on the top, just smaller leaves, smaller crashing. Look at the top space. Now that we have been using and I've been just extend this. So what I'm trying to show is that is that is there. So just trying to reflect that blended into the beach. Now let's add a few leaves using the turquoise blue color. So I will just pick up a little of the dark eyes, blue color and added thought all white color and get a lighter tone. And using the tip of my brush, I'm just going to add visiting it invades into the beach area. So I would just mix it with a little bit of white. And not much because, you know, we already have the beat space LIDAR, so the leaves have to be a little darker photos standout. So I'm not going to add much of right now. Foster Ivan, just add a little darker leaf to the light waves that we added. So basically, these are going to reflect as the shadow of the crashing waves. So do all of the white leaves that we added in, add a little shadow using the darkest tone of the turquoise blue without adding in any right. Now just using the tip, I'm adding very small. These are the ones that are near to the horizon line up quite smaller than less. And as I'm moving down, what's I'm adding larger wavelengths. So very simple ones, nothing in detail in between. I haven't even takeover leaves are all just take our lines are to give more detail to the sea area. So that does it do the beads. Now lastly, I've been just pick up a little bit of the black color and mix it to the sap green color as we discussed. And add this, I can push space. So by mixing in black to the sap green, I'm getting a darker sap green tone in case if you have a darker green color, you can directly use that. But adding a little black to this app, feed them, keep the composition into the same color tone link. Now the second bushes going to be smaller than the first one. So at places it may go taller than 0, False Neo that we added, but it's going to be smaller and view. So the background is going to be often lighter tone and the front view we are going to have the Docker Bush space. So just as we added the previous Bush, I'm going to add though all friend bushy area as bed. So I'm almost done adding the darker green spaces bed. And you can see in just under 20 minutes we could pain such a beautiful beach real and such easy that such less details but still such a pretty view. Now last name, just going to pick up a little of the bone sienna color that the excess paint I'm going to add visiting a dry brush onto the beach. That is this eigenspace of the beach area. Not much. And you can see just by adding a little dry brush and give so much more detail to the sand area as bad. Now let's remove the masking tape and see AFINN painting with those clean edges. Make sure to remove the masking tape at an angle from your paper. So you always, I find that painting from day 21. I hope you guys enjoyed painting this beautiful view with me today.
27. Day 22 - Sunset Seascape: Hello everyone and welcome back to the 30-day cross challenge the other day, 22, and we will be painting the seascape to D. So the colors that you need today's class project is white, black, scheduling blue, violet, yellow, orange, and sap green. So these are all the colors that you will be needing. Let's begin painting now. So I have my paper taped down and let's begin with the pencil sketch. So either just mark a distinction between sky and the sea, and that is it for the pencil sketch. Now let's have a look at the colors that you will be needing for the sky area. The Palo stack you would be needing for the sky area is post P, the city and in blue color. So I will just pick up a little bit of this color onto my palette and a little off the right color has been a patron this you would be needing the shade of violet, orange, and yellow color. So I have all the three color that's been on my palette. And if you want, you can just remove the other three colors as well. So we have been using these colors a lot. So while a deep color though yellowish orange tone and that bright yellow color to all the three colors. I will be mixing it with white gouache to get a pace to tone this time. And again, I'm going to be painting the sky with my round brush. Cyber force begin the density in blue color the top, and then pick up a little bite and get a little gradient to this Carlo. So this time, walking the sky is going to be fun because you will be working in small spaces using your round brush and now picking up light. I'm just going to blend it with the blue color and get a lighter. Good. So this time, the sky, you will see a little spiky edges I pleases, and that will add to the beauty of the sky. Now next I will just pick up the violet color, so I will mix invites to the violet color first or IV. Foster play a little bite your underneath the blue and let that whitespace be there for the violet color to blend it. So I'm taking a little clean white underneath the blue space. So you can see I've got a very light dish newtons to the right. So now that species when B will be adding the violet color, you will get a perfect blend between the blue and the violet with a little lighter tone has been. So now I just started with a little touch of the violet column extended bite. Now again, I can pick up side and try to blend this color and dilute the, um, you know, get a lighter tone to this color and blend it into the blue color has been. So for blending this time, I want to be using a lot of fight even between the colors and even to get the gradient of the kalos. So on the right-hand span, I again added a little darker violet tone and now going to use white underneath the violet us to blend and get Agreed Yeah, For the other color to blend and easily. Now just going to take the logit of the violet diagonally from the blue in the sky from the top space. So you can see this time we have this spiky edges into the sky ADR and it looks so-called fake and still cup lending looks much easier. Now I have mixed in a little touch of the whites to the yellow color. And I'm just applying it below the violet color. And you can see and apply the tone very roughly. And then using the white underneath, I tried to blend it with the previous color. So if you remember, even before or after the violet, we added a little layer of byte. So that makes the blending ECO. Now again, I'm going to pick up very diluted tone that is very light pigment of the violet. I'm going to apply it underneath the yellow and tribal blended. And then at the bottom-most piece, I'm going to mix invite to the orange color. I'm going to use this base to launch near to the horizon line. And then again, pick up fight and blended with the upper violet tone. Now since we're using invite for blending, we do not get much of the muddy tones if a blended perfectly. Now lastly, I'm just going to pick up a little bit of white and make the blending between the blue and the violet also a little smoother because there I can see a little bit of the sharp edges which I don't want. So just picking up light with a damp brush and trying to blend both Docker. And you can see how easily even after this base has dried, I'm able to get a perfect blend. So you are, is as chi and it looks so pretty with those strokes. And you can see the violet strokes that move so easily diagnose be at the top speeds, which is difficult to achieve using a flat brush blending. Hence this time we are blending with the round brush and step-by-step little by little with alkalosis. Now let's be, the baseline for the C space has been. So I'm mixing in a little bit of the blue, white and the violet Dawn. And I will begin with this door near to the horizon line force. So you can see I picked up both the blue and the violet and now adding in a little bit of white and getting a bluish violet tone, I'm going to begin near to the horizon line. So on most in the half CSPs, I will be adding this bluish violet tone. Then either the couplet invite and try to get ingredient. And then at the bottom, I will be using the city didn't blue color. And I will get the perfect radiation from divide it to the little lighter tone and then the city didn't blue tone. So now either you pick up light and get on a template in and space for blending or false time, we'll apply the blue at the bottom space and then pickup site in-between both the kalos and get a perfect transition from the violet blue up there in the blue tool. So you can see how just by easily using the white color, we can get perfect transition between the lowest and get such smooth blend. Now You are a few wouldn't have even used, right? You would have got the perfect blend. But using the right gives the transition effect much PEDOT, which you wouldn't get just by mixing the two colors directly for the bending purpose. Now let's wait for this to dry before moving ahead and adding the for the details and do the seascape area. So now my CTI is completely tried and didn't begin adding the CVs and do the CTO. This is the major task of the entire painting that is adding all of the leaves because we need to add, verifying these. So fostered going to be using this violet deep color for adding into VS to this. I'm going to add in a little bit of light if needed, or we can directly use the Docker to one side first apply a little of this tolerance. See whether we need to get a gradient to this color or new. Now I'm using my size 0 pointed brush and you can see I'm getting very fine strokes. Neanderthal horizon line. I'm going to add very smaller strokes so that strokes are going to be smaller than let. The reason behind this, I have shared this a lot of times, but if you're new, you're the horizon line is far from our view. Hence, the VMs that are visible near to the horizon line are going to be very minute because they are very far from us and became very easy them. And as we move closer to love you. So as we've been moving towards the bottom speeds, the view will be much closer to us, hence even be adding the bigger lines as we move downwards. And you can see at the top I'm not even adding much of vertical lines. But as we move downwards in-between the leaves, I could even be adding pico lines to add in some crashing or sprawling V is look. So now just keep adding very small leaves into the top speed, the horizon line in smaller leg, I'm not adding white to the violet color because it divided color is looking perfect onto the seascape area. Also make sure that you use a very fine liner brush for adding in this detail. Because if you add the t Covey's, it will not give you the perfect look like this. Now, in-between, I'm even going to pick up a little upto he said he didn't blue color. I'm going to add little leaves with this again in blue colored in-between as Ben said, even blue color also that I picked up is without adding in any bytes to it. So it's enough darker tone as you can see. So very patiently, I'm just going to add verifying these. That has been hi words. You can see I'm adding longer movies and even a little tickle leaves in between. So bear all at the top space in an entire line, I was adding roughly around seven to eight VS. Now in the entire line, I'm happy to add three to four years. As we move further down what we even increase the length of the VFS photo because the waves would become more closer to our view. Also, you can see I'm adding the veins very close to each other, but making sure that the bottom ASPs stack we begin to distill visible. Otherwise all of it will look just to, Oh, you know, a plain color. Look again. Now I mixed into violet and the blue together a bit. I'm going to use this tone to add some takeover. I just pressed the venue of this brush itself to get the takeover you look in between. And you can see these beads act to the beauty of the seascape that we are painting in. Now you can see just by using one brush, I'm able to add the t Covey's as well as the ANOVA is that these, by pressing the venue of the brush, you can get these distinct look. Now at the top space as well. Two of you often read, I'm giving a little shadow effect with the DACA tunes. So underneath of these, I'm just adding very fine line of the darker dawns to give a little of the shadow effect to the leaves as B. So adding these veins can be a tedious task and it can, you know, make you lose your patients. But to all what I would recommend to you is if you feed a diode or if you feel that you are willing to lose it, take a break and you can anytime come back again and continue painting of years, but make sure that you paint the leaves very patiently and honestly. All for me, painting these leaves is really, really relaxing. As you know, you just need to sit back and keep adding the veins very patient B and C then diode beauty of the sea coming together. Now in between again, you can see I'm adding the takeover. Now as I'm moving down, what's my waves are becoming much longer than men. Also, I'm alternating between the violet and the blue tones. And at the bottom I'm even adding some darker shadow. So that is how I'm painting the entire seascape space. Now after this B would be left ladder, little of this buckling effect on the v's and little of a green grass area at the bottom right side. And we'll just add a mountain range on our horizon line as bad. Suppose let's finish painting these VMs quickly. In between you can see very landed me. I'm even adding that the Covey's make sharp Black depth to add to the beauty of the seascape that not being paid. And also if you notice my VMs out on a difficulty and not a single straight flat line that I'm adding it. So make sure to add in that little cove as Ben. Now using the violet color, I'm just going to add a little of the dark of years on the edges from the top to the bottom very when I feel the need to. Now using a darker tone of violet, I'm just going to add a little of the shadow effect to that. The Covey's that I added in the bottom space and even told few of the technology if that I've added with the lighter tone, I'm going to add a shadow effect with the Docker drawn. And you can see how easily I'm going to add in the shadow effect just by using a darker tone. Now in case of your violet is not that dark, you can just add in a pinch of black color. I would not recommend you to use a direct black color for arriving in the shadow. Because, you know, if you've been use the violet blackish to one, it will stay in harmony because of the base colors that we have used it. Now simply in between just adding some Jacobi is very randomly. And then we'll be done painting the leaves. So that because that father waves ADR. Now let's pick up the darker tone of the violet color. So I've just added a pinch of black to the violet color. And now using this color, I'm going to add the force change of mountain onto the horizon line. And then we feel the need. I would even go ahead and add a second mountain range as Ben, underneath the first one. Now again, your it's not a black color that I'm using. It's a violet, blackish tone that I'm trying to use it. And we'll add a video down the mountain. And you can see, I'm trying to 3D the height. So fascia mocking the outline of the mountain range that I'm planning to add it. Now simply fitting the entire range with this color, make sure that you do not run into the CDR. Try to maintain the straight horizon line. Look first. Hi. So we are done adding the mountain ranges, but now let's shift to the black color. At the bottom right side we've enforced be adding a few of the grass strokes with the black color. Then after that dries, we will be adding a few strokes with the sap green column mixed with white. So I'm shifting to my bigger size. Don't brush. And now I will just pick up some black color in our thick consistency so that I get an opaque look off the grass strokes that I'm going to add it. And now using this color, I'm using the tip of my brush. I'm just going to add about a threefold danger auto all one-inch kind of strokes depending on the paper size that you are using. This iss of these strokes may 3D. This going to add very simple truss trucks moving in different directions but closer to each other, trying to make these graphs look on together. So I'm just going to move till the center, just an attitude towards the left. But major near Delta center only and it's all on that right side and nothing on the left side. So this is going to be the base name. So when I add the green grasses onto this, this will begin to act as the shadow to the green justice that we are adding in. Now to that narrative classes dry. As I told you, I can add a second mountain range with the black color. So now I'm picking up the black color and I'll add a second mountain range with the black color in front of divided change that we added in. So I'm going to vary the shape of this range as well. So some better, it's going to be taller than the violet color and some veterans going to be shorter. We have to add it in such a way that this mountain range looks as the front mountain date. And violet mountain village looks down behind mountain range and both the feet have to stay visible. Make sure that you added in such a way that is not covered compete. I'm trying to weed eating the sheep from them. Oh, Violet mountain D. So that denied under friends do you up being d? Now the last thing, Let's begin adding the grass strokes with the green color. So I'm going to mix in advice to my sap green color. I already have some white underlying this green color. So I'm just trying to reactivate it using what DO. So that's the best thing about gouache. Even if your beans dry in, you can reactivate it, it just by adding a few drops of water. Now using this, I'm just going to leave some grass strokes onto the black space. So you can see in between the black grass strokes are visible at pleases. So automatically that's beginning to act as the shadow now. So that is it for the vast space has been. Now I'm going to pick up fight quash. I'm going to add some sparkling effect onto the VFS that we added. So major now under the T Covey's, I'm just going to pick up the white gouache without mixing in any word though, I'm using the tip of my round brush. I'm just going to dab some dots on the Covey's trying to reflect as the sparkling waves look or the crashing wave effect. So just using the tip I'm dropping in these bite beans as you can see. So just dropping some dots of despite being trying to get that sparkling not so as you can see, I'm major. Yeah, I think they will kneel onto that. The Calvi's find visual of this buckling effect and Jada that the gobies, I'm not adding it onto Latino VBS. Now. I'm just going to add a Lipton off this buckling effect onto the rest of the CSPs. So it's going to be very less as compared to the sparkling effect that we added on the takeover. And it's going to be very random and very legit. So that is it. We are done with our painting for today. And this sees, it looks so gorgeous and I absolutely loved painting it. Let's remove the masking tape and AFINN painting with those edges. I hope you guys at enjoying this 30-day gouache challenge with me and that every new painting you are mastering the art of squashes bed, make sure to remove the masking tape at an angle from your paper so that the beads onto the masking do not see back onto the edges. So you order as the final painting for D 22. So much to each one of you for joining me. I would see you guys tomorrow into the day 23 class project.
28. Day 23 - Reflection: Hello everyone and welcome back to the top DD cost challenge. We add on D2 and D3. The colors that you need for today's class project is white, black, blue, violet, yellow, orange, sap green, and burnt umber. Let's begin painting this beautiful seaside view to d. So I have my people deep down onto all the four edges. And I will just begin by marking out my horizon line. That is the distinction between my Sky Italia and the rest of the details. We will be adding it with the beans. So I'll just show you a reflection area that we will be adding to the pine trees, that we will be adding the horizon line. And in this, we will be adding a reflection of that. So I'll just on the horizon line is going to be a pine trees, the reflection of ritual. Just be inside the, sees this. And I just haven't written the sign EDR out. So the colors that you need for this guy this time, I'll shade of yellow, blue, orange, and all even need a little bit of the violet color for adding in the clouds later on. So I just picked up a little too blue color, and I have the rest of the colors into my palette already. Now, either begin mixing my right and the blue color and begin from the top of the sky without lifting lighter tone of a blue. So it's going to be kind of a sky blue color, just mixing instead you didn't blue with white. So that does it for the blue space that we will be adding in only this much. Now, either pick up the yellow color and I will apply the yellow color on the horizon line. And in between the yellow and the blue, I believe in the whitespace there I can be using white gouache to blend both of these and get a perfect all your fans permission from the yellow to the blue color or the blue to the yellow color. Now the new document, the blue and the yellow mixed together then begin to form a dream condo. Hence, I'm using the white color to blend in and get a perfect transition from the blue to the yellow without forming in any green points. So you can see just simply by using divide quotient middle for blending together perfect transition into us guy. And this guy automatically begins to look so pretty just even without adding the clouds. Now either begin adding the clouds to the sky area. So for adding the clouds IVB using this bright yellow, orange and violet deep condo, I already have code, the colors on my palette, the ID just GI activity scholars and add in a little bit of white to get a little lighter. So I still owe, you know, sets in perfectly into a Skype wounds. So you can see I'm adding much of quiet and very less of the violet color. I'm using my round brush. I'm just beginning circular motion to add the clouds supposed to. I'll just get a perfect blend of two colors of every night to tour. Now you can see I'm adding this lighter tone very gently and moving my Prussians ocular motion, I found the cloud cheap cost and now my just fitted the bottom space. Now I'm going to pick up the orange color mixed in with a little bit of white and begin underneath the violet and try to blend both the Canvas in case if you want a little of the soft pages, you can use your thing, go for blending the colors or dabbing it into the backdrop. I will not pick up a little bit of white and P at some lighter edges at the bottom space and try to blend it a little into the yellows piece of the sky. So you can see I just picked up a little of the white and even blended it into the pulpal space. Now again, I'm picking up some darker shade of orange and adding it into this piece of the cloud moving towards the right site. And not at the top species, I would just add some smaller clouds with the orange and the violet bones separate E. So do all these clouds and I'm dabbing it quickly with the tissue and I will create a little subtotal into this. So I just add the color and quickly dab it from an endocrine tissue. Makes sure that every time that you're dabbing with a tissue, you place up the inside of the tissue for dabbing off the excess color. Otherwise, the color from the tissue may get added to your sky space. So what I'm doing is I'm just adding in the color and quickly dabbing it with additional so that it settles in a width and tons into a lighter tone. Then what we added in. Now see the either just died little of the orange clouds in the bottom space. So that does it for the clouds for now. Now let's begin painting the bees EDR called the C skip. So I pick up the yellow color and applied at the bottom of the seas. So just going to pick the same yellow that you used to disguise base. I'm going to add it at the bottom space. Now into the CDR to given the effect of the clouds, I am going to add the orange and the Y that tunes and cover the yellow tone of the sea space medially. So from the right side I will add the orange ones because the orange clouds, I'm usually on the right side and on the left either be adding in the violet tones because the violet clouds immediately on the right side. So I just tapped on it to help the audience Cloud as well because it seemed too bright. Now picking up the orange color, I'm gently gliding it in from the right side, as you can see now seeing me, I didn't pick up a little of the light of islet dawn and glided in from the left side. Make sure that when you're doing this, you do not pick up excess B. Neither do you pick up a lot of water. And you need to be fed each ended on hands on. You need to pull it out very slowly. So now you can see that yellow color is almost hidden and we have to orange and violet sheets coming in. Now you can see that I tried to add in the yellow color. A little of the violet color got lifted and was applied towards the audience here. Sorry again, you don't cover that space with the yellow color. And now again, I'm just getting in some orange application to on the right side again. Now I wouldn't be cognitive of the yellow and applied onto the violet as Ben n-type polite and a little of the violet color and try to blend it in and set it in with the yellow cones. Now let's meet for August is to try and then begin adding the final details into our painting. So now man dial painting is completely dried and I will begin adding the pine trees and the fine details into the painting. So for adding the pine Gs IDB using sap green color, I already have the Palo on my palette. I'm just trying to be activated using some droplets. No. I haven't identified the bone. Seeing about it has been on who my palette. I can just pick up this color and apply it onto my horizon line, depicted as a little muddy bass onto the horizon length embed define these would be standing, go onto the horizon line. Now bonded this my DSPs adding define, tease out that both moving into the sky speaks. So I'm going to lose a medium tone of this app theme color in case if your sap green all is you not to dock. You can just add in a little tinge of the white-collar or to obtain top the yellow color to get a medium. Good. I haven't digital to underlying white, so I'm just going to mix it a little off the white dish to my sap green color and begin adding the finances. So not find Eigen for us to add them onto the horizon line. And these are going to be a little detail as compared to the reflection that even be adding in later on. Now when you're going to add defines these, make sure that you use a brush that is smaller in size so that you can get little details of the bind. Adding simple ones, not too detailed ones, but the important thing is to read in the shape of a pine tree that you're trying to add. So you are, you can see at the end, define g comes into a triangular shape. Okay, so that's the important thing to maintain and go. Now see v onto the entire horizon line. I'm just quickly going to add in a lot of stuff pine trees. And I returned to VD. The height of the pine tree is 20. So I began with the taller ones you are. Now as I move ahead, I can add an integral of the shorter ones as spin. So you can see now I'm drying the lady, the heights of the bind G. But the only thing that I'm trying to make DNA is not the shape of the bind. The end looks like a triangular shape. So it's this article, Christmas G that, oh, it looks like. Ok. Then even be adding deflections enzyme darker dawns has been included top of the bind. So I'm almost about to reach the end of my horizon line for adding in these pine trees. I know adding in the pine trees in this detail view takes a little time and it misses a DDS one if you're using a bigger size paper. So in-between, if you feel tired, you can take a break and come back again and, you know, continue intuitively to patients. So they have the top space, you have the detail looking pine trees. Now you are, you can see towards the right side I'm adding in a very big looking prius. So define g that is at the top, that is the leaves that I'm adding in at the top space. You can see the leaves look a little more detailed. And as I'm moving down what I'm adding much bigger patches of the P, instead of adding lot of the details onto the horizon line. And getting a little rough reflection Luke or a little blurry kind of reflection. Look now this branch, it looks like a flat brush, but when depicted, what DO lab result of this brush get connected to each other? And we have our own glyco structural that gets formed on Buddhist brush. It may not even be visible right now. So I'll just dab it on the tenant ID so you so you can see a little complex structure that gets phone. So first, I'll begin with the same green color that we used for adding in the pine seeds and add a thin line of this color at the bottom of the horizon line for adding in that reflection. In case if you do not have a big brush, don't worry, you can use a flat, smaller size flat brush, but you need to be sure that your flat brush has to be done and try to use it dry only. Now I'm just pulling out this Kahlo using this rake brush. And you can see I'm pulling it out in the height according to the height of the pine trees that we've added in the top space. So whenever you have added the follow pine trees, you got to pull this out a little taller. And then I wanted short though you got to pull it out shorter. Now again, pick up a little of TOPO green color and add little shape of the pine trees. So you can see just adding little top details into this reflection space that I added in. And then again, I will pull it a little with the big brush. So I will say, if you do not have to read brush, don't worry, just use the smallest size flat brush, use it in a dam. We do not pick up any water, do a flat brush, and very gently just tried to pull out these strokes like this. Now again, I will just pull up a little more of this reflection. This time it's going to be quite less as compared to the four strokes that I gave it. So just giving in London to get a little blurry effect to the top edges that we added in 0 for getting into detailed look of the pine tree into the reflections piece. Now next time picking up the black color and I will add very little of the black effect here. And again, will this paint also using the brush, giving it some Docker reflections because we will be adding little of the Docker pine trees into the top ADL later on. For now, just adding that affliction, since we are already doing the reflection part now. Now just using the tip of the brush, I'm just going to add some black lines like this into the reflection triangle, show that this deflection is in the water space. Hence, we have these lines. So you can just use the tip of your flat brush or a pointed tip of your round brush and add these lines. So basically, I had pointed out that black color, so that black color was on the tip. And using that, I added these lines. Now I will pick up some fresh black color in a good thick consistency. If you want, you can mix it with a little touch of green and get a very dark tone of green color and begin adding some darker pine trees onto the horizon line. Now these taco pine trees are going to be quite less as compared to the lighter pine trees that we added in. So you can see, I'm very randomly adding them. In between. If you want, you can add video into the bush effect between the pine trees with the darker colors as well to cover the entire horizon lines. So again, make sure that when you're adding these taco brain teasers, when you read a range that is the height of the pine trees throughout. So you ought in between you can see I'm adding very low-lying Bush effect to fill in the space at the horizon line. So you can see the Docker pine trees are quite smaller as compared to the lighter pine trees that we add it. So now we have two layers of the pine trees, and especially that I had the Docker deflections mode, that is bad. I added more often. Now I'll just pick up a little off the yellow column mixed in with white and try and blend it a little mental the CDR better, but I feel that the reflection is a little more. So I'm just going to add in little off the yellow color in-between the reflections and try to get a little of the sea waves effect. So you can see just by blending in a little bit of the yellow, we get a little subtle look. Now using the same base to the yellow, I'm going to add very fine lines into the reflection space has been trying to depict the CDR underneath this reflection. So at places from the reflection also the C is visible underneath that is what I'm trying to depict them. Now next I'm going to lift up orange color and add a little of the CBS is a bit dark orange color. So just pick up and lift it off the orange. I'm using the tip of your brush just to add in some bad ones. Nothing much indeed. Now you can see that on the right side, the purple color is almost covered up. So I will just pick up a little of the purple color, add a little poeple patch, and a few of the poeple leaves as Ben. And I will quickly dab it with our tissue so that it gives us a tilde and oh, you know, nope, into the CSPs suggest I, I did a little of the poeple color and I just adapted quickly. So now I have an integer flexion of that poeple cloud that we have in the skies piece. Now, I'm just going to pick up little of the green color. And I'm going to pick it up in a little darker consistency and, and a little darker tones in that reflection space. Many, small, not much, and just neopentyl arise in nine major lead to give little more detail to the reflection that we added in. So you can see very little of it that I'm adding it. So automatically the reflection gets a more detailed look. Now just going to pick up a little of the orange color. I'm going to add the leaves. Your vet added the Cloud space because the VMs cotton if tick because of the cloud effect that we added it. Same thing. If you want, you can add little of the VMs, but the yellow color as Ben. So I will just pick up a little bit of the white and the yellows color. I'm going to add a little of the white VFS covering wherever I feel necessary. So now you can see I'm adding some takeover leaves with the yellow color and trying to cover up down the line leaves again. So basically what this miniature is, we get a loading effect to the leaves also that we added in. But you can see the leaves are still there. So that is why I just added the yellow color with a very gentle hand. So that does let's remove the masking tape. This time painting, this was a little detail step, but I hope that so many days of practice you could get this threonine, get that blurry effect of the Cloud as well into the CSPs with the Leo's on Nios that we kept adding in. That is the V is then again loading it then again the VS. So you're always our final painting for D2 and D3. I hope you guys enjoyed painting this with me today. Thank you so much to each one of you for joining me so far and staying in so far with me.
29. Day 24 - Floral Field: Hello everyone and welcome back to the 30 Challenge VR and D 24. And we will be painting this beautiful o fluorine middle kind of a look. The colors that you need for today is write black, pink or crimson, violet, yellow, orange, sap green, and yellow. So these are all the colors that you need for today's class project. So I have met people deep down and let's begin with the background color first. So further background I will be using in the sap green color and the black color. So I already have a little of this up being my palette, and I will just pick up a little of the black spill. And this time using a flat brush, I will begin with a background wash. So the entire space we will force to add in a darker color tone, which will begin to act as the shadow out to all of the details that we will be adding lead to Dawn. So first I'm picking up some sap green color. Make sure that you do not add a lot of water and pick up the color in a good thick consistency and apply it onto the entire space on worst. So I'm just going to add 0 first or little of the sap green color. And then I will pick up the black color and make all of this into a darker tone. Now I'm going to pick up the black color and begin adding this black color onto this Dreams fees. So make sure you don't automatically then you'll begin publishing this. You will get a very dark OB door. So now you'll see. I did not add a lot of Waldo. I did include picked up the black color literal onto my brush and drying blended with the bean box. So I'm almost done adding the black color. Now. Just adding some darker bones from the right side has been. So you've been either move your brush horizontally or vertically. It's perfectly okay in EVs because this is just the reflection or actually the shadow that will be happening to the all final details that we will be adding on the top side. So at present you can see I do not have a compete black luke and I do not even have a complete green law. It's a blackish, clean look that I have tried to achieve for the backbone. And now in between you can see Neptune black spots that I tried to add it. Now let's wait for this to dry. So now my background is completely dried as you can see, now we will begin adding the details. So Foster and picking up the sap green color. And I will just add in a little bit of white gouache to this and get our median bone to the sap green color. And after that, I will be adding more of white for getting into lighter tone for the next video. But for the first newer, I'm just adding in very little of this sap green color and mixing it with white color. And I will get a medium tone. I visited or try to formable the bones and show to you also the difference you can understand. So towards the top space you can see is the darker green tone that we will be using for the fourth CEO. And at the bottom, we have done I dislike green tone that we will be using for the second Leo. No, false using more bigger size John brush, just using the tip of my brush, I'm going to add some grass strokes and some nice effect. Then I will shift to my smallest size detailer brush and begin adding the final details. So in between, I'm going to add some BIG needs as well with this color. I'm just going to add a stem to it. Also. I will just add a bunch of leaves as well. You're at the top right side. So at present with this bigger size brush, I'm adding these details may need randomly. Now I did shift the way smaller size brush, that is a size CDO, pointed tip brush, and using the same color, I will add final grass strokes. So now the final best strokes that I will be adding can be overlapping these needs as well. Uneven moving on detection. And they will be a lot tilted as well. So just keep adding a lot of these, but make sure that you do not cover the entire night. Green space and you don't need and still be having differently. So make sure that you add so much that you have species to add the other Leo's as well. Because if anything is less, you can show me added later on, but anything off the excess will make you redo a lot of work to get the perfect balance into your painting. So now you can see with the light to be indoor, cat is the force, tone and value. I'm very randomly adding in the grass strokes. And some of them, as you can see, I'm adding them a lot in a tilted mano. So you can see I've tried to create such a messy kind of a grass. No, that's exactly what we needed. And now I'm almost done with the false color Neo that by what they did. And you can see, I have space for the other New York I make insist you still see that backbone. Now, I'll pick up this night. I don't mix that. I have your at the bottom and I can begin adding CMV grass top needs with this light o Carlo using my smallest size brush. Now these will be overlapping the first one. And they can, oh, you're not in a literal differentiate than the previous one has been. I'm just as you get by adding the phospho, keep adding these Asbury. Do not worry about them overlapping onto the Tico leaves out to that we added well for me, Okay, and it will add to the beauty of all of it. So just keep adding these also as well. These will be less as compared to the first layer of green stalks that be added. Because after this, we will still be having another NEO with going yellow green tone. So make sure that you added so much taboo spits didn't have space for the night of BIM tool to add in the total lever. So you can see a very randomly I'm adding in the strokes you are. And it's automatically making this face look more fun up. And it's making it look like on real grass field ADR, which we have in a lot of focus piece. And then even be adding a lot of flowers to this base. Different kinds of flowers with different color variations. So just keep adding these grass strokes first. Now again, I've shifted my bigger sized round brush and using this lighter tone of green, I'm going to add some tick on leave, ET and justice be added with the Docker. Be false. This time, we'll add with the light dopey. So you can have a lot of bands. Drop leaves are very nice to nice. I'm tickled grass strokes just as we added fetus needed that Docker. So just add a little of them urine there. So this will give you a little more detail note and give you the nice effects into the flowers that we shouldn't be adding in. So you can see already randomly, I added them to develop a bomb leave kind of an effect as well. So all of this makes it look more natural because you never know what by nef needs out there and all the get-go. So baby, now, I'm adding in all of this angina will make it more natural as possible. Now, I have picked up the force tonal variation of the beam column. I'm using that green oil, so I'm adding a little of the detail look at the top space because major off the detail under the grass to suggest adding a few of them on the top has to give it a little more detail. Look. So dark present for the grass strokes for now. Now I can begin adding the flowers. So far the flowers are going to be using the shades of pink, violet, orange, and yellow mixed with a lot of white to get paid so that they pop out onto this green background, GKE having, so do all of the four colors that I already have on my palette. I haven't written up the crimson red and I mixed in the right and got that piece to the pink color, to the yellow also I mixed a lot of right, and God are based in yellow bone to the violet I'm mixing invite getting in o paste and bind it to auto lavender color, you can get it. And to the audience has been Eigen mix in a little bit dark, right? And get obese, still orange tone. So these are the colors that I will be using for adding in the flowers. Now I will be adding these flowers very random knee into different species and different shapes of the flowers. So you need not follow the same shape of the flowers. Even be adding it. You can show me, go ahead and change the shape of the flowers, all the placement of the flowers as you wish. So first for adding in the flower, I will be using in this sketch down miniature brush and picking up the violet color. I didn't just use this brush to add ones drop leaves to form petals of the flowers. So first you're just pressing the tip of my brush and lifting it up so you can see I'm getting a better shape automatically. So I'm just going to use this brush to add in the purple flowers quickly. So I just press the dip and lift the brush up and I automatically get a better look. So I will just add in a little more of bytes to the violet color because the violet color seems a little darker and it does not stand out that grid onto the beanbag round. I want the colors to pop out to bend. Hence, IF don't them into pasted, don't. So whichever color you feel is not popping out of it, I would recommend you to add in a little more upright and make it a little more piston. Just for adding invite, you can see the colors are popping up much better and have an underlying violet tone to it because of the violet mix that we have added in. So I will just add approximately three to four of these flowers. You are at the top species. Now in case if you do not have this cat tongue brush, you can simply go ahead and use your round brush and add these ones Stokoe flowers, making it the other petal shape. Now, I will shift to the yellow color and begin adding the yellow color flowers you're at the bottom. So they can know flowers. I'm just going to add smaller dots trying to show very small yellow flower was your very simple ones. Nothing in detail. Now to the yellow color as well. I'm just adding in a little bit of white collar to get a little more light at all of the yellow color. And I can just add a little more of this brighter yellow flowers so that they pop out a little brighter than what they are at present. Make sure when you're adding in these flowers, you do not apply a lot of pressure onto your brush or the bottom green and the black color will begin to get activated and they may blend with the lighter tones that you are adding in. And the non gave an opaque look to your flowers that you are trying to add in. Now next with the piece to tone of pink, either begin adding the flowers. So I just started it in a little more white because I know this will also be a little darker. So first only, I added a little white to get a little lighter bone. Now your Apple top right side, I'm going to add a five, right, Better shaped flower that is simply five small round petals please together to form a flower. And I just started a lot of these flowers who are on the top right side with the pink color, it says. So you can see, I'm basing these plateaus very dynamic. I do not have any specific placement odd or you're not distance, you'll be getting between the flowers. I'm adding very random. You don't leave it on if you need UK instead of b0 batting a lot more of it. So better and I feel that the color is a little light. I quickly give a second, Leo, and I keep my hand very gender. Now either just weeks invite to the orange color and add some orange flowers at the bottom left side. And then we can mostly be done with the adding of flowers as vent. So you can see I've added the flowers very randomly on nothing in specific. I just wanted to perform a multi flower field your and just ready to handle dotting the flowers with random follows. Now if you want to, I'm just trying to add three patent kind of a flower. And in-between the yellow has value. Can see I'm adding in the orange flowers. So the orange flowers that I'm adding, I'm adding them in between all of the flowers very randomly so that whenever I have a little empty space or big, that is most modern look covered up. The orange flowers will fill up this piece. I'm just using the tip of my round brush. I'm adding these three buttons shaped flowers. Now to get the balance into the area, I'm just going to add an edge loop that thing, flowers, urine dare to fill this piece. So accordingly, whichever cauliflower was you feel the need in your painting, continue adding them. Now I didn't pick up a little of the violet color Weisbenner and add a little of the violet plow was also at places wherever I feel the need. So that is what I told you in the beginning. Begin starting by adding very little flowers off each of the colors. Then, according to the composition better we feel the need to add in to get a perfect balance between the kalos. Pick up the color that you need to add in. The flowers at places where you feel the Apollo's need to pop out. So you know, you get a perfect balance into your painting. Never rush and overdo the flowers with any one color. Now, I will just pick up my right pocket and add bonds to all of the flowers. Now for adding these bots, be sure that your flowers are completely dry. Otherwise you will not get an opaque look to the buds. You can simply add this using your white quash has been if you do not have the white permanent Marco, I'm just going to use the tip of my Marco and quickly adding this to all of the flowers off each of the colors. So to some of the bigger leaves, I'm just adding a little detail to the center of the leaf size bed to add a little of the white highlights using the white marker itself. Now, even though the orange flowers just going to quickly add in a little of the body fact at the bottom space. So that is it. We are done with the painting for D2 and D4. Another easy looking fluorine middle, kind of low. You can go ahead and paint any of the flowers onto this glass look. So what you could do is you could paint the entire glass look and add a lot of groceries in different angles instead of adding these different flowers. So you know, with just one or basically out of composition, you can go ahead and add as many different flowers you want and get different floral looking medulla very simply with just some simple techniques. So your is our painting for the 2004. I hope you guys enjoyed painting with me today. I would see you guys into the next class project to model.
30. Day 25 - Night Sky Camp Scene: Hello everyone and welcome back to the 30-day GWAS challenge the other day, 25. And we will be painting this capping look between the words, the kindness that you need for today's class critique these white, black, blue, yellow, orange, and burnt sienna. So these are all the colors that you will be needing for these the class project. So I happen to people taped on to all the four edges and even begins with a pencil sketch so fast, I didn't mark out the little of the same species. So approximately you can see how funny speeds. Now onto this, I would be adding a cabin look that is attained kind of a view that I'm trying to add of a rough one. We would just add in little leadings to distend the fellows typically suggests a small dent near to the midline. Now you're onto the right side. I will just add a fi of Xi because we would be showing of eye avoiding near to the camp site. Okay, so just adding a little shape of the file so that we leave that space. And then rest of the details in the file will directly be adding with the Pelosi one. So that is it for the pencil sketch for this one. Now this time, the sky will be of the Prussian blue color. So I'm just picking out a little of the blue color onto my palette. You can go ahead with any backup blue tone if you do not have a solution blue color, and even be adding the pollution blue-collar in obedient to one. So that is at the top of this guy is going to be very dark. And as we add each new output attained and the fibrocyte, It's going to be lipo. So forgetting the lighter tones, I have picked up some whitewash already onto my palette. And now I'm begin to take me applying onto the sky species. I didn't make sure to avoid adding the colors into the paint and the biospace that we marked out with the pencil sketch so that it's easier to achieve a quality. Go in, put out deadly Jaylen, and post using the round brush and I'm just placing the darker bones at the top speed. And you can see I'm going in a little circular motion this time. Natures on ivan use a flat brush and blend all of these colors and get the perfect blending and OCI to the blending that we need. Right now, I'm just adding the color easier for me to blend later on. So you can see on the edges I'm adding the docket bones. So on both the left and the right edges, as Ben you can see, I have added the docket bone. And you can see that according to the size of my people, it's a very small patch of the darker tone that I added in. And as moving more towards the bottom side, I'm leaving that space and not adding much of the blue because we need a very lighter tone there. Now, I will pick up the white color and applied to a white color, to the blue tones and try to blend this and get an a. Do you know all this from the darker blue to the light blue? All of this at present I'm just doing with my round brush and getting the collarbones. Then I will shift the reef flat brush and get a perfect blending between the palette. So I'm just roughly adding the kalos so that it's easier for me to blend using a flat brush. Now you can see I'm just picking up the white color and adding it near to the blue color. Now, I will shift to my flat brush and begin blending in a little circular motion from the top and move downward. Student that then under Files piece and then there again, I've given you more gently adding the cones using the smallest size brush. So now you can see when I'm blending with the flat brush, it's automatically giving me the perfect radiation from the darker tones to the lighter goons. And you can see I'm just simply moving my brush in a little. Did that was a little circular manner from left to right and getting the perfect radiation. And then between the kalos. Now at the bottom you can see I simply used white and I'm not picking up any folder blue. And as each the paint top space, I stopped my flat brush from moving in there. I haven't shifted my round brush and fill this model places there and blend it into the sky space now. So you'll see some B was England on gosh, I just took up the night the mood board that this blob of my dots off the lesion will Kahlo, and I'm just blending it and do the walk them species who are not body if the blending between the flat brush, I'm that I'm still seeing me up because you can easily go to this just running up there. Um, any imagery is all of this man get covered up with the t's that we will be adding include the sky species. So do not ready, just make sure that as you reach the bottom of this guy, you have to light up wounds of the blue. Now I picked up a little of the pollution new anim folder, darkening the top sky space and moving downwards gradually so that I have a perfect transition again. And you can see simply, I got a perfect transition. And you can see I moved my brush from left to right completely and do not lift up my brush investment those pieces. So I get the pool fixed stroke from left to right and do not have any brushstrokes left in the middle v. Now, let's begin painting the bottom space. So this sign, yes, I have picked up a little bit of the bone sienna color and I will be using the black color so fast I will just dive into to love the buoyancy and your, and then we'll use the black color and blend it into the space, but may need neoplasia FIOS base I've been nicked Apollo be more of bone sienna so as to reflect the warmth of the biospace and then lead to the uneven even be adding the din of the orange and the yellow highlights to reflect the Phi reflection on the design space as been so far, has just added a quart of the bond sienna color and Leto, even given the Doppler effect to it because of the darker night sky look using the black color. Now I've shifted to my black color and I will begin adding the darker strokes as I talked to you about it. Now beginning from the edges, I will just begin adding these darker strokes and I'm just pulling out the strokes now on the right side, be careful with that. Neil to the ISPs need that little space, completely burnt sienna. Later on, we can just add a little of the darker patch if needed after adding the two pi out affliction. So that does it. Science-based has been. Now I have just picked up a little bit of the fish, white gouache, and I will begin adding a layer of fresh by guage into this entire camps piece then needed on Ivan just given Nitin relates to the phones using the gray dawn and trying to blend it into the temp species. Suppose name down a layer of complete white, then for mixing in the gray color, who can just add in a little bit of violet, black, and white. Or you could go ahead and add black and white to get a PhD. So I'm just going to mix a little bit of the black color. I'm just going to all you know, flaws to add a little up the lines your and try to blend it in. So I've just added the edges with the black color photos because I already have an underlying by bone. Now, I can just use a very smallest size flat brush, and I've just tried to blend this into the bottom space. Now when I'm blending in the black widow bite you automatically or grayish tone has been formed. But the BRI has spread a lot in through the Fram space. So I didn't need to run again, pick up a little of the white and cover up the extra base, base. So do not provide enough. You'll get some extra PSPs. You can automatically get activated on using the white color things, but just make sure to have a clean Dakpo edges of the gray tones so as to reflect the edges of the opamp or the paint that you have added in your. So now you can see simply picking up light and adding it better, extract APL and S beta. And you can see, I could get gobbled up with the white again. And I've got the perfect edges to the end, just giving you the highlights to the void spaces of the paint off the dock, you know, rods off the tenth through which it is standing still. So now just getting the perfect window TO. So that is it for the fam space. Now next begin adding the 50 dy ds. So by adding the 50 IVB using the shade of yellow and orange. So I'm going to be using this permanent yellow light, bright yellow, orange mix. I'm using both of these colors. I'm just going to make stem all you not to get out, not onto my palette, but onto the sheet. So I've been forced to add in a little tone of yellow, then pick up on Egypt and off the orange color and begin adding new Apple each AGA and try to get blending and Baltic fire effect, do the file space that we're trying to add in. So I'm shifting my round brush again and forced I'm picking up the yellow color and I can begin adding it in boot up ice sheets that I added in. Now, you can define it above the Via space when you're adding in that yellow color. So you can see I'm trying to get a very rough edge. And if I'm running until the blue palo, you I'm just going sauteing means that the blue and the yellow mix together is not giving me the green bones. Now under the edges of this, I will pick up the orange tone and begin adding on the edges and try to blend it. Now you can see the audience color that I picked up is only onblur tip of my brush. And I'm just using the tip of my brush to blend in your on the edges first. And now I can just try to blend in and add little file effects until add little off goes, you know, phi odd all effects bonding out and flow, moving into this space. So just floss blending in a little of the orange and the yellow tones. So you can see through my phi ISPs, I've got a very rough and a perfect edge as needed. I have an app needs and up to 50 sparkle effect need to floss. Let's begin adding the cheese into the sky space. So why I'm going to do is I will be using my round brush and post add all the box to the tree. I'm the stems coming out from these CI, later on I've just shifted a round brush with just which does not have a pointed tip. I'm using that brush. Ivan, show you another way of adding the foliage to the t This time, so forth, just using our smallest size Dong brush, keep adding branches or the box and the stems of the tree. Now when you are adding, this makes sure that you try to maintain that cannot take R and you no longer on the shorter branches look. So add awesome smaller branches, some shorter branches, and some pico branches from something or branches. So try to maintain and add a lot of it into the top speeds major need that space near the diff-amp and the fire side is going to be very empty just to live in for islet effect. And very small background sees that will come in there. So you can see I'm majoring the adding the branches, moving into the top space, I pause dyadic Bluetooth pico box. And now just moving out these branches out from the stems that I have added in. And you can see, I'm trying to get something not short the Apollo branches. So try to be all of it. What you could do is first adding the ticket branches using a bigger size brush. And then if your brush does not have a point that gets shipped to a smaller size brush and add the tin or branches. So quickly add a little more of this and then show you the way of adding the foliage. So you can see near to the PAMP and the files piece, I added very small branches then stems popping out from behind the dam space and kneel to the 50 species and added some smaller branches. So in the center of this guy you can see I have an empty space without any branches. We will be having a bright moon propping up then lead to dawn. Now, I did shifts to the round brush and show you. So this is a round brush which is actually quite an eye. Using this round brush to the anything is if you did not have as point exome brush, don't pick up any don't brush which does not have a going to dip back, has a rounded edge at the top space. Now I've been just dip the tip of my brush into water and I have picked up the black color. And now I'm just going to hold my brush perpendicular and very gently just start at the tip of my brush. And you can see I automatically get the foliage onto my cheese basis and the balance and automatically the branches are visible as bad. So then we'll feel that the paint is 0, 1. You need to fill up the b, otherwise you will get very nice point H. Then it really will feel the need to dip your brush in the water. Make sure predict only the tip. Do not add any water to your brush. Otherwise, it will, oh, you know, Ben, you add the brush strokes perpendicular. The water will fall out and it will give you four pools or spots of water, which is not what we want. Now you can see so quickly and so easily just by using that they preferred round brush. You can dab off the foreknowledge and ghetto find digit clip onto their dialogue. Larger spaces very easily. So the eagle using this technique is, you need to wonder brush perpendicular. You need to use a round brush which does not have a pointed tip. Do not dip my brush into water much. Just used a bit and pick up the beamed and begin adding them perpendicular, not so automatic knee, kind of dry brush strokes that it gives and gives you the final digit Onto the T's, then you'll need to add in a lot of mileage of bay. So very simply you can see how I've got defined edge effect onto the T spaces and that did that for my foil edge effect. Let's move ahead and add the for the details now. Now using my round brush, I'm just adding some detail point a defect near to the camp and the friar site at the weapon species, but it is getting connected to the market space. Now next I'm mixing yellow and white and getting them it didn't write it on off the yellow color. I'm using this Kahlo. I will begin to add some files, bob Wills, meogda, FIOS bees. I'm give more details. You and to give a little wanted effect, I'm forced adding it into the center. I'm just dabbing this fellow and it's automatically blending the Gordon shades out there. Now picking up the orange color, I'm just going to add smaller dots and try to show some piles, pumpkins popping out into the keyspace from this fire that is bonding near to the camp site. So you can see I'm just using the tip of my brush, adding smaller details, post into the center of the biospace, and then even move ahead and add the files populace. Now I'm shifting from my smaller size, oh gosh, which has a pointed tip. I'm just using the tip of the brush. I'm just adding the FIOS Balkans as I discussed with you earlier. So very small lines with the orange and the yellow Kahlo popping up new ended up ISPs into that GAVI trying to show as the bias by calculus moving because of the bonding file effects. Make sure to keep adding them that both Apollo's, that is the yellow and the orange color to get a perfect effect of the fires Spock wins and the file moving out into the space. So that is up to the fires pocket. Now, either just died in a digit flexion of the file into the same space. So I first picked up a little of the yellow color, adding it at the bottom space, now picked up a little of the brown blending into on the edges, the orange color and now picked up and it's love the brow. And again, blending it with the rest of this space completely. And you can see automatically you get an identified effect. Now I will just pick up a little of the bond sienna yellow and add it on. Tomoko distinction between the fire and the deflection. So on the line of the same species just add a little darker burnt sienna line between the fire and the reflection. And then 0 completely as you will need them all, feel the need to add the palace for blending. Go ahead and add it so you can see a very small orange yellowish space. And at that I have picked up the bond sienna Kahlo and blended it together so that it looks just as a small reflection and Buddhist sign space and not an actual file and Buddha science space. Now, either using the bone sienna, yellow or the orange color, just to add a little bit of the highlights with this color on both some box of the CI, trying to reflect the fire light onto the keys and avoid niche as been. So ready to do. Not much just to add knitted branches, but this column that is unlit them highlight pulled up back branches but the bond C. And now, although orange tone, whichever you feel comfortable with, I'm going to add a little bit both the calories to maintain the balance and get both a different light tone values because of the file. Now even onto the foliage, I'm adding a little of the bond CNN orange touch to reflect the fire effect onto the foliage has been so based on the lower line trees and the foil leaf that I'm adding this effect not much on the top side. So when you're done, I will add to the t-stat is near the fire and the camp site. If you want, you can have under developed a yellow touch as bad. But when it didn't, yellow has to be, and it can be more of the bonds here now and the orange highlights. So now I'm adding a little while, the effect of the day yellow and the orange towards to the lower leg so as to reflect the light of the fire. And wherever I feel it's excess. I quickly dab it with my fingers so I get to sit there and look and then you feel think and you can again add a little of the black polish to get a perfect balance. Now just on this one root t out your, which is just about the fires piece, adding little of the bond sienna or the orange highlights because this tree is just about the file. So to add a little night of the fire there, now, I didn't just pick up a little of the black color and Till black college, again, your, because this piece has a lot of highlight of the file, which is not exactly what I want. So just adding in a little of the black color again to get the balance between the highlight effect that I needed in. Now picking the black color, I'm just going to blend this time-space again and get a perfect blend out your as bed till the fire reflection, please. And you can see automatically now we only have little highlighted part in the same space, not this off the fire reflection that we needed it. So very simply just pick up the black color and blend it in your. Now just using the tip of my brush, I'm again defining the edges of the PAM space using the black color. So in these of your brush does not have appointed big shift to a DD, no brush so that these details do not pop out. But the audit side to be darker gray mix the PAM space automatically adding some of the fold effects at the bottom spaces vent to give more D1 note to the camp space. So that is it. Now, I'll shift my white permanent mapping and add the moon into that little space of this guy which is there in the center. If you do not have this white marker, you can show me go ahead and use either whitewash autocratic, and and now using my white gel pen and just add a few stars and do this night sky loop. You can basically do not have a white gel pen as well. You can use your fine brush and whitewash and add in these tasks, I will be adding these styles in between the teeth as well as you can see, because we have little foil lit from behind which the sky is still visible. So make sure to add these stars in-between the finally jazz band to maintain the balance into the sky species. So that does it via a digital painting for today. Let's remove the masking tape and see your final painting. Make sure up to remove the masking tape at an angle from your people so that you do not get off the edges. And also the beans that is on the masking tape does not see back into your painting. I hope you guys enjoyed painting this beautiful night sky campsite. Look with me today. I would love to see you guys join me tomorrow for the deet when D6 class project. Thank you so much for joining me so far.
31. Day 26 - Sunset Cityscape: Hello everyone, Welcome back to the 32 equals channel. We are on day 26, and we will be painting this beautiful cityscape to D, the colors that you need for today's class project, right? Black, violet, yellow, and orange. This time, for the violet color, we will be mixing the red and blue tones to get the tool. So there is no pencil sketch. Let's begin painting in the sky. And then as we begin painting, the head will add the details that I will be using for this guy is the shader, bright yellow, orange, yellow. And this time I will be mixing in the ultramarine deep and the Rosemarie dark color to get a violet tone. If you have a direct violet blue, you can go ahead and use the direct violet bone. But this time I'm mixing in the shades of blue and pink to get Did my personalized violet color. Now I will be using all the colors in a piece to tune. So I will just pick up some fish, right? And to the blue and the pink color that I have on my palette. And get a violet color mix. I'm trying to get a dull violet color mix. And I will also be using the orange and the yellow color in peace to Boons. So I already have the right onto my yellow and orange. I will just pick up a little more of the weight and keep it ready. Because first I will blend in all the colors and keep them ready on my palette and then begin painting the entire areas. So now you can see the violet color is more towards the pink site. So I'm just going to add in a pinch of the ultramarine color again to get it a little more towards the, the side. So that is the reason I said, when you mix in the blue and the pink, you can adjust the Y. Let don't ask for your requirement. And since I did not want exactly violet color, hence that is the reason I went ahead mixing in the white and blue and the pink tones together to get this tool a little dull looking tone for painting my background this time, for painting the clouds, I've been bit, did it mean using the violet color from the two and not mixing these colors? But for the background sky, I needed a little mix of my own. And now I just added a little bit more of fight to get it into a little extra space to dope. And now I'm just mixing the yellow and the orange color is Ben, and keep them ready and then begin into the sky. So I'll make column mixes are ready. Now I will begin with the phaser to loss violet and begin from the top species. You can see it's such a pretty based in London, the sort of a color that we have gotten. And I'm just going to apply to almost onto the half off the beach. So my sky is mentioning going to be of this violet color and we will be having the Cloud effects with the orange and the yellow Lee Tuan. Now next time we'll pick up the orange and begin applying it near to the violet color. Now since we have both of these colors in the PCL consistency that is mixed in with lot of byte. So you can see when we blend both of these colors, we do not get any medical or form because of the white color use to get into pasted. Don't. Now, almost half of this piece I added the audience has been at the boardroom speeds, the little space that is left, I will just add little yellow, highlight them near to the orange color, and try to get a little sunset. You just let it operate not much. At the bottom, we are going to be having the cityscape area. So all of it will automatically get covered with the cityscapes. A look at that needed to be adding. So that is called a base layer of the sky. Now I will shift away round brush and begin adding in the clothes. So impulse beginning that the orange color. So I have added a little movement of the orange to the mix of the orange. And by that I used in the Bassanio so that it stands out onto the orange media as well. Now, all of the clouds that I'll be adding in your Ivan, dabbing it quickly with my fingers because this time I want a very subtle look to the crowds and I do not want them to pop out. So you can see as I'm applying the clouds into small areas, I'm quickly dabbing it with my fingers so that, you know, seconds into the background and blends and easily violet is still there. And also, you need to be sure about one thing that the darker orange that I'm using it, because if he will lose a lighter tone, it will not stand out onto the orange species. Now see, the eye has picked up the pace to the yellow color. And I'm going to add in the Cloud and keep dabbing it with my finger as I'm adding it so that it looks settled into the Cloud space. And I wanted a certain look to the clouds into the sky area. So in-between, I will keep alternating between the orange and the yellow color. And I will continuously keep them dabbing with my fingers so that the variable I want to set the look it has that typically look into the sky area. Now in between I'm going to pick up a little bit of white as well and add a little white highlights at the bottom. Thesis and technique, just going to dab it quickly. Now when you're having with your finger, you need to be careful about one thing as well every time that you that once make sure that you clean your finger again because if any adult color gets picked up onto your finger and then you want to dabbing on to another color that is already on your fingertip, may get lead or what would the Cloud Speech and may ruin the cloud look that you want it. So every time whenever I see that my finger needs cleaning process, I dab it with new undo the Ross toggles so that I do not have any wrong color or methane gas, which is point my crowd speeds. Now, I didn't begin adding some clouds with the purple color. So I'll just pick up a tinge of the black color and mix it to the violet color that's already onto my palette here. So this is the direct violet deep color from the tube. Now in case if you do not have the violet deep color, you can again go ahead with the mix of blue and pink or a red tone and get a violet color, adding a little tinge of color and a little bit of white colors. So we are trying to get a violet gray color kind of a look again. Now, according to how I want to adjust the tone, I am just picking up the extra violet column which I have. And I'm just mixing in yours so that I do not have to the east Apollo, which is already on my palette. So first I'm going to use a lighter tone of this mix and then I will make it a little more dark. Go ahead and use it for the second year of underlying clouds. So at the bottom speed will be adding the clouds with this violet color mix. So basically it's a three column mix that is violet, black, and white. So first I'm using it in a lighter consistency. You are also going to follow this process. That is, I'll keep adding them in smaller spaces and keep dabbing them very gently with my fingertip and make sure that you clean your fingertip. Also, you can see I'm adding a very rough cloud shape at the top speeds and dabbing it and getting a very rough looking cloud first. So I'm done adding the top sheet. Now I just picked up the same color again and giving a little more detailed look to the Cloud space and filling the entire speeds with this color at the bottom media. So at the top you can see I have got the blurry effect into the Cloud speed of the purple color. And at the bottom I'm just filling it with this color completely now at the bottom speeds and even still be having the black color details. I'm not adding in this color. If you want, you can add a layer of this tallow and later cover it up the black color as you wish. Now where do we see in the knee, you can quickly dabbing the paint again. Now either pick up a little of the orange color and I'm going to add it near to the top space of the sky and try and get a blend into the sky area with this violet. We will also be adding a little of the violet clouds into the top speeds of the sky. So you can see, I'm just adding little orange and white mix touch near to the top area of the sky. And I'm not even adding it completely onto the entire species. Now let's shift to the violet color and add a little of the violet clouds just using the tip of my brush into the audience. Chi ISPs. So very small sky, clouds into the sky and you can see I'm quickly dab in them to give them a set they look. So just Neo do this big purple cloud. You can see just on top of it, I have added two smaller violet clouds with a very light upon which they used at the top space of the sky. And I have, I have given them a very blurry on a second look into the sky. So I use the tip of my brush to drop the pin and quickly adapt them using the tip of my finger. So I pass a second look into the sky and they do not pop out dark gray and looks settled and glory into the skies. Now I will pick up the slideshow color violet mix, and I can begin adding little of the classic loud effects would do this big pilot cloud that I added. So just at the top spaces, I'm going to add in the lighter violet color and keep dabbing them with my finger and blend it into the darker tone and get us fluffy effect at the top space. So now you can see the automatically have two effects into the purple flowered, that is the lighter and the darker tones getting a fluffy effect. At the bottom. As you can see, I have majorly that back color tones because at the bottom, we will still be having the cityscape, which we'll be covering the clouds. Now I'm mixing in a little more of the black to my violet color mix to get her darker grayish pilot thought. And using this color, I will begin to add lots of DC low it at the bottom space. Now I didn't false desk or little color onto the Cloud area and see whether this color pops up. Both acne audit needs to be dark going a little more. So I feel the need to add a little bit more of the black color to darken this. So I'm using a kind of a dark grayish violet. I'm using this color. I will add the entire cityscape it. So you can see I'm beginning in the random shapes of the building. And I'll try to maybe the heights on the sheep's 200 AD, the weapons be meat and still be adding a little of the blue edge effects. This also these gaped look and then even be adding little off the PowerPoint and some bio connections into the cityscape IAP. So in-between, if you're not, you'll need to lighten the color a bit. You can go ahead and use coupons. Just spend the color is a little too dark, so I just added in a dim light dark color and I'm just overlaying your if you've seen that your collarbone is perfect, loony, not know this step. Make sure that you do not use a black color this time for adding this yellow VT0 Because we are trying to get done unmuted kind of look to the cityscape that we are trying to add. It needn't be adding the HDD is with the black color technique. So make sure to use a grayish find a bone for adding in the cityscape here. So I'll just quickly, I didn't know cityscapes and low hit onto this entire line. So you can see, I have strived to be the height and the shapes of the cityscapes. A loop that I'm trying to add in some way, readies mod some Verdot, hot kind of pointed edge loop. So dry media so that it looks not shooting through the cityscape ADR. Now onto the left side, I'm not going to add an ease of these gapes in low yet because I haven't detected be having a slice of what you said. So my black color and begin moving from the left to the right. Space at the bottom, which is white right now, is going to open them with this black color. So I'll quickly fill in with the black color first. So that is what it is that I wanted to add in the smallest size brush and this light violet and just add udacity escape building areas that I have additive model highlights and not just enough details that you can see I'm going to add the borders are very rough looking that I'm trying to add. And also adding a few of the RAF may know lots into the buildings and follow them in different shapes for different buildings. And you can see the bridge is a little diagnosis diamond the left side and the ascii and moving towards the right ask taken into endless GQ line will give the pocket radiation into those cityscape look. So just going blind as you move in most towards the right side and then even begin adding the photo details. Now using the lighter violet color, I'm just going to add a little highlight on the top of the page. On the left side. And then we'll shift to the black color. And I will add an advertisement kind of a board popping out some disparage ADR. Now using my smallest size brush, I will pick up the black color and begin adding in the advertisement board as I told you, now, make sure that you use the Palo opaque consistency that isn't consistent. People get an opaque look. Now, I will add it here on the left side of it. Small advertisement kind of a board popping up some the bridge space. So Boston and add the borders with the black color. And then I will add in the details with the lighter tones. So I gave the border with the black color, and now I'm going to pick up the white color and add that began with a very light tone of a violet color into the center of the billboard. So it's going to be almost a BIPOC may just didn't budge off the violet color. So that is it for the advertisements fees I have incorrect the black edge later on once the whitespaces dry. Now I didn't pick up black color and using my round brush, I can just add some tick goes into the bottom space and then shift to my smallest size and add the final details. That is the minute details off the power poles into this warping space. So I'm done on this one MOOC fall on the left side. Now again, I've been shift to my smaller size brush. Now using the black color, I will add a very long holder onto the right side, and it's going to be quite thin as compared to the one that we added on the left side. Now in case you're not sure about adding and detect any Vico brush you can post, have a pencil sketch, but add this nine with a marker or a pen directly instead of using a paint brush. So you can see I've just added over onto the right side. And now either be adding the folded into the O button Speak. Going to be adding a lot more details. But before that, I will just finish up giving the Baltic borders to this advertisement board again. Define just a bit the black color. Now I'm shifting my technical pen. This is 0.01, so the nib size as 0.1. And I'm just going to add the smaller poll. So it's all going to be major leaders treat light looks at we will be adding it. So I'm going to add a lot of them in different heights on Buddha entire space that we have added at the bottom. And I'm going to add a few of them and some of them overlapping onto each other triangles. So the distant views. So if you see I'm actually adding the wolf them close to each other, then leaving in some species and adding another site off. And then even add connection to all of these using the violin details. Also, if you'll notice as I'm moving towards the left side from the right, the size of the bowl has been increasing. And now again, as I'm moving towards the extreme left, I have decreased the height again, just going to add the last few of these. And again, I have increased the height moving towards the left. Now from this state, I'm just going to poke out to the tree of this cheap light notes. Now I didn't just connect all of these holes using simple lines and then shift to a bigger size. I'm saying all of this. Tonight's with the black color. If you want, you can use all of the light effects using the black wash or a pen as you are comfortable with eigenfaces with that because I spent, this is 0.1 nip pen. So hence adding the details with this pen takes a longer time. So I haven't shifted because I spent after adding in these minute details. So I read all the violin connections as well with this pen. And just adding a thin nib your at the top speaks to this poll that we added on the right side. Now I'm shifting my because I spent so this is a 0.6 nip pen. And I can quickly fill in all of the light species you are and make them looking at ball. Now, I could even get you off the light ones that I have randomly. So asked to give a little more depth and do this obese and drag will have a London radiation and match them looking no Udacity scapes. So you can see, I have not added that the Kellogg's to all of them. Now using this because I spend just a few of the lines in Udacity's gave less, not much. Now, I will just shift to my white permanent marker and add a small moon at the top right side. And then we are done with this painting for today. So this sunset kind of a cityscape, you with a mutated or cityscape look. Looks so beautiful rather than just being a simple black silhouette, kind of a look. Ok. Now let's remove the masking tape and CFI in and painting with those lean edges, just make sure that there is no bag beads onto the masking tape or is it recede back into your painting? So it's always important to remove the masking tape at an angle from your people so that you're not quite in those thin edge looked at you have caught it. So your final painting for D 26. I hope you guys enjoyed painting this with me today. I will see you guys tomorrow again. Thank you so much for joining me.
32. Day 27 - Misty Forest: Hello everyone and welcome back to the 30-day GWAS challenge. We are on day 27. Let's have a look at the colors that you need for today's class project. You need a shade of white, black, violet, and yellow, green. We will be painting this misty chord is kind of a look today. So let's begin painting. I have maybe what they've done and there is no pencil sketch. We will directly begin painting the misty background first and then begin adding pine trees with differentiates of v. Suppose to paint a misty background, I will be using white quash and I will be forming a greenish tone using the violet black and the white colors. So I already have a little of the greenish mix on my palate and that much makes will be enough for just creating them misty kind of a background. But in case if you want to know, I will be using this violet deep color you are, which is already your to this. I will just add in white and black to get a light grayish tone. I will just pick up some fresh white quash. Because if I push on, my palette is a little dry. Now I will just pick up a pinch off the black color and form the grayish tone and just reactivate this color that is tried your suggests that the inch I add up black because it was a little more on the violet tone. Now, I will be using my flat and round brush bullets. So I will be using the flat brush to just lay down the fellows quickly. And then using the round brush, I deeply begin creating the misty background. So pasta, I'm laying down some right at the top space. Then I will pick up that mix up the gray color that we have formed by mixing in the violet, black and white tones. And I will just applied near to the white color. Now you can see when we're applying it, we are getting those harsh edges because of the flat brush. This purpose I will be using my round brush and I will just move my regression circular motions to create a misty kind of a loop. So I'll just pick up a damp brush and begin blending the colors you are and try creating a misty kind of a loop. So in this one you can pick up a little bit of the white quash so that it's easier for blending. Or you can simply using a damp brush. So I'm just using a damp brush and you can see at the point where the colors are meeting in, I'm just running my brush in circular motion. And whenever I feel that the dampness of my brushes no longer supporting, I just dip it a bit into water again and trying to create this misty kind of a look. Now automatically, because at the top space we had white quash the color. Your is automatically make creating a very light misty tone at the top speeds and at the bottom we have the docket bone of the missed. So just create a misty back down. So even just be needing this misty background on most of the half space because the walker media will be covered with pine trees. So at the bottom speeds even directly down the color and not very much about how the misty look comes in. But at the top space we want that Misty kind of a look. So make sure you get a misty kind of a look. And also you can see you have a little of the cloudy kind of an effect because of the round brush that we use for moving and down motions. So that's adding the misty look at the top space. Now I haven't quickly fill in the bottom space with this. And I didn't want to go get my dog bones. So that gives me I've done painting the Bible and as I go, I don't need, so I just simply lay down the color without worrying about the misty look. Now for adding the buying team will be using for collaborations of supposed either be adding the pine trees with the yellow green sheet. If you do not have a yellow green sheet, you can just pick up any light of the input, or you can just mix in a little bit of yellow DOPS and get a yellowish green boom. Now using this tone almost in the center of the page, I will begin adding the costlier of parentheses. So I'll just mix the color in the right context. And now I'm shifting to my size two round brush which has appointed day. And I will begin adding the pine trees with the smallest size brush. Now we did not add a lot of detail. So even just be adding basic and quick shape of the pine she now adding, buying keys in folios will take a lot of time. So in case if you feel tired in-between, take a break and you can continue adding the pine trees later on. So first I will begin with this color of yellow, green, and I will begin adding the pine trees, as I told you almost from the center space of all misty look that we have added in. Now, I haven't be adding the buying cheese indifferent height ranges. So major in the top space you can see, I give a little detail and look and The boardroom, I just finished with colors because the water media will again be overlaid with the next video. Now as I'm moving towards the right, you will see Ivan keep creating the heights of the pine trees and some dipolar, some base shadow. And from behind me they just have them misdeeds sky look that we have added, go using the white and the grayish tone. So I will quickly finish adding the 190 binds first and then I'll shift to the next color tool. So in-between your, you can see I'm adding pine trees moving downwards as bad because then we'll be adding the second note off. So I'm almost done adding the force theatre of pine trees, just one last tree here. And you can see I've tried to 3D the height 0 throughout so that I have that behind misty sky Look Austin there because you'll need not cover entire grid space that we have formed using the misty Carlo look. Now after this, I will switch to the sap green color. And for the second node, I will be adding invites to the sub tree and add the second year with a little darker than this one. So I can just quickly pick up this doc sap green color here. And I will just add in another danger of white and add the second narrowed of biases using this lighter tone of Safi. So in case if you want, you can add in a little bit of your yellow-green if you do not want to add the white color. So I'm just adding in a little bit of the yellow bead and trying to create a second tone of green. You know, this will keep the harmony of the greens as well because of the same color sheets being used. So with after this, Ivan did like me, you was the sap green color without mixing any caliper, adding the cold layer. And in the last year, I've been almost use a blackish green tone for adding in the fourth layer of t's. Now, Applause notifying treasonous dry. I have again shifted the y's more or less ice brush and I'm going to begin adding the second node of buying G. So now we're going to have an ad, the pine trees down go into the overlapping the first floret pieces. And also all Ivan, keep reading the height of this bind G as well. And I'm just going to add this admin away as I added at the top space, by just this time, the heights will be different than the first one. Again. And you'll see at the top space I'm adding that he didn't book. And as I move towards the bottom space, I just filled up with the palette. And I'm not adding a lot of detail buying j MOOC, I'm just going ahead with the basic buying THE like that after adding Walden Eve's, it automatically begins to form a triangular shape. That is the basic shape of the pine tree that should be looked after adding in all the details. So now again, guys can see I'm getting and seeing the Ivan just continue adding the pine trees into the second layer using this green color. Now you can see this color is not a darker tone as well, and it's not even lighter as almost equal to the first video. So it's very important that you get Apollo distinction between the Nios so that all the Nios of finding these are visible distinctively. Now in-between you can see I'm adding some bigger pine trees which are overlapping the first layer completely. And that is how you will get the beauty of these pine trees in Buddhist misty pod is kind of a look. So keep adding the pine trees with this color onto the entire row. And keep reading the height so that you'll get an actual look to it. Hello. And I'll just another two pi and G is your and Ivan be done with the second note of pine trees as well. After this, Eigen again pick up the dark sap green color, but this time I would not be adding any green color or white color to it. I've adjusted equity, be using the Docker sap green color in case if you do not have a dot sap green color, what you can do is you can just add in a little bit up your black to your green to get DACA being done, and then begin adding this card layer with that color. Now Father God Leo, what I will do is since I already have a lot of the light tone, your I didn't just added danger of black so that I get again the doc sap green tone directly. And I do not have to pick up any new color because I do not want to waste the Scala which is already on my palette. So in case it means that even if you are having this lighter blue and mix, you can just add in a dangerous black and again get done o dot, sap, green mix. And in case if you do not have the palette already, you can directly go ahead and pick up the dark side. Now I will just pick up a little more than just plan to get the darker tone that I want off the sap green color. And then the last nail we will be adding almost with a blackish stool. So now you can see I'm beginning to add the code Leone. And you can see the color is quite different from the first two layers. That is what we need. We need four different colors off buying jeans, Nios. Now the phosphine T that I added, you can see I added it huge, so it covers the second Newton law and the false narrowed a bit. And that is perfectly okay. Do not worry if any will go from there. Ls isn't, it didn't completely, it will still be visible and return some value. And that adds to the beauty of the misty kind of look that we're trying to add in today into this pin date. So now quickly keep adding these simple onto the entire code. Read, make sure to Beidi the heights of these pine trees and make them overlapping onto the forest. And the second video, you're going to take some big O pine trees moving into this pie, Neil did a lighter green tones as well. It's wall thickening and how you want to win baby the heights throughout and get a perfect kind of a messy look into this part is change. So you can see your I added this huge find G and this bind G is quite bigger than all the bindings that I added in. So automatically this will bind G may create a lot of focus into the painting. And it gives you a kind of a center point look into the painting because of the huge find TWO added. And from behind that you can see the first two layers are still visible a bit. Now quickly, I'll just finish adding the other 23 onto this third row. So I didn't, I didn't find G. I'm just going to be almost like a blackish door. So I wanted to a lot of green bonds already there because I do not want to add the black branching. So I didn't quickly just add this underneath. Now I have a shift on my black color and begin adding the fourth note of pine trees directly with the black color. I'm using already smallest size brush. This is a size two round brush. Since this brush has appointed did, it's easy for me to get these fine details in Buddha buying Gs. And you can see the leaves of the buying jeans that I'm pulling out. I was a bit of soap, Lian De and so red. So now I can just add d dance with the black color at the top space and the bottom species either detect the black color and I did not match the day in the bottom. So you can see I'm just laying down the law quickly and not writing much about the details there. So I can just quickly adding in the whole buying T's. So you want also, you can see I'm adding a bind G with black color in some heights in the center. So automatically it reaches this, I can add the code layer on the top and adds two WT. And as I move towards the bottom, I'm just filling it with black. I'm not worrying about the leaf detail. Look there. I just wanted to finish and complete the lab. So say we're just going to be the height and add it to the rest of the Leo your. So I'm simply hostname down the pine trees and then I defend the entire bottom space with the black quickly. So for us just defining the top of these pine trees and then telling the rest of the layer with the black color. And then we are done adding the pine trees in between. You can see a little of the white gaps in between the buying G. So that's depicting that behind misty sky. You want, you can cover them a little with the Apollo's analytical. You can let them. Now after this, we will only be net to add the blackboards into the sky space. So by adding the boards as well, I will be using the smallest size brush and adding a flock of birds. Almost endless endospores are close to each other and very random and small shapes of boards. If you want, you can use your technical pen or you don't want to proof banquet adding in these boards. If you're not confident to add these using a brush and the black color. So you can see I'm just adding a fuel bots. All goals are to each other and most beam thus n bus B's and bays and put a box, nothing much indeed, if you will, that I'm adding. So just seven to eight, then back you'll get an ad and I'm done with this being date. That does it for our painting. Let's remove the masking tape and CFI and then painting with those clean edges today. So yours I find and painting for D 27 or miss default is, look, I hope you guys enjoyed painting this simple hottest with me today. I would see you guys into the day 28 class project soon.
33. Day 28 - Sunset Seascape: Hello everybody and welcome back to the 30 day challenge VR on D2L. And we will be painting this warm sunset by the sea today. The calories that you need for today's class project is white, black, yellow, permanent red, and burnt sienna. So these are all the colors that we would be using today. So I have my people, they don't want to all the four edges. We're going to begin with a very small pencil sketch. We will first begin mocking the horizon line. And then we would mark out the signed area. Now in case if you want, you can directly mark the sand with the colony to dawn. You may not do the pencil marking. So roughly on the right side we are going to be having or rough edge, which is going to depict as the sand IDA with the black color. I will define the final shape, wiping, doing directly because it will as it is we covered with the pains at present. Now the colors that I will be using in for this guy is I will be using the shade of burnt sienna. I would be using the shade of woman in trig and shade of yellow. And if incase you want, you can use crimson if you do not have the yellow color. So I've been forced pick up the bone sienna and the permanent red color and invasive. You do not have the Bowman new trach collar. You can use either crimson or scarlet color. Ok, go ahead with any bright red tone. Or you could even mix in a little bit of your vermilion and crimson to get a bright red color. Now, I can just even pick up a little bit of the yellow color onto my palette and then even begin painting the sky EDI. So I have all the three colors on my palette. I've just hit the colors in the right consistency so that it's easier to put D being the sky and get the full effect. So I've diluted all the three colors just using a little tinge of water. I want the color in a good thick consistency so that I get an opaque look. So you can see I have hardly just use a damp brush to dilute the kalos and get them in the right consistency. So I've been first begin with a bowl of yellow onto my horizon line and apply osmo, load off the yellow color almost to the center of the sky. And then this shift to the orange color and begin with the orange color from the top speed and get it done the yellow color and blend both of these colors. Blending point of both of the colors you will get a little orangeish don't because of the red and the yellow column merging into each ago. Now, I will just take almost a red color to the bottom yellow species so as to get a little orangeish sunset kind of a bone onto the yellow color. So I'm not picking up any fresh dead. I'm just moving my brush from the top to the bottom space. And you can see I automatically got an orange tint in between. Now I have picked up a little bit of burnt sienna and I'm just applying it at the top speeds to get a little darker tone at the top species. And then we will be adding little clouds with the bone sienna color. Now I'm just blending from the bottom to the top speeds to get a perfect blend. And I do not have any sharp edges in between left. So just moving my brush from left to right to get a clean blend. And now you can see the darker areas at the edges. I'm at the top space and we have to get no color at the bottom space. Now, I didn't think the CDO has been forced. So for the CAGR also, I'm going to begin that the yellow column near to the horizon line and then going to pick up the red tone and apply that the bottom space. So just as I did for the Sky Italia, the scene B, I have followed it for the CDF as well because the C is just a reflection of this guy. So first I lead down that yellow color, then the red color and gotten orangeish tone blending it with the Y'know, and then just added in a deny nights with the bone sienna color. Now using my round brush, I will begin adding some very foggy kind of cloud effect into the right space of this guy. So I am going to use my round brush and the bone sienna color. And I will just begin moving my brush in. So pillow motion and begin adding some cloud cheap at the top speeds. And as I'm going to lead on the colors, I'm going, we begin dab in these colors with my fingertip so as to get a blurry effect to the class that I'm trying to add it and get a second look to these clouds. So major me, these clouds are going to be only on the right side and not more towards the left side. And you can see after applying very little patches of the palette, I'm quickly dabbing it with my fingers so that I get the center look to my clouds and they look a little, you know, mostly do the background automatically. And I'm using a medium bowl of bonds sienna and a little diluted consistency so that it blends very into the skies piece. And I get set and looked through my clothes and written foggy effect because of dabbing it with my fingers quickly. So Justin, are this model cloud you are as you can see and be done with this guy space adding the clouds. So you can see how simply just by using one color, I'm dabbing it with often goes we can get such a foggy kinda cloud Luke, even into a sunset sky. Now using the same one sienna color, I'm going to add a mountain range forced onto the horizon line. And then they did on I will add a second mountain range with the black color, which is going to be smaller than this mountain range. Make sure that you do not add a very big mountain range. It's got to be a very fine mountain range as the horizon line is five from our view. So justice mod mountain range on to the horizon line first. So I'm done adding the mountain range. Notice that dries, I'll begin adding the CVs. So for adding the CVs, I'm going to mix my brown and the red color that is the permanent trip and the bond sienna color and get a reddish brown tool. And I'm going to begin adding, Let's see me using this reddish brown, golden. So I'm going to add very fine z leaves at the top species. And as I move downwards, I can increase the length of these v's. And as I move down what I did even be adding some tea Covey's and I am adding these names and symbols. Cheat Colby nice suggests some street lines in between, enzyme curvy lines in between to balance the Vive look. And I'm going to add most of these OBS using this mic's off the red brown tone. In-between if you want, you can add some dark Covey's using just a bone CNR Kahlo to give some Doppler shadow and depth to fit. I've been at the leaves onto the idea that I have made. So now you can see as I'm moving downwards, I'm increasing the lingo. And now I'm adding babes more with the bones. Because as I'm moving downwards, that don't be down is all ready.gov because if the Brown highlights that we have added by painting the base needle, so let us see names we visit bit I'm using a little more of the brown and less of the red color. Now this isn't for the CBMs has been now either shift for the black color and begin defining the cyberspace. So I didn't begin marking out the rough edge. So you ought to sound ADR can be different than what mine will be. And you can go ahead with a very random, she tried to be as much natural as possible. And you can see I'm giving very dark edges to design space so as to define it and make it look natural. And that the block them. I'm just going to offend them diode with the black color. Then I will be adding some smaller dogs into this space. I didn't even imagining the unlit Dan of the black color to add some drop D days and do this. See ya. But first let's quickly fill up this end biospace, but the black color. So I'm done filling this end ISPs with the black color. Make sure that you fill it with a thick layer of black color so that you'll get an opaque look and you would not have introns, but it looked because of too much of Watteau. Now I can begin adding in smaller rock details into the CDR randomly and add places I can even define the edges of this eigenspace into the sea. So you can see I just added some fine drugs into the sea. Now, I didn't just define a legit at the horizon line. And then I've been splat dorsum of the black rocks as I told you previously induced see the on the opposite signs piece. So I can just pick up a smaller-sized brush so that I do not have a lot of splat those because we need very much at all fit. And I didn't pick up the black color. Liquid consistency not to liquid and not to take because you will pick up into node thick consistency and even lots black dot. And if you were to pick them up in a too liquidy consistency, the splatters a lot and move out of this piece. So you can see just aren't the bottom space I'm adding a little of this, makes sure that you cover the sky area on the bottom of your page. Audio need to be a little controlling by adding in these plateaus. So now I will just add a little because blackness using the tip of my brush better but I feel the need to. So you can see, just read indicates plateaus, but it adds so much detail into this area and makes it look more natural. Now I have a shift to my right technical pen, and I will just begin adding a mood supposed using my white permanent mark, I will add a moon Your into the center and the onto the horizon line. And then using my right Ben, I've been just add a little highlight honest by it and look to this moon. So then for adding that, I will shift to my right gentlemen. Now in case if you do not have a white gel pen under white mockup, you can add all of these details using white gouache and the smallest size pen, also the smallest size brush. So now ready, good for me, I'm using a white gel pen and I'm adding some small spider and look around the moon to give it a glowing effect. What you can do is you can post that in our first year of the moon, I'm diluted and, you know, blended into the background and then add a bright moon. So either way, you're going to achieve all you know, a glowing moon around the moon effect. So all you'll be have added glowing moon effect by having a blurry back down at the bottom first. So we have done that in quite a few exercises before as Ben. Now using the white gel pen itself, I will just add little white effect on the v's just underneath the mood to give it a little glowing effect. And then I will shift to the right quash and gifts. 00 00 00 00 peak of the right color. So I'm just adding a little with the white gel pen, very much an effect. And then I will add the final details of the glowing effect with the right color using my brush. So now I have picked up the white quash. I'm the smallest size brush and very gently I'm just adding little dry brush effect just underneath the moon into the CSPs to give some light effect of the moon into the sea. So you can see Justin. Not too much. Now using my white gel pen, I'm just adding a few stars into the sky. You can go ahead and splatter some stars did using your white quash and the brush. Okay, so that does it for our evening. Oh, sunset view by the sea. Let's remove the masking tape and see I find the painting with those clean edges. It was a very simple one for today. I wanted to keep it light and simple and yet beautiful. So one last thing before removing the masking, I forgot to add this second danger of mountain with the black color in front of the boundary of mountain that we added in. So you can see, I added a new shape off the Black Mountain. Going the brown one ends on its own, letting the ground range of mountain be visible. Now let's remove the masking tape and see our final painting with those clean edges. So your order is I find and painting for day two and we adjust to these Avy from closing this 30-day challenge, I hope you guys enjoyed painting this beautiful yet simple seascape today. I will see you guys tomorrow and do the day 29 class project.
34. Day 29 - Pathway: Hello everyone and welcome back to the code VBA gloss challenge. We are on the second now speaking of this challenge and the colors that you need for today's class project is white, black, saying boo, sap, green, yellow, green, and yellow. So let's begin painting the second ASPM being for this challenge. So I have my pay put the DOM and we will begin with the pencil sketch for this one. So we're just going to have a horizon line. And Oh, you don't. The horizon line itself either begin mocking the bottom. So the top nine distinguishes the sky on the path we eat you up. And you're at the left side just mocking up, defeated AD up out to be as. So that goes if put up fences, guess just off the DDS, we will be adding directly with the beans. So for this guy, I'm going to use the setting in blue color and I'm going to use the dark shade of city and grew up desktops piece. And as we move down, what's the, what's the e Ivan night than this Kahlo and get a gradient wash to this color using the white girl. So I have some bite Carlo already on my palette. I've enforced makes fitting itself the white to the blue and get the paint in the perfect consistency. I'm building up language from the top species. Before that, I would just pick up a little fresh whitewash and deeper journey for blending and getting the gradient from top to bottom. So I'm not applying the blue color at the top space. Now amnesia, I'm going to use byte and drag. You'll get a gradient of this column moving down what's done in the past we eat no. So Neapolis, the bot to be, the column is going to be quite light and you can see automatically just by using right. And the blue color gets activated because of the force Neil V are automatically getting obedient washes. That is from the dark blue to the light blue. I'm near to the horizon line that is near to the back week, it's completely going to be a fading night sky blue balloon. So I'm almost done with this guy. This time we have a pretty simple sky just with one column. And I have just got the both a blend from top to bottom. Well, thank JBL. From the dark blue, the light blue ones. Now near the horizon line, I can just define the colors and make sure that you have a both men and you do not have any sharp edges in between. Now focal pop to me, I'm going to perform the gray column. So FOLDOC Nikola, I will be using it now violated deep column. I've been, I didn't think of black and white to it to get a grayish, the one if you'll mix in only the black and the white collar to get agreed, you will not be getting exactly greenish tone. So Few add in on getting things off the blue or the violet color, blue, that black and white mix, you will get a much better job with any composition. So now I just started up in just black and I've got the perfect Greek I love that I need. Now using this create bone, I didn't just added on Buddha and burial Bach VSB be the falsely or follow-up OT to be. So I'm simply filling dead bio pathways piece with this color. Make sure that you add the Buddha pathways on decathlon of not signing and Buddhist guys piece. So I'm done adding the BCL for the path we as men. Now next, I didn't begin adding the BSW Neo, That is the color blocking for the field in. Yup. So for that I'm just going to use and I'm going to phosphorus and bias. So with this, I bring along the doubt mixing any questions. Now on to the right side of the path B, as Ben, I've been mocked down the field, EDR, which I did not mark it to all depends on which I don't know. I would direct me begin mocking, then we begin adding the colors. So now you're on the right. I've just added this nine off the beam column and above it I'm going to add a pathway themed all Saudi afield EDR. Across the pathway you're onto the right side has been. Now on to the right of the path B. I'm going to begin adding in the green area VDS. So far the phosphate off to green, I'm going to be using black color. I'm using a smaller size brush on pivot topline of the path B, I can begin adding integral d ds. So we are going to add approximately two horizontal lines. And in-between that we're going to be adding smaller vertical lines to give it the details or the grid across the part b. The first line, I have marked it, as you can see, it's in a street name, and the second line is going to be a little below this. So that line is just going to cover half of this Bs as on the half of this piece, we have the BOP be coming in. So we adjust triangle showing a kind of a unique pathways. Bees are abridge IDA that you can consider it in between the mountains and in-between the bean fields. So here onto the right side, I'm adding the father grindy this because we have this all not just be sad the right side. Now on the top line, I'm just all you not take the name right edge of the top New York and just that much back, I'm going to add it in now take consistency. Now I want to do this. I'm going to begin adding connections. And given the Grundy did. So for the flock near to the left, you can see it was just end up OK. And for the rest of it I'm done. Check all the nightstand, the Greenfield area. So that is it for the first real effective, even wait for this to dry. Then at the second period effect with the white color, then let's begin adding folded ED is in space and I'm just going to mix in a little bit of the yellow ocher shade with white color. I'm just going to add the light lines of this color neon to the fetus bees that we have JB. After that we're going to be adding in the grass effect to the feet and then begin to add the class effect. Most of this may get covered up, but this is just to add a little bit additional, the death knell to the fetus based, suggests a 3D model nine into the shape of the road as it doesn't ring by. Okay, so make sure you use a smaller size brush for adding and steep so that you'll get a mega needed. All you get find the data is and not to take one's saying now to the right side as well. Now I'm just going to add the second name, your just New York or the fields, these companies. Okay, and then we'll be done with the DBs with this color as well. Now let's begin adding the details into the filling space. So I'm going to be using the sap green color and I will begin adding a little more detail look onto the left side crass field space. And I even take it near to the top space of the grin. So at the top I'm going to give it a detailed look. And as I move downwards, I'm just going to fill that space completely with this snack sap green color. Now next I'm picking up the yellow green color and I'm going to add a little brass detail in the same space with this light green color. So again, just an identity didn't look at the top species. And as we move through at the bottom space, I'm going to be adding much bigger batches of this column and not worrying much about the details. It's a very rough kind of a grass D1 that we are giving in for this one, nothing much in detail. So you can see very randomly, I just added the top layer with the dark color and now the bottom deal with that yellow green color. Now the third layer of grasses, I'm adding the dialogue. You can see it's a bright yellow column mix. Didn't get a little bit of by and see me as I was adding for the D2 Leo's, I'm adding it with this color as well. So you can see the yellow I'll go details that we added in is a little covered up that this crosses and that's what I told you previously, that it will get covered up with a little of these grasses. So we're just going to add an antagonist of grass effect onto the right time for human space as well. Then even add a little reflection to these grasses on the pathway. Now I'm just adding that didn't yellow highlight at the top space as well. And then I will add the grass details on the right side quickly. So on the right side, I'm just adding details at the top space using the yellow color only. We're not going to be adding much of the details on the right side, just at the top space, I'm going to give a little detail. And at the bottom, I'm just going to blend and get a settled color look. So that is excellent. The FIM details on the right side. Now I haven't shifted to my right permanent marker and add the bat we highlights onto the pathway using this fight mako. Now these, if you do not have the right Marco, You know, you can use whitewash and a fine liner brush and add these details. So I will quickly be adding two lines in the center of the part. We're moving in the direction of the pathway. So that gives us further details on the pathway. Now we haven't shifted my black color again, and I'm going to add a black female space at the bottom right side. So I'm going to quickly use my round brush and add a field space, but the black color moving from the pathway. So I'm just going to define the shape of the pathway are little more because of the black color that we're using in now. So I haven't just take it a little about the field space to get the perfect shape and a movement to this black fill space has been. Now I'm going to use my white quash and I have just mixed it with a little tent of the gray color that we use. And I'm going to add the second green D-Day in front of the false drill that we added with the black color. So I'm first going to add little details with dogs. I have mixed in a little more of the white to this grid tool and then use IDA white permanent mako Arbeit gloss to add highlights to this second green that we have added in. So I'm just going to use white quasi-static consistency and add the details to this. Now next using a black pen, I'm just going to add a pole onto the right side. And onboard that I'm just going to add a red color, kind of a flag popping out from this pool that we are adding it. So just to pinpoint and onto this, I'm just going to use the red color and add the flag effect. Now. Now next I'm just going to use my white gel pen and add a little more detail on the pathway. Your InDesign does piece in case if you do not have enough space, It's perfectly okay to skip this. But now I'm going to pick up a little, not divide gosh, in a medium consistency and I'm going to splatter some stars in the sky space this tank. So this time I'm using the splattering technique to splatter the stars. Make sharper cover the bottom space. You can cover it with a paper or your hand. Now, onto this, I'm going to add a moon into the center space has been. So for adding that, you can either use by TO permanent marker. If you have an odd, you can use your white quash to add the moon as Ben. Now the last thing left is to aggregate it to reflection off the left side grass field EDA on Buddha apart. So for that I'm just going to use in a little bit of the people for adding another flexion. So now the green that I'm using to add the reflection or to the grass field effect, I'm just using a darker tone of gray, saying, if you have an eye toward bone, you can just add in a pinch of black to get a little darker bone then the pathway Create on that you have used it. And just to add little deflection moving from the left towards the right. Just trying to show a little reflection of the left side feet onto the pathway. So just on a Do Not, not much. And then we'll be done with this painting for today. So that is it BID the top painting for today. Let's remove the masking tape and see our final painting. I hope you guys enjoyed this RDD challenge and the adjust. Do it one more painting and then be done with this RDD gouache challenge. And I hope in this RDDs, all of you could master and level up your skills with wash. So you are, is appealing thing for D 29. Another simple one part. We look, I'll see you guys tomorrow and do the last class project. Thank you so much to each one of you for joining me today so far.
35. Day 30 and Thank You- Fence : Hello everyone and welcome back to the 20-day quash challenge. We are on deed took B, and the last day for this copd is challenge. Now Pandora's that you need for today's class project. This fight plaque sitting in blue, sap green, yellow, green, raw umber, burnt sienna, violet, yellow, and orange. Let's begin painting the final painting for this TempDB challenge. So I'll just begin with the pencil sketch. So I haven't fast Mach the distinction between the feet of space that we will be painting today. So we're going to paint a fence looking field detail at the bottom. Your v will be adding a little of the virgin logs detail. I'm just adding a rough structure to the wooden logs because all of this will still get covered up with the kalos. And then we will given the final details with the colors. So I will quickly mark out this line and given an agility, then later on with the benzene, I will just state in this line a bit as well. That is the horizon line. Okay. So I'm marking these details very roughly. You're on today along deviance that we will be adding. You can add these details later on directly with the Apollo because Wendy begin to be driven for us to painting it with it with one base layer. And then even given that the DEM, look, now in the center of the sky, we are going to have a big cotton candy cloud looks. I'm just marking out a rough pencil sketch for the Cloud as well, because we will be leaving that space blank while painting the sky idea. So far, I'm going to use the cobalt blue color this time. You can use either civilian blue, cobalt blue, or any other lights, sky blue color. Now when I begin to paint the sky, I will leave that loudspeakers, MD and Ivan being the Cloud space needed on bonds by sky blue spaces dry. So I'm mixing in a little bit of the white quash to my blue color. And I will begin to add it from the edge and just need the Cloud space, they're empty. So I first Mandanten cloud space, and now I will quickly fill in the rest of the sky area with this blue color. Once the sky space will dry, I will add the cotton candy cloud look using the colors of yellow, orange and white, and a little bit of the violet tone. And we will try to get a big cotton candy Cloud into the center of this guy. So let's quickly finish adding up the blue color into the rest of the space. So that is the blue. Now we will wait for this to dry before beginning the pain that cloud. Now feel, begin painting the bottom fence space. So for defense space, I'm going to use a Greek allo mix. So I have a little think of the violet color, black and the white gouache mixing together. And I'm going to use a light tone of the gray color this time. And I will paint the entire space, fenced space phosphate this gray color. So it's a line to create on, as you can see, if you want, you can directly add in a little bit of black to your white goulash and get this color by adding either a little touch of the blue or the violet color, makes the query look a little much better than just mixing in the black and white. I need space with this color. And then I didn't do the brown sheets foreign giving it. Now at the bottom space for the wooden log, I'm going to use the shade of raw umber for the base layer. So if you do not have withdrawn book, although you can just pick up the yellow ocher shade and adding a little tinge of brown tone to get a raw umber. I'm using this ROM baboon, Ivan lay down the bees Neo, That is the color blocking for the entire wooden love detail at the bottom space. So now when I'm going to add this, I'll try to define the top shape of the wooden blocks that we were trying to map out with the pencil sketch. Just roughly going to try and get the top shape in a little curvy mannose like this. So I have enforced mock autosave zones and then I will fill the rest of the IDA with this color quickly. So now I can just fill in all of this space with this shade of raw umber. And then even given details to this using a bone sienna color. Once this space also dries completely. Now my sky spaces dried and I will begin adding that cotton candy cloud look for into the whitespace that we have left in here. So I'm going to be using the shade of permanent yellow, bright yellow, orange, and white quash. So I will be using these three colors for making the patent can be cloud look. So these are the two sheets that I will be using it. That is the permanent yellow and a bright yellow orange. So I already have a little of both the colors on my palette. I'm just going to mix both of them with a little bit of whitewash and get them an amplitude based in tune. Now I'm going to begin adding these colors using my round brush. I will begin moving my brush in circular motions so fast I have picked up a lot of fight with a little thin dark orange onto the Edge space as you can see. So now when it's blending the dark blue color via getting a little lighter tone of the blue and the white mix there. Now next I have picked up a little bit of the yellow color. I'm just going to add a new auto orange tone that we add it. And I'm going to blend all of them together as I'm painting in meals by newest. Now next time we'll pick up a little more depth of the orange color. In-between. Feel the need. You can pick up a little bit of white and get them to do gradient like this. So before moving to the orange again, I just picked up litter and white and go to gradient to the yellow as Ben. Now I'm picking up the orange. So this time I have more of the orange and less of the white. So you can see compared to the first layer, this oranges taco. Now as I'm applying it, you can see I'm blending it with the yellow colonial that I added previously. And because of the white color that I used in between, I get a good transition between the colors. Now again, I picked up yellow as Ben and added a little yellow at the end. Now as I move towards the bottom space, I'm again going to be adding a little bit of the violet color attached to this. So fast I'm just defining the edges of the cloud at the top space. Now the last year of the Cloud that we will be adding, that isn't a bottom space. I even pick up fresh white color with a clean brush and I will try to blend it with the base layer of blue color that I haven't. And you can see automatically I get a lighter sky blue tone mixing to the yellow and the orange tones. Now, I've enforced quickly apply in the white collar, tried to get a perfect blend between the kalos and I do not want any muddy color or green bones to be formed in. And then I can quickly use my finger and dab a little of it at the bottom space so that it blends much better into the skies piece. So I did not go ahead with the violet tone. I rather directly picked up the all white color and use the blue color of the sky to get up blending at the bottom space. Now you can see this cloud looks, settle into the sky space and looks as if it is botched into the sky space and it does not stand out separately. Now let's begin adding detail to the fence space. So I'm making a darker gray color than what we use in the bottom layer of the fence. So just dig a little darker tone than that so you can just mixing the darker tone to this nightclub on mics that you already have. And I've been just begin applying or, you know, giving details. So I'm just going to make some check Nokia. So I'm going to add that I didn't lines first and then I will add the diagonal lines in the opposite direction and get a little detail to this fence. So I've got four diagonal lines tilted towards the right side. Now I will just pick up a little bit of the bone sienna color for adding in the second line. So basically these lines that we added, what I'm going to act as the reflection to the lines that we will be adding with the burnt sienna color now. So just above this line, that is the gray lines that you added right now, I'm going to add some burnt sienna lines. So you can see I'm adding the bond sienna in such a way that I lifted off the green line is visible underneath and that was acting as the reflection or the shadow of these bonds sienna lines that you are adding right now. So because of Dasani, look beyond getting the shadow onto the right side of the main lines that we have. Now, I will add the diagonal lines in the opposite direction and try to form some on diamond shapes into this fence space. And to these lines that we are adding right now, we won't be adding any deflection. So the reflections were only for the full set of the diagonal lines that we wanted to add it. So I'm almost done. I'm adding this little detail into defense space. And you can see even without the flower and the leaf, this base already looks so pretty. And I feel like, you know, with keeping it simple your without adding the flowers. But I know adding the flowers is going to make this space look more prettier than wanted looks right now. Now using the darker green that we use for the shadow, I'm just going to add a very thin line at the top space so as to get a clear distinction between the sky and the fence space as well. So just a very thin line. You can see I'm since my escape down on a movable so fast, it's easier for me to just throw data so as to make my hand movements go easier. Now using the same onesie and I'm going to define these wooden logs your at the bottom space. So I'm just going to mark out the shape of all the wooden logs that we have added in. And then I will just add in. You didn't, wouldn't be denser and just add some random lines into this base to give it a little wooden log, kind of ODD. So fast, quickly mock out the outlines to all of the logs here. Now you can see very randomly I'm adding some lines with the same bond sienna color, trying to give it little wooden did this. So you can see very random upon zip lines that I'm adding in just simply nothing much in detail. To give it a little detail look here. So that does I'm done adding the details into the Fordham Law. Now I will shift to the green color and I even begin adding the knees and do the space where we will be having in the flowers. Foster, I'm going to lay down the leaves with a yellow green color. So I'm going to lay down very simple leaves using just the tip of my brush. I'm just going to dab some beans. So now all we are going to have a bunch of flowers moving into diagnostic OCI major, all onto the bottom right side. And at the top space we will be having very middle of the flowers. So we even have the fence Luke also visible. Otherwise, if you have an effect on bio species with the leaves and flowers may even lose the famous note that we have tried to achieve in. So you can see I am adding the news in the bottom right side and our tip-top spaces, I have added the leaves very muddy. So this is the first layer of leaves. Today, we will be adding leaves with different colors to give it more depth and detail into this little flowery area that we're going to add it. Now for the next layer of the leaf, I'm using a mix of the sap green and the yellow green color. And I didn't believe CMV as I was adding the first video. So now the second now needs are going to be overlapping the first layer. And then underneath I'm adding some detail leaves with dismay also asked to give in more depth. And you can see I'm just using the tip of my brush to add a leaf looking structures your and trying to get more depth into this little space. And I'm using a round brush which has a pointed tip. So it's much easier to get a little pointed leaf shape as well. And you can see it's so easy to add these leaves directly with dogs or round brush just using the one stroke method. So just keep adding them a little, but in such a way that the light of the leaves are still visible on it in urine there. So as to add in the more shadow and reflection details. For the third layer of leaves, I'm just going to add a pinch of black to this column mix that I already have your, and I'm going to use this darker green dot for adding in the third layer of leaves, just as I was adding the first and the second layer onto these, we will be having lot of flowers with the violet and the blue colors. So most of these leaves will even get covered up, but we do not know where we would be placing the flower. So accordingly, It's always better to place the leaves first, then it's easier to add the flowers as you wish do. Now I'm going to add the leaves with this darker green color also in the same way just as I was adding the first two layers. But now I will be careful that the fascial layers are visible in between. You can see and it didn't budge often eaves as well, giving it more and those that are visible that we are trying to achieve. So I'm done adding the leaves now till my leaf area dries completely. Let's begin adding the branch details into the skies piece. So we are going to have a lot of branches moving out from left to right into the sky speeds. But you need to add them in such a way that you do not cover the entire cotton candy looked at you have added it to the Cloud space. So I'm first going to add some thicker lines moving across from the left to the right completely. And then we're going to add some smaller details and little of the bush detail using the round brush technique that we had learned in one of the previous exercises. So I'm going to use that technique here, but this time I'm going to add very little foiling. So I guess indeed 25 class project where we painted the night camping C, we had used the round brush technique of adding the bushes quickly. So same technique we will be using your butt this time, I'm going to use a round brush which is actually not spoiled. So I haven't shown you how you can even use our normal round brush for adding in the details. Now, I'm just going to quickly add the branches your forest so you can see I'm adding the branches very randomly. So false adding some thicker branches. Then from that I'm trying to pop out some smaller branches and then some smaller connections moving out. And you can see I'm adding the branches moving in all directions altogether. I'm trying to get them look as much natural as possible. Make sure that you do not reach all of the branches completely till the right side. Let some of them be till the middle space as well. So I'm just going to add a few more of them and then we'll shift to adding in the bush details status, the finest details to these branches. So you can see we have a lot of branches onto the left side where it was the sky space. And as we move towards the cotton candy Skylab, we have smaller branches, very thin and very light. So I used a pointed tip brush hands. I was able to add all the details just using one brush in case if you do not have a pointed tip brush, make sure you use are detailer brush to add the final details. Now after you've talked to my normal round brush and I have not the bitten water. I deliberately picked up on it to paint at the tip of it. I'm just using it in a perpendicular motion. You can see I'm adding this foil it. My brushes not as 0.1. This is a size ten brush, I guess. You can see very simply, I'm even live in the foil HD data so quickly and undo the cotton candy cloud look, I'm adding very little and very light detail. So I'm using my brush with very less pressure Neo-Orthodoxy loudspeakers to add the details very lightly. And very what I want, the darker details, I add a little more pressure. I haven't even picked up a lot of paint on my brush. I just, you know, batch the tip of my brush onto the paper and quickly add in the BP. So I'm done adding the foliage and you can see such simple finish but such a pretty look. Now I'm going to use this violet color mixed with a little bit of blue color to get a bluish violet tone and a lot of fight to add the flowers. So we're going to add simple for petal shaped flowers you, or you can go ahead and add any other flower as you wish. You'd need not follow the same shape or the same flower structure that I'm using it. Now I'm just going to add a little more of white to this to make it a little more bright up because I guess the color is a little dial when we're adding it onto these green leaves. So just going to add a little white, and now this color pops out quite well. So I'm going to add the flowers with two colors. One is going to beat this mix of violet and blue, and the other is going to be a little of the blue flowers as well. So first I'm going to add the violet blue flowers buried underneath, leaving some space. Then I will add a few of the blue flowers, and then we will see what flower was. We need more. So some of the flowers, I'm going to add closer to each other. And some of the flowers half a day amongst all other flowers. Now I will pick up the blue color and I'm going to add a few of the flowers with the blue color first. So again, I'm using white and blue mix, so it's kind of the same sky color that you've used it alarm using to add in some flowers. And you can see just by adding another cauliflower, AVL gets a lot of more detail and the flowers begin to look much more than just being one single color flower. In case if you want to go ahead with different color combinations, you can go ahead with the combination of yellow and pink flowers are yellow and orange flowers, or even yellow and blue flowers. So you've got color combination for the flowers can completely be your choice. The reason why I selected these violet and 0 bluish violet and blue tone flowers is because I wanted a litter of the sky effect with the flowers. So these flowers 0 seemed to be the perfect color going along with my sky look, hence, I use this color, but you are free to change the color combination of the flowers as per your choice. Now I'm just going to add a literal, more of these violet flowers wherever I feel the need to fill up the space. And then we are almost done with this being just left to add a little of the bud details to these flowers as bad. So I'm done adding all of the flowers and I added a few of the petals, as you can see. Now, I'm going to mix a lot of white with a little tinge of the yellow color. I'm using this beast and tone of yellow color. I'm going to add buds to all of these flowers in the center piece. So you can see just more dots into the center of the flowers. Now in case if you want, you can add these details directly with the white color. If you do not want to give the yellow touch me your choice. And if you're using the yellow and the pink flower details, you can add these buds but either one CNOT or black color. So you know, you have to adjust the colors accordingly. Now one last detail, I'm just going to add a few of the lighter looking leaves are overlapping onto these flowers. And just a little of the leaves your end there so as to make it look more natural. So just to read it and then be a little off the leaves, overlapping little flowers you are in there and a little leaves popping up. And then we'll be done with this painting. So we are ready with our last and final class project of this topic is challenge. I can't believe we're already through the studies challenge. I hope you guys enjoyed painting all of the 30 paintings with me and enjoyed this challenge and got to learn more about quash VR ready with all authority paintings. And thank you so much to each one of you for joining me into each of the class projects and stained along so far with me. I would see you guys soon into my next class. Thank you so much once again.
 Umashree Taparia, Artist, Art Instructor, Entrepreneur