Transcripts
1. Hello and Welcome Back: To all the tough times since the pandemic hit us. Many of us indulged into art on daily basis and found out as an escape from these tough times through the pandemic. And if you haven't still tried it, then believe me, is the best therapy and relaxation after any dieting and stressful day. Hello and welcome back everyone to my new Skillshare class and my Z of watercolor and gouache artist based in India. You can find on Instagram and creating from the heart, right down to this 50 Day Watercolor Challenge class. When it comes to painting, artists have many mediums to choose from. Acrylics or oils, squash, watercolors, et cetera. Watercolors as one of the toughest mediums to achieve. It's transmitting streets almost impossible to cover up and its various techniques, prestigious and precise, but satisfying when accomplished. This class will help you level up your game with watercolors. And if you are a big no-no, you can become a pro in watercolor with 50 days of daily practice. Even if you are someone who is already working with watercolor, you can join us and develop a daily habit practice of giving in just 15 to 20 minutes of your digital art. For the next 50 these, we will be exploring watercolor with a different team for every five days. So in total, ten different teams to paint a wall. The coming 50 days. To get started with watercolors, you need a minimum. That is just some watercolor papers, beans, brushes. And you can begin this journey with us. Through every painting. I will keep guiding you through all the steps, color sheets, the alternative colors that you can use, and tips and tricks to walk with watercolor and level up your game with watercolor. I know 50 days is a long time, but don't you think together we can through the fifties, we will be working on different teams like skies, galaxies, Baba lines, middles, and some other beautiful simple landscapes. So if you want to transform your watercolor Jody, come join me in this class and explored the beauty and freedom of this medium called watercolor. I hope to see you join me in the next lesson and let's begin to create magic button, magical wands.
2. Material - All About Paper: Let's begin with the most important material that is the peoples that you will require for all the things. I will be using this chapter, but 270 GSM, 100 percent cotton people. This is an E3 size block. And I have cut this one block into six equal halves so that I get o people of approximately 14 by 15 centimeter in size. And I have caught this one sheet into six equal halfs using a paper cutter like this. Now many of you may feel that you can go ahead with any people and white people is so important. But when it comes to watercolor, the most important one is people, veterans. Many of them think that they require good quality paints and brushes to achieve effect. But it's the people that gives the effect. So I always recommend 100 percent cotton paper acids and at least 270 GSM. And about if it is good enough, this paper is almost like a 300 GSM paper. So it works perfectly fine for me. Any people that is at least 300 GSM and a bow and a 100 percent cotton people is what is recommended to achieve the desired result. Even if you are a big no, I'd recommend that you use a 300 GSM people, which is 100 percent cotton and see the results for yourself. If you are using a 25 percent pardon people, it tends to dry much faster. So you can see the rough green onto this one. Since this is a rough green, you can use cold pressed paper. Also. Hot pressed is not recommended when it comes to watercolors because it has a very smooth surface. Watercolor is what is recommended is ego, the cold pressed or rough green people? Also, I know what Apollo peoples are costly, but trust me, it is worth the investment to get the results and the vibrant look of the followers so that all your efforts do not go into when, and the painting stands out on the people. You can see this people doesn't even buckle up because since it's 100 percent cotton, it remains bed for the required time and does not buckled by your painting. So choose your paper wisely. And let's move to the next important material.
3. Material - Paints: The next topic, I love brands. I will be using watercolor. This is a professional. This is a set of 36 colors which comes in tubes, which I have pulled into the palette that comes along with it. So this is the set that I will be using for painting. This is quite vibrant and follows remain quiet by printmaking, things stand out. So I absolutely loved this set and it's worth the money that you invest. The next step I will be using is this White Nights palate. This is a codebase sheet valid, but in this, I have customized the color as per whatever Carlos I did. So this actually comes in different caliphate. And I have mixed and matched the sheets to form this 35 sheets palette. Now do not worry if you do not have the exact same sheets or CME follow brands or, or you know, the same colors. You can always go ahead with any Carlos you have, because the most important thing to invest in people, you can even begin to learn. We can limited color palette and then you can learn different column mixes. And as you grow and feel confident, you can begin to invest in the sheets that attract you or you feel that you need in your palette. So I always recommend to pick up the sheets that you like. Apart from the watercolor said that you will, you will be needing either by squash or writing. Because in some of the paintings, splattering stars and for adding by great detail onto the Lord kalos, you wash it so that the standard before a V class project, I haven't been guiding you to the fallow sheets and options available required for that specific class project. So don't worry, just join us with whatever basic palette available with you.
4. Material - Brushes: Now that we're done looking at our paper and pins, Let's have a look at the brushes that I will be using throughout the 50 days. These are my set of favorite brushes from the brand Princeton and silver black velvet. Two, I will not be using all of them. I will be using just a few of them. So let's begin one by one. This is my Princeton Neptune series, three by four inch flat brush. I will be using this brush, laying down the background water layer for each of my paintings. You can use either a more brush or any flat brush that is available at your end. Remember, you don't need to have the exact same brushes as I have. Next, I will be using this silver black velvet, size eight. I will be using this in most of my paintings for painting that basically was as this is a perfect brush with a pointed tip. Next are these three brushes. They are from Princeton, Neptune, Princeton heritage, and silver black velvet. They are all size 4 and size 3. So whichever comes in my hand. Using these for detailing, almost all of them have a pointed tip, one stepped into paint and water, so they are perfect for adding details to my painting. Another brush that I love for painting the background is this Princeton Neptune size 12. So whenever I have a bigger background to paint, I use this brush as it holds a lot of water and a lot of paint. Next, I will be using this liner brush by Princeton velvet touch series. This brush is great in adding those grass group details. Apart from this, I will be using these to detail brushes. This is size two and size 3 by 0. So these are some of my favorite brushes, but don't worry, I will not be using all of them. All we need to have is one flat brush, round brush or detailer brush, and maybe a smaller round brush for adding details. And the recall order liner brush. So grab your brushes and I will see you in the next lesson where we discussed the rest of the supplies and then begin with our D1 for today.
5. Material - Other Materials: Let's have a look at the other materials that you will be needing through the 50 days. You will be needing a pencil and an eraser and a scheme for some pencil markings and few of the paintings, you will be needing a black pen and a white gel pen. If you do not have a white gel pen, you can even use a fine liner and white quash or by declare acrylics. Next, you will be needing some masking tape to tape down your paper for each of the painting. I have these three different sizes of masking tape, of which I will majorly be using my half-inch masking tape. Next, you will be needing two jars of clean water for each of the painting so that you can clean your brush and 11 for applying clean layers of water. After this, you will be needing some tissue paper or rough plot because you will be needing to dab off the excess water or remove the excess water for some dry brush strokes. The next art supplies that you will be needing as a pallet to mix down or take out your canvas. I will be using this palette in which I have all my colors are already removed from the tubes. Do not worry if you don't have the same palette, you can use any palette that is available at your end. In view of the paintings, I will even be using the ceramic palette. So go ahead, grab all the materials and keep them ready for the next 50 days. And I will see you guys into the day one project. So come join me into the day one, and let's paint some magical skies.
6. Taping down your Paper: Let me guide you through how I will be taping down my people for each of the 50 because I will keep my paper taped down ready. So for taping down my paper, I will be using this board and a masking tape to tape down my people. I prefer masking down my paper onto a movable so phase when it comes to watercolor painting. Because in some of the paintings, It's very handy and it helps you make a soft background with the colors. So I begin taping down one of the edges, and after that, I begin to tape down exactly the opposite side of that so that in-between there is no space left for the papers to buckle up while you begin to paint. Now, after this, you can tape down either of the two edges that is remaining as per your choice. If you begin taping down from the left side, you can then take down the right side and then the top and the bottom. It's absolutely your choice. After taping down each of the edge, makes sure that you run your fingers onto the masking tape, that there is no space left and the tape does not below from any of the edges. Because if the tape is not taped down properly, water will seep into the paper while you begin to paint. And that will spoil that clean edge look that you want. So you can see I have run my fingers so well so that it's looking completely taped down. So make sure that you run your fingers. You can use a scale for the same purpose. So that is how I will be taping down my paper for those clean edges in each of the painting.
7. Day 1 - Soft Sky: Hello and welcome to day one. Let's have a look at the colors that you will be needing for today. The colors that I will be using is a shade of light yellow, orange, bright blue, indigo, Payne's gray, and black. I have listed all the alternative colors that you can use if you do not have the exact same sheets. So grab all the colors and let's begin painting. I have my paper taped down onto my board that I will be using. Let's begin by applying a clean coat of water onto the entire people. There is no pencil sketch for this painting for today. Make sure that you apply or even coat of water onto all of the paper and run your brush multiple times so that there is no potholes of water formed at any of the edges. I'm done applying a clean coat of water. I will begin taking down the colors out onto my palette. I am using the white knight set for this painting. So I have the light yellow color to this light yellow. I will mix in a little bit of orange to get a lighter orange sheet. Or you can directly use a light orange if it's available in your palette. Now from the bottom, I'm applying this layer off light, orange and yellow mix, just a very light layer. And onto that I added a little of the red color. So I use the ruby color from this palette, you can use either a red or a scarlet color. Now this is only what we need at the bottom. At the top, I will begin with the bright blue color. I have some color out onto my palette. And beginning from the top, I will begin to apply the blue color onto the remaining of the sky. Now make sure when you reach near to the orange, do not apply the blue color. Instead, just try to blend the two colors better. Damn, brush, because blue and orange, when March together, they will begin to form of magnitude. So be very careful at that end. Now too dark in the top area, I'm applying a layer of bright blue color again. And as I'm eating downwards, I'm just moving my brush freely to get a good gradient of the blue color. Now, I want the top area a little more darker. So I have some indigo color. And from the top I will begin with a layer of indigo color and just try to have a gradient of this indigo color and have a clean blend between the indigo and the blue as I move downwards. So you can notice I pick up the color and just move my brush from the top. And I do not pick up any beam as I'm moving downwards. I just tried to use the top layer of color to get a good gradient. So you can see in between the blue and the orange, I'm just using a damp brush and trying to get a good blend between the two colors. That is how I have got a good gradient sky. I'm just picking up some more of indigo and I'll try to get a little darker tone on the top ideas still. Because remember watercolors dry or don't like. And just try to get a good gradient and smooth layout onto the entire background. Now at the bottom area, I want a little loose kind of a grass look. So why is this background is still wet? I have picked up some Payne's gray Kahlo and I will begin to drop this Payne's gray in a loose grass pattern. Look at the bottom area. Now make sure you do not cover the entire orange surface that we have been dead or else it will not begin to make sense. Also makes sure that you add these details once the layer is a little dry and not too wet. Now, with the same Payne's gray color and a little mix of indigo color, I will begin adding a little cloud structure into the sky. So you can see very randomly, I'm giving in some strokes and do my sky area majorly using the tip of my brush. So these are the kind of half C strokes that I use to add. And I'm trying to use a different tonal values of the Indigo and Payne's gray color to add these cloud structures. Now while adding these Leo's bet on red, always remember to not introduce any new motto. Because if you will introduce new Waldo, the paints will begin to spread into the background and will lose its shape and you will not get any definite shape. Now at the bottom layer, I'm adding in a darker tone of the Payne's gray and indigo color mix so that, you know, I get in a little more depth to that. Lose grass looked at I tried to add. So just a little darker to make sure you do not cover the entire light tone that we painted first. Now I'll shift to my smallest sized round brush and I will use my size four round brush, which has a pointed tip. I'm using the same Payne's gray color. I will add in some clouds strokes. So this time I will try to add in some swirly kind of cloud strokes onto the left end. So you can see how easily we're able to add in more depth to our sky. Such a simple, easy sky with limited colors, but such a good effect the sky is having. The key, again is to not introduce any new Watteau. Because if you would have introduced these layers of clouds with a lot of water, they would not have the dean, the shape that you are able to see right now. And important to control the water addition by looping Leo's onto a white background. Also, my paper was a 100 percent cotton. So you can see it remain wet for all the time to add in all the layers. That is by I recommended you to use a 100 percent cotton paper. Now let's meet for this background. So my background has dried completely and I will just add some boards into the sky to give him a little element detail to this causes simple sky. So now picking up my black color, I will just begin adding some boards. So very random and easy boards that I'm adding. Nothing detail on, nothing complicated for anyone to follow. I'm just trying to make it look a flock of birds flowing together from one end to the other. I wanted to start this 50 day watercolor challenge on a lighter note. So VR happening with these simple, pretty skies, which you can be in just under ten minutes and get such beautiful, gorgeous looking skies. In the coming days, we will be painting more detail skies. And then as we move along with the sky is we will be adding in different element and loaning a lot throughout the 50 days. If you want to learn a little more detailed or you know about the basics of watercolor. You can visit my 21 day Watercolor Challenge class and visit the technique section of that class where I have discussed a lot about the watercolor techniques and adding these elements and the water control while adding the clouds and the ripple effects. So if you are an absolute beginner, I would recommend you the technique section of my 21 Day Watercolor class, where I have broken down the techniques into five parts and covered a lot about watercolors. Now with a white gel pen, just adding a small moon into the sky. And then we are done with the painting for the one. So you see such a preteen coaches easy sky in just under 10 minutes. Now let's remove the masking tape. And C are painting with those clean edges. While removing the masking tape, Be very careful that you're painting should be completely dry it. Secondly, always remove your masking tape at an angle from the people. Otherwise, it may take off your paper and spoil your painting. So while removing the masking tape, be very cautious. So there we are ready with our painting for d1, a pretty easy, simple sky. I hope you enjoyed painting this pretty sky for D1. And I look forward to see you all joining me in to the D2 tomorrow and paint another pretty simple sky with me. Thank you so much for choosing the joint is 50 Day Watercolor Challenge class. I hope to see you join me again tomorrow.
8. Day 2 - Color Sky: Hello and welcome back everyone today to, today we will be painting this beautiful color sky. So let's have a look at the colors that you will be needing. You will be needing a shade of yellow. I will be using the cadmium yellow. Next, you would be needing a sheet of either red color or a scarlet color, then a shade of blue, violet, and black color. So after you have got your palette ready, let's begin painting. I will begin with a clean coat of water onto my entire surface. There is no pencil sketch for this one also. It's just a pretty simple sky in under ten minutes. Make sure to run your brush multiple times so that your people that means wet for a longer time. And in case if you are using a 25 percent cotton, people running your brush multiple times helps in keeping your paper wet. Because the cotton fibers or happened to absorb the water and running your brush multiple times helps in keeping the people stay wet for a longer time. Now, I will begin adding the colors to my sky. So I will begin with this readin blue color from my Magellan mission set. And at the bottom area, I will just apply a very small area of this bright blue color. You can use any light blue color if you do not have an exact same shape. So you can see I left in some gaps in-between the right space because that will add beauty to the sky. Now next, I'm shifting to the cadmium yellow color. And I will begin applying the cadmium yellow color. So you can see very gently, I'm just giving in these strokes very loose and very light such that the colors pop out well and do not even spread much. So while I'm lifting the colors, I'm making sure that I don't introduce much water so that they remain at the places where I'm trying to add them. Now. I have my scarlet color. I have picked up the quin rose color from this set. So you can pick up either a scarlet color or any pink tone shade that you have in your palate. And onto the left side, I've just given some strokes of this color. Now again, I will pick up some cadmium yellow color and I will apply it near to the pink that I apply it. Now, I'll shift to my violet color. If you do not have a violet color, you can mix in a little bit of your Scarlett or any pink tone with your blue color and get a violet color. And on to the remaining top area, I will apply this violet color in a light color to unforced. And then using the same violet color and note-taker consistency, I will add in some half C strokes into the sky to give a little depth to the sky. So now majorly using the tip of my brush, I'm adding in these half Sea Scrolls moving towards the right. By adding these strokes, be very careful that you do not apply too much pressure onto your brush. Because if you will apply too much pressure, the yellow and the violet mixed together will begin to form a muddy color and will not give you a bright look. Now, I'm just picking up the violet color in a very thick consistency without adding much water and darkening the top area. Now, I will just add in another layer of the Scarlett Kahlo because I feel the scarlet color will dry a little light OH, as watercolor tends to fade when they dry. So I want a vibrant sky suggest adding in a little more of a color layer. And my background is still wet, so I'm able to add in all these Leos. If your background happens to dry, then wait for it to dry completely and use the riveting technique and derivative sky and add these darker strokes so that your colors also stay vibrant. If you want to learn the riveting technique, you can visit my previous class, the re-weighting technique class, loan everything about the riveting technique there. So I just added a vibrant layer of the yellow color also again. Now we've invented for this entire background to dry and then add in a little element to this guy. I just wanted to make it a good color popping sky of a really simple and pred1. So let's wait for all of it to dry. I feel the violet strokes are not standing out much. So I'll use a smaller size brush and add in some more darker violet strokes so that when it dries, those stroke stand out. So I'm just using my size four brush. And using the violet color and noted consistency, I'm just adding in some of the half C strokes so that when all of it dries, those strokes stand out and have a good look to us sky. Now, I haven't even add a little of the Pope and highlights onto the scarlet area so that my sky has a little more dimension and looks a little more vibrant and colorful. So very few, just a limited strokes. If you want, you can skip this step, but I would recommend you to add so that you have a good color ball. Make sure you do not add these strokes onto the yellow color because it will begin to turn muddy. I haven't even add some more strokes onto the yellow color. So just to take up color tone of the cadmium yellow color and just a few darker strokes so that the yellow color also has a good depth to it. Now I'm done with my sky. Let's wait for it to dry completely. And then even added the elements into the foreground so that the sky looks more beautiful. Now my sky is completely dried and you can see the violet strokes that are visible. And such a beautiful vibrant sky I have got, and the colors are vibrant because I added the layer again. Now I have picked up some black color. And using the black color and using the dabbing technique, I will just add some grass details into my foreground, not into the entire foreground. Just little onto the left and little on the right. So I am using my size four silver black velvet round brush. This has a pointed tip so you can see I'm able to add these final grass strokes just using the dabbing technique. So I'm just dabbing the tip of my brush to get these details. Now onto the right side, I will just add a very small pine tree, not a detail, one of very basic and a quick one. You want. You can even add all Pompeii your, and maybe you could just add all like four to five pages into your full round with this colorful sky that would also look very beautiful. So feel free to add your own creations or touched to the painting with the sky. Now at the bottom of the pine tree, I will just fill it with black quickly and not give much detail in the bottom area. So you see I'm just filling in with black and not giving much details as I have reached the bottom. Now from the left side, I will again begin to add, oh, you know, some of the foil it just using the tip of my brush and the dabbing technique. Now you can notice as I'm moving towards the right, I am trying to, you know, baby, the height of the grass looked at, I'm trying to add so make sure you try to vary the height and the look of the glass. Do not add it in one single height or else it will not give you a natural log and we'll look very clean. Now, onto the right side, I've added another small pine tree. And then in the remaining ADR, Ivan not be adding any folder, cheese, or foliage. I will just be adding in a very simple straight line in between the spoilage and the pine trees. So we have done painting this formulation pine trees. Now using my fine liner pen, I will just add the whole of the street lamp that I will be adding between the foliage and the pine tree. You can use any black pen for this purpose, but make sure to use a waterproof pen because if by chance you ever happen to drop even a little water, then the ink will begin to split. And if you do not have a fine liner pen, you can use your black watercolor and, or a fine liner brush and add these details. Let's just talk in the border of the lights a little because in between I will be adding the light look with the white gel pen. So now shifting to my white gel pen, just adding in the light to this point, you can use a white goulash auto white acrylic. If you do not have a white gel pen or white watercolor will not stand out this bright. So I would recommend using either a white watercolor or sorry, a white gouache. And right now we are done with us simple sky for today. Let's remove the masking tape and see our final painting with those clean edges. By removing the masking tape, Be very careful. Phosphine painting should be giant completely. Secondly, always remove your masking tape at an angle from your paper, a 45 degree angle so that your people doesn't take it off. And always remove the masking tape once you're painting is dry it on the edges and if there is any water onto the edges, dab it off, and then remove the masking tape. So there we are ready with our d2 plus the sky. I hope you guys enjoyed painting this with me. I would love to see you join me tomorrow and do the third sky. And keep creating and uploading your projects into the project section of the class. Thank you so much for joining me.
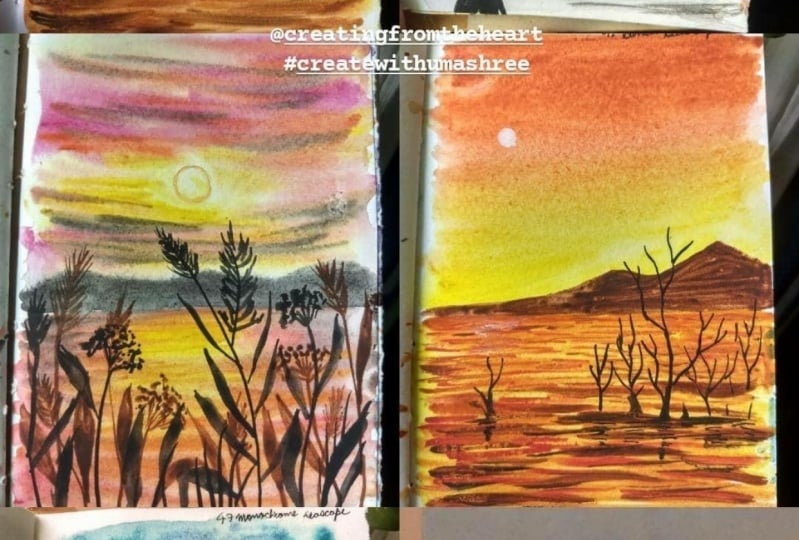
9. Day 3 - Warm Sky: Hello everyone and welcome to D3 of the watercolor challenge. Let's have a look at the colors for today's exercise. You will be needing a shade of yellow, red, autoscaling, Kahlo bond, umbo bond, sienna, right, quash and black color. So you can get all the colors ready. And let's begin painting. I will begin with a mean CTO photo onto my entire background. There is no pencil sketch for this guy also. And it's again, a very pretty simple, easy sky in just under 10 minutes. I have tried to keep the initial days projects very simple and easy and in a limited timeframe so that you begin to get a hang of daily practice and begin to give in just ten minutes of your day to create beautiful paintings. Make sure to run your brush multiple times so that your paper remains wet so that you can keep adding layers on layers. Now, I will begin painting the sky area first. So I will begin with the red color. You can use a scarlet color or shade New York to orange, orange tone. I am using the permanent red tone from my palette, from the brand Magellan mission. So leaving some white gaps, I'm just giving in some strokes of the red color first. So very lightly, I'm giving these strokes because I will be darkening these strokes with the bone sienna and burnt umber color. And in the center right area you can see I have left a lot of whitespace so that I naturally have the space there for the sun. I haven't tried to lift up some of the colors even now with my brush. If you want, you can apply a masking fluid there or you can even take down the masking tape there. But since many of you may not have masking fluid, I prefer using keeping the whitespace technique and then using white gouache to fill in that space. Now, after the red color, I'm picking up the scarlet color tone from this palette, and I'm just adding in a few strokes with the scarlet color. So you can see how randomly just using the tip of my brush very slowly I'm adding in these tools. Now make sure again, near to that area to let that can't be right and not adding any tones there. Now, again, I will lift up the color from that gap so that I have a white space there. I'm just using a damp brush and trying to lift up the color that is spreading there because of the wet background. Do not worry if you are unable to pick up the color, you will get it with practice. But in this exercise, we will be using white gouache later on to make that space right again. Now I'm shifting to my bone, sienna color first and better buoyancy. And I will begin adding in some darker strokes and highlight to my sky area the same way how I have been adding the strokes with the red and the scarlet color. Similarly, I will be adding the strokes with the bone sienna color. But make sure that while adding the strobes, you do not introduce any new water. Secondly, make sure that the color that you are adding now does not hide the entire background. Add on very fewer strokes of this bone sienna color so that the red and the scarlet colored sky is also visible. So now if you see my sky, I have all the three sheets that I have applied so far being visible completely. So while walking with wet on wet Leo's and trying to add in details, always make sure that you do not introduce water and do the next layer that you are adding. Because if you add too much water by newer adding these color Leo's, it will begin to spread and will not give you this definite the colors. Now I'm using the bond amber color and just giving in some darker highlights at the edges. And making sure that the red color in the center is visible and of us drops off the red is even visible in-between the browns. So make sure to move your brush very gently and very carefully such that you do not let only the brown color be visible at the end. And in the center you can see I have that right space maintainer. For the sun to be there. I will again lift up a little color from the sun area, just using a damp brush and dabbing it on the tissue and again, trying to lift up. Now I've envied for my entire background to dry and then begin painting the sun and the foreground details. I use a hairdryer to speed up the process of drying my backgrounds. You can either let it dry naturally or use a hair dryer. Now, my background has dried completely and I even begin adding the layer of the sun with white gouache first. If you do not have white goulash you can use by the Great Lakes. But if you do not have either of acrylics or guage than watercolors will not walk that green. But as a last resort, you can use white watercolor in its thickest consistency to add this layer. And if you have used masking fluid or Avastin day, then you will not be needed to add this New York anyways. Now onto this, I will pick up my cadmium yellow color and add in the cadmium yellow color to the entire white background that I have been dead. Now very gently using a damp brush. I haven't tried to smoothen the edges of the sun. That is the bottom edge because I want to show it a sunset thing in between the clouds. Let's pick up some more of the cadmium yellow color and make the sun a little more pie dough. And this time I will spread the little yellow color and do the bottom area also. So this is kind of a sun setting in-between the Cloud, so we do not want those sharp edges to the sun at the bottom medial. Let's begin painting the foreground. So I'm picking up my black color. And I will begin adding some grass details by just dabbing the tip of my brush. I haven't tried to be the height of 80 of grass structure that I tried to add some shadows, some metals. So at the top area using the dabbing technique, I will try to give in some detail. And at the bottom, I will simply fill the entire idea of a black color. So first time the top ADR, I'm adding the grass loop and then filling the bottom completely. Now now to the sun area, I want some soft look of the grass and a little lighter tone. So right now that area is a little red because I had tried to soften the edges of the sun. So this is the right time to add the foil age there so that it will automatically have a soft look on its own. And it will be a little lighter in tone, which will reflect the sunlight effect on do these graphs that we are adding. So the ADR near to the sun that I had soften the edges. It is still wet. So I will first Fernando right side and then I will add the soft look in the US and DO because right now it is too wet, so it will spread a lot too. I'm waiting for it to dry a little and then add these details there. Then I will just be in the other details onto the left and the right side. I want those soft edges to be dry it like 50 percent so that it does not even spread much and it does not even give me 0 the shop look and give me a light and a sunlight effect low. It's always important to understand venue should add the MEOS. Otherwise, if you add the Leo when it is true where the black color will spread into your son, which is not what we want. Hence, painting the rest of the details first. Now this area is almost 50 percent dry. So just using the tip of my brush, I will just given some dabbing details here. So you can see when I'm dabbing, It's already been named to get some soft edge and it's getting that brownish tone rather than a black tone that just trying to reflect the sunlight effect onto this black color. And once this dries, it will stand a little more dry down and look as if the sunlight trees are being popping onto this black color. And the sun is also now perfectly, uh, you know, kind of setting between this bush ADR. So that is what we wanted, a hiding and a setting sun. So via done with our class project for D3. Now let's remove the masking tape. Removing the masking tape, Be careful that you are painting should be completely dry it and if it is not dry, then be very careful when removing the masking fee. Also always remove the masking tape at an angle from your people of almost 45 degrees. And always make sure that there is no water on Buddha masking tape, Otherwise it may flow back into your painting. So this is our final painting from d3, a pretty simple sky in just under 10 minutes. I hope you guys enjoyed painting this with me today. We even a pain that day for Sky tomorrow and I hope to see you all join me tomorrow until then. Happy painting.
10. Day 4 - Fierce Sky: Hello everyone and welcome to the four. Let's have a look at the colors we will be needing. Naples, yellow, orange, scarlet, red, bright blue, indigo, Payne's green, and black. I have listed all the alternative colors. So if you do not have any specific color, you can use the alternative color. So let's begin painting this fuel sky. I will begin with a clean coat of water onto my entire paper. Make sure that you apply and even auto photo onto the entire people. And also make sure that there are no potholed of photo left out anywhere. Otherwise, it means while you are painting, if you are using a 25 percent cotton paper, then running your brush multiple times can help you make your people stay wet for a little longer time. So I'm done applying a clean CTO photo. Now let's pick up the yellow color first. I will pick up a mix of Naples yellow and cadmium yellow. You can pick up any light yellow auto bright yellow that is available in your palate. Now I'm beginning from the left edge. I will begin to give him some strokes into my sky, some very simple strokes majorly trying to use the tip of my brush. And magically all of this only in the bottom area moving towards my right side. So you can see from the left, all my strokes are going towards right, upwards. Now just adding some yellow at the bottom. Now shifting to the vanillin column, you can use either orange color or mixing your red and yellow to get an orange shade. I will try to add in between the yellow strokes that we have added. Now make sure you do not introduce too much water vile adding in these Kahlo's. Otherwise it will begin to spread it around and you will not have any theoretical outlook. And all kalos will just look much together and we'll begin to form of a muddy color altogether. Now, in the same way, I will pick up the quinacridone rose color. You can use a scarlet color or any pink tone that is available in your palette. And I will add similar strokes with doping color and just about the orange and the yellow color strokes that we have added. Also adding a little of the pink strokes into the yellow and the orange colors so that I have a good sunset sky. Now, actor top-left corner, I want to reflect the sun ADR. So I will pick up some yellow color and lay down the yellow color in a circle there so that I know that as my son area and I have a bright sunny look there. Now picking up the bright blue color, I will try to fill the rest of the sky. Now make sure that when the bright blue and green mixed together the form of green color, so near to the Yellow, be careful that you do not drop any blue color. When the pink and the bright blue mixed together, they will begin to form a population of violet shade. Okay? So it's okay if the violet shade gets formed, it will give unmet, better natural look to your sky. Now I have picked up some indigo color and from the top-right corner, just adding some streaks of indigo color to add the VOC looked to the sky. Now you can see even when the indigo color and don't think Alamos, they begin to form the violet color. Now using a because I stamp brush, I will try to give some soft edges to this darker tone that we have added. So I'm just moving a damn brush across the Rio indigo color that I have added and trying to blend it into the sky. So you can see it is giving us sophomores between the pink and the indigo color. Now, even on the left side, I will just add in some clouds with the indigo color. So I'm just using the tip of my brush to drop the pins. Now just to add in some clouds near to the sun area also. And now again, adding some darker speaks to the fields look. So this time I will not blend it back into the sky because I already have a soft edge and now some firm strokes or to add the fewest look. Now at the bottom media also just with the same indigo color, I added some bigger clouds and I try to blend it well into the sky. So basically I'm just trying to pull those colors into the sky area. Now with the same indigo color, I will add in some clouds into the water media also. So just some very simple Cloud strokes. So some straight lines moving out into the sky area. And some they're just little cloud structures by dropping the beans in circular motions. While adding all these elements into the sky to form those cloud effect, always make sure that you do not introduce any new water. Because if you introduce much of new water, the pins will begin to spread and will not give you that definite shape look of the clouds, although, you know shape that you're adding into your sky area. So it's very important to control the water level that you introduced by adding in these Leo's. Now, I will just try to add in some little orange touch to these clouds and the water so that they look popping out from the sky underneath. So even then I added these orange layers. You can see I have controlled the water so much that the paint is not spreading except for the place that I lead the beans. So it's very important to control the water when you are adding in these Leo's. Now I will just write in the sun a little, and then I will add in some darker strokes with the indigo and the gray color. Now, always make sure one thing, do not add the darker tones directly altogether in the first time only, Because if you will add the darker tones directly violating the first layer, you will not get the varied look into your sky of different tonal values. So you can see vans when I added the lighter color tones and now when I'm adding the Docker to one's, the lighter tones are already there underlying the darker tones and it is giving a much better effect to my sky. So when I'm adding in these darker tones, you can see I'm trying to maintain the lighter tone look and I'm not covering up the entire lighter tones. Also, my paper is still wet hands. I'm able to add in all these laws. If your people has dried, then let it dry completely and then add the Leo's. Now I will wait for my entire sky to dry and then add the details. So my sky has dried and you can see it has turned out such a pretty beautiful sky. Now using the black color, I will just add some bush element at the bottom area in the sky. This is just to add a little element detail to the sky. Because my main focus for this team is just to be in some pretty simple skies, which you can use to add in any detail. Or maybe do a seascape cityscape, or do any meadows or mountain ranges. So at the bottom you can try to be read the elements as you want. Our main focus was to understand the sky study. So I'm just dabbing the tip of my brush to add some grass details at the top and at the bottom, I'm filling it completely with black. You want, you can show only vary the element look that you want and need not be the same like mine. Now, I will just try to add in some leaves structures popping out from the left side. So using the same technique that is dabbing my brush, I will try to add in this also. So you can see how easy it is to add in this grass loop by just dabbing the paper off your brush and you can use any other color if you want. But I wanted to make it simple. So I'm using simple black color. Now, even under the right side top ADR, I will give in a little detail into the sky so that my sky look balanced. Now one last thing again, I will pick up my black pen and I will just add some violence into the sky so that it looks much Philips guy and gives a different look to all these bushes that we have added. If you do not have a black fine liner, you can use either a black pen or you can use your fine liner brush and black color to add in these details. So you can see just a few lines and a few crisscrossing each other so that it all begins to look natural. So there we are ready with us sky again. Now let's remove the masking tape. You are painting should be completely dry before removing the masking tape. And also remove the masking tape at an angle from your people so that your paper doesn't take it off. So they're really ready with our sky for day 4. I hope you guys enjoyed painting this with me. I will see you guys tomorrow and do our last class project for the Team Sky. Thank you so much for joining me.
11. Day 5 - Evening Sky: Hello everyone and welcome back to the phase. Let's have a look at the colors. I will be using. Naples, yellow, orange, scarlet, bright blue, Payne's gray, and black color. I have listed all the alternatives colors that you can use if you do not have the exact same sheets. Let's begin by applying a clean CTO photo onto the entire surface. There is no pencil sketch as of now, we will do the pension sketch after painting the sky area. Make sure to run your brush multiple times on to the entire surface so that your people remains wet for a longer time and you can continue adding all the Nios wet on wet. Now let's begin painting. I have picked up some Naples yellow color. And at the bottom, I will just give a little layer of the Naples yellow. If you do not have Naples yellow, you can go ahead and use any light yellow. It need not be the exact same sheets that I'm using. Now. I'm mixing in some red color with my yellow color to get a oranges Dawn. I'm not using a direct orange color because I want a soft orange. So I am mixing in the red and the yellow. Now onto the yellow just giving in on little orange strokes at the edges. Now I will pick up the scarlet color. And just given some scholars strokes into the sky, you can use either a Carmine sheet or a queen rules color. So you can see just a places I'm applying the red color layer. Make sure to leave those white gaps because we will be having in blue and the violet tone still coming into our sky. Now I'm picking up the same scarlet color button, a little thicker consistency, that is a little darker tone. And I will just add some layer of this darker tone. And I will make sure that I leave a little of the light tone urine there. So all of this will begin to add depth to you until now randomly just putting in the scarlet color urine, they're a bit. Now next I will shift to my bright blue color. You can use either a serine in blue or any light blue color. First, I repeat this color in a very light consistency that is more concentrated consistency. You can see it has a lot of Lato so that the paints flow good with each other. Now just adding a few strokes. So now you can see I still have some white gaps into my sky. I have left those white gaps because I will be adding to o variation with the darker tone that is the Payne's gray color. Now, I'll just lift up the excess water that has got collected because this time I used a beans in a lot of liquid consistency. Now forced to my bright blue color, I'm mixing in a little bit of Payne's gray and using this blue color, I will give him some darker tonal values into my sky. If you have an indigo color, you can digitally even use an indigo color, but in our little liquid consistency not too thick. So I'm trying to control the water movement also and trying to not introduce too much water that it's spread too much. But I'm not even adding the kalos and poor dark consistency that they look dark and of standard differently. Now using the Payne's gray, I'm just giving in some darker highlights onto the Scarlett area also. You can notice that with each layer that I keep adding into my sky, I make sure that my previously or does not get disappeared or hidden or lost completely. Because if the previous navy layer gets hidden, then what's the use of actually adding edge, right? So now I have just picked up some Payne's gray in its takeoff consistency and just adding some half C strokes where I applied the lighter tone. Now even onto the top Scarlett area, I'm just adding a little of Payne's gray clouds. So you can see just moving my brush in circular motion. I'm using my size 4 Princeton Neptune series brush and just moving it in little circular motion. And in-between I have scarlet color gaps also. So in my sky, if you notice I have to write capsule to there. The red color is visible in two consistencies, that is the light and dark. Now, I'm just adding some dark and Payne's gray sheets at the top-left area. And you can see I automatically have a violet tone form there because of the blue and the pink moist together. So that's the beauty of watercolors. You can directly get some beautiful color tunes into your sky by just, uh, you know, applying some colors next to each other. Now at the bottom media just giving in some scholars strokes very little, make sure that the yellow bees visible in the center to reflect the sunlight. Always keep or tissue handy so that you can lift up any excess water that's that gets connected on the edges of the masking tape so that it does not run into your paper again. Now picking up the bright blue analytical consistency, just adding in a little of the bright blue strokes. So always remember one thing, watercolors dry or don't lighter than what they are when they are there. So that is the reason I feel that the blue will dry out too light and it will not have, you know, any blue spaces left. So that's the reason I added in a darker layer of the blue color. It's always while walking layers on layers that you understand which Kahlo you wish to add more or you need to stop. So don't rush and add the darker dawns directly altogether. Because now if you see I have the darker and the lighter tonal values of the blue board. So all that will add more beauty to my sky rather than just one darker tone of blue. That is why I always try to walk with Leo's when it comes to watercolors and this people being a 100 percent cotton, it is still wet. So that is why I always recommend to go ahead with a 100 percent cotton paper if you wish to work with too many layers. So now I'm just adding in more darker tones of the pins gray color also. So just picking up the color in very thick consistency and just added in a little clouds by just moving my brush in circular motions. So you can see in between the pins girl, so I have the lighter and the darker tones. Now, I will just keep moving might be put in all directions so that I have a soft looking sky and all the colors blend and bleed into each other and give a good effect. I will just use my damp brush to blend. The colors are places where I feel the blending hasn't dawned out good match to me. I feel the white gap in between is too much. So what I do is I will just mix in a little bit of scarlet and blue and add in a little violet light tone there. But you can see still around that. I have the whitespace Also there. So I haven't lost the whitespace look, which I needed in my sky. Via moving the paper, make sure you keep a tissue handy so that you can keep picking up the excess what overachievers who was out of the people. So I guess I have got a good soft blend into my sky. Now we will wait for this entire sky to dry and then add the element into the foreground area. So my entire background has dried and you can see such a soft looking sky, we have an evening sky. So because we moved our paper in all directions, we have got those soft edges to the clouds and the soft cloud look and not those harsh cloud low. Now I'm picking up some black color and I will begin to add the solute at the bottom media. If you want, you can first add the pencil sketch of this silhouette or being directly, I choose to paint directly so that I do not have any pencil sketches left urine there if I missed to paint around it. So I'm just adding in the rough sketch while painting only so you can follow along or forced view the entire foreground that I'm adding. And then do a pencil sketch and add the same. If you want. You can even add any different or layout Jatropha cityscape as you wish, it need not be exactly the same as mine. So you can notice as I'm moving along, I'm trying to vary the shape of the cityscape that I'm trying to add. I'm trying to make it as much natural as possible and giving different dimensions and different shapes so that adult begins to look more beautiful. If you don't want to go ahead by adding the cityscape, you can even add maybe just GC low heats or some leaves are just some bush element into the sky. You can completely change this element that we are adding. I'm just adding it so that it gives him a TBD to a sky and it does not look up clean, simple sky. So you can see I'm trying to Wadi the heights of all the buildings Dima and even the shapes. Some vague I'm giving that triangle drew float somewhere. I'm just giving some. Oh, so good. So try to 3D the shape to make it look more like Jonah as much as possible. So I'm almost at the end of adding. These are cityscape fuel. Then even BID some violins into the sky to give it more of a sideview. So just for, in this last area with black, and after this, I will shift to my fine liner pen and add some final details. So now let's pick up a fine liner pen. If you do not have a fine liner, you can use any black pen. Or if you want, you can use a fine liner brush and your black gel pen. Now just adding some petals you will do the cityscapes you are in there. And some details to the Tombow pure. You want, you can add all of these with the black color, but I prefer adding these details with the band because it makes it easier and more precise. Now, I'll just add another street lamp. Your eye will not be adding the light details this time. Just a black silhouette, kind of a loop because we added the entire cityscape, Justin black. And now with the same fine liner pen, either be adding the violence and to the sky. Let's just add one more street lamp, your first, and then we'll add the wire lines. Now just adding some curvy lines into the sky, some overlapping each other. Just a fuel doing three lines you want, you can add some more. Also if you want, you can add some boats to your sky and make it look more filled up. Let's remove the masking tape and see your final painting. But those clean edges. Always remember to remove your masking tape once your painting is completely dried up the edges. So BID with topping thing for d Phi. A pretty simple sky. I hope you guys enjoyed painting this fit me. I will see you guys tomorrow and do our next team. Thank you so much to each one of you for joining me.
12. Day 6 - Sunset Galaxy: Hello everyone and welcome to DC via phone and second prompt, that is galaxies. Let's have a look at the calories that you will be needing for this exercise. I will be using a shade of yellow, orange, scarlet, windrows, sap green, dark green, right gosh, and black. I have listed all the alternative colors if you want to have a look at. So let's begin. I will just have a very small pencil sketch. I have my people taped down already onto my surface. Okay. And I have all properly or run my fingers onto all the edges so that the pins two and flow out Ann's point the painting. Make sure that your paper is properly taped down. Now let's begin with a pencil sketch first, just marking of the horizon line and that little sea area suggests that the person from below the paper, I'm adding in this COVID horizon line in little circular manner and a little oval shape your at the bottom to reflect as the sea area. And the bottom is going to be the field area. So now let's begin with a clean CTO photo only into the sky area first, make sure that you apply and even coat of water. Run your brush multiple times so that your people remains wet for a longer time. And in case if you're using a 25 percent cotton paper, then running our brush multiple times can help your people's David for a longer time. But I would recommend using a 100 and cotton people so that it remains wet for a little longer time and helps you add wet on wet layer is why you are walking with the sky. So I'm done applying and even CTO photo. I'll begin applying the colors into the galaxy. I will begin with the shade of yellow first. So I am picking up the lemon yellow sheet. And I have picked up two colors in a very thick consistency, not added much water. So it's more concentrated with pigment and less ideal. So near the $1.9, I added the yellow color. Now, I will pick up the yellow orange shape from my palette, and I will add the yellow orange shade near to the yellow color. Now, even the yellow orange color you can see I have picked it up in such concentrated consistency and not r then much water, so that I have a vibrant galaxy at the end. Next, I am picking up the shade of green roofs. If you do not have Queen Rose, you can pick up Scarlett, or you can pick up all the Carmine color or any pinkish tone that you want. Now, I am on purpose adding in this color and do the yellow and orange so that I have a clean blend into my galaxy. So you can see I've picked that took allo in such thick consistency such that I have such a vibrant look. Now, the last color that I will pick up is my red violet shade. If you do not have a red violet shade, you can pick up violet and mix it with a lot of pink tone Autoscaler tool. Or you can just add a little bit of blue to your or Scarlett auto Carmine color to get more of a reddish violet tone. So this is exactly a reddish violet tone. I'm even adding in a little bit of violet at the top area so that I have a little darker color there. I guess I missed to mention this color. Or if you want, you can just mix in a little bit of blue annual red, or pink tone to get the violet tone. Now, it's very important to keep your people moving by looping the galaxy so that the colors flow into each other and have a clean and the soft blend. I'm just adding in the layer of colors again so that they begin to bleed into each other. So you can see now my orange and the yellow are soap failed blended with each other. I will try to keep moving my paper in all directions so that I have a clean blend between all the colors. I will keep a tissue handy so that I can even lift up all the excess color while I'm moving my paper so that, you know, the excess water does not flow back into the painting and spoil the area completely. Now very gently and slowly move your entire sheet in two different directions. So that is why I always recommend to tape down your paper on a movable surface so that you can move it if you need during a painting for having soft edges. So I have got a good soft edge. Now, I will wait for this entire sky area to dry, but till then I can pin the CAD because the CATI is going to be just a reflection of the sky area. I just pick up the colors first which are on the masking tape. Always make sure to lift off any of the excess color so that it does not see back into your painting. Because if via moving again, this color seeps into your painting, it may give you either rough edges or even spoiled European thing. Now I'll begin painting the CATI. I haven't directly begin the wet-on-dry technique. You are because it's just a small area and I don't have much Laos there. So I haven't begin with the same colors that I used in the sky so far as the yellow color, then the orange shade, and then the pink tone to just try to draw a little reflection of the sky and to the CEO. And you can see the colors in my sky have blended. So when the pink coming on to the yellow, so naturally and giving in such a good galaxy view. So avant kind of for galaxies, what I've tried to paint here. So I'm almost done with my CAD. I also, I'm just trying to lift up some colors so that I have some yellow shade, dry it out there near to the horizon line. So now let's wait for this entire thing to dry and then add in the other details to this galaxy. So my painting has dried and you can see such a soft blend, I haven't do my sky. All the colors have blended well into each other naturally because we get to moving a sheet in all directions. Now I'm picking up some white goulash and I'll splatter the stars before moving ahead. So I'm just dabbing my fingers onto the brush to get these started effect. You can either use another brush to dab and get these side effects. But I prefer our dabbing it with my fingers so that I have the control stars. Also into the sea. I will add few dots to show a reflection of the stars also into the CAD. So that is a reason I am not covering the CAD. And just adding in the stars very naturally into the entire galaxy. And a lot of them because of what is a galaxy without stars, right? I know the IIT around this may become messy with all the rights plateaus. But it will give a good effect only if you do it this way. Because if you said to add the stars naturally, it will not give you this effect. Now, I'll shift to my sap green color and the entire bottom area that is white. I will paint it with the sap green color first and then add in some details to this area also. Makes sure that you'll see ADI is completely died by being, being knee out to the edges of the sea are the ways that follows will begin to seep into each other. And it would all be getting to become messy. So it's very important that the OTA entire background has completely dried, flossed. Now at the bottom, I will add in dark green color directly. So I'm just picking up some dark green color from my palate. And I will add it in the remaining bottom area and try to have autonomy radiation to the Greenfield. Also, if you do not have a dark green color, you can mix in a little bit of indigo to your green and dark green tone. So I'm almost done painting the base layer of the field ADR. Now the line neo to the C, I will just try to give some grass loop there. So picking up my dark green color, I haven't just try to pull out some strokes from the field area into the sea area. Just using the tip of my brush. If your brush does not have a pointed tip, make sure you shift to a detailer brush to pull out these tubes so that you do not have much thicker strokes, that spoiled ego. You'll see a video, audio field ADR. So be very careful by adding in these strokes so that it looks perfect and does not spoiling your painting. Now, I will add more depth to my field area. So I will pick up the darker green color and mix it with a lot of brown. I'm trying to get or the green color and add this green very randomly into my field area. My field area is still bad, hence, I'm able to add in these darker tones. If your area has dried, I would recommend to z vector area and then add this detail so you can see how notch to be my field. And to get another sense of debt by just adding some darker values or randomly. Now till my field area dries, I will begin to add the pine trees at my horizon line. So I'm picking up my black color and using my size four round brush, which has a pointed tip, I will begin to add some pine trees onto the entire of my horizon line. So very small tree is not too bad. But try to read the height of the cheese throughout and not add them in one single height. If you wanted to, you could just add some grass strokes there and not add these buying Gs. Or you could just lay a mountain there. Instead of buying GIF, you can surely change the element as poor or you know what you wish. But I prefer to adding the pine jeez this time. So you can see how I'm just trying to be the heights of the buying jeans, some vector. So all this will make your composition look more natural. So it's brought into the heights and try to make it look more natural. And not just add 1's and vote buying G, 01 symbol I did bind G throughout. I'm adding very gender buying, geez not the d David wants so that it's easy for everyone to follow along. And so that you can not get to dialogue because painting didn't bind with David, lot of dying. So I'm on to my last pine tree. And then just adding some details into the grass area is what we will be left with. So I just tried to get a good blend of the green and the black color because my green area was still bed. Now, I'm just trying to soften the edges of these horizon line into the sea area to reflect some shadow off the pine trees. I will not add the definite shadow, but just a little blurry black line to reflect the effect of the pine tree. So just using a damp brush, I tried to spread the color into the sea. So you can see how the buying T's reflection as adding a different dimension to the painting. I feel I have a little sharp edge in the CSU. I've inner oh, you know, soft unit even further into the pink color using a damn brush very gently, agenda and hands, basically using the re-weighting technique to soften the edges. So now I have gotten rid of that sharp edge and I have a soft blend with a good reflection of the buying Git's status, the little black area which I just tried to get them using a damp brush. Now and do the field area. I'm just adding in some strokes with the black color very randomly, some grass strokes urine there. If you want, you can leave your field area just like that with the plain green color. Or while it was bad, you could have simply added in some dimensions with the green color that is just a, you know, dropping in some darker green spots. But I prefer adding some strokes like this to add a little more detail. So I'm using my liner brush and you can see how randomly I'm adding in these grassroots just using the black color. Okay, So we are done with a composition for day 1 of the galaxies, such a pretty warm galaxy. Now let's remove the masking tape. Again. I will repeat some tips to remember, make sure that your painting is dried on the edges before you remove the masking tape. Always remove the masking tape at an angle from your paper so that it does not date off your people and spoil your painting. So there we are ready with our galaxy for day 1. I hope you guys enjoyed being this warm sunset galaxy view with me. We will be painting for the four different galaxies in the coming four D's. And I would love to see you all join me and create all the paintings for the team galaxy. Hope to see you all tomorrow and do the second galaxy. Thank you so much for joining me, your
13. Day 7 - Warm Galaxy: Hello everyone and welcome back to the seven. Let's have a look at the colors that you will be needing to pin this form galaxy. I haven't been using a shade of Queen Rose, blue, black, payne's gray, white quash. If you do not have any of these colors, I have listed down the alternative colors that you can use. So let's begin painting this galaxy. I will begin with a clean CTO photo. Onto my entire phase. We do not have any pencil sketch for this one. So let's begin directly with the Waldo onto the entire surface. Now make sure that you apply an even Gorbachev water. Some Dan applying and even go to photo onto my entire surface. Now let's begin. I will begin with the Windows Carlo force and into the center area first, I will apply this quin rose color. So you see I'm applying the color in a very concentrated consistency and not much of what DO, because I need a warm look. And I am beginning to tilt my paper already so that my beans flow naturally. Now onto the top edges and the bottom edges, I will add in some of these green spots. I just added a little water at the top ADR because I felt though people began to dry there. So now you can see in sports I'm adding in look window Scala and leaving in the white gaps in between to add the blue shades there. When the blue and the Queen Rose will mean they will automatically begin to form a population to one. So it's perfectly well given that don't get spawn because that will begin to give you a galaxy and other color variation. So now almost onto all of the white gaps, I will apply the tuition blue color. And I'm already beginning to move my sheet along with applying the sheets so that I have a clean soft blend between all the calories. So you can see variable, the blue and the windows color is mixing. It's beginning to form or purple shade. And I'm naturally getting a third sheet and do my galaxy. Now, I will pick up some Payne's gray color and I will begin to darken my galaxy. If you do not have Payne's gray, you can mixing black to your blue color or you could use an indigo color. And you can see how I'm trying to move the kalos to get a clean planet. That is just by moving my paper in all directions and trying to get in soft blend between the colors. Now onto the blue areas at the edges. I will try to widen this docket, dawn, make sure that you do not cover the blue color or completely with the Docker tool. Otherwise, the blue color will not be visible only. So at places, let the little blue collar be visible. So you see even I'm covering little of the red areas because I had applied it too much so that when I add the black color, I get that reddish black bone. You can see my greenish kind of a bone that I'm getting. So all this just adds a radiation to your SPI and makes it look more natural. Now just picking up the window Scholar again, I'm dropping it. I have the areas where I painted so that it blends again with the colors that I have placed right now. Now in the central area, that little area that I left to right, I even added a little bit of the black color there, just very little using the tip of my brush. And I will try to blend that with the queen rose color. Well, so just lifting up the excess color and trying to blend it back. Now Let's be it for this entire background to dry. So my entire background has dried and you can see we have such a warm Galaxy low, and all the colors are visible. That is there, jade blue, the purple color being formed, and then the Payne's gray. Now using white quash, I'm just plugging some stars into the galaxy. Just dabbing my fingers onto the brush to get the stars. So you can either tap it using your fingers or using another brush. So I prefer tapping it with my fingers because that helps me to control my brush movement. Now, I will pick up some black color and begin to add a mountain into the foreground area. Again, if you want, you can show the VAD, the foreground. You could add in some pine trees or some cheese naturally, or just some bush effect. This time, I wish to add some mountain range. So I will quickly add a mountain range with the black color first. And then I will just given some dry brush with the white Kahlo once it's completely dry. I tried to keep the class projects a little easy in-between so that you do not get tired up of painting every day. So in-between, I try to release some class projects which are just under 10 minutes or at times under 15 minutes. Now to give the effect of the warm galaxy, I have picked up some Quin rose color and I'm laying it in between the mountain along with the black, so that I have the effect of, that is the shadow of the galaxy on to the mountain. So just a very little area in between that I added with the pen ruse color. I hope you are enjoying this 50 days cities with me. We are already on the day seven, and we still have another eight crumbs to go ahead with. So I'm done painting the entire mountain range. Now we'll have to wait for this to dry. Then, then I will just add a little detail to my galaxy using my white gel pen. So very when I feel that the stars are a little less, I'm just using my pen and adding in those tasks and a fewer shooting and it's shining stars. If you want, you can add all of this using a fine liner and whitewash or white acrylics. White watercolors will not stand out this bright. But I would recommend having a white gel pen because having a white gel pen is quite handy and makes the task a lot easier. So just splattering a few more stars. Be very careful that if you are adding the stars like me later on, you do not run any of the stars onto the mountain area. Now let's pay for the mountain to dry before adding the dry brush strokes on the mountain. So my mountain range is completely dried and now I will pick up some white gouache and add some dry brush into the mountain. Make sure while adding these drivers troops, you do not have any excess water into your brush. Otherwise it will not give you the dry brush look. So always asked to picking up the color dab off your brush onto the tissue or a draft law so that the excess water gets absorbed by the tissue and then tested on a rough paper or a tissue and then begin adding it onto your final painting. Since my paper is a rough green people, it is helping me to add these dry brush strokes much better. Because of dodge off. My brush moves more roughly, hence allowing me to add the diagram. So you see your, I had excess paint and I could not achieve the dry brush despite being a rough train people. So that is what I meant by saying that it's very important that you dab off the excess paint and water either onto a tissue order rough cloth before adding it directly onto European thing. Now, I will just add in some details with the white quash onto the mountain. And then we're going to be done with the Galaxy for today. If you want to, you can just add in some dry brush and leave it there and not adding these details. It's completely. So I'm almost done. And we are ready with our galaxy for the two. Now let's remove the masking tape and see your final painting. Make sure to remove the masking tape once your edges are completely dry. And remove the masking tape at an angle from your paper and be very careful of the color collected on the masking tape as it may spoil your edges. So there we are ready with our painting for today. I hope you guys enjoyed painting this galaxy with me. I will see you guys in the next class project to Bordeaux, where VBE in the galaxy by the Seaview, tango so much to each one of you for joining me so far.
14. Day 8 - Purple Galaxy: Hello everyone and welcome to the effect of this 50 watercolor challenge. Today we will be painting this galaxy by the seaside. Let's have a look at the colors that you will be needing for this one. I will be using a sheet of win-lose, violet and bright blue, burnt sienna, burnt umber, black and white quash. I have my people deep down onto the surface already. I have run my fingers onto all the four edges so that there is no space for any important to see by. So let's begin with a pencil sketch for this one of any basic pencil sketch, I will first mark the horizon line almost at about 35 percent from below my people. So the topic is going to be my sky, IDA, and the bottom is going to be the CDO. Now why do just mark out some rocks into the CDR very randomly. I'm pleasing these rocks. Now. Onto the right side, I just added some tiny rocks and we are done with the basic pencil sketch, just a simple, easy markings of the rock and the CEO. Now let's begin painting the galaxy sky first. So I will begin with a clean code of photo only onto my entire sky. Try avoiding to apply water onto the rocks, ETO. But if accidently you run a little beans into them, do not worry because our rocks are going to be of a darker yellow. That is the sheets of problem. But try as much as possible if you can avoid it. Now while applying water, make sure you run your brush multiple times so that your people remains wet for a longer time. The until you paint all the galaxy colors into the sky. And if you are using a 25 percent cotton people running the approach multiple times will help in keeping your people vet for a longer time and will lead you all pinned all the colors and galaxies until people stays wet. So I'm done applying again CTO photo. Now I'll begin with the kalos into my galaxy. So the first follow that I will go ahead with is the bright violet color from this Magellan mission set. I am trying to use the calories in a very pigmented consistency and not do too diluted because I want a good bright galaxy this time. Now next in the center area, I even added a little of a pinkish tone, the Queen Rose tone. You'll get an ad in a Scarlett or any pink tone that is available in your palate. Also, if you did not have to violet color, you could mix in any of your red and pink with a blue color to get in a violet or published to one. Now next time picking up the city and glue from this palette, you can pick up bright blue, civilian blue. And I'm mixing in a little bit of violet to make it 0 bluish violet color. And in to the entire remaining sky, I'm just adding in this bright blue color. And then I will try to blending these colors and make them motion to each other. Now forced using a damp brush, I will try to lighten some EDA and the Santo Nino to the big rock because there I will be adding in white quash to reflect the light of the galaxy. So I'm just trying to lift some kalos. And there I will now add some white quash you want. You can use white watercolors also. But white watercolors will again blend into Moodle laws and will not give you that to a vibrant look. So I am trying to add in with the white quash. I'm simply picking up white goulash and I added it in the center area where I lifted the color just in a little liquid consistency. And now since the entire background is still wet, the colors are spreading. That is, the white color is spreading on its own and is forming a light area there. Until then, I'm just trying to add in another layer of the same tones that I used previously. So as through I get a vibrant look after my galaxy gyrase. Because remember watercolor dries or dawn light or so, right? Or whatever kalos we can see on our people when it dries, it will still act on or don't lidar. Hence, I'm adding in another layer of five intones off the blue and violet color, especially onto the edges. Since I'm trying to keep the center area light only. Now I will again add in some white quash. So the force plate has actually spreaded and toned or, you know, a little dull and blended with the backdoor. Now that I'm adding the second layer of fight, I'm adding you to analytical multicore consistency. And you can see how vibrantly it's standing out. And then lead into the rest of the sky. Just adding a little of the right spots. Make sure that every time you add the white color anywhere, you clean the brush and then pick up the white paint so that there is no other pigments on your brush, otherwise you will not get that right. Look. Now let's wait for the sky to dry and then move ahead photo. So my sky has dried completely. And before painting the C and the rocks, let's add in the stars in the galaxy, because of galaxy without stars will not look pretty. So just using white quash and dabbing it with my fingers, trying to add in the splatter of stars. You can tap the brush with another brush if you do not want to tap it with your fingers. But tapping it with fingers helps to control the movement of the white paint and have some controls plateaus. Make sure that around area may get DO. But it's what adding the stars like this in a nutshell, consistency. Now let's be the area first and then we'll pin the rock areas. So for the C, I'm just using a mix of blue and violet color. And with that color directly using the wet-on-dry technique, leaving the rocks area, I will add this layer of color into the entire area that we have mocked. So I'm adding in a little bit of pink and more violet then blue color because I want to make to see a reflection of the sky area only. So I'm trying to maintain the colors accordingly. You can go ahead with any shade of violet and pink or blue as you have used in the sky. And I covered those two small rockfall TO because that I will be painting with black. So it was easier to just be entered to pin the complete area right now easily. Now just giving a clean edge to my horizon line. Now at the bottom media though, sand area that is they're new to the C. I will just quickly be in debt with a shade of brown. And you did not wait for the Sea area to dry because it's completely okay. If the OC and the signed area blend, in fact, that will make it look more nitrogen. So you can just add in the shade of brown. I'm using the shade of burnt umber. You can use any shade of brown. So there we are ready with the sound, mixing with the sea area perfectly and the sky looks pretty. Now let's wait for all of this to dry. And then we will be left to add in the rock details with the shades of brown and black. So all of my background is completely dry it. And now let's begin painting the ROC area for the truck. I will first speak up or shade of burnt sienna, and then I will add in more details with the darker brown tones. So first I will pick up on CNN and added into the center area of the rock. Now I'm using the wet-on-dry technique. You're also because there is not much to add in or I don't want the rocks ADR vet for even much longer time. Now at the edges, I have picked up the bone down book Allah. And adding to the edges of the bone sienna, I'm adding in the docket bones. So you can see how it is creating a highlighted color in the center because of the bone sienna. And at the edge I am adding in a darker brown tone. So you can mix in a little bit of black to your brown color to get a darker brown tone. Or you could use a CPR color also directly. So you're basically what I was trying to show is because of the galaxy, Though center area of the rock is a little light and shining bright. So that is the reason in the center, I added the bone sienna color first, and then as we proceeded on the edges, I added the darker tones of brown to give it a highlighted look in the center. Same V I will be painting the other two rocks on the left side. Adding a little highlight on the Docker doll in the center area also, I am still left to add and highlight to this rock that is with the black color. But that I will add one store a drug is a little dry so that the black color doesn't spread much. Done then let's just be in the other two rocks onto the left, EDR, the same V how we been to decenter law. That is in the Sando a lighter tone and actor edges darker tones of brown. So you're also, I'm adding in the bone sienna color first and then the darker tone of brown to add to shoulder highlight actually in the center area because of the galaxy. So I'm almost done with this rock also. And now after this, my center rock is almost 50 percent dry and it's the right time to add in the final highlights with the black color. So I will shift to my smaller sized round brush and I will pick up some black color and adding highlights, make sure that you are rock is not too wet because if it will be too wet, the colors bedspread much and it will not give you a definite highlighted look what we are trying to add in. So it's very important that you're OK. Adr bees, at least 50 percent dry so that now you can see my color is having a soft edge, but it's not spreading out of proportion. And it's not spreading too much until, and unless I'm using my brush to spread it more and just adding a little highlight with the black color randomly. So now the rock has a more detailed look. And have done the same thing when the paint was too wet, then it would have spread much and would have not given you the different shades of brown and the dark highlighted look. Also make sure when you are adding the black color, you do not introduce much of what DO. Because if you add too much water, it will again begin to spread despite your area being 50 percent diet. Now remember the two small dogs we had added onto the right side. I'm just painting them simply with the black color. So your I'm just adding a few more tiny drops which we hadn't marked with any pencil. Just did if we added them with the black color. Now, I will shift to my black technical pen and I will just mark the horizon line and give it a definite Look. If you want, you can lose all veto fine liner brush and a black color. But make sure it's a very fine line. You can see how fine. But it has given a definite look to the sea and the sky area. Now with my white pen, I will add some stars in the sky because the stars are not looking that bright and vibrant. So to add in a few more, I am using in my white gel pen. What you could do is you could cover the rock and the Sea area and add more stars if you feel the need. But if you are satisfied with your four splatter of stars, you can completely skip this step. Now just adding some shooting stars with my white gel pen itself and having a white band makes adding these details much easier. So I would recommend you to go ahead and buy one white gel pen because it's really handy to add in such small details. So almost done adding the stars and near to the shore line, that is the area where the C and the Sanders meeting. I will just add a little off though. We've looked with the white gel pen itself. Just very little, not much. If you want, you can add this crashing waves look using white gouache and the dry brush technique. And if you want, you can actually even give this, oh, look onto the entire shoreline. I'm just adding this little bit and not too much. Now, I will just pick up some white goulash and splatter some more stars because I'm still not satisfied with the styles in my galaxy. So I will cover the bottom media with my hand and splatter the stars only at the top. Make sure if you're doing this, you Ido covered it with a paper ordered off lot orbital hand so that the stars do not splatter into the sea and the ROC area. We are done adding all the deals in Buddhist simple galaxy. Now let's remove the masking tape and see our final painting with those clean edges. Make sure before removing the masking tape, the edges of your painting is completely dry. It orders, it may spoil your painting. And always remember to remove the masking tape at an angle of 45 degrees approximately so that it does not take off your paper. So your, we are ready with our galaxy for d. I hope you guys enjoyed painting this bright violet galaxy with me. Thank you so much to each one of you for joining me. Hope to see you guys join me tomorrow as we beat the Ford Galaxy in this series. Thank you so much once again for joining me.
15. Day 9 - By the Sea: Hello everyone and welcome to Day 9, VR on the fourth galaxy painting of this series. We'll be painting this beach side galaxy look today. Let's have a look at the colors that you will be needing to pin this. You will be needing a shade of violet, indigo, turquoise, blue, green rules or pink violet, Sap green, dark green, bond, umbo, white quash, yellow callow, and some black color. So grab all the colors and let's begin painting. So let's begin with the pencil sketch first. So approximately at around 35 percent from below the paper, I'm marking my horizon line. And onto the top of that, I will just add a very small mountain range. Now in the center of the CDO, let's add a pathway or near to the beach. So that is it for the pencil sketch rest of the ROC area we will paint directly with the black color while the pain the sea area. Now we'll begin with a clean quart of what DO only onto my sky area, leaving the mountain range also. So even if a little color goes into the mountain range, it's perfectly okay. But as far as possible, try to avoid adding in water and the colors into the mountain range. Now, make sure when you are applying the water, you apply an even coat of water onto the entire sky and run your brush multiple times so that it remains wet for a longer time. Now, I'll quickly take out the colors onto my palette, which I will be using for the sky EDO. So I haven't been using a shade of pink, pink violet tone or a window Scholar you can use. I haven't been using on shade of violet and then a shade of blue. So first, near to the mountain range, I am applying the quin rose color. If you do not have quin rose, you can use the scarlet color or any pink tone instead of the quin rose color. It's perfectly okay to change the kalos as available in your palette. Now next, I will pick up the violet color and new to the pink color. I will apply an earlier of the violet color. If you do not have violet color, you can mix in a shade of pink and blue or any shade of red with blue and get on the arrest violet tone. Next, I will pick up the bright blue color and add the top area. I will add in a layer of this bright blue color. You can notice while I'm adding in these colors, I'm not adding any new water. So my beans are staying where I am applying and not moving. And, you know, all just covering the entire area easily. Now since I added a very light tone, I'm just trying to add more pigments so that open the entire sky dry is I have a good, vibrant looking galaxy and not a doll one. So basically I'm just picking up the color and laying over again the colors that I laid down. But this time with a, you know, almost no water and just pigment. Now at the top, I'm adding in a little bit of indigo because the blue looks a little light or, you know, matching with the other darker tones that we have. And just trying to get a clean blend between the kalos. And also you can see I'm trying to move my board in all directions so that the paints flow equally and have a soft edge. Now, Tinder sky area is drying. Let's paint the beach area. So I'm just picking up some turquoise blue color. And I will paint the entire beach ADR. But this turquoise blue color. If you do not have to acquire these blue color, you could mix in a little bit of emerald green or VDD and gene with a blue color to get a turquoise blue shade. And leaving the pathway and the mountain onto both sides of the pathway. Either paint a beach area with this turquoise blue color. So you are, I am using the technique of fungi because it's just a very small area and I don't have much details to add it. So quickly adding in a layer of turquoise blue. And once this will be 50 percent dry, I will just add some darker Lviv look at certain places on to both the sides. Now to reflect a little after galaxy loop and do the beach area also, Ivan be adding in a layer of the violet follow on blue, this turquoise blue color that I have laid down. But I will make sure that I do not, uh, you know, completely covered it at all edges such that all the Dogecoin's blue-collar is completely lost. But just to have the top ADL, I added in a little bit of the violet color. And you can see underneath, I am still able to see the turquoise blue color. So this is called a technique of glazing, wherein I'm trying to reflect the spiccato on Buddha, see color as though or reflection or the light of the sky. And I still have the turquoise blue color also visible. So use your hand very gently while adding in this layer of violet color. Now neo to the line of the mountain. I'm just picking up some of the color to reflect much lighter bones and trying to add in some CVs this time using the lifting technique. Now before moving ahead, we'll have to wait for all of this background to dry and then we will paint the details yet. So now my painting is dry. Now, let's pick up some whitewash and first splatter the stars in the galaxy, that is the sky. So using my size four round brush, I am dabbing it with my finger. I'm trying to get a good sludge of stars into my galaxy sky. And you can see my galaxy has dried so soft and all the colors have blended solvent. So that is the GZ. If you tape down your people on dual movie B so you can get to source blends into your sky. Now, we will begin painting the mountain genes for us. So far, the mountain range at the edge, I will be using a shade of yellow color to depict some light effect. So a very light layer of yellow color only on the top EDI Major League. And then I will be filling it with the shades of green and a little bit of brown. So on to the edge, I'm just applying a shade of yellow. You can go ahead with any shade of yellow, light yellow, lemon yellow, cadmium yellow, whichever is available in your palette. And now I'm picking up the sap green color and applying it quickly Miata yellow color, making sure that only a very little of the yellow highlighters visibility at the left corner. Now I am using the wet-on-dry technique. You are also because there is not much detail and just quickly a very small area to pain. So that is the reason you can either keep the colors ready in your palette so that even you can walk with me. Because inside small areas working wet on wet becomes a little DDS. Now I'm picking up some black color. And I even added this black color onto the Greenfield at the bottom areas. So it's just that it will automatically begin to form a darker green color mixing in with the sap green. You can either use or dark green color directly instead of using a black color. But since I applied the sap green color already, I am adding in this layer with the black colors so that I automatically have a different shade of green. And the sap green color look also that easy to pin that simple mountain. Now let's paint the Part B. So on the pathway also forced I will lay down a layer of pink to reflect the effect of the galaxy on the pathway. So I'm using the queen rose color. What you can do is you can use the shade of pink that you used in your sky. It can be a scarlet color, Carmine Gallo, whichever shade you use, and just apply a light layer of that color host. Now I'm picking up a dark brown shade and onto this pink shade, I am applying in this shade of brown. But at the edges, I'm leaving that little pink being visible. Even if you see underneath this brown, I am able to see the touch of pink that we tried to add. So all these little things add details and reflections and the effect of the sky on doodle elements that you are paying. Now on the edges, I will just give him a little touch of black color. Just using the tip of my brush. I'm not adding much water to my paint. So there you can see on the path B, I have caught a reflection of the galaxy, which makes it look so much more natural. And now let's begin adding the. And do the beach EDA. So I will pick up some black color. And at the bottom EDR, I will try to mark a black colored sand ADR look though, suggest, you know, not adding much, trying to show a rocky EDI look. Older son Luke, with the black color very randomly. It's basically kind of a shoe idea that we are trying to depict. You can consider it a rocky shore area, signed area, whatever you feel, tried to consider doing it with black, not using much Carlos and trying to get a silhouette kind of look. Now into the sea. I haven't just add some tiny box with the black color. It says vary randomly urine. You can please them as you want. You need not to place them exactly how I am placing them. Now after this very randomly, I'm just splat touching a little of the black color and do the beach EDR trying to reflect some very tiny students of which, you know, actually just not visible clearly to us, suggests a little splatter into the CDR and the Part B. You can see how tiny those plateaus are. Magic makes it look a little more natural. If you want, you can skip splashing the black elements. You might make sure if you are struggling with the black color, you do not run into the sky area. Audience. We will have some black stars in our galaxy. So we are done adding in the elements now we'll have to wait for this to dry and then add the details with the white wash. So then my entire painting is completely dry it, and you can see how beautifully the speech feel galaxy is looking and turning out to be. And even on the pathway you can see those pink highlight reflection of the sky is looking so beautiful. Now I will pick up some white quash and I'll try to add in some highlight to the shore area under rocks that we have been to. If you do not have white quash, you can use vita credit, but white watercolors may not give this wide print look. So if you are trying to use white watercolor, you may have to try to use it in its thickest consistency possible without adding in any layer of Waldo. Now, even undo these tiny rocks that we did at the bottom. I'm just adding in a little white highlight to reflect the shadow areas and trying to give it some crashing wave looks also. So just very simple lines and a little dry brush and onto the left side alter your I haven't added this white highlight kind of look near to the shoulder area. Now onto the pathway also, let's add some white highlights using the same white goulash. So very randomly, I will just mark some lines on to the spot. And then I will use the black color and given some dry brush strokes to make the pathway look more natural. If you want, you can skip adding in these white lines and directly given some black dry grass strokes onto the path, we always remember when you are giving him the dry brush strokes, always dab off the excess water onto a tissue or a rough clot. Because if you will have excess water, you will not get the dry brush stroke and it will completely low apart of black color. So always make sure to dab off excess Porto. So we are done with our painting for D9. Let's remove the masking tape and see yeah, painting with those clean edges. Make sure before removing the masking tape, your entire painting is completely dry. Or rails it may spread onto the edges andrew when you're painting. And also remove the masking tape at an angle from your paper towel so that it does not take off the edges. So we are ready with our galaxy. But I forgot to add one thing that they some wave look into the beach area so quickly using my size four pointed brush and some white gouache, I will just add some waves. Since it's not the OU know anything onto the edges, I can add this even after I've removed the masking tape. In case if you haven't removed the masking tape, you can first add this and then remove the masking tape. So very randomly you can see I'm adding in some lines to reflect the waves into the beach. And it added so much more depth. So then we are ready with shopping day. I hope you guys enjoyed painting this between today and tomorrow, we will be painting the last galaxy of the series. I hope to see you guys join me tomorrow. Thank you so much to each one of you for joining me so far.
16. Day 10 - Candy Clouds Galaxy: Hello everyone and welcome to detail VR on the last galaxy. Let's have a look at the calories that you will be needing for painting this cotton candy galaxy. So the colors that I will be using is violet, indigo, burnt sienna, burnt umber, Payne's gray, black, white goulash, a little hint of orange color. To get that cotton candy look. I have my people take down and there is no pencil sketch. So let's begin with a clean coat of water onto the entire SO phase, because it's going to be a simple galaxy. Make sure that you apply or even goto photo onto the entire face. Also make sure that you run your brush multiple times so that your people remains bed for the longest time. You can see, despite my people being 100 percent cotton, I run my brush multiple times so that my people also stays wet for a longer time until I add in all those details onto the galaxy. Wet on wet and you not to get a soft looking sky. Now forced to begin with, we'll try to lead on the cotton candy sky looks in first and then paint the rest of the area with the darker tones. So let's first prepaids of follows that B will be needing because v will be needing piece to dawns this time to pinto cotton candy look. So I'm picking up a shade of pink tone and adding in a little bit of white to it to get a piece till dawn. And CMB to my vermilion color, I'm adding in a lot of fight to get a basal tone. If you do not have vermilion color, you can use any shade of orange or you could mix in a little bit of orange and yellow and Jade and get only two oranges tool and add white to it to get a piece still orange tone. So now I have formed a very light base to orange. You can see with that I am adding in very randomly these cotton candy clouds and do the center ADR and leaving some white gaps. So very randomly I'm adding in these clouds. Make sure when you add in these clouds, do not introduce too much water. Just try to maintain the consistency of the paint. You can see my beans is a little fluid, but not do what they do. So when I will be adding in the next color to it, I will be able to maintain the look of the color. Now to this, I will add in or torn off violet mixed with white to get a base still violet tone. So now ready randomly around the face in orange tone, I'm adding in the base still violet Dawn. Now make sure when you add the space to violet tone, you do not owe you nor late too much over the orange because when the orange and the purple mixed together, they will begin to form a muddy color. So it's very important to control the pressure of your hand, your, and also the movement of your brush by laying down the color. Now at the bottom, I'll just add a little layer of yellow Palo, I guess I forgot to mention this scholar in the colonists, but you can add in the lighter orange shade also. That will be perfectly okay. Now onto this, I will just add some audience cheeks. And you're at the bottom. I will be painting the mountain range they drawn to. I just want to reflect a little light area here. So that is the reason I added in these vom colloids. Now, I will pick up indigo color and do the rest of my sky. I will add the indigo color and make sure while adding the indigo color, you do not lose the complete cotton candy sky look. Otherwise it will just be a plain indigo sky. Also, if you can notice, I'm continuously trying to move my board so that my colors flow into each other and have a soft blend naturally to get that cotton candy look. Now, even onto the violet color, you can see I'm adding in the indigo color and even our little onto the orange color. Because we painted the entire surface with don't be silly shades of orange and violet. And now when we are adding it in this darker tone of indigo, it will be easier because you already have that color or lower. So accordingly, you can let, you know little places be there such that those cotton candy skies are visible. So basically you can see I am applying the indigo color leaving gaps such that the orange and violet color is visible. Just a little to show the cotton candy like we didn't want the entire idea of orange and violet to be visible that the important key your is to keep moving your paper but in order to take action so that you have that smooth and soft blend into your sky. And those clouds look natural. So you can see I'm continuously adding the indigo color and still keeping the movement of my board. Now make sure that these colors will be jangled, tone lighter. Now I will just pick up a little bit of plaque and act the top area, I will try to darken the indigo color with a little touch of black so that when all of this dries, I have a good gradient between a dark indigo, light indigo in between those cotton candy cloud look. So I'm not adding much of photo you can see because if I add too much water, the paint will flow to match uneven lot. Give me this look and the cotton candy cloud look will also be lost so onto the entire obtain because I'm adding in a little bit of black. But you can see I'm making sure that even the indigo color is visible near the cotton candy clouds, giving a good transition. Now let's read for the sundial thing to GI and then add in our foreground details. So now my entire sky is completely dry it and forced. We'll add in the stars. You can see how our sky has dried with such soft edges. And those cotton candy clouds in-between are looking soap effect into this galaxy. Now using my fingertip, I'm dabbing in the white quash and do my sky to get the splatter of stars. Try to read from a little distance so that you get those tiny style look and you have a good control onto your brush also. So I'm done adding all the stars and do my sky. Now, let's paint a full ground. We will just be painting of it iss costs looking tree with branches and do a full ground. For the basely or I will be using burnt umber and black to show a muddy or mountain kind of look. So at the bottom, I will just be using the Pantone book, Allah and black color. You can get the colors ready onto your palette so that, you know, because you will have to paint it quickly, because we will be using the wet-on-dry technique. Your So now with the black color, I will first try to mark a little muddy. And then in the center of that I will be adding in the bond on book Gallo. Just as VPN did the rocks last time. That is forced to be added the bond sienna color. This time we are forced adding in the black color that is the edges, then add the brown shades in the center. So just trying to give all BCE to the t that we will be painting. That is trying to show from where the tree is standing here. Now, I just added the bond amber color at the bottom area. And just trying to blend it with black color onto the edges. So at the center you can see it's a little roundness sheet and undo the edges. It's visually black. Also though by ground yellow, orange color is completely or you know, just a little visible and not much. So that is the reason I don't do ID if you hadn't added that. Now using the black color, I'm just adding in a t with lots of branches. I'm using my Princeton heritage size three round brush. This brush has a pointed tip, because of which I can add in finer details by adding in the TIG details. Now in-between you can see I'm trying to use in the brown color to add some branches. Neon 22 cotton candy look, trying to reflect some light onto the branches there. And randomly shifting between the brown color and the black color. To add the branches. Try to add the branches in different shapes and different heights, and try to add some very tiny branches in between. Also makes sure that your white stars was completely dry before adding in these branches. Otherwise, it will be very difficult for you to maintain both and then separately. So very randomly you can see I'm adding in branches on today entire of the tree covering majorly the center area of the galaxy. And if you can see, I'm trying to VD all the branches of the tree that I'm adding. Some short, some tick go, some Taino and trying to add even the tiny branches while adding these big O branches. If your crash does not have a pointed tip, what you can do is first add all the Tico branches, then shift to a detailer brush with a fine and add the tiny branches. Or you could even add the tiny branches using a fine liner pen. But since I said my brush has a pointed tip. I am able to add measure of all the branches with this one brush continuously while adding the ticker branches also. Now you're onto the left side. I'm trying to show some branches popping out from our g, which is not presently visible to us. So just a few branches popping out from dad and then either just add a fuel brand just bumping out from this mud ADR. Now yo onto the right side also vary randomly. I'm trying to show some branches lying on do this mountain range that we being dead or the base ADF or the GI. So we are almost done with our galaxy. This is the last galaxy in the series. I hope you guys enjoyed painting all of the five galaxies with me. And I would love to see your class projects for the Galaxy team and do the project section. And I tried to vary all the galaxies and tried to make it simple for every big not to follow along. And being these beautiful galaxies in just like under 10 to 15 minutes. So we are done with our galaxy painting. Now let's remove the masking tape and see our final painting of this team. Make sure that your painting is completely dried before removing the masking tape. And remove the masking tape at an angle from your paper so that your paper doesn't take it off. So there we are ready with happy ending for detail, this beautiful cotton candy galaxy. I hope you guys enjoyed painting this with me. I will see you guys tomorrow into our next team. Till then, keep painting. Thank you so much once again for joining me.
17. Day 11 - Sunset Mountain: Hello everyone and welcome to day 11. We add on that toward poems, that is Mountains. So let's quickly have a look at the colors that you would need to pin the sunset mountain. You would need a shade of orange, yellow windrows, bright blue and black. So let's begin painting. I have maybe deep down on all the four edges onto this ball. Let's quickly have a look at the rough pencil sketch for this one, I will basically just be marking out the mountain ranges. So almost in the center area, I will mark the first mountain range. Now leaving some space underneath this mountain. I will mark another mountain range. But make sure you do not market exactly the same shape that you talked about, trying to read it, the shape and the range of the mountain. Now underneath this, I will just mark this toward and the final mountain range, and that is it for our pencil sketch. Now, let's begin painting. I will first begin with a clean CTO photo onto my sky area only. And then we even paint a mountain range one by one. For painting these mountains, I will be using different gradients of the purple color. We will form the purple color by mixing our pink and blue color. Now let's begin with this guy. I will begin applying a clean CTO photo onto my entire sky area. Make sure you apply an even coat of water throughout and there are no pothole dot excess water left anywhere. And try to maintain the edges of the mountain this time, because the first layer of the mountain is going to be of the lighter purple color. I'm done applying the Queen CTO photo. Now let's begin painting the sky area with the alkaloids one by one. I will first begin with the yellow color. I am using the cadmium light yellow shade. You can use any light shade order bright shade of yellow. So onto my left side near to the mountains, I'm just applying a little of this yellow color first. Now next after this, I will pick up the shade of yellowish orange, which is almost equal to an orangeish color. And below new to this mountain, I will be applying this yellow orange shade. If you do not have a yellow orange shade, you can use an orange and mix it with a little bit of yellow. I am directly using the orange shade that is available in my palette. And I'm applying it near to the yellow. Now, underneath this yellowish orange, I am applying the quin rose color. If you do not have quin rose, you can apply scarlet or carmine or any pinkish, reddish pink tone that is available in your palate. And very carefully leaving the edges of the mountain. I'm applying this color onto the entire area near to the mountain top and blending it with the orangeish color. Now again, I will pick up some yellow color and apply it at the top because the yellow was completely hidden. So just a little line of the yellow color again. Now next I will shift to the civilian blue color from the palette, you can use any shade of blue or lighter tone of blue, either a bright blue or civilian blue or sky blue color. And an actor doc, apply this column. Be very careful because the yellow and blue when mixed together will begin to form a greenish to one. So be careful there. So I'm just using a damp brush to get a clean blend between the yellow and the blue color so that there is no green color also form and I have a smooth transition between both the carlos. So just running or damp brush there. You can see I've got such a smooth blend by just running this damp brush. Now let's begin adding some Cloud details. So I have picked up the yellowish orange shade again, and I'm just adding some light lines to act as the clouds. Make sure when you are adding in these Cloud, you don't introduce any new water and just pick up more pigment and just with a wet brush. The brush also should not contain much water. Otherwise it will begin to spread and you will not get this definite lines that I'm trying to add. Now. Similarly with the quin rose color, I'm just adding some cloud strokes. You can see I'm not introducing any new water. Hence I'm able to maintain that line that I'm adding and it's not spreading much. Now near to the mountain, I am just adding in a little touch of the violet color. So about lying of the mountain, I'm just adding in a very diluted all of top violet color so that it reflects as the shadow of the mountain. So just a very thin line with a very diluted tone of the violet color. My sky is still wet hands. I'm able to add this or, you know, darker tone right now and it's blending with the background. And having that soft edge, if you ask II has happened to dry, then wait for it to completely dry and then begin adding this. If you do not have a violet to, you can make Senor blue and pink color order to get a violet tone. Now let's wait for the sky too dry. So you're all, my sky has dried completely. Now let's begin painting the mountain ranges one by one. I will be painting these mountain ranges with different tonal values of the violet color, from light to the darker tone. And then in the foreground, I will be using the black color to add some solute and grass details. So let's begin the first layer of the mountain. Firstly, make sure that your background, that is the sky, is completely dry. Now for the violet color, I am mixing in my Quin rose color and the civilian blue color. And you can see, I have got the violet. Now, this for the first layer of the mountain, I will be using a very diluted layer. So that is, it is more of water and very less of the pigment, a very light tone of files. Now be careful by highlighting it New York to the sky area that you do not run into the sky area. So be very gentle by applying the stroke out there. Also, you can see I am using the wet-on-dry method because I just have to add one layer of color. And I don't want to add any details or wanted to stay wet for a longer time. So this method tools perfectly for painting these mountain range. So you can see how diluted the color is. It is more of water and very less of pigment. Make sure that you keep filling the mountain range along so that you do not or you know, though, layer does not dry anywhere in-between painting. Otherwise it will begin to have some sharp edge. So you can see as I'm painting the top area, I'm even filling the bottom area quickly so that I don't have any sharp edge. Now let's wait for this first layer of the mountain to dry till then, quickly prepare the second shade for the second layer of mountain. Now do the same pigment I'm adding in more of blue and more often when Google Scholar. But this time I will be adding less of Bordeaux. So let's test the color onto a rough sheet and see as to what color is getting formed now so that we do not happen to apply the same shared as we applied the light 1 first. Okay, so it's always better to pasted onto a rough sheet. So this one's the fourth layer. Now, this is the second color that is formed. That is, I added more of city in, in blue and o queen rules, but very less of the water that I added. I want this stone a little more onto the pink side. So I'm adding in a little more of both the kalos to see what color gets fun. So this is the dawn neo to the pinkish side. The second tone was near to the blue side. That was more of blue, but I want more of pink. Hence, I again mixed Apollo. Now I will be using this second tone for the second layer of the mountain. So my first year of mountain is completely dry. So now I can add the Secondly, you need to be very careful with this that if your first layer is dried and if you begin to paint the second layer, We'll begin to spread and will not give you this sharp looked at we want right now. In case if you needed the soft law, then you could paint without waiting for the first layer to dry. But since we want a definite looked at as a hard edge to all the mountain range. So it's very important to wait for each layer to dry before going on to the next layer. Now, I will quickly fill in this entire layer, that is the second layer of mountain with this purple tone. In case if you wanted more to the blue side as we saw, you could add more of blue and less of pink. But my third mountain range, I will be painting more towards the blue side. Hence. I'm still keeping the world stopping sight. So then I'm done painting the second mountain range also, such a beautiful color tone, it has come out. Now this dries. I haven't prevent a color tone for the third layer of the mountain and desktop. That's the perfect don't I want that is the reason this time I haven't used the direct violet color from my palate despite having it in my palate. Because I wanted to Lady the tonal value of the same column by adjusting the column mixing ratios so that I can get this good gradient. Now for the third layer of the mountain, I'm adding less of the pink color and more of the blue color. Because as I told you this time, I wanted towards the blue side, that is a blue violet dawn and not all pinkish violet. So you know that that is why I always say, even if you do not have any color in your palette, you can always mixed local laws and get the color. So try mixing the color rather than giving up on a single shape. Now I've even added a range of black to this to get our docket bone. Now let's test this color that I have quarter. So then you can see this new, it's a bluish violet, but less of violet and more of a blue ball one. But it's a ball fake Fricton that I need for my Lewis mountain that is a little bluish effect because my sky has a blue shade. Hence, I wanted to get in a blue touch into my mountain, trying to show some reflection of the sky. Now with this darker blue tone, either paint the entire mountain range. So before you begin to paint this third mountain range, makes sure that your second Leo was completely dry it, otherwise it will begin to spread and as I said, you will not get this definite edge. All the veins will begin to merge into each other. And Vicki, We'll begin to have soft the edge because of mixing with each other. And again, for this noodle tool, I'm using the wet-on-dry technique because it's just one layer of the color that I want to apply. And I wanted it to dry quickly so that I can even add the silhouette. Always remember for speeding up the drying process, you can always make sure to use a hairdryer. Now in-between, I'm just adding in a little poeple touch also, so as to reflect the shadow after about two mountains also. So I have a balance between the sky and the mountain loop bought into this lowest range of the mountain. So then I'm done painting desal tool. Now we need to wait for this to dry completely. And then we'll paint the foreground or the ds. So now my entire painting is completely dry. And with the black color, I will just begin to add in some details into the full ground. It in a full-grown I'm just going to add some wooden log-log, some bush. Oh, by dabbing my brush and bind to on the right side. So on the left I'm forced to adding in a wooden log and Django give it some rough edges at places. Just using the tip of my brush. Just a fuel pawn kind of flux onto that log. Now, I've been playing some other log, your smaller one. Same veto. This also I'm adding some tone look. Now same with the black color. In between, I will begin to add the bushes. So you can see I'm just dabbing the tip of my brush to get this drastic structural and trying to form unnatural bushier. Now next, onto the right side, I will first add a bind G. So the binding is going to be more of a scarce kind of look with just branches and not too much of the foliage. So let's begin with the grant or the stem forest. So the DHAP is very thin and as we moved on, what you can see though, oh, stem is becoming take go. Now to this, I will just be adding branches. At the top, the branches are going to be very small. And as I moved on, what David begin to increase in land because of buying tea at the end should be almost into a triangular shape. Now, if your branch does not have a pointed tip, make sure to shift to a detailer brush. Since my brush is, you know, having a pointed tip when dipped into being, I'm able to add in all the smaller branches also, but this one brush. But in case if your branch does not have a pointed tip, then first add some Tico and dollar branches but your normal brush, and then shift to a detailer or 0 pointed tip brush to add in the final branch details. So you can see I'm just adding these branches, Nothing in specify. But as I'm moving downwards, I'm increasing the length of these branches so that automatically it begins to form a triangular shape. So I'm almost Jiajing, the bottom of the GI. And as I'm reaching the board, I will increase the lend more. But in-between your, I'm just adding some tones coming out from this. O means stem. Just very fuels, malls, kind of tons that I'm trying to depict. Now at the bottom, you can see I have increased the length of the branches more so that it looks into a triangular shape. And you can see very naturally I'm adding these branches, some overlapping each other, those, so I'm moving upward, some moving downwards. Just trying to give it all a natural look. So then I'm done painting the pine tree. Now on do this very right corner, I can add a pine tree which will just be half visible. So the stem of this pine T is onto the edge because only half of the bind G is presently visible to us psi now. So only onto one side either just add some details. And this time to this pine tree, I'm even adding a little foil age urine there. I'm trying to make it look all natural. Hence trying to overlap it somewhere on the big opined G and not Wedding March as to where it is overlapping and how it will all look nutshell if you try to make it look natural. Now, on to the left of this big buying cheap, I'll add another pine tree, but this time in a certain direction. And just with branches again, no foil know foil age, just simple branch. Look, you're again. Now I'll quickly add some more smaller branches onto this or big opined G. So just using the tip of my brush and adding these smaller branches variable, I feel necessary. So kind of extension to the main branches. Now you're at the bottom. I will add some more bush, oh, structural New York delta pi1 to almost. You can see I'm trying to read either lend to and trying to make it sound better, longer, shorter. Now, I will quickly shift to my technical pen. And with that, I'm just adding in some row kind of structures connecting all of this, the wooden lats. So like, you know, a farm kind of looked at this trying to add. Okay. And then we are done with tapping thing for D and live in a pretty sunset mountain view. So let's remove the masking tape and see our final painting. Now. Always remember vile removing the masking tape. Let your painting dry completely and always remove the masking tape at an angle from your paypal or 45 degree so that you're painting doesn't date off and you'll clean edges don't ruin. And then we are ready with our painting for d 11. And it looks so bloody with this clean edges. I hope you guys enjoyed painting this and at enjoying these 50 Day Watercolor Challenge. I didn't see you guys tomorrow into the D2L class project of the team mountains.
18. Day 12 - Snow Mountain: Hello everyone and welcome to D. To B. To D, we will be painting this easiest landscaped mountain. Let's have a look at the Carlos. You will be needing a sheet of orange, blue, indigo, black. And right, Gosh, I have my people deep down on this board already. So let's begin with the pencil sketch first off the mountain gauge, and then we will begin painting the components one by one. So almost from 30% below the people, I will begin to map my first range of the mountain. So you can see I'm trying to give it a very natural sheep by having some rough edges. Now below this, I will begin to mark some small amount in genes. So trying to be the sheep and trying to make it look more natural as much as possible. Now, again, from below your, I will add another big mountain range. Now the rest of the thing we will try to be read by being d. So the bottom mountain will be dark. The dark mountain will be more of snow cave, and you're at the right corner. We will be having the buying Gs and the top area is going to be the sky area. So now let's begin painting the elements one by one. I will begin with the sky. And I will begin by applying a clean coat of water onto my sky area. So using my Princeton wash brush three by four inch, I am applying a clean CTO photo onto my sky area. While applying water, make sure that you apply an even coat of water onto your entire sky. And that, that is no bottles of water being formed anywhere. Otherwise, you will begin to, you know, ruin your painting if the water seeps back into the painting. Now near to the mountain range, I'm applying the water very carefully because my mountain is going to be a snow escaped mountain. So I have to try and avoid adding any colors into the mountain. Also, if your paper is 25 percent cotton, running your brush multiple times will help to make it stay wet for a longer time. Now, I will first begin with this blue color at the top area. I'm just using a medium diluted dawn of the city and blue color. And at the top I'm having a darker tone. And as I'm moving down what you can see, I'm trying to gradually make it lighter. Now using the indigo color, I will try to darken the top area and again, running it turns a downwards. I will try to make a gradient color of this blue and indigo mix. Now I am picking up some white goulash and I will begin to apply some white gouache. So you can see I'm beginning to get such a light tone of the blue color, but with a little tint of blue only. And such a good gradient that I am having. Because I will be applying orange color near to the mountain range, which I have mixed in with white quash. And now when the orange and the blue will make, it will not form a muddy color because of the white gouache layer that I applied in between the white quash that I used. I used it in a very diluted consistency. Hence, it's not showing out boutique. And now I'm applying the space Still orange tone. I mixed in orange and white quash to get this base still soft looking orange tone. And I'm just trying to get a clean blend between the orange and the blue with the help of fight cosh. So there you can see such a good gradient I have without forming a muddy color because of the orange and the blue mixing together. Now to this base till orange, I will add in a little bit more of the vermilion color to get a little dark copies till dawn and I will begin adding some Cloud details. Now you see I adapt off the excess water so that it does not spread into my sky. So very important when wet on wet, you are adding Leo's for detailing. Always dab off the excess photo and make sure you do not introduce any new Watteau. Otherwise you will not get the clean look that you're trying to achieve by adding on these Leo's. Now with this add-in, in blue color, I'll try to darken some ADR because watercolors dry or tone lighter. So right now the tone sheets that I have, I feel when they will dry, they will turn more lighter. So to get a little more vibrant, don't, I'm adding in a layer of the city in blue and indigo again at the top area to get a little darker and a vibrate look. So Dad, I'm done painting the sky area, such a simple, easy sky right? Now, Let's begin painting the mountain range. So I will first begin with the bottom mounted engaged in my sky dry so that I don't have to wait for it to dry and I can paint other elements. So the bottom most mountain ranges on the left, I will force to add in a layer of the indigo color or very diluted, don't. So what I will do is I will first identify the edge to this mountain and then using what? I will try to just spread this color onto the mountain range. But some very, you can see I'm adding some dry brush so that the in-between I automatically have a snow lock. So that is 0. The technique that you can use that first pick up some paint applied onto the edges, and then in the center, just try to drag your brush and get some dry brush strokes. Why are they adding these dry brush strokes? Make sure that your brush does not have access what are otherwise you will not get these dry brush strokes. Also, if you want to add these dry brush strokes, and if you're using good afternoon people, it becomes quite easy because of the texture of the rough trained people. So yo you can see in-between, I have automatically got the snow look and at the bottom, the mountain range is having its own load because of the darker tone of the indigo color. The indigo color from this set is almost equal to a Payne's gray Kahlo hands. I'm able to get such a look. Now on to this bottom mountain range, I will still add some darker dawns. So using the same indigo color, but this time in much of big mentored of format that is very less of water and more of pigment. And I will just try to add in some darker details at the bottom media, you're just trying to pull out some darker tones. But you can see I'm trying to lead the lighter tone, a literal to be visible at places so that I get to gradations to my mountain. Now the sky ADR near to the mountain has also dry. So I'll begin painting the top ADR amount then also. So I am using the setting in blue color in a very diluted consistency that is like 90 percent water and 10% pigment. And I will just try to add some patches on Buddha Bob mountain. So the top mountain, I want to show more of snow and very less off the black look. So I'm adding in more of what those so that I have a very light look. So, you know, this guy tries to depict the eyes look onto the mountain that is this no look using the blue color here. And just in batches I will add the blue color at places and give it some soft edge trying to blend it into the background. And in-between, I will even be adding some dry brush strokes with Docker bones also. So you can see very randomly leaving some gaps. I'm adding these patch to depict us know. And the darker tone reflections because of the shadow concept here. So that is the reason. So the media seemed occur despite the entire mountain range being a snow-capped mountain. Now, just yacht on the top, adding some blue tones. And even onto the left side, either just add some blue dawns at the door. Then once this mountain range dry, I will add in some dry brush using the darker tone of indigo color, which is almost equal to the pins gray color. But before adding the dry brush strokes, you need to be sure that your entire mountain range is completely dry. So my mountain range is completely dried and I'm picking up the indigo color. And using this indigo color, I'm just adding some dry brush. So I am just diving the excess water and now just adding dry brush very gently from the bottom. So you can see I'm just dragging my brush and since my people is rough green, the paper is helping me to get the texture. Also, since i that both all the excess water, there is no patches being laid down and I'm only getting the dry brush strokes. So it's very important while adding these dry brush strokes to dab off the excess what DO? Otherwise you will not get the dry brush technique look that you want to add. Now very gently at the top ADR, giving some small lines or do reflect some darker tones. And then giving some dry brush from the top also to show the directions of the snow. So very slowly following the same process, trying to give in dry brush onto the entire top mountain. So depending on the movement of the mountain, I'm trying to VD my dry brush movement. So then my mountain is moving towards the left. I gave the dry brush also moving towards the left. Then I'm trying to sue the direction of my mountain and the snow collection towards the right. I'm trying to move the dry brush towards the right and do the entire mountain range. I am giving a very fine bordeaux with the same color. So to this larger mountain Also, I'm showing the directions moving towards that I, hence you can see I'm adding the dry brush tool moving towards that I'd say. So if you'll notice, every time that I'm picking up fresh paint, I'm making it a point to dab off the excess water onto a tissue. So always make sure to keep a tissue or a reflow time D while working with watercolors. Because while adding Leo's AAD using these techniques, it's very important to remove the excess water and always try to use the shoe that absorbs water. Or if you're using clot Applause that easily absorbs water. Now, after this to the low amount and range also, I will add some darker dry brush. So I'm using the black color this time. And I will just add some dry brush using the black color onto the lower mountain so that I have a good gradation there. Also, I given that dry brush with the indigo color, which is almost equal to a Payne's gray color in a diluted consistency. Now, you can see just by adding these dry brush with the black, it's beginning to getting more depth and getting much better. Look. Now for the pine trees I will be using in the black color. So at the top range of the mountain, I will just add the detail look of the pine tree and the bottom area will be easily fill it in with the black color. So I will try to, uh, you know, VD the length of the pine tree and just aren't the top. I will be giving the deal for LH look. So you can see just at the top of the mountain, I'm adding the pine Gilo and then the bottom media. I will paint it complete vivid black. Do not worry if you are overlapping these mountain disorder, these pine trees onto the mountain range. That's perfectly okay. And it will give it the natural law. So little of the pine tree or well IPO mountains and have a notch to look. And you can see as I'm moving towards the right, I'm increasing the length of the pine tree accordingly so that it looks in a little coffee mano. So we haven't guided ODD local for buying gene just bookstore stood there because bind G and I'm done adding all of the in-between, a little wide gap as visible. That's both big. And it deflects this noise effect onto the pine trees also, the board we will be adding in completely with black now. So now simply for Linda ngDialog, the media, but the black color. So I'm almost done filling it with black color and you can see the pine tree Luke is visible at the top and bottom. It's looking completely filled with foil age and onto the top area, the white gaps that are visible tried to reflect thus no, onto the mountains from behind the pine trees. Now from the left I will just add some branches popping out. So basically it is those branches of the g from the left side, which is not visible to us either at present. And just a few branches are visible. Now one last thing left is to try to depict a moon that is just about the right. So onto the top-right corner using white gouache, I will try to add a moon, which is just trying to come out and not completely outright now. So I will first add a little inverted, see that there's a reverse C-shape. And then using water, I will try to give it a little blurry effect. So almost a semicircle that I painted. Now losing little blue color in a very diluted consistency. I'll try to blend this moon and do the sky and then just using clean water oh, sorry, or damp brush. I'm just trying to blend it into the sky so that it has a soft edge and it completely gets settled into the sky and tries to depict just a moon that is about to rise. So you see very carefully just using a damp brush, I'm trying to get that look and just using the tip of my brush and going very slowly so that I don't ruin the sky area. So now you can see my moon has got that all soft looked and it's about to rise and not completely right. So let's remove the masking tape. We are done with tapping thing. Make sure that your painting is completely dry it. Otherwise you may ruin the edges and always remove the masking tape at an angle from the papal 0. So you can see I ruined though painting because I was removing it too quickly. So now I will just try to remove it very patiently from the other side. So that is the reason I said you need to be very careful while removing the masking tape. So there we are ready with shopping. And you can see the moon is looking perfectly half hidden now. I hope you guys enjoyed painting the second mountain with me today. I will see you guys tomorrow and do the third mountain. Thank you so much to each one of you for joining me so far.
19. Day 13 - Way to the Mountains: Hello everyone and welcome to the 13. Today we will be painting this beautiful mountain range along the road side. So let's have a look at the colors that you will be needing for this class project. You will be needing a shade of yellow, indigo, blue, sap green, dark green, beans green, black, and some white gosh. So let's grab all the colors and begin painting this beautiful mountain scheme. So I have my people, they've done onto my board already. And let's begin with a quick pencil sketch off the mountain range and the pathway. So I will begin by first drawing the pencil sketch off the mountain range. So approximately a little about the center area. I will first mock or rough mountain range and then mark some mountain range below this or, you know, top mountain range. Now from the center, I'm marking this other mountain range. So till now we have marked three mountain ranges. Now just adding in some details or just some basic lines to show the distinction or the shadow areas for the mountain. Okay, so just died. Now, I'll just quickly mark the pathway from the center you just taking out the roadway. So I'm showing the road way moving onto good decides that there's the left and the right. So my pathway is moving on to both sides and near to the mountain range. It's almost diminishing from a site and quickly marked over rising line underneath the mountain at the edge of the roadway. So that is it for the pencil sketch. Now let's begin painting the sky first. We will be painting just a simple Cloud sky. Then painting the mountain ranges, and then painting the rest foreground details. Alongside the pathway also we will be showing some snow collected. And onto the left and the right side of the pathway, we will show some pine trees with the green color. So that is how our composition is going to be. So let's begin with the sky first. I will begin by applying a clean coat of water only onto my sky area. Very gently I'm applying a clean coat of water. Now make sure that you do not run into the mountains because we are going to depict the school escaped mountain law. So try avoiding it. Otherwise you will have to use white gouache to cover up the area. And the sky this time is going to be a pretty simple, smooth sky with just blue and some dark blue ones. So let's begin with the city and blue color. You can either use a bright blue or a sky blue color. I am using the civilian blue color. So while applying these strokes, you can see I'm leaving some white space and medially onto the left side I will be leaving more of the whitespace. And onto the right side, I will add the more of the blue tones. Now near to the mountain range, you can see I'm running my brush very carefully and just trying to use the tip of my brush there to get those clean edges. Now onto the left, just some simple strokes and more of the whitespace. So you can see on the left side, I have so much after whitespace that will automatically form the cloud look that I want in the sky. Now, I have picked up some indigo color. And again onto the right side, I'm just giving some highlights with the indigo color. Now make sure when you're adding in these highlights, do not introduce any new water. Otherwise you will not get a definite looked at your one and the paint will spread too much and the blue color NOC will be for you not lost. So it's very important to maintain the water when you are adding Leo's with watercolor to give in more depth. Now you can see our sky. The white gap on the left is forming to be the clouds. And onto the left to be, sorry, and onto the right we have the entire blue sky look. So that is it for us, sky. So now tell my sky dry. I can paint a mountain range. So I will first being the pathway till then. So I am picking up some Payne's gray color. You can use a black color in a little diluted told if you do not have been screened. Or you can even mix indigo with a little bit of black to get a Payne's gray color. And I will be using this Payne's gray color onto the entire pathway. So now on the entire pathway, quickly applying the spins gray color using the wet-on-dry technique. Because right now I don't have to add any other layer or any bd into the pathway. So it's okay for it to dry completely. And since it is a small area, the wet-on-dry technique will work perfectly for this area. So I'm done painting the road, just giving in some highlights and trying to get a good look to this. Now, I'm done painting this pathway. Now I'll begin painting the lowest mountain range on the left first, because my sky is still wet, hence, I cannot be in the top mountain range. So I'll begin with the lowest mountain range. And there also, I will be using the Payne's gray color, but in a very diluted consistency first. So just as we did in the last class project, I am forced giving in some darker Payne's gray area at the bottom range of this mountain. And then at the top, I will just be giving in dry brush strokes with optical color of the seam of pins, gray color. So you can see I'm just very simply pulling out these strokes and not having a clean edge at the top. I'm just giving it a good of those rough edges at the top area also. Now I'll shift to my smaller sized round brush. And I am using my size four silver black velvet round brush. And I have picked up some Payne's gray color and adapt off the excess color. And now I am giving in some GI brush at the top of this mountain range. So first I will give in a very nice dry brush border and then try to pull out these dry brush strokes. Now when I picked up the paint for adding in these dry brush, I am not picking it up in a very diluted consistency. I'm picking it up in a more pigment and form that is more of pigment. And just trying to get these dry brush strokes. The important key and the point in getting these dry brush strokes dry it is that you should always dab off the excess water and try to pick up more of pigment with less diluted through water. So you can see it then I'm picking up more of the pigment. I am able to get the dry brush. And every time that I'm picking up the pigment, I am dabbing my brush on to that tissue so that all the excess water is absorbed by the tissue. Now using a damp brush, I'm just giving it some very light patches of the Payne's gray color at the top area depict as the snow deposit. So you can see it's giving so much more debt. So simply, I just use a damp brush and spread it the color there into the background. Now at the bottom range also using the color in Arctic phone, I'm giving in some dry brush. Later on, I will be adding more dry brush using the black color. So the entire key to painting these nodes escaped mountain is using this dry brush technique in the right way. So very important to learn this technique. And if you feel that you don't get the technique right, you should first try it on rough people before trying it on your actual painting. Now, I have picked up the black color. And with the black color I am adding in some dry brush and some darker patches on do this mountain range. So you can see, again, I do not have any excess water. Hence, I'm getting in these dry brush strokes so easily. And I'm just simply moving at random places and giving this dry brush strokes. And, you know, not covering all the Payne's gray strokes that I have given because having to kalos will add depth to your mountain. So try to maintain all the color looks that you add. So we are done with this forced mountain. Now let's begin painting this again Mountain gene. Now, I'll begin with this mountain range on the right side. And again, I'm beginning it with dopings, gray color in a dark consistency. And just as we did on the left mountain, scene V for start at the bottom. I'm just trying to pull out some strokes. And then at the top I will add in some dry brush and some are very night margins. Or to define the mountain range. So just some little details on the mountain before adding the dry brush. Now this time on the mountain range, onto the left side, I haven't even be adding some shadow to depict a shadow on the mountain range. So I will be using the sirenians blue color in a very diluted consistency. That is, it's, you know, like 90 percent water and just 10 percent of the pigment. And just try to spread it into the mountain range or login and have a soft edge to it. So you can see, I'm not covering up the entire mountain range, just a very small area to depict the shadow and the snow out there. So now let's add the dry brush, makes sure that your blue shadow that you have added is completely dry before adding in these dry brush. And this time, the dry brush, I am moving it in that direction. There I had tried to depict the movement of the snow. So after these blue shadow dry, I will add the dry brush till then I haven't been this last mountain and even the bottom of the right mountain is still a little wet. So I will add all the dry brush once they are completely dry. Now on to desktop mountain range, I will majorly be having more often dry brush and patch looks, and not just to how we painted the bottom mountains. So first, I will add a few patches roughly. You're in there with the Payne's gray color. Now with the blue color, I'm just adding in a little blending and adding some shadow. You're into this small area of the mountain. Now on to the remaining of this mountain, I will just begin by adding the dry brush strokes with the Payne's gray color and then add more of the dry brush with the black color. So first with the Payne's gray color, just adding dry brush and some border look. Make sure that always, always, always remove all the excess water from your brush before adding these dry brush strokes. Otherwise you will not get the stroke looks and you will begin to get patches of color. But all you need is these dry brush strokes because your paper is already white. And then when you add in these dry brush, the automatically try to depict the oldest known escaped mountain looked at. We are trying to get, okay, so now let's quickly add the dry brush stroke onto entire of this mountain range. Now, I will shift from my black condo and I will give the Docker GI brushstrokes on to all of the mountain ranges. So using the black color and noted consistency with without any excess water, I will begin to add the dry brush strokes and some small details onto the mountain changes. So very fine lines. I added your and now with the same black color, I will begin to add these dry brush strokes onto all of the mountain ranges and give the final effect to a mountain. So you can see, I am getting these gyros stroke, so-called fake news without any hassles or any difficulty because of phosphine, I'm not having any excess water. And secondly, my paper is rough greens, so it's adding to the ease of adding these dry brush strokes. Now even your on the shadow parts of the blue, I added the dry brush strokes with the black color. Now, this mountain is still a little wet, so I'll wait for it to dry then. The remaining 80. Ok. So I've been forced out by only OT off of AD by New York as the ice. And they don't want build this once it is dry it we add the bind Gs, but the green color. Cmv, even on the left, fill it completely with a very diluted tone of the blue color. Now we need to wait for both these blue patches to dry before adding the pine trees there. Till then, my top mountain range is completely dried and they're also now I will add the dry brush strokes, which was 0 remaining on that shadow blue area that we've been dead. So we'll just turn it down more DACA highlights on this mountain range also at the top. Now, even on do this mountain range, I do still add some dark go dry brush because they feel it is still not having that dried deck. So I'm using the black color and the darkest consistency and just adding some more dry brush so that it looks a little more detail. So now I guess I am done with the mountain and I have caught the perfect loop that I need. If any of you feel that, you know your digressions looking more or you don't need to add more of it. You can show list stop wherever you feel it is right now my pathway is also completely dry it and I will begin to add the details onto the part we tell my pine tree areas dry. So first I'll pick up some white quash and add some lines onto the edges of the room. So you don't want to both the edges that is the left and the right edge, I will pick up some white gouache and add these lines. Now make sure that you pick up the white quash in its thickest consistency so that you get the opaque look that we want on this pathway. And if you do not have whitewash, you can use high-tech relics or by coastal Carlos, but white watercolors may be a little tricky to get the opaque look. You can try using them or you know, without adding any water if you wish to go ahead with watercolor only. Okay, now, even onto the right side, I even add the same quickly. Now, on the center of this reward, I will add some more details. So what I can do is I will pick up the yellow color in its thickest consistency and add some pathway details using the yellow color. So I have picked up the cadmium yellow color in the thickest consistency with adding only or pinch off water just to wet the color. So you can see I'm getting a bright look even on put a dark color because your, I'm trying to use the watercolor wash basically in its opaque consistency. If you want, you can directly use a yellow gouache and add these road highlights. Okay, so just simple markings on the road. And now let's be it for all of it to GI and then pin the photo details. So now my entire painting is dry and let's begin painting the pine trees. So beginning from the right side, I will just add some simple pine trees using the sap green color. So just very simple, not detailed pine trees, very simple one. So first I will add them with the sap green color, and then at the bottom side, I will add some darker tones. Or what you can do is you can alternate between using the darker green color and the light green color. Now, I'm trying to take these binaries a little onto the mountain range so that it looks natural. Huike, and you can see I'm painting very simple pine trees, not even detailed ones. Very simple and quick ones. So just keep adding these pine trees onto the entire area. If you are someone who doesn't like painting the pine Gs and you know, your, you have to add in even the simple ones, but so many. So what you could do is instead of for painting pine jeez, you can cover the entire blue area with the sap green color first. And then just add some darker green patches and just some brush or a brush strokes to depict as the grasses there. So you can turn it into a grass field if you do not want to depict the buying jeans. So that's one alternative or for adding the details there. Now, I'm done with the first and foremost, I love being the first node of pine trees on the left side also. Find G on the right will also dry so that I can add the second Neo. So onto the left side, I added the pine trees in a little hydrogen. So I don't think I will need a second layer of pine trees onto the left side, but I will definitely be needing a second layer of pine trees on my right side. If you want, you can even paint the pine trees on the right first only follow. But I preferred adding a second, you're there or to add some variation. Now, I have been alternating between the light green and dark green color. In case if you did not have or dark green color, you can either mix in a little bit of brown or black to get the darker green don't automatically don't. Now all with the same dunes, I will paint the second layer onto the right side first, and then I will smoothen the edges. So for the second layer, I mix my green with a little bit of Payne's gray to get a darker green tone. And now the dark, dark green tone, I'm adding in the second layer of pine trees. So I have picked up some black color and in between I will add even darker pine trees and just some darker shadows onto dopamine genes that I have already added. Even on the left, I added some darker shadows. Now with this darker tone, I will paint the remaining pine trees on the right side. Now at the bottom on the right side, I will just add some green simply and smoother net you using a damp brush and blend it well and do the blue color because, uh, you know, some small deposit has to be seen there. So basically all the gaps between the buying G is trying to depict the snow that is there underneath and on the pine trees. Now, I have picked up some white goulash and on the edges of this road. And by Andrea, I will just add some white gouache deposit trying to show us the snow deposited there. So just dabbing the white gouache there. Nothing in detail or nothing specific in shape or anything. Just dabbing it in a rough manner, trying for sure the snow collected there. And there we are done with our final painting. Now let's remove the masking tape and see our final painting with those clean edges. Make sure that before removing the masking tape, your painting is completely dry it on the edges. And always remember the masking tape at an angle from your people so that you do not take off the people or spoiled the painting. So they're really ready with this roadway view mountain. Isn't that a complete vacation vibe to be ADD? So I quickly feel like adding a little more darker green highlights onto the left side. So onto the left spine, jeez, I will just quickly add some darker green highlights. It happens most of the times that after removing the masking tape, I feel like adding some more details. But as far as it does not spoil my edges, it's completely okay to add these highlights. So just little darker highlights. It's adding so much more depth because I had them on the right already. So now I'm done with the final painting. Do not worry if you do not add those darker highlights. It's perfectly okay. So you are, is the final painting. I hope you guys enjoyed painting this. I will see you guys tomorrow and do the next class. Reject.
20. Day 14 - Purple Mountain: Hello everyone and welcome to the 14th. Today we will be being done this beautiful sunset mountain view. So let's have a look at the Carlos. You will be needing a sheet of Oddi, windrows, violet, yellow ocher bonds, sienna and sap, green, white and black color. So I have maybe put down all today. So let's begin with the pencil sketch for this one. So I will begin with the pencil sketch of the mountains first. So very roughly you can see I just mark down among didn't reach at almost 40 percent from beluga paper. Now just a small line from the bottom approximately leaving a 1.5 centimeter area from water. So that will be my little field, ADR. Now, I'll begin with the sky. So I'll first apply a clean coat of water onto my entire sky. Make sure that you apply an even coat of water throughout and there is no potholes of photo left anywhere. So to find the orange shade that I will be using for this guy, I'm mixing in some yellow squash, a little tinge of yellow in case if you have a yellowish orange shade, you can directly use that. Now using this base still orange color, I will first begin applying it. So I feel the space loading just too light. So I'm just adding in a little bit more of a yellowish orange here. Now this sheet looks perfect. So using this sheet, I'll apply a court and then still darken the color and give a darker color. Now next I will pick up the orange color directly from the palette and apply that orange color neo to the boundary. So you can see in-between, I have left the white gap between the sky. So I'm going to be adding the pink tone effect. Now. I'm using my Quin rose color and mixing in white quash to get obese still tone. And then I will apply this color in the center where I have left a wide gap in my sky. So you can see very gently I'm just adding in some strokes, even on the orange color, very small strokes, just trying to pull them out from the toe. Make sure when you are adding in this second layer, you do not introduce any new water. Otherwise, the color will begin to spread and will overpower the orange layer. And it will all turn into a pinkish red and the orange color will be lost. Now again, I am mixing some peace till orange color, so I'm just mixing orange and white goulash and add the orange areas where I have applied the orange color previously, I will add this darker layer of the audit. So in-between the pink also, you can see I have been adding some strokes of the audit. Now, if you notice, every time that I'm adding these layers, I'm making sure that I do not introduce any new water. Otherwise, the stroke effect that I'm getting right now, I will not be getting that. I'm preparing a base to violet color by mixing my violet color with white quash. And I will begin adding some highlights cheeks in doing sky with this base to purple color. So very randomly, I will just add some strokes of this. Now, the thing to remember your is the orange and the purple color mixing together will begin to form some muddy color. So you have to be very careful and gender by applying the open LEO neo to the orange. So you need not apply any pressure while applying this Lee also automatically the Monte-Carlo, but not before majorly using the tip of my brush, you can see I'm just adding some half C strokes to act as the Cloud and, you know, given some purple highlights into the sky. So even onto the left, I just added some strokes with the purple color. And in the center you can see it's majorly the orange and the pink only on the edges. It's that I added the pop-up store. Now I will darken my basin pink color and add another layer of this dark copies stripping column because I feel and the pink color is a little too light. Now one thing to make sure is my paper is still wet hands. I'm able to add in Leo's on Leo still and try to maintain all the soft edges to my sky in case if your paper has dried, then VDD for it to dry completely and then add these darker strokes. So now I'm adding in these pink strokes randomly at places. So somewhere I've led, those are light pink strokes also be visible. And randomly I added the dark pink strokes. So then I'm done painting my sky and doesn't it look so perfect? Now what I will do is I will keep rotating my board into all directions so that all the colors blend smoothly with each other. Since my people is still wet and all the pins are equally well. So just moving it a little will help you have the soft edges to all the clouds that looked at we are trying to get, okay, so now till the sky dries, I can't be in the mountains. So I will begin with the bottom or little field area that we have. So first I will apply a court of yellow ocher, yellow mixed with a little bit of brown. So just a little bit of brown into the yellow color. You'll get the achieved near to raw amber color. So I'm forced applying a court of this color. I am using the wet-on-dry technique. You are because it's just a small area and not much of the deals to add. Now onto this, I am picking up some dark green color and I will just add some spots of the dark green color. Now makes sure that you do not cover the entire area with dark green because we want those raw umber look also a liter. Just add little spots like this using the tip of your brush. And also make sure when you are adding in this green color. You do not introduce Module 4 to 0, otherwise the green will spread too much on this look will be lost. Now let's add some brown also do this to give it a little more depth. So I'm using the bond sienna color and just randomly, I'm dropping in some burnt sienna color to add more depth to this field area. Now let's be it for this entire thing to GI. And then we will pin the mountains and add the final details to this guy. So there my entire painting is completely dry. It my sky and the field area. So now I can pin the mountain range. So the mountain range this time is going to be of a violet color. So first I will apply a CT of the violet color onto the entire mountain range or very diluted code or not to pigment it and not too diluted, also a medium code actually. After painting the entire mountain with the purple color, I will then add the details o with the black and the white gouache. Now be very careful while painting this mountain range. And the purple column because also that you do not run out of edges into the sky and ruin the look. So be patient near the edges and then fill the rest of it with the pople stone. In case if you do not have the purple color, you can make sym your pink and blue color, either a sheet of crimson or scar left with any blue to get our desired violet color. You know, sometimes just trying out the different proportions of both the column you will get the desired don't that you want. And your I'm using the wet-on-dry technique because it's just a simple quick EDI and not much details to add it. So there I'm almost done painting the entire mountain range with the violet color for now next, I will pick up some burnt sienna color. And to this mountain I will add in some spots of the bond sienna. Now my mountain James is still wet, so I will quickly add the bone CNOT before my mountain Js. In case if you're using a paper which is 0, 0, Twenty-five percent cotton, people are less than a 100 percent cotton, which dries quickly. So then I would recommend you to go for the wet on wet technique Your for the mountain so that you're mounting media will also remain wet for a longer time for you to add details. Because when you use the wet on dry technique, the paper dries quickly after the first layer. So I given some bond on body deals at the bottom and now at the top, I am giving it some bond Dumbo details so that I have those clean edges different from the sky. Now, I will quickly add some more darker, a little more darker than the previous tone that I just quickly add these highlights. So I still want some more darker purple look. So I will still add some more darker violet color, violet gaps that I had. Okay, So this time or even more pigment and less diluted and just to get this Docker depth look. So some there I have the light sheet and some veggies, Dakpo Tashi and adding so much more depth to my mountain. Now let's wait for the mountain to dry and then add the final details to this mountain. So my mountain gene is completely dried now and now I will begin to add the diaper rash DP adds onto my mountain. So fast for the dry brush, I am using the same violet color and I will give the dry brush with the violet color. Now, when you are adding the dry brush, makes sure that you do not have any excess water and you dab off all the excess water from your brush. Otherwise you will not get these dry brush strokes. So in-between, you can see I'm giving in some details to the mountain, two typical movement of the mountain or the shadow areas. Okay, So that line in between that I give to depict the shadow area towards the left side you're now seeing v I will be adding this dry brush strokes onto the entire of the mountain gene. But before that, I will add the dry brush strokes with the black color also undo this area forest and finish this area so that we have a look how we have to pin the rest of the mountain. So you can see I'm giving in some black line. You're so that I get a look to my mountain moving towards the left to show the shadow effect. So you can see I added more of the black color. And now let's spin the remaining mountains. Dry brush deals with the black. So I am simultaneously adding the giant rash with watercolors that is alternating between the violet and the black. So that, you know, I get a look of how the entire thing is coming to light. And to that I don't overdo any one color. So that is the reason I'm being done good pathway path and adding both the dry brush so that I get a better picture of what it is turning into. Now, again, on this mountain, you could see I gave a curvy edge moving towards the left, trying to depict more shadow there. So the other curves onto both the mountains you can see it's more darker near the curves and the rest of the ADR has light dry brush strokes. So that is what I meant by the shadow effect that I was trying to depict. So be out on the last mountain G, just adding some Dr. Rashad with Lee. And after this we will just be adding some simple black tea styloid kind of a look onto the field line. And then we will be done with this painting for today. So now I'm adding in more darker depth with the black color. So this time I'm picking up the black color in a very less diluted consistency and the darkest tone. And with that dark tone, I'm adding in these darker, dry brush strokes to give it more depth to my mountain. So just some more quick dry brush and then we are done with the mountains. Isn't it looking so bloody? Along with that purple look in the sky. Now, just some dry brush with the white quash. And then we are done with the mountain dream. And then just some spiky mountain range with the black color to finish this painting. Even the divide goals, the key to getting the dry brush is to dab off all the excess paint from your brush and then move your brush on the mountain range. If you will have even excess pigment with all the Watteau, you will not get the dry brush stroke and you will begin to get the badges. Now, I will quickly add the mountain range with the black color. So I have to take my board so that it's easier for me to give that spiky mountain range. So it's a kind of a tree danger or from a distinct, but you can even call it a mountain range. So you can see I'm just pulling out symbols change lanes from the black line that I have mobbed onto the field ADR and the mountain range. And I'm dying to Lady the height of these spikes that I'm trying to add. Also, these are like distant trees. So just symbols, Jade lines to depict. Make sure document them in height so that it looks bad. Because if you keep them off advancing, getHeight through all, do you not get a notch and knock and it will not give you the look that you should get by just meeting the height of these spiky look that you are adding. So I'm always done adding this spiky load onto the entire bottom of the mountain. If you want, you could have simply added some bushes by dabbing your brush, or you could have been entered some pine trees instead. So it's completely your choice and you can vary the subject there as per your wish. But I felt this looks perfect though. Now lastly, I will just quickly add in a few boards into the sky. So first I dropped the littered, so good. Then a little oval. Then I will add the wings onto both sides. So this time a little curvy wings into o structure. Now just making these veins are little tick. And we add id with the force board. Now similarly, I will just add another two to three birds in flight motion, you are into the sky. Now, another bond, your eye been added. So many boards that I'm, I begin, you again, try adding these boards onto a rough people. Also you begin to get a high, often structured off the symbol one spot by Bot. So there we are done with our final painting. Now let's remove the masking tape and see the final painting with those clean edges. Make sure that your painting is completely dry on the edges before removing the masking tape. And remove our masking tape at an angle from your people so that you would not get off your paper. So your is our final painting. I hope you guys enjoyed being being this mountain building today. I didn't see you guys tomorrow with our last mountain being Dean. Thank you so much to each one of you for joining me.
21. Day 15 - By The Beach: Hello everyone and welcome to the 15. Today be out on the last front of the mountain series. Let's have a look at the colors that you need for this painting. You need a sheet of bright blue bond, umbo, old Sienna, beans, green, right, garage and black. So let's begin painting. I have made before deep down onto this board, and I'll quickly begin with a pencil sketch. So first I will mark a horizon line. Okay, roughly in the center of the area. Now, I'm marking the beach area first. My right side is my beach area under left side is going to be the sand area. Now onto my horizon line and place the mountain range quickly. So in between the mountain range also, I'm giving in some lighter and darker shadow regions. So just splitting it into parts. So that is it for my pencil sketch. And now we'll begin painting one by one. So first I will begin painting the sky. So I'll begin the top lean CTO photo onto my sky area. Or I will try to avoid the mountain range. But in case if you run a little into the mountains, it's perfectly okay because the mountains are going to be offered darker door. But as far as possible, I would recommend you to try to avoid or, you know, running the colors into the mountain. So I'm done applying a clean coat of water onto the sky area. Now while begin with the city Lynn blue color. You can use a bright blue color. So my bright blue color from White Nights equal to the serene blue color from the Magellan Mission, say. So leaving some white gaps into the sky, I am applying the sitting in blue color in a very diluted consistency not to pigment. Now, in-between this, I will pick up some Payne's gray in a diluted consistency and apply the Payne's gray color. There. I have left the white gaps, but I will make sure that I don't cover all the white gaps also. So basically I will be having three color variations in my sky. That is some white areas, some things green and some blue. So I'm just applying some Payne's gray in some circular motions to give some cloud effect. By adding in these clouds with the Payne's gray color, make sure that you do not introduce too much CTO because in case if you will introduce too much water, then you will not get the look that you need. Now, I'll just tilt my board in all directions so that all of the clouds have a soft edge naturally. I'm just adding in a little more of the blue shade at places because I feel when it dries it will dry or don't like 80. And that would be too light for this guy. See, I'm just tilting my board in all directions so that all the clouds blend into each other. And I have a very soft looking sky. So you can see the pain scan, the blue color are merging so well into each other and having that soft edge in case if you have any excess water just lifted up with your brush. And then you can see my sky is having such a soft look without any sharp edges and so smoothly blend into each other. Now, I'll wait for this entire sky to dry and then we'll begin painting the rest of the area. So let's wait for this to dry and then paint ahead together. Now my sky is completely dry and I'll begin painting the CDF for us. And then we will move to the mountains. So far the CAD I will be using the Payne's gray color from White Nights in a very diluted consistency. So I will just add a little water to the color direct knee and apply it directly onto the CDO. So I will first read the entire area with a little bit of photo and then apply the pins gray color. So you can see I'm applying the Payne's gray color in a very diluted consistency and not to pigment day. So cover the entire area with this SlideShare because the signed area will be in black color this time. I know I haven't maintain the line of the signed area, but it's okay. I will oh, you know, V-shaped type line. When I do it with the black color for the signed area. Now I'm done with that. Now. I've been just give a little darker Payne's gray color at the bottom. So now this time I'm picking up the beans in a little less diluted consistency and just adding about this. So what I'm trying to achieve is darker color at the bottom and lighter as we move towards the horizon line. So as I'm moving from, you know, bottom towards the top, I am just using a damp brush. I'm trying to get a good grade. So that is you don't DACA at the bottom and lighter at the top. So just using a damp brush you can try to get this good gradient. Now, after my CAD and dries, I will paint the beach. Etl didn't then I haven't been the mountain range so fast. I'll begin with burnt sienna color and undo this left side bone ten, only at the half area. I haven't given a quote of the bone sienna color in a little diluted consistency, not too thick. So you can see such a light sheet I have given in first because then we'll be adding depth the orbit that dry brush strokes. Now onto the right side all Eigen add one mountain. Now I will just add a little more depth on to the left. And then I have invade for this entire working to dry. And then we will paint the rest of the mountain with darker tones and the beach idea. So now all my mountains and the beach EDA is completely dry. So what I will do is I will quickly pick up some burnt sienna color, but this time in a little thick consistency such that it is a shade darker than what I have previously applied. And I will apply it in the center of the mountain range. I am using the wet on dry technique. You are because it's just smart ideas that we have to paint and it's easier to use the wet on dry technique here. Now that last little mountain that will be left underneath the Eigen paying dip at the end after this center mountain range, Draghi's because you can see painting it in parts. I'm getting a distinguished look to all the mountain, despite being in one mountain range. Now on my horizon line, using the black color, I will quickly give us smaller mountain range onto the right side. Now, then my last mountain range gyrase. What I will do is I will quickly pain the sand idea with black color. So I'm simply just using the black color and I'm just applying it onto the entire left side, which is why try it now. And now while adding this black color only, I haven't even begin giving shape to the oh, you know. Oh, sure. And the shortest meeting. So you can see I'm adding in a shape line your now. So as I will be filling the entire of the lefty of a black color. So that is the reason that dying while adding the Payne's gray color. I did not worry much about the line there and just being did a directory in the easiest Mandel. So now I'll quickly fill in the entire beach area with the black color. So I'm done with the beach area also. Now, all my mountain range. What I will do is I will be placing some tiny drops. So Victor black column only. When we have painted the Payne's gray color. I may just add some tiny rocks there. So you can see very randomly, I'm adding in these rock shapes, nothing in specific audiences, Nothing in mind as to where to add them. Just to add a little detail to the sea. I am adding in these rocks because we are not adding any detail leaves on anything in the sea. Vaping these rocks, make sure that your VAD them in different heights shapes. As you can see, I have tried to Wadi them in lens shape and some vector x, some very, very thin. So all this will make it look natural. And if you will keep them in just one shape, it would not look that pretty how it gives you with the different shapes and sizes. Now my mountain range is completely dry it and I will fill that little white area which is left. So I am using in the bond on book Allah this time and with the bond amber color, I'll fill that small little mountain range there. So with a very diluted tone of the bond, amber color, I have filled in this little mountain. Now, I begin to add again that dry brush strokes to the mountains which are already GI. So first I'm picking up the bond amber color and onto this mountain range that I painted with the bones, Sienna Light this stone. I'm adding in the dry brush strokes with the bond on board Kahlo. And all my dry brush strokes in this mountain range are moving towards the left. So my brush movement is also towards the left. And I will just give a definite loop to the line that is the distinguishing line in the mountain range. And just add a little more dry brush with this. Now, always make sure when you are adding in these dry brush strokes that you do not have any excess water, otherwise you will not get this dry brush look. And if you have accessible DOT direct onboard tissue, you can see every time that I pick up being I forced onto the tissue and then begin to add the dry brush. And in case if you're not sure, always tested on a graph sheet and then added onto your final painting. And since might be but as that off green people. So adding this drive crashed is becoming a little easier for me. Now. I have shifted to the black color and undo this mountain range, which I did oh, with the darker brown sienna color. I am adding in the dry brush tool with the black color your, so even your, my dry brush is moving towards the left. The major leagues. Now my first Nios II brash on this mountain is dry. So now I'm adding in the second video of a dark black color onto this point and I'm done. Now one Buddhist last mountain I have forced added in a very light border of the bond amber callow, and I smoothen it, its edges. And now I will begin to add the dry brush strokes with that black color directly. Make sure that you dab off the excess water. Otherwise you will not get that dry brush look on the mountain range and even onto this lunar mountain range. I'm just adding a little dry brush with the black color itself. So just some final or a dry brush with the black color to add more depth. And we are done with the mountain range. Now, I will begin to add some dry brush in the beach ADL with the white goulash. So my sand and the CATI is needed. At that point, I will try to give him some trashing the bloke with the white gosh. So I'm picking up the right gosh in its thickest consistency directly from the tube. In case if you do not have white goulash, you can try adding in Seoul with acrylic color by two white watercolors may not do the VOC data. But if you want to use white watercolor, then you will have to use it from what Duke directly without adding any Watteau and in its thickest consistency. So for us to add though, you know, curvy line that I have found onto the edges of it. I am adding in Arctic line of the white quash you. So my brush has a pointed tip, so it's helping me to add this line in whatever size I want. And then from this I will give him the dry brush. Now, I've just begin to add the dr. Nash moving towards my right. Now, even then you are adding dry brush with white quash, made sure that you dab off the excess pigment. Otherwise, if you will have too much pigment, you will again begin to, you know, getting those patchy areas instead of these dry brush crashing lows. So it's very important whether it's squash odd watercolors for getting these dry brush strokes to dab off the excess color and excess water from your brush. And then just have the limited pigment of which you need for getting in these dry brush strokes. So you can see how perfectly even with quash, I'm able to get these dry brush strokes. So just an it didn't move. And then with the same whitewash, I will just add a little reflection kind of crashing and VFS underneath the rocks that we have been doing. So just simply another rock I am adding in a little dry brush with white quash bedding. It didn't just to depict some, you know, VFS crashing near these rocks also. So majorly just using the tip of my brush to add these dry brush lines. So you can add the same and you can see it adds so much more depth to the painting. Now I'm just adding a little more dry brush to add in some more depth and some more crashing be lochia. Now undo this mountain gene. Sure. I'm just adding some black dry brush because the older dry brush type we added, the mountain seem to be wet so that I brushed did not exist only. Now, again, at the horizon line, I'm just adding in a darker black color mountain range, which is smaller than the previous one. So adding another dimension. So the previous that I did was with a little diluted black tone. And your I'm adding in this model a mountain range with the black color or in its tickets consistency. Now one last thing is to add a board into the sky. Savings quickly add a detail. Looking bored into my sky area. So just forming the body fast and then adding in the wings. So you can either wait and see the entire shape of the bird or add the board in any shape that you want. Or you could copy the same word as you wish. So it's a simple board you can see, but just, you know, the look matters, how you pleased the veins and how you're trying to show its flight Movement. Now just adding another few buds, urine to the sky so that my sky also has a little more depth. So you can either, again, as I said previously, being the bads in the motion that you want or you can copy the same movement of the bads. So they have BID with our final painting. Now let's remove the masking tape and see our final painting, the dose clean edges. Make sure that your painting is dry it on the edges before you remove the masking tape. And always remove the masking tape at an angle from your paper. Otherwise it may tear off your painting. So there we have EDI without painting for the 15. Thank you so much to each one of you for joining me in this 50 day watercolor journey.
22. Day 16 - Soft Sky Powerline: Hello everyone and welcome to the 16. We have thickening and the Forbes team that there's some power lines. So let's have a look at the colors for this first class project. We will be needing a shade of yellow, orange windrows, violet, blue, black, white cosh. So I have my people deep down onto all the four edges. And I'll quickly begin with a clean CTO photo onto my entire area. There is no pencil marking or pencil sketch for this beam day. So I'll first beam the entire background because sky. And then we will add the elements to this painting. Now while first begin with the shade of yellow color at the bottom area, make sure that you have applied and even go to photo to vote so that your people the mean speed for a longer time. Because we will be adding a lot of Leo's into the sky to get in all the deck. I'm using the sheet of light yellow color. And at the bottom I have given in some light yellow sheet. Now next I will mix in some Quin rose and white quash together to get a basal pinkish tone. And using this base to the pinkish tone, I will apply it into the sky ADR leaving some white gaps randomly urine there. So I have left the top IDA blank there. Now into this same piece to the pink mix I just added in a tinge of the bright blue color. And I will just add a little more of the Queen Rose color to get a basal violet. So I'm not using the violet cutter directly. Instead, I'm mixing in blue and white goulash and getting this piece to lavender color tone. So you can see such a good piece to 110 to one we have. Now using this tone, I will apply it onto the top of the sky. So you can see I have left white gaps even by applying this lavender, lavender and onto the pink color also, I just given a little off the lavender highlight. Now, I'll make it a little more pinkish again. And adding a darker pink tone in the white gaps that I have left at the top side. So you can see very gently, I'm just using the tip of my brush. I'm dropping these beans. Now again to this mix, I added a little more blue and I have got a royal blue shade of a color. And using this darker tone, I'm just dropping in some callow vetted and the mean to the sky. So the key your is I'm forced dropping in all the beans and then I will keep moving my people in all directions. And I'll try to get a very soft looking sky. Oh, you know, all the colors blended into each other well. So now I will first tilt my board in all directions and you can see the beams are beginning to flow into each other because the beans were a little liquid this time then I applied. So they're naturally flowing into each other and have got such a soft edge and smooth blend or already beginning to. So now I'll just keep up the shoe handy and I'll pick up the excess water that I'm getting on the edges. That too much excess water also may ruin the painting. So just using what assure you can dab off the excess water from the edges like this. And you can see slowly just by tilting it, the NOL deduction, all the colors have blended so well into each other and have such a soft look. Now, again, I'm mixing in my bright blue and quin rose color and a little tinge of 0 whitewash and getting darker, violet look tool. And using that tone, I will just begin to add some more highlights into my sky. So this time you can see this lavender color is darker shade than the previous one. And now trying to add in some darker strokes into the sky. And I am all this time not even adding too much water, but this time I'm not even adding to less water because I want those soft edges. Also, you know, when I tilt up people and the paint is wet so automatically it bleeds into the other color and has that soft edge. So just using the tip of my brush, I'm adding in this DACA don't randomly at places and leaving some gaps so that the lighter bomb, Leo that we have added is also still visible. Now I will add a little tint of pink color to this mix again and get it into a little darker pink tone and add some darker pink highlights also. I know it may become a little confusing for you as to again and again, adding the shades. So what you could do is you could maintain or like, you know, different column mixes that you have already formed. And then all you know, like keep using it. But I prefer adding the tone as in when how I wish to use it so that the color which is already onto my palate also gets used. And I don't waste any coloniality MATLAB. So just a little darker, violet looking highlights, actually pople stone your. Now just moving my sheet into all directions and I'll just add a little more of the yellow highlights also vary randomly at the top. So you can see just very little yellow highlights that I have added and I just dropped in the yellow paint using the tip of my brush also that I don't tell, you know, mix it with any color and form of muddied own auto greenish don't. So that is the reason I just dropped the Kahlo using the tip of my brush. Now you can see I'm just moving my board in all the directions so that although alleles that I have added right now begin to have a soft edge just like the force Leo. And now we will wait for the sundial thing to dry and then begin painting the further details to it. So my background is completely dry it, and now I will begin painting the elements one by one. So first, I am again preparing a mix of a violet tone by mixing my Quin Rose and bright blue color. But this time I will not add whitewash to it. Instead, I will just add a little water to get a little diluted, don't because I will be adding the silhouette this time with these purple tone rather than, you know, adding it with the black color directly. So I preferred adding it with the violet tone this time because it will give a little more depth and effect of the sky kalos and do oscillate areas. So now using this violet color in a diluted, I'm just adding in some silhouettes your so simply some hard look and some building looks at the bottom media and fill it completely with the stone of the violet color. Now, I'll add another building look your neo to this habitat I have painted with this seam, don't. Now I am using a brush which has a pointed tip. Hence, I'm able to get these details. Oh, well, also I would recommend you to shift to either a size 2 or a size one brush and mantra outlines and then all you're not being dead end so that you have all those clean and clear looking building looks. Now moving towards that ite, ion and just add a few solo. Hit your time. Do I have left it blank because dad, we will be adding the PowerPoint. So that is the reason I have lifted blank there. Now I'm shifting to my black color. And I will first begin to add in some bush effect onto the right side with the black color. So using the tip of my brush, I will just begin to dab it and get some bush effect your own. And do not the body you will be covering the little of the solute area that you have been to. But the reason to pin that was that even though you didn't gap in between where, you know, between those black Bush, though building that will be visible from behind this bush, it will give it a little more depth. So that is a reason I added those on buildings false despite being getting covered up right now when we will be adding in this black color. So in-between, I just fit it in with black color. And someday you can see some gaps between the black color also from which you can see the sky color behind. So that doesn't seem before the buildings also be half being did the building for us. In-between the little gaps the building from behind is visible. So now when I'm adding it at the bottom also, I'm trying to leave in some gaps between the black color so that that little building color is visible. Now, even in the center that I have left to blank, I will add in the bush effect in this entire center area, which I have left blank. But I will not add it in all very hybrid manner. Just very small ones. Now some more bush effect moving towards the left side also. So poverty, the buildings on top but making sure to leave little gaps but the black color so that the building behind ads and effect did the same thing. Now, on to the left your, at the top of this hat, I'm just adding in some bush effect by dabbing the brush. So very little, not too much. You're on the left edge. So overlapping the roof or little mature. But you can see I have left a gap, so the roof behind is still visible from between the black shades also. Okay, So I'm done painting the bush ADR. Now we will begin to add the power lines below. Hit your end to this painting and complete our painting for today. So to add the silhouettes of the power line, I will shift to my technical pen and my law. And using the pen nanoscale, I will begin to add the powerline pools. So I will just tilt my board so that it's a little convenient for me to add this yellow hit and move my hand fully. So that is the benefit if you deep down, up people onto a movable so phase so you can adjust the angle of the board according to your convenience. So fasciola, I add one small power line. So on most new out of the left side or a little dog, but more towards the left side. I would just add this small line fast. It's about a two inch line. Now leaving some gaps. I'm adding in a bigger pool. This is a lot bigger. So the bigger line is more closer to us and the one that is shorter is a little file from us. Hence, it's a little smaller. In case if you don't have a fine liner pen, you can use a fine liner brush and black color and adding all of these details. But using a black pen or makes the task a lot easier for adding in these details. And then the Via lines that we will be adding to this PowerPoint. So now normally I'm just adding in some more details to these power lines. Now in-between both of these balls, I would add on August. Which will that be? That it is more far from both of these pools and more five from our view. And now all one line onto the right side. Now the main task left is to add the violins into the power lines and connect all of them and add some lines to this guy. So very simply I'm just giving some connections to the forced to power was the tallest. Now bye to swallow ones you are on the left or using the same online structures. So some bios you can see I'm taking them crisscross to each other so that it all looks nutshell. Now using a scale, I'm just adding in some violins into the sky first. So all very random and some crisscross on nothing specific or non-specific distance or shape between them. So very randomly I have added them. Now from the tallest pole, add some violet lines connecting into the top of the sky. So this time, these lines, you can see our little COVID when moving upwards, but not too much also. So very randomly, I'm adding in these lines and you can see one or two of them even criss-cross each other. So very randomly I have added all of these. Now some move ions moving from left to right. And then I will be adding in some bios moving from the rooftop to the largest power line. Now just adding a small lamp kind of a look here. And then I will be done for this painting. In between 0, I'm just you picking up my white gel pen and adding the light effect with the white gel pen, your 0 into this light here. In case if you don't have a white gel pen, you can just use white gouache audit it. You can just fill it completely also and make it a silhouette. So there we are done with our painting. Now let's remove the masking tape and see our final painting with those clean edges. Make sure that your painting is completely dry it on the edges before the moving the mastering day. So your is our final painting for D6. I hope you guys enjoyed painting this with me today. And you can see on the bottom left and right in between the black colored dark purple color is giving such a beautiful look. So I hope you guys enjoyed being doing this. Thank you so much for joining me today.
23. Day 17 - Simple Powerline: Hello everyone and welcome to the 17. Today we will be being tamed. The simple silhouette kind of look for parallel lines. So let's have a look at the calories that you will be needing. You will be needing a shade of blue, violet, sap green, black and white garage. So let's begin by applying a clean coat of water onto the entire sky area. There is no pencil marking or no areas to leave without what the yarn. So just obtain CT of even Waldo onto the entire surface. So I'm done applying of being CTO photo, and now I will begin with the shade of blue. So in case if you do not have the bright blue color, you can use, set it in blue, sky blue. And I'm using the beans in a little diluted consistency because I want a soft sky. So I'm randomly applying this blue color first, leaving some gaps because there I will be adding the violet color. Now in the color sheet, I mentioned window scholar as an option because in case if you do not have the direct violet color, you can use all shades of pink and blue and get the violet color. So I'm done applying the shade of blue color and I have left and gaps in between to fill in with the violet color. I will directly be using the violet color from my palate. But in case if you do not have, you can mix in your shade of pink or red or blue color to get on your wrist all of the violet color. Now using this violet color, I will applied in the gaps that I have left. And I will tilt the board while applying this color so that I have a very soft sky. And you can notice my violet color is also in our lithium diluted consistency. Every time I keep telling do not introduce new water. But you are when you need soft sky, you need to apply the beamed in a Lipton diluted consistency, not too much so that the paints flow veil into each other and have a very soft, smooth edge to the sky. Now keep moving your sheet in all directions and lift up any excess water on the edges with the help of a tissue so that it does not see back into the painting and spoil your entire clean edges. And that's the benefit of having the paper taped down onto a movable. So phase you can easily blend the colors whenever you want and move the service now acts certain places. I will quickly given some Docker goods because as we know, watercolors dry or don't lie, don't. And at certain places I feel it will be too light of the sheet. So just adding in a little darker layer or undo the places where I feel, especially with the violet color. Now again, I'll begin to tilt the board in all directions so that this darker tone also sets in between the color. Now I'm just using a damp brush and places to get some smooth edge where I feel the pain does not flowing freely. In case if your paint is already flowing freely, you can all leave this step and just to be it for the entire sky to dry. Now, I can even add in some darker tones with the same blue color. So by adding the darker tone, you need to reduce the level of water into the pigment and just applying it at the places where I had the blue color lay down already. And VIII in applying only you can see I am moving my board. So the key to getting those soft, smooth sky is a u naught tilting your paper in all directions so that the beans seep into each other. So you can see, I'm just adding some darker depth at certain places in my sky. You can see the light color and the white, the pieces also. So that is all adding the variation to the sky. So make sure that you also have some white gaps to add in debt. Now adding some darker purple shades also. And again, why am I adding in these shades? I'm moving my board in all directions or, you know, again and again so that all of the kalos seep into each other and blend smoothly. Now the water media, I didn't bother to be interred much right now because as it is, that will get covered up and I lead on the silicate part there. Now, always make sure that you keep adding these colors in Laos and not altogether. Because when you add them in Leo's, you begin to get more depth because of the tonal variation of the kalos. And in case if you add directly the darker tones at once, you will get a very, you know, basic kind of a sky. Now let's wait for this to dry. So my sky has dried completely and you can see it has such a soft blend between the kalos. I have the white gaps, the open loop, the blue, the light blue, dark blue, all dawns visible all together in one pretty sky. Now, I'll begin with the sap green color. And using the dabbing technique, I will just be adding in some bush and greenery effect at the bottom area. I will also have some black colored ID onto my palette so that I can keep alternating between gene and black and add the solute together, adding depth altogether. So I'm first getting Buddha colors red into my palette, and then I'll begin painting with the green first. And so you can see, I'm just dabbing that debuff my brush and leaving some gaps between each data so that the behind sky is visible on all this begins to form like the bush area. And as I'm moving downwards, I'm keeping in less space and just filling it with the color directly. Now in-between, I'm picking in some black color and I will just add a little depth with the black color. So I will keep alternating between the green and the black in case, you know, if you find this VDS, what you can do is for stopping the area with the green and then add in the black highlights. But in order to avoid the W ring, I just thought of alternating quickly between good Dhaka close. Now as I'm moving downwards, you can see I'm just filling in the space with the color directly and onto the edges. I'm giving in depth by the dabbing technique. So this is a very common way of painting. The foliage for trees or even pine trees. 0, 0 greener the ADL or bush effect into your paintings. So now as I'm moving towards my right, I'm alternating the heights of the greenery. And again, you're also, I'm altering between the color sheets, misogyny at the top area, it's more of the light green effect. And as at the bottom you can see, I'm adding in more of the black and a darker green to one. Now make sure that you try to read the height and the shape of these wash all throughout. Because if you will add it and a flat straight line, it will begin to look very monotonous and will not give you that natural effect. Now, onto the right side, I'm directly beginning in with the black color at the top. So on to the left it was the green on the top and onto the left it will be black on the top. So fast at the top, the same way, dabbing technique and then fill the rest with the black as we move downwards. Now you can see I'm just quickly filling in this area with the black color. And I'm getting it to the center point of the dream. I haven't just be using the black color now, no more green into the right side. And just trying to blend both of mature and at the bottom, I will just quickly for lead to good the black color directly. So I'm almost done painting these bushes and just some final effect with the black color. You're in the center to get a perfect height radiation around. Now we'll have to wait for this to dry and then add the final power line details into the sky. And then we will be done with a happy ending for today. So let's wait for this to dry and then paint ahead together. So now the entire area is completely dry and I will shift to my smallest sized round brush and using some violet color, I will first add the power line. This time I'm not directly adding the power line or with the black color. First I'm adding in with the violet color, and then I will just be adding some darker highlights with the black color. So that toe onto the power line also you have a little effect of the sky, the shadow basically. So that is the reason I'm doing it this way. So first, a simple line with the violet color, and then I'll quickly shift to the black color. And onto the edges of this line that we have been told, I will add in some black highlights. Now, I have shifted to my black color and undo the edges just using the tip of my brush, I just dropped in some black color, which is automatically, you know, blending in with the poeple and giving it the perfect shape. Once this will dry, you will be able to see some lighter highlights of the purple color effect that we want it. Now, in the remaining details, I will thus be using in the black color. And I will begin to paint the details and you know, all the little, little parts to this power line. So first to slant line to the other details into the power line. Now, from some venue or the Medieval of this power line, I will add another very small line connected to this, to debit, another connection to this power line. You're so directly with the black color. I added this mid-70s half-life. Now I will shift to my technical pen and given the details of virus into the sky, in case if you do not have a technical pen, you can use any black pen or try using a waterproof pens. So if by chance or you know, ahead, also, it does not spill off with water. And if you do not have a waterproof pen, you can even use black color with your fine liner brush. Now you can see very randomly I'm adding in these connections and some coffee via lines. So try to make it as much natural as possible in your daily life, how you see these power lines connections just very randomly, I'm adding in, make sure your violin connections can surely be different from mine. It's perfectly okay. You know, the monad, should you try to keep it the more predictable turn out to be so very randomly without having any perfect reference. I added these via lines. Oh, you know that my instinct. So that is the reason I said you could surely have different placements of the violins and different oh, you don't look to it. Now your, I'm just adding a very small power line or from a distinct look, you're directly with the pen. Now your onto the left. I'm adding in a street lamp look. So just to that power pole, I connected the street lamp. And in-between this, I will pick up my white gel pen and add the details to this land. The light with the white gel pen. In case if you do not have a white gel pen, you can surely use by the Great Lakes or white goulash. Now the purple color in the poll that we added, if you can see the little purple effect that the pool is having, it gives a different look and the shadow effect and makes the painting look more realistic. So I'm just adding in a little highlight to the white color with the white goulash also. Now, I will just add a quick few buds on to these bio sitting there. So just some boat sitting on these via lines. Now I'm using my technical pen because these are quite fine and very small boats. So directly with the pen, it's much easier. In case again, you want, you can surely paint them with a fine liner brush using your black color. So very randomly these boards that I'm adding. Now the last thing, I will just add a small moon you're at the top corner. You can add so with the white goulash again. Today we are done with this simple, easy painting for today. I wanted to keep it light for today because we had been been deemed too much detail. And tomorrow again, we have a detailed painting to be. So this simple, easy painting. Now let's remove the masking tape and see the final painting for today. I hope you guys are enjoying the 50 days watercolor challenge with me and I will, I'm loving to see all your class projects into the project section. So keep them coming and I would love to see them all ahead also. So your is a painting from D7 D. I hope you guys enjoyed painting this today. Thank you so much to each one of you for joining me today.
24. Day 18 - Roadside Powerlines: Hello everyone and welcome back. Today we will be painting this beautiful power line by the road side. So let's have a look at the kalos. You will be needing a shade of yellow, violet, Payne's gray, sap green, burnt umber, yellow or black, white gosh. So these are all the colors that you will be needing for today. Now, let's begin with the pencil sketch for this one, we just have some very basic minimum pencil sketch to go ahead with. So forth down the line to separate the sky and the pathway. Now, I'll just mark the Greenfield idea as we saw in the picture. So the bottom right is going to be the green field ADR, and rest of it is going to be the pathway. Now just a little more detail off a little fence, you're in the field area. Now using a scale, I will just mark down the marking for the powerline call this time. So moving towards the right side, it's in a little center, but more inclined towards the right side. I will mark down this power line poem. Now this time with the pencil on me, I'm forced giving you some rough markings of the details that we will be adding in. In case if you want, you can skip adding these details right now and directly add them with the beam by just giving you a rough idea of photos. And lastly, this one street lamp. Okay, So these are the details that we need. Now. I will just mark or very small mountain range also onto my horizon line. And that is it. We are done with the pencil sketch. Then. Now I'm forced applying a clean coat of water onto my sky area. I'm leaving the mountain areas because the mountains will be with the green and the yellow highlight in the sky area. I'm applying a clean CTO for DOE even unto the power pool because that at the end we will be being done with black color so we can easily achieve it. Now, I'll begin applying the colors one-by-one onto the sky. So first I will begin with the shade of violet color. I haven't used a violet color in a very diluted consistency. And I'm just adding in a pinch of black to my violet color to get up blackish violet tone, but in a very liquid consistency. And using this color, I will first begin applying it into my sky area. So I'm done adding in a court of this blackish violet. You see just in a doping, just black dots so much off the magic. Now in this I will be adding in some highlights with the Payne's gray color. So I'm shifting to my smaller sized round brush. And I will pick up Payne's gray and I will pick up the paints cruel to analytical diluted consistency. And I'll begin to add in some cloud effects vary randomly into the sky. So I'm just moving my brush in circular manner and adding in these cloud effects and do this guy. Now similarly, I will just quickly add in some more sky is into the, oh sorry, some more clouds into the sky using the same Payne's gray and the same technique. I always recommend to keep but the shoe handy to lift off the excess water which gets collected onto the edges of the masking tape. Otherwise, uh, you know, if, you know without keeping on or disulphide, you will just tilt your paper. And if that all pain to a story that water flows back into the painting, it will begin to ruin your painting edges. So very important to wipe off that excess water which gets collected. Now with a little darker tones, I'm just adding in some more clouds. Now this time that I'm adding in the clouds, I'm making sure I don't introduce much water because I want to let the definite shape to my clouds. I don't want a simple soft sky. So now I'm picking up the violet color in a little. Takeoff and systems even previous one. That doesn't a little less diluted consistency. And I'm adding in some DACA highlighted clouds into the top. So bottom media, I added it to the dark Payne's gray color. And now at the top, I'm adding it Roboto Medium by new, the tone of the violet color. In case if you do not have the violet color, you're mixing your bright blue and Queen Rose Fellow at that is what I have done Your to get 0 violet tone because I wanted to adjust the tonal value of the color. So I did not directly use the violet this time. For the base, I had used a direct violet from the palette. So now just using the tip of my brush, I'm adding very small half curvy line shapes into the sky to act as some DACA clouds. Now again, I've shifted to the Payne's gray color and I picked up the Payne's gray in a little darker consistency and just adding in some darker highlights of Payne's gray into the sky. But I'm making sure that I have the light Payne's gray look also. And now even adding a little purple highlights at the bottom area of the sky also vary randomly and very little. So that is it for my sky area. Now I'll begin to paint the sky dry ice, because after that only I can paint a mountain range if I am foster playing or clean coat of water onto the entire pathway. Now first I'm picking up a shade of yellow and remember the street light we add, all, given the pencil sketch off, just underneath that, I will mark out some yellow highlight onto the road area to debit the light effect because of this cheap light glowing. So I'm opposed to adding in the yellow. Yeah. So at your was made cheaply than just underneath there on the pathway. I'm trying to reflect that. Now. I'll pick up the bond amber color and fill the rest of the area with a layer of bond amber forest. So just trying to blend the yellow and the bond on Bhopal. Now, I'll shift to my Payne's gray color and I'll begin to add the beans may follow onto the edges of the road and try to blended and get some darker highlights on the edges. So on the right it will majorly be with the Payne's gray, but on the left, I will just be adding it on the edges. So my edges will be Payne's gray, then they will be born near to the Payne's gray. And then the yellow reflecting in the middle of the light. So I just added a little more of the bone Dumbo color to give a little darker. And now I can just lift up the color from this PowerPoint. Oh, that was your because I want that to be a little light to reflect the light effect on the pole also. So if possible, try to lift up the color from there. If not, then let it be. It's perfectly okay. Now, my sky is still wet, so I can't be in the mountain range first. This field because it's perfectly okay to blend it with the R4 because they're either be giving in the details folder. So first I am applying a clean CTO for Don leaving the fence and just filling the field area, and then even pick up the logo sheet and given allele, the yellow ocher color onto the entire these, if you want to make it a little simpler, what you can do is you can avoid that little area in the bottom right corner and being descend diarrhea as a fee so that you have less DDS to Ireland. But that's completely your choice, how you wish to go ahead? I will keep that fence there. We'll paint it later on. So now you can see the black color from the roots seeping it into those areas. And that's perfectly okay. Now, I have picked up some sap, green to yellow and just dropping in the sap green color quickly using the tip of my brush so you can see the yellow ocher shade also visible at places. And just adding in this green color, then I can add in some darker green color in the same base. So I have three variations into my field also. So in case if you do not have the darker green color, you can just add in a angels black to your green and get this darker green sheet. Or if you want, you can make it a ODD my mixing in a little bit of ground to your SAP v. Now let's meet for all of these to dry and then even paint the head the folder. So now my entire painting is completely dry and I'll begin painting the mountain range first. So I will first pick up a shade of yellow and give some yellow highlights at the top area near to the right side to reflect a little light effect onto the mountain. Also, a very little patch of the yellow color. So this patch is also majorly going to get covered up with the sap green color. But I'll still add it because it is going to add a little difference and make a difference to your mountain range. So what I'll do is I'll quickly pin this entire mountain range with a shade of yellow first, and then I will pick up the green and the black color to add in the detail to this mountain range. Now I have picked up the sap green color. And very gently I'm adding in the sap green color at the bottom, EDO and anneal to the light where I have, I have kept the yellow visible at the top and on to the rest of the mountain. I'm adding the sap green completely, but adding the yellow gives a little variation to your green also add places. Hence, I added the yellow color everywhere. But onto the left side, if you can see I have the yellow light still visible. That is the yellow color. I have tried to let it be visible despite applying the green color. Now I'm picking up some Payne's gray color. And again at the bottom, I'll add some Payne's gray highlight. But this time you can see I am adding this highlight a little most such that a little of the green color is also visible. So now my mountain range has three color variations. That is the yellow, green, and this pins click and add places. I'm even leaving little gaps such that the green is visible. So it's very important that you control the water content that you apply when adding these Laos. Because in case if you add in too much of the water, what will happen is that color will spread so much that you will lose the yellow and the green highlights. So sanely fine applying the green column, if you would have used too much water, you will lose the yellow highlight. So when you want or any layer to be visible or any component to be visible, you need to control the water contain that you are adding in the next level of details. Now I'll pick up some white quash and the light area that I have to paint, I will give him a layer of white gouache because I'll have to wait for that layer to dry. And once that level GI I will be able to add in the yellow light effect there. So that is the reason I'll first apply the white layer and keep so that it dries. Until then we can paint in the other details. So just marking the so-called Law where I had a, you know, taken out this street lamp. Okay. With the white quash only I will pin the fence area here. So this marking that I did, I will add in the white quash first and then that little corner will be with the black color. So the white quash and then the black details once have I gone astray is I will add the black detail there. So my white quash is almost dry. So I'll just pick up the black color and add in the detail of black color at this area here in the corner to reflect as the fence and some dark area which is not visible to us right now clearly. Now again, I'll pick up some whitewash and begin to add details on the pathway, so forth near to the field, I will give him a line of white-collar trying to show though crossing lines on the road and the field lines. So for speaking up the white goulash and adding it new to this field line. I am using my size four brush, which has a pointed tip. You can use any smaller sized round brush and add this line and the details you're on the pathway. Now onto the center of the road. I will again add some more lines to indicate the detailed on the R4. Now next, even onto the field, I will be giving in a line with the white goulash to depict some stone or on this field area. So just adding in optical white line onto the field area that we have been dead. Now in-between both these white lines, I will just add in a clear line with the black color or bold black color. So not too diluted one. I want a very take look to the black color. So now you can see the field and the pathway is separated. So when, hence I did not provide even I was adding in the pins and the pins or flowing into each other because we were going to add in these details to make them look nitrogen. Now in the field area, I'm adding in a reflection of the light, so the pole we have. So if you see the light effect, the reflection of this would be towards the right side. Hence in a slant manner. I have added in the effect of the bowl now. Now in Nepal, I will first add in a layer with a yellow color. Now after the yellow color, I'm shifting to the bond amber color and I will begin to add in some bond amber randomly you are in there. So again, in the poll also what I'm trying to show is because of the light that is on the left. So a little onto the left area, I'm trying to show the light effect. Hence, I use the bond amber and the yellow color there. And at the top I just added the black color. So I feel the black color has spread to much. So again, I'm just lifting up some color and trying to lighten that area where I want to depict the light and the shadow effect on the poll. So you can see how nutshell this is looking because of the light on the left, there is a shadow of the light onto the ball also. And then the reflection moving on the field is looking so perfect. Now I'll quickly add in the details that we had marked with the pencil using the tip of my brush in case if you do not have a pointed tip brush shift to a detailer brush, or you can map these lines, but a mako or a technical pen that you have these finite lines. I just feel like correcting this mountain range or literature because I'm unsatisfied. So just added in a little of the black color and just blending it into the rest of the mountain. Okay, Now let's wait for all of this to dry and then we'll paint the final details into this painting. So now all of my painting is dry it, and I'll pick up some black color and I will add a finite line with the black color in between my mountain range and the roadway because there I feel I have a little rough edge which I am not liking. So you know, even be make mistakes. But it's always the V how you can correct it rather than just leaving it there. So just by adding the symbol black line, I could get a finite distinction between my mountain and the roadway so easily. Now I'm shifting to my technical pen and I will add in the details Your to the fence using a black pen. In case if you do not have a black pen, you can use a double 0 or very fine line or detailer brush. And adding these details with the black wash or Black Water follow. But I'm quickly adding in and making my tasks and blow by using this black pen. Now, I'm mixing in some yellow color with a little bit of the white goulash. And to the light, I will add in a little light effect in the center with this bright yellow color mixed with white quash. And I will pick up again some pure white quash in a very thick consistency. And around this yellow, again, I will add in the detail of whitewash to make it look more distinguished. So you can see just a little again. And all of it has blended. Now the light is perfectly being reflected on the pathway. Now we're mentioning left with adding the details with the white gel pen and the black pen. So just adding some shadow effects into the field area using the white gel pen. So just a few markings with the white to add in details. Now onto though mountain range or 20, just a little white spot urine there to depict some light and shadow effects. Now, onto the mountain range, I will try to add in all fence effect of any broken kind of offense effect, not a detailed one. So a little onto the left, then directly into the center ADR. Very little. So that is it for the fence effect here. Now, I'll shift to my black pen again. And the final job to Endo, or those violins into the sky. And I am so much in love with my sky, with those perfect poeple underpins, Griggs clouds. Don't they look so beautiful, especially those various small, teeny many clouds with the purple that we've been dead. So I've tilted my board and I'm adding these bios because of the bottom area is still wet or literal with the beans. And I don't want to ruin my area there. So, you know, if I can rest my hand there, the pins will get lifted and the idea will be spoiled. Now, at places you can see I'm adding some to go via lines to depict depth into the sky. So in case if you want, you can add these vertical lines using black color and the final lines using the pen. So very randomly I'm adding in these, nothing in specific. So I'm just creating scene where I should add more and you know how it will look, coffee. So wherever you feel, you can add. Imagine you all of my lines I've tried to depict onto the right side and very little on the left side. Now just trying to add in some connections or undo all of these wireline, some screw details, some curvy lines, urine there. And I'll just add a little more spiral kind of connection. Your, so very randomly you can see I'm adding these vials, the spiral looks so try to make it as natural as possible. So you know, you can see all of these and do your daily lives on the roadways. So then we are done with the painting. Now let's remove the masking tape and see our final painting for d e d vk full by removing the masking tape that you don't ruin the edges and wait for your painting to be dried completely, you are about to ruin them. So there we are ready without being too. I hope you guys are enjoying this 50, the watercolor challenge, and enjoyed painting this today. Thank you so much to each one of you for joining me today. I will see you guys tomorrow.
25. Day 19 - Sunset Powerline: Hello everyone and welcome to D9. D to D, we will be painting this beautiful sunset view power lines. Let's have a look at the colors that you will be needing for this exercise. You need to shade of yellow, orange, bone, Tambo, indigo, Payne's gray, and black. So these are all the colors. Get them ready onto your palette. And let's begin painting this beautiful parabola in view. So I have my paper taped down onto all the four edges onto this board. I will quickly begin by applying a clean coat of water onto the Gentiles so fast and even phosphine, the sky together. Make sure that you apply a clean and even coat of water throughout and leave no port hold or excess water anywhere. I'm done applying the Queen CTO photo now and begin to apply the colors. I will be applying the kalos in Laos to get more depth to my sky. So you normally awesome Leo's, so I want my people to stay wet for a longer time. So make sure that you run your brush multiple times so that it stays wet for a longer time. Unfolds, fiddling with the shade of yellow at the bottom and just applying an even coat of the yellow color first. Now, I have just picked up some orange and to my yellow only I mixed in a little bit of orange and about a yellow color, just giving a little highlight of the orange color. So just adding some audience cheeks even onto the bottom yellow color that I have been. Now, I'll shift to a thicker consistency of the orange color without adding any yellow to it. And I will use this orange color at the top here to add in some darker details. Now leaving some gaps at the top, Ada, I'm applying a coat of orange color randomly at pieces. So in-between the gaps that I'm leaving, I'll be adding in the indigo and the pins Greek Hello there. So I have little gaps at the top and a little gap in the center somewhere. Okay, now I have to take my board a little because I want my colors to flow towards the top and not a flow downwards to the yellow area. Now, I have picked up some Payne's gray and applied at the top. Now I'm just picking up some indigo and I will foster apply indigo color, captain LFTR between the orange. Now when you apply this, make sure to be a little careful because orange and indigo may begin to form a muddy color. Now in the rest of the areas I'm applying the Payne's gray color and using the same Payne's gray color in different consistency. That is by adjusting the water level, I will begin to add it some half C strokes into the sky from the edges. And I'll try to maintain the center color of the sky. So from the edges, I will be having in this Payne's gray color flowing in. And in the center you can see I have the orange and the yellow color being visible. Now, as I said previously, I will be adding Leo's on Leo's scenario again, I'm picking up some Payne's gray and just adding little highlights. So this time you can see my Payne's gray is Dhaka in the shade and with less of water. So hence I'm able to get a darker shade. So that is why venule keep adding the pains Laos on videos, you'll begin to achieve depth into the sky and you get different color variations and more natural law. Even on the indigo color, I added a little bit of the Payne's gray highlight. Now using the tip of my brush, I've been adding some Payne's gray cloud at the bottom media. Make sure that you do not introduce any new water, because in case if you will drop too much water, you will lose the entire yellow and the orange sky. And you will just have Payne's green combo flowing everywhere. So it's very important to understand venue need to control the water and when you need to add much water. Now, I have picked up some bond amber color. And at the bottom media using the bond on vocals, I will be adding in some Cloud details, also, some half C stroke, some veggies straight lines to act as the Cloud. But make sure that you let the yellow and the orange color lookup be visible in the center area. We are yet not done with the sky and we will still be adding more darker Leo's and you can see my paper is still wet and I can still walk on to it for the next two to three minutes. So it's very important for your paper to stay with it. So in case if your paper has dried, I would recommend you to let it dry completely. I'm used a riveting technique. Now at the top also just adding some brown highlights. Now again, I have picked up the Payne's gray color in another darker tone than the previous tones, that epic DAP of Payne's gray. And now again, I'm adding the Payne's gray color onto the entire sky area. Just using the half C strokes amnesia, neither tip of my brush. So if in case if you want a very soft looking sky as we have painted previously, then introduce too much water and keep your board tilting in all the directions in case if you want to definite cloud look like this integral psi, you need to control the water that you add. Ok. Now, just adding some more orange highlights into the sky because they feel the orange color has turned out to light very gently. You need to be careful that you do not have the normal image and do too much of a muddy color look. Now, I will pick up some burnt umber color in a thick consistency that is without adding very less water and just having more of the pigment. And I'll try to add in some darker strokes with the bone Don Buchla. Always remember that the venue adding darker strokes, you, you add it in such a way that the lighter strokes are still visible. Because if you will add the darker strokes in such a way that the lighter strokes are completely lost, then it made no sense to add it in Leo's. You can just directly add darker layer at one go and have a plain blank looking sky. So that's important. When you add Laos on Leo's, make sure that you maintain the previous DO look to give more depth to your sky. So you are, I'm ready with my sky. Now let's wait for this to dry completely. And then we will add in the silhouette detail of the parabola in for this painting. So now my sky is completely dry it, and it's looking such a pretty evening looking sky, isn't it? I love to Kahlo's that we have used and how they have blended and all the shades being visible. In case if you want, you could show me VD some colors in the sky as per your wish. Now, I'll begin with a pencil marking of the power line silicate you now, or the pencil and marking at some places may not be visible to you. Because you know, if I add two lines, then it will be affecting the painting then. So I'm adding it in a light tone in case if you know it's not visible to you, what do you do is wait for me to first painted completely with black and then you can follow along. Instead of doing any wrong markings. So fast almost in the center area, I added a very thick almost of half centimeter. And now I'm just adding in little boxes and details of tools or, you know, power lines into this pool that I have painted. So for these details, major knee, I would recommend you to v and see the complete thing and then being dead. Now on to the right, I'm even adding a street lamp. And this time the solute, quite a simple one. Now I pick up some black color and using the black color, I will fill in this entire solo head first. Make sure that you use the black color in its thickest consistency. And in case if you want, you can directly use in black cohosh also. And another suggestion in case if you feel that you will not be able to get a straight line with the brush directly. You can falls to the bottom markings with tomato or a technical pen and then fill it with the black color or even fill these details to degree with a black pen. But since this time, this power bold line is a little tickle. I didn't feel like adding a directly with a pen and I felt like using a brush and adding this directly. So foster adding in this PowerPoint and then I will add data udp is. So just I I didn't 19 you're at dot-dot a little canal then the mean follow-up blood. Now on another line, you're just about us cheat lambda. I have added an NDA. I have a little box on the left, so I have an even month that with black completely. Now the street lamp also, I'm filling it completely with the black color and giving it a silicate look. Okay. I'm not leaving any gaps for the light to be added or anything justice in Peninsula, we'd love to keep it simple and easy. Now you're at the bottom left. I will just add some palm leaves popping out. So it's like the CI is not visible to us, just a fuel tea leaves are visible. So just adding two to three palm leaf structures to make me at the bottom media. If you want, you can again skip this part and just add some bushes 0 by dabbing your brush. Or you could even add a complete Pam G popping out from the bottom or any others and lobbied on maybe a cityscape as we did in the Fausto power line of this team. The Pope and one that we being dead. So, you know, all the different things that you can add different options I've given you. So I just added a small roof like structured. You are at the bottom. And now undo that, I will again show a leaf popping out. Now onto the right side, I am adding the bush effect by just dabbing the tip of my brush and I will be painting then dire rights I eat with this. So some metal loss or mesh auto. And you can see I'm just dabbing my brush very irregularly and very natural to me to get in the bush effect. And then after this, we will just be left to add the violins into the sky. Now in case if you wanted to make it a little more complicated, I would recommend you. You could pick up hello V8 or you know, any kind of a look from Pinterest or Unsplash and many other images, oocytes and use that as a GI friends and, you know, change this elongate as per your wish. But I felt like keeping it a little simpler than middle so that, you know, even a big knot feels motivated to try it. Because every time a complex subject, they may feel a little demotivated. So I'm trying to balance between keeping on D-Day and projects and simple projects so that everyone can follow along easily. Now, as I'm moving downwards, you can see I'm filling the gaps with much larger areas of the black color and keeping in less space. So for this guy to be visible, because that is how, you know, things are simpler. That at the top I had definite details and as I'm moving downwards, the black thickness is increasing and the task is a quite easier one. Now, as we have more water, I'm just going to fill it simply with the black color. So that is how adding these bushes are very simple layer at the top more detail. And as you're moving down, what's less detail and more of the black spaces so quickly fill this entire area with black color. Now Neo-Babylonian also, I will quickly add a little bush, very small Bush effect. Now the only thing left is to add the bio details to the power line. So now first I will add a few thicker lines using the tip of my brush, and then I will shift to my black pen and adding those final by lines. So first using the tip of my brush, I will add in some violence very quickly. So I've just added the board so that it's easier for me for the moving my hand and adding these lines freebie. Otherwise it becomes difficult to rotate your hand according to the wireline movement. I do one. Now the same violin, I will make it look disappearing and do these bushes. But I'll add it on the bush because you're not somewhere in the gap stack via this scene where we have the behind sky visible. So it's always better to act the complete solution rather than leaving it thinking that okay, it's on the black, how it will be visible. Okay. But I would recommend adding it even if it is on the same black background. Now, I didn't shift to my technical pen and add the remaining BI aligns with the thinner pen. So I'll be adding a few lines using the scale. Now when you are adding these lines, make sure that your power line is completely dry before you place the scale onto it. So at pleases, my Babylon is still the goal that I have added is still a little wet, so I'm being a little careful. Okay, now the other lines in a little curvy manner. Again, I will say designs I place very randomly and you know, just what comes to my mind quickly. So there is nothing in specific or you have to follow the same line movements. These vials can be moving from anywhere anyhow, just to make sure that they are connected to the pool. And title VD them some overlapping each other, some crisscross to each other, some moving only towards the left, towards the right, some connected from the left to the right. So title, add whatever variations possible from your end. Now with the same pen, I'm just adding little more details your, so you can see just didn't screw details and connection details into this power pole and the wires. So again, this also you can add in very randomly title, make it not shooting. And what you see on the goal. Now quickly just adding some spiral via connections or, you know, trying to show this electric violence, okay, very randomly again, I will say I'm adding this so you can show the 3D. And if you have any perfect reference, you can even use that. I am just adding what my motion seems to make it look nice texture. Now again, I just add in some finance Guo De data's Yoda and dad and then be done with this beam Dang thought today, such as symphony, easy looking evening sky, but it looks so pretty altogether. So just a few more power lines and a little more connections. And we'll be done with this painting for today. You can see very randomly I'm adding in some connections. You can surely take your own time and keep adding these connections. So now let's remove the masking tape and see your final painting with those clean edges. Make sure you remove the masking tape very carefully and at an angle from your people so that you don't take off those clean edges. I absolutely loved the simple, easy cloud painting with this powerline silhouette. I hope you guys enjoyed it too. And thank you so much to each one of you for joining in this 50 days watercolor challenge and coming along so far. I hope you're enjoying the classes and a few are. I would love to read a review from you and do the review section. Thank you so much once again to each one of you for joining me. I will see you tomorrow with the next painting into this team.
26. Day 20 - Cityscape Powerline: Hello everyone and welcome to the 20 VR on the last powerline painting today. So let's have look at the colors that you will be needing to paint. This one. You wouldn't be needing a shade of yellow. Queen, Rose, bond, black, red, violet, light gosh. So I have my B put deep down and I'll begin with a clean CTO photo onto my entire sky. Because I've enforced be painting the sky and then adding all the details later on. So that is more pencil sketch for this one ego. Just make sure that you apply an even coat of water throughout. So I'm just picking up the excess water from the edges and advocate onto a tissue so that I haven't even auto photo to out. Okay, and then we'll begin painting the sky. Now in case if you do not have the red violet color, and what you can do is you can mix in a little bit of your Scarlett or carmine color to your violet color to get the red violet tone. So first I'll begin with the shade of yellow color at the bottom. I am using the bright yellow color. Use a very light and a bright yellow sheet, whichever is available in your palette. Now at the top, I'll begin with the Quin Rose Kano. So in case if you do not have the quinoa Scala, you can use this college or the car main color. And I'll be applying a lot of this spindle scholar. So I tried to get a gradation of this stolen 200. So I've got to clean blend between the yellow and the pink tone. And from the edges, I will just lift off this excess paint, which is data on my masking tape. So just dab it off with the help of a tissue so it does not see back into your painting and spoil your edges. Now I'm just picking up the red violet shade. So as I told previously, you can just mix in a little bit of the Queen Rose or the scholarship or Carmine Gallo, whichever color you used in the base, mix it to a violet color to get this red violet dawn. I have this red violet tone. Did I clean my palette? So I'm using this shade. Now, using this shade, I'll just add some clouds effect somewhere. So very gently just moving my brush in circular motions. But make sure that despite adding these big o clouds, the pink color is still visible at places that is the base layer. Otherwise, as I always say, it will make no sense adding the BCR if you want the entire neuro darker shade only to be visible. So you can see the bigger clouds that I've added now, some clouds even onto the yellow color. Now, I'll just tilt my board so that I have a soft Unfinished to my sky because I don't want a sharp finish. Now, again, I'm just picking up little darker tone of the red violet color. And I'm just going to add in some darker dawns again onto the lighter clouds. And I'll keep tilting my board so that the colors flow naturally and I have a very soft edge to my sky. So that is it for my sky. Now let's wait for this to dry and then we'll paint the folder, the speeding. Now my sky is completely Jade and I'll begin painting the cityscape silhouette for us. So far, the cityscapes a low hit. I'll be using the same shade of red violet color, which I have used in the sky. So for that, you can again either use the same mix or the direct color as you prefer to. So I will first weekly begin with a rough pencil sketch of the means yellow hit area of the cityscape. So first, a big building your on to the left side. Now moving to what the right, I'm just adding in some rooftops and some building effects who get so very randomly, I'm adding these. So you can IDO for us to see the complete salivate and then add that. All you can see me beamed at first and then add it if the lines are not clearly visible to you. Because I cannot add two darker details of this because then they will be visible underneath the lighter tones of the pain that I use. So just some simple sketch that I have added. Now I am, I have picked up a little dilute to turn off the red violet color. And I will fill this entire silicate first with this red, violet, blue. And then once this dries, I will add in detail with the bond amber and black color to reflect as the windows and doors. So now I'm going, I'm adding in this shape. You can see how I have pleased to his lines. And then you can maybe have a pencil sketch if you want or do they creeping into the sheep? Now your even onto the left to one. I will just paint it with a darker tone of the red violet color completely. That right small building. I'm going to keep it yellowish one lead. That was my reason of adding in the yellow color in the sky. Because if you can see all the buildings still have a little yellow effect. And from that one building also onto the right, the yellow clouds that are still visible. Now on to this model building your I'm just adding in a little of orange color in the center. And now on the edges, I will use the same audit violet dawn, and you don't give it onto the edges. So since I had a little yellow in the background, this color will be lighter than compared to the other buildings. I guess I had forgotten to mention though, orange color in the color sheet. So I will be needing this little tinge of yellow to add some highlighted look to this one bending. Now let's wait for all of this to dry and then paint in the details. So my entire background is tried. And you can see despite using the pink color, the pencil lines are still visible. Hence, it's always important to use very light pencil markings when you paint with such lighter tones in watercolors. Now I'm using the red violet tone in a little thicker consistency. And you can see it automatically is a darker tone than the previous one. Since I have not added much of water. And now I'm just simply adding in the details to the cityscape. So simply giving an borders forced. Now let's add some window effects to these buildings here. Now. And do this leftmost building, I will just add a very small patch, but this Docker dawn and simply let it dry because that will begin to act as the state gets it affliction that we will be painting later on. Now what do you are? The bigger plot, I will just add a few windows. Now, another window next to it, which will be a little taller in height and 1001. Now, adding some details, you're at the bottom autosome simple when no effects again. So all of this with the same red violet tone with lesser photo mode of pigment. Hence, it's a DACA. Now on to this rightmost building, also adding in the details quickly. And you can see this has a literal or light effect more because of the orange color in the center, which is exactly what I need it to reflect the background sky. And the reason of adding the yellow color is you can see between the right building, the yellow dot is coming out from behind the building. Effect for the sunset look. Now I have picked up some black color and undo this so small, you'd all face of the building. I'm adding in the windows with the black color you are, and not with the violet color. To debit more shadow effect here. Now the next one to it, I'm adding it with the Bhopal, just leaving a little gap between both the windows. Now next, using the black color again, I will darken the Bordeaux highlights that I have given. So on bootup open at the top edge, I will add a very fine line of the black color. So you can see the underlying fopen line is still visible. So make sure that you let the underlying population be visible because that acts as the shadow effect because of the color tones that you have used in the background of the city light. Now you're adding in the state gives D1. So first with the black color, I have added all the little blocks to the potential stakeholders. And later on using a technical pen, I will mark the for the details there. Now you're in the right corner adding in a black roof and a little of the black effect your into this building. And I will just blend it using water and soften the edge of it. Now the same way, even onto this big building to deflect a little shadow effect, I will just use a dilute tone of black color. And using a damp brush, I will very gently blended into the background poeple kiloliter. Now again, let's wait for this to dry before adding the final silhouette. So now my entire painting is completely died and I'll begin adding the power line silhouette. So I'll be using my scale and the technical pen for adding in these details. First, I'll quickly add in the details to the stake is here on the left. So very simple lines to depict as the stake is Glyn. Okay, so I'm adding in these details video, randomly and magically, whatever comes to my mind over and you imagine, or data's looking stake is. Okay. Now I'll map the power pole first. So this time the power pole is again going to be offered thickness of say, half a centimeter side and phos marking it with the technical pen. And at the end, I will fill it with the black color so that I don't have to wait for the black color to GI again before adding the rest of the details and budding of moving my hand and, you know, spoiling the black color. Now you're in the rightmost corner. I will be adding in a few more PowerPoints in a little. So when I add it on the left, it was tilting towards the right. And when I added it onto the right, it's tilting toward the left now. Now another PowerPoint, a little, or maybe overlapping this one. So in a crisscross manner, I will add all street light look actually. Okay. So just I I did a lamp effect and unfinished completely with black sand even to get this one. And this powerful small you're also, I will fill it with black. The mean power pool is more takeoffs. Why won't fill it with pen and make quite tedious. And then I will just use black color day-to-day 6'10. Now let's add the details to the power pole first. So I would be adding in those little lines on the Via details there. Now in-between both of these lines, I would just add some VIA connections detail pane thing only. Now let's add the udder while lines into the sky. So as I have been seeing since Abbas for paintings, I add these lines vary randomly seen better I should add. So in between you can actually see me thinking as to you, Oh wait, I should move my violins moving. So very randomly, I'm adding in these. You can either copy the same lines that I'm adding or you can go with your own notion as to where you wish to add them. So just some small screw connections this time depicting in this pulse mode, so close you are. And underneath this, I haven't tried to show a lot connected to it at places. So you can see at places I've given it a lot of connections here. Now some virus coming in from behind the building this time. So there is some kind of a connections. They are behind the building which is not visible to us. And very randomly just adding small, small details on the go as I feel appropriate. Now one line connecting your and I feel I'm done adding the virus for now. So now let me add the other details and then in case I feel to add mobile iOS, I can show me adequately drawn. So now when pick up the black color and noted consistency and Bain this tick Powerball that I have left blank here. So be very careful by painting these Powerball in case if you feel that you know, your brush does not have a pointed tip shift to a detailer brush. But since my brush has a pointed tip, I'm able to add this power line with my brush directly. Now, I will just be adding some bush effect in front of these buildings. So it's kind of like, you know, trees are a bush. Neo today's power goal. Hence, a little off the buildings will get covered up again. So adding these Bush, I'm just using the dabbing technique as always, and just adding it in a bush effect urine. And as I'm moving downwards, I'll select more with the black color directly. So now I'm just filling it with black directly. You can see no shapes. I'm nothing to keep in mind. Just simple black color filling. Now your I feel like adding another power pole. So I haven't directly I did with my brush this time not giving any pencil marking because it's as it is supposed to be a take one In case if you want, you can first I did again with the pencil and then fill it with black or whichever way you are comfortable with. So just added this little power line and adding some details. And I'm honest sheet light your from this poll tool. So just showing some violet lines coming out from this pole to I'm adding them a little tip go with my brush today because I, as it does, wanted to add some thicker lines and not all the thin lines with the pen as always, because you need mediations in these also. So now I'll even to get all of the lines you're at the top. So which I've been with the band I just to condemn itself to acne. You're on the right, although I'm just adding a little of the bush effect to depict on the little bushes in front of the houses. I know a little of the details that we being dead gets covered up, but you can see a little of them is still visible from behind the bushes. So that is why it was first important to paint in those details, despite mean wink nudge didn't get covered up with these bushes. Because a little of that also b is visible. Now with my white gel pen quickly just starting in this small moon, your half-moon. In case if you do not tab or white gel pen, you can add so with the help of whitewash and just a few stars into the sky. So these styles also you can add it with by eight. Oh gosh, if you don't have a white gel pen, I prefer adding them and by Jumpin at places. Okay, So now let's remove the masking tape and see our final painting. Make sure that your edges are dry. And the little yellow effect on the right side you can see it's adding so much depth to the painting despite being that little area. Make sure that you maintain that light effect of the yellow color. So your is a painting from date when D and the last one for the power lines drawn. I hope you guys enjoyed painting with me today. Thank you so much once again to each one of you for joining me.
27. Day 21 - Grass Meadow: Hello everyone and welcome to D2 and D1 to D, We are beginning with the next bone that is meadows and 2 dv will be painting the simple grass field middle loop in just under 10 minutes. So let's have a look at the cash flows. You need a shade of yellow, Queen, Rose, violet, right? Blue, sap green, dark green, and black. So let's begin painting. I have my paper taped down and I'll begin with a clean coat of water onto the entire surface. And we will for spin the entire background with the sky and then paint the middle later on. So I'm done applying the clean coat of water onto my entire surface. Now, I'll begin to paint the colors in the sky one by 1. First, I even pick up a shade of yellow and mix it with a little bit of white or very little dent in case if you have a light yellow, you can directly use the light yellow. So alpha's pick up the yellow color and place it into the sky. So you can see very randomly, I have just given in some strokes of the yellow color. Now I'm picking up the violet color and I have mixed in a little tent of white also to my violet color. And now I'll use the violet color and given the strokes with the violet color into the sky. Now make sure that you use the colors this time in a little watery consistency because we will be launching the soft look to us guy, in case if you are someone who doesn't want a soft look, then you can lose it in a little thick consistency. About that, you can see I have used them in this slide, this tone first. And now I even be, you know, adding the darker tones one-by-one. Now I've been just mix in a little bit of my bright blue, little violet, and little of the white quash to form a royal blue or bluish purple tone. These are the three tones that I have mixed in. That is a little bit of violet, little bit of the bright blue and the white color. Now using this Nayar also, I'm very randomly adding some strokes into my sky. Some overlap in the purple and the yellows as you can see. So I just want a very soft looking sky. Hence, I'm adding the pains in our little watery consistency this time. And you can see already my sky is beginning to look so pretty and all the cashflows are still visible despite having a soft look. So you need to get a balance between the watery consistency to get the soft sky and even to maintain the base layer kalos that you are adding. Now to this mix of the royal purplish blue that I had, either just add in a little bit of the violet again. And I, even though, you know, add some darker leaves off the violet color. So very randomly, I'm adding in even over the queen rose color that I have used previously. I guess I had set the color wrong previously. The first year after yellow, I had used the windrows Kahlo and not the violet color. So that was the red violet tone all up when rules to whichever is in your palette, you can use it. So now vary randomly. You can see I am just adding in the darker tones of the violet. Now I will again pick up my windows Hello, and I will add in the Docker bones of the Queen Rose Scholar. Now, in case if you do not have a win-loss column, you can pick up a shade of carmine or Scarlett and add in the stores. So now I am adding less of water because I want little darker tones. So you can see very randomly again, I'm adding in these lines, not worrying about where I'm placing them. Now the last fallow highlight to add is directly off the royal blue color. So I've been picking up the bright blue color from my White Nights palette and just be adding some darker strokes of blue with this blue shade. Okay, you can use setting in new or any lighter sky blue color. And just randomly placing in this tool, matching even the pink and the blue is mixing. It's again giving me a different tone of violet color, and that's perfectly okay. Now I will just tilt my board a little bit on the all the directions and wait for this to dry completely and then paint the middle area. So you're, my sky is completely dry it, and it looks so beautiful with that little yellow highlights, the little white gap and the pink dawns. Now I'm picking up some sap green color and add the water. I will just add a little area of the sap green color. Or just don't. You're not trying to depict the background or the base Leo for the middle area. Now next I'm picking up some dark green color and I will just add some highlight with the dark green color on this middle area. So I will just drop in some dark green urine there and some very little light green layer also be visible. So very randomly just using the tip, I'm dropping this column. Now, after this is done, I'll wait for this middle area also to dry completely. And then I have an ad in the grass effect rather than I've been wait for this to dry 50 percent and then begin to add the grass effect to this. So now my needle is kind of 50 percent dry. I'll pick up my brush with a pointed tip and I've been OU's the dark green door. So I will add in a little bit more of the black, even though my dark green to get even a darker green don't. Then what I've used previously and I haven't just pull out some grass talks from this middle area now. So you can directly use the dot Blinn shading a very thick consistency and add the middle instead of adding the background. But I felt they got in the background because it acts as the shadow at places and also all available or the grass strokes are not visible stone the greenery helps and adds to the bean bag. So I'm using my size three brush which has appointed, I am forced to adding into force layout of grasses and some nearby grasses, Adorno, some metadata. As you can see, I'm just using the one Dylan, which I mixed in with black. And using that one Dawn, I'm adding in these middle effect, that is the grass effect. Now all wondering this, Ivan, Ivan, the second node of the grasses in the center area, and then the last layer of gases in the bottom one. So I'll quickly just add them one by one. Incentive. I've just picked up a little bit of the black directly to add some DACA depths. So having a paper tape down on go movable. So phase actually makes the task easier because you know, it helps you all move the board according to your hand angle and then makes your hand movement quite easy. Hence, I always recommend to tape down your paper on a movable surface even if you do not know how badly you need it or not. So I'm done adding the last layer of grasses out. So now I'm just thinking up some sepia color and adding it to my green your that is not green left on my palette. So directly the sepia color. In case if you do not have a sepia color, you can directly use the black color or mixin. Oh, you're black and brown to get a dark brown dog. So using this tone, I'll just add a fence effect. You are in the middle. You don't need to wait for your grasses to dry. You can quickly add in this fence. So very randomly forecast I'm adding standing wooden logs and then a sleeping line connecting all of these. So depending on the size of the people that you are using, the number of standing logs may 3D. And if your paper is on land. So you may even need to add the toward all what a horizontal line. So I have six what did the lines and do? What is under 900 to depict the fence. Now the last thing left is to add a few boards into the sky. So I will add a fuel boards quickly using my technical pen. In case if you do not have a technical pen, you can add to with your black color using your fine liner brush. But adding them with a pen at places, then you're not justifying Roe boards that you need to debate. It's quite easier and a quick process. I keep alternating either between the brush will depend, depending on what my mood with the painting booth. So I use both the ways, whichever I feel anyway. So we'll just a few flock of birds onto the right side majorly. And then we'll be done with this painting. So then I'm done with this painting for today. Now let's remove the masking tape and see if I ended up painting with those clean edges for today. Vk fooled by removing the masking tape. If you want edges of it, it made when you're painting. So be very careful by removing the masking p. And here is our final painting for D 21. We are almost halfway tool this 50 days watercolor, Joanie. And I hope you guys enjoyed painting this very simple grass middle with me today. I didn't see, obeys to model and do a much detail middle painting with some disease. So thank you so much once again and see you all tomorrow.
28. Day 22 - Daisy Meadow: Hello everyone and welcome to day 22. Today we will be painting this DZ middle. So let's have a look at the colors that you will be needing. You will need a shade of yellow. Orange who enrolls? Violet, blond, Dumbo, yellowish green, sap green, black, burnt sienna, whitewash, and some yellow ocher. So these are all the colors that you will be needing for today. Now, I have my B, but deep down onto my board already. And I've enforced begin with a quick pencil sketch for this one. So I've enforced market horizon line. So approximately 60 percent o is the middle area and 40 percent is the sky. Now I'm on top of this. I will just mark over Iraq mountain range quickly. So that is it for my pencil sketch. Now I'll begin painting the sky first. So I haven't given a quick quote of fresh water onto my sky ADR only leaving my mountain area. So I'm done with the clean CTO photo and now I'll pick up the colors one-by-one. First, I'm picking up a shade of lemon yellow and I'm just applying in some own sheets of the lemon yellow color vary randomly and big airflow near to the mountain range and try to avoid applying the kalos into the mountain range. So a little of the yellow highlight there, lithium onto the left side. Now next item shift to the orange color. So I'm directly using the shade of orange that's in my palette. You can use a woman in Palo in case if you do not have an orange color or you can mix in a little bit of red and yellow to get our orange color. And just adding in a little sheets of this orange color and new to the yellow. And onto the left side, I will add very little because my left side will majorly be with the violet color later on. So just adding the Latin onto the mountain range also. Now next I will pick up the violet color. So far, the violet color. I'm using directly the violet that is in my palette. If you do not have a violet color, you can mix in blue and pink. Now kneel to the Orange, be a little careful when you are applying the audio violet color. Because then the orange and the violet mixed together, they will begin to form a muddy color. So I'm very gently giving in some of the violet highlights onto the yellow and orange. Just very gently using the tip of my brush. Now, I have picked up some red violet dawn and adding in some highlights with delayed violet bone. You can see then I'm adding in all of these highlights. I am not introducing much water, I'm just using the beans, London diluted consistency, that less of water, more of pigment. Now with the Quinn knows color, I'm adding in some highlights all very randomly into the top of this thigh. And from the orange in the right end, I'm just adding these quin rose highlights using the half C strokes. Now, I can just blend a little of this. You're at the bottom because they feed on the stroke seemed to be a little Lucia. So just picking up little violet and darkening your At the left edge again and blending it developed with duck when rules follow. Now just using the tip of my brush, I'm adding in some very light violet highlights onto the entire top area of the sky. You can see then I'm adding this. I'm being very gentle and just using the tip majorly. So that does it for my sky. Now, I can't paint the mountain range until my sky dry. So I'll quickly apply a clean code of photo into my middle area and paint the base Neo for the middle, till my sky dry ice. So first I have picked up the shade of yellow and I'm applying this greenish yellow layer onto the entire surface post. Then onto this Ivan, pick up some yellow and add some yellow highlights and the dark green and some burnt umber highlights. But falls to Naoko of this greenish yellow. In case if you do not have this greenish yellow, you can mix in a little bit of yellow and your sap green and get this similar tool. Now next, I haven't pick up the shade of yellow ocher. And just using the paint and a little thick consistency, just adding some streets of the yellow ocher. All of this. But just to, you know, random visibility, you need to have radiations into your feet. So that is the reason it's important to add it, despite knowing that it's almost going to be hidden. Now next I am picking up the shade of black color and just adding a little bit higher day Dr. black color at the bottom media. So you can even use the sepia color or any dark brown sheet and just add this little highlighted the water. So that is basically behind shadow of the flowers and grasses that I want to do. Now let's be clear to dry before moving ahead. Now my background is completely dry. Okay, so let's begin adding the grassy fields to the middle area for us. So photo grass, I will be using to color tools. So for the first one I'm going to be mixing invite squash with my sap green color and forming a piece, oh, sort of a green color to get some distinguished highlight and shadow. I will be using the sap green color directly for the docket. So you can see I'm just mixing in my sap green with white quash and getting in opaque color. Because on today, lightly over the gene Kahlo may not stand out that way. So I want an OB, hence adding the white quash Kano. Now for the first layer of the classes, I will be using this API. Oh, so you can add these grasses in previous posts is by using a smaller sized round brush, maybe Psi 0, 1 or 2, and adding the grass strokes like this. Next, you can either use a liner brush like this, which is a, you don't have braces outdoor and canal. So you can either use a liner brush like this to add the class. But the third one is the simplest one to four adding the background grass Leo's that I want that is using a fan brush. So now I have picked up the sap green color onto my fine brush. And I will just given these grasses using the fan brush. So you can see for the background layer of grasses which need not be exactly perfect or detailed one. Using a fan brush makes the task quite easier and faster and even gives a nice night should look because of the volume of the grasses that gets added at once. So now you'll get these grassy lawn do the entire face off the middle. So this is a bag ohm load of classes. After this, we will be adding in the glasses with the wash mix scholar that we have. Now then this pause layer of grasses, dry IBP in the first layer of the mountain range tool. So till then, again begin add the details to the classes. Till then the layer of mountain will also dry. So far, the first third of the mountain, I am picking up some MSN and using the bond sienna Kahlo, I will be giving in allele onto my entire mountain range skyline that you do not run into this guy. And this guy has to be completely dry. Otherwise, if your sky the sky, sky. So I wanted was done by painting the photosphere of the mountain range with this buoyancy and no Kahlo. After this, we will be giving in some diagnose D data to the mountain. Now while my mountain is still a bit, I will pick up a dark brown sheet and onto the top edge where my mountain and the sky is meeting. I've been just drop in some darker shadow color. Okay. So just a very fine line on to the border and I will blend it into my mountain. And since my mountain range is still wet, the color will automatically blend through it. So giving in some darker dawns on Bool or some areas of the mountain at places you can see the bone sienna is visible. Now all I'll begin adding in the photo details to the middle area. So I will pick up go green color mix that we have that doesn't mix with the white quash. I'm using that. I didn't use my round brush which has a pointed tip. And I even begin adding these finite drops, drops, which look more detail now. So just using the tip of my brush, you can see I'm trying to add in these graphs tools. Someday my grass through content towards the left, towards the right and overlapping each other. So you can see Vedanta chimney I'm adding in these tools nothing in specific or non-specific places. Just randomly keep adding them as you'll feel OH, to make it look natural. Now makes sure about one thing that you do not use a thick brush, otherwise you will not get these final strokes. All you don't have debt because the glass, and if you'll see most of my glasses on the top. And as they're moving down the anticodon site. If you want, you can even add these darker strokes, again with the help of a fan brush using the colonial thick consistency. But I felt like adding them more precise with the R0 is smaller sized round brush. Now I'm going to pick up some black color. And at the bottom area, I will be giving in some grass strokes with the black color to act as the definite shadow. All these crosses in the bottom, ADLs defeat. So you can see the grass that I'm adding at the bottom is quite smaller in length as compared to the green grasses that I have added. Because this is majorly at the bottom area of the shadow and the darkness dot i1 to deflect there. Now just a very fuel Docker, grass strokes at the book ADR or very few and little onto the green ones. So I'm done adding the grass with the black. Now, I need to be it for the middle area to dry before adding the disease there. So del then my mountain range seems to be completely dry. So I haven't begin adding the dry brush with the black color onto my mountain gene. While adding the dry brush, you need to be very cautious about two things. One, that you also face has to be completely dried. Secondly, you should not have any access what DO by adding the dry brush? So always make sure that you dab off all the excess water onto a tissue or absorbent cloth. And then I'll add these dry brush. So you can see I have so many times during my brush onto the tissue because every time I felt there was access, what DO now since might be boys enough clean people. It's helping me to add in these dry brush strokes and it's making my task easier. So that is why it's always recommended for watercolors to go IDO veto little textured paper or green or cold pressed people, and not prefer hot press paper. Now, even onto the right side, Ivan add the dry brush and a little darker strokes you are in there first. So now I'm one was done adding dry brush onto my mom didn't. Ida. And you can see it has added so much more depth to my simple mountain range there. Now I can pick up some dark green color and onto the bottom ED off my mountain range, I will just add a little greenery effect with the darker tone of green. So basically you can see I'm just adding in a little bush effect, the greenery area then onto my mountain gene. So I'm trying to lead either length of the bush summit on us, on the shadow. So just to quickly add this model bush. Now in the center, I'm using a little of the sap green, which is lighter in Guam compared to my dark green. The reason being that in the US and Dave, you can see my sky has more of the light area that is the yellow color. So to reflect that light onto the greenery. In the center, I have used a lighter green sap green tool and a little of the greenish yellow tone now. Oh good to reflect the effect of the sunlight even onto this field area. And the remaining, that is at the edges, I use the dark green color. So I'm going to use Don painting this little bush audio onto my mountain range. Now after this, we're going to be painting the daisies into the middle ADR. So now let's begin to add the disease into amide anion. So I am and white quash. If you do not have my gosh, you can go ahead with white acrylics. But white watercolor will not do your walk that grid here because you know what the colors will blend and not be this obey. So I'm just adding in some daisies. Oh, very simply somewhere I'd be adding in complete daisies, our sum bear just half of it moving downward somewhere half of it popping towards the dog. Or and I will try to read the daisies into my field area, some base shadow. So I'm going to follow. Now the next one, I'll even add a little tilted towards the right side and whites more loaded lens compared to the previous tool. Or in the sand dot the little gap that I'm leaving, we will be adding the yellow ocher color. So don't worry about the details there. Now just placing on ADA huge Daisy your at the border media. So in case if you want, you can actually add the disease with any other bright color that you want. Or you could even add another layer of depth by using grade on forced as the bottom layer and then adding in the white layer of disease onto the grid. So that way you will get another layer of depth to your middle, that is the shadow to the DZs also, we have been did these ODCs with the shadow in my previous class, that is the baton painting to point O class, wherein the fifth pattern that we did V added the shadow to the disease also. So in case if you want to know how you can visit the fifth class project of the patent painting to 0 class. Now I am done adding the big daisies. Now at the dock area, I'm just adding some dot-dot-dot using the tip of my brush to depict as though oh, bases which are five from our view but in the field area. So this will help you fill your field area and make it a little more filled up. Now I feel like adding a little more disease in the water media. So we'll just, I'll quickly add in some ways easier. Now in the water media, although I will just add a little dot effect to add all the daisies which are five form of you. And to make our middle look a little more, hello. So this much is enough and my middle looks perfect enough with the disease. Now next I will shift to my yellow ocher, yellow. And I will pick up the yellow coat color in a little thick consistency and added into the center of my disease. Make sure that your white gouache flowers are completely dry before adding in this central idea. So you can see I am picking up the yellow coat color in such a thick consistency. Now it's automatically looking opaque onto the white flowers and giving a look to the center AT off the Flavell. So make sure that you do not add much water and dry to use it in a little tick consistency so that the yellow ocher color stays opaque. Now to add a little more depth to my flowers, I will pick up some burnt sienna Kahlo and into the center area in some of the flowers I will be adding in a little of the bond sienna edge to the yellow ocher. So what I'm doing is on today edges of the yellow ago, using the tip of my brush, I'm just dropping in some buoyancy and Accardo to add more depth to the center area. And you can see it's adding another node off debt to my flowers there. So I quickly add this depth to all of my flowers and, uh, you know, I guess then mean almost be done Gita middle hope today. So one last thing is I would just add a little more grass. You are at the dock ADR because I feel it's looking a little dark. So I can just use my own mix of sap green and dark green. And using my round brush Ivan quickly just add smaller grass strokes here. So undo that NIOS morula package.json and you know what little distinguished from the middle, I have added in this glass tube onto the entire OA. So phase there. Now I will just pick up a little of my white wash and add a lifted off distant Basie lobe then in though grass area that I just mean did. So I've been just died in this middle distant DZ loop. And in-between I've just done one or two, a little bigger so that the composition looks even and doesn't look out of proportion from anywhere. So I'll add another big Daisy, your, and then do these daisies also, Eigen added the yellow OCO details quickly. And now even the little Dodge of the bone CNR do the yellow coat color and then we'd be done with offloaded amino hope today. So that is one moving left before they're moving the masking date. That is just to adding the stem to these daisies. So I haven't quickly pick up some black color and just add in some stem to these daisies. Greek neat. So then I'm done adding in these stems, which adds more detail to my middle ADR. Now let's remove the masking tape and CFI new painting. Make sure that you remove the masking tape at an angle formula or paper and do not win the edges, I'll feel people. So via Don become IDO painting for D 22 and we have this gorgeous DZ medulla edematous. I hope you guys enjoyed painting this flawed in a meadow today with me. And I hope you guys are enjoying the 50 days watercolor challenge. I hope to see you all if you have deviations into the project section. And thank you so much to each one of you for joining me.
29. Day 23 - Wheat Field Meadow: Hello everyone and welcome to day 23. Today we are going to be painting these V8 fetal kinda for middle sunset view. So let's have a look at the fellows that you will be needing for this one. You will be needing a shade of yellow, orange windrows, red, violet, yellow ocher, raw umber, one CNO, rhombus and black color and some whitewash. So I have maybe put deep down onto all the full ages. And let's begin with a pencil sketch for this fun. My main pencil sketch is going to be my horizon line. So my sky ADR is a little more and the middle ADI is a little smaller because later on my middle will be popping into the sky. So that does it for the pencil sketch. Now, I'll begin painting the sky idea first. So let's begin with a clean auto photo onto my entire sky EDR. Make sure that you apply an even coat of water to weld and there are no quad told of water or excess water anyway. So I'm almost done applying an even coat of water and I have done my brush multiple times. So that might be put amines bed for a longer time delay. Paint my sky with differently. Now I'll begin painting my sky. So the first color that I haven't pick up is the shade of yellow. You can use any light yellow available in your palette. So very gently onto the left side, I'm flawless giving in a little node of the lemon yellow color from my palate. Now next I will shift to the yellowish orange shade. You can either use gamboge color or all mixing a little bit of your orange and yellow. All just add a red to yellow to get the shade. Huike and I will apply this onto the right side now. Now next I will shift to the Windows color from my palate and in, and if you do not have a queen rose color, you can use a scalloped auto codomain shade or any shade of a bright pink color. So this is the philosophy or with the pink color that I'm adding. So I'm adding it in a very diluted consistency and a very light door. Because onto this I will be adding in Dhaka depth so that I have different color variations in my sky. Now next I'm just picking up a little of the red violet tone, which is a darker pink color, and just adding little highlights here. In case if you do not have this, you can just add in a pinch off your violet color to your carmine audio scarlet color and get this door. Now again, I'm Shift to make windrows column, and this time I'll pick up the quin rose color in Arctic consistency that is less diluted with water and more of the pigment. And I'll just begin to add clouds like this into the sky. So now you can see at the end, I will be able to see the lighter areas and the darker areas bought. So in-between, you can see I'm leaving that very middle little white gaps and all of that will begin to add the BW DTO sky. So now next, I'm going to pick up a little bit of the vermilion color. Now in case if you do not have the Romanian Kahlo, you can pick up any shade of orange that is available in your palette. And I even pick up the color and not take consistency. That is again mode of pigment because I need a bright shade of the orange color and misogyny onto the right side you can see I'm adding in some bigger clouds. Now just using the tip of my brush, I'm adding in these smaller clouds onto the left side and the bottom EDI. So very small cloud such that the bottom colors are still visibility, that does the pink and the yellow color. Now, I will be adding in even a darker goal of the pink column. So I'm mixing in a little bit of my violet with the wind rose color. And I'm getting in a darker red violet tone that I was talking about previously. So I am getting this DACA tune, so it does more of the violet tone and less of the pink tone like 60, 40 days. Sure, you can consider. And using this darker pink tone, I am adding in such that all the colors in my sky visible. So you can see I have the light shade, Auden shade, yellow shade, the light pink shade. Then the second layer of the pink shade. So apply these clouds in such a way that, you know, you do not hide all of the areas underneath. You still have little of the places visibility. And this time I want very, very pinkish evening sky looks so that is a reason I'm going with more deep colors and adding these layers and layers of clouds. So I'll again pick up some vomiting, NOT consistency and added where I had added them previously because they seem to be hidden 0 because of the dark Leo's. So you can see my paper is still wet and hence I'm able to add these Leo still owe, you know, without worrying about any hard edges or that may pop in. So it's very important that, you know, your paper stays wet till the time you want to add these meals to the big too much depth into your sky in case if your paper dries quickly, then wait for it to dry completely and then, you know, revert dental. So phase and you can add these Leo's. I have covered this entire reweighting technique and my own class that is the re-weighting technique class. Now I have just picked up some purple color directly. That is the violet color from my palate. And just adding in a little of the violet highlights. I guess I forgot to mention this color in the colonist and I'm really sorry for that. So you all, you can see, I've got such a gorgeous guy with those pink clouds, the Bhopal and the orange look. So we are done with Test sky. What I'll just do is I will just add a very light layer of the yellow color underneath my sky, moving into my middles. And then I'm Wade for my entire sky too dry. So just a very quick small Leo. Don't worry, the middles is going to be adopt colossal. All of it will get covered up. But I felt a little less yellow in my sky. So now let's wait for this to dry completely. Now my entire sky EDA is completely dried and this guy has turned out to be so pretty and vibrant. Now let's begin with the middle area. So I'll begin with a clean CTO photo into the middle area forest. So I'm done with the clean quote of photo. Now, I'll pick up the ROM book. Hello, and I will give one allele of the Romberg color into my entire of field, ADR or diluted o allele or not a particular job because I will be adding the darker tones with the same color. In this. If you did not have to run book Allah, you can mix in a little touch of field brown to your yellow ocher color to get this rhombus. So I'm done applying this one layer of the ROM book Gallo onto my entire middle. Now why my middle area is still wet, I even pick up my liner brush and using my liner brush and draw on book allo in a little thick consistency. I will begin to add in the details. You're in the wet on wet. So I get some oh, you know, literally those are soft. We'd look your so I'm using my Diego brush and this is size 3 by z2. And just adding these glass make structures 0 red on red with the same color. But the calories less Daniel, Good, That is mod of pigment and less of water. Hence, I'm able to achieve this. So my field area is still wet and I'm able to get the soft grass Luke wet on wet in case you don't feel feel Lydia is beginning to dry, you can give it that EDR and keep adding these soft grass look. Also remember, if you feel Lydia will be two way, this column will begin to spread and you will not get the soft grass loop that you want and you will just get one flat color. So it's important to understand the priming. You know, at what level new people should be read for adding these. Gender, when you have people like the middle area is around 40% dry, you should begin adding in these soft grass loop that we want to do the middle. So you can see my color has not spread. I have that soft grass loop, then I'm not just one flat color now. Now, at the top you are where my sky and middle is meeting. Then I'm just adding in some of the grass look moving about. And that is the reason I had added the yellow collodion because you don't. Now you can see from behind the field the yellow color is popping out. That's exactly what I wanted. A setting sun look. So the sundries more of the yellow out there. Now why is this a steady rate? I will just add in a little bit of the bond sienna highlights also. So just the bonds here. Naca law in a little thick consistency that is less of what doc, just adding a few strokes in the center so that this would begin to give depth to your painting. Now using the same onesie and Apollo. And we just started a little bit of the strokes, even on the top area here. So we have added bodies. Leo's wet on wet in case if you're Leo has dried, don't do ID. You can still add them, but, you know, try to add them quickly. Now, let's wait for this to dry and then we'll add the further details to our middle. So my middle is still a little bit until the time of trays. I will quickly add in the boards into my sky. So at first I did the body of the board and now I'm adding the wings onto both of the sites. And a very tiny beak that I added. I'm using my size two silver black velvet round brush and this has a pointed tip pens. I'm able to add those minute details like that. So again, I'm just going to add a flock of goods flowing together over the field area. Now, you can add the boards in whichever way you want. Like, you know, if not the detailed ones on, if you find adding these details are a little tough. You can just add the simple boards on all you know, you could just add a few boards of any simply just using the simple V-shape or an inverted V-shape. But I'm just adding a few of the detailed ones and then I will add in a few of, you know, the basic ones maybe. So you are, you can see I'm just adding these simple bads, very simple and nothing much detail. And I guess I'll just add one more. And I'll be done with the boards in my sky. Then I'm done adding the boards into my sky. Now, I'll quickly pick up some white quash and I'll place the forcefully owed for the moon into my sky because the sun is setting and the moon is about to glow. So very tiny moon. So for the first layer, I will just lay down the color and blend it a little into the sky. Now what I will do is I will just use a damp brush and I will blend the edges of this white spot that I have been dead into the sky. And I will lighten this color so that it's not a vibrant white right now. And then when it dries then into the center of this circle, I will be adding the moon and the ADR around this will begin to act as the moonlight. So now my middle ADI is completely dried and I am picking up dog grounded cheat now. And using this tone, I will be adding some details of wheat field kind of a look into the middle area. So if you do not have the rounded color, you can just mix in a little bit of your bond sienna along with your dark red tone or a permanent trade color, and get this stone. Now you'll have to lead the proportion of the color according to your bones. That is the red and the bonds that you're using. So your, I'm done adding in this force to wheat field look. So I'll quickly show it to you on a graph sheet. How am I adding this so fast I drew a line for the center area. And now from that I'm just trying to pull out some very fine lines and Django give it the shape of the leaf. Okay, so this way we are going to paint the V2 when you're using this red brown tone. Now next, I will even be adding in some detail V8 feed Luke. So these are those little details that are there onto the wheat field though, seed like structure that is there. So a few of the stems I will be adding in with the Z depth. So it looks all the more detailed and you know, nutshell of VTE field kind of a look. So the second type of detail structure that we're using, It's kind of a stem with, you know, and generally smaller looking leaves, kind of a structure. And oh, it's just that it's a dog, red brown instead of the green color here. And this is generally, you know, you can find it on the wheat fields like this. So I hope you've got to hang off for the kind of wheat field, the data structures that we will be using. So now let's quickly add all of them into our middle area using a boat though structures. So you can place any kind of detail. Look at event as you wish, and in-between as you can see, I'm just adding some detail grass strokes like this without adding much detail forced. So what you can do is false, lay down a layer of this gastroc, submit this darker red brown color, and then variable you wish you can use either of the two details matter and add the details randomly. Make sure about one thing that your field area was completely dried before you started to add these details. Otherwise, these will again begin to get a soft edge and will not give you a detailed look. We already added a soft looking detail behind. So you can see the background where we added in the ROM bond, the bond CNR details, the vote, the soft look for VTE field area that we wanted to add. So now we are adding the final layer of the detail VDD field here. So you need to be careful about this thing that your paper has to be completely dried before you begin adding the detail look. Now on your own, I have painted again the second kind of the detail struck job. So you can see very randomly, I am alternating between the detail and in-between just adding simple grassroots to look as the wheat field which are distant from us and so not detailed ones. So basically the ones that are far from our view will not look detail to as David, just look like simple grass and the ones that are close to us, we'll begin to look like, you know, the detail ones that we are painting. Now in-between. I'm just adding some draw on Bardach details at the bottom media. So now some more detail, you're in the bottom area. I know adding these details may seem tedious task, but you know, it's very important to add some detail look also. Otherwise you could simply paint a soft looking needle-like the first one that was the simple grass meadow that we've been dead. But in order to increase the level of work and you know, go more deeper into painting on the meadows. That is the reason I get such a detailed painting. Your So now at the bottom, I'm just giving in some strokes again, just simple grass strokes. Now I will just use the same column and add a little of the wheat field popping out into the sky. So fast, this one big leaf. And now to this I will add the details. So like this, I will be adding a few of them into the field ADR, which I've ensured tried to depict that they are moving into the sky area so you don't. This will add a little more detail to your painting. So how I'm painting this is, I think, a very thin line. Then I dab the belly of my brush and then lift it up when I feel I'm done. Uh, you know. So you can see just a thin line. That the bending of your brush and again lifted up and take that pointed edge. So that is the rehab. I'm adding these details on field area look into the moving into the sky. So another one your, this is a little taller as compared to all. So these are kind of the one stroke leaves also. So you take a thin line, dab the venue of your brush and then lift it up video feed or you don't, the lens is enough. So I'm done with my middle ADR. Now the only last thing left is to paint the moon again. And my first node of moon is also completely dried. So I quickly pick up some white gouache, innovative consistency. And I will not be adding much of water do it because I need a very vibrant white look now to my moon. And into the center of that force Bitly or that we've been dead. I will just begin to add in the white wash, makes sure that you do not cover the entire force Leonato fight because it lose its purpose of adding a day. Then. Now my moon area is completely dried and I'm just left to add some white details into the field area once a dice. So now you can see my field is also completely dried and using my white gel pen, I will just begin to add in a few highlights into the field ADR, which will add more depth to your painting. So very randomly, I will just give some small white strokes and some on do the leaves here. So you can see I'm using very small movements of the white pen and adding in some highlights. I am giving breaks in-between, although I'm not painting it in one straight line anywhere. So just add a few of these highlights. And in case if you do not have a white gel pen, you can add the same with whitewash using a very fine liner brush and randomly just add these details. Now after this, I will just add very little to the boards, also some teeny tiny highlights near to the wings. So we're done with our painting now let's remove the masking tape and see our final painting. Make sure that you do not. The old noodle that off the masking tape by your painting is wet, otherwise it may spoil your edges and always remove your masking tape at an angle from your people so that it does not data off the edges. So I'm done removing my masking tape and the NAD without painting for D2 and D3, I hope you guys enjoyed painting this look middle with me today. Vr almost half the way through this challenge. And I hope to see you all join me do the day 50. And thank you so much each one of you for joining me, tell you, I will see you guys tomorrow into the next class project.
30. Day 24 - Thunder Sky Meadow: Hello everyone and welcome to D2 and D4. Today we will be painting this countryside middle lobe. So let's have a look at the gallows that you will be needing for this one. You will be needing a shade of yellow, beans, green, sap, green, dark green, bond, Dumbo, burnt sienna, black and white quash, and a little bit of the yellow ocher. So let's begin painting. I have maybe put tape down onto all the four edges onto my board. So let's begin with the pencil sketch. We will be painting a countryside. You may do, oh, just a glass field middle, in fact. So let's begin with the pencil sketch. So first I'll just mark out my horizon line and onto the left side, I will replace 0 countryside home kind of a look here. So the roof and bottom area of the house. So it's a very simple house, nothing much detail or complicated. I'll just mark the horizon line a little bit lower as compared to my house that I have been done. And now in-between, I will just give a very small part. We're moving towards my left side. And after this we are done with our pencil sketch. Nothing more to do. So now let's begin with the sky. So I'll begin with a clean CTO photo onto my entire sky ATO. Make sure that do apply an even coat of water two out and there are no pot holder photo form and do not run the water into the house. Adr tried to maintain that line there. So this time the sky is going to be like a condo or sky like as if it's about to rain. Odd. There was a great condo. So as you might have seen in the beginning, adopt oh, sky, look this time. So let's begin. First. I will begin with the yellow hand place, the yellow car loan at places to have that little lighting in between. So I have picked up the lemon yellow sheet and I've been just dropped the lemon yellow color randomly first. So that does it for my yellow color. Now, I'll pick up the Payne's gray color in a very diluted consistency and given a leader of the pins gray color at the remaining species. So in between the yellow also, I have left some white gaps as you can see. So I, Leo dawn of very diluted tone of the Payne's gray post and then begin to add depth to get DACA tunes and Leodes by Leos, get more depth into my sky. Now I'll just delete my border logins so that the first layer blends very well into each other. And all of them have a soft edge on the colors bleed Copley through each other. Now my sky is still wet and I begin to add in the DACA dick Nios. So I am using gray color, but this time less than you did that does more of pigment and less of water. And I'm just beginning to add some cloud effect to my sky. But you can see I'm adding in such a way that I have that little gaps in between such that the light, dark Payne's gray color Leo that we added is there. And that adds a depth to us sky and New York Dadaists roof of the house. I'm just adding in the beans gray color. So your neon where my horizon line, I'm this guy is leading. I haven't added the darker layer even after this, I will still be adding Venmo darker layer for the clouds to add in more depth. So this is the second level of the Boolean value color that I'm using right now, that is, you're not all like 50 percent more, 50 percent pigment. Now next, I haven't be using like 80 percent pigment and just hardly any water. So now I'm going to pick up the color in each doctest consistency so that I have to Dhaka depth into my sky. And this time. I will applied even smaller such that the white gaps, the light shadow is also visible and even the yellow color, and then the darker layer is visible. So in all my sky should have four different colors visible after the j's. So I'd written in such a way that the below tree Laos that you have added so far remained Isabel urine data at places and you don't cover them all completely. Now I have just picked up a little bit of the black color. And very randomly I will just add a little of the black highlights just medially at my horizon line, then Hadley at the top. And that does it for my sky area. Now I'll wait for this to dry completely and then move ahead with the painting. So now my sky is completely dried and that'll begin painting the house and the base layer for the middle area. So first let's begin with the roof of the house. For the roof, I will forcefully adding a little of the bone sienna color at the top of the roof. Then I will be adding in little highlights of the yellow and the Payne's gray color on the roof area to depict the effect or the shadow and the light of the sky onto the roof area. So now just adding in a little bit of the yellow in the center area and blending it well with the bone sienna. And lastly, I will pick up the paints gray color and add it. You're at the bottom. So not too dark and not too late. Now the remaining housing area, I will just fill it in with the bone sienna color Foss. And after the j's, I will add in the details to this later on. Now, for the field area, I will pick up the sap green color, light consistency. So that is like not too dark and not too light also. And I will fill the entire middle area on both the sides with the sap green color. Don't worry if your house is not drying, you can surely added and let them blend because, you know, there we will be having the grass which will be overlapping the house later on. So this edge, you know, that gets foiled, it will get covered up. Hence, I'm not waiting for the House to dry completely. Now onto the right side. So now I'm picking up my dark green shade and using the dark line follow, I will just drop in some dark green onto my field, ADR vile, my field is still wet. So randomly just using the tip of my brush, I'm dropping in the darker green dawns such that I have to tonal variations to my middle area already. Now onto the pathway also, I will add in the bond C and Apollo forced. Don't. If there's also blends with your middle area right now because when even be giving in the final components, all of this will get covered up. So this is like the color blocking technique. Now at the edges you are, I picked up some Payne's gray color. And onto the edge I'm adding these Payne's gray color of the pathway. And in the Santa I have that brown color. So at the top, the Payne's gray has spread too much because of the water. So I have just again picked up some brown color and I'm adding it there. So you can see again, I have been able to achieve the brown loop there. And in the center bottom media, I have to bond C and I look now, I'll mix in a little tinge of black to make him to get an even darker green. And CMB, I will just add some droplets of the darker green randomly so that I have more depth into my field area as I feel. It's still a little lighter and beneath little darker tone because all we are trying to show a very stormy kind of a look. So even the field area has to look dark. And onto the edges of the pathway you can see I'm adding in the black color line to depict the shadow effect of the field area. There. Now let's wait for this layer to dry and then we'll begin adding the final details to our painting. So now my entire painting is completely dry it, and it'll begin by adding the details to the house there. So I'm picking up the black color first and I'm using my size two round brush, which has a pointed tip. I'm using this brush, I'm going to begin adding the details to the roof. So first, I'll just give some outline with the black color. Now onto this triangle AED, often roof, I will begin adding the details. So I'll be no and just some straight lines to depict the wood. Now similarly in the bottom media also, I'm adding in the lines to depict over defect. And between the top and the bottom you can see I have left that to very little line, you know, straight-line gap there. And near the field area, there'll be grasses overlapping the house. So all of that rough edge will get covered up. Now onto the top area of the roof here, I will begin to given some time kind of a D1, so fast Alpha unit completely with the horizontal lines. Now today's added, begin to add the bleed D dance. So just Sinbad break d dance. Oh, you know, the lines in the center it off. Just adding these details. Very van did me. Now next, let's fill in the detail in the bottom area of the house. So in the bottom media also, I will be giving in some simple vertical lines. So after adding the lines, Yeah, I haven't even though you're not taking the other outlines of the house with the same bond to amber color. So this is the doctrine of brown that I'm using to add these details. I forgot to mention before we begin to add, but I hope you guys would have understood seeing the color tone. It was a dark brown tone. So I am using the shade of bond on bomb mixed with a little touch of red, so a brownish red color. You can directly use a bond on book alone. So even onto the roof, I've just given some thicker details vary randomly. Now let's begin painting the field area. So for the field area, I am mixing my sap green with a little bit of whitewash. And using this green color, I will begin to add the fourth layer of the grasses, mixing in my sap green, white quash and a little bit of a yellowish green color. And using my same size two round brush, I am adding in some grass strokes, verifying grass strokes and smaller ones. So the reason why I have identified quash your is it will help me achieve an opaque look to the grasses as if I use the green color directly from the watercolors set, so it will not stay this opaque. And I wanted an opaque look for my grasses since my base layer is all to the doc with quash, It's easy to achieve the opaque layer even on watercolors. A mixed media thing your while painting these grasses. So simply you can see I'm just adding small grasses right now with this yellowish skin tone. And just by adding a danger fight quash, I can get this opaque look so easily. So this is a false here of classes. After this, we will still be adding the Leo's with different tonal values of greens by mixing it with white quash. Now the same way, I'll add the grass, you're onto the left side near to the house area. And I will add these classes a little overlapping the house also to cover those edges with that we have because of few, not the base layer that we had added. So I'm done with the first layer of the grasses. Now do this scene makes, I'm just adding in a little bit of my sap green color, very little. And now using this darker tonal value, I will begin to add this grass strokes in the similar way, overlapping the first layer. So again, oh, you know, into not be overlapping exactly the same places, many randomly differently. I'm just adding these grasses here. And CMV, I haven't even added new house area there. So I'm done adding. And now for the third layer to this same mix I even added. This time, the grass is going to be even lighter than the first layer. And now using this lightest tone off, the green color, sort of a paste celebrate green color. I haven't begin to add the grass strokes again onto the entire middle area, both onto my left and my right side. So fast I'm adding it near to the house. You're overlapping the first two Leos that I have added now onto the right side also same way I did it begin to add the grass strokes, but this time david be quite less compared to the previous two Laos because I have to let the PVS to laos also be visible and randomly. Now kneel to the house, ADL. I haven't add in a layer of very top green grass effect at the bottom of the false layer that we have added that is now to the road area because data I wanted to depict the darker shadow effect. Even under the right same neo to the roadway. That is the pathway in the center. I'm just adding in this darker green strokes and onto the right side vd randomly a little of the dark green color directly. Now next time picking up the black color and using the black color, I then add some more darker shadow near to the pathway. Because oh, you don't because those dot O grass there. I wanted to pick some darker shadows and the AutoDock partly ADR. So that is the reason onto both the edges of the pathway I'm going to be adding in these grass strokes with the black color. Now, even under the right side, I will add the grass 2k similarly. So first I didn't give a line to my part, defining my path to me. And they didn't do the remaining area. I will add the grass strokes with the black color. Now to make it look natural. From the left side, I will just try to depict some of the grass effect. Three Ada also. So very randomly from the fat, the line that we had been dead just putting out some grass effect onto the pathway to deflect the shadow or the reflection of the grasses there. Now again, I pick up the light green color and add some of the night dreams strokes onto the black color trying to overlap. So now this remaining black area or figure depicts the shadow of the grass that we want underneath. Okay, so that is a reason I first started the black layer and then undo that. I tried to overlap it with this green color. So this is the beginning of the grass that we have been done so far. And it looks so pretty. And exactly onto the right side we have those bright grasses deflecting the moonlight effect there. Now you're onto the roof just adding some dry brush strokes with the bone sienna color, and even onto the bottom House of any little dry brush strokes with the brown color. Now using the same bond sienna color, I will just, you know, splatter lifted off the bottom sienna color onto my bottom pathway and the little feet area. So it does bring goods of this buoyancy and aka majorly on the pathway and a little undo my field area on the right side to depict some mud in-between. And after these plateaus will be done with a happy ending and we'll remove our masking tape and see the final. So now let's remove the masking tape and CFI and painting with those clean edges, make sure that your grass ADR is completely dry. Otherwise you may ruin the clean edges and you know, you may have difficulties and removing the masking tape. Your final painting for the 24 and our second last Nieto painting. And I just forgot one thing again that is adding some white highlights into my field area. So I'll quickly pick up my white gel pen and I'll just add some white highlights. So basically just to undo some of the grasses, I will just add these rights cheeks to debate to more of the light effect. And this will add another layer of depth to your painting and even onto the shadow area near to the pathway. Just adding little after white strokes to depict all the depth two up in day. In case if you do not have a white gel pen, you can add these highlights by using a fine liner brush, annual bite gosh. But adding these details adds a level of depth to your painting. And even onto the house. I'm just adding little details with the white color to that big toe, you know, more often light effect. So just some last few strokes mode onto the grass meadow. And I guess that is it. And another last thing left to do is adding a board into the sky because they feel this guy is a little too plain. So I will just quickly add a sky also. So all these elements were mentioned in the center. Ads five was able to add them even after removing the masking day. But in case a few haven't removed the masking tape, I guess you should add these details and then remove it. So I will just add one big board into the sky area. So to the wings also, I will give a little detail by pulling out those other feathers. So you can see the board from a closer view. The detail one board that I added. Now this is our final painting for Day 2004. I hope you guys enjoyed painting this and I will see you guys tomorrow with the last Nieto painting and are halfway through the watercolor challenge.
31. Day 25 - Sunset Lavender Meadow: Hello everyone and welcome to D 25. We are halfway through this 50 days watercolor challenge. Today, we will be painting this last painting in the middle series. So let's have a look at the colors that you will be needing for this one. You need a shade of yellow, orange, windrows, violet, sap green, dark green, CPO, black and white quash. So I have my paper taped down onto all the four edges onto my board. And let's begin with a pencil sketch of any jobs and a little pencil sketch that you need. So the false pencil mark is the horizon line. So about 35 percent of my top EDI is the sky. And the bottom is going to remain the C and the middle area. And on the top of the horizon line, I've just started a very small mountain range. And now I'm going to begin to add the middle. So the CATI is going to be quite smaller and the bottom area is going to be the middle area. So this is a simple pencil sketch, the sky mountain and the middle area. So even under the right, I have given a very small middle area marking, which may not be visible to you, but it's there. Now, I'll begin painting the sky. So I'll begin detected in quarter four TO only onto my sky area. And normal body if you run into the mountain area this time, because the mountain is going to be awful, very, quite dark color. So it will be perfectly okay if you ping the lighter tones there because it will get covered up when you pin the darker tones there. So I'm done applying the clean coat off photo. And now I'll begin painting the sky. So the first color that I will be picking up is the shade of lemon yellow color and beginning to apply this lemon yellow color near to the mountain area. So I have applied the yellow color even onto the top-left IDA, a legit. Now I'm picking up the shade of yellow, orange, and I'm applying it onto the left side majorly. In case if you do not have this yellow orange, you can either use a gamboge yellow, or you could just mix in a little bit of your orange with a yellow color. All you're vomiting shade with a yellow color. Now. I'm just lifting up some color to depict some light area there. Now the next comment that I will pick up is that a violet tone? So in case if you do not have the red violet tone, you can just mix in a little touch of your violet to your queen rose color. And I'm using this shade in a very light consistency you can see of any diluted tone for the first layer you are at the top area. Because as you know, I love adding depth to my sky. And for adding this depth into your sky, you need to paint the sky into level by level by adding Leodes on Berlioz bit different or new values. Now I'm picking up the violet color mixed with a little bit of the white color. So you can either use by it quash or you can use white watercolor. And using this basal tone, I will begin to add the second layer of the clouds at the top area. Now, I will darken this stone itself, so my violet color is over. So right now I will just mix my blue and the pink color to get a violet tone. And using this docker dawn of the violet color mixed with white, I will begin to add the second layer of clouds. So this is Dakota in the first layer that I added. And make sure when you add the Leo's, you add in such a way that a little off the bottom the Austin be visible urine there. So that is what adds depth to your painting. Now next epic Dr. Quinones Scala and added a little highlight windows Kahlo onto the top-left corner. Now using the same quin rose color, I'm just adding some cloud effects using the tip of my brush and just adding some simple lines. And even onto the right side, I'll just add a little highlight of this pink clouds. Then I will pick up the yellow, orange color again in a thick consistency this time and add for the depth to be the yellow, orange color onto the left side and at the bottom area of the sky majorly. So, you know, the first layer of the yellow, orange color was also a very dilute. And now you can see if and I'm adding it, it's such a darker color than the previous one. Be a little careful of the yellow islet color. Oh sorry, the yellow, orange color near to the violet tone, that it does not turn into a muddy color. Now, I have picked up the queen nose color in a thick consistency. And I'll begin to add the darker clouds at the top area. So just laying down some smaller clouds and some bigger clouds leaving gaps such that my previous violet colors are still visible urine there. Now next time again forming the shade of violet column mixing my pink and blue. And using this darker violet tone, I will add some darker highlights at the top area of the sky again. So there is a lot of water collected onto wet top-right corner. So I will just pick up a tissue and just dab the excess water there because it's seeping back into my painting and beginning to spoil the top EDL. So be very careful of these small things that there's no water collected anywhere, that it's points, you are edges and the painting again. So now just adding some violet highlights at the top. So I added a big patch onto the top right corner. And in the remaining area you can see just using the tip of my brush, I'm adding the photo highlights. Now, CMB with the queen rose color, adding some darker details into the sky area. So that does it for my sky now till my sky area dries and begin to paint the CAD. So my CEQA is going to be a reflection of my sky area completely. I can't paint a mountain range right now because still my sky doesn't dry. I can paint the mountain range. So del then I will begin with a clean coat of photo or neon to my C Eda forest. Make sure that you apply an even coat of photo and do not run into the sky. Now, let's begin with the same colors that we used for the sky to depict it into the sea. So false, the lemon yellow Colonia to the horizon line and medially onto the right side of the sea. Because majorly onto the right side of the sky, we had the yellow column. And you can see in the sky where we lifted the color. It's such a bright light, yellow shade that is there on the right color near to the mountains there. Now I applied TO yellow, orange shade and now I'm applying the queen rose color. You're at the bottom area. Now next time picking up the shade of the violet DO column mixed with white quash. Now make sure and be careful about one thing that when you are adding all these laws, whether it was in the sky or in the CAD. You do not introduce much of photon because if you introduce too much water, you will not get these definite cloud looks and the different color looks into your sky. The kalos will just begin to spread and they will form one plane or block of color. So make sure that you don't introduce much water. Now just to adding some darker highlights into the sea. So exactly where in the sky you used which Kahlo you need to deflect that into the sea. Very random v. So where I had the pink color in my sky, that is at the top-left corner. So in the bottom left corner of messy, I have the pink color and on the right side I have the purple color as in the sky. Now using the sap green color, I'm simply adding the force beyond that is the base layer to my middle area. So very simply just add the sap green color. What if your c is still wet? It's perfectly okay. Let it bleed or let it blend. But make sure that it does not bleed too much into the sea because then it will be difficult to control. So just adding those opinion and now just some darker green highlights. Because we will be adding further detail grasses there after this trace. So we can cover up that soft edge that has along with the c. So that is the reason I'm not waiting for the base layer to dry and just adding the base layer for the middle also. Now, even at the bottom media adding the sap green color you are. So I've just deleted my board so that the green color does not move much into the sea area. Instead, it flows downwards. So that is the thing that I said, that you need to control the flow of the color, that it does not see too much into Yasi, otherwise this even get to win. So in order to control that, I just tilted my board so my beans flow downwards and do not move much into the sea. Now just picked up some darker green and adding some darker green highlights into the middle area at the bottom. Now my CAD is sort of 50 percent or dried. So I will just add the shadow of the mountain range with the purple color itself. So I've just mixed in my blue, pink and a tinge of black. And I've just added or very small reflection of the mountain range. So whatever shape your mountain is at the top of your horizon line, just add a similar looking shape into USE area like this. So in case if your C has dry it, then you can just add this layer and soften the edges of this mountain using a damp brush like this. So I felt it's a little dry, so I just use a damp brush and soften the edges. And F tilted my board so that the pins are flowing downwards again. Now let's meet for all of this to dry and then begin adding the details to this middle. You are now diode painting is completely dry and I have got a little rough patch in that middle area there on the right side. But that's perfectly okay. It will all get covered up and I begin to add the grasses. Now. I have mixed in white goulash and my sap green color to get an opaque green color. And using this, I can begin to add the first layer of the grasses here. So I'm using my rigger brush three by 0 and I'm just adding some simple grass luke your at the bottom. So this is just the photosphere of the grasses. After this, we will be adding the grasses, the different tonal values of the greens again. Now for the next year of classes, I've just added a little bit of the viridian green color to the same makes nl add the second load of crosses underneath the forest clear. So if you do not have a VD didn't gain Kano, you can use your emerald green or any darker green tone. It's perfectly okay. And I have added up to the same mix so that I do not have to waste any colors there. So that does it for the second layer of the classes, no father cloud layer. I will further darken this mix so I can add in a lot of the dark green color to this same mix. And I begin to add the third layer at the bottom, almost onto the edge of my paper and at the similar grass strokes. So I've just darken the color a little bit more to add some darker deck. So you can see how simply I'm able to add these grass strokes using this brush onto the other right near to the mountain range there in the middle. I haven't been using my fan brush to add the grass effect. There. I haven't not be adding these details. Grass looks that we are adding your at the bottom. So it's just as tedious task you're in the water media to add all of these graphs loops one by one using a brush. Engage us on one who wishes to go ahead with us. In below, you can use a fan brush and add the class effects. You're also, as I did previously enough, you off the paintings. Now maybe just to add a few often darker strokes, even onto the top of the grasses that I have I did, but quite less as compared to the previous two Laos. Now let's add the grass effect. You are at the top middle area. So I'm picking up my fan brush and I'm taking some dark green color. And I'll just pick up this dark green color and begin to add the grass effect your onto the top middle area. Make sure that you do not use too much water while adding these drops. Otherwise you will not get the grass job because of too much water. So now you can see just by adding these grass strokes, that soft lock near to the sky is completely covered. Hence, I was not waiting for it to dry before adding the middle area. Now, I will just add a little of this grass look into the sea area also. So I'm just using the fan brush very gently and adding these small glass patch growing into the sea area. So you are also, I'll just add a little after grasses coming out into this Ediacaran, make it look more nutshell. Now I did pick up my rigger brush again and just add a LinkedIn, windy day, D1, D2, these grass popping into the sea. Now next I'm going to pick up a little bit off the black color and I will adjust and very few grass strokes with the black color into my bottom middle area. And using my rigger brush very gently, very randomly, just a little of these black grass drops to add a little more of the depth and the shadow effect to these grasses that we have been to make sure that before adding this layer with the black color, all your green layer of classes were completely dry. Otherwise they may begin to spread again. Now I'll paint a falsely offer the mountains here. So I'm mixing in my Payne's gray color with a lot of violet color to get all dark tone of all violet color. And using this docker dawn, I will add the mountain range. So the reason why I'm using the violet color or darker tone this time is to deflect the other effect of this guy on to the mountain range. So that is the reason I had even painted the reflection with a violet color mixed with black so that, you know, all of it goes well with the team. Now very simply, I'll just paint the entire mountain range with this doctrine of violet color mixed in with a little bit of Payne's gray. So you can either makes you out aid violet tone with the Payne's gray color or you can mix in all the blue and the Payne's gray color to get such a similar-looking dog. So I'll just define the edges of this mountain belt again so that they look all, you know, well-defined. I just feel like darkening the reflection a bit. Scientists pick up my fan brush and pull out this color a little bit into the sky area. And then I will add or do you know that top layer again, suggests very simply, I'm using my damn fan brush and I pulled out the reflection. You're into the CAD and now I will just softening it a bit onto the horizon line. So just picking up some color again and adding it your horizon line mountain range. So I'll wait for that mountain range to dry and then I'll paint a layer again onto it so that it has a proper finish to it. Then I will begin to pin the lavender into my middle. So for painting the windows, I haven't mix up my white gouache should be the red violet tone. And I will add a touch of blue to get the purple tone again, because since the purple in my palette is currently or walk, so I'm mixing in my pink and blue to get the violet tone and then mixing it with the whitewash to get the lavender color. In case if you have the lavender color, you can directly use it instead of mixing this color. But I will just mix this color so that all of you can follow along easily. So for the first layer, I even use this lavender in a dark consistency. So you can see it's a little too dark. So I'll show it to you. I'm basically just having the tip of my brush into an oval shape, basically an egg shape. So the top has a pointed edge and as I'm moving downwards, it's becoming a little bit on edge. Okay, So this is how I'm painting the fullest layoff or the Windows, you're just dabbing the tip of my brush and forming this egg shape. Now seminar, I'll just keep adding a few of these randomly into my middle ADR. So you'll get no detections of my 11. Does that on defense some vertex moving towards the left, somewhere towards the right. So I'm moving into the CAD semester. So try to make it automatic and keep them moving in different directions. So as I said, this is just the first layer of the live indoors. After this, we will be adding the Leo's with the lighter tones. And the reason of mixing the violet color COVID, right? Cautious so that you can see the colors are no peak and they're standing out and despite the darker green near at the bottom. So that does that easily by just adding a little bit of whitewash to Yellowstone. And it becomes a sort of a mixed media thing that is a wash with water kalos. And it helps in achieving these details and giving them an OH peak, not despite the wantonly or is being done. Now to this first layer of the Lambdas dry. I will just quickly add all those small stem to all of these windows using the black color. So just very simply pick up some black color onto your brush and add these little stem to these flowers. Now I'm adding a few of the stems varied randomly, which do not have any flowers blooming onto it. But just to add a little more depth, I'm adding these stems with the black color. So I'm done adding all the stems. Now let's begin to prepare the second layer. So I've been just add a little more of the white quash to the same mix that we had for the first layer, and then turn it into a paste in a violet color, a very light base syllabi lip color. So you can see, I'm just diluting my white quash again. And using this lighter tone, I'll begin to add the second Leo in the same way how we added the first name, but not completely overlapping exactly onto the first VR randomly around. So now you can see if we can see that two Leos onto our flower. So simply add this onto all of the flowers into your field area. Now I'll just pick up some burnt sienna color and I will just add a few burnt sienna highlight because I feel some black colored stem stack we added have competing motion with dogs, Grass, EDL. So to add the definite stem, look, I will again add the stems with the bone sienna color so that the standout and add o, you don't want the detailed look to the flowers that we have been dead. Now, I am adding more white to my PE still mix of the violet color and making it more towards the wider society. And just adding some better look into the middle area to depict some of the flowers which are distant from us. So just a little of them is visible. And this one, oh, you know, automatically fill up our Middle Asia and give a detail. The middle area. Now the last thing, I will just again add the darker violet tone onto my mountain range again. Because as I said previously, when I pulled out the reflection again, So it was, you know, getting merged with the deflection. So I waited for it to dry. And now again, adding this definite mountain range to make it look distinctively visible on to memorize in lane. Now some last details. So I'll just pick up some black color and add some black grass effect. Look Your into the middle area at the right corner you're near to the mountain to depict some shadow of the green grasses that we already have. And even a little of the black effect onto the grass that doesn't do the CDS. And the last thing, I will just pick up some whitewash and add some white highlights to the flowers that we have been dead. So PR white color on the telephone to add a little bright effect to the middle area. So under the flowers you can see varied and be hardly three to four dots poured flour is what I'm adding, but it's adding a bright touch to a flowers. So I'm almost done adding the white dots onto the endometrial area at the bottom. So that does it for our painting for today. And we are done because we do EDA look at the sky in this one looks so perfect and I'm in love with this guy, especially the sunlight effect over the mountain, that very light effect there. So now let's remove the masking tape and C are painting with those clean edges also Vk form by removing the masking tape, especially that your edges are completely dry. And always remove the masking tape at an angle from your people so that you do not take off though people and spoiling the beam day. So you are, is Ami doping thing for d two and d phi. And we are halfway through this challenge. And thank you so much to each one of you for joining this challenge and painting along with me every day. I will see you guys tomorrow and do the next team of this 50 days challenge.
32. Day 26 - Vibrant Sky Street Lamp: Hello everyone and welcome back to this 50 watercolor challenge. We have crossed halfway through this challenge, and today we are beginning the second half of this challenge. So today we will be beginning with the bronze street lamps. So this is the first one in the series. Let's have a look at the calories that you need. A shade of. Yellow, orange, permanent shed or scarlet color. Bright blue, indigo, Payne's gray, white gray, and black color. So these around the colors that you need. Now, let's begin painting if you have all the colors ready. So I have my paper taped down onto all the four edges. And I'll begin with a pencil sketch of the painting that we are going to do today. So first I'll begin to mount the green area on the foot fact that we are trying to depict by the seaside. So you are, is the glue that we are marking. And the gradient is a little slant in our view right now and not a straight line. So you can see my scale is also a little diagonal. Okay, Now onto this I will begin to add the details to the grid. Now next I'll begin to add the street lamp on the top of the screen onto the left side medially. So fast I'll mark the board and then I'll give the street lamp. Even the bowl is a little triangular in shape. That is, it is tonight at the top and as you're moving downwards, It's little ticker in bread. Now I'll mark down lamb area here. So I'll add the details to the lamp also. And you can just copy out the same details. Or if you want, you can show that go ahead with any other lamps, low hit or the shape of the lamp as you wish, may not be the same lamp as mine. So yeah, I'm done marking the lamp also. Now. I'll mark the horizon line. So approximately 35 percent from below the people. So the About a year is my sky area and the bottom media is going to be the CEO. Now one last pencil sketch is a little sun ADR. You're into my sky near to the horizon line. I will just mark already small side. Now I'll begin painting. So this time I'll be going the wet-on-dry technique for painting the sky. And I indirectly use the colors in a bowl look so fast. I'm beginning with the shade of orange mixed with a little bit of red color to get this orangeish straight tone and neon two-way horizon line, I'll mark out with this color. Now makes sure that around the sun, you do not take this color into the sun. So use either a smallest size brush for us to mark out the sun and then fill the rest of the area. It's perfectly okay if you run into the bowl of the street lamp. But make sure that you do not run the colors of the sky into the main street lamp about. So what you could do is you could either use a masking fluid and mark out this GB lambda bar audio cold place masking tape there, you know, cutting it into the shape that you want and place it there so that you can run your brush. But I ran my brush very carefully around the edges there and not run into the sky without using any masking fluid. So fast with the orange color, I am marking out the details near the horizon line. Then next I'll shift to the color of yellow. So I'll be using the hansa yellow from this set this time, you can either use cadmium yellow color or any bright yellow, but don't go for a lemony yellow color, go for a little darker tone of the yellow. Now next I will pick up the shade of bright blue and add the top area of the sky. I'll apply the brake blue-collar. Now be careful about certain things. Firstly, do not run the color into the lamp area because the lamp media has to depict the light at the end, that is the bright light glowing into the lab. So you got to be very careful there. Secondly, when the blue and the yellow mix you can see there is a green color getting form. So be very gentle out there and remember to clean your brush. Before picking up the blue color again. Otherwise you can see how I have that little green touch on to the top-left corner. So you can see near to the lamp identify the color because they wanted to be a little careful. So now shifted to my smallest size brush and then I will add the color very obediently so that I don't run into that street lamp and lose that light effect there. Now the top sky color that we have added is too light right now, so I can pick up the bright blue color, but this time in a little thick consistency that is with less of water and apply a DACA and a deeper layer and apply it to very carefully so that there is a little green dash, but not too much also. And I just did the board so that the pains automatically flow into the yellow color and have a soft and a perfect blend. So now, whenever I feel that there is a little bit more of the green touch, I'll just lift up the colors quickly before they dry and just dab demo for onto a tissue and lighten the tone there. Now to darken the top area of the sky, I am picking up some Payne's gray color. And I'll just apply a little dot of this Payne's gray color onto the blue part of my sky. Now be careful about one thing that you do not introduce too much water. Because if you're going to add too much water, then the beans will begin to spread too much. So be careful about this. Otherwise you will lose the blue touch complete V. Now, even onto the yellow, I just started a few strokes of the beans green color to add little cloud effect to my sky. Now with the same pains Greek allo, just using the tip of my brush, I'm adding a very fine line onto my horizon line because I wanted to pick up any dark area near to my horizon line. And the same deflection I will be adding when I begin to see. So right now, I'll just blend it again with the orange color because my orange color had almost begun to dry. So I'll just read it quickly. Now. Let us pick up the Payne's gray color and add photo. No clouds in the sky. This tan color you can see is even darker than the previous layer of Payne's gray that I added. Now I just add a few little clouds and then we'll be done with this guy. So that does it for my sky. Now let's read for this guy to dry and then only we can move ahead with the painting. Now my sky is completely dry it and I'll quickly add a reflection of the sun into my CDR, which I forgot to add previously. And now I'll begin to being the CEO exactly with the same colors of the sky. So first I'll begin with a very light line of the beans gray color. That is the deflection onto the horizon line. Just as I added about the horizon line. So this time I'm adding the Coulomb force to need before adding the orange color so that I have a perfect blend and I need not re-read the audio. No. Again, they can't off the orange color there. Now next time picking up the orange and adding it now makes sure you're all done. You leave the sun ADR blank and it's okay if you run into the bowl of the street lamp or even if you'd run on do the grill area that we have added. Because the greatest ADR, we will be adding details with the black color. So all of that will get covered up. Now next time picking up the shade of yellow color just as I picked up in the sky. So my CDI is exactly the reflection of the sky, hence the same colors that I have used. I'm using it, you're just too big, the reflection of the sky into my scene. Now lastly, I'll pick up the bright blue color and added your at the bottom. So I'll just blend it when you're between the yellow and the blue color to get a perfect blend. Now my orange color in the scene looks a little unplanned it. So I'll just use a damp brush and give it a perfect blend with the yellow color and the Payne's gray color at the top to get a perfect reflection of my own sky, EDI into the sea. So that is it for the CDR, although we won't be adding the cloud effect your indices because the major Cloud IAP will get covered with the grill details. Now to my C drive, I'll begin to be in this lamp yours, since my sky is dry so fast, I'm just applying a clean layer of water very gently only to the center of the Lamb. Make sure that you do not run into the sky. Otherwise your sky will get to it. Now. I'll just pick up some bright yellow color. So I'm using the lemon yellow color this time. And I'll just added onto the edges of this land using my smallest size brush. So since this brush has a pointed tip, I'm able to identify very carefully and the center area of the lamp, I'm leaving it blank and I just blend the yellow color into the center area using a damp brush. So you can see in the center I have the white light effect and onto the edges that yellow effect. Now when that dries, I will add the black coat color borders to define the street lamp. Then then just adding the same yellow color to both the son that is in the sky and the reflection in the sea once it dries. Now my entire painting is completely dry. So I'll quickly add the reflection of the sun even into the CEO suggests simply you see V left a gap and we just being direct with the bright yellow color, both the reflection and the original sun in the sky area. And in this area, I will just add very demeaning lines with a local law to reflect this under flexion more detailed way into the sea area. Now the only thing left in the painting is using the black color and defining the rest of the element details. First, I'll begin with the street lamp. You're at the top. So I'm fast using my fine liner pen to define the exact shapes so that it's easier for me to add the rest of the black details. So I am giving the fine bordeaux to this cheap lambda we had marked with the pencil and in-between very binded the yellow color. In case if you do not want to use a fine liner pen, you can use your fine liner brush and add these details using the black color itself. Now I'm even marking the outline of the top. And later on, I'll just use my brush and fill it with a black color. Now into this entire area of the lamp also, I will just add these details. That is, oh, you know, the data is giving these lines under the lamp. Now I'll switch to my black color and using my brush, I'll begin to add in the black color into the places that I have to fill complete leave it black. So at the top, I added that black color completely. And at the bottom of this GIF land, that little semicircle. I defend that also completely with black. Now next I will finish this street on the street lamp pole compete with the black color. So in case if you want, you can forced even mark this Gi, clamp it up bend and then fill it with the black color. If that way, it's easier for you. Now adding this little brick details as we had done with the pencil sketch also. So just the little bottom stand for this soldier to give it to more detailed look. Now you're at the bottom, the little foot path that that is visible. You are new to the CEO. I will fill this, although completely with the black color. Now let's begin to add the deal on Buddhahood. But first, I'll begin with the black color. So approximately a 1.5 centimeter block here, which I haven't finished completely with black now. Now next to add some details to this. Agreed. Yeah. I will just shift to my Benson and add in the defense's sketch off some design into this grid ADR. So I'm just making a vast kind of a look. Sure. Okay. In-between the grid to add the design shape to this grid, you're so like this, leaving even gaps between the grids. I will just add the green into the entire remaining or ADR of this drill. So in case if you want, you can just add simple thin, rectangular shaped lines your, instead of going with this detail design, odd, you could add these D1 design, add more gaps, or you will have to be less of them as you wish. And in-between these designs, the CATI is visible from behind. So then I'm done adding these details. Now. I'll be also with the black color. So all you know, nothing detail, just simply black filling your and even onto this top AD off the grid, I would just add the black color and then do the designs that we've been dead, either be adding the black color. So that I'm almost done adding the black color at the top EDR. I'm just trying to get an even. And now I'll just fill in the black color into this design that we marked out. I know it may be a little difficult to get an even shaped do all of that designs. Even a doesn't it too difficult for me? But by just trying out, you can get almost similar looking shapes. So it's like half semicircle at the top, half semicircle at the bottom. And in between you have an oval shape that does how does design is. So then I'm done adding all the grill, the data. And that does it for our being. Just one last thing is on doing horizon line onto the right side. I did just to add a little bit of the bush details onto my horizon line near to the CAD. So embedded with the black color, just dabbing the tip of my brush at the top and at the bottom, I would simply fill it with the black color. So Foster, I'm giving a straight line onto my horizon line so that I don't run into the sea. And now just dabbing the tip of my brush at the top, IDA. And I'll fill the rest of the water media with the black color. So now quickly filling in the rest of the area with the black color and just leaving a little gap in between some better. So there you can see, I just started adding meaning water media with the black color. And we are done with our painting for today. Now let's remove the masking tape and see up ending with those clean edges. Make sure that your edges are completely dry before removing the masking tape. Otherwise, you may ruin your painting. And also be careful or by removing the masking tape and remove it at an angle from your people so that your people doesn't date off. So then Eddie without painting for the 26 and the first one for the prompt street lamps. I hope you guys are enjoying this challenge. I will see you guys tomorrow and today, 27 bits. Another painting.
33. Day 27 - Cityscape Street Lamp: Hello everyone and welcome back to D 27 of 250 days watercolor challenge. Today we will be painting the city light kind of abuse CI plan. So let's have a look at the colors that you will be needing for this one. You need a shade of Queen, Rose or carmine or any other pink sheet. You need a shade of orange or red. Yellow, red, blue, indigo, Payne's gray, white quash and black color. So I have my paper taped down onto all the four edges. Now let's have a look at the pencil sketch for this one. So the mean pencil sketch for this fun is this treat land because we have to leave it empty, vile painting the sky. So I'll first begin to mock though street lamp and then add the poll. So I would recommend you to force to create NC, the final sheet plan and then sketch it out. Or in case if you want, you can change the structure of the street lamp to any other reference, whichever you have at your end. Now at the top also, I will just give the details here. So first a double lining to this and then taking this kind of a look here. Now this time I will be showing as if the pole is tie Oh, you know, hanging onto a hook from the pole. So that is the reason I've left that round there from where I will show the H2CO there. Also, this time the poll that we are making at the top idea. I am just giving the Lipton, you know, Calvi kind of a look to make it look a little Designer kind of a polio. Now, firstly, I'm just adding in a very thin polar, the top area. Then as I add each the Santo almost, I just increase the thickness of the. So at the bottom it does take God and at the top intestinal. And as it is turning towards the lamp, it's more tunnel. So this is all for the pencil sketch. Rest of the city ADR, even paint after painting the sky idea. So let's begin with a clean coat off auto, undoing entire sky. Make sure that you do not go into the lamp area. We need to keep it blank and be careful around that area. So I'm done applying a clean coat of water onto my entire sky idea. And I'm beginning that the shade of carmine gallo your and picking up on mine and the Queen Rose mix. I haven't just begin applying this light pink tone into this idea. And you can see I'm applying the paint in a little diluted consistency and not to take your because I need a very light tone first. Next, I'm picking up the bright blue color from this set. If you do not have pride blue, you can go ahead and say in, in blue, sky blue. And I'm applying this color onto both the top and the bottom media of the pink that we have a play. Just make sure that knee out to the lab. You'll be very careful and mark out the edges better so that you do not run into the lamp area at all. So in case if you want, you can use masking fluid onto the lamp area or again, cut the masking tape in this shape and apply there. If you want to run your brush more into the sky freely from left to right. So far the first layer of blue also you can see I applied a very diluted door because now I have to be using the indigo color. Do you not give the DACA debt? So in case if you do not have indigo, you can go ahead with pollution glue on mixing a little tinge of your black to your tuition load to get neoteny and negotiate. All you could add a little of your Payne's gray color to any of your darker blue to get this story. So fostered with this indigo color, I'm beginning to add it. After Cloud effects into the sky. Now when you are adding this clone, makes sure that you do not cover the pink area much lead that pink area be there because we as it is, I've been dead only little off the pink area and more of the blue ones. So now you are at the top. I have just darkened the tone and give good wash of indigo color completely, but I have blended it well with the blue colors. So you can see at the top it was Dakota, and as I was reaching down to the blue, I lighten the tone same way at the bottom also have added a layer of indigo color. Now in the lamp area at the top, a little indigo is running, but that's completely okay because there I will be using the black color. Now, I have picked up again the indigo color, but this time less of water, more often, Diego. And I'm giving it this darker layer of clouds down. So this layer, you can see majorly I'm just adding from the edges still the literal Santo and letting the major center area be light because all you know, because of this GQ line defect, the same idea around the Lamb has to reflect on a dim light or don't. That is the reason I'm adding the darker Leo's medially onto the edges and not getting it near to the center. And letting that center area be light only. Now in case if you want again, you can mix in a little bit of Payne's gray to indigo to get a darker layer photo. Now using our little darker tone of tocar main color, I'll just add a little of these pink clouds into the top area. And when the pink and the blue is mixing, you can see it automatically gets an undertone of violet. Now that is it for the sky. Let's wait for it to dry completely. So my sky area is completely dry and now I'll begin painting the lamp first. So very gently I'm just applying a clean coat of water onto the Lampedusa using my smallest size brush. Now I'm picking up the bright yellow sheet. It's a very bright lemony yellow color. And using this color, I will drop it into the entire street lamp that I have a painting. Now, very gently, I'll just try to lift up little color from the center area debt to reflect more light effect there. So just lifting up the colors using my brush and navigate on to the tissue. Now next I have picked up a shade of bright orange. And using this orange color, I have been very gently just add it into the border of the Lamb and it will automatically begin to blend with the yellow color since my yellow is bad. So make sure that you do not let your yellow dry before adding the orange. And this audience has to be added quite quickly. And just using a tinge of yellow again, I'm blending it onto the edges so that you get that light effect warm look into the street lamp this time. Now we need to wait for the street lamp go drive before beginning to add the folder details there. Then, then I even begin to paint the cityscape fuel at the bottom area. So first arm to the left side and just add some bush effect. So it's the same technique that we have been using. Just dab your brush at the top and at the bottom, finance companies, new bud flat. So you can see almost half of the ion to the left. I have added the bush. Now. I didn't yet some to be scape, so just some building blocks and all, you know, somehow was vented roofs. Now adding another one. We'll cover that in the bottom media. It's perfectly OK. Management, knock make myself a defense. Now, Neil did this. I didn't add another million kind of a look. Now again until the remaining right EDI, I've had just finished with bushes like this as we did on Google. Left side. But just the defense, you're this type, the bushes auto netTotal law as compared to the left side. And again in the water media, I've been just some definitive at the black color. Now from between these bushes, I haven't tried to show some buildings of a job behind these bush, hence justifies the bundle as unloaded. So in the same way, just why not do your into the left side of the bushes also. So we need to read for the bottom. So delay dog, so Drew GI and then beams. Till then let's pin this polio. So at the bottom of the pool, I'm filling in the thick layer of plaque that is not a holistic at the bottom. And as I move upwards and take care and just use the tip of my brush to add a very fine Paul detail there. In case if you're not confident you can first mock this outline, return, find 90, and then add the detail using your black color and a brush. And also make sure that if your brush does not have appointed day, you shift to a detailer brush and then add these details. But you can see my brush has appointed depends, I was even though I had even that thick line with this brush and even that fine line with this brush. Now let's begin to add the details. You are near to the street lamp. So again, giving a very fine I'm not exactly F9 button little of, you know, bonded between the thick and the fine combination you and just adding the details and hour claims to this street lamp. Now from bottom of this also, I will just give a little semicircle and the Lipton, so cool and a very small street name to add detail look. So I guess my yellow neon to the bottom media was a Lipton read through the black has spread of it. Shoes, I'll wait for all, all of it to dry completely. And then again, I will connect it with a layer of black. So now here are all of the top three goes on so that we have been dead. That does all the details to this cheap land. I'm filling it completely with black simply and know more details or nothing or, you know, D12 Lou Your. Now though design I'll handle kind of loop that we had been doing. So I'll map that also with the black color. So in case if you're not confident of adding these curvy lines with the black color, you can act orbital l buffer Marco or a fine line up and your also. Now I'll shift to my fine liner pen and using a fine liner pen and just add some violence and do the sky EDR medially into the center of the sky that is new to the pink column medially. So some of them overlapping each other. Now onto these lines I will just play some board sitting on to these via lines that we have been dead. So just to buy these embed, what's annoyed that I'm adding in case if you want, you can add with the Kahlo's instead of using the fine liner. Now let's make for all of this to dry and then add the final details to this beam. So now man thiophene D is completely dry. So I'll begin the dough finally do is in this cheek them forced. So I've picked up the black color again and I'll just do you know, increase the border you are to cover that spread off my black color. So I'll show a thick outline to this cheap land. And you can see I'm easily able to achieve a pretty look. Again. Now this time I will just add 19 into the center only and no more details into this cheap land as Gi clamp is ready. Now let's add a little detail into the cityscape that we have been to that the bottom area. So in this case, what details I will be adding is I would just be adding some light effects into the buildings that we have been doing. So I've just picked up some whitewash onto my palette and do the white quash, I will just make some lemon yellow color and get a very bright looking yellow. And with that yellow, I will just mark out some window looks into the black silhouette of a city scape that we have added. So you can see very fine details of the windows that I'm adding just using the tip of my brush. So in case again, you're also if your brush does not have appointed day shift or detailer brush auto brush orbitals of a size 0 or one. And then add these details so that you do not add them to bake or, you know, are out of proportion. So very randomly, I'm just adding a few windows into the building. You can surely change the placement of these windows again as you want. And you could even follow any other city solo hit if you have a reference photo. So onto this fun Your, I'm just painting one big window. And now you're at the center, again, just some small windows. Now some of the data onto this last building, your behind the bush. So this time I'm showing the window. It is half hidden behind the bush and half is visible from your. Now the last thing, I just pick up my white gel pen and I will add onto my top right corner. Now again, if you do not have a white gel pen, you can act So with the help of white gouache, it's perfectly fine. All right. Acrylics. Okay. So now I didn't just pick up a little bit of the white gouache and make my moon a little more via print because it seems a little dark right now. So there'd be a done with appealing thing for the 2007. It's the time to remove the masking tape, which is the most satisfying part to after doing up being 10. So let's remove the masking tape and see a painting with those clean edges. Make sure that you remove the masking tape carefully so that you do not actually when you're painting. So your painting from D2 and D7 of this 50 days watercolor challenge and VR on to our sixth prompt that this street lamps, I hope you guys enjoyed painting this. Thank you so much for joining me.
34. Day 28 - Blurry Sky Street Lamp: Hello everyone and welcome to day 2 and 2, dv will be painting this beautiful street lamp by the branch. So let's have a look at the colors for this one. The colors that you need for this one is a shade of yellow, Queen Rose, minima, or Scarlett Payne's gray, black, white, quash. These are all the colors that you need for this exercise. So let's get your colors ready and begin painting. So I have maybe put tape, don't want to all the four edges. And I'll begin with a clean CTO photo onto the entire surface. That is no Ben to sketch or even forced feed the entire sky. And then using the black color, we will directly the pig, the lamp hanging from the branch. So make sure to apply a clean vote of even water to out onto the entire page. Make sure there are no pore total photo left anywhere. Otherwise, it may seem back into your painting and ruin your edges. Now let's begin painting so far. So I'll begin with the shade of yellow. So I'll map of other light area of the lamp and I'll try to maintain that yellow color, blue because we have a blurry background this time. So you're onto the right side. I am adding this, so, so color shift the dialogue. So this is why the lamp is going to be hanging. And this is the yellow color that will depict the inside light from the lamp. Now next time picking up the queen rose color and using the Queen Rose Kahlo very gently, apply it near to the yellow color, but make sure that you do not run in blue, the yellow color, and let the yellow color be visible well. Okay. So you can see very gently I just passed a few strokes across. They look a lot because we have a blurry background as I told you. So to reflect that very gently onto the top item. Now next time picking up the shade of permanent job and applying it from the top. So you can see I'm using the colors in a too diluted consistency and not too vibrant because V, I haven't the background kind of look. So I've been just document that. So didn't places. So using a damp brush, getting a clean blend between the yellow and the pink color. Now I will just pick up a very little touch of the bright red color and give it across the yellow color to depict, oh, you're not a fire inside having that orangeish Dutch. So just to very little you can see very lightly I'm adding it using the tip of my brush and innovated I knew did tool and trying to blend it. Now next I will pick up the sheet of beans and Hello In a very diluted consistency. I will give him the bottom Neil. Now in case if you do not have to be in three columns, you can use the black color in a very diluted consistency for the first layer. So randomly, I'll just begin to add a bush kind of an effect your, so since we have painting or blurry background kind of look. So I'm adding the bushes also your wet on wet to depict the blurry low. So I'm running on a gel onto the pink colors you can see false here for the bush. Now i, then, I'll pick up the same color. That is the beans fecal up at this time, less than new debt that has more of pigment, less a photo. And begin with this again, we are at the bottom. So you can see a little at the top will be the four still visible. And at the bottom I'm painting with the darker shade. Again, I'm adding this also wet on wet so that all of it has a soft edge and uploading look. Again, if you're using the black color, you can directly use the black color with less dilution this time. That is ness of water, more of pigment, but make sure you do not use it in its darkest color form because we are still yet to add one more darker layer onto this. So now this time I have picked up the beans green with very limited water that is 90 percent pigment and 10 percent water. And adding the darker layer at the bottom most ADR. And you can see I'm adding all the tree Leo's video you don't match to be so somewhere or some Mr. Lawson based on man oh, you know, somebody owed is shorter and all the three nails are visible distinctively. Now I will just pick up some yellow color and add a yellow highlight your in-between where I have left that white gap. So you remember why Watercolors. I had just used a damn brush that you don't have that EDI light effect there. So just added a little light effect there. Now I will just keep my people to dig downwards so that the black color from the bottom, EDI does not flow too much into that. Yeah. Or lightning though for us to Leo's of the Payne's gray. So again, I'll just add a little touch up here of the darker tone that is the second one, because I feel it's a little too light and the force and the second DR looks a little more edge to each other. So just to my board so that my colors flow downwards and do not seep into the pink color or sheets of the black Leo's that we have added gets ruined. So that is the reason I think I'm keeping my mortal debt so that the Docker Leo remains at the bottom. And you can see I have such a clean soft sky from the yellow and the pink. So in-between, That's the reason of leaving that white gap and blending the pink and the red with just a simple damp brush. Now let's read for this to dry and then we'll begin adding the details of the street lamp into this. So I'm just moving my brush border into all the directions so that I have a smooth blend throughout. My entire background is completely dry and, you know, the yellow Carlo for the lamp is perfectly d, d. So I'll first begin painting. Yeah. So I'm directly painting it with my fine liner brush. That is the brush which has a pointed tip using the black color. What you can do is you can first watch the endolymph structure and then you'd all be in the structure. Or if you want, you can even give the sketch for the structure and damping did. But I prefer directly going in with the structure without any pencil sketch. So let's be the lamp here. Make sure that the yellow area that you have seen the center of the lamp to depict the light area there that is light from inside the lamp area. That is what they look, i'll I supposed to depict. So just like the previous two times, it's a very simple land with basic silhouette. Nothing much in detail, but just changing the top and the bottom structure to make it look different from the previous two lamps. And this time it's a simple rectangular lamp and not a diamond-shaped or you know, the full four sided shape lamp. Now the top of the lab, I will add it at the end after the branches may be depending. Because this time we have been thinking, oh Lamb, which is hanging from the branches of a tree. So the tree is not enough view, but the branches you don't just hanging outside from dot top-right corner will be in our view. So just adding some fine details or to the bottom area of the land. Now I just tilt my board, talk. You know, who only for the hook to be hanging for this year. So just marking a soaker sheet with the board drought plane you're now and fill this end dieting with the black color. And then at the top I've been forced paint a branch. And then through that branch I will try to mark out from there don't lamp is hanging. So now beginning from almost a LinkedIn towards the left area, not too much onto the left major in the center area somewhere. So from your now, I'll try to depict some branches vary randomly. And you're marking the loop from where this lamp is hanging and the branch passing too. Okay. So you've been either been the loop force from where this lamp is hanging. And then add the branch or you can post mock the branch and then show a loop. So now ready randomly, just keep adding the branches or show some of them passing through this loop because you know, the branches after hanging this lamb can grow anywhere. So try to make it look natural. And you can see really randomly I'm adding these branches. So foster adducts on bigger and taller branches. And you could see all of them are moving into different directions, some completely from the top to the right side. So I'm falling from the and now to these branches begin adding some smaller branches. So I am using my same brush because this has appointed depends, I'm able to add these smaller branches also altogether. So in these, if you do not have a pointed tip brush, what you can do is fostered the dollar branches or veto bigger brush and then shift to a detailer brush and add these fine branches. Now, even this fine branches you can see I'm very randomly adding them, nothing in specific, just ready, randomly variable you feel like. And even from the smaller branches you can see I'm trying to show for the smaller branches are coming out. So I just extended the main branch and into the molar. And I been just add a little more smaller branches. And I quickly add a few more of these branches. And then we'll be done with desktop ADR most be in case if you want, you can do the same thing onto the left side like cooking. Show that though medially towards the left side. And all these branches are popping out from the left side instead of the right side as we have shown right now. Now, I'll just add a few more of those smaller branches, urine, they're very where I feel that there is too much gap or looking less of the branches. And also if you notice onto the left side, branches ending, I tried to show a branch moving downwards also to depict the moon, I should know. And you know as much nationalized, you'll try to keep it, it will turn more PTO. Now, I'll add a few branches just onto the bottom right corner. So just using the tip of my brush you can see I'm just adding some branches like this, okay. And to overlap them onto each other. And I'm just trying to depict, you know, some branches growing from the bottom grass EDL because the behind Bush area that we have been. So from there I'm just trying to add in this little detail look and a little bush also by dabbing the brush at places. So you can use a mix of both. The techniques are just add a few branches of grass like structures going from there or just wash it back as you wish. And after this we will just be left. Add the light effect in that center area again. Because right now it's uploaded a legend to the street lamps, which is not exactly how the light from the street lamp should look like. So we'll just be left to give that a little detail look. So first I'm just adding another layer of black onto these lines because I feel they are a little too transparent. So to make them look darker, I'm using the paint in Arctic consistency and add the line again. Now here at the bottom, just adding a small stand kind of look to depict a, you know, there is this time from where the candle is gone and the lightest being depicted, that is, the candle is inside this time that be added. Now shifting to my yellow color, mixed with a little touch of white. So I'm using the lemon yellow color. And again, you are ready, please, the yellow color. Then I'll just add around with this scholar to debate the light glowing from the candle underneath. Now using a damp brush, I'm just giving a soft edge to the so-called that I just painted so that it looks a little bit blurred because you know that the fire is a little blurry. If you click a picture of anything. Dude, no effect again, just softening the edges. I'll go back. Now again, I shift to my black color and just add an animal bush D daylight the bottom area because they feed on LinkedIn unsatisfying job when the bushes. Also, I will quickly add a few more branches. So that is what I said. You know, after adding all of the components, if you feel anywhere that anything is less, you can keep adding them. So always go mindfully that you do not add any detail too much all together in the beginning. Otherwise it will be very difficult to go back to that. Oh, you don't lesser detail again. But if you add less or branches first, it will be very easy for you to add more branches right now has just read it. Now one last thing to add is a little d d into the lamp again. So make sure that the yellow color that you added is completely dry before adding. So my yellow area is completely dry. Now just using the black color, I'm adding all, you know, separating point into the lab to depict the details into the lab. So very simply just a simple black line into the center area. But make sure that the yellow has to be completely dry. Otherwise the blackman begin to spread and you will lose the light effect that we have got right now. Now I'm just darkening a little bit of the details into the lamp area. And at the bottom, I can give for the more detail of smaller spaces here. So that is it for our painting for today. Now let's remove the masking tape and see those clean edges. Make sure that your edges are completely dried before removing the masking tape. Or else you may ruin the clean edges and always remove the masking tape at an angle from your paper so that your paper doesn't take it off. And your BIG but our day, 28 of the 50 days watercolor challenge and painting this blurry background street lamp you hanging from the branches. I hope you guys enjoyed painting this with me. Thank you so much to each one of you for joining me so far.
35. Day 29 - Snowscape Lamp: Hello everyone and welcome back to the 2009. Today we will be painting this beautiful snow kind of for loop where the Lenten is sitting on to the personal area. So let's have a look at the colors that you need for this one. The colors that you need is permanent red and yellow. Bright blue, ultramarine blue, indigo, Payne's gray, orange, right cosh, and black color. So I have maybe put deep down onto all the four edges. And let's begin with the pencil sketch. We will first mark out this new EDA at the bottom and then please the London resting onto the snow area. So let's begin with the pencil sketch, almost all at the bottom, just leaving about 1.5 inch from the bottom media. I am mocking up the snow ADL. And onto this I will now mark out the lamp that is just to go and do the snow. So again, as I have been seen for the PVs 3D, you can change the shape of the lambda1 and you know, go ahead with whichever shape of the lamp you want. Or you could simply follow the simple amplitude. So you can see I'm just adding a very simple lamp look and nothing much in D1. And since it is resting on to us know, all you'd need not even buddy much, but at the top I haven't even open loop oh, you know, from vetted can, you know, like kind from the branches as we can show. Okay. So that does it for the land. Now, I will just mark out a few bigger branches, oh, which we will be adding with the black color and then trying good epic this nor esteem and do these branches also so that it meaning I haven't deduct the added with the Kahlo. So now let's begin painting the elements one by one. So let's begin with a clean auto photo or name to the top area, the bottom snow ADR, we will paint afterwards. So first begin with a clean auto photo. Now make sure that you do not run the water into the land area. So you've got to be a little careful there again because the lamp area of even pinched later on at the end so far has just been the remaining of the sky area. So then I'm done applying and even clean coal dust logic throughout. And I do not have any bottle, just go anywhere. And you can see I have already Bayesian greasy job the lamp. Now let's begin painting the ADRs one by one. So fast on beginning with oh, for CD when mixed with a little touch of indigo. So you can either pick up bright blue mix with indigo or sitting in blue or cobalt blue mixed with indigo color. And I'm using it in our LinkedIn diluted consistency. And I'll first begin with this layer onto the top of my sky. So you can see it does a diluted tone of the color. If you want, you can directly use a lighter tone of the blue palo. And very randomly, I have applied the strokes with hello. Now just picking up some ultramarine blue and giving some ultramarine blue color at the bottom area. So this is just a for stone. And after this we will still be adding some darker details. So do not worry about how light this is looking right now. Okay, Now be careful near to the line that we have this noise resting. And also be careful that you do not run into the lamp area. Otherwise, it will be very difficult to control and get the details out there. And done with the forest feel for the sky. Now when, while this is still wet, I will begin with a second layer. So I'm picking up a little bit of the green color and mixing it with the blue color to get to turquoise blue color, if you want, you can directly use the turquoise blue color. And I guess I forgot to mention the scholar also. So I'm just mixing my green and blue to get this turquoise blue color. And at the bottom area using again a lighter tone. So this has more of blue and less of the green color. And just adding a very rough kind of look. You're in the bottom area of the sky. Again, make sure that your paper remains wet for the longest time. Otherwise, it can be difficult to achieve. The soft edges. So my people is a 100 percent cotton so you can see it's staying vet for a considerable amount of time and I'm able to add these zeros and it is still bed to add the photo. Leo's. Now just adding a little darker details at the top area also, and just blending the bottom area well to each other. Now next time picking up the indigo color directly and giving much darker depth with the indigo color here at the bottom. So in case if you do not have indigo color, you can just mix in a little bit too for black or to your pollution local law and get a darker blue tone and use that. So now when you can see I'm adding the indigo color. It's a little smaller area as compared to the previous 0 dacoits blue shade that I applied. Now even onto the top edges, just giving a little touch with the indigo color. So all of these layers I have added based on BET. And after this, I'll wait for my sky area to dry completely and then begin to add the further details into this painting. So you all you can see, my sky area is completely dried. And what I'll do is I'll force begin to paint the bottom area. So for the bottom area, I'm forced picking up the yellow color. And I'll try to add a reflection neo to the line that we have. That is I'm just trying to reflect the London night that will be reflected onto this new idea. So around this, I'm adding a little touch of the orange color, very little batch. And now the rest of the area, I'll try to depict this no effect. So I'm just going to use the OEM setting him knew Kahlo in a very diluted dawn that is 90 percent water and 10% pigment and just giving a light wash with this color to depict the snow area. So you want I'm adding all the details. Oh, but don't drive because it's just very simple, small details and nothing much for the people to stay wet for a longer time and all, but just make sure that you do not run into the sky, IDA, ruining the sky effect that we're having. And at the bottom media try to get a clean blend between the orange and the blue color so that the reflection of the light that we are trying to show on the snow ADR looks perfect. Now I have just picked up the same blue color in a little darker consistency and adding a little highlight with the darker color onto the edges because watercolors Bill gi or don't like 80. So in order to achieve the depth after it dries, it's important to fainted total cost so that energize in the perfect tone that you want. Now I'm shifting to my black color. And using the black color, I'll begin to add the branches into the sky idea about the lamb. So a few of them, I had a mock dot with the pencil by doing the pencil sketch. So I'll just spin them forced whatever is visible. And then very randomly, I'll begin to add branches connected to these all and moving in all directions. And after that, oh, you know, after these branches dry, I will be depicting this door data's collected onto these branches also. So very randomly. Show all the branches popping out from the left side into your Sky, Italia. Now again, as I told you in the previous one, like in the previous one, we had shown the London hanging from these branches onto the right side. So I told you if you want you can show a tanning from the left side. So seeing me for this one, if you want to, you can show an issue. This Langton placed onto the right side and all these branches popping off from the right side itself. But just make sure if you're Landon is out from the right side, then you know the direction of the light that you want for the reflection of the light that we have at the bottom ETL, you need to adjust that accordingly. Like right now if you see the London light is 0 onto the, moving towards the right side, I'm trying to show that the light effect is from the left side. So accordingly you need to adjust the deflections. So when I'm adding branches connected to each other, some smaller so I'm shorter. And since my brush out the pointed tip, I could add all the branches just using one brush that does the taller. And though Otieno branches all we also have branches I'm showing lying onto the ground ADR. Okay. So they have a lot to bench right now. Now just I think I'll feel more of the smaller branches. And then for those smaller branches connected to the smaller branches, it says. So then I'm done adding all the branches. Now we need to wait for this to dry before adding this whole area. Then I will just pick up my pencil and add a little sketch into the lamp. Mitch, I have missed to add that there's a little detail. So I haven't just mock or candy. So I'm just trying to show this time that there is a candle inside this lab which is going to be lit. So this scandal, I will be painting with the permanent red color directly. If you want, you can change the color of the candle as you want and you will not. You can choose your own color for the panda. So fast I'm giving you a quote of the yellowish orange color. So if you do not have a yellowish orange color, you can just mix and no yellow and orange to get this yellowish orange color. And then at the bottom, I'm just picking up the permanent red color and adding the rest of the standard EDI, but the permanent red color. And I will try to add the permanent shed a little onto the top EDA also. So you can see into the panel area, I just have that little yellowish orange touch in the center area. And the rest is covered with the permanent red color pole fake news. Now, what I'll do is I'll my black branches are completely dry. So I'll just pick up some whitewash and begin to place though. You'd almost no effect on do these branches. So very randomly on to the connections of these branches, I'll try to just add some white patches to bet because the snow collected on do these connections of the branches. So you can notice some where I'm trying to depict a lot of false no collected. That is the Big O white patch and that places I'm showing even Bayes model, you know, connection. Oh sorry. The white patches that is little snow collected. So triangle BED it and drive and make it look as natural as possible. So you're onto the right side. I showed a let us know oh, you know, collected even onto the ground EDR which is connected to these branches. Now on to the remaining branches also vary randomly. I'm adding the snow collection and trying to show the snow deposited onto these branches. Again, your branches could be in different shapes as compared to mine. So even us know collections can be accordingly and try to be free and you don't try to get your own variation to these branches and this know that we are trying to add. Make sure that you try to be these patches in size because see if you're ready, begin to add all the patches in the same size. It would not look nitrogen because it's normal when gets collected in different proportions at different paces. And if you do not try to read them and to not look natural and give that effect to your painting. Also make sure that you know, you are adding the snow in different shapes and different sizes a boat. Because if you're going to add them in the same shape, every vector, again, it will not look natural. And make sure that you do not even add too much at one place that all the branches get hidden. So you can see in my painting, I have no spread across, everywhere, but my branches are also still visible. So that is the key to even met the branches be visible. Now I will just pick up some white goulash and I will begin to given some dry brush technique into the bottom EDR to depict most known. So just some simple dry brush or into the bottom. And you're not distend the dry brush is not too much detail load tool. So if you get a little patch of pieces and it would be perfectly okay. But try that you do not get too much or take patches 0 at 0, please. Otherwise it will not look natural. Now, I have picked up the same blue color that I have used and I'm just trying to add them to do dry brush with the blue color. Now when you are adding the dry brush with the blue column, make sure that you try to add it in a little detail B, so dab off the excess colonial brush. Otherwise you will begin to get DACA patches which we do not want into the snow area. Now the main thing left is to add the details to the lamp ETO. So for adding the details to the Lampedusa, it's very important that your lamp or red color is completely dry. And about that now, I'm just adding the light effect. So just adding the yellow color there to depict the fired from the scandal that does knit. Now, I want this effect in our little blurry 0 state and not good defined order d, D, and E minor. Hence, I'm not worrying much about do you know how the shape is right now? Because I wanted to make it a boat effect as it is now onto the edge, just adding a little touch of the orange to this file. So well that does all the light of the candle lit is going to be. Now again, I will pick up the same shade of blue that is no, sitting in blue-collar and very gently onto the edge of this lamp, I am adding the city named Luka. And now I can just die new debt and mix it into the background. So you are, what I'm trying to show is this lamp is Chris UPI or that visitors off a glass look. So from behind the glass, the backbones guy is again visible. So since this guy was if a blue color, so to depict the same color visible from the glass through, I'm adding this blue layer onto the edges. I'm trying to blend it and you don't give us off the edge of it though panda d, D, and O in this lab. So now you can see the light that is the bloat effect of a candle that Fed wanted is Bowl fake lead there. Now onto the top aide ya, I'm adding on the order of Kilo California because this time owned. But the thought idea, I will be adding the black color and elliptical design. No Mano. So now let's wait for all of this to dry and then add the final to this being done. So now my painting is completely dried and it's time to give more details to the Lambda. We have been dead. So first I'll again mako The funded IDA and give it to them the til precise Nuuk. Because it's just all about theme that I wanted to bloat effect and not the fandom or below or good. So just putting that gotten done again, but the bright red color. Now next time picking up the black color and I'm going to begin to define the edges of this Landon as giving the borders to this lambda1. Now make sure that you are using appointed brush, auto ODD load brush to add these details. So my brush has a pointed tip, so I'm going to add these DDMS with this one seemed okay. So undo all the four sides I will add the water goes to this. So lambda, we have line one to this new idea. Now at the video of this land may be have been to the yellow color. I would not be funding into, it's simply black color completely. What I can do is Ivan be mocking some soap goes onto the yellow area and then leaving those so goes blank. But also forced. I'll just quickly beat the details at the top. And then at the end I haven't been the deal stand on the yellow area. So now I'm done with the details at the top Ada that does the loop. Okay, so now I'm picking up the black color and all do this yellow area. I've enforced give a Bordeaux with the black color. And then they send DO either just mock some tiny mini so goods with the tip of my brush. So if you want, you can mark them with a pencil so that then you get from the rest of the ED of a black color audio. Goodall followed this process and just mark it with the color and the tip of your brush today, acne. So very simply just adding some so goodness. Now these so-called, I haven't led to B with a yellow color visible. And in the rest of the ADR, Ivan fill it with a black color. So if you're not confident adding this with the brush technique, you can Technique good, Bend, mob the sulcus and furthered and stuff to ETL using a technique called Ben. So you can see Betty random VFB is the so good, nothing in specific on Apache and to follow. So you can see those yellow dots are coming together and forming such a beautiful pattern at the dock. And that is what I wanted to wadi into this class project even under the Bot. Now the last thing is just adding a little most nor D1 neo to the lambda is some snow collected near to the lamps site. So just picking up whitewash and adding some white patches, yawn, very rough edged or white but you can see, so don't try to give it all perfect shape but anything just try dual or let it be nitrogen. And innovative, crooked kind of fishy. Also make sure that before adding this neo to the lab, your lamp black edges will completely dry, otherwise they may get spoilt. So data, I'm ready with my painting, but just fun, nasty Dave, to add IV shift to my technical pen and add the d, d, That is just 0 crisscrossed line onto this lamp ADR to depict the details into the lab. Make sure that your entire lambda does the Camden and the fire is completely dried before adding this line. So I've eaten for that to dry and then added that. Now let's remove the masking tape and see you happy ending. But those clean edges, I hope you guys at enjoying the 50s watercolor challenge and loving all the problems that via painting so far. And I hope you guys, I'm getting into the DE10 habit of practicing your painting from D to a and d nine. And this is the second last painting from this team. Thank you so much to each one of you for joining me. I will see you guys tomorrow with the DoD and the last one for this prompt.
36. Day 30 - Street View Lamp: Hello everyone and welcome back to this 50 D watercolor challenge beyond d sub d to be our last one for the Ohm's law. And to Dean even be painting this beautiful lamp hanging from a rod. So let's have a look at the colors that you need for this font. You need to shade of yellow, orange, Scotland bond, CH, bond a bot, black, beans, green and bright. So I have might be but deep down onto all the four aging. And I think he begin with the benzene. So I've been just forced have a pencil sketch for the lamp and the rod form which it is hanging the sign because oh, you don't the same. You're going to paint the lamp also along with the blurry backbone and then given the details for the lamp run. So we can begin in the Santo mocking up destructured audit, rough pencil sketch off this lab. You can either lead for the entire sketch to be completed and then, oh, you don't mock out this edge OT if you have any other reference photo, lamp hanging from the door, you can consider that. So again, it is a video, but just this same. It's a little more 3D effect that I'm trying to give him. So you don't owe it, just simply 0 elements to add it and make it look more produce. So just adding the details you add on top of the ladder. And then I will be showing, oh, you know, metal drawn hanging from the left side onto which this lamb is hanging in this sheet view. Now let's add the loop and then add that 00 coming out from the left side. So the road is a Lipton diagnosed and onto the top you're giving it to admit than 0 spider kind of look that up as a little round edge to this. I'm now Q over again. In the road, I will try to add in a little d, D, and that does a little designed to destroy so that it looks a little ND kindof a look. Now one last thing into the pencil sketch. It just started dopamine your, that does mocking though models also this time, oh Father lamb, which we're going to be naked on. You're not darkening and giving the Docker effects. So it's important to have this line this same because, oh, you don't floss to be up painting then dieting and Joe Blow the backbone and then we add the details. So now let's begin by applying a clean coat of water onto our entire face. So this time, even into the non VR applying the water because we are going to flow speed and then Diablo the back row and then even give to designate details to this cheap land on the road only rest all of the background is going to look uploaded one. So for us to begin with the yellow color, I didn't do the lamp and half to color your photos soft edge. So into the center AT off the map, just applying the yellow color, leaving a little white gap for the night to reflect there. Next, picking up a shade of orange and funding then diaphragm area. With that, it's okay if the fellow seeps out a little from the lamblia, but GI that it does not cool to watch Oh, you know, outside. And if you will apply too much water, it may spread a lot which we don't want because we want the light defect majorly into the lamp look. Now next time picking up the shade of permanent and applying it again onto the edges of this Lambda. Now the same yet Kahlo, I'm spreading a little across the land area. In a very diluted consistency. So inside it was in a little darker tone and around it. So the reason why I'm spreading the scholar is to reflect the light effect onto the background. So that is the reason I have used that color. Now next, I'm picking up the shade of a bond umbo and onto the edges of the lamp, again adding some darker details with the bond on book allo, but in a very diluted tool, you can even use bone CNI, feel want. Now next time picking up the shade of beans green, pause me in a very diluted consistency and I had been applied into the rest of the whitespace of my sky before that just adding a little more red color so that the only term that I blend it with the Payne's gray, I have a clear transition from both the kalos. Now make sure when you're adding all of these blurry backgrounds, you did not add too much water at any places. Otherwise, the Kahlo's me begin to spread a lot into the other color. And you may begin to have just one color left. So even then it wasn't a lamp case of safe to add it too much water while adding the orange and the red color, you would have lost the yellow and the white look which I have present. If by adding the brown color also, if you would have added too much water, you would have lost the rest of the colors. Now just using a damp brush and trying to blend those colors look with the Payne's gray. So this is a false NAOH for the remaining backbone. Now I will pick up the same beans green color, but in a little darker consistency that is less of water and mode of pigment. And I'll just begin to add it onto the edges now. So majorly neo to the lamp area. I want a lighter blow the backbone because that reflects the light effect there. And onto the edges I need the docket bones. Now again, using a damp brush to blend it better with the lighter tone and the red color. It's very important that your people does not giant between while getting this blurry background. Otherwise you will not be able to achieve a result like this. Now I have picked up the recto and just using it a little bit onto the edges of the beans green to get up Leno blend between the kalos and too little, you don't add a darker effect there. Now make sure that you do not run into the lamp ADR and spoiled the lamp loop that you have gone because that is the perfect light effect that we want inside the lab. Okay, so just adding yellow color again to add more light, that is vibrant yellow color light effect there. And I will again dock and all the colors there because watercolors dry or bone lighter. So you don't, I don't want them to be done. I wonder vibrant light defected there into my lamp, IDA. But in case if you would've added the darker dawns, did I clean the force? It would not be right, I would see because it's very difficult to understand how you're spreading. And if you add darker dawns all together, you will not get variation order detail looks of a new adjunct. In the Secondly, you usually get different color tonal values, which adds more beauty to your painting. So you can see, I have been adding the colors again and again to achieve different delimiter values and the perfect light effect there. If you are not confident, you can let it be what it was in the forest effect, but make sure that the yellow light stands out vibrant because this is what is going to reflect the light off your land. Because after this dries, we will just be adding the borders and adding detail to the lab. Now just lifting up a little color to add some by defect also for the night. So that is it for my lamp, but now I didn't pick up some burnt amber color. And I will begin to use it in a little diluted consistency forests. And onto the left bottom corner, either just be adding some blurry building looks. So this is also again, all in the blurry manner. The only focus of this painting will be the completed Landon Luke or the street lamp looked at, even be painting the genome rest. All of the background is going to be mostly blurry. And just adding simple building kind of looks. You are onto the bottom left corner using the bond amber color in a diluted to. All of this is wet on wet and my people is still a bit to continue for another few minutes. So almost, I guess it's been seven to eight minutes that might be placed in bed and I'm even to add so many nails continuously. So it's very important that you use a people which remains wet for a longer time. And in case if your paper has dried in-between, then wait for it to dry completely. Used the riveting technique carefully, and then go ahead with this being day. Now I've shifted to my smallest size brush and picking up some black color, I will just begin to add it to DDS lot onto the mountain. So this is also again beta1 bed to achieve the soft look. But I'm making sure that I don't introduce too much water because if I add too much water, too much because everything is still bad. And I will not be given to achieve some definite loop despite the blurry background. So now I'm just adding a fuel d. D is to the building, as you can see, just some darker lines to depict as a roof. So you can see I'm not covering the false light layer of bone Dumbo completely. I'm just giving in some lines with the Docker tool so that it's looking like a roof ETL with those lines. So it's very important to understand the water control your, if you add too much water though DACA kalos bit spreading such a way that all of the lighter colors will be lost. So very important to understand the water control. Now let's meet for this to dry. So your my entire background is completely dry it and we've got the perfect blurry look even to the buildings and all of the details that we want it. Now let's begin painting the lamp in a detail manner. So first I'll begin with the black color and I'll begin to map the edges of the lamp that we had mock. So make sure that you use a pointed tip brush. Center one. I'm giving in a line with the red color because you are also undo these rods. I haven't tried to depict the night effect. Now next, picking up the black color and filling it onto the right side edges of this. So you can see on the left side, I just have that Nitin ejecta, which is the effect of Tom burning lamp or the light inside which I wanted to reflect tool. Now onto the edges, simply just giving the Bordeaux with the black color using the tip of my brush. Now you're at the bottom autofocus giving the black lines. And then I can send that bottom diamond shape with the bond on Buchla complete with a little yellow effect may be in the center. So I'll fill it completely with the buoyancy and Apollo, and I've not be using any yellow sheet. And now I even fit in the top area to again, picking up the black color. And foster and Monsanto's little draws on doodle on top of this Langton. And then, you know that we will be painting with the red and brown tones. So make sure that you are using a pointed tip brush so that you can get these details definite because this lamp is the entire beauty of this painting rest, all of it is the booty back node. For the top ADI your, um, first picking up the right jet, that is the permanent red color, filling the entire thing with permanent shape. Now next I have picked up the bond on board and on to the remaining area of this top part, I'm adding the bond Don Buchla on to the edges. So you can see it's blending with the red Kahlo and giving the perfect flame effect did. So what again, you're, I'm trying to depict is because of the light that is lit inside. It's giving that warm effect onto the top EDA Also, hence that little jackpot to depict the light and the warm defect. Now onto the remaining top ADR, I'm just using the shades of brown and black or brown in the center and then black at the edges and filling It's completely with the darker tones. You can either directly Blackboard, already darker brown shade, maybe a sepia color and fill these. Now from your eye will begin to be in the road that we had mob. The pencil sketch off that road may not be visible to you right now because you know, it's completely covered because of the beans pea color that we paint it. So if you want to, you can all be watched in diode or being painted and then paint the details like that. Or you can even paint any other designer looking or rubeola. Make sure that you don't paint a very simple one because this is the NIO beauty of this being day. So try to give it a knitting touch by these curvy lines and you know, just little additions you're in there. So you can see just by giving those curvy lines on the board decides that is the left and right off the road. Oh, we've got a little design and looking kind of abroad. And now from your onto the left side just gave a little more detail to this rod which is UNO, just to visible to us. Now using the black color, I will just be adding a little bush effect. You're at the bottom area. So this is basically the trees in front of the building which is not visible to us completely, just a little foreknowledge of the cheese visible. So adding it in a bush effect actually just a little, not too much. So as automobiles after making the top EDI, just fitting the rest of the EDR with simple black color. Now one to the right side, I will just be marking a few branches popping out from the right side. So again, this is a, you know, either from a tree which is not visible to outside or girl growing from the buildings or the words, whatever you want to assume a das, but just a few branches. Make sure that you try to read the branches in the sheep and sizes that there's their movement or do not mark it just as simple straight lines. Otherwise it will not give you the natural law. And remember to add those smaller branches look under connections like this. So onto the major right side I'm going to show these branches popping out from all, you know, some Baird of the site which is not visible to us, just these branches are visible to us presently. So keep adding them very patient via do not flush with these. Because, you know, if you add them in a very simple be as I said previously, didn't not to give you a detail and manage to make sure that you add some Tico branches, some dollar branches, some shorter branches, and overlap them onto each other at them in a little natural manner. That is the strokes or, you know, use for adding these branches. So just you'd already patiently I'm adding these branches so that they tried to look natural. So you can see I'm overlapping them onto the previous videos very carefully and Danko make it look natural as much as possible. Now the CMB, I would just add in the ground just popping out from the left side here. So competitive me from my right side, we are going to have very nice branches onto the left side. And then blue line would need that is onto the bottom media much. I'm just trying to show them moving towards the London bought. So just a few more and I'd be done adding these branches. So you can see I added some popping from behind of the bush idea that we add it. Now, I didn't shift to my technical pen, and I will just add some final details to the lantern. So using the technical pen now, auto black pen, auto want to prove Ben already fine liner on in case if you do not want to use a fine liner, you can even use your black wash or blackwater color and using a very fine tip at these details. Now you're at the bottom first, I will begin to add the final details at the bottom of the slab. So as I said, the designer look of this lamp is then diode beauty of this being dates. So adding these little d, d is all you know to make it look indeed and vintage kind of a look even onto the sides of these nap. I will just be adding some simple Mandela I know EDS using the tip of my pen. And just very simple designs, nothing complicated or difficult. So you can see just simple designs to make it look a little bit. Cmv onto the left side also quickly. Now right? Adding it onto the other side, be careful of the DNA. Matching it with the right side or the left side, whichever you being done. Now the last detail on to the top here, just a little more, didn't like this. Now in the bottom areas in between the branches, I will just show some violations passing through. So just simple by lines using the same pen from one branch to the other branch, passing in between. Now, after your lamp area is completely giant, pick up some black color. I'm using the tip of your brush. Add these final details into the lab. Make sure that your backbone of the lamp, and although edges that UP lamp are completely dry before adding these, otherwise they may spread and you don't spoil your entire Look. I didn't even give another Leo to these borders because they seem to try a little Done column. And I want them to do vibrant look to them. So just adding another quote that the black color simply. And that is it. We are done with a painting for D. Let's remove the masking tape. Make sure that your painting is completely dry it onto the edges and you move it at an angle from your people so that you do not see when your people. I hope you guys are enjoying the challenge and I'm loving to see your projects into the project section. Also drop a few if you are loving this class. And I hope you guys enjoyed painting this beautiful lamp you to D with me. This was the last one for this plot, and tomorrow we will be on to a new clade. Thank you so much to each one of you for joining me so far.
37. Day 31 - Red Moon: Hello everyone and welcome back to data D1. Today we will be beginning with the next from that is moonscape. So this is the first one for today. Let's have a look at the colors that you need for this one. You need a shade of Oddi, permanent shed. One sienna, yellow, Payne's gray, and black color. So these are all the colors that you need to get them ready onto your palette. And let's begin painting. So I have made people taped down onto my board already. Okay, make sure that your paper is taped down perfectly. Now using a compass, I will just mark a huge into the center of this page that I have. So in case if you're using any other size, you can accordingly MC the moonscape, as you have seen that a friend so you can judge how much and where you need to place your moon. Now let's begin painting the sky. So leaving the moon, ETL will begin to apply a clean coat of water onto the rest of the area. Make sure that you do not run into the moon area. So you again, are you covering such a large area with masking fluid is generally what I don't prefer or even covering it with masking tape or just edges that you can go ahead with if you have that much of patients, do you know deep it down in that she otherwise you can just feel little careful and apply water accordingly and you're not try not running into the moon area. So I'm just making sure that I have an even coat of water throughout and the edges of my moon are also perfectly or in shape there. So just being a little careful and patient by applying the water there. If you want, you can use a smaller size brush and apply the water there if you're not comfortable adding it with a flat brush. Now let's begin applying the colors onto the sky area. So first time beginning with the shade of yellow. So I'm using or yellow deep color. You can use any brighter shade of yellow or except for the lemon yellow color. And very carefully onto the bottom area, apply this yellow color. Make sure that you do not run into the moon, otherwise you will lose the moon Gallo that you wish to have. If they're yellow. And that is perfectly fine because they will be darker colors. But now next I've picked up some orange and applying it, you're at the bottom most IDA and blending it, lending it went with the orange and the yellow. Okay, So I'm just tilting my board downwards so that my Carlo fluids or towards the top area because the water media as it is, will be covered with the black colors are not what it with the bottom finishing line. Now next time picking up the Payne's gray color and then apply the paint straight onto the rest of my sky area, leaving the moon area. Now be a little careful when you apply the Payne's gray color because Payne's gray is a darker color and it should not run into your moon. Otherwise, the lighter bones that is the orange did and the brown bones that placing into the moon will not be able to hide the Payne's gray color. So that is where we said if the yellow color runs and do your moon is perfectly okay because the orange AND gate will hide the lighter color, that's the yellow sheet. But if the darker shade that so payne's gray color, if that runs and do your mood, it will be very difficult to hide it. Now in case if you do not have a Payne's gray color, you can go ahead and mix a little bit of indigo and black and use that color. So you can see, I'm just adding it very carefully onto the edges and have a clean blend between the Payne's green and the yellow color. Now, again, I'm picking up the paint streak allo in Dakar consistency and applying it at the top and gently trying to get water. So basically just trying to get a gradient of the Payne's gray color that is at the top, it will be of the Docker tool. And as we're moving down towards the yellow color, the color will be lighter in tone compared to the top area. But when you're doing this, be very careful of not running into the area. Okay, so be careful. Use appointed the brush, maybe auto smallest size brush if you're not confident. Or as I said, if you want to use masking fluid, all must imply, then that is perfectly your choice. Now this time I have all my board on downwards. So basically my colors are flowing or downward. So the Payne's gray is flowing into. So you need to keep tilting accordingly to see which color is flowing more so safe Pain streets flowing too much, you need to tilt it in the opposite side so that the yellow also flows into the Payne 3 and b are both docker logs into the sky. Now using a tissue paper, just lifting up the excess water that's come up Your onto the masking tape. Otherwise it will see back into my painting and ruined those edges that I have. Now let's read for this entire sky to dry and then we'll begin painting the moon area. So my entire sky is completely dry it, and now I'll begin painting the moon. So for the moon area Alpha supply of clean coat of water onto the moon, ADI, using my round brush. Now be very carefully by applying the water. If you know, if you want to be a little more carefully applying the water onto the edges so automatically your sky me not get ruined. So even Ivan, avoid applying the water onto the edges and I'll do the edges. I will directly pick up the color and apply it very carefully. You've got to be very careful about this thing that your sky falls. He has to be completely dried before you begin to paint the moon. Moon, the full sheet that I'm picking up is the shade of Valmy. You can pick up any shade of bright orange that is in your palate. And now very carefully, Ivan apply the shade onto the edges of the moon forced there. I did not add what? Not directly adding the paint. And I'll try to maintain that round shape. So use of a smaller size brush for adding this. So for adding this edge of the moon, I'm using my silver black velvet series of size four round brush. This brush has a very fine point, and hence I'll be able to achieve the definite shape for the moon. And as well as L, you know, add the details and the scholar very carefully onto the edge without ruining my sky. So having your paper down onto a movable so phase adds to their advantage that you can just tilt the people and, you know, adjust your hand movement accordingly. That will help you in getting better blend or maybe a better or, you know, additional details like these. So you can see I could and simply tilt my board and, you know, or I could adjust my hand movement that suits me best and just add the details like this, if you will, have it on to a non movable so phase, then it will be very difficult, you know, to add though oh, borders onto the other side or make fertility in your hand. So that's the advantage and hence I always recommend to tape it down onto a movable surface. Now, let's fill the rest of the moon with the same 1 million colors. So I'll just shift to my bigger size brush now and fill the entire moon with this color first. So this is just a first step. Adding the depth by this sky is still wet. But you can see despite taking so much care, that little color data drawn outside, I just lifted it up using a damp brush. Now shifting to the permanent shape color and shifting to my smaller size brush again, I'll just begin to add the patches, but this OH, permanent jet Kahlo very randomly onto this moon ADR. Now when you are adding the patches with this permanent red color, you got to be very careful about certain things. The first thing is that do not infuse much of Cordova and adding this column use the Palaeolithic consistency. So you can see I'm picking up the color in such a thick consistency. Secondly, do not add the red color onto the entire of the orange color. Otherwise, as I always say, adding the fourth snail wouldn't make sense at all then. So make sure that you will lead the orange be visible and you can see very randomly, I'm just adding smaller batches. And medially onto the edges, I'm giving DACA depths with the red color. And then in the center, just adding very small patches with this color. So you can notice in the center ADI I have to orange look and imagine you're on the edges. I gave the darker red Gordo to debit more depth. Again, I don't know this little speeds again and again, the colors are seeping out. So using a damp brush, I'm just cleaning and picking up the color from there. Now next one, do this. We will be adding the layer with the bone CNR Kahlo. So these were just the two layers of depth. Now we have to begin adding the third layer of depth with that whole column. So now I have picked up the bone sienna color. And I begin to add the buoyancy and Apollo. Now the Guanzi and Docker login BHP see some bit onto the red colors, some golden orange color. So make sure that you read, eat, and additivity down nimbly and in smaller places such that the photo studios are also visible art pieces. Now, even by adding the buoyancy and knock ALU, you have to be very careful about Guan thing, that you do not introduce too much wardrobe because if you're going to begin to introduce too much, what DO it was? Adequate gobbled up your audience and the red colors completely. So you can see we just added some gotchas with the buoyancy and knew Kahlo. Now next time picking up the ball and Dumbo, Kahlo and added, begin to add the dark UDP is with the ball and gumbo Kahlo. In case if you do not have a bone Don Buchla, you can go ahead with any Docker dome shape that doesn't New York ballot. Or you can just mix it up then just the black color to your o brown that you have and get this darker tone of brown. Now, again, I'm just using my smallest size brush and using the tip of my brush. I'm adding these details. So you can see I'm adding details in such a way, such that though a lighter bones and the Nios that I have added before, I'd still visible. I don't know why this edge is again and again spending Despite the dam during this EPO. So again, just lifted up the color from that little area. So that does it for our moon. You can see all the sheets visibility into our moon of just, Oh, you don't tend to maybe point to all the edges so that the kalos just flow. Now let's wait for this to dry and then add the photo D does not remove. Eda is completely dried and that'll begin painting the foreground EDF forest. So first add the water media, just adding a very small patch of black color. And from this batch, I haven't tried to depict achieve blooming into the moon audiologist with branches. So let's fill this area completely with Black Forest. So I'm almost done feeding into the black in case if you wanted to you again given a duotone also you could use a little bit of bone. Cnn does Endo and add the black edges and given the door and Ahmadiyya and the light effect of the moon. But I taught us keeping it simple this time. Now let's begin adding the G so that G is, you know, all hiding the moon at basis. So basically that g is in front of the moon. So just 0, 0, 0 t co-branding. And then from this I will try to go about different branches. So some follow, some sharp DO somethin awesome, pico. So let's continue to add these branches. Now you can see I'm trying to add the branches of AD Nash Tunis. So at the top it has a pointed tip on, as it's meeting the mean on stem off the G, It's a little tick GUDDAT pieces. Now since my brush has a pointed tip, I'm going to add all of these details. Now before this water media dries, I'll just swap out some grasses from this water media so that all of it all looks very blended to each other. So just some simple grass strokes with the black color and not undo the entire ADR video-on-demand yet basis. So that does it for the bottom grass for now. Now, again, I'll begin to add the branches here. Now my brush has a pointed tip, so I'm able to add that t naught and the Tico branches all through this one brush In gaze, as I always say, if you approach does not have appointed bit at the big ODD is Toby Go Brush and then shift Joie de Dino brash auto pointed tip gosh, oh, maybe SIDs WC door. And then add the final branches so, you know, so that you do not have one type of branches throughout. So you can see ladies and NAM just deepened to add these Taino and find out branches using this tip of my brush, which becomes point did vendetta with feigned and what DO. So I'm just going to add a few more branches. If you want to make it look all videos, Scott's kind of cookie, you can just start fewer branches and leave it there. And in case if you want to make it all filled with branches like this, keep adding the branches, but make sure to review all the branches throughout. Now, I'll just add some boats sitting on a few of the branches. So very simple bots also could then a no women and then just little feathers popping out from behind. In case if you want, you can add a little boy dish on Buddha or trees. Majority do not want to do the edge. But just a few other ways the movement get covered up compete knee which we don't want because the topic is moons gapes. Okay, So that's the reason I'm just adding feel bored sitting on preview off the branches many Janda me. So I'll add another one. You are sitting at the door. You can show me all you not change the basement of the boards via the acid day. So I'm almost done. Just one last thing. I'll just add a few more or grassroots at the water media because they feel they're quite less, right? No. So some taller ones and some shorter ones do. So dark, is it? No. Let's remove the masking tape and CFE being d. Again, as always, make sure that your edges are completely dry it and remove the masking tape at denying them from your paper so that you do not date off your people. I hope you guys enjoyed painting this simple moonscape for today because folder and we're going to be being dig more detailed and different fuel, new wounds, gapes in the coming days. I hope you guys are enjoying the 50 days watercolor challenge and all the prompts that are coming in. Thank you so much to each one of you for joining me to this challenge and painting along with me, if VDI, I will see you guys tomorrow into the next class project the water to them. Happy being doing. And thank you so much once again for joining me.
38. Day 32 - Snowcapped Moon: Hello everyone and welcome back to the 50s watercolor challenge. We will need 32 today, and even the painting this moonscape to moonscape today. So let's have a look at the colors that you need for this one, you need a sheet of bright blue, indigo, Payne's gray, white, and black color. So these are the only colors that you need for today's class exercise. So I have might be but deep down onto all the four edges. Let's begin by placing the moon. So this time, my moon will be a little onto the left side and almost in the center, but more towards the left side. And at the bottom you will be having much more gap. So that does it for the pencil, sketch, nothing more. So even be applying water onto the entire surface, but leaving the mall. Because just as the last exercise, we will be painting the moon hated on so forth. Let's begin with a clean coat of water onto the remaining sky. Make sure that you do not run into the moon. And even if you run only do, it will be perfectly okay because this time our sky is going to be very, very light. It's going to be 0, you know, more office, no looking sky. So it's going to be awful, very light tone and the moon is comparatively going to be offered DACA door. So you can be a little iffy, but try avoiding as far as UCA. Think is if you want, you can use the smallest size brush around the moon to apply the CTO photo. So I'm done applying the clean CTO photo onto my anti also face and even know ITIL 4, don't know airport wolves left. Let's begin by painting the sky. I will be using the sitting in blue and the yellow is going to be in a very light consistency. You can see I originally had water onto my brush and very less of pigment. So it's going to be that light off the door. So this is a backhoe one. I'll just lift up the callow and spread it across even me. So you can see such light tone that I'm spreading across evenly and 0 near to the moon. I'm being very careful. So this is how light I want my sky this time. Oh, it's a small-scale looked at we are painting as we saw in the beginning. Okay, so just spread the city and in blue palo evenly, you can either use a bright blue or a nice sky blue tone. So it was 90 percent water and just 10 percent of the pigment that I use to get that lifted, sky blue color tone. Now next, then pick up the indigo color. So the indigo color that I'm using is from the band brightness. And very lightly, I'll just add little spots of the indigo color. So you can see even they may go Kahlo is in non diluted consistency that I'm using. So it has too much water unless off pigment. And I'm just adding fuel spots, you are in there into the sky using the indigo color. Okay? So you have to add it so lightly that it blends well. And the reason that I'm adding it with too much water is so that I have a soft look into my sky. And the paints will automatically spread and bleed into each other. So you can see the indigo Palo is spreading and mixing the descending and Luke allo easily on its own. And I do not have to worry much about the blend things there. So better when I'm feeling that the color is light, I'm just adding the drops of indigo color again. And in a diluted you can see, I'm just tilting my board. So you can see automatically the paints are spreading on its own and having that very soft look into my sky. So both the callosum blending them. And now neo to buy more EDI either just be copying this column so that o to reflect the shadow of the moon because the moon is going to be of a darker color. So on edge also, I'm giving the darker color. Now just moving my board in all the directions for the colors to blend in bed. And after this, I will just net all of this to dry. So I did this shift to my smallest size brush along the edge of the moon, Ivan just give up Clio because at certain places, some bright spots. So even you can use a smaller size brush to get a blending unappealing shape around the moon. So I'm almost done. Now let's make for the entire sky to dry completely. And then we'll begin painting ahead one-by-one. So your sky is completely dry it and you can see it. And soft blend and such like. So the perfect Cytoscape look that I needed for the sky area also. Now let's begin with painting the whole area. So for the moon area, I'm not applying any CTO photo. I'm directly picking up white watercolor and giving obesity opened the right water valid says, I'm not using gouache for this one because on do this I will be adding or black color and the Payne's gray colored details. So I just needed all the white layer for the paint to spread and get that lighter look on its own automatically. For my smallest size, brush again and onto the edges of the moon, although I will use my smallest size brush and begin to apply the backward loans. So the white color, I have purposely not applied it onto the edges because under the edges I'll just did. Let me begin with the backbones. So I've picked up the Payne's gray color in a little diluted consistency forced not to or dark also not too light also and very carefully on Buddha edges using the tip of my brush, I'm just dropping this beam. So you can see because the paint is I knew therefore see it's spreading on it to one. Secondly, because of the load off white color that I had, the idea was already wet. So it's helping in blooming of these beans automatically. Using the tip of my brush, I'm dropping the beans in on liquid consistency for them to spread. It's very important if you want these rules, you need to add the pins in this liquid consistency so that they automatically spread. And secondly, it's important that the background has to remain back. Otherwise these pins will not bloom on its own like this. Now using the same consistency of the Payne's gray color, I will just begin to add some patches into the center of the moon. So very carefully and begin to drop using the tip of your brush. Now, again, you know if you're going to be adding too much water, but also it will spread so much that all the white gaps will get covered up. And if you will adduct, albeit very nice watercolor paints and not move as they are blooming right now. So it's both ways, excess will also not be good and even less will not give you the effect. So it's important to get the right consistency and amount of water that you need. Now I have picked up the paint streak alloying a DACA consistency and onto the pieces that I've added, the lighter tones on randomly or small patches of that I'm adding the darker dawns, not covering the lighter patches completely. So the darker patches are quite final as compared to dogs. Patches that are either. Now onto the bottom media, you are also just adding the light patch force because it's a tomato whitespace that I feel. So added the lighter patch and onto that I will be adding the darker patch now. So all of these technique and do the moon right now, I have been doing bed on back and oh, my moon is Sinbad for adding all the Nios. So make sure that you are Moon stays back. So in case if your moon dry and then wait for it to dry completely, G vetted religion key and then begin to add the zeros. So you can see, I'm adding these videos very carefully. So I have not added all the patches all to get also, even the lighter patches I'm adding in parts and even the darker patches I'm adding in parts so that I do not do any of it. So first I added a little places lighter patches then shifted to the darker patches. Now the darker patches that are Laplace's and Mishnah onto the entire edge, I got the darker color. So it's very important to go part by part so that you do not do any. So now my moon is completely dry. And now let's begin adding the fourth unifying GCE fool us. And then we will be adding the small loop on to the g's after VB them and the dry completely. So I'll begin reading the pine Gs with the black Paladin technique. You can either use beans three or black color, whichever you are comfortable with. So on, Do the Right Thing. I will be having a very huge buying PPE. So beginning the domain stem forced. So it's thinner at the top and as I'm reaching the bottom media, it's stoning pico. Now I'll begin adding the leaves to these pine tree. So this time, this is a little detailed bind G nought too much detail too. And a lot of big branch and then begin adding the smaller branches like this. And eventually, since the right side of the T is not visible much to assign it to a, so the ship dead would not matter. But on the left side, try to make it 0 triangular looking shapes. So that means on the top It's very short, DO in-breath. And as we are moving downwards, the breadth of these leaves will begin to increase so quickly. Just add all of them. So under the right side and just add the simple ones that just pull out some simple lines because all you know that the leaves are not visible there as it is. And then went to the left side. I have an add them as we were adding PVC. Now let's begin to our demo again onto the left side. So under the left side you'll see I'm adding some branches and some that also I'm trying to pull out some branches so that all of these will begin to add the details to the t. Now I feel this brownstone not to be blue. You also onto the top box I can just extend and breadth of the branches also so that, uh, you know, it looks symmetrical and looks in propulsion actually not symmetrical. It looks a little in proportion as compared to the branches above. Now, again, just taking a few branches overlapping the womb. So it's very important for your mobile data before you do this. So this is sort of a Christmas. She looked at me or adding in your book. So like a Christmas tree. Now, on to the remaining net site, we clean It's add the branches just as we were adding. So continue adding these leaves. Now you can see at pieces my leaves are moving towards the top. And acnes is, I'm trying to add them moving downwards, That's tilted downwards. Now you can see Vedanta me MRD, though broken shape of the leaves also by adding a very crooked large so that all of this and an act with a national unity of the t that we are trying to add. Just in between, I took one branch to the moon of AD big branch. The undermining just simply branches are some better to get a little short to the in-between to add on more of a natural look to it. Now almost onto the end of this big, huge thing. And then we'll be adding some smaller trees onto the left side under the moon area. So just a little more branch moving your into the moon. So there I'm almost done with the tree onto the right side, you can see it's not the ODU DVD logo. It was very simple. Lambda o means you need a black girl DDS that are not being D2 gave me because on Buddhist I've been 0 is simply using whitewash and adding the small batches. So that's the reason I did not being did a lot d11 in case if you are someone who wants to make it all you don't fit EDD land, aldose need kind of funds. You can surely wired with it, but I just wanted to keep it loose and simple. Now, let's begin adding those smaller pine jeez, even on the right side. So just adding final details your now on to the left side I will be adding very small by injuries just under the moon. So these are buying jeans would not be oh, you know, moving on to the moon any of it. So you can see these biases. I'm not even adding the medial ones like onto the left side or right side. So just very simple pine trees, which at the end should begin to look like a triangle shape. That is what my motto is your. And just very simple leaves that I'm trying to pull out. Adding another smaller one. You are to have a good variation of the pyogenes that I'm trying to add. And now after this mean, we'd put all of these to dry and then begin adding the snow patches and the snowflakes on Buddha entire piece that. So then my pine trees are completely dry. Now I'm picking up some white goulash and thick consistency and I'll begin to add patches of snow onto the prion genes that we have. So many. Just begin to place some patches with the white color to depict us move on to the pine trees, normally joins with the main branch, tried to add this blue patches there. So you can see, I'm just ready, give me using the tip of my brush and dab in some, right? So the important thing is that you're being asked to be not take consistency so that it begins to look as snow patch. Because if you use too much, what Repeat, it will not give you this. You not take an opaque look onto the black color. So maintaining the consistency is very important you are to depict this new area and make sure that you do not add too much also otherwise you may cover then Biopython T and even looser look in G. So very carefully vetted. I'm the lead addicts in such a way that it looks natural. So keep adding the snow onto all of the branches of the pine tree. And make sure that again, you do not cover all of them otherwise, the pine trees will not be as good. Even on Buddhist smaller ones, we will be adding a little of this noise effect. The same bright color will be some snow. Just as we splatter the stars. Baby will be splashing snow into the entire piece that we have been told to depict. A snowfall kind of a C. So now what do these smaller by NGOs, all three you can see varied under me, I'm adding these little patches and even onto the smallest one you are, let's add a little off this little fat. Now, as we always matters to us, Let's drag this, I'm slow this type In the same vein using whitewash and I'll be dabbing it with my hand. Oh, that is two fingers so that I get the 0 V lookup, the school fixed. I want to add in these if you want, you can scratch it using another brush or you can even stretch it using the brush as you are comfortable with, suggests that there are a few of them. I'll make sure that you march that are marked on Buddha pine trees, otherwise 0, since we've already added the patches, they're too much, there will begin to be 0. You don't cover the team war. So now let's remove the masking tape and see our final painting. Now be sure that your edges are completely dry and remove it at an angle from your people. So let us know slapped onto the moon also because this is we're trying to show or snowfall scene. So it's falling from a front view of the moon. So your myself, I'm painting for deeper D2. I hope you guys enjoyed painting with me today. A simple one for today. I didn't see you guys tomorrow with another moonscape triangle so much for joining me to lead happy painting.
39. Day 33 - Evening Moonscape: Hello everyone and welcome back to D 33. Today we will be being doing this evening. So let's have a look at the colors that you need for this class project. You need to shade of yellow, windrows, Vionnet, right? Flu beans, green, black and white goulash. So these are all the colors you need. So let's begin painting if you have to, Carlos GDI. Now, I have my people deep down onto all the four edges on to this movable surface. So let's begin with the pencil sketch. The only pencil sketch that I have is pleasing the moon. Using my compass, I replaced the moon this time into the center right side. So it's majorly onto the center of the right side. So that is only pencil sketch that we have for this beam. Now let's begin painting. I will begin by applying a clean coat of water onto my entire sky, leaving the moon or completely without water. So apply the coat off auto very patiently around the moon so that you would not run into the moon because as you would have seen in the reference, or the moon is quite right and we do not run the Docker sky Carlos, to enter the moon. Around the moon. One, you can use the smallest size brush to add the clean coat of water. Otherwise with your flat brush also, you can apply it very carefully and into the rest of this guy apply and even green auto photo. So now I will shift to my smaller sized round brush and around the moon, I will just give a proper finishing of the water, Leo, that I want. As I said previously, it's always better to shift to a smaller brush to get the details or Beta 0 rather than just thrashing around with the bigger size brushes. So I'm done applying the even older photo. Now let's begin painting the sky idea. So the first color that I'm picking up is the shade off lemon yellow. And I don't even apply at some batches of the lemon yellow color. Now this time, my colloids are neither read nor good Digg. They are in a medium consistency to get a medium vibrant effect. So around the moon majorly, I have added the yellow color and spreading it across as moving towards the rest of this guy. So neon to the moon, It's quite vibrant and into the rest of the area. I'm just grading it with my brush and getting that lighter tone. Now next let's shift into dark purple condo. So for the popular color, I will be mixing and make windrows and the bright blue color to get a violet don't eat, you can either directly use the violet tone availability your palette, or even you can mix the colors. So you can see I have mixed a closer written roughly so that I'm getting that little blue patches in between. So my brush has blue color. So that is the reason I make stoke our laws instead of using the column from the ballot so that I get this underlying gluten automatically on its own. Now, you can see I'm carefully or trying to ignore the yellow area and avoiding the violet color there. And onto the remaining space that this onto the remaining part of the sky. Just applying the violet color that I've formed by mixing in though of blue and Windows Scholar. Now, undo the edges you are, I'm using in the little bit of red violet door. Or you can either use a crimson auto Scarlett color. So at the bottom, to give a little pink dodge, I've used a red violet, don't. Now I will just pick some things Greek allo, and onto the edges I'll begin to apply the Docker quotes with the Payne's gray color. Now make sure that your sky is still wet. I knew begin to apply the beans green color, otherwise you will not be getting the soft edge in the sky that we want. So I'm using the Payne's gray Palo Alto in a medium consistency, make sure that you do not add too much water. Because if you would like too much water, you will lose a pulpal damage. And as I always say, anything excess are anything less bought off, it may ruin your painting. So which practice? It's very important to understand where you want too much liquid consistency or value 1 to maintain the level of water. So now only onto the edges you can see I've applied the beans clique are low and I'm just tilting my people in all directions to get that soft blend between the violet end of beans green color. Now just dropping in some things Carlo near to the yellow tones. So wherever I had applied the yellows using the tip of my brush, I'm just dropping the green door scholar in a little liquid consistency so that you can see it's naturally spreading and blending into the yellow color. Now picking up some darker dawns of devided column mix that I prepared and applying it on to the violet that I applied already near to the pins, Greek Hello. So this is our coin loading technique of it. And you keep adding the Leo's to achieve those soft edges and the depth into the painting. So now you can see I've got the little blue touch also undo the top-left corner. Now at the bottom you are to maintain the light effect. I just lifted up some color, so that does it for this soft evening sky blue. Now we need to read for the entire sky background to dry completely before painting ahead. So let's wait for this to dry and then we all begin painting the moon and then add the remaining celebrate area. Make sure that you tilt your board in all directions so that even you achieve this soft blend into the sky that I have achieved. And make sure near to the moon you have the yellow highlights. Now my entire background has completely dried and you can see such a soft sky look I have, and near to the moon I have that yellow effect for the moonlight to be reflected. Now let's begin painting the moon area. So for the moon area, either directly begin by applying a layer of white quash. You can either use white gouache or white watercolor. You're bored of, it will be perfectly okay. Make sure that you do not run into the sky idea. And this time, the reason why I'm applying the white quash first, because I will just be adding little yellow touch to the entire moon. And the rest of the Moon will majorly be the blue. So that is the reason I'm beginning with a layer of white quash first and then I'll blend in the yellow to this squash. So there I'm done applying the court of whitewash onto the entire of my moon. Just a little area left now. So the color that I've used is in a little thick consistency this time so that I get that opaque look and not too diluted because I don't want my yellow color that I will be applying now to spread too much. And again, since my paper is taped down onto a movable surface, you can see I'm just able to rotate the board and make my hand movement more comfortable rather than constraining my hand. So I'm done with the Clean Code of whitewash. Now next time we'll pick up some yellow color. I've picked up the same lemon yellow and onto the top area of the moon using the color in a very light consistency either just blended with the whitewash. So you are all whitewashed, act as the moon area has to be wet when you add in this yellow layer. And you can see I'm just adding such a lady a load on major new onto the top side of the moon and just spreading it very gently with my brush onto the bottom side. Now next I have just picked up a little mix of the yellow and the orange color that is a yellowish orange tone. And using this stone, just applying some light does drops onto the top side of the moon and trying to blend it with the white and the yellow Palo. So majorly, the entire moon light effect is on to the top side of the moon. And the bottom is mentioning going to be white just with a little touch of the yellow. Now using a damp brush, I'm gently blending even the yellowish orange tone into the background of the moon to get a line defect there. So this is how our moon is going to be for this much a bright shining moon. So now let's wait for the moon to dry before beginning to add the final GC low head to appear in B. So now my mood and my sky both are completely dry. And now I have picked up some black color. And using my smallest sized round brush, which has a pointed tip, I'll begin to add the GC low hit some phosphate need to add in some branches. So these branches are going to be overlapping the moon also. So it's majorly some branch popping out from the right bottom area. And then to this, I haven't continue adding some taller branches and then some shorter branches do. So make sure that you use a brush that has either has a pointed tip to a smaller size brush for adding in all of these branches. After adding these branches this time, I will even be adding a little foolish to these branches because this type of even just not be adding the symbol for mileage of dabbing the brush. This time we will be adding or three shaped leaf, a three pattern or shape leaf that we will be adding to act as the foliage. And major of it is going to be on the top-left side. So you can see I'm adding these branches vary randomly and most of them are popping out from to the right side and moving towards the left side and onto the left side, I will just be trying to show some branches that will be falling from the top left side. So continue adding the branches. Just make sure that you read the movement of these branches and also maybe they're in the thickness and the land and tried to add variation so that it looks more natural. So you can see I have tried to maintain the variation by adding some smaller branches popping out from the Tico branches and the branches. Now I will quickly add some smaller branches from these toddler branches that I've added and near to the moon either tried to add these branches, but I haven't even made sure that I don't add too much newer to the moon. Otherwise, my moon will get covered up. And you can see under the water media of the moon, I have just added one bigger branch and not added much smaller branches onto there because there I will be placing towards yellow hit. Now I have tilted my board and undo that left corner, which is right now in the image though bottom right corner that you can see. So there I am adding in these EFS below it, the three leaf button. Okay? So the three petal leaf actually suggest adding three leaves in our bunch together like this. And just oh, you don't. So they are medially like in the shape of an autumn leaf. Okay, so continue adding these leaves and some better. I'm just dabbing and, you know, filling the area, making it look as far LH there. So the idea that was the first line, I added it very distinctively and then as I moved out towards the edge, I began to add little foliage. Now again, I will add little o properly shaped autumn going looking leaves. Because this time I'm trying to make these leaves look as the most detail and look to the painting. You can add any other leaf shape that you want need not be the same leaf that I'm adding. Or else you can even use the simple dabbing technique that we have been using all this. But this time I felt like adding a little more detailed look to this painting rather than the simple leaves. So you can see majorly upto o bottom media. I am still using the dabbing technique because there is a, you know, more clustered they are what I want to show. But otherwise I have used o near to the first line, the detailed ones. And now on to the remaining branches that I've added, I will be adding some of the leaves dead also, I will be adding the tree leaf looking better. So first adding a few leaves in such a way as if they are falling from the top branches. So basically the LEA those leaves out in air and in motion right now. Now, just add of your work I do as if they are falling from the top branch and undo the rest of the branches just dive a little foreknowledge of these leaves. So very limited, not too much because I want these branch look to be there and on good at taught by a ragged edge loop that we needed. So you can see I'm adding very limited. And so I'm just using the single leaf and nothing detailed and very limited just to 10 to 12 each branches but MID. So I'm almost done adding the foliage onto these branches. And the only thing we will be left to add is that toolbox silhouette sitting on to that one big branch onto the moon which I had left it blank. So in case if you want to, I'll just draw a rough saluted with the pencil for the boats for us. Already rough one. So you can also either have it off, swallow it, or directly all painted with the black color. So this time the boats are going to be quite huge. And I'm trying to depict DO, DO boat sitting face to each other. So the first board your and the second bond, or a lithium underlying this one. Now I will simply fill in this entire silhouette with the black color. Make sure that you use the black color in a good thick consistency so that it remains OB because since you are adding it onto the white gouache, the white quash begins to activate and it may, or you don't give you a little grayish tone. So try to use the Apollo noted consistency. Now the other word, you're just filling it with the black color like the first one. So that is it for our being dangerous. This last board, we are done with a happy ending for D2, D3. Now let's remove the masking tape and see our final painting with those clean edges. And this moon with that, oh shine around. It looks so gorgeous and perfect and such an evening pretty sky look that we have got. Now make sure that you remove the masking tape at an angle so that you do not ruin the edges and be patient while removing the masking tape. So your reserve final painting with those clean edges for the 33. I hope you guys enjoyed painting this painting today and loved this pretty shining moon. Thank you so much to each one of you for joining me so far into this challenge. And I hope to see you by his continued till the day 50 Earth and see all 50 creation from this 15-year watercolor challenge. Thank you once again to each one of you for joining me today and painting this along with me.
40. Day 34 - Night Sky Moon: Hello everyone and welcome back to D to D for today we will be painting this beautiful nighttime Minsky. So let's have a look at the kalos. You need a shade of gray, blue, green, blue, indigo, Payne's gray, black and white quash. So these are all the colors that you need. And let's begin painting. So I have my paper taped down onto all the four edges. I will first begin with the pencil sketch. So for the first thing called a pencil sketch is marking out my horizon line. Now just adding a little while, sort of a d Datastore or maybe a wrong detail you can consider just now next, shifting to my campus and adding a moon onto the top left side. So that is it for my pencil sketch. Now let's begin painting. So first I will begin with a clean quota for DOE only onto my sky. Make sure to not apply the water onto the moon. Edr are the ways of view and not be able to achieve a distinguished loop there. But even if the little colored runs day, it will be perfectly okay because the moon is also going to be of a dark color with just some white highlights onto the Bordeaux depicting the moonlight. So don't worry much, but try to avoid it as much as possible. And onto the rest of this guy, apply an even coat of photo. Now I will first begin with a bright blue color and apply a layer of pride, blue and new to the horizon line, I will leave a little white gap of approximately one centimeter and lead that all whitespace be there. So I'm tilting my board so that the paint doesn't flow down near to the horizon line. Because then again, I wanted to depict glowing light effect. So I want that ADR to be white with just a little color spreading onto its own merging with the water, the OH, that we have applied. Now onto the top area, I have picked up the indigo color and applying a little touch of the Indigo and then picked up some blue and adding some pollution blue mixed with indigo. Now just trying to achieve or clean blend between the bright blue and the Prussian blue and indigo, indigo color that I have picked up. So shift to my smallest size brush and be precise neon to the moon area. Now so that my colors blend of valence to each other. I'll tilt my board on the Dylan old elections. But as soon as I feel that the blue color is seeping too much into the white area on the auto my horizon line. I will quickly tell that into the other direction so that the color does not flow into that species or near the horizon line where I want the white layer. Now I have picked up some Prussian blue color without adding any indigo color to it and just applying a little Leona to that dark blue color that I have. And a little of the bright blue is still visible you can see. So basically I have four collaborations in my sky. First knee out to the horizon line, It's a white patch, then a little of the bright blue color. Then a little fusion knew Kahlo and at the top the indigo color. Now I'll just pick up the shoe and dab off the excess water onto the masking tape from the edges so that it does not run back into the painting and spoilage. So be really careful about these little things otherwise they may ruin your anti-doping day. So I'll just lift up the little color from your because it's spread it to mature and that don't follow your seem to turned out.gov. So to get that light effect again, just lifted up the colors using my brush. Now, I just keep tilting my board in all directions and add some darker layer at the top again. So this time I have used spins Greek alla and added a darker patch of the pins gray color. And again, just keep moving my board in all directions so that the beans flow naturally into each other and have a cleans mood soft blend, rather than any harsh auto specific color blend at places. While you are tilting your board, make sure that you do not all tilted too much in the downward direction. Otherwise, that white light effect neo to the horizon line will begin to be all covered with the blue color completely which we don't want. So you need to control there and get that very light blue shade I've got right now, which will be your not depicting or depicting actually some bright light effect there at my horizon line. Now next I'm just picking up some white quash. And using some white quash, I'll just drop it your at the top area to have some lighter species in the top sky also, I will not be having these color exactly as the white color there. It will just create a lighter patch in-between the blue skies. So that is all what I'm trying to achieve, suggests I added some white quash now liquid consistency. Now I will just tilt my board again to get a smooth blend and the flow of the cash flows naturally. So keep tilting the board until you feel satisfied with the blend. And after this, I will just read for my entire sky to dry completely. And then we will move ahead painting the other elements for the painting. So my entire sky is completely dry. And you can see I've got such a good glowing effect on my horizon line. Little light blue sky tone. Now Alphonse begin applying a clean layer of color onto the sea. So I'm using the peacock blue shade from this set, which is equal to 0 coins blue color. So you can just use a turquoise blue color and using the turquoise blue color, apply it onto the entire area. Don't worry if you run into the drop area marking that we had done, it is perfectly okay because that will be covered in black later on. So just apply our clean layer of the turquoise blue color. Now if you do not have turquoise blue color, you can just mix in a little bit of viridian green, green with your bright blue to get a turquoise blue color. Now, over to the edges, I am adding in the same color, but they're not darker consistency to get some darker tones onto the edges. Now to this same color, I will just add in a tinge of the Payne's gray color to get an even darker tone and apply the darker layer onto the edges again. So if you do not have Payne's gray, you can just mix in a little touch of black to get our Docker dawn than the previous two, Laos and apply it onto both the side of the edges of the sea and let the center light because of the moonlight effect that we will be showing. Now let's begin painting the base scenario for the moon until the C drive. So you can see we've got such a bright light now or reflecting perfectly on the horizon line that we need it after we've painted the sea, that is giving a much better effect. Now for the moon, I'm forced beginning with the white quash, so majorly or at the bottom area, I will be having a ring of the moon with the white quash. So first, I'll just get a clean circle using a white quash so that other kalos that have seeped in your eye can all get a proper so-called share. So you can see I'm just applying the white gouache onto the edges, are not adding it much in the center right now because in the same dot as it does, it's going to be our docket one. It's just on the edges that I needed the shape of the moon do 3D unit cell. Now next I will just pick up a little touch of the windows Scala and added at the top side. So the reason for adding the Queen Rose calories then I will be adding in blue. It will give it a little Polish touch. Your after all of it drains. So now I have picked up the same turquoise blue color in Arctic consistency and applying it onto the rest of the moon. Now, I am going to apply the color in such a way that at the bottom area of the moon that is neon to the horizon line, I will be having a very thin white quash line that I have spin debt. And the rest of the Moon will be just covered with all those seem blue color underpins recolor that I will be adding later on. So the entire moon is going to be dark. Then after all of this dry is at the top area, I will just be giving some ringing effects are on summaries effect of the light. Again once all of these trays, so you can see it's beginning to take the shape that I want. So the ring-shaped that I was talking about, you can see, so at that dot, there is no white effect left because they've, we will be adding later on after the fourth year of moonrise. Now just adding some darker sheets, make sure that you read in the white ring shape that I have got across the remaining moon area. Now again, I have picked up though turquoise blue color in much thicker consistency. So in case if you are unable to pick it up in Dhaka consistencies, you can just keep adding a little touch of black or Payne's gray to get the darker consistency. Now there is too much water collected here, so I'm just lifting up some water and beans using my brush so that the area will also dry quickly and it will not split into the white line that I've tried to achieve. The reason I'm adding all of this neon Boolean so that I can understand when to stop and I don't overdo all together. Now, picking up some darker layers again, as you can see, I'm adding it onto the moon area that we have got, avoiding it onto the white line around the so-called that I want to achieve. Now next I've picked up some Payne's gray color. And on Buddha edges I'm adding the Payne's gray color so it will automatically spread into the central area Since the entire moon is completely vague. And onto the top side on top, just adding little of the Payne's gray highlight. If you do not have Payne's gray, you can use indigo color mixed with black, or you can just use black color directly. Now adding a few more batches with the Payne's gray color to achieve DACA depth into the moon. Because the moon is just going to be shining because of the white drawing, a sort of an effect that we already have around the moon. And then the white trees that we will be adding after the moon dry. So that is going to be the entire moon effect for this painting. So that does it for the first layer of the moon. Now let's wait for the moon and the sea boat to dry. And only then we can add the details folder. Now my CAD has completely dried and my moon is still wet, so I will just begin adding the details into the sea area until my mom drives for adding the photo details there. So for the CAD, I am for speaking up some whitewash and just underneath the moon into the sea, I will be adding some vide dry brush strokes to reflect the moonlight effect there. Very little effect, not too much. In case if you are unable to achieve dry brush technique, you can even just add simple white lines there in a little triangular shape that is near to the horizon line. The reflection is going to be a little bigger. And as you move down, what's the deflection will begin to turn smaller. And if you're using the dry brush technique, make sure that you dab off the excess paint every time you pick up so that you achieve the dry brush tool. Now since maybe already has a rough for all you know, green. So it's helping me in adding this dry brush stroke. Now this rock AVI, your eye will pick up black color and fill it and do the entire shape. So the shape that we had done with the pencil sketch, okay, just mapping out that shape again, I'm filling this area completely with black. So this is just like a wall area near to the sea. A little rocky or you know, Wall's or the brick walls that are there. Then even into this, even we will be adding a few of the rocks with the black color it sells. Now let's begin to add some rocks into the sea and even onto my horizon line. So first I will begin by adding a little rock onto my horizon line. So I'm taking it from little under the sea. So basically it's not exactly onto my horizon line. It's a lifter dipped into the sea area. Now just adding or rocky look your unknown exactly among the look that I'm adding this time. So majorly in the center part and not all taking it towards both the edges completely. Now make sure that you do not cover the entire white light area that we had near the horizon line. You can see still on the board, the left and the right side, I have that white effect on my horizon line that I had added. Now just adding a few more OK effects into the SR very randomly using the same black color. Now adding another rock your onto the horizon line, onto the left. So this time, this rock has a little hole in between so that behind sky is visible. That right glowing light effect that we are getting there. Now this side, I will just extend this RockYou and make sure you can see where the white light was there. I have taken the rock shaped very small and verifying so that I don't lose the white light effect on the horizon line that I've tried to achieve. So you can see I'm adding the rocks of ID randomly and Ducasse ADR now make sure that you tried to VD all the shapes and sizes, often rocks that you enjoy and do the CDO. Otherwise, they may look over on mono dummies kind of a thing and but an honest look, nitrogen. So make sure to read the shapes and sizes of all the drugs that do Endo. So my engineer, I'm adding the rocks into the bottom side of the sea and onto the top side, I'm leaving it empty. Now the major big rock that I painted on the left, I just connected it with a very fine line onto the root 0 right side also trying to depict all small short area kind of a thing also there. Now I haven't just randomly add various fuel, small rocks, urine there into the sea area and just plateaus and black color to the alittle bit of those very teeny weeny stones into the sea. So make sure when you are splashing the song stones, you do not run into the sky and ruin it with the. Now the only thing left is to add the details and to the moon and the sky. So let's wait for the moon to dry completely. So my EDI is almost dried. Do then I will just pick up some white quash and add some final whitewash details that I have. So as I said, with the white gouache onto the top corner of the moon, we will be adding some lines. So I'm just adding a very fine line with the white gouache forced onto the border of the moon. And then from there I will be pulling out some strokes onto the moon. Now you can see in between I have that little purple effect because of the pink and the blue meeting there. And onto the remaining edge, its major neither Payne's gray color Luke mixed with blue color. So just this little white patch and just pull out some very fine lines from this. Makes sure that you do not all connect the entire webpage completely with the ring effect that we already have. Now these lines also, you can see it yet in different shapes and sizes and not of the same All. And Saudi not different shapes, different sizes, and they're not all of the same height. Otherwise it will again not give you a nutshell look. So its major kneel onto the top side of the moon that I've given this effect. So that is the reason, oh, there, I did not have that white ring effect that we have at the bottom side. Now onto the right side of the moon, I will just add a little white patch effect using the dry brush strokes, very limited and very little. Make sure that you do not have much beans. Otherwise you will lose the effect there. Now I will shift my white gel pen and add a ringing effect around the moon completely. So just adding these small lines and trying to form a ring across the moon. So in case if you do not have a white gel pen, you can access all the videos modifying liner brush using whitewash OT VIII. Okay, So that is the ring across the moon that I wanted to add. Now, I would just be basing a few stars also into the sky and document it far up being doing for data before. So now I'm using my white gel pen itself. I'm just adding some stars in case if you want, you can cobble the moon and the CAD and splatter the stars using your brush rather than adding it with the white gel pen. But I feel like adding it with the right judgment, this type and just some shooting stars you are in there. So that does it for our painting for D 34. Let's remove the masking tape and see a painting with those clean edges. It was almost a sort of a monochrome painting with different shades of blue and just the black and the white details that we have added. Make sure that you remove the masking tape at an angle from your paper and once your edges are completely dry. So you are, is as I can thus be ending for the prompt to move. I hope you guys enjoyed painting this time just so much to each one of you for joining me in this 50 days challenge.
41. Day 35 - Warm and Cold Moon: Hello everyone and welcome back to the 35 to Davies and BPD, this warm and cold moon together. So let's have a look at the colors that you need for this fun. You need a shade of yellow, orange, bond, sienna, burnt umber, blue beans, three, indigo, black, and some white goulash. So these are all the colors that you need for the speedy. So grab on the kalos and let's begin beating. So I have my people deep down onto this movable so fist. Now let's begin with the pencil sketch. So the first and the most important sketch for this one is the moon of very big moon into the center of the people. So that is one of the biggest pencil sketch. Now the only other pencil sketch is I will just mark a very small line just underneath the moon to reflect this EDI. So the CDR is hardly going to be all you know of around one to two centimeters, that is it. And the CAD covers the little o below, that is the bottom 80 off the moon and the rest is going to be the sky area. So the left half of the moon and the sky is going to be the warm side, and the right part is going to be the cold side. So the left side is going to be with the bomb sheets and the right side is going to be with the cool, cool sheets. And the bottom is going to be just as the deflection, very small one. So let's begin painting. I will begin with a clean auto photo onto my sky area first. Make sure that you apply an even older of water throughout and make sure you do not run into the moon area. Led the moon be there and this time try to maintain the water from seeping into the moon area and also into the CAD at present. So you can see near to the moon Ada, I'm being very careful and make sure that you apply an even coat of photos so that you are people means bed for the sufficient amount of time for you to get that the ovum and the coal look into the sky area also. So I'm done applying the clean CTO photo and I've enforced begin with the cool side, that is the right side. So I'll first pick up the shadow sitting in blue from this palette. You can go for any bright blue, sky blue color that is available in your palette. I am using this, adding in blue color from the brand Magellan mission and onto the equal half of the sky. So that is the right half of the sky. I've been forced to apply a layer of this teddybear0 in blue color. And you can see neon to the moon. I'm being very careful so that I do not run into the moon area. Now next I have picked up some indigo color, and I can begin to apply the indigo color onto the top area. So the indigo color that I've picked up is very less of what DO and mode of pigment. So you can see I'm just adding the patches in such a way that the bright blue collar or the setting and blue color that I've added is still visible accident places and meet any new or to the moon. I have not. I added the darker patches. Now, I'll begin painting the left side of the moon. So far, the left side, I will first begin with the shade of lemon yellow order gamboge yellow. And you can pick up any bright yellow that you have in your palette. So I have forced, picked up the shade of cadmium yellow and a little bit of gamboge yellow mixed into this cookie. Now, applying it onto the rest half of the moon, that is the left half of the moon. Make sure New York to the blue collar. You be a little careful otherwise the kalos memoirs and tone and do a green color. So be a little patient there. Now next time picking up the shade of orange color. So this is a double million color for my palette. I have picked it up in a little thick consistency so that I have tobacco depth look. And now just as I added the indigo color onto the right side, I'm adding the orange colored this side. Now next time we'll pick up the bone sienna color and begin to add the darker depths with the bone sienna coulomb. How the bond sienna color will be at less of places as compared to the orange and the yellow. Because when von the forced to Leo's also to be visible as I will receive when you're working with Laos, it is because you want each layer to be visible and have the different layers and do your area that you are painting. Now moving on to the blue side, I will begin to add DACA depth so you can see my blue side is all to still read. So now I will pick up the Payne's gray color in a thick consistency and begin to apply the darker patches onto the blue, say, Oh, so you can see on the left side we already after darker patches because of the brown tone. But onto the blue side it was a little too light. Now, onto the left side, I have picked up the bone Don Buchla in Arctic consistency and adding patches but the bond on book Allah. So you can see in between I'm just picking up the excess water that has been collected at places and dabbing it on do a rough cloth because oh, you know, applying Laos of pins so many times, so there is excess water that gets collected. So lift it up with a damp brush so that it does not flow back and uniform one single color onto your painting. Now I'm done adding the pages with the darker tone onto the left side and the right side would. Now I will just blend them a little while. And then we will wait for the entire sky to dry completely before moving ahead. So I'm just picking up some yellow color and I'll just add a little yellow patches in between to get those lighter tones wherever I feel it's too less. So just dropped the middle of the yellow color. Now I will quickly just move my board in all the directions a bit so that the paint flow into each other and have a soft blend into my sky. So don't worry about the beans that have flown into the sea area because the CATI is also going to be of the same colors and vehicle panes have flown. Uh, that ADI is going to be covered with black color. So I was not what it much now around the moon using my fine brush, you can see I'm just getting those clean edges and the perfect round shape of the moon. Now let's wait for the sky to dry completely before moving ahead. So my sky is still wet. But what I will do is I will quickly pin the CAD Aalto and then wait for all of it to dry to get also that will only be left with the moon. So in the sea area I will be having the yellow color onto the left side and the bright blue color onto the right side. So just simply painting both of these colors. Now the same colors that we used in the sky, I will be adding a little of them into the CAD. So forced onto the left side, onto the edge, added a little touch of the hominin Kahlo and now picking up some indigo color to add it onto the right side. Now in my sky also, I added a little more touch of the darker shades because the colors would shine a little light. I felt so just I I did a little touch of Payne's gray and burnt umber to get some darker patches. So now lastly, with my fine brush, I will just add a few lines into the sea. So using the buoyancy and Apollo on the left side and using the indigo color onto the right side, just adding some fighting CVs, which may actually not tubular reactor dry. So just adding them violet is wet. And then let's wait for all of this to dry before beginning to paint the moon now. So now my sky is completely Jade and before beginning to paint the moon, I will just splatter some stars into the sky, ADR, and after that, we'll begin painting the moon. So far splashing this task, I have picked up my size four round brush and using some white gouache and noted consistency, I will begin to splattered it by dabbing my fingertip onto the brush. You can either use another brush tool that or use your finger to dab onto the brush. Make sure that around ADR, lot of fights plateaus will be there. So be prepared for that. Oh, you know, white splatters around onto your table. So that is it for the stars. Now let's begin painting the moon area. So for the moon area, I will first begin to talk mean CTO photo. Be very careful near to the edges such that, you know, the palace from the sky don't begin to bleed into your moon area. So you can see around the edges, I'm being very careful and trying to, you know, leave a very small gap between the moon and the sky. And directly there, I haven't used the Colorado than applying water and risking the colors bleeding into each other. So I'm done applying the clean CTO photo. Now, even in the moon area, I will begin to paint the cool side first. So first time picking up the shade of blue color and I'll begin to apply it. I'm using my size four round brush, which has a pointed tip. So I've enforced begin to apply the colors from the edges. So you can see very patiently on to the edge. I'm just dropping the bright blue color in a medium tip consistency so that it's a little vibrant and it doesn't even spread too much all initially, because in the moon also I will be adding all levels and variations of the same color. And half of the moon is also going to be called, and half of the moon is going to be one. So make sure that you just add the blue color onto the right half of the moon and do not shift onto the left path. Now the same bright blue color, I'm beginning to add it onto the right half in the center also. So you can see in-between I'm leaving some very fine white gaps that automatically will begin to add variation to your moon and the color will begin to bleed. Now, next, I am beginning with the yellow, Carlos. I'm using the deep yellow color. So beginning onto the left side the same way as we began on the right side. So you can see now on the left side also, I'm beginning with the yellow color in the same vein just as I began with the blue color on the right side. So first I gave of a Refine Edge and then just taking the colors a little into the center, you can see the major center of the moon is still completely right. Now. This was just the first video for the moon. So again, I'm picking up the bright blue color, and this time you can see the color is darker consistency than the previous one, and just beginning to add the darker layers onto the first light Leo's that I have added. Now in between, I will pick up a little bit of white goulash in only two liquidy consistency and added sudoku, it will automatically bloom and give us spread out there and give the perfect effect what we want. So you can see the right launch that I'm adding it in such a liquid consistency that it's automatically blooming and giving a proper spread out there. We are still left to add many more layers onto the wound. So this is just the force and the second Leo that we have added as of now. But make sure that whenever you are adding the next layer, as I always see, the first two layers that you have added shouldn't be lost completely because otherwise it will not make sense to add them. So you can see at present I can see the lighter and the darker lose both of the blue colors that I've added. And now again adding some blue droplets so you can see the right droplets or two that I, I did have created the Beaufort room between the kalos. Now on the left side to add the darker depth, I'm using the light judge sheet. So if you do not have the sheet, you can just mix in a little bit of your bones CNOT to your old red color or your rose-colored color and get this shape. So this is the lighter shade which is like a brownish tone that I have. And now I'm adding the darker patches on to the warm side using the slight ridge here. So again, you can see I've added the darker shades in such a way that the yellow color in-between is still visible. Now around the edges. I will be very careful and try to get the proper shape. So I have picked up the indigo color. And now onto the right side, that is the gold side. I'm just adding the indigo color onto the edges. So my center of the moon is going to majorly have the light colors that I've added on the right batches and the edges are going to be darker. So now the indigo color, you can imagine the adding on the edges to get the clean edge to the moon again. Now again in between Ivan pick up some white gouache and add some more white patches to get the blooms in between. So that is how, you know, you need to keep adding the Bachelor of in-between again and again. And the reason why I'm tilting my voice so that these blooms are spread evenly and get the spread in all the directions. And also if you can see, I'm adding this whitewash, good liquid consistency, and hence they're spreading on their own and getting the perfect bloom. So now you can see I'm just adding the white patches and keeping to rotate the board NOL deduction so that the white beans flow naturally. So majorly in the center, I have more of the white patches and around it, just adding smaller batches to add details onto the moon and onto the edges, I will still be given the darker color h to get the perfect shape to the moon, so forth, getting the center dendrite. So keep rotating it in all the directions so that you can see how naturally though of beans are flowing and spreading into each and where the yellow and the blue meets. Be a little careful so that you do not get any green Galliform dead. And accordingly, whatever you feel, you feel fem to add more white, you can add modal fight if the right-hand spread too much, you can just add in a little bit of don't lose all the yellows again, depending on how your beans are flowing and how you are adding them. Now, I have picked up the beans green color and using my point that they brush, I'm just adding it very carefully on Buddha edges. So you can see I am just dropping the beam onto the Edge to get that fine edge under definite edge loop that I went to the moon. And my moon is still wet so that darker paint is also spreading into the lighter one and having a perfect blend and do the Moon rather than, you know, standing out differently if you add them or like after the moon will dry completely. And then if you add them, then the edge will look very distinctively standing out. So it's very important to addict venue or moon is completely dried. And onto the left side, I'm using the light spreadsheet in that to get consistency. That is the darkest color consistency. And adding it onto the edge, the same VI added on the right side. So you can see even the light red color is spreading and having a soft edge instead of a dark luke or distinctive look from the entire moon. Now let's wait for this to dry completely and then add the final details at the horizon line that we have to add. So my moon is completely dried and now I will just begin to add the details onto the horizon line. So for that I will pick up the black color. And using the black color, I will just be giving some glass details on the horizon line. And a little reflection of that into the CAD has been. Now you can see I'm just pulling out the black strokes are little different. Height, so not too different from each other. Just in between, I will be adding a few follow ones, but all of them are almost New York, the similar height and around the moon also in the sense I will be adding these overlapping the moon. So that is the reason you can see if my bottom medial of the moon, I did not worry much about the shape and the details there because I was going to add this black layer data at the bottom hands, all of it would get covered automatically. So now you can see in between, I just added a few biggest drops, not do we gone too just a little bigger than the previous ones that I have added. And automatically, all of this will begin to give you a little natural look. And I'm just adding them in a little slanted manner this time. And the deflection will be in the opposite slant manner. Then if you do not want to add these graphs the day, what you can do is you can just add a simple mounted onto the horizon line and add the similar reflection of it into the CAD. Or if you want, you can avoid the reflection also in the CDA and just add a little CVs. D didn't do the CAD or just some blocky batches into the CAD and skip this part of adding the grass. So I am going ahead with the gas now the deflection of these grasses will be in the opposite direction. So you can see on the activated and opposite direction as compared to what they were dead onto the top of the horizon line. And the deflection is a little smaller as compared to the audit log that we have added about the horizon line. If you want, you can even add these industry manner rather than the book, but the Delta Luke was giving a different view. So this time I felt like adding these in a little tilted manner that there's a little diagonal strokes that we are adding carbon di. So that does it for the base areas. Now, I'm just shifting my white gouache and add lithium or gigantic patches onto the moon do not do much. So you can see very randomly, I'm just adding a little of the gigantic patches onto the moon area. So be very careful when you're adding these diverse patches. Now, Ivan, shift to my white gel pen and add some stars into the sky area because the TV stars seem to have merged with the color and lost its opacity. So just having them quickly with the white gel pen this time rather than splat June because it will be difficult to define the styles from going onto the moon and the rest of the areas. Okay, so that is it. Now let's remove the masking tape and CFI no bending. Make sure that your entire painting is completely dry before removing the masking tape, especially the edges are the ways they may get ruined again. So your is our last painting from the CDS moon. I hope you guys enjoyed building all the five moonscape, and I would love to see you all create each one of them and uploaded into the class project. Thank you so much to each one of you for joining me in this 50 days watercolor challenge.
42. Day 36 - Simple Lighthouse: Hello everyone and welcome back to the 50s watercolor challenge. Today is D 36 and via beginning become an exponent that is lighthouse. So this is the fourth simple been dinged for this prompt. So let's have a look at the colors that you need for this one, you need a shade of gray blue windrows, burnt sienna, burnt umber, beans, green, black by quash, and green color. So these are all the colors that you need for this exercise. Now let's begin painting. I have my paper down onto this movable surface on all the edges. And I will just begin with the pencil sketch forced. So for central much the horizon line. The horizon line this time is a little about the center area. Now next, I will mark out the CDR or and other rock area distinction in doodle bottom area. So marking out the ROC area and the remaining of that will automatically be the CEO. So the left side is the CDR and the right side is the ROC area that I'm going to debit. So you can see very randomly giving those very rough curvy edges, I have formed a rock area. Now, let's begin to add the silhouette. It's going to be of any symbol Lighthouse for the first time, justice in bin one. So your is the final lighthouse silhouette. You can bonds that we do and then copy the exact same silicate or you can add any other solution that you want need not be the same exactly as mine. So just are good or a small window at the top and just at the bottom, although I will be adding a little Dutch. So in-between the line that I had for the ROC area, I'm just easing that off because of my lighthouse is going to be off the white follow. So I don't want the charcoal lines to be visible after the blind optical iodo fight ego. So onto the bottom left adding a little roof D1, which I will be building with the black color. So that's kinda of like the NGO, their debt I'm trying to debate. So that is it for the Benton sketch, just a simple pencil sketch. Now let's begin painting. So first I will begin with the Sky Italia. So let's begin with a clean border further into the sky area. Make sure that you do not run into the lighthouse EDR. And the lighthouse EDR will be Being didn't lead to wrong. So it's important that you do not make the colors move into the light IDA and get onto the remaining of the sky. Apply an even coat of clean water and make sure that you do not have foretold of water also, otherwise, the beans may spread a lot. So you can see around the lighthouse, I'm being very careful and running my brush really carefully so that I do not run off into the lighthouse. And also making sure that there is no bottles of water. And even Gordon for dot. And this time our sky is going to be a pretty simple one, nothing much in detail. So now let's begin painting this guy. So for this guy, the first color that I've picked up is the bright blue shade and onto my horizon line, adding a layer with the bright blue color. So I have picked up the bright blue color in a medium consistency this time that does not do or that you didn't fill because I wanted to little vibrant. And you can see near to the lighthouse, I'm being very careful and adding or Iturbide patiently so that it does not spread into the lighthouse. Now on to the remaining sky, I have picked up the windows color and I will apply it to compete neuron until the top of the sky. So again, you can see near to the lighthouse, even with the queen rose color. I'm being a little careful so that I do not run into the lighthouse. And in-between you can see the blue and the pink mixing together is forming a little bubble sheet. Now I'm tip-top most area. I am just mixing in a little bit of my blue undock windows together. And I'm using this violet kind of a bone at the top area. And then I've been just blend all the three dawns it together to get the perfect blend into the sky area. So you can see, I've got the perfect blend into the sky area and all the colors have blended built into each other. Now it didn't nice guy dries, I will begin to pin the rock EDO foods because they can't be in the sea area as a disconnected to the sky onto the horizon line. The ROC area is a little distinctive from the horizon line. So I can be in fact as the beans will not flow into the sky. So for the ROC area, I'm forced beginning with the bone sienna color and I'm using the wet-on-dry technique your because, you know, they will not be much details to add. It will just be the darker tones that we will be adding. So first adding onto the entire area. But in a good medium consistency. In case if your paper dries quickly, you can even, you know, adding the layer of waterfalls and then begin with the buoyancy and Apollo. But I know since by adding this force Leo may people will save it for enough time for me to add all the layers onto the rocks wave and on with the wet-on-dry technique. Now next, I am picking up the bond amber color and using the bond on Buchla, I will begin to add it onto the edges of this ROC area to get the darker depth. So you can see mentioning I'm just using the tip of my brush for adding these darker depth onto the edges. Now, even onto the right side, same way I'm adding the darker edges and the center will be more of the bond C and are presently we will still be adding more darker depth. So now I will just add in our denture flag to my bond Don Buchla, and begin with that darker tone onto the edges again to get more Dakota debt. And this time I will even be adding a little into the central area to get more darker depths and less often lighter looks in the center area has been forced onto the edges, the darker fallow. So presently have just added a little tinge of black color and not much of it. Now next I have picked up all the bonds on book alone mixed with a lot of plaque. So this is almost like the sepia color. And now onto all the edges I will begin to add this darker Boone. If you do not have a sepia color, you can simply mix window brown and the black color as I have mixed in. Odd if you have the sepia color, you can directly use in the sepia color. If you want, you can even use a beans green or black directly. But if you add in a patch of ground, it will all stay in the team and, you know, add to the beauty of there and make it look all nutshell. So even under the left side, I've added the darker batch. And you can see I've tried to maintain the shape of the rope that I want around the CDO. Now let's wait for all of this to dry and then begin painting ahead. So now my entire painting is completely dried, including the rock and the sky, EDR. So now let's begin adding the fourth year of the CEO that we are still left to being. So for the C Eda, I'm directly picking up the beans Greek alla, forced in a light consistency and then I will add the darker leaves effect radon bit. In case if you do not have a beans Greek alone, you can just mix in a little touch of your black to your indigo to get a similar looking color. And go ahead with the shape. First layer you can see my fellow is pretty nice because onto this Ivan's to be adding a lot of Leo's. Now, again, I'm going vid on dry technique because again, there is not much details to add. Just say in the rock area we had added the same V, it will be your so around the ROC area. Be a little careful. And if you want, you can shift to a smaller size brush anodic. And if you feel that your speed is going to be a little slow by adding it around the edges. So then I would recommend you to go with the wet on dry technique so that your paper doesn't dry. So you can see in-between I'm running my brush again, even onto the left side so that it remains wet until I finish adding these details. You're in the shapes that I have around the dock area because I will still be adding wet on wet waves you're in the cdr do given the darker details. Now I'm shifting to my smallest sizes, four round brush. And using that, I will just pick up the paints gray color in a little thicker consistency and begin to add the V's. So very simple lines majorly on the left side and under the right side we will be having the crashing waves look more. So then I will just be adding a little of these waves do. So majorly, all of these wheels will be from both the edges of the seed that is on the left edge at the border of the beach and near the right side. That doesn't alter the rock side also, but the same dot is going to be pretty light color only. So the waves will be mentioning from both the edges. Now, I'll keep adding these VMs. Make sure that you do not add these waves with too much water, otherwise, dividends spread a lot and Monod give you that VV look after it dries and it will just spread and give you one color look. So if you want that soft edge as well as to be blocked, you need to add the following and the two thick consistency. Now I have picked up the fallow and much more thicker consistency and adding the second layer of fifths. So the force Naomi, you know, begin to reflect a little shadow to this and then this darker layer of leaves again. So that does it for me see EDF or the force. Now political idea of the sea onto the right side is still left side and just add the beans. Greek, I know there are because that is also a part of the sea. Now next I'm picking up some dark brown color and I will just flat out a little of the dark bone collar on to the bottom right corner that is on bedrock ADR to give a little more detail to the rock. So make sure you cover the rest of the page so that the beans do not spit it out there. So the first flag done was with the bone sienna color. The second one is the sepia color that I've used times plugging it using two different colors to give that little detail at the bottom area. Now I can still pick up a little more paint and splatter it then at the bottom area. Now tell me see the address. I will carefully begin to lay out the white layer on domain lighthouse. So first I'm completely painting the light house with a whitewash. So you can see I'm just named on the white wash or using a pointed tip brush and leaving the windows. I haven't been there in dire lighthouse with the right panel. And then even just be adding the windows with the green color, the dark area with the black color, and the bottom left roof with the problem Carlo. So it's that simple light out for the first one. Do not worry if your windows on to vet covered up because we will be painting it with the green color which will still be visible on the white. So you can see using the department brush, I'm able to achieve the edges of very clean and both exchanged line for the lighthouse. So as the Internet completely done, that dot, the top roof is going to be off the black color and then the black details a little at the top area. So we need to make for this force near also to dry. So let's wait for the c and the false narrative lighthouse to dry. And then we will begin building a head. My old Leo's of C and the lighthouse or completely dried. And now I'll begin adding the details into the lighthouse first. So I'm picking up a little touch of VD didn't dream follow and mixing it with whitewash to get a base green color. And using that base to green color, I will begin to add the windows that we had forced. All pleased with the pencil sketch. Okay, just adding those windows with this C gene color, kind that we have formed with the same green color. I will just add a very fine line at the bottom area also. So I will just add another big window. You're at the top side. Or I know I hadn't done the pencil sketch of this, but it's a pretty small window which I can directly add it even without the pencil sketch. Now next shifting to the black color and using the black color, I will add it on the top of the roof, your at the lighthouse. And this little roof you're at the bottom corner or two, I will add it with the black color. Because if I added with the brown color, it will get merged with the rock AD and it will not be visible distinctively. So that is the reason I'm adding it with the black color so that it's visible distinctively. Now, all your Ivan just be adding a little kind of a grill detail at the top of the big window. Reinvent know that we added additionally, suggest a little green kind of a look here. Now next time and shift domain they go brush, which has appointed dependent verifying and using the black color. I will just be adding a few gas strokes and do the ROC area and around the lighthouse also suggests simple dry strokes. So make sure before you begin to add these grassroots, your lighthouse is completely dry, otherwise it may begin to spread. Now I will shift to my smaller sized round brush again, and using the black color, I will just be adding a few details at the bottom area. So you can see just using the black color and adding in this rock at the bottom. So a little of this has got covered about it. Ox is visible and that's adding the buffing beauty to this. So just to add a few rocks like these if you wish to and if you want to again, simply needed. Also. Now I have picked up some whitewash. So let's begin adding the dry brush technique on to the CEO. So first using the white color and noted consistency with my point that the brush I'm marking out the edge of the rocky area that we have. And then from this area, I will try to add in the dry brush strokes. So for adding the driver strokes, you need to remember that the pin has to be noted consistency always dab off the excess beans so that there is no excess paint onto your brush. Otherwise, it will begin to create batches and make sure that if you're not sure you owe desktop onto it off sheet forced and then do it on your final painting. Also, since my boys draft when I am able to achieve the dry brush mode easily because the green of the paper, as you know, eating or do add these dry brush because the paint is dry, my brush does not have any excess water. Do I access beyond the green on the people. It is also a rough and so, you know, it's helping in spreading the brush movements like that. So first adding all of these dry brush onto the right side near to the ROC area. Now in the same way, beginning to add all of these onto the left side also. So you can see every time that I'm picking up being I'm being very sure that there is no excess paint or water. Otherwise, I will begin to get patches and not get these dry brush strokes despite my people also being dark green, Ivan faced that problem then. So the system, the force New York, I will still be adding more opaque layer to get a D didn't look. So now I'm adding the second node of the dry brush to get more opaque look. So the first layer is a little sad day down to now beginning to add the second layer onto the fourth layer to get the detail opaque look again. Now in-between, adding a little VIV look and, you know, adding the drivers to that. We've also, So it specifically your wish, how you want to or, you know, depict all of these waves. So in between you can see I'm adding a little of the white leaves or lines also to get more detail. Look, it's perfectly again, as I said, on do you how you want to add all of these? Now onto my lighthouse, I will just be adding an edge with the black pen. You can add it with your black color using a fine liner brush, but I offend adding it with a black pen will be much easier as compared to adding it with a brush here because I want a very fine detail and undo the windows also adding this edge. Now using my white gouache, I will just add a very small moon on almost in the center of the sky near to the lighthouse at the job site. So just a very small moon with the whitewash. So I've picked up the right Washington very thick consistency to get all opaque look to the wound because since this guy's on to the light, it will be difficult to achieve it too. It's like the Moon is just about to be 0 out. Now I will shift my white gel pen and just add a little detail with the white gel pen. So make sure that your area is dry before you begin to add this to just some white highlights onto the dropped area. So just some borders and some grass details with the white pen itself to give some highlights. And that is it for our painting for today. Just a simple, pretty looking like house. So now let's remove the masking tape and see the final painting. I had added a literal dry brush onto the rock, EDR the bottom, which I forgot to add in your so if you want, you can add in a little dry brush date on to the bottom ROC area. Otherwise it's perfectly okay if you leave it completely back black also, be careful by removing the masking tape so that you do not do when the edges. So this is at main thing for the ETE prompt. The first being that is the lighthouse. And I hope you guys enjoyed painting this with me today. I will see you guys tomorrow with us again, lighthouse being done. Thank you so much to each one of you for joining me so far.
43. Day 37 - Galaxy Sky Lighthouse: Hello, review bond. I'm going to come back to the 50s watercolor challenge, VR on the second day of the bone, Plato's, today we will be painting this galaxy looking lighthouse you. So let's have a look at the colors that you need for this one. You need the shade of blue, indigo, violet, sadly, black and white quash. So these are all the colors that you need for today's class project. Let's trap them and begin painting. So I have my B put a bow on to all the four edges and I will begin painting. But before that, you just hold the pencil sketch of the lighter. So false, I am marking out the horizon line and almost in the center area. And just remarking on rocky ED often bear the lighthouse will be standing. So in-between often rise in line ending, taking it into the CDO, mock out the ROC area, then onto that Ivan be adding in a little house look first and then onto the right of this house will be the lighthouse connected to it. Now to the right of this, I will begin marketing the lighthouse. So you can see the lighthouse is a little behind the house, so a little part of it is covered by the House. And the lighthouse is 0, you know, a ticket at the bottom and it is tonight at the top. So that is almost did for the pencil sketch. I will just mark all the partitions in the Lighthouse for the black and white alternate color that we will be adding it. It's perfectly okay if you don't even want to add depends on schedule. Don't you can take me added to the beam Canvas. So that is it for the pencil sketch that we have. Now, what we will do is, I've been forced to mock out a little of the D didn't load onto the household tool. So I'll just give you a closer view of the pencil sketch that we have done so that you can pause the screen and do that the pencil sketch. Now I'm going to begin with a quote of photo. So I will begin with the sky first and make sure that you leave the lighthouse area because the lighthouse is going to be off the black and the white color. And onto the rest of this guy begin applying a clean quote or photo because even think of galaxies, sky. So make sure that you apply and even CTO for those so that your people remains wet for enough time. 0 because for painting the galaxy, we will be adding colors on Palo so that, you know, we have a good and soft blend into the galaxy. So the paper has to remain wet for a considerable amount of time. So I'm done applying a queen photo photo. Now let's begin painting the galaxy. So for the first color, I'm picking up the city in blue color in a very bribe inconsistency that is less of photo and mode of pigment and applying it to the horizon line. So make sure that you do not run into the lighthouse. So around the lighthouse, be a little careful and use the tip of your brush or smallest size brush to cover the details there. And also new to this house ETO, be a little careful. I don't want to vote the sides of the lighters near to the horizon line force given on the order of the city in blue-collar. In case if you do not have a city name blue color, you can either use bright blue or any Docker sky blue color, but use it in a medium consistency not too diluted as you can see. Now for the force Nala, I'm applying the city in blue color onto the entire sky. And then I will begin adding the Leo's onto this column to get more depth into the sky. Now I'm just picking up some violet color and I am using this violet color on the top area. So you can see my sky is still wet and that is a little blue mixed into the violet because of the background that already is blue. Okay. Applying it wet on wet so that I get the soft blended to the sky and get a very smooth looking galaxy. So keep picking up the color. I am picking the violet color also in a good medium consistency. And now To the Lighthouse you can see I have left that little white gap at the top side to reflect on it tonight, EDR out there. So make sure that you try to leave a little white gap there. And I haven't even applied the blue color there and not even applying the violet color. They're trying to maintain it white just with a little smooth blend of the blue color that is going in there. I don't do the entire edge. I am giving in the court of the violet color. I'm continuous. Moving my board in all directions so that the colors bleed into each other well and have a very smooth and soft blend. Now next I have picked up some indigo color. And using the indigo color, I'm giving the darker edges at the top area forced. I'm trying to blend it. Now when I'm adding the colors, my colors are not too diluted also, but they're not, uh, to take also. So you can see my colors are in a perfect consistency that direct nice blending into each other. And I'm adding the violet coloured again, neoplasia indigo. You can see I'm adding it in a liquid consistency because this is the second Leo. I already have a vibrant Leo down this neodymium adding so that the beans spread into each other and have a soft blend into each other. So keep moving your board in all directions in between to understand where the colors are flowing and how much, you know you need to add more Leo's or you may not add any more Leo's. So neoplasia night owl, you can see I have tried to maintain the light blue color and onto the edges on the top area is there I have added the darker sheets. And on the top of the lighthouse, I've tried to maintain a legitimate batch, which may actually disappear no more than the beans begin to dry. But I have tried to maintain it for now. Now, right? My sky is still wet. I will just pick up some white gouache and splatter some stars or into this galaxy so that I have some white patches and, you know, some gluing look into my galaxies. So I'm picking up the white quash in order to liquidy consistency. And I've been splattered it into the galaxy and add a little white quash New York of the lighthouse to maintain a light effect there. So you can see my gosh is an illiquid consistency, so it's automatically spreading. And now I will just, oh, you know, splat to get onto the rest of the galaxy and they will automatically bloom because of COVID Bagram. Now again, tilting the board in all directions for the white beans to flow. So keep moving it and let this dry completely. Then we will begin painting ahead. So now my entire galaxies perfectly Jade, and this time I will be using a toothbrush, the stars. So I have some white quash and I will just begin to splatter the stars. So you can see that the help of a tooth brush, we get GOD, find stars. And you know, when you need a lot of them and very minute ones in BOP and things. This is the perfect way I would recommend. And I love this V even more than all using the normal, regular painting brush. Although your finger me gets pointed a bit, but that's totally voted the look that you get. Now let's begin painting the rest of the areas, so forth. Let's begin painting that little house area that we have. So for the house also, I'm mixing in my violet and my city in blue color and picking it up enough consistency. The reason why I'm using this shape for the house is because to reflect the light of the galaxy onto the house. The house is actually of a white color. But since this is a night view and we have a galaxy about so to reflect the reflection of the galaxy is the reason why I'm using this color variable. We were supposed to add the white color and even onto this little area underneath the house, lab-based Verdot lighthouses standing in the houses there. I am adding in the same color. Now using the same color, I will be painting alternative blocks of the lighthouse also. So why do you think that I told I'm even adding on a wash so as to distinguish it from the galaxy that we have been dead. So makes adding invite painted into the parts of the house. Even the most block I'm being with simple byte and giant book. I didn't bang shape there. Now onto the roof off that you didn't House, I'm just picking up something black color and adding it with the black color. Black. Now, we'd buy a house scholar to dry completely and then add in these black dance. Now we've got a beam, the rest of the lighthouse GDS need to draw. Let's begin the themed EDL. So father fiend IED, Yeah, I am picking up some VDD and Jean Coulomb force and adding it at the bottom, you can pick up sap green on any other V01 all may be m dot a gene VDD, green, olive green, whichever green you want. And just apply it at the bottom of the house and then onto the rest of the area. I have mixed in black, like I didn't clean my brush I detected picked up the black color and Django blended with the green. And even around the lighthouse, the little area that we have. So this is basically a field area this time and not a CDO. So just a field where this lighthouses standing. So that was my mistake in the beginning that I call it a CD or by mistake. So rest of the IDA I'm just trying to oh, you know, depict the green color. But since it's a night, so the green color is really dark because of the night sky effect. Okay, so I will simply adding in the darker tones onto the edges. So this was just the first layer. Now I will pick up the black color in very thick consistency and begin to add it on the edges. You can either use black color or pins three Congo. Also, if you do not want to make it look like a gene field look, you can use a combination of black and brown or for the day so to kind of look, but since it's a night view again, it'll be dark colors. So instead of the green color in the center, you can just use burnt sienna, yellow or yellow ocher sheet. And then onto the edges you can apply the black color just as I'm doing it into the green color. Now, onto the top of the horizon line, I did just be adding little bush effect. Dabbing the black color with the tip of my brush medicine. Nothing much in the data. Even onto the right side, adding a little of that. Now let's begin to add the find MDD is To the Lighthouse, so the gaps dot, dot bending right now, all of that has to be covered with the black Kano in case if you want to again, you'll all do the kalos and go ahead with any other colored bone that you want and not stick to the black and white glove. Before you begin to add this black color, make sure that all the white patches often I toes are completely dry. Otherwise though white color and the black column will bleed into each other and you wouldn't lose dog alternative MOOC that we are trying to add in your Just adding a little Jimmy effects on the top of this little house. Now I can just add some quick go black outline to this lighthouse using the tip of my brush. If you want, you can use a black pen for the same. Or they feel brush does not have a pointed tip shift to a D, D, no brush before adding in these dy dx. Now one last thing I did just add some shooting stars into the sky. So for that I have picked up my whitewash. I'm using my pointed tip brush and just add something into this guy. Also adding some small shining stars into the galaxy. The galaxy look, the more detail. You can show me. Oh, you know, oh, please them very well. You want and need not be the same placement as mine. So via done with our galaxy Lighthouse for today. So this is a finite beam does now let's remove the masking tape. Make sure that you remove the masking tape onto your painting is completely dry. And always remove your masking tape from an angle from your people so that you do not take off the edges. Now since my edges are a little wet, I'm being a little careful or by removing the masking tape so that the beam spread onto the edges by removing the masking tape. So be a little careful while doing the scene. So you see despite being so much careful, that little area gotten off, I didn't just connected two ones. I removed the last masking D. Then using the paint I've just tried to correct that area so that oh, that little area that has got lifted gets so I'll just pick up some black color and add in there and be very careful. So that is what I said. You need to be very careful by removing the masking d. Okay? So that is it. We had ideally copying thing for D. So D E, and this is the second painting for the prompt Lighthouse. I hope you guys are enjoying the 50s watercolor challenge, and I can see you guys tomorrow into the next slide, house painting. Thank you so much to each one of you for joining me so far.
44. Day 38 - Sunset Lighthouse: Hello everyone and welcome back to d 38 of the 50 days watercolor challenge. Today we will be painting the sunset view lighthouse. So let's have a look at the calories that you need. You need a shade of yellow, orange, rights blue, indigo windrows, burnt umber, burnt sienna, Payne's gray, black, and white quash. So these are all the calories that you need for today's class project. Go grab them and let's begin painting. So I have maybe but deep down onto all edges and let's begin with the pencil sketch for this one. So for the pencil sketch, I will first begin by marking the sand area at the bottom that the lighthouse is going to be sending. Now about that approximately leaving 1.5 in space is going to be the CEQA. Now let's begin marking the lighthouse. What I would recommend this you could first read and see my entire pencil sketch for the lighthouse and then begin making it. Or if you want, you can simply follow along. The lighthouse will be turnover at the top and thicker at the bottom. So that is it for our pencil sketch, the list of the deviance. I will deduct the addict after painting the background and with the white pen and a black pen as needed. So now let's begin painting. I will first begin with the sky. So let's begin with a clean coat of water on the sky area. This time, if you want, you can run into the lighthouse EDR because the lighthouse is going to be of a darker shade this time. So you can run into though light 0's, but make sure if possible, then tried to avoid it. Otherwise it's completely okay. Infinitude pain goes inside it, but make sure that you do not run the blue color of the sky into the lighthouse. Iap, I will be little careful and I will not be applying water on the lighthouse EDA so that the blue color doesn't run in. Because if the yellow been done in its perfect Now given the bone CNOT but the blue colonial not give a good look when BP in the bones, Canaletto's. So I'm done with the clean CTO photo. Now, I'll post begin with the shade of yellow. So I'm using the cadmium yellow color. And I'll begin near to the horizon line with a thick coat of the cadmium yellow color. So my beans are quite less diluted this time and mode of pigment rich. So almost half of my sky EDR, I'm forced covering, adopted the cadmium yellow color and I'm making sure that I do not run much into the lighthouse. Now next I will pick up the shade of yellow, orange. You can go ahead with any light orange. If you do not have an audience, you can mix in a little bit of your hominin with yellow to get this light orange. Now onto the edges of the yellow color that I've applied, I'm adding this light layer of yellow, orange shade onto the entire yellow surface. So in-between allodynia Lewis visible, but since this is a yellowish orange here, so the yellow paint is still staying there. Now next time we'll begin with the bright blue color at the top side. So I'll just pick up some bright blue color. And I'll begin to add in the strokes diagonally this time from the top to the middle of the sky. Now, for that, you don't want all of you know, go too much into the yellow because the yellow and the blue mixing together will begin to form the green color. So be a little careful and quick near the yellow column and you add in the blue strokes. Now next seven pickup though upwind rule sheet and added into the center of the sky drop EDA on LinkedIn. Not much, just a little touch of green nodes cannot. Now I'll pick up the bone sienna color and begin to add the darker details. So I am shifting to the tip of my brush and on the horizon line forced adding a little of the bond CNR details. Now when you're adding in all of these details, make sure you do not introduce much water. Otherwise the beans will spread much on you will begin to lose the yellow and the orange layer that you have added. So it's very important that you control the water this time by adding in these bonds here and our strokes. Now you can see I'm just using the tip of my brush, not having any excess water and adding very simple Street curvy lines to depict the sky clouds area. Now next I have picked up DOD, ROM, Buchla, and CMV. I'm just adding some clouds in the diagnose shape in the sky with the raw amber color. So you can see at the bottom it is raw sienna, and then at the top it's with the raw amber color. Now I've picked up the bone dumbbell column. And in the same way, I'm just adding some highlights into the Cloud with the boulder book. Allo now you can notice I'm just using the tip of my brush shore and not using the belly of my brush. Now I have again picked up the bright blue color, this time in a liturgical consistency and adding the strokes again in a diagonal Mano, again near to the yellow. I'm being a little careful. Also, you can see a little white space between the yellow and the blue color. That is because to reflect the sunlight effect which we will be adding lead to wrong with the white gouache. I'm not just trying to add in the clouds. Make sure that when you are adding these neons for the clouds to not introduce much water. Otherwise, the beans will begin to spread a lot and you will not get this definite look. Now again, I just picked up some buoyancy and Accardo and thick consistency and adding some strokes near to the horizon line. So you can see I'm doing all of this by my sky is. Hence it's very important for your people to see that, to add the details so that you get a soft looking sky. Now I have picked up some indigo color and CMV onto the bright blue color. I'm just adding some indigo strokes. Also. One important thing, if your paper dries in between, then wait for it to dry completely and then give it again. And then paint the rest of the sky detail so that you have the soft look. Now I'll begin painting the bottom most area for us to until my sky guys for me to be in the sea. So far the water media first I have picked up the wrong book Gallo and beginning to apply on even God of the ROM book Gallo. Now I'm going wet-on-dry your because I don't have much. And you don't deserve any small area and it will stay put a sufficient amount of time to add in the darker depths. Now next I will pick up some burnt sienna color and begin to drop the bond sienna color onto this ROM obese that I've been dead. So using the tip of my brush, I'm just dropping in some buoyancy and our color. So my condo is in a medium consistency so that it spreads automatic Neolithic and a little after raw amber look also stays there. Now after this in the same V, I didn't pick up the bond Don Buchla and begin to add details with the bone Dumbo, Apollo. So the bond amber dots will be quite less as compared to the bone CNN because now we have Booleans to be, you know, to keep them visible, that is the raw umber and the bond C and also applied in such a way that all the three colors be visible urine, they're legit. Now next, I will just add in a pinch of black to my gold Dumbo color and get a darker deep bone and just add it on the edges of this lighthouse. So you can see just trying to achieve some Docker tool there. So now just to adding enough tinge of Jacobin Tom boat that is mixed in with black. You can either use a CPR apologetic near and near to the lighthouse. Now let's leave for all of this to dry and then we will begin to add the folder details into the sea and the lighthouse ADL. So now my entire background is completely dry, my sky and the bottom sand. Now let's begin painting the CEO. So the CE law, I will first begin with the color yellow or green sheet. You can mix in a little touch of your vermilion to your yellow to get this yellowish orange sheet, it's more towards the yellow side and less towards the orange site. Now, I haven't been this into that area, so this is a falsely over the sea. You are also, I'm going that don't drive because there's not much details to add. Our rhabdo. I don't want to do Steve at for a longer time and wanted to dry quickly once I finish adding the details. Same day, filling the right title to be the same color for the force. Now I will just pick up a little touch of the brown bones and add it near to the horizon line so as to depict some shadow, all of those sky that we have. So Though sky near to the horizon line has more of the brown sheets. So adding a little of the brown shades wet on wet near to the horizon line. Not much you can see I've used the color in a very diluted consistency. I used a bond amber color to add the shadow. Now just trying to get proper blend into the CEO and making it a little more darker using the same sheet for the second layer. Now right may see EDA is still wet. I will begin to add some CVs, which I want them in a soft look. So I've picked up Mary go brush and using the bond sienna color, I will just begin to add some lines and do the CDR to depict as CVs. So you can see I'm just adding base mall street lines to depict as the leaves look. And since I'm adding it better bed, they don't solve the by the GI and will not be visible. So Dow, since watercolors dry Auto-Tune, right? Oh, now I'm using a regal brush which has appointed. Hence I'm able to achieve such fine strokes. So make sure that you either use a pointed tip brush order smallest size brush, or maybe your line not already go brush like this. Now today, I'm adding more of the stroke so as to depict the shadow effects. Now, I'm adding the strokes onto the right side also using the bone sienna color. Make sure that neo-pagan horizon line might be absorbed quite smaller. And as I move down towards the CEO assigned, now onto the left side, since I have a lot more brown into my sky. So just adding a little more brown strokes and do this see in the center area and CMB onto the top most right corner. Just adding a little few strokes. Now, after this, we will have to wait for the C Eda to dry before we begin to be in the lighthouse. So didn't then I will just pick up my whitewash and begin to add the sun look into the sky. So for adding the sun, I will be using whitewash. You can either use white gouache or white acrylics. White watercolor may not give the same effect as the whitewash or acrylics may give because of the obesity. Now picking up the white wash in a thick consistency, just add a very small. So could you go to depict as the sun first? Now I'm just softening the edges of the sun using a damp brush and trying to get a soft blend into the sky behind. Now, I will just pull out a few days afterwards, but first, just trying to lead on the force field. So that on to this icon again, add an opaque layer for the sun. And just now trying to pull out some, some grease in our body. All little strokes not to DDL ones just needed some strokes or Sunlight moving out. Now I didn't may see EDR dries. I will begin to add the details into the sand area. So I'll just pick up some Payne's gray color and begin to add some drop details. So basically I'm just dabbing the tip of my brush to Debit either the grass structure or bushes and some very little of this stone structures that I will be adding. You again, all you don't either and mode of the bushes or you could just splatter some black color or beans Greek, hello, to depict us some stones on to the grassy area under the sand EDI actually that we are adding. So you can see I'm just dabbing the tip of my brush to get a mixed look and just softening a little of the bottom area and do those same area. So to get a smoother blend. Now let's VG for all of this to dry fullest. So now my entire CIDR is completely dried so I can begin painting the lighthouse. So for the night, How's the force palette that I will be picking up is a little touch of the yellow color. So that is the yellow orange sheet again onto the left side because I wanted to depict a little of the sky effect on To the Lighthouse. So first I'll begin with a yellow orange color and then around it I'm completely finished with the bone sienna color. So onto the left edge, just given a little touch of the yellow, orange color, you are also, I'm going vegan diet because it's a small idea and nothing much TDS to be ended. Now be careful when you're painting the lighthouse or false that you do not run into this guy EDI, otherwise, the sky will begin to spoil it. Now, I have picked up the bone sienna color and beginning to apply. It needs to go or yellow, orange. I have applied. Also, I'm using a pointed tip brush so I'm even to achieve the edges of the lighthouse. So in case if you do not, you know, if your brush does not have appointed, add the edges with a pointed tip brush and then you can use a bigger brush to fill in the center of the lighthouse. Otherwise, it will be very difficult for you to get the shape of the lighthouse. And you notice cheat look of the lighthouse. Now onto the left, if you can notice because of the yellowish orange shade, the effect that we're getting off the sunlight effect onto the light dose. That is exactly what we needed. But still there I will add in a little more often brown color on the edges to get the definite edge to the Lighthouse. It's now just adding a little more of the yellow orange color to get a blend between the all yellow orange and the bone CNS so that there is no definite edge between both of it. Now using the same onesie and Apollo in a little multicore consistency either begin to add the second Leo medially on the right side again. And I've let that little left side B in that yellowish orange tone only. So you can see the light effect that it is there just on the two, is what we need on the left side. Because if the sky there, now using the same onesie and aka low on the edges, I'm just trying to achieve a definite edge loop and a crisp a look to the lighthouse. Now next time picking up the sheet of bone Tambo, and I'll begin to add the bond on book hollow on the right two of the lighthouse. Now the bond Don Buchla will be very little less compared to the bonds that we have added. So you can see majorly just on the right edge is what I'm adding. The bond on book Allah. It is just true or, you know, try to get the shadow and the light effect perfectly since our Sun is on the left side. So that is very needed. The light side that is on the left side, and to depict the darker shadows it's on the right side. So now this is what we have achieved, the different tonal values in the lighthouse. Now we need to leave for the night hours to dry before we can add the for the details in the lighthouse. Till then, I will just be adding of a small mountain range on my horizon line to distinguish my sea and the sky area. So I can be using the same onesie and Apollo. And the mountain range is going to be very fine and very small. So I'm using a brush which has a pointed tip. This is size four from the brand silver black velvet. So in case if your brush does not have a pointed tip, I would recommend you to shift to a smaller size brush to be in this mountain range because you can see how fine and minute this mountain range is and not to take and neither do the deal. So it's basically just a small street line on the horizon line with some curvy edges on the doctor depicted as a mountain range. So this mountain range is quite distinct from us, hence it so minute all do our view. The CMB Vida, all leaves near the horizon line or smaller is because it's five for my view, under leaves Neo-Orthodoxy sand line, closer to a view. Hence they are because the CMB, the mountains are quite smaller this time. Now let's begin to add some more leaves into the sea. So I'm picking up my rigger brush again. I'm using the bond sienna color in a little diluted consistency not to take because I don't want the v's to look much taco, again, beginning to add very small series near to the horizon line. And as I move downwards, I'm just increasing the length of the leaves, its major state lines, analytic, curvy lines, urine dare to depict the CVs since we already have the first year of CVs, you don't wet on wet when BP into the sea. So now we just need to add a little to give it a little. He didn't look. In case if you want all you know, you can avoid adding the second layer of the waves, But adding this will give it a more detailed look to European thinks I would recommend it to add. Now the same way, I will just add a few leaves on the right side also. So you can also see I have just started very limited beads are not much or as compared to the first waves that I added. But this little We've also that I added is adding so much detail. And the bone sienna color also isn't such a diluted consistency data does not standing out on the yellow tube. Does exactly what I needed. Now neo to the lighthouse on the right side, I would just add old smart TV and just a few branches. So you can see it's basically just a brown just popping out and it just from that little black rocky and the Bush. Did Oh yeah. That gives the reason I had added that on the right side to depict these fees popping out from there. Now between the C and the shoulder area, just adding a small black line. A little CoV-2 depict some rocks all, you know, in-between the sea and those Sandia. So you can see I'm just adding very random lines are not the NAD deal ones or all triangle, you know, give it as random, cheap as possible. Just adding a few more tiny branches you are to the branches that I've added. So since my brush has a pointed tip, I'm even to add all of these details using just one single brush. But in case if your brush does not have a pointed tip, I would recommend you to, you know, keep alternating between your brushes so that you get the DBS perfectly. And you know, not just to lose your patients and add it all with one gosh. Now, just adding a little dab in effect, you are in debt to show some bushes on Buddhism and some voyage onto those branches that we have been dead. Now let's add some data onto the sand EDA. So I've picked up the wrong book are low and adding some dry brush strokes. So you can see it's just ready to do dry brush strokes. Always remember by adding the dry brush strokes or dab off the excess water from your brush. Otherwise you will not get the dry brush look and you may just get patches of color. And when you are doing the dry brush technique, make sure that you do not add much water, but you're also that automatically the Kahlo will be allowed to take. And since my paper, it is that often when people, it's making it easier for me to get these dry brush strokes. Now dermatitis ADR, dry. I will just start the last final videos also. So I'll just add a little reflection of the sun above in the sky. We'll just diving off your white the old dry brush strokes into the senior doctor debit that reflection of the sun indices. So you can see I'm just using the dry brush technique with the white wash. And again, as I said, since my baby boys it off again, it's had been made to drive as easily. Now the only the Didn't left is to add on the lighthouse, but we need to wait for the lighthouse to dry completely before we begin to be in the details there. Otherwise we may ruin the loop. So let's wait for it to dry. So now my lighthouse has dried completely and I shift to my technical pen and begin to add the details. So you can either use a technical pen, audio can use your fine liner brush and black color to add in these details. But I feel 0 using the technical pen is easier to add in these fine VDS. Now at the top also adding a small semicircle look and then just, I'll try to pull out a fine stroke from the top of the lighthouse. Now using a scheme and the same technical pen, I'm just mark off the edges of the night toes. Make sure that all of your ideas are completely dried before you lay down the scale on your being due. Otherwise, the Apollo's may begin to spread because of the skin and Meru window and bioprinting. So you've got to be a little bit and careful about this. Also. You know, if you want you can detect me or go ahead without using mosquito and just use your fine liner brush, auto pen, and adding the edges of the lighthouse. So just a very little market to give it a definite loop, you can see the black color is not even visible completely, but still it has given such a mean look to the lighthouse. Now using my white gel pen, I will just add in the windows out to the lighthouse. So alternatively, I've even added a few of the street lines l in the lighthouse to depict more detail. And filled in that window also complete even though a white color now buried underneath, just adding a few lines to depict a little more detail into the lighthouse. So those two lines at the water media was just to add in a little more detail. Now the last thing, adding a video model fence just at the bottom of the lighthouse using the same Bite bet. In case if you do not have a white gel pen, you can all use your whitewash annual video, pointed brush, auto fine liner brush, and add in all of these DDS. But having a white gel pen is always handy. Now I would just add last few strokes, all of the white gel pen onto the lighthouse. Very small strokes, urine data you can see. And then we will be done with this bean day. So even on the fence about just added a little white dash to add more detail. Now, even on the sand ADR, just adding a little of the white strokes here and there. So that is it sort of being dig. Now let's remove the masking tape. Make sure that your edges are completely dried before you begin to remove your mask and also to move your masking tape at an angle formula people, otherwise you would date off the edges and Ms. Point the anti-doping day. So we are ready with our painting for D, D, E, and it's such a beautiful sunset view. I hope you guys enjoyed painting. This fits me today. And we are almost nearing the end of this challenge. And I'm loving to see all of your class projects. Thank you so much to each one of you for joining me so far. I will see you guys tomorrow into our next lighthouse painting.
45. Day 39 - Evening Sky Lighthouse: Hello everyone and welcome back to the 50 days watercolor challenge. We are on deep 39 to D. Let's have a look at the column for this painting. You need a shade of violet, windrows, bright blue, indigo, burnt umber, burnt sienna, black and white quash. Or you would also need a little of the yellow and the orange colors. So I have my paper taped down onto all the four edges. Now let's begin with the pencil sketch for this one. So I will first begin with the horizon line. Then I didn't mapped the rocky area in the sea and then begin to add the lighthouse or coming out from that ROC area. So roughly leaving approximately one centimeter from the horizon line, I will mark the ROC area. The area is going to be the Sea area and the water media below the rock is also going to be the CEO. Now on to this, I'm just placing the o litres this time. The lighthouse is also thicker as compared to the previous lighthouses that we have been did now just adding the details on the top quickly. And then on the left side I will just add a rocky core in novo. Go look and then we'll be done with the pencil sketch for this one. Now next, using a small coin, I will just please oh, sun goes behind the lighthouse so you can use any so Q low object that you have auto-completion just placed a sun. You can see the Sun is half hiding behind the lighthouse. Now let's begin painting. I will first begin with the sky area. I didn't make sure that I do not apply the water onto the lighthouse and the sun area. Leaving those areas I will begin to apply DO DO onto the rest of the sky area. So make sure that you are a little careful because this guy is of the darker tones and the sun is going to be quite right. So I'm almost done. Clean the arrow photo onto my entire sky. Edr know, let's begin painting the sky. So I will first be beginning with the Penrose color onto the top of my sky. So I'm picking up the queen rose color and adding in a pinch of violet to it to get a red violet tone. In case if you have the trajectory violet tone, you can use that. Otherwise even you can mix in any tone of pink and a pinch of your violet color to get the stone. Now onto the top of the sky, I am applying this color. And then on the bottom sky I will just be applying the violet color. Delete. Now. I'm using the color in a medium consistency, not too diluted and not to take my sky is going to be awful lighter tone. Only. Now on to the rest of the sky, I am applying the violet color. And you can see I'm being very careful near to the lighthouse so that I do not run into the lighthouse neither and do the sun area. So be a little careful about it. And similarly, even on the left side, I will be painting the rest of my sky idea with the violet color. And I haven't tried to achieve a proper blend between the Queen Rose and the violet colors so that I have a good look to my sky. So I just ran my brush into the rest of the Windows sky to get a block or blend little by little badge on the top, ADR or the soul. Now let's view the sky to dry before moving ahead and be ending, there is software areas. Now that my sky is completely dry and at the beginning of the sea, for the C, I am picking up the bright blue color. You can pick up either bright blue or city Lynn blue or the setting and grew from discolored is equal to my bright blue from the White Nights palette. So using this color, I will just be painting all the CDF force. And then after this dries, I will be adding in a little of the CVs, but I'm just going vegan dry right now because there is not much details to add. And, or rather I don't even want my people to stay wet for a much longer time zone. So, so just quickly adding a light layer of this edit in Luke hello, I'm using the paint and a little liquidy consistency that does not do doc and not too light or too and Just applying this even bought onto the entire area. So in-between on the right side we add to or Arcadia and in-between there wasn't a DC area again. So I've been good that literacy area also, but the city didn't blue color. Now seeing beyond the left side and then on the left side near the horizon line on. So I will just add the same color. Now, how did he may see EDR dries? I will begin with the first layer for the sun. So for the first layer, I will just pick up some white quash. I'm using the white quash, I would just lay down a layer of white quash onto my entire Lausanne to get those clean edges around the sun variable that little color has been done. And that will be the base layer for the sun. Then I will be adding the yellow and the orange highlights. Make sure to use the smallest size brush so that even you can define the edges of the sun. And also half of the sun will be hidden behind the lighthouse as we did for the pencil sketch. Now just applying a clean layer of the white quash first. Now, let's pick up some yellow and the orange color. So I have some yellow and orange mixed along with white gouache to get the yellowish orange sheet and losing this sheet, I will apply it onto the sun. Also meet a new onto the edges and then it a little into the center. And I haven't tried to blend all of it using a little water. So the reason why I applied a layer of white quash post is so that when I add this New York, all of the colors that we didn't do, my son media, that is though OK, Windows undivided color. All of it will be hidden. And I even get up right looking sun, but this yellowish orange tone. So that is the reason why I added the rightly of force to achieve this opaque and, you know, bright look of the sun. Otherwise, if I would have direct me use the orange and the yellow color, the pink and the electrons that ended my son area would have been visible and which will be, you know, make it look a little point. Now I've just added a little more of the orange to the same mix and putting some darker patches on the sun in the Sendai damage. And all of this is wet on wet and you know, just been doing them one by one. Now I will begin painting the first layer of the lighthouse. So for the lighthouse, the first node is going to be off the bone sienna color. So this timeline, so it is going to be wet-on-dry technique because I wonder skin color to dry quickly so that I can add the photo. So just applying an even coat of the bond sienna color in a medium consistency onto the entire lighthouse. Now be careful about two things that near to the sun area, you'll be a little careful. And near to the sea area also, be a little careful that you do not run into the sea and that you'll see EDS completely dried before you begin to paint the lighthouse. Now with the same tone, I will be painting this little wall ordered a rock. Look beside the lighthouse. Now then all of the layers dry. I even begin adding the weaves into the CDR. So I'm using my mini 90 brush. This is from the brand Bond Marty. And using this mini liner brush, I will just begin to add verifying these into the sea area. My CTI is completely dried hands, I can begin adding the scene. I'm using the same set, even blue color that I used for the C. And using the color, I'm just adding very fine strokes into the CDR to depict as the waves. So in the same manner, keep adding the leaves into all of the sepia. Now the VFS that amniote. In line, but to be quite smaller inland. And as we may be moving downwards, that is, uh, you know, at the bottom of these we're going to begin to go down. Now, even the middle area between the rocks I baby, adding this email is dead. Now let's begin adding the CVS in the bottom media. So in the bottom media, either force we are having a very large sea wave go and then I will be adding the minute CBS. So the entire line from left to right adding a very Coby looking CV with our little darker tone as compared to the PVC waves that I've been adding. And it's a little Keiko compared to the other CVS that I'm at. Now just as we were adding the waves about beginning to add the same BC waves. This time you'll see WBS up white men. I think previously on the top. Because these waves are closer to our view and the V's Neanderthal horizon line 5 from us. Hence they are shorter in length. Now the same base, I'm just adding the sea waves even underneath the dark, albeit that we have added. And you can see underneath I'm having even more larger sea waves as compared to about this thicker line. So that is because these waves are the most nearest to us. Hence I'm adding these big obeyed look. Now just adding another darker behavior at the bottom area also. Now using the black color, I'm just beginning to add the rock ADR. My lighthouse ADR is also completely died and my CAD eyes on so completely dry. So just beginning to add this, adopt the ADI. I am not going to be all of the rocky areas that are white right now, but the same black color. So onto the left side, adding the same drop, the black color. And you can see at the top, I'm having a coffee shop looks there. Now, even at the top of the lighthouse, Ivan be adding in the black color details. Make sure that your son is completely dried before you begin to add this. Otherwise it may owe, you know, begin to spread into the sun area and make it look black. So be a little careful there. My IDA near to the lighthouse is dried up the sun path, but the edge near to the sky is a little bit, I'm just being a little careful. And even on the top, adding the details with the black color. Now, I will shift to my smallest size, flat brush, this is an eight by 0 shader brush. This is again from the grand want my data many Linus set. Okay, So using this brush, I will be adding in the big details onto the lighthouse using the same buoyancy. And this time the bone CNR column will be in a little taco consistency and Docker initiate as compared to the first layer that we laid down. Now I'll just begin to pick up this color and begin to add smaller bricks onto the entire lighthouse beginning from the top. So I will add small obliques, leave gaps between the bricks. And in the next row, the obliques will be between the two bricks of the first nine and so on. Didn't add a similar grades into the entire night calls first. So you'll get no this in-between. I'll see you up the breaks out of the light one because I did not pick up the color again and again. And that is exactly what we want. We want some of the bits of light on some of the darker tone. And oh, you know, some links in the medium tone so that all of it looks in action and has variations to your lactose. If you want, you can even add a few of the bricks with the bond Don Buchla in the middle or randomly at all places, urine, they're just like price to six of them. And it would look more PT or even day. In case if you do not have such a small flat brush, you can add these details using a round brush for smaller size, but you will just have to be a little more carefully by adding these so that you get this break glucose. A rectangle look to depicted as the bricks onto the Lighthouse which is forming. Now I'm almost at the end of the lighthouse and I will be adding the same rates on to the ROC area. We are beside the lighthouse on the left side. So this would be using the same brush, but just that this time the bricks on the rock ADR are going to be a little thicker as compared to that of the lighthouse. So for adding the teacup bricks, I'm shifting to match. I said Lando size two brush. This is again, a kind of a flat brush only, but it is o smaller in size and has smaller businesses. So using this brush, I'm beginning to add the details onto the ROC area. And you can see these are taken as compared to the ones that I did on the lighthouse. The reason I'm reading the size is so that there is a difference between the rock and the lighthouse that we have added. Now, did my lighthouse dry is complete? I will begin to add the details with the white quash and do the c. So the tool take leaves that we painted with the dark blue color. I'm going to begin to add in the white gouache detail there. So I will begin by adding a little detail, trying to pull out the waves out there. So you can see I'm adding two kind of the DB and some bad. I'm just dabbing a little ensemble. I'm just trying to pull out the leaves moving upwards. So I'm using the white wash it in a very opaque consistency so that it can means opaque afternoon guys also. Now again, I'm using the dabbing technique, performs on form out there. And using the same we've look at the bottom beam also. So I'm done adding the Vive look. Now, I can just shift to my pointed brush and using the Payne's gray color, I did just add a very fine shadow underneath the stucco beefs that we have been dead. So I'm using the Payne's gray color. I'm using my fine brush and just adding a very fine line as you can see underneath the blue bead line, so as to depict the darker shadow of the waves. So now adding the same way at the bottom, we've all good to depict the darker shadows now using the black color itself or the Payne's gray color, I will just add the details to the lighthouse also. So my lighthouse ADR that I have to add the window DDMS is completely j. So using that small shader brush, I'm just adding in the BIM, sorry, the window looks here. Now just adding a bigger block onto the bottom left corner of the lighthouse. Now, either shift to my size four brush, I'm using a brush. I will just add the borders to the lighthouse and the rock and just a little black touch onto the big obliques you're on to the ROC area, just undo few of them. And then just adding the borders to the lighthouse to, you know, give it a more detailed look. And the same V to the ROC area also. So in case again, you progress does not have a pointed tip. Either you can use a black pen or use your detailer brush to add these details also. Now at the bottom you're just adding the robbed PDF so that all of this looks that lighthouse and the dog is standing on the ROC area that we have. Now. Lastly, using my white gel pen, I would just add the final details and the highlights to the lighthouse. So you can either use your white gel pen, odd use whitewash to add in all of these details. Using a white gel pen makes the task a lot easier. I prefer using a white gel pen for adding these fine details into any of the paintings. Now just randomly adding a few highlights with the white color onto the lighthouse. You can see very randomly, I'm just adding a few of the white lines to depict some highlights. Now let's remove the masking tape and CFI new painting with those clean edges. I've heard about removing the masking tape so that your paper doesn't tear off. And also make sure that your edges are completely dry before you remove the masking tape. So your final painting called deeper D9 and the second last one for the prompts Lighthouse. I hope you guys enjoyed painting this with me today. I haven't see you guys tomorrow. Thank you so much for joining me.
46. Day 40 - Evening Sky Lighthouse 2: Hello everyone and welcome back to the 50s watercolor challenge we have on D for D and the last one for the prompt lighthouse. So let's have a look at the colors that you'll need for this class project. You need a shade of yellow, orange, Windows, violet, ultramarine blue, one sienna, burnt umber, black and white. Gosh. These are all the colors that you would be needing for this class project. Let's begin painting. I have my paper taped down onto all the four edges onto this movable surface. I will first begin with the pencil sketch for this one. So first I have my domain, my horizon line. So my horizon line is quite low this time as compared to the previous being banks. Now IV falls to add a drop into the CE Yeah, at the bottom, it's in the bottom center that I'm going to be adding this doc ADL and then from this ad hoc ADR, Ivan standoff that lighthouse. So again, this time the lighthouse is quite thin as compared to the last lighthouse that we've been doing. And at the top, just adding the little details to the lighthouse, you can pause the screen after the entire pencil sketches done and copy the pencil sketch. Now this time to the right of the right house, I am adding a small hot the roof kind of a house. Suggestive at East model one onto the right side this time. So that does it fold up into sketch. Now let's begin being done. I've enforced begin with the sky EDL. So I'll just begin with a thin coat of water onto my sky. Eto. Also be careful that you do not run into the lighthouse AVR 0 this time and not, not even into the small How's that we have added? So I'm done applying an even coat off auto on-demand sky area. Now let's begin painting the sky fullest. So I will first begin with the yellow color for my sky. And this time I will be adding a lot of the diagnosed strokes using the tip of my brush and be very careful. Also this time, we will not be adding the kalos and not to liquid consistency. The colors are going to be less than you did. You can see false near the Lighthouse. I have left a little gap before adding the yellow color. So that little gap that I have left there is going to be light only I want the white light effect. They're obese or that is the reason I left that little gap knee out to the lighthouse onto both the aged and then started with a yellow color. Now next time picking up the shade of yellow orange in case if you do not have this shape, you can just begin your orange color and mix in a patch of yellow to it to get an Irish orange shade. And I'm applying it near to the horizon line enforced. Don't worry if you run into the lighthouse little because of the lighthouse is going to be off a darker tone this time. But make sure that you do not run the Docker kalos and the lighthouse because we will be having the yellow lights in the Lighthouse, which will not be hidden if you add the darker colors. Now next, Eigen pick up the permanent red color or you can pick up your vermilion color. And with that color, I will begin to add in the details. At the bottom side, again, adding the darker bones. So this tone is equal to a reddish orange tone. So you can adopt a copy of 1 million cholera in thick consistency or mixing your red and orange to want to get this color. Now next I am picking up the violet color and using this violet color and mixing in a little touch of blue to this violet color. I have got a bluish violet door and I'll begin to your neo to the yellow at the top. Now you can see I'm majorly using the tip of my brush and giving it some strokes very freely. And all you know, trying to give some distinct look strokes this time. And in-between there other little white gaps. That's perfectly okay. Now next, I will shift to the quin rose color and begin to add the strokes at the top side with this quin rose color. Again, you can see I am not just, you know, adding the color altogether. I'm adding it stroke by stroke, some very little white gaps that I'm leaving. So all of that is just adding, Oh, you know, to us sky and giving that different soft sky look under different color variations. Now I'm shifting to my smallest size brush to add in the diagonal and a lot smaller details stroke so as to get the different radiation do my sky now. So I've picked up the violet color first. And you can see I'm just adding some diagonals strokes at the top side. So some strokes are moving from the left and some from the light and in the center, all of them are kind of merging. Just like all meeting each other at the center point, moving from left and right. Now to this same mix, I will just add in a batch of the blue color again and get 0 bluish violet tone. And again, I'll just add a few strokes onto the yellow color also. So when I'm adding on the yellow color, I'm being a little careful and adding the strokes very lightly and not adding too much pressure. Otherwise the color will begin to turn muddy. So you can see at the top side I have more of the vibrant strokes and at the bottom I have more of the light strokes. Also, you can notice that the light area that I had left and the other lighthouse is still quite bright and the yellow color has just marched with the water and got the perfect stroke. Now I've picked up the bond sienna color and beginning to add the highlights with the bone sienna color forced at the line neo to the horizon line. Now, again, I'll pick up some Quin rose color and add some highlights with the Windows scholar at the top AD off my sky. And I've just added in a pinch off the Payne's gray color so as to get a darkish pink tones and adding this diagonal strokes of a doll or pink color at the top Skype to get the strokes look and the cloud look. Now CMV, as I added the pupils talks also at the bottom, same way, adding a few of the Rose strokes also at the bottom area. So to this color, again, I mixed in under delta H of the pins gray color and adding the strokes with this color. Now you can notice still that white gap. I haven't added any stalks there. Okay. So be careful and shot about this one thing that you do not ruin that white gap looked at we have achieved by, you know, not applying the color there and just letting the yellow color spread that on its own. So this is a Tata sky. Now let's wait for this to dry completely and then we'll begin painting the rest of the area. So you can see my sky has dried completely and you can see the white light effect neon to the lighthouse on the left-hand side, right, that we tried to achieve. Now next I have picked up some ultramarine blue color and using this Kahlo and going ahead with the wet-on-dry technique, either painted into the entire area, make sure that you do not run into the lighthouse. And I will just add this color onto the entire see on both left and the right side. To this ultramarine blue, I will just add in a pinch off the beans green and get a little darker tone of the ultramarine blue color. And just add a few strokes with this darker color into my scene while it is still wet, so as to get a little different tonal gradation to my C, O wet on wet. Now same B, I will do the same thing onto the right side. Make sure that knee out to the horizon line. You'll be a little careful that you do not run into the sky and try to get a straight line, look at the horizon line to get that distinguish between your sea and the sky area. Now why am I see is still wet. I will just pick up some Payne's gray color and add some strokes into my Sea area. Pvc, we had mixed in the Payne's green to my blue and added it. Now I'm just picking up the Payne's gray color directly and just going to add a few of the waves while this is still wet. So you can see on the edges I added the Dakpo VFS and the area near to the lighthouse. I've tried to kept it light because of the light effect that we have near the lighthouse. So same V added the darker leaves onto the left side also. And you can see I added the darker tone on my horizon line to get that perfect distinguish between my horizon line and the Sea area as well. Now I will just pick up a little more of the ultramarine blue color in a letter. Consistency and just added in-between the Payne's gray strokes I've ever had it so that I have a little darker blue toll also. Now let's meet for this entire area to dry, then we can be in the rock and the lighthouse area. So my CTI is completely dry and let's begin adding the further details to the lighthouse now. So let's begin with the rock EDL. So for the ROC area, I'm first picking up a sheet of bond on both and in-between. I will add in a little bit of a bond sienna to get a little night defect in the center of the rock. So onto the edges I'm first beginning with the mix of black and bond Don Buchla to get the darker tones onto the edges of the rock. If you want, you can directly use the sepia color instead of mixing your brown and black. Now in thus m dot, I'm just adding in a little bit of the bond sienna color to get a little light effect in the center. And then at the bottom, again, going ahead with the darker tone of brown. Now I will just add a little more of the darker tones on the edges. So this time mode of black and less of the brown color to get more darker tones. So that is how you can keep feeding the tonal variations by either adding black or white, depending if you want the darker tones or the lighter goons. Now I will just pick up some yellow color and using my smallest size brush, I will just add two windows in the Lighthouse with the yellow color, roughly. I'm just adding the yellow patches because the lighthouse is going to be off the black color. So I will give it a shape file. I'm adding the black color and CMV, even this little house, I will just add a window with a yellow color at the top AD also you are adding this little yellow color. Now do the yellow windows often light house and the house dries. I will just quickly add in the boats into a sky. So using my pointed tip brush and the black color, I will just be adding a few boards in the flight motion. You can add the boards in any shape and size that you want. But most of them will be just near to the left and the right side of the lighthouse and not too high in the sky. So just adding the boards in differentiates. So you can see all my boards will be moving towards the lighthouse. So when it is from the left side, my birds are flying or towards the right. And then I will be painting the bonds on the right of the lighthouse. David be flying towards the left side so as to move towards the lighthouse. And you can see I'm adding the gods very patiently just using the tip of my brush to get them in a little detail look. So be patient while adding the boards. If you are planning to add them in a little detail banner. And again, you can notice though my boards are in the flight motion, but they are of different shape. And you know, veins, aspirin indifferent, didn't choose. Now let's begin. I think the boards onto the right side also, and you'll again see the glowing effect that we have near the lighthouse. It's so prominent and it's going to look beautiful. Winds to me, I didn't a black color to the right house. The lighthouse is going to be of a black color simply. So nothing much to do on that part. But it's going to look pretty with that. By defect coming from behind the lighthouse. Suggests one last bowed your near to the roof of the house. And then we'll be done adding the birds, just this few of them for 25 that we have added. And then even read for the yellow windows to dry and then paint the light house and the house once this is completely dry. So my entire painting is completely dry. Now, I will begin painting the lighthouse now. So for painting the lighthouse, I'm just painting in with the black color and I will first define the windows that I have added with the yellow color. So I will try to get a rectangle o shape and a square shaped where needed to these windows that have added on the lighthouse and on that little house on the right also. And then I will fill the rest of the area completely with the black color. And I'm using a pointed tip brush so I'm able to achieve all of these edges simply. In case if your brush does not have a pointed tip, I would recommend you to shift to a detailer brush given these edges and then fill it with a bigger size brush. And even on the edge of the lighters, I'll try to achieve a strict law using the tip of my brush and then fill the rest of the area also makes sure that the yellow windows are completely dry before you begin to add this black paint. Otherwise, they may spread into the yellow column and you may lose that light effect of the window that you want. So just filling the entire Leto's with the black color simply. And go ahead very slowly so that you do not run outside the shape of the lighthouse. Otherwise, it would be very difficult for you, you know, correct. This area because for me it's been the black color. And second B1 that create locked to the lighthouse. That is, the edges are straight lines. Now let's fill the house also with the black color in the same I've been forced to have done the bills. You're at the top and then add the house DDS. Now using the tip of my brush and just add in the details to the yellow patches of the lighthouse also before moving to the house. So just two lines, one standing and once need to add that to the window that we have added. Now for the house, I'm forced beginning in with the shade of brown sienna onto the right of the house. They just add in a little detail with the bone sienna color and then use the black color. Just as we did for the ROC area, we used two shades of brown to get a light effect. Same way for the house I'm using in a little bit of the bone CNOT to get the light effect onto the right side. And now I have shifted to my black color and I will fill the rest of the house with the black color. Try to get the roof shape and the little pointed edges to the house. And don't forget the chimney at the top of the house to be painted with the same black color and CMB as in the lighthouse, we got the window edges. I will get the window edges you are as well. Now just adding the details to the chimney. And that is why it's always good to have appointed them. Because it's easier to add in all of these details all together with one Russia didn't continuously shifting between brushes. So I'm done adding all the d, d. Now let's add a little. First, I have picked out some black color and using the same point that the brush, I will just be adding a few leaves with the black color into my CEO. So the VFS that are neon to the horizon line are going to be shorter and the leaves that are all moving, Oh, you know, five from the horizon line are going to be bigger than lend. I'm just going to be adding a few of them, not much. And then I will just be adding a little dry brush with a light wash to get detail to my own CATI and get a pretty looked to my C also. Now seeing on the right side also quickly adding in the leaves, the ones that will be near to the horizon line are going to be shot down. As I always say, that horizon line is five from us. So the leaves that are visible to us for, at the horizon line are going to be smaller than men. And the VMs that are near to the edge of the people are more closer to our view. Hence, I'll be good inlet so quickly adding in a few of them you can see as I move to towards the end of the people, I have added very little of these leaves because I'm going to add most of the dry brush strokes there. So just adding one thick plaques, Tokyo on the left side also, just as I added on the right side, now I will pick up some white gouache to add the dry brush. So make sure that you do not add any water to your white gouache for adding in the dry brush now, because if you will add water, it will be very difficult to achieve the dry brush on the sea area. I can use my smallest size brush and just pick up some whitewash. Always remember to dab off the excess paint and water before you begin to paint the dry brush strokes also makes sure that if you want tested on a rough sheet phosphate before going ahead on do you mean pain? Pain. Now, since my paper, is it off green paper, it's eating to get these dry brush strokes easily. But in case if you are using all people which is less affects Shaw or does not have much texture. It will be a little difficult for you to achieve the dry brush. And that time it's very important that your brush does not want too much of what all odd, odd, too much of pain. Otherwise you will just begin to get batches instead of the drivers to us. So in-between the leaves that I painted, That's the reason why I had left so much of gaps and added the black VIV effects far from each other because in between, I was going to live in these dry brush strokes with the white color simply to assay area. And you can see it's getting such a beautiful look by just adding a little dry brush widow bite strokes to get that all form and severe effects into the sea. So that is it for our painting today. Now let's remove the masking tape and see our final painting with those clean edges. So this is our last painting for the prompt lighthouse. And via done without the for just ten more days before we get done with the 50 days watercolor challenge. And I'm so happy that so many of you are painting along with me and out uploading your class projects as well. Thank you so much to each one of you for joining me sulfide. Be a little careful by removing the masking tape so that you do not do in the edges. And your is our final painting with those clean edges. I hope you guys enjoyed painting all the firefighters prompts with me. And you can see the glowing effect near to the lighthouse. That is exactly what we wanted to achieve. So it's very important that then you do not apply the yellow paint and let the water and the pins plates magic directory. Thank you so much for painting with me today. I will see you guys tomorrow with the next class project.
47. Day 41 - Monochrome Seascape: Hello everyone and welcome back to the 50 days watercolor challenge. We are on our next prompt and the second-last problem that a C scale. So this is the first one. Let's have a look at the colors. You only need four sheets, that's turquoise, blue, violet gosh, beans, green, and black color. So let's begin painting. I have my paper taped down onto all the four edges, and I will just begin by marking my horizon line. And that is it for the pencil sketch for this one, there is no other pencil sketch for this project. So this time on the top-right side, we are going to be having a glowing effect in our sky. So this area here is going to have a glowing effect. We won't be adding much of the colors day the colors will be added mostly on this site. So it's not actually exactly a moon that we will be placing them, but we'll just try to show the moonlight effect there. So let's begin by applying a clean border for Dawn Glenn diode sky area. For now. Make sure that you apply an even auto photo so that your paper everywhere equally and water does not, you know, seep in from the edges if you have more water at certain places. Now for the turquoise blue color, I will be mixing in the peacock blue and the viridian green from this set. So it's 80 percent Tokyo peacock blue and 20 percent viridian green color. And that's how I have got the turquoise blue sheet. You can directly pick up a turquoise blue color if you have Lady me in your palette. But in this palette, since I did not have, I just tried to mix in the shade. Now you can see I have left around patch and trying to apply the colors around it because There's going to be the glowing part of a sky. So slowly the colors around there, we'll begin to seep in there because of the water that we have. So you can see already, already the colors have begun to kind of bloomin there. That is how the light effect will be created. Now I have again picked up the same color, but this time in a little thicker consistency and I'll begin to add a darker layer in the same V. The reason of adding the force polio is to achieve that glowing effect. So around the sun, sorry, the moonlight area that we are trying to debate, I like the colors be a little light and as we're moving around from that area, I'll try to increase the depth of the color. And you can see around that area, I'm just moving my brush in circular motions. You need to be a little quick while doing this so that you have the proper Zhang shape that be one day and in-between. I'm just running my damp brush there. So as the lightest color tone of this scholarship, I get in there. Now, again, I'm mixing the same colors with less off for DOE and more of pigment to get even darker tone to begin adding the Cloud details to the sky. So now you can see just using the tip of my brush, I'm adding in some Cloud details. So this had a little more of green, so I just added a little more of the blue again to get the bluish tone. Now majorly, this does not contain much of water. Hence the pains are not spreading much and retaining the cloud shape. And you can see I'm just using the tip of my brush to add in these cloud patches. So randomly I'm adding these cloud patches and a little overlapping this whitespace that we are trying to achieve. And some of the strokes are going diagonally. Some of them are street, some of them are in the cloud effect. So just trying to add in different cloud shapes possible into the sky. Now again, using a damp brush, I will just try to get in a little color into this white area. So basically I'm just dropping droplets of water around us, round area that I have added so that the colors from the boredom begins to seep into the center area. And I get a very light glowing effect there of this color as the base. So it's almost like 50 percent pigment and 90 percent 95 percent water in the center area that I'm trying to get. So now you can see the phosphate of clouds that we added have kind of settled into the sky and having a very soft edge because though it was wet on wet and we added little water. Now for the next layer, I'm mixing in this turquoise blue color mixed with a little bit of Payne's gray to get a little darker tone. And now I'll shift to a smaller size brush and begin to add some darker clouds. So that was a phosphate of clouds. Now let's begin adding the second layer of the clouds. Now again, you can see I'm majorly trying to use the tip of my brush and adding these cloud DDS. Also this time if you've seen the water content in my color is quite less as compared to the first layer of clouds, because this time I want to read in the cloud shapes, in the fourth layer, I wanted the clouds to have a little spread so that they begin to form the soft clouds underneath. And then we add in this dark or LEO. So now you can see my paints are not spreading as they were spreading in the forest, Leo, because that is less of Bordeaux. And it's the dark with stone as compared to the first layer of clouds that we added in. Now with the same tone, I will add in on the horizon line also a good layer of the clouds. So you can see now I have added a little more of the Payne's gray color to achieve a little more DACA that they're now, I will just add a few more darker clouds you are in there in the sky area. So it's a little more touch of Payne's gray in the same color to get little more darker clouds urine there. But these darker clouds will be quite less as compared to the last layer of the clouds. Now, after this, we will just be adding little white spots in the sky area to get some defects. Now all of this is wet on wet. You can see my paper is still wet and I can still go ahead with more Leo's. So that is why I always recommend to use a 100 percent cotton paper which stays wet for a longer time. Or you can use a riveting techniques so that you can achieve the soft cloud look into the sky. Now I have picked up some white gouache and I will just drop little of the white quash underneath the clouds urine there to get a little highlight to the clouds. So the right course that I'm using is also in a little oily, medium consistency, not Tool or liquidity and not to take also, it's in a medium consistency that it's spreading also a bit and giving that little white dots underneath the clouds. So Major League just underneath the DACA clouds wet. I'm adding in these little white dots, urine there. You can see the glowing effect is still the day. I have a very light diluted all of the turquoise, no color coming in there and the rest of it is glowing, trying to depict the moonlight. Now let's wait for this to dry completely before we move ahead. Now my sky ADI is completely dried and you can see the glowing effect that we had. Now let's begin painting the CDO. So I will just begin with a clean coat of water falls under the entire C. Don't worry about the horizon line that it is looking right now, but you will be correcting entry once we paint the CDO and then being tried to define the horizon line and the sky defense for now, just apply a clean they are affordable throughout your CEO. First, I will just begin with a diluted tone of the turquoise green color and give it onto the entire C. So this is the false color consistency that we used by painting the sky also. Now exactly maybe had that glowing space in the sea there. I will be leaving the white gap and not be adding the colors much. So you can see just trying to get a little the exact stroke in the center area just underneath that highlighted space. So automatically that ADR will remain light. Now let's begin with the second layer of colors. Now the second layer is again going a little darker as compared to the first layer that we add it. So I'm picking up the color this time in a little more thicker consistency. So you can see NACADA is quite 0 DACA as compared to the first layer. And again, just underneath that gluing so-called that we have in the sky. I'm trying to maintain the white light effect there because I wanted to depict the light effect on the sea area. Now I'm just trying to get a lineup my horizon line. Don't worry if it looks a little messy right now. But once I add in the leaves out there and the mountain range on the horizon line, all of it will turn out pretty. Now. Again. I will just pick up a darker shade than this also. So I just added a tinge of beans green now to my color mix. And just using this darker tone, I'm again running from the edges. Now you can still see I'm trying to maintain that light effect in the center of ADR to see just underneath that moonlight effect. Now just trying to define the horizon line bell right now and adding the darker shades on the edges. Now, I'm picking up more of Payne's gray and less of turquoise blue and adding it again on the edges, but this time I will not pull it completely to the same area, just letting it be. The edges. So at the edge now you can see I have the darkest tone. And as we are moving towards the center light ADI, the tones are diminishing in value. So that base of gradient effect that I was trying to achieve in the sea area by adding it Leo's on Leo's, the phosphonium was on the major ADI, the second Naomi again sharpen. The third Leone was again shot. And now the fourth doc is NIO is majorly on the edges. Now till this is giant, I'll just be adding two boards into the sky area. So the boards also I will be adding in with the same turquoise blue collar to depict the sky deflection on the boards. Also, I will just mix in that turquoise blue color that I have formed with a little bit of Payne's gray to add that to both sides. So this time, the boards are also going to be a literal huge as compared to what we always add. Make sure that you do not possess your hand onto the CDR by adding these books. Otherwise, the CAD army gets spoiled. So either you can tilt your paper or if you have tape down your paper onto a non movable surface, then wait for your painting to dry completely and then add these boards audience, Oh, if it's on a moveable It's Office. You can simply rotate and added, right, make sure to not spoil the CAD. So fast at the bottom of the board, I added the callow with Dato coins, blue color. And now I picked up though Payne's gray column, but it does seem brush without cleaning the brush and adding the rest of the details. So the board, we'll just have a little of the turquoise blue shade at the belly area of the book. So that will reflect the effect of the sky and the shadow that we're trying to achieve in the end diet composition. So this was the first board or in the sky. Now we will just be adding another board. So you can see how huge the board is. Now in the C V I will be adding the second bird, but the second board this time is going to be born with a dark blue and less of the pins gray color. So let's begin adding the second one. Again. Be careful that you do not rest your hand on the c. Otherwise it may get spoiled. Also in case if you want, surely change the shape of the board and you know, show them in different flight motions. Or if you want, you can add a lot of money buds also. But this time I felt ahead of going with just two big buds into the sky area and not adding too many of the smaller boats. So it's completely your wish how you wish to add them. So I'm just trying to show two huge voids in flight motion. So in both the birds you can see the wings that got on the behind site out a little T knot and the wings status, close it, love you is a little more spread because that is more closer to our view. So accordingly you need to, you know, see the post and adjust the wings and the details. Now to this body, I'm just adding more of the windy days. Now my CATI is sought of 50 percent, right. So I can just begin to add in another layer of the Dakpo leaves on this wet, on wet. So I just mixed in a lot of beams glued to my turquoise blue color. And I will just begin to add the leaves your. So you can see just adding a few of the V's and major leader Tico ones. And I'm just trying to get them a little into the white-space, Not much. And majorly adding all of them on the edges. So the edge is more Dhaka already, so the end of evs may not be visible much. So in the rest of the sea area, just add a few takeover waves for now. So this is again wet on wet. In case if you ought to all ADR has dried completely, then I would recommend you do reverted and then add in these Leo's already or you will not achieve the soft glow. So that is it. Now let's wait for this to dry. So now my CTI has dried completely. And you can see those little leaves that we added have spread in and do not have a sharp edge. So those were just a bygone VS. Now let's begin adding the rest of the leaves. So I've picked up my pointed tip brush and using the Payne's gray color directly, I will just be adding the VFS in case if you want, you can just add in a pinch of the turquoise blue color to the Payne's gray to maintain the team of the entire painting. Now as I always see, the movies that are near to the horizon line will be shorter in length. And as you move down, what's, it's going to be larger than land. Now, neo to the white gap in between, you can see I'm adding the VSV carefully and just a little. That I do not lose that whitespace look again because they're, I've instead be adding the whitewash to get the VIV effect there. So I'm first starting in all of the VMs neo to this white gap that I have so that I do not by mistake, oh, you know, run that and add too much there. So trying to add the leaves there first and then even added into the rest of my Sea area. So now you can see as I'm moving down, what's my leaves are increasing and I'm beginning to add a little Covey's also as I'm moving downwards. Now I will quickly add the similar CVs onto both of the sides. That's the left and the right side of this white patch, that p-hat. And as I'm moving down, what's either begin to add little thicker and longer patches of weeds also. And you can see I'm trying to add different radiation that some small Aviv, some shorter leaves, some typical ones, some little cove, some just an elliptic of hands mountain sheep. Okay, so try to get radiation so that it looks on nitrogen. Now in the same vein, let's add the leaves onto the left side also. And you can see I am already randomly beginning to add those leaves. You are in there and some wet I'm falls laying down though they go patches of VBS and then I will add the shorter patches you are in there. I have mixed in a little bit of my turquoise blue color with the Payne's gray color to maintain the harmony of the entire painting. And now all of us decide, I thought of laying down the big obvious so that I know. Then all I have to lay down the smaller leaves and how because at the bottom area, I wanted a good Big O V If no cure. Now near to the horizon line, let's add the smaller leaves and complete the left side also, in case if you want, you could directly begin with the top side and then move downwards. But I felt like for styling the big O and then adding the shadow bands at the top to understand where I need to add more of the Big O BFS so as to make it look perfect along with the soft of VIV looked at we have because the back beams that we did with the soft edges will be go ones. So now even at the top side you can see just adding a few of these big OVS so as to get the harmony in the painting and make the leaves look nitrogen. So that is a reason I first I did a few of the bigger leaves, then added the smaller one so that I can understand where I need to add more of the big obese. And then I don't need to add the big obvious because we need to understand and not cluster or single area with a big old leaves on a similar kind of V block. So that is it for the leaves into the sea. Now done this, try it. I will quickly add a small Bush ETL on the horizon line so as to define my horizon line and this sky IDA distinction. So using the Payne's gray color, I will just be adding a little area beginning from the left side. You can either consider it as a mountain range or a bush area as you want. Okay. And I will not take it completely then the right, I will just take it to the three-foot all of the horizon line. So you can see as I'm moving towards the right side, I'm decreasing the height of the bush idea that I added. And just try to end it with a very thin line till the threefold space of my C. Sorry, my horizon lines are dark is the distinction. And that much is enough. So we have a good compliment. So I'll just add a little more of the bushy area quickly and try to get a proper finished there. So that is it through the bush effect that I wanted to add on my horizon line? And you can see just the 3 fourth of the horizon line. I have taken that effect and try to shy away from the tallest on the left and moving towards the right, it's going smaller in length and short debt. Now, I'll quickly pick up some white gouache and add the dry brush effect on the white area of the sea. Do they pick the white beans and the moonlight effect onto the CEO? So always remember, whenever you are adding the dry brush, make sure that your brush does not have excess water. Neither does it have excess paint. Otherwise, you will just begin to get patches instead of the dry brush strokes. And make sure that you are using a brush which is done and which does not contain too much water otherwise, again, you will lose the effect. Now majorly on the white area and around deck, I'm adding the dry brush strokes. And since maybe put his head off green paper, it's eating to adding this dry brush strokes. And if your people will be a smooth textured paper, it will be a little difficult to get the dry brush strokes. And that time it's very important that your brush does not have any excess water or beans, or you will just get badges of the white color instead of these dry brush strokes. So that busy, just knitted of these dry brush strokes to debate the moonlight effect into the CDR and the little baby. And we are done with our painting for D 41. Let's remove the masking tape and see our final painting. So I feel that I forgot to run my fingers around the masking tape because of which the little beans have C dot. I'll try to correct it later on using white color auto white pencil. So you are, is our painting for now for D 41. I hope you guys enjoyed painting this course, simple seascape for the prompt seascape. Thank you so much to each one of you for joining me in this 50 days watercolor challenge and being with me so far, I'll see you guys tomorrow into the next class project.
48. Day 42 - Sunset Seascape: Hello everyone and welcome back to day 42. Today we will be painting this sunset see scheme. So let's have a look at the colors that you'll need. For this one, you need a shade of yellow, orange or a yellowish orange bone, sienna, black, white goulash, or Payne's gray. So these are all the colors that you need for this class project. Let's begin painting. I have maybe what they've done on to all the four edges. And I will just begin with the pencil sketch for this one. So the major pencil sketch that we have is marking out the horizon line and marking out the trees that will be popping out from the sea. While its own, Let's add the mountain range that we will be having on our horizon line. So my mountain is growing in height from left to right this time. So on the left, it's the smallest height. And as we are moving towards the right, it kept increasing. Now roughly adding in that tree trunks that will be popping off from the CDO. So I'm just giving rough markings and that is the reason I'm using the pencil sketch in very light V and just one I am mocking rest of it algebraically B into a decolonize because I don't want any charcoal months after I add. And you know, if I feel the placement should be changed, then it will be difficult to change it. Then Let's begin painting the sky. Now, I will first begin by applying cupping order of water only under the sky area. If you run a little into the mountain area, that will be perfectly okay because the mountain is going to be of a darker tone. But as far as possible it's always better to avoid it. So fast. I will begin with the shade of medium light yellow color. And near to the mountain range, I will begin with a yellow color. And I'm picking up the colors this time in a medium consistency that is not too thick. I'm not do or diluted also. So your as my medium yellow color. So this is like a cadmium shape and I'm using it in a medium consistency near the mountain range forced. Now next, I have just picked up a little bit of orange mixed with my yellow and applying it next to the yellow. Now next I will directly pick up the orange color. So I have an orange color in this set. In case if you do not have an orange color, you can eat up a cup of Armenian color or go ahead with mixing in your red with yellow to get an orange tone. So now I've picked up the orange color directly and adding more towards the yellow and are taking it towards the door. And now I'm picking up the orange color without mixing any yellow DOT. And I will apply it onto the rest of my sky area and try to get a good blend and smooth transition between all the three different colors. So the first column was only the yellow color near to the mountain range. Then I mixed in a little touch of orange to my yellow to get an a orangeish yellow sheet. And then I picked up directly the orange color without adding any yellow duet. And to get up the top sky. And now I'm just tilting my board so that the colors flow into each other naturally. And you can see, I'm again, again lifting up all the excess water that's collected onto the edges of my paper so that it does not ruin my edges. Now I'm just trying to get us mood blend between the colloids and get a good grade into my collarbones. So I don't want more of the orange to flow into the yellow Kahlo hands. I'm tilting it downward so that my yellow flows into the orange and Aidid in that yellow look near to the mountain range. So you can see near to the mountain range. I have that yellowish look still there and the orange hasn't seemed there. But in case if you will delete it completely downwards, then the arrangement seep into the yellow completely and you will lose the yellow look completely. So it's very important to understand Vento dealt in which direction. Now next time picking up some bond sienna color and onto the top line, just giving a little touch of the bond C and Apollo. All of this is radon bet my sky Stenovec and just adding a little layer and trying to blend it with the orange color. So this is kind of the fourth radiation to us guy. And again, tilting it in directions to get that smooth soft blend into the sky. Make sure that it does not run so down that it covers the entire orange and the yellow tones also. So keep that in your board in all directions to get a perfect blend. I will just pick up a little more of the orange color because the orange color seems to have turned to light. So I will just add a very small layer of the orange color, again, near to the urban sienna color. And I will make sure that the yellow highlight also still remains. And I'll again move my board in all directions to get a smooth blend into my sky. So just adding a little touch of the yellow also again to get that smooth blend. So it's always important in case if your paper is drying, wait for it to dry completely and you can use the riveting technique. And always, uh, you know, to get a good gradation, you should always try to pick up the next color also a little, so that you'll get the perfect blend. Now I'll begin with the sea area. And for the Sea area, I'm going for the wet-on-dry technique because for the first year of the sea I don't want to remain wet for a longer time. So I first picked up the same yellow epic dot for the sky, and I have applied it in the center. Now next time picking up the orange color and applying it on to the edges, both the left and the right edges. Now, after this, I will pick up the orange color in more thicker consistency that is very less of water and get a good tool and add some VFS or, you know, some begun takeovers with this orange color. But then does enter, you can see I still have the yellow highlights visible. We need those highlights to reflect the sunset effect in the sea area. So make sure that you do not cover all of those yellow light. So again, I've picked up some yellow color. I'm dropping in some yellow in-between to maintain the yellow highlights and between the orange sheets. In the same way, I will just pick up some burnt sienna color and add some leaves with the bond sienna color. Just as I add it with the orange color, make sure that when you pick up the paints for adding in these v's, you would not introduce too much water because in case if you will add too much water or paint will spread too much and they will not be in your control. And because of that, it will begin to spread in all of the area and you will lose all the orange and the yellow color looks that you have in your area. So it's very important to control the water by adding in these VS. Now again and pick up a little of the orange and add little more darker orange VFS because the orange wave seems too dark to light as compared to what I added all your suggested little highlights of the orange leaves again. And you can notice, even by adding the orange waves are not adding much a photo. It's majorly pigment and very less water so that the pains don't spread. So you can see the strokes that I applied are not spreading much. They are staying where I have applied them. And I only softly blending with the rest of the area and not completely covering the entire area with that beam. So again, a little more of the bonds, the unobvious you are in there and you can see my buoyancy and Aviv's are also not spreading the testing in the way I am adding. Just that. They even have soft edge because all of this is wet on wet. So now I'm adding more distinct waves. So you can see just using the tip of my brush, I added a few VFS. All of this is still wet on wet, and hence all of this will be soft edged look. So this is a falsely off of the sea and the sky. Now, let's wait for all of this to dry before adding the final more weaves into the sea. So my entire painting is completely dry it, and you can see the perfect radiations that I have in my sky and in the sea. I have all the distinct wave looks awesome. Vector yellow colors popping out some better orange. Then the bond sienna or strokes that we added with the tip of my brush. So all those are visible and they all have soft edges, but they are giving a distinct look to a sea area. Now let's begin painting the mountain range force. So for painting the mountain range, I have just picked up the bond sienna color in a thick consistency and directly adding it onto the mountain range so fast using the tip of my brush, I'm trying to define the shape of the mountain and then I will fill it. So make sure that you are, you know, it's okay. You know, the shape can be random because it's of the darker shades. So you can accordingly cover the sky as you want, but make sure that the color is in a tech consistency because we need a good brown looking mountain. Yeah. One more thicker consistency and just dab the tip of my brush and drop the panes here so that it will automatically bloom and have some darker patches on a mountain range. So that is FOR a mountain range, a simple bond to sienna color looking mountain range. In case if you want, you can surely use any other shade of grounds or the mountain range. But since I have used a bond sienna color for my sky and the sea, I'm trying to get all of the dawns into harmony. Now let's begin painting the leaves. So for painting, the VFS, or false color that I'm picking up is the audience sheet. And I'm going to pick up the orange sheet and a medium consistency and using my pointed tip brush, I've enforced weekend do add the leaves with the orange color. So as I always say, neon to the horizon line, the VMs are going to be shorter in length. And as we will move downwards, the waves will begin to increase in length. So I'm forced adding the waves majorly in the center area, and then I will add it on the, either of the sides as well. Now one thing that you can see, I'm using a pointed tip brush and adding these waves very fine be in-between. I'm using a little bit of the hominin color also to get some darker leaves effect. Okay, Now let's add all of these V's. Don't worry, this is just the first layer of WBS. We will simply adding waves with different colors. Make sure that you do not add too many v is at one place altogether. Try to add little by little so that you can understand. Because always, oh, you know, if you add lithium, that is always an option that you can add more to it. But in case a few, we'll add more to it already. It will be very difficult for you to go back to the fourth stage, because with watercolors, it's very difficult to go back to an earlier stage and connect something veterans with gouache that is easy, undoable again. Now I'm just adding the waves. You can see some of the leaves out a little COVID and some of them. So just keep adding the orange leaves first. Now you can see as I'm moving downwards, I'm increasing the land in-between. The leaves enzyme called me back now. I'm not sure that you are trying to add. So let's add the orange wave stone to the bottom area also. So in the water media you can see I have added the orange VFC leaving a lot of gap because there will be a lot of brown leaves coming into that is the reason I've always said, I add little by little. Now in case after adding the brown leaves, I feel the need to add more of the orange areas. I can always go ahead and add it. So that is the reason IF false dotted the waves at the water media a little far from each other. After adding the brown leaves, I can decide what more to add it. Now next I have picked up the bone sienna color. And using the bond sienna color, I will be adding in waves in-between the orange leaves that I had and CMV as v. But adding the audience waves, we will keep adding the leaves with the bond sienna color. So some very short obvious ASAM. They have any long VFS, some better little curvy, some vector Covey's try to get all the variations as much as possible to make all of it look as much natural as possible. Now at the top side also adding a firing range of the brown colored leaves also dose so that, you know, all of you, EDL looks well into Omni with all of the color will spread across even v. So just adding in a few of the brown leaves in the top area of the COSO. Now for the next layer of the V's, I have picked up the bond sienna color and Morty go consistency that as it does in a more darker tone. And I will just add a few of these darker buoyancy and Aviv's null. So the false color that you can see when I added the bond C unobvious, what I wanna do diluted. Now when I'm adding in, I'm adding it all in multicore consistency, that is the Dakpo v's. And these views were imagined to be in the water media and not much new York with the horizon line. And majorly for around, you know, from these Dakpo Vz is where those branches will be popping out. Now in the top area, just adding a little of these Dakpo VFS. Not much. So you can see I've not even moved to the end diet dock area. Now let's wait for this VM to dry before beginning ahead. So now all of my CBMs have dried completely. Let's begin adding those branches popping out from the CDO. So I have picked up by pointed tip brush again. And picked up some black color, and I'll just begin to add those all branches. So the first one for that, I have done the pencil sketch. So I haven't tried before fluid so that all of those chocolate lines get covered up and rest of it either be adding naturally just like this in different heights. So again, you can all our default, the placement of these branches popping out from this EDA as you want. But dipole, make sure that you do not add all of them. All of the same height on the same shapes. Otherwise it will not look nutshell. So if you want, you can copy along with me and follow the same V. How I am adding in these. My brush has appointed enzyme even to achieve the Tainos strokes and the pKa stops altogether just with the head both von brush. So in case if your brush does not have a pointed tip, I would recommend you to shift to a smaller size brush and add the final strokes with the smallest size brush. So now just adding in these all branches very randomly. So one by one, I'm adding in so that I do not to add too many. I've just one place. Now, ionic Ananda, smaller branch popping out from the sea overlapping the first one. And this one is going to be quite smaller in height as compared to the previous one. This one on the right of the bigger branch that I added. Now to the right of those branches, adding one more ready, big branch. And you can see the shape of this branch is completely different from the first one that I added. So that is what I meant by beating the shape, size, height of the branches that you have tried to add it so that all of it looks touched on, doesn't look just, you know, a copy paste kind of a thing. Now added the smaller branches to this also randomly. And you can see in-between, I'm adding very small branches. I would suggest using the debug my brush. So that is why they say you can either add all the big O branches, pause, then shift to a smaller size brush to add in the smaller branches or as if your brush also has a pointed tip. You can add all of these together. And majorly from von big brands, you can see it's only those smaller branches popping up and not so much big branches. Now adding on although a small branch, so this branch that demotic is more distant from our view, it's behind. So dark is the reason that smaller and height of there. Now let's add one, take bronchioles on the left side. So you can see the branch on the left side is competitiveness that got us to the ones that we have added so far on the right side. Also, you can see I have tried to pop out these branches from the bond. See Anaconda darker tone that we added. So they are all major need from that Docker dawn leaves that we added. That does the reason I had told you I will be adding those takeaways major, the anthem water media asked her ball, you know, pop-out these branches from there. Now just using the same black color, adding a little reflection of this into the CEO. So I have mixed in a little bit of my bond CNN the black color to add this reflection into the sea. So very little deflection, just adding some very small as exact lines. And Jain Do added affliction, do these branches that we have added. Now one last thing left is to add a very small moon into a sky. So using my white gouache, I haven't be adding a very small moon on the top left corner of my sky. So it's going to be a 5050 pretty small moon. So just to unlimited socle out there with the white quash, make sure that you use your white Guassian uptake consistency so that it remains opaque on to the colors that you have added. And just ammonia. In case if you want, you can give a little moonlight effect on the bag DOM that is paused or diluted layer of thought, oh my gosh. Then wait for it to dry and then add though opaque newer. So Yomi I've done without painting for D 42, let's remove the masking tape and see our final painting. That little reflection that we added look so beautiful and giving such an option viewer to the seascape that we have. And those darker brown VS. on making the composition look all the more beautiful Nika flow rather than moving the masking tape so that you do not get off the edges of your paper. So yoga is up being things from the 42. I hope you guys enjoyed painting this beautiful sunset seascape. It's me today. I will see you guys tomorrow and do I make seascape project? Thank you so much to each route of fuel for joining me so far.
49. Day 43 - Evening Seascape: Hello everyone and welcome back to the 50s. Want to call a challenge. We add on D4, D3 today and we will be painting this beautiful sunset sees clear. So let's have a look at the colors that you need. So the colors that you need, yellow, orange, windrows, pins green via SSH and black condo. So these are all the colors that you'll need for today's class project. I have maybe put the abdominal onto all the four edges. I'll just begin with a pencil sketch. So the pencil sketch is the horizon line, which is approximately almost in the center of the people. Next, let's mark a small son area here and do a sky almost in the center of our sky area. So that does it for our pencil sketch. Now I will just add over the rough pencil sketch of the mountain range also. So this is all going to be a little blurry and this mountain range on the horizon line is going to be bright. Okay? So behind this mountain range also, we will be having a blurry mountain range effect. And we will be having the reflection of the sun into the center of the area and the entire background is sort of going to be uploaded one and then divergence be having the foreground grass effect with the black color. So now let's begin painting the sky first. So I'll begin with a clean coat of water onto my entire sky area. So I will try to avoid adding water on that little sun area that we have, and I will try to leave it without water. Then we will try to achieve a bright shining sun out there. So apply an even coat of photo to the, to the rest of your sky area. Now I'll begin with the colors for the sky. So the first color that I've picked up is the lemon yellow sheet. I can apply it near to the round off the edges of the sun first. So you can see very gently just using the tip, I'm adding a little glowing effect there. And now with the same yellow color, I will just be giving lines at the top of the sky and near to the mountain range. Then in between, I will pick up the quin rose color and add the Queen Rose strokes. So you can see I'm using the colors in a little diluted consistency that is very light tones because I want my sky to be a little blurry effect this time. Now I've picked up the windows callow and I'll begin to add the queen rose color onto the remaining right gaps of the sky area. Now just adding the effects of the Queen Rose scholar little bit on the yellow also, but you can see near to the sun area. I'm trying to maintain that yellow look and not adding much of the queen rose colored there. Now I will just pick up some orange color and add it near to the sun area again to get some volunteers around the sun. So I have picked up the orange color in a little medium consistency. And just using the tip of my brush, I'm just dropping in this orange color or little around the Sun. Now using the yellow color, I will try to blend it with. So I'll first diluted orange color mood, and now I'll pick up the yellow color, the same that I used for the background. And I just tried to get a good blend between the yellow and the orange color around the sun area. And I'll try to blend it a little bit document rose color in the area around the sun. And I will also add a little of this yellowish orange strokes into the sky idea to depict the effect of the sunlight. Now let's pick up some Payne's gray color and add some Payne's gray strokes into a sky area. You can see I'm using all the colors in such diluted consistency. Now when you are adding the Payne's gray strokes, make sure that the color is in a light consistency, but it shouldn't read too much watery, otherwise it will spread much. And all you know, it will cover up all the pink and the yellow sky is that you have. So majorly just using the tip of my brush, I'm adding very simple strokes of the Payne's gray color into my sky area near to the mountain range. You can see I added that beans three effects because I wanted the background of the foreground mountain that we will be adding. I want a good reflection of the Payne's gray at the backoff it now you can see all of you is in a very light color tone still. Now I have picked up the Payne's gray color in a very thick consistency, and I'm adding it on the foreground mountain range. My sky is still wet hands. I've tilted up people. The reason why I'm adding the mountains also now because I don't want a clear distinction between my sky and this foreground mountain. Because my entire background painting is uploading one, only the foreground of my leaves that we will be adding at the bottom, at the end are the main focus of the painting. Rest all of it is the background. So that is a reason I'm adding this mountain range also wet on wet, that is, my sky is still wet and I'm adding this mountain range. And hence I've tilted up a bus so that the paints don't flow much into the sky area, making the sky too dark. So ego or what you can do is wait for the US guy too dry or later and then add this. Or if you do not want the soft blue card uploaded look in the background, then you can add or distinct mountain look onesie sky is completely dry. Now just trying to achieve the light effect for the sun a little bit more using the orange and the yellow sheets. And you can see I've still got my total debt so that the black color of the mountain that is the darker Payne's gray color doesn't flow into the sky image you can see present, it's just having a soft good effect and not all much spreading into the sky because I didn't add much water and maybe put a stilted continuously. Now just trying to achieve the light effect around the Sun. Now I've just picked up the windows color and adding a few more strokes with the beans pinto scholar. And just a little, not much you can see. And again with the Payne's gray also adding few strokes because they seem to be too light as they will begin to dry. And once they dry completely, they would have done more lighter. So that is the reason my sky was still recommends. I was able to add it. Now I'll keep this boat tilted only. I will just keep a tree underneath and let it dry like this so that the black doesn't flow into the sky. Let's wait for this to dry completely. So now my sky area is completely dried. You can see now let's begin painting the sea. So I'll keep my boat tilted only so that, you know, Carlos don't flow and dot, dot. Now I'll begin with a quote of plain water onto my entire area. First. I'll first begin with the shade of yellow in the center to achieve the sunlight effect. Then around it, either place the orange color, then the quin rose color. And then I will pick up some Payne's gray color and try to blend it with the Penrose cannot getting dark, upwind nose shape kind of OPO Payne's gray color. Okay. So now near to the yellow on both the sides, I'll add the orange color because in the center, I want to have the sunlight effect on the CAD has been. Now next I'm picking up the queen rose color. And I'll apply the windows coulomb to the entire left and right places that is left to right in the sea area now. So you can see the reason why I've kept my day paper. Because the little pin, the water that vented to the mountain veins, the veins began to spread. And if I would have kept bitstream, the pains would flow into the mountain and ruin my sky area. Hence, I preferred keeping my paper a little tilted this time. Now on the same day at the left side, I'll switch just adding the queen rose color first. Now to make Windows color, I will just add in a touch of Payne's gray color and begin to get a good, Oh, you know, blackish, kind of a pink tone. And I've used this color and add it onto the sides of the sea again. So what the left hand, the right side. And try to drag it to learn the dots and make sure that you do not lose the orange and the yellow look that you have added into your CDR. So you can see as I'm reaching the Santa, I'm moving towards the tip of my brush and lifting up my brush. So CMB keep adding the strokes and make the edges a little darker. So now I've directly pick Dr. Payne's gray color and I will just have little strokes of the Payne's gray color. So you can see now in my CATIA, I have four different colors. That's the yellow, orange, little of the Queen Rose, and little of this docket windrows tune. Now I've shifted the my smallest size brush and I've picked up some Quin rose color and just adding some, a bright windows color effect near to the Payne's gray mix of the Queen Rose because they feel that pins quin rose color is kind of completely hidden. So to get our proper effect of the windows color, just added a little of that. And now picking some yellow color, I will try to get a good blend into the center of the sea. So now just using my clean brush, I'm trying to get a good blend between the Penrose and the audience sheet. And in-between you can see the yellow and the orange highlight that is maintained to deflect go sound effect into the sea area. Okay, now let's paint the sun also to the mycelia. Dry is only then we can add the foreground and domain details in the painting. So till then, let's paint the sun area. So I've mixed in a little touch of the yellow color with my white gouache. And using this color, I will add it into the entire San area that we have your. Now I will just pick up some orange color and I'm little highlights on the edges of this sun to depict some vault effect all coming out from the sun area. So now let's wait for all of this to dry completely and then add the final foreground details too happy ending, and see your final painting them. So let's wait for this to dry and then begin painting ahead. So now my CTI is completely dried and my son is also completely dry. Now shifted to my smallest sized round brush. This is a size four brush, and I'll begin adding the details in the foreground. So I have picked up some black color in a good thick consistency, but make sure that the paints at least are able to flow easily. Now we'll just be adding leaves and different kind of grass effects from the bottom in the sea area. And all of this is going to be your main subject of the painting. So basically your entire background is upload the one and only. This isn't the focus of your freedom. So that is a reason. Now you can see the mountain range that I painted. Oh, you know, I tried to get a soft edge to it so that we can get that blurry effect and keep the focus only on to these grasses that we are adding. So I just painted one stem and tried to point out some pointer grass looks from them. Now, I'll be adding a few popping out from the bottom area as well. So you ought to I'll just add a leave kind of a detailed one and 45 leaves popping out from this area. I'll try to add it. You can go ahead and add any different kind of leaves is 0. If you want, you can even use a color combination mix of different greens. Or if you want, you can add the green, brown and the black color and try to use all three colored in mediations. I'll just be going ahead with black color and adding different kind of leaves, different kind of stamps, different kind of grass looks and try to debt IT gone because all of this is kind of a little field area around the edge of the sea which is popping out from your dots. I'm trying to depict. So you can see I'm trying to have different varieties of leaves. Are some villages, some symbol, single stroke leaves. And then somewhere I'm just trying to pop out those simple leaves popping out from that big stem. So trying to add a different vendor IDs as much as possible. Now adding this one big leaf here. And you can see I've just tried to cover them between the sun. So I've got the sun in between both of these stamps so that the sun also stays in focus because that is the reason I got that. You don't boil orange outline to my son because it was going to be popping out from in-between these two leaves. So the focus would fall in debt as bad. So now added this big branch and from that I'm just trying to pop out smaller branches and leaves Lake structures and I'm fully achieved details out here. Now again, you're in the bottom media. I will just died a few of these single stroke leaves. So that takeover, you can see I start with a thin straw, press the value of my brush and then again, oh, you're not trying to lift up my brush as invent I'm scientists fight with the straw. Now just adding a few of these take one's very randomly. And then in between again, a little detailed leaf as bad. So you can see majorly all of it is overlapping onto each other. And, um, foster adding a little of this, then I'll try to understand where I need to add more, where I didn't need not add more of it. So that is the reason I'm going step-by-step and slowly and not adding much of all of it at one place altogether. Because as I always say, there's always an option to add more, but you will not get an option to remove anything that you have added. So always try to please as object main focus, object little by little, and try to understand where you need to add more of which thing. Otherwise, it will be very difficult to control your painting. Now on the right side also, just adding a few of these bigger leaves and a mix of the smaller need the DNS also. Now again, just adding a few of those single stroke leaves and trying to add details wherever I feel there is gap and needs more of the leaf work. So you can see I've tried to maintain that orange and the yellow look of the sea, which is visible from behind these leaves as been depicting the effect of the sun into the sea. Now randomly vary, but I feel you can see I'm adding these leaves strokes. So that is a reason always make sure that even you add these details little by little and not all together. Now, very randomly vary, but I'm feeling the need, I'm adding them. So onto the left-hand drive, wherever I feel it's important. Strokes in different angles. I'm trying to just try again. So I'm off the strokes of this amine that we added because these look as come back for the rest of the beam. Now, I just pick up a legit off the white gouache and I didn't have to make it look more bright. So that is it for us. Escape painting for the three of the seascape paintings. So you don't want a blurry background look. And the main focus is the sun and the leaves that we added in the foreground. Now let's remove the masking tape and see our final painting. Make sure that you remove your masking tape at an angle against your paper. And make sure that your edges are drained or be careful by removing the masking. So your painting for the 43, I hope you guys enjoyed painting this beautiful sunset, kind of a seascape you with me today. I will see you guys tomorrow into our next seascape paintings. And we adjust six days away from ending this 50 days watercolor challenge. Thank you so much to each one of you for joining me so far.
50. Day 44 - Winter Evening Seascape: Hello everyone and welcome back to the 44 of 250 days watercolor challenge. Today we will be painting this purple sunsets seascape. Let's have a look at the colors that you need. You need a shade of yellow, orange, violet, Payne's gray, black color, and white quash. So these are all the colors that you'll need for today's class project. So I have my paper taped down onto all the four edges. And I will begin with the pencil sketch for this one. So I'll begin by marking the horizon line, or at most a little below the center area this time. Now at the bottom, either macro, the snow other sand area, and above the horizon line, I will just mark out the two mountain ranges that I have. I'll first map this model, a mountain range and then add the bigger mountain range behind it. So that is it for the pencil sketch. Now let's begin painting. I will begin with the sky first, so I'll begin with the plane quarter photo onto my entire sky area. Make sure that your pencil sketches not too dark because this time our painting is with the light sheets. So if your pencil sketch rabid too dark, then it will be visible underneath your painting and it will be very difficult for you to cover up those pencil sketch. Hence, if you can notice, my pencil sketches also saw light, which is barely visible on the screen. Now, I have applied to clean water for dawn to the entire sky area. And I'll begin painting with the colors. So first I'll begin marking out the glowing effect of the sun. So I'm mixing in the shade of yellow, orange and write cosh, and I'll begin with this base color shade of yellow, orange, and white quash. And I'll begin to apply it in the center. So I'll mark out the round first. So the Sendai area of that is going to be right. That's the main son, IDA and around it, I'm just trying to add in the sunlight now. So now in the center you can see I've tried to achieve that gluing or yellow and the orange look. And that's going to be the sunlight area. So we are not going to be adding 0 motivated distinct sunlight. The last thing, it, she's going to be the sunlight effect from between the sky. So now just adding a little of the sand base effect onto the edges. Now after this into the sky area, I will be adding in the violet color. So I will be mixing in a little bit of white gouache to my violet color to achieve a very light and a piece still don't. And so that when it does mixing with that orange, it will pick one, give me a muddy color because it's the right content. So I am mixing in my blue and pink to get a violet color. You can even directly use the direct violet color from your palette. Now to this, I'm adding in a little bit of white quash and using this color forced in a very diluted consistency, I will add it on the edges. So you can see it's almost equal to or transparent sheet of the violet color. So it's a lot diluted with water and white quash. After this, I will be adding the ozone layer. So that is the reason I'm going with lighter tones. And then next tone, I will be going with a darker layer and then I will be making it more darker. So just added in a little bit more violet color and trying to add the second layer. So this was a little extra dots, so I just tried to lift up the color. Also. You can see I'm just using the tip of my brush and trying to drag the color from the edges to London Center. And as I'm reaching New York to the orange light of the sun, I'm trying to lift up my brush pretty. Make sure and be careful about one thing that all you know, when the orange and the violet mix typically to form a muddy color. So New York ago Audi to be gentle and do not apply too much pressure. Otherwise, the colors will get begin to turn into a muddy bone and it will be very difficult to again connect it out. Now, again, I added a little more of the violet tone to this to achieve the third attuned and value for the color and adding some darker highlights with this color. So you can see I have three different colors of the violet into my sky area. The light doc and then the darkest. Now just using the tip of my brush very gently adding a few strokes overlapping the sunlight effect that we have added. Now using the bright yellow color, adding the Samnite effect in the sun in the center. So I added this one since I'm Ada was a little dry so that this color doesn't flow much and spread much. So now you can see that bright shining sun effect that we have. And at the edges, the Popplet sky now with the same violet color, I believe it on the first layer into the sea. So it's all Muslim medium diluted to and new to the horizon line, it's darker. And then as I'm moving downwards, I'm just using Grado and trying to spread the color is a good gradient tool. And you can see how liquid the calories and so much Bye. Also lots of pigment, more of water. I'm trying to achieve a good gradient color from the horizon right till the sand ADR or the snow area that we have Manto. Now, even in the sand EDR, I will just add a lighter tone of this scandal. So it's almost water and very less pigment, even lighter than what we added in the CEO. So this is just to add the deflection of the sky on Google snow. Ada dot v will try to depict floor. So this is the base scenario for the snow. Onto this, we will be adding the dry patches to depict as the snow. Now just at the edges and adding little darker highlights because of the DACA highlights in the sky also on the edges. So you can see the three bones, the skies of the darkest Popolo on the edges and the seas of the medium tone. And then this noise of the lightest tone. Let's wait for this to dry now. So now my entire background is completely dry. My sky, my C and the snow area. So I first begin by painting the mountain range. So I'll begin with the falsely over the mountains. So the fossa is going to be a little diluted one. So I finished the Sendai a mountain range with this lighter tone first and then it dries. I even add the second layer with the darker tone onto this mountain range, which would be schwa as compared to the force change. Now to the fullest range of the mountain dries, I'll begin to add the sea waves into the CEO. So for adding the CVs, I've shifted domain money liner brush. Okay, so this is a very thin brush. And using this brush and the same poeple Carolina diluted, don't, I'm just adding the CVs. So New Yorker, the horizon line, the leaves are going to be shot down. And as I've moved on, what's the visual begin to increase in length to reflect the sunlight into the sea area. I'm leaving the central gap without the poeple VFS because they're either be adding the views with the yellow and orange color to depict the sunlight effect into the sea area has been now major. Now I'm forced trying to achieve that central area look, and that is the reason I'm just trying to add the Kahlo patches or sorry, the color waves with the violet color only on the little area besides Sosa. And now adding the VFS onto the rest of the EDI has been. So they'll say, I've lifted completely blank. I've enforced have the yellow and orange waves and then add a few of the popular VS. Now you can notice as I'm moving from e from my horizon line, the length of my leaves are increasing. And by adding these beings, I'm being very patient and trying to add them very slowly so that I do not ruin the entire loop. So be patient and adding these waves can take a little longer time and miss him a tedious task. But it's very important to maintain the land and the movement of the VS. So in-between you can notice I'm even adding of fuel of EVs, which are literally called Egon Schiele to maintain a balance into my CAD. Now, as I'm moving, move downwards, you can see I'm adding the VFS in much larger lens and a little darker leaves in between to depict a little more of the detail leaves. So in-between you can add a few leaves with the Docker poeple are low order, darker, violet tone. So that will all had different variations to your seat. And in between you can know this oil local VBE offset I'm trying to add in. Now in the bottom center area also, I will be adding in the pelvis. And at the top I will add the poeple leaves. After adding in the yellow and the orange leaves, then I will just add a few of the pelvis, but then the bottoms and I've completely added in the entire line. Now just trying to achieve the Vive look on the edge of the CSB. Now just adding a few of the COVID and the Docker VM's here in their indices. Then needs will be for the first layer of the sea and the mountain to dry completely before beginning ahead. So now my first layer of the VFS is completely dry, and I'll begin adding the yellow leaves in the same area to reflect the sunlight. So I've mixed in the yellow, orange and a little touch of the white quash, not much this time. And just adding the leaves with this color in the center area where we left a gap for the CVs. And also you can see the sun is shining so bright because of the yellow color that we added at the end. So first adding in the weeds with this yellowish orange color, and then we may even add a little of the yellow leaves if needed. You are in there. So just adding a few of them in between the Popplet also near to the center area. Just a little, not much to get a perfect balance. Now, after this, we will begin to add the second mountain range. So make sure that your force mountain ranges also completely dry. So I'm mixed in a little touch of Payne's gray to my violet color and got this darker grayish violet tone. And using this tone either just type the second mountain range on my horizon line, overlapping the first one. So the first light mountain ranges visible from behind and add the four foreground area. You are adding this darker mountain. And you can see very randomly have achieved or shape of the mountain range. And now I'll add a proposed horizon line and fill in the entire mountain with this color. Shifting to my black color to add the details you are in the snow area, so forth using my point of the brush, just adding very small lines into this new area. For us defining the distinction between the C and the small area by adding a very dark black line. Now in this new area, just adding a few of the black dots, I'm going to add a little of the drivers towards. So this is basically trying to add in the muddy area or the rope and the stone effects. It's actually the beach area which is completely covered with the snow at present because it's kind of a snowfall evening that we're trying to depict a new suggest adding a little of this black patches to reflect the stones or a little visibility aren't there. And then we will add little dry brush. So the drivers may cover little of this. So make sure that you add in very distinct and very randomly or nothing in specific. Now I have picked up the Payne's gray color and I do not have any excess water on my brush. And just adding this dry brush stroke with the Payne's gray color. So you can see, I'm just trying to add these strokes may engineered the bottom area and all from the edges and in-between just adding a few batches you're indebted depicts some snow effect. On this side is the side effect of which is visible from between the snow, suggests a little of these dry brush practice for us with the lighter tone and then a little bit of darker tone. So for the first layer, I use toppings, clique are lonely, too diluted. Now, a little more with less water, sunshine to achieve these different patterns. Now let's add the tree in the foreground area. So on the left side, we will be adding this G. Make sure that your second mountain range is also completely dry before you begin to add this. So it's majorly just going to be G with branches because there is no foil. Foil is because of the winter scene that we are trying to depict them. So I started with a thin stem at the top, and as I move downwards, it has tone takeover. Now I'll just add a few branches to this. And from these branches popping out the smaller branches very randomly keep adding these branches. Nothing in specific as I want with my branches can completely be different and your branches can completely be different. The placement that you want to go ahead with, it's perfectly fine. Just make sure that you do not cover the entire San area. Let that sundries and the sunrise, sorry the sunlight be visible. And just keep on adding these V's or sorry the branches. Now also be careful about one thing that if your brush does not have a pointed tip shift to a smaller size detailer brush for adding in the smaller branches. So since my brush has appoints pointed tip, I'm able to add all the details together. That is the smaller branches as well as those big optical branches just with the help of one brush. But in case of you do not have that shift to a detailer brush but after adding the takeover branches so that you have a proper look to your scars. Tsv. They're popping off. After this, I will shift to my white gouache and add a few leaves to deflect the sunlight again. So I'm using the white Guassian, a very thick consistency so that it remains o p. In case if you do not have a white quash, you can even go ahead and add these leaves with a white gel pen. Or you can even use your white acrylic. White watercolors may not stand out this vibrant. And after this, we will be adding a little dry brush with the white color in the snow area as well. So just to over the patches that we have added, simply adding some dry brush effect. I know the stones and the lines that we added will get covered up. That is exactly what we want. A perfect view of the sun and the mine area mixed out together. Now again, I've just picked up the Payne's gray color and I'll add a little of the stone and the mud effect on this idea that there's a slow ADR that we have just a little effect, not too much, and it's majorly onto the right side that I've added. Now again, I'll shift to my mini liner brush, and I'll just add a few leaves into the sea to depict more depth into the sea. So using the violet color in article consistency and the darker tone, just beginning to add a few of these dark Covey's. So very randomly. So when you are adding them near to the horizon line, make sure that they are smaller in length. And as you are moving downwards, increase them in land, and even just trying to add some shadow to that, the Covey's that we added. So very randomly you can see that I've added that takeovers. I'm adding this darker line just underneath that to reflect the shadow of the leaves underneath. So just to so we are done with our today's painting and evening snowed side. Oh, seascape view. Now let's remove the masking tape and final painting. Make sure that you remove the masking tape ones your painting is completely dry and remove it at an angle from your people so that you do not take off the edges and always remove the masking tape against your paper and not towards the angle of your people. So your final painting with those clean edges, I hope you guys enjoyed painting this beautiful sunset seascape again with us knowing, look with me today. I will see you guys tomorrow and do the last painting of diplomacy skin. Thank you so much to each one of you for joining me so far.
51. Day 45 - Boat Seascape: Hello everyone and welcome back to the 50s watercolor challenge we had on the last painting for the prompt CSC. Let's have a look at the colors that you need for today's class project. You need a shade of yellow, orange, raw, umber, burnt umber, burnt sienna, Payne's gray and black color. These are all the colors that you need for today's class project. So I have maybe put down and let's begin with the pencil. So first we'll begin by marking the horizon line. And then we'll have a rough shape of the saving both that we have in RC. So now I want to make right side. I will just begin to add this boat in case if you want, you can go ahead with any other good silhouette of your choice. Need not be the same as mine. It's specifically your choice and you can change this a little bit as your preference. In case if you want to go ahead with the same solute as mine, you can pause the screen after then dial pencil sketches done, and then go ahead with the same silhouette. Now roughly just underneath this board, I will just give a very small pencil and a light pencil sketch of the deflection that we will be adding. Make sure that this pencil sketch is quite light because this is just for reference where the reflection of the board we are going to depict. So make sure it's in a very light pencil sketch. Now let's begin painting the sky first. So I'll begin with a clean coat of water onto my hand, diode Sky Italia. And I will just all even it's okay if you run into the boat area of the sky because it's going to be off the darker colors later on. And the sky is of a lighter tone, so it will all get covered up later on. Make sure that you apply an even coat of water throughout. So I'm done applying and even CTO photo. Now I will first begin with the shade of yellow, orange. You can mix your yellow and orange to get this yellowish orange here in the center of my sky, I will try to maintain a light look because of the sunlight effect that I want to show there. And onto the edges I'll begin to apply the color. The colors will automatically begin to spread industrial area because of the water that we have applied there and create a lighter tone day. So make sure that in the center of the sky you do not add much of the kalos. And I will just be adding these drugs from the edges. Now you can see I'm trying to lift up my brush as soon as I reached the center of the sky because I wanted to maintain that light effect there. Now just again adding a little of the kalos again on the same way how I add the first one. Now next I'm picking up the shade of raw umber and I've shifted to my smaller sized round brush and I'm picking up the wrong book. In a medium consistency. I'm not adding much of Mordor and I'll try to add the clouds into the skies. And this is the fourth layer of the Romberg clouds that we are adding. After this, we will still be adding a little of the Docker depth. Now you can see I'm using my smaller brush. The beans are not spreading much because I have not added much of water. And I'm trying to maintain the consistency of the paint. You also that it does not spread and cover the entire yellowish orange shade that we have added. Now onto the top, top-right corner. I'm just adding little patches to act as cloud. So you can see just adding those netted around C shapes, dabbing the tip of my brush and just lifting it up and you can see the orange gaps that are left in between. So all this will begin to add depth into your sky. Now in the same way, I will just pull out some diagnose strokes from the lower left corner as well. So you can see, again, I'm still trying to maintain that center light effect that I want because of the sunlight effect that I wanted to depict them. And you can see the orange color in my sky is still visible. And I haven't covered it up completely with the raw umber Coulomb. Also, my Ron Buchla isn't such a thick consistency that it's not spreading much beyond the limits that I want. Now just picked up the middle of the yellowish orange shade and add it to the white light. And now using a damp brush, I'll just try to get the calories in a little so that I have a predictor lightest color tone out there. So just adding a little round shape to depict as the sun. And now I'll just try to blend the colors around this. Now just going to define the sun area more. I guess my brush had a little off the Bhopal gala at the bottom which has got applied here. So I'll just lift up the color again and try to get a good blend here. So I'll pick up the yellowish orange shade again and try to define the highlighted area around it now. So in case if you want, you can skip the step of trying to get this highlight, but I would recommend you to at least try rather than giving up directly. Now picking up the yellowish orange shade, I will try to move it in little circular motion around the sun area and try to get a little of the sunlight effect around this. So you can see the round VBS that kind of look that I'm adding. Okay, so that little effectively give it that side effect to the sky. Now again, I'll pick up the wrong book, Allah, but this time and more thicker consistency so that I have a darker tone in case if you want, you can mix a little tinge of your darker brown shade to this to get a little darker color. So I just mixed in a pinch off the wrong book of drama with the bone Don Buchla to get this little dark tone. And on the same lines as I was adding the clouds with the wrong book, Allah, I'm adding it with this darker Boone. The only difference is that this time these clouds are more fewer as compared to what I added with the rhombus shape. Now let's wait for the sky to dry completely and then begin painting the sea area. Sky area is completely dry it, and they'll begin painting the CAD. So for the C here also, I will first go ahead with a clean CTO photo. Also, you need not leave, although both scape your also because it's perfectly okay if you painted over the board also because the board is going to be off the darker tones and that can be covered up with the lighter tones that you have in the background. So that's perfectly okay. Just be a little careful on the horizon line that the colors from the sky do not begin to, you know, again read because of the water if it goes into the sky area. Now for this area, I'm first going to hit with a shade of yellow color. So this is the cadmium yellow light color. And then apply this color mixed with a little bit of orange now and just try to get a good layer of this color. Now we are going to add a lot of details in the seascape, wet on wet. So, you know, you need to make sure that you see a daddy means vet for a considerable amount of fine. Also, you need to understand the timings of adding the details that we will be adding. A few details we will be adding directly or when after applying this yellow sheet, a few details will be applying once the paper is kind of a little dry but not completely dried. So I will first begin to the shade of orange color and begin to add the photosphere of the V's. So I'm picking up the orange color without mixing in any yellow and I'll just add a few leaves on to this yellow color Leo that we have. So when he randomly just adding a little of day in strokes to get the orange effect into the CAD adjust in the center homogeneity. Now next half picked up the wrong book, Allah, and I'll begin to add these colors from the edges. So again, you can see my beans are not spreading much because I have not added much of Bordeaux. And I'm trying to maintain the consistency of the paint so that it does not spread much uncovered, entire yellow and the orange shades that we add. So onto both the edges, I'm trying to pull out these raw umber v's. So this is just a false Leo. All of this is wet on wet and, you know, you did not require people to dry much. Now I'll just add a few more of the raw umber VFS. So I'm done with the fourth layer of v's. Now, I'll just wait a few seconds for this Lao-Tzu center LinkedIn, then I will just pick up my next sheet. So I'll just mix in raw umber with a little bit of burnt sienna or burnt umber to get a darker brown sheet. And once my layer of leaves is almost like 30 percent dry, I'll begin to add the second layer of fees. Make sure that your entire area has to be read, but not that wet how it was highlighting the first name. So now my people seems to be the perfect consistency for me to add these V's. Now you can see I'm adding these views in a little curvy Mano. Also I'm beginning to add these majorly from the bottom area, because at the top area, I'll be adding small Aviv's and as it is on the top, Ada major part will be covered with the board. So the major VIV effect has to be at the bottom area. Also, if you notice my beans are in a proper consistency, they're not spreading much. You can see the sheep that is retained of the leaves. It's having a soft edge because of Darth Vader on wet technique that we're using. But my leaves are not spreading and covering the lighter tones underneath. Now, as I'm moving at the top, I'm adding a few obvious and shorter than land. Make sure that you add these veins around the boat area also completely and especially underneath the board also to debit the VIV effect because of the war movement as well. So we are done with the second node of the waves. Okay, now we'll wait for this also to set a little bit, but make sure that again, your page doesn't has to dry completely. Do then I'll prepare the darkest tone for adding the v's. So I've just picked up the bond Don Buchla do the technique without adding any lighter tones of brown. And now using this shade, I'll begin to add some darker index into the VIF. So majorly, under the leaves that we painted underneath that I'm just giving light does drops of this ONE is the thinner strokes of this darker color to depict the shadow ends at affliction effects. Now, this column I'm adding once my ADI is kind of 50 percent dry. So basically we are walking with the Aviv's in three nails. That is when you began painting the CAD. Then the second video we added when the paper was kind of 30 percent dry and now we are adding this when it is almost 50 percent dry. And the Docker VM's, we're only at the bottom areas much. Now. I have picked up a little bit of Payne's green mixed with brown. I'm using this color of the shadow that we had added. Just adding you didn't do the exact manner because it's going to be blurry. This is also wet on wet because we want the shadow to be underneath the other CAD. And just adding this model line to reflect the board as well. And all of this shadow you can see a little bit of the brown colored is visible in between these lines. And since we are adding this wet on wet, all of this will get called up. Now let's wait for all of this to dry completely and then add the final boat silhouette. So now my entire area is dried and you can see that affliction has turned out to be bloody exactly as we needed it. Okay, Now I will first begin by adding a small mountain range or a bush change on my horizon line to distinguish my mountains and the sea area. So at the horizon line, picking up the darker brown shade, I'll just begin to add in this you want, you can mix in a little bit of Payne's gray to this color. I have picked up the CPR Logitech viscera. It's already a darker brown color. Ok. And I've rigged it up and not take consistency. So it's almost if you fall into a black color sort of OCI. Now in-between the board also make sure you have that little gap with the horizon line is visible. So I did that small mountain range, that also, so you can see a very fine mountain range, but it defines the distinction between your sky and the horizon. Sorry, undersea ADR, making IT DO both look distinguished. Now let's begin painting the board area. So I'll first begin with the shade of brown sienna. And I landed on Buddha or flaps of the board that we have. And then do that, I will add the darker dawns around it. So first picking up the bone CNR callow, make sure that you use a smaller size brush so that you do not lose the shape of the board or if your brush has appointed to use it. Now, I'll just add the fourth layer of the bone sienna color. Then pick up the Payne's gray dawn and added onto the edges of this so that it will automatically lead into the Sando. Sando. You're going to have a little of the bond C and our stroke. And then on the edges that darker dawns. So this will reflect the effect of the sunlight on this, making the center area shine right now just dropping in the Payne's gray color from the edges. Now the same vein, we will be painting the one on the right side also. So first I'll begin with the burnt sienna color and then pick up the Payne's gray color and added just on the edges. So you can see on the left side, in the same though you have that on buoyancy. And I look at this reflecting the sun effect there and adding the perfect, you know, real do this. Now onto this side we had a little bit of a box to leave it because we just had a little flap in the silhouette that I am referring to. Now adding the Payne's gray color on the edges. Make sure when you're adding the Payne's gray color. Do not add much of Florida. Otherwise, the beans click on Login split so much that it will cover up the entire MSN, aka law, and you will lose the bond C. And I look, and the reason why you added the bone sienna. Now at the bottom, I'll directly use either the Payne's gray color, other black color and add though NDI, a boat silhouette. So I hope the pencil sketch that you added is Nitin visible to you at least for you to follow. So just fill this entire area completely with either black or Payne's gray color. And now I'll just dive little line D did onto the right side. And then I will use the tip of my brush and just add a few lines in the reflection as well and try to blend. It went so far as to having one line your, and now just a few line into the reflection. Just making this board a little darker Foster. Now using the tip of my brush, just adding little deflections, vetting antennas compared to what we added earlier. And then smaller ones you can see. And I'll use a damp brush and blend it also a little so that they're not visible so distinctively. And then that will be it for our class project for today. And we'll be done with our D 45 and the last one for the prom see scheme. Mean just be left with the last prompt and last five days of this 50 day watercolor challenge. Now using a damp brush, I'm just blending this an adult so that they don't need to shop at all. I'm just adding this Linton D1 here. And we are done with our class project for today. Let's remove the masking tape and see our final painting. Make sure that you remove the masking tape onto your painting is completely dry. Otherwise it may begin to spread onto the edges and ruin your people. Also make sure that you always remove the masking tape against your people and not towards the angle of your paper. So your is our painting for D 45 and just five Modi's to end this 50 day watercolor challenge. Thank you so much to each one of you for joining me so far.
52. Day 46 - Northern Lights 1: Hello everyone and welcome back to the 50s watercolor challenge. We are on the last front and it is Northern Lights. So this is the first one for the front, a pretty simple one. Let's have a look at the colors that you need for this class project. You need a shade of yellow, green, green roofs, turquoise, blue, indigo, Payne's gray, black, and white goulash. So these are all the colors that you would be needing for the post class project of this font. I have my paper taped down onto all the four edges, and let's begin painting. Make sure about one thing that your paper is taped down. There is no pencil sketch for this one. So I will directly begin with a clean auto photo onto a entire sky area. Now when you're working with the prompt northern lights, you will have to be a little quick as well as you will have to be a little careful that your paints do not blend into each other or that do you know, you'll ruin the entire look of the Northern Lights strokes that you're trying to add it. Also, this time the colors that we will be using, we will make sure that you do not add too much photo. Otherwise, David spread a lot and it would be very difficult to control the flow of the colors on the people then. And then it will be difficult to achieve those clean strokes into the northern lights and maintain the different colors in the northern lights. Now in case if you do not have the yellow-green color, you can mix in a little bit of your yellow or green to achieve this yellowish green color. Or if you want, you can even use the cobalt green color. I will be using the cobalt green color ahead and a few of the exercises. But for now, I'm beginning with a yellow green color. So now I'll shift to my round brush and I will pick up the yellow green color directly from my palette. You can see I'm not adding much of photo. I will directly be using the paint and a little thick consistency. Now begin to add some COVID strokes into the sky area. So you can see I'm adding the hot seat strokes, kind of a local leaving space in between. Because then we will be adding the other colors, strokes as well. Now next I will pick up the turquoise blue color. So the peacock blue color from this palette is equal to the turquoise blue color. You can go ahead with the turquoise blue color. And in case if you do not have a digital coins blue, you can mix in a little touch of green to your blue to get the turquoise blue sheet. Now in between the gaps, I'll begin to apply the turquoise blue color. Make sure when you pick up the turquoise blue color, there shouldn't be any additional water. Otherwise it will spread so much that it will cover all those green strokes. So it's very important that you control the strokes here and pick up the color in a medium consistency so that it does not spread much. I'm adding these strokes, I'll throw in a little curvy manner. So at places vetted, spreading a lot, I will try to lift it up with a damp brush and try to have that soft edge between both the PAN-OS, but make sure that no Kahlo overpowers the other much. Now next, I will shift to the Windows color and just add a few strokes of the Queen Rose Kahlo. So by people is still wet and I can walk quickly. Ozone Leo's. So I'm going to mix in a little bit of the Bright operator to my Penrose and begin to add the strokes in between the white gaps at random places so that we're not strokes is going to be quite less. Now when the rider better mix, blend, turquoise blue, polite will give you a little published on out there, and that's perfectly okay. Now the next color that I will shift two is the indigo color. So I'll pick up the indigo color from the white knight set. Now you can see my people still read, the beans are not spreading much. I have AB, I have been eager to control the water on the people. Now using the indigo color beginning from the top, I will just add some darker strokes from the top. Now make sure that you do not cover any of the color completely. So you can see a little bit, despite me adding the indigo courts and even the green is visible. So major, neither entire top area is going to have this darker strokes of the indigo color. So keep adding them and you can notice even my lighting, the indigo color. I have tried to control the water hands. It's not spreading into the kalos completely and via email to achieve distinct strokes and all the color looks into the Northern Light galaxy. So this is the first one for the Northern Lights, and I've tried to keep it simple. And now I will just rotate my board in all directions a bit so that you know better whether beans need to flow, they have a soft edge between all the colors and no color has any sharp edge between it. Now again, I will just pick up a little of the yellow green tone and added at the places where the yellow green is visible because I feel the yellow-green will dry even more lighter and will not stand out by countries or just added a little touch of that same V, picking up a little bit of the bright opera and adding a little pinks, true? So this time you can see the palate is more vibrant than the previous job that I added. Because these are kind of the final strokes that I'm adding. Now again, I will just delete my board in all directions so that these scholars also blend and flow into each other. Now using a damp brush, I'll just try to blend it. You are because this Kahlo seem to be the two less water hands. It's not flowing naturally. Suggest using a damp brush. You can always blend the colors. Now I'll just pick up a little more of the indigo color and add some highlights at the top area that I feel the color is a little lighter. So that is why your paper has to Steve and for the longest time, because for northern lights you need to walk slowly on it so that all you know, you do not spit it all add much off either one color on all the beans flow into each other such that the strokes get through it. Now I'll again just did my border little urine there and then wait for all of this to dry before moving ahead. So you can see I'm trying to do denial detection so that I have soft edges between all the strokes that we have added and variable, you'll feel that the paint is beginning to flow in one direction and you have not wanted to flow that way, then tilt it in the other direction and the beans will again flow in the opposite direction. And you can see now again in the sand doping Galea IV been able to convert by just dumping it in the opposite direction. Now next week for this to dry before moving ahead. So now you can see my entire Northern night sky is completely dry. And let's begin by adding the stars forest. So this time for adding in this task, I haven't been using the toothbrush because that gives the final styles. So I've enforced pick up some white quash and take it out onto my palette. And then using the brush I will sprinkle the stars. Now make sure that you pick up the white quash enough thick consistency and do not add much. Otherwise you will not get the opaque stars do so in order to maintain the opaque stars loop, it's very important that you control the water into the white stars. So I would just get the old paint right consistency using my round brush and then using the tool brush, I will begin to sprinkle that stars into the galaxy. And after that, we even paint the pine trees at the bottom of this Northern Lights view. So I have picked up the white gouache onto my brush and now using my finger, I will just begin to sprinkle these stars so you can see the finite stars that we are getting and they are so fine. And all in all you get a lot of them. But so minute that they look perfect for the northern lights sky. So make sure that you use the Apollo noted consistency so that even you have an opaque look. Now the other thing you can do is you can first add a few of the fine styles using the toothbrush so that you get these fine stars and a lot of them together into your night sky. And then you can use your round brush and sprinkle of you off the stars. So I still get a little bigger stars also. So now I've shifted to my round brush and using my round brush, using my fingers. I haven't got the brush so that I get those because stars, so now you can see I have different sizes of this ties into my galaxy and they look in a perfect combination altogether. Now let's wait for these tasks to dry in a bit. Then, then I will prepare it in the color for adding though buying Gs. So for adding the binaries, you, you will spins gray color or black color. I haven't been using the Payne's gray color for adding in the pine Gs. So I haven't been using the Payne's gray color from my right night set because this set does not have a Payne's gray color, but the beans green color, this sect or is almost equal to indigo color that is from the SEC. So now I just pick up some Payne's gray Carlo and begin adding the binaries on the foreground. So that is the reason you can see at the foreground, I did not worry much about the blending out there. Now for painting the pine trees also make sure that you pick up the color in a little thick consistency and do not add much of Bordeaux. So I've shifted to my smallest sized round brush which has appointed, this is the size 3 Princeton heritage don't brush. This brush has a pointed tip ends. I'll be able to add the fine details along with this. Now you can see my color isn't such a thick consistency. And I'm first beginning to add the pine trees on the right edge and the other in a little tilted Mano that is moving towards the center. So then we will be adding the pine trees on the left side. They will be tilted towards the right, that is moving towards the center. And then we're adding it on the right side, they are tilted towards the left, that is moving towards the center. Now I'm not adding much of the detail by Andrea. I'm just adding a very simple buying cheap at this inbuilt branches. So in case if you want, you can go ahead with adding or detail one. But I prefer adding my pine trees the simple way and not much DD. Okay, now make sure that you read the heights of defining G throughout and are not added in the same size throughout. Now, I'll begin adding the next one you are, and that will be a little smaller as compared to the first one. Now the next one you are again, I will add it almost equal to the size of the first one, but this time with a very few branches and not much. So in-between, again, you can add this mediation as well. You can add a few of this cost buying G and off you often all you know, law finish by injury. So all of this will add defense and detail to your painting and make it look more beautiful. Now also one thing that when I'm in the center, I'm not auditing these binaries a lot. So my Eugenia on the edges, the boundaries that I had, I'm tilting them much. Now you can see I'm very gently just moving my brush left to right. I need for the bind G. And now this is kind of a pine tree that I'm adding. You can see that for an age is quite less onto this one. Now your from the left I will be adding a big pine tree and you can see it's a little tilted already. So as I said, when we will be moving towards the left edge, we will be adding the delta G's. Again, I'm not adding the bind these in-between for us because first I thought let's please the bigger pine tree. And that's then let's see what other kinds of boundaries we need to add of which height. So that as I always say, we do not do any one kind of 15. So it's always better that you add all the different things and then see what more needs to be added accordingly. Now, I'll quickly add the foil H2, this big bind G, and make sure that as you're moving downwards, the length of this point H will begin to increase and they even begin to form a triangle shape at the end. So I'm almost reaching the bottom of this bind G makes sure that you'll be a little patient by adding these pine trees and don't rush despite adding the simple foliage. As you can see, I'm not even adding the detail once you're just pretty simple ones. So make sure you be a little patient while adding these simple ones as well. Otherwise you may lose the shape of the pine G. Now as I'm reaching the end, I'm just adding more of the black patches to show that for religious filled up much. So you can see now I'll just fill in this area with black completely. That is the bottom of the tree has a lot of foliage, hence nothing is visible nucleoli. And in fact, I will add this small black line onto the entire bottom area so that all of the pine trees look coming out from an area. So Saudi knock my brushes slipped by. Now, quickly add some smaller binary is your again a little tilted. And you can see these are quite minute. And just to fill in this piece, make sure that you maintain the height. All of them in big O heights. Otherwise, the entire Northern night sky will be hidden. Now at the bottom, just adding a fine line to show on the pine trees popping out from one piece. Now quickly adding another binary or in the center. And then maybe I'll just add one more pine tree on the leftmost edge, and that will also be a little dead. And then we'll be done adding the binds to this Northern Lights painting. And you can see in the sky we have all the colors visibility or distinctively. The green strokes are dark blue strokes, that indigo strokes and the window strokes. So that is important to achieve that all the polos be visible. So your B are ready with topping. Think for the 46 on the first one, for the prompt northern lights, I kept a pretty simple one. We will be painting for the more detailed paintings in the Northern Lights prompt in the last three days. Now let's remove the masking tape and make sure that you remove the masking tape once your wantonly or is completely dry, otherwise it may ruin your day. And if you remove it before that, be a little careful and always remove your masking data from an angle from your paper so that you do not date off those clean edges. I hope you guys enjoyed all the ten different prompts for the 50 days watercolor challenge. And I hope you will enjoy all the five paintings up this prompted test. So your is awful spending from this bond. I hope you guys enjoyed painting this. And I know Painting Northern Lights is a little bit a difficult object, but with practice, you will begin to get it perfect. Thank you so much to each one of you for joining me so far.
53. Day 47 - Northern Lights tent View : Hello everyone and welcome back to the 50s. What kind of challenge? This is the second painting thought for the prompt northern lights. So let's have a look at the colors that you need for this one. You need a shade of yellowish green, turquoise blue, indigo paint, white quash, and black Congo. So I have my people deep down onto all the four edges. And there is no pencil sketch for this one eagle. So we'll quickly begin with a pin photo, photo on the way entire sky ETO. Make sure to apply an even coat of water throughout onto the entire species. Because you would meet the people to stay there for a little time to paint your entire night sky. And so that actually means, oh, you know, wet enough for you to get all those proposed troops and the soft blending. So if you're using o people which is 25 percent cotton or less, run your brush multiple times so that techniques of people stays wet for a longer time. So I'm almost done applying all the CTO photo. And despite my people being 100 percent coordinate, you can see how many times I kept running my brush. Now, I first begin with a yellowish green color, and this time we are going to paint a spiral galaxy look, I'll showing out from a tend to view. So now our strokes are going to go in the spiral manner. So I first applied one layer. Now giving another stroke and from your eye will take it into a spider more. So you can see, I just took that stroke and got it into a spiral mode, leaving gaps in between for the other colors to come in. Okay, So the spider is mentioned you onto the left side and on the right side we only have the strokes coming up from this spider. Now leaving some gaps, you're on the right. I will give the second stroke as well. After this, I will shift to the turquoise blue color and add in the turquoise blue strokes in-between the spinal white gaps that we have left, forming a spider with the turquoise blue color also. In case if you do not have a dope boys blue column, you can just mix in a little bit of green to your blue and get a dark blue color. Now you can see again in between the gaps, just moving my brush in that spiral manner. Make sure that you do not add much of photo otherwise the paint will spread much Andy may mix with each other, not giving you the distinct Brooks and also make sure that you leave a little gap in between if you want, so that the colors will automatically meet together and get the perfect blend. Now in between, you're also adding the strokes in everywhere. Then we will just add some darker highlights with the indigo color in-between these strokes. Now I'm picking up the indigo color after this and I'll begin to add the highlights with the indigo condo. So it's just giving in the turquoise blue quotes. When I begin with the indigo color, I will be applying the indigo color just on the edges of the turquoise blue color. So both the sides edges. So now in the center, I begin with one edge of the Dogecoin's Luca. Hello. And as we move towards the coast looks I can add the indigo color onto both the edges. So you can see in-between that is the turquoise blue color that is visible on the edges. You have the indigo palette and then the green color. Also, if you noticed my beans are not spreading much because of the consistency in which I am picking them up. If you will add too much water or even slow and you wouldn't be not able to control this movement of these tools, losing the effect of the night sky that we are trying to achieve it. So even under right side on the tickets tropes of the turquoise blue color, just adding the indigo color on the edges. Now you're at the center of this spider. I will just open it enough, the indigo color in the white space that is left behind. So now you can see we've got the perfect strokes and all the colors of visible and the spider looks perfect. So I can just show it to you quickly cap onto a rough sheet despite at how to get it. So I'll pick up the yellowish green and I will just place the tip of my brush and then begin to move my brush in circular motion, leaving gaps in between. So you or evil to achieve this, look. And then between the gaps, you can pick up the second tone and go ahead the same V. But this time I have been to the spider moving towards the left region II. So we have a small spider, amazingly the big leaves that are bounded. Now my entire background is completely dry it, and I'll begin with the pencil marking of the window view that we are going to paint into this. So I will just do a very light pencil sketch. Make sure that you do not place the pencil marks to dock. Otherwise it would be very difficult to cover them. Also, make sure that, you know, you'll do the pencil markings very Nike that does not apply much of pressure. Otherwise it may begin to create gaps into your paper as well. So if you want. You can first week 0 and C then dial a pencil sketch. Or maybe you could even do the black marketing services a little bit markings, and then you could paint along. So now we're in-between. I'm giving you those window grills that we want. So first in the central area to cause cheat nine and then onto both the sides either add three to four lines. But even beyond that, to diagnose. Now seen the ads on the left we added I'm adding it on the right equidistant. Make sure that the left and right look almost identical. That is, the gaps in between the lines that you are adding has to be a little identical. So go with a legitimate argument. All of you could, you know, going your way, how you could get them equidistant from each other and looking symmetrical on both the sides. So that is it. Now first, I will just pick up some white wash and splatter the stars into the night sky. So for stretching the size again, Ivan be using the toothbrush to get those fines task. So I will pick up the right quash in a thick consistency without adding much a photo, I'd just add a drop of water to get the perfect blend. Now, I'll just pick up little effect onto my brush and begin sprinkling the stars using my finger. In case if we do not have any boot brush to use it, you can go ahead with your brush and strategy by dabbing onto your brush. So I've been watching a few stars maybe with the brush also lead to run, depending on how much stars or what proportion do we need more. So when you are adding these tasks, you've got to be patient and add it little by little until all the spaces. It shouldn't happen that you add more of them onto just one. Please try to have them equally onto the entire sky area so that it looks perfect and you know, very blended with your galaxy or the night sky, whichever of, you know, any of the paintings that UP and using the pool brush. Now, I'll pick up my round brush and I pick up some whitewash onto my round brush and splatters of fuel because stars with the help of this. So you can see with the toothbrush we will getting verifying stars and bit.ly round brush, we get a little thing called Stars. So that is how you can get the balance and do your entire sky. Now, I will begin with the black color, and I'll begin adding the details to the tamed window view that we have just mocked up with the pencil. So now, in case if you didn't have the pencil sketch, you can see this black marking and go. Or if you have the pencil sketch, you can follow the pencil sketch that you have added. I'm using a smaller size brush so that my details don't run out of proportion. Your and I have control over them. So now just I will fill this entire bought them EDR with the black color first. So for pulling this entire ADR, I'm using the black color in a good thick consistency so that it remains opaque. And if you want to add too much water news that you will not get, this'll be McKesson, all of the RDD, Carlos being dead, I'm beneath. So it's very important to use the inequality consistency. Now I've just did my board so that it's for me to add the block on the top EDA Also because that also has to be filled completely with the black color. So on that dot it is an elliptic hexagon sheep or edge. And at the bottom it was a little semicircle, kind of flashy. So that is the difference in the shape at the top and the bottom view of the window that we are trying to depict your, so it's basically the Northern Lights view from a 10 to Van Gogh. Now you're also using a smallest size brush and take P If you want, you can go ahead with the Payne's gray color as Ben. I am using the black color and not going with the Payne's gray color. But if you want, you can surely use the beans paper layer thick consistency and that will be perfectly okay. Now filling this entire Soviet black quickly. So you can see my color is so big that it is covered the entire bottom layer and I have a distinct lack look and none of the buttons offices visible. So that is why it's important to use the ballerina thick consistency to get this opaque look. Now, I'll begin to add the glass. All the window, please stop pencil markings that we had done. So I'm using my pointer tip brush to add these GPS in case of your brush does not have a pointed tip. You can via for all of the black Leo, Deputy interdental top and bottom to dry. And then use a scale and a black marker to add these fine lines. And in case you feel comfortable adding these with the help of your brush, then go ahead and add these fine lines using your brush. We asked hidden depth to add a bought them all, you know, spiky mountain O T kind of an inch at the bottom site, which we will be adding after adding in these beans. So you can see since I have my people deep down onto a movie business office, it's so easy for me to just keep it all day eating my board, I'm making my hand movement much easier rather than having it fixed on an unmovable surface, sorry, an immovable sulfate and making it difficult to rotate my hand to add these ideas. So that is why I always recommend to have VOP put deep don't bundle movable sofas. Now let's add two autosomal grids as well in between these vertical lines. So we didn't have the pencil sketch for that because I wasn't sure where would I be pleasing them. So I'm detecting, mocking them all with the help of my pointed tip brush in case if you want, you can force even have a pencil sketch for that now and then go ahead onto it. So you can see my lines are so fine because of the point of the brush that I'm using. Now, I'll just add one more at the bottom your so data I'm done adding the second one is underdiagnosed. Venule can see it's intermittent tilted manner. That is a little gobies draw. Now at the bottom your, I'm just going to add a little of this bygone age kind of obscene MOOC will be so either add them in different heights. So you can see I'm going to do beginning to read either, right? Not much thought at all. You know, that ball is 21 is of one centimeter and in that range only. So make sure that you do not add them. Otherwise, you would do all you know whether endorsed Biden look of the northern lights. So it's very important to control that look. Now just going to add it onto the entire bottom line, your so beyond the database by adding these because it's critical at the time, but make sure that in hurry, you do not add them to door or it not off all the same heights. Otherwise you will not get the distinct and the nitrogen know. Now the only thing left is to add some shooting stars into the galaxy in-between. Sorry, the northern lights. I don't know why. I always mistakenly call this as galaxy instead of northern lights. So now using my right gentlemen, I can just add some shooting stars. You are in there. Although we'll be adding a little of the shining stars. Now in case if you do not have a white gel pen, you can go ahead and use your white goulash and appointed the brush and add these little details into your night sky. And your via done with the painting for D 47. Now let's remove the masking tape and CFI ended up being day. Before that, I reached out to my right gosh. And I can add these oh, shooting stars. Right quash. Because with the write-back, they don't seem to be that obey Q. So just adding an opaque layer so that the standout. Now finally, let's remove the masking tape and see, yeah, painting reduce clean edges. Be a little careful near to the edges if your edges are still. And always remove the masking tape at an angle from your people so that you do not date off the paper edges as well. And as been as the payload that is on the masking tape does not go on do those. Otherwise the edges may get through it. Okay. So your eyes up being thing for D 47 and the second one for the prom, not that night. I hope you guys enjoyed painting this. Another easy illustration for the prompt northern lights. I can see you guys tomorrow into the code northern lights. And thank you so much to each one of you for joining me this 50 teach-out end and staying down the end here with me. Thank you so much to eat. You're on a few.
54. Day 48 - Winter Northern Lights : Hello everyone and welcome back to D 48 of the 50 days watercolor challenge. We are just three Bs from ending this 50 DES challenge. Let's have a look at the colors for this fun. You need a shade of cobalt, turquoise blue, indigo, Payne's gray or black by cosh. So I have my paper taped down onto all the four edges. And we will begin with a very little pencil sketch for this one. So I will first begin marking out the horizon line. That's the distinction between the snow area and the night sky area. And in this new area, that is the bottom area, we're just going to have a few pine trees popping out as you would have seen in the beginning reference. So I'm just marking out the rough lines, just a little of them and rest I would directly add after adding these. So you can see my pencil sketches quite light so that they do not stand distinctively. If I miss any of the area, then we will be having a little range on the horizon line has been. So now let's begin painting for this guy. I'm going to be using this cobol gene color from the brand Magellan mission. So you can go ahead and use the cobalt green color over charities are living at your end. Or you could detect me using the greenish yellow tone for adding as we used for the previous two exercises. You could even use appeal color in case if you haven't. Now, I'll begin with a clean quarter photo onto the entire sky area. Make sure that you apply an even coat of water and also do not add much water, otherwise the beans will spread a lot. So you can see, I'm running my brush so that there is no excess water. Aqua pulled off water formed on the age, otherwise they made one back. I run back into the sky, ruined I entire sky. So it's very important to control that while painting a northern lights. Now while first begin with a medium tone of the cobalt green color, you can see the color consistency is quite thick and it does not do liquidity. Now this time, I'm adding the night sky strokes in a little coffee man, as you can see, I'm moving my brush. Only zigzags example get those Covey's tools. So I will add a few of these forced and then I would shift to the next one. So just taking some streaks on the left column very randomly. So the major cobalt green color lock is on the right side and on the left side we will be having gluing and the turquoise blue look. Now next, I have picked up the turquoise blue color and beginning to add some strokes with the turquoise blue color in between the cobalt green color that I have added. But you can see in between the turquoise blue and the cobalt green color, I'm leaving some white gaps so as to add the darker details there. And that place is to achieve the light effect. And majorly, on the left side we will be having a lot of white effect neo to the horizon line, which we would be adding using whitewash. Now next I have picked up the indigo color. I have picked up the indigo color in a good thick consistency and beginning to add it in the white gaps that I have left. Make sure that you do not add too much water in the indigo color also, otherwise it will begin to spread a lot and the entire turquoise, blue and the cobalt gene will get covered up the indigo color, spoiling the entire different stroke look that we want into our night sky. Now from the left I'm trying to pull out the strokes diagnosis moving towards the right and on the right in-between the strokes that I left the white gaps, just adding these darker strokes. So just as the previous one, adding these strokes on the edges of the turquoise blue color and letting a little turquoise blue we visible, and then on the edges we have the cobalt green color. Now again, if I have picked up some cobalt green color and adding it near to the edges again to get a perfect blend between the indigo and the cobalt green color. And this time I'm adding the color in a little more liquid consistency so that the flow well into each other. Now I will just tend to my border Nitin so that these veins flow value. And I have a perfect blend between the indigo and the cobalt gene, so major there on the left, if you can see, we have the cobalt green globe and it's blending perfectly. You can see the brains moving into each other. Now, I have picked up some Bitcoin. I'll pick up the white Gaussian and lead to liquidy consistency, not to liquid also, and not too thick also. And I'll begin to add this color at our horizon line on the left side medially to get a glowing effect there. So my sky is still wet and enzyme able to add this. And then using a damp brush, I will just try to blend it with the background and get a knighthood boom there. And try to show the glowing effect there. So you can see just using the tip of my brush, I'm adding the pains force and then a damp brush and drag a blended with the colors around it so that this doesn't look out of proportion anywhere. So just a little glowing effect on the horizon line. Also make sure by adding this, if your brush happens to pick up the color from the background, wash it completely before picking up the white color again so that you'll do not all you know, destroy your white-collar look. Now using my smallest size brush or a damp brush, I'm just trying to blend it into the background since my sky behind his alter the bed and engage feel 14 blending. You can pick up the color around the white color to get a perfect blend. So like now, I will just pick up a little indigo color and blended. You are at the top again to get the perfect blend with the white so that it does not look that it is added or separately or a separate look out there. So you can see it's easier to get the blends there. So I'll just delete my border so that the beans flow. Now again, I'll pick up some whitewash, but my smallest size brush and add a little more of these strokes onto the board. Most left corner, you're on the horizon line because they really need of any bright glowing effect because we will be having the pine trees there and this should stand out on Buddha glowing background. So to get that glowing effect, again, I just added a layer of the white quash. I'm trying to blend the indigo color now. Also, if you can see my sky is still wet hands, I'm able to achieve all of this very easily. So make sure that you guys went on to newer adding all of these white Leo's. So that is the reason why I said your paper needs to stay wet for enough time. And now you can see on the left I have achieved a prop but glowing effect near the horizon line. And at the top we have the Docker indigo look. Now let's wait for this to dry completely. So my entire sky is completely dry it. And I'll begin with the bottom snow area. So I'll first begin with a clean coat of water onto this new area. So you can see we have got the perfect glowing effect on the horizon line at the left. Just be a little careful near to the horizon line, highlighting the Neo4j dad, the bottom area. Now to depict us know, ADL, we'll just be adding a very diluted, don't orderly or of the turquoise blue color. It's going to be quite denuded just oh, you know, it's going to be like, oh, 90 percent water and then percent pigment. So foster care to begin with the chief of cobalt gene, you an agonist and strokes of this to reflect the night sky color effect on this no ADR. So you can see how diluted the color is, almost no pigment. Now see that the turquoise blue color, I will begin to add it. So this seems a little darker. So I'll quickly lift up the color from you also that before it begins to stay. Okay. Now I'm just trying to spread it and blend it went into the rest of the sky. So just going to add these lighter tones. And again in the center, I will try to maintain the light effect, your because the cobalt green colors the light effect in the night sky. So at that plays in the center, I'm trying to maintain a lighter look. So very gently, just keep adding these effects strokes and you can see I'm adding it then stalks manner that vended Dr. David begin to look as that strokes and the galaxy night light effect. So that is the reason I'm adding them diagnosed to depict go, Oh, stroke movement of the night sky as well. Now next I have picked up the indigo color in a liquid consistency. And just touting the London Eye is effect with the indigo colors. So you can see again, I'm using the same strokes or to reflect the reflection of the night sky into this new IMO. So accordingly, I'm moving my brush strokes and again, yeah, I'm just trying to maintain a light effect for the snow as bin. Now, I will just try to blend all of this bed and get the Knighthood Booleans. Always remember watercolor dries or bone lighter. So all of this will dry or bone lighter than what you can see right now. Now you're also, I will just pick up antigen of the white quash enlightened, whichever ideas I feel seems to be a little more darker. So just tie different antelope divide, kwashiorkor and data analytics liquidity. C, and we are done with this. Let's wait for this to dry it Before we begin to add the pine trees onto this little anion. So now my school area has tried perfect me and I'll begin by adding the range of trees onto the horizon line first. So just as in the last class project, we added the cheese, just do spiky mountain range kind of for loop. We will be adding a similar kind of look this time at our horizon line using the black quash or the Payne's gray color, whichever you are comfortable with. I am using in the Payne's gray color here. So first I will just mark out the line on the horizon line. I have tilted my board because it's easier for me to add these by giving this speech rather than, you know, adding it from underneath. So again, as I always say, it's always better to have your people the bone on bone movable. So fist, it makes a movement a little easier according to your hand adjustments. So again, this time I'll just quickly adding these spiky mountain range in the heights. So you can see some mismo, less on veto law and not the dollar than one centimeter, almost. Ok, So quickly add them on to the horizon. Make sure you do not add them Bu door and cover the entire Northern Lights. Otherwise it wouldn't make any sense. So be a little careful. Also, what you could do is you could, for splatter the stars. I completely forgot about strategy in the stars before adding these mountain range. But now since I've already begun to add them, I'll first our Devin dense splatter the stars. Add this mountain range onto the entire horizon line. You can take your own time by adding these. Do not rush are the ways you may ruin the loop. Also make sure to read them in heights accordingly so that you do not have them off the same height throughout other ways, it may not looked at, not sure. So now that I'm done adding this range, I do splatter the stars, which I forgot to add before adding this. So I've just picked up some whitewash. I'm using the blob brush again. I'm going to begin to add this blanket of stars here. Make sure for splashing this task. You'll pick up the white goulash in a good thick consistency. Do not divide if the literals plateaus go into this new area, that's perfectly okay. And then just as the last two exercises, I would splatter some stars using my regular brush so that I have different size stars into my painting, not just the tiny ones, we have some medium ones as Ben. So now just picking up the white quash, I'm at its black jet using the tip of my fingers by dabbing it onto the brush. So now you can see I have some biggest stars as Ben Andrews, finite stars, which we added using the toothbrush. Now let's begin to add those pine trees into the snow ADR. And then we will just start a little reflection of the pine Jesus has been. So for adding defined genes again, you can either use black color, O pins, gray callow. And you remember the little pencil sketch that we had added for the pine trees in case if that is still visible, you can follow that or you can change the placement according to your painting. So the binaries are going to be a little tilted this time. So the ones that are on the left will be tilted towards the right and the ones that we add towards the right will be tilted towards the left. As always, I'm not adding much data. You can see I'm just dabbing the tip of my brush to get the full INH for the pine trees might make sure that the bias is to NADH the top and as it is moving downwards into and become the go and get a triangular shape. So you can see as I'm moving downwards, the for religious increasing in size and it's beginning to take a triangular shape. And also as I'm moving down with my four editions and take go as it's at the bottom, ADR. Also in case if you want, you can just type the buying jeans with simple branches, drafts done, adding it with foliage. So you can obviously go ahead and change the look of the pine cheese. Now, I'll add another small pine G here towards the left edge again. So you can see the spine jeez, popping in to that OH, white ego of this guy that we got by using the white quash. It's adding the Gothic defect there and we have a perfect night sky lightning popping from behind these findings because of the Squash. So that is the reason we tried to get a light on a bright neon, neon to the horizon line there by adding the white goulash. Now next I will begin adding the pyogenes towards the right. So again, you're also, if you have your pencil marks visible, I would recommend you follow those marks so that they get hidden up. Otherwise they may be visible to your entire painting. And in case if your marks are not visible, then you are free to choose the placement of these bind Gs as per your wish. But since I can see my pencil marks, I'll try to follow them as far as possible. Now we're adding another bind G at the bottom, most aid young. So on most in this Endo ADI who are adding on our list modifying G. And then I've been forced out the deflection to these bind Gs and then go ahead and see whether I need to add any fold up by this much is enough. Now first I would just pick up a little bit of the indigo color or you can pick up the turquoise blue color and using it in a diluted thought, I would just add the bottom two these pine trees and try to blend it into the backbone. So I've just mixed in a little bit of the turquoise and the black color to blend it well into the background and have a perfect blending with the snow. Now using a damp brush, I will just move in this area and blended into the background. So this is just trying to show from Vega bind G is popping out, okay, so Cmd, I will just start demonstrated on the most of the cheese here. So this is not the reflection of the binder. This is just the bees from van that binds. These are popping up. So that is the reason I've just added this DACA ADRs and drag a blended been thus no ADR so that it doesn't look out of proportion. So just a mix of the turquoise, blue and the black color to get this perfect bottom media for the cheese. Now let's begin adding the deflection to these trees, what I was talking about. So I've just mixed in a pinch of black to my turquoise blue. And according to the movement of the cheese, will just try to add the shadow and just the center nine shadow that we will be adding. Now in these, if you happen to go up the Docker balloons, dab it with the tissue component or Lido. What I would recommend to use a very diluted thought. So now my OT at the left was tilted towards the right. Hence the shadow is more at an angle from the GI actually. And the genes that are towards the right. I'll just add a shadow underneath that doesn't the bottom area because of the northern lights effect behind. Okay. So just adding the shadows accordingly with a very light and diluted to make sure that you do not use a much darker. Now, I'll just add a few more shadows into those no ADR. So these g's are not visible to assign, but just the shadow is there into us know ATO. So make sure to smoothen all of these shadows that you add it using a damp brush. Just try to blend it a little into the background so that it does not stand out boot distinctively, looking out of proportion from your painting. So you can see, I just used a damn brush and try to blend it into the Biden and have a little of the soft edges. Now, I'll begin adding a few more of the Pine Valley, but I feel the need to loop, but the omission are going to be the smaller ones and not much bigger ones. Just adding more videos, montane mini G here. So we just added a few of the Gs. And you can see that is why I always say, go ahead by adding the elements in the domain to do so that you do not do any of it. Now using the Payne's gray color, I'll just add a little of that dry brush effect into this new area. Very little money on the edges. Make sure that you do not use it in a boutique consistency. Otherwise, when we get to very dark dry brush strokes, we want a medium tone and very light, not too dark. Now next, using the white goulash, I'll add a little of the dry brush with the white quash has been so as to get a perfect then undoes the way look into our bottom EDI. So if you want, you can even add image of the white patches urine there to depict this MOOC elective. So you can see I'm running my brush and intellect places to get those white patches to depict the smooth area. Now using my white gel pen, I will just add a few of the shooting stars and the shining stars into one night, that night sky. So just a few of them here and there. Not much. In case if you do not have a white gel pen, you can even use your white gouache for this seem. Just adding a few of the shining stars is Veni vidi down to meet, make sure that you do not do this also, the y's are both ethnic of this guy may be lost. So your result being day. But I'm a little unsatisfied with this no audio. So what I do is I will just pick up a damn brush and Jibril get a blend in between so that these darker patches tone out a little nicer because I'm a little unsatisfied with the central area. So I'm just trying to blend in this area with whitewash to get a perfect snowy look again, beyond the Duke, I flip it and engage with us our despite then I would recommend you not to go ahead with this because it's very difficult to, you know, all have a blend your Against such that you do not have those sharp edges at places. So you can see, I'm very carefully moving my brush in those little edges as Venice. With that, I do not have a sharp edge anywhere. So that does it via a digital painting for D, for D. And you can see just by that middle blending in the center. It looks much perfect because I feel the batches are dead. What do dogs and do much? And we're not reflecting this no ADR or fake. So you're zapping thing with those clean edges that thought northern lights. I hope you guys enjoyed painting this with me today. We are left with only two more paintings for the 50 days challenge. Thank you so much to each one of you for staying with me so far. I would see you guys tomorrow into our second last reject.
55. Day 49 - Northern Lights Seascape: Hello everyone and welcome back to the 50s watercolor challenge, VR on the second last painting of this challenge. And today we will be painting this beautiful northern lights by the leaks. So the kalos that you need is covariance gene, yellow, turquoise, blue, indigo, burnt sienna, right quash Payne's gray and black color. So I have maybe put it down on to all the four edges. Let's begin with a pencil sketch for this 1. First, we'll begin with the horizon line. The horizon line is almost in the center this time above the horizon line, even mark out a mountain gene. So the mountain range would be with different height throughout. So on the left side it will be lower. And on the right side we have those huge mountains. And I'm trying to give it a random shape as much as possible. Now in the water media, let's mark the distinguished between the atria and the C. So on the left is the CATI, and on the right is the sand snow area. That will be the big thing. Now just adding a few rocks into the sea area in this, if you want to conduct a key added with the color later on and not have a pencil sketch for this. Now next, just marking out of your small houses, you're on the snow Alia, very tiny ones and not much detail. They would just be rough houses. These are like a log file from our view and just adding them one behind the other. Now just another two here. So these are very small houses that I'm adding and just adding one house in the front view and then how is just half hidden behind this house? And yes, we will just be using the yellow color, pick some lights and some more houses far distant from us. So this is the only pencil sketch that I've done. And rest all effect we would be directly doing on with the beans. Now further Northern Lights this time I will be going ahead with the shade of cobalt green. So I would be using the cobalt green color from the brand Magellan mission. You can go ahead and use any cobol tree that is available in your palette. Or you can even use the yellowish green shade in case if you do not have a cobalt green color. So like our previous exercises, you can go ahead and use the yellow green shade or any notice sheet. You could even use a green color in case if you have that. The next color that we would be needing is indigo and the taco, so that I will pick up when we begin painting. Now, I will begin with a clean cut off auto only onto my sky. Make sure that you did not run into the mountain area this time because the mountain is only going to get its effect through the dry brush strokes and the rest of it would be right. So it's very important that you do not turn your northern lights into the mountain area. I'm trying to control the mountain sheep as much as possible. So I'm done applying the thin coat of water and now I will just get the perfect medium consistency of the Coval gene color and begin to apply strokes of this into a sky area. So I'm going to begin with COVID strokes into my sky, leaving gaps in-between for the dope boys, blue and indigo color. By now, you would have understood the technique of leaving gaps for painting these northern lights. And also make sure that your pins are not too liquidy consistency or as David spread a lot and you will not be able to control the movement of these tools. At present, you can see IPO control the content of water into my hands might be it is not spreading much. It stays at the places that I'm applying it. So it's very important to control the water in the pain that you add. Otherwise too much, what DO will make the paint spread so much that you will not be able to control the stroke slope and get the Northern Lights view. So it's very important to have the water controlled by painting northern lights. Now the next color that I will pick up is the shade of indigo. So I didn't pick up the indigo color in my palette and get a perfect consistency fought it does. I'm not adding much water. As you can see. I just dip my brush and pick Dr. Carlo. And without adding much water, I have picked up this color. I'll begin to add the indigo strokes in-between the Payne's gray color, also an in-between the cobalt green color that we have added. Make sure that you do not add too much water. Otherwise, it may spread a lot into the cobalt green color and may ruin your stroke looks of the cobalt green color. I am repeating this multiple times because this is the mean by painting northern lights that you need to control the stroke look to get that northern night look into your sky area. Now just using a damp brush, I'm trying to get a perfect blend between my cobalt green and the indigo color. So in case a few one to get the perfect soft blend, you can just pick up a little of the cobalt green color and add it on the edges so that dark color blends and you have 0 smoother transition between boat dock alloys and they have a smooth, lighter stone transition in between. Now by Lambda indigo color, the remaining space as well. And again, you can see my indigo color is in a good thick consistency. Make sure that I'm didn't you are adding in good the sheets into your sky. People. It means vague, otherwise you will not be able to achieve the soft look. Now I will just try to get a clean blend. So at places wherever I feel to get a perfect blend between my indigo and the Coval gene, I would just add in a legitimate of the covariance gene color to get a blend. And just move your board and detections so that they have a smooth blend. Now next, I'm just picking up a little bit of the lemon yellow color and I will just add little yellow strokes in between. And just a little. And make sure that by adding these yellow strokes, your opinion doesn't a good thick consistency and not much water dot and added with a very gentle. Because if it will interact with the blue and the green, it Madonna and do a different door. So it's very important to control the pressure out there. And you can see I have retained my mountain sheep as it is. If you're not confident about adding the yellow strokes, you can surely skip that and just go ahead with the blue column without ruining your sky. So that is it for my sky area. Now let's begin painting the CDR because we can't pin the mountain, undo the sky, gyrase so far the sea area, I'll just pick up the taco is no coulomb force. I can pick it up in a good diluted consistency and add the forced New York. I'm going with the wet on dry technique because there is not much detail or I don't want it to remain wet for much longer time because He's just going to be a fun color. So first I will give an allele of the turquoise blue palo in my entire see IGA, including the rocks area as well. Then on the edges I will just add little darker tones of the turquoise blue color. Now make sure that you have all your paper to mean vet for at least a minute or two so that you can add the darker strokes and achieved a soft edge in your C as well. So I'm done with the photosphere and now I have picked up the turquoise blue color in a little thick consistency and adding it on the edges. And you can see just on the edges I'm trying to get the darker tones and pulling the strokes in between, maintaining a little lighter stroke in the center area. Now, after this, I'm going to again pick up the turquoise blue color in much motif consistency and keep adding the strokes from the edges itself. I'm trying to Indiana lighter look in the Sando ADR because then we would having a lot of whitewash. You don't dry brush technique strokes out there. So hence, I've already adding a little duet by keeping that EDI light. Now, I'll just pick up the darker tones and adding it and beans key in case if you want more darker tone. Or you could even go ahead and pick up a little of the indigo color to get the darker tones and just add some darker tones from both the edges of the sea area and also around the ROC area. Add a little shadow like this so that we knew being the rock areas black, you automatically have the little shadow in the sea area. And even on the edge of the snow, EDI just add a line of the indigo color to get this darker shadow area for this, no EDI has been make sure when you are adding all of these young people has to Steve vague. Otherwise you will get hard edges and not the soft blend NERC area. Now my entire painting is completely dry and I'll begin painting the snow area first. So I will just need on the first New York for the snow area. So put epic does no idea. I'm just picking up the turquoise blue color in a very diluted consistency. So it's like 90 percent water and just 5% pigment. You can see hardly the blue color is visible. But just to reflect this no, under another effect on this no, ADI the light of these two things onto this no, Ada, I'm giving it this costly or of the turquoise blue color in such a diluted consistency, then we would just be adding a little dry brush to get the details into this new area. Now let's begin painting the base area for the mountain has been. So I'm using the same turquoise blue color in the same diluted consistency as the snow. And I'm just going to add little of these patches onto the mountain day. So I'm not covering the entire mountain range with this color. I'm just adding little patches on the top and at the bottom randomly. In between, you can see I'm leaving some white gaps as well. Very random model gaps in between all that will just begin to add beauty to your range. And in case if you want, you can add the entire force layer and then go ahead with adding the dry brush because this color is almost equal to a white stone. And, you know, once it dries, there's hardly a little bit of blue that becomes visible. So I'm just done adding the first year of snow onto this mountain area as well. Now I have picked up some Payne's gray color and I can begin to add the rocks area till then all my store area of the mountain and the right types no, ADR would dry. So I'm just adding the mountains in random shapes. I'm going to add little off this smaller rocks around this as well. And you remember we had added a little shadow to these rocks as well. So I'm just trying to add the logs there so that they have a little darker shadow underneath or around, adding more beauty to us, the area. Now randomly add little more rocks. Your now just adding a few of the smaller rocks as bell urine there. After this, I would use the same Payne's gray color. And now men begin to just add more shadow and detail like your own near to the snow area. So it's on the snow area. And that's marking the distinction between the snow and the CAD are giving you to Geico shadow on the edge at the connection point or left. This will just done detail and more of the shadow and reflection details into your painting. So you can see a very fine line that I'm adding in. Now to this, I will just give a very rough line to depict all kind of the ROC area in between both of this or maybe the signed area which is connecting goat of this. Now to make it look more natural, I would just pull out this sand or the ROC area a little into this new area as well. So at places randomly, I will just try to call it out into this new area. Give it to love finished Jain visual effect connection in between like this actually the right side doesn't diode need this rock or those SIMD ADR, which is advertising word with this law, haze just the medulla edge is visible is what I'm trying to depict in your. Now I have picked up the yellow color and I will just begin to add the yellow lines into the houses. So I would just add small boxes and let them they're picked up indoors. So and once they dry, I would add in the details of the houses with the bond sienna color. Now very randomly in the snow area, I'm just going to add very little yellow dots. So all of this but just that big, the other lights of the houses which are quite far from us, which we will not be adding in detail. So this is just the PFAD view. Hence just a light effect that is the glowing lights that there because of the houses that I'm trying to debate. Now next, I'm picking up the paints gray color and a mix of the black color. And I can begin to add the dry brush on the mountain area. So you can see I always dab my brush onto a rough flock audit tissue before I begin with a dry brush tool. So as to I'm beginning with the dry brush strokes with a very diluted analyte code. After that, I will be adding darker dry brush to get a more depth to the painting. Also, I'm trying to define and Victor mountain ranges your by adding in lines in between. So you can see I forced marked out of Kobe Line mapping it to a small mountain gene so that you get distinct mountain range. Now in-between, I'm picking up a little indigo as well and adding some GI brush with the indigo has been to get more details of that into the mountain G. So basically, this is a snow-capped mountain that I'm trying to depict in. The left side is going to have more of this no, that is the right lobe. And this big, huge mountain on the right, almost in the center that we have, is going to have more of the black dry brush strokes and less of the white gaps visible. So first using the tip of my brush, I'm just adding a definite shape your because this mountain range is going to be pretty dark. That is more of the dry brush strokes. And your you can see I'm already using that bone in a good thick consistency and adding in more space at the bottom, I even have more of the white gaps and after dark, your eyes will be having more of the black color. You can compare it to the ones that I added on the left. They are super light and you ordered is already saw dot because this is our darker mountain range that I want to add in-between. And at the bottom again, I will add light this mountain range as Ben. So you can see at the bottom I have still left that gap because then I would be adding it again in the light tone. The key to having the perfect dry brush is that you need to remove all the excess water and all the excess paint from your brush before you begin to add in your and since my people is enough paint, paper, it makes it much more easier for me for adding in these dry grass, true? Because the people contributes to the roughness of the movement of the brush. So in case if you're using a rough grain or a cold pressed paper with the toolkit green, it becomes easier to get the dry brush strokes, but even enough clean paper, if you add too much water to the page, you will not get the dry brush tool. Now near the horizon line and the c, I'm just defining the darker edges and adding some darker dry brush strokes on the left side of the mountains as well. Now, even you're on the right side mountain. I just defined the bottom EDR near to the horizon line. You can see at the left banner ad into Docker dry brush. It was just major new on the top and the bottom to get the distinction between the C and though you don't mountain range and the sky and the mountain gene. So it's very important to understand the lighter tones on the docket ruins wave, you need to add them. Now in the C V, I would just add little doctor diagnose in this new area who are at the bottom has been so very randomly using a mix of the indigo and the Payne's gray color. I'm just adding very nice dry brush strokes here to there. More of this no details here. Always remember to dab off the excess paint and water from your brush before you begin to add this. Now, Naoko, the houses, I'm just giving a little more darker line. You know, not a dry brush line, butter darker lines to depict again the shadow effects of the houses on the snow. In case if you want, you can still use of grayish color, tone your and spread it and blended in the background. I'm directly using the Payne's gray dawn for adding in the shadow to the houses. So now just I I did a little bit off the small drop details. Your I'm just adding some darker dry brush varied randomly in the snow Asia as well. After this, we will be left to add the house details with the MSN, aka law under dry brush onto the sea. Now next I have picked up the bone CNR callow, and I will just begin to add the details to the houses, make sure that you again localized completely dry before you begin to add this. Otherwise there yet oh, bonds Ian or column we see, seep into the yellow column and you may lose the yellow window loads. And at only yellow dots make sure that you don't run your brush very gently and patiently so that you do not cover all of the yellow windows. Now on the roof of this houses, I will just start a little patch only off the buoyancy and McCollough and try to leave it or you don't leave some white gaps, urine they're depicting this nor that is getting collected on this house. So you can see when I'm adding the bone sienna color, there are many white gaps in the house that I'm leaving. So that is intentionally so that I get that snowy look onto these houses as well. Now next I have picked up a little bit of the yellow and the orange column mix, so it's a yellowish orange. And I'm just going to add a little more yellow dots. You are in debt to depict more light and more distant houses, all of which the only the lights are visible. And you can see majorly near to the horizon line. I'm adding in these lines also, if you notice the house at the bottom is much clearer to the view, then we had smaller houses and as we move closer to the horizon line, the houses began to dawn more smaller. Now do these houses just adding a small reflection or moving towards the opposite side with the same yellowish orange tone. So that is it for the details, your near to the snow. I'm just added those little yellow highlights urine there. Now next I haven't pick up some white wash and begin to add the diagram into this new area. So the area now all using the white gouache, thick consistency, I'm costs beginning to add it around the rock areas and under to London ROC area to depict us does no collected. And also new to these rocky area, I will try to give an effect of the crashing waves. That is, the waves are crashing near to the ROC area. So major off my white gouache this time into the CDNA is just going to be New York to the ROC area and not much on the top area. So now again, I'm beginning with the dry brush or widow bite guage. So the same technique is used. You already go white quash has to be in a thick consistency, dab it onto a tissue or a draft lot before you begin to add in this dry brush so that you do not have excess paint. Otherwise, you may just begin to get patches of color. Also, make sure that you do not add much water to your white color. Because if you've been out a lot, it will not give you this opaque look that I'm having right now. So you can see I'm getting a quite opaque look right now with the white wash. So to maintain that you need not add water to your white quash. I'm typing it in the thickest consistency. Now a little newer to the meeting point of this new area and deci, deciding on a dry brush there to show the crashing waves look out there as well. So just adding a few more Vive and snow collections. You are in there in the sea area. After this, I will just be adding a little dry brush with the white quash itself on the mountain range as well. So very little, not much. So that every you'll see in the need to have a little bit of the white quash that you can go ahead and add this. Okay, So make sure that you do not add much. Uncover all of this now in thus no idea as better, better, but I feel just in a deliberate off the white wash. Now one thing, what I had forgotten earlier was to add in this task into the northern lights. So you know, my sky is looking so incomplete without those tasks. So now I will just call it the bought the media with a rough sheet and Eigen, pick up the toothbrush and use the white goulash not take consistency and splatter the stars into the northern lights. It's okay if this data is drawn a little bit into your mountain range because you already have those white gaps in the mountain range. So that would just be justified. I'm really sorry that I completely forgot about adding the stars into the northern lights. We should have done it after painting the sky immediately. Oh, you know, after painting the CEO. So that we didn't have to put this rough sheet now, but no issues. We can always add in details. Now. You can even add little bit of red using your oregano brush so that you get a mix of both desktops. So that does it to be a duns plugging this ties into the sky ADR if you want, you can even add a little after shooting and the shining stars, but I can leave it here. Now let's remove the masking tape and see our final painting with those clean edges. I hope you guys enjoyed painting this more detail, northern lights. Oh, prompt. Today. It's one of my most difficult subjects to paint. And I'm so glad I could practice and level up my skills along with you guys in this 50 days challenge. So you always are painting for the second last day of this 50 dB HL. And via just one painting of a from a 50 days challenge. Thank you so much to each honor. Fuel for staying along so far. I would see you guys tomorrow into our last class project.
56. Day 50 - Northern Lights 2: Hello everyone and welcome back to the 50s watercolor challenge. We are on the last day to day, and I can't believe you've completed this challenge and so happy to see all of you join. Need to list last class today. For today's class, the fellows that you would be needing. The sheets off, yellow, green, blue, indigo, Payne's three burnt sienna, yellow, orange, right Bush and black color. So these are all the colors that you need for today's class. And you can get them ready onto your palette and we can begin painting. I have my people deep dome onto a movable surface. And you'd begin with defenses sketch. So I'll begin by marking up the horizon line. And then we would place that small house on this no, Ada. So you can go ahead with any house silhouette that you want or you can copy the same. So maybe you could be it for the entire pencil sketch to be completed and then copy it alone. Or you could go along P0, marking up the pencil sketch with me as I'm doing it. Suppose f place the roof area. So on the left is smaller and on the right the roof is taller. Angular view of the house that we are trying to add it. At the co-opting Moore adding this little small area on which this house would be standing. Now, I would get the house her down and add the details to the house. So on the left your I'm just getting the horizon line a little below because if the House of MOOC that I want moving into the sky, now into the house I would add a doula and a window look. So just starting the folder into the door and the windows. And the last pencil sketch on the left side, I would just add an adult. Yeah. Just about this snore and below the horizon line. So that is it for my pencil sketch. Let's begin painting the sky first. So I'll begin with, well, don't undermine DIA Sky Italia. I can make sure that I do not get on into the roof of the house that we have in the sky. So beyond the duke and flew by applying the water out there. Also make sure that you apply and even coat of water throughout. And also make sure that your people when stayed with them, enough time for you to be then diagonal than sky and get a beautiful blend between your kalos. So in case if you're using a people which is 25 percent called Genoa 50 percent Ogden, I would recommend you to read your people voted for it to dry a little. Angie, read it so that it stays wet for a longer time. And if you're using the a 100 percent cotton paper, run your brush multiple times so that it stays Bedford enough time. So New York Dada roof, I've shifted to my smaller size brush so that I have the perfect even older photo here. Now I've been shifted my size each round brush, and I have picked up the meat all yellowish green color. And I'll begin adding the strokes in a little circular manner and leaving gaps in between the strokes that I will be applying. So this time you brush strokes that I'm adding out a quite large as compared to the previous told that I was adding because it is going to be more of the green strokes and in-between we would be having blends between the gallows. Now next time we'll pick up the turquoise blue color and begin adding this drops in between these greens using the dope boys, do Kahlo, make sure that you do not add much water to your turquoise blue color. Otherwise, it may begin to spread a lot and may cover the ngDialog. So you can see I'm picking up the color in a good thick consistency. It's not spreading much. It's just having a little lead into the vein. Hello, and now onto the left side, although media of idea that I left, I will post cognitive compete D with the turquoise blue color. And then I will be adding the indigo color at the top. You get the darker sheets. Now just trying to get a good blend between the green on the left side. Now next I've picked up the indigo color, and I'll begin to add the indigo darker strokes onto the turquoise blue color and I will add it median you want, but the ages of the turquoise blue, that is the turquoise blue and the green is meeting. I'm glad it medially on those edges. So you can see my consistency of the indigo colic is also taken up and it's not spreading much. Now at the horizon line on the left has been, I will cover it completely with the indigo color strokes and make sure that you don't add much water. Otherwise, you will lose all the color effects into your sky. So at present you can see the light green that Toko is blue and indigo colors, troops all visible into my sky. Now just defining the horizon line on both the edges. So that is it for this guy. Now while begin painting this new area to my sky Joyce. So post, I'll pick up the yellow color and I'm just applying a little touch of the yellow color on the top area of the school, I added up being quote of water first. And now I will just pick up the yellow color and just add it at the top. Now I didn't pick up a little of the turquoise blue color and add it at the bottom of the snow. So that's known as ADR is having a reflection of this guy. So docker bonds, I'll just 1980 using the water now and already this will still GI or bone lighter and this will have the pulpit light effect of the northern lights on this new idea. Now let's meet for this to dry and then we'll begin adding the stars into the Sky Italia. So it might be induced compete the Jade, I'm using the brush. I'll begin to add this ties into the sky IDA first. Make sure you have a good spread of stars in the sky. Because the Northern Lights gets its looked through the statuses. Now using my regular round brush, I would add a few of them because I stars. So the brush add these tiny dots which you know, looks much fuller and better. So that is it called a non-word. Begin adding this quantity deals into the house. So first I'll pick up a very dilute the dawn of the violet color to add it into the windows. And I would give it a little touch of yellow to give the light effect. So I'm going to use a very diluted don't, it's going to be like 90 percent water. I'm 10% pigment and go ahead and use the violet color. Or you could mix blue and pink to get this violet tone. And since it says Model ADR, I'm going vegan dry here. I'm diluting that bone folder to get a lighter bone. Now at the top of this bin, know, I would just add in a Davidoff the yellow to give the light effect. And since that Dawn was sold, I knew did, even though you look along, this would start node right enough. Mendel's the door I'm adding in the yellow color since I already have it onto my brush and then I can send that. I stopped at IDO. It does seem book but don't forget, move up this house. I would pick up the yellow sheet and fill it completely, but the yellow ocher color, make sure that you pick up the ballerina good thick consistency so that you can cover up all the needs. Now that you have on the roof area, as you can see, I'm using the Apollo in a very thick consistency, very nice Ofwat and mode of pigment. Now does these details of the house is drying. We can paint. So let's be the mountain range on the left and the right side of the house. So for painting that I'm picking up the indigo color in a word thicken that consistency and I'll begin to add the mountain range. So I would just add an edge to the horizon line. And a dragon depicted as a very distant mountain. And fill this compete with the indigo color and see that even on the right side, I would build a scene. Now on the right side as adding the same and giving us a DM distinct, then I would be the same mountain range even on the right side. So just be a little careful. Neonatal the roof on the right side, you can see my color has needed a little I would just use up mean on a damn brush to lift up the color from there and make it clean again. Now while begin adding the other DDMS in the house has been. So I'll again pick up the yellow sheet and added here in this little gap that I have on the door and the windows. Adding together. We know as bed, make sure that you use a smaller size brush auto pointed brush to add these details. So you'll do not go out of proportion anyway. Now, let's be the cdr. I'm just picking up the a new color and I will add it Your into the sea. That is not much details to add it into the CEO, just make sure that your indigo color is dry completely before you begin to add this. So after adding it on the right side is very good for all of this to dry before beginning ahead and adding the final details to our painting ahead. Now my entire background is dry and then begin adding a little of the light DDS onto the mountain. So we tried to show some distant houses of pitch. We just have the glowing lights coming out from there. So I'm picking up the white wash and I would just need on some soap goods and typo blended and until on the edges with the backbone. And then once they dry, I would add in o, yellow effects on the white effects are places. Now I'm adding in these so-called AT places in different sizes. So some best Mozambique shot and I'm facing them, they didn't know me. And you can see I'm even using the smaller dogs random yet pieces to add these distant house looks. Now using a damp brush, I'm just trying to blend up into the background deleted. So this way, you don't begin to form the glowing effect behind the light that we will be adding after this glowing effect right? Now in the CMB, even on Done right side, I've been just add in a denote these dots to create the light and the distinct house glowing lights that we are trying to add it at the bottom of a mountain. Now let's begin painting the house. Edr makes sure that all of the details on the house is completely dry, falls down, picking up the shade of yellow color to add some bond effect of the northern night sky. So I'm just died and adopting a local law on the house first. And then I would pick up the bond C and Apollo and add it onto go to meetings. So you can see on the left and right, I just added the Duke batches of the yellow color. Now quickly picking up the bone sienna color I've added onto the edges. Don't nobody, if it knows on digital media, yellow color, that's perfectly OK. It will blend. Good light effect on the edges. I want all knew little of the yellow effect. And medially at the top area near to the roof, I want the major yellow effect. Now make sure that your yellow doesn't dry out quickly because we're going to debate on dry technique here. So make sure that your yellow cities but until you are adding the bone sienna color so that the colors will bleed and automatically blend together and have this soft bend, the perfect one defect that I want on Buddha house ADL. So you can see I'm just using the tip of my brush in-between the yellow also I just added that developed as exact lines with the bond sienna color to get the Beaufort and not bright yellow effect, because this is just the effect of the northern lights green color that we have. So just shine visual on the genome, that light effect onto the house. So I'm done adding the Force theme. Now I would just pick up the bond sienna color in a thick consistency and add it on the edges of the roof to get a little, you know, shadow effect of the roof on the house has been or even still picking up the darker tone of brown and adding the detail there once it dries or logit all approximately 50 percent. Now onto the door also, the idea that is left white, just add the bone sienna color out there. Now we had an effect on the right side of the room. So you will see, and I'm going to add that as well. Make sure you add all of these details with the smallest size brush and very patient. So that when EDS guy or the hows effect that we're trying to add in. Now next time picking up the beans green color. And I would add a little bush effect at this node and moving into the CDR. So on the line of this new idea, just using the tip of my brush and using the Payne's gray color in a good thick consistency, adding very little bush effects. So you can see very small bushes that I'm adding. It seemed even on the right side, I would add a little of it. Now that you How's Elijah didn't bet because we are still yet to add the border to the house area. So now picking up the scene Payne's gray color in a good thick consistency and just using the tip of my brush, I'm adding this Kahlo on Buddha edges so that we get the perfect shadow effect onto the edges of the house. So you can see very nice sheet that I've added in. And now using a damp brush, I'm just trying to blend it with the brown color to get the perfect effect that you want. You can use the sepia color to add in this detail as Ben. Now go add the lights your eye has picked up the lemony look hollow in a good thick consistency. And I'm glad it on the center of these white lights that we have added. And I will add a little of the yellow dots urine there on the mountain range as bed. So I'm picking up the yellow color in a very thick consistency hands, I'm getting this OH, peak effect even on a darker color. So now just using the tip, I would drop these lights urine. Now next, I'll pick up the paints gray color and I will to add dry brush on Buddhist, no idea. So make sure that you pick up the callow in a very light consistency and dab off the excess water. My house ADI is still wet, so I'm waiting for it to dry completely so that I can add the final details date as been done, then adding the final details onto the other places which are dry. So adding the little dry brush effect. Next time picking up the white wash and I would add a big moon Your, onto the left side, we have the medial blue color in the northern lights. So first I'll add the 0 using the white quash. Make sure that you use the tip of your brush and go very carefully and gently. Do not add too much big office, okay? Because at this, we would be adding smaller lines to depict the moon effect much better. Now, I would just add another layer of the white quash. And this time I've picked up the color and a good thick consistency for adding in the details here. Now maybe put this post video to dry as bin and then add the final details onto the moon as been. So now my entire painting is completely dry. I'll post weekend to add the details onto the house. So now I'm using my fine liner pen and I'm adding borders to the windows, doors and I will love to break effects to the house has been. So in case if you want, you can go ahead and use your smaller size brush and black paint to add in these details. And you can even add that using a fine liner pen or any permanent pen. Make sure that you try to use append, which is waterproof. Otherwise, in case if you drop any water ahead, this may spread ends 0 and dial painting. So very patiently add in all the DDS post to the borders. Now I would just did to my border Latina and I would begin defining the edges of the roof as well. So that in-between better, but I see that oh, you know, my tip of the pen has picked up a little bit of a paint or it's not running smoothly. I just drawn it onto a rough be but all the edges of the painting so that my pen begins to run smoothly again. Now I've picked up the white quash and not thick consistency and I would add it your in the center of the moon. And then later on with the white gel pen, once this dries, I would add the link effect around the moon. So now I have picked up by right shape and I will just didn't my board so that it's easier for me to move my hand. And around the moon. I'm just adding smaller lines in this ocular motion to create this spider ordering. Look at on the moon. In case if you do not have a white gel pen, you can use a very fine pointed brush and add these details using the white gouache or by decree, and make sure that your brush strokes are very fine. You can see such fine details. And to add that drink effect around the moon. So that is it for the moon area. Now again, I will shift to my black technical pen and add the final Blake details to the house. So first I will just add a few odd is odd didn't lines leaving some space. And then just keep adding the brick details. That is the vertical lines in-between each ADA amongst the horizon line. So just continue to keep adding these. Just make sure that the vertical lines are away from each other. And in the next line, the vertical lines are in the center of two vertical lines of the above line. So basically it's adding the big details that we are doing in your, again, you can go ahead and use your black color and a fine liner brush for adding in these. But you can see using a pen makes the task much easier, faster. And also, I have a good control on adding this cheap lines using append rather than a brush. And that is it to be a finally done with that. Think of this 50 days watercolor challenge and this beautiful northern lights. You may not believe I always fjord painting northern lights. And this was the most difficult subject for me. And I kept pushing this subject that maybe I would shift to another subject, but I'm so happy and glad that I gave it a shot and I tried my best and so happy to see my own progress through these 50 days watercolor challenge. So thank you all so much to each one of you will join me in this challenge and kept the ongoing painting with me. Thank you to each one of you for staying till the end of this challenge.
57. Thank You: Thank you so much to each one of you for joining me in this 50 days Watercolor Challenge class and staying with me throughout the 50 days and painting along with me each day. Since the past 50 days, I have loved my own journey in this 50 days challenge and I have seen myself grew from D 135. I hope all of you enjoyed this challenge. And to everyone who painted alone, I'm loving to see all of your class projects into the project section. Keep uploading all of them as in when you complete. Thank you so much once again, to each one of you for joining me in this challenge. I wish to see you all join me into my next challenge class coming this October. Thank you so much to each other.
 Umashree Taparia, Artist, Art Instructor, Entrepreneur