Transcripts
1. Welcome to Floral Lettering!: If you love nature
inspired designs and you want to create
beautiful floral letters, this class is for you, even if it's your first
time drawing flowers. I'm Jim Bonus, a lettering
artist, illustrator, and educator from Barcelona, and I'm also the co
founder of Shao Bam. Over the years, I've been super lucky to work with
brands like paper, stab, booking.com,
or even Calsberg. But nowadays, my real
passion is to help creatives like you
to find new styles. Through my patron, YouTube,
and digital products, I've taught thousands
of artists how to push their limits when it comes to
lettering and illustration. Today, I'm going to
guide you step by step through creating a floral
letter composition, breaking down leaves, flowers, and palms, so you can sketch and arrange
them with confidence. So you can sketch them
in different angles, even different stages
of blossoming, and the best part is that you don't need an iPad
to follow along. I'm going to be using Procreate, but you can use any other app
or even pencil and paper. Class is designed for
absolute beginners to master the basics of floral
illustration and composition, so we can later on adapt it
to our favorite letters.
2. Today's Class: In this class project, I'll
guide you step by step to create your own floral and letter composition from scratch. I chose this team not only because I did a bunch
of them in the past, but because flowers are such a timeless and expressive
element to work with. And when you combine
them with letters, you get something truly
personal and poetic. Also, you don't need to
be a botanical expert or a pro illustrator
to make this work. Whether you've drawn
1,000 florals or zero, this class is
designed to just have fun and help you get
started with confidence. The goal here is to combine organic shapes with lettering, which is something
that you've probably seen that I'm really
passionate about. One of my favorite ways to merge both illustration and type
into a piece that seems alive. And it's a great
chance to develop both your sketching
and composition skills while making something
beautiful that you can share, print, or even gift someone. As I told you before, you can do this project digital
or also analog, but I will be using an iPad
Pro and an Apple Pencil, and also the drawing
app Procreate. But yeah, feel free
to follow along using any software or using analog tools like pencil
ink, watercolors. I finally, I've also included extra resources to support
you along the way, a floral stem as both
procreate brush and PNG, a brush set for texturing and also a color palette
that I've created. But throughout the class, I'm going to show
you how to create this color palette
by referencing a sunset photo that I
took the other day. You will find all of these in
the class resource section. So if you're ready, grab
your favorite tools, and let's start creating your own botanical
letterform masterpiece.
3. Inspiration: Before we start
sketching, I want to show you a couple
books that I love. They have been inspiring
my work for so long, and I just wanted to
show you. Let's do it. There's obviously 1,000 more
that you can find out there, but these ones are
really, really cool, especially this one
because Tahin is, like, you know, has
these offers sometimes, and they are quite
cheap to find. So yeah, let's see
what's inside a little. Remember that I'm
going to leave you the links of both of
them in the description. So it's good to
analyze these kind of flowers because
it's going to help you a lot when it
comes to colors, composition, ways of
just illustrating. Also, like, it's going to
give you a lot of movements. I did an illustration, actually, based on this one a
couple of years ago. So you will see that you will find just a
lot of references, ways of shading, even, like, kinds of different
patterns inside the flowers. These are really well studied, and I think you should
definitely get the book. Also, you know, styles like
engraving, for example, this one, or just, like, more realistic
things like this. But you will see that a lot of my work is influenced by
especially this book. Look, there's even
lettering here. So, yeah, that's the
first one that I wanted to show you garden Eden. Alright. Also. Let's
talk about the cover. Well, no words, right? So beautiful. So let's
go to the next one. Now, this next one,
it's very interesting. I found it in a
shop in Barcelona. And when I saw it, I had to buy it. It's called Botanicum. It's by Katie Scott and Cathy Willis. Alright, so let's open this up. It's not gonna even
fit in the frame. But this background
looks beautiful. So let me just zoom
out a little bit. There. Okay, so this book is just the best thing to keep in the studio because this
is a Spanish version. I'm not sure that you can find it in English, but, you know, I kind of bought it for
the pictures as always. So you will find here all information that
you are kind of, like, gonna see today in
the video in this class. There is different chapters, and they're divided by plants also different flowers.
How do they look inside? So let's go and show you all
this awesomeness of a book. So you will see that it starts with this Okay, look at this. Like, I would be just looking at this
whole the whole day. So I'm just going to pass fast, but you get a sense
of what this book brings, especially
for composition. Color Palettes, this
illustrator is just incredible. Also, if you have any book that helps you with
today's class or, like, you studied plants before or you find something beautiful, please share it with us because, yeah, I just need
more books like this. So you'll be able, as well, here to
sample some colors. You see, like, it even shows you how the trunk looks
in the inside. But anyway, let me
just Oh, my God. This is so beautiful. So
let me just pass first. But I hope that you're
getting a sense of, like, why having these books is important and also how
important it is to go out in the nature and just
document these things. In today's video, I wanted to show you a product
that I'm working on that will allow you to document different kinds of letters,
different kinds of plants. It's still in the
process of making, but hopefully for
the next class, I'll be able to show you these field notes
that I'm working on. So that would be
it for the books. Let's start drawing.
4. Breaking Down Leaves: Start studying leaves first. There's a couple simple
tricks that you could do. One is to get the leaves, fold them, and then
take photos of them. And then obviously
analyze how they fold. The other trick is to draw a simple leaf on a
transparent paper, and then you can cut
it, and then you can twist that so you
can see all the lines. By the way, I prepared you
a little drawing guide that we will be using for
leaves, flowers, and palms. You will see that I've
included it as PDF, procreate file, and
also a procreate brush that you can just, like,
stamp, and that's it. Okay, we're going to start
by doing our leaves. So I'm going to create
a new document. And that's going to
be in centimeters. Since I'm in Europe, I
always use centimeters, so I'll just step here, and then I'll create
a canvas that is 30 centimeters width
times 22 centimeters height. DPI, so far, I'll
just keep it at 300 and I'm going to tap create. Perfect. Now, the first thing that I wanted
to show you is that I have prepared a little brushet that will help you throughout
the whole exercise. I might be adding more
textures later on, but you can go ahead
and download it. It's going to be the
updated version. Probably like, I'll put a couple more here to do the
final exercise. But right now we are
going to use these four, well, actually, five stems. And in this chapter, I'm going to start
with the leaves. Okay, now, I'm gonna get any color from
any color palette. This will be the
color palette that we will be creating
later on based on my sunset photo that I'm
also providing for you today. So we will do this
in different ways. We will start with the leaves, and then the flowers are
gonna get a little bit more complicated and the palms are going to be a little
bit more complicated. So let's start with the leaves. I'm going to break them down
a little bit now for you, and we're going to start
actually from scratch. So we're going to just you see that here there is also different sizes
that I've set for you. So I'm going to tap
on this third one, and I'm just going to put
it here on the left side. Just go to tap here.
And now here we see that I have done some kind
of evolution of the leaves, starting with this shape
and then we are gonna well, I'm just going to select another brush so the hover doesn't mess me up. Okay, good. Gonna see that we start
with the basic shape, and then we go ahead
and fold it in one way, fold in another way,
fold in the third way. Now, here is basically the same shape as well
as the structure. But here, we're just making it a little bit
more complicated. We also won't be super technical about names of flowers
or the leaves, 'cause I'm pretty bad at it, so we're just going to draw
the the different shapes. So this second one, for example, is one that I have a
bunch of in my garden. Then we have this one as well. You see that just by doing these little
treatments to our leaves, they're just gonna become
different and better, and a variety of them in
a piece always helps. Now, for example, if
we mix this and this, we get this, right? And then if we were to
mix this with a fold, then we would get a fold with, you know, a more
complicated leaf. We won't do folds on
these leaves, though. It's gonna be a little bit
advanced for today's session. And now we're gonna
finish with these ones, which are what happens when the leaf just
bends like this. So what happens when I
think this is the mid rib, so like the central
part is just, like, a little bit
curved, right? So you will get this. And also, this is a different perspective
that sometimes I use. And then this one, what
happens when one part of the leaf is folded
behind the other one. Okay, there is 1,000
more ways to do this, but for today's session, we will get a really good
breakdown of what's happening, and then we will be adding
it to our final letter. Great. So I'm going to
start here on a new layer. My iPad was a bit lagging. I don't know why. And now I'm
going to go select pencil. I'll select any
pencil that you have. I'm going to just do
one that is very solid. And I'm going to draw
this shape right here. Okay, so for this, you could do it
in a lot of ways, obviously, but you
could go to actions, Canvas, drawing guide,
and edit drawing guide. Now we can do a mirroring here. So everything that we draw on the left side of leaf goes
to the right side, right? So let's go to symmetry. Now here, gona zoom in. And you see this
little blue dot. I'm just going to move it
somewhere around here. There you go. Perfect. Tap and done. And now here you will see that it says
assisted here on this layer. So let's go ahead and I'm going
to start doing the shape. So first, I'm just
going to draw a line. Remember to tap
it with a finger, so it becomes
completely straight. I'll do something like this. More or less guiding myself
with what I did here. But obviously, the
shape is gonna be different since I'm
gonna free hand it. So now, from up here, I'm going to just do this shape. You can do it a bit more
straight if you want. Let's attempt one more. Okay. This one works. Could also do this a
little bit thicker. So the branch is kind of
showing here, like it was cut. Great. Now we have the
base for our leaf. Now we're going to start doing these lines that we have here. And these are called, I believe, the
veins of the leaf. So let's just go
ahead and draw a few. Really, it doesn't matter how
many. Something like this. I could even go down just
to see if you're kind of, like, following the
same kind of angle. Then maybe here we could put I don't know, a
couple more, maybe. What do you think?
Something like this. Remember that you can also
draw on the right side, right? And again, if you're doing
this without Procreate, it's pretty easy, since with a pencil and an eraser,
you can do the same. Maybe just a tiny bit slower. And then from here, let's
do something like this. Perfect. Okay, so now we
are gonna duplicate this, and I'm going to start drawing the different leaves
on top of this one. So let's now duplicate
it bring it here. Well, actually, let's
do something different. I'm going to just
turn the opacity down of this leaf
just by tapping on this end. There you go. And then I'm going to
create a new layer and I'm going to be doing the
different leaves here, then I'm going to move
them, so we don't have to change the center
of our symmetry. So now if we wanted to do
something that mirror, remember that you can
go to this new layer, you tap on it, and then you
tap on drawing, assist. But for these three
first leaves, we won't do that because they won't be mirroring. Perfect. So now I'm going to create
one that makes a little fold, like, a very something
very subtle, very not complicated at all. So I'll just go from here. And like in the example, I'm just gonna cut it like this. There you go. You see? So, this distance will be similar to what's
happening here. So we can make it a bit shorter. And now the thickness of this part, we will
do it like this. So we will from here, instead of going
straight like this, just gonna bend a little
bit here like this. So it's folding a little
bit flatter. Right. And then from here, I'm just
going to go to that side. Let's do it again. There. Perfect. So now, this part
here is the mid rib, so it's this part here. Again, I'm not a
botanical expert, but this is how
I've been kind of, like, folding and studying
different leaves. And this is one of
the methods that made it super easy for me since I am originally a
lettering artist. So now from here, we will do the
second half of it. Maybe you can do it a little bit smaller since it is
a little bit behind. There you go. I'm going
to select an eraser. Always have an eraser ready. And that would be it. That's it. Now we will just
finish the shape. And that would pretty
much be it. Nice. Okay. Now, let's select
this, bring it there. And let's make another layer, and let's make another fold. Now, what would happen
if the fold kind of, like, wants to go up? So we will do the same thing. We will start we will
just be working on this upper left side here, just so it's a bit clearer. And then from here, instead of going up and fold it, we're going to fold
it from here down. So we will do this and then
go up. Oh, just like that. Perfect. And now I
will do the same. So I'll do a bit of
this shape, kind of, like, more wavy here.
I'm gonna go up. And then the second
one. And then you finish the plant
in the same way. We've got a second one now. Let's move it right here. And then let's make
yet another layer. And now we will fold it
like it's looking at us. It's a little bit more
complicated this one. But you could actually activate the drawing assist and
we will do a fold, we will draw until here. We're just going to
fold this little tip here of the leaf, and we're gonna just do
like some shape like this. And now, all this part is
folding right here, right? So we will try to
make the same length, maybe something at around here, and we will do it like that. And that would be the
mid rib, mid rib here, and then the different
veins. Done. Now, what would happen if we
turn off the drawing assist, and let's say that we have
a fold here, as well. So I'm gonna erase
this part there. And now I'm just gonna fold it. So just folding this shape
like this. You remember? So this is the fold that
you're creating now, and you could create
even one here. Again, just as a pure example. And if you were to
get a real leaf, you would see what would happen. But if we fold the shape a bit, you can see that we
have a little fold here and a little fold. Here. Now, let's move
this one as well. There. And now I'm going to pinch
these three together, and we have our
first three leaves. Okay, now let's go
to the second row. Now I'm going to do
this shape right here. Let's see how I do it. So using that same
thing that we had here, I'm going to remember
to create a new layer, tap on it, make
it a drawing est. And now I'm going to be doing
some different shapes here. So now, there's a lot of
ways you could do this. Let me show you one that is not in the example because I
think it's interesting. So now here we've
drawn these veins, kind of, like, straight, but you could also make them wavy. There's so many
leaves out there. So you could do something
like this, right? So they come like this
and they come like that. So that would be how you would do this kind
of veins, for example. And then here, you could join every vein
with the next one. Making a super cool leaf. If you were to do it together, you could do it
like this. You see? That would be one. I'm
just going to erase it, but it's good for you to
have the example here. Let's continue with
the straight ones. Now, one thing that I do for these folds is every second one, for example, we could do
maybe this one and this one. And then maybe we can
add one somewhere here. Okay. Now, we're going to make some little holes in here
to get that natural shape. So, let's see. I can start like this, actually. Just like, do a
little oval here. Yeah. And now,
once we have this, we're gonna do this shape.
See what I did here? You could also do it
straight if you want. You would have the
same. Let's do it straight, so
it's a bit easier. Sorry for that.
Let's do it again. You see? And now we do the
same. We finish it here. And from here, we
do the same thing. There you go. Now from
here, do the same thing. And since we have this one
here, do it like this. Let's bring it a little bit more up somewhere around here. And then we're gonna
finish it like that. We got it. Perfect. And now here you could
do a couple of things. So, for example, one could be to do it like wavy
like we did before. Something like this.
Again, just as an example, you will for sure, do it
better than me. There. We've got another leaf. So I'm going to bring
this one down here, create another layer, go back. And let's do something a
little bit more complicated. Remember that every step will be just a bit more
complicated than the last. Okay, so now let's do this, but in a different
shape, shall we? So these are the fall leaves that I call them because
my town is full of them. So I'm just going to
maybe use this one here. This one here and this one here. And you'll see what for now. So here, I'll do kind of like
the same that we did here. You see? The little ovals are gonna be placed
somewhere around here. And I'll do this shape now. I'll do this shape
right here like this. This time, these ovals are going to be a little bit bigger. And then instead of going up, like we did before,
I'm gonna go here. So this is gonna be a little
bit trickier, but you see? So these two parts should get closer together,
something like this. And then we'll do the same here. Maybe even we could do
this one even bigger. Remember that your eraser
is your best friend. So keep erasing until
you got a nice shape. Now, remember that the
more veins you put, the more realistic
it's gonna look like. But as an example, I
think this is gonna work. And then maybe we'll do one here as well on
little indent like this. So we'll do this
and then go inside. And then we can somehow
finish it like this. So that would be another leaf. You can check the
example because with the veins that I drew there
is a little bit better. But again, making leaves is cool because it's kind of it
randomizes a bit process. So you see here, since the angle of our veins is
a little bit different, then you get something that looks a little bit more natural. So you can also go ahead
and reference that one. And now, as an example here, we could do something that
is a little bit dented. So it's gonna be a leaf that, for example, you could do even, like, this one's this
veins like that. And then each vein finishes
here like that with a little little
oval here as well. And then just go ahead and
and do this. Super randomly. And you will see that you
will get that kind of result. I'm doing it very fast now. We got it. And now, sorry, that
was the same layer, so I'm just going to select this one and then three fingers down, and then cut and paste. I'll put it somewhere there. And then what would
happen if we were to do this effect into this one here. So, well, let me just Yeah. Now, this one here, for example, what would happen? Let's bring the opacity down. Actually, let's even
deform it a little bit. So I'm just gonna go
with the free form, maybe I'll distort it a
little bit like that. See? By distorting these leaves, you get different
new things as well. So here, for example, we could go ahead and do
the same as we did here, but in this one right here. Actually, let me show you a little bit of a
thing that I do here. So I do this circle. I stop here, you see? And then from here,
I do it again. You see that I'm
not mirroring here, but it doesn't matter right
now, just an example. There. Now here, stop. I
do this circle, stop here, and then I continue. And I'll show you one last time. So stop. Go down and start again. And you see that we've got now something that is a mixing between this
one and this one. So you can move it there,
leave it somewhere there, bring the opacity back and
pinch all of our lips, but not the guide, remember
all of our lips together. Perfect. And now let's
do the last row. New layer, and this won't be mirroring because
that's going to be something
completely different. I'm still going to
use this as a base just for some lines, though. So I'll do the meat rib that it goes somewhere around here. Like that. And now, I'll
do this first part. So from here, I'll do
this shape like this. I'm gonna raise this a little
bit so it's a bit cleaner. And even do a perfect line. So if you don't lift
off the pencil, remember you can do a
perfect curve here. So I'm just gonna
leave it like this. And now I'm going to start
doing this shape first. So it goes like this. And then as it approaches up, it does this curve. Remember that, you know, every time that I do
a class like that, and I'm doing these lines
that are super free handed, I'm always keeping
my whole arm up. You will have to
do some stretching later because my shoulder
hurts sometimes. But the difference between
doing a curve like that, even for letters, obviously, the difference in between having your elbow down and just using your wrist is that you have a
certain space to move. But if you move your whole arm, then you can move
the whole Um, well, you can make a bigger
line actually and have way better
control on curves. Okay, so now that we got this, I'm gonna
do the other part. So gonna come like actually, this is going to be a little
bit closed like that. And then from here, it's
gonna be something like this. And now, this part it's
gonna fall behind. And you see that we have a
nice fold as well there. Okay. Now you can do the veins. So something like this. And we got this one. Now, we're to do
the little branch. Instead of cutting it straight, I will cut it like this, just so it plays better
with this perspective. Perfect. Now, let's bring this down as well,
leave it there. New layer, and let's go ahead and create a
more complicated fold. So I'll do a line
like this this time. Let's go to the right. I'll
do something like this. Perfect. Now that we cut this, I'm going to do one part
and it comes. From this. It follows kind of our shape here that we have in our base. And it cuts here. Let's do it again. Cuts like
this. Or something like it. You see that now out
of just two lines, we've got pretty
much most of it. Now, here I will join
this with this one. And I'm gonna cut here
right in the middle. And I'm gonna Well, actually, let's do
it like this, yeah. Better. And then
this second part, it comes with it from behind and it does something like this. And almost done,
but we have to do the right side of our main leaf. So I'm just gonna do this
shape here like this. And now the last thing,
I'm gonna cut this here, so it doesn't look like this
line is completely same. And I will make it come from up. And we've got this one. Now, we could do the veins
here since this is the inside of our leaf. And then here you could
do just a couple of them. Like that. Okay, so, we've
got a second fold. Let's put it right here. Let's go and create
another layer here. Now, this one is super
complicated, even for me. So, this one is gonna be
the one that looks at us. It's folding, looking
at us completely. So we won't see this
part of the leaf. We just see this part
completely like that. So let's try to make
the perspective. So from here in the middle, I'm just going to draw
a line like this. This is going to be our mid b. And the leaf is gonna
finish around here. Now that you have this, you
can actually now imagine it. So I'm gonna continue
this kind of, like, straighter here like that. And then from here, I'm just going to do a line
that goes like this. So this part is more towards us and this part is
a little bit behind. So now I'll do this. There. And we are done.
Now, the mad rib, right, goes from here,
and this would be behind. So like, imagine it like that's
this, this this do this. And it comes here. That's
eraser because it's behind. But we will keep this
line here. You see? Let's make it a
little bit thicker. There. And we've got this fault. Now, we could do some
veins like this, just to even make it a little
bit more realistic there. And now you could do even
this ones like that. There you go. Okay. Now, let's bring it here, and we are officially
done with our leaves. I almost forgot here. Let's make this one, shall we? So we'll just do a line
that goes like this. And now, it's super
easy because we have to just do this meat rip. There you go. Somewhere
like something like this. And then we're just
gonna from here, just gonna go straight here. And then it's gonna kind of, like, bend here like that. You see how easy it is actually. And now the veins will
just go in this direction. And there's gonna
be a tiny part of the other side of the
leaf right behind it, just like this. Now, if you have time,
you can always try to do more effects
like this one, right? So you could add, like, different kind of right? Like, different kind of plants and leaves
and also do this. So it kind of looks like
it comes from behind. Maybe you could make some heros, yay, ya, ya, ya. Okay. Now, let's move
on to the flowers.
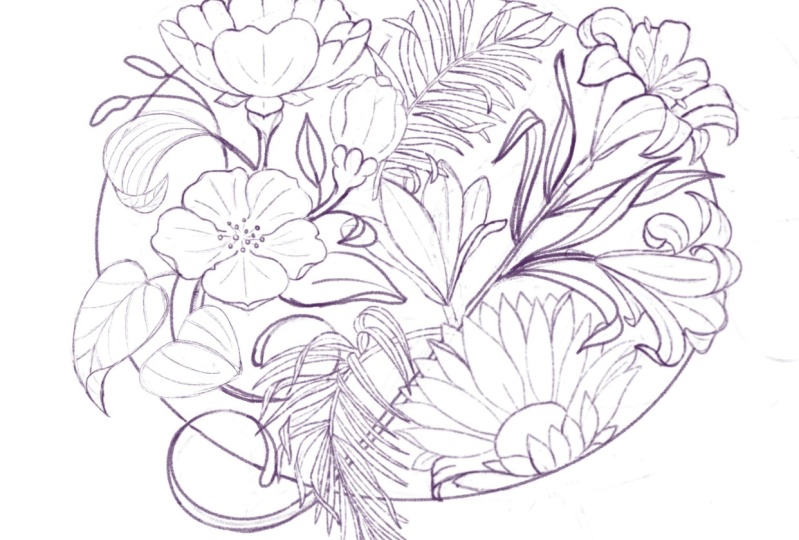
5. Breaking Down Flowers: Flowers may look a
little bit complicated, and you would be
right. They are. But we will break them down in a way that makes them
more understandable. We will sketch a few
different types, so you get a feel for
how to simplify them. Okay, so now it's
time for the flowers. I'm just going to
pinch all these together just to keep it
as a reference somewhere. Here, and the first thing that I will actually do is to
turn off my drawing guide. So go to actions here on the
wrench tool, turn it off. And now I'll create a new layer. I'll go to my brushes, so the ones that I'm
giving you today, and I'm going to
go to the flowers. But this time, we've got
something a little bit different just to help us guide ourselves
a little bit more. Flowers are a tiny bit more
complicated than leaves, and you'll probably see it now. Okay. So we've got
two stems, right? So first, I'm going to show
you the She Bams flower. So just tap on it.
Let's do it again. Yeah. So you'll see here that I usually use
geometrical shapes. It helps me a lot. And you will see
here that with them, it's way easier to come
up with certain lines. You will see it here as well, and definitely not the first one and not the
last one to do that. So you can find a lot of
examples online as well. But these are some of the
ones that I use the most. I did it in a way that
every flower is blossoming. So I'll show you from when it's blooming to when it's
blossoming right here. And then we're going to add even more details here as well. Now, you have it here as well. But in this example, instead of showing you
the whole blossoming, we just go from here to here, and then we change angles. You can see that every time we see more in the
center of flower. And here, I just
teach you how to go from a very simple sunflower to a little bit more
complicated one, and then what would happen if we were to make
it into an angle? Great. So, as we did before,
let's make this smaller. Sorry. Let's step
here on uniform. Let's make it smaller. Leave it here. And now I'm going to go to
Shao B's flower structures, and I'm gonna stamp it, make it smaller, maybe just
a little bit bigger, even. And let's stamp it somewhere around here. Okay. Now, we will draw using
these shapes here, but I'm going to bring the
opacity down just a bit, maybe at around 50%. Let's create a new layer. Let's go back to
one of our pencils. Now I'm going to use
probably an AB pencil. But again, any pencil that you
have will definitely work. And let's start
with the beginning. So when the flower is
closed, it's very easy. So I will keep this line. But the new lines that I do are going to be a
little bit more natural, a little bit more wavy, still following the
same structures. So I'm going to start here by
doing something like this. And then maybe just
make it a little bit. So again, it's not
completely straight, that will make it
look unnatural. And let's finish
somewhere around here. Remember that this
will be the center. And we want this to
be standing upright. So now here, I will continue
with the shape here, then I will go do something like this and finish it down here
as well, like this. Perfect. And now
this line will go here, like it's folding. You see, it really
wants to bloom. And then you can also, like, do more lines here. In our letter composition after, we're going to use
combination in between different
stages of blossoming. So that's pretty much it. We've got this one. Okay. Now, let's see what happens when this flower
opens up a little. I'm gonna use this line again, so I'll do something like this. There you go. Take this
and then bring it down. Now one little vein here. Now I'll do yet another one
that goes to that side. And it touches this line here. There maybe yeah, maybe something like this. What do you think? No. The vein. Now, these ones are the ones
that are the most visible. And now we can do one here
that kind of falls behind. This one is a little bit
more behind or flower here. It does this little shape. And then here, it
does a little fold, similarly to what we
did in the leaves. And then it just gets
summer like this. And then even you could do maybe another one somewhere around here. Just like this. Now, here, there could be one. Listen, let's do this
one here as well. Let's do another
kind of fold here. So kind of from here, and then it folds as
it reaches up here. Let's do it again. There. And then finally,
one here that is behind and one here
that is also behind. And there you have it. We've
got this one right here. Now, let's go to
this second one. Well, third, actually. And this one will be a
little bit more open. So you see this
leaf, for example, we will have to translate
it here and make it so it falls so it opens up more.
So let's do it again. We are going to do something that is gonna
be like something like this. Again, very similar to how
the leaves fold, okay? Perfect. And now comes like some around here. And then here it
starts the folding. Then it's gonna be there's gonna be a line here like this. And then one that goes
behind. You know what? Like, let's do it
again. I'll use this one as the first one. And then there's gonna be one coming from
here. Yeah, there. Coming here. And then one behind. Just like this. And even if you wanted to
play a little bit further, you could even do
another fold here. So if we bring this a
little bit further, you will see that now we've got the perfect space to do
one last fold there. Okay, good with one. Now, let's do one here. This one is going
to be also super open and folding right in
front of our eyes there. We'll do this shape
here like this. And then here we will go
here and do this kind of, like, triangular
triangular shape. The mid rib would be here. And then this could finish, for example, Sumern here. There. Made rib here. Now, you could do a
little bump here, like, a little there. So that's something
that is behind. I'm not gonna touch
it right now. Now, let's do four more. So we could do one
that comes from here. So it's kind of like behind. And it does also a little fold. Mid rib here. And then the fold would be
something like this. Maybe shorter. Yeah,
something like this. Now, yet another one, but a bit bit smaller here. So I'll start maybe
from here there. Okay. Okay, here we have it. And now I will do one
that goes here, behind. Like this. It's gonna be the
fault, and then this is what's going to be behind. And the mid rib would be
somewhere around here. And then finally, one here
that it also kind of, like, does this nice twist. Maybe even a bit more. And that's it. You see? That would be it. We've got this one, as well. Let's go to the fourth one now. Now, this one will
be even more open. So instead of doing
the folds here, it's going to happen before. So let's start with this
main one as we did before. But instead of going
up, I'm just going to go here just like this. Yeah, this will work.
Now, this like this, then the mid rib
will be somewhere around here in the middle. And then as we did
this fold here, we're going to
translate it here. So triangular shape, and then here it finishes very abruptly like this, and
then it falls down. There. You will see that I go from my eraser
to my pencil very fast because I've
done it in setting. So when I squeeze my
new Apple pencil Pro, it changes directly
from eraser to pencil. If you want to know how to
do it and you don't know, you can always ask me. You can send me a message, and I will get back to
you as soon as possible. Okay, so now that we've got
this one, let's fold more. Let's fold now this
one right here. So it's going to come from here and then do kind of like
the same shape here. Ah. There you go. I just realized that I
said a word in Catalan. Okay, so let's go
down here like this. And then and remember, finish it abruptly and go down. There. And just simply do this right here
and the main rib. Perfect. Okay, let's do more. Now, this one behind
maybe can be, like, completely folded behind. So I'll do something
that goes like this. And it's just completely behind. And now maybe one
that comes from here. And does this nice
twist, as well. Actually, let's make it bigger. There. There you go. Now maybe I'm
gonna cut this one a bit, and then one can be A behind. And then the last
one. Okay, maybe, like, could do let me
see what I did there. Mm hmm. Okay, so let's
do this nice fold here. Maybe be shorter like this. Yeah, I like this,
so I'll do it. There you go. No. Line and line. There. Okay, something like it. Actually, I'm going to select
it with the free handle. I'm gonna select this
part here, this. And then I'm going to
turn off the snapping, if you have it off, perfect. And I'm going to just rotate
it a bit and just maybe, like, even squeeze it
a tiny bit like this. Yeah. Okay, cool. And
now I'm just There. Now, we could even put some filaments and
some enters here. So, like, what would be
the little dots here. There's different ways to do it. So let's let's first do some lines that come
from inside like this. Just like, very kind
of, like, randomly, maybe one shorter, one
longer. That will do. For now, that will do. And then you could do
two kinds of enters. Actually, you could
do one that is kind of like that, like, very simple or one
that goes like this. Just like this kind
of different shape. I think I'm going
to do these ones. So just add some here. And then now with the eraser, I'm going to erase what's behind just so it's
a bit more visible. There. Maybe one here
in the middle, as well. And we've got our flower. Now, I feel like I just I would love to start adding
some shadows, but we will leave
that for later. Okay. Let's now do
the second flower. We'll start here by doing
something very simple. So I'm just going to just mark a little bit
of my center here. And then I'm going
to start down here. So I'll do this shape. Then from here, I will add three kind of,
like, semicircles. Let's make this bit thicker. It's good to have a good
foundation before we build the roof, right? So I'm just gonna add
just like this very, very simple, kind of, I
don't know how to call them. Maybe like they
look like petals. So I just gonna
call them petals. And now from here,
just gonna draw a circle, kind of, like, market. So something like that. Now, here I'm going to start. Making the shape here. Again, you could go super randomly here. Everything
will look good. As long as it looks
like it's layered, so it's about to open up, about to bloom,
it's gonna be fine. So just doing this kind of more like random something
like this will work. Now, some veins here. And from here, just
following the shape, kind of like something that is behind and swell the
same thing here, there. There. And then there's
something behind here, something behind here,
and something behind. Here. We got it. Let's go to the second one now. Okay. So I'll do the same, but these petals will be
opening up looking towards us. So this is gonna be the start. Then from here, just gonna open a little petal.
It's not big, right? Remember, this is kind of like the way we folded
the leaf before. It's looking at us.
So that's why it doesn't look so long,
but more like white. Yeah. Now we will do
a couple more here. I'll do something like this. There. And another one. There. Perfect. And now let's do the big petals. Now, you could technically kind of separate
these in more parts. So I'm just going to
do a couple lines. So it's gonna be one like this, right from the center,
and then one like that. Doesn't have to be exact. And then I will do also
one that is like this. Now, here, I'm going to fill
it in with my first petal. Remember this is the center. So now we will divide the petal like this. You will see how. So I'm going to start
the shape here. Gonna go down right here in
the center. A do it there. And even make it a bit thicker, a bit wider like that. Then let's bring it here. Now here, you could do maybe
just a little bit more wave. Maybe before, so I
keep this better. There, something like this. Perfect. And now from here, I'll just do some veins,
some little lines here. There. Okay, we have
the first petal. So now I want to do
these ones here. These ones will be we will
see the side of them, right? So I'll do a shape
that goes like this, and it falls behind. So it does this, and
then it falls here. And it does a little
bit of this shape and a little bit of this shape
as well, and it goes behind. And this is the most
visible part of it, and I'm just going to bring it just like that, very simple. And maybe we could
even cut it here. Just like this. Okay, now let's go to the left. Then we will do
something similar. There. I got it here as well.
There you go. Perfect. Now, let's do the ones
behind. Very easy. So one will be I'm
just gonna mark it. One will be somewhere
here. The other one will be somewhere here. And then the one that
is completely and h behind will be
something like this. Yeah, that looks
good. So I'm just going to erase it a
bit a bit with this. When I tilt my pencil, I got the opacity of it a
little bit more controllable. So now I'm just gonna start breaking this
like we've been doing. And sometimes just, like, as
long as you do wavy shapes, this will look good, okay? So don't get super
overwhelmed. Boom, we got it. And now let's do
this one. There. And that one there. Okay, we've got this one. Now, let's go to one that is
just a little bit more open. Here we've got the
center here, right here. I think I should have maybe put it a little bit more aligned. But so I'm just going to go to this shape and just move it a bit.
You can do the same. Yeah, better. And now, this will be the
center of our flower. So, and this one, you're just
seeing it like this, right? And then this one, you will
see it from up. Perfect. Now, let's also start from here. And now we will be
dividing this in five. So I'll look like lines from the center.
What do you think? So one could be somewhere here. The other one could be
somewhere somewhere there. They don't have to be in
the exact same position. Remember, we are not
mirroring this right now. Then one could be there. One could be maybe just a little bit more open,
something like this. And then the next one, the last one would be here. Perfect. Now, you could even
do circles, so semicircles. That's something
that I do sometimes just to see where all
this is happening, maybe we could even open
this one a bit more. Something like this. Foot.
Sorry. Let me charge this iPad. Okay, done. Oop. Okay. Yeah, maybe like this, so we keep a bit
the perspective. Now, this one can be
something like here. Then that one there could
be something like there. Then this one can
be somewhere here. And finally, this one.
Can be somewhere here. I'm just going to
erase this a bit. And I'm gonna start doing
the shapes. Now here. So Break it here. May I change the center a bit? Yeah, something like this. Then this one could
come from here. Actually, this is too
straight. Let me do it again. Yeah, that will work, I think. There. Then actually, this one
will be in front right, so we will extend
it somewhere here. Perfect. There.
Now, this one here. Perfect. And now, finally, this one. I'm actually gonna
probably put it behind. Yeah. Yeah, just behind. Nice. And and then since they're all
meeting in the center, I'm gonna make it kind of, like, so these lines, right? They are. Because the petals are, you
know, they start like this. So let's do one petal here. They usually start like
this, and then they blend with the center
of the flower. It's funny because if a
botanist would see me out, they would be like, You have no idea what
you're talking about, but this is what I see
in my daily walks. So that's my way
of explaining it. Great. And now here, you could just do a bunch. You don't have to get super exact with the center of this. So you could do
just a little bunch of enters and filaments
like we did before. And they are basically
coming from the center. And we are done with this one. Now let's do this fourth one. Okay. Perfect. So now we are
seeing it right from above. Now, I'll do the same thing. And now we will play maybe
with a couple of folds. So as we did before, line line. Then maybe this one I want
to be somewhere here, so it's a bit different
than this one, there and than this one. There. Okay, let's get started. I'll start with the one down. So, as I said in the example,
I open up like this. And I go down here. Like that. Now, maybe this can fold a bit. So just I'm just gonna
do a double line here. Like this. And then we've
got this little fold here. Nice. Okay, let's do
let's do this one. So it will start somewhere here. It will touch this
line right there. Wet. Let me make the eraser
a little bit smaller. And now from here, I think I'll do a fold
here as well, like this. Go up here, maybe
do a little cut. Cats always look
good on flowers. Imagine that an animal just bit it off, so we
could do it here. So if we do first the shape and then we do this little cut, it, it looks more natural. So we could do this here and there, don't
overdo it, though. And now here, you see I'm doing this fold right there. There. Perfect. Okay. Nice. Now let's do
maybe the left one, so we start balancing this
whole composition out. So it will be something
like it will go there. Now I'll do more like
a natural shape. So now here, you can do this little curve
here, and then enter. There. And now we could do a little
fold here as well. What do you think? There you go. Great. Now let's do
this one right here. And then finally, this
one that goes behind everything else
somewhere like this. And then here, same old
story we did before. They are all going kind
of like to the center. And then you could
make ones that are a little bit beyond that. And we are done. Now, let's go ahead
and do the sunflower. Okay. And for this, we will go again to
actions drawing guide, edit drawing guide, and we
will bring this to the center. Sorry, I don't know what
happened. Oh, yeah. If you tap the green dot, it changes the angle
of the symmetry. So you want to
move the blue one, remember? Sometimes I forget. Perfect. Now, I'm gonna start
doing something very easy. And you know what? I'll
create another layer, tap on it, and tap
on drawing assist. Perfect. Now, I'm gonna create a circle here. Like this. And now let's start
doing the petals. The petals, there is a lot of
ways to make these petals. One that is very kind of, like, very easy and
graphic is to just, like, do from somewhere
around here, go up. And then as you go up, you curve and meet in the
center right there. Let's make it maybe a
little bit more rounded, but you get the point, right? There. And now that
we have this one, we can start doing
the other ones. Okay. You don't have to do it exactly all
the time the same. Remember that we're talking
about the nature here. And we would have here
a simple sunflower. Now, let's go to make something a little
bit more complicated. And for that, I'm just
going to copy this layer. Bring it here. And this time, I will
move my drawing guide. And now let's make the
second layer of petals. So I'm gonna go behind
here. And start making this second layer. Can do this circle just like
a little bit irregular. And now, tap on the layer, tap on drawing assist. And with the eraser, I'm
going to start erasing some of the things like randomly. So I can start adding some
folds here and there, and, yeah, you will
see what I'm saying. So, for example, I'm
gonna raise here, I'm gonna raise here,
maybe not this one. No, this one. Then maybe
I can do something here, and I don't know, maybe something something
there, for example. And maybe something
there, come on. Okay. And now I'm gonna start
playing around with this. So you see? There you go. One fold here, then one little one
here, another one here. One right there behind it. One here. And finally, one here. So it kind of is
symmetrical now, but it has a little
bit of more life. And now, if we were to do the veins of our
flowers of our petal, just, like, do simple lines. And here we would have a pretty cool looking,
simple sunflower. Okay, now let's go and make something even
more complicated. So again, We will just do the circles here,
even more irregular. And now here, let's do something completely
out of the box. So you can see that now we have more lines here
than we had here. So I'm going to start doing
petals very randomly here, even with a smaller pencil. And I'll do them a
little bit compressed, just so they fit, and I still have a
little space here. So let's get started. Okay. And while I'm at it, I'm going to start adding
some folds as well. Remember, this is one of the leaves that we did.
Same with the petals. So you can apply you can apply it here as
well. So let's do it. I'm gonna take 5
minutes, I think, gonna probably leave you with a little bit of
music, so I concentrate. But again, very easy, very easy and very I can just experiment with
different folds. Doesn't matter, really. There's
going to be so many that even if you do one that's
kind of not the best, it won't be visible. Oh Okay, that would be it. And now, finally, let's
do this in perspective. Okay. Now, we're going to start with the first
petal for this part, which is the easiest
of them all. So I'll start right here and I'll do a petal
like I did before. Just the same. There. M Okay, now that
we have this one, I'm going to do one right there. And as I approach the side, they are going to become thinner and thinner because
of its perspective. So this one will
be say it again. Now, the center will
be just a bit there. And now another one here. Again, thinner. Perfect. Now we'll do the
same on the other side. So on here. Now, one here. I'm actually gonna
even fold this one of. Okay. And now before we
get even more complicated, I'm gonna do the
ones at the side. So this one will
follow this like this. Now let's do it a
bit less, maybe. Maybe, something like this. Now, this one can
go a little bit, like, outside of the box here. So, something like this. And now the ones here,
this one will be easy. So just thicker and right
there in the middle. Then like this. And then
this one can go like that. Remember, this is very
similar to what we did here. And now. One here, one here. And now pretty much we have it. Now, we're going to start
adding maybe one here that also folds like this and then start filling it
up based on the angle. So the ones are on the middle, then they're gonna
be straighter. And then as they
approach the sides, they're just gonna bend bit. So let's get into it. Now, probably do one as
well here that also bends. So something like this. Actually, maybe comes from here. Great. Then one can also bend there. There you go. Now. This one
can be a bit wild here. Yeah, why not? Then there's one behind here. And then here, just fill it up. It doesn't matter really
what you do here. It's gonna look good enough. Maybe you can do a
little fold here. And then one right here
and just a fill behind. And actually, here, we can
do also one that folds. Awesome. What do you think?
Now, this shape, right? Let me do another one here. This shape will instead
of being this circle, will be like this. Okay? So it would go like this. And then for this part here, we're also going to make
leaves that fold towards here. Excellent. We are done. Let's finally move
on to the palms.
6. Breaking Down Palms & Ferns: Palms and ferns
is something that I didn't think when I
was doing this class. But then I was like, This could be very interesting
to actually do. They add a lot of movement and contrast and sometimes
I forget to draw them. We will study their
flow and structure to help balance our
piece later on. Okay, let's go onto the palms. So I'm just going
to hide this layer. I pinched all of my
flower parts together, so we have the flowers, and we have the leaves as a reference. Now, let's create a new layer. And let's go to the
shop BAMs palms. So going to stamp it here. So around here. And you will see that we have different
kind of palm leaves here, and if we were to put
them all together, we would create a palm. I'm not going to be, again, super specific about what
kinds of palms are these, but definitely the most
interesting are these ones here, and these are the ones that I see constantly in Barcelona. So now, I found a couple names probably
that I'll be skipping. I hope that I will
remember some of it, but I believe that
these are gonna wait, let me select the pencil again. I think these are called Well, obviously, the leaf lets. So the leaflets, 'cause
this is a leaf, right? They're gonna have
a lot of cuts, and depending on,
I think, again, depending on how
young is the leaf, it's going to have
more or less cuts as well as when it bends. So for example, this one, see there's a lot of
these little cuts then might be because
it's a bit older. I think, again, correct
me if I'm wrong, I would love to hear
more about them. And then I have something that I'm not sure
of, but like the branch. So like, this part
here in the middle. I think this is
called the pitile. So like, that's the pitile
would be all this part. And then as it becomes
as it becomes inside, I think these little parts here where the
leaflets come from, I think it's called regs or Riches or
something like that. Again, not sure, but probably we could be
talking about the PDO, which is this, and
then the leaflets. Let's see if I remember. Okay. Now, let's
go to a new layer and I'm going to now select
the habamsPum structures. And now, same size. It's the third little dot here. I'm just going to put them here. You can see that they're
pretty much already done here, but it's going to help us a
lot in order to create this. Okay, so we start
with these ones, but you will see
that when you get here and when you
master how to do this, this is just, like,
so easy, actually. And when you start understanding the
folds and all of that, it just becomes
super fun to drop. But let's start
from the beginning. I'm just going to
turn the pasity down, and I'm going to
create a new layer. Get a pencil, again,
whatever pencil you have. And now we are going to be using this base to create the pum. So fairly easy as well. The only thing that we will have to do here is to
go a little bit. You see, we got all the
structural parts here. And this, for example, these triangles here
are going to be the ones that are having like the biggest cuts
on these leaflets. So I'm going to start
with this one here. Now, you could
basically do this. So you do this and you do that, and then you kind
of have a palm. You say you have the leaf. But I'm going to go beyond the lines just to make it a
little bit more interesting. So, anyways, let's
start with this cut. So I'm going to start
with the cut like here, and then I'm going to go
beyond this a little. And then here, I'm
just going to maybe do something like this and
then something like this. Then I could just do
something like this. Then maybe there could be like one that comes from behind, so it could be
something like there. Yeah, that could work. And
then maybe a little cut here, and then it joins here. Okay, let's continue. And as you can see, I'm not
using any symmetries this time because I don't want this to look
boring and symmetrical. You can see that I'm
kind of like cutting it. Just make it a little
bit more interesting. Always following these
lines that I've prepared for you because in this sense, it's gonna be way
easier to make. Then we are done with this side. Then here, actually, we could do something a little
cut like this and then join it here
like this. Great. Now, we could do the other side. Let's go faster this time. Let's see what happens here. You can see that, like, it's
kind of cool to go fast, just so you're not thinking
about the shapes of it. And by the way,
this is real time. This is not a time lapse. So it's all about just
letting your mind flow here and see what's the result. There. I could finish it
just by doing the PTO here. And we're done
with this one now. Let's go to the second one. Pretty much the same, but we
move the PTOle to the left. Therefore, this
right side is more visible and the other one
goes a little bit behind. But again, same same, same, same as we have just done. So then maybe here we
could exaggerate this. Well, actually,
there's a cut here. So there. Okay. Perfect. Great. Let's do the other side. The side instead of
going like that, it's going to be if
there is this outlier, it's gonna be a little like in that shape, so it
goes behind, right? Again, pretty random here. Let's make the video. Don. Now, let's do the third one. Now, this one is the same as
that leaf that was folding. Remember that? And we
just saw one side. Well, this one, we're
going to get to experiment a little bit because since
there is the leaflet cuts, it's gonna be more
interesting to actually show what's
behind cause like, you know, when we
had the leaf here, it just, you know, pretty easy. But now that we've
got these cuts, it's gonna be just a tiny
a bit more interesting. So let's start here. Actually, I'm just gonna
rotate it like this. If you have a paper
as well, rotate it. It's gonna be easier. And then let's start
doing this shape. Even you could do one
that just goes here. And then instead
of cutting here, it could also start right here. And then just gonna make
this last one here. There. And when it
comes to behind, well, it's pretty much the same. So just go a little bit nuts here and then make some
that go a little farther. If you had time,
you could also add some shadows behind
just like this. So it's clear what's in front
and what's behind, right? Also, you don't have to
fill it up completely. Maybe there is some leaves
that go right here behind, and then they're not visible. So keep that in mind as well. It but yeah, I'm definitely gonna add
some shadows for this one. Like, very simple.
Mark them here. There. And then finally, just let's do a bit more
here and we're done. With the leaflets now,
let's do the po Boom. Done. Let's now go
to the fourth one. Now, this one, I'll be
doing it very dried up, and in a very random
distribution of this leaf light. So let's try here to do something looks a
little bit crazier. And these palm leaves are, you know, as I said before, very cool to play around
with because yeah. You just, like, can come
up with, like, very, very weird shapes
that end up making sense together after. Mm. Let's finish it up. Now, there's the
possibility that there is some visible part from behind. I'm not gonna do it
because otherwise, this exercise will last
a little bit too much, but same as here, you could add behind, right? So let's say if you
were to add one here, you could just add it here and just give it
a little shadow. And even you see here, I marked it because it goes
a little bit behind as well. You can see just a part of it. Done. Okay, so now
we have the four, and we are gonna start
with the wavy ones. Now, very easy to make
these ones as well. I marked here the direction, and our job here is going to
be doing some wavy lines. And then, like, some
sort of like it was like a flame shape,
if I can say that. So yeah, let's give it a try. Let's start up here. Gonna
start something like this. You see? So every line, I'll go from thicker
here to thinner, right? So it's gonna be thicker, thinner, thinner, thicker,
something like this. And then just continue doing it. Maybe one just, like, cut here, and then we could
start somewhere here. There. Perfect. Let's su the
out of sight now. You'll see that sometimes
I rotate the screen a 1,000 times just to find the best angle. Okay. Okay. Now, let's go
to the second one. Same old story, but
just going that way. And then maybe you could
even do some longer ones. Then maybe one can be a bit wild and go
to the other side. You see, like, the wind
is blowing and then maybe affecting some of them
differently than the others. Oh. Say this one. It's going on top
one or the other, it's good to practice
this because as we get to the lest palms, which are gonna just twist and
bend and all of the above. So it's good if every
once in a while, maybe you just do, like,
a crazy one like this. And then you put
some maybe. You see? Maybe one can be on top of it. The other one can be
behind. Just feel free to go a bit nuts with this. And remember to zoom out
here and there, okay? It's always good to see
your pieces from afar. Also take a break sometimes. And most of all, do not burn out because you've
been doing it for too long, which happens to me constantly. Okay. Let's finish it up fast. That pidio Boom. Good. Let's do the third one now. Now, even we are
hiding this part here. So this is going to be super kind of like the
leaves are gonna be tighter because we
won't see them much. It's similar to
what we did here. So these ones are
kind of similar, but this one is another obviously another breed
and another angle. So it's more curved so let's
go ahead and start doing it. Now, I put less lines here. You could make it thicker,
if you want it like this. Or you can stick to this
and make them thinner. Think I'll do it halfway. So something like, Yeah,
I like this thickness. And then maybe I'm gonna
be adding one or here, like, here and there, there. You see, as I sat behind,
they're kind of together, and you could even do this,
see if you want to go faster, cause some of them
won't be visible. You see? Is just like this. Done. And then here, let's continue. And then here. There. Video. Perfect. Now, let's do this one and you remember the
shape of this one, right? Because it's the exact same one as we used before
for our leaves. So it's going to be the same, but adding this kind of pum
effect of the leaflets. So the leaves are just going to fall here.
So we're going to do this. See, they just falling. Just like that. Maybe one, like shorter, one longer. Then maybe what would happen if one falls short
here, for example? Well, it would go maybe
like that, right? So maybe we could do
something like this. And then, for example,
it goes behind this one, it goes on top of this one
there. See what I'm saying? Now, let's There. Let's make a little
maybe cook here. Then let's make
another outlier here. There. Now, maybe one can go like this. Remember, the plans
are unpredictable. There. And now, same old story
up here as we did before. So it's kind of we
won't see it much. So make sure of that. You see? Because they are
falling behind, right? So maybe, like, one
can maybe come and, like, fall shorter here. But generally, as
long as you do lines, that is enough for this part. Then maybe here, let's let's make something a
little bit better here. Maybe. Okay. Yeah, something like this, huh?
What do you think? Okay, now, the branch or like the PDO just
go behind here. There. Man. Done here. Okay. Perfect. What do you think?
Let's do these ones. These ones are, as I said
before, super interesting. So let's go ahead. And I'm going to tell you that you can do this
yourself after. It's all about having let
me put you an example here. It's all about having a pile and all about having a shape. It doesn't matter
which one, really. Palms are very unpredictable. But, if you do this, kind of, like, shape like this. And then you start
throwing lines. You've got this, okay?
And, for example, if you throw a line like
here and you're like, Hey, what happens if this part
of the leaflet kind of, like, breaks here, right? And then what happens if
this one goes up here? Then it's when this palm
trees become interesting. So that's what I've
done here on the guide. And now, let me show
you first how to do a normal leaflet and then
how to make the folds. And then after you've
done probably at, say, 10-20 folds, you just gonna do it by yourself
without any instructions. So let's start from
the bottom, actually. Let's do this one right here. Now, the shape of this
palm is kind of like, as well, so it comes from
thin to thick to thin again. And then the same
for the other side. Thin, thick, thin.
Always finish with thin. Doesn't have to finish
like that as well. There's going to
be a lot of pumps that finish like this as well. But for this exercise, I rather finish like
I told you before. It's gonna be easier. Now, for the fold, I'm not going
to start with this one. It's a bit more complicated, but let's start with
the fold up here. So, it's all about doing this. You see? And then see what I did here. So I go, I do the shape. I go beyond it, and then
I finish it. You see? And the main line is right
there in the middle. Then after you could
do this and this. And that would give
you that would give you a Perfect fold. If you were to do more detail that would look
something like this, maybe some shadows here.
Some shadows here. And you see that it looks cool. Now, we could do instead
of folding it like that, we could make that
the fault is in front of our palm
tray, for example. So of our palm leaves, sorry. So if we raise this part in
the middle, there you go. We could do something
that does this. You see? I just
change the line and then it goes in front. And there you go. So let's do this
one, for example. Now I'm gonna fold here as well. Just one fold, I think. Perfect. And now I'll do this. And then let's do this
one, for example. So the folder is gonna
be in front this time. Oh, so again, open
up, cross, finish. Then here Done. Now, let's continue with
the other leaflets. Now, this one doesn't
have to fold, can just be like this, maybe. Then we could fold this one. Then this one will fall heavily, so I'm just
going to do this. And then cut it like this. Well, actually, let me
cut it a bit straight. So like this. There and do the same here up. Here down, sorry. Perfect. Now, this one, you
can just draw it, then you can decide later,
maybe this one and this one. So you see that it looks
very interesting like this. One behind and one in front. Let me see this one. We could even fold it, like, let's see. We could do this, and then then once you have this
line, you can decide, right? So you can maybe do this. Then here, give a bit of
entrance and do this. And then even you could make it like it's
folding like that. It's a little bit crazy, but you got what I say here. It's kind of like origami. D. Okay, let's do this one now. Now, this one is very easy, and you could turn on the
drawing assist, go to Actions, edit drawing guide, bring
the drawing guide right here and start doing the same. These pumps are a little
bit boring to draw, but in real life,
they're gorgeous. There. Done. Now,
let's go to this one. Again, this is the same,
same same technique. So let's do some folds first. And then once we have them, then we can go and do the rest. So let's start with Sorry
with this one here. So I'm going to do
I'm going to do this ones a little bit
more less straight, like the ones we've done, but
a little bit more curved. So something like this. Then actually, maybe. Yeah, maybe something
like this better. And then the part of the
fold there. And then here. There you go. What do you think? I like it. Okay. Now, maybe we
can do this fold here. Let's do this one
up here, maybe. Then maybe this one. Then this one will be
interesting as well. So for it, we could do something like this. Now, come here, and then
it will fall from here. So it would look
something like this. Yeah, good enough.
Okay. Let's finish it. Almost done there. Done. What do you think? Fun,
right? It's all about. Again, it's all about
the main line structure. Now, let's do this one. So this one is kind
of like falling. It's hanging a lot. So it's a little bit more complicated because
of the folds, right? So especially this
part right here. So that will be
something like this. I will always keep
this in the center. Now, from here,
I'm gonna go down. Go down here until
the end there. And now, easy, one following the center
and the second one. And we we got this one. Okay, now let's do
this one behind. So same old story.
Just gonna do this. There. And now, first one and second
one. Let's do it again. There. Okay. Now, this one, we won't
even see where it begins. So I'm just gonna do a little
line here and it goes down. There. Now, this one. Let's see how I can
start this one better. Actually, I think I'm
gonna turn to this. Yeah. Yeah, like this. Okay. Perfect. Now we have done the
most complicated ones, so I'm just gonna do this
ones that fall here. But first, I'm gonna do
this one that's an outlier, so there you go. There. And now,
just do the rest, like easy. No faults, nothing. Perfect. Okay. Now, maybe let's
start with this one here. Something Nike as before. There you go. Now
let's fold this one. This one's up as well. Same
technique down like this. Well, actually, let me maybe
use a different angle here. So yeah, better. Then here, same. Sorry for that.
Let's do it again. Since it's behind it, it's a little bit
confusing right now. There. Perfect. Now, this one, like, super easy. Let's fold this one up. And then the last two. There. Mm hmm. Perfect. What do you think? Oh,
I forgot the ones. Okay. Sorry. Let's do it. I forgot the ones because
they're really easy to do. It's just they're
not super visible. They are a bit more
together because they're falling from here. So there is more of them, but
you cannot see them much. So there. Do. So we are now officially
done with the pumps. And we've done
something that It's quite funny because I had
assisted on from here. So I've duplicated the pumps here and there as well.
So forget about that. We'll just pretend
that it didn't happen. We still have the guides
here, so it's good. So let's move on now on to making a floral
arrangement without thinking. And I want to show you
a really cool technique that I've learned from
someone. Let's do this.
7. Loosening Up: The Moebius Sketching Technique: So now comes the
fun part because we're going to get to
relax a little bit. I learned a technique
from Tim Gul who learned it from Mobius, and this method helps you
let go of logical thinking. Allow your hand to move freely, creating organic and natural
compositions. Let's do it. Okay, so now it's time for
a little art meditation. I'm going to turn
off the layers, and I'm going to
create a new one. Now, the exercise
here would be to just let your brain calm down. We have no intentions here. We just want to draw lines
that flow with each other. And I don't know what's
going to happen. I didn't I didn't
sketch this before, but it's going to help us come
up with a nice composition for a floral arrangement before we jump onto the
main exercise for today, which is going to be
the floral letter. So I'm going to get a pencil. Let's try with a peppermint. I didn't use this for a long
time. Yeah, that will work. So, this technique that I've learned from Tim
Gul who said that learned it from Mobius is just about letting your mind go
and see where it takes you. The thing is that if you want to create a floral arrangement, you have to be precise where you want to put
the flowers, right? Let's do one where I'm actually actively
thinking about it. So we could do
something like this, and then you'll see. Then I know that there's
going to be a flower up here, for example, maybe one
somewhere here, right? And then I know that there's
going to be obviously, like leaves here and here, and then maybe something like somewhere around here, right? So I know I'm making a
calculated thought of, like, where these
things will be at. But if we start going
without thinking much, just creating lines, then
somethings can happen here. So let's get into it. I'll leave you with a
little bit of music, and I'm going to try to just
relax and see what happens. Okay, so here it is. I have no idea what
I've just created, but for sure, I know that
it was a nice 15 minutes. Now, from this random thing
that you've just drawn, we're going to
understand, maybe, like, if there is any shapes
that can help us in order to construct
a floral arrangement.
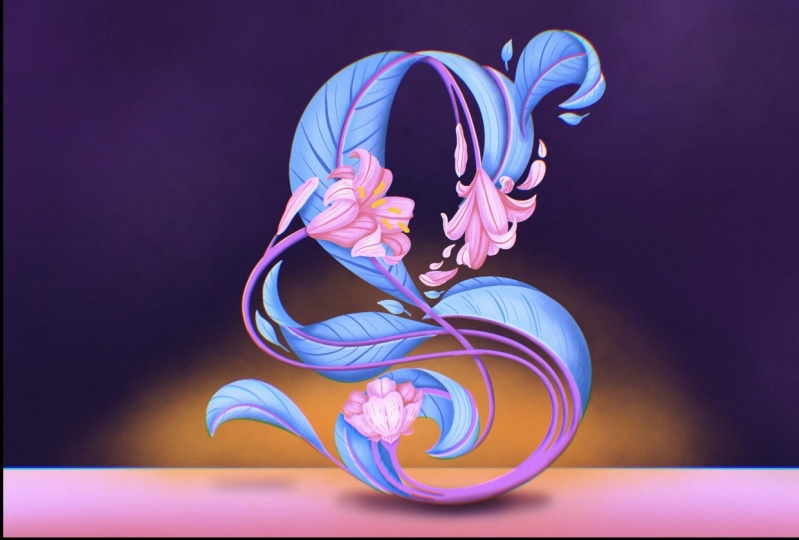
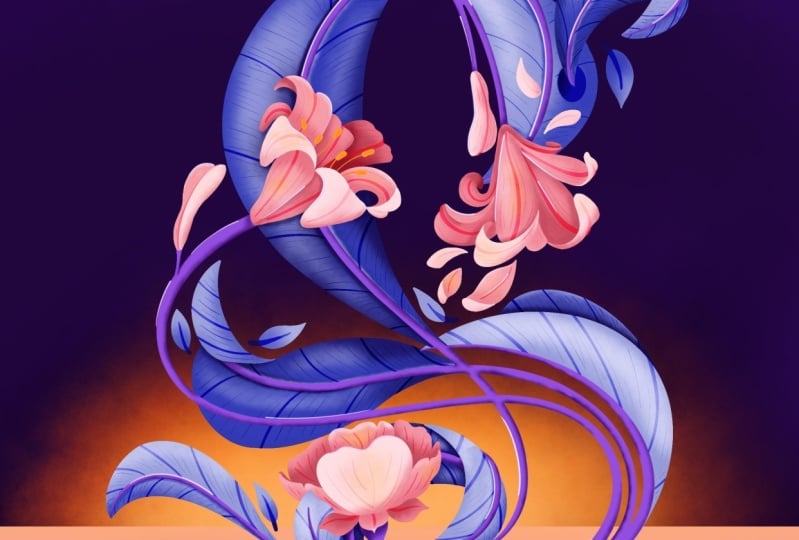
8. Designing Your Floral Arrangement: Using the while lines
we just created, we will start refining a
cohesive floral arrangement by introducing all the elements that we've
learned before. Okay, so I'm just bringing down the opacity of this
weird thing that I did, and I'm going to
create a new layer. Now, I'll draw a circle
because I feel like there's a lot of circles
here in this crazy sketch. So I think if I maybe put it somewhere around here,
let me move it a bit. It's going to serve me as a nice element for
my arrangement. I'm going to use it as a kind of like a secondary background.
You're going to see. Mm. Okay. Now here, the good thing is that we have a lot of lines
and we can analyze where the flow of our
arrangement could be. So I'm thinking like, there's this middle line here
that I really like. So I think I will
just use this line, for example, this
one right here. Yeah, that's gonna look good. And I think I might even bring it until here.
Let's see what happens. And that's gonna
be my main flower. Yeah, good enough.
Then I'm going to use this circle as an excuse. To make the flower. There you go. Now,
here I'm just doing I'm just positioning the flowers because since we
already draw them, we can go ahead and copy paste them so we don't have to, like, do everything from
scratch and we can have a functional
sketch in no time. So let me just do
the center here. And that's going to
be one of the flowers that I showed you
how to do before. And since I have this
one here, I'm thinking. So now I'm going to
use this line right here and I'm going to bring it, so it kind of naturally
follows from the main line. And now here, maybe I can use. You see, there is
this circle here, and then there's this. So maybe I could use that
as a shape. Why not? So maybe we could
place it, like, something like this.
What do you think? Now, we could do another flower here. Yeah. Perfect. Okay. Now, I kind of, like, drew a flower here and I swear that I didn't intend
for this to be a flower. It was just a bunch of circles. But it looks like a flower
that has a center here, and it's looking
that way, right? It's a bit off from
our composition now, but maybe if I if I drew
it, let's see what happens. Say we could do
something like this. I'm not doing the
structure of this one because I did it
by mistake, even. So that's one of those
happy accidents, I guess. See? There. And then maybe this circle here could
be something like this, and maybe this one is
a little bit too big. So I could just make it a bit smaller and do something like
this. What do you think? Now from here, have to think of a way that this
could actually match. So flour comes from here. Actually, I kind of have a
line here that I could use. So maybe I'm going to use
this line right here, this. And then maybe there's
one here that I like, so maybe I could do
something like this. So it's kind of, like,
parallel with this one. So maybe something like this. And then, yeah. Okay, not bad. Not bad, not bad, not bad. Okay. Nice. I could finish this
one like here. Okay. Now, this one
could finish there. And then I'm
thinking about using this circle in a way that it's kind of
like a window, right? So there's some things that are hidden inside of the window, and then some of the
things that are outside. So these ones are going to be mainly the ones that are
going to be outside. And then I'm thinking
that maybe right here. And again, now I'm just, like, going away from some
of the lines here. But maybe I could do a big
flower somewhere around here. H Hmm. That could look
interesting, I guess. Could do one that has the
center somewhere around here. So maybe even if I was to do you remember that one
with it that had a center, and then it had, like, this composition of these
petals that were behind. You remember that one
that was like this? And then, like,
something like this. And then this could
be the flower. Something like
this. Okay. Now let me think what else
can I do here? I could add maybe a
little palm here, so following this
line right here. And then I could
draw the structure Then maybe, like, some
of them could be on top of this flower
and some of them could just be behind. Hmm. Okay, pretty good. I think I don't know
it's gonna happen later, but I think I've
got something here. Okay. Now, maybe there could be another one using
this shape here. So maybe there could be. So, like, if let's make
this thicker, right? So maybe there could be
some maybe big leaf here. Let's it could be
like this leaf. That cuts inside. And then, obviously, we will make
everything thicker so the branches are good
and a little bit realistic. And then maybe we could draw one here that's still
about to bloom. And now we have the
big elements here. We could either start. Well, actually, I
need another palm because it kind of feels like
I need to balance this out. We have three flowers,
well, four flowers. I'm going to do
tiny leaves after. So they are somewhat
in the middle. And I think that's gonna be it. I'm not gonna add much more. So maybe there could be another palm tree
somewhere down here. Let's see if I can find maybe, like, a shape that I could use. So there is this
little thing here. Maybe we could add a
circular palm tree or maybe just, like, one randomly
here in the middle. What do you think? Maybe? And we can do some kind
of a shape here. Yeah. Sure. We could do
something like this. And now there's a little
one that is up there. And maybe we could
make here sunflower. We could just copy paste
the one that we did before. So it would be the one that had a perspective that you remember that it had
the center here. And then it had like
this one right here. H. I think this could
look interesting. And then finally,
let's do some leaves. Now, this one, maybe. I can make it as well. Longer. Actually, like this one, I'm going to make it outside. And I'll do that one that
falls, you remember? This one should be, but yeah. There. And now this would look
something like this. Can rotate it and
put it somewhere. Here, maybe a little bit smaller there. Somewhat in the center. And now that I have this,
I'm going to bring this down and do a cleaner sketch. So now let's go search some of the things
that we wanted to put. We could draw from scratch, obviously, that would
be a good exercise. But again, not a lot of time. So we could maybe put
this pum, for example. So we're gonna select this And maybe even this one. What do you think? I
really like this too. So that's duplicated. Sorry, I didn't select
the layer. Let's go here. Three fingers down the
screen, duplicate it. And then just gonna make them bigger and
start placing them. I think I'm going to
place this one here. Fits perfectly. And
then this one. Here. Good. Perfect. Okay, now
I'm gonna go get the let's see some
of these flowers. So I could get this one. And then which ones
where you put? I think I'm going
to put this two. So there's gonna
be the two here, then this one right there. And then I wanted
to put this one, but I think I'm going
to go with this one. And obviously, this one. So three fingers on the screen. Duplicate. And let's
start placing these ones. This big one will go here. Perfect. Now, this
one will be here. Then this one will be here. This one here. And here's a little technique. If you see that it
doesn't quite match, it could go to warp and just
warp it around a little bit, just a little bit. Until more or less you
think it could adapt. And now, finally, we're
going to get this one and bring it up here. Perfect. So now we've got this.
We got the palms. Now, we're just going
to make sure that So I'm gonna erase some of these parts here just so they actually look like
one on top of the other. Maybe the other
parts of the palm. Can just hide like this. So the sunflower is on top. There. And then maybe this one can
be on top as well. Great. Okay. Now I'll pinch
these two together. I'm going to create a
final circle and erase those parts that I don't like. Well, the ones that I've decided that going in that are
going inside, right? So there. Now let's go to this layer
and erase, for example, this part here, Then
this one goes on top. This one This that's it. And now in the same layer, I'm just going to
finish my lines. And that would be the final
sketch that I could render, even though we won't
get into it today. But you could use any
technique that you want, watercolor, dry media. Or the technique the techniques that I'm going to show you later on when we do our final letter with everything that we
have learned today. Actually, this, yeah. I'm gonna bring this line
on top of everything there. Let's make this
rounded like this. And I'm actually going to select this with a
free hand selection tool. And then with the word, I'm
going to make sure that is following a perfect circle. Way better. And now I
almost forgot this flower. So I'm gonna turn
everything off, and I'm gonna go and do this
flower a little bit better. And I'm almost done here. Yeah. Actually, there should be a
bit there as well. Mm hmm. Yeah, maybe some Yep, way better. And now let's draw this line. It's gonna bring everything
just so I see what I'm doing. Then I got an idea
here for the pum. We can actually put this
half behind, half in front. What do you think? So So I could start erasing, so, for example, this part here. And then all this can go behind. And actually, maybe just
a couple more of them, and then go to the palm
and erase this one. Let me see, gives us this nice effect that some things are behind and
some things are in front. And now I'll do the same here. We can erase maybe this one. Then this one that
is kind of boring. We can leave the folded ones, which are the most
interesting ones there. And now go here
and clean this up. Great. Now let's
go finish. This. I'm gonna actually finish
the plan right here. Pinch the two together, and now let's just finish our job here on a
new layer I'm gonna make. M then we are done with
our floral arrangement. So let me just make sure that some of these
things are properly layered. So, for example,
this could actually, you know, what I can erase here the leaf, so
it goes behind. And then this goes like this. Then some of these
things as well. Some of them can just Go. And then some of them
are gonna be on top. So let's finish
cleaning this up. And now the circle part as well. So some of it goes behind. And we are done with
our floral arrangement.
9. Share Your Results (Midway): Now that you've created your
own floral arrangement, it's the perfect time to just take a breather and
share your progress. You've already done
something amazing, designing a custom layout
using natural elements, you studied and
sketched yourself. And to be honest, that's huge. So before we move on into adding everything that we've
learned into our letter, post your floral arrangement in the project gallery because I would love to see
where you're at. And in this way, I can leave you some feedback and
maybe cheer you on. Plus, I believe that sharing it midway helps you
stay motivated and kind of makes it easier to track your growth when you see the
final piece come together. So let's celebrate this step. Can't wait to see what
you've got so far.
10. Coloring with Nature’s Palette: About to sketch,
refine the details, and also making the
composition pop. Then we will pull color
palettes straight from nature. I have an awesome photo that
I can't wait to show you. Well, you actually
probably seen it because it's also under
Project Resources. But we will sample
each color together, so you see how I create
a color palette. Okay, so now we will start
doing our color palette. I'm giving you a sunset
photo that I took last week, which I was really
impressed by the colors, and I automatically
thought about doing this exercise with it because there's a lot of good colors, but you can also use your own
photo or whatever you have. Like, I'm going to
show you my techniques to get the colors from an image, and you can pretty much
do it from any image. So you'll have to go here
to the wrench tool and then d and then insert the
photo and import yours. I already have it here. But before that, I'm just
going to hide everything else. I'm not going to well, I deleted the sketches that I didn't that I didn't
need anymore, but I'm leaving this here
just in case and also all of the other flowers and
plants and palms that we've done before because
we're going to use them as well now like we did with
the floral arrangement. Okay, so now let's see
what we can do here. I already created
this color palette, so it's going to look like
this one more or less. So yeah, so go here to this color here and
then go to palettes. And then we'll tap on the plate
sign, create new palette. You can also new from the camera or you
can also just like, drop this photo inside, and it will create a
palette automatically, but I never do that
because the colors are just like they're gonna be all random and you
won't be able to use them. I mean, you will be
able to use them, but the way that I kind
of save the colors is a better way to understand how tones
kind of, like, work. I hope that made
sense. But anyway, I'm just going to
create a new palette. And then this you can
rename into, like, sunset um, whatever, sunset, floral letter, for example. And then I will start with the color that
I love the most, which is this pink from this. I think that's an almond
tree. I think I'm not sure. But, um, it's really pretty because
it's the first one that I see flourish this year. So I'm going to go here, tap here, and then I'm
going to sample the pink. I'm going to start with a pink that its value is
somehow in the middle. So I'll get something like this. And then I'm going
to be edding it here on the third little square. Okay, now you might
be wondering why? Well, I always go
with the mid tones, the tones that are
going to be more present in my illustration. And then from there,
I kind of go. So I'm going to now select the other color that is really strong and
which is the sun. And I think I'm going
to get a nice yellow, and I might change
the value a little bit because I think
this is too saturated. So I'll go ahead and get
a yellow somewhere here. Well, actually, instead
of getting this one, I think this one
is way too strong, I'm going to go
somewhere around here. Good. So I have my color here. Now, I might sometimes I
just go here and I kind of, like, get something similar
that I like better, maybe, like, a little
bit more orange. And then you tap here for, like, a second or two and
then set current color. And you will get this
one. Okay, perfect. Now I'm going to have to find darker values for
both and also lighter. So I'm going to go to
the pink first and I'm going to try to see here
if I can find something that is darker or like the
next step, I would say. You see, like,
somewhere around here, I kind of like what I'm seeing. Wait, I'm just going to
select another brush because the hover is kind of
messing with me. Okay, cool. So let's get from this
petal here, maybe, like, a darker pink, something like this, maybe. Let's do it again. I like this. So, put it in here. Perfect. Now I'm going
to get something darker. So I'll get probably something like this
and place it here. And now something lighter. So let's see if there is one of these petals that is kind of like touching
more the light. Maybe somewhere here,
there is, like, this nice you see, this nice tone, so
I'll put it here. And maybe you can even make
it a little bit whiter. And, again, set current color. You see, now we have
these four pinks that will be really
fun to play with. Now, let's go for the yellows. So for the yellows, I'm thinking about something
darker, obviously. So I'll get maybe something
around here. Let's see. Yeah, maybe a little
bit darker even. Mm hmm. And now
something even darker. But that's, you know, I'm gonna also get
oranges after. But probably I'm not gonna go for a darker yellow that
is more to the orange, but instead, it just you see, when you go straight here,
you just lose saturation. So well, actually, to the left, you lose saturation, and here
you just make it darker. So go select this yellow, and I'll give like some
value somewhere around here. Good. Perfect. Okay, so
now that we have this, I'm going to go for
the orange ones. And again, I'll do, like, maybe like three or four
oranges and also reds. So let's get now a very let's say an
orange that is clear. Let's say this one. And I'm
gonna place it somewhere. I'm actually going
to place it. Here. Now, let's find something a little bit darker
and more saturated. Something around here will work. Yep. And now something
even darker than this. And probably that even
goes to the red. You see? We have some red color here. So maybe I could sample
something in between this. This is maybe too
dark. You know what? Let me save this one right here and then find
something in between. And I can do that just by going to the wheel and
kind of doing it myself. Yep. Okay, I like
what I'm saying here. Okay, now let's go
from pink to blue. And to do that, gonna go
to the sky, obviously. And I will try to
find you know what? Like, I'm just going
to sample the sky, just like this part up here, and I'm gonna place it here. Now I'm going to try to find something a
little bit lighter, so I can do it in the wheel
directly and place it here. And now maybe a tone that is
just a little bit darker. So you can go up here
maybe as it goes up, it kind of gets darker.
Let's do it again. And even make it a
bit darker yourself, maybe something like this. Yeah, okay, that will work. Now, I want to get maybe I
see some other colors here. So, if we zoom in,
there's some greens, I don't want to put greens in today's illustration, though. So I'm going to go
maybe you see here, there's some kind
of a purple color here that I think it's going
to be a good transition. And probably probably
even we could use it for the leaves instead
of making them green, we could probably do
them purple and blue. I really like what's
happening here, but it's a little
bit desaturated, so probably let me get
this color, for example. And then I'll save this
as a dark purple here, and then I'm going to just
move the wheel slightly here and try to find a nice
purple that is saturated, but not that much
somewhere around here. And let's place it in here. And now, just trying
to find, like, a dark purple value, something around here
and put it there. And just with this, we are done with
our color palette. So in the next lesson, we are going to start creating our letter with these two
brush structures right here. So I'll see you
in just a second.
11. Inking Your Design: Making It Pop: To apply everything
we've learned. Today, I'm also giving
you a letter stamp that will help us with the structure for
our final letter. You will see that
is available as a procreate brush, stamp
it, and that's it. And also a PNG just
in case you're using another app or for
non digital artists. Remember that you can also find these under project resources. Okay, so now we've got
our color palette, and we are going to
start with our letter. So, create a new layer. The color doesn't matter. At
the moment, something dark. I have a purple, so it's good. And now I'm going to go ahead and stamp
these two things here. So this is going to be our base. So I'm going to get the
maximum size, the fourth. It's really important that both of them are
on the same size, so they align perfectly. So I'm just going to stamp it, okay, not the last one. So let's see what
happens with the third one, even the second one. Okay, we will do one thing. We will get the
third one, and we're gonna rotate this, and
we're going to stamp it. Makes sense? Now, I am
actually gonna paint this in pink and create a new layer. And I'm going to get, let's say, a blue color, maybe
like something. Maybe this one and
go to the branches. Now remember that we
picked the third, and then we are going
to just stamp it. Just for you to see it, I'll probably get a purple
so you see it better. So just like around
somewhere here, but always on a new layer. Okay? Now, go to
the transform to, and we are going to transform this so it aligns perfectly. In order to do that, you can use this curve
here, for example. Until you see it aligns
perfectly to the curve. You can always turn off the
snapping, so it's better. But I think I've done
a pretty good job. See? Now it's perfect. Now, if you were to
bring down the opacity, you see that it's quite there. I made these stems just
so we can accelerate the process a little
bit because otherwise it would take us hours
to do this letter. Now, I'm going to
select both of them. I'm going to rotate this,
go to the Transform tool, and rotate 45 degrees twice. And now with the
uniform selected, I'm just going to
make this smaller. So I would say around
somewhere here, and then this will be
around here. Perfect now. Turn the snapping on, and let's center it until we see a yellow line across
our vertical axis. Let's see if we can find it now. Sometimes it's so hard to
find this line. There you go. Okay. I'm just going to you know that if you
tap outside the boxes, you're actually
moving the image, but like one pixel at a
time, so that's always good. And I'm done here. Okay.
Now, I'm thinking maybe I can move it a little
bit to the left after all that struggle that I
got with the yellow line. But since this part is heavier, then maybe by moving
it to the left, it's gonna look a little
bit more centered. What do you think? I
think that's good enough. Maybe just a little
bit more even. Yeah. I like this. Perfect. Now, go ahead and bring the opacity
down of our letter. We won't use it,
but we will need it to draw everything else. And now let's create a new layer on top
of everything else. Get a pencil, and
let's get sketching. These are pretty much like all the structures
you will need, but now I'm going to start
sketching some leaves. Some of the leaves
that I'm going to sketch now you have done
before, most of them. But some of them obviously
will not adapt perfectly. So I'm going to draw them again. Now, so if we start, let's say, let's start
here on the left. I decided that this will
be a whole huge leaf. So it's going to be let me get the other pencil that I
had the eight B better. Yeah. So it's gonna
come from here there. So you see this is gonna
be a leaf that is gonna fold and go here.
So let's do this. And then this goes
down here. Nice. Now, let's more or less finish
this shape of the leaf. Now here, you'll see
that it bends here, right, as we were doing before. Remember that we have
drawn all of this before. And now this one will
bend and go there. For this, I'm just going to make a little shape from here
that goes like this, touches the G, and then
falls down a little. But you see what
I'm saying, right? Perfect. And now this
comes like this. Until touching this
part right here. Perfect. And now,
same old story here. There. Let me redo it a little bit. Actually, let me step back. I want to do this a
little bit better. Yeah, maybe like this. And now let's finish it up. But now we've got
this massive leaf. And I'll do first the leaves, and then I'm going
to copy some of the flowers that we
sketched before. So we don't have to sketch
them all over again. Now, there's going to
be a leaf as well here because this G kind of always has this little part up there. So I thought maybe we could put a bending leaf or anything. So we're going to start
somewhere around here. See, then we're going to go
up and just follow the shape. There. And then we're
going to make it bend. So it touches this line here. Just like this, and then
it goes down. Like this. It starts looking like
a leaf, right? Perfect. Now, we'll do like this
little shape here like this. And then we will finish it up. Just like that. Perfect. And now, obviously, this line. Right there. Nice. Now, since
this goes inside, maybe I could create some kind of a hole
here so I could do something like this. There. Okay, good. Now, we will go down and
create the leaves down here. So I'll create this one first. This one is one
that I showed you. So the last leaf that we made. And this one will
simply go from here till there like this. And then do this
little shape here. Maybe. Let me redo it again. I'm actually not satisfied
with this shape. So let's do it again. Okay. Better. Yeah. Better. Okay. And now there is the part from behind that goes around here. And this one goes behind. So even in the sketch,
you can add a bit of a bit of shadow here. So you know that it's behind. And now, remember that the
veins will go just like this. And there's also, this little shape here that
I still don't like, so I'm going to go to
the selection free hand, select this line
here, and then warp. And then here, I can
finish the retouch. Okay, now. Perfect. Let's go
to the next leaf, and it's gonna be an
interesting one here. We will use this branch. To make the lift. So I'm going to start here
in this intersection here. And then I will go like this. I'm going to just go
out of the G a little. Like this. Let me redo this a bit. So the flow is a little
bit more natural. Great. And now,
it's going up here. And I'll do a little fold
right there like this. And so it meets around here. There. Okay. Perfect. And now this, you see, we will use it to make
the perfect fold. Adapting flowers to
letters and make them readable is a little
bit complicated sometimes. But I've prepared
this G for a while. And you can do that, too, because by the end of the day, if you do a letter that
has kind of, like, more nature inspired
natural shapes, then adapting it with
leaves is going to be easier than than
expected sometimes. Great. Okay, now we start
seeing something here. Perfect. Now, let's
go to this leaf. Nothing much to it.
Just mark it because we already have it, right? So there. And there. Done here. And now let's make
the last leaf. And we're gonna start
copying the flowers. So I will do it right here. So this is gonna be the fold, and then the leaf is
gonna start from here. So there's gonna be
this branch here, spied pidio was it? I don't remember the name now. So it will go like this. Go up. Mm hmm. There. And now here
we are gonna break it and do our fold. Man, let's finish it up. Something like this.
What do you think? Remember that the
cleaner your sketches, the better your piece
will be later on. Now here I'm also
going to do a leaf. That just goes, like like this. So it's the perfect excuse. So this branch goes behind. Perfect. Okay, now, let's go
dig some flowers. Again, I think I'm going to pick my favorites like we did before. So I'll go to the flowers, and I'll pick these two. So just like we did before, select them three fingers
on the screen, duplicate. But first, select the
layer, of course. Well, actually, let me
select also this part here. So I'll select this
one and this two. And I think from here,
that's gonna be it. So three fingers down, duplicate. Let's bring it up. And then we could paint this in another
color, for example. So we see what is
happening, right? So let's now bring
back these layers. And we're going to fill
the other blanks here. So, for example, we need to add a flower
here, for example. I'm going to add one
here, even though we don't need it because we
already have the leaf. But I thought this could
be one of the flowers. I think that's going
to look pretty good. So let's get the pink. I'm going to move this
here and I'm going to place the first flower. So I think I'll do this one. And I'm gonna rotate it and turn off the snapping
so I can rotate it better not try to adapt
it somewhere here. Even like this? Well, actually, no, let's put it like this. And let's bring it
somewhere around here, I would say, what do you think? And now with the word,
an advanced mesh, you can just go ahead and try to adapt it a little bit
better to the letter. Doesn't have to be exact, but just a little bit. What do you think? There you go. I'm always asking,
what do you think? And I know that you will
not reply instantly, but I feel like I love talking, and sometimes I would I would like some live
feedback as well. So I should do a
live session soon. Okay. There you go. Okay, now I'm going to just erase this part here,
and what do you think? It adapts pretty good. Perfect. Now, let's
get this one. And we will rotate it
flip it horizontally, and put it right here. There. Nice. Okay. So now
that we have this one, I'm going to get the last flour, and I'll put it
somewhere around here. And this one, I think I'm
just gonna go beyond my G. Just like this, that will work. Eriase oh and we are
pretty good here. Now, I forgot that I'm going
to use yet another flower. So I think I will get
this one right here. And again, like before, select
three fingers on screen, duplicate, bring this color
in. Let's bring it up. Turn everything on and then. Let's place one here because I think these flowers
are going to be pink, and this one, well, all the
flowers are gonna be pink, and I want to balance
out the colors. So I think I'm going
to put this one here. Yeah, actually, I had it
ready before already. Perfect. Now let's try to
maybe adapt it better. So again, go to
Warp Advanced mesh, and just gonna bring
some part here there. And even if this goes
out, that's fine. Nice. And now I
will actually maybe even get another one of this. Somewhere there. Yeah. Perfect. Pinch them together
and get a pencil now. And I'm gonna now cover
some of the spaces. So there is one
here, for example, that you see that
will go that way. So I'm gonna create some petals like
flying around, maybe. Maybe here. There. Yeah. Maybe a couple here, like simpler like this. And also, I'm gonna go up there. Let me do one here that
is quite big. Like this. Just select it and move it a bit. Perfect. And now, maybe with a purple, just to know that
this is a leaf. I'm gonna add a leaf here. And maybe one right here. And I'm done with the sketch. Okay, now, before I go
ahead and start rendering, what I like doing
always is to add some color just to see
what's gonna happen, right? So we don't have to paint
later on kind of blindly. Now, I'm going to turn
off the letter G, make sure that it's
still readable. Obviously, obviously, it's not gonna be as
readable as a Helvetica. It's not going to be readable
as the original G. Okay, so now we'll start
adding some color. I like doing that because
before you render the piece, it's always nice to see what's about to happen
to your piece, right? So I'm going to turn
off this letter G, make sure that it's
still readable. Obviously, this is not going
to be super super readable. It's also not most of the
intent of this piece, right? But I can still read a G
now even with the line. And I think when
we add the colors, we will definitely read it. So now that I have this, I'm going to create a new layer underneath my lines
somewhere around here. And I'm just going
to start painting it a little bit that much, just like just to understand what's going
to happen, right? So I will get from the
brushes that I gave you, I think I'll get,
like, the soft shadow. And then I will start painting. So I'm going to start with
the flowers right here. I'm actually gonna put this
layer underneath the flowers, so we kind of cover the purple. And I'm just going
to start painting a little bit with
this pink, actually. Like if we were children, we don't have to make sure that the piece
is perfect at all. Remember this is just for the feeling that
it's gonna give us. Yeah, that looks pretty good. Now, I always do these
colors in separate layers, kind of the same as I do when
I render my whole piece, because then it's easy to change them
through adjustments, give saturation, and brightness. You can go change the
color that you don't like, and you don't have to
change your whole artwork, but rather just one color. So Perfect. Now let's go paint this
one here. There you go. And these loose petals as well. Okay. Perfect. Now, I think the
plant will be well, the leaves is gonna be a mix between a nice
blue and a nice purple. So I'll create a new
layer underneath that. So it'll be here, actually. And I'm going to
start with the blue. So I'm going to start maybe with this clear blue and
paint these sides, the ones, the folds
that are on top. So this one then this one. Yeah. Actually, underneath
the lines, should be here. Yeah, then this one here. Now, today, I'll show you one of my techniques
to paint this. But if you've seen any
other of my classes or obviously any
other classes online, or if you have any other
brushes like dry media, watercolor, you can also
use that technique. Well, it's pretty obvious, but I just wanted to I
just wanted to tell you that even though I'm gonna be using one specific technique, you can use whatever
technique you want. You also make it you
can also make it flat. You can also put it into
vectors if you would like. And then this one here. Okay. Now, well, this and maybe even the
leaves could with this color. Yeah, that will do. And now, with this other blue,
I meant this one. In the same layer.
It's the same tone. So if I want to change it later, I also want to change both
blues at the same time, right? I'm gonna show you
what I mean right now. But spent this one. And now on a layer on top, I'm going to select this purple. I'm going to make
it a clipping mask. And I'm going to go
down to the color mode. Why? Well, because I want to add some purple tone in my blue. Yeah, something like this. And that's pretty much it. I could do maybe
maybe a new layer. And then with this yellow, maybe we could paint
some, like, nice details. The yellow is always a
super good contrasted color to add some fine
details here and there. So maybe even this one could have something
coming out of it. Right? So, and now maybe
with some orange, we could also give just
like a little tint here on the plants just a bit here. Lately, I'm obsessed
with the combo of, like, pink and orange. So maybe we could
make this happen in this plant as well,
in these flowers. There. And we are done. Now, I would do
the floor as well, so I could make a new layer and then go
to the selection tool, the rectangle and do a rectangle
somewhere around here. And then for the floor, we
could paint it into this pink. And then with the
soft shadow brush, maybe we could give
it a little bit of a lighter tone here. Remember, we will be
doing this after, so you don't have to
be super precise. But this was always
good for me to give me extra motivation
because I kind of know how this thing is
gonna look like in the end. And then we will figure out the background
later on. Perfect. Now, you could go ahead
and select all of it, make it a group,
duplicate the group, tap on the group,
and now flatten it. Now, I always like keeping my
images here as a reference, and then I'm going to
turn off my colors here. So now I'm actually going to erase all my sketch since this is the only thing that I need a little thumbnail. So I'm just going
to reveal what I like what I like to use after. So the sketch, obviously, and then this line. So I'm just going
to select those, bring them up, erase the group. Now I'm going to pinch
this sketch together, bring the past it
down just like this, and now create underneath
my lines there. And this is going to be for
my first part of the letter, which is going to
be this leaf up. So I'll do this one. Here, you can select the clean lines. I've just included it in
your brushes as well. And let's get to it. You will just have to go
through your lines here. Can always put it as an eraser. As well. And then with this technique
where actually, let me just touch one little thing here that
now the size is good. I'm just gonna maybe
remove this taper better. So The technique that I always use is to do
compound lines, right? So you do this one, you stop, make it better with
the shape edit, and then finish it up. It will always give
you better lines. So as we did with the color, let's do this part
from all the plant. Perfect. Now, let's go and create a new
layer for our second blue, which is gonna be the
folds of our leaves. Let's do it. Actually, I think this
blue is too dark. So I'll just sample this one right here and I'll just
find a darker shade. Yeah, this one works. So I'll just place
it somewhere here. Now, when you find these things, for example, now, if we were to paint, it would
go behind, right? So I'm just going to turn
off this for a second, and I'm going to show
you how I do it. So let's do the shape. Now, we don't have to care
about how it finishes here because remember that we have
this in the other color. Let's reveal it. And now we could do it in
different ways. We could add masks, for example, but I'm just going to
erase that little part. You could do it also manually. But what I will do is
to tap on this layer. So the dark one, tap, select, and now go to the original
one to this one right here. And with the eraser, I'm just
going to erase this part. Done. Okay. Now, let's go back to my darker layer,
and let's continue. Did we just forget? Yeah, I forgot this part before, so I'm just gonna
paint it right now. This will go behind, so I
will just erase it manually, since it's a small part there. Okay, and let's do the
dark. Put this one here. And finally, this one. Perfect. Okay, now
let's go to the pink. We will create a new layer
on top of everything else, but not the sketch. So on top of these lines, right here, and let's go with this third pink that
we've created before. And now here, we're going to
do it in different layers. Every flower is going to
be in different layers. So the first layers that
we're going to do are the ones that are
in front of us. So these ones. You see? And then in another
layer, we will do this. So we have separated layers, and it's easier for us to
paint later. That's it. That will do for
il. Let's do this one's. Also, the petals. Everything that we
can get painted now will be better for after. See, they're all separated. Now, this petal, we're just
going to do this upper part. We could even paint this one. Actually, let's just do one
half. So let's just do this. Yeah. So same here? Than this part here. This Then down here, we could do this main one. And that will do for now. Okay, now, I'll do another layer just
underneath this one. And with actually,
let's do this. This one that we just had now, let's paint it with
this lighter pink. Yes. And now in the
underneath layer, I'm going to use
that original pink. And I'm going to
start painting things that are right behind this, but still on the foreground. So I'm going to
leave all this part for layer. Let's do it. Okay. Even some of them that
are kind of behind. But since they're not touching our main shape, I'm
also gonna do it. Otherwise, we will immediately
run out of layers. So, kind of, like, everything
that is not touching this red, this pink, sorry. Hmm. Okay. That will be for now
for that flower. Look, actually, I could
even do this one here. And then from here, I could
do maybe like this one. And this part here. There. And obviously, this one. And you know what? I could
even do this part here. Yeah. Okay. Let's do another
one underneath this one with this pink. You see that now I
can do bigger areas. Look, even this one,
though it goes behind, again, let's try to save as many layers and still
make it easy for us. Yeah, I could do it like this. Actually, this one is kind of, I can do it in this
layer, this part. There. And even
this one, actually. As you start filling
up the gaps, you will see that
you will think, Oh, I could use this
there or that there. Like, for example,
this, as well, I could just even
though it goes behind, but I could place it here. And then, even this. Nice. And these pins are
just a reference for us to know that they
are different layers, but then after we will
make them all the same. And again, this is
an approximate job. You don't have to do
it perfectly, right? For it to look good. Here. You see, I can actually
use this color. And if you don't want to here's
another little technique. If you don't want
to touch this and that and you want
to paint just Okay, so let me explain it over. So we are on this
layer right now, yeah? And this goes behind, but since I want to save layers, I cannot I could just, like, draw like this
like I've been doing. But if you don't want
to touch this layer, you could always go to
This one, tap, select. And now down here
you go to Invert. Now, you can draw in any layer, and you won't be
stepping on this one, even if it's on top. You see? It's always
going to be there. So you could always do that and then paint this
like this better. There. Perfect. Let's go down. And this last layer.
Hm. Interesting. We have this part right here. I think I'll need another layer. So I'll paint this
and this potentially. Well, actually, I
can do this as well. There. And even this ones. And one last layer just for
this part. But whatever. I'm just gonna use the
same color. It's fine. I thought I would do
everything in three layers, but well, it's okay. Now, let's see if there is any other element that
needs painting. Maybe we can add somewhere
something if you want. But I think that
is pretty much it. We can create a layer on top of everything else,
and with the yellow, we could draw these little
things I forgot the name of. There. So far, that's it. And now I'll do another layer. Let's see, on top of
this line, maybe? No, actually on top
of all the colors. So on top of everything
but the yellow. And I'm going to start
doing these mint ribs here. So I'll do it, and I'll erase it in the parts that
I don't want it. And in these parts,
I'm just going to make it so it goes out a bit. See? This is gonna look more realistic if
you do it like this. Like that. Let's do this. And you can also add
more like thinner. Like this. Oops, here, there is a should
be a hole here. Better. Let's go back
to this made rib. Actually, that's the better.
12. Adding Shadows, Highlights, and Texture: This final episode, we will
make our piece stand out. So we will add shadows
and highlights for depth, and we will add beautiful
natural textures using the brushes that
I'm also providing. Okay, so we are done
doing the veins, and then before I get
started with something else, I'm just going to go in this layer that
I've just created. I'm going to
duplicate it. And I'm going to bring it
to the background. And the reason why is
because I'm going to change the mode of this right here, and I still want to keep
the ones as a solid vase. So, go to this little N, and now we're going to
see which one looks good. Usually, the light ones
give a very good effect on these darker lines I didn't want to do
something super visible. I think I'll probably keep it
like this with hard light. I like what I'm seeing here. Perfect. Now, before Oh, yeah. Now we're going to go
to the purple layer. So the one that I've
given you today, and I am gonna make sure that this one is following this. Perfect. M Okay. Great. Now let's create the floor. I'm going to erase this image since I don't need it anymore, and now I'm going to go
ahead and create a floor. So as I did before, I'm going to go here
to the last layer. So in the background, and I'm going to go to the
selection tool, rectangle. And now I'm going to
add a floor right here. I'm going to drop the pink color and now I might even change the background color
before anything else. So I'm going to go to
the background color. Gonna tap on it, and
now I'm going to put it into a dark purple. So this is one that we took. A black would also look good. I'm just going to go with purple since we have a lot
of purples here. So now, this kind of
starts looking good, and we could actually
live it like this. It's a flat piece, and
that's good enough. But I'm obviously gonna
add some more effects. And I'm going to be
showing you how. So for, I'm going to tap on
it and make it an alpha log. Now I'm going to be
getting this color. Maybe even a yellow. Let's try with the yellow. And the soft shadow that you have here on the little brush
that I've given you today. And just gonna add some lighter tones here
and some darker pink down. Awesome. Now I'm going to add a drop shadow of this plant. So we will think that the
light comes from this side. So from the upper left. And so it's going to cast a
shadow here on the floor. So I will go ahead and create a new layer on
top of my background, go to the selection tool, go now to Ellipse. And I'm going to draw
an ellipse here. Let's say something about like, something like this
will be okay, I think. And maybe with this
darker purple, I'm just going to
drop a color inside. Okay. Now I'm going to move
it slightly to the right. Well, actually, no, I'm
going to make that the light comes especially
like from up here, not from the left, but from up. So this shadow is kind of a little bit
more balanced here. So I'm going to add
one right here. Now what I will do is to
duplicate it and hide one. And then with this one,
I'm going to go to adjustments and
then Gaussian blur, and I'm going to add a
Gaussian blur just like this. Now I'm going to go
to this little N and I'm going to change the
mode into something dark like multiply and
maybe even bring down the opacity a bit because remember that I had another one. Well, I'm going to also
put it into multiply. And this one will
be way smaller. So this is just for the immediate thing that actually touches
the floor, right? So there's two I always
put two shadows. So I'm going to make
this also caution blur like this and then just
bring it down a bit. Perfect. Even a bit more
gaussian blur, I would say. Yeah. Awesome. And now with the eraser and
the soft shadow, I'm going to erase just a bit
in this side here. There. And just put here. Cool. Now, you know what?
I'm even gonna sorry, I'm even gonna
create another one. So I'm gonna duplicate this.
Bring capacity super down, and just make another
Gaussian blur. Perfect. Now, you could even do a little shadow
that comes from here, so he could duplicate it again. Maybe bring it here,
make it a bigger Gashmblur like this and just
leave it somewhere there. Now you can pinch
them all together. And maybe the color is a
little bit too strong. So I'm going to go
to adjustments, hue saturation and brightness. And now here, I'm just going to move the hue
until I find something, maybe even the
saturation until I find something that blends with this background a
little bit better. Yeah, something like this
will look good. Okay. Now that we have this,
I'm going to start adding some shadows to
some of the leaves. So let's go to this leaf. And again, we could be adding effects here until tomorrow, but I'm just going to
show you the basics, and then I'll probably even
finish this piece after. But I think if I
get perfectionist, like I always do, probably it's gonna take me more than 5 hours. So I'm just going to
show you the basics, and then you will be able to
experiment with it as well. So I'm going to show
you now how to paint, for example, this
leaf right here, how to make some shadows,
how to make some lights. So go to this layer, add a new layer, tap on it, and make it a clipping mask. Now, I'm going to go here
and I'm going to select this I think I'll just
do a stronger blue. So something like around here, I'm going to edit
somewhere here. And then I'm going to go
to the soft texture brush, which is one of my
favorite brushes that I've offered in
Petrin ever since, and I really like it because it's kind of
like the soft shadow. But as a shape, it has this nice texture that I've created
a few years ago. So it gives you,
like, this kind of, like, cloudy texture that
I really, really enjoy. Great. So I'm going to now
add a little bit of shadow on this part here there. On this side, See? This starts looking like
already like something, right? Okay, now I'm gonna
add a harsher shadow here since there is
this flower on top. Just go to make it like
comes from small here. It's kind of like
the closest is to the letters the closer the
shadow is and the strongest. And then as it goes here, it's kind of generating this. Great. Now, let's make
one here as well. There. Now, let's continue
with the shadows. Let's do now the general ones. So here, there's gonna be one just like here
at the fold here. Then there's gonna be one here. If you see that there
is two shapes together, so when I add shadows here,
it goes here as well. You can go to the selection and select free hand and just
select what you want to shade. There. Perfect. Now we can go here. I wonder what is this line. There is one line here that
I don't remember creating. So I'm just gonna
try to erase it. There. Okay. Let's go
back to our shadows, and let's continue here. Adding shadow here inside, and also on this side, and definitely also
coming from the flower. There. Now, gonna add
some here as well. Perfect. Now, some here. And that's it for this. I'm gonna go here,
just add a bit. Not much. There, pun. Let's go up. Perfect. And now I will go to
the selection too, and I'm going to
select this part zone. You can see here, I'm going to go and select
this part right here. And now I will go with
a smaller size brush and add a bit of shadow that
touches right here. There. And now with the bigger one
to plant it a bit better? And I'll do this on the
other leaves as well. You can also do it
the other way around. Like first the big one and
then go and do the small one. And then here Okay. Okay. Now we will add some light. So in the same layer, I'm going to select
this blue color, and I'm just going
to add some light. I'll just add it
somewhere around here. That will do,
actually, just a bit. Yeah, just a little bit. Also here, maybe just a bit. Then here, and that's pretty much it. Now let's go to the second blue. And we will get this blue color and just
give a big old brush here, just so it becomes kind
of like the blue we had in the in the
other layer there. And now let's repeat the
process. Darker blue? Shadows in. And remember, so like this. I'm actually gonna give
him more shadow here. It's kind of going inside
and it didn't look like it. That was too much. Yeah. Okay. Great. Now let's go here. And then here. I like this part. And for the lights, you can also select
this white color. So the lights are
even a little bit stronger than on the other half. Okay, maybe a bit up here. I actually forgot
the shadows here. Okay. And now that we have this, let me add just a bit here. The last thing that we
are going to do for the blue parts is to add the same as we added the shadow here, but we're
going to do a light. So we will start
actually with this part. So we're going to
select the opposite. So this part right here, and we are going to add with
this blue, the light blue, just a little light here. There. And let's continue doing that. Let's do it on the
other side now. And actually, this was
pretty badly done. Perfect. Let's do
just a bit more. Now, for the flowers, I will do a clipping
mask for each. And I'm just actually
going to show you with one flower
because otherwise, it's gonna be a little
bit too much, I think. I already was calculating
a little bit less time for the leaves and look
at us right now. So for the flowers,
if I was to do, let's say, this one, for example, it's
pretty much the same as we have done
for the leaves. So now I'm going to
try to find first. Yeah. So this one right here. And I'm just going
to start adding some shadows the same
way, the same way. Just like this.
Maybe a bit here. You can even go find
a darker color. There. Actually, it way
too dark, so Nope. Okay. And now you can also
balance it out with the pink. You could add a
little bit of orange, even right there in the middle. What do you think? Maybe even
a lighter pink somewhere. Just look around in nature
and see what you find. And then the lights, we can do them right away. So we could add some lights
right here in the middle. And that pretty much will be, how am I gonna
shade the flowers? Let me do another petal. For example, let me do this one. Let's go to the
clipping mask here. And here, let's
start adding maybe, like, more pink, right? Then maybe like some
shadows here. There. Then maybe some orange. Just a bit right
there in the middle. And maybe some
extra lights here. And that would be it. So as an exercise, you could finish the flowers, and I'm also going to show you a couple more things right now, so I'm going to finish it later. But for example, when it comes
to these purple branches, so I'm going to add
also a clipping mask. And then what I'm
going to do is to add as well some
shadow right here. And here, let's say, And then as it goes down, the shadow gets less strong and it goes to the other
side. So here. There. So that's the second exercise
that you can practice. Then a little trick here. So you see that this
branch is going on top of this leaf, right? And this is not a branch.
I totally forgot about it. Again, keep forgetting
the names of the plants of the plants parts, so go to this leaf here and add a shadow that actually
comes from this branch. So if you add it just a
little bit further down, it's going to look
like the branch is not touching the plant. O. But it's gonna give
you this nice. You see? Like it's flying
right on top of it. Cool. And then also one brush that I gave you today as well. I think the last one we
news is the rim light. For the rim light, it's
really interesting to add some lights to our piece. So you could add, for example, if you go to, to make a layer
on top of everything else, you could put it into
an overlay mode. And then you could add
some lights like that. You could do you could do
it in different places. You could do it even here. Or maybe here.
Looking at the few. And it's gonna make your
whole piece pop better. So maybe here. Right? And keep experimenting and you'll see that this
gives you great results. And now we could even do. And you see that every time
that I'm telling you like, Yeah, it's done. Well, surprise, surprise. So let's add a new layer
underneath my floor. And here I'm just going to add maybe with my soft
texture brush. I go to add some yellow. 'Cause remember that this
was a sunset kind of thing. So maybe some yellow,
maybe some orange. I just want to pay
a little bit of tribute to my photograph. So I'm just gonna
add a little easy easy easy sunset
right here behind. See. So it gives us this
nice little effect here. And then maybe you could even
add some lighter purple. Here, maybe even some
darker shades as well. And when you have
everything done. So when you finish all
these little details and all the flowers
and all that, which now you have
the tools for. Now you can go to
actions at Copy Canvas, go on top of everything else, and that's something
that I always do. Three fingers down
the screen and paste. Now, in here, you could
always go to color balance, and you could check
if you tap here, you could check your shadows, your midtones, and
your highlights. That could give you, for
example, if we go to shadows, that could give you
a better control over your color palette, so we could maybe, like,
make it more bluish. Maybe the mid tones
could also change, see? And even your highlights,
maybe there is, like, some of the highlights
that you would like to maybe make more
pink, for example. So you see the difference? You could always make
it pop like that. And then finally, since
you have this layer, you could go to adjustments. And now here you
can add a couple of things that I always add, which is the
chromatic aberration. If you do this, it's just going to give
you this nice effect, like the aberration of, like, kind of, like
an old camera. And then if you add some grain, which is the noise one, it's just going to
give you a little bit more of a better, kind of, like, it all comes
together a little bit better. So that would be it
for today's piece. Don't forget to do the
shadows and the lights, and you'll be done. Thank you so much. So here's the final piece
with all the shadows. You can see that
I've also added in the end this grainy effect together with what I showed you, well, let me find it the
chromatic aberration. So if we turn this layer off, you can see all the tiny details that I've included
that are pretty much what I showed you before in one of the flowers and in
one of the leaves. I've also included a couple
bigger flowers here. You would do that by just, like, copying the G and then
bring it to the sides and then go to adjustments and add a little bit
of caution blur. And that would be
pretty much it. I thought I would show
you before we finish.
13. Thank You and Next Steps!: Okay, so we are done. Here's what we covered
in this class. How to break down leaves, flowers, and pumps
into simple shapes. The mobius inspired technique to loosen up your
creative process, how to design a floa
letter step by step, and adding color, shadows, lights, and texture for
a polished final look. Can't wait to see
what you create. Make sure to share your
project with the class. Now, if you want to
dive deeper into floral lettering and you
like retro inspired designs, you should not miss my Arnivo
Skillshare class where we explore floral ornamentation in a completely different style. Thanks for joining, and I'll see you in the next class. Bye.
 Jimbo Bernaus - Shoutbam, Letterer & Designer