Transcripts
1. Welcome! : When you stop creating
one of pieces and start thinking in series,
everything changes. Your work stops being just a cool poster and
suddenly it's a story, a duo, a collection with
meaning and connection. Hey, I'm Jimbo. I'm
a lettering artist, designer, and educator. And if you took my
first Skillshare class on Artnuveau Lettering,
welcome back. And if this is your first time, I'm so glad that you're here. But if I was you, I would probably start on my first
class about the topic. This class is all
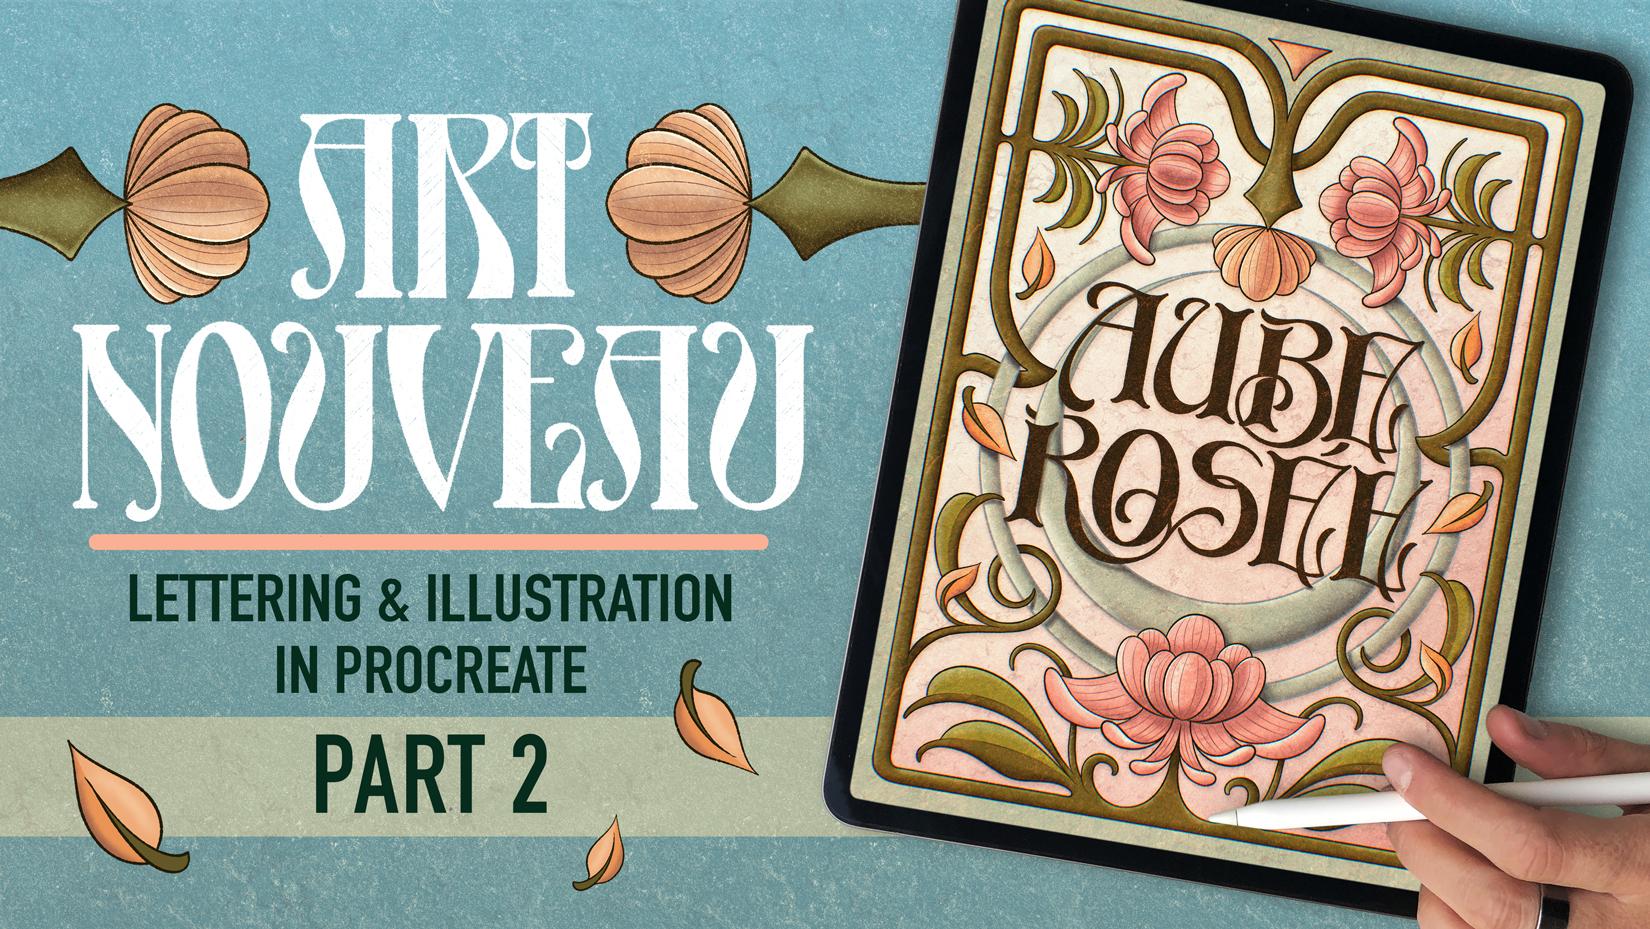
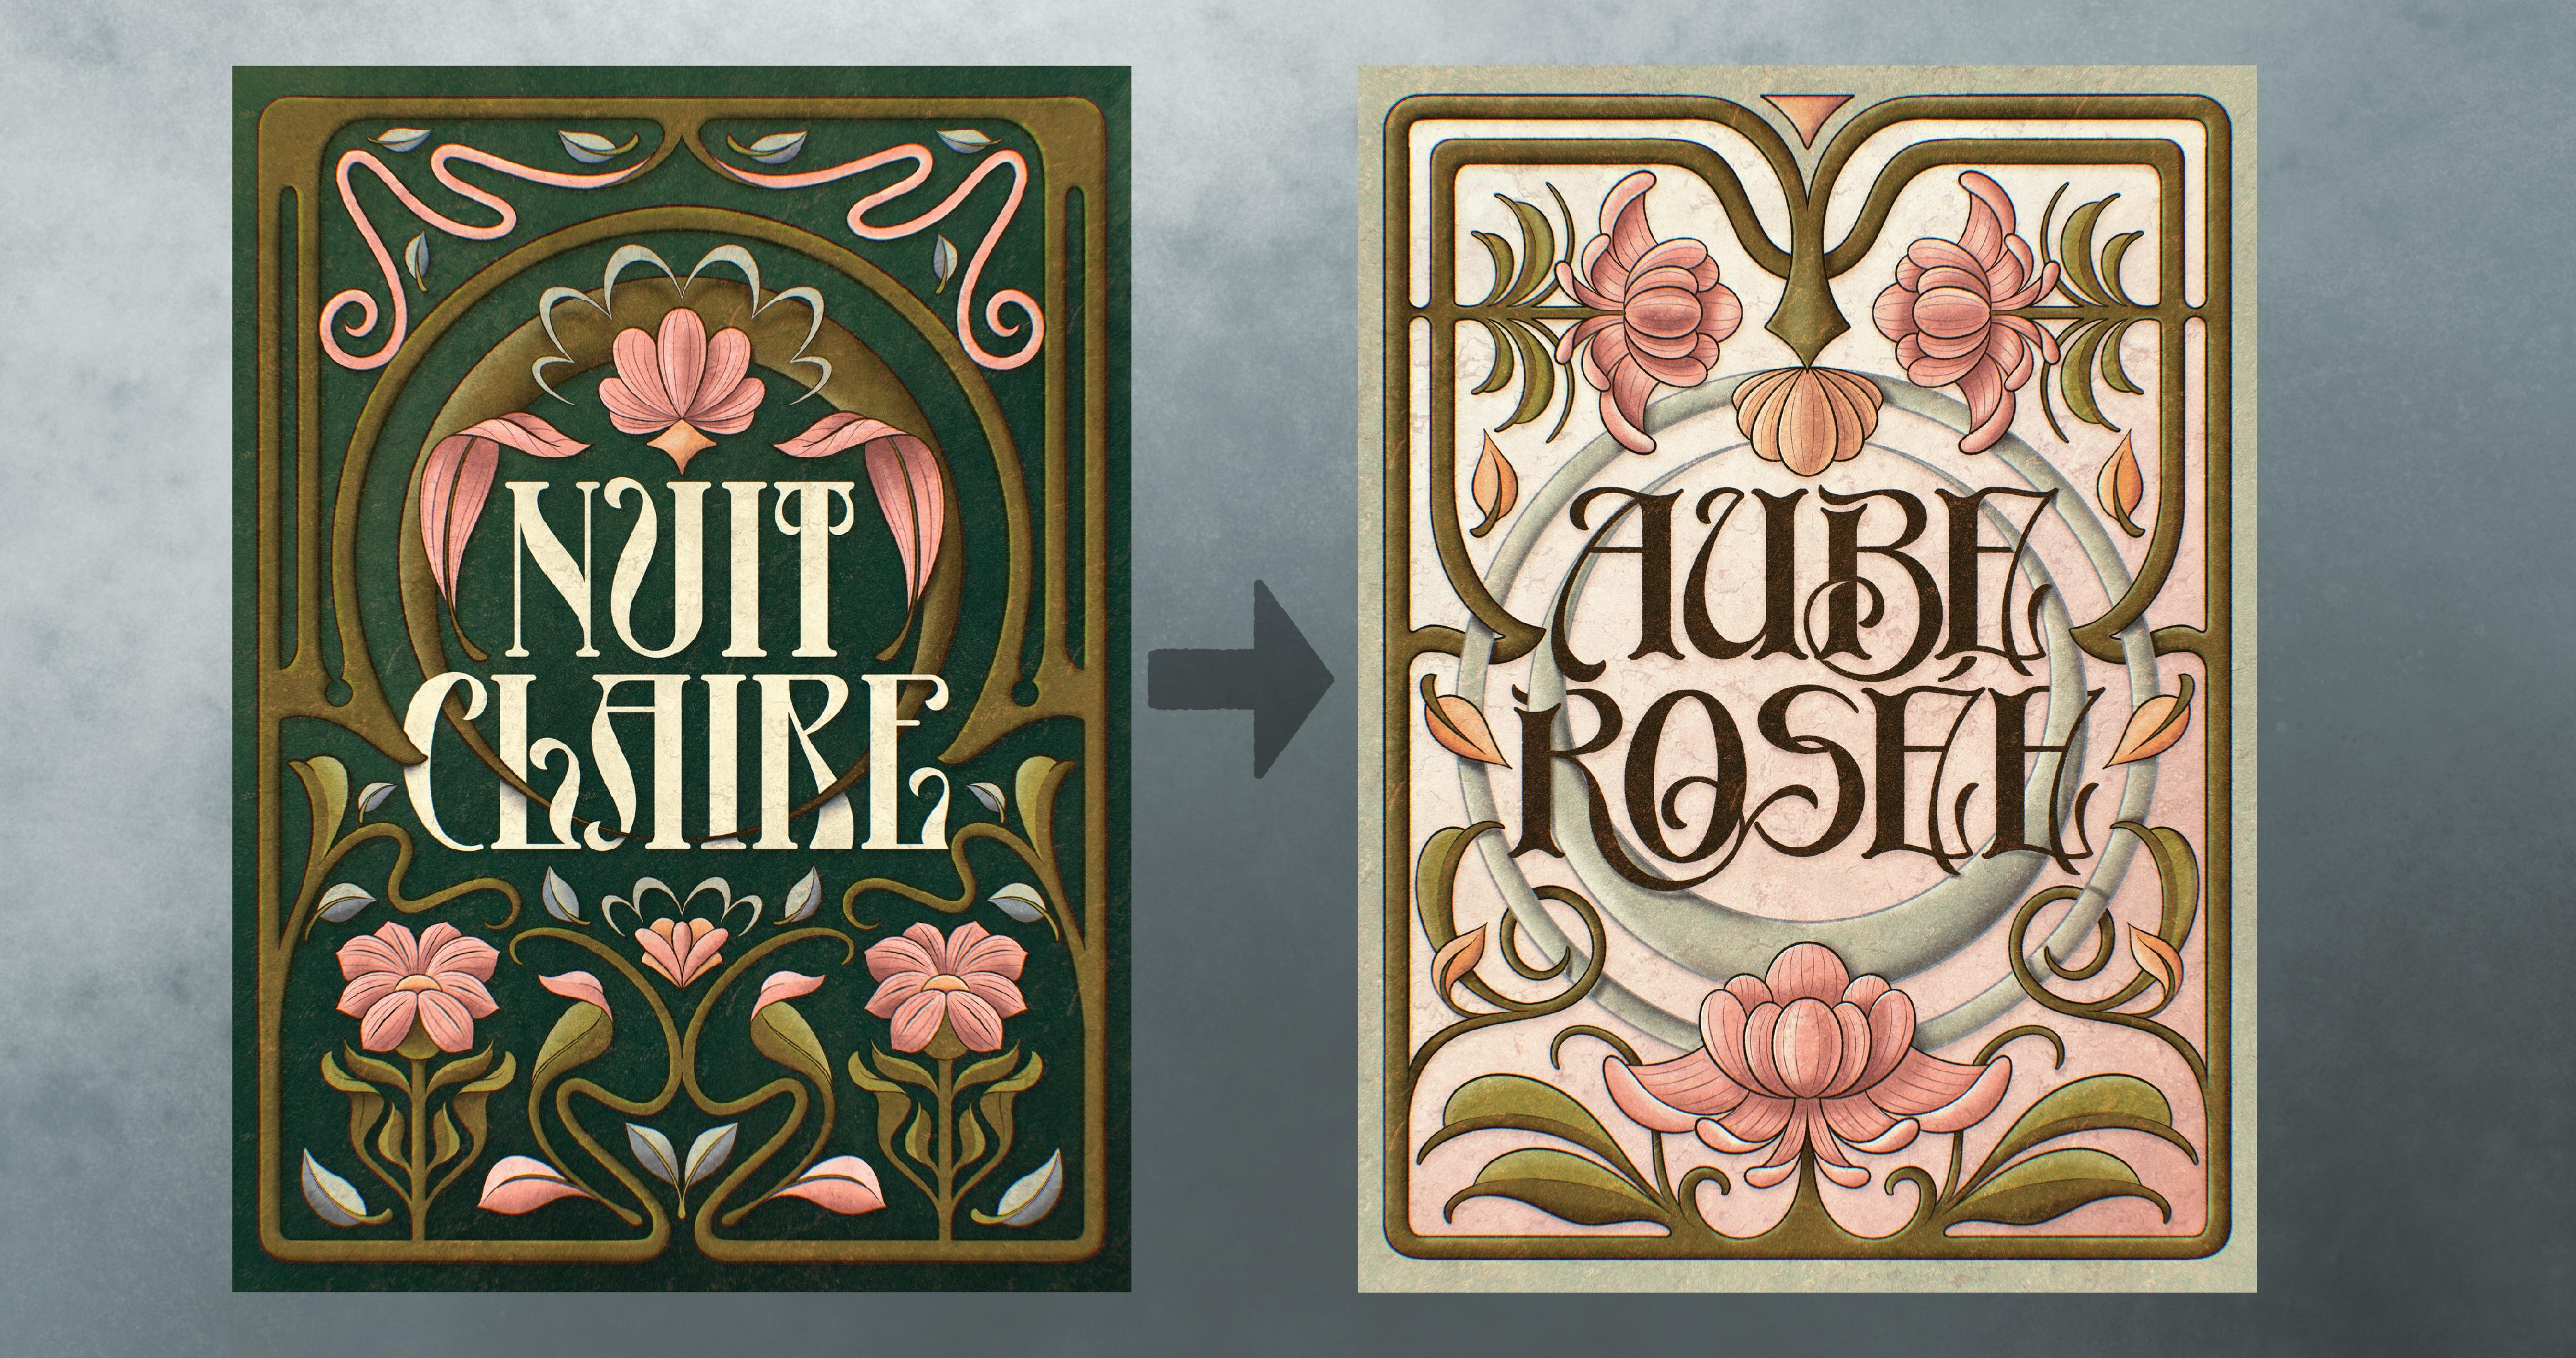
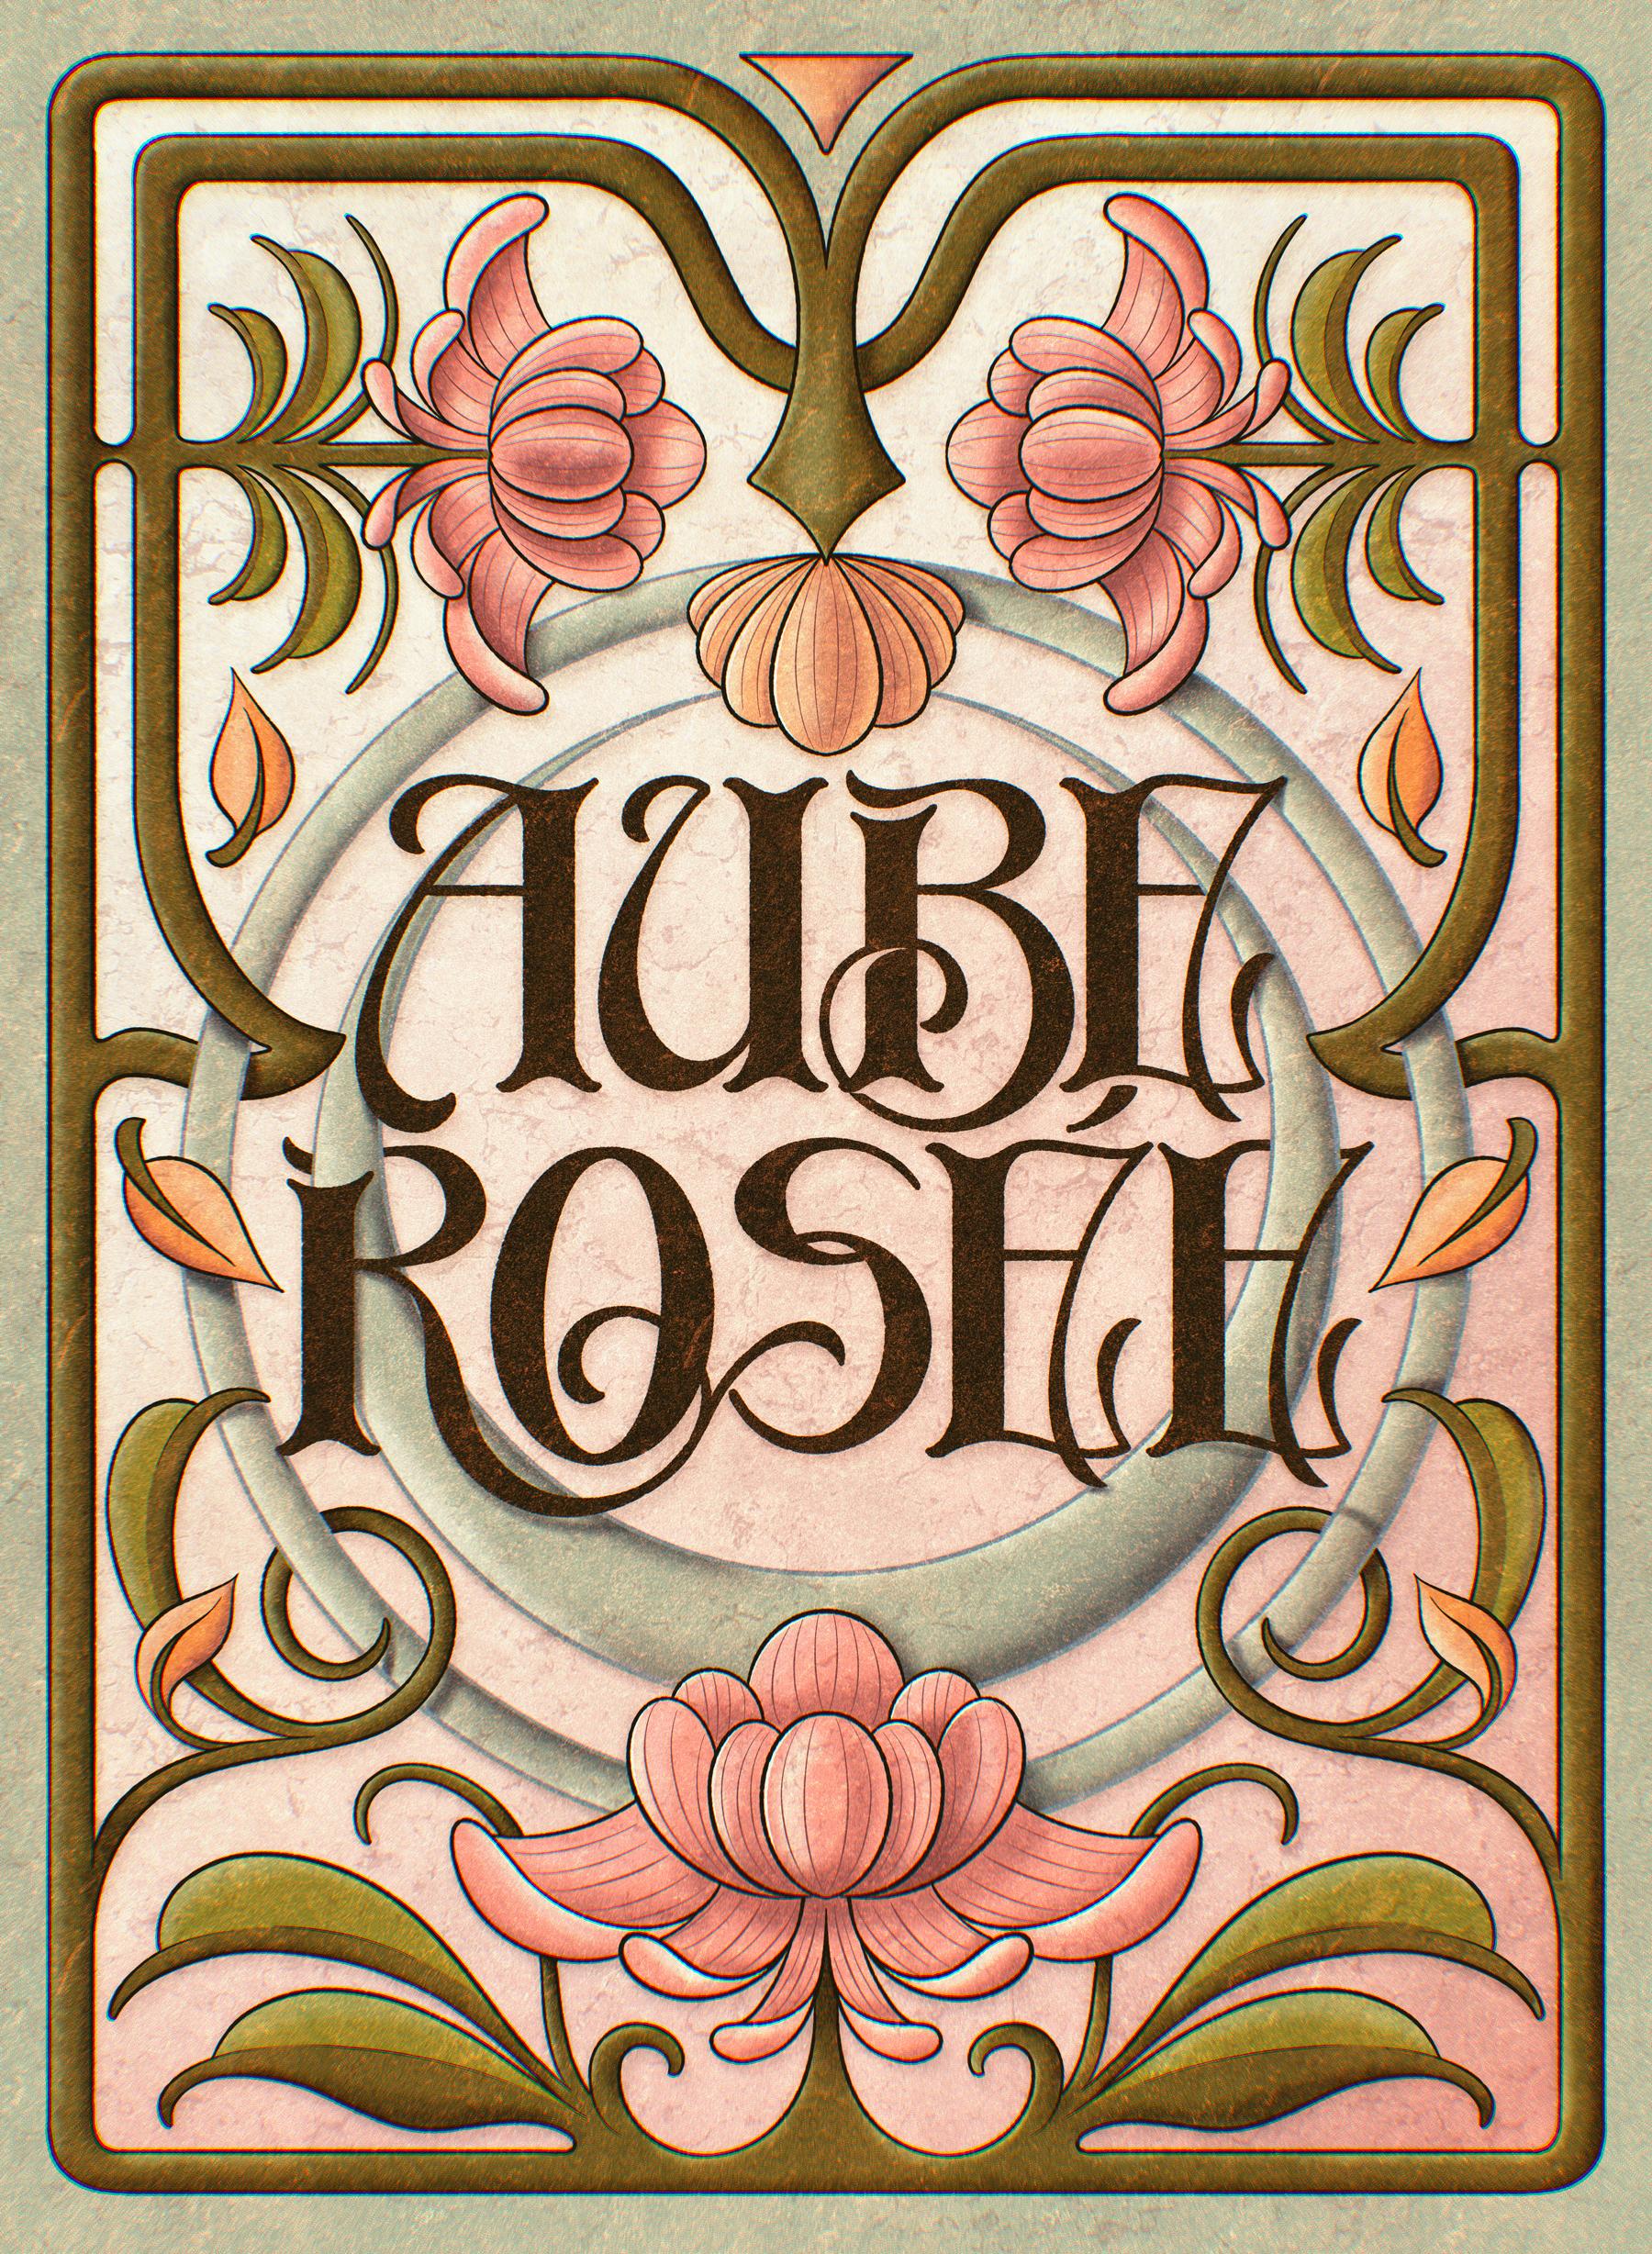
about continuing that art nouveau journey. We are creating a
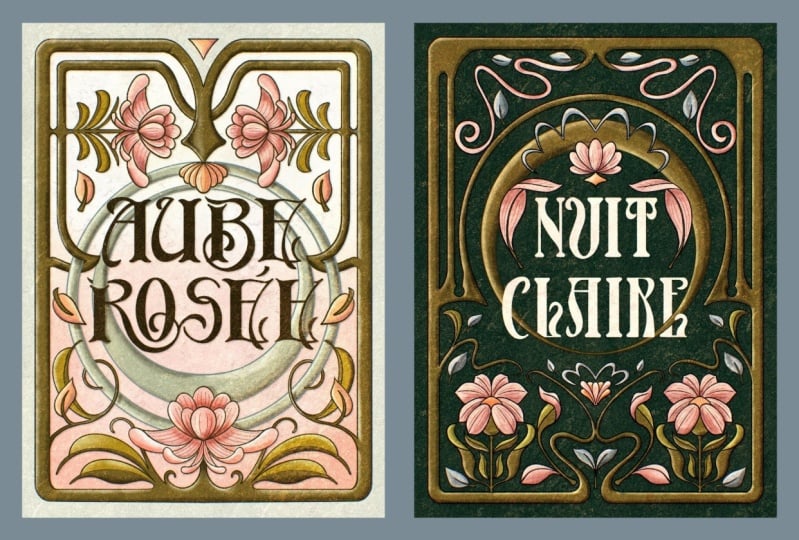
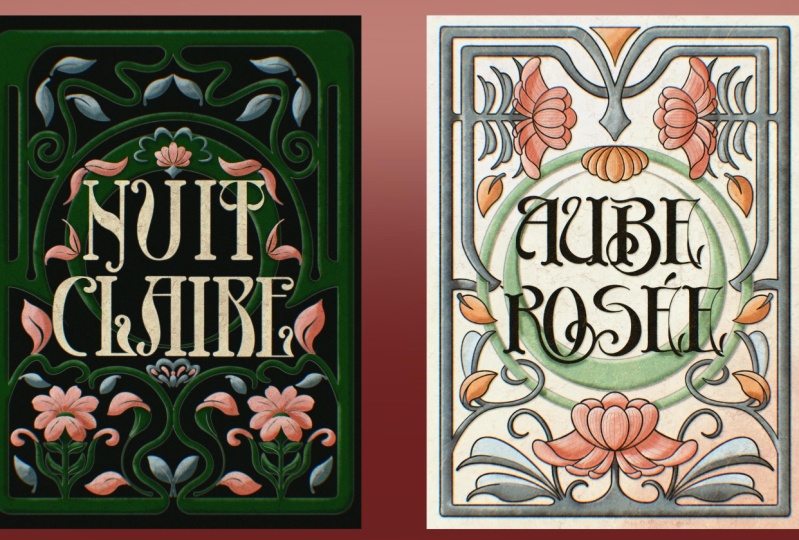
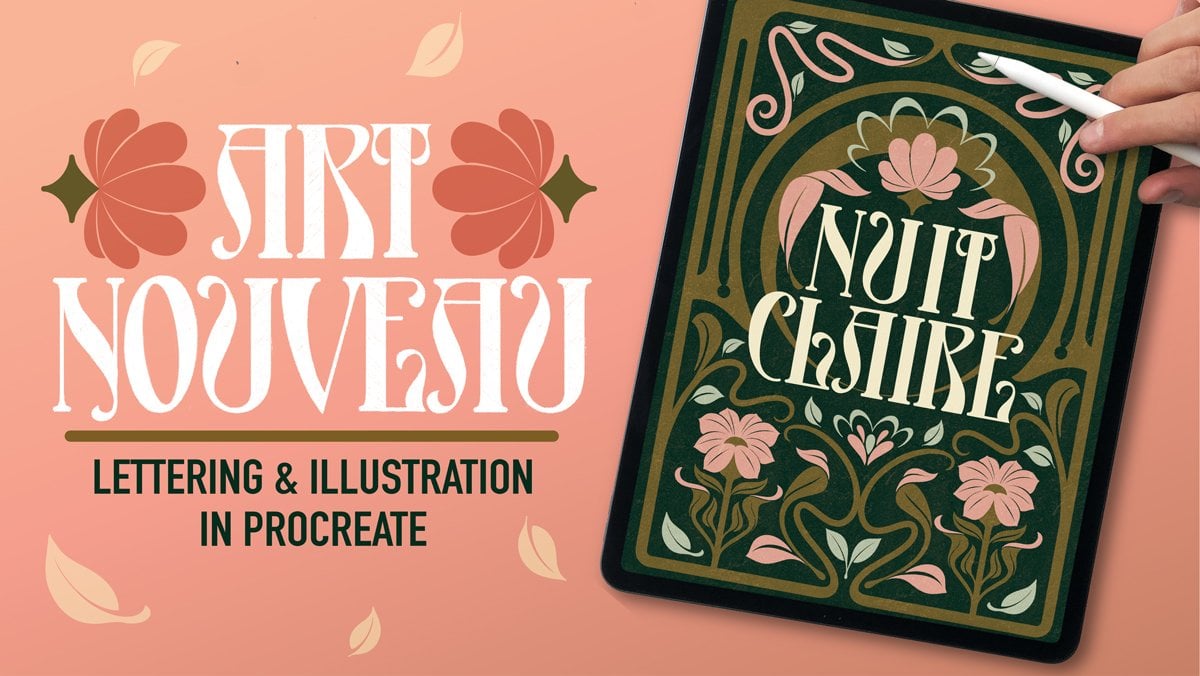
second piece called Rose. I think I said it, right? That's designed to
complement Nuit cra the clean moonlit design
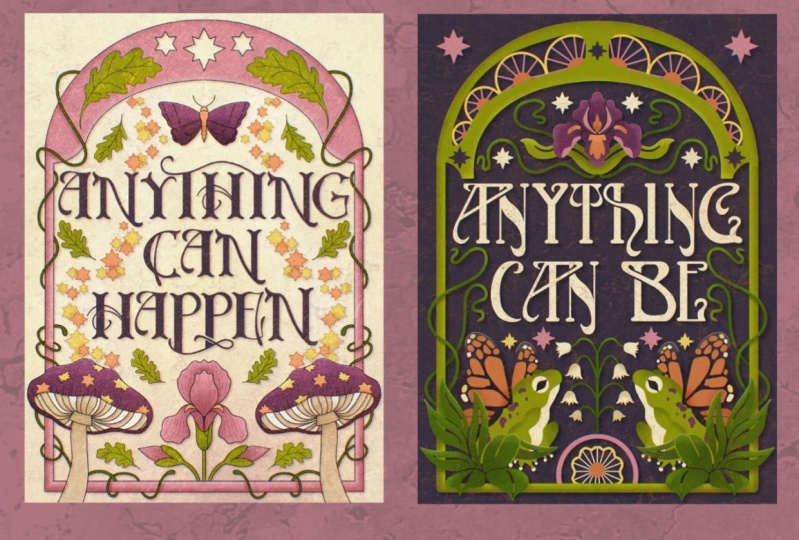
from the first class. Here's a few results
that you submitted. This time, we're adding texture, warmth and more of that
hand crafted textile feel like moving from a
calm clear night into a soft pink done. I've also added today's
final touches to the first piece that I did
back in my first class, and I'll show you
how both posters can work together as a series, either using a flat style, like in the first
class or adding textures like we're
going to do today. The thing about
making them a part of a series is that when you
put them side by side, they're not just two
standalone posters, but they belong together. And building that kind
of visual connection in your work is definitely
something that clients, collectors, and for sure, your creative soul will
appreciate deeply.
2. Today’s Class: Alright, here's what we're
going to do in this class. We are creating a brand
new arnuva lettering piece called a Rose, a tactile companion to kat clay. This one's all about
soft done energy, subtle gradients, and a
more organic handmade feel. I'll guide you through exploring a different arnova
typography style. We're going to add new florals, depth using textures and
overlays with my custom brushes. We're going to use the
same color palette as last time but
inverted because this time we are conveying
done instead of night. And most importantly, we'll explore how to think in series. So your pieces connect
and tell a bigger story. We'll study the key
elements that can help this second piece visually
link to the first one. If you took the first class, you'll definitely see the link, and we'll even open Nut Clare
by the end of this class. So we can give it
a textured upgrade so it matches this piece that
we're going to do today. But don't worry
because if you're new, you can absolutely follow
along and still end up with a finished piece that
stands strong on its own. The first thing we will do
is to get inspiration by May art nouveau Pinterest
board and also talk about contemporary real life
examples of visual series. So you can apply this not
just to this project, but also as a mindset for your portfolio or
passion projects after. Let's get to it.
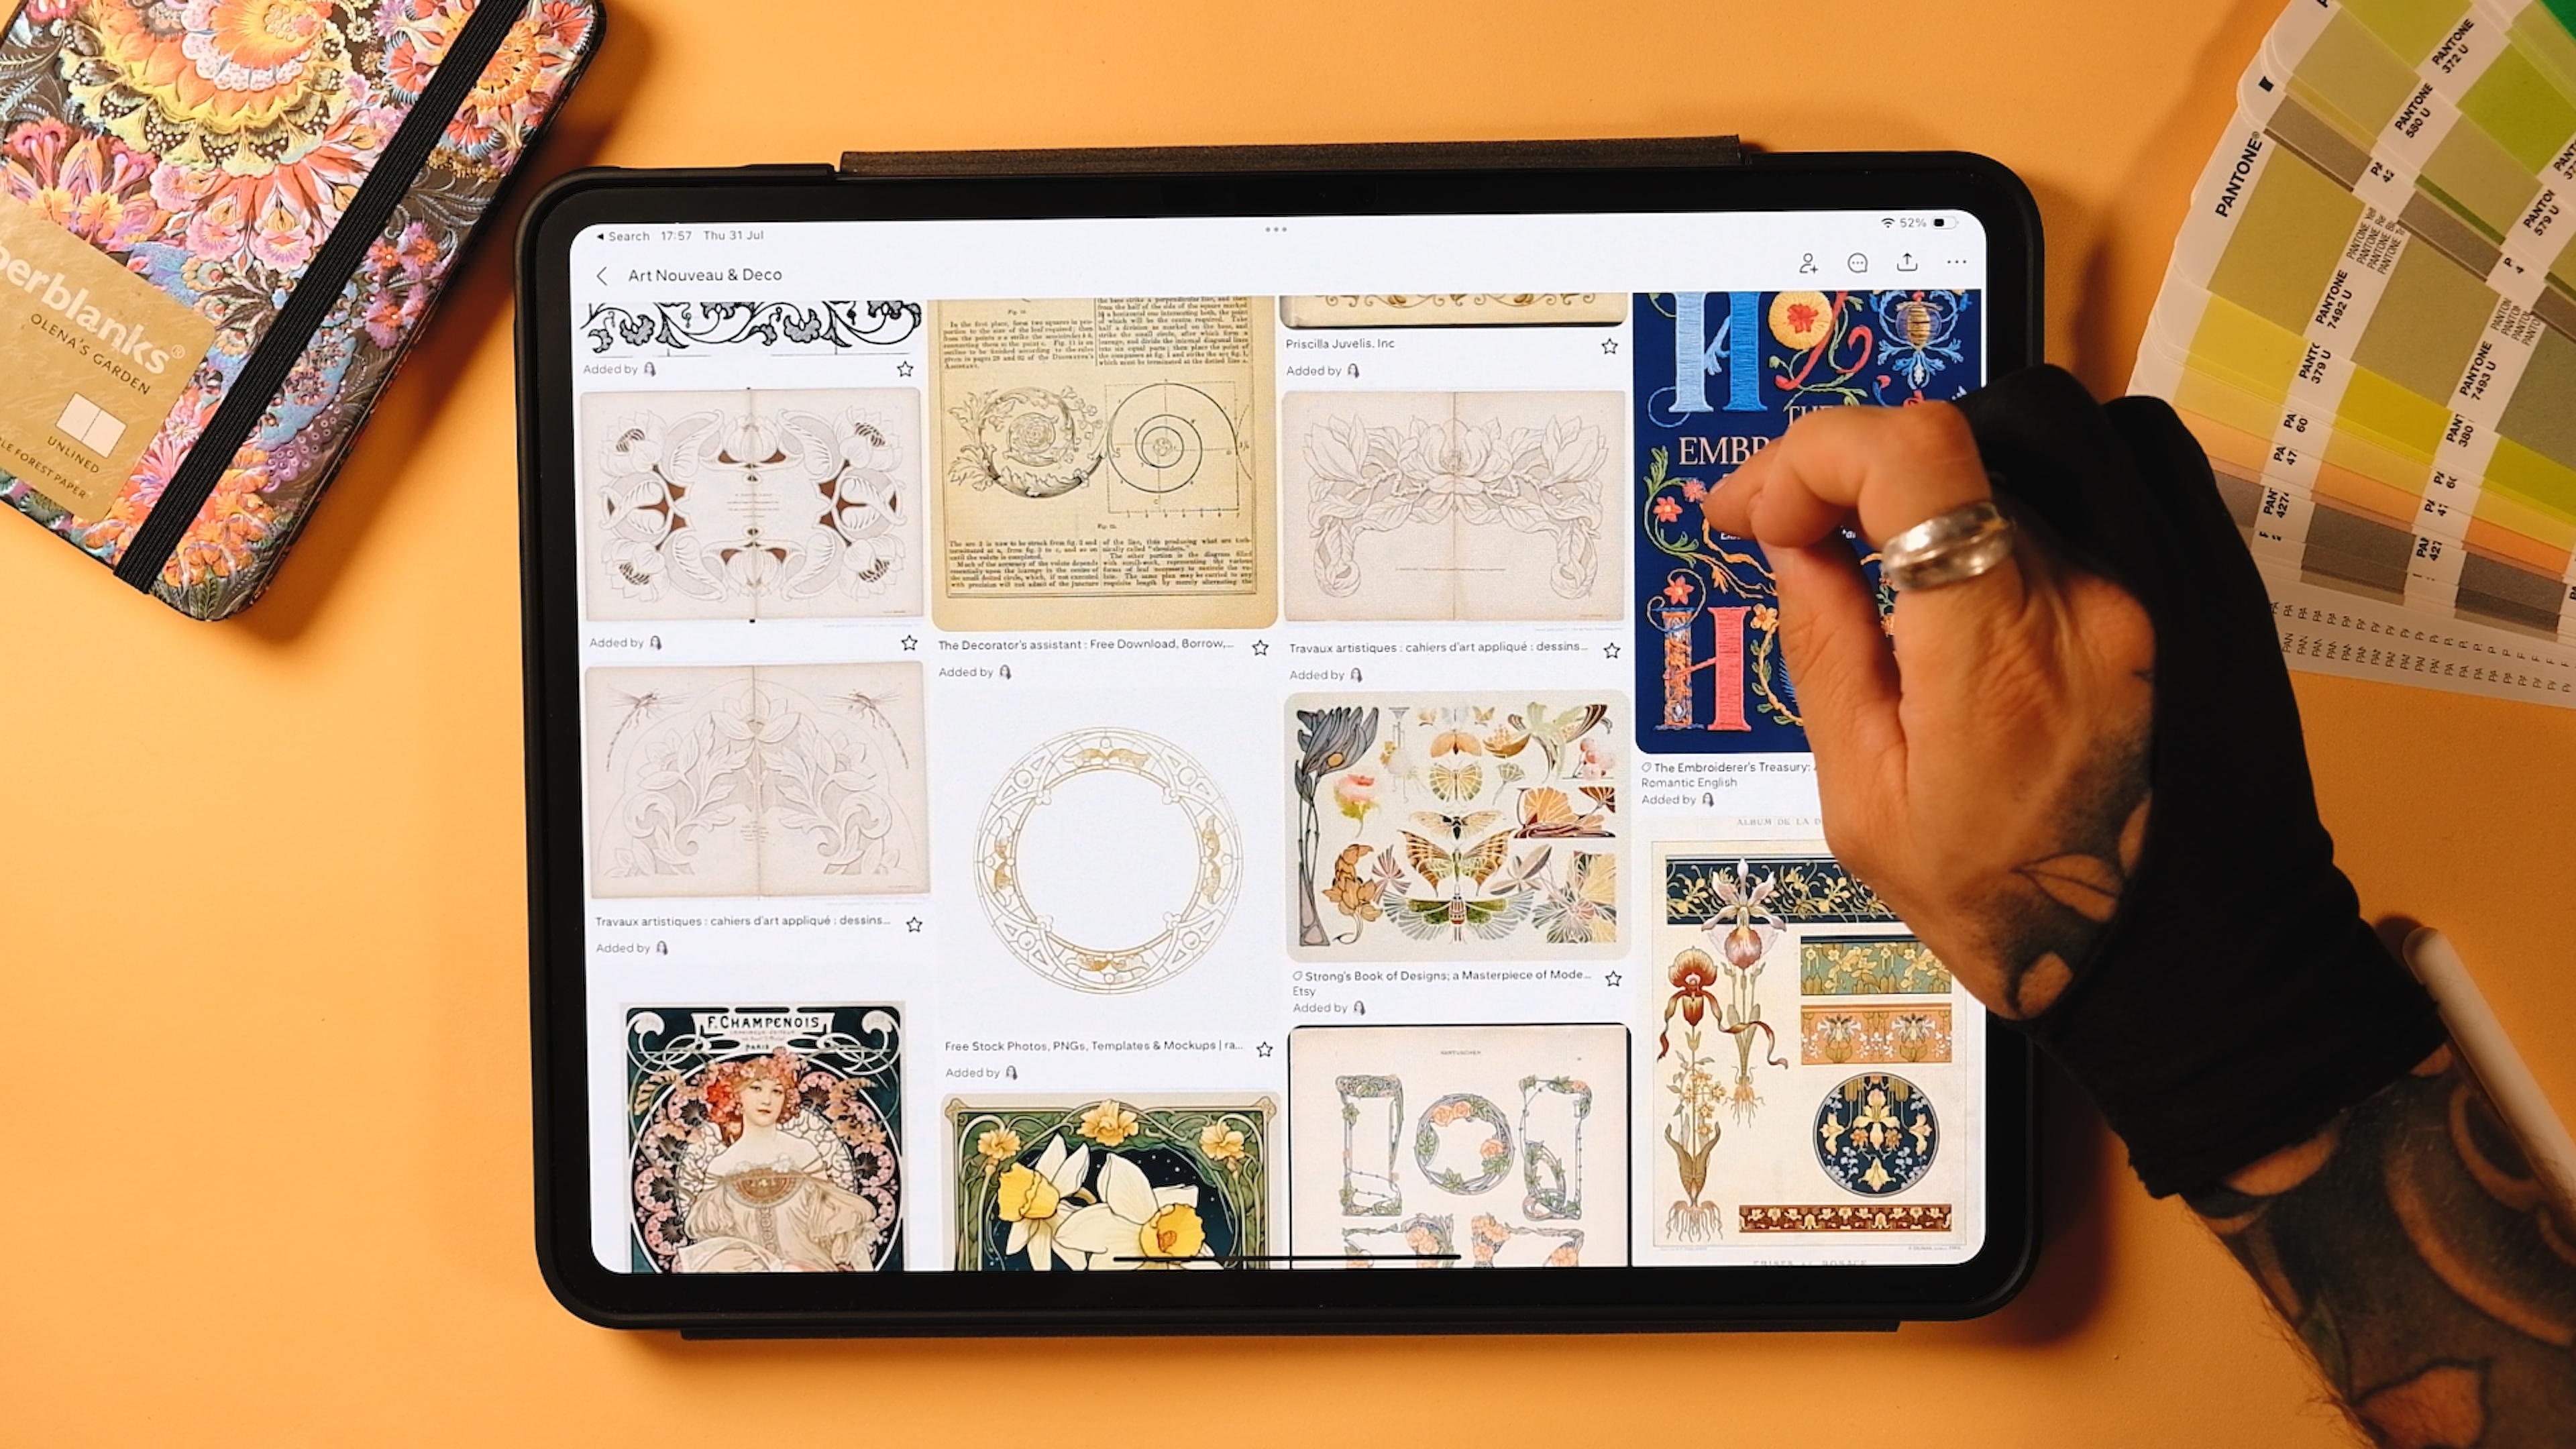
3. Inspiration: Before we jump into sketching, I want to share a little
bit of inspiration. We'll take a look at the Arnuva board from my previous class, plus a new Pinteres
board that I've made that explores how
posters work in series. It's a great way to get
your brain thinking about cohesion and how
color palettes can work. Before getting started, I
wanted to show you this Pinteres board that I created together with my
first Arnuvo class. You can find a lot
of inspiration here. I've been curating it for over, I would say seven months
now since the class came. And there is really a lot of things that you
can learn, even, like, how to draw some leaves and a lot of things that actually
can help you kind of, like, derail from what I'm
going to teach you today. If you see that I'm
creating a flower, you could create another one, just come here and check it out. If you didn't take
the first class, I would actually
recommend you to go there because I shared a couple of books that really helped me when it comes to
learning all these things. Anyways, this Pinterest
board will help you, not just with florals,
but also if you want to draw, like,
other elements. So yeah, you will find
literally a lot of things here. Okay, and I also wanted to show you another Pinterest
board that I created called series
Illustration series. There you go. These
are not art nouveau, but I wanted to show
you just to see what a series of designs mean. So if we go to, let's say, we can analyze them all of it. But, if we go to this one, this Daredevil, you can
see that there's a lot of things that these
posters share. So you can call them
a series, right? So there you can see here that obviously
the text is the same. The color palettes are the same. You can see that the
blues are very similar. They all follow this, like, very dark and greedy, environment here, you can see, right, that this is
happening in the night. This is a vigilante. You can see a lot of little things, right? So the text is always up. Imagine that the text
would be up and down. Then you could maybe
break the series, but the series, I really, really liked when I
found them and I think this is a very good example of what a series of posters is. Now, if we go to this one,
we can visit the site. This project from behind, you can see that the main thing here is the flatness
of these designs. You see, they are very simple. They have a lot of blank space. There's always like this big you see these
silhouettes, right? We have the hands here,
we have a cross here. Here we've got also a person. So this series really works
well when it comes to negative spaces and the overall flatness
and simplicity of it. Now, let's go to the next
one, which is this one. I'm not going to open
the project here, but you can see the
series is already. Like, the illustration
style is very similar. It occupies the whole
page and the credits. You can see it here.
The credits or, like, the little text is always on the upper left and
upper right corner. But you can see here.
This works as a series. Even though the colors
are not similar, so the color palette is
really not followed here, but you can see that it's
on the same shading style, and the composition is
really similar since the illustration occupies
99% of the page. Now, for example, if
we go to this one, you can see that the series, let's go visit the site. But you can see here just
by looking at it, right? Like, you've got the very weird combinations, I would say, in between what would be
like a Sunserf type here. They all use this
very stretched sensor together with this
funky lettering, you see, here in color, here in I don't even
know what it says, but you tell me or like here in e. And then there is always
like it's a collage, right? So it's a photography, always
like in monochrome tones. This one is purple, these
ones are black and white. But then you've got also these very trippy, kind of, like, elements on top that
distortion a little bit, the posters. And this
is the same, you see. Look at that. Now, other parts of the series is that the text is on the left and on the right, you can see that this is
consistent in all of the pieces. The logo is always
at a one place. There is also a small type
that hides behind the people. You can see it here
as well, I think. And then these
ones, for example, these are the sketches, I believe. Yeah, these
are the sketches. Okay, 'cause this
could work as well as a series without the three
D elements, you see, because you will have very
bold type together with this um kind of collage with these
handrawn illustrations and then with the pencil here. Great. So you see that series always share some
of the elements, and that's what we're going
to try to do today in the sketches and in the
final piece, obviously. Now, this one works as a series
because of the palettes. You see, like,
everything is flat. There is no textures here, but the color palette
is always the same. It's this autumn kind
of, like, you know, this these oranges and yellows and browns, and
it's always the same. So you can do a series just
by following the same colors, and they would look like
a series, technically. Now, this one, for example, you can see here that the
colors are very distinctive. There is the text
up here always, and the color palate
is very simple, but very, very effective.
They kind of use as well. Now that I see it,
they kind of use like a central structure. You see, like, there
is something going on always in the center of it. You see this structure here. Then we've got this
little castle here, this packaging here as well. And then finally, something
like this, as well. They are not necessarily
following a series, but when you have a
very specific style after some years designing, you will at some point, just design posters
that look like a series just because
your style is so so, so much visible, right? So yeah, that would be it. You see here, for
example, it's the same. This person really has a style, and they all look like
from the same series, even though probably they
were not done in that, you know, using that intention. But anyway, that's pretty
much it when it comes to the inspiration that
we're going to use today. You can find the pinterest
boards linked in the project. So you can visit them and
just take a look by yourself. So let's go sketching now.
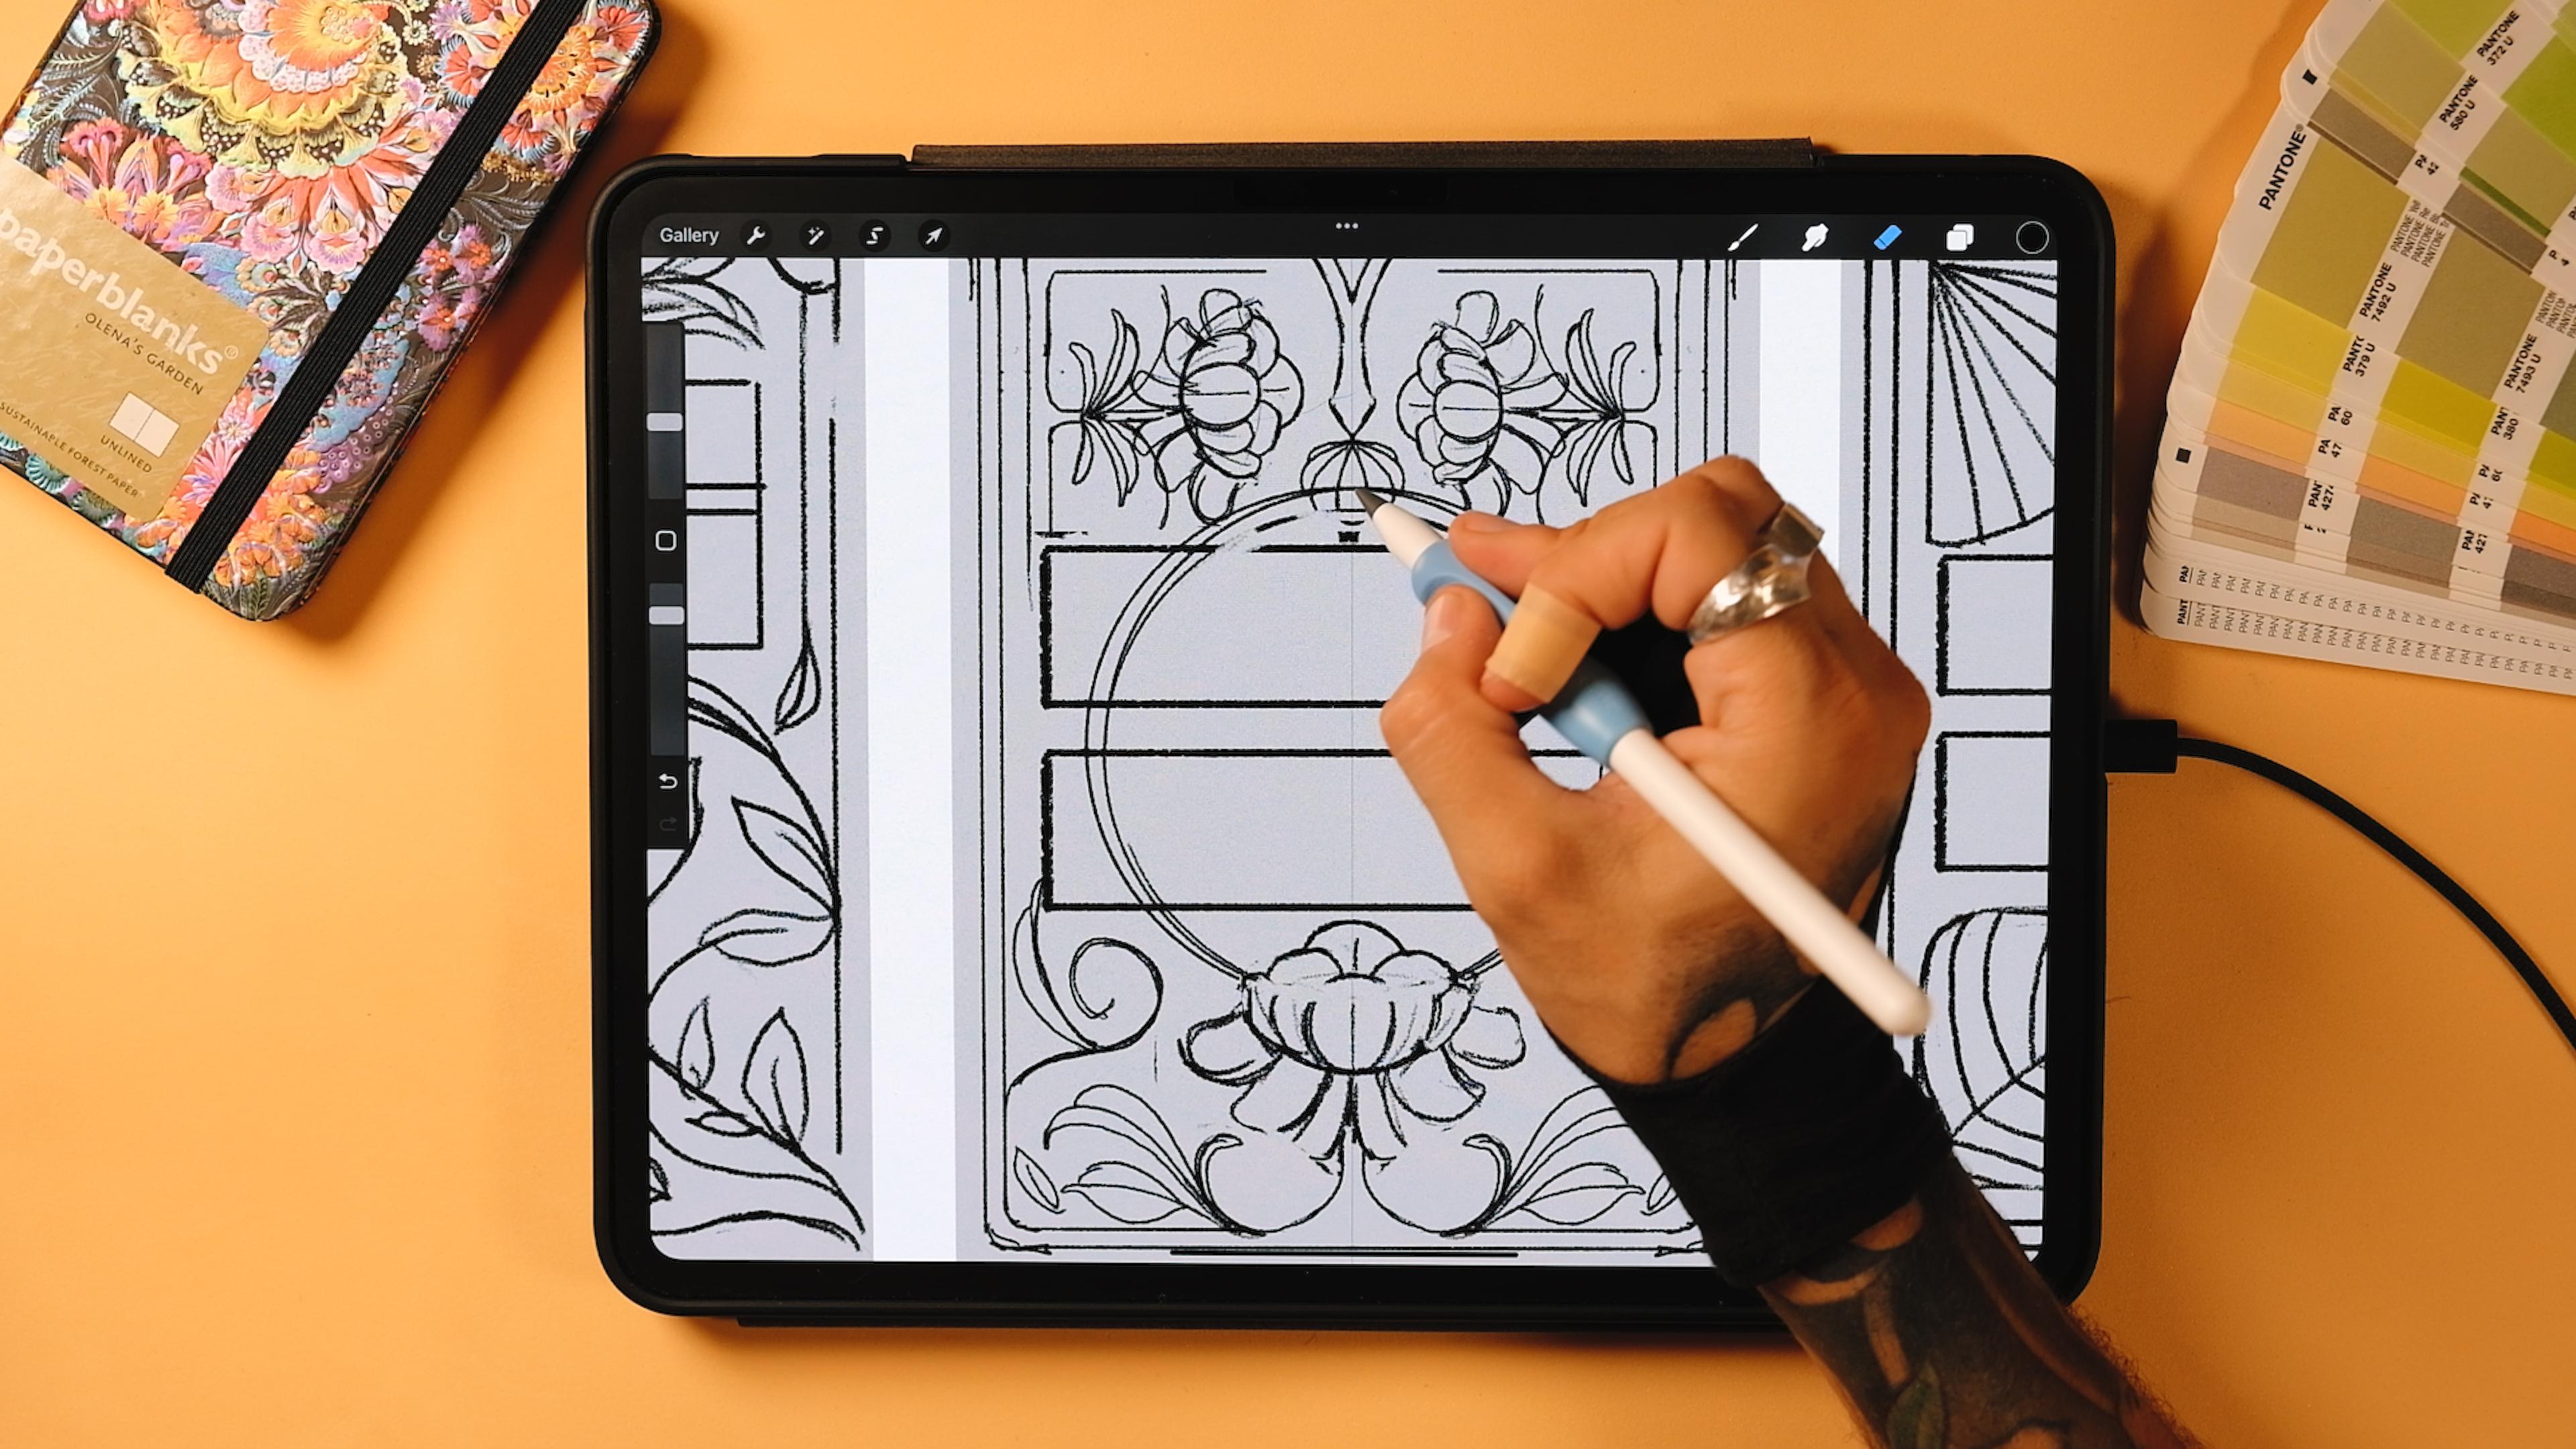
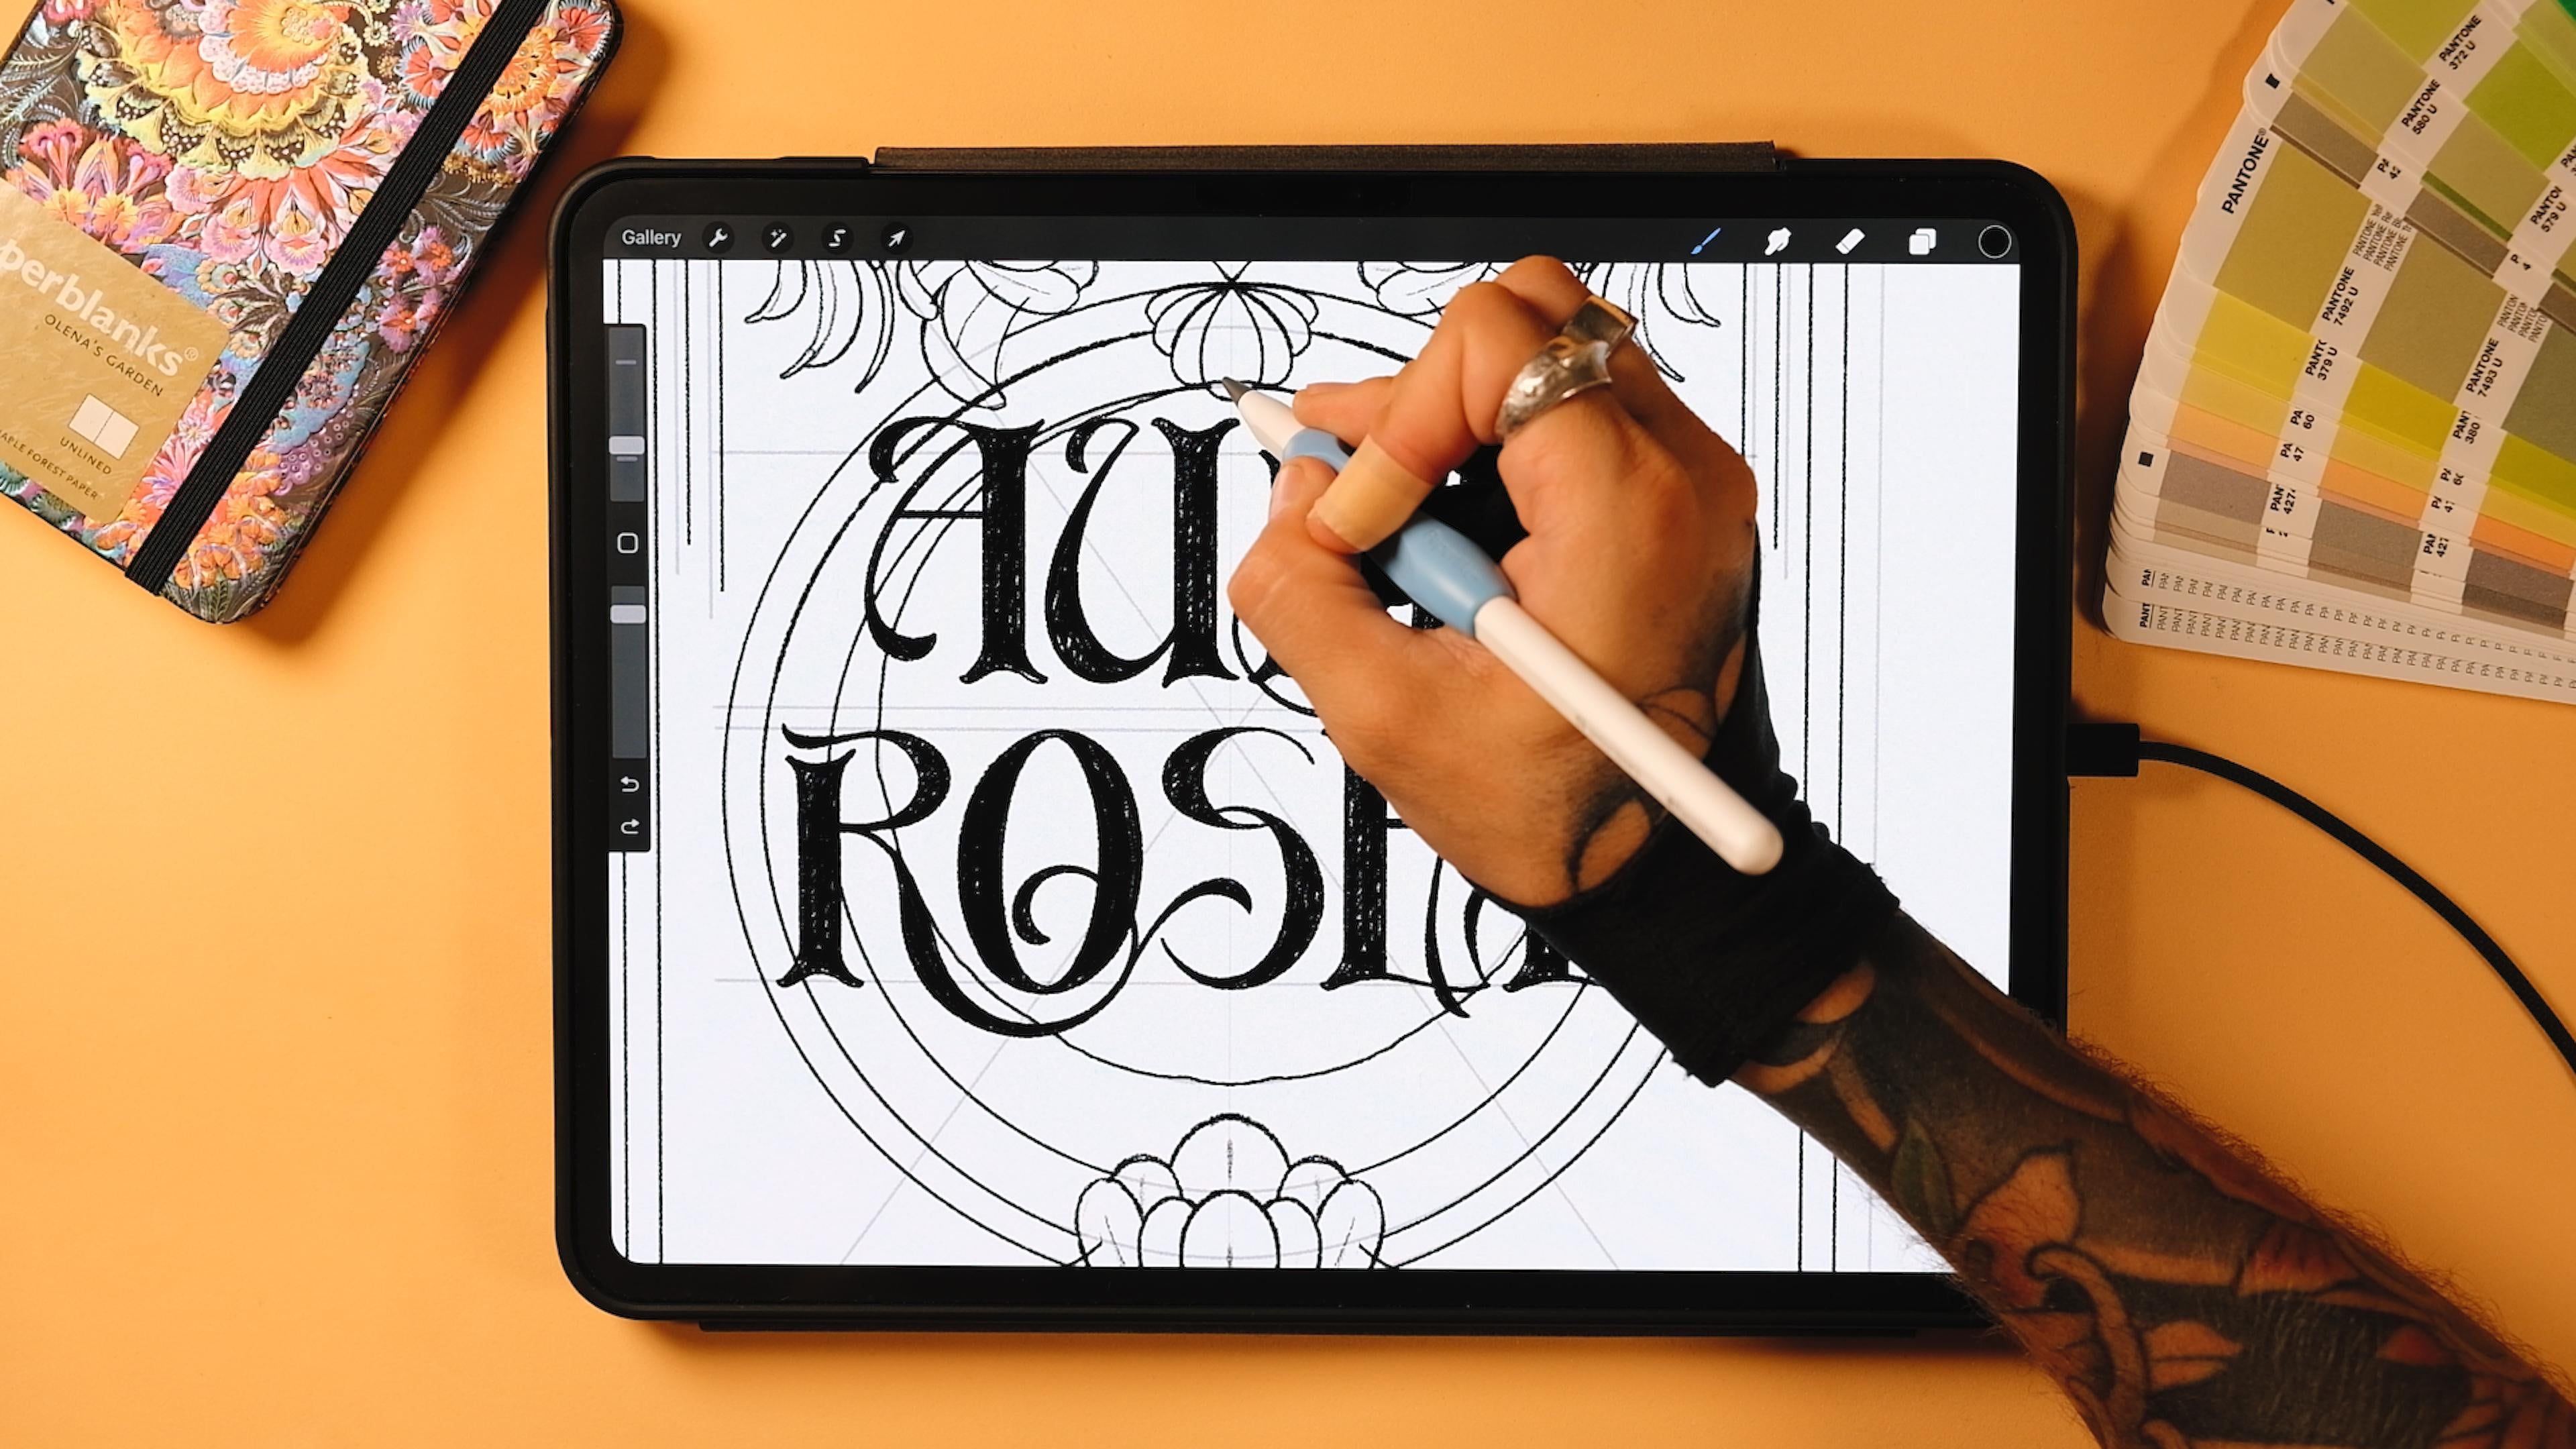
4. Thumbnail Sketches: Time to get sketchy.
I'll talk about why I chose the
phrase that I chosen. I'll also give a little shout
out to my French friend Whitney for improving
my French phrasing, not pronunciation yet. And then we will open Procreate and sketch three
quick thumbnails. Remember that you
can do this using paper or any other software
that you have available. Each thumbnail will have one more element than
the last to see where is that sweet spot for our
poster to become the second one in the series and
not just that disconnected. Okay, so let's get started. I usually sketch the little
thumbnails using paper, but since I'm doing a class, I thought that I could
use the Procreate app directly because it's gonna allow me to zoom in so you
see better what I'm doing. Now, I'm actually
very much inspired by this sketch that I did
for my blog when I went to Madrid and that I created a piece that
was kind of arn voish and I found a lot of straight signs with
different art nouveau letters. And those are some of the
examples that I found. So I think I'm going
to use probably a couple styles that I found there. Let's see what happens. But now, the thing that I will do is to tap
on the plus sign. Again, on the plus sign,
I'm going to choose centimeters because
I'm in Europe. Remember that if you're
taking my classes, I always use centimeters. You can use inches if you want. Now, for the width, I'm going to create a 292 times 30 height. Now, the PI will be
I'll put it at 500, just so I have a bigger
poster later on, and I'm going to tap on Create. Now, this is going to
be our final poster, but now for the sketches,
I'm just going to rotate it, and that's going to be it. Now, to do the thumbnails, you could just
drop a black color here on the first layer, and then tap on the Transform too and
just make it smaller. In this way, we are keeping the original size of our canvas. Now I'm just going to
rotate it and put it here. There you go. Now I'm going to duplicate this, bring it to the center,
and then duplicate it again and bring it here. Now, pinch them all together
and bring the opacity down. Now I'm going to
lock this layer, and now I'm ready
to sketch here. Now, I'm going to go to actions. I'm going to go to Canvas, drawing guide, edit
drawing guide. And once you're inside, I'm
going to go to symmetry. Now, this is something that
we are going to use in today's class as well, we used it in the first class. But I've seen a lot of Aarne va pieces that we're just mirroring, and that's
what are we going to do? It's way easier, believe me, because if you do different
elements left and right, then the whole composition
becomes more complicated. But, I mean, at some
point, we can try. So if you are interested in
learning art novo that is not at all like doing
the symmetry thing, mirroring, you can tell me. Probably I'll do a third
part of this class even. Great. So now I'm
gonna tap on done. And before we get started, remember that you
have a brush set here that I've prepared for
you to create today's piece. Today's piece is
gonna be textured, not like the first
one, which was flat. And then you also have
the color palette. Now, we won't use any of it. So I'm just going to tap
on my recent brushes, and I'm going to get my soft
pencil that I always use. Really, a lot of you ask, What kind of pencil
are you using? And to be honest, I don't really care about the pencil that I'm using for sketching. Everything. It's
pretty much the same. I've done some pencils in my brush packs in the
beginning of 2022, and and I use those by default, but it's totally okay if
you go ahead and pick the pencil native brushes which are somewhere
here in sketching. I thought it would be
more complicated to find it because I have
so many brushes. But anyway, let's
start sketching. Now, the main
difference here with the first piece is that
the first piece was, you remember, let me
create a new layer. And remember that the
first piece was Nui clay. I hope I pronounce that well. Um Now, this was the literal
translation is clear night, and evokes a sort of a
dreamy night atmosphere. Like, the palette
that I used was mostly dark background
with clear letters. And today's piece is rose. I hope that I don't think
I pronounce that well, but anyway, let me write
it for you better. There you go. So,
this means Rosy dawn, and it kind of symbolizes the warmth and the energy of the early morning. The colors are going
to be brighter. I'm going to use probably since I want to
do a series that, you know, like night and day, sort of, maybe the
background can be light, maybe, like, white
or maybe pinkish. I don't know. But I'll be using the same colour palette
in just a different way. I think it's going to
be also interesting to see how the same color palette could work for two artworks, and at the same time, they
are going to look connected, but they're gonna be something
completely different. If that makes sense.
So, let's get started. Now, I'm going to create
a new layer again, and then I'm going to tap on it, and I'm going to make
it a drawing assist. Now, everything that we draw on the left will
be on the right. So now, for this first sketch, I'll be doing something that is a little bit disconnected, just to show you that the more
we keep the sort of, like, the elements of
the first poster, the more we kind of make the
series consistent, right? So if we were to do a series that has no
structure or, like, nothing visibly related
to the other piece, I think it would be
more complicated for it to belong in the same family in the
same collection, right? So that's something that I really wanted to
touch upon today. You could obviously make it look the same if the color
palettes are similar. So that would be
one element, right? So, if it's already, like mirroring, that would
be a second element. Um, so we're going to see, like, how many elements we can
repeat without doing the same, but at the same
time, so it looks that it belongs in a serie. Okay. So now, in the first one, I'm going to do something
a little bit freer. So I'm going to go
ahead and create a box like this,
probably put it up. And this is gonna
be for our text. Remember that it has two lines. So it would be two boxes. Okay. So now here we could
use this as I don't know, maybe you could use here. We could do a little Sometimes I just put elements like this. So you don't have to
draw in the thumbnails, you don't have to draw, like,
a whole rose, for example. Now, this would be
one. Then maybe we could do some leaves
coming from here. Maybe. Now, here, there could be something like some plants. So we could do
something like this. And then you see something that it's just filled with them. You see, if I was
doing this with paper, I wouldn't erase it. And you should erase
it not much, right? Because when you're
doing thumbnails, it doesn't have to look pretty. It just has just it
needs to look clear enough to understand if that piece can become
something else. You don't have to do something
pretty because this is not how your brain will
get used to something. So let me try to
explain it better. Um, if we were to dedicate
like now time to, let's say, you know, make this leaf
better or whatever, we would be just
fixated on one element, not on the overall composition. And that's what makes me really excited about these
thumbnails that sometimes you just do three
very sort of ugly, messy thumbnails, and then you look at
one and you're like, that's the one that
could become better. Whereas the other ones won't
give you the same feeling. That's why I'm saying
that it's very important for you to just do something that allows you
to understand the piece, get used to the composition that you want to use rather
than just the details. So so it could be, you know, maybe
something like this. Then maybe right
from the center. You could do, like, a line
and then some vines here, for example, with
leaves as well. Let's say, now this one can
do something like this. Again, here, just
improvising here as I go. But you see what I
mean overall, right? So something like this could definitely work if
you were to do it clean. And then from here,
maybe you could do maybe even a line here. Then something like that. Just to underline a bit
the quote sentence. Maybe a couple more
geometrical elements here. And here we could have
one of the thumbnails. Now let's bring this over there. And let's do the
second thumbnail. Now, in the second thumbnail, I wanted to make something that is a little
bit closer to what we did. So you could again, I know that we're going
to use the color palette, the Arnval letters. But let's say that in
the Nila first poster, we have the lettering
in the middle. So let's do this. Let's do the letters right
here in the middle, like we did with Niccla. So that would be one box. You could go to the
selection tool, three fingers down the
screen, and duplicate this. You can pinch them together
and move them again. I think they were
somewhere around here. They were not centered,
but just a little bit up. I think something
like that could work. Now, another of the
elements that could repeat here could be a frame. Remember that we have a frame that was doing
something like this. So that could be the second
element that could repeat. Now, we did this kind of, like, ticker, kind of, like, tube like frame. And now, this is something
that we could use. Now, we could, for example, now that we have
this, we could stop thinking about the first piece
and create something else. What if we created a palm here that I saw I've seen a lot of these art novo posters
that they kind of are super geometrical and
natural at the same time. You see, like this is
kind of like a square. But then when they did the
palms, it kind of, you know, put natural elements inside
an organized poster. So inside of, like,
these geometrical, like elements, they could do
a palm inside of a flower. And I found that, that could
be really interesting. Maybe if you were interested
in a third class, maybe we could go ahead and do something
completely different. Now, we've got this. So maybe here we
could repeat it. We could do maybe like a
pom something like this. Maybe. And then here we
could do maybe, like, a little flower like the one with it in the first poster that would think
something like this. Now for the pums you could
now hear just do this. And I know it's a thumbnail. I know I said that it
shouldn't be detailed, but I sort of want to do this a little bit better just to show you
how to do these palms. Now, this one, instead of having the mid rib of the palm here, could be one of these
open palms, you know? And then it could
be something like this. This is the structure. Yeah, better. Let's say something like this. Now, I'm just gonna bring
the opacity down by tapping on the little end here, and then I'm gonna
do these poms. You will see that making
palms is really easy. So you do this, and then you close here. And now a little reminder
that if you want to learn how to
create palms better, you can always take a look at my floral class where I take you step by step on how to create different
palms with different angles. And it's a class that I'm
really proud of because I really break it down in
a way that everybody can learn how to
draw these ones. That's kind of interesting to see that see now here we could do something
like that as well. So that could be a palm.
I didn't mirror it, but let's bring it here. And this actually looks
really interesting. Probably I could use
this for something else. But now, let's tap on it and make it a drawing assist,
and let's make the palm up. This is the same old story. Sell it's like
this. Kind of like Actually, let's
make it like that. Yeah. So that could be it. Now I'm just going to
select in the first layer, the structural things, and I'm just going
to put them off, and I'm just going to
pinch this together. Okay. Now we've got
the second sketch. Now let's bring this
one to the right. And now let's do
the final sketch. Now, in this one, I want
to do something very, very, very similar
to the New clap. Now, again, we had a frame here so we can start with the
frame same as we did here. Remember, that would be
like our third element. So the first colors, second second the
Aarnvo style lettering. We could even grab the
boxes from this one, three fingers down the screen,
duplicate, bring it here. Something like this. Maybe
a little bit bigger, somewhere around. I would say. Here, pinched together.
And now here, for example, we had I
remember in the first piece, we had two flowers right here. So what happens if instead
of putting it here, we put them up here. So we could do Let's
make the tube first. Alright, I think,
something like this. Yeah. Now, there could be a little flower coming from
up somewhere around here. Now here we could
do another flower. Could do as well a parallel tube like the one we did up on the first piece. We did some of these more geometrical
tubes that were kind of, like, parallel to the first one. So I could do this as well. Hmm. Great. Now this flower
can go like this. Something like this. And
now Wait, actually, here. Let's finish the stub. Yeah, something
like this. And now the flour could go here. Be one battle here, then I'm telling you not
to go in detail, but sometimes I get super
motivated and then I start doing it myself, so Yep. And actually, this flower
could just go somewhere here, whatever, and then more
petals maybe that go here. Just to make it a little
bit more complicated. And then I think I'm
going to use this flower to to actually I think I'm going to use it
somewhere else as well. So anyway, we've got this
two pretty flowers here. Let's just move
them a little bit. Some are here, and then
the other ones as well. There now here we could also do some
kind of flower again, so like it could go like this. Yeah, something
like this. And then we could also do the
same flower that we did before that we did in the first piece as
well. Something like this. Perfect now here. We
could go and create something that it has
some leaves here. You can see that
I'm spending more time with this one
already because I think I kind of like it
more than the other ones. Okay. Now, this flower
could actually go. Hey, let me select. Yeah, now, let me
select just this. Three fingers on the
screen duplicate. I'm gonna rotate
it. I'm gonna use it bigger. Somewhere here. Yeah. Now let's try to
center it better. Great. So now here we could
also do some plants here. Let's pinch this together. And now here. So leaves. Something like this. Now,
from here we could also do some of these vines here. Maybe another leaf. And now one of the
elements that was very much there in the first
sketch was the circle. So we've used a circle over here that was
kind of like the moon. So what if we did another
circle, the same one. But instead of doing it
up, going to do it down. So it could be
somewhere like this. And this would go
behind our elements. Something like this.
Again, just for it to be there for the time being. Great. So we've got the
three thumb mills now. Now, you could pick any. This one would be way
easier, actually. But I think for the series, obviously, this one
will be better. Again, here we are
repeating so many things. So we're repeating
these two flowers. Instead of being
up, they were down. We had more like
a central element here on the first piece.
Now we have it down. We've got some vinees. We've got this frame, this double frame, just double tube frame that we also had in
the first piece. We've got a lot of
little little elements. Like, for example, this
circle here as well. We've got some of these
elements as well, where, like, the tubes were
kind of going elsewhere. And I think we got so,
for example, here, we could do something like
this as well to just, like, keep doing it. Like in the first one. So I am definitely
definitely picking this one. Now, I'm gonna rename this
layer into thumbnail. Great. And then I'm just going to get the rectangle
selection tool, select this one, three fingers on the screen and duplicate. And I'm going to turn this off. Actually gonna unlock the
first layer and just erase it. Perfect. Now I'm going to
import the Nuit clay piece here so I can copy some of the structural
elements to create a final sketch. So let's do it.
5. Structure & First Word: Okay, let's build the
final main structure. We're going to pull from our
sketch and start shaping the main guidelines from
our first piece Nuit clay. Right after, we're
going to tackle the letter forms with a
new refined rnouba style. Awesome. So now we've got
our first piece here. And again, remember that we are going to get a
lot of things from it. So we're going to
get the circle, we're going to get the frame. We're going to get the
position of the letters. More or less, it doesn't
have to be the exact same, but something that
is kind of centered. And also the size of
the flowers and stuff, I think I would keep some
of these things as well. Now, you will see that
as you do the series, your posters keep
getting better, and there is a reason why because the more you study a style, the better
it's gonna be after. So you're going to
see, like, if you do a series of, let's say, I don't know, like
eight posters, the eighth or, like, fifth will be better than
the first one. At least this happens to me. So yeah, let me know if that's
your experience if you've ever done any series
of posters before. Now, what I'm going
to do is to go to the nui Clare and just
bring the past down. Now go to actions and in Canvas, edit drawing guide, and now
tap on this blue circle, and I'm going to bring
it to the center here. A good reference point
would be this one. Tab Don. Great. So now that we
are here, by the way, I'm also giving
you my Nila piece. So if you didn't do
the first tutorial, you can also reference my piece directly to create
this piece here, okay? But obviously, I would
recommend you to go watch the first class because there is a lot of things there
that are very interesting, especially when it
comes to inspiration. I showed you a
couple of books that I've used to study this style and stuff. So yeah,
go check it out. Now let's create a new layer, and that's gonna be
our final sketch. And I'm going to start by
getting the frame here. So this is gonna be.
Let's do it again. So tap with your left finger. By the way, tap on this layer
and make it a drawings. Always, always, always forget
that. I don't know why. So let's do it. Perfect. Now, let's
do the frame. I'm not gonna get the
details, obviously. Because all these
is gonna change. Perfect. Now I'll also reference this frame
just to have it. I think I want to use
it up here as I did. I'm just gonna get
this right here. Nice. Perfect. Okay. Now I'm gonna probably probably do the circle here
in the background. Actually, for this circle, it's way better if you
go ahead and create a new layer without
being mirroring. Because otherwise, it creates
really weird circles. It's really difficult
to make it. So let's place it here. And now let's do the same. Tap on circle. And this one needs to be a little bit bigger. So if you want to do if you want to control
the circles better, remember that if you tap here, the circle is just going to make it is gonna
get bigger, okay? If you tap outside,
you're gonna move it. And if you tap on
the blue circle, any of the four, you're gonna
deform the circle, okay? So again, for moving it, just for making
it bigger, sorry, but in the same position, just grab right here in
between the blue dots. S, let's do it again. Nice. And now let's
do this one, as well. And the other one. Something like this. Perfect. Now, this circle, I'm
actually gonna select it all, select it with the
rectangle selection tool. All of it. Go to the Transform
tool and flip vertically. Now I'll bring this down here. Something like this.
Perfect. Now, I'm just gonna pinch this together, and on a new layer, I'm going to do the letter boxes here. Duplicate and bring
bring it down right there. Inch together. And I think that's going to be it when it comes
to my structure. So I'm just going to move
the two and move them here. Perfect. Now, my sketch, I'm just going to
make it smaller. Just put it somewhere up there. Just to have it somewhere if
I want to get back to it. But now more or less I
know what I want to do. Now, for the structure, I'm just going to bring
the opacity down. And I'm going to start
doing the letters. Now, before I get into the final style that
I want to use today, I'm going to show you
a couple letter As. There's a lot of Arnabo
styles, actually. And if you've seen any
of my alphabets before? Up in my shop at chubm.com, I have a few alphabets that teach you how I create
each letter step by step. So now I'm thinking, and I would like to ask you if you
would be interested in me creating an
rtenubau brush set for Procreate that has
four alphabet styles and a lot of elements
for Artnuva. But I would like to know if
you would be interested in it because it would take me around three or four
months to create. Let me know if some of you
would be interested in that. Now, let's do two letter As. There could be a lot of ways to create these
styles, and you could, you know, I've been
doing some of them, and they become
better as you go. They become easier. So now there could be one that
does something like this. Right? Now, we can
duplicate this, flip it. So that could be one. You could even make it thinner. So that could be one style. You'll see that I
didn't choose this one, but this could be
one of the styles that I could create
an alphabet for. And I didn't choose it
today because to me, it's not that ornamental. Some arnvo styles
are more ornamental, and some of them are just a
little bit less ornamental, more I would say more going to an art deco kind
of like style. So this is one that I
tried in the beginning. And then the other one, that's the one that
I'm going to go for today, that's
something like this. So if we create the
first stamp like this, and now we're going to create it because I prepared a stamp for you to make
this style better. But let me just, like,
sketch it fast just so you see what kind of letter
I'm talking about here. And then from here. We
do something like this. So this could be
the other style. Not could be because
this is going to be the style that
we're gonna use today. Okay, so let's erase this. And now, on a new layer, I'm going to go and select
the Ardovo letter base. Okay, so let's stamp it here. Let's make it smaller. And now the upper part
will go a bit more up, and then this will be
somewhere around here. Yeah, bring the pasit down. Now, just a little bit of
theory before we do it. I'm going to tell you
what is an overshoot. So when you do letters that
finish with a straight line, you're going to
follow the X height, right? This line right here. But, for example, when
you do a circular letter, there's gonna be an overshoot, meaning the circle
will be always, always going a little
bit beyond the line. Now, when you zoom
mouth, your eye will tell you that these two
letters are the same height. But if you were to put this one the same level than
the straight line, your eyes will tell you
that this is shorter. Okay? That's just like
an optical illusion. That's why we are
going to do that. We can start by
doing a main stem. Stem is the vertical
main part of the letter. So I'm just going to copy
this just trace on top. Again, here, if you wanted to, you could exaggerate things. You could do maybe a
Serif that is like this. You could do a serif
that is even shorter. You could do it even
straight if you want it. You could do something that is more like a
Tuscan kind of letter. You could do anything
that you want. But for the sake
of the exercise, I'm just going to
obviously follow this. Great. So now I'm just gonna duplicate it,
flip it vertically. Put it up and just fill it in. You could also drop
a color inside, but for some reason, I like
better doing it by hand. The process is a
bit more tedious, but the sketch
looks better after. Great. So now we've
got this one. Now, we're just
going to duplicate it and bring there for after. And then with this
one, we're going to create the first letter, which is going to
be the letter A. Now I'm gonna erase this
and keep it like this. Now, the first one is to I'm
gonna change this a bit. And instead of
finishing like this, I'm gonna finish like that. Because here I'm going to
do this line go in there. And now, I'm going to
finish the letter A, just by tracing on
top of the stemp. These letters that I do
for the art nouveau, they're always coming from an alphabet created in that era, but I always give my own twist. Now, here, the crossbar
very important. We're going to
keep the crossbars all the time at the same level. So for the A, the B, et cetera. Great, we have the A, so
let's bring it to the left. Let's leave it there. Now let's duplicate the main
stem that we have, and let's bring it here and
let's create the letter B. Perfect. Now for the B, I'm gonna go ahead with the
selection to select this and bring it down
somewhere around here. I'm also going to change a bit Taserbs. So
this one will be up. And this one a bit down.
Something like this. And now the bee.
We'll just follow this shape and do a
little ending here. So let's do now the second part. You can also use this guide
that I've prepared to actually make any curve that
you want on your lettering. If you want to do
a nice flourish, you could also use this circle, rotate it around or if you
want to use any of this to whatever part that you would like to create,
you can also use that. So I believe that this
will probably help. But please let me know if
this helps or next time you want me to just
do the letters from scratch. I could also do that. I do it in my patron all
the time every month. I create the letters
from scratch. Sometimes I use guides, sometimes I don't I guess
this is good for beginners, but if you're more advanced, you really don't
need to use this. Okay. Times when you want
to do a class, it takes so long to
do the letters that sometimes my classes
or tutorials are over 6 hours and sometimes that might be a problem if you're
short in time. Okay, great. Now we've got A and B. I'm going to
put this one here. Now I'm going to do the
E and letter U. I'm going to again
duplicate my main stem, put it here on top of this. Now we've got our stem to determine the width
of the letters, right? Not all the letters
are the same width. So for example, if you
do a W or a letter M, they're usually wider. But generally, most letters in the alphabet are
pretty much the same. So now let's do the letter U. So I'll do this little thing
as well, using the guide. Up until here. And now let me just make
it smaller, actually. Yeah, something like
this. And not from here. I'll do the letter U. Now I'm gonna select this again and bring it
a little bit here. There. More or less. Now, I'm gonna pinch
these two together, and now here I'm also going
to retouch this like that. You'll see that in any alphabet, the letter U, if it has a serif, it never goes like a normal serif because
you need spacing here. When you use out, you
need some of the spacing. There. Perfect, then. Actually, this curve
should be a bit more down to do the overshoot that
I was telling you before. Perfect. You got it. Now, you could also do
some thickness here, for example, if you wanted to. But now this depends on you. Perfect. You know
what? Even a bit more. Nice. Now we've
got the A, the U. So I'm just going to
pinch together these two, move them so I can do the E. So again, duplicate this, bring one of them
on the stem here. And now let's use the letter B as a reference for our width. Now the letter E will do something like let
me actually pins. Yeah, let's not use a new layer. We can use the same one. So it will be somewhere up until here. We're gonna do a line that does let me just erase this curve here 'cause
I'll make another curve. So it's a curve that does this. There. Perfect. And now
here, I'll go up like that. There. Now when it comes
to this upper part, we'll do something like this. Like a wave, it
finishes as it starts. See, this one goes up, and these two go down. And then from here, we'll do something crazy that a lot
of our new alphabets have. That is to do a line that
goes from here till down. Probably you've never done
a letter E like this. But let's see what
happens when we there. And make it thicker a bit down. Now, let's finish this part. And actually, I'm going to select this part up here
and I'm going to bring it a little bit to the
right like this. And now let's finish. The shape. And just like that, we've
got a letter E, mostly done. Now they should go straight
down, just like this. And then the crossbar,
I'll just make it in the same same place there. Awesome. Okay, we've got the first word. So now let's bring
the stem down here. And let's put
together this word. So the E goes there,
the B goes here. Try to balance out the spacing, so maybe the A can be a
little bit more to the left. Just, let's try to
make a nice kerning. Kerning is the individual
spacing between each letter. So if you were to fill
up this with water, the same amount of
water should be here. Okay, regarding even details. This is a detail, for example, that will
make our kerning differ. So let's put the E.
Can also zoom out. I think when you zoom
out, you really have a clear sense of
what's happening here. There. That is good enough. Now, let's pinch
it all together. Not the stem. So
let's bring it down. And let's center this. And this is how we have
we done the first word. So in the next chapter, we'll tackle the second
one. Let's do it.
6. The Second Word: Alright, second word time.
We will repeat the process, but keep an eye on
contrast and rhythm so the two words feel like they belong in
a sentence together. Not just stylistically,
but in tone as well. Great. So now we are going
to do the second word, which will just
be three letters, actually, because we
already have the E, and we've got two
letter Es here. So first of all,
I'm just going to ing the word up a little bit up 'cause we've got
a challenge here. You see that the letter
B goes down, right? So, like the spacing between words will have to be
a bit bigger than this one, because this one has no letter that actually goes
beyond any of the lines. But in here, we do have it. So just go to bring
it up for now, locate this stem somewhere
like around here, duplicated now bring
them the stamp as well. I always say the Stem,
so SDEM then stamp. But, you know, sometimes, since I'm not a native
English speaker, I have when I talk fast,
I just get confused. So Stem and stamp. B. There you go. So okay, now let's move
this one right here, and we are going to do the
letter R. For the letter R, we are just going to follow
what we did in the B. But for this, actually, I'm
going to erase this part. Up. Three fingers, cut.
Go to the letter B. Select this part, actually. Up, all this. Three
fingers on screen, duplicate, bring it down. Bring it here, and then spit
this one, pinch it together. We've got the letter R,
almost done here, actually. Okay, we have it here. Now, let's bring
this down a bit. Usually, this could go a little
bit more down than the B, but I think we can
keep it like this. Maybe we could do it
just a little bit. Because generally, since we
don't have the down part, then visually, there should be a little bit more down,
even more, actually. But since it's RNvo
I think it's going to look good for it to be up. Great. Now, here I will just
do something like this, and I'm actually going
to leave it for now. I know that I want to
do something like this. But that's all I
know because first, I'm going to do the
letter R. The letter, sorry. The letter O. Now, new layer. So
for the letter O, I'm just gonna do an oval here. Edit it. Make it the same as
like the same thick, more or less as the
rest of the letters. Maybe like this. Make sure
that there is an overshoot. And now let's make No, actually, what I'm
going to do now is to make it a little bit
thicker on the down part. Just a bit. The letter always never a perfect
oval, actually. It always so if
this was a vector, there could be like
two points here. This part here should be
a little bit flatter, and then as it goes down, it should go a little
bit like this. Just a bit. Now, this makes a
little bit more sense. We can always retouch it later on when we
render the piece. But now let's make a
big oval here as well. It's well, actually
a smaller one, and it's going to be
the one in the center. And let's make it a stick so
we keep this thickness here. And on the right side
as well, more or less, you can eyeball it like Yeah. This is good enough. I think
we can distort it a bit. Again, visually, I think now it's quite good.
Now let's paint it in. And when we add the ink inside, we're going to see what
parts are actually flat. Maybe this in the end
was a bit too flat. Something like this
will do for now. Yeah. Maybe it's a little bit too
heavy on the center part, so let me trim it a bit. Let's bring it
somewhere around here. And now with the letter R, what I will do is following
a bit this shape here. I'm actually going
to bring it a bit closer and following the guide. Actually, if you were to
flip horizontally the guide, maybe this could help you. So you could do
something like this. Follow this circle. And then here, make it thicker. Perfect. Now, I'm gonna
pinch them together. Well, actually. Wait a second. Yeah. Maybe with a
little bit more spacing. Remember to keep the same
spacing up and down. Okay. Great. Perfect. Now, let's go ahead and do the letter
S, and we're done, actually. So I can just erase this, actually, bring the
RO somewhere there. And let's do the letter
S. Now for the letter S, if you get the guide, you could select you could actually, sorry, you could follow the
letter B, a little bit. Not much, but just a
bit just to keep this. So we're going to do
two circles here. It's gonna be a little
bit different than the letter a that I, you know, usually do, but it's something that
I've seen in a book, and I've never seen something like this. So let's
see if we can do it. So you could do an oval
this, bring it up. There. And now you do another one. Like this. That actually goes
beyond the first one, so goes inside the first one. And there's this overshoot here. Let's see what happens now. Let's bring this layer. So pass it down and create a new one. Perfect. Now, I'll start doing this one. Do
the thickness here. Something like this.
I'll do serif later. Let's just leave it
like this for now. And then I'm doing this part. And it finishes here. And also do the thickness. Remember to keep the
same thickness always. I think something like
this will actually do. Let's paint it in. And let's paint
this bird, as well. And we will leave it like this. So far, maybe I can Yeah, actually, I can finish it. So it doesn't go from
thick to thin directly, but it does a bit
more like this. I think this is gonna look. Yeah. Good enough. Okay, perfect. Now. This
seems a little bit too. Let's make it a bit whiter. So with the free form tool, I'm just going to make
it a little bit whiter. It's a sketch, so I don't
mind it. Let's put it here. Yeah, I think this
is good. Now let's bring the S closer to the O. And now I'll do something
that's gonna look cool. So we could finish the letter S, doing something here, right? So you could do
something like this. You could actually do
a continuous circle and do something like this.
You could do a lot of things. But since I'm putting
it next to the O, I had the idea to do this. So there is a little
ornament that comes from the O and it goes inside the
S. It's like a ligature, but without touching the ladder. There. Perfect. Okay, now let's erase this, let's erase the guide.
Let's go to the letter. E, select it with a free
hand selection tool. The fingers on the screen,
duplicate, bring down. Zoom out just to see the
spacing. I think this is fine. Place it somewhere here. Now, duplicate it,
bring it to the right. You can even touch
a bit if you want. And you could modify
this a little. That's why it's
called the lettering, so you can actually
modify things. Like that just for
stylistic purposes. Perfect. Let's bring it
a bit more up, actually. Just like this. Second
one as well. Just. Okay. Pinch it all together. So the rose. Well, actually, let's
pinch it all together. And I'm just going to
select the rose part. The pink, actually,
it's not a rose. It's Jose. And let's bring
it in the middle. You can I can help that you have the circle and it's
center so you can use. Great. And now let's
bring it down here. Awesome. We got our lettering. Now, there is an accent here. Remember that this is French. And I think it's
in this letter E.
7. Illustration Part: Okay, now let's add that
little extra magic. The flourishes, ornaments, and illustrative bits that bring this piece to life and push it into a final
poster territory. We are about to do the
most complicated part, sketching this whole thing
and positioning everything. First, I'm going to go to
the edit drawing guide. Gonna bring it here
at the center of it. If you want to find the center
also better in the guide, just go here, get a line from
this corner to this corner. Without without it
being assisted, okay? So just, like, spring
it from here till here. There. Perfect. And now from here to here. And if you do this perfectly, you have a center. So if we were we
can go to actions Edit drawing guide
and then bring this blue point right here. Now we have the center of this. Perfect. So let's bring
back the letters. Then on a new layer,
drawing assist. I'm going to start
doing the rows here. Now, I want it to be somewhere from here and do
something like this. Yeah, I think that's good. And then here it should
finish somewhere around here. So gonna be something like that. Now, I'm gonna bring
this plastic down, create a new layer, make it existed as well, and start drawing
the flour here. In this one, actually,
you can Well, actually, we can use this line. Okay, great. Sorry, sometimes I talk to myself when I'm
creating these things. Um, actually, from here, I'm going to create
the first petal. Now, the second
one. The third one will go a bit more up.
Something like this. Now I'm going to
do a couple ones here, that they're behind. And then a last one. Nice. Okay. Now, here. That's one of the big ones. And this will be
like a folded one. So I'll shape like this. An And then from here, a couple more. But small ones. Good. Please don't ask me
what kind of flower is this because I don't know.
I have no idea. But it's cool when you know how the petals
work and all that, it's kind of cool to just
create something like this. Okay, let's refine it a bit. Okay. Seems pretty
good to me now. Perfect. Now that we have this, I'm gonna duplicate it and
rotate it twice 45 degrees. Actually, wait,
give me a second. I think I'll do it just
a little bit less wide. Maybe it's like this.
Yeah, this looks good. Duplicated and again,
rotate it twice. And with the uniform,
bring it here. And we'll place it
somewhere around here. Duplicate it, flip
it horizontally, snapping two on
and bring it here. There. We pinch them together, and then on a new layer, I'm
gonna do the frames now. So Let's try this again. Right. Actually, this one, I'm not gonna follow the guide because I think it's too close. Great double frame here. These two flowers are going to be a bit smaller somewhere here. Great. Okay. So now,
from the frame, what I will do is to create This branch here coming
from the flower. And let's say that
they go up until here. And so now I will make it. So it's together with this. And here, there
is something like that. Yeah, something like it. And now, again, there is
a lot of Arnovo posters that combine really
straight lines with curves with natural curves, which was the main
element in Art novo. So now here, I messed up
this little part here. Okay, great. Let's go
back to the layer. And now here, I'm going to start creating this should be
mirroring this side, actually, but, yeah, we would
have to create something that mirrors both on these two sides and then
it goes there as well. But it's fine. We're just
going to do it here, and then we're going to do
something by hand later on. So from here, we'll
do a little nee here, then a leaf that goes
somewhere like this. And then a smaller leaf. Perfect. Now we can just go
ahead and well, actually, I'm going to erase this part here and now select this part. This part three
fingers on the screen, duplicate clip Vert
quick and ring. Perfect. We got it. Now, let's do something up here. Let's just erase. Yeah. I want to from this one up. Come down like this. There. And now, this
goes like that. I'm doing something similar
to my previous poster. And here, maybe we have
to cover up the space. So what if we do
something like this? Yeah, this looks pretty good. And this will go top. Now, here I can do a
little triangle, maybe And then this can be
a little This could be like the flower that we created in the first
piece as well. Something like this. Nice.
Okay. Perfect. Now, let's go here and create
the bottom part. So now let's mark
these circles first. So we know that this
will go over here. And this will go like this. Perfect. And now this one. That's. I'll go like this. Awesome. Now, we want to make something that I can actually
turn off the guides, actually, now because I
don't need them anymore. Now, we could do something
with this part here. So that could be like a
little so it enters here, something like we it
right here, right? So it enters. And then it goes up like this. Actually, I would like
to try something. I would like for
it to go inside. Right? And then, so
the circle goes here. Let's see if I can
make this happen. Actually, yeah. Yes, so it
does something like this. Because in this exercise, in this class for today, what I'm going to try to do is to make the piece with
textures instead of I mean, I said it before already, but
the other one was flat and I didn't want to
spend a lot of time using depth and stuff. So but here, I'm going to try to find elements
that can go on top of the other just to create
that depth that I'm really, like, trying to find. I can make it better later on, but yeah, something like this. Nice. Perfect. Okay, great. So, okay, now that we have this, let's go down, and let's
make the florals here. So as I did up, this would go down like
this on a straight line. And then it would do
something like this. Yeah. Let's see. If I do a vine here and then
here it could be a big leaf. Something like this.
And then let's see, like the vine could be
something like that. And then from here could cut and do another leaf
here. What do you think? Maybe? I could do a leaf here. Hm. Yeah, this could do. Let's bring this one up a bit. Hmm. Yeah, interesting. Because this lift could
go maybe could cover this space up. There. Yeah. Okay, and then here we could
do something like this. Perfect. Okay. And now, finally, and I'm
done after this. I'll do one that goes from here. It does like some kind
of a circle here. And then there's a leaf co up. Yeah, I'm actually
doing different lefts than in the first piece, just to give it a little bit more of that
differentiation, even though if you were
to do the same leaf, so the typical leaf like this,
that would also be good. I think I'm going
to put a few ones just to reference
the first piece. But I'm doing this
one's a bit different. I found that they were
actually actually, like, very fun to paint. So as you'll see later, when we add colors, And then
there's another one here. And actually, here we could put now that I'm talking about
it, we could put another one. You can always go to the other side and make
sure that it looks good. Sometimes when you are drawing on the right,
it seems good. And then when you
go to the left, you see it's not good at all. So you could go select it
and then distort it at. Or with the warp tool. This is very, very
helpful, actually, 'cause you can just touch
here and there until. Yep. There you go. Okay, we got it. And then if you want
to, you could also. Like, let's say, this
one could be behind the circle. This
could be on top. Now, I'm just gonna copy this. Clip it and
bring it there. And before I bring it
there, I'm just going to erase it from that side. You can drag it
outside the screen, and then bring the new one. Sometimes when you sell, I mean, sometimes now, when
you select things, let's say if I select
this and I paint here, you see, it won't go there,
even if it's mirroring. Look, actually. As I erased it, I actually raised it there,
so select it directly. Without erasing, bring it
outside not bring the new part. Okay, we're done. Now, you could bring a
couple flowers here, a couple, sorry, a
couple of leaves, just to make something similar
to what we did before. Maybe one here as well. And that would be our sketch.
8. Positioning Colors: Before we start
cleaning up our piece, we're going to lay
down some colors to get a feel for how the final
illustration might look. If you balance them well, you'll also get
an extra boost of motivation because when you zoom out or just
squin your eyes, you'll catch a sneak peek of how your piece could look by
the end of the class. Okay, so now that
we have this and before rendering our artwork, I'm going to show you how I
decide which colors go where. I never wait for the
end of the artwork. I always like to see
a preview before. So then when we paint it,
we don't have to think we can put some music on
and just start painting. So the first thing
that I will do is to determine what kind of
background I'm gonna have. I think I'm going to have
this green background. But it's not green. It's
like a bluish tone. It's somewhere in
between here says green, but, like, to me, it kind of looks a little bit
blue, as well. So I will go to the selection
to bring my guide again. And now here with the rectangle, I'm just going to do this. Just do the rectangle. And then with remove, I'll do the same
but remove this so because I need just the
frame. There you go. Now, with a pencil
or if you want, you could use a soft
brush, for example. Any brush that you
want, you can just go. Actually, I didn't
create a new layer. Create a new layer,
bring it underneath your sketch, and drop a color. Now, with a soft brush or
any brush that you have, because we are not painting
this like for real. So tap on it, draw and assist, and then just we're gonna do
these little corners here. And then inside here. Well, again, don't overthink it. Paint. Don't try to make
it pretty or anything. Now, the circles, as well, will go in this color. Both circles, I think. Yeah, good enough. Now, the background, go
to create a new layer, and with the same
rectangle to it, I'm just gonna do this
and drop a color. I'm gonna use this
semi white color. Just bring it inside. I could maybe maybe even
make it a bit brighter. Yeah. Look I'm just gonna
sample it here. Yeah. Better I guess. Perfect. Now I'm going
to do the frame. So on a new layer on
top of the main color, I'm gonna use the screen,
which is the one for nude cla. So, wait, let's I
think I pronounce this worse and worse
every time that I say it. Okay. Remember, it has
to look like a pair. Now, letters, actually, they are a little
bit smaller here. So I'm just gonna
make them a bit smaller and center them. Yeah, I think now more or less. They're obviously thinner, more compressed than these
ones, but I think it's okay. Now, on this layer, make it a drawing assist the
new layer that we've done. And let's paint the frame. Perfect. You will see that
I go from rush to eraser because I have a
new Apple pencil Pro. And just by squishing the pencil, I go from
one to the other. If you've seen any of
my tutorials in Patron, you're gonna see that I always
do it because I think it's the best function that Apple has put out really for
the for this pencil. Great. What else? Do do, do, do. Oh, here. The vines here as well. This leaf can go, maybe pink. Okay, we are starting
to get something here. Awesome. Okay. Now we can do pop,
pop, p p Let's see. Yeah. Let's do the pink, which is going to be my
favorite color in here. So I actually changed
the tone of the pink, so you can go ahead on
the old piece and ed it. I'm actually adding a chapter in this class where I go through this piece and I tell
you which things that I've done just to make
it look like this one. So we're gonna finish this
one and then I'm going to show you how they
work as a pair when I add the shadows and the textures and all
that in the clay. Great. So let's go to the pink. Again, let's make it a
drawing assist and paint it. You could always just
do the outside of this. And once it's
closed, you can drop a color inside. Okay. Now, actually, I added an orange that would be
interesting as well to add there. So the orange could be just a little details
like these leaves, for example, you can do
it in the same layer. And maybe this thing here that we could make
actually bigger. What else I could do here? Maybe that thing here as well. Could do it orange. Nice. Okay. Well, we are
pretty much done here. Now, you can also
add some let's say, some lights and shadows here. So you could do this
make these layers alpha. And just for your reference, you could go ahead
and, for example, this one could go green. These parts up here. You see that now, it starts adding a bit
more life as well. So this part here as well. Now, you can just hint a little bit of light here and there just for you to understand where it goes. You could stop making
it stop being a docs. Just so we add the lights here. So, for example, on the
on this kind of tubes, it's going to be the
light is gonna come from the upper left corner. Therefore, there's
going to be here, like here, And then here. S? Because if it was mirroring, then this light would go here, and here I won't shadow. But here I want light. Again, this is just
for your reference. So you don't forget
these lights later on. Sometimes, you know,
we get excited and we think that
the piece is done, and then there's some
lights that were not edded. So why not just edding a bit here just so we know. Perfect. Now even a shadow. Here, just as a reference, I'm not gonna I'm not gonna do everything because
it's too much time. But okay. Now, for the pink, we could use this darker tone, maybe adding a little
bit of shadow. Don't make it a drawing assist. Because the shadows could
be here on that side. And that would be it. So we've got our sketch. It kind of looks from
the same series. So mission accomplished here. And now I'm going to
show you how to start adding the linework here, and we'll be
rendering some of it. We won't be rendering
everything because otherwise, this class will last
until tomorrow. So what I'll be doing is to probably render one of
these flowers with the leaves, rendering one of the
letters and maybe rendering the circles and adding some textures and all in
the end of the class. So I think what I
will definitely do is to at first the texture. So it looks textured, then
add shadows and lights, and then I'll go for a coffee. I'll finish the
piece, come back, show you the final result
and comparing it to the final result that
I also did using the same effects that
I'm showing you later. So let's do it.
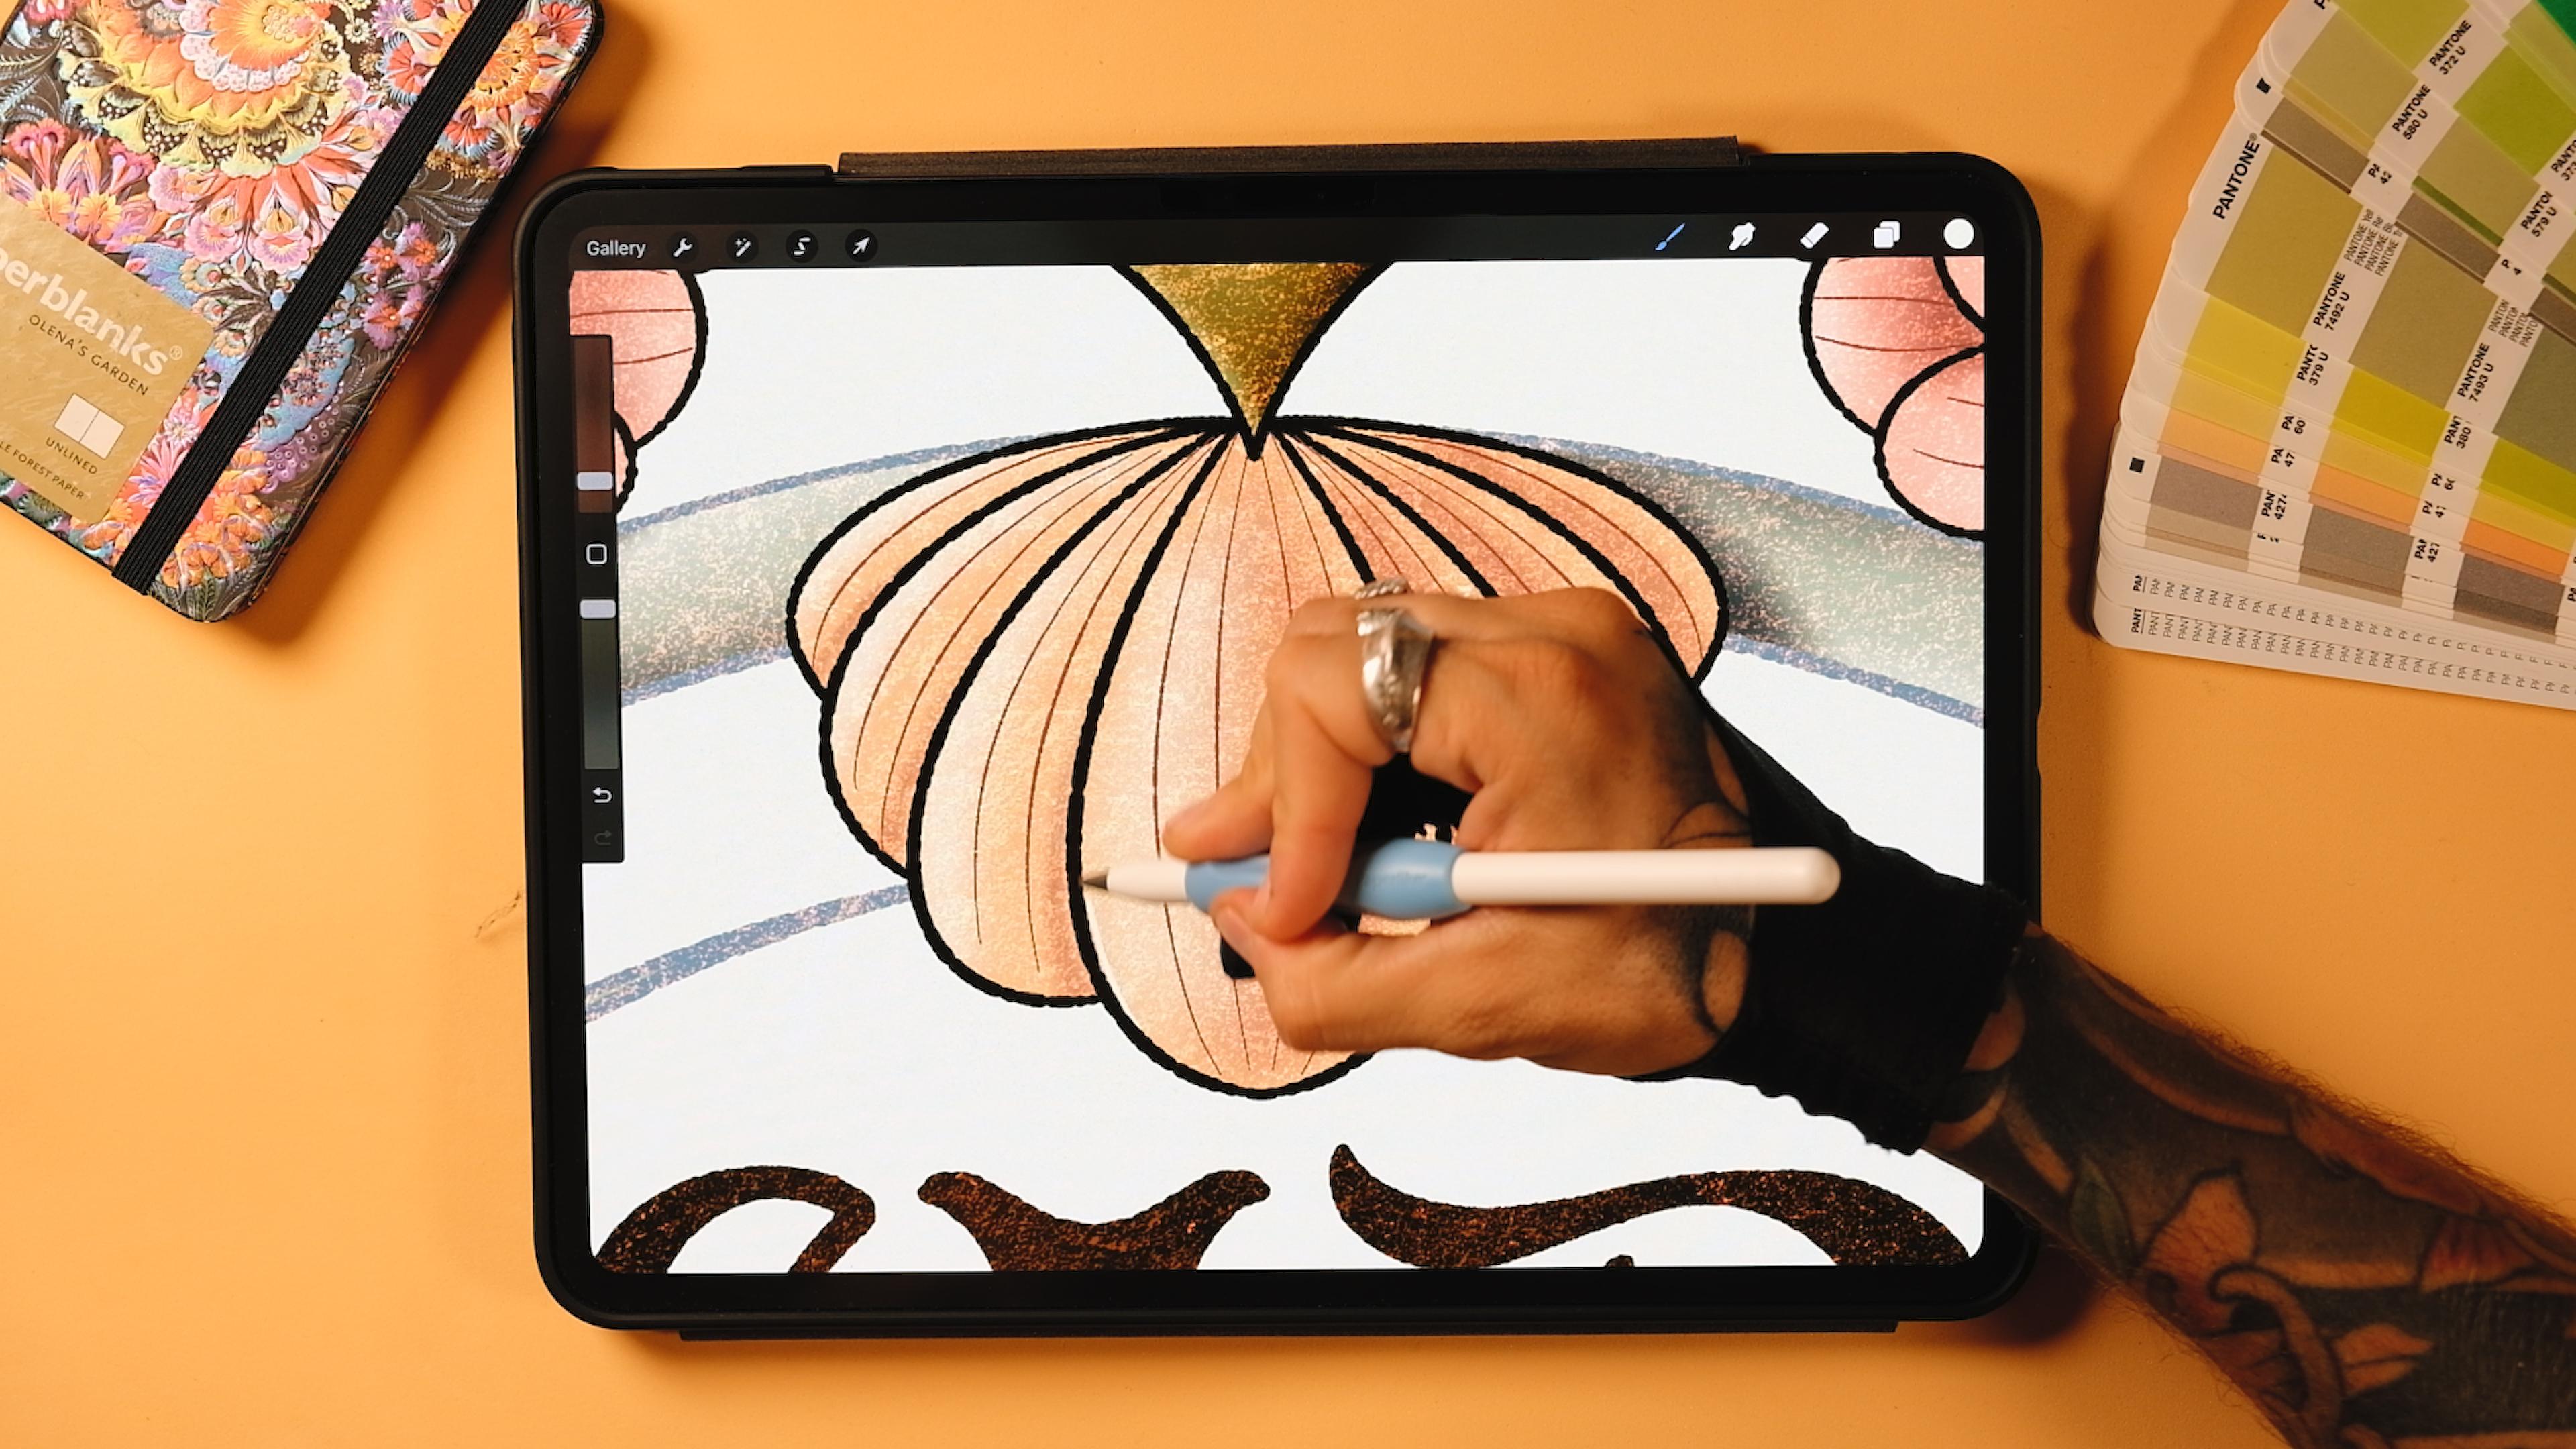
9. Linework & Texture: This lesson, we will render our piece using
linework and texture. Remember how in the last class, we kept the final result flat? Well, today we're going to do something
completely different. I'll walk you through how I render the lower part
of the illustration, adding lines, color and
texture and show you, as well, how I
approach the letters. After that, I'll leave
the rest up to you while I head to my favorite coffee
spot to finish my piece. It will probably take
me a couple hours, but with the sneak pick
that I'm giving you, you'll have everything
you need to confidently keep
going on your own. Okay, so now what I will do it's too high the
things that I don't need. So I'm still going to keep
some of my structure here. The colors, I'm just going
to pinch them all together. And also the flowers with the whole sketch
here, I'll keep it. So I'm just going to select these five things, group them. And then I'm going to turn this vertically here like that. And then I'm just
going to adapt it. So make sure that the
snapping tool is on. So I'll bring this here until you see these
two yellow lines, and it's going to be a
uniform transformation, then I'll bring it there
until it adapts perfectly. More or less, at least. Great. Awesome. Okay, so now
that I have this, I'm just gonna turn off
some of the things. So I'm just gonna reveal this sketch because
I just want to well, first of all, I'm
just going to show you how to do this
flower, actually. We're gonna do this
flower, and then we're gonna copy
it right there up. So let's bring the pasity down. Great. Now, go to actions
in the drawing guide, put edit drawing guide, go to options and
then put horizontal. And it's going to directly be centered in the middle here. Now, if you see that there's some things that are
not completely aligned, you can always move your sketch
a little bit to the left. I'm just going to
select everything, and you're going to see
that see this here, it's not super well aligned. So I'm just going to tap
here with the finger a couple of times until
it's centered enough. Maybe just one more time. Yeah, now it's centered. Perfect. Okay, so
the first thing that I'll do is to create a
new layer outside this group. This is going to be sketch. You can rename it into sketch. Now, let's get a new layer. Then let's go to the
Arnvo habems brushes, and then here, I'll
select the ripalizer. Now, the size, I'm
going to select a 5%. And on the layer, tap on it and make it a drawing cis, like
we were doing before. And let's do the flour. Great. You're going to see
that when I do curves, if you've ever done any of
my classes or tutorials, when I do a complicated curve, let's say I do this
one right here, I always do part of it. So let's do this. I
always do a part. And then without lifting my
pencil off of the screen, keep it here, and then I
continue doing the rest. I never do complete curves like this one, for
example, right? Like, if you were to
do like a whole curve, you could do it if you've
been doing this for a while. But, for example,
if you want to use the drawing assist
and if you do this, let's say, want to do something more complicated
like this, for example. With the drawing
assist, you see, it's not going to look
the way you want it. Even if you edit it sometimes, it won't be. Maybe
this one could. But like, never I would
never do complicated curves. Imagine that this was
a curve like this. Obviously, it's better to
do it step by step. Okay. Maybe this one good.
Yeah. Let's see. Now, let's select the
same eraser, the palizer. Actually, this one will
come from the center here. Yeah. While I'm at it. I think I'm going
to do the ornaments as well at the bottom. Just wanted to do
the flower, but I think if we do this together, it's gonna be better for
you later. So let's do it. Curve. Stop. And let's do
it again. Let's stop here. Now, here's also
a little reminder that the cleaner your sketch is, the better for your curves. This is too rough for me
because sometimes it's harder to make the circles when you are cleaning
them up, right? So, if you keep the pencil sketch cleaner,
it's gonna be easier. Say, for example, here up, it's doing something that
I don't like necessarily. Maybe not better. And these lines are
kind of loose here. It's better for you to do them kind of, like,
from thick to thin. So they look better later
on. Okay, let's continue. Good enough. Okay. Now, this one I'm gonna
leave it like this, so Because with the colors, I'm gonna do
something cool here. So I'm just gonna
I'm not gonna do this line right now. Oh. Yeah, this one will join. This other leaf here. And let's make this in as well. There. And then this line, I'm just gonna erase, actually, to do the same as with it here. There. Perfect. Great. So now you could continue this. Let's do the frame, okay? I'm gonna do the first frame, and then I'm going to
start painting this. There. Now, this frame,
I'm just going to close it for now because I'm
not gonna do the details. I'm gonna do them later
on in the coffee place. So I'm just gonna close
it for now, okay? But, like, as you paint, you just gonna erase this
and continue like that. Okay? So let's
let's do it again. The good thing about
doing these things with this palizer brush is that it gives you
this rough texture, and the lines don't have to
be perfect all the time. You see here, for
example, I can do this, and it looks good
because it's irregular. Okay, so once we
have this closed, the technique that we could
use is the following. So create a new layer underneath my underneath the line, right? Now, go to the line, tap on it, and then
here put reference. Now, on this layer, I'm
going to do colour by color. But on this layer,
I'm going to paint this using the pink. So I'm going to get the pink and just drop it inside here. You see that now, since you
have this reference on, it's like you were
painting this layer. But instead, you're
using the one underneath to put the
ink inside the line. So do this, can move left to right until it's well painted, and then go up here,
continue filling, then fill everything Good. Then I want another
layer with this green. I'm gonna drop it in here. Continue filling, and then Wow, actually. Do this. Great. Perfect. So now
that we have this, I'm going to create
a couple layers on top of each of these, and I'm going to tap, and I'm going to tap
on clipping mask. And now this layer also
tap and clipping mask. Now, this will be for the shadows and for
the lights in our piece. But before that, I'm going to create a layer on top
of everything else. And then I'm going to try
first with this orange, maybe, like, make it a
little bit more orange here. And then go to the
concrete facades here and I'm going to
spray here a texture. Now we've got this
very kind of, like, strong texture here
that is going to give us an overall texture
to our piece. Now, you could go to
hue saturation and brightness and change
it as you please, add more or less saturation and brightness, maybe
something like this. Now before start shading, tap on the little on
this texture that we just edit and put Ed. And this texture is the one
that I was trying to find. See, we already have
some roughness to it. Perfect. Now, let's
start shading, shall we? Go to the flower first, and then here, I'm going to
select this second color. And then the soft texture brush that is included in
my patrim brushes, and then I'm going to
start shading this. I'm gonna obviously do it without the drawing assist for the first time
in this class, and I'm just going to
make this smaller. So remember that the
light comes from here, so I'm going to do something
that makes sense like this. So I just going to
add some shadow behind here. Just some. Not much. And then
with the eraser, I'm actually going to select
the soft brush eraser. And so I can erase
this part here. Great. And we're going to
do it from there till here. Perfect. Now we're going to add a bit here and erase the one in front. Perfect. Now, this one
is on top of this one, so I'm going to add some
shadow here as well. An erase. Some of it as well behind. If you see that now this shadow will be kind of
like fighting with this one, you can also go to the
selection tool freehand and select just this part. So you can just add
your shadow here. Now, you could do the
same in this one, so go ahead, select this part. And add shadow here. Now, Grace, this that
you don't need. Perfect. Now we could add also maybe just some light shadow here
down and keep it there, actually, because I
also want it here. There. Now, just a it here. There. Now I want some
shadow also here. There you go. And I'm
gonna erase. Is part. And add some shadow here
on the other parts. Great. We got this one. Now, on a new layer, also make it a clipping mask and I'm going to
add some lights. Now, you could either add
the pink lights like this. Maybe you could add a bit. Right? So right here
in the spots here. Then here as well, and
erase the one inside. So you see that I'm adding the light here, not inside, right? So I add change to eraser
and then erase inside. This is a very easy way to
put lights and shadows. It doesn't have
to look realistic because this is an
illustrative style. So just by adding some texture, I think this whole
thing is just going to look. Really good. And now with the white one, you could go to the
palizer for example, and you could add an
extra light here. And then maybe with
the soft texture, you could have just
some more lines here. A Great. Cut some texture. Now, for the green, I'm going to go to
the main color. Gonna tap on it, and I'm
gonna make it an alpha. I want to do something similar, but starting with
a double color. So I'm going to get
this green here. And with the mono ripalizer, I'm going to go and
paint this like that. Following this line,
this direction. There. I'm gonna do
it here as well. But yeah, I'm going to
get the normal palizer so I can go s here. Oh, and obviously,
I didn't mirror it, so I'm going to duplicate
it and then flip horizontally and just
erase this part. Yeah. Pinch them together. But yeah, this should have been
with drawing assist. Perfect. Now we've
got this part. So let's do some
shadows and lights. Go to the clipping mask. And then for the shadows, I might use maybe this, like the color of the line. So I'm gonna get
the soft texture. And I'm gonna start
adding some shadows. So the first ones that
I'll do is shadows here, obviously, the ones that
the flower is making. There. I always do the same. Go to the obvious shadows
and then do the rows. Yeah, that's good enough. Now, let's start adding
some shadow here. Remember to erase this one down, and we'll do the
same everywhere. So here, here Here. Now, for the ones, I'm going to add
some shadow here. Just like this. I'm gonna
leave it like this. Then here. Here, and then on
the other side here. Down here as well. And finally, down here. Great. Now, when it comes to this tube, you can add shadow down. You could do a
straight line like this and add some shadow here. And on this side as well. That side, no, because it's
going to be the light. There you go. Great. And now instead
of going there, the shadow will be here. So same at a line up.
Do the same here. And now on a new layer,
also clipping mask. And with a lighter green, I think I'm going
to use this one. I'm going to add some lights. So I'm going to do a line here. Then this will be
lit up as well. Then this And finally. Well, not finally.
We have another one. So here is light. And then here. And now more light detail. So some here. Some here. Here. And that would be it. Let's do a couple of letters, and I'll leave the rest to you. Okay, so let's go and
turn on the letters here. Bring the opacity down. Now let's create a
new layer on top of everything else under
the texture here. And let's start rendering. Now, I'm going to
use the monoline. Because I want to make sure
that some parts are really, really following this line. So I'm gonna make it smaller. Let's see. I have 29, maybe like a 30%. Maybe a bit less.
Let's try with 28. Mm, a bit less. 25. Yeah, I like 25. You can keep
25. I can mark it for you. Here. That's gonna
be your brush. So let's first do the monoline. Cross bar. And actually, we can
do this part of the A. And now with a smaller monoline, I'm going to finish this
little corner here. You're gonna see that
now, if you want to drop a color inside of this, it's just gonna be wild and
crazy, even if you adjust it. That's because we have
this layer as a reference, so you have to tap
on it and remove the reference and now go back to your line and then now
you can drop. Perfect. Okay, let's continue with this. And now that we have this, you can make it less
rough a little bit. Just a bit. And now on a new layer, you can actually do the
first thing that we did. You remember that
we did the stated first. So you could
do that, too. Here. So let's do a line here. This. You could actually duplicate it pinch it
together. You could join this. And now duplicate it and get up. And pinch it together. Now that we have this, I can just duplicate it and as
we did with the sketch, just bring it there,
leave it there, and now go here and
finish the letter A. There. Pinch these two together. And we would have one
of the letters done. Now, continue doing
this with the rest. Continue doing this
also with the rest, and I'll see you in the next chapter where we are going to add
the final texture and also going to
show you the result on the Nuclare using
the same style, and then I'm going
to compare them both to see if they actually
look like a series. Hope they do. I'll
see you in a second.
10. Final Touch Ups & Comparison: This lesson, I'll show you my finished piece
and walk you through how to add those final touch ups that bring everything together. Then we will open up Nuit Clare and place it side by side to up Jose to see if they truly feel part of
the same series. I'm a bit nervous
to compare them, so let's see if I pulled it off. Also, let me know if you like it more flat or more textured. Okay, so I'm almost
done with this. But before I finish, I wanted to do a couple details
here and there. So there is an
important thing that I left for the end of this
tutorial just for you to see. But, for example, I've done, like, the whole frame on top
of everything else, right? But, for example, in
here, I would like to do something so it generates a
little bit more of depth. So what I will do is
to go to the circle. So these are you see the
lines of the circle, go to tap on them, and then
I'm going to tap on select. Now I'll go to my
frame and then here. Is it this one? Yeah.
But first the line, I guess, the line is up here. Yeah. So I'm just going to erase this line
here, here and here. You see that now when I erase, I just erase what's going
on on the linework here. So now I go down here and
I'm going to do the same. Great. Now I'm ready
to erase everything. You can also do this
manually if you want to. Now go to the line work
right here and erase. You're going to see
that the linework is always dark using this
second color here. But in this case,
for the circle, since it was touching
the letters, and I didn't want something
dark because then the letters wouldn't be as
readable as they are now, you will see that it's blue. Perfect. So now I also have it here. So I'm going to go
to the shadows. Remember that all those
are clipping masks. I did clipping masks
everywhere for the shadows. So I'm gonna raise this
shadow right here. There's something here that
still didn't erase good. So let's see. Now. And now we go here as well
on the shadows right here, and I erase them as well. Now, we could put even
more shadows using the subtexture
brush on the frame. So if we go to the
frame, then we could add some
shadows right here, for example, erase
some of these lights. And here we do the same
but on the right side. So erase the lights a bit
and then on the shadows, add some shadows
right here. Okay. Now depth is going a
little better here. So you can do this everywhere, pretty much, but I'll
do it here as well. So I think I'm going
to erase this. Just so we do it again,
go to this linework, tap on it, and tap on Select. Now, go back to your
linework here and erase this too. Is it
the raising there? Yes. Perfect. And now we'll go to the green here
and erase this as well. And now, erase everything
else by diselecting this. So go to the frame, and that is here.
Sorry, the linework. And it's done. Now let's add some shadows on
the clipping mask. I'm gonna erase some
of the lights here. Perfect. Now shadows. And do the same right here. Add shadows here. And I didn't add some
lights right here, so I'm gonna add
some lights that I forgot also here. Nice. Okay, now I just need to
erase this shadow right here. Perfect. And I can add. As you san, you're going to see that you will always
forget something. So a bit of shadow here. And that would be
pretty much it. So now, what I could do is to get a new layer on
top of everything else. So I would say, Well, on top of my
linework right here, and this is going to be
for the detail lines. I'm going to select this color. I don't want this to
be super visible. And for the lines, I want
to do something very small, so I would say like 3%.
Yeah, that's gonna work. And here we can just go and
select a drawing assist. And let's do it. There's
actually some line that is going off here,
Yeah, perfect. You see, my perfectionist
can't stop, as it seems. That's all it's it. There. Great. I no here. Now, maybe you could add one. Somewhere here, maybe
with a darker green. One here. Just kind of
following this. That much. Just a little detail here. Perfect. Now, I don't
want to overdo it. You can do more,
obviously, if you want to. But I just want to do. It's cooling. Not to overpower the whole
illustration. Remember that. Sometimes too many
details aren't good. Now, here, you
could also just get this and actually
paste it up here, but you know what?
Let's do it ourselves. Let's do it by hand. Let's
the last color again. Because this one is
mirroring, remember there. So I'm gonna have
to do more lines. But instead of four lines,
maybe we could do two because they are
gonna be way smaller. And again, you don't
want to overdo it. Actually, I have this line
here that I don't like. I didn't do it down. I don't
know why I did it here. Yeah. Here, I'm just gonna
add one, I think. Op. Same here. Mm. Okay, let's go back to a minute. I didn't select. And that would be
pretty much it. Okay, so now that we have this, you could add more green lights to places such as the
ones we added here. But these flowers are too small, so I'm just going
to add a couple here, a couple there,
but that's it. So I'm going to add
maybe one here. Let's make it a bit
bigger. There you go. So one here, one here, one here. And I think that would
be pretty much it. Now maybe you could
add more here, for example, the
leaves and everything. But I think so far, these are details that
are not that important. Perfect. Now we're going
to add a cork texture. Yes, it's from my peg rough
and row two point oh. And it is I kind of resembles some
kind of a cork texture. Actually took it from real cork. So I'm just going to Oh, no, it was from my ultimate
background set. Yeah. Okay, so I will
select a dark color, go on top of everything else. And with the cork, I'm just gonna add an overall
texture like this. And now that we have it here, I'm just going to lower
the opacity down. You can try also
different modes. I like the hard light one. Or the darker modes as well. What you could try as well is to tap on it, tap on it clear. And then you could try
maybe another color, maybe, like, let's try this red. Let's see what happens
with the red color. There. Now let's try different modes, as well. See what happens. You know what I think
I'm just gonna put a multiply mode.
I like this red. I'm just gonna bring
the opacity down. It's there, but it's
not there, okay? It's always like
that for texture. I should never overpower the
illustration. I like this. Perfect. Now I'm gonna
create a new layer, and I'm gonna drag it on
the background down here. Well, actually, you could
bring it on top of the sketch. It's still at the bottom. Now here with the soft texture, we try to add a bit of a
darker tone here down, maybe like a green or
maybe like a pink. What do you think? Maybe
we try some kind of a pink color down here
and then white up. I think because, you know, we're talking about this
kind of, like, pinkish dawn. So I think maybe it
would look good to add just a bit of this little shadow up down, sorry. Down here. And then, you know, you could add white up here.
Could make it darker. You can just try things
and see what happens. You see, I don't want
to go that dark, but a little bit of a pink
I think looks pretty good. I always try to
combine it with white and so it doesn't overpower.
Great. We have it. Now, turn off the main texture and turn off this texture
and turn off the background. Then I think we
forgot one texture. Which one is it?
This one right here. Great. You see how different this looks
without the texture. It really looks modern and
obviously we didn't want that. So now, go to actions,
add copy canvas. Great. Now, turn on
everything that we just turned off. This
is in the background. Now here, right on
the background, put three fingers on
the screen and paste. Now we've got this, you see, all our effect here. I'm actually going to put
it on top of my texture. And this is a layer
that contains all of our illustration
and lettering. Now go to adjustments, hue, saturation and brightness and bring the brightness
down to zero. You're gonna see here,
and now it's dark. Great. Now I want to
move this slightly. Here. Just a bit. Go to adjustments, Motion blur. And from here till here, drag your pencil just a bit. There. I'll do the
same with Gausionblur. Just a bit. Now, this maybe we could add, like, a green shadow, something like this, so it's not overpowering everything else. And then you can select
the mode, maybe multiply. And make it so it's not
super visible, right? I want it, but really,
I don't want much. You know, just a little bit.
A little bit like that. This is good enough.
Yeah, that's fine. Little bit lesser. Great. Now that we have
this, go to actions, copy canvas, and then on
top of everything else, three fingers on
the screen, paste. Now, here we've got
the whole artwork. And since I wanted to look even a little bit more retro, I'm gonna go to adjustments. Noise. And I'm going to add
a bit of noise, just a bit. Maybe like 14%,
something like that, and now go to adjustments again and go to
chromatic aberration. Now, from here to center, let's add just a little bit of
a chromatic aberration. And this would be
our final piece. Now I'm going to go to actions. Copy Canvas again,
to show you what happens when I put this
one next to the N clay. Um, artwork from
the first class. I'm gonna go to gallery, and
I'm going to show you what I did with my Nu cla Artwork. So, this is what we had before. This is the style that you
actually came up with. Probably you added textures. I saw some of you
adding textures. But if you didn't, you can add them now using the same steps that
I showed you before. So this would be the comparison between
one and the other. Nothing much changes, some hierarchy of elements,
you can see here. You can see here some of
these things in depth, this circle, just as I did in the last
steps in this class. Now what happens if I go to these that I
prepared already here. And I put three fingers
down screen and paste. Remember that we
copied the canvas. Now, let's make it the same big. With the uniform and
the snapping tools on, let's bring it here. And here we've got the second poster of
our art nouveau series.
11. See you next time!: And that's a rep.
You just created a rich lettering piece
in Arnbau style. And more than that, you build something that
belongs in series. I hope this piece felt like a
natural continuation of the first one we created in the first class or the
start of something new, if this was your
first class with me. Don't forget to
upload your project, so I can see your progress, whether it's just a sketch, a final export or your
own matching series. And also, if you have any
questions, please let me know. And if you're curious
about my classes, feel free to check out
the first Arnoba class if you didn't check it out yet, or browse my page for more
lettering Shenanigans. Marci Baucu and I'll see
you in the next one. Bye.
 Jimbo Bernaus - Shoutbam, Letterer & Designer