Transcripts
1. Welcome to the Class: One of the most beautiful things about handcraft in projects is that when you do a product with your own hands
from scratch, you start building a
connection between the object you're
doing and yourself. This object, no matter how small or big, lightweight or heavy, will always reflect
your very own style in its design almost
like a signature. Leather crafting is no
different from this experience. Every handmade leather
good is unique. Even if you're doing
the exact same project, you know the story of each
one one them and you'll have a strong unique connection
with each in particular. Hi, my name is David. I'm an industrial
designer from Mexico. Over the last eight years, I've been working as a
leather crafter. What started as a
hobby soon became a side business which I've been working on every single day. Besides having my leather
craft in business, I also work full time as a design professor at the
University of Monterrey. Here I teach classes such
as product sketching, word and polymers handling, prototyping and many others. What I like about being part of the Skillshare community is that it allows me to combine
two of my greatest passions, which are obviously leather
crafting and teaching. Because of this, I
feel myself very fortunate to do what I
love in a double dose. Today, I want to share part of my experience with you with this fun project
that will help you not only to enhance
your craftsman skills, but to look at leather
outside the box, so to speak. This is because we all know
leather is used in wallets, bags, and clothings,
and accessories. But there's so much more
you can do with it. In this class, I want to show you just that with this project. The project for this
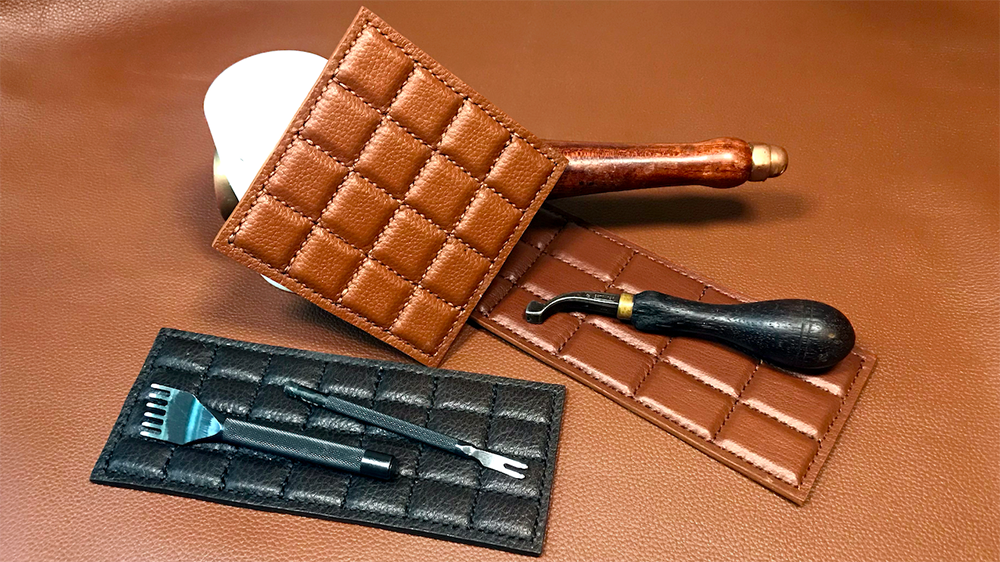
class will be to make your own leather
chocolate bar from scratch so you can use them as coasters or give them as a
gift to someone special. In this class, you'll
learn how to create your own template for the
project we'll be doing. Of course, the methods
that you'll learn will be useful for future
projects you wish to do. You will also learn how to cut glue and stitch your
leather projects to give it a nice finish with some leather edge paint
and burnishing them. Besides the craftsman skills that you'll learn in this class, you will also enhance
your creativity as a crafter since you'll be working with leather
on a project that is uncommon to see in a good sense, of course, make it
even more original. Naturally, I'll provide
you with the links to some suppliers where you
can get the materials and tools for this
project and also share with you some of my
personal tricks that I found along the way as
a leather crafter so you can adopt and use them
on your behalf as well. Great. Without any further ado, let's get started and I'll
see you in the next lesson.
2. Introduction to the Project: [MUSIC] Great. Welcome back. Before going to the workbench, I want to talk to
you a little bit more about today's project. You see, years ago when I
started working with leather, I used to think that leather
was only used to make bags, shoes, wallets, and belts, the common products that
we're all familiar with. Of course, there are
more applications for rather than
those I mentioned. But I truly believe
this was all it was. I dedicated most of my time working on this project
as a leather craftsman. That was until I found the
template on how to build this amazing piggy bank out of vegetable-tanned
leather online. I immediately fell in
love with this project, purchase a template, and had an incredible time
work acquitted. It was such a beautiful
eureka moment and thought to myself, this is truly thinking outside the box when
leather working. These are the projects
that make leather crafting unique and
truly original, what inspired me to design
this class for you. Now making this piggy
bank does require some skill and hammering on curve leather and
cross stitching. Having previous knowledge on leather working is a huge plus, which is why I chose to
design a more simple project that is achievable for
anyone who wishes to learn, practice, and master new
skills or having tons of fun. As I went to the kitchen
to find any snacks, I found a chocolate bar and I knew that was going to be it. I designed the template, code, and prepared the leather, stitch the pieces, and gave the project
its final touches, keeping in mind always on how achievable this was for
anyone new in the field. I think it was a success. I finished leather coaster in the shape of a chocolate bar. Today, I want to show you exactly how I made this project. Go in front of the sign
of the template up to having your finished
product in no time. One important thing to consider is the tools required
for this project. I understand that learning
a new skill and using new tools can sometimes
be intimidating, which is why I tried to keep the essential list
of tools and it will guide you along the course
and how each one is used. My goal is that at the
end of this class, you master the basics of leather crafting through
a unique project. The best part of all
is that in the end, you can use the methods and
techniques you'll learn in this class to create your
own amazing projects. When you're ready, get
yourself some paper, a pencil and eraser, a pair of scissors, and a ruler, and let's begin to
design our template. See you in the next
lesson. [MUSIC]
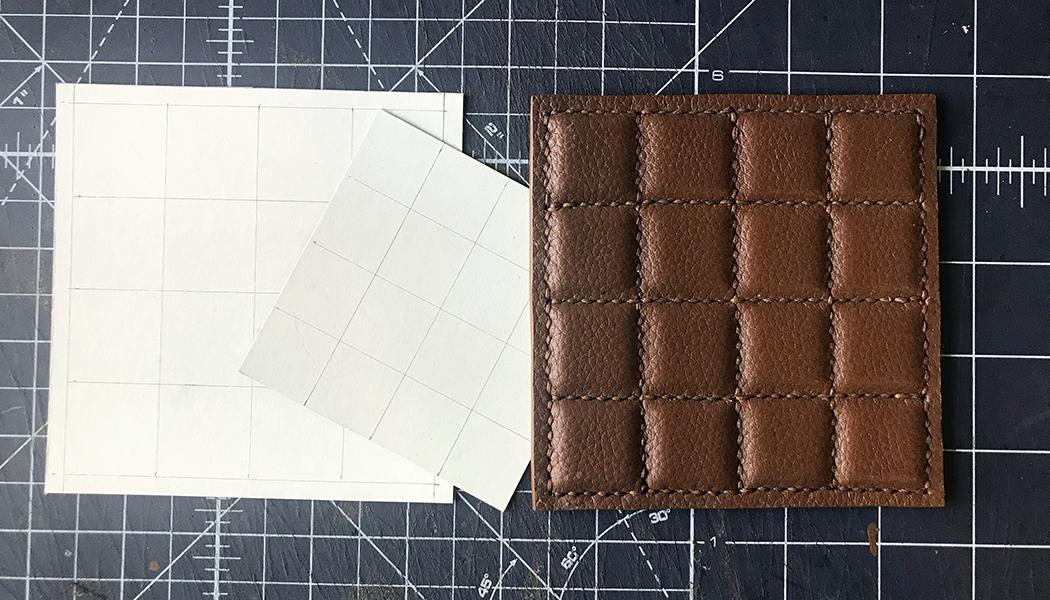
3. Designing the Template: Let's begin by
defining our template. The tools you'll need
for this include a cable paper or
card stock paper, one cutting ruler, a
mechanical or regular pencil, an Exacto knife
and your scissors. An eraser might
also come in handy. Now, you can work with any
paper really, however, I strongly suggest you
work with cable paper like the one I'm using in a
video or card stock. This is because these types
of papers are thicker and way more resistant
than regular bond paper. Cable paper in fact, is used by tailors when they're designing
bespoke clothing. Use your ruler to measure the total length and width
of your chocolate bar. In my case, it will measure
11 by 11 centimeters. Guide yourself with
your ruler and draw the limits of your design
with your mechanical pencil. [MUSIC] When you're done, the next thing is to
draw the stitching line that will go all around
the chocolate bar. It's important to establish this line first
since it's easier to then work on the design with the stitching limits
well established. Draw an offset of four
or five millimeters from the edge of the 11 centimeters
squared you just drew. [MUSIC] I'll actually use a secondary lighting for this. You'll notice the color
tone slightly different. It's important you have good
elimination when doing this so you know exactly where the lines will be
drawn on the paper. [MUSIC] When you're done, it's time to draw
the lines that will divide the chocolate
squares inside the bar. [MUSIC] When you have
all the vertical lines, do exactly the same for the horizontal lines
of the design. [MUSIC] Now, to get the template, you can either use
your cutting ruler and Exacto knife or scissors. I personally prefer to use
the exact same knife since it leaves the edges much more straight and using the scissors. But for this lesson,
I'll use both of them so you can
see the process. Whichever you prefer to use, remember to work
the cuts slowly. [MUSIC] We need to design
the small squares that will give the
bar its volume. This will be made out of
vegetable tanned leather and need to be smaller to give the leather enough space to ditch comfortably as
you'll see later. [MUSIC] Draw a new template
with small squares inside. In this case, the
small squares will measure 2 by 2 centimeters. [MUSIC] Again, use your cutting ruler, Exacto knife or scissors
to cut the template. [MUSIC] There you have it. The template is now
finished and ready to be used for our
project. [MUSIC]
4. A Surprise for You: [MUSIC] Awesome. Now that
we've designed our template, we can move on to
the workbench and start crafting our
leather project. In the following lessons, you'll learn how each of the tools and materials is used while working
with the project itself. I'll also share with
you the techniques and tips I've learned to craft not only this but any other leather
projects you want. Now in the project section, I've got a surprise for you. Just as in the previous lesson, you've designed the
template for this project, I also prepared three different chocolate bar designs for you. If you want to play
with different sizes and colors for your project, you can simply download
a PDF file and use them as reference to make different
sets of chocolate bars. I hope you find them useful. In the following lessons,
we're going to work exclusively on the
workbench and I'll start by showing you how
you can use these templates and glue them to caple
paper. See you there.
5. Preparing the Template: Let's get started
with our project. The first thing we need is
to have the template ready. The template for this
chocolate bar has two main parts; the upper one, which is the one we'll use to cut the inner
squares of the bar, which are going to enhance
the volume to the project, and the large section,
which is going to be used for cutting and repairing
the main leather piece. You'll also find
a small one inch square drawing that
you can use to verify that the dimensions of the template are good
when you print them. To do this, just use your ruler and make sure
the square measures one inch or 2.5 centimeters
vertically and horizontally. Before moving forward, always make sure that template measures what it's supposed to be by checking the dimensions
of this small square. When you share about
that, the next thing to do is to cut
out the template. You can use any type
of scissors for this. In the template you'll
notice there are three lines facing each of the main
edges perpendicularly. You can use these lines
to guide yourself on how far you need to
cut out the template. [MUSIC] When you're done
cutting this part, you can either work
with the template directly on the leather or
if you wish to keep it, you can glue it to a
stiffer papers such as very thin cardboard or a cable paper like
the one Ill be using. The good thing about
doing this is that your template will
last longer and you can use it several times if you wish to make more
chocolate bars later on. [MUSIC] Now, that this part
has been cut out, I'll be gluing it
to the cable paper. I'll actually going to be using the same glue that I normally use for work in the leather. You can use any type of glue
you want for this part. I normally use leather glue when doing this
because incredibly, this type of glue
helps the template gets very well fixed
to the cable paper. I haven't had any
issue with any piece of paper going lose
when using it. The only thing you
need to do is to make sure that all the area is well covered in glue so
that it won't come loose. [MUSIC] When gluing the papers together, you only need to apply
glue to one side. Again, doing this will help
you keep your template for a long time and use
it many more times. [MUSIC] Now we're going to cut the small section
and just make sure to cut outside the border or
edge lines of the template. Do not cut right over the edge, you'll
see why in a while. [MUSIC] When you're finished cutting out the template, the rest of the paper left
is not useful anymore, and you can once again
glue the side over some cable paper or
cardboard if you wish. Remember to cover
all the backside of the template we glue so it
sticks well to the cardboard. [MUSIC] Again, flip the paper, stick it to the cable paper, and press it with
your fingers until it's completely flat
and well glued. [MUSIC] When you're finished, you can check if
there's any excess of cardboard and just cut it out and even round the edges so it's more comfortable
to work with. [MUSIC] As you can see, there was a very
easy step to do, and we have your template ready, we can now move forward to work directly with a leather
in the next lessons.
6. Making the Small Squares: Let's begin with the small
squares that are going to be glued behind the main site. These squares will give the
chocolate bar more volume. To make the squares,
we're going to use some vegetable-tanned
leather. I have a small pacing here just enough to fit the template, and this is a 1.2 millimeter
thick rectangular. What we're using now is a scratch all and you
want to make sure that your template
is well-positioned and placed firmly
over the leather, and we're just crush all, you want to mark the four
edges of the template, as well as the points where
the lines of the edges of the squares reach the
edge of the template. This is going to be
very important since the holes are going
to be aligned with the edge and are
going to serve as a guide to where to mark
the lines of the squares. Just make sure the holes
are well marked in the leather and are visible
enough as you can see here. Again, make sure that template doesn't move while you're
making the points. [MUSIC] When you
remove the template, you'll notice that this type of leather marks really easily, and if the marks are visible
enough, that's all you need. To mark the lines,
you're going to need your ruler and
your scratch hole. First mark inner lines
of a template by connecting the marks that are on the opposite side
from one another. What you want to do is to create a grid you can see in the
template design first. At the end, we're going to worry about the edge lines
with a template. [MUSIC] Let's begin with the first, second, and third lines. They're all going to be parallel and slightly marked
on the leather. [MUSIC] Do exactly the same with
the other lines that will show up perpendicularly to the first one is
you just marked. [MUSIC] When you're
done with this lines, you can now focus
on the entire edge. To cut the edges you're cutting
ruler and Exacto knife, this doesn't need to be any
special or fancy knife. Just make sure the
blade is a well sharpened and be careful
while according to the level. First, place a ruler in a position where the
first edge will be cut. You'll know you're well
aligned when the ruler passes through all the points of line and mark in that space. When you're sure you're about
to cut the line straight, make sure the ruler doesn't move and it's firmly
pressed over the leather, then cut your leather
carefully with your knife. [MUSIC] Do this for the rest of the edges of the template. You'll notice I'm using the
ruler downwards in the video. This is because
first, in this way, the metal is pressing
firmly over the leather, and this allows our leather
to stay fixed while cutting. Invertible term leather, this isn't much of a problem since it's a more
stiff type of leather, but a more flexible ones, this can have a huge impact in your card since their
flexibility can ruin them. Second, the cork of this ruler
lifts the metal and casts a shadow of the leather
in a way in which I can not see exactly
where the cutting line is, so the cuts may end up
looking really bad. But whatever the brand of
cutting that you're using, try to go slow with your
Exacto knife and your cuts, and makes sure the blade
is well sharpened. Well sharpened blades will avoid your using more force than necessary into the cuts which can result in
a leather bending, or moving and potentially
harming yourself as well. There's no need to rush
while making this project. Remember to enjoy it since it's a fun one to make
in the first place. I have the edges of the
template to cut out. The next thing to do is to cut them in a vertical manner, so you can then cut
each cube individually. Place your ruler
over the mark lines of your template and
begin to cut them in straight lines all the
way through the leather. [MUSIC] When you're done,
start cutting each cube individually until you have all these small
cubes cut and ready. Since you've marked
all the lines with your scratch,
all in the leather, the vertical strips of the
leather you just got out, will have the line marked
where to cut each cube. [MUSIC] Now, when you have
all your cubes cut out, you'll notice how the edges have straight and sharp angle, which is natural since we just cut them straight with
our Exacto knife. But what we're going to do
next is to round these edges. To do this, we'll use
our edge doubler, which is the tool you're seeing, and what it does is
it takes out leather from the edge and
leaves it very rounded. When you put them in leather
on top of the cubes, you will have a more natural
and softer appearance than are very pointed
edge would do. Rub your edge parameters and begin rounding all the edges, as you can see in
the video, until you have your cubes ready. I'm using a number to say
what brand edge doubler. They're also number one
doublers that leave the round slightly less
pronounced as well. [MUSIC] When you have
all the pieces ready, you can continue to glue
them to the backside of the main leather part which we'll be doing in the
next lesson. [MUSIC]
7. Making the Front Side: Let's begin to work with
the main leather part. This is going to be the upper
side of a chocolate bar. For this project, I'm
going to be using this beautiful texture
brown leather. You can also use any
leather without texture. It's completely a
personal choice. I personally want
to use this type of leather since I like the
way it looks overall. [MUSIC] What I'm
going to do now, is I'm going to mark
some small holes that will indicate relevant
points to the design. With my scratch all
I'm also going to mark the four points
of the outer edges, as well as the inner edges and the intersections of
the lines that cross all the way through
the chocolate bar and reach up the
inner edge lines. All of these points are very important to mark since
they will tell us where we need to cut the leather and punch the stitching holes. [MUSIC] Place the template over the leather
and begin marking the outer edge points
with your scratch all. Then continue your way with
a four inner edge points, and the points where the lines touch the edge lines
of the design. While you're doing this, make sure your template is as fixed as possible
over the leather. Use one hand to press it
over the leather while you punch the small holes with your scratch all
with the other one. One advantage of doing this, is that if you wish to make
another chocolate bar, you can reuse your template and it will be easier
for you to mark the points since they have already been punched
with the scratch all. [MUSIC] When you're done and depending on the
leather you're using, you might notice the points
are not so visible at first, so we need to mark
the lines where we're going to be
stitching the project, and also the outer lines where we're going
to be cutting it. Is very important to
mark these lines well, and to do this, we'll be using a ruler and
scratch all once again. [MUSIC] To do this, place your ruler
over the leather, making sure it passes in
a straight line between two points where you
want to mark the line. Then, we use scratch all, mark it wide on the leather. In this case, it's
better to first mark the inner lines of the
chocolate squares, because when we
mark the sidelines, this will show the
points where we need to finish and start
this previous lines. This point will be very hard to find where a line passing
right through them. [MUSIC] Then move on with the inner sides
of the design. When you're doing this, you only need the leather to be marked. No need to over scratch it. Also don't worry about
how it looks right now. These lines are not
going to be seen in the end since
they'll be stitch over. Also because the leather
is considerably thick, this scratches will not cut
or damaged your leather. They will only scratch
the upper layer of the hide where the
texture is present, not where the fibers
of the letter are. Now, continue with the
rest of the sidelines. Among the scratches and
textures of the leather, it might be very
challenging to find the marks we previously
did. Take your time. Remember, there's no rush
in finishing this project, rather enjoy the process. If you get to a line where there isn't anything else
to be marked near, you can directly cut the
leather with your Exacto knife. Using your Exacto knife
in this part, well, ensure you make a
neat straight cut. You can now cut
your chocolate bar from the outer side lines. If there's any excess of
leather that is on the way, you can cut it out first and then move on to cut the
rest of the leather. [MUSIC] Place your ruler over the line you
wish to cut out, and always double-check you are about to cut the
correct line and the Exacto knife will
pass through the points and lines you mark
with your scratch all. You want to press your
ruler over the leather comfortably and
firmly so that when you're cutting the
rather the pressure you are applying the
leather and the ruler with your knife doesn't move the ruler and potentially
ruins your cut. [MUSIC] There it is. Now, we can begin to punch
the stitching holes. To do this, we'll be using
our diamond chisels. Poly block and poly mallet. Place your leather on
top of your poly block. To begin with, you need to make sure that the stitching
holes that will go on the edge of the
square coincide with the lines that cross all the
way through the surface. [MUSIC] As you can see, the chisel I'm using will
make the holes coincide. If not, however,
you can also use your two prong chisel
to force the letter a little bit to make this holds right on the points where
we want them to be. Now, when you start
to punch the leather, you can start with the inner lines of the
squares to make sure that the first and last
holes correspond to the line where the holes
of the edges will be. In this case, if you need to force the leather
a little bit more, you can always do so with
your two prong chisel. Also when you're doing this, try to make the
stitching holes of the crossing lines to
coincide between them. However, if this
is not possible, the most important thing
to do is to make sure that the first and last
stitching hole do pass right through the
stitching edge of the design. This will make the project look much more professional
in the end. [MUSIC] Now, if you don't have a poly block, you can also use a cutting mat and it
will do the job well. In fact, as you can tell, I've been using this small
mat to punch the leather, and what I like about this mat is that they are
very thin and soft. So they don't damage your chisels and leave the
hole is very well-marked. Sometimes even better
than a poly block. The downside, however,
is that you need to replace them more
often than the blocks. [MUSIC] When you're finished
punching on one side, just move on to the
other ones and make sure the holes coincide
as much as possible. If everything is looking good, you can continue to punch
the rest of the holes. [MUSIC] This is a very relaxing
activity actually. When you've finished
with the inner lines, move on to the punch the
hole from the outer lines. [MUSIC] Beginning one edge of the design and guide yourself with the line
and holes you just did. Just go around the entire
square and when you're ready, you can see how
the leather peace actually looks very neat. [MUSIC] You can see that some of the points in
the crossings do coincide in the middle of the leather
while some others don't. Again, don't worry
too much of this happens on the inside
of the chocolate bar. However, look how on the edge all the holes are well
marked in a straight line, and have an even
distance between them, and that's exactly
what you want. [MUSIC] In the next lesson, we're going to glue
the small squares with it previously, this piece, and you're going to see how the volume of the bar actually
begins to form. [MUSIC]
8. Glueing the Small Squares: [MUSIC] Now we're ready to start gluing the small squares. We're going to glue them to the backside of
the brown leather. The way to do this is by joining the front part of the
vegetable-turn leather, where we have all the edges with the backside of the
main leather piece. When it's glued, it will have
a very nice round effect. We're going to guide
ourselves with the marks that were
left in the back, thanks to the whole way punch
with our diamond chisels. If you wish to mark
them even more, you can do so with
a leather pen. The way to get the
parts is to put glue on the back
side of the letter, just enough where the
squares will sit. Do not put glue in all the
surface of the main piece. We'll do that later on. But right now, just focus on the spaces where the
squares will go. Also, cover the small squares with glue on the nice
part of the leather. This squares should be all covered with glue as
you see in the video. When both parts have glue, you can place each square in
their corresponding place. Now depending on the type
of glue you're using, you need to apply glue to both leather parts
before joining. With most glues
I've used and know, this is the way to do it so the pieces stay well
glued together. You can use a brush or a glue applicator if you
wish to do this. I like using my
fingers because I feel I have more
control over the glue. Normally, leather
glues are gentle and safe to use with
direct contact, especially the ones used for
shoe-making like this one. However, always check the glue's specifications
before using it. One thing is for sure though, always work in a well
ventilated area, regardless if the glue
smells a lot or not. You can see how the main
leather piece is getting some stiffness from
the front side. Thanks to this course,
you've just glued to it. When you're doing this,
make sure there are no leftovers from the babbling that might get glued
between the letters. They will stand out if
there are some attached to the main parts so make
sure it's all cleaned up. There it is, the last one.
When you're finished, close your blue bottle
and now you should have your arrangement
looking like this. In the next lesson, we'll
glue this assembly with the backside we've prepared from vegetable tanned leather.
9. Making the Backside: [MUSIC] In this lesson, we'll see how to prepare the backside of
the chocolate bar. This is a pacer that is
going to be in contact with other types of
surfaces like tables. One thing we need
to have in mind is because we're going to be using vegetable-tanned leather, this type of leather
in its natural state will develop a very
nice patina over time. But it also absorbs a
lot of oils and tends to stain if it is in contact
with water or other liquids. I want to protect this leather
from external elements. What we're going to do is to add a wax solution called
carnauba creme. What I'm going to use is this Fiebing's
carnauba creme and use a clean cloth to generously apply it to the surface
of the leather. [MUSIC] You can grab any
type of cotton cloth, even an unused shirt, and try to cover
the entire area, the leather with carnauba cream. You can lift the edges
on covers since at the end they will be
cut out and we only need enough to cover
the area where the main leather piece will
be stitched to the base. [MUSIC] When you're finished, let the cream sit there for around 20 minutes until you see the color becomes more even
and feels right to the touch. [MUSIC] Then with a
clean piece of cloth, buff the entire surface
of the leather. What you're going
to do with this is to polish the surface and you'll notice it becomes shiny and even feels really smooth. What this cream does is to seal the entire leather and
protect it from humidity and external elements
that might stain the leather and will also give
the leather a nice finish. [MUSIC] When you're finished, you can leave this piece
aside for a moment and move on to work with the other
pieces in the next lesson, and then we'll come back to it.
10. Achievements So Far: [MUSIC] Hey there,
how are you doing? Before moving forward,
I want to take the time with you to
reflect on how much we have achieved so far and how much you have learned
during these lessons. Up to now, we've
learned how to easily design our template
using a ruler, a mechanical pencil,
and a cutting knife. We've seen how to prepare our different types of
leather for our project, how to cut them, glue them, and visualize
how our project will end up looking after just a
few more steps we need to do. When you think about it,
this is actually a lot. You're about to finish your
first leather project that was completely assigned
by you from scratch. The best part of this is that these techniques and
methods you've seen are employed exactly the same when making any other
leather product. Of course, there's a big
difference of the templates and material between making a
handmade wallet and a handbag, but the methods of handling
the leather follows the same principles
you've learned so far. I just wanted to take this time to reflect with you on this, since I believe it's
important that we understand how much how we learned
throughout our journey. In the following lessons, we'll see how to glue and stitch all leather sides and
then paint the edges of our chocolate bar.
See you there. [MUSIC]
11. Glueing Both Sides Together: Great. Now let's glue both the backside and
the main part together. One thing you'll notice is that chocolate bars have a
rectangular volume. This is partly yes, because of these small
rectangular pieces that we just glued in the inner
part of the main piece. But also this effect
can be enhanced by using some tools to mark the
separation of the squares. You can use any tool you
wish that's going to help you press the leather
between the squares, just make sure it's not sharp or can potentially
damage your leather. Examples of adequate tools are wooden edge furnitures, molders, the backside of a
leather hammer, the backside of your cutter, which is usually around shape plastic, or
even your fingers. [MUSIC] For this project, I'll be using a medium-size
molder I've got since it's a very comfortable
tool to use for this job. To glue both sides together we need to glue all the areas of the sides that are
going to be in contact with one another, meaning the inner sides
of the leather pieces. We can start by covering
all the squares and spaces that are now on the backside
of the main part with glue. We also need to cover the edges and sides of the
backside of this part, and this will be
reinforced with glue, once I've done
covering the rest. Just make sure all the
areas are well covered. When covering the side with glue this doesn't mean they need to be tampered or soaked
in glue with excess. They just need to have enough to stick well with the other side. Reinforce the edges and sides. You want to have
both sides as fixed and join as possible when
working with this project. When you're done doing this, repeat the process
with the back part of the vegetable tan leather that you'll use for the
backside of the project. Again, make sure all the space is well
covered with glue. When you're finished,
place your glue aside and flip your main parts so the sides with glue face each other and join
them together. [MUSIC] Start pressing with your fingers all the squares and also begin
pressing the edges to the backside of the
vegetable tan leather with your fingers or your tool. When you're finished, your piece should look something like this and you can begin pressing the spaces
between the squares. Yes, your project
will be stitch and the stitches will help
enhance this geometry. But by pressing them, it does help them quite a lot to get a nice sharp square
shape in the end. If you don't have any
tool to help you with, you can use your bare
fingers to do this, though, with the help
of a molder or tool, it's much easier and
comfortable to do so. They also help you leave the
squares way more marked. [MUSIC] If you happen to get yourself a
leather hammer, these are great tools since
the heads usually come in a convex shape and
are very well-polished. This protects the
leather when pressing it and from any scratches
when working with it. [MUSIC] When you're ready, with your chocolate bar
glued and pressed together, we'll continue to
punch the holes for stitching both sides
together in the next lesson.
12. Making the Stitching Holes: Now that the leather has
been pressed down and the edges have been
weld with the sides, we can continue by punching
the entire assembly. What we're going to
do is we're going to use again our diamond chisels. But this time we're
going to guide ourselves with the stitching holes
we've already made. There's no need to draw or mark anything else on the
leather for this. We only need to re-punch
the entire assembly. I suggest you start by
punching the edges of the piece because the
edges will clearly define the limits where the
assembly will be stitched together and while you don't necessarily begin
stitching the edges, this does help to align and fix the leather
slightly even more. [MUSIC] You can alternate between the large and
small chisels at anytime. The important thing is
to make sure we punch the holes as they have
been previously marked. [MUSIC] You'll notice the backside will have a very straight
punching line because of the work we previously did when punching the
main part alone. Go ahead and finish punching the hole for the
entire perimeter. [MUSIC] There it is. In the next lesson, we'll see how to stitch our
project. [MUSIC]
13. Stitching the Leather: [MUSIC] Now that we have
glued both sides together, we can either start stitching the chocolate bar where
we've already punched a hole through or start
punching more holes in the center to begin
stitching our project. In fact, that's actually how I'm going to start
stitching the sides together from the central lines instead of the edge lines
so you can see what I mean. Also by doing this, you're absolutely
sure both leathers are well fixed between them. In reality, there shouldn't be any problem with all the glue we've just applied
to the leather. But doing this is more like
a double-check on this. [MUSIC] Now, to know how much
thread you're going to need on every line, measure the total
distance of that line, and multiply that number by 4, then add an extra 20-30
centimeters to the total length, so you can work comfortably with the needles when stitching. Before punching holes in
the middle of the square, you might want to press again the leather with your
fingers in between the square so that the
leather stays fixed while punching and
stitching later on. [MUSIC] For this project, we'll be using this polyester
thread using the video. This type of thread is
actually really great, especially when you start
working with other, since it has a nice
amount of wax on it, and that helps you
work much more comfortably than
with lime thread. What I'm using is this
Ritzer 25 thread, better known as Tiger Fred in Havana cigar color and size 0.8. The final amount of thread
I'll be using to stich the first line is going
to be 40 centimeters. To that amount, I'll be adding an extra 20-30 centimeters
to work comfortably, and this distance
will be the same for all the straight simple lines
that are inside the square. The needles I'll be
using are a pair of John James size 002. These are really great needles. But if you wish to
try other brands you feel more comfortable working
with, that's also great. The way to prepare your
thread with the needles is to first pass one edge of your thread through the
hole of the first needle, pass it so you
have enough of it, so you can stitch the thread with the
point that the needle. It is very important to stitch the needle
as you see here. [MUSIC] Once you've done this, pull the thread backwards to the needle hole and started
pulling it back until the small excess
of the thread can be pulled completely
through the needle and locks the thread with itself on the back of the
whole of the needle. Then repeat the process
with the other side and the second needle as you
can see in the video. [MUSIC] When you're ready, you can now punch
the stitching holes of the leather while
you'll begin stitching. Because we have already punched the holes of the leather
side previously, these holes will serve you
as a guide on where to place a chisel and punch a hole through the
entire assembly. The good thing is that the
holes are now well-marked. They're not going to move or anything and they're
going to guide you really need over the
stitching holes you need to do. When you're making the
stitching holes, once again, just make sure the chisels fit well on every hole
you previously did. [MUSIC] When you're done, you can start stitching
your first line. To begin with, pass your first needle
through the first hole and make sure that both sides of the thread measure the same. Then pass the first thread
through the second hole but don't pass all the metal to
the other side just yet. Leave the needle
inside the leather, and with the other needle, pull the needle and insert the second needle through the same hole in
front of the thread. You can pull the thread
back a little with your fingers so that the
needle passes in front of it. [MUSIC] Then finally, you just need to
pull the thread on both sides to close
the first stitch, and then pull again
the thread to fix the stitch well
to the leather. [MUSIC] Now, repeat the process
for the second hole. Pass the first needle through the hole, grab the needle, and pull the thread backwards
with your fingers so that the second needle
can pass through the hole in front of the thread. Now, I personally like to use this method of crossing
the needles when pulling the first needle from the
leather because it's easier and faster to pass the second needle since you already have
it in your fingers. Finally, pull both threads until they're well fixed
in the second hole. You're going to repeat
the process all the way through the
end of the line, and when you're done, you'll need to
reinforce this stitch and cut the axis of
thread there is. To do this, go back 1/2 stitches so the
thread is firmly fixed. We're going to do
exactly the same process but backwards, one
stitching hole, and then the threaded lies
on the front of the design, we're going to pass it
through the next hole, but only that thread. Both threads are now
on the backside of the chocolate bar and are not visible on the
front. [MUSIC] There it is. You
can see how clean the stitching on the front
of the project looks. The only thing left to do, is to cut the excess
of thread on the back. [MUSIC] Cut this excess
with your scissors, and with a lighter, try to burn any tiny excess of thread left, and use any piece of metal like your own scissors to press and
flatten the thread excess. This will prevent
any threads from coming loose in your
other projects. [MUSIC] Now, repeat the
same process with a perpendicular line from the center of the chocolate bar. [MUSIC] When you get to the
middle of the process of punching the holes, you don't want to punch the space that is
already stitched. So carefully move your way using the chisel that is most
convenient for you at a time. For instance, if the
stitching hole that it was previously marked has
been hidden from view, you might want to use
your two branches so to punch it carefully. But if the stitching holes are well-defined and fit
the large chisel well, then carry on using that chisel. The point here is
be careful with the stitches that have
already been made so that you don't pass your
chisel through those already stitching holes once again
and damage the thread. [MUSIC] Then repeat the
stitching process once more for this line. [MUSIC] There it is. The second line of the project,
stitched and finished. [MUSIC] Now, we're going to focus on
stitching the sides of the chocolate bar before stitching the rest
of the inner lines. Try to stitch the
sides on one goal. It's way faster this way and the stitching looks much nicer. Once again, measure the entire length that
you will stitch, multiply that by 4 and add 20-30 centimeters
of extra thread. Adding this extra thread
is very convenient, not only because it's way
comfortable to handle the needles as they get closer to the end
of the stitching, but also because you make sure you have enough
thread to finish your project without
having to prepare a more thread to finish
a small portion left. To start stitching the edge, I suggest you always start on one edge and move along
the entire perimeter. There's going to be a
point where you'll meet the first stage of the
lines you just did. In this case, just stitch that hole naturally as
if nothing happened. The holes are wide enough to fit this new stitch
without a problem. Actually, by doing this, all the threads will
look like they were part of the same stitching
since there'll be together on the
same stitching hole making your project live more clean and natural and effect. [MUSIC] Now, we've reached a
second edge of the bar. If by accident you happen to stitch the thread
inside the leather, you can unstitch it by pushing the needle backwards
through the hole. This will make the
thread to come loose from the needle through the tape and you can continue
to work your way through. Stitching this thread like that is actually quite common, so don't worry if
that happens to you. When I started
working with leather, this happened to
me all the time. One way to prevent this and know you're not stitching the thread when
passing the needle, is to pull a small
amount of thread through the hole once you place the
second needle in position. If the needle and
thread move together, the stitched thread
will come along with a needle and you can
easily unstitch it. [MUSIC] When you reach the edge, just flip your
project to work more comfortably and continue
stitching the sites. Let's continue to stitch your
project until the end now. [MUSIC] When you're finished
stitching the sides, remember to backstage
1.5 stitch, cut the excess of thread, and burn the tip of any excess of thread
left on the backside. [MUSIC] There you have the
anterior side stitched. Now, repeat the same process
for the inner lines left. Remember, if you're
stitching the lines and the next stitching
hole happens to cross a previous stitch, you can stitch right through
it without any problem. If the stitching
hole is actually not aligned to the
line you're stitching, you can move forward and simply jump the stitch
to the next hole. [MUSIC]
14. Painting the Edges: Now that you have
your chocolate bar cut out and prepared, the last thing to do is to paint the edges and polish them. What I'm using to
paint this project Vernis heatable paint. This particular one
is in cognac color, which is the closest color to the leather we've been using. I'll be using a paint
applicator to apply the paint to all the
edges of the project. Before doing so, however, I want to stress
out the importance of maintaining your tools clean and ready whenever
you are going to use them. [MUSIC] As you can see, this edge applicator
has a lot of paint all over its surface and it's
okay for the handle. But when there's
paint on the tip, which is the one that carries
the paint to the leather, it becomes quite uncomfortable
to handle it properly. I just wanted to show you
that and I'm going to actually be using
another edge replicator. But when you have dried ink
that sticks to your tool, it doesn't help very well, so you just want to
be aware of that. [MUSIC] The edge
applicator I'll be using in this project has a different point
and you'll notice the difference since this one is cleaner than the other one. You can move way faster and
safer that way since the ink won't drip to the side and it's much more
comfortable to handle. When we're finished
painting the first side of your chocolate bar place your project in a
vertical position so the ink can sit and dry well. When it's done,
we're going to do exactly the same with the
rest of the sides now. [MUSIC] There you go. Now because I'm just
saying this paint, which is the same
color as the leather, it will make the chocolate
bar look more realistic. The first paint color we applied is going to dry relatively quick and it's going to feel quite irregular and rough
to the touch. That's because the
paint has been absorbed through the
fibers of the leather. However, the second
coat will feel smoother because it will be
less absorbed to the fibers, and will dry directly
over the first coat. It is important to
give your project at least two coats of paint
to make them feel smooth. Just paint the other edges once more and let them rest
as you did before. This time, however, the
waiting time will be longer. If the first time the pain took around 5-10 minutes to dry, the second coat will need
at least 20 minutes. [MUSIC] You can see the difference between
the edges of the bar when using only
one and two coats. We want the chocolate
bar to have a nice polish edge
as much as possible, so it's always a good idea
to give it a third coating. You can leave your
project a two, but if you leave a third one, it's really going to
make the difference. Try to apply the
paint carefully since this time you will see some
surface tension because it's not going to be
absorbed to the leather anymore rather is going to
dry on top of the coats. The more paint you apply, the smoother will feel. [MUSIC] When you're finished applying the third coat, once again, let it sit this time for around
25-30 minutes at least before painting
the other edges and you're really going
to notice a difference. In fact, you can start
noticing it right now, how smooth it starts looking. Now that the paint has
dried in all the edges, we have the project
almost ready. You can see they
have become quite smooth and the matching
color for the paint, leather and stitch makes it look very even and
more realistic. The only thing left
to do is to decide on whether to keep the
edges made or polished. I'm going to give these edges a little polish with this edge burnishing gum from Tokonole. It's an excellent product. I strongly recommend you
make yourself one of these. The way to do it is you grab
a little with your finger, apply it to the surface, as you can see, and with a clean canvas cloth, you just rub it until you feel or hear a little cracking sound. You'll notice that the edge
has been published then. You can see how this edge shines more than the other
ones with this gum. You don't need to
repeat the process with the rest of the
edges and that's it. When you finish rubbing
and polishing the edges, you're done with
you're chocolate bar. [MUSIC] You can see how thin and comfortable the chocolate bar
looks and feels. I hope you have enjoyed it and now you can have some
fun with it. [MUSIC]
15. Conclusion and Final Project: Awesome. We've now reached
the end of our class. I hope you have enjoyed
this class and had a lot of fun while
working on your project. Leather is a great material
and when we think about it, we usually imagine other
products such as accessories, clothing, bells, or any
other common day objects. However, as you've
seen in this class, you can get very creative with this material and make
cool and unique stuff. Is now time for you to make
your own chocolate bar. Use the methods and
techniques you've learned in this class to create your
own amazing project. Remember that you can combine many different types
of letters and use the templates that are in the project section
at your convenience. When you're finished, don't
forget to upload your project in the project section so other students can
see it as well. Let me know your
thoughts on this class and also if you
want to learn how to make more leather crafts and enhance your
crafting skills, don't forget to
follow me here on Skillshare for more
unique leather projects. I also have classes on sketching and everyday
carry leather goods. Thank you so much for watching. I'll see you in the next
class. Have a great day.
 David Gonzalez, Industrial Designer