Transcripts
1. Welcome: Hey, friends. So today, we are working on creating stickers out of
landscape photos. So I hope you are ready to
dive in and have some fun. I'm Katie from Perch Handmade. We are going to go over Using procreate and
Adobe capture and affinity designer to bring our photos of our favorite
landscapes into digital form. And the best part is there
is no drawing today. It's all about just converting and using Q and saturation and turning those photos into
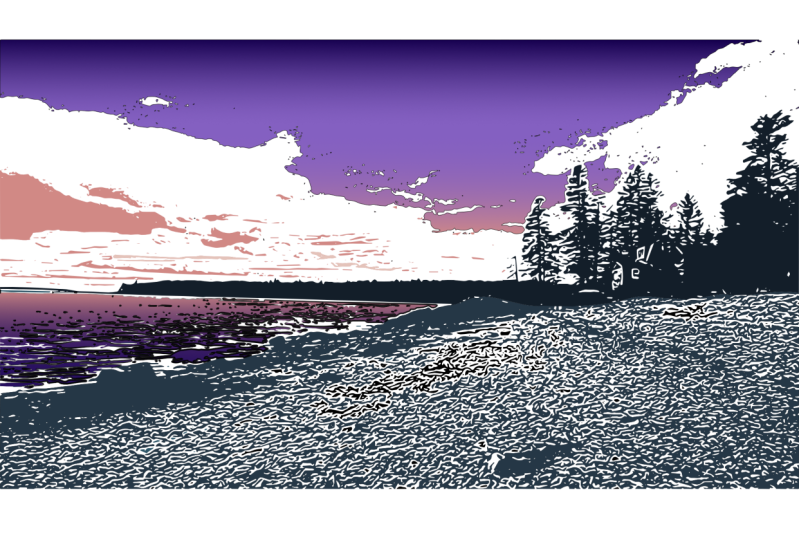
layered layered digital prints. They're not going to look
the same as your photo. It's not going to be all colorful and
beautiful like that, but they're going
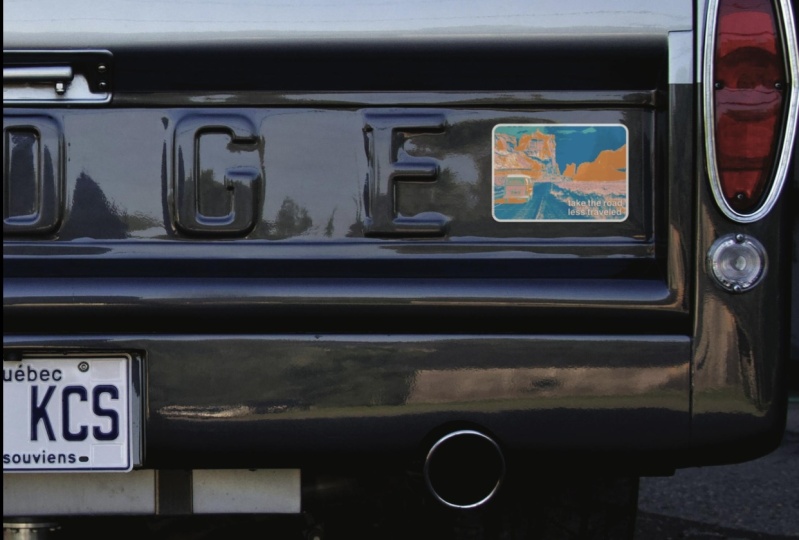
to be really fun in a new creative sort of way. And I don't know about you, but I love a good sticker, and I love putting them on my water bottles and
putting them into, selling them at stores and slapping them on
the back of my car, I have a few on my car. Not too many. Those are saved for really
precious fun stickers. Let's get going and we're going to dive into
this really fun class, I'm going to start off by
showing you how to prep your canvas and bring in
bring in your photos.
2. Prepping Your Landscape Canvas: First off, let me show you
your digital downloads. So here are your
digital downloads. This is what you get
when you take the class and you'll have at the bottom, you'll find your downloads, you'll get a color palette, and it'll show you
how to download them. I use No for this
and it's a free app to download and save
your save your files. I hope you have chosen your favorite landscape
photo and gotten your iPad ready
with procreate and Affinity Designer
and Adobe Capture. You have to have all three
of those for this class. We're also going to
go into sticker app and upload your final design
to create a fun sticker. I have given you an infinity
palette both in CYM K, which is great for
print and RGB, if you just want to
show off your artwork. RGB is best for
going on the web. If you need some inspiration, I have some landscapes in
splash that you can use. Let's open up splash. I have it saved in in my file, and I'm going to go
to the collection. For my landscapes, and this is what you guys have as well. And all of these photos, you can use freely
as long as you modify them and use your best practice to give
credit to the original artist. I love all the different ones. You know, This class
originated because of my love for where I live. This is looking over the
Halen Bay at Nicani Mountain, and I got it with a beautiful
rainbow in the background. And I I'm so blessed
to live where I live, and the magic of my area
is just incredible. Beyond the mountains,
we have the ocean, we have the forest,
we have the rivers, and I love getting out into nature into those
places to just ground myself and relax and
just enjoy my area. So I hope you guys have a
fun place that you love to. Let's go back here. So I'm
going to use this photo. It's best to use
something that has a higher contrast so that
you can create your layers. So I am going to just click the load button here and it will download
right into my photos. And I'm going to open my
photos, and here it is. And what I can do next is just share it right into procreate. I'm going to send it right over and I don't need
that one anymore, I don't need unsplash anymore, and I can open procreate and it's going to
import right in here. I like to have all of my
projects in an order. I'm going to move this into my landscapes spot and
pop it right here. So like I said, you just want to open it
directly into procreate, rather than rather than trying to set up a
canvas the right size. The great thing about Splash is you can download the photos at different sizes if you
download it from the app. On into your photos. It will download, I believe, at the very largest size. So if I come into
my actions button, we're going to show your canvas size by going to information and go
into dimensions. And there are your size
is, there's your DPI, you don't have to change the DPI because we're going to
be vectorizing later on. But it does make it easier for keeping it the
correct larger size. I guess it doesn't
matter anyway, but it helps when you're moving things in
and out appropriate. Let's go into our next
module where we're going to be enhancing the landscape and design and we'll do that there.
3. Enhance Your Landscape Design in Procreate : Let's get started, and we
are going to have fun just getting that going
and working on enhancing our design
in procreate first. Here we are. We have our photo. What I want to do is come up to my adjustments tool and I'm going to go to
Hue and Saturation, the first thing I
want to do is just bring the saturation
all the way down. When you're working and
vectorizing in adobe capture, it needs to be black and
white for your best picture. Now, that's all I'm
going to do here. I can darken or lighten it, but I think I'm just going to keep it here right around 50%. That's where it starts
at. You know what? Maybe I'll bring it back
up to 53 because I liked the contrast or the brightness
of the river right there. Then I can just hit my layer. Now I want to I'm going to do this really
quick and duplicate. Sorry. Then I'm
going to lock it. I want to keep my
original in case I do something with it
later. Now I'm going to go. Sorry, if I'm a little
flustered this morning, bring that saturation down, bring that up to about 53. Last night was a late
night for me with my kids for sports. I'm going to pop my glasses on so I can see what I'm doing. A little bit better. Do you guys need reading glasses
now? I sure do. Now let's duplicate
this layer and always duplicate the bottom layer for the best quality or
the original layer. I'm going to just
do this four times. I know from this
photo there aren't a whole lot of layers that
will be needed for this one. And I'm going to start by
turning off the top layers, and I'm going to work on
the very first layer. What I'm going to be trying
to do is change the hue and curves to make different
pieces of this photo. When I layer it in a finite designer later
with our different colors, then we can have them
all in one spot. Let's go back up
to our adjustments and we're going to go to curves, and I'm going to keep it at Gamma and I'm going to
use my pencil for this. What I want to do is bring
some of the brightness up in different areas and bring the
contrast in another area. I really like the main outline here and maybe some of these clouds, some
of this background. When I go later to change these. This will just create more
texture in my picture and see how the different pieces
are just showing up here. I might do this a little bit
more this way. Let's see. Okay. Yeah. I don't think
I liked it at first. Because I like
this little bit of a definition happening
as well on the river. All of these pieces will
create more layers. Mm. Okay. I'm going to darken that
up because I want to have that to be separate and not
see the trees quite yet. Okay. So my first layer is done, I'm going to turn that one off
and go to my second layer, and we're going to
do the same thing. But this layer, we are going to make
a little bit lighter. Okay. And it's all about
just working with it, going back up to adjustments, going to my curves. And maybe now I want to show
off the pieces down below. Okay. And if you move
this around on here, it'll change as well, but keeping at the top and the very top and very bottom really
gives that definition. If you went over this way, then you're going to have
more background colors. But for now, I'm
still just working on these pieces up front. I think that one's pretty good. Let's see. Mm. Let's see. Oh, yeah, see, I
like the definition of the train tracks
happening on this one, and let's see what happens if I bring it all the way over. No. I like having that
definition there. I'm going to use that
for another one. I'm going to turn that off, turn this one back on, on the last one where I
went all the way over, I'm going to do
that again because that will help me to color in these areas later on
with affinity designer. It helps to create color
on the backgrounds. One thing you do
need to know is that when it goes into adobe
capture to vectorize, it will pixelate it
a little bit more. You've got to choose
which pieces you're going to which things you want colored in because that's going to be all one
solid color favor. Okay. Okay. And now, I'm already up
here at the top layer. I'm going to duplicate it because I'm realizing I
want a few more layers. So let's go here
again, go to curves. And let's see what happens when I bring it
all the way over here. I like just having some
of that definition. Let me look I'm going to turn that off and
see what I have for layers. I have the color here. Then I have the color here, which this one I think
needs to be a little bit darker so I can
get let's wait. I have the train tracks.
What else do I need? I need the trees. Let's work on getting these trees going. There we go. Yes. Okay. Let me look at all the
pieces I have happening. I have the layer here. I have the mountain. I have the train tracks. I have the background, and
I have the trees in front. Let me see if I can
do one more piece. Let's see what happens.
Have those guys. I feel like I can do one more. Oops. Don't need
to hit gradients. Curves. Okay. I think I just want one more a
little more definition on the rivers and the pieces
here. Yeah, yeah, yeah. Mm. Okay. Let me see where I'm at. Have
a little bit there. I have the trees. I
have my background. I feel like this one needs
to be done a tiny bit more. So let me duplicate it
and see what happens. This one I might
have to go back. So I can't duplicate that one
because it's already set. So I'm going to like this, and I'll duplicate it, lock it and see that's why we always keep an
original layer. Bring my hue saturation
by saturation down, my brightness up, tap again on the adjustments
and go to my curves. What other piece was I
looking at trying to do? I'm a lie, the river piece,
the background piece. So go to my curves. There we go. That's
what I needed to create a little
more background color. Okay. So I have one, two, three, four,
five, six layers. And all of these, when they're stacked
in affinity designer, will create that
layers of texture in our in our when we want
to make her stick Sorry. I'm working on a few hours
of sleep here. Bear with me. Okay. So we have
enhanced in procreate. That's all we're going to
do. That's it in Procreate. Now in the next lesson, we're going to be vectorizing
in adobe capture. Site, we will move into the next lesson and I'll
show you how to do that.
4. Vectorizing Your Design in Adobe Capture : In Adobe capture, we will be capturing and refining our image just a little bit more and turning
it into vectors. We will be uploading each of these six designs
as separate pieces. It just takes a
couple of minutes and I know it's a little
bit of a work around, but this is the best way to do it within affinity designer. Let's get started. I'm going to just send off each individual
layer one at a time. So we're going to use
our action tools, we're going to go to share, and we just need a JPEG.
That's all we need. If you can't find
it in the top here, you can hit more and maybe you can find adobe
capture in the bottom. Mine, I use it so often, so it's right in the top. Then I can hit post it
opens up adobe capture. And it says shapes
because we are going to be turning all of these
into vector shapes, since it's already pretty dark, you can come down or go up
and it'll fill in more space. I like to have a
little more definition and this little piece down here, I'm not crazy about it, but I can refine that
a little bit later. And I'm going to keep
it just a little bit lower than when it
originally popped in. Then you hit the check mark. Now this is where you
can refine and you can erase pieces or
draw in new pieces. If you need to
crop anything out, you're more than
welcome to do that. I'm going to keep it
all the same just because when it moves
into if Ineedy designer, we want it all the same size. So I want to fill in
this little space here. To fingers will
pinch to open it up, and then this is your brush. This isn't the best brush, and it's a little
finicky sometimes. But it does the job. So sometimes it'll add other
things across the screen, use your undo button. And I think that's okay. I do want to keep it
a little bit filled or a little more speculate. And see there just trying to
move that, put a line there. Then I hit done. And I know I probably don't
need those pieces here, so I'm just going to
erase those pieces. Like I said, sometimes
it's a little bit finicky. But you'll get it. Then
I'm going to hit done. You could hit smooth, but I usually don't do it because I want the rough pieces. If you hit smooth
and turn smooth on. First of all, it takes a
little bit because this is such a bigger thing and I lose some of fun
characteristics. I'm going to turn that off.
I'm going to hit refine. I love the species
that are happening. I'm going to hit save. And I keep mine in different files. So I'm going to change
mine to my landscape file. And I'm just going to hit one and hail and hit save. Now, it's in my file there. What I'm going to do,
slide up from the bottom, go back to procreate,
and I'm going to go on and do the next ones. Follow along, do
this with me or sit tight and watch the
process until I get done. I'm going to hit JP.
I'm going to go over to Adobe Capture, hit post, And this one, I do like the little bit extra
on the mountain there, but I want a little more
definition down here, so I'm just going to find
a little bit better place safe and to me. And since it's already I
did landscapes last time, it's going to go in there
and there we have that one. Now, this one, well, I'll have to resize it later because it didn't
have anything at top, they are going to go
in at different sizes. And one way you could
get around that is adding something
extra into the top. I might do that really
quick right now. It doesn't matter what it is. That one's going to go there. But this one, I'm going
to need something there. So I can erase those later. And I should have done
that for this one, but I didn't, and I will have to just resize properly later. So let's see how this
one pulls in into Adobe. JPEG capture. Adobe capture is great because it is one of
their free programs. This one didn't pull
in the river as much. Well, I guess it did if I
want to put it this way. So I think I am going to
I guess I have to decide. Do I want more texture in the clouds or do I want
more texture down below? I guess I could do it twice, but I feel like that's
a little redundant. Although I do like what's happening up above the mountain. I think I like that.
We're going to go here. I save three, and I can change the order in a finite
designer and a little bit. So slide up. Oh yes. That's what happened
there. Here, I'm going to go back to this layer. I put things in the corner, when it goes into
a find designer, it goes in at the same size, post, Well, this one was
all about the train tracks. So I want to decide how detailed I want the
train tracks to be. If I pull it down, then it's just you don't see very much. If I put it all the way up, then I lose some of it. So I think right about there. It's great. Hit save Sometimes the app gets slow. So let's see what happens. You might have to
do this one again and close out of Adobe capture. That's the easiest
way to do it. Post. Okay. So we have
all of our pieces. We have one, two,
three, four, five, six, and then that one, even though it was
having issues, it still saved it. So I'm going to just delete one and get rid of it because
we don't need all of them. One, two, three, four, five, six. There we go. Now, we're going to be going
into next lesson module, where we're going to be
layering and bringing in color into affinity designer. So if you're ready,
let's get started. Just look out my window. My cats on the pro. Hope she doesn't bring in any critters. It's a real possibility. Anyway, do you guys have cats?
5. Layering in Affinity Designer: Let's go into the next part
where we're going to be exporting from Adobe capture and importing it into
affinity designer. Let's go. All right. We're here. And we're just going to make sure that in affinity designer, it has to be not on a
project for it to import. I I have these projects
that are folders, and so I like mine to go into the folders that I'm
going to be working on. Here are some of my
landscapes already. And if you saw me
on social media, you'll see some of those, but I don't want a project open. I just want the folder open. Let's start with number one.
We're going to hit Share. We're going to hit export as
and we want it to be an SVG. Again, look for affinity
designer at the top. I'm now using Affinity
Designer two and if you need to go to more and look
for it in your suggestions. And there is our first one, and that one has the
full top and bottom. What I do like to
do right here right now is take a whole section And I'd like to create pieces or layers with it because if you
really look at this, I mean, look how many pieces
all these curves create. I'm going to now go to
the move tool and hit geometry and hit add that creates this whole
piece as one piece. All these little bits
create one piece. I'm going to do the same down
for each of these sections. Let's do this. Add. That way we don't
have so many pieces down below and I want to make
sure they're all connected. What I mean is all
these little dots. See how all these pieces. If you hit Add, it makes
it into one big piece. If I turn those off, then I can see where
my other curves are. I just move that, so I'm
going to turn that off. And then this piece here needs to be connected with some of
these other pieces. So what I can do is
turn this one back on. I'm going to hit
this piece here. Actually, I know what I'll do. It'll be easier if
I go from this one. This guy here, I'm
going to just lock it, my bottom piece,
I know that one's worked I'm going to lock
that and the top piece. I'm going to lock that one too. Now what I can do is select that and select
all those little pieces all around here and all around the bigger piece because I want to get all those
little pieces together. And then I'm going to add. I have one, two, I have one piece, two piece, three
pie, four pieces. Instead of so many
curves and layers, and now I'm going to keep that. I'm going to I'm
going to go out and I'm going to come to the hamburger and hit
save on this one. It's my number one
Nahalm I'm going to save the project Perch affinity
projects, fin landscapes. And then hit save. This is going to end
up being my main one, but all the other pieces are going to be put into this one. Again, I had to get out of the project before I
can import the second one. I'm going to get
rid of procreate. I don't need it anymore. Let's try this a
little bit faster, it or, has to be an SVG. It brings it into
its own new section. This is the one that was
bigger, and you know what? I can get rid of this one. Remember I was erasing it
and all the other pieces. I'm just going to
tap on this one and hit the delete button
or the garbage button. Now, I'm going to take this
bottom piece, hit the ad. I'm going to take this piece, I think can be a couple
pieces because some of it's water and some of its land. I'm going to turn that
into something else. While it's still highlighted, I'm going to come over
to find the layer, hit the three curves, and I'm going to lock it right away. Now when I go to get these other pieces down
here that are the water, it won't get that big piece. I can hit add. And let's see
what's happening in here. Then I'm going to grab
this guy and hit at because I know that's part of the boat. Let's see what I have. I have one. That's the boat. That's the top. That's
the bottom. Perfect. I have the four layers. What I need to do is
tap on the top one. Let me unlock double tap on the bottom one that gets
all of my pieces here. I'm going to hit the three
little dots here and hit copy. I'm going to go back out of this project back into
my Nehalem one project, and I'm going to hit paste. Now, remember what I was saying that because I didn't
have the top pieces, it's not bringing in the
right size. But that's okay. As long as I have my move tool, I'm going to bring it all
the way to the bottom. I'm going to see what that
first layer width is. So if I come over here, I know that the
width is 1,691.7. So I can come to
the other piece. I'm going to lock this one. One, two, three, four, this one to that one. I'm going to say I'm going to turn that so it
stays the same size. It was 1,691.7. And I want it to move from the bottom and move
to this base. Okay. There we go. Perfectly lined Did you
know vectors all about math and makes it really easy for getting things
the size you needed to be. Let's work on the other layers because that's in this one, I'm going to actually
make that a group too. I opened it back up and
the one, two, three, four, and I'm going to hit group and same with these
and I'm going to hit group. That way, I know the different layers
are grouped properly. I don't need this anymore. I'm going to hit the x. I'm going to close
without saving because it will be here and I'm going
to just be safe, hit save. Now that's saved there. Let's keep going.
That's one two. Let's do this a little faster, port, designer, the clouds. Okay. So I know this bit
down here is the river. So with the move to, I'm just collecting
all of those pieces, and I'm going to come
to my layer. Wait. No, I'm going to come to
my geometry and hit add. And I am going to
collect these pieces separately and add and then collect those
pieces separately. I can add. I have one, two, three, I'm going to hit the
top, double on the bottom. Hit copy after the three dots, move into this one,
and hit paste. This one did that again, but I know that that was 169, 1.7. Is that the number? I'm going to do that
from the center. Let's try that again. So change the anchor to the second Center, one, six nine, 1.7. Yes. I love it when
it works out. Okay. And then that's going
to be another group. So hit the file
button and hit group. I'm going to move that up top. And we can hit save on this one. Hit x and close without
saving on that one. Okay. Now, I know this is a
little bit tedious, but it will get faster and faster the more
you do it, right? So I'm going to
keep those for now. This piece, I'm going
to add and this piece, I'm going to get
rid of that piece, I'm going to add. I'm just going to
hit add on those two because it'll help me get into it and find
the later faster. So I have one, two, three pieces, copy. Move into here, hit paste and see because
I kept those two, it went the right size. What I can do is hit that
little guy there now, and if you zoom in, you can see that those
pieces are highlighted, and I'm going to get rid of them because that's all
I need to do now and make sure I have both
of those and group them. Save delete. Okay. So we have got them all in here together. And the next part we're
going to do is really quick. I'm just going to turn
that off just so I can see the layers. We have one, two, five, six groups, and now it's
time to bring our color in
6. Coloring in Affinity Designer: Okay. First thing I want to do is you have all your color palettes
if you have swatches, and that's what I shared
with you guys today. You have all your colors. Here, you can choose between all your
different RGB sliders, heck sliders, CYM K, all of those happen here. Or you can go into swatches. What I want you guys to
do is go to swatches, hit the little hamburger
and import your palettes. If you had saved your palettes from the
downloads, find the file, I always say an
application palette over a documentation or
document palette because I really like to use all my color palettes in
any design and project. If I put it in a
document palette, then it can only be
used in that document. I always say application, and then you need to find
where you find your file. I already have mine, and remember I gave you the CYM which are
great for printing. And I gave you the RGB. So let me find RGB.
There they are. So either way, let me
show you real quick. These are the samples I made
to try and get my colors. And I don't know
if you can tell, but you can barely
see the lettering. So this was helpful for me to print out the sample and then change my
colors a little bit. So that's why some of these
colors are a little bit darker than what you see here. I'm going to go to
my CY K. Actually, I'm going to stay in RGB because when you
guys look at this, it might transfer and look
differently on the screen. So I'm going to keep mine in RGB because you're
watching this online. But for print, use the CY MK palettes because
those will be the most true color for
four I can do this, guys. Remember, sleep that perfation They're the most true color for printing out your designs. So CYM K is for printing, RGB is for viewing online. So if you want to
create the stickers, you can save them in affinity
designer in one format, and then when you go to share, you can save a JPEG in an RGB. Just change it to RGB and I'll show you
that in a little bit. That way, when you if you
are showing them online, then your people will see it in the color that you
want to represent it in. But CYM K is best for printing. So when the printers get it,
that's the best for them. Let's go back to this. Okay. Okay. So here
my color palette. It's not very many colors. If you can change how
you view your palette. This is nice because you can see the colors that are happening
right there. Pardon me. I need to sip. What I'm going to do first
is just take a group. I don't want to work
with the stroke. I only want to work
with the fill. I just want to see what happens when I start dropping color in that one might be blue
because water and sky is blue. And I can finest the colors a little
bit more within each group in a little bit. Like that one, you can't
even see anything happening. I know that needs to be up top. Hey, that's probably going
to need to be green. I want to I'm turning those
off so I can see what needs to be colored pink. That one's going to
be a darker green. That one is a few
colors, but it's okay. I'm just going to go like this
for now and then see where my layers what's happening
with all my layers. That's a green. This one needs
to get moved to the top. No, that one needs to get moved to the bottom.
There we go. And it's all about just
seeing where your colors need to go in your photo
or in your sticker. Then that's where
we can kind come in and finesse it a
little bit as well. And so this guy got
moved over a bit. So I'm going to do or maybe
it's just the wrong size. So let's see what happens. Oh, that's why. Let's see. 691.7. Okay? I just want to make sure all of
my pieces are that 1,691.7 1,691.76 91.76 91.7. Something seems like 1,691.8, so let's see. 1,691.7. Okay. A, there we go.
There's my culprit. That one is a little bit bigger. So let's see in that one. I know the top is going to be where I want it to
connect the right size. So 1,691.7. Now, they should all
lined up properly. Easy way to make sure everything is working
the way you want it. This is where you can
then just come in, and so I know that is going
to be some green back there, but maybe I want that one to be blue or different color green. Actually, I like the
brighter green on that one. And so I know that one. I like that one, the colors.
I'm just going to lock it. And then maybe I want
this guy to be green, then this piece is which piece? That piece isn't even
showing right now. Yes, it is. I'm going to make that
one this brighter pink because I know
it's those fun clouds, and that can be my mountain, but maybe I want that green and this cloud I'm going to keep here and this one I'm
going to keep like that. That one is locked
and ready to go. This group is my group here. So I want that to be
that brighter pink, a little bit more sunsety. We have the most amazing
sunsets in our area, and I'm going to do that one
that brighter pink as well. Because you know what, a good sunset is amazing. I'm going to lock that and I'm going to go for the next group. What are these pieces here? I'm not even seeing this group. So that means it needs
to get moved to the top. There it is. It's the
background for that one. I'm going to do two fingers. That's my problem there. That needs to get moved
down below. There we are. Did you see just trying to
figure out figuring out the definition or the layering
really helped on that one. I know it needed to be
down below. I think Let's see. I think
that is ready to go. I like the different
colors there. I like the different
colors happening here. Serve somewhere hid in a
little bit, but that's okay. Let me see what happens. This one, I might
move up. There we go. What's going on? And see
that is a cloud area. So I'm going to change
that to a lighter pink and it's okay to move things out of groups when you
get that all figured out. Something's going on
with this blue layer. I can see the outline of
my mountain right there. I know or maybe it's the pink
layer. That's what it is. So I'm going to unlock this one, and I'm going to move it up. There we go. If you put one finger down
here, let me get closer. If you put one finger
down, hold on. I don't know if you can see it, but there's a yellow line
right there that helps you to keep it in the same
place just moving it up. There we are. I can see that mountain better and
the clouds look nicer. Okay. That one I'm going to. This one I'm going
to lock because I like what's
happening with there. Let's see. I don't know if
I like this dark up here, so that's this layer here, and I just need to
find the piece. And, I think I like that. Do I like that back there? I feel like that one. Well, we'll get to that.
That's this piece. I like that darker
and I like that. This one is done. Now this piece, there we go. I'm going to come
back up here now and make that one more
pink because I really just like the pink clouds in the sky there. Is that
what I'm going to do? Hold on. Let's see. It's all about figuring it
out, what you love best. Maybe I do like that one
because I remember that was a pretty dark and
moody space there. Then there's our
background with the blue. That one's locked
and ready to go. All right. We've got our color. We've uploaded our designs. What fun is that. It takes a little bit of time. But really, we're
almost there and almost ready for creating that
sticker background. The next part we're going to
be going over is crafting your sticker and creating boundaries and having
fun with that. Let's go. Let's dive in and we'll move into
the next section. Okay.
7. Crafting Your Upscale Sticker : Okay. In the next section, like I said, we are going
to be adding our borders, and if you have a
quote you love to use, let's find that or put it in, but it's not necessary. But sometimes you like to have little quotes added
into your stickers. And if you don't have
a quote, that's okay. You can also just add in
the name of the place. So let me show you
how to do that. In this next part, First off, I am going to tap on this one, tap on the top one,
double tap on the bottom, and I'm going to
make that one group. I am just going to rename it by tapping on the two or three dots and hitting group and
then let's see landscape. That way, I know that this whole section
is just a landscape. And member. So for adding stickers. You can just take this
and send it off to sticker and do what
you want with it. But I like to create my own border and
stickerp requires you, if you have your own
border and border size to use a perfect magenta color on your stroke on the outside. The first thing I am going to do is I'm going to come over to the side here and you
can choose your shape. I am probably Well,
let's try this out. I'm going to do a rounded edge. I love a rounded edge, and I'm going to come
up to the corner. I'm going to make that white. You always have your white here. I'm going to come when I
have the lock button on, it lets you find your corners
and find the right size. Then see this little hoops. Let's see what happened
here. There we go. I want to make sure my
corners it's all the way, so the lives are matching up, and then you take
this little dot and roll it out to the edges. I'm going to put that
below my landscape. Okay. I'm going to turn off my landscape per minute and
I'm going to go to my stroke. My background is white
and that's fine. But my stroke, I want to
make it that perfect pink. I believe I have it somewhere. Let me see. I know I have this. Here we go. Sticker up
swatch. There we go. There is corner, see you can see a hot
pink around the edges. I'm going to duplicate
this and I'm going to make a tiny bit
smaller and turn the top one, I'm going to turn
off the edge piece. I know this seems a little bit. It's going to be hard to
see it, but that's okay. So if I bring it down, one two fingers Tree fingers. Move it from the immediate
center and bring it down. Now I have another
one on the outside there and I'm going to you? I'm going to do
that differently. Let's see. I'm going to turn this
little piece off. I'm going to have my
anchor in the center. Make sure I'm on that top one, and I'm going to
just move in here, so I have each side
equal in and out. I'm going to hit -50 And so that brings that in
and I want to even more, minus maybe another 50. Then over on this piece, I'm going to hit -100. That way, it's equal
on all four sides. And what I'm going to do is take my top picture and get it to hover and drop
it into the top one. Okay. And instantly, you've
got your border. If you're sending
it to sticker app, you've got your pink border. If you're not sending
it to sticker app, turn that border off, or if you want to use their
borders, that's fine too. What I do notice is this curve is a little bit
different than that curve. So what I can do is
bring it and just pull it out so it is a little bit more
symmetrical on the edges. We have our border. Now,
let's add our place. We're going to come over
to our artistic text tool. You can I usually like to
do art text rather than the frame text so I can
get the size proper. If I want to pull the sides
out and make it bigger, I don't have to deal
with anything like that. Let's just go with American
typewriter There we go. I wanted to bring up my keyboard rather than typing
it in or writing it in. This one is Byron one, I want to change the color. Let me go back to my I'll just make it
white. There we go. Okay. I'm going to go
back to my move tool. I'm going to get this out
of the way out of the way. And I could just
add this in here. And you can choose which
sides, which font you want. But by using the art tool
rather than the text frame, I can resize it really easily. And this is where maybe I'm
going to add another one, and I'm going to do
it with my finger again and put my in. I love this from Romy, which is wherever That's
two words, I believe. Wherever Wherever I got this, you stand be the
soul of that place. Now, I see how it's done this, but that's okay because I'm
going to get it to the size. I want it and then come back in here and
hit the return button. I'm going to move this around and do I want it all
the way up here. This is where you come in and
figure out how you want it to see how I moved
to a different one. That's so I can get it back
to bring up my keyboard. Then I want to put I like to have that low
guy or this low guy. And that's one sticker
already done and ready to go, go to my move tool. This is where you can
just finagle it and get it how you like it best. I do like putting my own
website on my stickers. And that's why I have the
borders here because if I send it to the printer and sticker app and I have
something on the outside, it will make a extra
lump on the sticker. It makes a little I don't
have one to show you, but I learned the hard
way and now I know adding the border helps so I don't
have an extra little piece. I do keep all of my branding
stuff in my assets folder. Okay. Branding. And then we just
hit insert. There we go. And my sticker is ready to go. I can choose to change the color of this or just
keep it how it is. But when it's ready to get
printed in sticker app, it won't make an extra
dent around this. So in the past, I've had
stickers where it came here, and then the cut edge
went around that. And that's why I put the
magentle line down now as well. Now, your project
is ready to share. I'm going to first go
out and I'm going to hit save again and you always have to save from iPad out on your main project area. If you want to
export your design. This is where you get started with that and
you can hit port, and if I want it to be JPEG, this is where it says preset, but this is where
the color or sorry, that's the quality,
you want to save it. The pixel format. This is where you can
change from CYM K or from RGB and then send it out as CYM K. You can
do that as well. Or vice versa. If you
make it in CYM K, you can send it out as R GB. I always try to if
I am sharing it to. I'm going to send this
as CYM K, full size, 100% quality, that's
for printing. Then I would I can preview that and see
what it looks like, and then I hit,
and I can share it or if I just save the image, we'll see in my pictures, that's saved saved there, that one is saved as CYMK
if I need to save them. Also, if you want to
share on social media, you can keep it as RGB. But I would bring my
quality down to probably even say 75% and bring
your size down to ten 80. That way, nobody's going to be really trying
to steal your design. It it helps to protect your
design a little bit better. If you want to save as SVG, you can save that or as a PNG. For stickers, you do want
to save it as a PNG. And make sure your artboard is a transparent background,
and real quick. If you want to, you can
add it to a mock up. I have saved it and you
want to I did save it. Now I want to maybe
add it to a mock up. Let's first do this. I'm going to add an artboard
and a second artboard. I guess I don't have
one artboard yet. There's one artboard, I'm going
to add a second artboard. In that second artboard, I'm going to hit computer. And search. And maybe I want to
add this guy in. So I'm going to bring
it over, add it in. I'm going to move it, use the move tool and I'm
going to, you know, This is also I can try
and have a mock up of the sticker on
something, right? So I'm going to hit
locked on that. And now I'm going to place
my sticker from my photos. On, and I didn't
save it as a PNG. Let's try that again and I'm going to delete
that lo guy from this one, artboard one, I'm going
to save export as a PNG. I'm just going to
hit Share and hit my save image and hit cancel. Now I'm going to come
over to artboard two, and I'm going to hit place
hitting the hamburger up top, hit place, place from photos. I'm all over the place
on this one, you guys. So it created two things because I didn't specify
which art board, but that's okay. Watch
what I could do. I could just crop this
little piece out. There can move. And then there. I've got my sticker on my mop up to see how it might
be on top of something. Anyway, that's a quick
little fun thing you can do. Here's your sticker
and the next lesson. I'm going to show
you how to take that PNG and send it to sticker app so that your outline is shown properly in
the app and cut it out. Real quick, I'm going to share
proper one to my computer, so we can do that, okay?
8. Printing with StickerApp: Okay. Export. So this is where I'm handing
port whole document. I want artboard one.
I'm going to hit Share, and I'm going to
air drop this to my computer so I know
it goes straight to it. Hit done there, and I am going
to show you my next thing. Here is the sticker app. Sticker app is my
personal favorite because the quality
is really quite nice. What we're going to do is you can just click Make your
custom stickers, right? And they have a lot of different you can
do sticker packs, you can do die cut, we're going to do die cut. And I'm going to do die
cut file for these. But like I said,
there's a lot of different options
of craft paper, glow in the dark, glitter, holographic, you can do
all the different sizes. And they have sizes
here and quantities, but I always just
go to upload file. That one, I saved
it onto my desktop. See how it's showing
the extra corner here and see how it's showing the extra bottom around
the perch hand made. Those are both things
that when we get to it, I will let them know, they have a note
section that I want it cut on the pink die cut line. I uploaded the sticker, you can add little mask layers, say you want everything
in white to be glitter. You can add the mask effects, or you can again put
that in your notes. Let's go over to cut line. And I always hit small. I don't like a lot
of extra where if I got a one by 1.3 inch, that's a pretty small sticker. So let me show you really quick. So Remember this one. This one is 3 " by
about 1 ". It's small. I want to do a different size, and you can type in, say, I want the width to be 3 ". It automatically does
the math for me. If I hit small, it bring that edge size
down even smaller. And the quantity is 176 for $99. That's a pretty great amount. What I love about sticker app. Like this one, brought
it down to it a little bit smaller and you can go up by increments and
see the different prices. You can change your quantity, say only 50, it'll give
me the price for 50. Like I said, you can
fiddle with how many or the size you can see the
price changing over here. Maybe I just want 2.8 b
and then $60 instead of 69 at 2.8 versus three is not going to be
super noticeable for you. Then you can see up
here, it says laminates. Okay. Let's see, right now,
their mat is out of stock, but that's where I would either
choose my material vinyl, but I usually like a mate. Right now, they're out of matte. I'm stuck with glossy, but I personally like a
mat finish on my stickers. And then I would add
to my cart, right? If I go to my checkout, just make sure you get
everything in there. Their free delivery does come by FedEx and they're
really quite quick. And they you get just a
beautiful quality sticker. These stickers that I have, I got from a different company. I got these from sticker mule because sticker mule is nice. If you want a product
test, your colors, you can get ten stickers
and for, I think, $9. And so that's the
best way to test your colors on your product because most of the companies
will do all the same. Um, Okay. And that way, you don't
have to have a big batch. And it's good because
like this one, I realized that I need to make my background colors
darker so I can you know, I want to see the words
a little bit better.
9. Thank You!: Have fun. Have fun
creating the stickers and I just I hope you get them out there
and stick them on things, and they're great for gifts for people or maybe you want to
sell them one of these days, and that's the big draw. I make one design and I sell
it over and over and over, and all I have to do
is hit reorder and it's so simple because I am making a nice chunk of change on the side for a
little bit of effort. A little bit of effort gets
me that chunk of change, and I have my stickers around my town and this new
set of stickers, I'm going to finest a little
bit more and get those out. It's so fun to be able
to share your designs with the people you love
and with your customers. I want to thank
everybody for joining and having fun today
with this class. We went over quite a
bit of stuff and yes, it is a little bit of a process. But getting your landscapes
of your favorite places and getting them into design is such a fun fun thing to do. Look. Look at all those colors. I challenge you to
make a great sticker, put it on a map and share
it with our community. I'm Katie from Perchan Made. Don't forget to use
my hashtag hash tag, creating with PHM and when you're posting to social media because
I'm going to find it, and I'm going to share it. If you want to find
more classes for me, go to my website and I
have procreate classes and affinity designer
classes and have fun looking and exploring and
you know what, hit reply. Share your project in
the project area and also share it with the
world because people want to see your artwork and don't think that
it's over saturated because everybody's got a place and your place is
perfect for you. I'll see you next
time. Have fun. And share your stickers. Okay. Bye for now.
 Katie Simmons, Digital Artist | Perch Handmade