Transcripts
1. Introduction : Hey everyone, I thought we
could explore a craft rich and culture from the
comfort of your sofa or wherever you're comfortable. Join me and revealing
the structure behind Islamic Geometric
designs. We'll choose bold colors found through
inspiration on Pinterest, and jump into symmetry and repeat patterns to create
these mesmerizing titles. When you're finished, you'll
be able to start selling your designs on Spoonflower
to earn a passive income. What's a passive income? It's when you put your designs out there and upload your designs, you're already
making your artwork, you're already making, and you start earning
a little bit of money each month alone, just for having them out there. I can't wait to get
started with you. I'm Katie from Perch Handmade. In the next lesson,
we're going to cover the tools and the materials
needed for today. Let's begin.
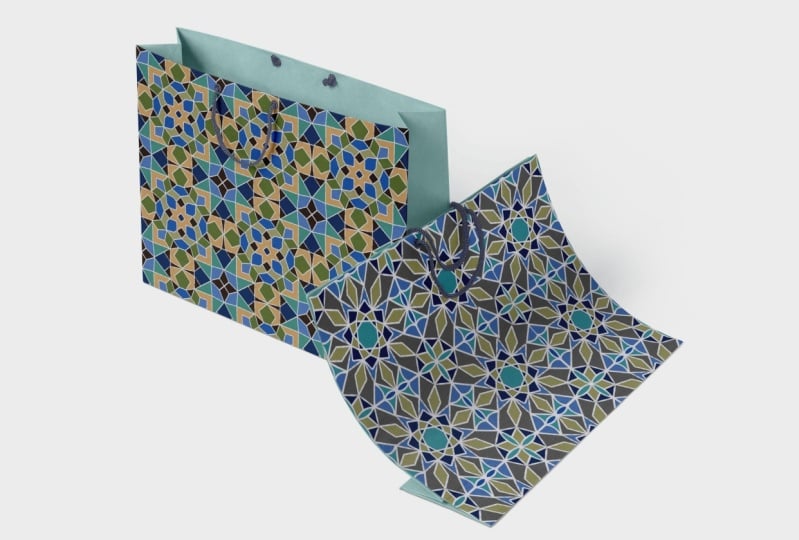
2. Collect Your Materials: You guys, Moroccan tiled design. Really cool, right? But in order to jump into Islamic geometric
pattern design, we need a few things. To start. Have your iPad or an iPad Pro and your Apple Pencil
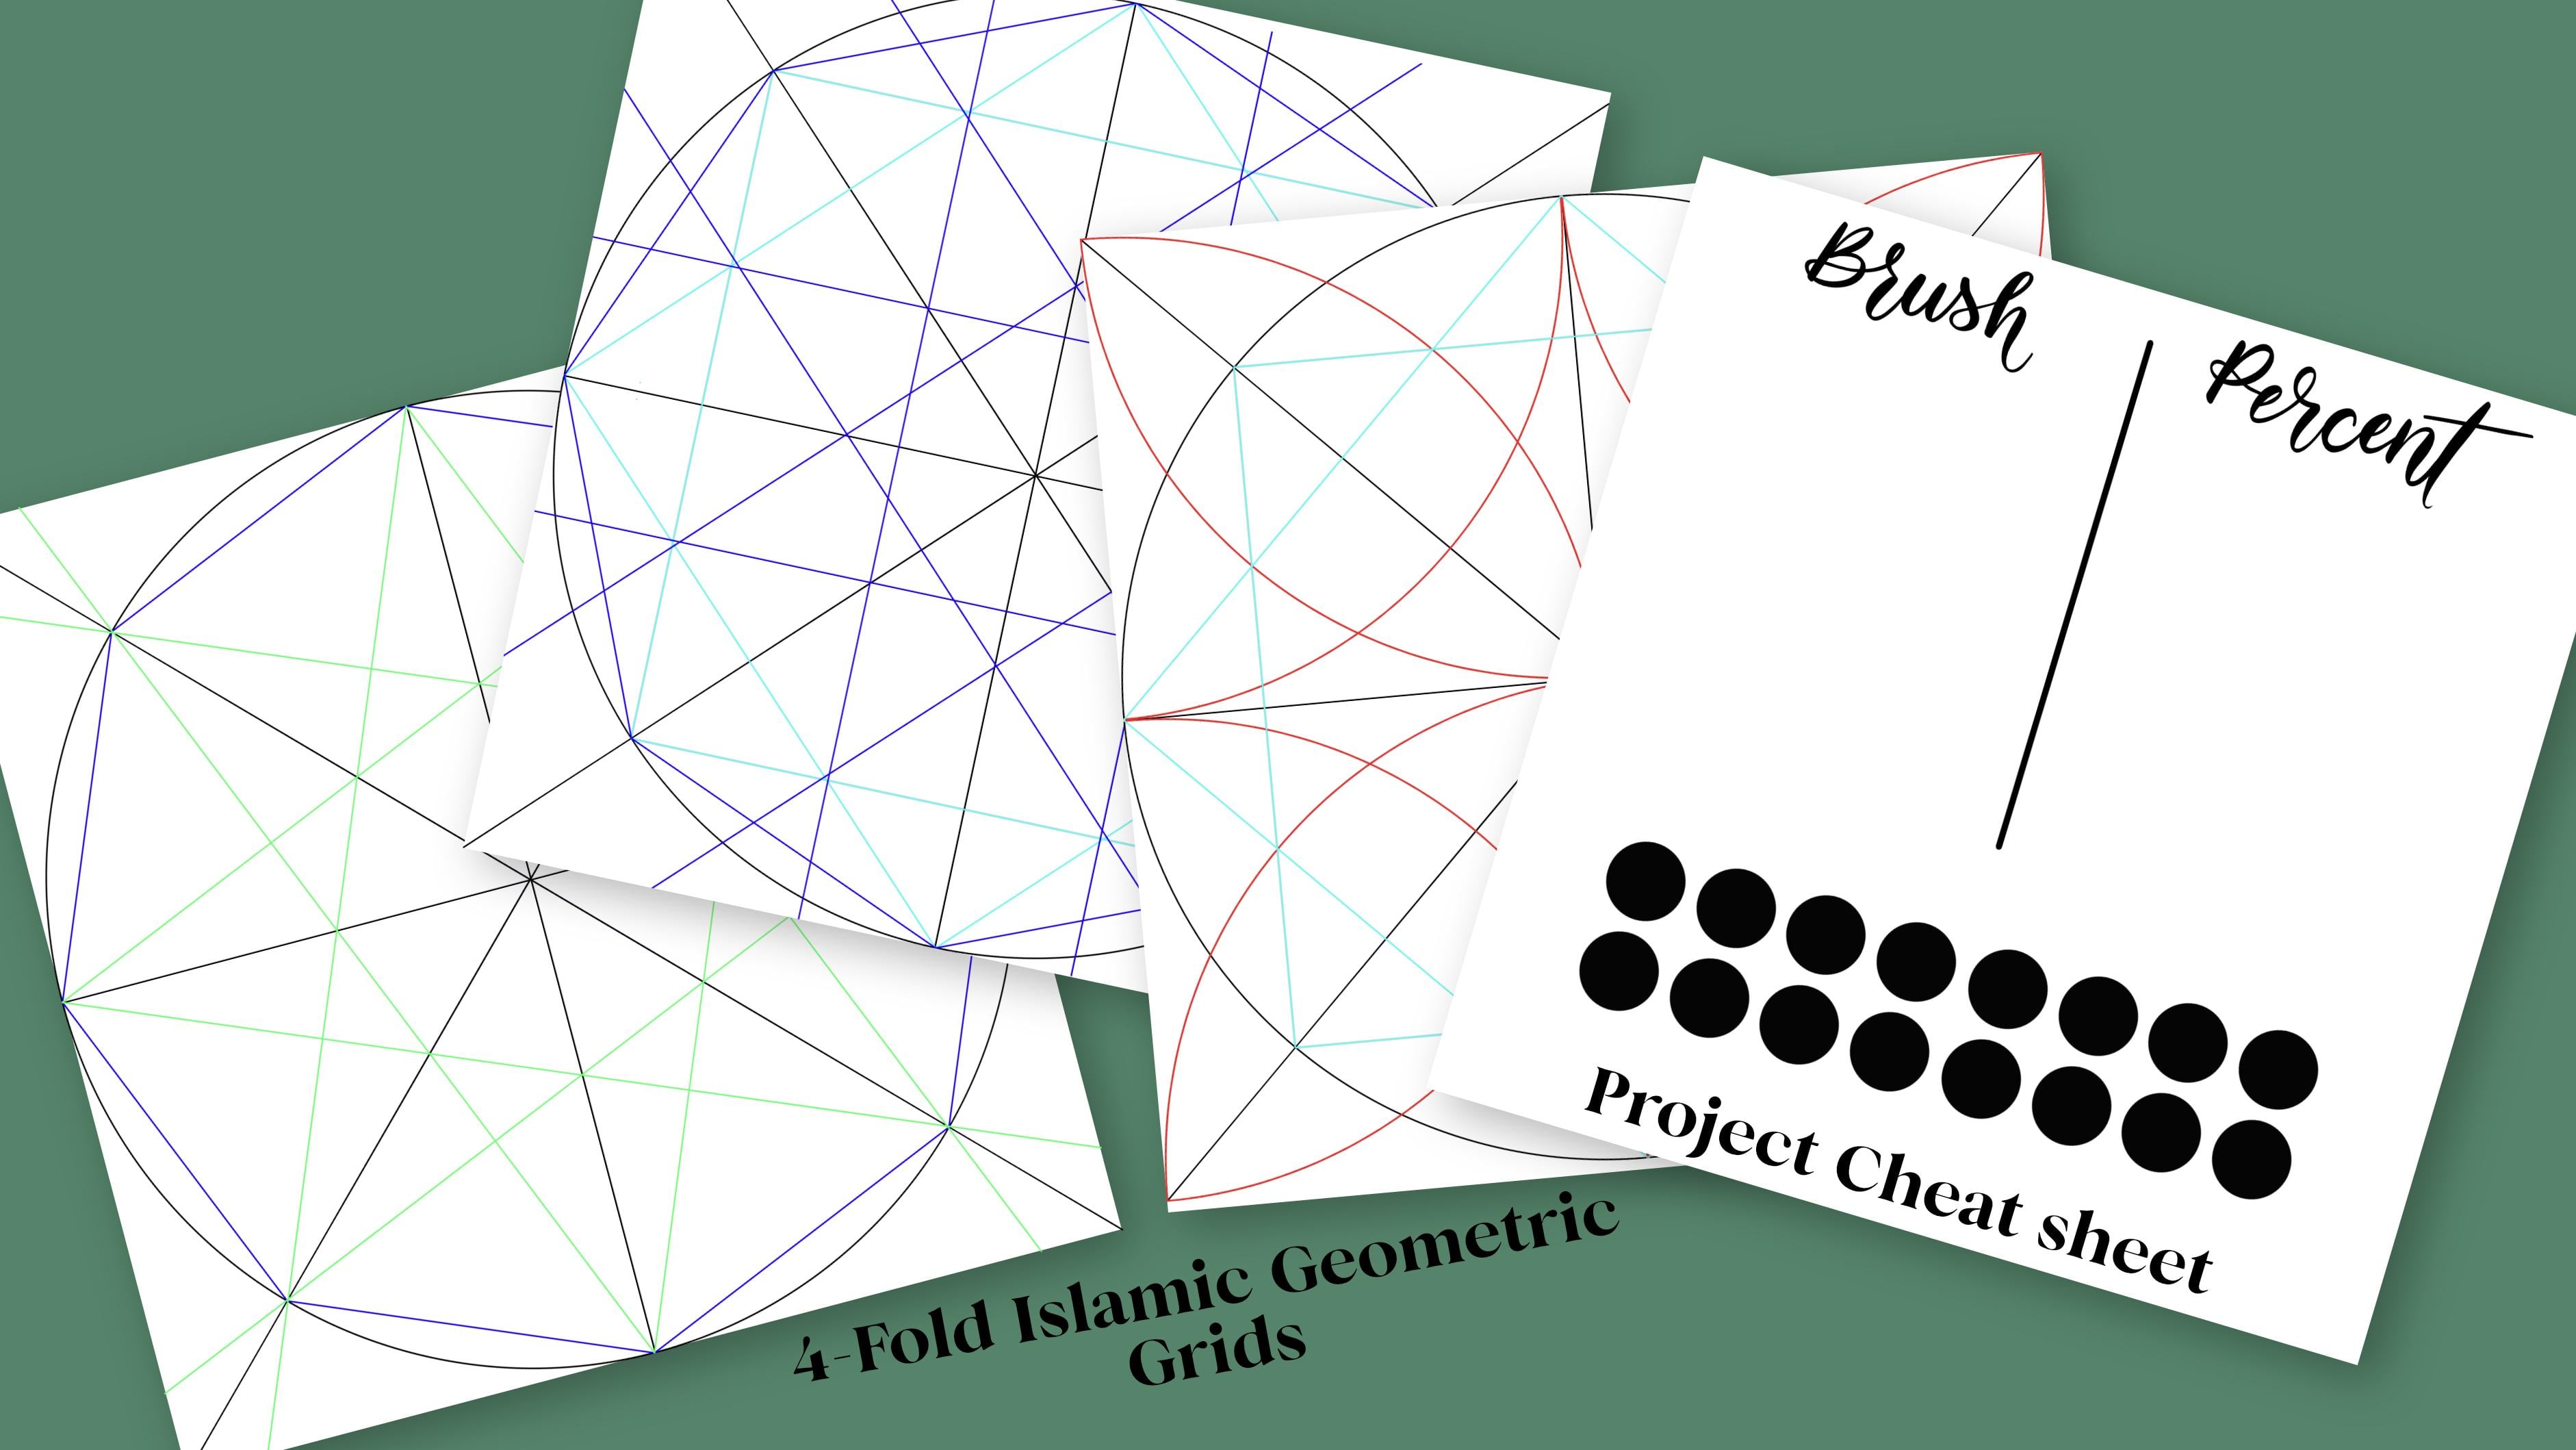
and your Procreate. I've created a project cheat
sheets so you can keep track of your Procreate brushes
and your project colors, which is great to use for
any project you're using, it keeps you a little
bit more organized. I've also created a
geometrical outline, PNG to be used today
and the procreate file. So take a moment to download those right now from
my resources pages. I like to name my
files immediately, so I put them into, say, Moroccan tile design to
make it easy to find later. I'm going to pause right
now so you can do that. We'll also take a
look at my tile and color inspiration
Pinterest board. I have two files. They're
based on Islamic. If you haven't already take a moment to download
those resources including the brush pen and
meet me in the next lesson, where we'll learn about Islamic geometric patterns
and setup your Canvas. See you there.
3. Prepare the Tile Panel: Hey guys, welcome back. Hopefully you've gotten
your materials ready and your resources have
been downloaded from my resources page. First, we're going to learn a little bit about
these patterns. Islamic geometric patterns date back more than a 1000 years, but the muslims couldn't use animals or pupils
in their designs. So they used calligraphy
and floral design and geometric designs based all of their patterns off of
simple grid system. It's a series of
lines and shapes to create these intricate designs. There's a few grid types. There's the fourfold which
is repeated on the square, fourfold and an eight-fold. They're all repeated
on the square. There's a six-fold that
is based on a hexane. Hexane execute, hexagonal,
exogenous based on a hexagon. Great. Don't you hate it when
I'm next up on the words. Based on a hexagon grid. Also there, the fivefold
that's based on a pentagon. And this one's a
little bit trickier because it doesn't
meet up exactly. You have to use a
little few other shapes in there to create this pattern. But they're really cool. Your finished pattern is
called a tessellation. It's the process of
isolating the surface. Making an arrangement of shapes with your repeated pattern without gaps are
overlapping like this one. Here. These Islamic craftsman is
created there tessellations using a compass and a ruler
on wood, ceiling and tile. I don't have a campus in my plethora of supplies,
but maybe I should. But I do have my Apple Pencil and my iPad
and the procreate app. I've already made a couple of grids for you to
choose from that you should have already
downloaded on my resources page. There are three PNG files
for dropping in separately. Then there's also a Procreate
file which will open directly into Procreate with
a pre-built layer group. Along with those, there's a project sheet and the
Procreate brush pen. It's called the grout Penn. Did you get those already? If not, then I'll pause
a second so you can download those to a file
called Moroccan tile. Alright, so now we're ready
to set up our canvas. Let's open the Procreate app. We need to make a new canvas based on a 3 thousand
by 3 thousand pixels. So I'm going to
just do that now. And 300 DPI so that it'll be
the best quality for later. First step, we want to upload those files and your
project cheat sheet. I'm going to go into
insert the file. I'm willing to upload
all of those grids separately and name
those as well. You can follow along. I'm going to speed up
the camera real quick. Next, I want to group
those together and name those for full reds. I can type. I'm sure of it. I'm going to close those. And actually let's
bring the opacity down to about 20, 2520%. I'm gonna do 20%. I don't want them to
visible when I'm working, but that is your own preference. So do what works best for you. You'll figure it out as you go. Now I'm going to lock
those because I don't need those and I'm
going to turn that off. The other thing I'm
going to insert is. That project cheat sheet and that's going to
go to the bottom. I will rename that as well. I like to name all my files. Sorry, I like to
name all my layers. I'm going to drop
that at the bottom. I'm going to add one more layer. That's gonna be my
background layer. One more layer on top of that, that's gonna be my tile layer. I'm also on my tile layer. I am going to go to Canvas
and hit Drawing Assist. I'm going to turn my
symmetry on to radial. That way. When I'm
working on my design, it is all ready to go. I'm going to turn my
truck project cheat sheet off for now and lock it. I'm also going to duplicate my tile layer four
or five times. Now I'm ready to group all
of these layers together by sliding to the right,
hitting group. And this is going to be
called my title panel. For when we have to do
the repeat pattern later, it helps to have that
background layer and all of the tiles together. All right, I'm going
to lock that as well. I have all of those
layers locked and ready to go for later. One other thing I'm going to
also do is make a create, or sorry, to create
a copy layer. And we'll use that later for our for copying our Canvas
for a repeat pattern. Now we're ready to
name this file. Going back to the beginning
and I'm going to name this my tile pattern. I can type. I'm going
to hit master copy. I don't want to do
anything to this later on besides replicating it. So if I slide it to the left, I can hit Duplicate. And I'm going to change
the name of this. And I always just do
the three dots for now. That's what I do because I'm
not quite ready to name it. But this is the file that I'm going to work on and this is my master copy
that I'm not gonna do anything to remember. We have all of our
layers are locked. So that later on, if we do open this monopoly, we can kind of remember,
oh, that's locked. Let me go back to the beginning. Another thing I like to do
is also name it and add, add who, who made this in
case I share it later on. It just helps with copyright infringements so that people know that
this is from Katie. Let's look at that again. We created our Canvas. We've uploaded your cheat sheets and grids, your Procreate brush, your set, your title
panel to group into your different layers if named it and you've duplicated it. Now we're ready to find
inspiration for our colors. Let's meet in the next lesson.
4. Colors Unveiled Using Pinterest: In the last lesson, we learned
how to set up your canvas. Now it's time to grab
inspiration from Pinterest and handpick
your color palette. Check out the tile and
color inspiration board. We have the Islamic
tile patterns that has all of the cool
designs that you can make, but also the color of that
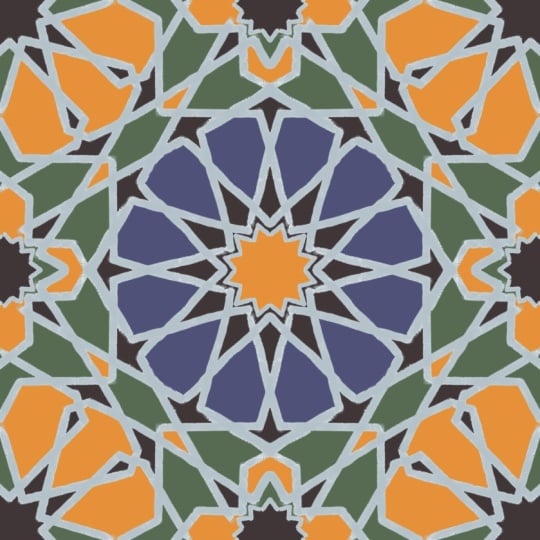
goes along with those. I'm loving the yellows in this one and the
blues are incredible. I'm really drawn
to these greens. And I think maybe I'm
going to go that way. But look, there's also
the morocco board that is beautiful as well
because it just shows all the colors that they have
throughout their cities. One of these days I'm gonna go. Maybe you've already
been. I'm jealous. When you've chosen your picture, it's easiest to do
that screenshot, holding your power button
and your home button. And I like to just open it right up and I can bring
it down in size. I don't need to do
a whole lot to it, but I just want to
see the picture. Then I'm going to save it
directly into my file, save to files, and go directly
to Moroccan tile design. I don't really
need to name this, but I think I'm going to
name it just for now. Green tile inspiration. And that's where I'm going
to pull my colors from. And save that there. And once you've saved that, you can get rid of
your screenshot. I'm going to pause here so
you can find the colors you love and try not to go down
that rabbit hole like me. I mean, maybe go down the
rabbit hole a little bit. We all get there sometime, but maybe back here
in five minutes. Okay. You've got five minutes. Alright, so now
we're going to open your renamed master copy and upload that picture that you saved your file to
create a new color palette. First, we want to
hit this Plus icon and create a new palette, but we're gonna do
it from the file. So here's my green
tile inspiration. And look now we have
all of those colors from that photo in one spot. I didn't have to do any
dragging and dropping. They're just there. I am going to rename this. We also want to add those colors to our
project cheat sheet. I'm going to open that up so I can turn
my tile panel off. I'm going to turn this on. I'm going to unlock
it so I can do this. I'm going to start
pulling in some colors. I want a pink color that will kind of be
representative of my grout. I'm going to chose this
one and I'm going to drag and drop that
right into here. And need to be on that layer. Sometimes that happens. I'm going to drag
and drop that here. And I'm going to
pull my threshold up so it fills that whole space. I don't want it to
fill all of them. That's what happens if
you go to the full, it'll drop it into everything. But if you pull it
down to 90% or so, then you're all set,
then I'm going to start just picking
some colors randomly. I like this dark green. I'm going to add that one in. I think I like these more yellow green versus
these blue greens. I'm going to stick with these. No, I didn't want to do that. Try this again. Sometimes I just
want to drag and drop everything and I've got to pull it from
these individually. I want to add that
lighter color in. You know what, maybe I will add one of these bluer greens. I like a limited color palette
that way I don't feel too overwhelmed when I'm
working in these. Okay, so I've got
five colors total. Again, look there so many
colors to choose from here, but I'm going to keep
mine just to those. And you'll see why
later when you have this limited color palette that is created again and again, it just makes these
mesmerizing tiles, which is what this
class is about. They're really easy to make. So that was nice and quick. Thanks to Pinterest, you'll have this beautiful
color palette that you've learned how to
add into Procreate. And now we're ready
to move on to the next lesson where we will
start building your tile. That's what we're
here for, right? So I'll see you there.
5. Create a Mesmerizing Tile: Part I: Oh my gosh, way to go. You've gotten there and we're ready to get into
building your tile. You gathered your inspiration and your color choices
from Pinterest. Setup your Canvas. Now it's time to build
that mesmerizing tile. It's really super exciting. Let's write down what
pens we're going to use. I can't really write too
much with the grout pen. So I'm going to pick a
different pen and come in here, but I'm going to write down
that I'm using my grout pen. And we'll choose a size. This is where maybe I go back and decide on what
size might be best. See these little
buttons on the side. It's the new fun. One thing that
procreate 5.2 is setup. So let me show you. So if we hold on here, I can see I've got it
set at 20% already, and I think that's the
size I really liked. That's that first one. But I can reset sizes here. So what do I have? I've got ten per cent
and I believe I have 5%. So I can take away a percent
and move it and reset it. And you can do this
for up to 445. I think it's five. Let's try it. Let's see. So if I have something somewhere
else, Let's try that. Okay. Oh yeah. So it's four lets you do up to four different
sizes that are saved. So anytime you come back into, I think it's into this project, it's brand new, so I'm
still figuring it out. It keeps track, but
I'm kind of all about the tried and true method
of keeping track on my own. So I'm going to just
take away these right here and let's write those down. So I've got the grout, I've got 2010, 5%. Maybe I can do this. 520%, 20 is probably the one
I'm going to use the most, but I'm going to write down
the other sizes as well. Just so I have it
in my, in my setup. If you want to use
other brushes, make sure you jot
those down as well. It just, you know, it's something that
you can use for every single project because
at the end of the day, like let me show
you really quick. I have so many projects and I didn't start doing
this until just recently. I don't know what to
use and half of these, so it's a really good
thing to keep track of. So I've got those SAT. I'm going to lock that
up and turn it off. All right. We ready to go? Alright. Let's what was that? What was that? Okay, So let's dive in. We're going to set our background
layer to a light color. We have to fill it. I know we already have
this background layer, but let me show
you for later on. We have to have a solid
background color in there. I just usually like to
keep it straight up white. I'm gonna go to my desk. If I double-click
over near the white, that's gonna be
your solid white. It doesn't look like it did
anything, but it's there. And we're going to go
onto the next layer. So first, I need to
open up my grids. I have to make a choice on
which grids I want to use. Again, we're using these fourfold grids
because in Procreate, we only have these four
sides to work with. I think if we do other grids, we could make it into a hexagon. No, that would be an
eight-sided grid too. And that's part of
an eight-sided grid, is part of the fourfold grid. Let's just double. But that's the easiest one
to use in the Procreate app. You can toggle these off and
decide on one or two layers. I like to use at least two. So I have a more segments, these segments to,
to connect with. Three, just gets a little
too busy for me to see. So I'm going to start with
two and then close that up. I might even bring
that opacity down again because it's still just a little hair
too much for me. And you can do whatever you're
comfortable with as well. I'm going to lock that because
I don't want to work on those layers and go to
my first tile layer. So here we are on this
first tile layer, I'm going to make sure I've
got my grout brush and I'm going to pick a light
color to use as my grout. Remember I use this
one over here. And I'm also going
to just make sure my drawing assist is
on and see it's not. I'm just gonna go through really quick and turn all those on.
6. Create a Mesmerizing Tile: Part II: Easy as pie. Once it's set, you
can just click over and hit Drawing Assist. So lessons learned. Mine wasn't turned on. So now what we're going to do is start drawing,
connecting straight lines. These are going to be falling
through different segments. So a connection of two lines is a segment,
the green here, those are segments and you can start connecting your lines. These are gonna be your
construction lines. So makes sure I'm
set on that top 20% and really use just
start making lines. The easiest way to make a straight line is to hold
it and to lock it in place. And you can edit your
shape a little bit if you want it to be a
little more precise, or if you want the
corners to be a little bit more angled
depending on your brush. We just are going to start
making these designs look. There's our first line segment. And each line segment, I like to put on
a new layer and I can connect them later
before filling it in. But that way, if I need
to erase something, I I'm erasing it
on one layer and I'm not bumping into another
line that I've said. Just keep going and
connecting your lines. However you see fit. Really liked to use that lock, but if you want a
more organic look, definitely don't lock
those into place. This one. No, no, they're all connected, but
I'm going to keep it here. This one, I'm going
to try to keep it below this line a tiny bit. So you're connecting all
the way to these edges. And once, once we do
our pattern later, those will connect as well. But yeah, let's just keep going. Let's, I mean, it's really
simple if we already have a beautiful
pattern to begin with, but I can add two more of that. I can add more to that
in just a second. Let's see where I want to add. And when those connected, they will make a
different shape. I'm going to do one
more right here. No, it doesn't seem like much. But you know what? This one, to make it a little bit easier for
making that line straight, I'm going to change
that drawing guide on this one to quadrant, so only the four corners
will go straight across. So looking back, so
quick, that's done. Let's start filling these in and let me show you how
we can do that easily. I think because I am ready here. I'm going to do one more
layer and duplicate it. I'm going to clear that
layer out this way. If I want to make any
changes in a minute, I can. But I'm going to
pull my tile layers together by merging them
with that two-finger swipe. And from here, I'm also going
to turn those grids off. I'm going to duplicate
these actually. A good way to fill, but not fill directly into this layer is the
two finger touch. I usually have this in my
hand and I use two fingers. I hold that and then everything. We're gonna do this, right? Let's see. No, I need to invert it. Oops. Let's try this again. Two-finger touch. Now I'm going to invert it so the gray lines
won't be colored, but I can fill in a color
inside those lines. So let's go back to
our color panel. I am going to open up my cheat sheet and I'm going to start which color
do I want to start with? I'm going to start
with this color. I'm going to hold it
until the color drops. And that back on. And I'm going to just fill here. Easy. I'm gonna do that
one more time so I can fill the threshold
all the way up. Then what other colors, whether it's places, might
I wanna do that color? I think I'm gonna
do it here as well. And maybe here to, here we go. I'm gonna go find a new color. And every time I change a color, I like a new layer. So let's find my colors again. I'm going to turn that off,
turn this off, turn this off. I'm going to go with that
darker one, hold that down. He's back on and start dropping. I'm going to turn that
one down a tiny bit. The threshold down a tiny bit. Because I could tell
when it was up. I was finding it in this area
here and I don't want that, so let's bring it down there. Now it's out of there. You guys look so far. Look how quick this
is coming along. And I'm getting
those great colors from my inspiration board. Alright, we're going to pick another tile and another color. I'm gonna go with this, except the one I used
before. I don't think so. Let's try this out. Nope. Not the same one I used before. Not one's going into place
really nicely as well. So I think I'm close. I've got to decide which
colors I want to connect here. You know what, I
think I'm gonna do? This one. Oops, I just changed the color.
Let's change it back. Remember if you hold it down, it'll change back to
the color previous. All right, What should
I do for this top one? That's our last one. Oh, that's what I'm doing. I'm doing that color because I didn't fill
it in properly before. There we go. Guys. I know it seems pretty simple, but wait until we start really moving that pattern along
and making it into a repeat. So let's look back at what
we accomplished here. We filled out our cheat sheet. We learned how to
lock our brush size. We worked on learning about segments and our
construction lines. We pulled our color palette
into fill your tile and we've connected it to all of our sides so that we can
create this repeat pattern. So meet me in the next lesson, we're going to learn how to
create that tessellation with your tile and remember that
fancy word, tessellation. So yeah, we're
gonna come back and we're going to learn how to
tessellate our patterns.
7. Repeat Pattern with Color Changes: You guys, you finished
your tile right on. Now is time to have a little more fun and
create this repeat pattern, this tessellation with it. So make sure we have our
magnetics turned on. We do that by hitting
our tools, snapping, turn on magnetics and snapping, turn them all the way up. Let's go to just
your title panel. You don't want to have
any thing else open. Because the first
thing we're gonna do is just copy our Canvas. Because that's the easiest
way to replicate this. I'm going to make a new
layer and I'm going to rename that copy canvas. We can paste that
right in there. I'm going to turn this
layer off because when you're using
snapping and magnetics, it snaps the best
when nothing is open, the low it you can
have them there, but have them closed because the snapping will
work just that much better. So I'm going to
duplicate this layer. I'm going to lock that layer, turn it off because that's
our original layer. Later, when we want
to change the colors, we want to have an original Full Size Tile
layer to change or copy. Now we've got our coffee campus. This one's locked. We're going to duplicate this. So we have four layers. And starting at the top with my tools button and my
snapping turned on. I'm going to take this hold up here and snap it into place. See how it snapped
right at 1500 by 1500, that is exactly
one-quarter of the sides. Alright, now we're gonna
go to the next one. And do repeat that each time. And you can see it
has the yellow lines. That means we're directly in
the center on both of those. We do all four corners. Got out, guys. I'm going to pull
those together. We just made a repeat pattern. This is the easiest way
to do repeat patterns. If you have it going
direct to the, directly to the edge and doing a four sided repeat pattern. If I want, I could do that
again and duplicate it again, Again, lock the one
layer, turn it off, and duplicate it
four more times to see what our layers will
look like, even smaller. So I'm gonna do
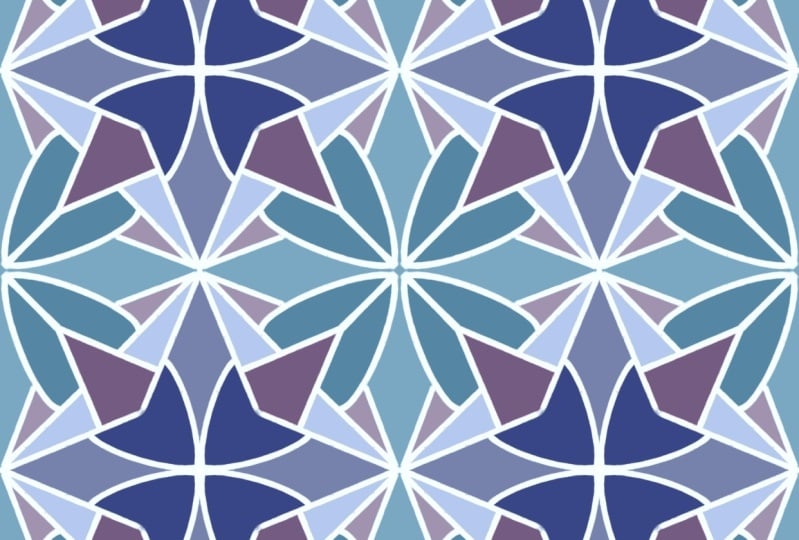
it one more time. Go through it quickly. I'll speed up the camera. Look how mesmerizing
that is already. It's just incredible. We went from is essentially what this two that's our
original to so much more. It just as it goes and
gets smaller and tighter, the pattern gets even
more mesmerizing. I loved these tiles in there. So, so simple to make. Another really fun thing
we can do with this now is we can change the color. You can always go in and
drag and drop new colors in. If you feel like that. Like if you want to
change something in here, you can change it to
a new color here. I've locked that. I wouldn't normally recommend
this, but that's fine. But I don't really
recommend doing it this way because I want to take a little more time
unless you really want to change the colors
dramatically. But then that gets a
little tricky as well. You've got to bring
the threshold down. You're doing each
individual one. That just gets a little tricky. Let me show you what
I like to do instead. So I'm going to keep that
layer the way it is. It's open. This is the original layer. I made a new copy. So I'm going to rename this copy or maybe I'll
even rename it color. I'm going to rename it color. Change. That way. I know. Because I haven't
picked a color yet. So we can go up to our wand tool and hit
Hue and Saturation. And this is where we
can come in and just start changing colors here. Going through and
picking your favorites. You can change the saturation if you really want it brighter, or if you want it
more muted tones, you can change the brightness. So if you want it like a brighter color
but really bright, you can do that or bring
it down and habit dark. Just play with it. I'm liking that the best. Hey, let me just change
the colors up again. I'm going to do
this one more time. Before I change that out. You can also, you know what, I'm going to change it
this way this time. That's color balance where
you can change shadows, mid tones and the highlights. And just fiddle around with
it and see what works. So the shadows on that one
isn't working too much. But it does on the
green because we have a little bit more
happening in there. Let's see what happens
if I change these, not a whole lot, but let's go to mid tones
and see what happens. Yeah. What about our magenta? So that brings it to a different color
altogether as well. I'm really liking that
magenta and green. Put that back and let's
see what the highlights. You never know what
you're gonna get. Like that last one,
Let's see anything. No, I liked that a lot. That made me happy. So now we've changed it completely different
than the ones before. But still, I mean, it's so easy to change these
up and have a lot of fun. So I'm going to repeat the duplication
process, lock that one. I'm gonna fast-forward
real quick. All right, so now I have all these different
things to choose from, sizes, colors, all of that so that we can bring
it in to them next lesson. First off, I'm going to just
pull my colors together. So I'm going to
group all my greens. I know where to find them later. So another thing that might, you might run into is if you
run out of layers space, you can always copy your canvas. Open up a new canvas. Say I want to do these purples and copy your
original layer size, hit the Copy Canvas, and then go straight
into a new document. And do that 3 thousand
by 3 thousand size, your Canvases are always
going to be saved. So just pull it in
here and then you can start sizing and changing
the colors later on. Your iPad, really the
size of your iPad really determines how
many layers you have. Also, if you have an iPad Pro versus the eighth
generation iPad, I have both of those. And I know my 3
thousand square on. My eighth generation only
has 25 layers versus 55 layers on my iPad Pro
of the 1.5 inch size. So that's really going to
change things up for you. So that's one way to work. But really keep all your regular original
tile layers altogether. There. You shouldn't go over those layers in any
of the programs. For your original tile. What do we want to name this? So now it's time I need to
come up with a name for this. I am going to go back to that Canvas icon in the
wrench tool and orange tool. Yeah, the wrench tool. And let's rename this. I like to name mine
after people I know. So that's just
something I like to do. That's just my tiles. I can keep them all
in a collection. I also like to keep it as
just a one syllable name. I'm going to name this one. I always do this with
all of my work that way. If I share things than people know who it came from
and what a great lesson. We've just created your
first tessellation by copying your tile
four separate times, using your magnetics
and snapping it down, changing the color up. Merging all those
layers together. To create, we created
technically we created nine different because we have three different sizes
for each color, hue that we went with, which, I mean, how
that was so simple. So have fun creating this tile. Now we're going to
go and add it to some wallpaper or
fabric in Spoonflower. So meet me over in
the next lesson.
8. Upload Your Tiles to Spoonflower: Alright, now that we've created your tile and made it
into a repeat pattern, you've given it a
fabulous name as well. Now we're going to add it
onto Spoonflower so we can make it into fabric
and wallpaper, which is really, really fun. I mean, that's what
this is all about, where we're making fun things and getting it for everyday use. So first we want to
save our designs. So I'm going to save the
largest for the best clarity. So use that wrench
tool, hit Share. It's gonna be a JPEG. I'm going to rename it just
a little bit too green, since I'm gonna be saving
each of the three colors. Hitting Save. Sometimes it, when it goes to save it, we'll try to go to
a different place. Just find your file when
you're getting in there. Sometimes they'll try
to go somewhere else. Just zoom it up a little bit. I have those all saved. And now we're going to
hop over to Spoonflower. I already have mine open. I have an account already. If you don't have an account, just log in and join and fill out all the
information you need. I'm gonna give you a minute
to do that right now. Yeah. So meet me back in five. Now. We have your Spoonflower
account all set up. We're going to hit the
little person up here to go to your design library. We want to add a new
design over here. You can add up to
eight files at once. So I'm gonna go to Choose
Files and hit Browse. And I'm going to hit Select and choose the ones that I want. Those are all the same. Some of them got downloaded
a couple of times, but that's okay and hit
Open. Don't hit Done. If you had done
it, doesn't do it. So hit open and it'll open
those three tiles at once. You can add more if you need to. But I refer now we just
have the one I own the rights to this
because I made this tile. I didn't copy off
of anybody else. I didn't take it from another place and just
print it out regularly. I own the copyrights to this. And then I'm gonna hit Upload. This is gonna take a minute, so we're going to zoom
through and I'll meet you back here when it's
all ready to go. You guys upload yours too. Alright, so they're all set. I want to make sure
that I named mine. I'm going to add them
all to a collection to what I might do
collections first. I'm going to rename
mine Moroccan tiles. Date. I have I have a collection. I'm going to go back
to all of my designs. I'm going to just start
changing things at first. I'm going to add
this to collections. I'll do that really
quick right now. I also want to make all
these public it as well. Now that I'm here, I can change a couple
of things about I can add a description,
add some details. For now, I'm just gonna
leave it as it is, but I am going to
add some, some tags. So like Morocco. Morocco, I can add both. Your tags are specific
to what you've got, not just generic, but I
do like to add those. A little bit of generic ones
is fits a certain theme. That's where I've got like
it's Moroccan and tiles. It gives you some ideas. You have up to 20 to do. And so that's all set now I'm also going to make mine smaller. So the print on the
fabric is smaller. I don't want a big, big square, that's just one
square unless it, I'm doing it for wallpaper, then maybe I want it bigger, but I can change that in here. But for, for my fabric, I want it a little bit smaller. I think I like this one. So like this almost circle
here is about four inches. I'm also going to save that layout so it
doesn't change later on. I can change it versus the
wallpaper and the fabric. You can change the
layouts there as well. But for now I'm just gonna
do the fabric, not one set. And I'm going to do the
same with the next two. I'm going to zoom
it up a little bit. The easiest way to do this
is go to my design library. And then if I click
on collections, then up here, this
one gets tricky. So you've got to do it this way. I click on collection up here
and click Moroccan tile. And now I'm able to
hit get a sampler. You don't know how many times
I've lost how to do that. So watch the video back every time you need to
figure that one out. I might do the same. Now, you can order a sampler. You can have up to 30
designs on a sampler fabric. So it's a great way if you're
making a lot of designs, throw them all into
one collection. You can separate the
collections later, but throw up to 30 into one collection order,
one big sampler. It doesn't matter
what fabric type for the sampler as long
as you see it printed, then you can change which fabric type you want to use later, or anybody else can choose
a different fabric later. So the cheapest one for the
three designs, Here's $12, and it looks like the most expensive is the
performance linen and the breast cycled Canvas. Those are 22 up
the Belgian linen, that's thirty-two dollars
for a sampler pack. But you can just go with the cheapest one order
of fabric sampler, fill out all the information
you need for that, and place your order. That fabric. How pretty is that? These are all the different
ones that I've made so far. On different style tiles. There are really nice to have. Those. They come as an eight by eight square that you
can cut down to size. I use my extra for making masks because
it's the perfect size. And that's the world we're
living in at the moment. So let's recap a little bit. We signed up for Spoonflower. You added your designs
to design library. You've named those and
add the descriptions. You've set your
pattern layouts and added multiple to a collection which you then ordered
a fabric sample. Once you get your fabric
sample in-house at your home, you can toggle it off
to make it public. It's really easy. I hope you have a great rest of your day and I'm gonna meet
you on the other side. And just one more quick essence.
9. I Just Wanted to Say Thanks!: Thanks for joining me today. I really hope you
enjoyed taking this fun, easy class, learning how to make
elaborate Moroccan tiles. You've learned a
little bit more about the Islamic culture and these beautiful
tessellations they create. You've also learned
how you can set up your own canvas so
you can create them yourself and change your colors for even more
mesmerizing designs. Please make sure you share
your work in class or on social media using the
hashtag creating with PHS, you might just find yourself
featured on my site. How fun taking more
of my classes, including this one
on repeat patterns. I'm Katie at purchase made. Thanks for joining me today.
 Katie Simmons, Digital Artist | Perch Handmade