Transcripts
1. Intro : You struggle with
creating repeat patterns. Maybe you've heard
the terms full drop or half drop
repeat patterns, but you don't know
exactly what that means. In today's lesson. We're gonna go over
all of that and more. I've included some
great resources for you to use and download
for this class today. I've also made it really simple. You don't have to draw anything. That's right. I really want you to
master the technique using the snapping and magnetics
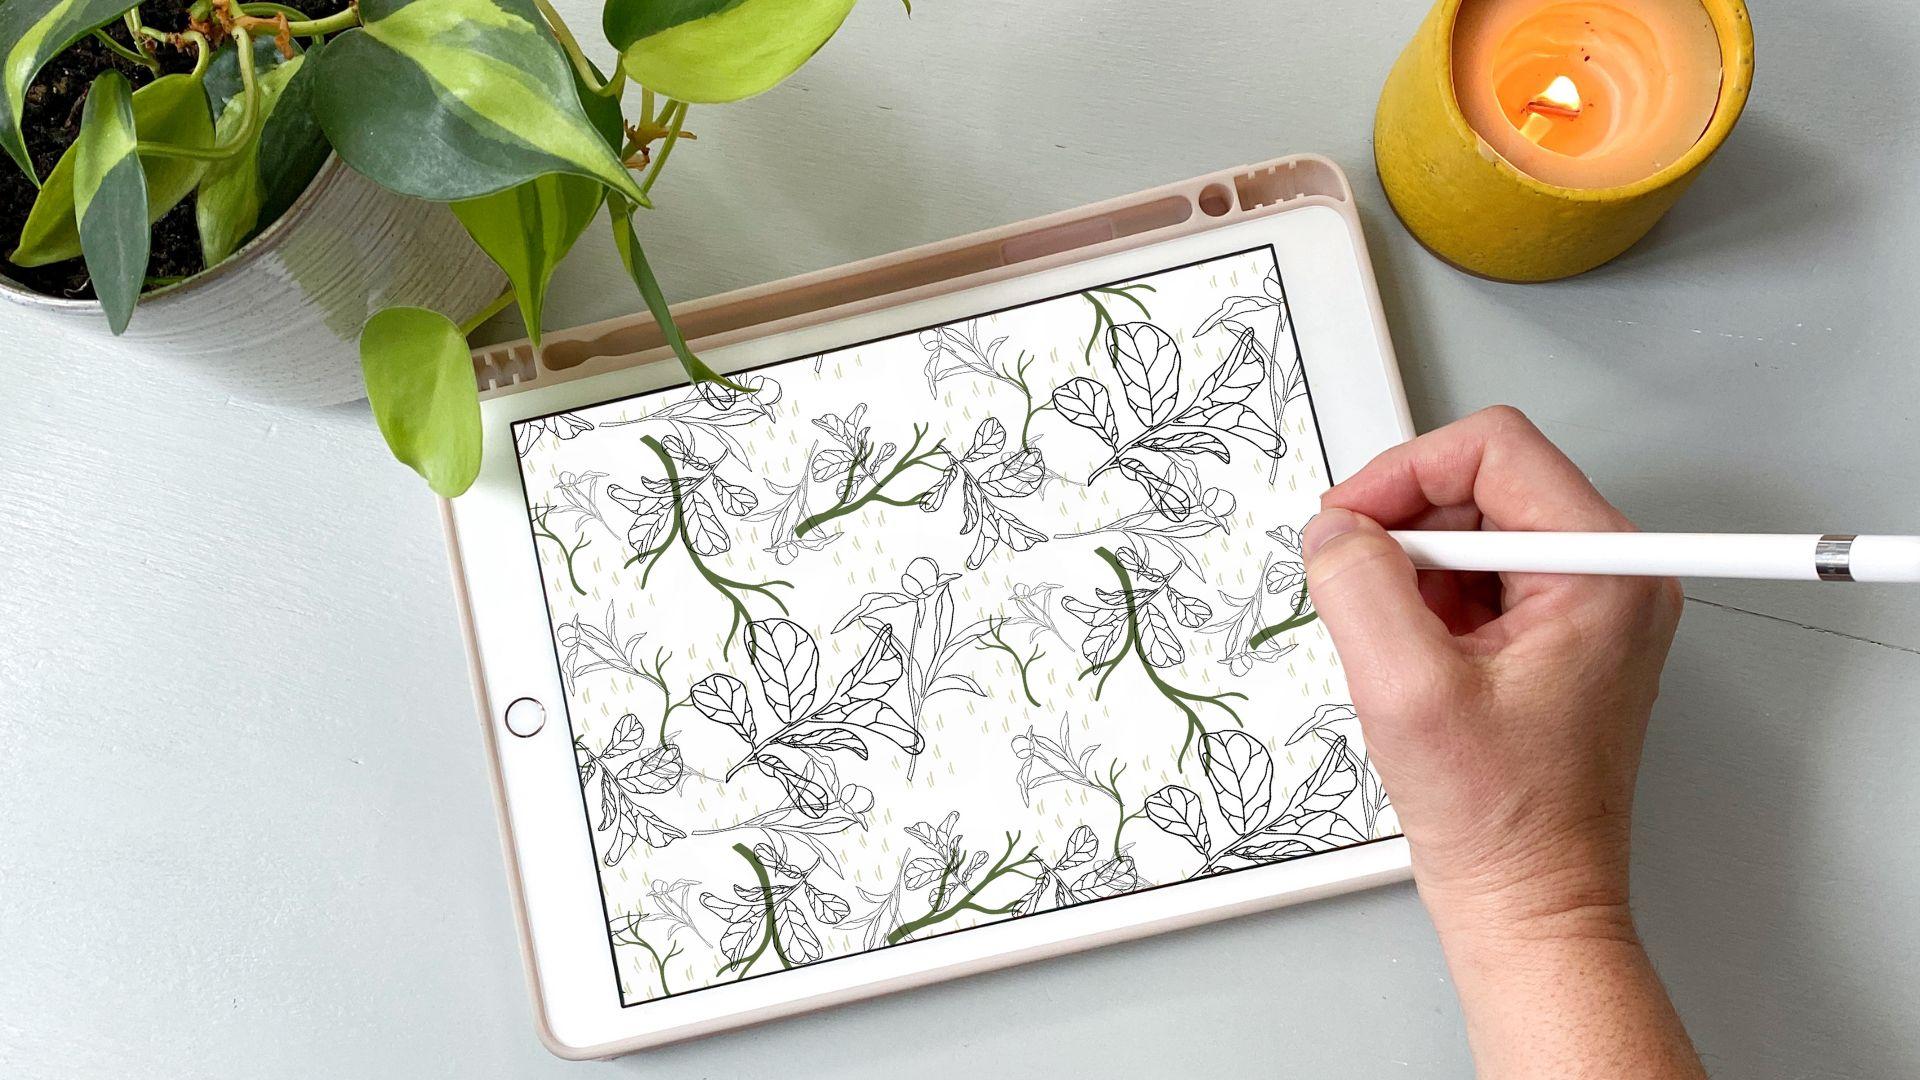
tool to flip your canvas. So I've created a
beautiful line of botanical line stamps
for you to use today. Believe me, it's so easy, you'll be making patterns from
the comfort of your sofa. Just like me, over and
over and over Number. Here's what we'll go
over in class today. You'll learn the
difference between half-drop and full
drop repeat patterns. Create a half-drop
repeat pattern Canvas. Complete your design
and flip it using snapping and magnetics
to check your pattern. And learn about a few
print on-demand sites in case you choose to start purchasing or selling
your designs. So get your iPad and
your Apple pencil ready. And we'll get started. I'm Katie from perch handmade.
2. What are Half-Drop Patterns?: Half drop repeat patterns. What are they? Maybe you've heard the term, but you're not quite
sure what that means. There are two main types
of repeat patterns. First, you have a
straight repeat pattern. Repeats vertical and
horizontal lines. Sometimes you'll
hear this called a full drop repeat pattern. Next you'll have your half-drop. That's what we're
learning about today. Half-drop works equally
on the vertical. Then on the horizontal. It goes over and down
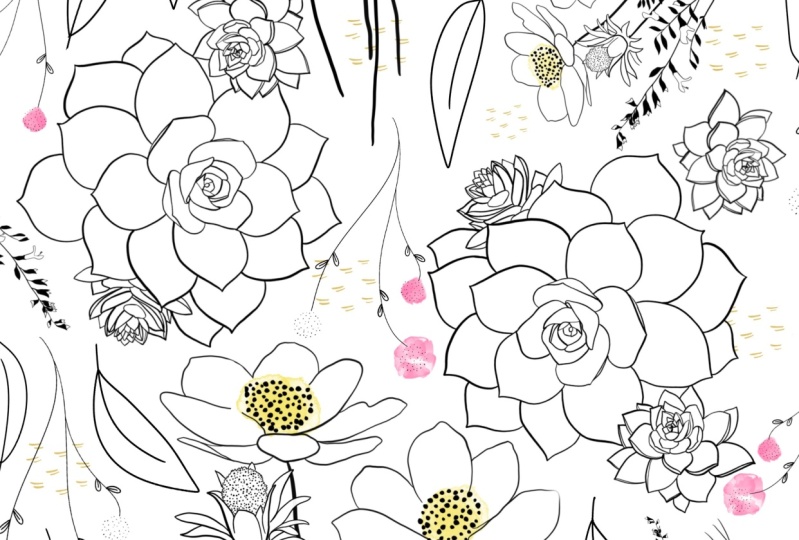
along the diagonal. Let me show you real quick. Can you see in this one, I know it's a lot of flowers, but if you match them, it makes a square. These patterns are moving in
a square around the page. Now let's look at a more
complicated picture or pattern. If you see this flower, it also moves down
the page equally, but it staggers itself over and down on
the vertical line. This is a half drop
repeat pattern. Take a few minutes to look at the following slides and
ask yourself, these three. Can I see how it repeats? Is it full or half? Repeat. Is the pattern visible or is it harder to see and
more camouflaged? Let me show you how we
can use just one stamp to make a half drop repeat pattern. I'm going to use one of
the botanical stamps from the collection of stamps that I've gifted to you
in this class. And show you how. Let's go for the cosmo and just need one
big one here, right? So here it is. And I've already set
this up a little bit. So let me show you
what we can do here. Here's our stamp
that we just placed. And if I go in here, I've already moved it for you. Um, because I don't want to show you the whole
technique right now. But if we reveal underneath, I've flipped it, so it's
moving down the page. Now this doesn't look much
like a repeat pattern yet. But if we go into the next one, I can show you after
careful maneuvers, how it repeats on the page. We go the first one and then we go down and over
and on the vertical, see, it's even on the horizontal
line, It's staggered. I've included my
Pinterest board that has so many beautiful repeat
patterns for you to peruse. Fun. Checking them out and
looking them over. See if you can see
repeats happening. And see if you can tell if it's a half-drop or a full
drop repeat pattern. In the next lesson, I'll
go over how to download the resources that I've organized just for
you for this lesson. So meet me over there. Okay.
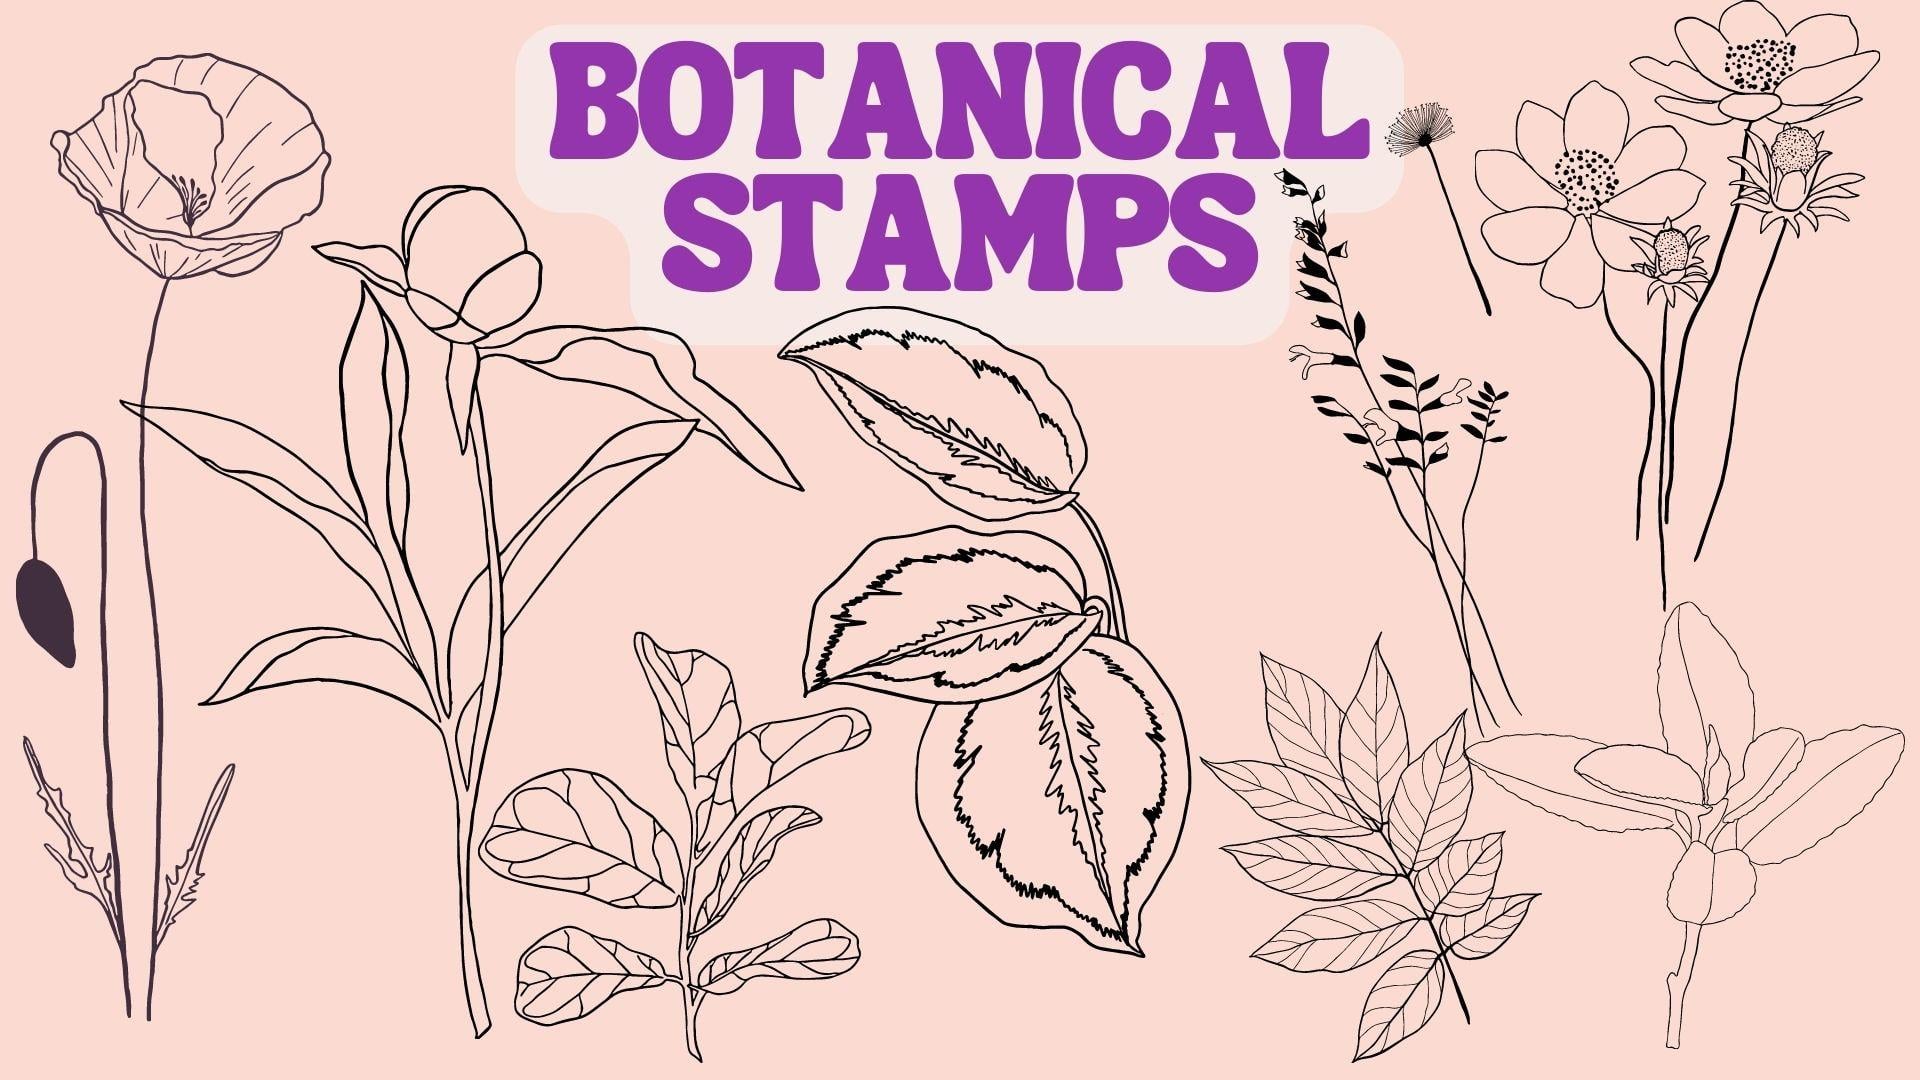
3. Free Resources : Since this is a beginner course on half drop repeat patterns, I've decided to make it
really easy on you and added, made a line of botanical
stamps for you to use. I've also created a
beautiful color palette directly from the plants that
I use to make these stamps. You'll also get the Canvas
guides to get you started. I really want you to
understand the process of turning your
pattern into a repeat and using the save
and load techniques rather than trying to get
a design down on the page. It's not to say that
these stamps aren't beautiful because they are. But I just want them
to be super easy for you to make and
get started with. To get the downloads, click on the project resources, link on your page, and make sure to save
these files, uh, to your hard drive so that
they're there for safekeeping. When you're ready, open
them up on your iPad and they should pop right
into your procreate app. If you're having trouble
with some of the JPEG files, saved them into
your file or into your photos before sending
them off to Procreate. I've created the
stamps so that you can use the color palettes
that I've provided. Or you can leave them as a
solid color of your choice. If you do decide
to color them in, my favorite is using the reference tool and dragging
and dropping the color. So set the reference on your, on your pattern and then go to into the
Pattern layer below. You can drag and drop
into the section. If it bleeds over, then bring your threshold
down and it will fill in. If you notice that you have any other places
that need to be maybe erased or fill
it in a little bit. You can do that really easily. It's such an easy way to
create these patterns. In the next lesson, we'll learn how to set
up this canvas and prepare you to start creating your half
drop repeat patterns.
4. Canvas Set-Up: Now that you're
beginning to understand the fundamentals of what makes a pattern either a full drop or half drop
repeat pattern. You've downloaded
your free resources, you're ready to start
tackling and your canvas. I've included the
guide for you to download directly into
your procreate app. But I believe it's really
important that you understand how the Canvas is set up so that you can create it on
your own later on, Let's begin by
creating a new canvas, 3,000 by 3,000 pixels. And the DPI is set at 301st. We're going to set up
the pattern group. You'll need a minimum
of three layers. The bottom layer will be
your background layer. Then you'll need a couple of layers above that
called your pattern. I'm just going to
duplicate that. Let's slide this to the right. So they're all blue
and then hit Group, and we'll rename this group. A group. It can have as many
layers as you want. But this is a great starting
point to begin with. If you need to always duplicate an empty layer and keep going, sometimes you'll find that you accidentally forgot to
duplicate an empty layer. So say this one is drawn on. You can always just
duplicate it and then clear. Next we'll add two more layers, which will be our guides, group those and
rename them guides. I'm also going to rename
this one, guide, one. And guide to close that group and add one
more layer above it. This next layer will
fill with one color. It doesn't matter which one because we won't be
using it later on. But it's being used to help build out your first guide set. We also want to make
sure the guides and the pattern group
layers are closed. Because when we're
snapping these into place, it works better with
closed layers below them. Using the Move tool, Let's make sure our snapping
and magnetics are turned on and your distance and velocity are all
the way turned up. We're going to begin by dragging from the bottom corner
up to this center. Now we're going to click on
this layers button and using two fingers will hold
down this layer. That brings up your
selection tool. And now we have to
make sure it's set to freehand and color fill or
anything else is turned off. But that's set there, will hit save and load. It will make a selection one. Now we'll turn off, will refill the screen, hit our move tool again. And from the
opposite top corner, we're going to slide down. And we'll have the
bottom corner filled. We'll go back to our layers, select it with the two finger
touch, and hit selection. Again for selection to. The next part, we're going
to take our tool and we're gonna fill
just half the page so we don't have to hit
any of the loose box, but we just take it and slide it over to the right
to fill up that side of the page is the first two are on this side, left side, right. And then we hit the layers tool. We select it with the two fingers touch and
add our selection three. This is what we're going to get for our guides
for the first one. The next thing you wanna do is pull those guides over from the Canvas that should have just downloaded already into
your procreate app. The perch half-drop,
repeat master copy. What you can do is
just take those open, open that up, take guide one, and just hold onto guide one. If it's locked, you
might have to unlock. And you just take it
and hold it till it hovers and you can start to
move it without letting go. Hit Gallery with
your other finger. Continued to not
let it go and drop. It. Decided to do its own thing, but I dropped it
in as guide one. And I'm going to do that
again with Guide to, let's see if we can do this a
little more clearly, right? So take guide to
hover, hit Gallery. It's your artwork that you're
working on and drop it in. So seamlessly that time, but it worked out. Alright. So I don't have my guides and then I don't
know if you noticed, but I also have in case you're left-handed
or right-handed, we can drag those in
as well because later on you will see from
where you can drop them. And it's nice to have it based on if you're
right or left-handed. So I'm going to add those
into my guides as well. You're just trying to get
it to go to the bottom of the page or bottom
of your group layer. You can just hover right on the group layer name and
it'll drop it to the bottom. And not working as well today. But here we go. Now we've got it in, so we have all of our guides. I'm going to turn those off because I don't need those now, although let me show you
Here's guide one, right? So we did the layers. I'll bring the opacity down. You can see that was save
and load number three, we didn't save and load one. Save and load to
save and load three. All right, I'm going
to turn those off again to keep those clear. Not opacity backup, I'm going
to drag and drop again. So now we're gonna go and work through setting up
our second guide set. It doesn't look
anything different, but we're going to just go to
the other side of the page. So we're going to slide up from the bottom left
corner up towards the center. And hit the layers. Move tool or sorry, the selection to touch and hit selection for tool. Top left corner. Bring to the center. We're going to slide this one over the left side of the page. So now you have all
your selections. You got seven loads, 123456, and you have
your guides setup. So you can see how they fill
in the different areas. Now I'm going to just
delete this layer because I don't need it anymore. Now, you have your guides and you see your selections
are all set up. You're all set to go. So in a minute, we
will get to using our saving mode and it will
start flipping our artwork. And yep, You heard that right? We're going to be
doing some flipping in in this class today. Get your jumping shoes
on and get ready. Okay. Take a minute. I have a quick stretch. Have a cup of tea, whatever you've got that you
want to take a break with. Because when we get back, we're going to hunker down
and really start working on building out your pattern. Meet me back here and
five-minutes. Okay. See you.
5. Create Your Design: Did you get that break? Did
you get your cup of tea? Great. You've set
up your canvases. So let's jump right into
creating our repeat pattern. Alright. We're going to begin by duplicating our master copy. So slide it to the left, hit duplicate, and immediately
go in to change the name. I always just do the three dots because later on you're
going to want to change it, but you don't know what
you're creating it, so you'll have a name
for it later, right? So open that new one. Never work on the master copy. Although I did just
show you how to create the canvas if you accidentally
use your master copy. But it's easiest
just to duplicate that master coffee and get
going on a new canvas. Let's begin by turning
off our guides. I'm going to open this one, the colored brush tracker. Because if you need to remember which colors
do you use later on, you can drop them
into the little dots. And that'll keep track later on so you know
which brushes you used. It's a little bit easier with the stamps to know
which ones you're using, but you can put in the size. And if you like a
size that's bigger, you can type in what
percentage that is at. I'm going to turn
that off and let's open up our pattern group. First things first, you have to drop in a background color. That way later on
when you're flipping, it uses the whole screen. I'm going to just start
with a white background. So it doesn't look like
I've done anything, but if I turn my background off, that layer is spilled
and now we can start picking stamps to use. So open up your botanical
stamps that should have been loaded right into
your brush library. Sometimes with your colors, pallets when they get loaded in the load all the
way to the bottom. So if you want that at the top, you can just hold onto it and get it to hover and with the other
finger slide it up. But I've already
done that on mine, so I don't need to do that. Now I'm ready to choose
an outline color. I'm going to start
with black and pick a stamp that I'm ready to
put down onto the page. One thing I like to do is use a different stamp on each layer. I can use. I can use
the same stamp in different sizes or however I
want to do it on each layer. But that way later on, it's easy for me to understand
where to find that. You also don't want it to go
over the edge of the page. So do the two finger
tap if you need to, to get back to center. And I made that really big, but that's okay because
I can change that later. I can I'm going to change
the size of that one. You can always size down without
it changing the quality. But you can never size up. I'm going to put a
few on the page. And I like to scatter
them so they're in different sizes and
different areas going in different directions. Another thing you can do is hit the selection tool on free hand and circle one of them and
then flip it and rotate it. So it's got a different, it's not looking
exactly the same. Open the new layer and
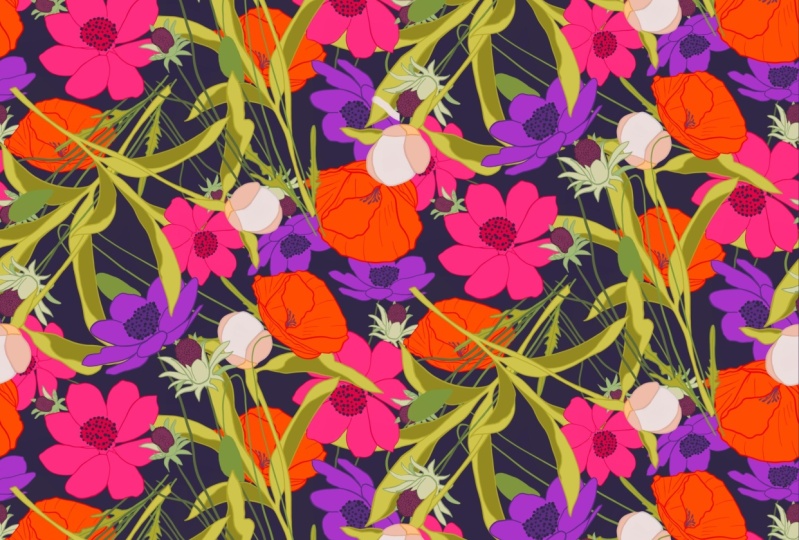
choose a new pattern. I'm going to go with
this ficus leaf. It's okay to go over different patterns because
they're on different layers. You can always
change that later, but it helps your
pattern to kind of have freedom to it to just move around the
page and I'm sorry, it has what does that even mean? The freedom to move
around the page. Now what it does
is it allows you to kind of overlap it and make it a little
more camouflaged. Remember, if it
goes over the edge, erase it with the two fingers to undo that action and move
it over a little bit. When you're snapping tools on, you can get all the way
to the edge and it'll, you'll see that
yellow line pop in. Let's see if we can see it. Can kinda tell that
it's yellow right here. And it also hasn't actually gone over
the edge of the page. There's just a couple
of pixels there, but it makes it nice if you want to move that or
keep it really close. I'm going to move this one
into the corner completely. Alright, now I'm gonna go to, remember, I'm going to have
an empty pattern layer. I'm going to
duplicate it and add. Let's try. Now. Let's just do one more 0. And I've added some fillers, which is really nice. If you just want to add a
little extra to your page. And you need to fill
in some of the space, but I don't think
I'm quite there yet. I kinda like these
branches as well. And these I might do in a color. Let's choose a color for that. Because it just adds a little more interests to your page. Sometimes these get
a little crazy and, or the control, but
that's all right. Go in, use the selection tool and go around and
move it a little bit to where I want it to
be a little bit better. Now I know we're not going to do this on a different layer, but it's all kinda the
same aesthetics, right? Branches. It's got the same look
that I'm going for. So to move this
up and over here, I believe area that's
feeling a little empty. I can change where things
go on the page as well. And which layers. So say I want this on the
bottom. I can do that. And then you can see the
other designs above. I probably will move some of these around and it's
all a matter of just kinda fiddling with things
and making it work. While you're before
you start flipping. You're gonna do that even more. And once you do start flipping. But it's good to
see before you've gone over these edges before you've started
flipping your pattern. Another thing I like to do, if I want to use some
of these, again, I'll duplicate it
and pull it out of my pattern group
and then turn it off. And that way when I go to flip, it won't it won't be a
part of the flip process. When you're happy
with the beginning of the design and
you think you're ready to move things
beyond these edges. This is when we're going to
do our first set of flipping. That's right. Get those
jumping shoes on. But not really. Okay. We're going to begin by closing
down your pattern group. And we're going to toggle on the first guide with your
pattern group selected. It should be blue. If you hit the selection tool
and if that doesn't work, just make sure guilt go to
a like a not a group layer and make sure your
it's set to free hand. And if you're using
color fill or anything, that's, that's turned off. It just always have
to be on freehand. And these buttons below
have to be empty. They not colored. So you can kinda see
here save and load one, save and load two, and then save and load three. So what we're gonna
do is hit the heart. Go down to selection tool. Selection number one. And I don't know if you can see, but there are the lines across except for in
the save and load. That's perfect. So then, then we'll hit our move tool and see they're
both, they're selected. And the move tool is
ready and you'll hit flip horizontal, flip vertical. And then you can hit
your move tool again. And that deselects that area. Then we'll hit our selection
tool again, save and load. Selection tool. And the Move tool, flip horizontal, flip vertical. And we'll do that one more
time with selection three. We're going to turn the guide
off and you can kinda see how things are over
the edges, right? But you have a few
pieces that are still inside the edges and that's perfect because those pieces that haven't
moved beyond the edges, you can move around. So open up your pattern
where it began. Find, let's start, let's start
with this peony perhaps. And I'm going to turn these
off so I could see it better. Hit that selection tool. And I'm going to turn them
back on and see how it's it's still on that you'd
still see it selected. That's great. So now I'm going to
hit that move tool. I can change where I
see this on the page. Perfect. We're gonna go to the branches and I'm gonna do the same thing. Let's see how this one
is so close over here. I'm not loving it, so
I'm gonna go around using the selection
tool and freehand. I'm gonna move got into this
kinda emptier space here. I'm going to flip it a
little to rotate it. Just don't want it exactly
as the other pieces are. I'm going to move this guy to. Sometimes if you need to, you can turn your
snapping off and that way you're not
snapping right back to the center because that
could be a little annoying sometimes when you want it
so close, but not exactly. They're just makes
it harder to move. I do like to keep my
snapping on though, especially for this process. You can also use this
stamps that maybe we saved and move them around
in the page to help fill. But actually, let's see. We're going to see
they're lighter. It's okay. I can tell that
those are the ones that I want to move around. So it's like this one I think
I want to move somewhere. So make sure I'm on that layer. Use my selection to move it. Over here. They don't have to
keep all of them. You can take some of
them out completely. Which is kinda nice as well. Like that big one. And I can kind of see
the big one in here. I don't want that one at all. So what I'm gonna do is just turn off those layers
so I can really see it. Make sure I'm getting
it just right. And rather than getting
rid of it completely, I'm going to put it
on a different layer just in case you never want to get rid of things
completely until the very end. So do the three fingers swipe for me and then I'm
gonna hit Cut and Paste, and that's put it
onto a new layer. I'm going to turn that off. I'm going to turn this up. And I'm going to also bring
it into my pattern layer. We can turn it all back on. There we have the beginnings
of a fun pattern. But we're not quite there yet. So let me show you
let me also show you. So I've been moving this around the page and we have to go through the
process of all the guides. So see how this one
is flipped that way. So we want to get
it back up, right? We're going to turn
this guide off and this second guide number two on. And we're gonna go through
the processes for 45.6. Hit the saving or
the selection tool, save and load selection for. So something's going on and
it's not letting me move it. I'm on the wrong layer. That's why thankfully, it didn't throw me
fully out of it. So you can still see
the Selection tool. So I hit the pattern. Now I'm going to
hit the Move tool, and now we're ready to go. Hit flip, flip. There's one. Then when
a selection tool again, selection five, Move tool flip
horizontal, flip vertical. And one more time selection six, Move tool flip horizontal,
flip vertical. So now we are fully ready to
make this pattern happen. If you choose to. Actually you know what? We're not because now I
have this funny big space. And maybe this is where I bring this bigger piece
and I'm going to, I'm going to bring it down when it slide it
around a little bit. Just fill up that space a bit. And I'm going to bring that
into our pattern group. I'm just going to move it and pinch it right into
that pattern group. That way we know
that's all there. Okay, So this is where maybe maybe you use some of these
filler assets as well. I'm going to go for a
different greenery color. Something that's not too bright. Just make sure they don't
go over the edges, right? You know what really, what
I should be doing is going back through this process
again of flipping. But I'm going to not do that
and see what happens, right? And then to bring the pattern to the layer just above
our background. And I'm also going to go into
the spaces that have Arles, make sure it's on a
hard airbrush and good good eraser tool. And just get rid of
it from those spaces. I don't want that
pattern in that area. I think we're mostly there. Another thing we could do is do the same thing
for the branches. But I like seeing
them in the pattern. So I'm going to
keep it that way. What I am going to do now is select the entire
pattern group. And going to also make sure all of my
guides are turned off. And now we have so many pattern or
layer and many layers within each group. So something that we
definitely need to check is how many layers your iPad holds. If you have the big
iPad Pro 12 inch, you're going to have
so many layers. If it's a smaller iPad Pro, you're going to have on this
side is about 55 layers. Right now, I'm working on
just the iPad 8th generation, which only gives me
about 25 layers. When you're getting ready to check your pattern
for the repeat, you need at least five layers when you're creating
your pattern, remember to use
the simple trick I showed you to add
a pop of color. Use the reference tool on the layer you want
to fill in and drag and drop your color layer below your reference layer, like I showed you in lesson
three, free resources. Take a look at the multitude of colorful creations
you can create. Go experiment, and have fun. At this point, we're ready to
move on to the next lesson. We're going to make our repeat pattern
appeared before our eyes. It's magic. You'll see how, how it
works and drops into place. If you've got, if you've got your design to a point where you're ready to do the repeat. Then let's move on. And you can always
come back and tweak a few things after you
see the bigger picture, which I probably
will need to with the filler filler
assets that I put in. But it's a good place to start
and to check your pattern.
6. Repeating Your Canvas: Are you ready to see
the magic happen? You've created your design. Now want to begin. You want to see how many layers you have left in your design, depending on which
iPad you have, the large iPad Pro, the smaller iPad Pro, or the iPad 8th
Generation Like I have. You need to know how many
layers you have available. You can begin by hitting
the wrench tool, hitting Canvas and
Canvas information. If you go to layers, it'll tell you how many views and how many you have available. If you have more
than six available, you can just continue on
in your open layers above. If not, then you're
going to want to open a new canvas at 3,000. Now that this is open, you'll go back to
your original Canvas. Make sure all your
guides are turned off. And hit the wrench tool. Hit the Add button
and hit Copy Canvas. Go back to your new canvas and hit wrench tool
and hit paste. If you're in your
original canvas, you can just stay there and
hit the same, do the same, hit Copy Canvas, and in
a new layer, hit Paste. I can do that right now since I've already
hit Copy Canvas, I can open a new
layer and hit paste. Stick with a canvas that you want to duplicate your layers. And again, if it's the new Canvas with just
the one layer that you're gonna duplicate or
your old canvas that you're just going
to duplicate onto. I'm going to stick with
my original canvas. So I'm gonna go
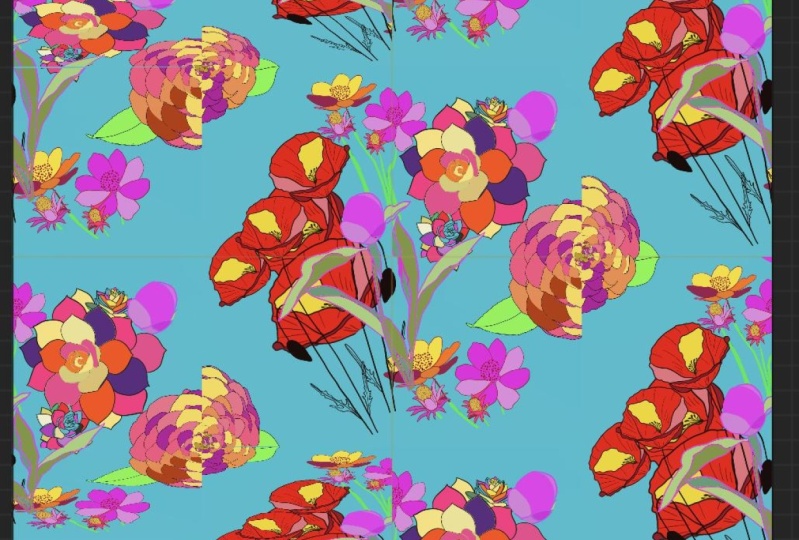
to this new layer and I'm going to duplicate it. So we have five
copies available. I did one-to-many,
but that's okay. You know what, I'm going to lock this bottom one and close it up. Then I have 123-451-2345. I can count. It's okay. Sometimes looking at things. I can't count, but I can count. Don't judge me anyway. So making sure your
pattern layers and all your other layers
below are turned off. And also making sure you're snapping and magnetics
are turned all the way on. We're going to
begin this process. One thing we can do is I'm actually going to
move this guide layer up. I'm going to open my guides now and see how I'm going to
toggle these off real quick. Just show you the guides. So you can have your
left-handed guide set if you're left-handed or
right-handed guide set, I am right-handed. So I'm gonna do the
selection such as this. These, like I said, they're just guides to
show you where you need to drop your layers into place. I'm going to open
these backdrop. And since these are below this
guide layer, that's okay. If the guide layers
were below and open, it would make it a
little more tricky. Sometimes, sometimes it doesn't, but sometimes it does. So it's always best to
have as little layers pop open as possible for using
your snapping and magnetics. So I'm going to start
with this top layer and hit the Move tool. And I'm going to take from the bottom right corner and
slide it to the center. So it's filling section one. It gets a little, a little difficult to see here
because you can see the bigger pattern
underneath and the smaller pattern
starting to take shape. That's okay. Then I'm going to take
the next layer down, hit the Move tool, and take from this section
and slide down. My cat is trying to say hello to me if you can hear him
in the background. So now I've filled this section and if
you can see already, those pieces are
snapping together. And even though they're
two separate pieces, you can see they
connect just perfectly. And that's our vertical, right? So now we're gonna work on the diagonal and see how you can kinda see section for section
three and section five. Section 4.5 are
just half pieces. Let me show you how we do this. So hit the third layer down, hit your Move Tool. And rather than
taking from a corner, we're going to take from
the left-hand side that blue dot and slide it over. So it says 1,500 here and
it's filling section three. Now, the next layer
down we're gonna do the exact same thing
from the left side. Slide it over. It's going to be
behind Section three, but then we're going to go in
the center and slide it up. See how that just
happened there. So now it's just half of it and it looks like half
of it is off the page. That's okay. That pays piece
that's off the page. Is it's going to disappear. We won't have that anymore as soon as you turn
that to log off. Now we're gonna go
to the bottom layer, see how you can see it's
just like a half section. Now, the bottom layer
That's going to be for your selection or
your section five. The same thing, we're
going to slide it over from the center
or to the center, and then slide it down. The bottom half
of the picture is going off the page and
then hit Enter Move tool. So now we have all
of our layers. I'm going to turn
our guides off. And if you zoom in, you can see that actually, you know what, I'm going
to turn our guides down. We want to turn it up, but I'm going to turn it down so we can see where they're connected. You can't see any overlap. There's no missing space, which is really great. They're all on different
layers to start taking these off. Right? So what I'm gonna do it, turn that guide off again. I can close that
guide up real quick. We're done using it. I'm going to lock
it and I'm going to close it completely. We're done with that for now. But I am going to take this and pull it all together with that
two fingers swipe. Did you see what
I also did there? If it's small enough to two-finger swipe on your
page and it fills the page. Four-fingered tap for me, gets rid of everything. So now you can see, see your patterns has happened. Let's, let's look at it. So we have the
best one to see is this branch here and see how
it comes down vertically. And it's even. But if you go over and down, It's on the diagonal and that's your half drop repeat pattern. You could tell a
little bit that I probably need to fill in some of those spots with the background
filler asset that I used. But it's a fun repeat
pattern to begin with. Another thing you can
do is turn that off and go down and change
your background. I'm going to duplicate it. I'm going to turn it back on. And I'm going to fill my background with a
different light color. And it changes the whole
vibe of your pattern. You can do that again, I'm going to clear that. And I really like some of the dark color
sometimes as well. Although now I see those
fillers, they stand out. So that's something that I
would like to change later on. Take a minute to really look your pattern and see
all the repeats. Can you see the repeats? Are they camouflaged? Or maybe you're not
trying to make yours. So camouflage, maybe like
that first one I showed, you want it staggered
and that's how you want to see your repeat happen. Just wait until you start creating more and more and more. You'll become so obsessed
with making these patterns. You'll crank them out. 12345 and a night, believe me, I have sat there and
I sat there on wet, cloudy, rainy, gross
Northwest day. And I think I've
made 15 in one day. Then you can keep changing
them a little bit here and there and make a
whole collection. But that's a different
class coming up. I'll share with you some
of my favorite sites for uploading these patterns. So meet me in that.
7. Adding Your Design to POD Sites : You have this repeat pattern. Now, what are you
going to do with it? There are so many
print-on-demand sites that it can really be overwhelming to know
where to begin. Many sites will have you upload your designs and you'll
get a small commission. There are also sites where
you can upload your designs, where you set the commission
and then you sell them on maybe your Squarespace
site or Shopify, ETC. Any of those sites where
you set the prices and mu make the full commission,
except for what? Your carrier percentages take. Society six, red
bubble in Spoonflower, all great places to start
adding your designs. Society six and red bubble
are places where you can look for items like water
bottles and curtains, beddings. So much more to add
your repeat pattern to. Spoonflower is strictly for
wallpaper and fabric design. So you put them out
there and you put it into their selection. And you can make fabric or
wallpaper for yourself to use. You don't have to do the whole part where
you're trying to sell it. If you don't want to, if
you make a pattern and you want to make it for
your own personal use, you just put it in there
and you order it away. You don't have to do
any of the other steps. If you do want to, if you do want to sell
through their site, you're going to have to
go through their steps and processes to
make that happen. If you need to look into that or I want to
learn about that, you can check that out
in my other class about simple repeat patterns with procreate five
sites like printf, full, Gooten, and print. If I allow you to upload your work and your designs
and set the markups. That way you can sell and
make a good commission on your own website
or Etsy, or Shopify. All of these print on-demand companies automate the
fulfillment process for you. And you don't have
to lift a finger. Make sure to research which
companies integrate best with your sales platform because they don't all match up seamlessly. Now, go make a design, make your patterns, and upload your designs
for the class to see. You'll be able to
see your patterns on the mock-ups
that they provide.
8. BONUS: Adding Your Pattern to a Mockup: Hey, hey it's bonus time. I hope you had time to watch the series
leading up to this. If not, scooch back
a little bit and watch the rest Before moving
on to this next section, you're going to need
that repeat pattern to move into this next bonus. Also go back to your
project resources. I've included one more mock up in there for you to
use for this lesson. Because we're going to put
our products onto mock up. You can get all of
those for free on raw pixels.com That's
where I like to get mine. Let's begin by uploading the
file into the procreate app. Once you've downloaded it, find the file that
you uploaded it to open up procreate
and hit Import. I've downloaded mine into my mock ups that I
call raw pixels. I'm going to download it
right into procreate. That way I don't have to fiddle
with cupping and pasting. It's just going to
go right in here. First things first,
we're going to add a new layer on top. I'm going to lock
the layer below. Go to your pen guide and choose a hard airbrush and
bring the size down. Then choose a color
that's really bright. You want something
that stands out. What we're going to do is
just start on the layer. Since I locked this one, I would have tried to lock draw, it would have let me
know on the layer above, we're going to draw above
your mock up layer. Also, one more thing, set this to multiply. Just start drawing
close to the edge. Pick up your brush every
once in a while because if you do like a big area
and make a mistake, then you're going to
have to go back over that area and just
follow along the edges. Keeping inside
against that line, we might see some shadows. Sometimes you'll
just have to pay attention to if
those shadows are, say, this pillow or if they're
part of the outside line. If they're part of the pillow, you want to go over
that shadow line. If they are not, then you want to go on the
inside of the shadow line. But this one I believe
is on the pillow. I want to keep it that way. Skip ahead or stick with me, but I'm going to speed
it up and get through this part and meet me when
this is all finished. The outline is all finished. See how that got a
little tricky there. I think that's right. Yes, that part was right. But then once I get into here, I don't I think we
stay on this side of it gets a little tricky
where your shadowing is, maybe this red that I used wasn't the best
choice next to this. But that's okay.
I'm making it work. If I'm getting into close, it's really because I don't
have my reading glasses on. Can you do anything without
your reading glasses? Are you at that point,
are you at that stage? I am. This one I think
actually goes back here. Sometimes it's hard to
see on those edges. Just zoom in real close. Get those reading glasses
on if you need them. We're so close, aren't we? No, it got half. We're
only halfway there. I know. We're getting
really close to the end here. No, I am. Yeah, there it is. All right, I've done all the edges and
now I can hit a dragon drop, and now it's fully
covered, fully in there. All right, we're going to do one layer above it and
make that layer multiply. And then we're going to set a clipping mass to that layer. I'm also going to
change this back to white and do the whole
layer just white. Fill in my color
graph all the way. All right, now I'm going
to get my pattern layer. I'm going to go back
to the gallery, find my pattern layer, and make sure I have my
guides all turned off. I'm going to stick
with the white, I believe. Let me see. Yeah, I'm going to
stick with the white. I'm going to hit Copy Canvas
and go back to the gallery. Open up this layer here. In this layer, click on our clipping mask
layer. Hit Paste. You can see if I turned
off the clipping mask. It's taking up the, it's taking
up the whole thing there. Because it's step to multiply. That's why I'm seeing all
the different areas covered. Okay, I'm going to put
the clipping mask back on instantly. We have that pattern and you can see some of the
shadows that are happening. Like to turn it down
just a little bit, I can see those shadows
a little bit more. It doesn't take away from
the integrity of your print, but it helps to show those
shadows which really help it to look more real. Right. Other thing you can do is I'm going to take the
snapping and magnetics off. If you move it around, as long as it's outside
of your clipping mask, you can bring the
pattern size down, which I like, but
don't go below it. You have to stay within
your design. I like that. There you have it. You've got your own mock up that
you've used for this class. Go to Raw Pixels and used the link to go to my
board for mock ups. Download a few of
those mock ups, usually finding a Jpeg. If you want to look for more with something that really
has something that's white, that I want to see three different mock ups
for one repeat pattern. Share that with a class posted
on social media creating, HM, that's my hashtag. We can see what everybody is up to and what
everybody's working on. Have fun perusing. Have fun making these mock ups. And we'll see you next time.
9. Thanks: I had fun teaching you this fairly simple technique to make half-drop repeat patterns. I know from now on, you'll be just like me and trying to see if you
can see where the repeat is when maybe you're at the
fabric store or even just at your favorite shop you go shopping for, for close. You can see the pattern
on the clothes. And can you tell is it half-drop or is
it a repeat pattern? I can't wait to see the lovely
designs that you create. Looking back at this class, you've learned the
difference between half-drop repeat patterns and
full drop repeat patterns. You've created a half-drop
repeat pattern Canvas. You've completed your
design and flipped it using the snapping and magnetics
to check your pattern. You've learned about
a few print on-demand sites in case you
choose to start purchasing or
selling your design. I'd say that was a
pretty successful day. If you want to learn how to
make a full repeat pattern, take my class, simple
repeats with procreate five. Remember to use that
creating with pH M hashtag for social media and share
your patterns with the class. I'm Katie from perch handmade. If you're interested in
any of my other courses, go to perch handmade.com. You'll find my whole list
there and a little bit more about what I do
and teach and who I am. And come find me on Instagram. Bye for now.
 Katie Simmons, Digital Artist | Perch Handmade