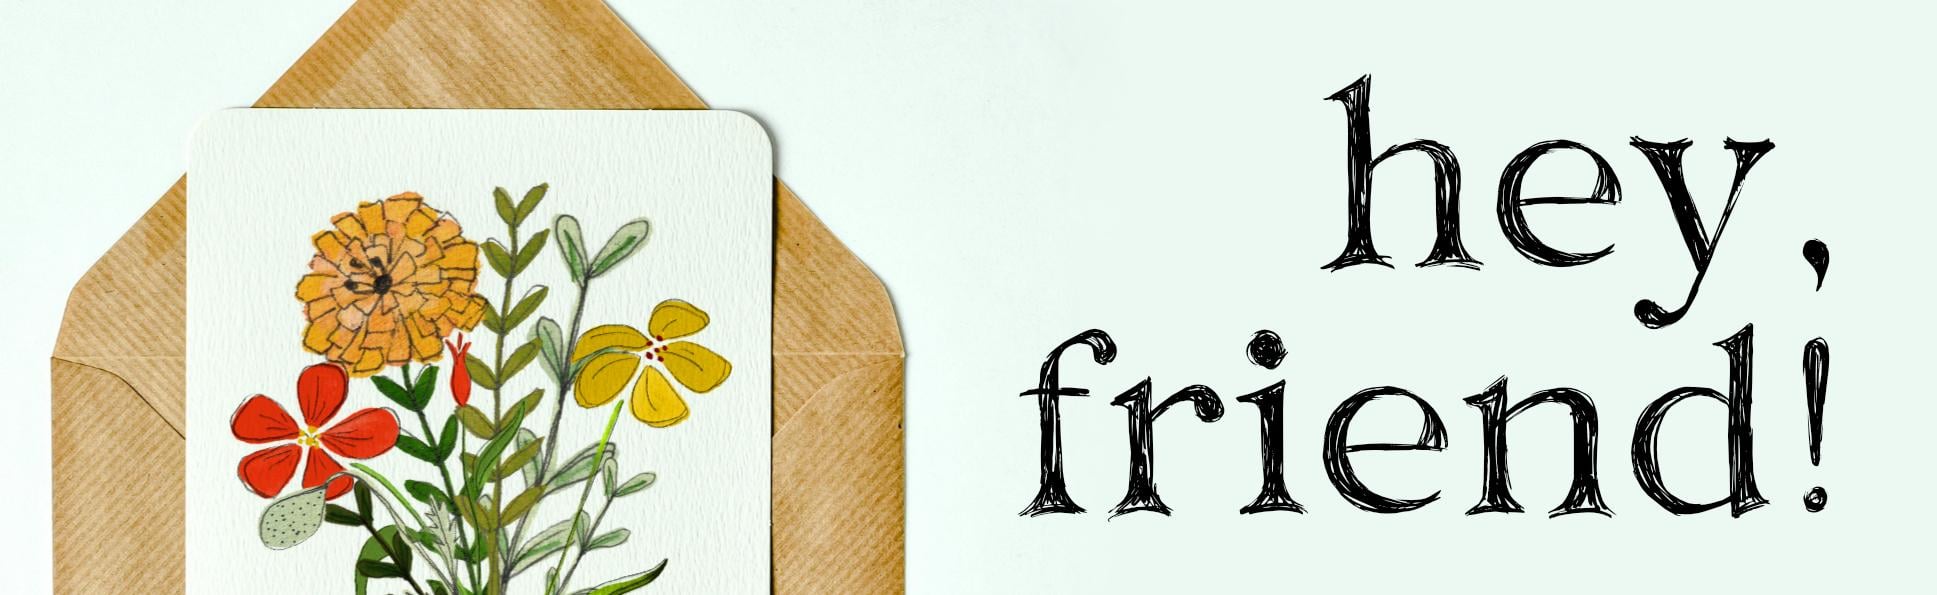
Transcripts
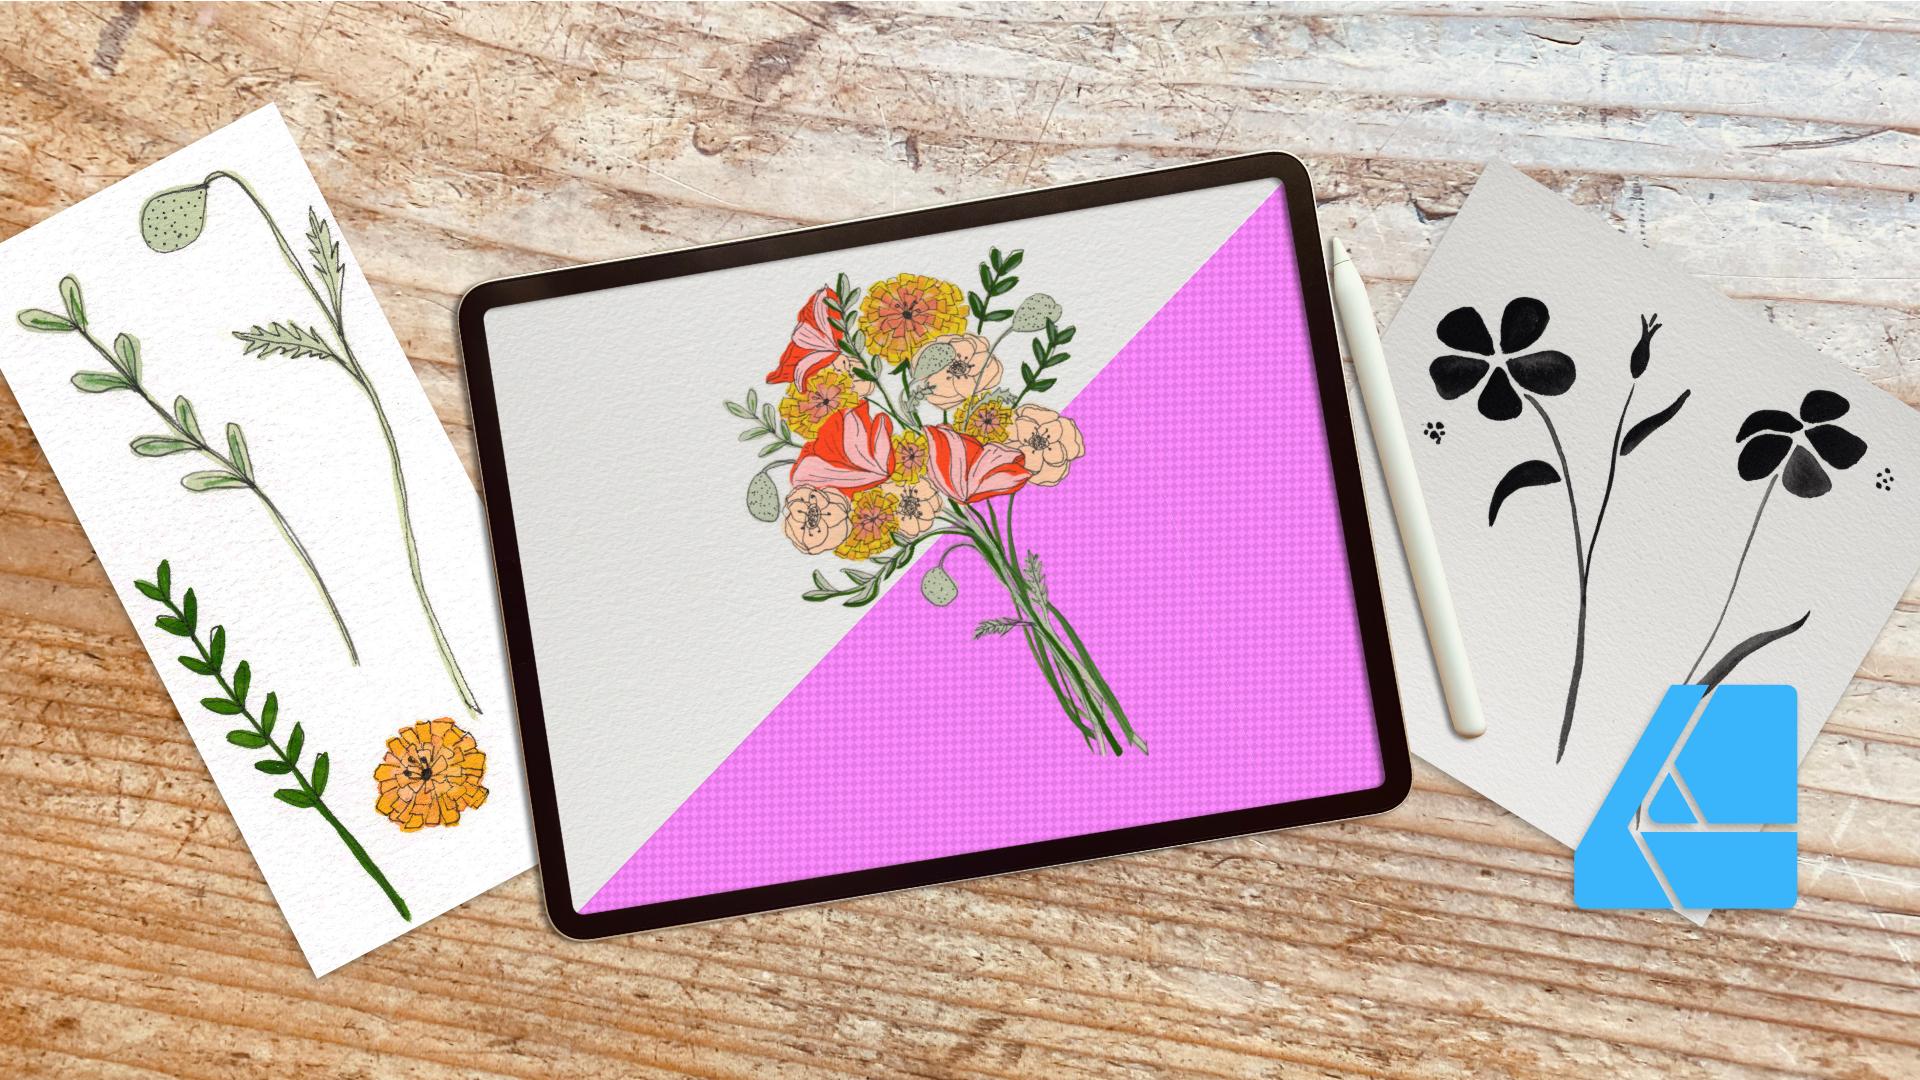
1. Welcome!: All right. Welcome to
digitizing your paintings and mastering background removal in Affinity Designer on your ipad. I'm Katie from Perch, Handmade and I can't wait
to dive in with you. Today, we are going to be
going over learning how to scan your art or
snap pictures of your art to get
the best lighting. Also with scanning your art and being able to
scan it in properly. And then we are also going to go over prepping your artwork
in an editing app. I like to use Light
Room, it's from Adobe, and you can use it for
free and still have a good set of actions that you can use
within the free portion of it. Then if you don't have that, you can definitely just use
your phone and edit that way. We are also going to be
popping into pixel persona in affinity designer and using our smart selection brush to remove your
backgrounds today. And I'll show you
how to do that. Then I have two different
paintings that I made for you guys
that you get to use and practice on today. You don't have to have a piece
of artwork ready or handy. Although, of course, you
can use your own artwork. But I've shared two
for your personal use. We can have fun with that and we'll go over that together. We are going to work on
refining your edges. And there's one that I
painted all in black, but we're going to
use the recolor tool by painting in black. With the recolor tool, you can pick up all those
shadows that come with your painting and change the color to whatever
color you want. It's really fun and I'll
show you how to do that. Finally, we are going to put
your design onto a mock up. I've shared the mock up
with you in your downloads, but you can also find it in
the Affinity Designer app. In the stock photos, there's two different types of stock photo companies on affinity designer and this
one is through the Pexels, P, E, E, L, S. If you are unfamiliar with this, I do have other classes
that you can take. To figure that out, just pop in to my website and look for my other
affinity designer apps or classes so that you
can learn a little bit more on how to
um, work your canvas. If you need to learn
touch gestures, you can go to my Youtube page
and my website and download my free guide for 30 plus touch gestures
in a finny designer. Say that a few times. Fast. Anyway, sit back, relax. We are going to
have a great time.
2. Understanding the Basics: Let's get started
and we're going to be working on
understanding our basics. I am putting on my glasses because I need to be able to see the screen in front of me. And let's dive in. I have my apps here. I already have them open, so I'm going to slide up
from the bottom. Let's go to our
downloads, right? Let me show you those
really quickly. I'm going to open
up my Notion app. I send them through
Notion to you. If you're going to your
digital downloads, this is what you
are going to see. It might look a tiny
bit different on your end because you will
probably pop up on a website. But you can download your
attributes that I sent to you, the black painted one
and the white one. And we can pull those
in by opening it. And then, yeah, me, since it's already
downloaded there, should pop up with an arrow here in the middle of these two and that's
how you download yours. And same with the mock up, but since mine is already
in my regular system, it's not popping up that way. Let me I'm going to
show you real quick how I take photos to
get the best look. Let me show you my
presentation really quick. We have a photo and to
get the best light, I try to do it like in front of a doorway or a window where you're going to
have the best light. A north facing window, where you don't have direct
sunlight popping right in and creating mega shadows
is probably the best. If you are taking photos, you want to get up as
close as you can to take that photo because you want the largest resolution possible to upload into your
affinity designer app. Same with the black one and I
don't know if you can tell, but you can see the different shadows
that are happening with the paints there and the
details that are cut out. We're going to work on getting into your designer app today. Then another thing is
using your scanner. This is how I uploaded
for you guys today. Here's go through
a little video, popping it in and doing
the highest resolution. My scanner is just
one resolution, it's like 4,000 DPI. I usually put my hand
on top to hold it down just to make sure no
extra light is getting in. You'll use your scanning app to get, you'll figure it out. Every scan there has comes with the app already downloaded. You'll figure that
out on your own. Let's get started with going into light room and
showing you how to work, how to get the best light if you are taking a picture
and not scanning. I'm in light room now. I'm going to go to my paintings. When I'm here, what
I want to do the most is I want to work
on the lighting of it. And I don't exactly want
to up the exposure, but upping the highlights
helps to decrease the white. And maybe bringing our
shadows down a little bit, upping our whites
even more here. And upping your blacks. I also want to go
to color and work on your vibrance to
bring that up and your saturation up if you need to
go to bring shadows down. Even more. I'm going
to bring shadows up. That's what I'm going
to do. There you go. Now it's popping more and
then you can crop it. I'm going to get as close
to the picture as possible. Now I can share that or
save a copy to my device. That's what I will bring
into a finite designer app. Same with this one. I'm going to work on the light. I'm not going to
work on exposure. I'm going to work
on the highlights. Bring the shadows up, bring the whites up, and
bring the blacks up. You can see already
you're seeing the differentiation in
the colors or the black. Let me see what happens
if I bring that down. I like it a little bit darker. I don't want quite
as many instead of light because I want to
see the black pop up, but I want the white really. This one's harder to crop just because I have
this one at an angle, but I can hop it all the way to here, all the way to here. There's whatever way you have to make less removal possible. This one I had painting with
other things on the page, but I was only sharing these. I'm going to hit
Done. I'm going to hit the safe device
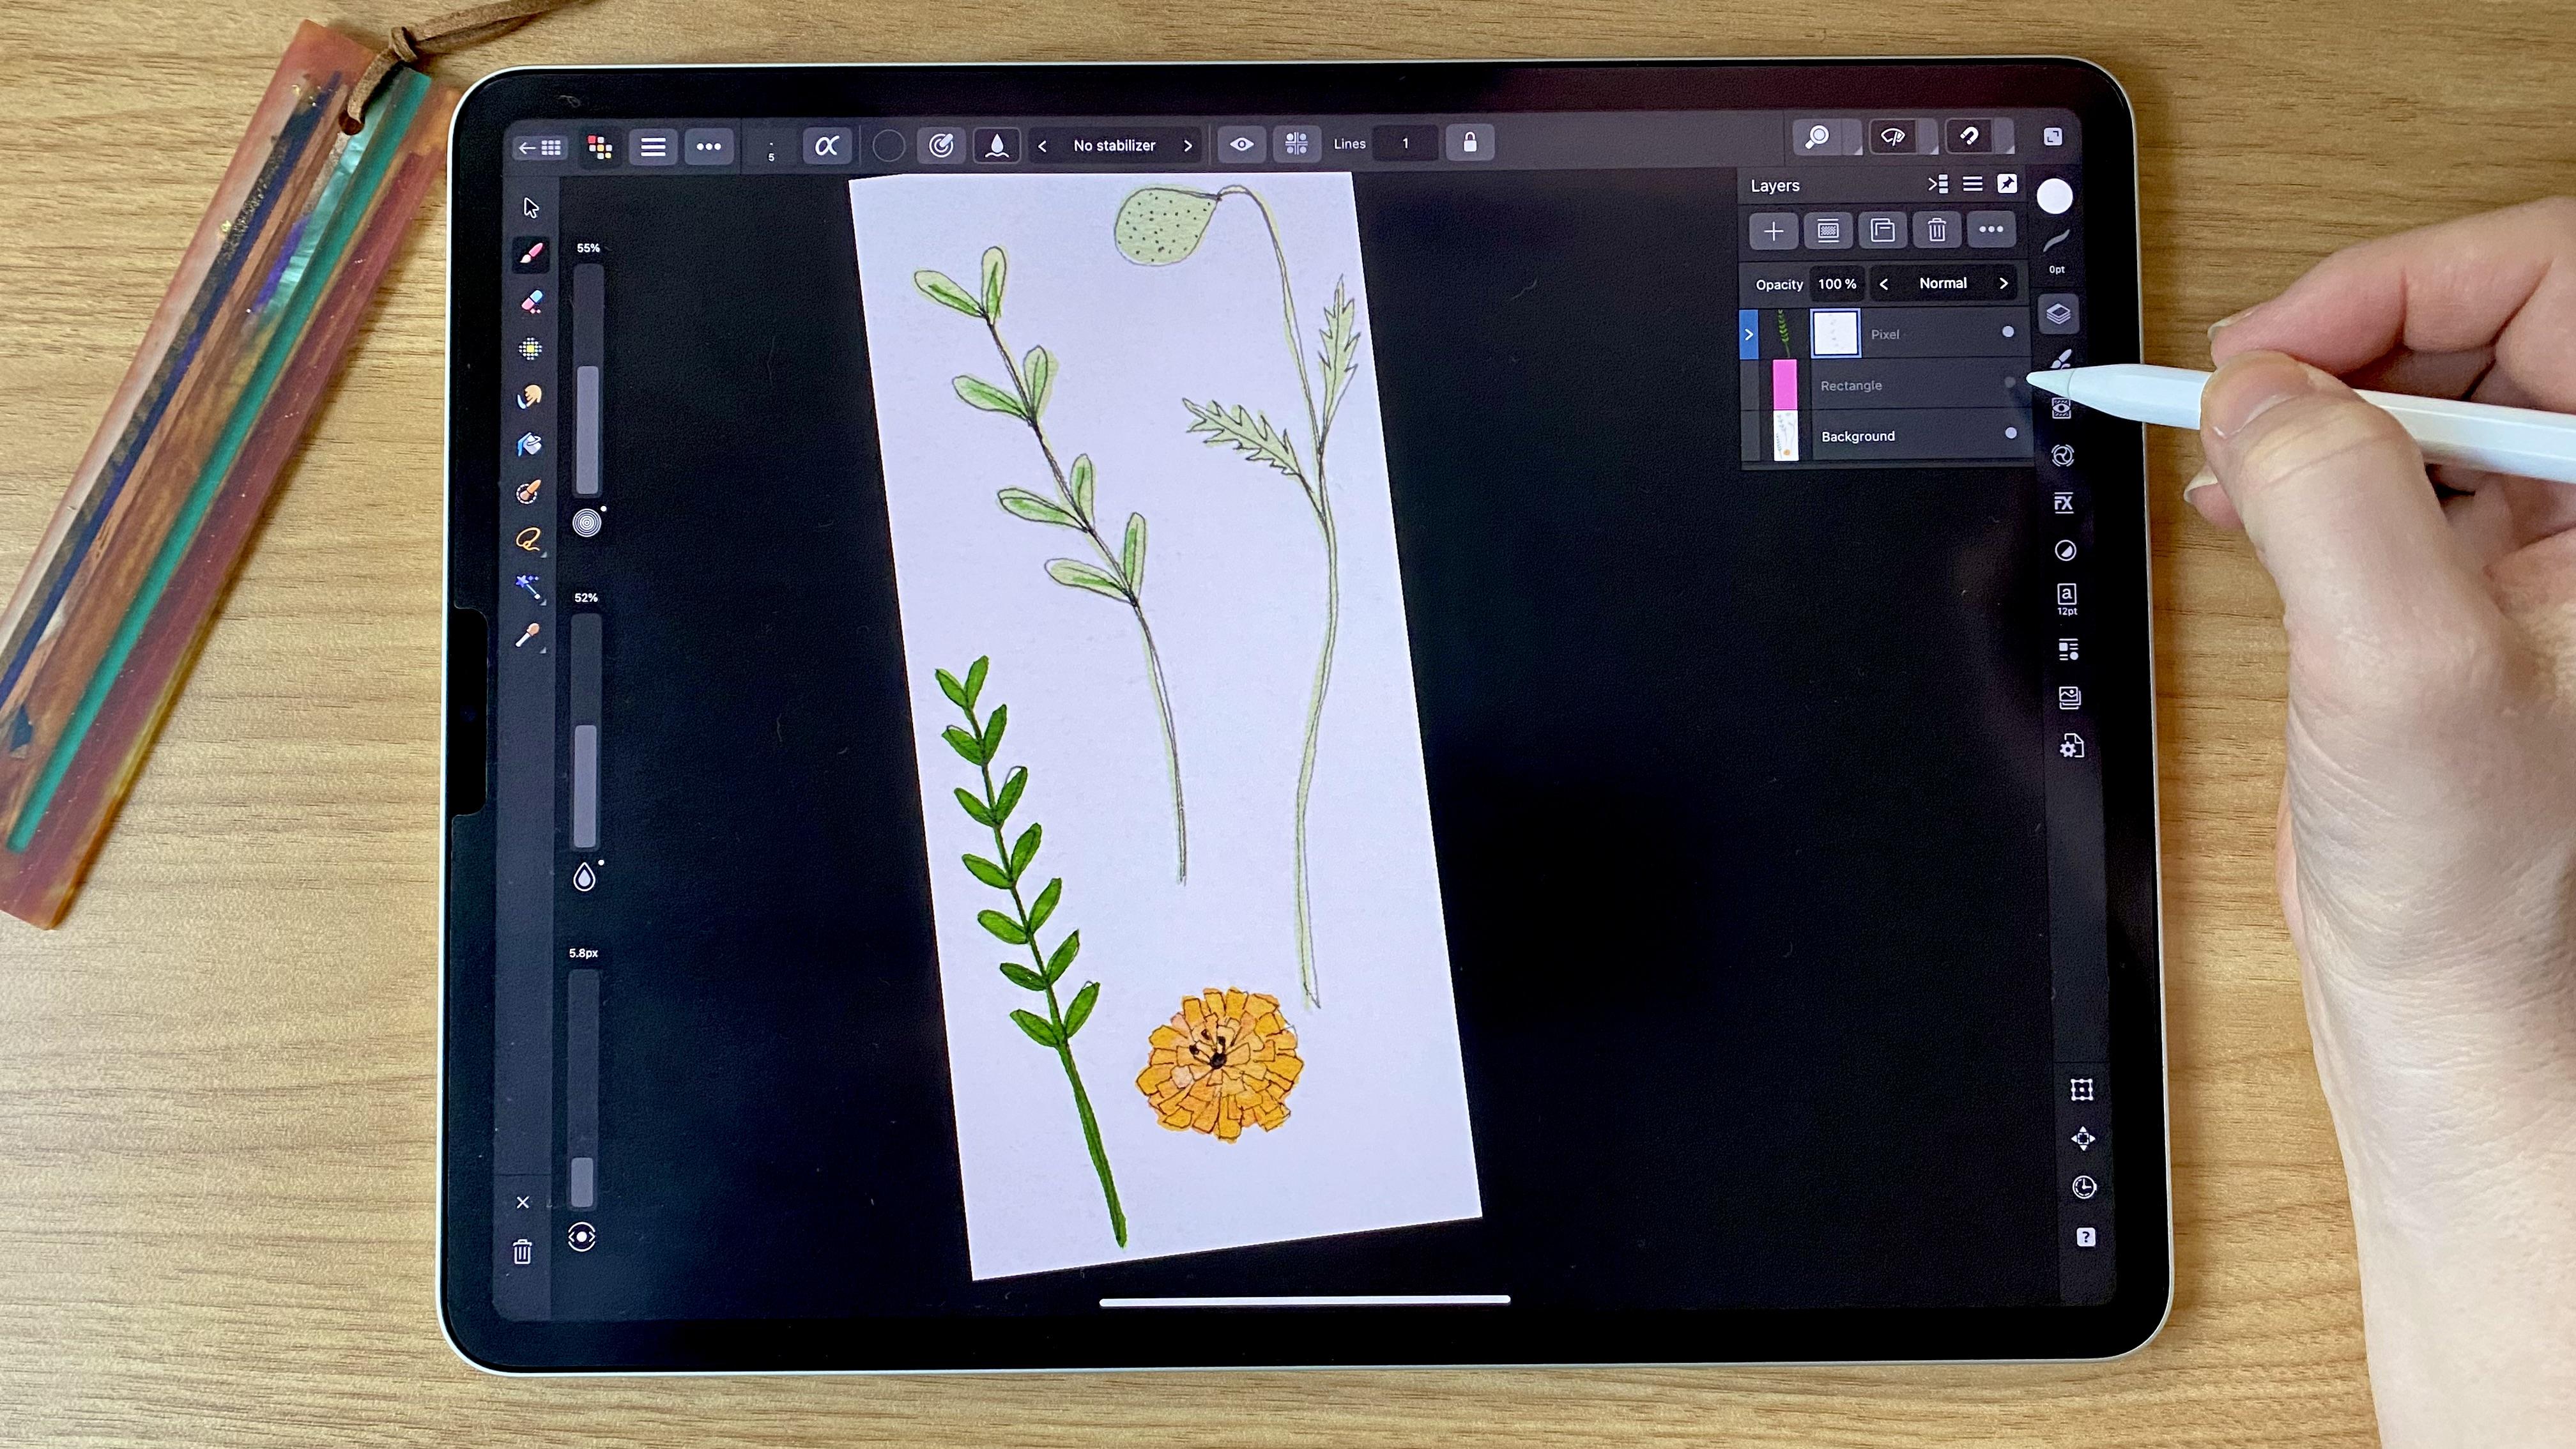
with the share up top. Then that's what I again will bring into affinity designer. Now let's open up
affinity designer. This is how mine is all set up. I have mine set up with
different projects. I it just makes it a
little more organized. I'm going to go to my
botanicals because that's what I am going to be
pulling into today. Instead of working on
a specific file size, I'm going to open up my photos. I'm going to import
from my photos, and I'm going to the black one, and that's going
to be a full file. And I'm going to hit the
back button and I'm also going to import this one. The reason I do it this way, instead of opening up a document or creating a
new document this way, I get it the exact size that
this was scanned in at. I won't be making
it super pixelated. If I make a document that's bigger or make a
document is smaller, I want it scanned in
at the size that I am going to be wanting
to save these pieces at. There are a few different
tools I'm going to show you in the top corner that
we're going to go to pixel. That's our pixel persona. We have these three expert
persona designer persona and pixel persona. We are going to work in
pixel persona today. We're also going to be using
our smart tool brush, right? You can find your
brushes by hitting in the corner the question mark. And we can see that's the
smart selection brush. We might use a little
of the freehand selection brush as well. And we might use the eraser
brush a little bit today. But that's all we're going
to be ing for this class. You can pinch and turn to
get where you want to be. All of your pictures
are set into layers. They always pop in
as a locked unit. I can unlock that to
be able to work on it by sliding or tapping on it. And hit unlock. That gives us the opportunity
to work on this layer. I'm going to go
out and I'm going to unlock this layer too. Slide to the left a
little and hit Unlock. That gives us the opportunity
to work on those layers. We are going to be moving on
to the next segment module, getting some hands
on practice in removing our backgrounds
in affinity designer.
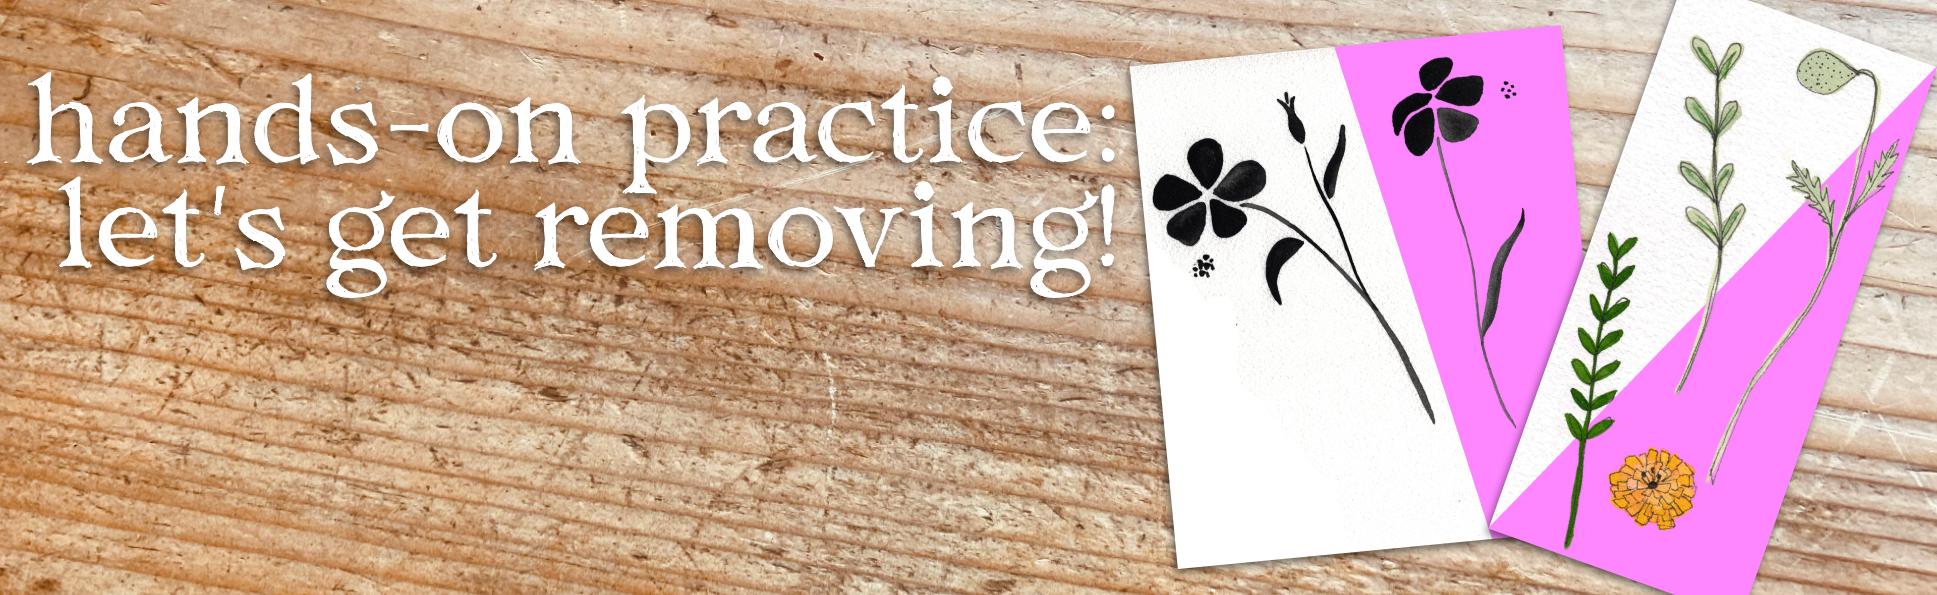
3. Hands on Practice: The first one we're
going to be using is we're going to be
popping into that, the black flower picture first. Let's go over there
and open this one up. Okay, so we're going to be
diving into this black photo first and learning how
to get that background. We don't want all of this right. One other thing we can
do while we're here. If we feel like we need to get rid of more of the texture, we can go into your adjustments. You can change the
background here more. I like to go into
curves sometimes to do this we can just see what happens when we bring
the top one up more. Just sliding across the top. See that background
is getting wider. But then I'm going to bring the bottom one down so I can get my black
to even blacker. Let me see how that's looking. The other thing I do
is I want to, again, keep the detail of the
flow from the paints. I don't want to do it too much, but I can do it just enough. All right? Okay. And
that seem to work, okay? Now what I'm going to
do is I'm going to, since I change that working, I usually slide to the right
to get both of them blue. Another way to do that is
two fingers on the bottom. And I'm going to hit Group. And I'm going to hit the
three dots over here. And I'm going to rename it just so I know
it's our flower group. Right? Not weigh anything
I do on this full layer. I'm going to work on it
altogether in pixel persona. Let's go to pixel persona
now and work on that. You can do the adjustments in pixel persona or
in designer mode. I can come over to the smart selection
brush and tap on it and you have
different sizes, right? You can see that
happening right here. What I'm doing here is I can
choose to put it on here. But see that took everything. See the little
marching ants here, that took everything there. It's much too large. Usually, if I tap here
on the top number, maybe I'll put it
to 20 to start. I'm also going to do two fingers to take away those marching
ants for what I did before. All I need to do is
working on that design, but see how it's
picking up the white two, it's still too much. I'm going to hit
two fingers back and I'm going to
change this maybe down to ten and
see what happens. All right, that's
better. See it just did the marching ants around
the outside of the black. I can pretty much just
tap all of those. And you can see the marching ants around
all of the flowers. That means, I know it's working. And I can just slide
it down the stem. And I've got that whole, this whole, I'm going
to work on that one. Ten for me is working
great right now. But by zooming here, you can see the marching ants goes over the edge a little bit. But that's okay, because
I'll show you how to adjust that in a minute. Because you can do right now, it says add up here. That means we're adding
to our smart selection. But with one quick
tap on an arrow, I can hit subtract. I'm going to bring this number
down to, let's say two, to try and get rid of that little white
bit that went over. Now see it took more of that and I can just hit the arrow over. Or I can choose by
tapping on the ad. But I want to hit Ad. I'm going to change this to one. And see what happens. Now, I could get that a
little bit more detailed. That full piece is
already done there. I'm going to bring this number back up to five, let's say. I'm going to work on
getting this bit, I don't really need any of that. I'm going to just keep that out. I'm going to come
to this one because I know the five works best here. I'm going to stay on that five. Come over to this stem here. Just go up the stem. Got my marching ants
all the way around. That one's all cut out. See even got that little
dot that's missing, which is really fun. Actually got
something over here. I'm going to subtract. Get rid of that. I'm
going to go back to add. I'm going to bring this number back up to ten because I knew it worked well for
the petals before. All right? I have my marching ants around all of these pieces, right? So what I want to do
next with three fingers, I'm going to swipe down, bring this over to
the side, swipe down. I'm going to hit Copy. And I'm going to hit three
fingers and swipe down. And I'm going to hit Paste.
Let's see what happened. Oh, I did something
a little bit off on. I forgot to do one thing. I'm going to delete this one. It's still swiped,
but I'm going to hit Background and I'm
going to come up here and I'm going
to hit rasterize. For whatever reason it
wants it to be rasterized. Now, you can still see the marching ants
happening, right? My selection is still selected, which is really great
with a finite designer. They're selected
until you select. Let's do it here, let's make sure we're on
our background layer. Maybe that's our
trick copy paste. There it is. Then I can
turn this layer off. And we just have to work on
the background, not the full, but it helped us to take away the background
or make it easier by having the
adjustments turned on. The way we turn
those marching ants off, I don't know
if you can see, you can see the pixelated or the transparent
background there. Right? The way I usually turn the marching
ants off is I hit the freehand selection
and outside of my picture I just do a line down there. You have it. Let me show you. I'm
going to go back to the designer and I'm
going to tap here, but just to make sure
that my layer goes underneath and if I show you, just move up color, I've made the rectangle
underneath the background. You can see that, you can see the color
differentiation. And you can see the background has been fully removed
from our painting. I show you this one here,
that's still there. And then that's the new one
that is the quickest way to work with paintings in
removing the backgrounds. As you can see, it
worked really fast. And we had a couple
mix ups there, but it's still really
quick working with black photos or black paintings, if you really want
to digitize them, it makes it easy. Don't worry, we can change
those colors later. But working with black to change the colors makes it the
easiest possible to trust me.
4. Advanced Techniques: Our next module, we're
going to be elevating our design and learning some
more advanced techniques. Excuse me, screechy. And we're going to
be working with that color print
that I gave you. I'm going to open mine up. I'm going to open this one up. This one is a little trickier. That's fine. Because we can
do the same thing with it. And going to get my
glasses back on. This one, we're going to use this color painting and learn some tricks to really define
some of the lighter colors. It's harder to see, I don't know if you can tell, but we're going to have
some pieces missing here that will be really working with
lighter colors is harder for moving
the background. So we are going to
make that work. I'll show you how now. Okay, I'm going to go in. First off, and remember to hit the little button
here and hit Rest Ice. That's the first thing
I'm going to do. Then I still want to go to my adjustments because I still want to
get rid of those. I'm going to see
what happens with the curves on this when I try to up the brightness of it. But without taking
away the color, this one, it's really taking
away more color there. I've got to make sure
that doesn't happen. It's too much. I'm
going to go two fingers back and start a
little bit over. Let's see, let's see, that's where I was at. Let's go back. You can also hit this button
that hits to reset. I'm going to pop
that brightness up a tiny bit and that darkness up a tiny bit to get a little bit more
definition and contrast. And it's still there,
but we're going to work to remove that right. Then I'm going to
slide to the right. Since this one is done, I'm going to slide to the right. And I'm going to hit
the Group button. I'm going to rename it Ridge. Okay, Then this is
where I'm going to now go to Pixel Persona and
hit my smart selection tool. I'm still at ten
because that's where I worked last and it'll
always go back to that. This one I might, let's try it out and see what
ten does on this painting. Ten is working for me, but it's not getting
this piece all the way. I do want to get
all of the pieces. We can refine more of that
in a minute. Keep going. Get all the pieces.
I'm going to do the subtraction in a little
bit with a lower number. And get everything you can
with this really quickly. Right? I'm going to go down, you're going to have to just see which number over
here works best for your painting if you're really missing
a ton of stuff. Like I'm missing a little bit
here, but it's not a ton. I'm keeping it at ten. But if you're missing
a ton of stuff, then just change this
number over here. That's your smart selection
brush number, right? It's the size of that brush. And I want to make
sure I get, oops, a good amount of the detail there and get all your pieces. Oops, this one is going to take a little bit
more, but that's okay. As you can see, I'm going
fast and that's okay because there's a little bit more
detail for refining. Then I'm going to show
you that will help get this and make it easier to connect all
the dots for real. We'll have all those
pieces connected. This one's darker, I can
just go up this one. And I am going fast on this
because this is a live class. Sometimes I would take
a little bit more time. See this one going that fast
already took out this piece. I don't know if you could see the marching ants
happening here, but it already took
out that little bit, which is great for me. Okay, now I'm going
to hit the button over here and hit Subtract. I'm going to bring this
down to say three. And try to get these pieces that need to lose some of that extra color or whiteness color, the whiteness. Bring that in. I want to see if that one will
work. And it will. Nope, it won't. It took
out too much for me. I'm going to wait on that bit. Really? You're going to I'm going to bring this down so
it's not working for me to get that piece. Like I said, we can
fix that in a minute. But I want to get over
as much as possible. I'm going to do this,
I'm going to leave that that one did work, I've got the bit going,
that one didn't. It's just a trial and error. Now, I'm going to open up and
go back to my background. This one I'm going
to go to refine. Okay. So it just made by refine. I've got the matt. It gives us a background
with the overlay. Right? You can
change it to black. If you want to have
a black background, a white background,
you can change it. That one makes it really
hard or transparent. But I usually just go to the overlay because then
I can see the colors. I can see where it is. And then I'm going to, this is going to be
creating a new layer. But I'm also going to come in here and I'm going
to keep it on map. I'm going to go over, still in my smart
selection brush. I'm going to come over here and change my width to be
something a little bit smaller. See how the color is
filling in there? It means that it's filling
in that space automatically. It's not getting the
other space of the black, it's just doing
the white pieces. Then you come in here, if you
need to make that smaller, you can make that smaller. I'm going to say ten and see if I can get that
defined a little bit more. It's refining those
edges for me. You can do it a couple
of times if you need to fill in those spaces. Right, anything that
you see is that red color is going to be
edited out a little bit. It works well if you've got those little white bits in there that you
want to take out, especially like this
big piece here. And it helps to kind of
fill in those spaces. Right, I'm trying to go fast here. My computer is not loving me or my ipad is not
loving me as much. It's just about refining
those edges just a little bit to get it to
where you need to be. Then we'll do now and see
how much you've progressed. Okay, get this piece a tiny
bit more. There we go. All right, so it's looking
pretty good to me. So what I'm going to do that
one a little bit more now. What I'm going to
do, I'm going to hit a new layer, right? And then I'm going
to hit the checkbox. And what it just did was took
it away from my background, turned my background off. You can see that
it still kept the original and made a new
layer inside that has, that has all the
different pieces. If I go, I'm going to
go back to designer and make that layer
that I'm starting at, go with my circle or square. I'm, let's give it a blue color. If I build it out
now you can see the pieces that are taken out. But you can see a little bit
more of the edging here. I don't know if
you can see that. I'm going to go in
and I'm going to refine this picture
a little bit more. I'm going to go back
to my pixi layer. I am going to just go with my eraser and just
see what size it is. Let's see what sizes
my eraser and come in and smooth up those edges just a little bit more just to take away that
extra bit there. If you want to, you can go to the smart selection brush
again and go to your refine. I forgot to do my
smart selection. You can go in and try with
the smart selection again, just to refine it even more and help get some
of those bits out. I'm going to hit that
back up to five. That will help get those
last little bits separated. Sometimes you have to
do a little extra work, but once you get good at this, I want to get rid of that piece. Then I'll go to subtract and get rid of that piece.
Going to go back to add. It's just going back and forth and it's not as fast
as some programs. But this, I feel like
is one of the faster, more effective ways of doing it. Because there's programs out there that will do it for you. You're going to be paying
this monthly price for it. If you learn to do it
efficiently and fast in your affinity
designer program U, you're going to save a
ton of money for me. It gets me into this then moment where I'm just working and
working on my artwork. And it gives me a little bit of slow down time because I
don't know about you guys, but I feel like
sometimes I don't slow down enough when I'm
working on my art. This gives me that
moment to slow down, chill out, be present with my
artwork and go from there. For this one, I'm
going to hit Copy, and then I'm going to hit Paste. You can see like from the original that
had the spots there, and then take that away, and then they're all gone. I'm going to come over to
get that off of there. It's because I only did the one. The other ones are
still over there. But I showed you just how
to clear away the one. Now that one's ready to put into your assets and I
don't know about you, but this is a great way to save things to
work with later. Do you guys know about assets? I have a whole class on assets, but if you use the
Assets button, you can hit the button here. Let me go to my
Botanicals, or actually, let me go to my PNG Assets. What I can do, I already have it set up and I can go to Floral and I can tap on the hamburger and hit a asset from selection. Since I only have the
one layer selected, I can hit Add Asset
from selection. And it's in my
program ready to be used to add any other time. Which is amazing because then I can just drop it in
whenever I want. We're going to be going
into the next section and learning to use
the recolor tool. We're going to go back
to those black paintings and I'm going to show you
the really fun thing. You can do that.
Okay, let's move on.
5. Recolor Tool: The recolor tool in
affinity designer is really perfect
because you can take those black paintings that
you'll be able to see the paint swashes and the
textures that they create. What is really fabulous is
when you're working with it, you can really see the
definition of the painting. If you've got a watermark
or like a bleed out, you can really see those in the black and you think
that maybe you wouldn't, But it picks up for digitizing really well
and being able to change the color from black to any other color is
easiest when it's black. Let's begin on that. Right now we have our black painting. We have started working
on what I'm going to do. I'm going to turn
off that pink layer. I'm going to turn
off the black layer. Right, I'm going to copy. I'm going to duplicate this one. I'm going to move it out of my flower background.
Am I going to do that? Let me see. I go to do this, I'm going to duplicate this
too. I'm going to take this. And this one I'm sliding both of them and
I'm going to wait till they hover a little bit and move them out and create a new picture. Right. I'm going to turn this one off and I'm going to slide it over
and I'm going to lock it. I don't want to work
on that layer at all. I guess we can work with that off because
it's more like the original. But I guess that depends
on what you want. I like the darker of
it, what I can do. What I'm going to turn it off because it might change later. I'm going to get rid of that. It worked well for
getting the white out, but now I'm going to work in my adjustments on justice
layer It wanted to move. I'm going to lock that because
I don't need to move it. Actually, scratch that. Unlock it, because
what I do want to do is separate my pieces. First, I'm going to go
back into my pixel layer. Okay, I'm going to come back to this freehand selection
tool and I'm going to put each of these pieces
onto a new layer. Starting on this one, I'm
going to circle here, I'm going to do that
three finger swipe down. I likes it better when
I'm off the screen. And then I'm going to cut, I'm going to three swipe down. And I'm going to hit Paste that, put it onto a new layer, right? I can rename that if I want to, which might be easier. Center one. Okay, this flowers
could be flower one. I'm going to go back
to the background. Still on here. And
now I'm going to go around the
flower here, right? And three fingers cut. Three fingers paste. And it's okay that
I'm separating them all because we
have the original still below and
flower one petals. One might have just said
petals, but that's okay. Get, get where I'm at. I'm going to do this one. Every time you do a new one, it de, selects the old one
and redoes the new ones. The three fingers cut,
three fingers paste. Rename bud one back to original. I'm going to just do
the stem all one color. You can change do that
separately if you want to. Now, I got over onto the side. I think that's I'm going
to Yeah, it's okay. Because I can erase
some of it. Hit paste. Okay. Yeah, That's they're fine. I just wanted to make sure. And then stem. Okay. So now we have, those are all one flower, right? But they're all separate pieces. What I can do is I am going to make groups
out of each piece. I'm going to hit the stem one and hit group
right, Bud one. And hit group, hit petals
one and hit group, hit center one and hit group. I'm doing that
because if I didn't, when I changed the colors, it would change everything. If it's hidden
inside of a group, then it will only change
what is in the group. Let's start, let's
start with our stems. Okay, open the stem group. Come over to this adjustments. You can see it pops up
and says adjustments. If you're hovering,
if you don't have an ipad pencil that
does the hovering, you can always
find it by hitting the question marking the bottom. Go to adjustments. Then we're going to come down to the here
and hit Recolor. It immediately goes to red. That's what it works
from the beginning, every single time I'm here. But I want to do something
else and I want to find out what the H L is. I don't know if you worked
with your colors before. If I go to Swatches, let's find some trendy colors. Okay? No, those aren't
the best colors. Let's my we've got this acrylic wash colors
because that's what I painted with painted
using my acrylic wash. We're going to just
use these colors. If you come to one
of these colors, say this stem color, right? If you go to swatches
and change in, go out of swatches
and go back to color, you can change how
you look at this. The L slider hue, saturation and lightness slider gives you numbers
over here, right? I know that the hue is 83. The saturation is nine
and the luminance is 40, or the lightness is 40. If I come here, I can
hit 83, hit, okay? I can hit saturation and
hit nine and hit, okay. Then the luminant,
I can hit as 40. That gets me to this color. Hello. How easy is that to
recolor your paintings? I love it. Okay, let's go back now. Anytime I want to pick a color, I'll come to my swatches. Maybe I want the petals
to be this coral color. You can do this in swatches or you can do it just in color. But I love working
with swatches. I know where my H, S, L slider is. I'm going to go
back to that one. I'm going to close,
and I'm going to lock it. We're done with the green. Let's find my petals.
There they are. There's my petal group. I'm going to open up. I'm going to go back to recolor. It goes back to the red like
it does every single time. But I know my HSL sliders are. If I come here, hit
5909, this one. So close 200 and then the
luminance or the light. This is 68% he. It's looking pretty similar. It's looking just
the same, isn't it? But you still have the definition of
painting added to that, and you can change
that later on. I'm going to make that one. I'm going to lock
it, my bud next. I want my bud to be
a little bit darker. So I'm going to go to my color here and figure out a
color that goes with this. But maybe when it's in the
bud and then it opens up. But in the but it's darker. So, I'm going to go
back to my HSL slider. I'm going to find
that layer I'm on it, I'm going to hit my adjustments, come down to recolor, look back at my color, and I can go and type in 11, type in 99 again, type in 54. That one is just a little
bit darker than that one. It's hard to see in
this camera lighting, but it is just a
little bit darker. And now I'm ready to work on the center of my flower
lock, that layer. Here's my center. Okay, come
over adjustments, recolor. What do I want this one to be? Maybe I just want this a little bit darker
than the last one. Maybe just keep in
the saturation. Maybe I keep it in the same hue, but bring the saturation
down and bring the luminance or lightness down to be a little bit darker. Then I pop in here, I still have 11 that's
based off of this color. Right now, it's 63 on my saturation and 30 on my
luminance or my lightness, and it's a little bit darker. And you know what, I still want to make that a
little bit darker. What I can do is I
can also come over here and slide up or slide down. You can see the color change. You can change that
color however you want by just sliding
up and down the page. I want that a little darker. Since this group is over here
and not in the center now, I can come over here
and click my Move tool. I can pop it into the
center of my flower. All right, you guys,
we just change the color in our and
had fun doing that. Let's jump forward into the next lesson where we're
going to create our project. We are going to take
our things that we've removed the background
on and we are going to put it into a bouquet.
6. Project Time: Remember those assets? Sometimes I get a little
bit behind on this. I am going to
resave this flower. I have a different option, I can unlock those. I am going to pull
them all together, sliding to the right
on all of them. Or you can tap on one and double tap on the bottom
one to bring them together. And I'm going to hit
Group and I'm going to rename Coral flour. Okay, I'm going to come over here to my assets and I'm going to add a new one into my
assets. Okay? It's there. It's also here and
a different color. And I have this flower here, and I have a couple other
pieces already saved. Now what we can do, I can open up my document. Let's bring it. Let's make this one just
2000 pixels square. I'm going to create an artboard. I don't want, I guess
it doesn't matter. I'm going to keep my
background white. I could say make a
transparent background, but I'm going to keep
it white and hit new. Now since I have them
saved in my assets, I can come together and just start placing my pieces in here. I have this one. I'm
going to hit on this one. This one I'm going
to hit Insert. All right, See how before I must have saved the other
ones in a smaller size? Like I said, working and saving them in bigger sizes is really helpful because it won't
pixelate too much. But we're going to
work with this one, how it is just create cute little buka with
just these pieces, right? If I want to, I can hit flip because I feel like that one needs to be going
the other direction. I can insert this guy. And another thing you can do is once you've inserted them, I only have a few options, but I can change the color again using the H SL to recolor. But it's different with colored
photos or colored images. I'm going to group
it, open it up, and hit the HSL, or
hit the recolor. It's going to go back
to the where we're at. So what I'm going to
do is I'm just going to start pulling through, let's see, let's see where the color green might be on
the HSL platform, right? 682750. Let's see what happens when I change the
hue to 68, right? It's bright green. If I change a saturation to
27, what's going to happen? This one might work out okay. Let's see, 50 now. That one made it too light. This is, you have to fiddle
with it a little bit, but I do like that darker
background that's happening. And you just make your pictures happen the
way you want to have them. Right. And that one seems a little big for
me, if that's okay. I'm going to also add my
yellow guy on top of there. And it's a cute
little bok, right? I'm going to add
this one in again, but this one I'm going to flip. Then I can change the rotation, but I can also change
the shear on this maybe. Let's see what happens
if I hit seven. It changes the angle
a little bit more. It's not quite the
same as the other one. Let's see what happens if change where the anchor is
that changes anything. A little bit. So I can change. Since I'm working in that, I can change that now. And that one, I do want to
change the color again, group it, and go to recolor. Let's say I knew the other
green was 68, let's say 30. See what happens. It
wants pretty light. I'm going to change
that. Maybe change the color a little bit. I'm going to make it
a little more green. There we go. It's all about
just fiddling with it and making it work for you. Right. Okay. So from here maybe I'll add
one more flower bud in. I'm going to add this one. This is the one I did before and I want
to pull that one to the back because I'm just using it to create
a little more color. Right. That's like how that's working. I know what I wanted
to do. I wanted to change the skew on this
or the sheer on this one. Again, let's see
what happens there. That's too much T, all right, We have a bit of a fun little
design happening. The color of the flower is still a little dark for me
or a little too red. So I want to change
that a little bit more. Let me make sure I
opened up the group. Okay, I've already
started that one. I can bring the saturation
down on that I liked. Yeah, see I like that
helps pop bit more. Okay. Now I'm going to move the whole group again,
just a tiny bit. Center it a little bit more
because I want to have it. So it looks like the
bouquet is held together. Right. Okay. Now I have all these pieces tapping
on the first one, tapping on the bottom one. And I'm making that a group, and I'm just going
to write bouquet. Okay, there's my bouquet, right? I can move that whole group. I'm going to center that. If I want to bring
that size down, I can bring that size down. I'm going to lock that
for just a hot second. I am going to show you next
how to find those mock ups. First of all, if you
already downloaded it, you can just pull it into your program and
I can show you that. But I also want to show
you where to write it. Okay, Come over to
your stock photos. If you type in Pexels, there's Pexels and
there's Pixabay. Those are two places to search for whatever
you want, right? So I'm going to type in search card mock up and hit the search button. There's the one that we
have from the class. I'm going to just bring it
over here and drop it in. And clearly it's way too
big, but that's okay. We can bring that
size down, right? And use the move
tool to bring it down so it fits your canvas. Mine is a little big, more narrow than our canvas, but I can adjust that later. And get it just to
fit just right. Yeah, I'm going to
put that right there. You can also bring it in by
hitting the sandwich up top and hitting place and finding it in your files
where you saved it, or if you saved it
in your photos, wherever you saved it. Now I can have, this is my mock up image, and I can put it and slide
it below my bouquet. Clearly, my bouquet is too
big for that one right now. But I can unlock it
and change its size to fit for the sweet
little mock up. Right? This is where you can have fun and maybe you add
some words to it, or maybe you put it
on some other design. See how I want it
popping up here. Next, what I can do, I'm
in designer mode here, but what I can do is come
over to the crop tool, that's your vector crop. You can do it in
both in the pixel persona or Infinity designer
vector part of the program. You can just slide that up and crop it right at that spot, right it looks like
it's popping out of that section which is cut. I'm going to go back to move and see if I feel like I want it a little
bit bigger on there. But there we have it. You can send these out and save them and send them
off to people, or you can put them on products, and it's a great way to see how they get onto
products later, which is really fabulous. Oh, one other thing I
forgot to show you. Let me show you real quick. Let's go back here.
You see that? This is on watercolor papers. It's a little ironic. We took it off of watercolor paper, right? But what I want to do, I want to go into
the bouquet, right? I want to change, instead of pass through, I want to change it to
multiply By hitting multiply, it just gives that one
extra detail to make it look like your mock up
is on the watercolor paper. I don't know if you
could see that, but let me show you. If I go back to normal, it goes from being
pretty like right on top digital and changing it to multiply and it looks like
it's right on the paper, which is really pretty sweet. There you go. That's how
we created that design. And removing your
background from, from your painted artworks.
7. Thanks!: I really want to thank
everybody for showing up today and watching
along with me. If you missed a live, you can pop back in later
and watch the replay. And I'll have that up in
about a week and maybe less we can move together. And show me show
me your artwork. Right. Show me your artwork. I'm Katie from Perch Handmade. Go to my website at Perch Handmade or
follow me on Instagram. If you are creating your removed backups
along with the class, then share them and use the
hashtag creating with HM. And we will have fun looking at
everybody's artwork together. I do love to share. If you do create something, please please show
me your artwork. And I'd love to see if you are removing the background on
your own original artwork. Remember, the things I share today are for
your own personal use. Don't put them onto products and try to sell them
because I did take the time to paint those and make those and offer them up for you. I love sharing what I'm
learning with you and I hope that we can go together on this fun adventure
of learning new things. All right, thanks for coming
and thanks for joining. I'll see you next time.
 Katie Simmons, Digital Artist | Perch Handmade