Transcripts
1. Introduction : Do you struggle with getting a party put together
and planned? Maybe you don't quite know
where to begin or how it's going to end up without being too stressed the day
of your party, I fell in love with
event planning. Gosh, I guess when
I started planning my own wedding, 25 years ago. It was always those
little touches that I saw in magazines
that really caught my eye. I've been in the
hospitality business for more than 15 years now, I began with floral design for weddings and most recently
bartending at a whiskey bar. Obviously my path has changed. I'm here to teach
you guys how to add that extra touch to your party. At home, I've always loved making sure my drink table was
set up just right. I didn't need the
fanciest equipment, but people were
always taken care of. Today, I'd like to show you how
to elevate your drink bar with custom cocktail
recipe cards. Something like this! Having that
special touch of a recipe card actually
helps you in the long run, because who wants to be making cocktails all night
for your guests? You probably want to
be able to relax, but also give you a guest
that confidence they need to make their
own cocktails. It's also nice to
have your recipes written down and
save them for later. I know I need mine written down. Look at these. Even though I'm a bartender. I'm Katie from Perch Handmade. Today, I'm going to
show you how to make your own retro
cocktail recipe cards using Abby Nurs's Riso brush
pack from Design Cuts. It'll give that fun, screen
printed look to your cards. I'll show you how to
layer your elements and easily line up your texts
to create your own cards. I'll show you two
different layout styles depending on what you need. Because I know sometimes
I like to prop mine up inside a jar so it's not falling over on your table or bar, As a special bonus. I'm going to teach
you how to make these delicious
cocktails... exciting. Join me in a fun class that you'll be able to show
off at your next event.
2. Tools + Downloads: To get started today, we're going to need
a few tools and some downloads with your iPad, your Apple pencil,
the Procreate app, and Abby nurses
reserve brush pack. From Design Cuts. You'll be able to make these
retro cocktail recipe cards. If you haven't tried
these brushes yet, you're going to be so glad when applied your artwork will have that kind of screen
printed look. Now, I know this is
an affiliate link and I'm gonna make a little
commission off of it, but just enough to buy myself a cocktail at the
end of this class. I know sometimes buying those extra brush packs
can be out of your budget. I've also found a
couple of brushes from the Procreate brush library with just a little
bit of tweaking. They're gonna give you that screen printed
look for this project. You'll also find a link to the recipe so that
you have that on hand when you're copying it to type down onto
your recipe card. We're gonna make a
limited color palette. And in addition, you're also
going to mean a printer, some card, stock or paper
and a pair of scissors. Now, let's get started
on downloading those Rizzo brushes into your
procreate brush library. You're going to have a link on the page that is
going to take you there. I'm going to just go there
now I already have it set up. If you don't know, Design Cuts. It's an amazing site for just about everything
you can find for design. Type in Rizzo. And that will definitely
just take you right to the graph brush pack. It's uproot brushes
by Abby nurse. And you're just going to
go through the process, add it to your cart. When you're ready to check out. It, just complete your purchase. I already have it, so I
don't need to do that. I'm going to go from there. You're going to go
to your downloads. That's where you'll
find everything that you've downloaded and have saved in the
design cuts library. So if you do ever
lose something, you've always got your hard
copy that you've paid for. So then it will hit View Files. Click to download. Then we'll hit download. And it will come here to your
little button over here. It comes as a zip file. So you'll just have
to tap on that and get it unzipped and
moves it all over the place. Now, I don't want it
just in my downloads. So I'm going to hold
it and hit Move. And I always send mine to a file called design cut,
download and more. So all of my extra prints
and stuff go there. I already have mine there. If I hit move, it's
going to bring this up, but I don't need to do that, so I'm going to go back. It will bring it into the top of your brush library
pack in Procreate. And there's really
so many to use here. We're only going to use a
couple of them from here today. Like I said, we also have the ones that if you don't
want to buy this pack today, you can go to the vintage pack that comes with your
procreate brush library. Here it is. This honey eater
works really well. It's just a little
couple of tweaks. We can make it look like the screen printed
brushes that Abby has. But always, always,
we're going to slide to the left to duplicate because
we never want to change. The original. Will go down to rendering. Change it to uniform glaze. And we're gonna go down here to the blending mode and
change that to multiply. I also want to change the names. So what about brush? That way I know it's the
one that I've changed. And I write, I changed them to glazed because it has
that glazed look. I'm also going to
create a new set point. That way, if I change it again, I can always get back
to this original state. I'm going to save that. And now I'm going to go to the drawing library brushes and do the same with
this Blackburn brush. I'm going to duplicate it. I'm gonna go in here. It's the exact same, change it to uniformed blaze, change it to multiply and
change the name to be glazed. And create a new set point. Now that I have
those duplicated. And I'm also going to take a minute to go back up
to the top and add a new add a new brush library pack for my cocktail recipe cards. I've typed it in so many times, so it's already there
at the top for me. This way that when I'm
working on this project, I go to one pack. I'm not like searching constantly for the brushes
that I'm going to use. Let's begin by going
into the vintage, going to the honey
eater, glazed. We're gonna hold on
it until it moves. And then without
lifting this finger, we're gonna use this
finger to scroll to the top and now we're
can drop it right in. I used to do this differently and I would
find the one I needed. And I'd hold with one finger
and I go over here and I try scrolling up and
it didn't always work. I realized you can just use your other finger
without letting go here. Tap it, and then
drop it right in. I'm gonna go to the graph
brushes and choose a couple of those to duplicate as
well and bring over. I don't need to change the name because I'm not doing
anything to them. As you saw me do this
super light shade. I'm also going to do a dense Renzo that I
like this project. Let's get one of the
crisp, the crayon brushes. I liked this monoweight, so I've got a few
that I can work with. If I need more from
the result pack, I can just do the same thing and duplicate
them and bring them over. But for now I'm going to
just start with these. Now, you're also
going to find a link to a color palette that
I've chosen for you. Guess what? We're gonna choose it right now really quickly because we're just going to work with a
limited color palette today. I don't need it won't
take me too long. So let's go over to
our library here. I'm going to create
a new pallet. Let's see where we're going
to find it always at the top, right, I'm gonna rename this. We're gonna do the same
name, cocktail recipe cards. That way I know
where to find it. I'm going to go from another pack that I
have from Abby nurse. I'm going to pick a couple
of her modern print pack. Only want probably three, maybe four colors that will
layer together nicely. The residual graph. It's really great with this AMK colors because
once you layer them, they create more color. That's why we only need to begin with three or four colors. I am going to pick
probably a pink. I'll scroll back to the
top and drop it in. I'm going to scroll back. I also like this yellow. Want to put that in there? I probably want a teal is a CYA, MK is the pink or the magenta and the
yellow and the teal. I'm going to also maybe add one more color that
might layer nice asleep because I don't want
the colors to blend and turn to a muddy color, but I do like this, like deep blue so we can
keep it at these colors. Then they will layer together without turning brown unless you layer all of them together. I'm also going to add
a black or the gray and the white because
it's always good to have those colors on hand
in your palette. As you can see, like
if I wanted to, I can use over there's our cocktail recipe
card, color palette. You will find the link to this. And when you click on the link, it should just download
into your palette library. When you download the pallets, they go all the
way to the bottom. When you download the brushes, they go right up to the top. So look for that. We'll work on getting
our next thing setup. You have all of your tools. Now we're going to
get our canvas setup. Meet me in the next lesson.
3. Canvas Setup : All right. Did you get those
brushes downloaded? Are you with me? I know this is going quick, but today we're going to
make two recipe cards. To recipe cards. We're going to set up both
of those campuses to begin. The first is going to be a
postcard sized recipe card. So we're going to
hit our new canvas. We're going to hit the next little one and we're
going to change it to inches. Now this one we want to
have as 5.5 inches by 4.25. You're always going to
want to keep your DPI is set to 300 and then
we'll hit Create. We're always going to have
a layers set to multiply. We can do that initially
and then we can just duplicate and duplicate, and duplicate and duplicate
probably five or so. And bottom layer is going
to be the background layer. That's it. That's it. So far, we can go
onto the next one. We're gonna go back
to our gallery and do the same
thing over again. This one we're going
to set up in inches. The width is going to be 4.25, but the length is
going to be 11. That's exactly half a sheet
of letter sized paper. Same thing again,
set to multiply. We're gonna duplicate,
duplicate, duplicate. The bottom layer will
be our background. Now remember if you
need more layers, you can always duplicate
an empty layer or duplicate a layer that has something on
it, just clear it. It just makes it easy to have
it all set in one place. We are going to name those, are, we're gonna name this one
the cocktail recipe cards. And then that's going
to be the size. Let's do postcard. Then we always wanted
to say master copy. That way. It's always set and you
know where to find it. Not that this one is
very hard to replicate, but I'd like to
have I always like to have a master
copy of something, so it's just I only have
to duplicate that later. And same with this recipe card. And then the size or
this one's gonna be, let's just call this
the tall master copy. Now, when you're
ready to use these, we're going to slide
to the left duplicate. And I'm going to just
rename that real quick. I always do the
three dots until I'm ready to figure out what
I'm going to call it. That way. I know that's the one
that I get to work on. And these I could to keep keep as they are and
don't work on them. Although, like I said, it is an easy one
to build later. Now your Canvases are all set and you're ready to
begin designing. In the next lesson, we'll work on creating a really simple yet retro
cocktail recipe design. You'll handwrite
the title and use the text function
in your recipes. Now, don't forget that recipe. Get it handy so that you can follow along
at your own speed. All right, I'll see you
in the next lesson.
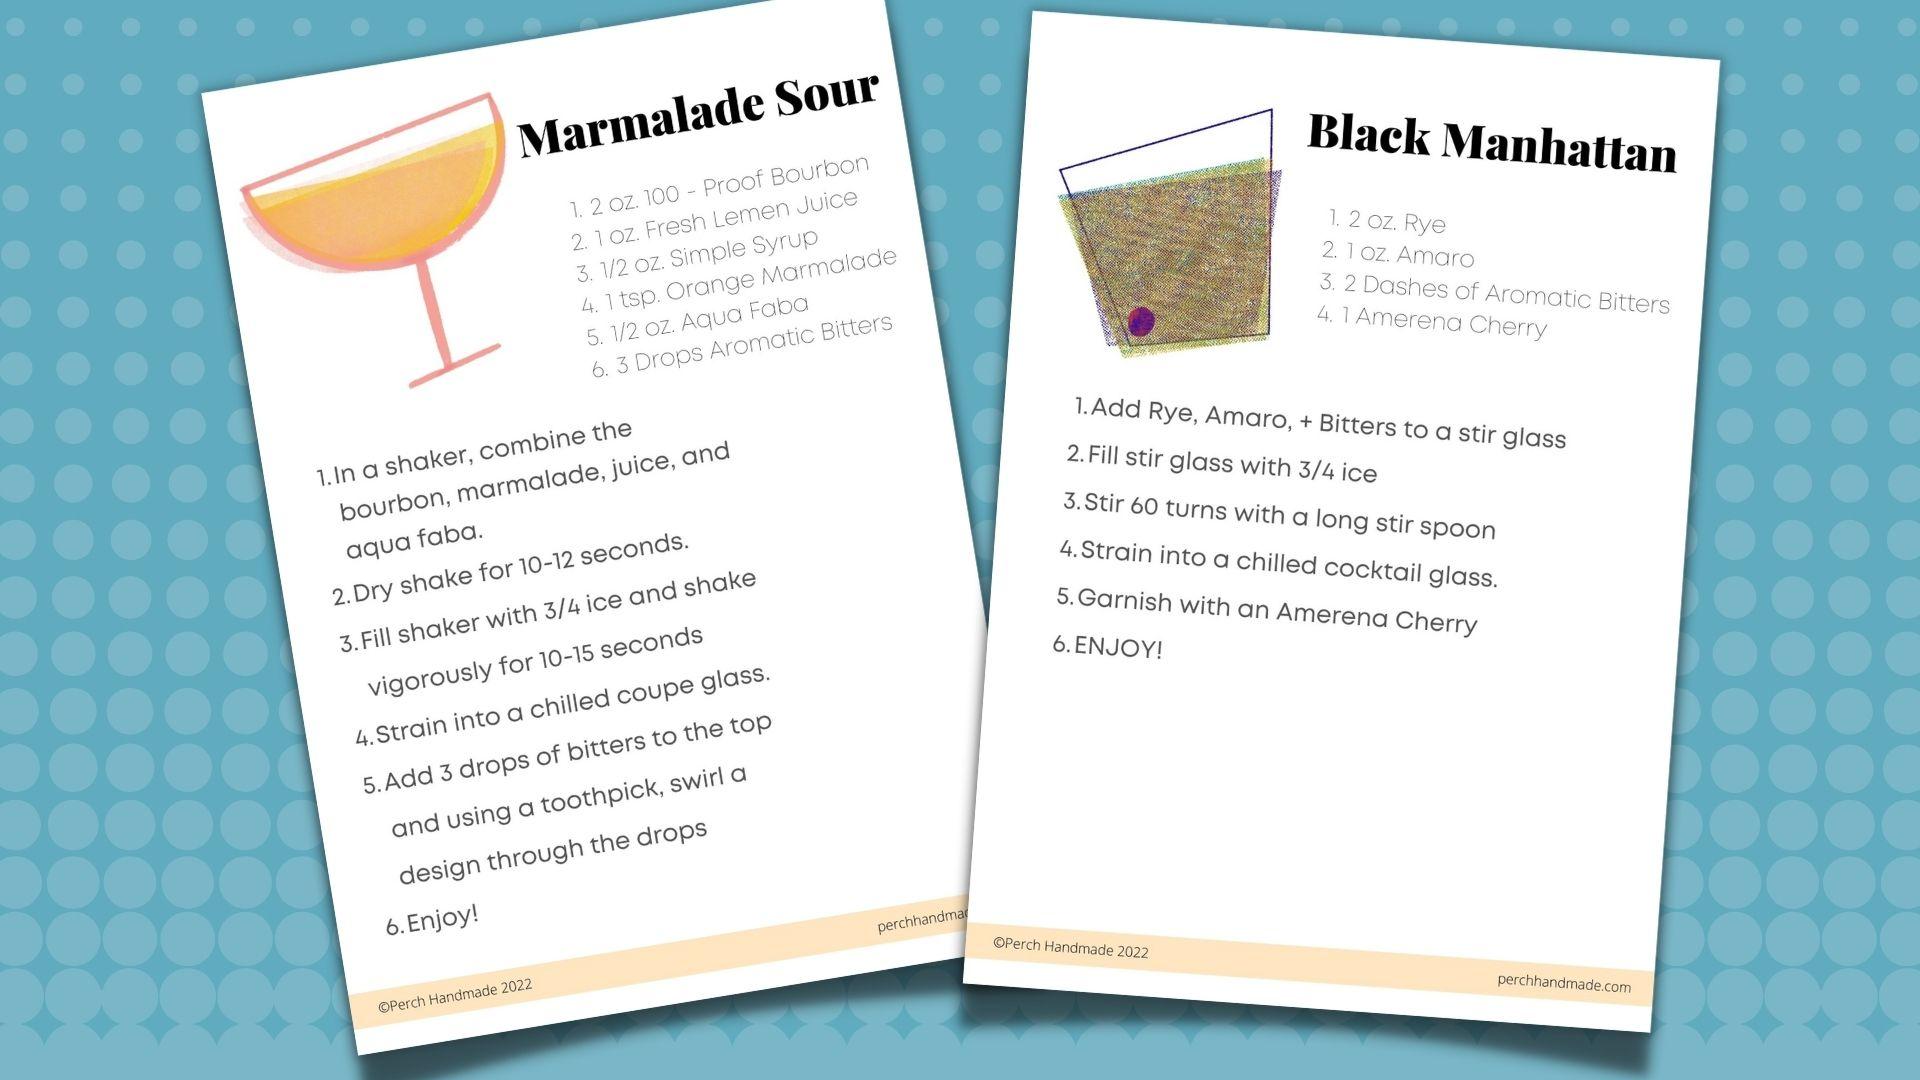
4. Card Design: Black Manhattan : Now that you've got your brushes downloaded and you've
set up your campuses, we're ready to begin designing
our cocktail recipe cards. Our first project is going to be that
postcard size canvas. I'm going to open that up. And this one's going to
be our Black Manhattan. Let's take a moment
and rename this one. This is going to be
our Black Manhattan. I like to start with a
lighter colored canvas. I'm going to go with this
pink, but you know what, I might even bring this
one a little bit lighter. But we'll see, we'll
start with this for now. And we're just going to drop
it and make sure we're on our background layer
and drop it in. I'm going to use
the reserve brushes first for this one and the next one we're going to use those honey eater glazed
and the Blackburn. But let's go with the Rizzo. And the first thing I want to do is add a mask layer to this. I'm going to use one
of those light shades. Maybe I'll do the dense shade
to create a mask on this. Because I want to get
that layer lighter. This one works great. Do that. I want, I can bring
that opacity down. Let's see. That's where I want
to be without one. I wanted just a little bit
lighter to begin with. On our next layer,
we're going to add the cocktail glass shape. So I know that I'm going to
have the title here and I'm going to have the words written out in this corner over here. I'm going to just take
up a little bit of space to just draw out a shape
for a cocktail glass. I think I want this one to
be a little bit darker, maybe even a little
bit smaller than that. You see how I'm
doing these shapes. Really just simple, simple outlines that don't need
to be perfect at all. And I'm holding them
until you see the kind of snap into straight lines and
you can edit the shape here. So I'm going to do that. We can bring, bringing the
pieces together a little bit. I want them kind
of quirky shapes. I want them all a
little bit off. Maybe they don't have to
be even straight across. They just need to
be kind of fun. Like this shape. The other
thing I want to make sure is that I don't
have any extra lines going over or any
extra spots where it's empty because
I'm going to use this shape as a reference. So we're gonna click on
that and hit reference. On this layer. I'm going to drop in my color. Let's go with a
yellow to begin with. I'm going to just drop it
in and see how it doesn't. It only stays in that space. So if I buy undo that, It's, it's only referencing
then layer above, you still have the
definition on the side, but I also want to give
it more of that result. Let's see. And if you
zoom in now we've got a couple of different
colors happening here. But I'm going to mask this layer and maybe go
over it with a dense. I'm also going to, if use the rectangle select tool on this layer, on the layer here, delete some of that. Now we can come in here and kind of move things around as well. I'm going to merge
those layers together. You're gonna hit distort or
not these over a little bit. They're not gonna be
perfectly on there, right? This one, we're
going to duplicate. I'm going to see how the color
is getting darker there. Manhattan's are dark. This one is going to be
our Black Manhattan. I'm gonna do two fingers just
to select just that layer. I'm going to change the color. So I hit the teal. I'm gonna go back to that layer, see how it's still selected. I'm gonna hit fill layer. Now I've got a green. Then I can move this around. And with screen printing, the colors really are
overlapped differently. And I liked that about these. Just work with it and get your layers to
where you want them to be. Like I said, a Black
Manhattan is a dark drink. I'm gonna duplicate this again. On this layer. I'm
going to fill it in with this darker color and
let's see what happens. I'm going to move this. I'm getting all those colors
kinda moved this shape and a little bit you can see there are multiple
colors happening here. I liked that. I liked to see
all those different colors. It gives it that
fun, retro look. I want something dark there, so there's so far
cocktail is looking good. I do want to add our
cherry in there, so I'm going to do
that pink again, and I'm going to take our
monoweight brush again. I'm going to
duplicate that a few times to get that darker color. Let's look in there. So far, so good. I'm gonna do that one more time. I'm going to do
that same select. I'm going to add some
yellow to it. That layer. That happen. That way I wanted it to. Well, I'm gonna try
that again one more time and I'm going
to go with Lou. Really dark. There we go. So it's all a matter of
fiddling with the colors. You know what I'll do
on a mask that layer and do a radiograph
shade on top of there. There we go. That's the look I'm going for. All right, I'm going to group
all these layers together. I know that that is
my cocktail glass. I'm going to rename that Glass. Going to lock that and see how
I'm running out of layers, but I can just duplicate
and get more layers. I'm going to hand write
the name into this one, but if you choose
to just use a font, that's perfectly okay as well, just find something that's
a little more modern. If you are willing
to handwrite it. I always change my canvas
to Drawing Assist. And I bring my grid sites up based on about how many letters are
in the word Manhattan, or whichever is
your longest word. Man, HAT TA Anita, bring it down to a little bit. That way. I know where and how much
space I have for my lettering. It's not a perfect It's
not perfect match, but I know the letter
and then I want to use today is kind of blocking. So I have my crispy
monoweight brush and I wanted to
see what I want to bring that stroke level up. But I'm gonna save the two
because I know I liked that for the outline
of the glasses. And I'm going to save it
by hitting that plus sign. So it's always saved there. And then, good, wait, I'm gonna save the four. That's gonna be for my words. So I'm just going
to start writing. I like really fun
kind of modern. Type for this one. Try to stick to the same
rules with you want your bees with smaller loop at the top and a
bigger at the bottom. Just go for it. We have our first word, black. All right, and it's a little
more of a modern print. This one, I feel like it's
a little bit far away. So how easy is it
just to come in here and use your tool
to move it a little. And you know that great
trick of isolating it. And then just a couple of finger taps to move it
one pixel at a time. I can zoom out and I
like where that is. There's our first word. I'm going to go to the next
layer and write Manhattan. And I'm going to do this
lower, but I cannot, I can move it later on the
next layer, right, Manhattan. Every once in awhile
I it had been known to do each separate
letter on a layer, but this is such a
quick and easy one. I don't need to do that. Same rules. The AM the upstroke
and downstroke as little. This is where it
gets a little bit trickier because with my age, I don't like how heavy it is
to have both of the outside. So thick. So I just choose the
one side to be thicker. Fish that's up to you. On the other side, you do
font but you really like. Alright, so I've got black
Manhattan written out. I'm going to move it around to where I would like the
final placement to be. This is where I will
probably turn my snapping back on that way it will
line up to the same spot. Let's see how you can
see those lines there. Alright, now I can turn
my drawing guide off, because from here on
out we're just going to be adding some
lines and such. I'm going to group those layers. And that way I, I always like to group
the layers when I'm finished and lock them that way I don't do anything to them. There'll be locked and I won't
be able to next book them. Now, we're going to add our lines because your
liver recipe card has lines to go with it. And actually, let's turn
our drawing guide back on. We're going to bring
our lines down to the smaller because they
will come in handy. Yeah, I got that right
at 75 like that. And we can also edit
our drawing guides, so we have Assisted Drawing on. That means our lines are
going to be perfect. No matter what. I'm going to use a lighter color because when you
use recipe cards, not noticing the lines, but I liked that kind of
retroactively vintage look. I don't want to just print
it out like we would do when you're printing
just off the computer. I want the lines. So I
went with that monoweight, I'm gonna go, I might even
go smaller on this one. Let's see. I'm going to
bring the opacity of my drawing guide down
because I don't want it. I want to be able to see
what I'm doing here. That line is much too small. So let's look here that
Let's bring the two. Let's see. There we go. We're just going to since
since it's assisted, no matter what I do, it's only gonna keep
it on those lines. All right. Let me
clear that out again. I can just Those lines all the way across. We're going to try and stick
to the actual grid lines. Does it does allow you to go off those grid lines and
I want to stick to my grid lines and see that you've got different weights of
the brush stroke. So it kind of gives it that
nice hand-drawn field. But look how easy it is. Can you see I'm drawing
right through the cocktail. That's all right. We're gonna erase that a
little bit later as well. I have that. I'm going to turn my Assist
off so that I can erase. I'm gonna find a good
monoweight brush. I have nice ones. My brush library. But just something easy to just erase some of
those lines, right? Actually, you know what, I'm
going to do a mask layer. That way. If I do something, it's easy to just put it back. I loved the masks
for that reason because I didn't even do that. Pardon me? Let's
find that again. Alright. I can do this. Alright, how it's masked. And if I need to put something back from the mask
layer, I'll show you. If you don't know about
masking, It's really easy. The takeaway is always black, and if you put it back, It's always always white, C. So I can just put,
put it back if I don't want it to be
over a little bit more. Now, get in there. This one over a little bit more. This really simple. Now I have that layer done. I can just merge those together. Because that's done. I've
already finished it all set. I am going to turn my
drawing assist off. I'm going to lock that layer. Now. We're going to go in now and go for our
typing our recipe. So make sure you have
your recipe handy. I'm going to pause for
a second, grab it, printed out if you need it, and meet me back here
in just a minute. Okay.
5. Recipe Font: Black Manhattan : All right, Now that you
have this helper together, Let's go in and add a font. First, I'm gonna
change my font color. I'm going to go with
this gray to begin with. And that way any color, anytime you pick a font, you've got the color
chosen to begin with. I can change that later on. But for now, let's
start with gray. I am going to hit
the wrench tool and hit the Add and Add Text. And it always start with
something really just simple. Just a really simple font, but I wanted to change that. So now I'm here. I'm going to go
click that button and hit go over to our fonts. I know, Let's see. I really liked this. All right, This one here. And regular, I don't
need it super fancy. Sometimes it's
hard to figure out your text where you want
it to be in the size. And I know I don't want
it going over the edges. If you want it. I'm just going to
keep this here in line with the cocktail glass. That way anytime I go down it, it's not going over
because I know my first few words
aren't gonna go all the way to the
edge of the page. And I always want my
attributes set to the left. I do want to bring the text size down so it fits inside my lines. In the 18. Maybe even
16 will be just right. Let me see how that looks. Let's see what 15 looks like. I want this line to be lined up with my lines and
that is just a bit confused. Zoom in really close. You can see the blue lines
on top of my yellow lines. They're gonna rant just below that actually because I want it kind of just
in-between those lines. Let's see what happens
when I type something. So we're gonna go
to the keyboard. I know that I have two ounces. I like this font too, because it, it's just
uses all capitals. You can choose a font, whichever one you want. I also like this
one because it has a similar look to the
font that I made, although it's more
condensed and narrow. Let's see. Yeah, that one was
works perfectly. The size. It seems like it works perfectly for typing
out my recipe. The next is an MRO. Sometimes you have to check
your spelling on that. Try that. I have two dashes and aromatic, bitter. One, Marina cheering. So always use those Marina
cherries instead of a mare. She know cherries. They are actually just delicious,
dark Italian cherries. It's nothing compared
to the other. We have, we have our
recipe or sorry, our ingredients in there. And as you can see, I didn't
write ingredients on there. So I'm going to change it up a little bit by
choosing a different font. I'm going to stick with
something kind of narrow. Maybe change the color and
independent over a bit. This is where maybe you have
your recipe next to you, so you're typing it out. Take a moment, go
at your own speed. I'm going to finish this up
and scoop that video alone. All right, so I have
this finished here. I'm feeling like I need the
letters up here to be darker, so I'm just going to tap on that and change the color to black. And this one, I'm
going to change that. Maybe I'll bring that
color opacity down just a tiny bit so it's
not quite so strong. Yeah, that's working
better for me. When I change it to multiply. Multiply as well. It's kind of just going in. Here. We have our
first, first 1. If I did it four finger tap, then you can see the
whole thing matter. So there's our
first recipe card.
6. Start To FInish: Marmalade Sour : Let's move on to
the next project. Okay, This one, we're going
to rename marmalade sour. Because we're going to
make a sour on this one. And this one we made longer because the recipe is a
little bit more complicated. To type out. We're gonna do the same thing. We're going to choose that
nice, good background color. This one, I'm gonna
go with the yellow and mask that layer again. And I'm going to
use the honey eater glazed and the Blackburn
glaze for this whole project. I'm not going to use any of
the roads of graph that way I can show you how they
work and the differences. We've got the honey eater
glaze and I'm going to go over a habit on
the mask layer so I can add some fun,
different textures. Fives to it. I like
how it's a little bit lighter in here and a
little bit darker up here. And let's go onto
our next layer. Next thing we need to do, make that cocktail glass. This one I'm going to make
with a fun coupe glass. The coop classes, the
shape kind of like this with a little
short squat stem. I loved those. Just how I like to do things. We'll color. Am I going
to make my grass? I'm gonna make my glass. Gonna make it pink. Let's try. Let's check out brush sizes. So we're at the 12 here. Let's see, that's
too thick for me. I'm going to bring it back down. I'm gonna use that
shape assist again. Get a cute like wide angled, cute little glass shape. Make sure the shape is kinda
where I want it to be. This one is really wanting to blend over and I can change
that in a little bit. Let's get our get our glass
shape going to begin with. Now I'm gonna just hold on
here and I'm going to choose a blend brush to blend
those out just a tiny bit. Almost doesn't even matter
what kind of blend brush. I just want to not see that darker color happening
when they're connected. That's the easy way
you can get around. That is remember holding, holding the two
fingers that way. I'm not blending outside of
the pink lines. Alright. Did exactly what I
wanted it to do. And remember it's thick
enough so I don't have any open edges. I don't want the open edges. Or when I use the reference, if I use a reference
layer and drop and fill and there's
an open gap, then, you know what will happen. It will just bleed
over the whole page. Hit reference. I'm gonna bring this layer up. On. This layer is where
I'm going to my color in. I'm going to drop. And I'm going to start
with the yellow though. Here we go. Now I'm gonna drop that in. I am going to use
my rectangle select to take them off the top there. Cut that out. That looks
like a tip sea glass. Ultimate. Alright, I can, I'm going to duplicate this
layer a couple of times. Because I know I want probably two or
three actually Gosh, I'm really liking the
double layer there, but I might make
this layer pink. So I'm going to, because I know my sour is a pink color
right. There we go. That's better. And I'm going to mask
all these layers. Do the reza graph over them. Well, that's a little too much. It's just a matter
of give-and-take and doing a little bit of
maneuvering right now. Well, I work on my design, you work on yours, and we'll meet back
here in just a minute. The title, I'm going to use
that Blackburn glazed brush. I'm gonna keep it at
the 2%, I believe. And I'm going to turn
my drawing assist on. What word do we need that's
the longest marmalade, MAR ADE. Is that right? I'm gonna make this
one a little more handwritten because I feel like a marmalade as opposed to a Manhattan which is
really smooth and sleek. Marmalade sour is a
little bit frothy. You're so let's go with
something a little bit frothy or healing. It doesn't have to be perfect. The best part. When they are doing something
in your own handwriting. Your friends will love it. It's something just for me. Now I can go in and I'm going to bring my drawing grid size down. I want that smaller. Try to stick to your lines. Your eyes get a little bit wonky when you're staring that
lines for too long. I know I definitely do. Then we'll hit the mask layer. Now we're going to find that recipe and
start typing it in. I'll pause here
for just a minute. I'm gonna start with
the gray and I'm going to add the text. There we go. I'm going to make
sure that I have at my finger rather than my times when I use
it with my pencil. It doesn't bring up the big keyboard and I
don't know about you. But sitting here for a long time using a little tiny
keyboard is not my jam. I'm going to use the
bigger keyboard, set my attributes to the left. So you have brought
the size down here. Let's find something
kind of fun. All right. There are so many
different, as you can see, so many different
fonts you can find. I definitely download many
for my own personal use. I will only purchased
a couple of them to use for my
website and things, but make sure if you
download something, you're not using it
to sell something. Unless you have the license
to use to sell it with. I'm going to type
this out real quick and meet you back after
you've typed yours. Okay, So you get
to typing and I'll type and we'll meet
back together. Okay. So I have those written
out there and I'm going to now put in the directions, same thing I did before. I'm gonna move it
over too little bit. Take a moment to
figure out which function you want to use and what color you
want that font to be. Because it's nice to separate it with a little bit
of a different color. So meet me back
here in a second. Okay. There you have it. You guys fun cocktail recipes and work on it like the day
before I know it. You can whip them up real
quick and print them out for your recipe book, for your cocktail party.
7. Printing : Alright, now when you're ready, just, we're gonna send
it off to your printer. The easiest way since we did two of them is to go
back to your gallery, slide to the left and hit share. We're going to click on
PDF and the best quality. That way. You've got the most vibrant
look when you're printing. The colors may
change a little bit, but that's okay because this is just for your
local get-together. I have mine set up
and I can hit print. And it will go to the printer. I'm going to work
on the next one. Do the same thing. Best quality, and hit Print. That simple. You guys. This can take just
a couple of minutes or you could spend a lot
of time working on it. I choose to do them
pretty quickly. And it's a lot of fun
because your company feels like you're putting that little bit
extra effort into, into their time with you. Alright, you guys
there, you have it. You have your cocktail cards. I'll print it out. Now it's time to take a minute and just cut
them down to size. Get your scissors handy. I like these because they have the top border is kind of
where I want it to be. I don't want to cut it
all the way to the edge. So I'm just going to go up
here and cut it quickly. It doesn't have to be
anything super fancy, although if you do have
a straight cutter, you can use that as well. And what makes these perfect, these tall ones perfect
is that they can go directly into a jar
or a glass of some sort. To wrap up. You have these jars here. If you pop them in there, they just pulled up. Work perfectly that way to your company can
see the recipe. When I cut this one down, a little bit of a
border as well. Unless you want them
to be kept for years. Just do it on your
simple printer paper because I can guarantee they're going to get
a little bit messy. When you're using
that your party. There you go, you guys. You've got your recipes, you can lay them
out on the table, youth or your bar. Where is it There it is. You're all ready to go for
your next get-together.
8. Bonus: You didn't think I was
going to leave you hanging. Get you all worked up. Making these delicious card does delicious card designs know
delicious cocktails recipes? I design guide show you how to make these
cocktails as well. First off, event planning doesn't have to be over the top. I have always used
what I've had on hand. My own personal style
is Ben low key, head to the thrift store. Use jam jars. What have you like? Email and these cute
little jam jars. I loved the cut class. These are my everyday
drinking glasses. Again, little cut glass AS a families for a dollar
at the thrift store. I think I already said this, but I always had
things written down. This one says, get your name on a cup is yours to
keep for the night. Something else I've
always done is had like tape or label out so that you can put your
name on your company and you don't lose it because
I don't like waste. I like to recycle things
and read these things. And if you do need to
collect some things, you can find them really
keep your local big shop, you know, stirred glasses
is something that you're gonna need for today. For Manhattan, you always want to stir it rather
than than shake it because cocktails
that don't have any juice or some sort
of fruit are in there. You want really
smooth and stirred. If you're putting juice in it, then you can shake it up. Jars. Again. It's a great shaker. If you don't have one on hand. I have one, but I don't love it. So I go for the jar. We have our new recipe
cards right now. So I'm gonna get
these, but that aside. We just made ours. So we have our Black Manhattan, that's gonna be the
first one we make today. We have our marmalade
sour and like I said, I like to wrap them up so my
guests can read them easily. That's my cocktail mix
glass for my supplies. And they don't have to pick
it up If they don't want to, if they need to, they can. But it's really simple. First, let's try the
Black Manhattan. When a Black Manhattan,
like I said, you're going to want
to use the STR glass and your clock, your
alcohol measure. This is called a jigger. It has a one outside
and a two outside. And every once in a while
you'll get one that has a half ounce or 1.5 ounce
written on the inside, is always the same recipe to a two ounces of
your bourbon or awry. One ounce of your other. Nucor, such as
moose, is typical. But today we're going to use
an MRO, which is Sicilian. It's got this a more robust
belief flavor to it. I use a 100 proof or higher. You don't want your
Introduction to be shaken or too diluted. That's what the STR
glass helps to do. Marina cherries. That's the Cherry of
choice for this talk. Then are used my trainer
to pour into the glass. You always want to use a
chilled cocktail glass. Let me show you
this. Here it is. This nice, really dark Cherry goes well with the tomorrow
in your Black Manhattan. And there you are. Alright. The next cocktail we're
making is our marmalade sour. Sour uses the juices, so you do want to
shake it. This one. You might have
noticed something on that recipe called Aqua Baba. It is an egg replacer that
is really easy to come by. In fact, you're never going
to believe what it is. It's the juice that comes in the cam when
you're garbanzo beans. And so it's a vegan
replacement that creates that foam that you get
with whiskey sour. You want to have a nice
little foam at the top. Also. I always use fresh
squeezed juices. It's really easy to do. And it gives that a nicer
flavor to your drink, as well as your simple syrup. Your simple syrup is
a two-to-one ratio to the water to
one of the sugar. And you can make that up
really easy with some kettle, tea kettle of water. Really easy to make as well and can last a little,
a little while. And you're afraid I'm
going to grab my glass. This one again, I'm going to use a high proof bourbon on this one or 100 proof
higher bourbon. That creates a nice flavor to go with the sweetness
from the marmalade. And it combines really nicely
with the sour preliminary. This is where you might
not recognize the trick. I learned it later
on, bartending. Not getting any ice in there, shaking it up, mixed, but also she get It's awful. Father really get creating a administer following for you. You want to shake it for a
good 1015 seconds or so. Then you can add your ice. I don't need too much. I use a couple of cubes
will work for you because I don't want it
diluted too much. It helps create more phone when there's more ice in there, it kind of breaks
down the phone. I'm gonna put this
one in the jam jar, going to strain it a little
bit to keep the ice out, foam and that one's
looking good. All right, the next trick
is to do a couple of drips. Bitters. It can do now
is bring her stir, stick through it to create
pretty little designs. Cheers everybody. So there you have it. Really easy cocktails to make. You've got some nice
foam by shaking, you really want a
vigorous shake. Always remember to stir
those cocktails that don't have any citrus or
thanks for stopping by. And I hope you learned a little something and are
ready for your next party. Okay. Thank you.
9. Thanks! : Look how much fun we had today. I hope you're feeling a
tad bit less stressed about hosting your next
party or get together. Remember if you
plan ahead of time, you get to enjoy your
company even more. I enjoyed showing
you how to create these fun retro cocktail cards. They're nostalgic and reminded me of my grandmother's
recipe books. With that added twist. Thanks for following me along. In the bonus. To learn how
to make those fun cocktails, It was my pleasure to combine all of my skills into
this exciting class. Remember, use the hashtag
creating with PHL. When you post to social media and share your recipe
cards with the class, because we all want to see if you have a new
recipe to share with us. I'm Katie from Fortune made. If you're interested
in my other classes, follow the links or go-to
purchase handmade.com. Thanks for joining me
on this adventure. As always, I can't forget
to remind everyone to drink responsibly and make sure to have a designated driver
to get yourself home. Have a good day now.
 Katie Simmons, Digital Artist | Perch Handmade