Transcripts
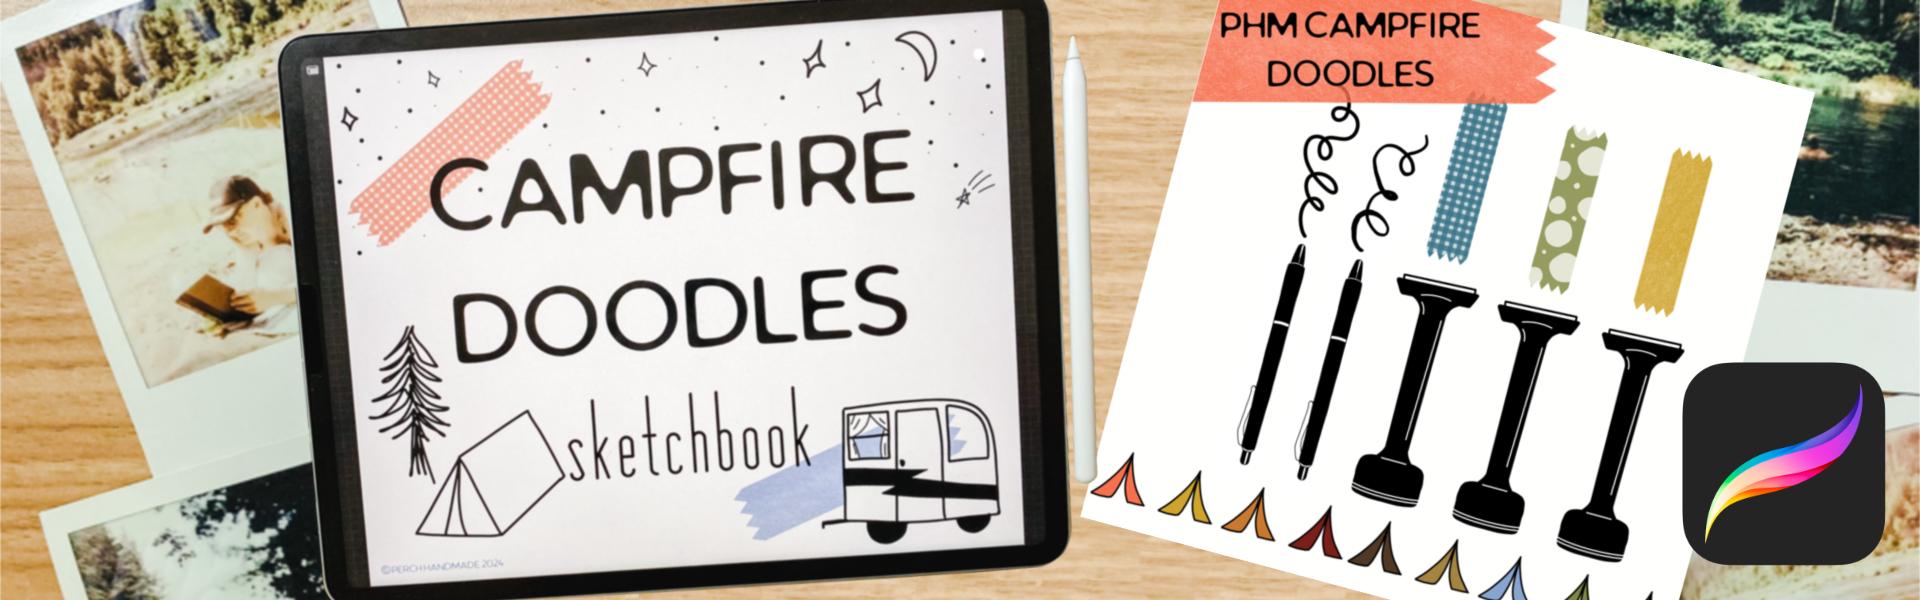
1. WELCOME!: Hey, friends. Summer is just coming to a close here
in the Pacific Northwest, and kids are getting ready
to go back to school. So I thought this would be
a really fun time to start a campfire doodle
sketchbook camp. I mean, it's a great way to get your children started using Procreate and in this
beginner friendly class, we're going to create campfire doodle
sketchbooks together and procreate to capture the fun and excitement that
you had over the summer. I don't know about
you, but going camping is top on my list
during the summer. As much as maybe
I'm busy working, I always try to get at
least a few weekends of camping going
during the summer. And if I'm not camping, then I'm just getting
out to the river, honestly, and swimming and
relaxing and having fun. So using the campfire
sketchbook, doodle book, then we can have fun
just making mistakes, having fun just doodling and showing off your
artwork and showing off your summer fun because sometimes you
forget what you did and a little sketchbook
keeps the summer alive. Sit tight and let's
have some fun. In this class, you get a color palette
that's fun and campy and a few pencils from me and that also come with a couple
washi tape brush stamps. You can add those to
your doodle book. I'm Katie from
Perchanmd and you can follow along with other classes of mine at perchanmad.com. I teach a lot in Procreate
and Affinity Designer. But today, I love working
with newbies and people who just starting out or
people who have been afraid to let go
and be artistic. I was once one of those people
and now I'm here to help you along your little adventure
of learning Procreate. All right, sit tight and we'll hop into the next module
in just a second.
2. YOUR PROJECT: All right. Are we ready
to get started with our fun summer camp?
You know, camp class? I don't know about
you, but going to summer camp was a lot of fun, and we always had art class, which was my favorite. So today, we're going to
work through five prompts, and you can take each of these lessons
and spread them out over five days or sit down
and do them all at once. It's your choice, but we will go through five
different prompts, and I will show you how to set
up your canvas beforehand, so we can get started
in just a minute. Why don't we sit tight? I'll show you real quick what it's going to
look like in the end. But you can make it just
the way you like it. Let me show you
what I have here. We're going to show
you how to make this fun campfire Doodle
sketchbook in Procreate. Each page will be set
up so you can draw on each page and have fun
doing tent under the stars, campfire and
marshmallows, trail map, camping trailers, a
starry night sky. There are a couple
more pages for your own ideas to add and
duplicate going forward. Like I said, it's a
fun beginner class, so why don't we move into the next module?
Come and join me.
3. DOWNLOADS: Let me show you where to find your campfire sketchbook
brushes from Perchanmd. I save mine two files, and all you have to do is when you're
working on your iPad, go to the file saved it in, tap on the file and it goes right to the
top of your brushes. The same with the doodles campfire doodles, color palette. We'll go to the file
you saved it in. This one's called
Swatch or Swatches. You tap on it, and this one actually goes all
the way to the bottom. I don't know why it
goes in at the bottom and on this one,
but it just does. If you want to use it regularly, cat top the three dots
and hit set as default, or I like to move
mine to the top. I press a long hold
until I see it hover, and then I take my
other finger and slide it down and I can
bring it all the way to the top, just like that. I already have one in here, so I'm going to delete this
one because I don't need to.
4. CANVAS SETUP: So maybe you're brand new to Procreate and that's
perfect because this class is perfect for beginners and we're
first going to show you, I'm going to show
you how to set up your Canvas using page assist to create a sketchbook that you're proud of
and happy to use. Let's take a look now
and pop into Procreate. Here's my Procreate app. To first do this, we're going to add the plus button in the
top to make a new file. I want my screen size
to be a certain size. So if I want to make a new screen size rather than one that I
already have started, I'm going to hit this
plus button here. I like to work in pixels, but you can also work in inches. I'm going to just do that
for today and we're going to do 10 " and by 8 ". That gives us a lot of
pages to work with. I always keep it at 300
DPI for the best quality. Then we hit Create. That
brings us right into a page. It's just one layer
at this point, and we are going to go so I
don't know if you saw that, two fingers can zoom in
and zoom out by pinching. Two fingers pinch will bring it back to
our original size. Two fingers, again, pinches. I like to have mine a little
bit smaller than my screen. Now let me show
you how to set up your Canvas in page assist. We have our layers
and you can add more layers by having the tap button or the
plus button up here. But to do page assist, we hit the wrench tool here and make sure it's set on
Canvas and hit page assist. What that does, if I
write on this layer, and then go to the next
layer, it disappears. I can write on a new
layer and it disappears. If I do one more and then
go back to the first layer, I can see them
move here or I can hit the page assist down below and see
the different groups. I'm going to delete
both those oops. Oh, yeah. That's a good
mistake right there. I just accidentally slid
two to the right and hit group and it made a group and anything that's grouped
together will make one page. Those two different
layers are now one on top of each other. But I'm going to slide
it to the left and hit delete and I'm going to
slide this one and hit clear. It always leaves you with one. Let's get started
setting up our page. I like to have a cover
for my sketchbook. I can add text to it. Let's do that first. Let's hit the wrench tool and it
add and then add text. Because I was working and
tapping with my Apple pencil, now I have to write
with my Apple pencil. I can write sketchbook. But maybe I want
something different. I'm going to go back out. Letters, words always get a
new layer, but that's okay. We can change it later. I want campfire. Can't fire sketchbook
as my title. I can leave it this way. This is vectorized. All our letters are vectorized, when you first type them out, no matter how big or small, it doesn't get
pixelated on the edges. But if I take two fingers
and pinch them together, now that is one layer. Instead of, if I
do two finger tap, I went back, I have
two layers here. One, two. If I pinch them
together, that's one layer. Now that is rasterized. If I go big, it's going to get more
pixelated on the edges. I have campfire sketchbook and if I want to have some fun, I can doodle on
this page as well. I'm going to add new layers, and I'm going to add some
washi tape to the edges. Pick a color. I like the green and I'm going
to use two fingers to turn and pinch and then I can just add some
washi tape to the edges, and that's on one page. So if I hit the move tool, I can get that to
where I want it to be. If I use snapping, I can have magnetics turned on, which means that the blue line shows up and it tells you you can move it straight
across that line. Or if you have snapping
and magnetics, you can move it and it'll
take it to the edge. I don't know if you
saw that there. There is a yellow
line that happens. If I take it up, I don't know if
you can see that, but the yellow line
that's happening and that means it's centered and it's
on the edge, it's centered. I'm going to just bring it up just a little
bit to the edges. Because I like it at the edges
and it was a small move, so it didn't pixelate
it too much. I can try to make that the
same or I can hit a new layer. I can hit two fingers
on this layer. And that selects this area. I don't know if
you could see it, but it selects that area. I'm going to pick a new color. Let's go for the blue
or the peacock color. Then I can go to this layer, the open layer, tap on it, and hit fill layer, and it fills it up so I can have it identical
on all the pages. I like to have that, so it's just little something
to add to each page. From here, I can slide to
the left and hit Duplicate. I like to go every other layer, and so it's green, blue, green, I can slide to the left and duplicate
and I can move that one up. Always take the
bottom layer when you're duplicating because
it's best quality. If you just keep
going up the layers, then you have less
quality to work with. I need one, two, three, four, five days, and then
two extra days. I need a total of seven. I have one, two,
three, four, now. I can hit Duplicate and
bring that to the top, and that's a long
hold and hover. Slide to left, duplicate, hold, hover, and
drag it to the top. I one, two, three,
four, five, six, I need one more, duplicate, and slide to the top. And I can also rename these. I can hit tap on this, tap again and hit rename,
and this is cover. You know what? I
want one more layer because I also want
an About page. Who's this about? Because if you want
to print this later, you can print out each layer. So this is going to
be my sketchbook. And then we'll have day one. Day two, and so on. The last ones we're going to
have extras or bonus pages. Let's say they're bonus pages. All right. Now we have our
sketchbook. You know what? I want to add some washi tape to the front because why not?
Let's add it in there. If I use this button over
on the side, I can make it. This is your size button, and then this is
your opacity button. Do you see how you can see
it hovering and showing up before I hit my
paper or my iPad? Oh, that's the other
thing you can do. You can use two fingers if you have it on
the right settings. That is a setting in preference, so I have my brush cursor turned on and if I hit
advanced settings, I have it show while hovering. I love that. It makes
it easier for me. And under gesture controls, cover, I can touch the
Apple pencil with a finger and adjust the brush
opacity and pinch and zoom. I have that turned on as well. I'm going to just pop them in
here and I'm going to pick another color and maybe even a different washi
tape because that's fun. I think I want my words
to be moved down. Since I have these
all on one layer, one page, I'm going to use my select button
set on free hand. I can circle this
and then I'll hit my move tool and I can move it to the center of the
page. Here we go. All right sketchbook, and then
I can doodle on this page. So we have it all set up
and we have our sketchbook, Day one, day two, day, day four, day five, and bonuses. When we get to each page, I'll show you how
we can draw on this and keep them separate or we can fill it up different way and I'll show
you that in just a minute.
5. DAY 1: TENT & STARRY NIGHT: All right, friends, day one of camp is underway, and right now, let's work on making a doodle with just
tents under the stars. Really simple. Just think of your favorite tenting
or camping experience and putting stars in there. So let's get started. So first off, I'm going
to use my monoline pen. We have two different
pens styles. So if you like a straight
line that's really smooth, that's where the
manline pen comes in. If you like a little bit
more of a line drawing pen, then it's got a little
bit more roughness and I like both of them, but I'm going to go with
a monoline pen today. I'm going to have two fingers that will take away
what we just did. I'm also going to
use just black. I'm a traditionalist. I really like just
using black on my page. First, let's add some
text to our page, and it's going to show up and not show anything for a minute, but I'll show you
how we fix that. Hit Add Text, see it
has nothing there. We lost our other page, but I'll show you how to
fix that in just a minute. This one is tent
and Starry Night. And see how it moved it over. If I just move these
blue marks here, then I can get it
to the right size. I can move it and you can move from the center and
make it bigger or smaller. Or if you're off of this space, then you can just move it
and slide it to the top. I'm going to take
off my snapping because I don't want
that on right now. Now I just tapped on my layers and I'm going to hit my sketchbook page and
I'm going to hit group. That is going to put them into one group that I can
write on and color with, and then I'm going to go
to my sketchbook page. You know what? I'm
going to tap one more and that's going to give
me a new layer to draw on. That way, if I want to
duplicate my sketchbook page, again later, I can duplicate it and not
have any implications. I'm also going to slide it
to the left and hit lock. That way I don't
work on that layer. I'm going to do that the
same with my words layer. Okay. We have our first
sketchbook page, tens and story nights. I'm going to take my
monoline pen and I can change the size of it over
here by sliding up and down. I can see how big it gets. When I move it up
or move it down, see how I have these little
blue spots over here. Those are saved sizes. I have a size seven
that I like a size. If I tap on it, it says size 15, and then I have a
size 30 that I like. Those are all good
for different things. The way I save those, and I'll show you
by adding one more. I can tap a size here. Let's slide it down to 60. I'm going to tap it on
my finger because it's easier this way and I hit
the little plus sign, and that adds another
saved size in there. It's big, so I don't
really like it. I want to take that away
by hitting the minus sign. You can do that with
your opacity as well. If you have a
favorite opacity that you like, you can save that. I save that at 65 or 58, then I hit that what it does is it gets it back to
the same size easily. But I don't really
need that either because I don't usually use the opacity
when I'm doodling. I am going to go to
this larger size. I like the 30% and I'm
going to just draw tent. It doesn't matter, it wavy and it just starts
off like that, right? But my tent, it's just a
triangle at this point, right? So how about I make it a
little more two dimensional. I don't really like
that little line there. I could undo that
way and start over. If I have three
fingers and I go back, then I can use my erase brush. If I'm on, say I'm on a different brush in
my brush library, have lots of brushes. This is your smudge brush. They can use any brush
from your library. But I'm using my monoline pen and I want to erase
with my monoline pen, but right now I'm on
a watercolor pen. What I can do is do a
long hold after being on my monoline pen and now I'm on my monoline pen
for erasing as well. I should just erase pretty
easily. There we go. I'm going to go back
to my man line pen for drawing and I'm going to
add a little bit of details. I know my tents usually have an open little door and maybe I have some
trees in the back. Guys. A pine tree is
pretty easy to make. Doesn't have to be perfect. That's what I love
about doodles. It's just basically just scribbling and making
it the way you want it. Do I want to add some stars? Well, I can do a little
diamond in the sky. I want to bake, but that's okay. That might be the North star. Maybe I come down to a smaller size of brush and
I make some smaller ones. Guys, if you don't
want it to say ten, you use a little buttons over here and toggle it off
and that one's gone, and you can keep
drawing on your layer. If you want a little star
like that, put a little star. I like to do stars this way and I can't do little
dots with my pen, but sometimes that moves and it makes them a
little irregular. I like to do my
finger and it makes a perfect little circle
dot except for this one. Because my fingers slid
on the page a little bit. I can go to a smaller size
and add smaller dots. It's whatever you
want to make of it. I don't like this one, but
I do like the one up there, so I'm going to just
erase that one. Sometimes procreate up does
things you don't want to do. What else could we have
here with our tent? Maybe we have little mushrooms. Did I say I was very
good at doodling? No. Doodling is not
my forte. It's not. But I'm having fun with it. Are you guys having fun yet? All right, let's get back to it. So there's my little
wonky mushroom. I can fill it in. Or
let me show you this. If I take this color, I can slide it over
and fill that way. I'm going to fill that in. Let me get maybe a
couple more mushrooms. These are really
big mushrooms. I. I'm not very good at
this, but that's okay. That's the best part of
doing summer camp, right? Mushrooms come in all
little shapes and sizes. They are pretty wonky. I love them because they are a lot of times under the trees. But there we go. Four fingers down we'll
make it so your page, you lose everything on the side, just to look at it, four fingers back, we'll
bring it all back. That's what I'm
doing so we can see it in full, two finger pinch. Look, there's our
very first page. Was that fun? Day
one camp is done. Really quick, really fun
and meet me for day two, Day two in just a minute.
6. DAY 2: CAMPFIRE & MARSHMALLOWS: Here we go for day two of our campfire sketchbook
doodle camp. And today we are going to do
campfires and marshmallows. Do you love a good
marshmallow? I know I do. Think about all the
Schmors fixings. That's things that you
can add into this doodle. And the doodles don't have
to make a whole scene. You can do doodles over on
the side of the campfire. You can do doodles on the
side of your marshmallows. You can do doodles of all the different things
and all the fixings. Let's dive in and
let's start doodling. We finished up tent
and Starry Night. Let me show you an easy
way to copy the text. I'm going to slide
to left and unlock, and then I'm going to slide
to the left and duplicate. I'm going to take that out, use my finger, slide
it above day one. Actually, I'm going
to slide it and hover so day one turns blue. That makes its own group. Then I'm going to tap on the
page and write Campfire. Fire and Mars. Maybe I know how to write. Mos. I can slide that out. The blue dot over the side. I can hit my button here, I can slide it over, so it's even in the page. Fo, slide it to the left, lock it, doesn't matter
if it's above or below. This is my day one and remember, I want to add a new layer
to save the blue layer. Because remember, these
are our first pages of the blue lines that
we always want to duplicate from if
we want to have bonus. I'll show you how we can just draw on the next
layers in a minute. But hoops, took that
away accidentally. We have our campfire
marshmallows page. And I'm going to stay
with my black color. I'm going to stay
with my monoline pen and let's just start
making a campfire. Let's think about that. We have our logs and sometimes you
see the end of the log. If you pitch to Zoom, I don't like this
little extra bit here. I'm going to take that out
and it's okay to erase. If you don't feel
comfortable with something, get rid of it. Right? Fix it up. This is your piece and you get
to have fun with it and just try to not go
overboard erasing things. You have other logs on top
of it and different hoops. Let me get onto my brush. Let me go other
logs on top of it. I don't really like how
that layer happens. I'm going to take this and
I'm going to move it up and erase that section because
that's the under piece. Fix those lines up a little bit. I'm going to have some
shadow under this one whit. Maybe I'm adding some dimension, texture to my gs. Maybe I have one coming
out from underneath here. Logs come in all different
shapes and sizes. This one's looking a
little too smooth, so I'm going to put some chart bits in there. Okay. Does that look great? No. That's okay. I am going to add a new layer because I want to add some
color on top of this. I want to add fire to
mine and fiery colors. There's one little fire piece there and I'm going to
change it to some yellow. I'm going to add and then I'm going to take
that slide and drop. I'm going to move this
over just a little bit. Did you see, I used that little green dot
to rotate a little. I'm going to add one
more color in there, a little orange color. That didn't fill all of it because I hit
another color there, but I can hit continue
filling and drops. Drop that in. But let's
bring that color. Threshold down by sliding. It didn't work. That's
okay. I may go like this. You know what? I'm
just going to color it in because it's not doing
what I wanted to do, and that's one way around it. I am going to add some
black on top of this now so I can add some fire flames. There we go. There's
my campfire, and I added some
fun color into it. I'm going to go back
to my black layer. You see, I did that on top of the black on
top of that. That's okay. I'm going to go back
to my black layer and get my marshmallows
happening. I don't know about
you, but I love a good marshmallow stick. If I go like this and
draw a stick and hold it, it made the shape perfect,
just by holding it. Then you can edit that by
changing it into a line, polyline, or a circle because that one gave
you those options. I just want it this way
and then I can go back to I'm going to
slide and drop in my color because I wanted that
to be a little different. Let's work on my marsh. Though. This one's
getting gloopy already. Here's my marshmallow,
maybe. Yeah. Easy. Marshmallows. Marshmallows or maybe
you want the box. Maybe you want your box
of gram crackers, right? Because this is a sketchbook, you can make it
however you want. So maybe I've got my gram. Is it? Is that how we do it?
I want to move that over. I'm going to slide one line, and then I can just tap to get around it so I don't have to try to draw around it easily. I'm going to move it. Is
that how you spell Gram, you guys? For Gram cracker. I'm going to say yes
and I'm going to draw a picture of
some gram crackers on the front and bring
my thing down. You should see a little
wine there, right? I feel like that's
too much though, so I'm going to not
do that or bring it even lower, smaller in size. There we go. There's my gram. Maybe I need a couple of
grams on there though. Look at the size I was using. And you can fill in these boxes. So it's usually about a
blue box, bluish color. And then I can hit
Continue filling and fill in the space. Oops. Is not wanting to
color drop that way. And I can still on color drop, hit my color and
pick a new color, and I can add it hoops
to my gram cracker. All right. S, this
is a little bit. Let's go do my other color. I can go back to that color. All right. Ground box is
done. What other fun things? Let's make the Schmor Let's get a different wine size. I have my one I'm going
to go back to my black. I'm making my Schmor and oh, we almost forgot the chocolate. Here's my marshmallow. Amushi now. Right? And let me add my
chocolate layer on top and get another
graham cracker on top that's about
the same size. You know what? I'm going to do something. Let
me show you what I can do. I'm going to remember
how as tapping. I'm going to tap this line and bring it down to
the edges, right? I'm going to show you how
we can duplicate this. So now I can hit three
fingers to swipe down. That brings us our
quick menu here and I'm going to hit duplicate. Now I have a second gram
cracker layer and if I move it, I'm going to take off my magnetics because I don't
want that on right now. I can slide it up and it's the same shape as other
gram cracker layer. I'm going to take
those two layers and because this is
on a different layer, it puts it on a new layer. I'm going to take
two fingers and pinch them together and it
puts it onto one layer. If I undo that can also tap on this and hit merge down and
it does the same thing. I have my graham crackers. I'm going to do my color of picking my colors
and filling them in. I'm going to hit fill, continue filling, drop those in. I'm going to pick a new
color and get my chocolate. Yum. We've got our
colored in doodles. Let's do our Hershey
bar real quick. Then go back to my block because everything I have
is outlined in the black. I'm going to go go
to go like this. Wow. No, I didn't want that. My iPad is going rogue. No, usually have a bar lines. There's usually four of them that you can break
off and have more. Where is it five of them? I think it's five of them. It's been a little while
since I've dug into that. I'm going to select that area. I'm going to move
it a little bit. It doesn't have to be perfect, but I'm a perfectionist. I'm going to just make
it a little bit bigger. There we go. Now I'm going
to drop the color in. Drop, continue filling,
drop drop drop drop. There is my Hershey bar. All right, Campfire
and marshmallows. We've got Doodle page
day number two finished. How are you guys doing?
Are you having fun? How are your pictures looking? I want to see them,
send them my way, pop them in the project section, and, you know,
share them with me. Put them on social media.
I want to see them. Okay. Here we go with day
three coming up next. All right. See you there.
7. DAY 3: TRAIL MAP: Camp day three is underway, and I hope you've
been having fun. These are really
fun quick lessons that you can get
through quickly, and I hope you're doodling
even more beyond class time. Beyond our time because that's the fun of
doing this, right? So camp day three is underway. We are halfway there, and today we are going to
making trail maps. So think of drawing a
fictional map of a place. Maybe you know the place, maybe you don't know the place, but let's add trails, let's add mountains, let's add maybe a little cabin in
there that you're hiking to. Maybe it's your campsite. Let's see what we
can add and make a fun destinational trail map. Maybe it's someplace you
went this summer and you remember, pop
that in there too. Let's get started. Okay? Okay. I already went ahead and
added the title trail map. Let me show you how I did that. I did it the same as before. I copied and duplicated it, moved it up into the new group. I'm going to slide that title and lock it so we don't
have to see that. Because we already have the green and blue layer
saved as individual layers, we can get started just drawing straight onto this
one because we don't need to save or duplicate
our washi tape for later. So let's get started. So let's think of a fun place. So I love hiking to rivers. So I'm going to add
my river first. I'm going to put it up way up here and they get wider
as they go, right? And the water rushes, there is a rock in there, maybe you've got
some waves in there. It's going all
different directions. This is where we want to get to. Here's my big X marks
the spot, right? But how are we
going to get there? What are we going to
pass along the way? That's our monks spot. That's our destination
is getting to the river so we can
float down the river. But where are we starting? Maybe we're starting at our campsite way
over here, right? And I'm going to have
my tent right there. There's my tent.
I'm starting here. This is where I'm beginning
my starting to get there maybe there is a little cabin where
we're going to pass along the way, right? The cabin is smaller because
it's further away, right? What other things might
you see along the way? If you're a little person, tell your parent what you might see along the way and tell them what you want to add into your story or maybe just
surprise them, okay? So I've got my little cabin. Little cabin little window here, I got some windows here. I, not doing that one. You know what? I feel
like this is too big, so I'm going to go
to the smaller size. That helps me just a little
bit, even smaller yet. That's where you can
play with your sizes, maybe you have another
big window over here. And I like to add
a chimney to mine. I'm going to just add it in
and hoops. Maybe my chime. It seems a little
big, but that's okay. My dad used to build chimneys.
That's what he used to do. So I love it good chime. You always have the smoke coming up from our
chimney, right? Somebody's having
a fire in there. Okay, so there's
my little cabin. What else am I going
to add along the way? So I've got my campsite. I've got my little
cabin. I've got this. Maybe I've got a picnic table
that I need to head off to and maybe have a lunch
at my picnic table. So I'm going to have my
picnic table set up. I'm going to use
that thing where I hold it and get it on the right. It snaps it into size. They're perf little boards. And my picnic table, I'm
going to fill it all in. Those are the boards that
help hold it together. There's the top of it maybe. Maybe I've got some legs, guys. I never said I was
a doodle artist. That's okay because
I'm having fun. Are you guys having
fun? Sure hope so. There's my picnic table.
Maybe I need a bench. That bench is a little small. I know what I need on this. I need a little dimension
on my picnic table. Here we go. There's the
bench. There's some seats. Or my legs. There's my bench. Not the best. I'm not
going to lie to you. Okay, we went camping and now we need to get
our lines in there. Because first we went on a little walk and we're going to end up
at our picnic table. I feel like we need a tree
or something in here. Let's add a big tree. A little tree hole for
maybe an owl or something. I'm going to bring
my size down, Dad. It, a little texture to my tree. This is what I like. I like to hold my pen way
up here, right? You just start squiggling
because it gives it a really loose scribble. If you're scribbling
way down here, you're really thinking about it. But if you're doing up here, then you're just letting it get on the page. A lot of fun. You can go out the edges because trees aren't
perfect, right? Okay. Let's go back. Let me see what
size I was using. Not that size. Okay. After that, we're going to stop
along the tree going on a camp excursion, taking the rest at our tree, going all the way up, stopping at the little cabin. Maybe we're getting warm
before we go all the way to our river. X marks the spot. You know what? I feel like
I need some flip flops cause that's what I'm
going to take off when I'm at the river and
I'm gonna jump in. So I need to leave
I flip flops by. The river. There's
really big flip flops for this tiny river. But that's my trail
map you guys. Love it or like it. You
can add color to this. You can keep it black and white. Oh, let's add some washi
tape. You know what? I feel like adding some
washi tape because it's a lot of fun to add
color that way. Have my washi tape. Here's
my size. It's way too big. I'm going to use the two fingers and bring it down in size. Yeah, I'm gonna
pick another color. And another washi tape. Ooh. There we go. It could be a picnic blanket, couldn't it? Alright, guys. That was fun. Alright,
our trail map is done Day three,
we're halfway there. We have two more days left
and use the bonus pages. They're a lot of fun to just fill up with
whatever you want. Okay, see you in
the next lesson.
8. DAY 4: CAMPING TRAILER: All right, friends, day
four of camp is here, and today we are making
trailers, camping trailers. We're doodling our
camping trailers because maybe you don't
go camping in a tent. I love camping in a tent, but I also love
camping in a trailer. I love a cute little
vintage trailer. That's what I'm
going to draw today. So let's get started and you can follow along
with me or make your own. Make your own style camping
trailer. I want to see them. So let's get going. All right. I've already gotten
my pages going. Added I added the
title into Day three, and I'm going to just draw on this page with my washi tape. Oh, I just had a
really good idea, and I'm going to do it. I'll tell you in a minute. I'm going to go
back to my manline and make sure I'm
on my black color, and I'm going to start. I'm just going to
use my whole page to make a fun trailer. I want the bottom line, right? And the top is going to go up, then it's going to come and have a cute little dome
f. If I love that. I love a trailer like this. Look, I can come in
here and take me as and smooth out the outline. Super simple. There is the
outline of my trailer, right? You know what? I'm going to
move that down just a tig. Is that on the
same line? I know. I'm going to circle
that because it's on the same line with this
on the same layer, probably move that down and I'm going to give it a little bit of a three dimensional look. I'm going to try that again
and leave it over this way, just a tig. There we go. And then take it and
follow along. Here we go. There's the part of my camper and since
it's turned that way, I can add a little
window to the back now. And usually you have some sort of tank on the back
for your water, right? I'm going to take that out
here and go like this. It's my little water
tank and I too. Raise that extra space there, so it's three
dimensional, right? They don't have to be
perfect, you guys. As I'm saying that,
I'm erasing things. It's just part of me.
I do need wheels and usually you don't
see the full wheel on a camping trailer, depends on the trailer, but sometimes it's got
a hook or your axle. But this one I am going to give extra wheels of four wheels. You don't usually see
the whole wheel, right? Because the rest of it is
hidden up into the body. I want to fill in my wheels, give it a little bit. No, I'm going to
leave it like that. I'm going to give it a hitch. The hitch is going to
come off this way. That's the hitch that's
going to hook on to my car. Is that the right look for it? Probably not, but that's okay. Usually, I have a little
step that will drop down so that you can step onto your step
out of your door. Oops. Sometimes when you're working and trying to
move things around, I'm going to give my
door a rounded top. They probably don't have
that many rounded tops, but I think it's cute. I'm going to have a little
bit of a rounded window because this is my dream. I don't like that
line. I am going to put door handle. I'll come down. I'm going to have
some windows here, to look out of. That windows going to go that
way and this window over here is going to be
just a rectangle. Oops. Can you do it, you guys? I
don't know if I can do it. Do this without erasing. That's really difficult. It's very difficult for me. I love tapping back
and undoing things. That's just me. How are you? All right. I feel like my
window needs some curtains. I'm going to come down here
and first I'm going to add in usually they have a line
across the center, right? And then I'm going to
come to lower side. I'm going to add
in the curtains. I don't know if I like that. The curtains are just
off to the side. Not taking up the whole window. This one's a little
different because it's cute little curved window and usually some little texture.
Now it's your curtains. All right guys, I
don't know about you, but I love a vintage trailer that has a big stripe across it. Can we do it with the
washing tape? Yes, please. I'm going to come up to my layers and add a
new layer for this. And I am going to go with I think the brownish
red because why not? Then I'm going to
pick the plain washy. And that way, Whoa. Is that the color I want?
No, I don't want that color. I'm going for a different
color. Let's go for green. There we go. All right. So what I can do is
come into this layer and I want it to do
this angled shape. So I'm going to pop
it here and then I'm going to erase in this area. I'm going to get my
eraser big for this. And as that end. And then I'm going
to erase this end. I know the edges are on that black line and
you can still see that there, but I will fix that
in a little bit. Now I'm going to go back. I'm
going to do another line. This one, I'm going to have going this direction.
You know what? No, I'm going to bring it down. Let's see. At the same angle. Oh, that's where I'm going
to drop it. All righty. Come back in here and erase. Okay. As I'm going to add another layer
because I want to be able to erase these layers. I want to connect
them. At a fun angle. Let's see if I can. There we go. I'm going to erase because
if I had put that on the other layer on
the same layer, then they would be connected and I didn't want
them connected. To be able to do this,
I can see it better. I'm going to turn that layer off by hitting this
little button there. Okay. I raise. Okay. I'm going to
turn that back on. And since this is so
far away from this, I'm going to put it
on the same layer, but I want to add the stripe
across the back as well. So pop that in. Hit raise, turn that other layer off so I can see
it. There we go. All right. Let's see. Put those on. They're
all filling up. But see how now they're
above the black line, let me show you what
we can do to fix that. First, I'm going to
take two fingers and pinch those together
because they can be on the same layer now. I'm going to slide
it down and move it underneath the black line layer. Instantly, you've got your
stripe, it's on here, it's going in a great little zig zag and it gives that extra little funness
to your camping trailer. Camping trailer day is
done. How quick was that? So quick, right? So
tomorrow is the last day, day five, starry night skies. I know we did that a little
bit in the first one, but this one's just
going to be stars. All right. So meet me
in tomorrow's lesson. Okay? Great. Alright.
9. DAY 5: STARRY NIGHT SKY: Okay, friends, we are back for day five of our camping
adventure sketchbook, doodle, all the things, right? So today we are finishing
off with an easy one. A starry night sky. Think of constellations,
shooting stars, the moon. Just make a lovely calming. Starry night sky. I live at
the beach and when I get out onto the beach and lay
on the dunes late at night, I see meteors, I
see constellations. I see satellites up in the sky, I see all the things, and that's how I want
to leave you today with a fun nighttime chill
watching the stars. Think of all your favorite
stars and let's add them into your DooglePage.
Let's get started. So again, I have added the title to the
page, but you know what? I want to fill this page with my stars and I want
to turn off my title. I'm going to go back to my black and back to my monoline pen, and I am just going to
get started filling in. I love these little
diamond shaped stars. I love that shape because they have this twinkle
quality to them. You can add little twinkly
lights marks to them. You can just fill up
your page with them. This is just your
starry night sky and that's what we're going
to fill our whole page with. I'm going to pick
a different size and add bigger ones in there. Maybe that's too. I'm going to hit my back button. Okay. You know what
I am going to do? I'm going to add
a star in there. I like to add the
stars this way and then create my shooting
star like that. Oops. And what I can do is
come in here with my erase. I'm going to take out the wins because maybe I want
to fill it in in a minute. But let's first get through putting our stars
in. What else do we want? We want a moon in there. I know a full moon
is really nice. But when I'm drawing, I love a little crescent moon because there's something about, you know when the
moon is so thin, we call it a fingernail moon. That's what I want to draw
is the thin fingernail moon. This I'm going to
keep it really thin. Because there's something
about a night when the finger nail moon or the
really small crescent moon, the other stars shine brighter because the moon isn't
drowning out their light. I went around that
because I want it a little bit more turned. That's just the look
I want to go for. Let's add, you know what? Yeah, let's add more This shape. And I'm going to add
the big dipper in here. Do you know the
big dipper shape? It kind of is that
ladle shape, right? So when I see it in the sky, it's got other stars around it. But I'm going to use
that trick I showed you before where it's
just one finger down. Oops, for some reason my
opacity was turned out. So one finger down,
one, two, three, four, kind of like
the soup ladle, one, two, there
is my big dipper. Maybe that's the little dipper. These are in the way. I'm going to just hit my selection tool on freehand
and then hit my move tool. I'm going to move them out of my big dipper because
I don't like it. It's a little too busy. I'm going to do that
with this one as well and move it up over here. There we go. All right. I've got my big dipper,
I've got my moon. Now I want to come in with the littler and just make and I don't know if
you can even see those, but I want to make
the smaller stars. I'm going to put my pen
up here and just pop it out of the way for
this next part. I'm going to go to the next
size bigger because you've got stars and planets of all
different shapes and sizes. But I'm not going to go for the bigger one
because I'm keeping my big dipper in
that bigger shape. All right. What else
do we need in here? You know what? I am going to add a little planet in
here and it can be really small really cute. No. Cute is that. All right. It's far away because Saturn is pretty far
away. All right. Now I want to color in
a couple of my stars. We do the fun drag and drop. I pick my yellow color, and I'm going to
drop it into my star here and I'm going to add
it to this shiny star here and I'm going
to pick up blue to fill in my saturn and
hit continue filling, and hit the spaces in between. And you guys, you can
keep adding to this. I kind of love the
simplicity of this one, and I'm going to stop while
I'm ahead right there. Oh, I think I forgot one thing. Let's dive in one more time. So we have our page, but I always like to add a
title page to my sketchbook. I'm going to take my Btus pages, which I want you to
draw even more on. I'm going to duplicate I'm going to duplicate this one
and move it to the top, and I'm going to rename it. And I'm going to just
add in the text in black and have it
say my sketch book. Then I'm going to group those
together so we have that. Then I'm also going to take another washi tape and let
me do this in a gray color. And add it in here and I want it bigger. Maybe not so big. I don't like the gray. That's
a little too boring for me. I'm going to go. Let's go
with this orange color. There we go. Top that in there, add a new layer, go back to my black, and go back to my monoline
and add your name. There we go. That's
my sketchbook. Now we know who it is. You know what else
you could do? You can copy some of the things
from your other pages. This star, and select it. D three fingers, swipe
down and hit Copy. I'm going to go back to
my sketchbook page and do three fingers swipe down and hit Paste I can do that with
other layers as well. So if I go to this page, I'm going to select the tree. Now I'm going to go around it. I got some stars in there, three finger swipe, copy, go back to my sketchbook. Three finger swipe
and hip paste. I'm going to move that
down a little bit. I'm going to move this
one up a little bit. There we go. You can do that
with your cover as well. If you want to add one of
those to the cover page, move it right out of the cover. I can then move it. All right. Friends,
campfire sketchbooks. So much fun. Look at all the fun pages we've
created together. I hope you've had so
much fun creating these fun pages in a
sketchbook with me today.
10. THANKS!: Adding these personal touches
are just the thing to make your sketchbook just even
more fun to work with. I would love for you to share with the class and have fun. Like, share with your best
friend, share with your buddy. I want you to share with your parents
if you're a young person and you want to get them excited about
your next camping trip. This class is perfect
for beginners and adults or kids alike. If you want to explore, just doodling, you don't
have to be perfect. It doesn't have
to be your thing. It can just be fun
and letting go and just exploring your surroundings and exploring yourself in art. Doodles are art too.
I'm Katie from Perch handmaid and I'd love to share more classes with you or just let you know
that I'm on Instagram. Find me at Perch handmaid or go to my website, perhanmad.com. All right. Bye for now, and I can't wait to
see you next time. Remember, don't forget
to share. Okay. Bye.
 Katie Simmons, Digital Artist | Perch Handmade