Transcripts
1. Welcome, Friends!: Have you been curious how to create assets in
affinity design? Er, maybe you see your competitor,
competitors, competition. Maybe you just see other
artists out there creating these really fabulous
designs with such ease and you're curious
how they're doing it. They're using assets
A lot of the times an asset is a design that you've created in
your vector program. You can even create it in
your photo shop program, but they're little drop ins. It's like a P and
G, but it's vector. You just drop it in and you
can place them wherever you want in whatever
design you're making. I love to use them
for making patterns. All of my artwork
for this class. Actually at the end
of the day today, we are going to be getting everything ready set so you can use these
assets regularly. We're going to be using Procreate Adobe
Capture because it's a free program from Adobe
and Affinity Designer. That is my preferred
vector program. It beats out the competition
because it's so accessible. Stick with me and we'll hop
in in just a minute. Okay.
2. Getting Inspired: One thing I love to use to
get inspiration is unsplash. Unsplash is great
because they have so many free licensed artwork or photos that you can use
for your own artwork. I must confess, I never
thought I was really artistic. And I am still learning to draw and create
things on my own. But I really love
to take a photo, something and trace over it
and then make it my own. Makes that really easy for me. Right, let me show you
splash real quick. Hopefully that goes through. Here's my unsplash board. I have different collections over here that you
can look through. We're going to be working with my botanicals collection today. There's so many that you
can look at and see, and it's just really nice to have these amazing
photos that you can use. Then the birds collection, I love having full pictures
of creatures or animals. That way I can get every little, last, little bit of them. Like this little
book guide here. When you have found
what you like, then you can just hit the
download button and it gets it right into your
download file right here. And this is great. If you're using it
for something else, you can give a shout out to
the owner of the photos. You can just copy that
to your clipboard and you're ready to use
it and save it all. Let me show you all the files
do come with their names. If you didn't quite get that copy to the clipboard
for an attribute, their name is
always in the file.
3. Adding Hand-Drawn Charm with Procreate: We're going to begin
today by using procreate to bring
in that photo. I can send it right
to, let's see, Let me open, I can send
it right to my ipad. I'm going to do
that really quick. Then f my ipad I show
you from my ipad. I've dropped it right in and
it's ready to go from here. I can just send it
right to procreate. And it'll open right up
in my procreate app. Now I have this little guy, I'm going to pick just a
black color to get started and I'm going to turn my
opacity way down on this guy. I'm going to find
a brush to use. Usually I just like to use
my ink pen brush because I like the I'm drawing on
the wrong sent side. I like the fluidity of it. And those you can get
in on my website, I'm going to make it
a little smaller. I'm going to make
a layer on top of the original layer if
you're new to procreate. I have other classes on my
website that you can take. I'm not going to go over
too much of that right now, but this one is pretty easy. Like I said, I open
this up and I turn the opacity down by
hitting the end here. It's on normal, that's
why it has an end there. I don't need to
do anything else. And I'm also going to
slide it and I'm going to lock it because I don't want to do anything on that layer. What we're working with is doing full multiple layers
to create this design. Another thing I always do
as well is I create little, I create things over in the corner here that makes it when I'm sending it
to my other programs, it knows to keep them
all the same size. Because of that, I'm going
to lock that as well. I have the size I want. I am going to first just start
outlining this little guy. I don't need to do anything except outline his actual shape. You might not know
this about me, but I am definitely
afraid of birds. I hate birds. I don't know why, Well,
I kind of know why. I think I was traumatized
as a kid by birds. But even this is a little bit scary for me and it's
totally irrational. I understand that. But okay, don't we all have things that are a little bit
irrational sometimes? As you can see, I'm just
loosely going over, this doesn't have
to be so perfect. In fact, less perfect it is, the more character
it's going to have. That first one,
I'm just going to take the color and slide it in. That creates our
background for this bird. Then I'm going to turn it down to a lower opacity
and add a new layer. We're working on separate
layers every single time. Okay, now what I can do, one thing I like to do,
actually I duplicate this. Then I can come in here with an eraser brush and let me
see what eraser I have. I'm going to use the same brush. And if I want to take this brush and turn
it into an eraser, I'll just hold down on the eraser tool and
it will go over here. Now, I just come in. Start erasing bits. If I turn this all down, I can see it better. Oh, I see what happened here. That one, the opacity
came down too, because I duplicated it
with the opacity down. You just start erasing and getting rid of
pieces that way. If you're doing it this
way from the base piece, when they transfer over, you're not creating new shapes
on top of other shapes. And you'll see why
that's an issue later. We're going to turn
it on free hand and use the selection tool
to just get rid of all of this and three finger
swipe down and then it cut. All right. I'm going to bring the pace
down on that one again, I'm going to duplicate
this layer again. Now I'm just going
to work on eyeball. Bring that a pass. I
need that pace down on this one so I can see
what I need to erase. I'm going to bring that down, this piece. What I can do is now bring
the opacity back up. I can make the selection
tool on just the eyeball. Do the three fingers swipe down. And I can do cut and paste. We look at that one. That's how I took it away from and I'm going to
delete that piece. I don't need it anymore now. This little guy has some detail on there and
I can add that detail. But for this first one,
I'm not going to do that. I think I'm just going
to leave it as it is. But I am going to
create his wings now. Let's duplicate this
piece again and start erasing where his
little wings are. I come up here, we can get his whole wing section you want to create the shapes. See how if I bring that gacy up, you can see the shapes
coming together. This one I want to
fix a little bit. It only needs to be
on the piece that I'm trying to work with a. Right now I'm ready to
use my free hand tool. I'm going to go around it again and cut paste. I don't have to
worry about having the quality really high quality. Sometimes when you
duplicate with your layers, every layer above the
first layer is losing quality when working
with it this way. I'm going to be sending it to Adobe Capture to turn
it into a vector. So we just need dark
colors. And that's it. You know what I am going
to do on this one, because I do want
this sky to be, I do want to show the
detail on this one. Now, let me see what happened. There were in there. There we go. I had a little
bit that was an erase mark. I'm going to lock
this for right now. I'm going to start using
my eraser tool and bringing down to a
smaller percent. See where we have the wings now, I'm just going to start
creating those shapes. Can you see how using the ink pen with that
variable brush stroke, it creates a really nice design. I'm not going to go,
oh, maybe I will. I can't go all the
way to the edge on that piece because that one
doesn't matter as much.
4. Bringing Assets into Adobe Capture: Now the first thing I'm going to do is I'm going to send each
layer individually. I don't need that top one. Oh, this was my corners. Sometimes it's good to layer your corners or to
name your corners, but we want to send these
off to Adobe Capture. How we do that is we go to this wrench tool
here and hit Share. We just share it as a J peg. Mine comes up as Adobe Capture. If you can't find it, go over to more and you
might be able to find it in your selections down here. And we hit Adobe Capture
and then hit Cost. Okay. It immediately brings
you to the shapes, which is any shape that
you is going to go here. If it's a type, it will come here different
graphics or color. It'll go in separately. We want to make sure it's
going to be really smooth. So I bring the threshold
here all the way up and then hit the check mark you. It's looking pretty
great right now. I always check to see if I
need to refine anything. The refined button
is here and that's where you can do erase. But I don't really
love it very much. It's a little bit
tricky sometimes. You can't get it perfect. That's why I like to refine
it in procreate first. But if you have to, then sometimes when it
comes over to vector, it changes it a little bit. But this one is pretty good, I don't need to do much
and you can add to it. If you find a spot that
you need to fill in, then you can just fill it in. It'll help to smooth
this out because all of these little pixelated pieces sometimes will transfer
over once it's spectra, then I always hit smooth, it smooths it out. I typically don't turn smooth on because sometimes
it smooths it too much, then you don't have
that hand draw look. I just keep it off and hit safe. You can name it if you want. I typically don't. I'm going to put it
into the Ay because that's for the
birds and hit safe. Then I have the first
piece in this little guy. This is where naming
it can be good. You can name the bird. Say maybe it's a finch, I'm not sure. Finch one. And that way when you're
going down the line and you have lots of
pieces like I do, then you know where to begin sending it off
to affinity designer. But usually when I start
with the base shape, then I know now I can just go
right back to procreate by hitting up here and
working on the next layer. I turn this layer off, I'm going to lock it
because a used it. And turn the next layer on. We're going to do
the same thing. Share Adobe capture post, bring that threshold
all the way up. That one still is coming
through pretty well. I don't need to do any
refining I can hit. So save. There's the second piece. I'm going to go back and
quickly go through all of this. Peg, adobe capture
post threshold, so it's looking good
to me. Go the feet. This one I think it'll be fine because the feet came
through fine the other times. Threshold. Yeah, see that one's
got this little piece, I want to take away that little piece
there and that's it. I didn't want that to go
through and then hit Smooth save it's in there. So I'm going to go back to
procreate and go to the next one Je capture post. It can get a little
tedious, I get that. But once you're on a roll, it really helps out.
Can you see how? Because we have each of
the corners in there, Every piece is going through
at the correct size. If it didn't, that
would be a smaller, it would distort it. We want to make
sure that they're all the right side when they're going into an affinity designer, that they get
placed very easily. Save on to the next one, then we're done after this. Peg it. Adobe Capture just
needs black and white. And that's it because all vectors work best when they're coming into
that as a black and white. If it's not black and white, you're going to lose quality.
5. Saving and Exporting into Affinity Designer: Now we're ready to take it from Adobe Capture and we're going to pop it over to
Affinity Designer. One thing to know also is all
of the assets that are in Adobe Capture are
automatically saved to your creative
suite on the cloud. You don't have to worry
about these taking up too much space on your ipad. You don't have to worry
about losing them. You can find them
later on just by logging in to Adobe Adobe Suite. It's really nice because the
capture app is free to use. You don't have to
pay for anything because I don't like to have too many things
that I have to pay for. This one works
seamlessly that way. One tip to before we start sending them over to
affinity designer is to make sure your affinity suite is open but you're not
working in a document. Let me show you mine. I'm going to open
up my Adobe suite so you can see some of my
assets that I already have. A couple of them, I
believe this one and this one are what you got
in your packet today. You got them in
your packet today. You can download
them into procreate, and send them over and make
the any color you want. But those are the two that
you get with this class. If you want to create something quick right
now, maybe you did that. But if you want to just
work with me and use those, then let's send those over. Hopefully that's what
you use already today. Right, let me show you. This is closed out. I'm going to open my Adobe Capture and
start with this sky here. We're going to hit
the three menu here and hit Share Share. Then we are going to
export as an SVG file and send it right into Adobe Capture or send it
right into Affinity designer. Here's our first one.
See the little guys here are at the edge. What I'm going to do
is clean those up. If you go to your layers panel, you'll see each piece individual because that's
how vector programs work. They are individuals,
individual layers. You can take them, put the first here and the two fingers down to
get everything in between. And then I'm going to
hit the ad button. This has to work
when you're using your move tool that creates it on one
level, on one layer. If you're new to
affinity designer, take my other class. It goes over all of
this and how to use all your panels and how
to create a design. I'm going to just
keep those here. I am going to slide both
of those to the right. I'm going to hit Copy. I'm going to move out of
here because remember, we can't be in a document when we want to bring
the next one over. Actually, I didn't need
to do the copy there. I need to do that later. Okay, let's just work with
the next pieces, right? Like I said, it's a little bit
tedious to do all of this, but you get pretty fast at it. I picked all of those corners and created one layer with them. Now on to the next piece, Share Export VG 1.2 fingers and then
hit Add, Go back. You're at this board here. Did you see how I'm doing
that here on my new ipad? I slide up from the
bottom and I can get back to all of the programs
that I have open. I just did that
little piece here. Now I know I need to
do the feet next. Share ports, peg. The feet are each
individual pieces too. I'm going to create one
layer with those then. You'll see what I can
do with those later. I can separate
them later but for moving them to a new page, because I'm going to
put those all onto one page, can share ports. Same with all the wing pieces. All these pieces here
are individuals. I know the bottom
41234 are my corners, 1234 and you can see they're
lit up with blue, right? I'm going to hit Add there. Then I'm going to create the wing as one big curve
as well and hit Add. Now it's one piece, another thing to do. Well, we'll do this when we
get it all in one place. Okay, so we just do the wing. Now I need to do the SG and now we have the beak. We don't want to edit it,
I'm going to share X W as S. Can I show you one thing to say, you are near the bottom
of your list, right? Maybe this is the
first time you've used Affinity Designer or Adobe
Capture and you go to share. And sometimes it
brings it up here. Let me try this one. If this one's down here, see how it brings
it up down below. And sometimes you
can't get to it. What I'll do in those
cases is I'll just open it up and then hit the Share
button and export as SG. Just sometimes it creates a couple of problems when
you're trying to share it. That's a workaround
for that one. All right. I'm done with Adobe Capture and I'm
done with Procreate. I'm going to get rid
of all of those. Now I am going to take all of these pieces and create
one document with them. This is my base document. I'm going to save my
base document as bird. You want to save all you
want to make sure you save the main file for all of your assets and put them
on a hard drive somewhere. That way later on you want
to use them or God forbid, something happens and you lose them in your
asset program file, then you can have them stored somewhere
else and you won't lose all that always making sure
you name them properly. And maybe if you have a project name them for the project as well so
you can find the easier. I'm going to name
this one first. I'm going to say E, R I, E because
that's my category. And then I'm going to say, maybe, I don't know
if that's the finch, but that's what I'm
going to call it. I'm going to put the
date in there to 92223 day of the
first day of fall. I'm just going to do
the month in the year. I believe today is the
first day of fall. Happy Fall. Find where you're
going to put that. I'm going to put that in
my creative, actually, I'm going to send
that to my assets. I have an asset, affinity
assets and birds. There you go. That's the main one
is going to be saved. The rest of these, I'm going to just copy pieces out of it. Here I'm going to
create. That's good. Now I'm going to go
to the next one. I'm going to take both of
them and just hit Copy. Then when I bring
them into this one, I'm going to hit Paste. It's putting them on
top of each other. If I take that one away, you can see it,
the curves there. That is your corners. And I don't need that anymore. So I'm going to delete that. I'm going to rename these, you can rename them by
sliding to the left. Rename layer and just saying, base, oops, I didn't want to lock it. I wanted to rename it. That's the second layer now, because I just did this one. I'm going to close
it. And I'm not going to save it because
I don't need that. I'm going to do this with
the next layer copy. Bring it over into
this layer. Hit Paste. Get rid of my curves there. I'm going to turn that one
off so you guys can see. I know that one there, but I'm keeping
it until the end. I'm going to actually
lock it for now. Then I'm going to
delete this one, rename it in Head, and get rid of this one. Open this up slide since
the first layer is already done slide so I have both of
them copied or highlighted. I'm going to hit
Copy, go back here, and I'm going to hit
Paste the corners. Again, delete the corners. And this one is the fine naming, all the layers
helps later on when you're creating your asset
and turning it into an asset. That's why I'm taking the time, as I'm dropping them
in there right now, to name all the layers. You could not do that, but then later on you might need to know what all the pieces are. For me, that's the
fastest way to do it. I'm going to come in here, copy, go back to this hip paste. I know the bottom one
is, those corners. I'm going to get rid of it. I'm having a hard time
seeing, okay, Sax's wing. Do you see how I
turned all those off? Just by hitting the
little dots here. Right, And then the wing
so I can get rid of it. Next we're going to go
to his little eyeball. I remember that
eyeball, copy paste. Get rid of the bottom curve because I know
that bottom one is the corners rename finch eye. If this is not a finch or
I'm calling them a finch. Okay, and now we have is beak. That's the last piece. Copy, paste. Oops, I think I hit copy. Those are still no copy. Let's do this again. Paste. There we go. We'll eat that one.
Rename finch. Beak.
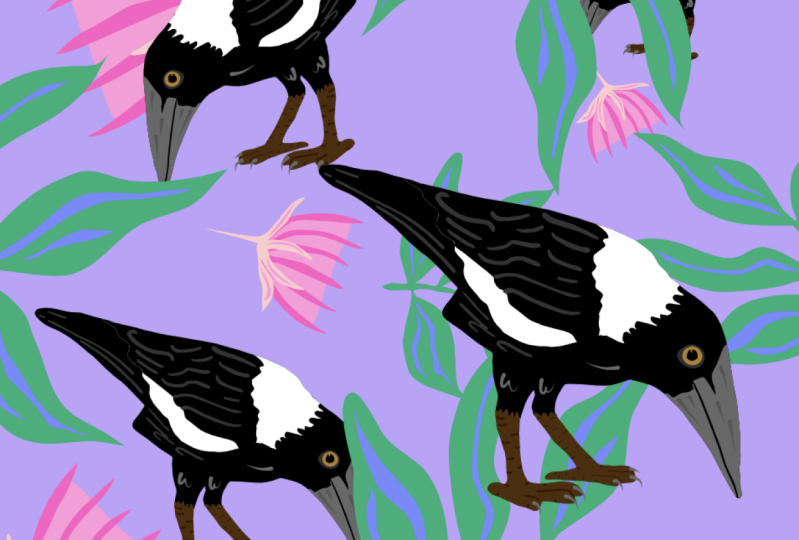
6. Working within Affinity Designer: We have our bird, we have our finch
and we're going to work our magic when the affinity
and clean up our design. Let's keep going and remember, check all your layers. Check that they're all
named and we'll move on. Okay, okay, I have
all my layers here. I have my corners. Guess what? I don't need my corners anymore. Did you see? I can do
that a couple of ways. I can delete it here or I can click on this one
and hit the trash can. Next, I'm going to well, let me make sure they're all in the order I want them to be. I want this is I
want it up here. I want his head. Let me see. Okay, here's his
head, here's his eyeball. I think that will
work. I think I want his head coming over his
eyeball a little bit. I want the beak to go over
the head piece a little bit. I think that's a good order. The feet. Okay. I'm trying to figure out this blue line and now I
think I've figured it out. Remember when we
first went in to the base and I was showing you how to
add some space to it, What I can do because they're
not lining up properly. And I'll show you
when we add color. I'll show you when we add color. Let's hold on. I'm going
to group all of these. Bottom one has already clicked two fingers on the top one, and that will get all
of them together. And I'm going to
hit the File button and I'm going to hit Group. We need to rename this group. This is where, again, the naming and
organization comes in. Remember we call this guy finch. I can just call them finch and this is my first
one of the finch. I'm going to, okay, now we can start going in
and picking colors for it. We can choose to keep this
base layer on or off. I'm going to keep it on. I'm going to go to my swatches. You can choose colors,
different ways, You can use the sliders, you can use the color wheel. But I really like working
in color palettes. I have one, where is it this summertime assets is what I was using
the other day. But there's so many
different palettes, colors you can use. I like to find really fun ones and take the
time to upload them all. But let's see. I'm going to go with
the curiosity palette. This is from the
palette perfect book. Here, let me show you. I wasn't going to do this today, but palette perfect book. If you love good color
palettes, Lauren Wager, she's got these amazing
color palette book lets you can just go through and find really
good cohesive colors. That one's the curiosity
color palette that I had downloaded. That's a lot of fun. All right, let me back to
my camera. There we go. That one I did
when I was in Kai, I want to go to curiosity. Where was that? They're all
alphabetical sometimes. It's hard to find. All right. I love the bright colors. It's a mix of cool and warm
and a lot of fun contrasts. The I like to keep the bases as a light color and then
work my way up from there. Then his body, he was a
really fun orange color, but I don't have to keep
that if I don't want to, but maybe I will
for now, his feet. Bird feet color, we can
go with a darker color. Maybe I should turn them on
real quick. Can you see? You can see the difference
in the colors there. This is something we
can clean up later on. We will definitely
need to clean it up, but everything else
is coming through. All right, let's see, a little wing, let's still on the F. Let's
go to his wing. Maybe a dark red, maybe you want like a pink. This is a fun little
guy decisions. I'm going to stick with that red and see how you can see the color coming
through underneath. Look at this little
guy taking shape. I love him. He did
have a dark eye. I'm going to go, I wanted to do like maybe I'll do, let me see. I think I need a little
bit darker color. Another thing, if you are not finding quite
the right color, go back to your swatches
on color wheel. It's really nice and handy too. There we go. That's
what I wanted. A dark brown, which was
not in that color palette. Okay, the finch head. We're going to go back
to my palette here. He's coming along
nicely. What is he? Okay, and his beam, I'm going to go
with maybe a blue because it doesn't
have to be perfect. Look, you guys, we just made
the cutest little finch, right? How sweet is he? I'm going to, just
for this section, I'm going to make my base really bright so I can
see it underneath. Actually, I really
like really bright. Actually, I'm going to go black. So I can see it even better. Down by the feet right, you can see quite
a bit underneath. One way to get around that
is to take the curves, because all of your
layers are called curves. I'm going to take the
curves of the feet, I'm going to take the base. I'm going to come up
here and I am going to divide them and see how
we just got a piece, but I see one piece here, okay? Then another piece here. I'm going to move those guys. Actually, you know what, I'm going to just
group those two. It's going to be faster
for me to group them. Oh boy. So sometimes you get all
these little pieces. So I'm going to go down and
get rid of all of those. I can just know I
can't get rid of all that. Something else. Oh, I know what I can do. There we go guys. Now I'm going to come over here. I'm going to use my nodes tool to click all those pieces
and just delete them. The faster way to do what
I was just about to do, put on those pieces, sometimes you got to find
the faster way to do it right sometimes Doesn't want to work for you. There you go. Okay, here's my bird. That's what I
didn't see earlier. All right. So see how it also
took the feet away, but that's okay because
when we put them back in, they're right there, right? And you don't have that space underneath. Here's our little. And you can do the same thing
with the the outside here, but it's pretty okay for now. And I'm going to give it
that lighter color again. All right. You guys, we've just created our finch.
Those are the feet. See how they're separated. Now, if you want to, you
can add them back together, but I think I might
keep them separate. I'm going to add them.
Rename it again. Sometimes it's a little bit of doing things over
again, but that's okay. All right, and see how I
moved it out of that group. Now that group has this little empty file,
we can get rid of that. Here's our finch guys. This is what we're
going to do next.
7. Building Your Asset Library: Now we are ready to
create our asset library. We have our finch, we have our bird. We have whatever you used
to create a design with, it needs to be in, otherwise you'll have separate
pieces in your asset. So keep it all in one folder. And like I said,
it makes it really easy to have them all named. This one's not named anymore, So I'm going to rename it Base. Can do this. All right, now we're ready to go to our
asset library right here. If I just hover over it with my Apple pencil, it shows up. And that's because I
have the newest version of Apple pencil and the ipad. If you don't know where it is, you can always here on the question mark and it
will tell you down below. And there's your assets.
Can you see that? There are your assets? Now I'm going to open my asset library. Your asset library has you
have different categories. This top name here is
called the category. If you want to create
a new category, do across from the
very top assets. Get the little sandwich, add a category,
right, and rename it. I already have one for my birds. I'm going to keep it as, put it in with the. Hm, the ayo. This little guy is
not a humming bird. And I shared with you
guys humming birds. I do want to create
a new category. What I need to do is come up
here and add a subcategory. It's going to rename
it just assets. I want to rename
it something else. I'm going to click on
the hamburger down here. Rename category, this one. I'm just going to name finches, or maybe I'll just
say little birds because how many finches am
I actually going to find? And it's something different
than humming birds. Humming birds, yes,
are a very small bird, but there are so
many different ones. Now I can, because I have
this whole one click, make sure all of the
buttons are open. Right. Another thing is if you add any effects
to any of these, which you would do over here, then that will be saved when you save it
as an asset as well. But I'm going to
come over to Assets, click on Little Birds, and add Act from Selection. Now this low guy is right here. I can move this guy because
he's in the folder. That's why I can move, resize him the way without
the ratio changing. If it was just one piece, I'd have to have one
finger down to resize. Let me show you real quick. If I just resize one piece, I can't do the one finger. If I have one finger down, then it keeps the
ratios the same. But I don't want
to do any of that. Okay? I've got this
little guy over here. Here's my assets
of my little bird. And I can click here and insert, Look, I'm going to try
with the humming birds. You guys, this is where it gets really fun because
you can just drop them in. I shared with you a
botanical as well. That's where you can come
in and start inserting different things and creating
your little designs. I'm going to flip that.
This little branch is going to be
underneath which one? It looks like he's
holding onto it maybe. Right, we have the branch. We've got this humming bird. And this humming bird.
8. Sync + Symbols: Okay, let me show
you something else. What I can also do, I'm going to clear these. I don't need all of them. I want to show you
something else. And this is another
really fun trick to creating your assets. This is a little extra, right? Take your asset and hit the
symbols symbol over here. We want to add symbol
from selection. Now, add this guy in.
I can change him. I can where he's going, Oh, he's upside down. I'm going to change
how he's positioned. Right. Maybe I add a branch in. I'm going to add
I'm going to add the other branch as well. It's okay if they go
off the page. Okay. So remember I left there. Oh, their feet separate. Oh, nope, I did lock him. Never mind. Never
mind, you guys. Okay. So there's that branch. Right? And I'm going to hit
symbols and add the symbol. Right. And I'm going
to insert it again. I'm going to flip. I'm going to make it a little
bigger for this guy, right? Going to put, see how
they all have the orange. It means they're
all sync, right? If you go to your sync file, you know what things are sync and you can
turn the sync off and then you can turn
or you can hit detach. If you detach, let me show you. That one doesn't have the
orange anymore, right? Let's see. But I want it sync. I just did the two fingers
and it's synced again. Let me show you what
happens now when I want to change a color in a design. If you want to change
all the colors in one design, it's super simple. Let's try with his body. Hey, it changes everything
that's sync together, right? And maybe you want them to be different and that's where you just
detach them, right? I think I like a darker,
let's see, beak. Let's give him a
little yellow beak. And I'm going to change
it wing here, color. You can do the same
with the branch because the branch is a
different color as well. There we go. This is where it comes in really handy when you're
working on a pattern. And you need to change
everything in the pattern, or you just want to change
the colors really fast. You just come through
and use all your assets. You can s, other things as well, but you can use your
assets and start changing the color in one design
and it'll change it across the whole
four which is. But then you can also
see where having all your files named properly gets big show you
if you have a lot of files open and you need
to find the right piece, you know just what
you're getting. You know, you're
getting the finch head, sometimes they're kind of small, so it's hard to see, you know, you're getting
the finch eyeball, right? Yeah. So having those
sync pieces really creates a faster,
easier workflow, right? Really, that's all
we're trying to get is to have a faster,
easier workflow. It took a little time to get these all put in and together, but by having that time now, anytime I want to go and
create a new document, let me show you like by go
and hit a new document, then I can come in
here and like I said, just start dropping
assets, right? It makes things just so
much easier to work and create these really nice pieces for your documents,
for your artwork. Right. Make a change sizes of the
and change the placements. Yeah, I think it's
the Be's knees. I think it's the Be's knees. Making great assets and putting a lot of effort or design into them
can be another thing. Once you start really getting
to know affinity designer, you can create, you
can create shading in procreate, use your layers. The shading won't transfer
over the same as it would, but you can create vectors out
of black and white shades. You can and it'll give it
a handle on look, right. And that's what we're trying
to get with vector designs. Because whenever you
think of vector designs, you think of really
just strong graphics. We want it to be a little more feminine sometimes or
a little more fluid. Yeah.
9. Thank You!: All right, I hope
you had fun today. Today, we were able to get our inspiration using unsplash. And you can find the link to my unsplash collections
in the downloads. Sorry, I have downloads
that came with the class. In the downloads, yeah, we learned about creating really fun pieces
with those blocks, with the black and whites
for using that in procreate, which then we sent over to Adobe Capture as each
individual layer and then we pulled them
into affinity designer. Yeah, we created really
fun little pieces today. And that little finch, it was cute, so maybe I don't
need to be afraid of birds. I don't know. It's usually
when they're flying at me, that's when I have issues
with them anyway. Have fun. I'm Katie. I'm from Per
Chan made and you can find more classes on
my website and yeah, I hope you have a really
fabulous day today. Don't forget to share your assets and designs
that you're making with your assets on social media and use the hashtag
creating with H. No, that's my hashtag. Okay, let's see. Can I have that in there? Probably not. I'll put it in the
links down below. All right, bye for
now. Thank you.
 Katie Simmons, Digital Artist | Perch Handmade