Transcripts
1. Introduction: What I'm going to
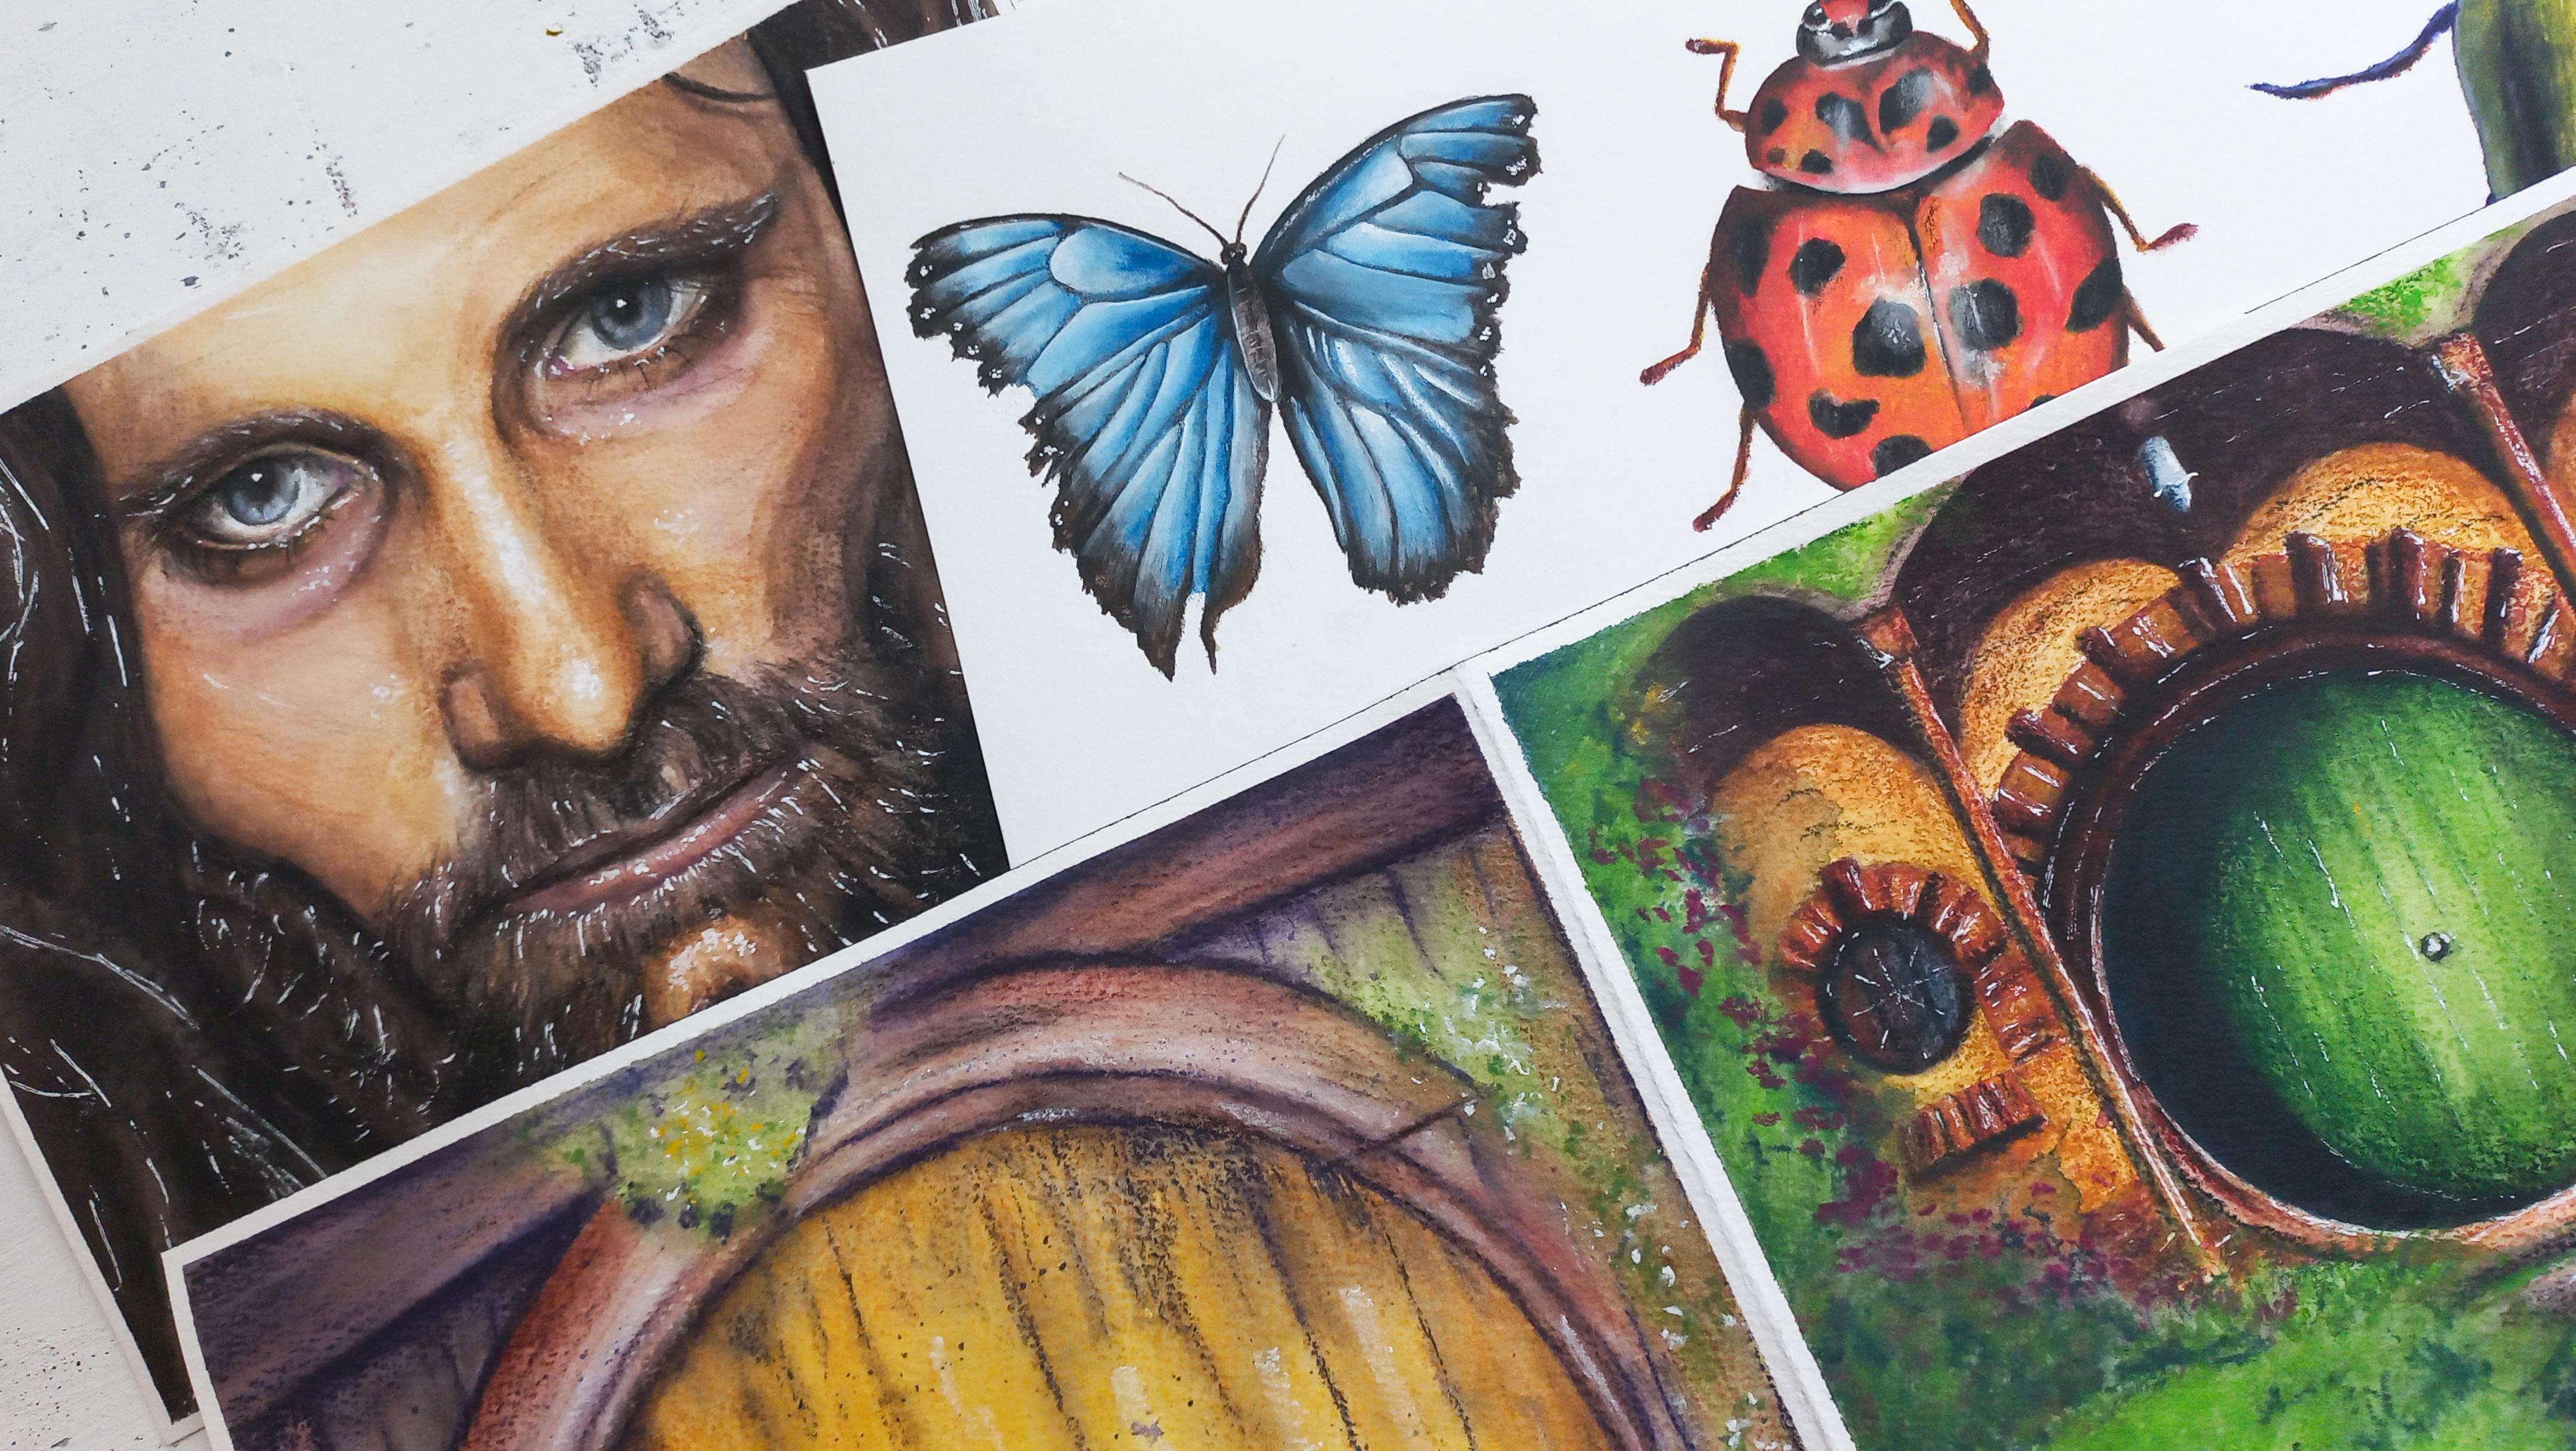
pencil is one of the most surprising mediums I have come across as an artist. It looks like a colored pencil, but it acts a bit
like watercolor. Although not quite either. High. I'll pass wiser
and realism artists. And even though I mostly
paint with watercolors, I enjoy using all the mediums. And when our became serious
for me a few years back, I realized I really
loved to teach. So I ended up turning my hobby into a full-time occupation. Nowadays, I create on
skillshare every month, and I've also started expanding
locally with workshops. I share a lot of
YouTube, social media, and I also collaborate with
art brands with watercolor, pencil or not really what
I was hoping for it. And after that, my supplies, a set and a drawer
for about two years until I decided to teach
myself how to use them. I also noticed that a
lot of other artists on a box of watercolor pencils,
but they don't use them. So I pulled my community about
it and alert that overall, most people don't really
know how to use them. They find them confusing
and hard to blend. I wouldn't be surprised if
you told me that you came across this class
first met her reasons. This is why I like to teach you techniques developed
through trial and error to help you paint beautiful watercolor
pencil art pieces that are clean,
smooth, and vibrates. First, I will show
you my supplies. Then we'll sketch a
lady bug the easy way. All start coloring with
a watercolor pencils, and we will learn to activate
the paint efficiently. To make our painting
look realistic, will add dark tones and shadows. And I'll show you how to
blend them smoothly into brighter tones and how to add highlights to a watercolor
pencil piece of art. This class is for you if you're new to
watercolor pencils, or maybe you've tried using
them and you've had trouble. Or, you know, there's a lot
of an export potential. By the end of our time together, you will know exactly
how I managed to create realistic
works that look clean, smooth, and Firebird with
this one of a kind of media. I can't wait to see
what you create. So let's get started.
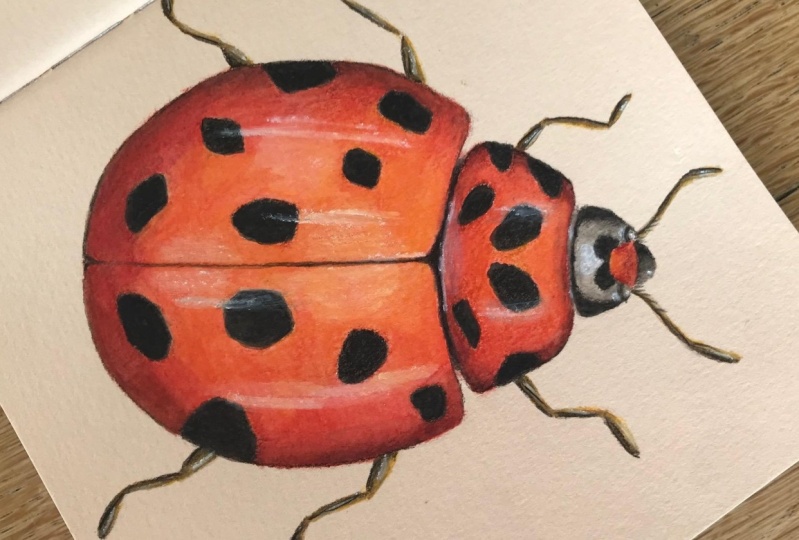
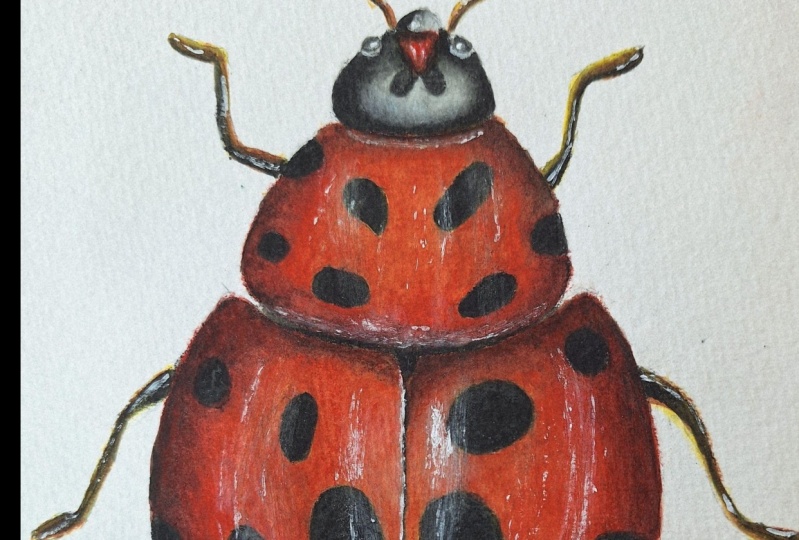
2. Your Class Project: Your project is to paint a cute lady bug using the
techniques taught in the class. Our goal will be to keep the bright colors
looking clean, smooth, and vibrant, despite
the layering of dark tones and highlights. If you tried to walk
our pencils before, you've probably
noticed how easy it is to make a mastering
the blending process. Because dark colors tend to overpower all of the
colors so easily. And it may seem like an
impossible task to have bright, light and dark tones
all in one painting. We will be taking this projects step-by-step in a logical
order that allows you to dan watercolor pencils a
lot better and practice key techniques like layering,
blending, and burnishing. Simple supplies are all
you need to get started. And if you're a watercolor NCVS, I bet you have them on our ready to make the most
out of the class. You can download
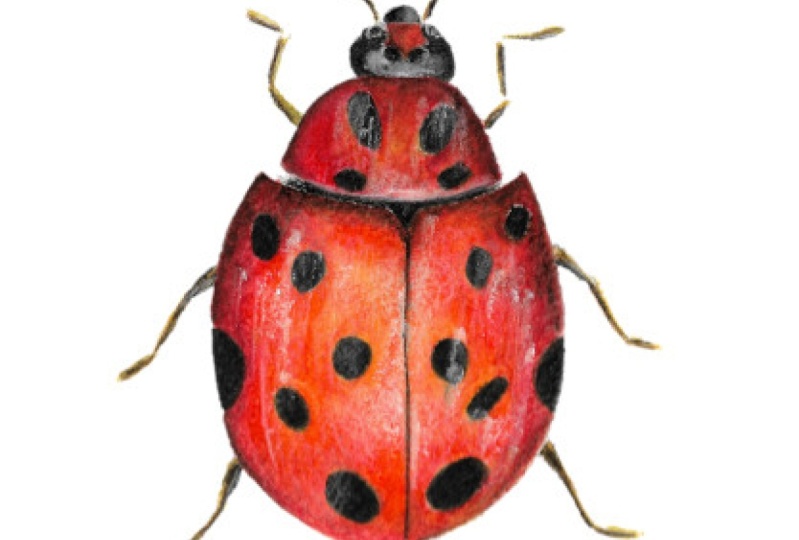
the supplies list in the resources section, as well as a photo of my art
and the reference photo. Please post your project to the project and
resources section. When you're done. You can also ask me for feedback
if you need it, or just sharing your
art with the community, we're ready to start. So I'll see you next For a look at the supplies
we're going to use.
3. Recommended Supplies: To paint realistically
with watercolor pencils, I always use the same supplies. And if you're familiar
with watercolors, you will notice that, except for the pencils, you can easily repurpose all of your favorite
watercolor supplies. Let's start with the paper. Here. I'll be using a six by six inches sheet
of watercolor paper. I cut out of a large
Winsor and Newton pad. This is a 100% cotton
cold press paper with a weight of 300
grams per square meter. You're welcome to use any other watercolor
paper you already own. However, I prefer to recommend a great quantity papers like
this one for best results. As a general colors look
and blend better on 100% cotton papers than they
do on the cellulose papers. Don't forget to download
the supplies list from the resources section for more
paper references from me. Next, we want to grab a
roll of masking tape. This is plain construction tape, but scrapbooking washi
tape will work too. We will be taping our sheet onto the surface of your choice. And this will help us draw and paint without having to
hold the paper in place. We will be needing a pencil, ruler and eraser
for this sketch. Anything basic you have at
home is absolutely fine. I recommend a negative rays are like this one by Faber Castile. This is to soften
your sketch lines when they're a bit too harsh. It's not a must, but it's very convenient to have
when you draw a lot. Watercolor pencil
work does not require a bunch of fancy
paint brushes too, is always a good choice. And whether pointy at the end, it's even better
for realistic work. I absolutely love these silver brush black
velvet paint brushes. Size is 84, as you can
make thick strokes, but also create fine details. One paintbrush will be enough. You can grab two of them if you prefer having some choice. Our Lady Bug project
being quite small, I suggest at least one
small enough paintbrush to get the details, but big enough so
it doesn't take ages to blend each part. In this class, I
decided to showcase the door wet, intense pencils. They are in based, but they do act just
like watercolor. I didn't notice a big difference with regular watercolor pencils, except for their
beautiful colors. The main difference with ink based pencils
is a dry layer. It won't reactivate easily, but that will not
affect our class project outcome even when you use all the watercolor pencils
as a great alternative, I can recommend the famous
pastel brush, their pencils. I picked only five watercolor
pencils for our project. And you will find the exact
Darwin's intense color names in the supplies list. Otherwise, any
color red, yellow, brown, white, and gray or
black will work just fine. Colors won't affect
the outcome that much. But will is the
technique we use and maybe also the quality of
your watercolor pencils. If, for instance,
yours were to be a bit less pigmented or harder to
blend, but that's really it. Makes sure to have a
pencil sharpener handy so we can keep the labs sharp
for the coloring part. Out of habit, I
prepared to water jars, but really one is enough
with watercolor pencils, as they are way less
messy than watercolor is. One or two paper towels will do. For our final highlights, I'll show you techniques using our white watercolor pencil, but also a white gel
pen and whitewash. So don't worry if you only
have the white pencil. We're all set to get started. So see you in the next
lesson for a quick sketch.
4. Start with a Simple Sketch: To complete our project, we will need to draw a
simple sketch first, as a great way to use watercolor pencils is to start
coloring within a shape, blend the colors, and then keep building realism
on top of that. First, Let's use the
masking tape so we keep our hands free and just
focus on drawing later on. I suggest you use the ruler to locate the center of your sheet. You might also want to determine a top and bottom
for your lady bug. So it ends up being
well centered. Doing this will avoid
having to erase everything when we realize
is completely off center. And it's something
that happened to me quite a few times before. I use this reference photo. And as you can
see, I only use it as inspiration since
the lady bug will be creating today is positioned slightly differently and
commas are more basic. When you observe
this lady bug and start converting it into shapes, you'll notice we could
imagine circles or ovals, shapes overlapping each other. Thinking of it like this will be an easy way to get
started sketching. It's a lot less overwhelming
and intimidating. I'm noticing these
four major parts here, all of different sizes. Let's start with a large one. It should start from
the bottom and come slightly above the
center of the sheet. The middle of your
sheet will also be the middle of
our second circle. I overlap a third
circle for the head, will draw the last one later. Mice trucks aren't confident at all and that's not a problem. What matters is
the final sketch. I wanted to point it out
because these little things don't determine the
artist's ability to draw. Just like color choices. Don't determine how present your piece will look at the end. For sketching
observation patients. And the little bit of refinement is what's going to
matter the most. Now we can start refining the shapes into what we
see on the reference. It should be much easier with
simple shapes as a base. I went a bit off center here, but it's very minimal, so I'm
going to keep it that way. This sketch doesn't have to
be perfect as you can see. And drawing those first
lines really helped keeping that lady bug
somewhat centered. Anyway. Let's add a looks like
some kind of a nose. Now we can erase just this line. And there we go. A beautiful
lady bug. From here. We only need to add the details, eyes sparse and so on. The legs, same way, larger at the base
and also the tip. I didn't try and check exactly how these it should
be looking at. The focus point would be
the body and the spouse. I find it's okay to
not try and be a 100% accurate with
realistic art. That's why I don't call
my art photo-realistic. The way I do it allows me
more play and freedom. Before we add the spots, I want to show you what
a kneaded eraser is for. All you need to do is to take a little piece of it and pick up excess graphite pigment
on the sheet like this. From time to time. Just rub it between
your fingers to get rid of that excess of
graphite and keep going. Kneaded erasers can
last for a long time. I love her so convenient
and much better than regular erasers to remove strong sketching
lines with 0 mass. I'm going to add some spots. Some look a lot bigger than the others on the
reference photo. So once more, I draw a lot of
inspiration from the photo, but I don't stick to the
photo a 100% either. On another note, I
learned the spots of a ladybug are a way to
discourage potential predators, kinda like red mushrooms with white spots mean poison to us. The black spots of Lady Bug are red flag to animals who
would want to eat it. And a ladybug isn't born with the spots they
develop over time. You can also learn about what species this or that
lady bug as part of by looking at the
number and location of these spots.
Pretty interesting. Remember, to prepare
for sketching. Tape your sheet on around and locate the metal and
edges of the drawing. Observe the reference photo, draw simple shapes, refine
those shapes at the details. I hope you enjoyed
drawing the sketch and learning about
ladybugs in the process. I'll see you next for
some coloring fun.
5. Place the Light & Mid Tones: In this lesson, we're going
to start working with our watercolor pencils and block in the main colors
in our lady bug, you will need red, yellow, and brown since we want to keep our darkest and lightest
colors, black and white. For the last stages. We're going to
sharpen our pencils. It's always easier to color effectively when the
legs are nice and sharp. Even though coloring with watercolor pencils
does not require near as much care as
colored pencil work does. Since here, we have the advantage of blending
the pigment with water. The first color
is we're going to work with our red and yellow, and later we will overlap brown and places as a way to start building
subtle shadows. I've started with
Brad, as you can see, but there are no set rules
as to how much red or yellow you want to apply and where for a base
layer like this, I mean by that, you might want the ladybug to be
more yellow than red. In that case, have
more yellow in there. If you'd like to see
more orange tones, then make sure to overlap red
and yellow in most places. And if like me, you like it mostly red
with a little bit of yellow and orange tones
Showing have more red there. Remember will be activating
the paint later. So don't worry if specs of
paper are still showing. It's one of those luxuries
with watercolor pencil. We don't need to
worry too much about getting into all the
nooks and crannies. I decided I want this
part to be orange. So I'm going to add
yellow first here, and later over that red on top. By doing it this way, I avoid adding too much bread as red will easily
overpower yellow. Every time you add a new color. Overlap it to the one right
next to it for more realism. For instance, here I overlap yellow onto
the red parts nearby. To create some kind of
connection between both colors. We could be
activating the paint. Now, the reason I'm adding more water
colored pencil on top of what we just did is because it's going to help
realism a whole lot. Rather than having a
whole area looking, just read one more looking just yellow with a little bit of
an orange grade in between. I'm overlapping more to create some depth to this base
layer with color variations. For example, here,
adding yellow on top of red will give
us an orange tone. And unless I press hard with
a yellow watercolor pencil, it should lean towards
read a bit more since we covered the
area in red first. I keep going with threat now, as I'd like my lady bug to lean towards strong red
and orange tones. More. Have fun here creating
the tone should like, since we're working
with only two colors that are close on
the color wheel. Don't worry, it will
look messy or anything. Whatever you do all
turn out just fine. Now this is where
Brown comes in. We're done with fat and yellow and brown will help us create our first shadows
and the subtle way so that when we add
dark shadows later, we avoid ending up with a harsh change of color
between our bright reds, yellows and oranges, and much darker versions
of these colors. Now the edges are taken care of. I'm going to add more
color where I think it's lacking to make sure the
space looks nice and smooth. For example, here we can
see a strong difference between the red and brown
parts and yellow and red part. So I'm going to connect both
areas with more yellow. If you're not sure
whether you need to add more of anything, you can take a short
break and take another look at your
coloring in a few minutes. Harsh transitions may
look more obvious to you. Then remember to block in the main colors
first to overlap with more in order to create
color variations, to add subtle shadows last, and to fix harsh
transitions if they'd be. See you in the next lesson, where I'll show you how
to activate the paint.
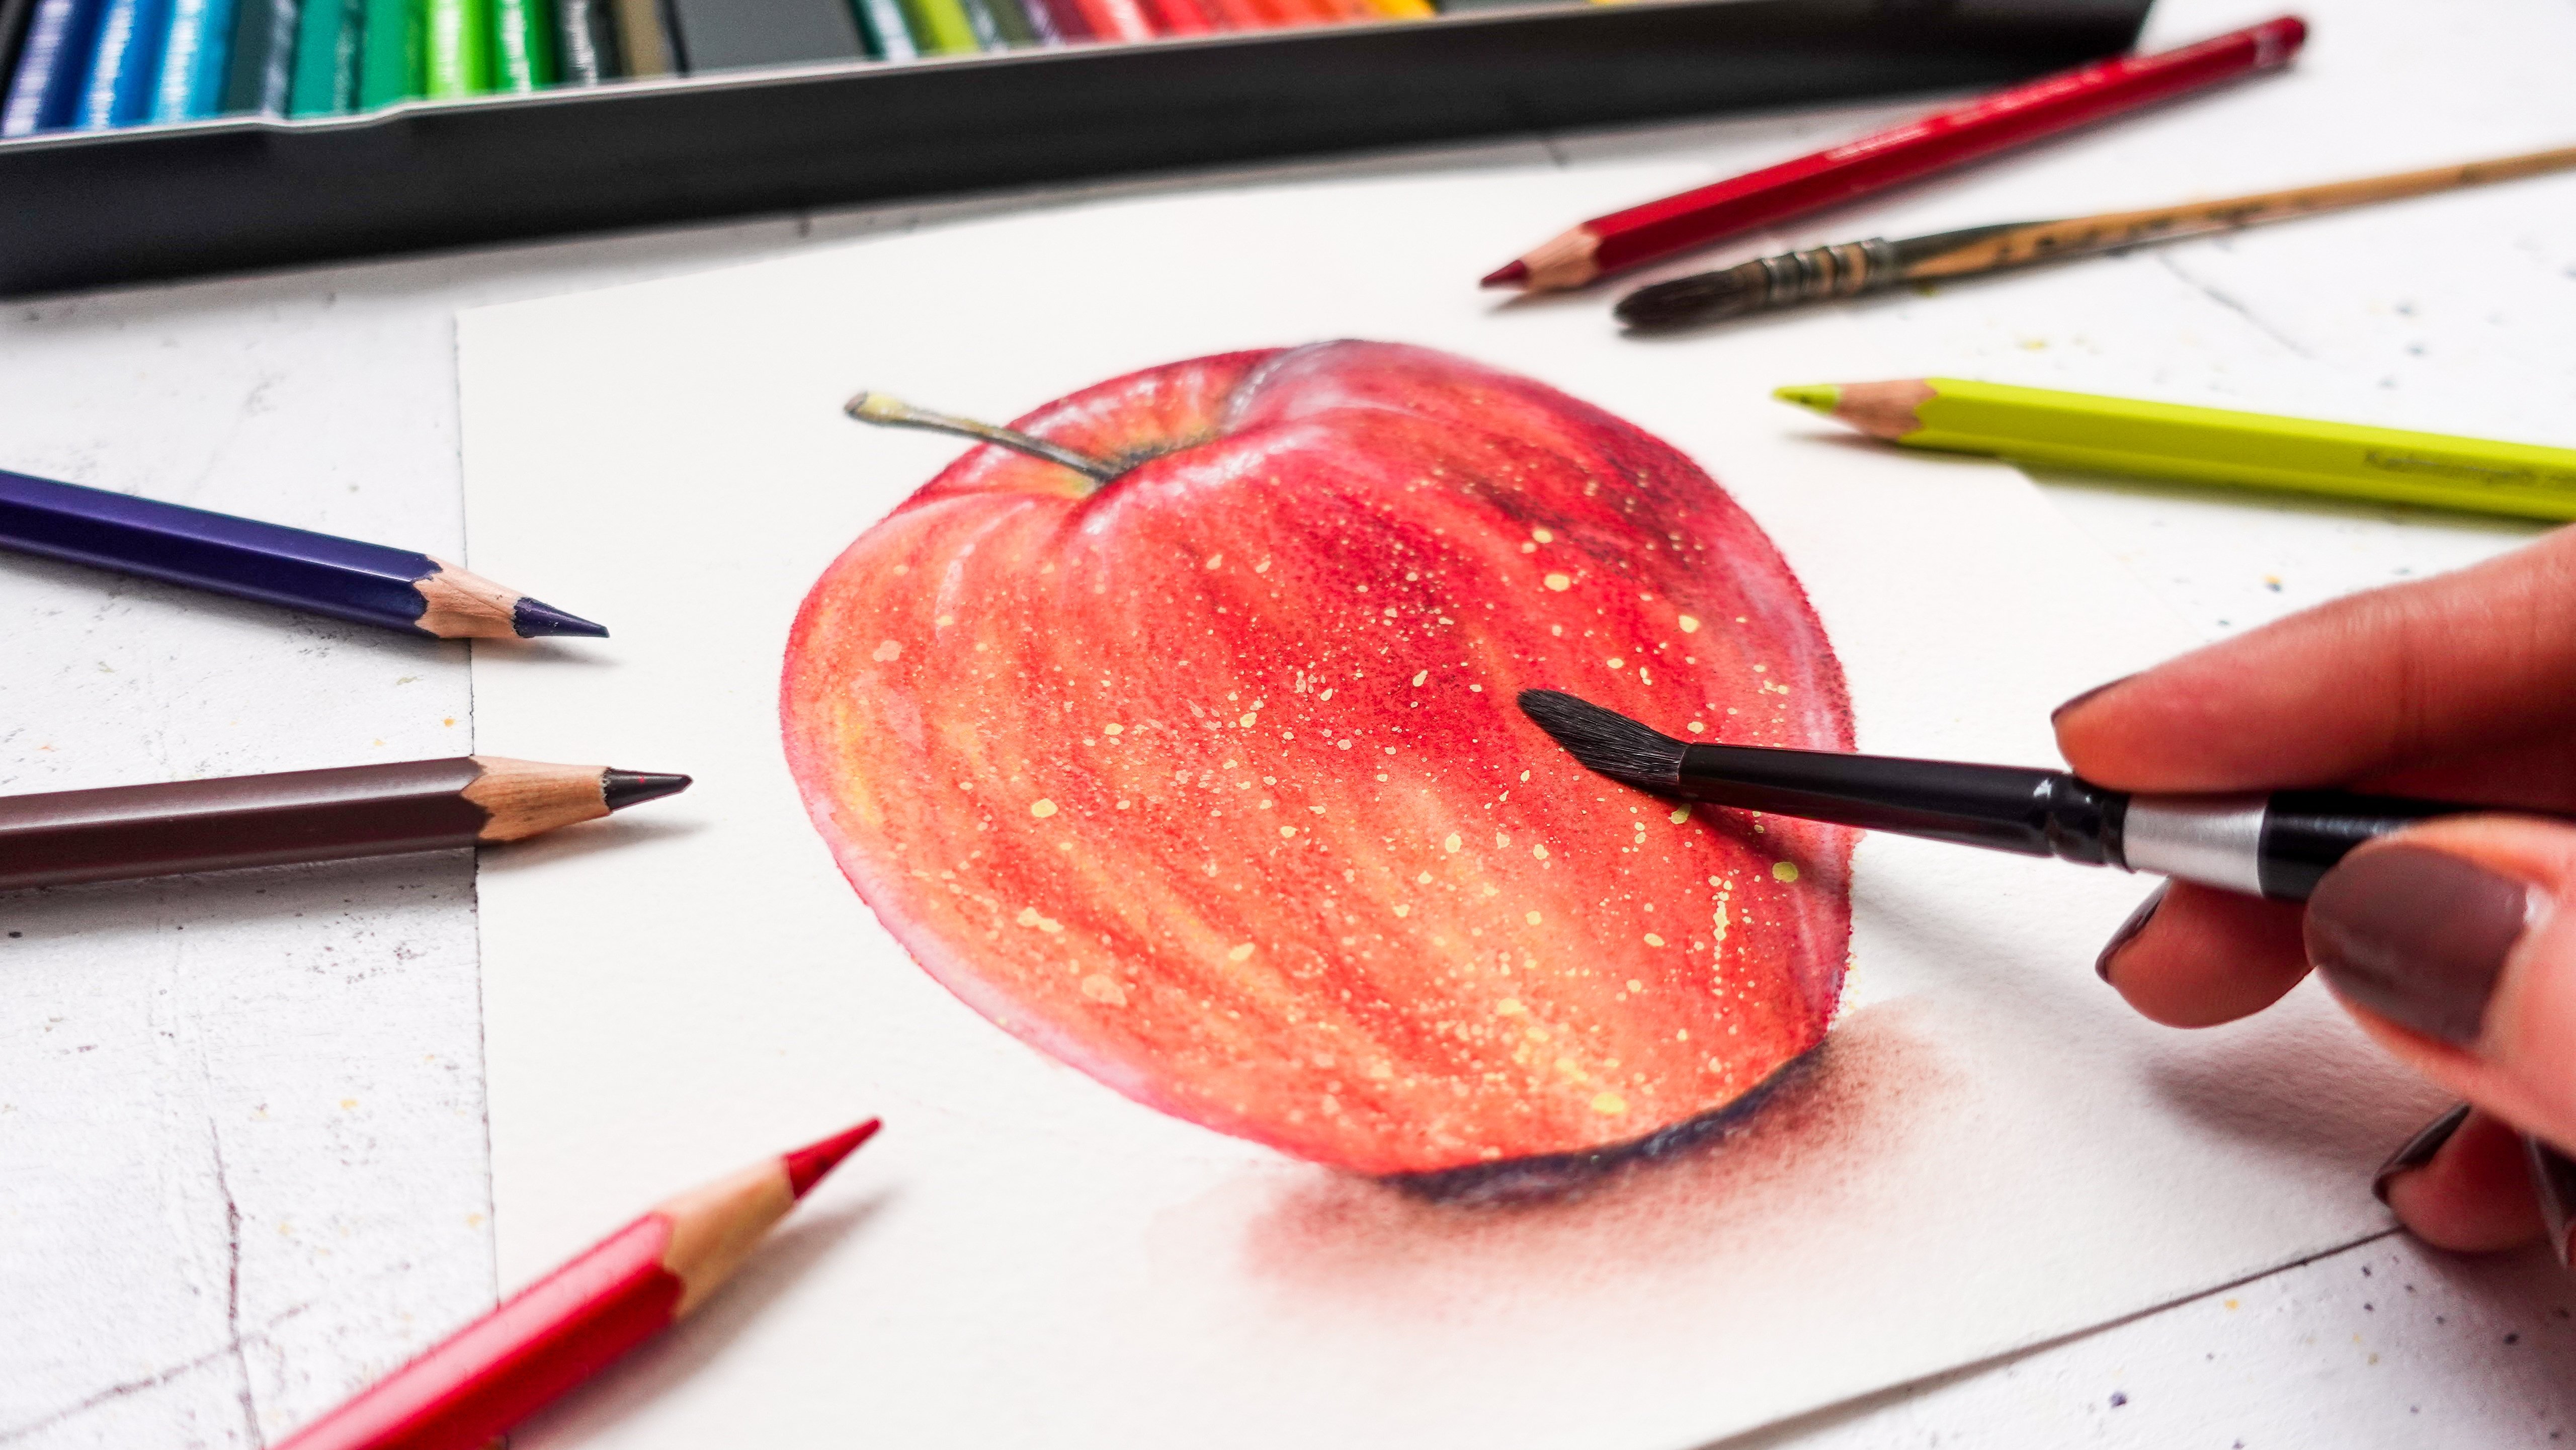
6. Activate the Paint: We're ready to paint. Now we
have colored Our Lady Bug. And with this lesson, I'd like to show you
the technique for activating watercolor
pencils effectively to avoid muddy areas. Grab a paintbrush when you feel comfortable with to blend
the areas with colored. We'll need to have
at least one jar of water handy and a paper towel. Start by dipping a paint
brush in clean water, then dab it on the paper towel to take the excess water off. Then you're ready to
activate the paint. The areas we're
blending are small, so we really don't need a
bunch of water on the brush. And then I'll is
enough and it helps with preserving color vibrancy. You will notice your paintbrush
gets strike quickly, which is why I have
you read wedded often. But that's not the only
reason we do that. When we activate paint, that paint gets on
the paintbrush. Imagined blending an area where
there are several colors. If you don't rinse your
paintbrush, often, you will transfer it
some other color you previously blended
onto the new one. It's something with
watercolor pencil. I noticed that can
make it difficult for a beginner to blend
colors effectively. And that's why they keep colors looking clean and vibrant. It's important to
clean the paintbrush regularly so you
blend the colors on paper without adding anything else that's
already on the paintbrush. This is also why we want to
blend the light colors first. For example, here, I'm
blending a yellowish parts before I even get to the darker ones with
red and brown pigment. This way there are
less opportunities for turning colors into
mud in the painting. Once you use this framework
with watercolor pencils, you will be able to create
anything you'd like while keeping colors
looking clean and vibrant, even when they are contrasting
colors near one another. Even with my high-quality
watercolor pencils. Notice pencil marks is
still showing right now. And we'll fix it
soon with layering. We're not going to try this
with a heat gun or hairdryer. I'm just going to dry on
its own very quickly. It's something else I love
about watercolor pencils. Remember to get your
blending kit ready, paintbrush, but a jar
and a paper towel. Dip the paintbrush in water, soak up the excess on the
towel and activate the paint. Start blending light
colors first and keep painting a paintbrush to
preserve colors and vibrancy. Now, most of our lady
bug was taking care of me next to add
and paint the legs.
7. Add & Paint the Legs: To paint the legs and
then Taney's will need are yellow and brown
watercolor pencils. The idea is again to create an interesting
variation in the colors by using more than one
and overlapping colors on top of each other and places. That's just color all of
these with a yellow first. Now you can add brown
on top and insist a bit more at the base and tip
of each leg and antennae. To activate the paint are going to do exactly
what we did previously. Grab your thin as pain, rash and more precision, a water jar and a paper towel. Remember it's best to
start with a light colors. So I suggest to blend
those areas where you see more yellow
first and finish with the ones with more
brown pencil colors don't blend into each other
as beautifully as watercolor. I find they do mix a little bit, which really helps
getting smooth gradients. And it should be the case here. You're done with this
part. Great job. Next we're going to start placing and blending
the dark tones.
8. Place & Blend the Dark Tones: This is an important part of the class because the
darker the colors are, the more many times we're
likely to end up with an, a watercolor pencil painting unless we use
certain techniques, including the ones
I'm teaching here. So let's see how to
handle the addition of strong dark tones will be using a gray or black
watercolor pencil. First of all, notice that
because a subject like a lady bug bears such dark
tones with its black spots. We're adding them just now. I didn't try and add the
spots before to limit any muddy effect with black leaking into
red and yellow parts. And that helped us paint a
clean and vibrant base layer. We get the shadows really
liked using brown. Now it's safer to color
those dark areas so we can activate them without disturbing the bright parts too much. These areas include the head, the spots, and the
legs. In the head. I'm keeping paper
whitespaces because they appear as a very light gray
on the reference photo. So we don't need to add
any more pigment there. We'll create this
light gray with water. And when we blend
the pigment nearby in the legs and then Taney's, I find it's nice as some strong shadows to give them more of
a realistic look. Even though the focus here
will be the body and spots. We also need to connect parts
of the body in this area. A strong color
like gray or black will show quickly
while we activated. So there is no need to spend too long adding pigment on the spot. We can still enhance them later. Now we're ready to activate the paint to build
a gradient from black to a light gray
friendship paintbrush as it is covered in
black payment now. And pull a little bit from the previously vented area
into the white of the paper. We're going to do this again here with the legs. We're going to be careful not to cover up the entire area, to let the other colors show stuff and keep a
nice contrast going. I find painting the spots. After painting the body
is really effective here as black or gray is going to cover up the lightest
parts easily. Which means you can
give his spots nice, irregular shapes and
be sure they will come out opaque on top
of the rest of the body. Imagine doing it the
other way around. Dark spots first, then
vibrant red and yellow areas. It will be much harder to avoid the backspace and
keep the colors pure. Remember to add
the darkest tones after painting the
mid and light tones, and to activate them with care. What renting a paintbrush. Often, we can tell this
lady bias coming together, even though it could use
another layer to fill up these lighter spaces are
still showing through. We also need to add
a little bit of vibrancy and more realism. And I'm going to show you
how in the next lesson.
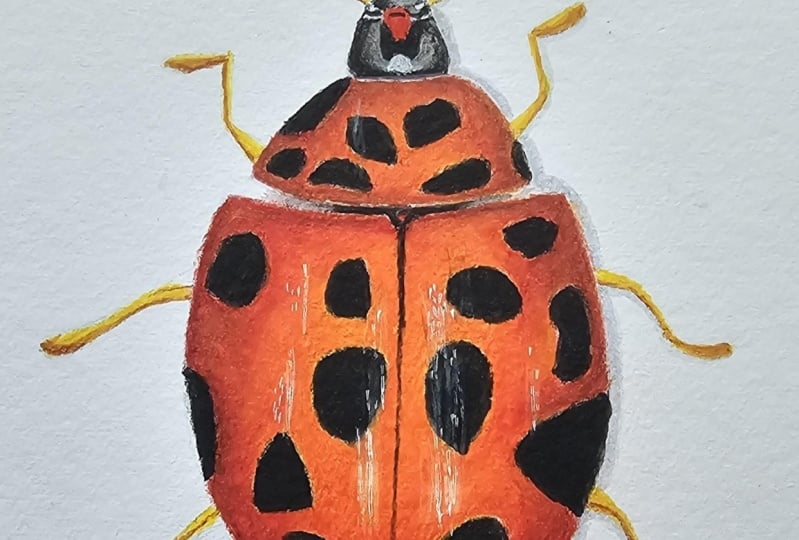
9. Add One Layer for Vibrancy: In this lesson, we're going
to increase vibrancy and the colors by applying a second layer in the same
manner we did previously. This is not mandatory, but it's well worth it. It will make your painting
look so much more realistic. All smooth, vibrant
and beautiful. We'll be using are enlightened
midtones once more, yellow, red, and brown. Just like we did
in the base layer. Let's overlap yellow
and red first on top. Don't forget you can
sharpen your pencils again when they become blunt and
less agreeable to use. We'll also coloring and
circuit emotions as before. And because this
is a second layer, it's okay to press a little harder now with the
watercolor pencils. This way, the little hills
and valleys in the paper, also called the
tooth of the paper, will fill up completely and we will get a
smoother finish, especially when we're able to use light colors like yellow and red that can be layered without affecting the
end result a whole lot. Unlike Black, for instance, we'll be getting a
nice polished surface and finish improving gradients where there might be lacking kind of pencil and UBS, we'll call this burnishing. The only difference with
colored pencil as that later, we'll get to activate
the paint once more to make it even smoother
and more vibrant. Now let's add brown towards
the edges once more. For now, we can still
see a lot of texture from the pencil is
okay and normal. We're going to improve it
when we add the water. Notice I always blend the
lightest parts first, even in a second layer, and I keep rinsing and
dabbing the paint brush often is really
important because there's a lot of pigment
and we want to keep each area looking
nice and vibrant. Also, take care to
avoid those black spots and keep our light and
midterms clean style. If you find you've got some
black paint in places, you don't want it to
just lifted up with a clean and damp paintbrush before it dries and
you'll be fine. Remember you can press a little more with watercolor pencils on a second layer to burnish and make the
painting look smoother. Keep rinsing your
paintbrush often to keep each area clean and fibrin. Avoid dark areas. Remove the dark paint with
a clean and damp paintbrush and some of it bleeds
into bright areas. It's already looking
so much better instead of a flat because we need to add shadows and then
the highlights. So see you in the next
lesson to paint the shadows.
10. Increase Realism with Subtle Shadows: In this lesson, we're going to work only with black or gray, whichever color you picked. We're going to add shadows
that will help with a realistic look by making this lady by painting a
lot more diamond channel. This area right here, for instance, is completely red. So I'm adding a little
bit of black to it, but not too much. I don't press hard at all. And I move in circuit
emotions again. I think higher-end
watercolor pencils or creamy or the
most cheapest sets. So pressure may also vary depending on the
kind you're using. Now, some brands will let you purchase a pencil
separately from the set. That'll be a good way to try
and see what you like best. I like to keep this trunk tone towards the edges of
the lady bugs buddy. To emphasize the fact that these parts right
there are curving inward and will be catching a lot less light than the rest. We can emphasize this area
now where the wings separate. I find my watercolor
pencils take a second layer really well. And usually after that, it is harder for the
pencils to grip on paper with a strong
color like black. However, it is easier to make adjustments
after a second layer. So this is our chance to
draw the final details. Notice I'm not adding a
bunch of pigment on around. Remember we already
used a brown, so just a little bit
of black should be enough to run the shadows
in this painting. The spots like color in places. So let's add pigment there. Now, it's time to grab
this jar of water, paint brush, and paper towel
to activate the shadows. In the eyes. We want some very dark tones
and lighter wants to suggest that protruding shape he will observe in Bucks eyes. To activate these shadows
we created on the edges. I recommend to clean the
paintbrush very often. To avoid and transfer black
on the bright red areas. It's so easy to get some
paint over an edge. That's when paint brushes with a fine tip come in so handy, it's also important not to rush. When I use them. I
enjoyed to listen to music or podcasts
and take my time. Look at how much nicer at those boss or looking
with a second layer. Remember to keep the
shadows discrete and press a little with
your watercolor pencils. Activating such a dark color as black will also
require some care and patients is looking pretty good because we need some highlights to compete
this beautiful project. Let's meet in the next lesson
and finish this painting.
11. Three Ways to Add Effective Highlights & Details: In this lesson, I'm excited
to show you several ways to add beautiful highlights and details to Our
Lady Bug painting. You're welcome to
pick and choose, but if you have all the
tools, try them all. First we'll use the
white watercolor pencil. Make sure it's not too blunt. And if it's dirty at
the tip like mine, just wipe it clean. Let's start with the head. We're going to highlight
those light parts even more so they contrast nicely
with the dark parts. We're burnishing again here, which means we're polishing those parts of the
painting even better. Pressing and the white
watercolor pencil will add a nice glossy
effect of the piece. Keep in mind, not all
watercolor pencils perform the same. This glossy effect will
show more or less. Don't worry if you have
trouble with this step. This is why we can also use white gouache or gel
pen for highlights. I will show you how next. I really enjoy using a white watercolor pencil because the highlights
are very subtle. On the reference photo, you will notice some
of the black spots have that shine with gouache. You will be tricky to add it
there because we need to wet the paint and we might make mud on the white gouache
because of the black. White gel pens are
great alternative, but they can also make
very sharp highlights, which is why I find a white watercolor pencil is best for this type of
subtle highlights. Especially when the highlight
is located on dark part. You can tell already this is looking very natural and subtle. And that's also why we
need stronger highlights. Cool tick, tick you
can try is to wet the lead of your white
watercolor pencil like so. The lead will dissolve just enough to create
brighter highlights. Just make sure to press
a little bit with a pencil so the pin can
get deposited on paper. Now let's try it.
White gouache at its best to work with
to paint brushes, 12 pi the paint and one that's wet and just damp to
smooth out any harsh edge. We're going to use it
straight from the tube, apply it, and then save
the harsh edge into the rest of the painting with a clean and damp paintbrush. If you have only one
paintbrushes fine. We'll just have to
fill in more often. The advantage of white
gouache is it shows more than the white watercolor
pencil and you can have it look very
sharp or very subtle. It's my favorite way
to add highlights. What's known as great about it, especially when we work on
dark watercolor pencil areas, is that since we'll need to wet it a bit to remove heart edges, we might also create mud when the dark watercolor
pencil gets reactivated. And my Darwin's intense pencils are not supposed to reactivate. But I still find there's
a potential for making mud with white gouache,
even with them. To add crisp highlights, I enjoy using a white gel pen. I find this is the best method when is to use it sparingly. Let's tap the tip of the pen and places and create more shine. If you find the
color is too sharp, you can turn it down
with your finger. We did not add the hair on the antennae and
where the mouth is. I suggest we use the
brown pencil here and what the lead directly
with a wet paint brush. This way we can create very fine details using
only the paintbrush. With all these techniques
I'm showing you, you can see with
watercolor pencils that it's possible to create
realistic fight, even though it might not look
like it at first glance. We don't want to overdo it. So just a few hair
will be enough. I think some shine on
those legs will look nice. So let's add that with a
white watercolor pencil. Remember, you can create highlights with the
white watercolor pencil, white gouache, or white gel pen. Each have their pros and cons. You can just use one
or combine them all. Wet the lead of a
watercolor pencil to create sharp highlights or get pigment on a paintbrush,
but better details. Congratulations for
completing this project. Please share it with me and other students in the
project section of the class and see you next
for some final thoughts.
12. Before You Go !: Congratulations for completing
the class and project. Please let me know how
your enjoyed using your watercolor pencils and learning about the
techniques we've practiced. Once you understand how to layer and blend
watercolor pencils, how to handle light and
dark tones together. I want the same painting. I find that you can
tackle any subjects. Remember that observation
of the reference photo is always key to creating a
realistic piece of art. One of the pencils that
plan well or pigmented, also going to help
you with the outcome. Follow me here on
Skillshare to get notified each time I
upload a new class. And you can also find
me on YouTube and Instagram for inspiration
and behind the scenes. Before you go, please
leave a review so that potential students know what to expect when
they're coming in. And you're more than welcome
to share your project. The project and resources
section of the class. Have fun using your
watercolor pencils and see you next time.
 Francoise Blayac, Professional Artist