Transcripts
1. Welcome to Class!: While realistic pencil drawings may take a while to complete. Coda painting is a lot faster, but it may seem intimidating
for those of us who aren't used to holding a paintbrush or handling water. And that's where what
actable pencils come in. They're a perfect
blend of both mediums. And in this class, I'm going to show you how to use them to easily paint gorgeous figures
with a simple system. Okay. Hi, I'm was. I've been painting with
Watercolors since 2019. And my thing is to research and share my findings
with the world, and that's why I teach online with 25 classes
here on Skillshare, but also a white branch
of art videos on YouTube tutorials on Patrin and water of workshops
in my local community. Watercolor and wo stable pencils are one of my favorite
mediums to use, and I know that a lot
of us own a box set, and yet there's very
little instruction as to how to use them. That's why in this class, I'm going to teach
you how to use the graphite kind to
paint beautiful figures. First, we'll go
over the supplies I recommend to create
this type of artwork. I'll also share examples of what I paint
with this medium. Then we'll practice the
only two techniques that you need to
complete the project. Because what I love about
drawing the figure and painting with a graphite pencils is
that they're easy to use. You need zero sketching and painting experience
to paint the project, this elegant figure
of a ballerina. Together, we will practice a very easy sketching
technique and practice it again
once you're more confident to draw the actual
project with my guidance. Finally, you'll
learn all the steps in my painting process to quickly turn a graphite
drawing into a painting. The best is that water
sitable graphite pencils are so versatile that you can use what you learned
in this class and apply it to other subjects
going forward. You can even do that with
watercolor and ink pace pencils because what works
with graphite pencils works for the other ones too. What are you waiting
for? Let's meet next and get started.
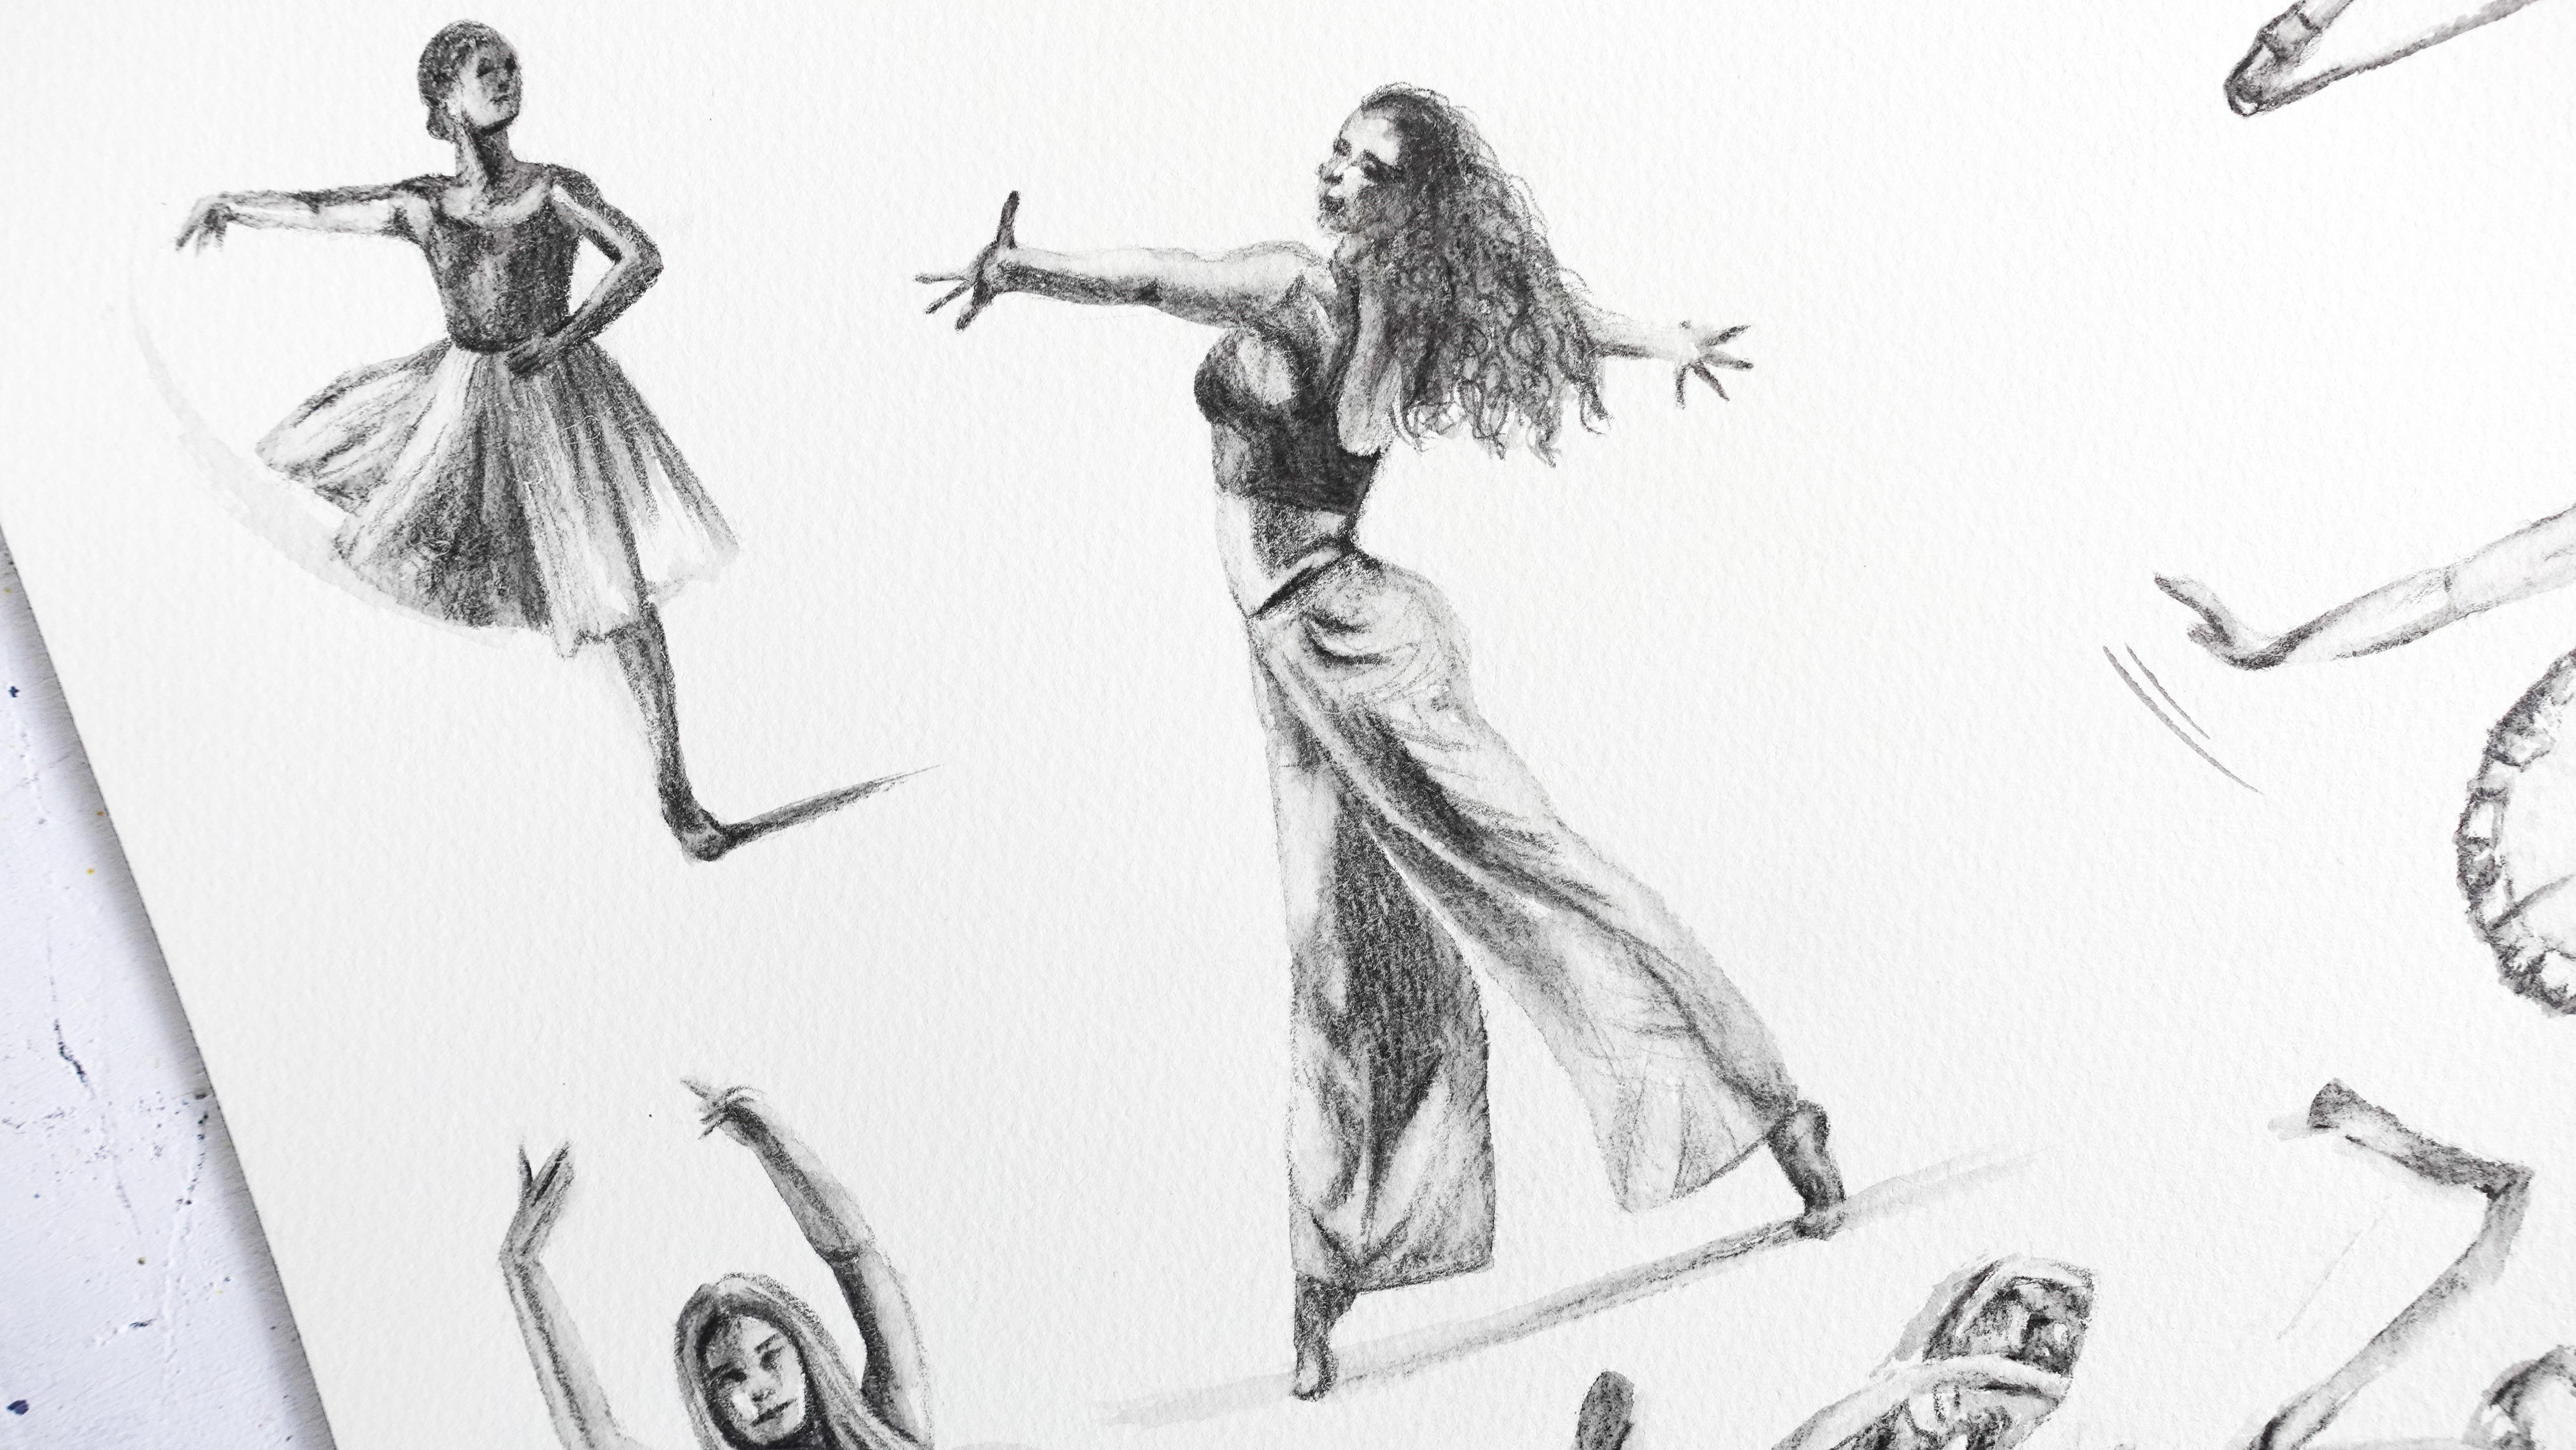
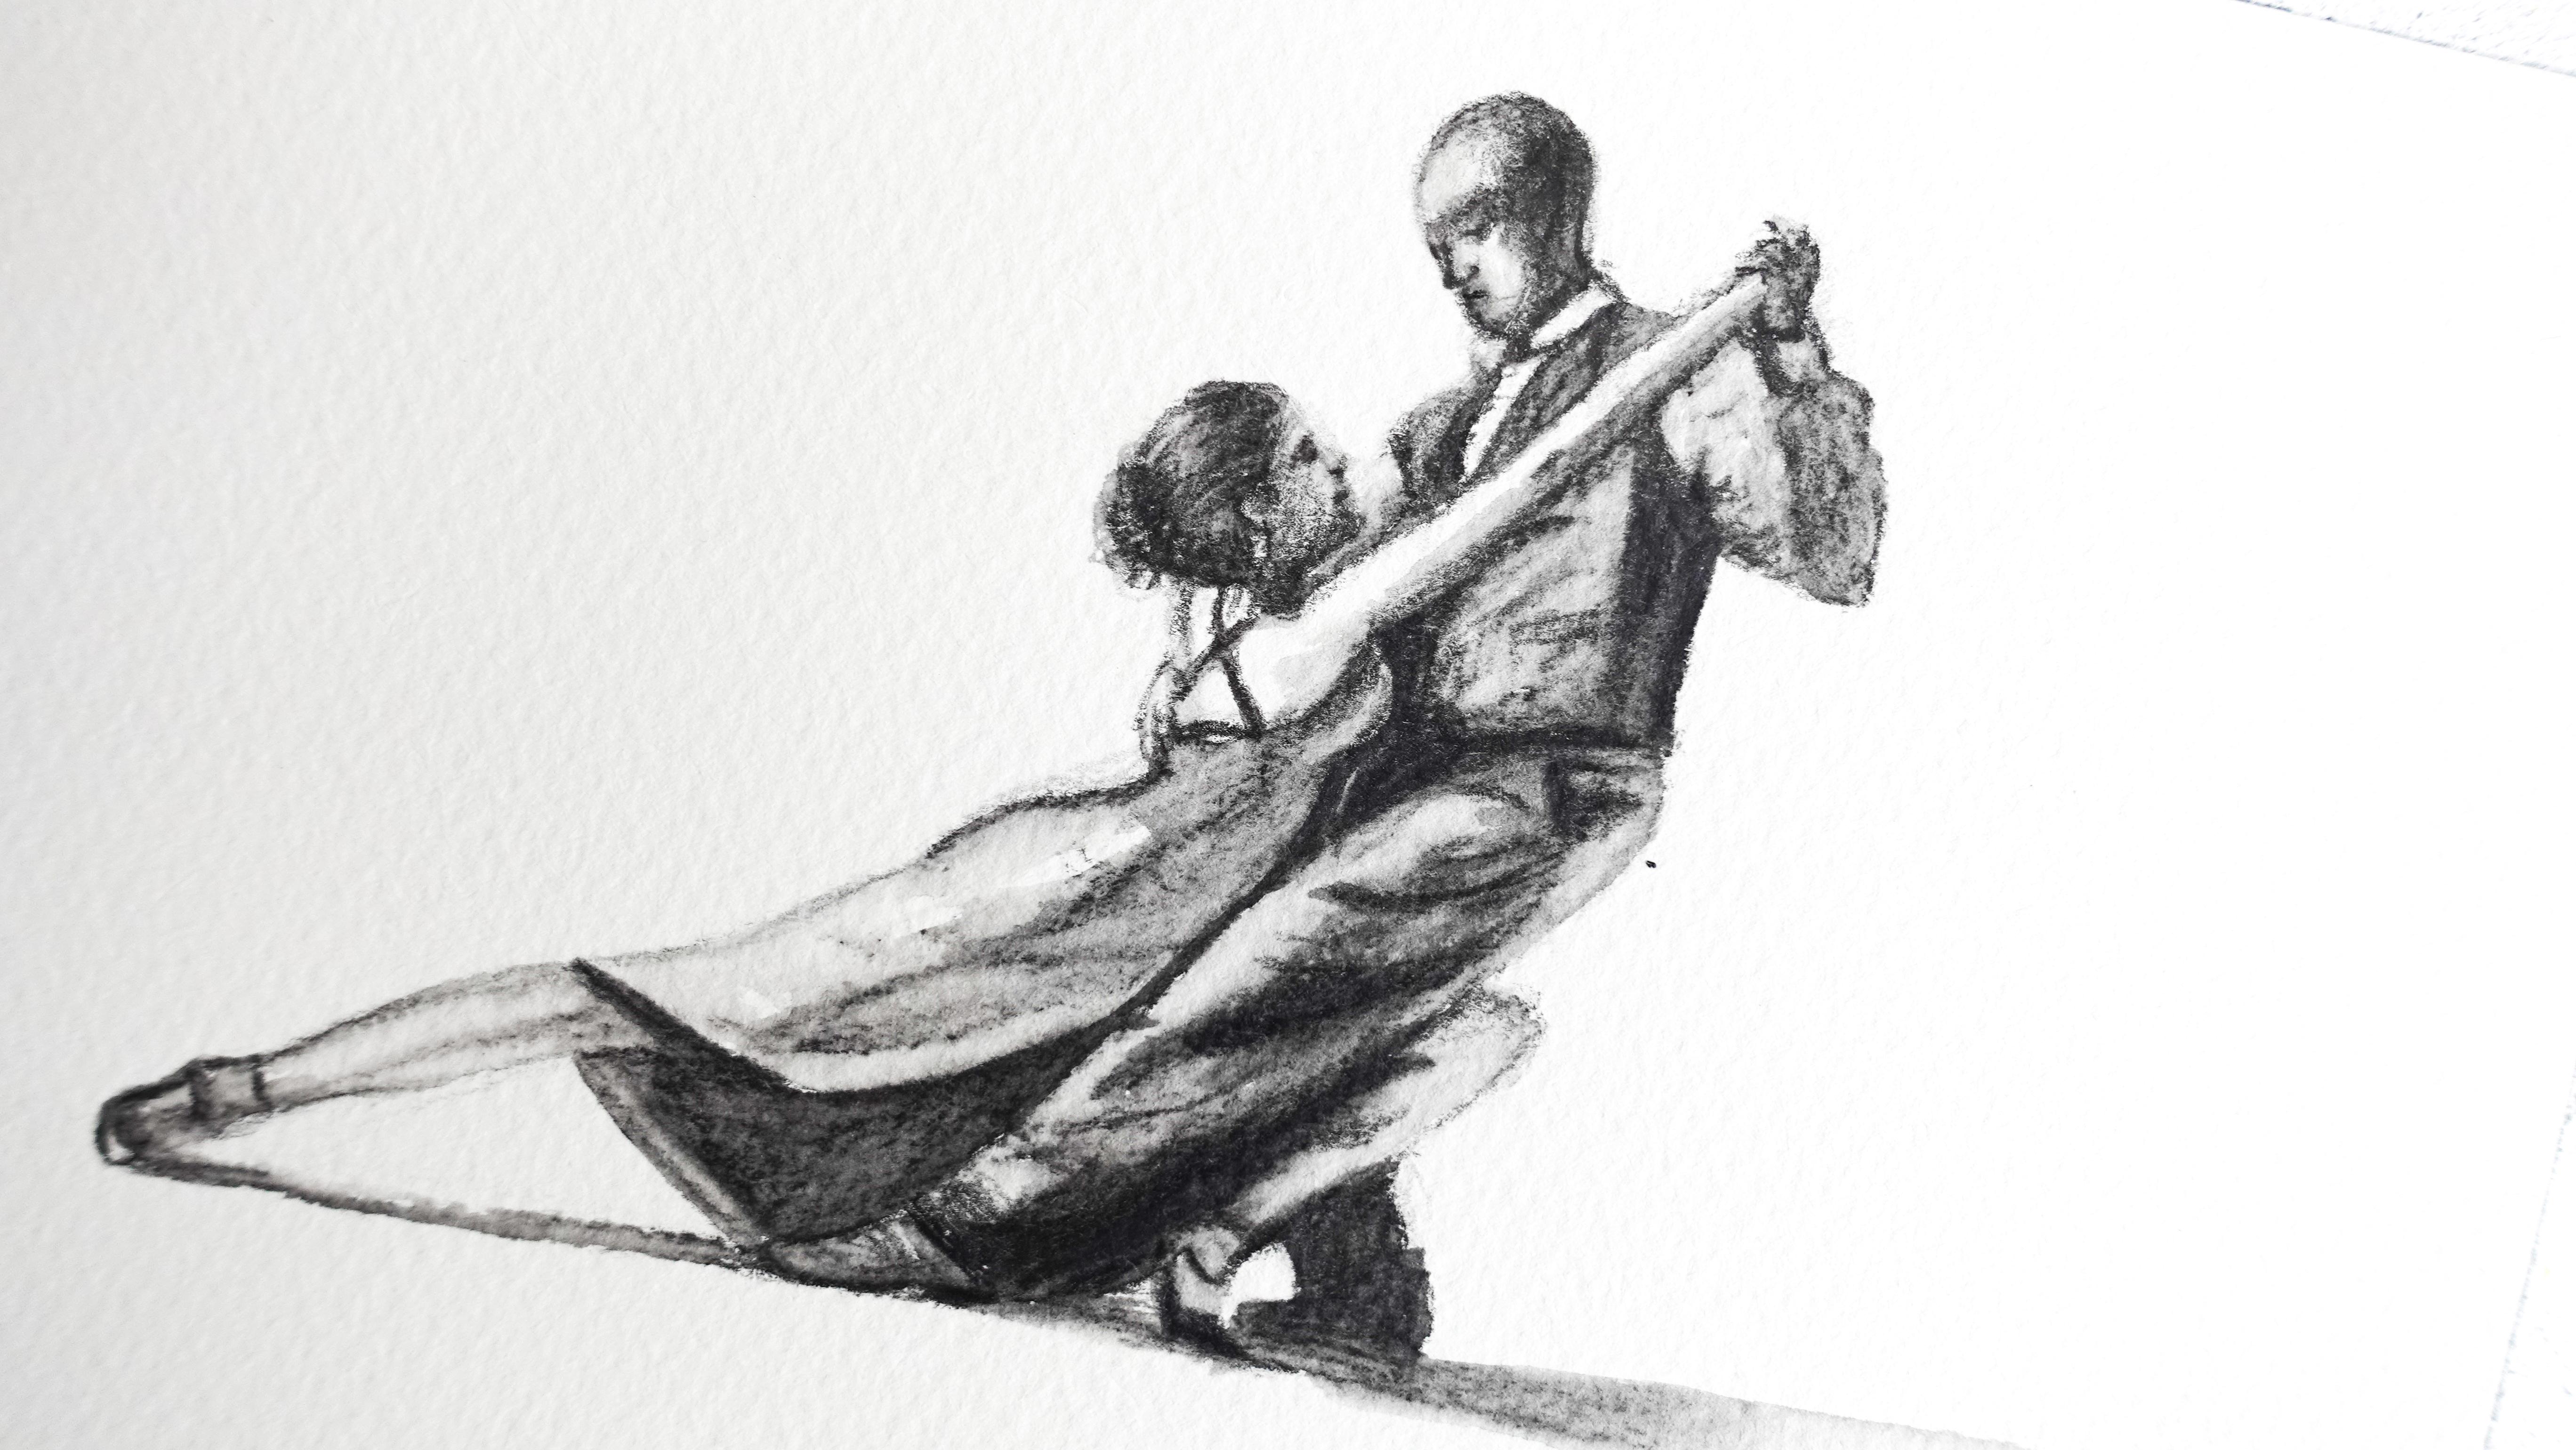
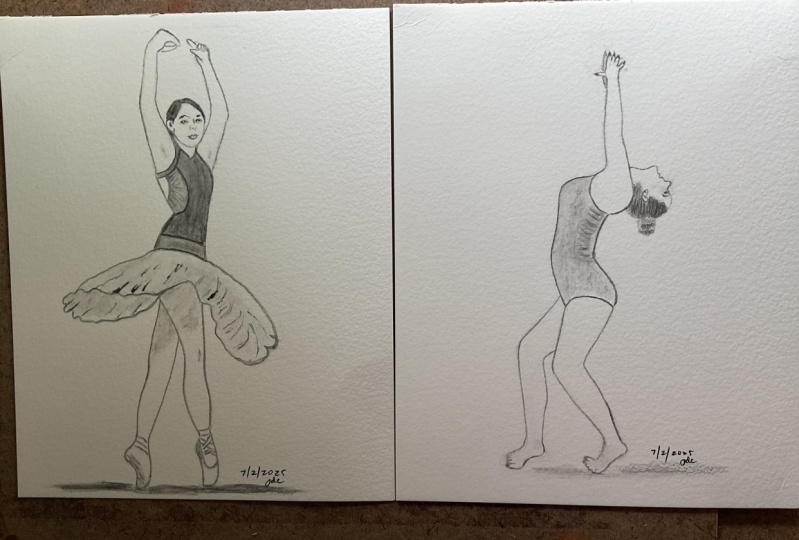
2. About the Class Project: I'm glad you decided to join this class because
you're about to learn to paint realistic
figures with basic supplies, basic techniques, and
a fantastic medium. Although I hardly ever took any dancing lessons in my life, I find that dancers
and ballerinas make perfect subjects to practice on when it comes to figure
drawing and painting. They're elegant, and I love
to draw their dance clothing, especially when it's textured. I know that sketching
can be intimidating. The fear to get it right
gets to me every time to be honest and sometimes
makes me procrastinate. But you'll see that
I'll help you draw with correct proportions through
smart observation techniques. Then you'll learn how to
leverage pencils and paper to create a three D effect in your art without getting
into perfectionism. If you don't believe me,
check out my art and zoom in on it and you'll
notice it is far from perfect. Because drawing figures is more approachable than it might seem and so is
painting thanks to the simple and forgiving medium. If you need support
while following along, make sure to
download the sketch. You can also download
a reference photo, a photo of my art,
and the list of the supplies in the resources
section of the class. Of course, you're also
welcome to reach out for help when necessary
in the discussion tab. You can also share your
process, share the exercises, and your finished
piece of art in the project section with
me and other students. I think it's time to dive in, so see you in the next lesson for a quick tour
of the supplies.
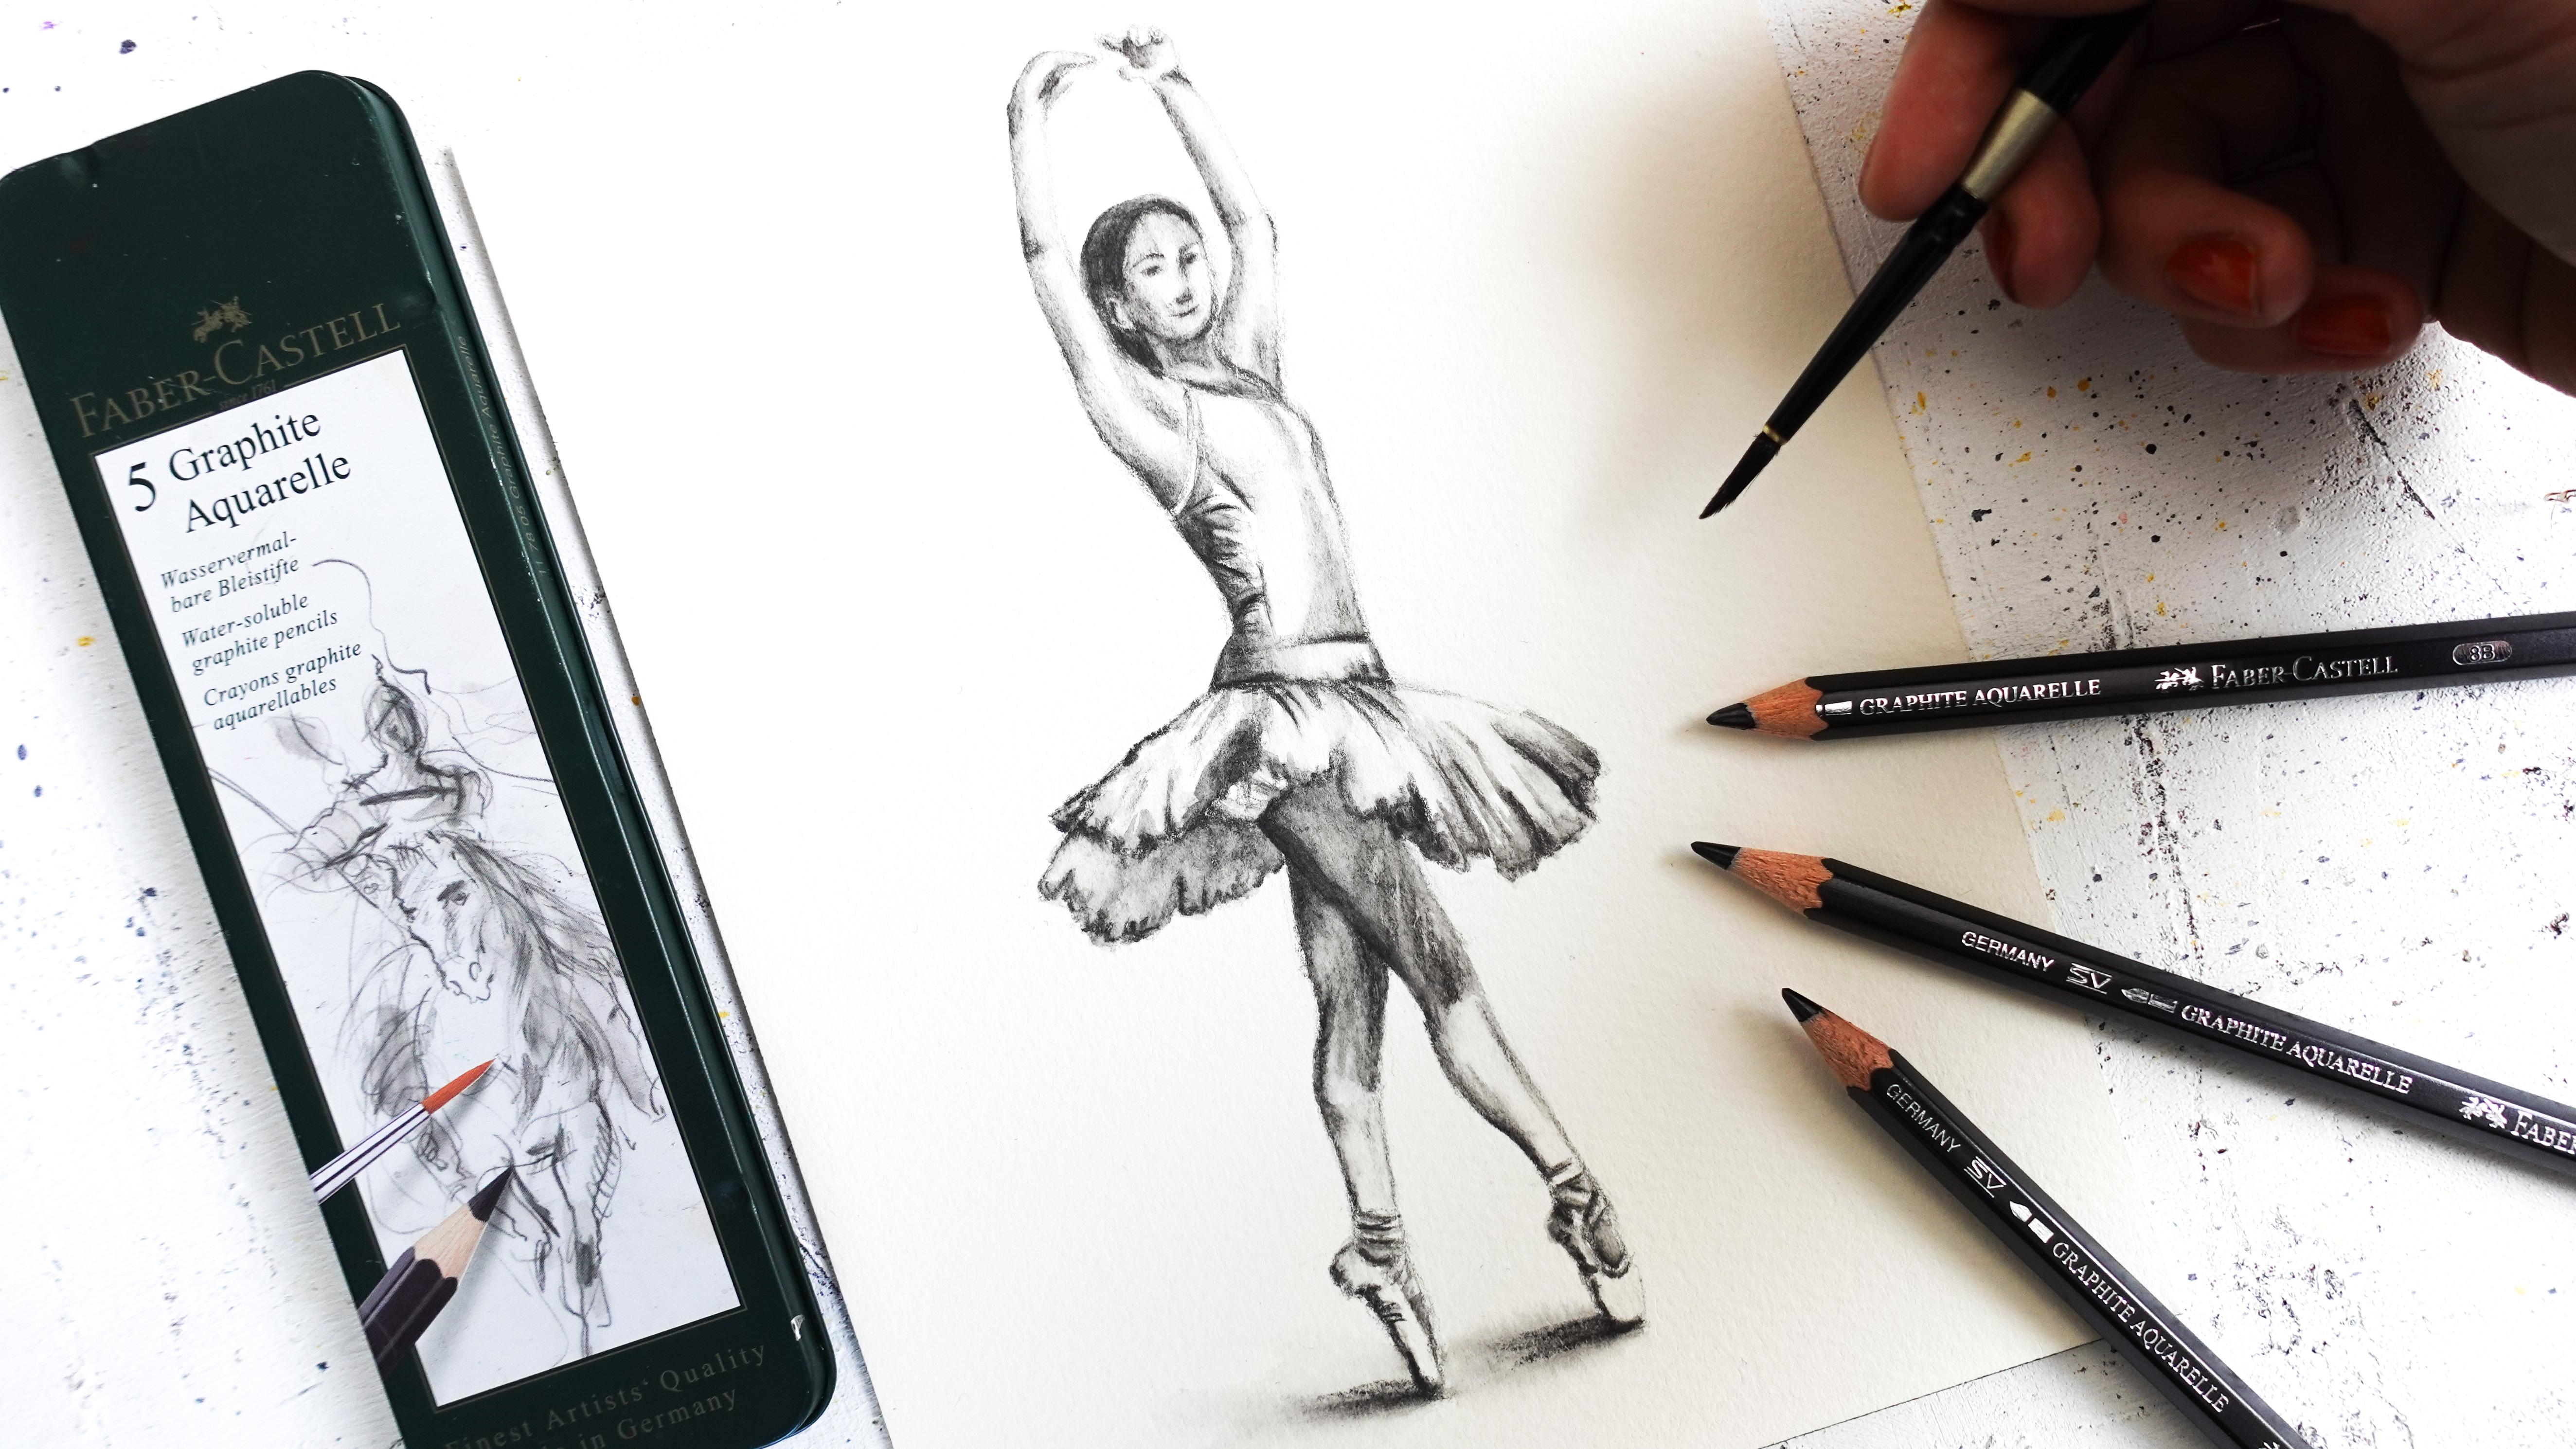
3. Recommended Supplies : In this lesson, we're
going to talk about the supplies we'll need
to complete our project. The first thing we're
going to be looking at are the what a suitable
graphite pencils. This is what I'll
be using today. This is the fab Cast
graphite acohal box set. I know a few of the brands
offer the same kind of set, so you can see that in there you have a choice
of five pencils, hb2b, B, six B, and eight B. Usually, that's a selection that most box sets of what a stable
graphite pencils offer, and you can also buy those
in open stock if you prefer. What I suggest we use today is either an HB or a two B
pencil for the sketch. Then we'll be using
a four B pencil to place our mid tones, and finally, a six B or an eight B pencil to
place the darker tones. What I like to use
and you can actually see it from the way my pencils
are looking right now. I prefer to use the two B, the four B, and the eight B. For paper today, I'll be using this Saunders Waterford
watercolor paper. It's 100% cotton paper, it's cold press, and it's
300 grams/square meter. But for watercolor pencils
and water suitable pencils, you can also use drawing paper. A good one that I've
tried before is Strathmore 500 bristol paper. Then you can also
use a sketchbook. One that I could recommend is the beta sketchbook
by Stillman and burn. It's 270 grams/square meter, and it's cold press as well. It's water colored paper. There really are a variety
of papers that you can use. I think what's important with water sitable pencils in
general is to really aim at a paper that is thick like this so that the water
doesn't make the paper warp. Then you also want to
find paper that is smooth enough that it's easy to actually
color with a pencil. What you also want to look at is the tooth of the paper
is the surface here. You want the paper to be pretty smooth with some tooth
as you can see here. Ideally, you don't want
something to be too smooth. Otherwise, the pigments not going to grab onto it that well. In the same way, I wouldn't
recommend something too rough in texture because that would make it
very hard to color. What I'll be using today
for the project is going to be a six by 8
" sheet of paper. Yours can be slightly
larger if you like. Remember, you can
use drawing paper, watercolor paper as long as
there is some tooth to it, so it can be hot
press, cold press, if it's watercolor paper, and the thickness
needs to be there too. We'll also need a scrap piece of watercolor paper and you can really go for anything
you want here, even a paper you don't like and you're not
using that much. Just to try the main techniques and do a quick warm
up with our pencils. Then you also might
want to have a piece of copy paper or really
something very simple, just to draw on and practice
your sketching skills. Let's talk about
paint brushes now. For this project,
since we're going to be getting into a
little bit of detail, I would recommend to go for paint brushes that are round
and pointed like these. These are actually
watercolor paint brushes. That's what I use with
watercolor pencils and water soluble pencils. I really like the point here, the fine tip because
it really helps me get into the nooks and
crannies of my drawing. It's especially convenient
with figure painting. Now, if you have a paint
brush like this one, which is more of a
round paintbrush, you'll notice that
if you wet it, it tends to come to fine tip. You can make do with
that if you manage. That's what I used to paint with as beginner
for a long time. That's all I used. But I do
think it will be a little bit harder to create those
fine details we're going for. In the supplies list that you'll find in the resources
section of the class, I've listed all the details about the supplies
I'm using today, so feel free to go
and check it out. Other convenient supplies for water soluble pencils
is a pencil sharpener. I know this is very basic, but usually most basic tools are the ones that work the best. This is just one of
those sharpeners that all school boys and girls are
using here in my country. You see, I didn't go
with anything fancy. Another very convenient
and simple supply to use is a ruler, basic one once more. Actually, you'll see
that I do not use the ruler when I
sketch my figures. But you can, if that makes
you feel comfortable, that's why I've added
it to the list. Of course, since we already know what
pencils will work with, we'll need any, a
simple one once more. Just to add a few
corrections here and there, if we need to. Now, if you're familiar
with watercolor, these are supplies that
you know that are very handy when working with
water. This is a water jar. With watercolor pencils
and water soluble pencils, we only need one, especially
for figure painting. Because usually with
watercolor painting, we'll work with two of them, one that is intended
to stay clean, and one that's intended to clean our paint brushes and that generally ends up
being very dirty. Well, here, not only
do we not need a lot of water that is very true for water soluble pencil
work in general. And for figure painting, you'll see that we
do not work on wet. There will be no background. We'll just work
directly on paper. That's why one water
jar is plenty. Then we'll need paper towels or a rag or whatever
you prefer to have, and this is probably one of
the most important supplies to have for water
soluble pencils and you'll find out why
when we start painting. Now, masking tape is also one of those supplies that we use a
lot in watercolor painting, and this is absolutely
optional here. However, I like to use it. Because when I paint,
I don't want to have to worry about my
sheet moving around. Having masking tape
really helps me make sure that the
sheet stays into place. Now you know everything
about the supplies that we need when working with
what a stable pencils. Next, I'll talk to you about what these pencils
really are and what you can actually do with them. Okay.
4. About Water-soluble Pencils: In this essen, I'd like
to introduce you to what a soluble
pencils and just what a soluble graphite in general. What a soluble graphite is not the most popular
medium out there, and yet it is extremely powerful and that is why I
wanted to make this class. Something very important
you might want to know about this type of
pencil here is that it differs from regular
colored pencils and graphite pencils because of
the binder that's in it. The binder in these
pencils is water soluble. That's what makes them
water so graphite. That's the main difference. Otherwise, ins, it is going to be very similar
to graphite itself. I personally really love these pencils because
I think that it's faster to draw with them and you can also get this cool
watercolor effect, which we will work
on in this class. In the drawing, coloring
and watercolor community. A lot of people
know the pencils. What a soluble
graphite also comes in the form of a watercolor
stick like this. Daniel Smith is the brand
that offers this product. Then you can also
find it as a block. That would be convenient for you to actually use
on large surfaces. Well, the stick is going to be convenient to use water
soluble graphite on the go. You can even find those sticks for regular watercolors too. Then a product I really
like and recently discovered is this
graphite gray watercolor. This is actually Sminke
but I think that other brands also
offer this color. This is really nice if
you're used to watercolors, you really like the concept of water solle graphite and you
want to include it in there. You really don't need
all of those tools. With the pencils alone, you can do a lot, and I'm going
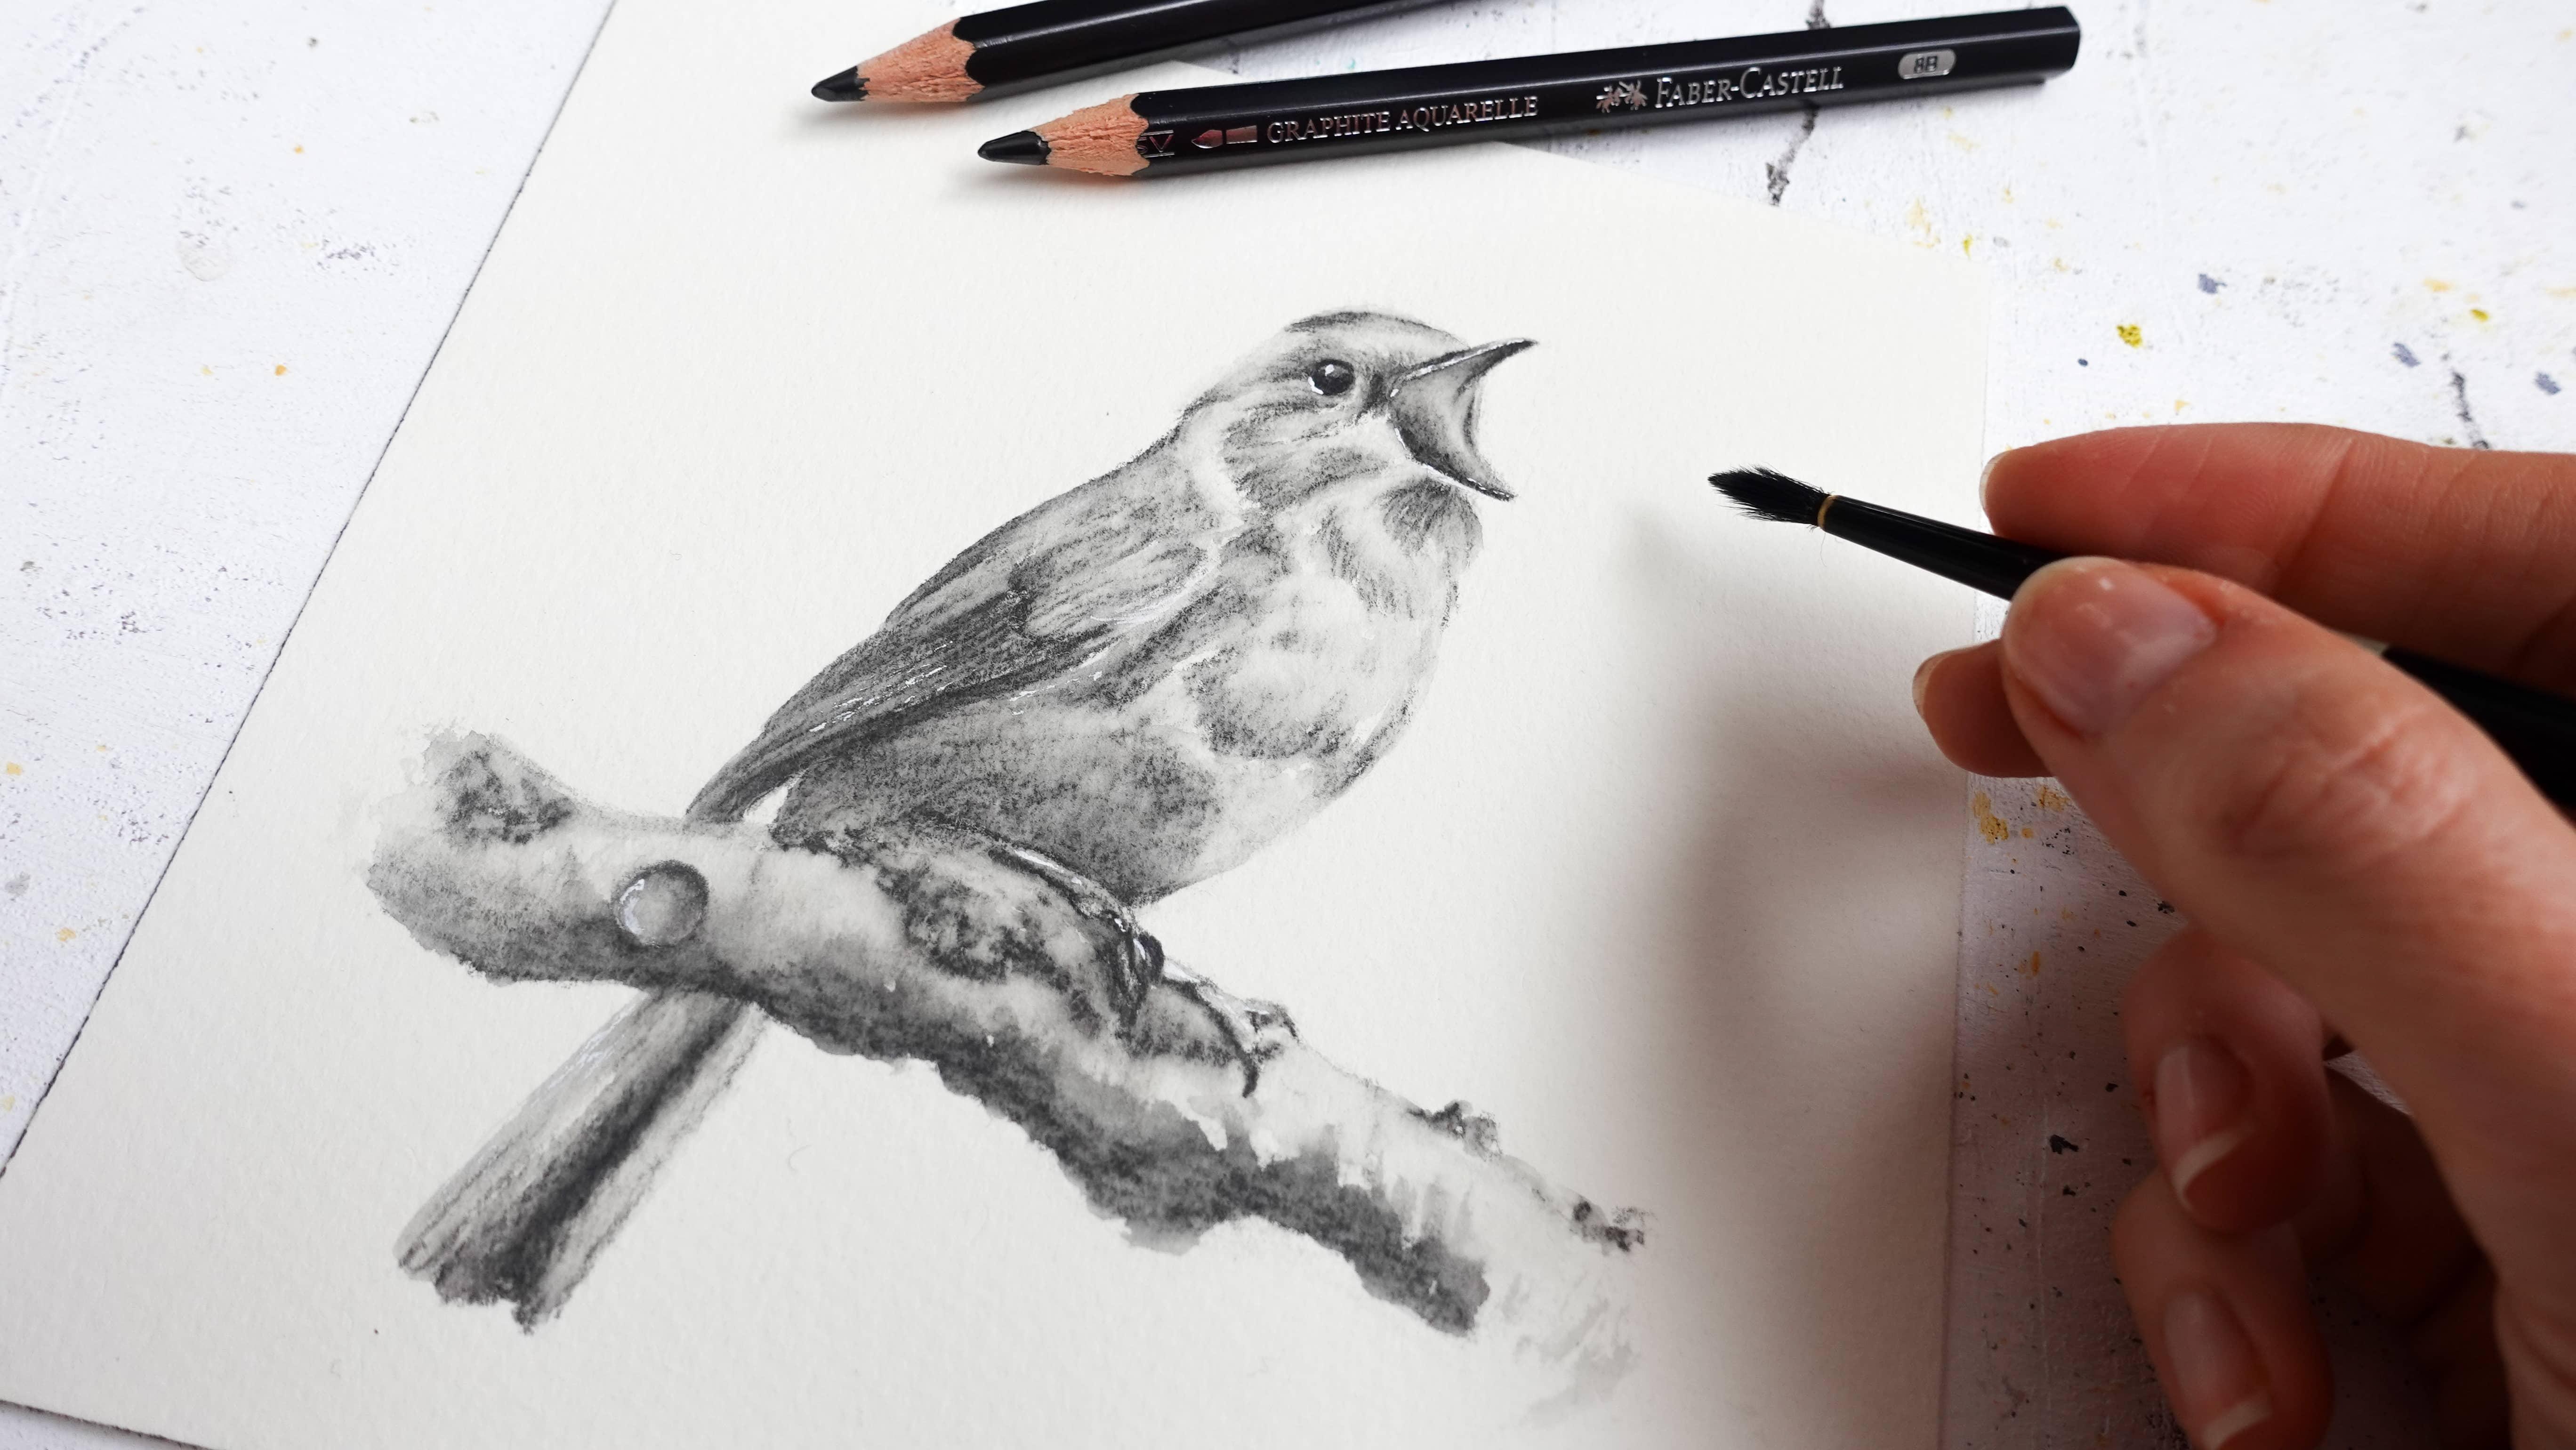
to show you exactly what. I love this tool so much. I've been practicing
and experimenting, and I want to show you
this little bird first. You can see this looks like the figure painting we're
going to be working on today in the way
that I've executed it. It's exactly the
same techniques, and I just wanted to show
you this one because the class is applicable to
any subject that you choose. It's not just for
figure painting, you can really tackle
anything else, even the full landscape
if you'd like to. This is another
way that you could use water soluble
graphite pencils. Here you can see I've used it for figure painting as well. The only difference is
that there is color, and that's because I've combined water soluble graphite pencils
with watercolor pencils. That's another way
that you can use them. Okay. This is a similar example. The difference here is that
it's not figure painting, it's just still life. Again, you can apply the
techniques I'm going to teach you today to a
bunch of different subjects. Now, these two paintings
here look like watercolor. They're actually watercolor
pencil paintings. There are landscapes,
as you can see, if you look closely, you can tell that there is a lot of the graphite
showing in there. That's when you can use your waterle graphite pencils as an addition to give a different
flavor to your painting. You could even do this on a traditional watercolor
painting I've done it before. There are really no
limitations and it's actually a great tool to add
little details. Here, for instance,
I've used Mola stole graphite pencils to
emphasize the shadows here. To also emphasize detail in the birds and
make them pop mar. Lastly, you can see that on this watercolor painting
of this beautiful bird. I've used my graphite pencils
to just add little twigs. Then I've used some watercolor
graphite gray paint to give that simple
painting a magical mood. I hope you enjoyed this
little presentation about was graphite pencils, and I'll see you next for
a quick warm up exercise.
5. Quick Warm-up Exercise: This lesson is going
to help you understand how water soluble
graphite pencils work. You'll notice if you know how
to use water color pencils, that they're pretty similar. Let me pick one
of those pencils. We'll go with the four B for
the little demonstration. The main technique here and that's the one
we'll use today is to color with your pencils as you would with
reckon pencils. While I'm not
pressing very hard, you'll notice that I'm
not very careful either. I'm going pretty fast. Here to cover a larger area, I'm using the side hair of the pencil rather
than the tip. Of course, you can press a little if you want
to add mark pigment. Okay. And then you
could of course, use the tip to create
fine lines and details. These are the main techniques
for water sortable pencils, and then another big one, of course, is to
activate the paint. To activate the paint, you're going to need
your water jar. I'd like to have my
paper towel nearby. What you want to do here is
just wet your paint brush. With water soluble pencils, it's very important that your pain brush is
not dripping wet. That's why I'm just going to remove some of the water here, so it's just damp now. Now you can go ahead and
start activating the pigment. Here, I'm doing a
little bit of back and forth to dissolve the
pigment really well. You can see that it's
getting darker and darker because I've
used more pigment here. Working with blood stile
graphite pencils is just a very simple and
very straightforward color and then activate
the pigment. Okay. In case you're wondering, all the techniques,
all the things we're going to practice today. You can apply to
water color pencils and even ink based pencils like the intense pencils by Doran and it's going to
be exactly the same. Something we did
not talk about is the difference between all
of these pencils here. We do find box sets
that come with a range HB 2b4b6 b and eight B
for a specific reason. H and HB stands for black. And all B pencils
stand for black only, and they're going to be softer. The leads going to be
softer than the H pencils, which means this one is
going to feel drier. Well, these one are going to
feel a little bit creamier. Pigment intensity is
also going to get better and better as we
move up in the numbers. For example, the AB pencil
here is going to be more rich in intensity
than the two B pencil is. This is exactly why in
the supplies lesson, as suggested, you pick and HB or a two B pencil
for the sketch. Because these are just
lighter in color. They're just easier to
erase and easier to work with in the beginning
stages of a drawing. Here, this is what we'll
be using for sketching. That's actually how I use what adobo graphite pencils.
That's my technique. This is either H B or two B. And the HB pencil feels so much drier and a little
lighter compared to the two B. To build up contrast in
our drawing in a way that feels safe because we're
not going dark too fast, we're taking it step by step. I like to pick the four B, which is the pencil
that comes between two B and eight B
along with the six B. With that four B pencil, what we'll do is just
color like this. Then we'll just
activate the pencil. Remember we don't want
a brush that's too wet. Okay. You can see the
color really shows, which means that from
there, the drawing will start coming
to life already. Now the reason why I did not
fill that out is because we will leave white space in our drawing for
the highlights. This will be the light
tone in our drawing. Well, this will be the mid tone. Maybe you're familiar with this. If you want to build
realism in a drawing, you really need light tones, mid tones, and dark tones. That's where the white
of the paper comes in. The four B pencil
comes in, and finally, the eight B or the six B, whatever you want to pick. That one is a lot darker. And that will help us
balance with the white of the paper and
create high contrast. And also emphasize
the dark areas for them to pop against
this mid tone here. Let's activate that now. And look at this intensity, how rich this is. You can tell the difference. This is a big reason
why I love this tool, water stable graphite
pencil because with a very simple set
of just a few pencils, we're able to create a variety of tones and rebuild
realism fast. Thanks to the fact that
they're water stable. If you're familiar
with the term value, this is exactly what we have here with the white
of the paper, this mid tone here, and
this dark tone there. We've built a series of values, they're going to help us create something realistic and
that looks three D. I hope this was informative. Before we tackle the
project in the next lesson, I'd like to talk to
you a little bit more about sketching with
what a sitle pencils. So see you there. Okay.
6. How to Easily Draw the Figure: In this lesson, I'd like to
talk to you about sketching. I want to show you how I go about sketching my
figures in the easy way, the most simple way
that I could think of. I've printed our project here so that it's easier for
you to see what I'm doing. But also another one. You have another example to refer to. The way that I sketch is I
rely on lines and circles. I'm going to use this drawing
to do a quick demo and then the next lesson we'll
actually sketch the project, but you already have some
experience with this one here. I'll make sure to attach that to the resources section in case
you want to work on it too. What I do to sketch this
as easily as possible, is just find where
the drawing actually starts and where it ends. With two horizontal lines. Then I would find the
middle of my sheet. Let's say it's going
to be this here. The next step is
I'd use my fingers. This is a big one. That's
where I was telling you you don't necessarily
need a ruler. I'd like to do it approximately
and use my fingers. I would look for a way to
find my first landmark here. Let's try and find the middle
in this figure. Let's see. Well, it seems in luck as this
is almost the middle here. So I'm trying to
find the middle, it'd be towards this
part of the body. Yes. That would actually be I know this is where
her back is arching. Now I have the middle, but I want to know where
the chin ends. I'm going to try and find a
way to place that landmark. Let's take the top
of her fingers here, this is the proportion
between the top and the chin. I'm noticing It's about a
third of the whole figure. Even if I'm drawing on
a piece of paper that's a lot bigger and I want
to make this figure, I know this is about a
third of the entire figure. That's how I know the proportions without
measuring anything. Here, of course, it's easy because I'm drawing
right next to it on the same scale,
but you get the idea. Now that I've got the chin
now it's just circles. I'm going to start with
one that I'm seeing here. Then I'm seeing
another one here, another one there and
one here for the head. This is the sequence you
would want to reproduce. It doesn't have to be exactly similar, but that would help. Here, start drawing. You see, I'm doing
this pretty quickly. I'm not overthinking
it too much. Can we know again the
chin comes right there. Now we already have
the overall shape. We can even see another circle right there if you look closely. See when we have that,
it's going to be easier now to shape the body to link at
the dots Of course, we can refine that as we go. Okay. Okay. I'm just linking the dots and I'm sketching again with
that HB or two B pencil, so it's easy to erase. Now for the legs, we have a line that's
a little tilted. Again, you can measure and
notice that the knee actually is way between this
part here and the foot. This is how you know
where to place it. Now, if you want to know where
the foot should be placed, and notice it's going to come right here where
the shoulder is. So I'm really doing
this fast to show you. Knowing it's going
to be easy to refine our drawing with a
suitable pencils anyways. Now I'm seeing the knee here comes up compared to this one. So this helps me decide
where to place it. Yeah, the foot is
slightly higher. Okay. Okay. You see, this is not similar, completely similar
to the original. But you can again, refine it as you go, and
it's still pretty good. Doesn't need to be extanly
what your reference is like. The line here for
the arm seems to be slightly tilted
towards the left side, and the hand actually
comes right here. This is how I'm
going to make it. Then for the fingers, I'd
like to just draw lines at first and not even worry
about the fingers themselves. We can still do them later later on in the
process if we want to. Now to do the face
since it's upside down. I would just to the sheet, that would be the
easier way to go. But you get the idea, get the main lines
in your drawing, and then you can refine
the placement and you can quickly get to the original
here with just a few lines. I hope this was useful
to you and I'll see you in the next lesson
to start sketching.
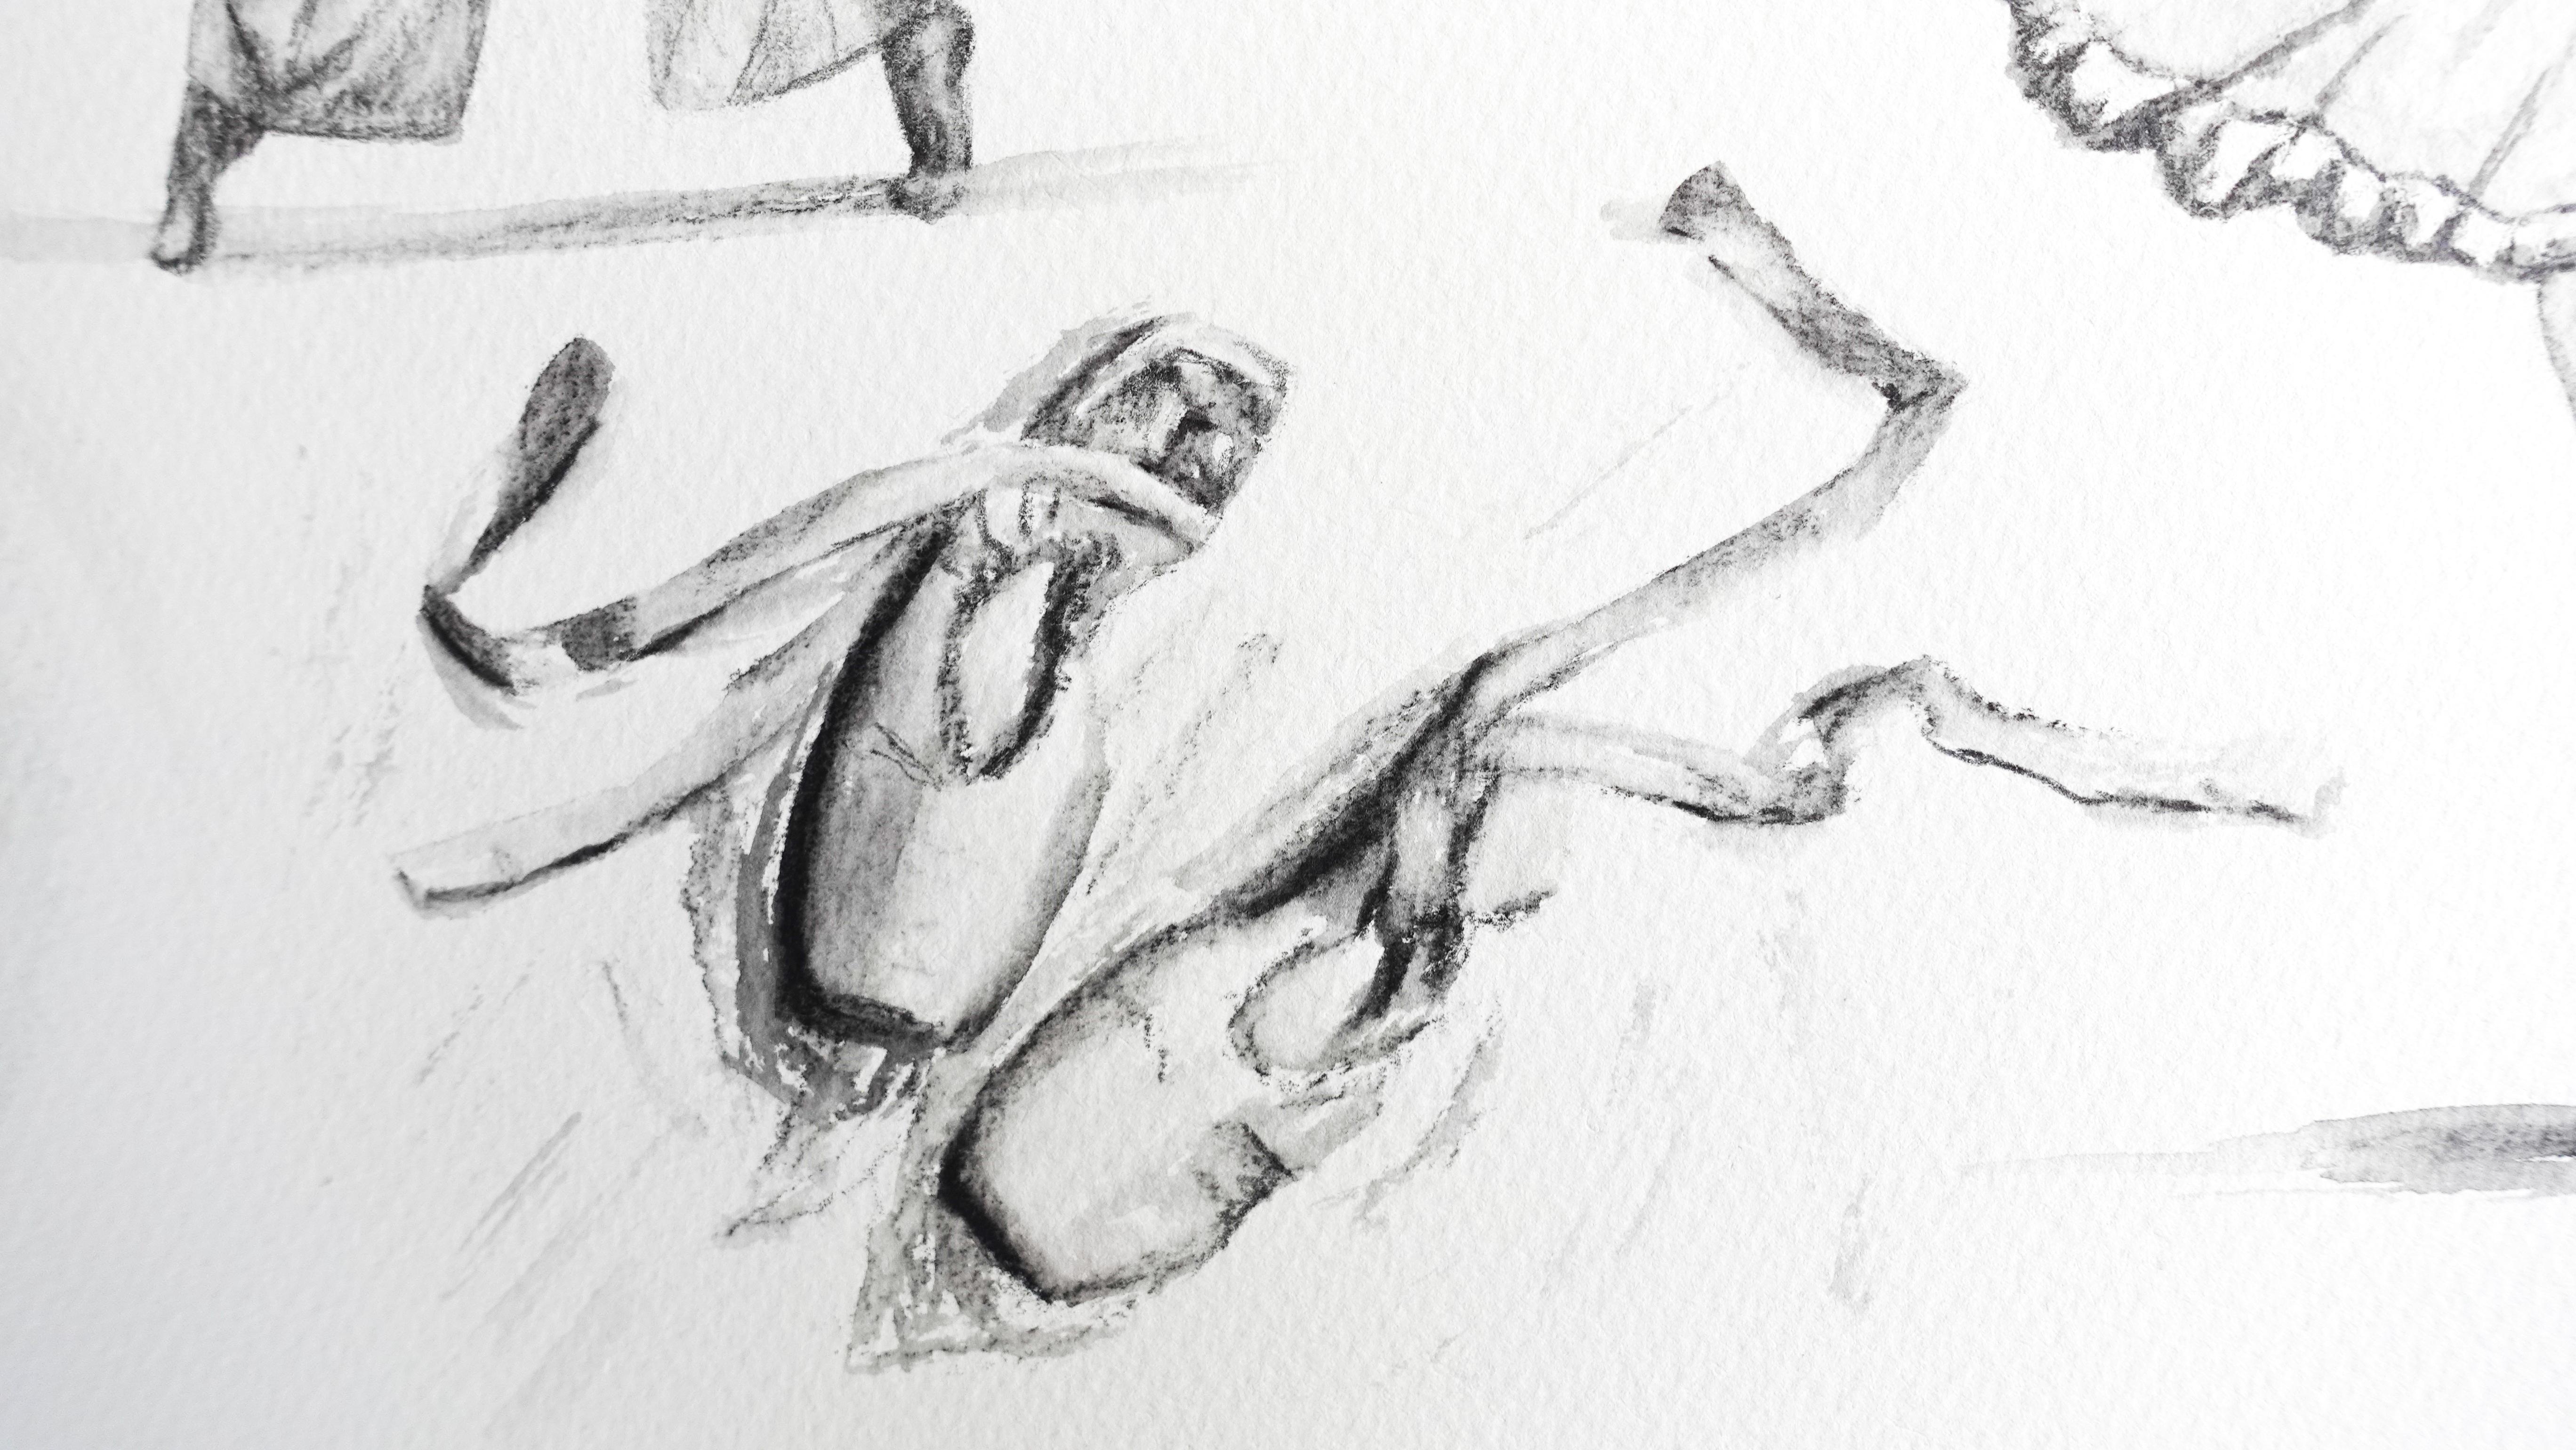
7. Let's Sketch!: In this lesson, we're going
to sketch the project, so this beautiful dancer here. I'm going to start by taping that sheet all around
with the masking tape. Again, so it doesn't
move around as we work. Actually, we don't even
need to tape it all around just the top and
the bottom will be enough. Okay. Now I'm going to work
with my two B pencil. You can pick up an HB
pencil and my eraser, and I'm not going
to press very hard. Normally, I don't even
work from the same scale. I just really did this
so you can see how I take my measurements
and proportions. Of course, again,
you can download this drawing from the
resources section. It helps you also
when you sketch. The first thing you
want to do, remember, is to find the top of your
drawing on the bottom. Ideally here, we'd want
to leave a little bit of white space on top
and at the bottom. I'm just going to make it
here. Then down there. This is where the
feet are going to be and the hands are
going to be up here. Now, I want to find the
middle of my sheet. That's where it can be
convenient to have a ruler. If you want to make sure. For example, here, I have this spot here,
that'd be the middle. You can actually see that this dancer is
standing up straight, so this could be
the main line here. This will help us. The legs will come on
either side of this line. The arms also will
come on either side, and then the head and the rest of the body
will be centered. Next step is to find our first landmark for
the actual figure here. I really want to see
what's the middle, where the middle of this
dancer is located at. I'm just going to start
measuring with my fingers. If I wasn't printing
a sketch of it, normally I work
from my computer, I do it directly on
my computer screen, but I thought it would be
easier to show you this way. Here I would try to
find the middle. Let's see from the top of
the hands to the waist here. This is not quite the middle. Now let's start from the top of the hands here to this
spot right there. Okay. This is more like it. If I take actually this hand, which is higher up, I think we can make
it the middle. Yes. From the top
from this hand here, which is further up to this spot is exactly
the same distance than it is from here to there. That gives us a good idea that the middle is actually
going to be this spot. That's where again, you can use your ruler if you're not sure. For me, it's going
to be over there. I know this is the
middle of my sketch, and this helps tremendously. From there, it's going to be
easier now to start working. Now I'm trying to think
of what I can do and to decide on the next step,
I'm looking for shapes. What I'm seeing is
an oval shape here. That's going to be something
important I want to look at. Now to actually locate
this oval, same thing. Again, I use my fingers. I'm going to try and work from this area here since we
have it on our paper. We have this first landmark. See how I can find the middle. Here to the chin is too much. Now I'm going to try the base of the neck and this is better. What I'm doing now and I'm
just doing the same here. I'm trying to find the middle. This would be about right. That means this is going to be where the base
of the neck is now, which means from there, it
gets easier to actually place my oval because I know the oval shape comes further down from the
base of the neck. It's just easier
for me to make it. Okay. I'm trying not
to press too hard. And you see already how we have the
placement of each arm. Okay. Now we have another circle right here, which
should be the head. Remember the base of the
neck is this line here, which means the head would
be somewhere around there. Don't worry if you're not sure that your proportions are exactly perfect
because right now, I know mine aren't and I'll need to refine this
drawing later, and that's fine is
always how I do it. I'm just trying to really observe and notice
that the circle here here there's
a lot more space on top than there's going
to be at the bottom. I'm to find the same space. We know the head is right there. We can also look at
where the neck is located compared
to this line here. I think the neck is
going to be more towards the middle
of the drawing. If you trace that line we had from the beginning,
we can see it. Now we know the neck
is somewhere around here and we know that the
dress is going to fall. There are the belts. Again,
we can refine this later. I'm going to keep moving on. Now I see we have a small space between this
part here and that part, so I'm going to try and find it. It will be somewhere
around here. You can remember use your fingers if you're not
sure and take measurements. Okay. I'm also noticing that the belt ends towards where the
hands located here. So the hand is going to be here, then it means the body, the waist, it's actually
located in that area. We really have to
start somewhere. This might look like
it's disorganized, but I'm placing a few
landmarks here and there, and then I'll just add
corrections if I need to. If I notice that it's not right, I'll erase, but
little by little, we're going to
place more and more landmarks until we have something on paper that allows
us to actually move on. Now from there, I'm noticing the chest is going to be
somewhere around here. It's actually lining up
with this spot right there. So we can already link the dots. And I keep looking at my
reference as I do this. Again, this is really
just a sketch. So the drawing will help
us make it even better. I keep adding more
landmarks. Okay. Now we have the neck here. We can start working on the arm. I need to leave a little
space for the hands. This is going to be the wrist. Now the goal is
going to be to link this area here to
the arm itself. You see how from one line, one landmark to the next, we're able to move
on and keep drawing. Now I'm looking at
the thickness of the arm to try and get the same And I'm not hyper
focused on getting everything to be exactly
like a drawing for now. Now if I want to know where
to end the arm here, again, I can use my fingers and
try to find, here it is. Try to find the middle. This is actually
right in the middle from the bottom of the chin here to the top of
the belt there. That really helps. All I have to do is find it
be around this area here. And you also can
look at the way it lines up to the
rest of the body. Which means that the
arm is actually more towards this area here. I was a little bit off. This is really through
observing that you notice how things are
aligning with each other. I'm noticing here that my arm seems very thick so
I can change that. This is not a problem. Remember, we don't have
to get it all perfect. I'm just going to
try to work on it, so it looks a little better. I more accurate? If you don't want to go through the whole sketching process, you can of course, use the sketch directly and
just to transfer it. But it will help you may do without sketches and
just draw them yourself. So see how I've made this
arm look a lot better. Remember that the face ends right here, but
then we have the hair. So far, this seems
pretty accurate to me. Okay. I think we're on the
right track with it. Okay. Okay. We can also check the width here, make sure we get it right. I think this is a thick on mine, which means I might need to make it a narrow. It looks better that way. Now, let's take care
of the other arm. Here the wrist comes in a place that further down from this one. These are the small details
I'm paying attention to. Then remember that line we
placed in the beginning. You'll notice finger
merged towards it, which helps me that arm now. I'm looking at the gap between the actual line and the wrist. So here now, I want to
check on this area here. That's where the line changes. Again, I'm looking at
the width of the arm. Make sure to get it to look proportionate to
the rest of the drawing. I think this is looking
pretty good so far. Doesn't shock me or anything. Now, let's just refine the face a little bit.
Now we have all that. Really helps. Where is the hair coming
somewhere over here. And I need to make the arm a
little wider in that area. That's when I'm noticing. If things don't
work out exactly, you can also tweak the
original sketch a little bit. For instance, I could
get I could add a space between the head
and the arm if I notice my arm was
a little bit off. It's not going to take away
from the realism. Okay. Let's place the ear. Now we have the ear. It's
also easy to place the eyes. So we'll just draw a dot. The nose and the mouth. And it becomes easier to just make my drawing a
little bit better. Just going to enhance the
chest a little bit here. As you can see now, we already have something going on
that looks pretty good. Now I'm checking out
the little gap here, and I'm noticing may be nice to rearrange
that a little bit. Although, as I said, we can go to tweak it
a little bit and make the head to look like it's
further away from the arm. Here, the back is arched a bit more than what
I made it to be. Okay, so that looks good to me. We don't get into too much
detail in that part here. We just want to get the main
sketch like this one here, which is a very simplified
version of the photo. And that can help you to
turn a photo into a sketch, you have a bunch of free
softwares that do that online when it's hard for you to simplify
the photo itself. Usually, I'll work from
the photo right away. But that can be
an easier option. Now let's look at
that address and also maybe the legs to find
our replacement again. So here, that's the bottom. This is the bottom of the belt. Now if I want to
find the middle, where would that be? Okay. Trying to find agical
place to do it from. We can also try to find
a third instead of half. For example, if I
go from here to the bottom of the
dress, what do I get? I get about a third, so we could try that. Now we're going to try
to divide this space in that's too much. This is a little bit better. So I think the dress comes
here. That helps us. And and this is a bit above the feet. I think this is where the
feet should be located. They look pretty
tall compared to the rest of the legs that's
because she's tiptoeing. I just want to check
I got it right. I'm just going to do this. This is a little bit
more than the fourth. Let's check on that and
see if I get it right. Yes, it seems to match
this version here. I'm going to keep it that way. Now we can find where the
feet are located here by looking again at their alignment to the rest of the drawing. I didn't draw the
hand there, I forgot. Let's say we want to look at the tip be located to the hands. Here in this area, we can
use a ruler for not sure. Without really taking deep measurements is what
I wanted to show you. We don't really need to do that. Okay. So that would be at the
bottom of that foot. Okay. I'm really lightly sketching it without getting
into crazy detail. Now let's look at the other one. Does it align to
something in particular. Doesn't really although we can get an idea of where
that should be located. So I guess it'd be
some around here. I'm trying to get
the overall shape without overthinking
it too much. There we go. I think
that looks good. Now, I want to find this area. Try to see if I can find a
pattern again with my fingers. Okay should fall here. Let's try it. No,
that's too much. Too much, it's going
to be higher somewhere around here would
be more like it. We can also check
the gap in between these two areas to get a good idea of where
that is supposed to be. Now if I look at where
this part is located, you can see it's almost in
enlightenment with that one. That's why we can decide
it's going to be here. Now we know where
to direct this leg. Okay. So we can already have a rough placement for it
and then refine that shape. And because of this, we now know where the
other one should be. Okay. Somewhere around here. We can use our fingers to take measurements in the
other way horizontally. If I want to know how wide
the skirt actually is, then I could look
at how wide it is from the middle line to the arm and try to
find a pattern once more, is that half of it? It's actually going
to be a more. The skirts going to be a
little farther out than this, but it gives us a good idea. Okay. So be somewhere around here. Again, if you make the
skirt more or less, why is not really going to
affect your drawing that much. I'm also looking
at this noticing that these two points
almost to align. This is how all I have to
do now is link the dots. Noticing also we want
a bump right here. Maybe closer actually
to this area. Then I refine it if it
doesn't look right to me. It's also important
to take a look at your drawing to step back
for a minute just to check. Then here we really don't
need to be too precise. Your same thing. Okay. I'll see if I need to measure placements here with my fingers. If it seems good to me, I'll
just leave it that way. I want to overthink it. If it seems like it's well centered on the sheet
and it looks coherent, then it's just fine. Notice how easy it is
to erase the pencil. Okay. Now, we need to finish the hands
and the legs. Here I'm dying to on this and noticing the knee
be placed around here, aligning with this area, also checking on the
thickness of it. Okay. And now let's take
care of this one here. And I think it looks
pretty good. Okay. Now, we just need to
take care of the hands and remember we have this
middle line here to help us. There we go with this one. A. Okay. I'm not getting into too
much detail at this stage. So I'm done with my sketch. Now the next step
is just to erase those lines that we've
made all around. They're already
going to be useful for the rest of the painting. And now we have this. We're
ready to start coloring. I'll show you how I do
this in the next lesson.
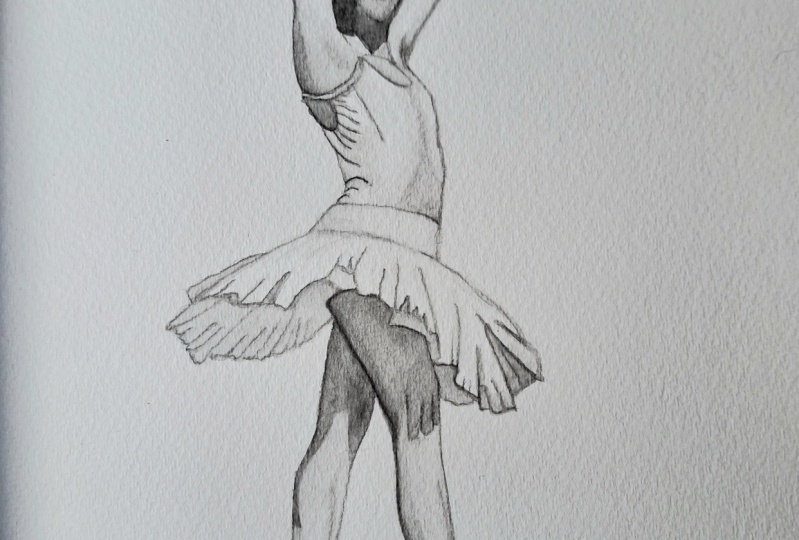
8. Draw the Main Features: We're ready to turn this sketch into a drawing and make it more and more realistic and to do this with what a stole
graphite pencils. I'm going to start using a
darker pencil and placing more detail and I'm going
to use the four B pencil. You want it to be sharp enough at the tip here just because this specific drawing is detailed enough and
it's not that large. That will help. The
goal here is to turn this flat sketch into
an actual drawing. Even before
activating the paint, you can already see all
the main features and it really looks like a drawing
at the end of the lesson. And this stage is also
going to be super helpful for us to refine
everything, all the details. We also want to start
placing the first shadows, so we can start
pressing a little more, for example, here in the
hand. It's a little darker. There's like a shadow there. I'm using the tip here because
this is very detailed. Here also, we're noticing
that we have a shadow. I'm just going to shade this. Okay. And add a little shadow here shading this part as well. A cool thing about what a graphite pencils is that when we activate
the paint notice, we can also fix our drawing and make it look even better and if there are mistakes,
that's no big deal. We can totally fix that. I'm starting to add some detail. Okay. Here we can
draw decreases. Notice how this part here
is darker than this one. Which means we can start shading a little bit
with that pencil. We're just coloring lightly
without overdoing it, so that when we
activate the pigment, we have some there to be able to create
that small shadow. Same here. Adding a
little bit of pigment. Here, also, we want
to shape the breast. That is an important detail for the realism to really
build the three D effect. Again, you really need to observe your reference,
that's really important. Now I'm going to
work on the neck. Really shading that area right there because it's very
dark on the reference. I'm not afraid because I know that when I
activate the pigment, if there are things
that I want to fix, I can do it easily. I might not color this part. It's very dark in the reference, but I might be careful with it because the backgrounds so dark, but here it's not the
case, it's white. We're just going to keep it to the figure itself and remember that there's
no background here. Okay. Now I'm shaping the
hair a little better. And remember, we'll be using our AP pencil later on
to improve on this, so don't worry if it's not as dark as it looks
on the reference. That's not very
important at this stage. We just want to finish
drawing towards the end, and then we'll make it
even more realistic later. My figure painting is really not detailed in
the face that much. Okay. Again, if something's wrong, we can erase even at this stage, and you'll see what the water
is going to help us also. Now, the mouth, I'm just not going to try to draw the lips, but just to draw the dark
line between each lip. Here, I might want to add a
little shadow for the cheek. The will be enough for now. Okay. Now, the arm here when you have
the arm pit showing. Remember, it's possible to
reshape the body a little bit. I'm adding a slight shadow here. I'm noticeing a shadow
here with the wrist. Okay. Since we're drawing on
a white background, we need to make sure that the
other side shows in places. That's why I'm
adding a little bit of graphite, but not all around, so it doesn't look
like I outlined the shape in some
strategic spots like here, there, so we can see where that arm is actually ending
once we activate everything. Just noticing we have
a shadow over here. Underneath the fingers here
so that we can see them pop. Okay. Okay. Okay. I'm going to make that part a bit darker two. I think that looks
pretty good for now. I'm going to make that line a little bit more visible here. I'm going to start
pressing a little harder. Now I'm starting to see
where this is going. I'm pressing a bit down here. You can see there's a shadow. Notice also how this part
is darker on the reference. I want to make this too dark
because the dress is light, but remember the background
itself is pretty light. It won't pop if we
don't add color. You can see we're getting bolder as we keep
adding details here. It's really a gradual process. Now, I'm going to just place little strokes that look
like they're messy, but it's normal because
if you look at the dress, we do have these
pretty creases in it, and a pencil is a perfect
medium to actually show that. Okay. Here, we're going
to want to add a shadow. We can see it in the
reference underneath. I'm not pressing
too hard for it. Remember the dress is white, but we want to add
it so we can see it's beneath this area there. Also adding a few creases here. I can keep refining. I'm being messy here,
but it's actually nice to be able to place
those little strokes. Okay. Same strategy here. You want the dress to
show a little bit. That's why I'm adding a
little bit of graphite. Now let's focus
on the shadows in this area and we can
draw the muscle here. We also want this leg to detach itself from the
other one a little bit. That's why I'm adding
some graphite here. This area is anyways,
catches less light. Okay. Same here. I'm just going to press
a little bit harder. Here, it's pretty dark. I'm trying to render that. We also have shadows
from the dress on there. It's important to make sure they appear over here as well. Now let's take care of
the feet and we'll almost done with this part. Okay. I'm being approximate
once more here not trying to draw all
those traps exactly. Here, I'm going to press it
a little more to make sure I get the creases in the shoes. And let's not forget
the shadow right there will help us make
it even more realistic. Again, let's observe to
notice this is a tilted line. Here we already have something
that looks pretty good. The next step is going
to be to activate this and that's
what we're going to do in the next lesson. I'm going to show you
exactly how to use graphite pencils when it comes to turning a drawing
into a painting.
9. Activate the Paint: So now I'm ready to
activate the drawing. You see that I have
my water jar ready. I have my paper towel, can have a rag, if you prefer
and I have my paint brush. I decided to go for
that smaller one. I think it will be
easier for this size. What we need to do is
wet it, first of all. Then we're going to make sure to remove some of the excess. And you see it's very fast. I just dab it once or twice quickly on the paper
towel and that's fine. Now I'm going to work
section after section. Here in the hand, for instance, I would like to keep
this area pretty light, which is why I'm going to start wetting that area, that's white. Now I'm going to start
activating the darker part. You might wonder
why I would even want to wet a part that
we haven't colored. And why not just
start right away by activating the parts
that we color this? That's because by wetting
the white part here, and we're going to
keep doing this. Then when we activate
the darker parts, they melt into the light ones, and that creates a
natural gradient without you having to
do anything extra. Instead of having
a harsh line that wouldn't look very nice
nor very realistic. That's a little trick
that you can use to make sure you get a natural gradient in your water soluble
pencil drawings. So now we're going
to keep going, and you'll notice that I keep rinsing my pain brush
each time and then repeating that step of rinsing wetting and then getting
rid of the excess water. Because if you don't rinse it, you're going to
keep transferring the pigment that you pick up. It's very important to do this. I keep going section
after section. Okay. So now, again, I rinse my paint
brush and I repeat. I'm still looking at my
drawing to make sure that this is looking exactly
like I want it to be. Okay. Now, I'm going
to keep wetting the white part in between the arm pit and the
edge of the arm. Look at how easily
the paint actually melts into the figure. It's very easy. The fact we use a little
water also really helps in preserving
those wider parts. Remember that we want paper white parts showing
to build that realism. Now I'm going to start
taking care of the face. I'm sensing I didn't shade that face enough,
but that's okay. I'm just wetting
it and we're going to fix that. It's
going to be easy. So I'm just wet it, and
now I'm going to go ahead and wet the features. You see, I'm not super careful. Remember, this is just
a figure drawing. It's not like a
portrait where we want to be really
detailed or anything. This can be a little
bit approximate. It's fine. Now I'm going to take care of the
ear and it's so dark there, I'm careful to rinse my
pain brush frequently. Now the hair. I'm realizing
I should have shaded the face a little
more so I can just transfer some of that pain
time activating in the hair. Transfer it into the face
while it's still wet. That's an effective way to work. Now I'm going to be careful here to shape that head correctly, so it's not out of proportion. That will be a little
bit hard to fix. I think this looks correct. Here we could imagine
there's a bun so we can make it darker and that we can
do later if we want to. Okay. I'm activating the neck and this is also a chance
to reshape the face. Nothing is firmly set in
stone yet at this stage, even though it might
feel like it is, but remember we have a
darker pencil to use later. We can fix little
things and see I'm transferring paint
here to draw the butt and I can also reshape that
arm when I'm doing this. I'll just add a
darker paint later when it comes to time to
work with the B pencil. Now I repeat the process here. Okay rinsing my
paintbrush each time, wetting the white
parts first so that the darker pigments melt
into the drawing Okay. Same for the arm. Notice how the arm here is not as close as the one that I drew compared to the reference,
and that's okay. I actually don't really like
the way that it looks here, but I'll just fix it later. It's not too bad though. Now the dress, we
want to keep in mind. It's pretty light in color. I want to make sure to
keep those whitest parts. Winning this first,
and then following the movement of the body. That really helps in creating the shape that we're activating. Now, I'm looking
at this part here. I want to make sure
this area stays white. Okay. Now, that built. Activating the
little creases here. This is so fast to do once
you get the hang of it. Here is same we want to keep some of those light
parts showing. This is a darker
part, so it's fine. Here it's much lighter. I'm just activating the creases. Okay. This is very meditative I find to do and it's pretty not
stressful at all. What a color painting
if you've tried it, sometimes can feel a little stressful because
you have to be fast. Here you can stop whenever you want and pick up
where you left off. They also a good way to get
into painting when you used to learn to work
with a pain brush. Okay. So I'm going to quickly finish taking
care of this area. It's a little darker
underneath here. So it's okay to
add more pigment, keep it less white. Okay. Now the legs. What I want
to do with the legs is start with the bottom
makes more sense to me to do it that way
because it's so much on top. We can keep creating
those shapes that we are seeing the shadow
from the dress. Okay. What's enjoyable as well with water soluble pencils is the fact that we don't
use a lot of water. It dries very fast, so we don't run into problems of one area bleeding into the other one like we
would with watercolor. I don't even need to use a
heat gun or a hair dryer to actually dry my drawings in between layers, and
that's really nice. And now, same thing. I'm trying to
recreate these lines. And they still show
from the coloring part. That's because we're doing
session after session, so we keep more control on
the blending and it's easy to just activate the drawing
as we actually made it. It will be very hard if
we used a lot of water, everything we mixed together. All the paint and then
add paint everywhere. If we were trying to
blend everything at once, we would lose the actual
sketch and drawing. This is what happens when you
get started with pencils, usually, you don't
know how to use them. It can be discouraging, but it's actually very easy to use when you know
the techniques. I'm trying to make sure to keep those shoes light in color. I'm really doing this quickly. Now to activate the
shadow, same thing, start with a clean
paint brush from the outside here and just start blending so that all that paint melts into the white of the
paper. So much nicer. Now we've activated the pencil. You can see this looks
pretty realistic already, but it might be nice to add a little touch of color to it to make
it even more three D, and that's what
we're going to do in the next lesson, see you there.
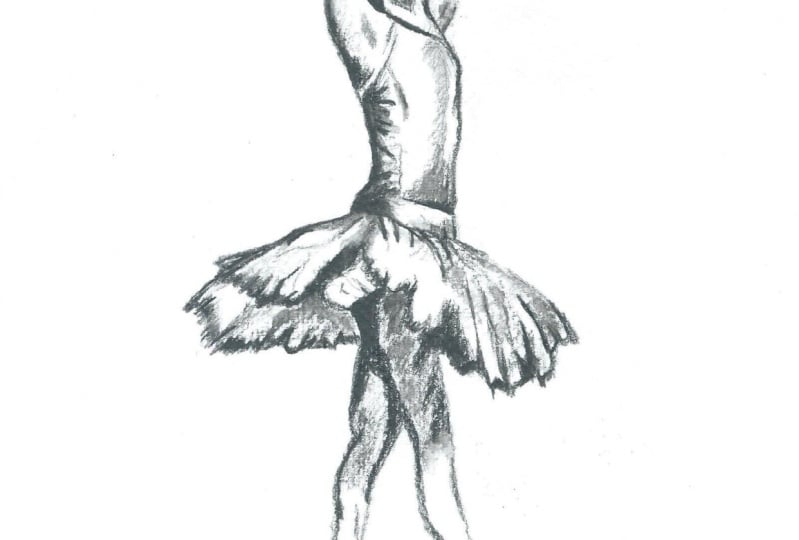
10. Create a 3D Effect: In this lesson, we're going
to repeat what we've done before by coloring and
activating the pigment, except that it's going to be much faster because
we're just going to add a little bit more
pencil to our drawing. We did most of the work here. Now we just need to
accent some places, and we're going to do this
with the eight B pencil or the six B if you don't
have an eight B pencil. It just needs to be a
little than this version. Remember, light tone paper, mid tone, that was
the four B pencil, and now this is going
to be the dark tone. That's where you want to
enhance features like the hair, here, the eyes, the
nose, some shadows. That's what we're
going to do now. Make sure that a pencil is actually sharp and let's start. Now I'm just going
to really focus on those darker areas of all. You just want to accent
some parts of the body. Try to focus on the ones that are darker
here, for instance. And that helps us refine
that drawing really well. We can also make a bun
for this nice lady here. We're just going
to do that here. I'm pressing quite hard now to make this happen to make sure that we
get something really dark. Actually adding the
bun here is helped me reshaping the neck
also. That's nice. So, if you compare my drawing
to the original photo, you can clearly see it's
not exactly similar, there's a bigger arch in her
back on the photo, I find. Also this part is a little
bit shorter, I'm noticing. But overall, it doesn't
look bad or not realistic. You don't really
need to get into crazy detail with
figure painting. Then you can also improve as you use the
techniques I taught you in the class to sketch
and get great proportions. I'm just trying to
get the hair line to be a little more visible. Here it'd be really hard to
draw the eyes in detail, so we really don't
need to aim for that. I'm really just using
the tip on my pencil. I still think the nose
should be higher. With the water, we can attempt
and make it like that. Can make more of a smile
on her face if we want. Try to be careful not to
add too much to the lips. It can become quickly
overwhelming if we do. Here underneath the neck, we're going to want to add a shadow to make that face pop. Okay. And we can of course, press
a little harder to make the hair stand out a little more and still get the neck
to pop against it. To simple pressure
on the pencil, you get the effect
that you want. Here. Remember I
didn't really like the way that the arm
was right there, so I'm just fixing it now. Thanks to the darker pencil, I'm able to reshape it. Now let's just get more
shadows over here. Okay. Maybe enhance the hello area there a bit. Here we can emphasize the
details in this part. And also the creases, we can make them a little more visible by pressing
really hard with the tip. That really adds to the
realism really fast. I don't think this
area needs more, maybe a little bit here though. Okay. And a little bit
there to really get to see each area pop
against each other. Now I'm just going to
make this dress even more fun and
emphasize some areas. Here, I find it might
not be dark enough, so I'm just going to add
a little bit of a shadow. Makes me think the face
would need some shadow too, which I might add later. Here I want to add
a few fun creases. Maybe emphasize the
creases here as well. Some of them can
stay pretty light. I just want to add
some contrast here in this part of the drawing. Here also. Now, let's look at the face. I want to shade it
to a little bit. Okay. I'm trying to spot
the lightest parts, which should be around here
on the cheeks, actually. And parts of the nose. Making the face a ser. And now let's move on. Okay. Thinking I want to increase
the shadow here a little bit because her skin is a little
bit darker here than there. I want to make sure it matches. I think here I'm just going to emphasize those shadows we
see coming from the dress. I want to make sure
these two parts are distinct from each other. I'm going to leave
these parts alone. I think we did enough earlier. Maybe just use the tip here to make the
detail a little nicer. And the creases also. I a little more precise. Here, I didn't actually add any creases
earlier. Let's do this. I still want to
emphasize that part a. And I think that's it
looks good enough. Now I'm going to go
ahead and activate this in the same way
that we did it before. Always starting in
the white parts and moving towards
the dark ones. Don't forget you can also transfer some paint when
it's on your brush. I feel like another area
might need some shadow, pick up the wet paint where it's the most
intense and transfer. Okay. Okay. Now, if you really were
to zoom in my drawing, you can see a little
bit of pencil here where the face
was a little wider. But because we added
darker version of that, then we're able to correct the proportions little by
little. That's really cool. You really get to make mistakes
and it's not a big deal. You can correct Okay. Now with the hair, we're
going to be able to get that rich black or dark
gray from our pencil. I can correct the hair
line when I'm at it. How we shape the arm here. You can see how much
more intense it gets when I run a wet brush on top. I really like the
eight B for that. Just know that you don't have to activate everything
either if you want to keep a line
to look at obvious. I make it darker on purpose, darker than the actual
photo just because again, the background is white
and I want it to pop. I want some contrast against
that background too. Let's use the brush also
in a playful way here. We can transfer
paint as we activate it and create extra
creases if we want to. Remember that's okay if this part here is a
little bit darker than the one on top because it's underneath so
there's a little shadow. And a tip for you if you
need to remove graphite. For example, here you
want to make it lighter. Make sure to wet clean
your paint brush. It's almost dry now because I removed a lot of
the water from it, and I'm pressing hard to lift the paint and make
it a little lighter. That's something you can do. If there's an area
you don't like. Now let's work on the leg, same strategy as before, wet the bottom first and it's easier to make the rest of
it melt into it naturally. I'm rinsing my paint
brush very often. Otherwise, it will all
get re dark and we'll lose all those little
details we've added. Right now, all the shoes is really not much
to activate here. That's nice because
everywhere I added that darker pencil, the eight B, you can really see the lines making everything
pop a lot better. Everything is a lot more
intense, better defined. Now again, remember to
activate this part, you can even wet
more of it here. You really want
to make sure that the areas surrounding
the shadow are wet. Then you can push
the paint into it. See here, I didn't
wet it and now I'm getting a harsh line,
so I can still do it, of course, as long as I don't
wait for the pain to dry. Now let's do it here too. Okay. And I'm just going to
transfer a little bit of the paint over here to make that shadow
show a little bit more. When that's done, one last thing we can do is just enhance a few things in this drawing directly with a pencil
and not activate. For example, if I wanted to enhance the mouth
and make her smell. I could very easily could. I just added a little
smile on her face. I don't want to do too much on the face so I don't ruin it. So that's it here. We're done. I'm just going to
untape this now. Remember that you're welcome
to post your project in the project and
resources section of the class. I check. I'll give you some feedback if you need some or if you
have any questions, you can also write it there or just to leave a message
under the discussion tab. It's up to you, but feel free
to share the project with us for feedback or just to
show us what you've done. Hope you've enjoyed
painting this along and learning
all my techniques. I'll see you next for
some final words.
11. Before You Go: I hope you had a great time
using wood graphite pencils. Imagine now what's
possible with graphite, but also wacoto pencils
and ink based pencils. In the class, we learned
it's possible to draw accurate figures
with simple shapes, add graphite to build
a three D effect, quickly activate the pigment, even correct and
refine some areas of the drawing without perfectionism
or any fancy tools. I pointed out the flaws in
my own art so you can see how forgiving what a stable
graphite pencils really are. I hope you got to experience
this for yourself too. If you did, please let me know. I encourage you to
share your process and your art in the project
section of the class. You may also leave
a review to let potential students know if the classes are
right fit for them. If you want to learn
more about this medium, I have three other classes
here on Skillshare. I also share a
variety of videos on YouTube and tutorials on Patrio. Thank you so much
for painting with me today and see you
in another class.
 Francoise Blayac, Professional Artist