Transcripts
1. Intro: we all start out as little bundles of untapped creativity as soon as we work out how to hold a grand we draw. Creativity is a natural human instinct on that instinct is hardwired into us. So no matter what a jewel, that creativity can be rediscovered with a handful of simple lessons. Hello, I'm Martin and I'm going to share with you. Everything I've learned is a practising artist and experienced shooter. Whether that's choosing the right materials for the job or have to hold a pencil to draw, we'll start at the very beginning with line and then we'll see. The world is a collection of shapes will give those shapes form to create the illusion of volume and space. We look at perspective on composition, all you need to know to rebuild your creative confidence and to draw fearlessly again and Levante just like you did when you were little
2. Tools & Materials: don't don't Oh, and T One of the really nice things about drawing is you don't need lots of fancy equipment to get started. Simple pencil and some paper and you're off. I'm gonna hear you say, under lots of different types of pencil and those two different kinds of paper, too. And if you walk into an art store on the hundreds of things to draw with, well, yes, you're right. Let's have a look at them. The core of a pencil that's the black bits surrounded by wood is made of a mixture of graphite and clay. The different types of pencil are graded using the HB graphite scale, where H describes the hardness, which is the clay on B describes the blackness, which is the graphite. H grade pencils have more clay, unless graphite, they're harder and give a lighter mark. B. Grade pencils have less clay and more graphite. They are softer and give a darker, blacker mark. The two sets are ranked by number, with a nine H being the hardest on lightest pencil on the nine be the softest on blackest pencil. Generally speaking, artists prefer the darker and softer B grade pencils, which offer a wider range of tones on greater mark making possibilities. An alternative to a wooden pencil is the propelling pencil, where the graphite core isn't bonded to the casing and could be mechanically extended as the point wears away. A propelling pencil is great for outline drawings, and it never needs sharpening the graphite. Founding pencils also comes in a chunky graphite stick. This produces a thick, bold stroke, which is good for shading and creating blocks of tone. They can, however, be unnoticeable. Shine to graphite handy tool to have around when using graphite is a tortilla on or blending stump. It's usually made of rolled up paper, and it's used to smudge or blend marks to make a softer, more even tone. Some pencils are water soluble. When water soluble graphite is mixed with water, it creates a liquid wash and can be spread over a surface with a brush. Charcoal is made by cooking would sticks or vines in a low oxygen environment. Charcoal is black and brittle. It comes in a range of thicknesses and is one of the most versatile drawing materials available. It's wonderfully Messi on is grateful to use producing soft, sooty marks on subtle tones. It could be smooched, blended and easily a raised, and it's easy to control to light. Pile on more charcoal to dark, wipe it away, smudge it back with a finger or a rag, or rub it away completely with an eraser. Compressed charcoal is powdered charcoal that has been mixed with wax or resin on compressed to form a stick. It also forms the core of charcoal pencils. Compressed charcoal is similar to, but grittier and darker than vine charcoal. It's also much harder to a raise. Contact brands have the same characteristics as compressed charcoal and come in a limited range of colors, usually black, brown, gray and white. George and passed ALS have similar qualities to charcoal. Joke is, well, chalk a naturally occurring white mineral Past ALS are powdered pigments mixed with the binder on formed into steaks. The pigments are the same as those used in artist's paints. On come in a dazzling array of vibrant colors. Joke and passed ALS are most effective when used on a colored paper. For finer detail, it's often better to use pastoral pencils, which could be sharpened to a point. However, the cause are fragile and need to be treated gently. Oil pastors are also made from pigments but are mixed with fats and waxes to create a crayon. They are harder to blend from chalk pastels but worked well in mixed media. For example, a tzar wax resist with watercolor. Both charcoal and pastels require fixing. When finished, fixative comes in aerosol form, and it's sprayed onto the artwork to stabilize loose particles and pigments. The final step for preserving a charcoal or pastel drawing is to frame it under protective glass. Drawing with ink requires a pen that could be a sharpened stick. A buyer oh of felt tip a magic marker or a dip pen with the neb. When choosing ing, do check whether you're getting permanent or non permanent ing. This is particularly important if you want to use it with watercolor. For example, if the ink is non permanent, the addition of water will cause it to run. This could be a disaster or an advantage, depending on how you want your artwork to look. A metal net with a handle for dipping into a bottle of ink is great for drawing. It can make a wonderfully organic, uneven line on allows for expressive spattering. You can make your own nips from bamboo, twigs or feathers. Keep an eye out for more specialist pens like this brush pan, which can produce a flowing rhythmic line. Okay, paper. Lots of choice. Colored, handmade tissue, thin and cardboard thick. The common choices. Cartridge paper. A combination of wood, pulp and cotton. It's often supplied in a convenient pad form in a variety of sizes and weights. Wait is shown is grams per square meter, or GSM. It's a good idea to look out for an use acid free papers, which have been treated to prevent yellowing and to extend the life of the paper. Some papers are hot, pressed and silky smooth. These are good for line work. Others are cold pressed and have a pitted on course, a texture. These are more suited to working with charcoal and pastels. Thinner paper like printer paper is fine for sketching with pencil, but Inc will bleed through, so a heavier paper is more suitable for pen and wash. Work on a razor is not just for correcting mistakes. It's a valuable drawing tool in its own right. There are three main types the classic robbery razor does the job but faces stiff opposition from the newer plastic eraser, which is firmer, more efficient and good for clearing larger areas. And then there's the need. Herbal or putting rubber. It's no use for large areas, but it's very pliable on could be moulded to appoint and used precisely for pressing on pulling and adding a whole new range to your mark making vocabulary. And finally, keep your pencil sharp. A good point on your pencil means you can make both the thick, onda thin line. You need a sharp knife for a charcoal or pastel pencil. Grab the knife in your drawing hand on the pencil in your other hand with the edge of the knife facing the tip of the pencil, Place your thumb on the non sharp edge of the knife and push away from you. Whittle away until you get a good point. Of course, you don't need stuff to start drawing. What you do need is something to draw with and something to draw on a positive mental attitude. Andi On understanding of a few basic principles, let's get started
3. Line & Shape: At its most basic, a line is a path left by a moving point. It could be horizontal, vertical or diagonal because we think thim wavy dash stores exact a line can show the outline of a shape or object. A line can also describe detail and features. We can use line to create texture and pattern rose and patches of line can be built up to create areas of tone. This is known as hatching. Hatching on top of hatching is called cross hatching. But a line can have different qualities which express feeling a movement A line can flow on . The line can dance because the line can have rhythm. You can do an awful lot with just a line. The shape is an area enclosed by a line. It could be just a now outline. Or it could be an area of tone, with no outline shapes of height and width, but no death there, two dimensional. There are two types of shape. Geometric and organic. Geometric shapes are mathematical shapes, such as squares and triangles and circles. They are characterized by straight lines, angles and points apart from the circle, which is a simple enclosed curve organic shapes are those that can be found in the natural world, such as leaves, shells and clowns. These shapes are all different from one another and are often curved and random and unpredictable. When we looked a typical man made landscape we can see it's made up of lots of geometric shapes, squares, triangles, parallel a grams, rectangles, all straight edges and sharp angles with the occasional circle. Geometric shapes suggest balance and order and generally things that a man made. When we look at the natural landscape. The shapes here are organic. They are irregular and random and usually curved and flowing and unpredictable. We can reduce pretty much anything to a collection of shapes. Grab a magazine and the market pen and pick out the shapes in the pictures. Get used to ignoring the detail and you'll see the shapes. Here's a tip. If you're finding it tricky to seethe shapes, try turning the picture upside down. You'll find that is, your brain fails to make sense of the image. The basic shapes become more apparent. It's a fabulous exercise that you can repeat many times with different images to develop your shape, recognition and observational skills. It's also important to keep an eye out for the shapes created in the spaces between shapes . This is called negative space and is just a Zim Porton tas the shapes themselves. The relationship between shapes and the negative space around them helps our brains to quickly understand what they are seeing. Negative space can also help to identify the edge of an object that is proving tricky to draw. Sometimes drawing the negative space first can help you describe the shape of the object more accurately. For the artists, the whole world is made up of shapes, all fitting together like a jigsaw. Recognizing these shapes will improve your observational drawing. If you look past the detail and see complicated objects, is a collection of simple geometric and organic shapes. It's possible to draw anything.
4. Project Getting Started: grab yourself a pen, any pen and some cheap paper printer paper is ideal because expensive paper will make you nervous. You don't want to be under pressure to draw anything wonderful. So cheap paper at any old pen. Wilder. You can use a pencil if you want to, but there's no rubbing out. We're going to embrace all mistakes, but I'm going to rub them out and pretend they never happened. Mistakes are essential. They are the best way to learn. Develop in progress. Let's warm up with a collection of lines, some straight ones, some curved ones and some angle dwarves. Now let's use those lines to make some shapes. Fill some of the shapes in, I believe Others is. Outlines make asses many types of mark as you possibly can. Pretty much everything we see in the world is made up of shapes. Tarbox, we're going to draw inside this box. It gives are drawing a border. Let's draw a far. It's just a collection of shapes. Let's draw a fork. Let's draw a house That's drawer of mug of coffee. - Lester . A pencil that's drawn apple good. You're broken. Running
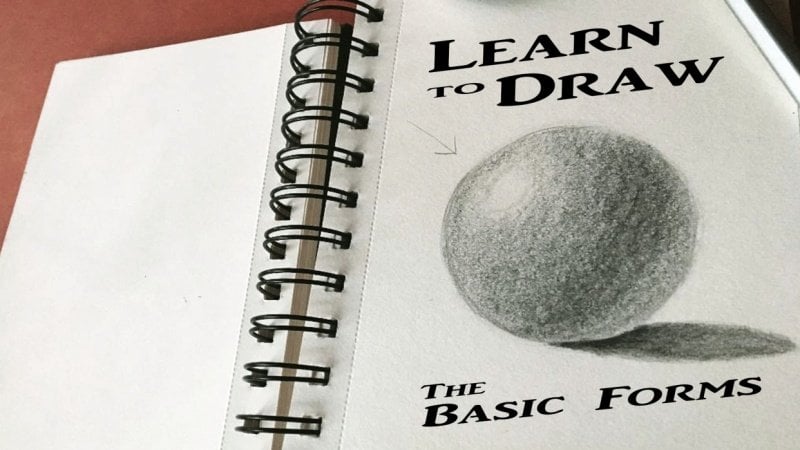
5. Tone & Form: in the real world, tone is created by the way light falls over a subject, creating highlights and shadows in art and design. Tone refers to how light or dark something is. The full range of terms goes from solid black to pure white. We used tone in drawing to recreate this light falling over the subject and to give the illusion of three dimension or, for it's good practice to make yourself a ton bar with whatever medium you're drawing with drawer bar on divided into equal sections, the lightest tone could be the white of the paper, the darkest tone, the darkest mark you can make fill the sections in between with a range of grace. Here's a tone barring charcoal at the tone bar in ink, where the range of grazes created using cross hatching and Dr Paton. These are called midterms. Contrast refers to the difference between terms. High contrast is achieved by placing very separate tones together. Locum trust is achieved by placing similar terms together. By contrast, images are often striking and dramatic. Locum trust images creator, quieter, calmer atmosphere. It's when we have turned to a shape imitating highlight and shadow that we create the illusion of four. Let's have a look at these four basic shapes. Triangle a circle, a square in a rectangle to turn these shapes into three dimensional objects. We need to give the shapes form. When we do this by adding shadow and highlight. Turning a triangle into a three dimensional shape creates a cone with a round of base. A circle becomes a sphere. A square becomes a cube on. This rectangle will become a cylinder I'm using. The tone of the paper is my midterm, so I'm using white chalk was my highlight by adding a little tone where the shapes would cast a shadow on a surface, the illusion of form is complete.
6. Project Donut: Oh, this is my kick box for drawing with charcoal and chalk. I've got thick charcoal thin jock. I got Joeckel from out of the fire chunks of charred wood. I've also got chalk, a bit of tissue sandpaper. Rob is on a razor's various types of pencil on a handful of color jokes, a nice variety of mark making equipment. We're going to do this project on a budget. I'm trimming down a piece of old used cardboard packaging, and I'm going to draw with a piece of birch wood. Look, I'm drawing a circle and I want to turn it into a doughnut. I'm imagining the light is shining from the top, right. I started to shade half the circle to create a sphere. But wait, I don't want to do that. No problem. Charcoal wipes away very easily. I'm going to draw a don't, huh? The holes a bit big. Let's start again. That's better. The light from the top right is going to leave the bottom left of the doughnut in shadow. It's also going to leave the inside of the top right of the door. But in each other as the cardboard is a lovely brown midterm. I'm using white chalk to create my highlights. I'm drawing in the highlights where the doughnut is facing the light and softening the edge as it rolls away from the light with my finger. A shadow on the surface beneath the doughnut tells us it's standing on its edge. How about some Sprinkles? The combination of brown card and black and white marks creates a very attractive effect. And there is something really nice about being able to work down to the shadows with black and up to the highlights. With white on this little scrap of cardboard, I'm going to draw a cylinder with a pen. The light is coming from both, which means the lower half of the cylinder is in shadow For the highlight. I'm going to use a white gel pen. I'm going to imagine that this is the cardboard inner of allure. Oh, so this cylinder is hollow on the light illuminates. The lower half of the inside of the tube on the upper inside of the tube is in shadow, and again, a cast shadow sits the object on a surface
7. Space & Perspective: space is three dimensional, but it has no fool, so you can't draw it. We have to describe space by drawing the objects that exist in it. We can use size. Larger objects seem closer to us. Smaller objects seem further away. This creates the illusion of distance and space. We can overlap things. This cube is sitting in space. If we draw us fair and allow the cube to overlap it, then clearly this fear is behind the cube on a sense of debt is achieved draw the edge of a table beyond on. An even greater sense of space is created. We can use tone. This is most noticeable in landscapes where distant objects appear paler objects that are darker and more details seem closer, while objects that are lighter with less detail seemed further away. Perspective plays an important part in creating the illusion of space. It describes how objects appear smaller as they move away into the distance. There are two main elements to perspective. The horizon line. Under Vanishing point, the horizon line runs horizontally across the image on determines the eye line of the view . We can move the rise in line to change the viewer's perception over where they are in relation to the subject. If the horizon line is in the center of the image, the view is brought into the scene with an eye line at a natural level. If the horizon line is moved to the top of the image, the eye line is raised, giving a bird's eye view looking down on the subject from above. If the horizon line is moved to the bottom of the image, the I line is load giving a worm's eye view of the subject. A vanishing point is the point on the horizon, where parallel lines converge when they are shown in perspective that could be worn vanishing point or two, depending on the angle at which your viewing your subject.
8. Project off the rails: Let's put what we've learned into practice. We're going to take the one point perspective of disappearing train track and make our own version. Grab yourself a sheet of paper and a pencil on a Roomba, a rule resumption all. We'll begin with the two vital ingredients for a perspective, drawing the rise in line on the vanishing point. Let's begin with the train tracks. Now we will know that train tracks of Parallel never actually meet each other. But under the laws of perspective, that's exactly what they do. They appear to converge as they disappear into the distance they meet the vanishing point. The sleep. Is there a series of horizontal light that get closer together as they go towards the vanishing point? Each one of those lines becomes the front edge of the block of timber that forms each sleeper. I'm shading sleepers to give them a little bit of four, this issue of the lights coming from the left so there will be shadows cast from that direction. I'm drawing a path to the right and putting guidelines in for the base of a house, another for the top of the wall of the house, one more for the roof line from the base of the house on during a vertical line, this will be the front corner of the house. Further away, I'm drawing another vertical line. This will be the far corner of perhaps two horizontal lines. Give me the end of the house and a triangle takes us up to the roof line for the guidelines . Can have replaced the door and a window on the other side of the tracks by putting down some more guidelines for a small stream. The banks aren't a straight is the railway lines, but the stream still disappears back to the vanishing point. Next to the stream, I'm gonna place a row of trees, so I'm putting in a nice high guideline. These trees role going to be the same height now, as well as using perspective to create the illusion of space. I'm now also using size Trixie getting smaller as they move away to the distance, and I'm also using overlap. The closer trees are overlapping. The more distant trees telling us is we didn't already know that this row of trees is receding into the distance. We've now got several elements in place with perspective diminishing size. Andi overlap, telling us that all these objects are moving away from us into the distance. If we start to embellish the objects in the foreground with detail darkening the tone of the foreground, this will further give the impression of depth and space. Go ahead, introduced some other elements. Offence some, she whatever.
9. Composition: composition is the arrangement of all those visual elements we've been looking at line, shape, tone and form as well as color. Texture and space are all organized according to several principles of design, like balance and rhythm, contrast and pattern. A successful composition draws the viewer end, leading the eye in and around the image. None of the rules of composition is set in stone. If I breaking the rules come very often, generate the most striking compositions of all. But there are a few things that helped give structure to the layout of the picture. On the way that this subject is present, the rule of thirds is a good place to start mentally. Divide your paper into thirds both horizontally and vertically. The's imaginary guidelines or used to place important visual elements. Points of interest. The rule of thirds means that the subject isn't centred in the image. Instead, the main focus point is off to one side, drawing the viewer's eye into and around the composition instead of allowing it to just rest in the center where you decide to place the horizon line can have a profound effect on the composition. Straight across the middle is generally not a good idea is that slices the picture in half on this usually looks visually unappealing. Raising the horizon line lifts the island, giving the viewer a bird's eye view of the action. Looking down on the subject, the view has a feeling of supremacy and power. Lowering the Horizon line takes you down to a worm's eye view, making the subject mawr imposing and powerful on making the viewer feel small and insignificant. Think about the proportion of positive and negative space in your picture. Large amounts of negative space around a subject produces a light, airy feel. Less negative space on an object packed tightly into its frame feels mawr intimidating and imposing. The angle of lines in a composition can create a specific mood. Horizontal lines create car relaxed imagery. Vertical lines imply energy, vitality and drive. The Haganah lines give a sense of movement and action When placing objects in a composition . Odd numbers always seem to work better than even numbers. For example, thes three bottles create a more visually appealing composition than these four bottles. Creating space and depth in a composition is important. Also, we've learned that we can create the illusion of depth by size, where the larger objects appear closer to us and the smaller ones appear further away overlapping. Describing objects traveling back in space and tone, dark tones appear closer. Paler, lighter tones appear to recede into the distance. Sometimes it's important to indicate scale in a composition. For example, is this a tree in a landscape? It's only when we introduce the snail. We can see that it's actually a blade of grass. You scaling your artwork to tell a story. He's a useful compositional guidelines to follow. But don't be afraid to break the rules fully you instinct, it's usually right.
10. How to hold a pencil: of course you know how to hold a pencil, but holding a pencil to draw isn't always the same as holding a pencil to write. We're taught very early on that there's a right way toe hold a pencil. It's known as the tripod grip. The pencil is held near the tip with the film and forefinger, creating a triangle with the middle finger. The wrist is kept pretty rigid on often rests with our hand against the surface on. We grip the pencil firmly in order to create even and controlled marks. But when drawing with a pencil varying, your grip allows for more mark making possibilities and therefore greater creative freedom . Dry holding the pencil higher up with your hand on supported, you've got more flexibility and freedom of movement on your marks will become looser and flow more easily dry, resting your little finger on the surface. This is good for looser sketching on preliminary drawing, where lines may need to be altered and corrected. Then there's the overhand grip, which enables you to use the side of the pencil lead as well as the point. This is a really good hold if you're working vertically at an easel, your hand is positioned above the pencil, which is gripped between your thumb and forefinger. It allows you to move not just your fingers, but your hand. Your wrist, your elbow on your shoulder. Drawing with your whole arm influences the marks that you make on the paper. Just like the conductor of an orchestra. This energy creates expression and rhythm and delivers a lyrical, passionate quality to your lines. That just doesn't happen. If you are rigid, intense even when you are drawing detail, keep your fingers hand and wrist relaxed on the march you make will flow on dance into your work. Some of these new grips might feel odd when you first start to use them, but persevere before long. They'll be second nature on like everything in art, it just requires practice.
11. Eureka! Bringing it All Together: Now let's put it all together. On draw. I found a mark because they've already drawn a mug on the Macal because we've already drawn on Apple to No, let's doorframe. It sets off boundaries for us. I'm holding the pencil away from the tip because I'm drawing shapes lightly. The shape of the mug is rectangular with rounded ends. We're going to make that a settlement shortly. The apple is a surgical will make that into a sphere. The mug has a handle and it'll sits on a table. There are grooves in green wooden table. We head off to a vanishing point. This is our composition. Just get a nice point on my pencil. The apple has a stork. I'm going to make it bigger. I can because it's my drawing and I can do what I like. That's the nice thing about drawings. You can make him into whatever you want. With a firmer, darker line, I'm making the sheikhs more definite. Even the surface of the tea inside the mock is a shape with shapes in place. I looked to see where the light is coming from because this will give the shapes for it's coming from the left, you can see the reflection in the shine of the app. This means that the right side of the mug is in shadow and he's darker than the left, so I'm shooting it in. Inside the bog. The shadow is on the left, where is hidden from the light. I'm also putting a shadow on the handle. The right half of the apple, which is a sphere, is in sugar, and there's a dimple in the top, which is also each other. The stork is actually a little cylinder and also has a shade side. I'm building up layers of tone with my pencil, making the shadows darker and turning the two dimensional shapes into three dimensional forms. Oh, I must shade in my tea drink. The apple and the mug appear to be sitting on the surface of the table. They need to be casting a shudder. Putting the lines on the table heading back to the vanishing point creates the illusion of space. With everything in place is simply a case of refining your joy, adding more tone on detail until you're happy with the result
12. Final Thoughts: good work. Now you get a solid understanding of how all works. Here are a few tips. Well, this is your June. Don't compare yourself to anyone else. This is just for you two. Don't be afraid to make mistakes. Mistakes are creative. Gold dust, in fact, positively encourage them. Mistakes will take you down. Paths you didn't even know existed. Three. Forget the rules in art. There aren't any full. Remember. Drawing is a skill you already possess. It's a basic human instinct. Five Enjoy myself.
 Martin Thompson MA(RCA), Art is for everyone.