Transcripts
1. Introduction: Hi, I'm Bethany of Lunesta Art. Welcome to my skill share class of learning to draw. Today, we're going to be focusing on learning to draw the basic forms, which are the cube, the cylinder, the cone and sphere. And today I'll take you through the steps of each one as well as common drawing instruments . Afterwards, I will show you how to set up your very first still life from objects in your kitchen, in your pantry and things you confined at home. I did graduate with a degree in art from Houston Baptist University. I learned drawing design. I loved watercolors in printmaking. They were they were wonderful. However, drawing is the best place to start when learning how to become an artist. You use it for everything, I swear, if only because you need to sketch to make sure you know what the heck you're doing. Where you're going with a piece, you really need to learn how to sketch effectively, which means you have to draw effectively. So I'm teaching the four forms as the basic foundation of art because it helps you to learn how to draw what you see. Everything around us is made up of the four basic forms either distorted there colored, but they're there. So obviously probably the clearest example is cubes in houses rectangles, which is a distorted que if you know how to draw these four objects, uh, it will help you look at something and see it clearly enough. You can get it onto a page with some realism. A stress light not light versus dark, but your light source. How light is interacting with the shape. If you know how to do that, you'll understand better what is happening when you're just looking at an object. So it's light is moving. Light is travelling, Light is coming from a source hitting an object, and then parts of it are getting blocked, and it's important to know why and how that will look on a piece of paper. Before that, though, I'd like to tell you a bit about the tools will be using today some common artist drawing tools. If you can tell me the difference between an HB pencil and a to be and you know what a kneaded eraser is, you're in good shape. However, I will also have some tricks and just a couple of things you may not know. I hope I've caught your interest. I hope you're excited to draw because it's fun. I love it, so let's get started.
2. Drawing Tools & Tips: Welcome back. I'm going to talk about some tools of the drawing trade here. Like I said before. If you know what sets artist pencils apart from normal pencils that use in school or mechanical pencils, you're probably in good shape. But you can still watch for a reminder. Also, be covering a few tricks. I learned that I really think will help you with your drawings. So if you had no idea artist pencils or even a thing, then you were in the right place. So we're gonna play a little game called What have I got my drawing bag? Okay, so the first thing in here is probably guessed it. Artist pencils I use for a fee in pencil. Now, on the outside, they look much the same as your ordinary pencil. Apart from the big difference of they have no eraser. You raise the do so very important function and art from fixing mistakes and lightning to dark values. However, what really sets artist pencils apart is this little number here, if you can see it. This one is a four b pencil, and but the scale goes from let me see something like two h 28 or nine b. Now the reason they label them is it's indicating how soft the lead inside the pencil is. So theeighties is done here at the really hard end of the scale. Will have really light values and then the bees. They're getting into your softer ones. So they're easier to get real dark much quicker, because the lead inside is softer. Nine. Bees. I didn't even know they made nine seasons like a month ago. The ridiculous cause. Eight. These are are like you sneeze and there's black graphite everywhere. Maybe not sneezing, but you get my point. I like to work with. There's a 2 to 5 p just ah, for kind of in general, especially if I'm sketching sketching you. I like it to be a little looser, so that helps me not just stay in these set lines, you know, really light set lines. Now these will. The graphite will spread. You can rub it to to smudge it out for reference. Your ordinary yellow number two pencil in school that's around an HB. That's kind of the center of the scale. H, B, F and H. They're kind of your mid toe light normal ish kind of pencils. Next thing I got in here is an Altoid tin. It doesn't have also I did it. You should not eat artist utensils and shouldn't eat our tools. And I'm pretty sure more than one artist has died for extent. Lee doing that, they with paints and yeah, you know. So I do have an eraser. This is a stetler, Tomorrow's plastic erase or just a, uh, pretty utilitarian Whitey racer. So you can see mine is quite dirty. Uh, if you if yours gets sturdy, you could rub it on. You know, that really ugly carpet they have in public schools. The blue model stuff. Well, actually, if you wipe it on that, it's ugly enough. No one will ever know. It will take thesis much marks right off it. Or you can have, like, a spare piece of scrap paper just on your desk. You know, scrub, scrub, scrub, and those little eraser shavings will come off. That's what this stuff is. So that's how you clean your eraser and then this some of you probably artist familiar with this is a kneaded eraser and these air cool. These are like my favorite racer because they spread and they are really erasers. You can, uh, you carefully scrubbed with, um, as you can your general kind of erasure. What they're good for, however, is dabbing not that No, no, just don't. Uh but you could mold it into shapes into points. So say you have a really fine detail. You can mold this here into a point and just kind of dictated to take off really light really focused, uh, areas in your drawing. They're also really fun just to do this Like your board. This is very relaxing. It feels like Tiki tech. Uh, it is a little sticky, like ticky tack. So if you just throw it in a case, if I just threw it in this fabric bag here, it would pick up all this fuzz and quickly become useless, like once. It's hard and brittle and full of fluff. It doesn't really take up drawings anymore. So I did finally find one with a case that I can close. It's fun. Uh, you can tear apart. You could mold it together to clean it. You just do what I'm doing here. You just smoosh it all around until the graphite you've picked up has disappeared, and it should return to kind of this light gray color. When it gets older, it'll be, ah, darker grey because of all the graphite it's picked up. But this one's still pretty fresh. So I'm gonna mold it back in its shape, put it back in this whole box because I want it to last a long time. Yeah, these are awesome. I just love these. However, you don't necessarily need one. If you're just a beginner artist, if you'd really just want to learn how to draw the forms you don't like to die for. Need this. However, if you want to keep drawing and this is something you find you want to do in various forms , I would recommend one. They're very useful. Also, my little twit. 10. I have, uh, just a metal pencil sharpener. They like to sell these in pencil kit to find it like hobby lobby, Any kind of art store. Really? Michael's Juries are around. You know that one. I love them. Uh, so there's no casing to it, so you have to have something to catch it. Which is originally why I kept the Altoid tin. So erasers and pencils air like the two must have things apart from paper if you want to drop. Uh, now I have a couple of useful sort of extra things. You don't really need them, but they come in handy, have a sharpener here with case so that, you know, makes less mess. I like this shape mainly because it fits in my bag when normal, Bigger pencil sharpeners wouldn't I haven't Old makeup brush. Uh, this is good for getting all your pencil shavings off. I mean, you can blow on it. You know, just, however, then you run the risk of spit, which isn't really good for your drawings. That leaves marks also fair of people nearby. They may not appreciate it. Uh, so make up brushes. This was just a old one I had from a set. I never used uh, they're dense enough. They can just get all of that little girl and wipe it off If you really can't stand the thought of using something that is a makeup brush. Uh, either you don't have any old ones or you know your guy and you don't do makeup. Check your hardware store like seriously. Hardware store has some useful art things Russia's. They're used for sawdust or wood chipping, sweeping a table clear that would probably work Justus good. Or if they have any really dense, kind of fluffy paintbrushes, they might have some for special effects. But I'm not sure that those would work. Really? Well, I would imagine they just need to be dense so they catch all of those shavings and get them out of your way. You don't want eraser shavings on your paper while you draw, because if they get caught under the pencil, they will smear across the paper and the leave little marks that you actually can't get up . So you do want to be careful with that As you're drawing from the last thing I haven't you . I'm going to show you is Ah, it's a ruler. This also came in a kit you could just use your normal kind of ruler to, But mostly I call him a straight edge, so I don't really measure in art. However, straight edges can be handy, and that's what I have in my art bag. I hope you guessed at least what a few of these things were scored yourself some points in our little mini game. Next, I will talk about some useful tricks that you should definitely keep in mind as you draw. Okay, So before we actually begin our forms, I want to demonstrate why it is important to move your arm from your shoulder as you draw and not just from your elbow or your wrist. Okay, so here is drawing from the wrist. Here's drawing from the shoulder, so it's ah, bit different. And the reason for that is you are giving more motion from your elbow. It helps you to cross the whole page or even just a bigger space of the page with ah flowing line instead of that kind of jerky screw ble wrist motion. Sometimes you don't have the space or you're working real small like I'm going to be doing with the forms. But even then try and move from the shoulder and not just from your elbow or your wrist. Of course, they're times we use these joints. They're good joints. Why would you not use them? They're part of your arm. I mean, however, you will get a nicer consistency in your lines if you move from your shoulder were more thing. But what we get to our cube, see, when you're drawing, I want you to draw your lines with the shape of the object you were drawing. So if you're drawing a flat surface like the surface of a cube, you'll be drawing straight flat lines. If you are drawing the curve surfaces of the cone cylinder and sphere, you're gonna use curved lines. So practice that if you need to just in the corner of your page, but definitely use your curved lines. As you can see from this example, your curved lines will make your I think this is a curved surface and your eyes picking up on the flow and the the shape of those lines. It's a very useful illusion when you are drawing. If all you have is like a mechanical pencil or normal school yellow pencil and it's Robbery Racer, that's fine. Uh, I just wanted to make sure that you understood what these tools conduce. Oh, how they can be used and how they can be helpful if you want to continue learning to draw. So that's all of our tools and a few useful things to remember as you draw, and now we're ready to tackle the blank page. I really need to watch what I say.
3. The Cube: Okay, Welcome to your first actual lesson class. Uh, and welcome to my drawing board. As you can see, there is nothing on it which at times is very scary. So if you're afraid of the blank page, don't be old. Well, I swear almost every artist is I certainly am at times we're gonna push past it and we're going to start with our first form, the Cube. I'm going to start with the Q because, well, let's face it, we should all know how to draw Cuba. At this point, we're very least a square. It's also probably the easiest shape for you to check yourself there. So many matching lines. In fact, it's all matching lines that you can look at it as you draw it and go, huh? It doesn't quite look right. Why? And you go well, let me check against this other line. It should match so mine. A pretty straight. But this top one, it doesn't quite look like that bottom one, which it should. So I will just try it again. Now, perfect square will have four sides that are all exactly the same length. However, the anything perfect is hard to do with just your hands so you can just eyeball it and try your best. And, ah, the first step of our cube, the square. And now, since we're making a three D object, we're going to draw another square. So if you need help, put your pencil on that corner right here. Go over, Go down. Dreadful Dutch. Okay, that's gonna be another corner, the corner of your second square. Now, your second square is going to be as close in size and shape as your first square. It's almost like if you were on a computer program and you give you copied a picture of a square, you would drag it up. And over there we have our little squares and just you would pick it up and drag it over. Now, this second square it's gonna be in this case is gonna be the back. I'm gonna make it the back. If I wanted it to be the front, I could do that too. It all depends on how which corners you connect to each other. But I'm gonna make mine the back of my cube now to make the cube itself. You just connect all these corners with straight lines. Now, those three lines I just did. They should all match, so they should all have the same angle or roughly the same angle. And I'm going to include this one. You can't see this one. Like, if you're looking at it opaque shape, you would not be able to see this line or this corner. We're actually even this one. This whole, I guess. Why shape right here you wouldn't be able to see unless it's an open box. Then you would just see this corner. It's our next step. Actually, it's to erase it because I'm going to draw and opaque Cube. So I just take my eraser and he raised it. And if you want to be racing parts your line, that's OK. Can just headroom beckon. Okay. How many of you can see the cube raise your hands? I'm gonna be optimistic today and say, Oh, look at all those raised hands. Okay, I'm going to draw on Open Cube. So actually had this line back in. If you want to draw a solid cube, I will tell you how to do that afterwards. It's very simple. The first thing you want to think about after you've drawn the outline of your shape is where your light is coming from. This is one of the most important things to think about at the start of a project. Any project, because your light is going to direct your shadows. It will influence your shading and your values, as we will see in a minute here. So if you're doing real life, you'll have really life light source. So take the video right here, for example. We do have a light source, the sun coming through my window, and it's coming from that way. Over there is the sun and you Comptel here on the board is much lighter than here on the board. So the sun is coming these way drawn imaginary arrow here. And so it's hitting, say, the spiral on the paper. First, it's kind of glancing over the paper cause it's not directly on it, and the book itself is in the way of it. So you got a shadow right here. It's the darkest where there is less light, so right next to it, and then you can see a kind of fades or graze out as you get farther away. So we're going to do that same process here on our cube to tell myself where the light is coming from. I'm just gonna draw narrow, saying okay, like the sun. It's just gonna be coming straight on this way. So what does that mean? It means that the light will be hitting this side of the cube first, which we can't really see. So that's gonna be our brightest one. Somebody the outside of this panel right there, the side of it. And like the paper surface here, it's just gonna glance over this front of our cube. So I'm going to shade it in with one rather light value. Because of all the flat surfaces, you're just going to use single values. When our shading in your cube do you notice I'm going over it again? Just evening out those values and then I'm actually going to this way too, just to make it smooth. And to get those bottom and top edges, you see, got kind of screwed Lee from just going the up and down. I'm just going real lightly over not a lot of pressure there and then cleaning up those stream marks that got away from me. Okay, In a few hours, you know, you can still see lines. You can kind of smooth it out with your finger. Yeah. See? Right there comes off. I'm using a B pencil, by the way, which is relatively in the middle. It's gonna be your ah, the be with the hardest lead. But it's still, you know, relatively dark is a little darker than an HB pencil. Okay, now back to our light. So lightest side there, which is hidden from us. Ah, this will be the lightest side we can see. And so none of the light is making it to this backside or this other side, because that's the back None of it is making to this other side here because the rest of boxes in the way. So this is going to be her darkest side, the dark side of the box. Just make sure you fill in all those little nooks and crannies that your pencil may not want to go into it first. There we go. Okay. So our darkest side So that just leaves the inside of the box. Like I said, I'm doing an open box. Ah, if you're doing a closed solid box, you would just fill this in like you did these two sides here and you would be done. But we're not going to do that. That's just too easy, even for a box. So to show the depth of the box say, this is a cardboard box. This inside here like this side isn't getting any light cause it's being stopped on the outside. So I'm going to draw up and down these vertical lines. You have to make some horizontal ones you know, to fill in those edges. That's fine. But mostly you want your eye to notice the's up and down. It's going to fool our brain into thinking, Ah, it has depth. Okay, now the back here, it's Ah, like this one. It's just getting the light glancing over it. Unlike it, though, it's being stopped by the site here, so it's gonna be a little darker. We're actually going to Grady ate it a little bit, so this is gonna be my darkest corner again. I'm going to do the up and down vertical lines starting off light. That's okay. Most forms of arch. It is perfectly fine to start off light because you can make it darker. It's a lot harder unless you're working with a really opaque medium like oil paints. For instance. It's a lot harder to make things lighter once, if you get them to dark. Okay, smooth out the top here. Okay, so that's a pretty respectable box right here. But the gradation were about to add Will make it, you know, even look a little better. So this bottom or more inward part of the box, you just go over a little harder with your pencil. Now, over here is gonna be a lighter, cause more light is seeping in through the open cover. Okay, even smooth that out of bed. Now, if you're dark Sega too dark like mine kind of did right in here. You can either lighten up the rest of it, or you can take a darker pencil. Go for five b to really drew. Exaggerate my point here. And just think that a little darker, okay? And you have a very lovely bucks. There is one thing I'm forgetting. Go back to my be here. The shadow. If you have a light, then you will have a cast shadow. So for a box, it's very simple. We're still relying on our matching lines. It's coming straight on at the side. I'm going to do straight edges, and the top of the shadow here should match this angle. So if you can't get it right, you can measure it with your pencil and just scoot it on over. I've seen some people, you know, or some of my students. They'll just do a straight down here and it looks a little funny here. So say you just do that. Doesn't quite look right, does it? Looks like the box is skewed toothy to the source of the light. So, like the light would not be coming straight on to make this shed. It would be coming on like this way, I think. And that would change. You know, the light and the values of their other sides, your bucks. So your brain, I would be telling you that doesn't look right, that it just looks off. Even if you couldn't pinpoint why you would realize it looks off. So you want that at more of an angle, and so it should match. You're the top. Your box there mine is a little off, actually, be more like that. But now I'm getting nit picky, so I'm gonna stop. It's good to know when to stop and to shade in the shadow. He just want a nice solid value. Now, it's gonna be rather dark along this corner here because this is where there is absolutely no light. No light is making it through there. So it is. It will be the darkest part of your box of your drawing, and then you can actually soften it as you get more towards the far edge here because shadows you if you notice if he doesn't look at him on the ground, they get softer the farther away they are from their source. Okay, so now all that is left is to clean up our edges. I would recommend you clean up edges at the end. Unless you like, make a big, goofy mistake like you go a see, Then you can erase that or get a new piece of paper, depending on how hard you drew it, because you may end in your paper. But otherwise, I think you should save most of your just, uh, cleaning up for the end that way. You are, you know, stopping every five minutes every five seconds, sometimes to clean up your edges. So there you have it. That is how you draw a three d looking box with pencils. I hope to see you again. Relatively speaking. I guess since this is a video, I hope you will continue on to the next form, which I believe it should be. The cylinder. So soup cans. And that's all I can think of for cylinder shape scandals. Here we go. We got two different real life examples. They're funny how those air, like the only ones you can think of.
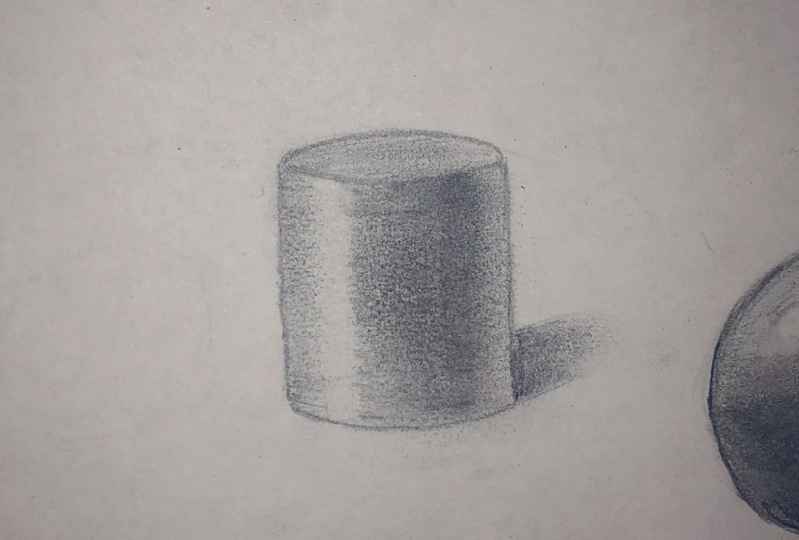
4. The Cylinder: right. So now that we've gone over the Cube, we're gonna move on to the cylinder. Cylinder has a few more rounded angles, however, like the Cubit shares a lot of straight lines and matching curves that you can match yourself with. So I start with just, like, kind of a real skinny oval. Remember to move from your shoulder like this is your wrist. This is your shoulder, and that will just go over it a few times until you find a circle you like. So So that's my wrist and, you know, eventually see, it's starting to even out Now here's a my shoulder. How can you get it a little bigger? And it's, I think, a little smoother and so on. So you get all these little lines here, you just There is essentially a circle in here that I see, so I'm darkening it. And then if I was, you know, doing a sphere of go back and erase the squiggle lines. But for the cylinder, yet you just use that for the top. There I loosely put in a bottom just beneath it, and now you need to straight down lines. Connecting the edges is a little hard because I'm at the edges paper here. Should I got in a bigger people? More good thing about small papers is you can move them all around. They're so these two lines will need to match. Okay, Now you can see the top of your cylinder, so I'm going to just smooth that out. However, the bottom you're only seeing the front, and this line here will match this line here. So I'm going to try it and you can see I totally botched that curves raise it. So I needed to match this line. So I'm just going to softly put it in there until it's more or less matches. It was a very slight curve. So my bottom one here is just very slightly turned. You can kind of still see, this is where the back is, but we don't see it, so I'm not going to make it darker. If you really need to know where it is, you can put in like a dash line just really gently so that you can erase it later. Now, again, we're going to put on our light source. I'm going to do the same as the Cube here. Well, not quite the same gonna angle it. So it's like sitting above it and coming down. Now the cylinder is all about stripes. And these stripes, they're going to match these two lines. So my light sources over here, then my highlight, the lightest part will be about here, and they match as well. So highlight. And that means shadow over here, where the cylinder is turning away from the light source. Notice again. I did not put the darkest shadow right at this line. There's going to be a reflected highlight here where the light is bouncing off. Whatever surface your imaginary cylinder sitting on it bounces back and makes this a little lighter. So highlight shadow. Okay, so now we're going to fill in our middle values. Now, when you're cylinder is done, you should not see these to illustrations here. That's just to help us. And remember to move with the shape of your objects of sense. This is a cylinder and its curved. My lines are gonna look a bit like this. So just practice kind of that half moon curving with your shoulder. I have to be here, but I'm going to lessen it into F for this highly for this light spot here. So just very gently adding in a very light value. This is very close to our light source. But it isn't right where it is the light of striking. And you just want one light, simple value. You can see I kind of have some, uh, not just curves, but they'll have some space between them, someone to try and even the mountain. Nice. And so just so I'll leave this white for now for highlight. You know, you can even use the white other page. Or I could even try and go even softer than this. But that would be rather hard. So for now, I'm just gonna work from the middle. Values over here is a little darker on the far side of the highlight, because it's going to the emerging with the darker shadows all the way down to the end of the cylinder. Over here. You got a little darker. Don't worry. A little striated neither. So right now we're just getting the values in the lines around the shadow. These ones here, they're gonna be a lot easier to cover up because you'll be using very dark values? Uh, yeah. Big Illustrated. That's okay. I'm just mellowing it out. Emerging values more together here. Very light pressure to get some of those dark spots merged with lighter. Okay, Now I'm gonna go back to the to be well, shadow find. Using the side of the lead gives you a little more fuzzier Come a line which I think helps when you're putting in values. Cause then you don't story about Thea, you know e So you got more like that. So they fade together a little truer. So right now it's kind of about the same. Darkness is the middle value next to it. So I'm gonna go over again, even go over again 1/3 time to try and get that darkness. I'm going to go over this far side rather dark as well. The reflected highlight. You can take it out with any racer, so don't worry about that, okay? Looking a little straight. It was gonna And with the tip here, you can get more pressure which can help you get a darker value. I think I got rather as dark as I could using the side of the pencil living with the shape. Now to try and get those. I used to follow it. Now I wish I could've got in this. They opened downtrend mellow out that really harsh, uh, kind of line that I didn't intend to make There. That's better. Now I'm going to use my kneaded eraser for the reflected highlight that you can use the plane Wide eraser. I'm using the needed one because I want feel foreigner shape. So I'm just gonna tap it up, done a little bit, go to lights a smooth it out just a tiny bit. Especially here where the racer was freshest. Another little darkness back next to it because the reflected highlight looks best when it's kind of surrounded by the shadow. Okay, now the top of my cylinder, like the cube here, it's just the light glancing sort of off the top of it of a flat surface. So it is one value just going to color that in. Okay, now we kind of have clean up time where he just get rid of thes smudges. You don't want the little lines. And that got out out of bounds. Like down here in this corner kind of got away from me. You can erase your light aero if you like. Oh, okay. In the last part, My shadow. He did not leave myself a lot of room here, so the best I can. So if it's coming down this way hitting here, the shadow is going to be kind of this way. It will connect with your corners. You won't see this over here, so draw your pencil over it without touching the paper so you can get that line. And since these two lines match and they're casting the shadow, the shadow lines should match. They should have the same angle he ran at a room which was shortsighted of me. But the top of the shadow would look something like this You rounded out cause it's following that roundness there hands and you just shaded in with one value. And since shadows get Lozier farther away, they get from us. You can even fudge that out of this so that it isn't just one hard line, okay? And that is the basics of the cylinder. If I could change one thing, I would actually soften these two lines around the highlight. But otherwise, uh, looks like a cylinder
5. The Cone: Okay, here we have formed three. Congratulations on making it halfway through your forms. That's fantastic. Okay, now onto the 3rd 1 because there is no rest for artists. The cone. Ah, the cone is a lot like the cylinder, except instead of matching top and bottom, you have one round bottom that sits on and two lines that meet up tough. Okay, so I'm finding Justin angle. I like for the bottom. It doesn't have to match anything. So it could be, you know, as sharp or shallow as I like Here, this is the This is the back of the cone that we don't see. So that's what we blocked by the rest of this. This line got kind of Missy. So I'm just going to do that. They meet at a tip, and this is important because everything inside the cone is essentially going to match this , including this tip again. My light source. It's coming from the same direction that we have been coming from. And like the cylinder, I'm going to mark out my highlight. Unlike it, though, it's going to go up and at an angle, essentially not meet the tip of the cone not quite all the way up, but very high. Okay, highlight. And I learned the same thing for the shadow here, so I made that one pretty wide swim. I'm going to make this one very wide to kind of match and see its matching this outer edge here. It's not all the way up, but very close. And down in this bottom edge here matches the curve of the bottom. Okay, show. I left space for my reflected light there on the outer edge. He race my outer circle there because we won't need it. Okay? And now becomes the same process of filling in your middle values. However, they're going to get narrower at the top. So you have to remember me. See, I'm gonna switch to these h this time h is very light. Was a very hard graft. And we follow the curve of your object. So kind of that crescent, half moon stroke. It is difficult in the smaller spaces. So if it comes out a little flat, that's all right. Just make sure that gets skinnier. Very narrow. With the talk, there might even just be, you know, like a couple of lines. Okay, you see a press too hard there. I'll have to try and get that out with. We needed eraser. You can see this time. Unlike the cylinder, I make sure to keep the inner the highlight ones. They're very light. You can see it fading away more just good. You want that? Okay. And here we have a little more room from press a little harder. Okay, that goes over the line. You're just marking working out your highlight territory, so to speak. Help. I've said this before, but it is perfectly acceptable to use more than one kind of pencil in a drawing. We have all those variance, so sure used them. So I'm going to switch back to my be here because it is darker, because this is going to be darker. You switched to the side of my lead to so my tips kind of getting a little undefined. I'm going to add in some of the darks now. I think just kind of down, you see, I could have done a much better job rounding out my light side. I will have to do something. Okay. His shadow. You're just really softly blurring thes middle tones so that they match more. This one. I'm not so much blurring. So much is filling in those extra spaces Snuck in there. Okay, can see. I haven't my core values. They're very straight ID. I'll smooth them out a little bit. Otherwise, I kind of like them this time. It's very sketchy. I like that. Okay, and it's a very light on the side, so I won't need much touching up for a reflected shadow. But I will add a little bit, a little touch with my kneaded eraser. Just honey Fitz. So it looks more like it was done on purpose, very lightly darkening this, do you think? Reflected by lights with best surrounded by shadow. Otherwise, I think they look too strong. I did say like the sketchy, but take just a few of the soften those lines so that they blend a bit more. Some of them are, Let's see strong. It took a little too much out, but hey, you don't wanna make this lesson too long. An a. An example of what not to do a perfectionism. It is very difficult not to finagle. Sometimes it's been cleaning up my edges very carefully, cleaning up the bottom because some study racers in the way it makes it hard to see okay and all the shadow to have your light coming this way. Here's your highlight. So if this is the brightest point in the shadows, when we kind of off behind it, you don't have to match edges so much with the cone. We just have to draw them to a point off behind the cone and make sure your ends touch the edges of the cone there, so it's a little more forgiving. You don't then the cube and the cylinder. You don't have to match as many edges, and I'm going to make this well, darker than I have been, so it doesn't blend in with the cone itself. Number shadows. It's, Ah, lack of light. There's something blocking the light from reaching that point, so if they're quite dark, they usually look pretty good. Don't be afraid of your darks. I was when I first started drawing like at school, I had a professor who was always telling me, push the darks, push the darks when I got out of school and tried drawing, you know, without anyone you know, Professor is watching over you either hovering or, you know, just watching. I realized darn it, I need to push like Tark's. I could hear the mantra in my head put Just push your lights and dark. So I recommend you to push your lights and darks as annoying as the phrase has become to me . But he was a great professor, So obviously you know what he was doing. I just wasn't very good at it in the beginning. So I'm getting better. And I hope that you will learn from my mistake and start off real strong in the beginning with your lights and your darks. Okay. And after this, we just have one last form, our sphere, which I do think is one of the hardest. But that's why we built up to it. You notice We've been getting curvy er as we moved along our shapes. So now we have reached the curvy shape in the next video. Hope to see you there
6. The Sphere: All right. Our last form, the sphere. I hope you're excited. Despite the fact that it is probably the most difficult. It is my favorite. Actually, this is how we started off. I swear, every art class I took in college, well, there was a picture of a sphere on the monitor or the chalkboard or whatever, and he had to draw it. So I have a lot practice with this one. Now, take your pencil. I have to be here. And, like I showed you before, you just wanna move from your shoulder, Go over your circle a few times until you see the actual circle looking circle within the mess. Oh, okay. It's not perfect. Freehand elements rarely are perfect. And if you look at real life, okay. If you look at organic life, you don't find perfect shapes very often. So oranges are lumpy. Cherries have that deployed. A stem comes out sea grapes, sir. Kind of overly naming food here. I must be hungry. Okay, that's good enough. Doesn't have to be a really hard to find edged because you're going to be filling it in. And you don't want your outer silhouette here to be that different from the mid tones you put inside. Okay, you can see it's not a perfect circle. That's okay. Again. I want to start with my light source, my imaginary light source. Now, like all our other shapes, what is inside will match this outside shape. So it's a circle. It doesn't have to be a perfect circles actually would be kind of oval. And that's just gonna be your highlight. Their you know, when a light shines on a ball or an apple or something, it hits one point, and then over here is gonna be very light over here is gonna be very dark, not gonna add in a silhouette for the dark. However, I am went to lightly draw in. The midline of this sphere is giving a very slight curve. And I will show you why when I start putting in the mid values, that book's there we go Looks more shook, gonna switch my pencil like I have been doing when he's f very lightly going around the highlight. So here I'm matching the outer edge of my sphere from here on tree, seeing around highly before moving into my circular motion very lightly. doing all this. Okay. Here. It's just one Nice motion. You don't have to change English. You know, the highlight makes you want to do this on this site. But actually, you want to follow If you're outside shape in your outside shape over here, still doing this, so go back. But then it gets really shallow here. This is the middle, right? So you're almost me straight right here. And then you're gonna switch directions can be bowing out this way to match your sphere. Now, this is my shadow side. Something a little darker again approach at midline and switched direction lighter over here. That midline a little more parent you can see because I'm using the side. It's getting real fuzzy outside, and that's okay. Kind of helps around it out, and we can always clean it at the end. So now I'm going to move on to my to be put in more shadows. Actually, I'm gonna go harder this time is still pretty hard to be Pencil Someone used for B so I can get dark real quick and easy. It's just kind of this crescent almost here. Gonna make this very dark Lumbee in my shadow. You see, I didn't go to all the way to the edge, but I will go and dark in the edge. This will be my reflected highlight. Hey, here. This isn't be feel my mid tones, So not as hard pushing there. Make sure you keep up your semi circular kind of motions to match your shape. Your matching the contour of your shape, the outer edge. This is where I switched direction very lightly. And see, it's not really doing much at all, Which is okay. It's very light of here. Could be a little darker. That one. Yeah. Be careful when you put pressure on your tip because it will leave really dark, hard lines like that. Now, over here, it's not gonna be this outer edge here. It isn't going to be your highlight, so you can make it a little darker. Okay, that's looking quite good. I like that. I'm going to even out the rough pencil marks, so I like them to be smoother. You can see with the soft pencils, so the four b you can really see the feel of the paper underneath. Now my highlight got a loss. So I'm just going to come back here and dab it out with my normally racer. And since I think this girl dark, just dab it real light around it. You often have a really hard spot, you know? Think. But then around it'll be softer but still lighter. But then, you know, say, over here, Dabdoub deducted. If I get to light, I can go back with a light pencil and put some of the darkness back in, or even rub it out of it. Okay. Same thing here from a reflected highlight face. And just gaze my normally research Deb, Deb, and smooth it out a tiny bit. Okay. Gonna clean my edges. Okay. Sounds just stuck. Always anything. Okay. And that is my sphere. This may be one of the shortest videos. However, I said it was the hardest object, and, uh, those of you trying to do it, it's essentially all you're doing is this curved line over and over and switching when you reach the other side. So what makes it difficult? I find is trying to get these values right. It's too dark trying to get it, get them to bleed into each other, and that is difficult because there are no hard lines inside the sphere. So the Q Buchanan, Watch yourself the cone and the cylinder. You match your highlights and your shadows to the outer edges. The sphere. You just kind of have to keep working at it until it looks around, and that makes it difficult. So don't give up your first ones. Probably. Well, look, is there a nice word for funny looking cause they're gonna look a bit like that, But that's OK. It took a lot of spheres. It's even get close to this. It's OK. That's so now the shadow. Okay, so since there are no hard outer lines, I'm going to just gonna come this way. It's kind of just, you know, an idea of a round shape, see kind of slight curves to your sides. They hoop around and meet. Okay, here is something to remember, though, right here, where your shadow meet your ball. There is no light here. This is where the ball is touching the table. So this here is your darkest point of your whole drawing. No light is getting through their. So you make that the darkest you can make it like practically black, almost black, that pencils never really reach black closest you can get, and then you lighten it out like the mid tones of the sphere itself. He just have toe bleed them together until you reach over here, which is still a shadow, so it's still relatively dark. But down here is darkest, so you just kind of go over them until it looks like a shadow and I'll clean these edges to very carefully. I don't want to take a chunk out of something I want to keep. Great. So next class I'll go over just a little bit how you can use these basic form to create more complex forms such as people, animals, trees, things you see every day. And then I will explain your class project, which I'm actually very excited on.
7. It All Takes Form: Welcome back, everybody. So now that I've showed you how to draw each of the forms just out of your head, the basic rules in steps I do want to take a moment to show you why thes forms are so important. Eso I'm going to show you how these forms build up more complex forms like this rabbit with its carrot cute little bunny. And hopefully you'll get into the practice of seeing these forms and shapes in the rial life objects you want to draw. Okay, So, as you see here, we have a bunny and it is very cute and adorable and with so much white, it would be difficult to draw. However, how many of you now that we've drawn the four basic forms can see those shapes in the rabbit. So you've had, ah, better minutes of look at the bunny. So let's start with the most obvious very circular reddit. So there's actually two circles here. It's very hard to see because of how the bunny is myelitis butts, actually two circles. So the head and then the body here Now you only draw the circle for the general shape. However, knowing how to knowing how to shada sphere helps you know how to shade in this rabbits. You can see starker along here kind of a little bit there and over here it's very light. You'll shadow there. Okay, now what other shapes can we see years Or rather, cone like triangular. So is this carrot. The point has just disappeared in the bunnies mouth because he's a hungry bunny over here. His leg will be part of a circle, cause the rest is hidden by his body. This I guess I would call that a distorted cube. It's more rectangular, for one thing, however it does have, he sighed, and then it gets rounded, so it's very distorted. New often see distorted shapes in real life or photographs compared to the perfect shapes that we have been drawing. Next up, we have this zebra cult. He is easier to see with his darker stripes on the background, very light background, so on she take a few seconds and see what shapes you can spot off hand. So I always like to start with head. So the 1st 1 I really sees kind of this circle in his nose, and then the rest of his head. It's a very interesting tapered rectangle. It is not quite a cone because it doesn't come to a point. And it's not a cylinder because the sides aren't parallel. So I would call it somewhere between a cube and a cylinder because it does have some rounded effects, especially with light. However, he has very flat sides. Horses and zebras do, so they'll have like a kind of a straight nose, and then there cheeks will go up and down. You can also see a rectangular kind of shape in his neck. Now, when you're drawing bodies, usually you rely on a lot of circles, so you'll see it in the front of their body. And then, obviously here in the rump and horses and apparently zebras have very knobby kind of knees . You can see more circles down there. These would be is his wrists or ankles and then horse legs very straight, so they're more obviously the rectangle cube shape. Now, these upper legs, you can see more clearly on these three, so one to three their wider at the top. So these are actually kind of a triangular kind of shape. This one will be, too. It's just the angle you're at. You can't see that. It's growing wider here, so rectangles and triangles are very prominent hero and the most famous triangular shape. I found the ears. I'm hoping you're starting to get into the hang of it, of seeing the shapes within the big shapes. Here we have a fox, and unlike our rabbit and zebra, he has more of a background. So let's see what we find in him. We find circle, but then his nose, his muzzle is more of a cone. They're in a lot of lumps in his body, so it's beginning to take on that rectangular shape. Legs its tail. Really, I don't think it has a hey basic shape. We recognize. However, it is very tubular, which I would put with the cylinder family now the background very big and obvious, yet cylinders. They look rectangular when you draw them just over the image. However, look at the light here, the dark coming around. Then the light hitting. Over here, the light is reacting with a cylindrical object instead of the very flat values of a cube object over here so dark, hopefully you can see the dry erase marker. The highlight. Okay, now how about what he's standing on? Let's see here. See lines like that. So there's a semi circle, which would be half of sphere. So let's see what the light is doing here. It's going like this in curving up. Same here. Here. It's more dipping in. Then here it's rather flat. So you got some light parts there and some foreground dark parts here. How the light is reacting tells us a bit more about the shape, so this is obviously the spherical shape. Like I said, to get the dark moving like that, you have, Ah highlight here. It's lighter over here. Here. I would call these. I'm not sure what difficulties, because they're very organic. Like I said, I showed you how to draw the keep your forms over organic forms. Obviously they change. It's more natural. It's very odd. Shapes like very odd. Have you ever thought of a nose and shape? It's weird. I mean, it has to be described by light more than shape, but it's very weird, very organic. It's just not something you find, except in a nose. So organic shapes that get very strange, which is why it's important to know how light effects a surface, which we've learned by practicing reforms. So these they're more straight. However, they have some curves in them, so I can't really call them a shape. In particular, however, learning the shapes will help you understand how to draw in light and darkness. When dealing with these very strange organic kind of shapes, I have one more for you. It is a tiger, but more than that, it is the face of a tiger. The last few animals I've shown it was their whole body, so you can see the big shapes that make them up. But faces are very intricate, so they have a lot of shapes in themselves. So the first obvious one is the I is very circular, and then usually there's the part around the eye, not just the eyelid, but you have tear ducks. You have the skin around your eyes, so that's usually kind of a teardrop shape, especially if you include the tear ducts here, and a teardrop would be a distorted circle. Teardrops lead down to the nose, usually so his nose. His tigers have very broad noses. His other. I would be over here somewhere. I think so. You can see it. It's a very shallow cylinder, like almost the side of a cylinder. If you unfolded it and rolled it out, you to use thes very shallow curve lines to define his nose muzzles very oval pretending the rest of tigers there. But noses at least for tigers are triangles. You can see the edge of his head so you can tell from that curve very strong her. And because we know heads air rather circular anyway that it's the start of a circle. Some of you may be wondering, Well, this is all well and good, but how can I use this for myself? I'm not going to show you that as part of the class today, but I did want to give you an idea of how you can build these shapes to make a drawing. So our pictures showed us how to see the shapes, and now I'm showing you how to put them to use. So I started a horse here. I like to start with head like I said. So I began with the circles of his nose. I added his ears and here you can see his body and legs. Bodies were very circular. They'll have at least one, but animals often have to for the chest. And then the hind quarters like you see here, just going back now, adding some more of those Kurds to better define the horses shape. And here you can see how putting in those basic shapes is helping me to understand where I should be defining the horse. The legs got a little messed up and sketches that happens, not just with legs. Everything can get messed up. It takes quite a while, which is why I don't show the whole drawing here. And learning my basic forms has helped me to understand how to shade in the horse, which gives it a much more lifelike appearance. So you've heard me talk about throughout this lesson how knowing these warms will make you a better artist. And this is essentially why knowing how light interacts with these different services helped you when you're drawing more complex objects or animals because you know the basic rules that the light is following. That's why I greatly encourage you to practice your forms, especially before your project, which is your very first still life
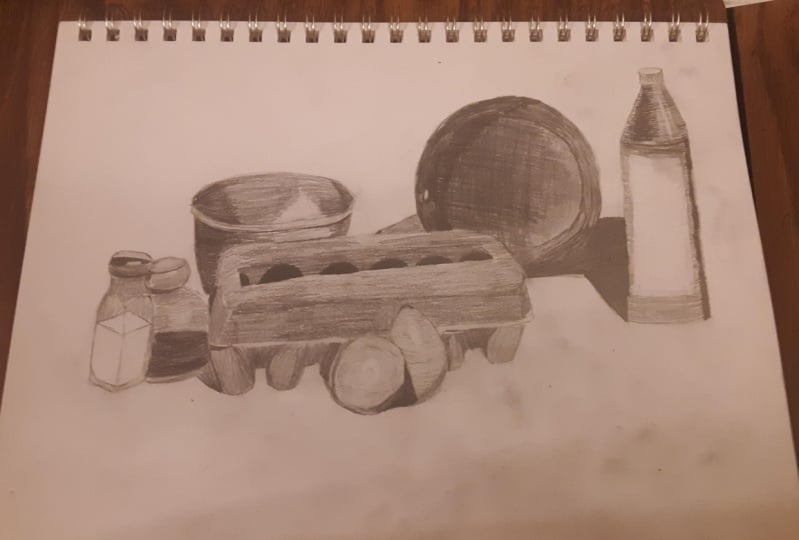
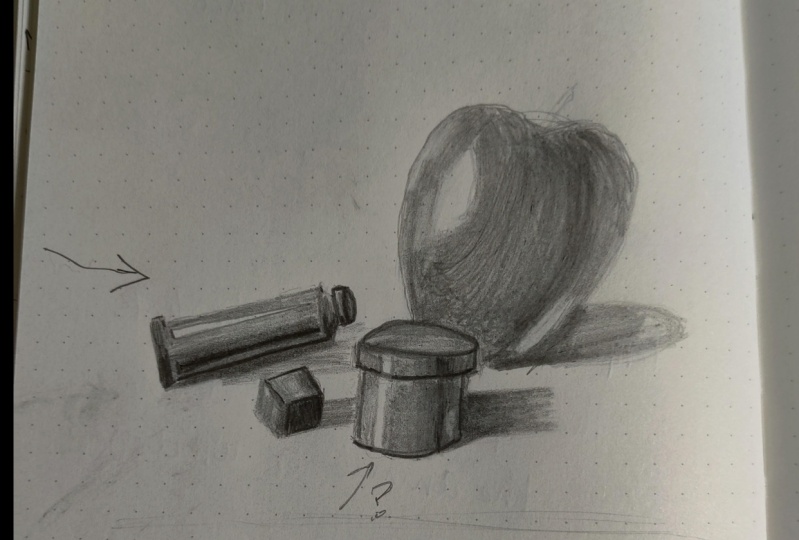
8. Cherry Picking Your First Still Life: and now it's time to talk about your project. Oh, I've been very excited for this. So what I want you to do for the class project is go to your kitchen and your pantry and find four examples of the forms that we've been drawing. So believe me, there there, I didn't have too much trouble finding forms. For the most part, where are all the common sheep foods? But if you need to expand your search to other rooms, then go for it. I know you have these forms somewhere in your house. I've also included some reference sheets that you can download just down in the main description. And that being said, here's what I found for my still life. I found an empty oatmeal container for my cylinder and a large great period for my spear, a set of salt and pepper shakers that were shaped like Christmas presents for my cubes and some funnels for my combs. Now, setting up a still life might sound very daunting, so don't panic. It's really not that difficult. Here's some ideas, though, for how to put one together with your objects, you can use shapes of various sizes you can have things spilling out of a larger container . You can lay things on their sides or even upside down. You can late things over each other. You can cluster them together to make it a more compact, still life. You can use shapes of various sizes. You can include matching shapes like my insulting pepper shakers. You should definitely move things around and find an assembly that you really like. And then, once you do, try viewing it from different angles to see if there's a certain perspective you really like. Once you have draw it. And that's your still live. Thank you so much for watching. I hope you enjoyed my class, and I can't wait to see all of your projects in the Project gallery. You should definitely go and upload them. And if you would like me to comment on them, please just ask. Otherwise, I can't wait to see you for more classes by
 Bethany Lindell, Author & Artist