Transcripts
1. Introduction: Hi everybody. My name is China and I'm a professional artist. I've been in office for around 12 years. And for me is one of the most imposing things. It helps me to meditate when I'm stressed. Host me to express myself when I'm feeling frustrated or creative. And I'm very lucky that I have the tools to be able to do that. One of the aims that I have with my students is to give them the tools to everyone is entitled to draw. So it's really important that you know where to start and you know where to progress. Now as a realist artist, I come across a lot of challenges. How do I make something look like the paycheck? How do I call in nature? In this lesson, we're going to be looking at the grid method. Now you may have seen this method you use quite a lot with professional artists and they do use it. The grid helps system break down the image into tiny little sections so that we can stop seeing the full picture. We just draw the shapes that we can see. Hopefully by the end of it, your drawing will come together quite naturally. And then he just felt the shading doesn't matter what level you're at. The grid method is really good for beginners and advanced level people. Well, you'll need in this lesson is a roller, a piece of paper, your pencil, and maybe a rubber. Now if you only have one pencil, that absolutely fine. But if you have more than one, then brilliant pencils, I use R to B, to H and a six week. These are really good for getting the definition in the shading and to find the joy ride the end. So follow the step-by-step guide and hopefully by the end of it, you'll produce a drawing that you're super proud of. You should be because at drawing isn't easy. And this method just really helps us to get us on the right track. This method has been used for century. So I really encourage you to give it a go and see what you can do to make sure you share your picture in the project gallery so that we can see exactly what you've done.
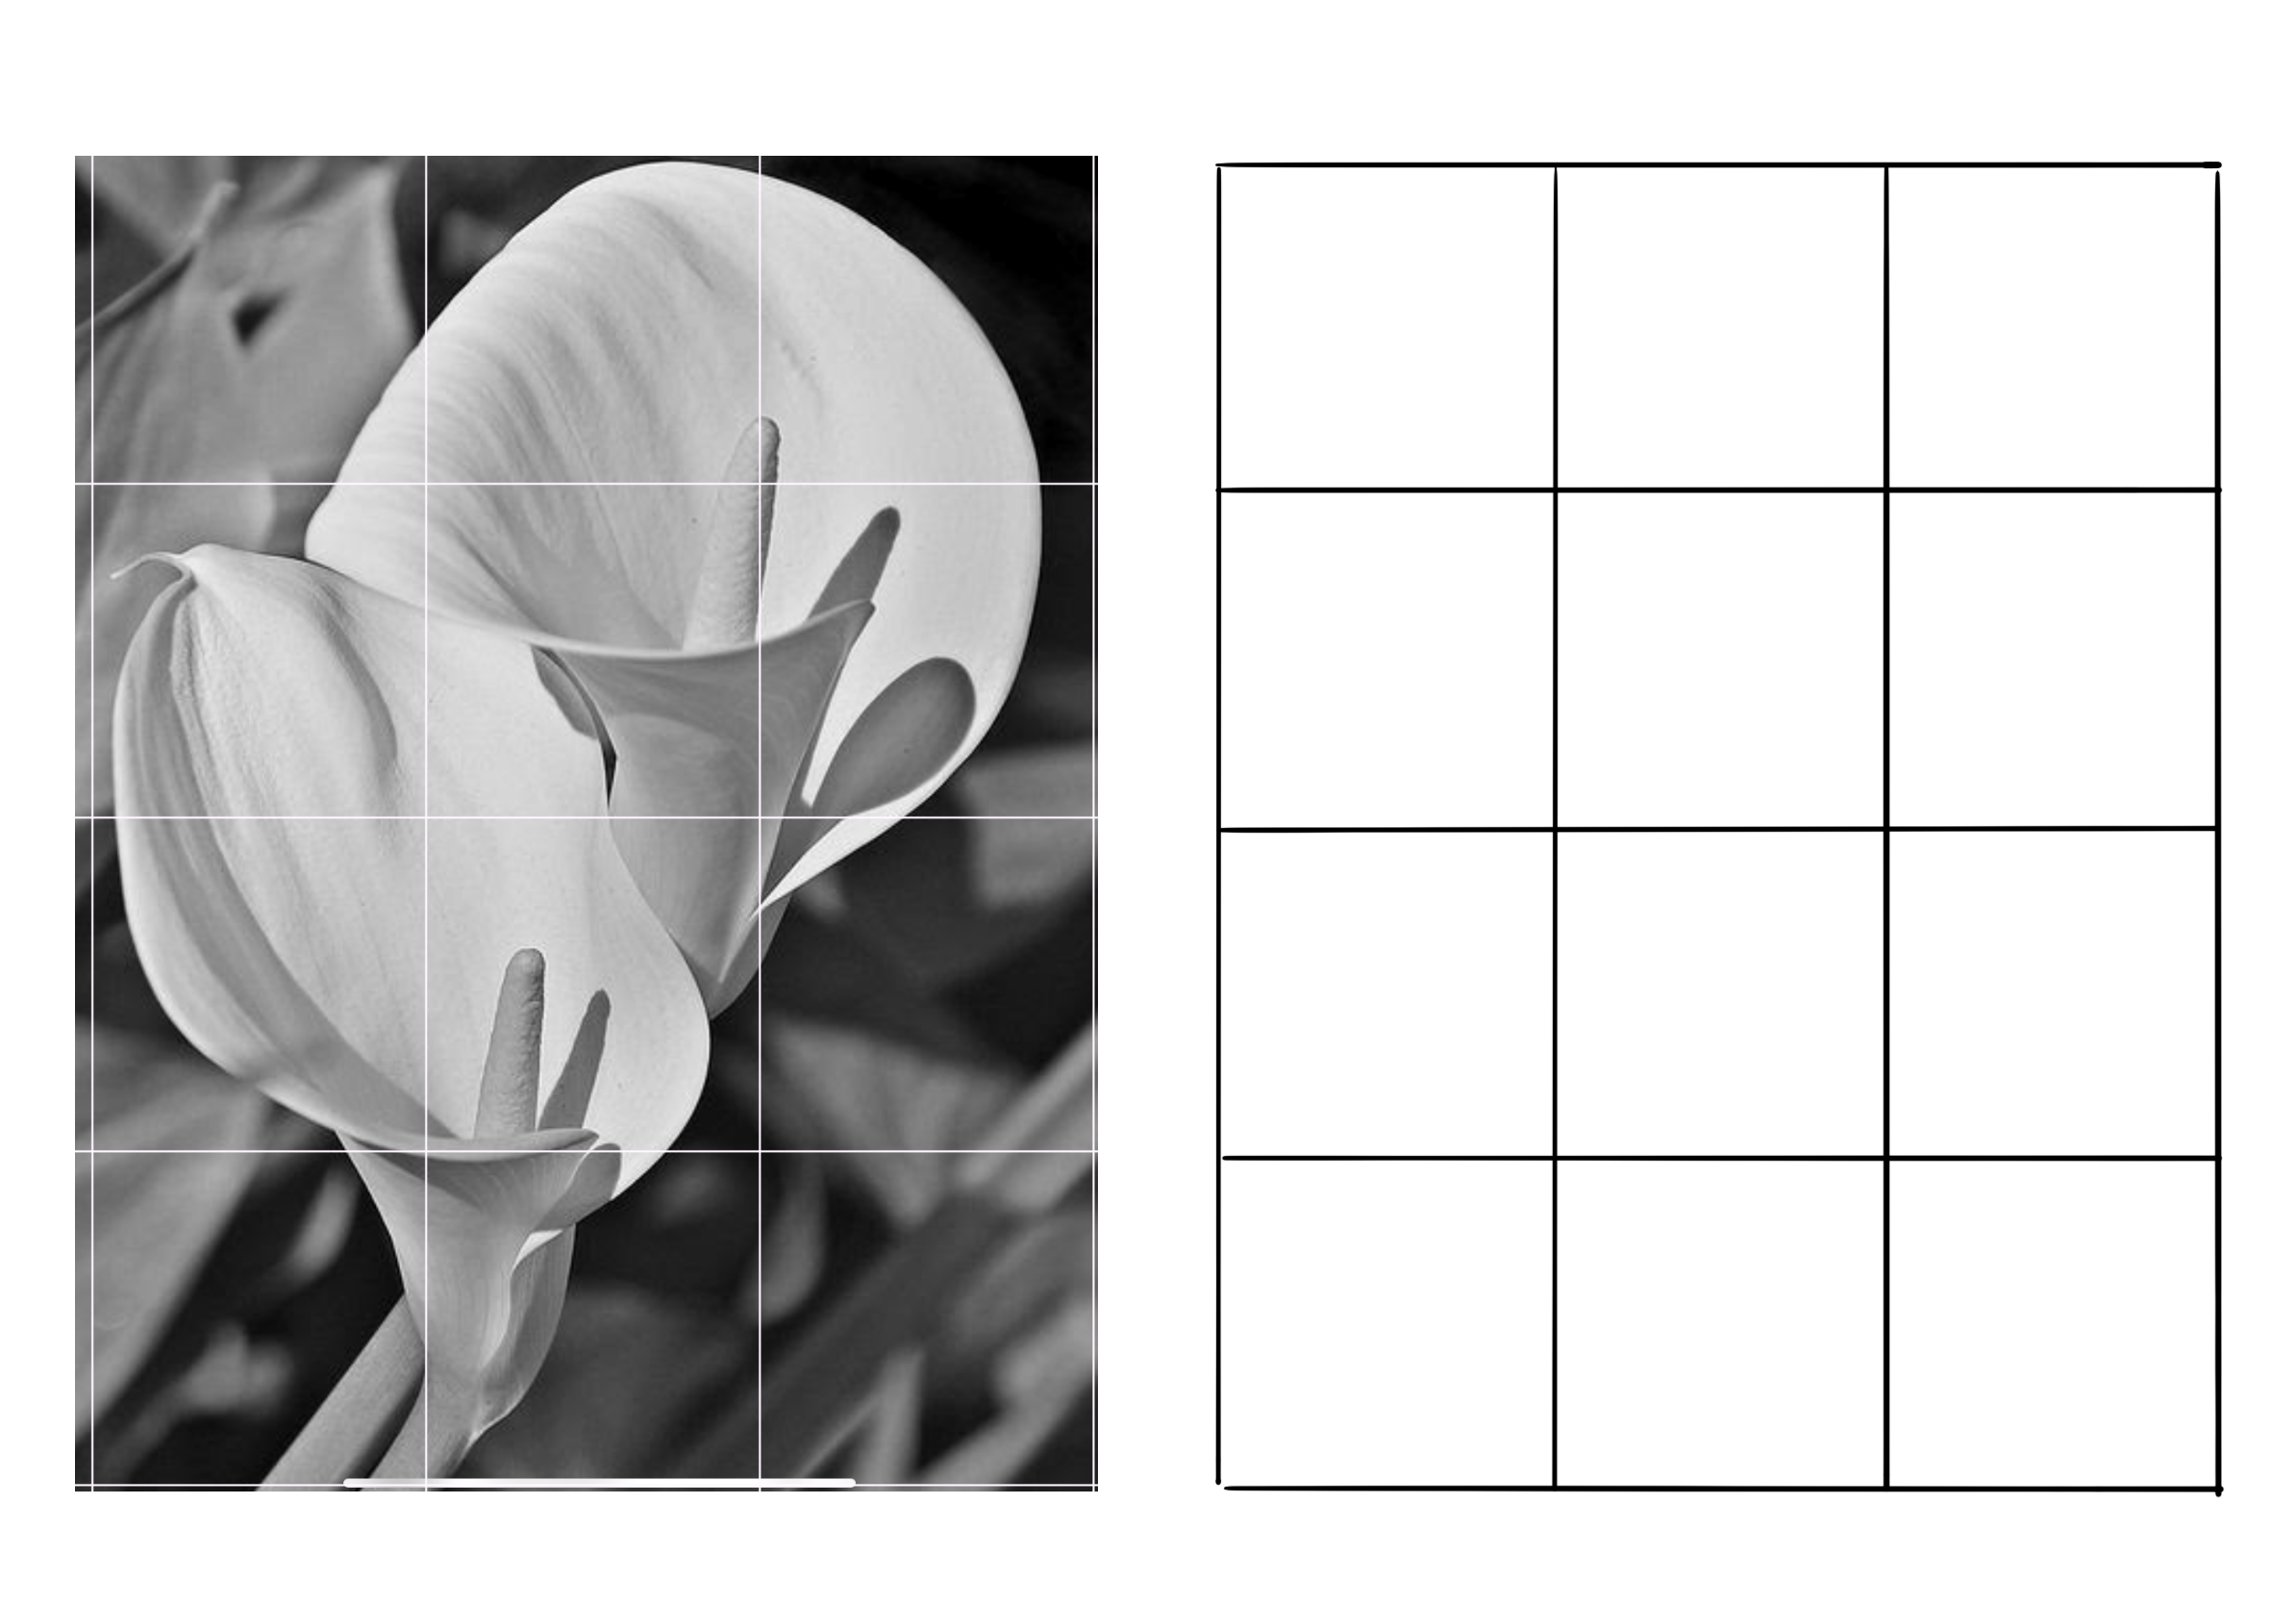
2. Step 1 - The Grid: So let's start by drawing. A grid. Is super important that your greatest squares and not rectangles. I've done it plenty of times where I've accidentally drawn a rectangle and my whole drawing is alpha portion. So spend some time getting that right. Grab yourself a roller and starts a puppet on the paper. I'm going to get four centimeters each square. 04812, down.
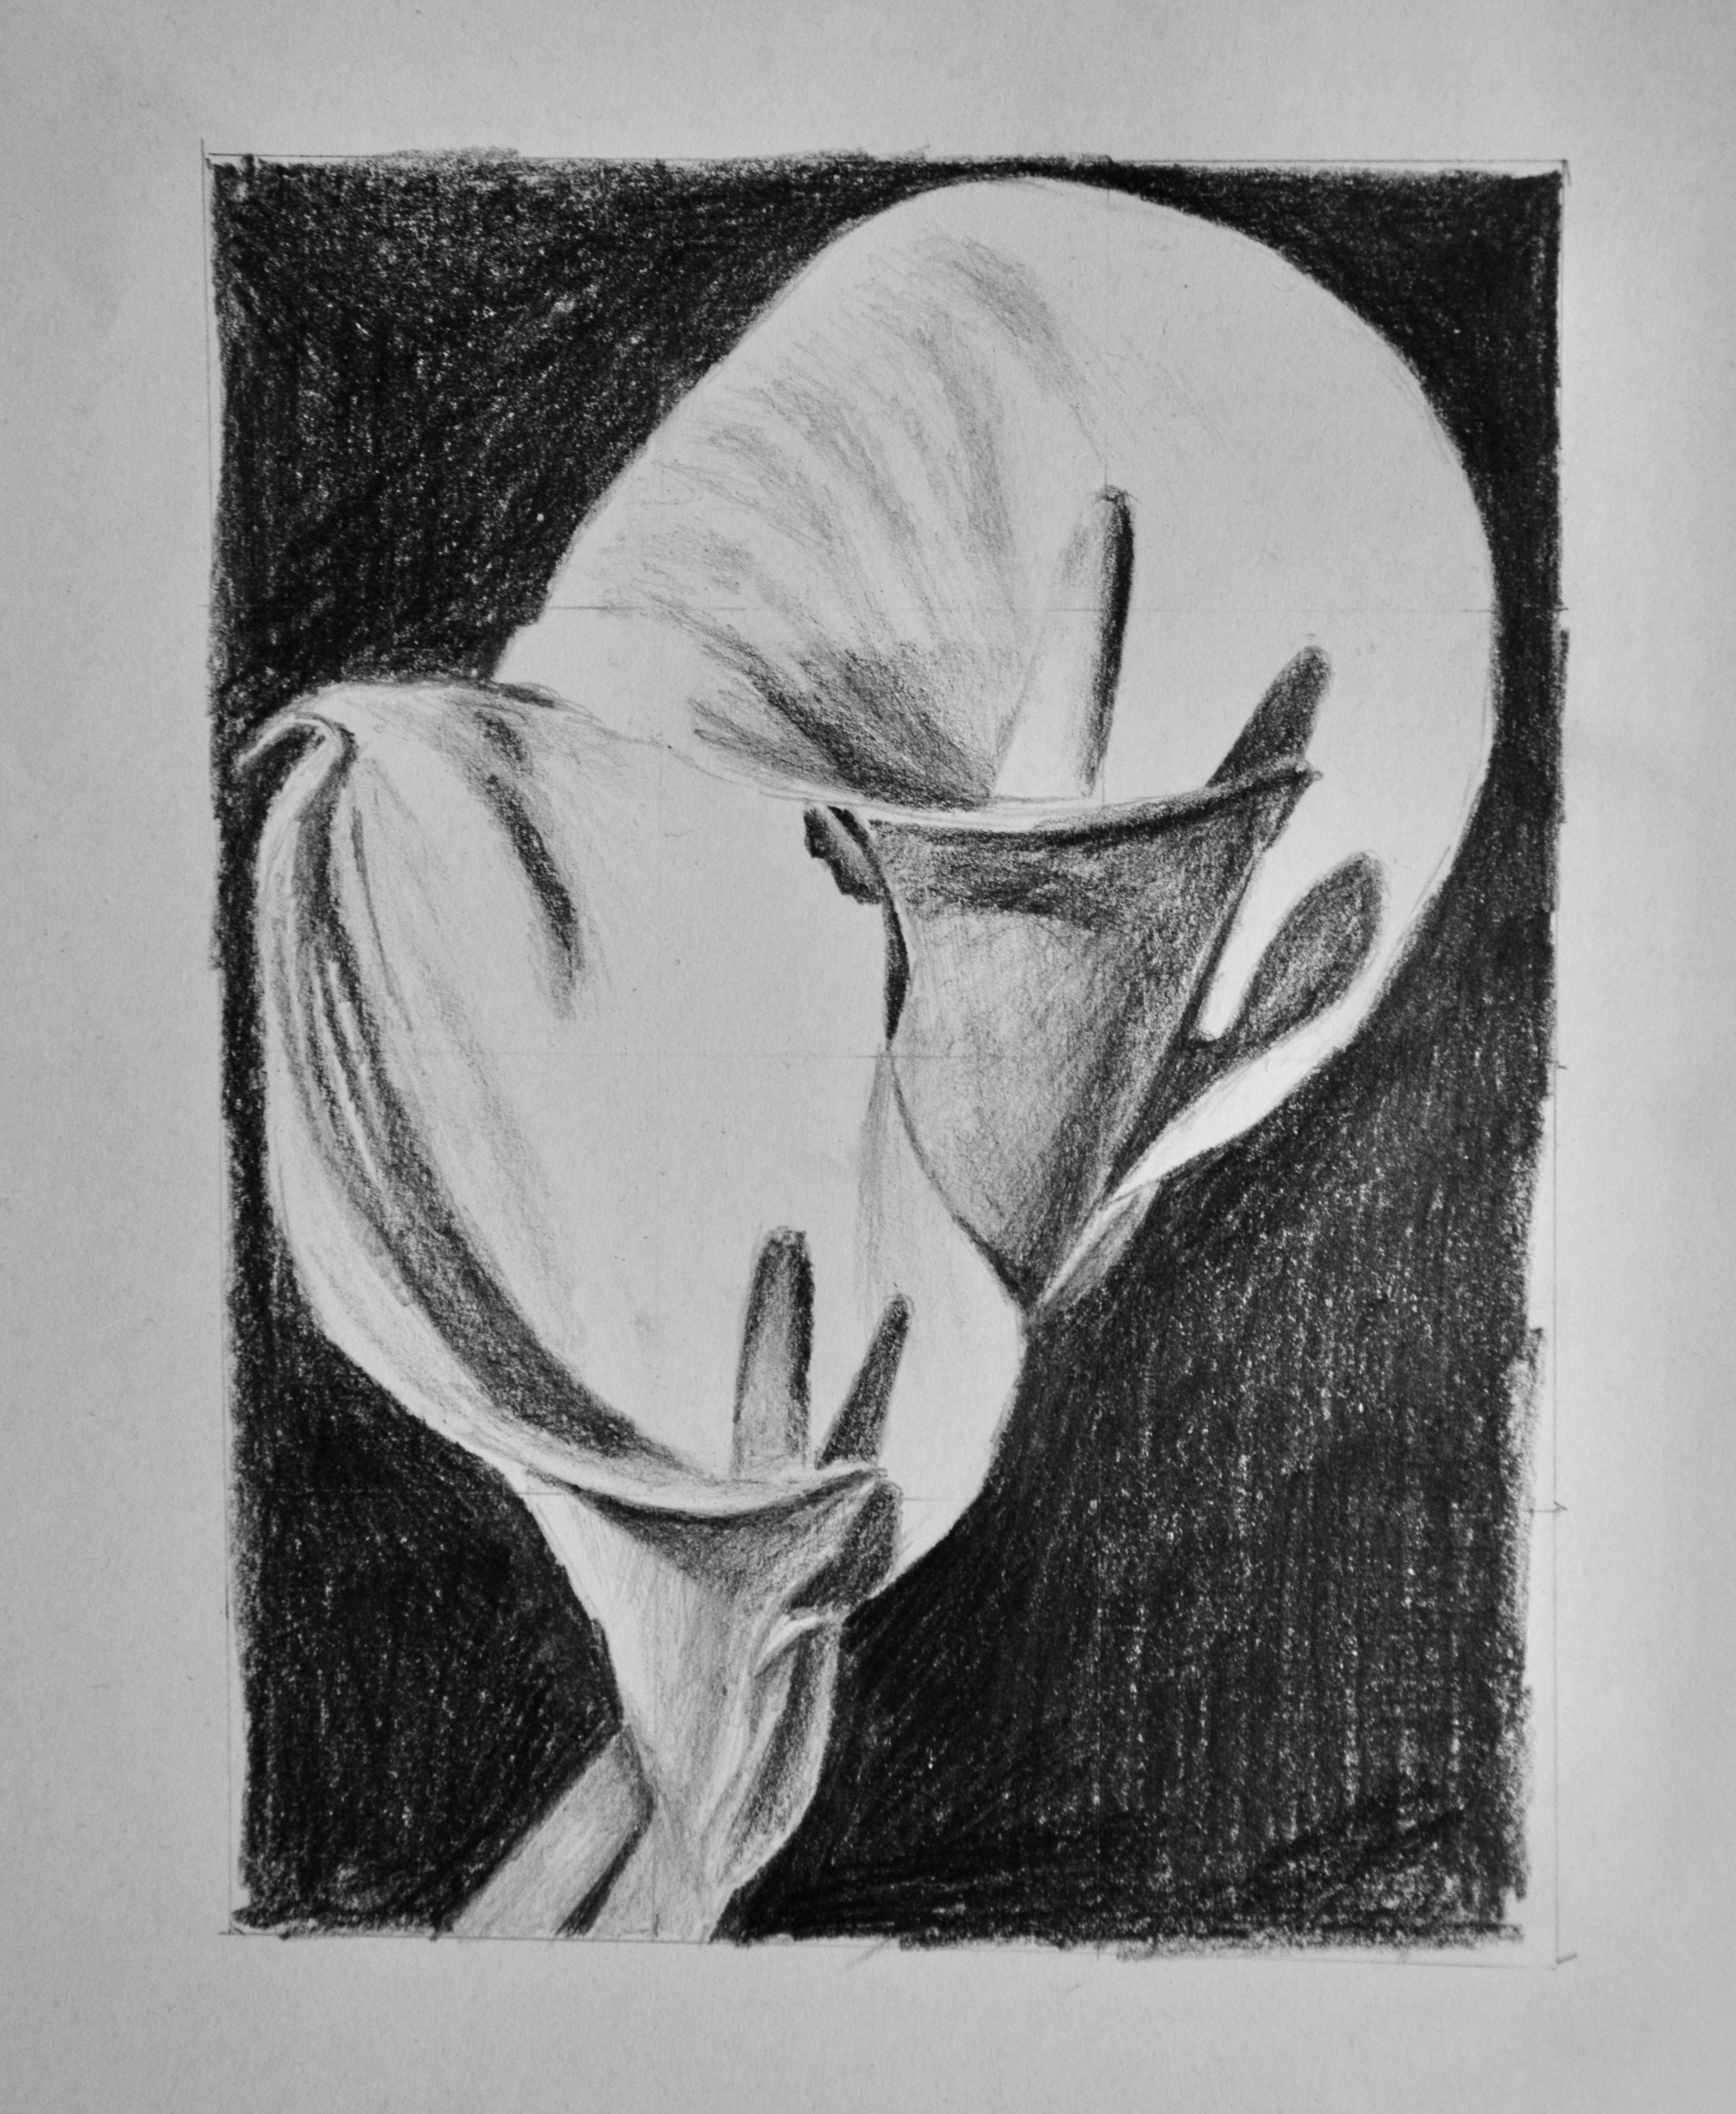
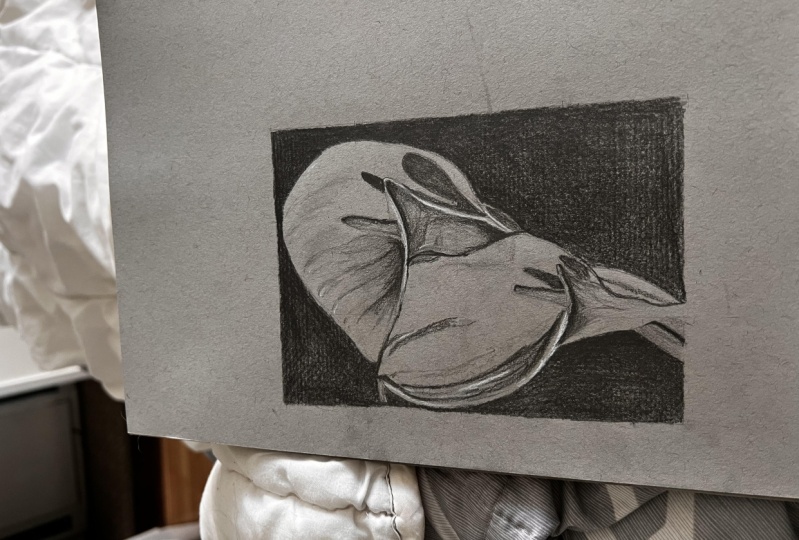
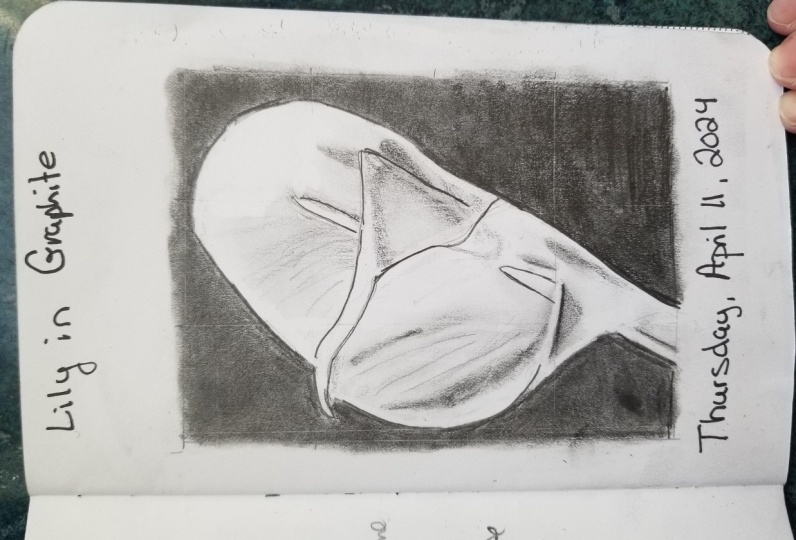
3. Step 2 - The Outline: Okay, great. So we've got grid there, nice and equal. And that means we can start off with a drawing. Now what we're gonna do is we're gonna do the outline first and then we're going to look at the shading. So that means it just makes it a lot easier for us to think about. And it's not too complicated when we start. Now, whenever we start to draw a square, there are two different ways that we can think about it. The first method is to think about junctions. So where do I have a line of the object into set in that horizontal line? And where does it intersect this vertical line? So where do those two lines meet? From the object to the grid? That really helps to kind of set up a potions and figure out all lines. Another way to think about this is if we have any trouble with the object itself, perhaps the object is very complicated and we keep seeing it for what it is rather than the shapes that it's creating. So we can think about positive and negative space. Positive space is the object itself. So if I'm thinking about drawing the object, that will be when I'm thinking positively. If I want to switch the way that I'm seeing, I could imagine the shape of the negative space. Usually that will be the background of this picture. So that's really going to help us to situate our drawing and to get our lines in the right direction. So I'll talk about that throughout this process and hopefully you'll pick out fairly quickly. Now, let's start with this top left square and let's think about where those lines that intersect in a horizontal and vertical grid. So if I think about where the line of this flower is chopping into this horizontal line. I can just make little gesture that. And then if I travel up the vertical line, I want to think, okay, is my junction halfway up? Is it slightly below? Slightly above? And when I look at the image is slightly below halfway. So it creates quite a steep little lines. So maybe this line is slightly too far out. Yeah, that feels a lot better. So let us move one square across to the right. And this is a good way to imagine negative space. So first of all, I'll get my junction on the other side, which is roughly that. And then what I'll do is I'll think about how high does it peak? So how far away is it from that top line? So there's roughly that. And you know, the peak isn't InnoCentive it slightly to the right. So that way, if I use my junction, pop into that line and then travel down and meets the other line in the other square. Beautiful. So we might want to adapt some of the lines later on, but at this point is just a rough God. Now, let's go into a stamen. So we've got a little bit. Thus, x and our y axis, we found the junctions. We just want to cut that down, that brilliant. So moving on to the right-hand side. And remember, you can go slow if you need to. If you need to go a bit quicker, you don't have to watch this whole process. That I'm gonna get my pace and feel free to pause, feel free to fast forward and do it yourself. But this guide is just here to help you if you need any, any help. Just adapting my curve there. Keep it nice and clean. And then all we do is get that stamen. Well, so that is a quarter done is super easy. So now let's move down one square. So again, I'm thinking about that junction where intercepts here. And it allows me to then think about this negative space. So actually, what shape is that dark background creating? Have I managed to replicate that in my own drawing? Great. And the good thing with this is, even though it's complicated, we actually have a lot of junctions. So there's a little junction there. There's one just above half way where the foreground of the flower comes. And then the is one where the stamen cause back in. Then let's get the curve, this foreground pestle. And then let's get this shadow. So how far is it from that horizontal line above? Where does it touch this foreground pestle? And what sort of shape? Trying to make. Get happy with that. And then just wanna come down for this shadow. Actually, if I create bit more space there, and I can create the shape of this big secular shattered. They're just clean that up. Okay. Okay, so that's the complicated squared done. It's not to say there's nothing complicated Next. That, that's our first challenge. And It's quite simple when you break it down into these big shapes and think about the junctions. Let's move down one more square and think about these junctions here. So one there, one there. And then we could join that up. So think about the gaps. How wide is it? Where's the widest point? Where is the narrowest point? And let's not forget that little cup there. Perfect. So if we move down one, there's nothing that we don't need to do anything. Now, let's move one square to the left. So another great example of positive and negative space. So I'm gonna get my junction, the Boston. And then I can just think about what shape is this actually that is incorrect. So I might need to adjust my whole drawing. Not my whole drawing, but the box on the right-hand side there. That looks much better. And you know, it's absolutely fine if it means that it's going to make my drawing more accurate, I'm more than happy to make those little tweaks. And actually I only changed a tiny bit, but it makes such a difference. So let's get the junction here. So a millimeter of beyond halfway to the right. And then hopefully that should make my curve nice and easy to get. And k so few junctions on this horizontal line there. So first of all, we've got the shadow, quite small. And then we've got the overlap of the PESTLE plus the lip of the PESTLE. So double-whammy in this area. Teeny tiny little shutter. Then I can use this line as a new junction. So where is the stamen situate in itself on that curved line that I created. So for the rest of the drawing, I want you to do this in your own time. Spent some time getting the outlines, keep looking at my reference if you need to. And then we will be able to work on at the shading brilliance. There we go. There is our outline. Hopefully it wasn't too complicated and you picked up quite easily. So now let's go onto the shading pop.
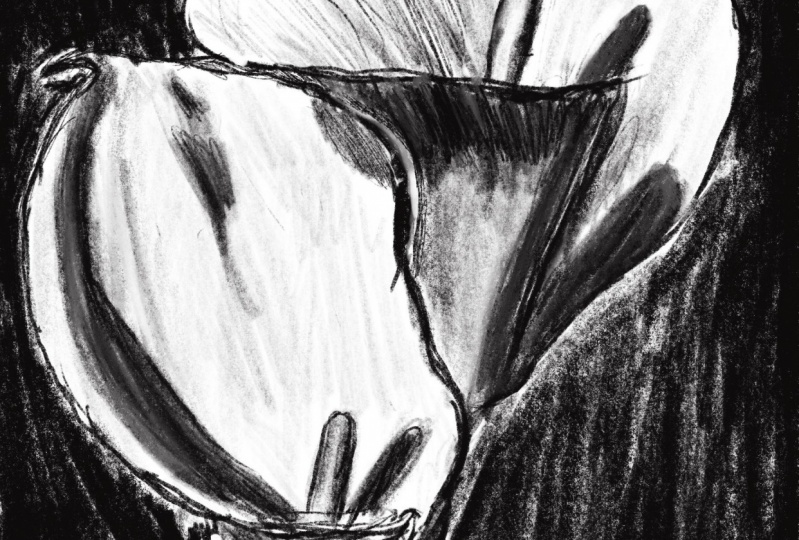
4. Step 3 - The Dark Bits: Shading, where do we start and what should we do first? Now in my experience, shading the darkest areas is always the best idea. And that's because our eyes like to see enlight and dog. If you've ever watched any of my videos, you will hear me talk about this quite a lot. So when we start shading, let's hit those dark areas first because our eyes are able to recognize this as a realistic image quite early on. So if we do anything or if we don't do anything else than at least do the dog bits. So let us start by adding an average shades. So not too dawg, not too light in our drawing. So in the shadows that the flower is casting on itself. And then from that we can begin to work in the lightest areas. So we want you to use your six B because this is our Docker pencil. This is the one that's going to reach those dark is Values. And hopefully start to put us in a really good place with a drawing. So with all those shadows. So no adding too much pressure on just nice and easily adding that shading in. Okay, great. So to fill in the dark areas and hopefully it was fairly similar to now. We can leave it that you can, you know, it makes sense. It looks like a flower, but I always like to push it a little bit more.
5. Step 4 - The Light Bits: So now what I want you to do is grab your 2B. So I wanted to use your 2B pencil and starts work in as light areas. So maybe it's not quite as shadow, but it is a little bit darker. Maybe is just off whites. And you don't want to add too much precious or this is a really excellent pencil to get all of those values in. So I'm going to start again with the darkest areas I haven't done. So maybe the middle of this flower, I think that'll be a good place to stop. And I just want to stop playing around with the values and make it show the I'm honoring how dark or how life is. And I'm not afraid to also put this pencil whether 6B has been as well. And that will just help to unify this textures because different pencils have different textures. So it's probably a good idea for you to just go over everything in this pencil. But take the time now to fill in areas and think about the way you are holding it. So as you can see on this section, I'm holding what pencil? Strongly between these two fingers, but it's just resting on the back of my middle finger there. That allows me just to use the edge of my pencil and just glide across. So now I've put that in. I can actually see how light my original shading was. So those dark areas I had and now super super light. So I'm just going to work on at the same time just to make sure balancing out those dark areas, I might re-introduce our 6V laser on just to make it pop even more. So what I want you to do now is work on those mid values are the things that are not quite whites. And a not super doc somewhere in between. Closer again is a bit more dynamic. We've got Doc, we've got grey and we've got mid gray. So what I want us to do now is to focus on the lysate areas. How can we very gently just touch the papers so that it's still coming to life even more. If we leave an area in one shape that it becomes very flat. So I want to avoid that. I want to make sure all the drawing is dynamic and interesting and has something to it. So spend your time now working on those license areas. So again, we're going to be holding a pencil very loosely, so that would not pushing too much pressure on the paper. And it's just very gently adding some, some shade. So you can see is kind of changing the whole perspective and idea of form when you add a little bit of shading in the y and just creates curves and shapes, bro, so it might tell you, okay, that needs to be a bit darker. So my stamen already needs a bit of a dark edge. So I want to make sure that I'm fixing as I go along.
6. Step 5 - The Background: This is really going to help to make that white stand out because at the minute we've got a wildflower on white paper. And it looks good. It looks cool, but can we make even coolers? So see if you can make your shading in the background even this is a challenge in itself. This could be quite therapeutic, Actually, just to color in the lines and really define those edges. Get a nice background in there and you know, hopefully it will really change your drawing and you'll be able to see it differently. Because often what people do is they'll spend so much time in a drawing that by the time they finished it, they come to hate it because they can see all the flows, everything that's in that is wrong with it. But usually they have done a really good job. So this should help with that almost imposter syndrome drawing gray. So I didn't the background makes such a big difference. Hopefully you've done yours. If not, I recommend it because if maybe you have a little bit of Penn of aggression to get out of that background. Therapy, therapy sick. So it can be finished again. But if you want to challenge yourself, let's push it even further. So let see what we can do when we want to improve our drawing at that is already quite good. And let's refine it. So this Fano stage is refinement.
7. Step 6 - Refine: In this final stage, this is purely for fun. Now you've done all the hard work you've measured out, you've got it on there. And why not make it puff? I wanted to make it better for me on my drawing. I need to improve the background. I want to make that nice and smooth. And the actual object is self. I want to make sure I'm making it as dark as it needs to be, where it should be. And adding all those details in the, in the rest of the flowers self. So I've now grabbed my H pencil. And this is a really hot sharp pencil. So this should really helped me to get into those little nooks and crannies where it needs a little bit of refining. And then hopefully it will make everything look nice and smooth. So you can either just six B again, just to really push that darkness, get it nice and smooth. And I'll definitely be doing that live in my drawing to but also your two, which is just going to help to get rid of all those tiny bits of white paper that are slipping through. Or maybe you need to get a nice clean edge. Wayo flower is. And because this pencil is super hot and super sharp, you can use that for finding the area to I2, which is also really good inside the flower. So for example, if I work on this shaded area, then you can see how it's just pushing it darker and darker without actually using a dark pencil. So rarely get to play with your equipment and understand what the properties are. Also, if I wanted a soft pencil, that would be my TB, that's what we use for the light areas. The two H's hard said has helped me to refine. And my six B is really dark, but really, really soft so often it can't give me the definition that I'm looking for. So these are the only pencils I really use in my drawing because it gives me the full range. I'm able to reach those doll connotes quite easily. And I am able to reach those MIT values as well. And it's purely from the pressure that I apply on my hand and the way that I hold the pencils as well. And you might have seen several different grips. So at the minute I've got a rightist pencil. And previously I had on his edge so that I could use the side of the pencil. So by playing around with all these different things, then you are able to reach all those different grades of the other pencils will give you. For the last part of this lesson, I want you to spend some time refining. See if you enjoy it, see if you don't. You might find that stuff this and you might actually not want to do with the urine drawing it. This is where your journey takes you. You've got to find out what you enjoy, what you're good at, what you hate, what you never want to do again. So I'm just encouraging you to do this just to give it a go and at least you can cross it off. Or maybe you're like, Wow, that was the most satisfying bit. And this is definitely the most satisfying stage for me. But that's my Jenny, and I'm happy to share that with you and I'm very thankful that you have watched this and share your drawing. I would love to see what you've done. I absolutely love seeing people's artworks. That's one of the reasons why, why we teach to see people improve. So by all means, e-mail me, put on social media or spread the word, tell everyone how good this lesson was. To show me what you did. So finally, what I want to do is just remove those little lines that were made for the grids originally. And then I'll have my wonderful accurate drawing.
 China Jordan, Art Teacher