Transcripts
1. How To Draw An Eye Introduction: Hello, my name is China and I'm here to show you how to draw a realistic by. Now. Maybe you've never Jordan I before, or perhaps you have any really enjoyed it. But you want to make it look realistic. That's where I come in. If you're anything like me eyes or your favorite thing to draw. And most important thing is that we are training our eyes to see. So what we wanna do is we want to draw what we actually see broader than what we think we can see. Often when we draw eyes, we know that they're roughly in the element size, shape, and there's a lovely circle in the middle. Well, in actual fact, there is a lot more complicated aspects within that. Throughout this course, we're going to take you step by step. We're going to start with a simple outline and build our way up from there. So don't think you're going to go into this stray and defend. You've got a chance to fix that. We use in our tools to really enhance the drawing itself. So we'll be using a 2B in API and a two-page. We'll be looking at all the minute details and which ones we decided to keep and which ones who decide to get rid of because we don't need them all. Lastly, we are going to understand the structure of the eye from the Face sheet, burn the eyebrow, and understand the foundation behind it. Throughout this course, you're gonna learn so much and hurtful. You pick up a lot of tricks along the way. Remember anything that you learned these lessons and you can apply to any aspect of your drawing. So good luck, and I can't wait to see it.
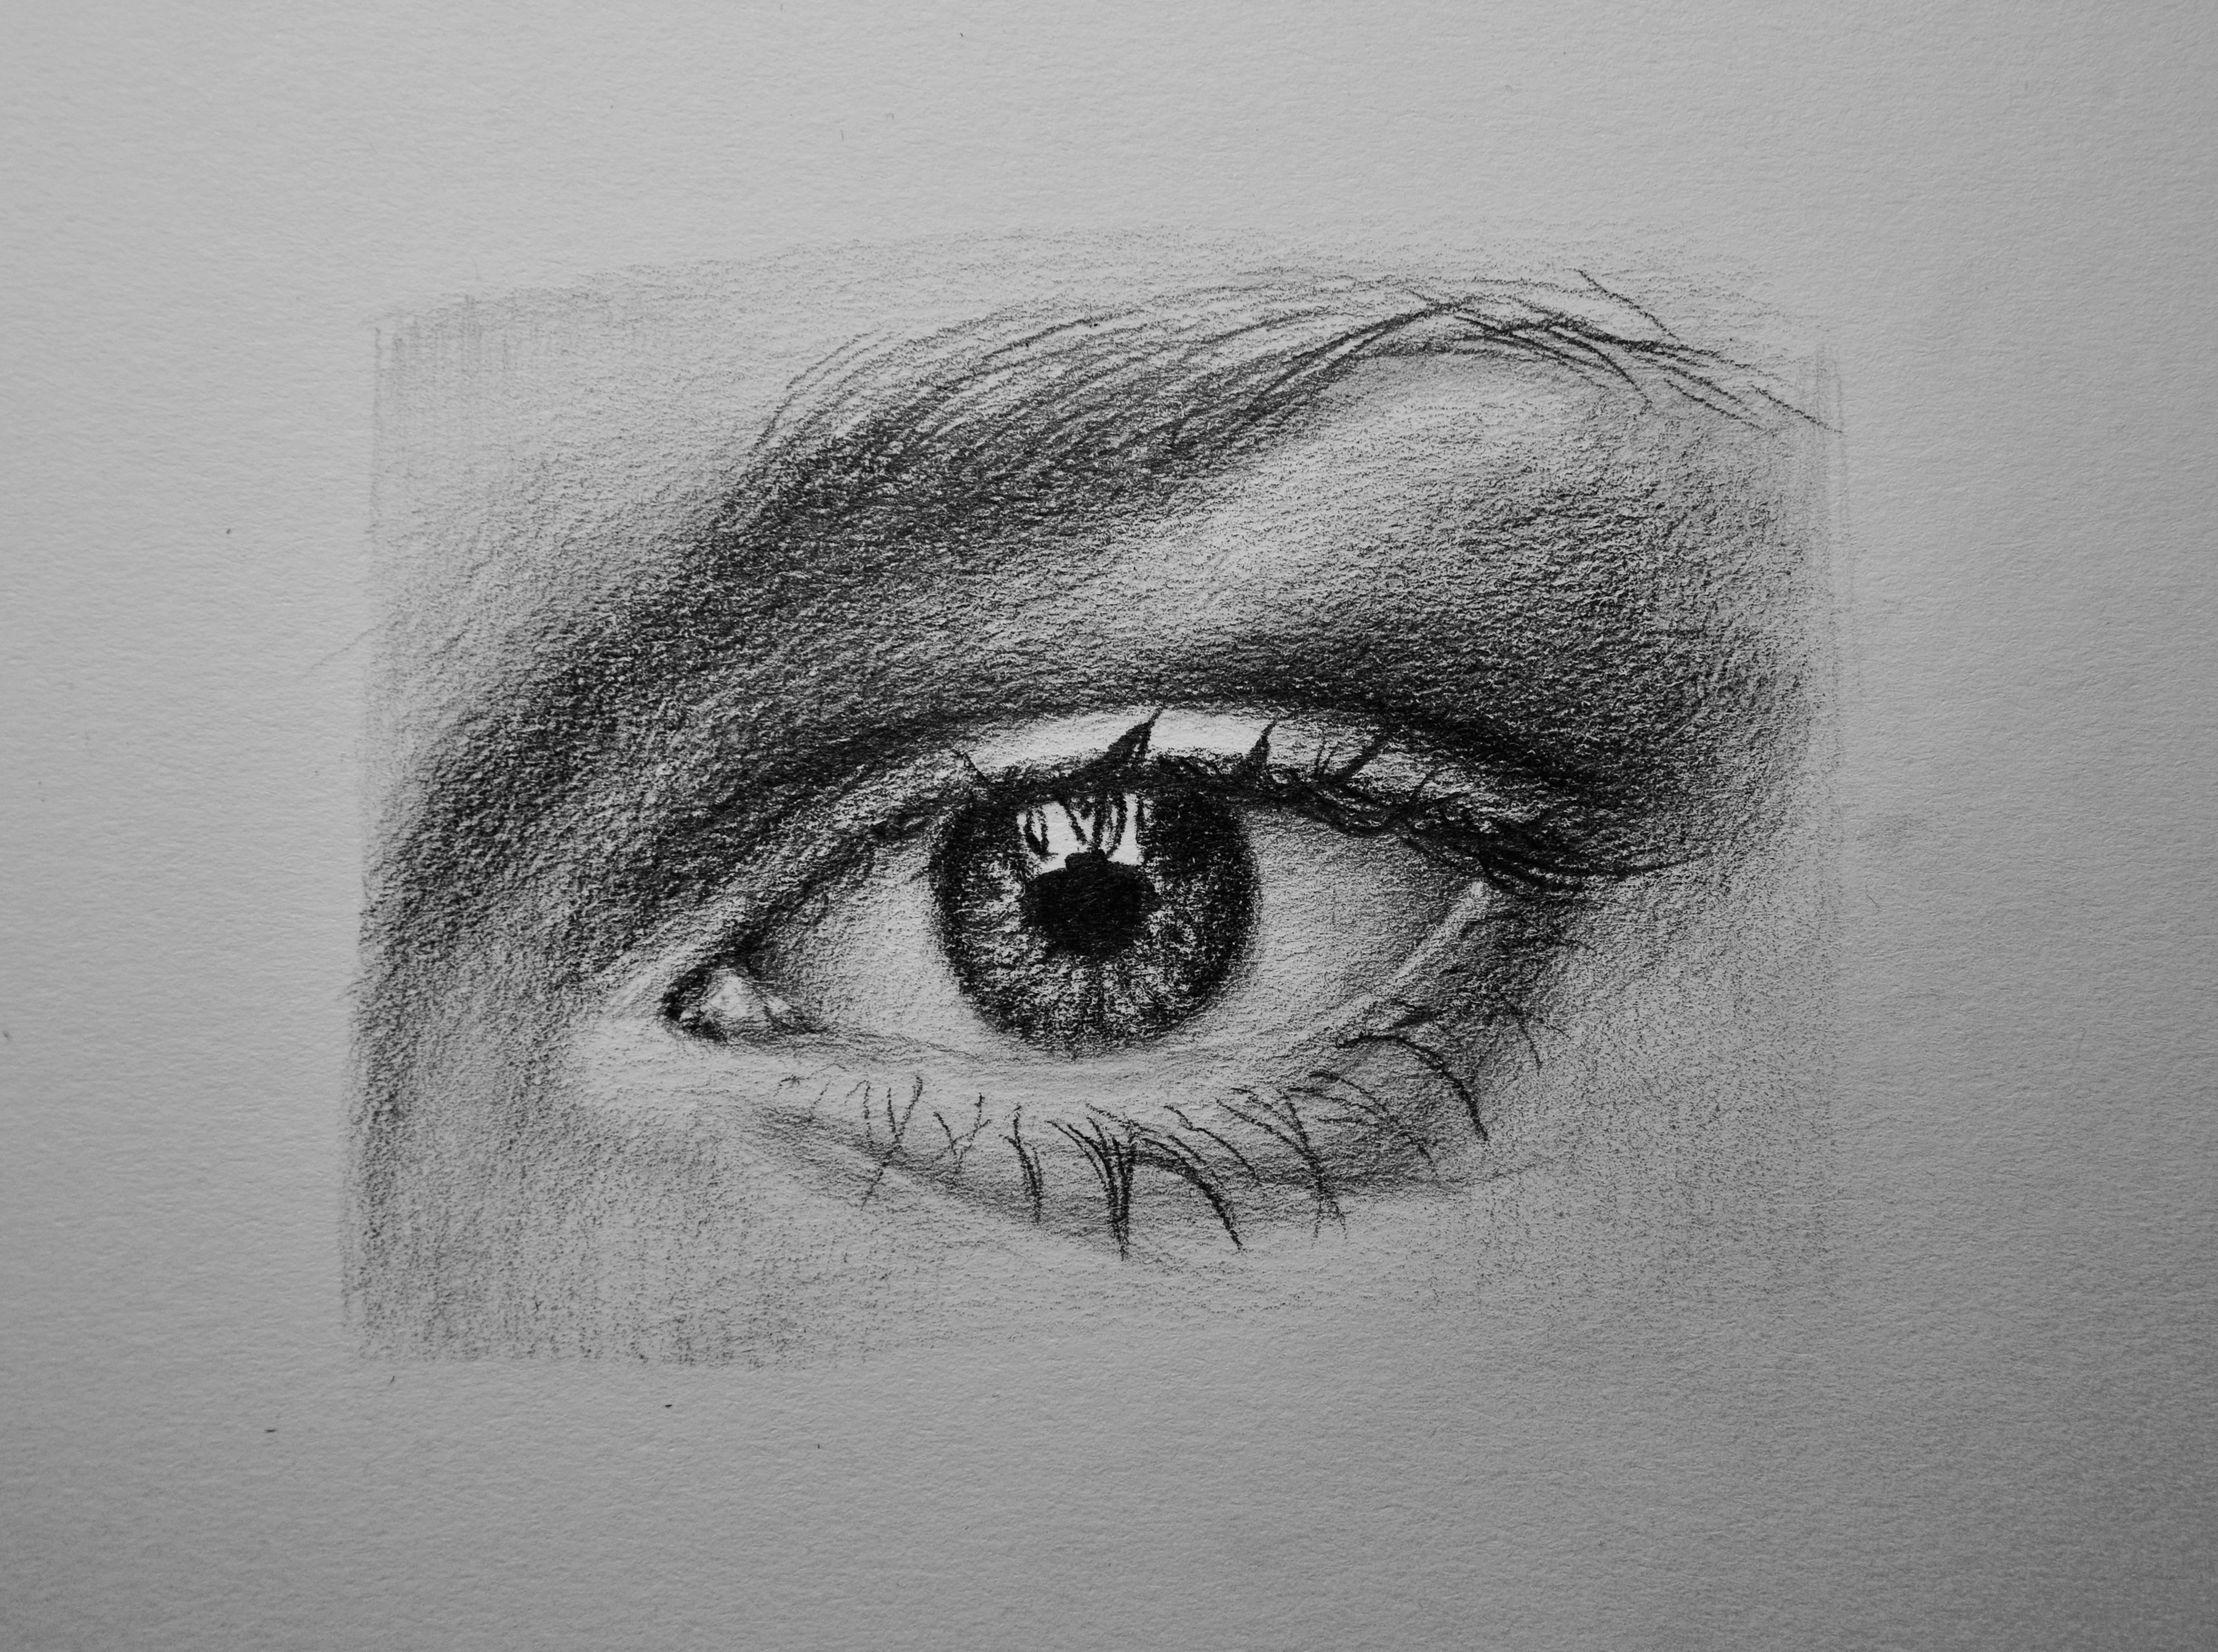
2. Stage 1 - Outline: When we begin to draw, the first thing we need to do is understand what is in front of us. We need to turn our eyes to see minded details. And we need to stop assuming that we know exactly what the shape of an eye is and how it works. We see eyes so often in our everyday lives that we end up drawing what we think we see rover than what we can actually experience. Once we break it down, we're able to put the pieces back together onto our paper. Take a minute now to write down all the details that you can see in this photograph and see if we have the same list. I'll start you off with a few examples. In this photograph, I QC and iris, some eyelashes, some veins. Now over to you. So hopefully you got the obvious. We've got the eyebrow, the eyelid, the top eyelashes. But notice that they actually don't come up like this, which many people end up drawing. They actually come across to the right here. They actually come down. As we move down. We then have the iris and the pupil and a white reflection in there. Inside the reflection, you can see the eyelashes coming through from the top. In the iris. We've got all these bands, these elastic stripped coming out of the pupil. And then in the eyeball itself eventually got some minor, very faint and veins. On the left, we've got the tear duct with two reflections in there. And then if we move underneath, we have through rim of the lower LIT. So often we forget to drool that when we're drawing eyeballs. But depending on the angle that you can see, usually you can see this one. Underneath that. You have these big eyelashes coming out here. And then we have two little wrinkles just underneath the eye. Then finally, let's just think about the structure of the face. So here you've got the bridge of the nose, so that will come down this side. And then here you've got the eyebrow burns so that bulges out in front of you. And then finally you've got the star of the cheek bone here. So there's a lot going on in this picture. And I really want us to start thinking about all of these elements so that when we come to our drawing is much easier and we're not missing any details out. So fluorophores stage. Now that we've done our observation, we're going to start our outline. So I want you to outline all of these edges. Wet, dark meets lights. So we have the obvious shape of the element for the general AI. We've got a very faint rim here. So don't come all the way because we have no doc meeting light on this rim here. But we do have the Ayelet. We've got the general shape of the eyebrow. And then we can maybe add. To very, very faint wrinkles in that. Obviously don't forget your iris, your pupil, and your reflection. So let's start that now. So let's start with the outline. So I am going to start with that general element shape on the I. And I'm really thinking about where it starts to peak and where it starts to fall. So you can be quite sketchy at this stage because I'll shading is really going to help refine everything. And when we're shading what always fixing, shape, we're always improving it. So if it's not perfect at this stage, don't worry. Because mine it probably won't be either. So there we have the edge of that rim. So I'm just coming about a third of the way across. Because over here if I continued, we're actually adding dog value where there is none. Okay, so this is very, very lie in their next, I'm going to add the islet. So I'm leaving quite, quite a gap probably bigger than actually needs to be because we have quite a dog run whether I eyelashes are just folks out at that side. Let's put our iris and there's a tiny gap with iris meets that ram or the Bolson. I'm gonna pop my reflection in first. Well it by more people. So again, I've done it a little bit smaller because that allows me to then make it bigger is much easier to make a dark shade bigger than it is to make it smaller because removing a dark shape or dog value is very difficult. So let's move it into the doctor think mind could be a little bit longer. 12. And then let's grab the eyebrow. So just know is how far in the eyebrow comes. So it's just to the left of the iris, the get and keep it quite sketchy. And then finally, a very faint wrinkle. Kay? So there's an outline. Next stage is shading.
3. Stage 2 - Dark Shades: So look at the first graph. Now, I want you to decide whether whitest area of this first graph is, whereas the white is part of the eye. If you've said the reflection than you. All right, so this is the why is pop. And also we have a reflection in the tear ducts. And we also have a very small reflection in the so let's leave that alone. Let's start with the rest of it. So I want you to just throw down a very light shade so that it's not any darker than this highlight here. So we just wanna make sure we don't get into Constable with white because what tends to happen is people just don't like adding pencil. And you might find that you are one of those people. You might find that a lot of your drawings are quite pale. And what they really need to do is they, they need to be dynamic. They need to be they need to have a lot of contrast. So I just want us to get out of that habit straightaway. We just want to get rid of the white so that we have a very light gray. And if you want to look at the grayscale, please look at one of the previous videos on shading and that should really help you to understand what we're kind of going for here. Will going further. The second lightest grey that we can oversee. We have the whites of the eye as well. But if you look at the picture is not y o. So again, let's just add some grain that and we're avoiding these highlights. Ok, excellent. So now we've done that, we've got rid of the white, let's hit those darkest areas. So this is really going to help us to see how lights our shading actually is. So take a second just to look at the eye and ask yourself, what's the joke is part of that pigeon. Whereas the blackest part of that image, hopefully it will set the iris. This is completely black, so let's hit that straight away. It's really difficult to mess up the pupil. But if you do find is not quite right, then this is your time to fix it. So I'm actually going to six my highlight just the I had a little bit to learn. And remember we're leaving us a little bit smaller than the iris itself because the edges are not hard, the quiet soft edges, so it just gives us a little bit of room to play with. It's better to have it too small rather than too big. So make sure you're looking back at the shape of the people because there's not, a direct circle, is not a perfect circle by any means. So that's really sounding out. Next, let's hit this eyelids in. That crease is quite dog as well. So think about how thick the lines are. Just above the iris. It's a very, very thin line. So we wanna make sure I'm not making that big. And then as I bend round to the right, it's quite thick lines. So let's make sure we emulating that as well. Remember what always refining our shapes. So it doesn't have to be perfect at this stage. We just want to get some contrasting values on them. Looks a little bit wait at this stage, but that's absolutely fine. So obviously we have the dog eyelashes here, but before we even touch that, we wanted to leave those finer details to the very end. So the next doc is value would be in the iris itself. So just look at the whole shape and think about where is it dark and where is it light. So just like we did with this overall gray here, we're going to add an overall dark gray in the iris. So not to dock. But we just want to make sure we get a nice even coverage. And then later on we will be adding the different strands and all of them don't make it difficult for ourselves. But we just want to make sure we're not leaving anything to light just because we've seen a section is lighter than another one. So the reason why I wanted us to get that is because actually in the iris itself we have some really dock areas. So just underneath the eyelashes, it's pretty black. And then we have really nice cascading darkness down there which comes into the eye. And then just on the right-hand side. Just comes down into that one. Don't worry, we're going to refine the shapes very, very shortly. Excellent. Last but not least, let's look at the eyebrows. So we have quite dog section under here. Now I am not drawing the eyelashes. I just want to get that value in there. We don't want to lose the shape of the eyebrows. May should make not dark enough. They don't need to bring on a bit lower. So that we have separated a lights and odd ducks. And now we're ready to push the shading even more in the skin.
4. Stage 3 - Refine & Define: At the minute is looking very, very flat. We don't really have much to the eye. So let's think about the shading on the skin. Now. In the image, we have a really nice shape just here, where the eye meets that bridge of the nose. So let's look at that as dark shading it in. I'm using my HB pencil. So that means I can really get a nice dark value. Just keep looking back to the picture and thinking about that shapes. So we have a few different values and different intensities of gray and his. So what are we going to do is just throw down an average grey. So if we're looking at the value scale is middle of the range. Just wanna get the Oliva. Because then I'm able to push the darker areas, even Docker. Okay. And this is quite a hard edge, so lets just blend the end just gently, gently using the edge of my pencil to get a nice soft edge into the browser that knows the edge of that. Notice. So all the edges are quite soft. So now let's really try and push this area here. Is the dark is part of this section is comes up into the eyebrow. To really push that in. Try not to scratch you. You'll pay per by using the tip. So keep it on its edge, on the side of it just so that we have some nice clean soft edges. If we do need to read anything out, then we haven't affected the paper and we haven't imprinted on it. Like sometimes if you write notes on a notepad and then the next sheet has that same note just in a scratched version where we want to avoid that. We want to keep everything as soft as possible. Because at the end of the day is skin and it's very self. Ok. So that'll do for now. Lets now move across. And keeping with the same pencil, just think about the lighter areas are, is lighter than this section that we've just done, but it's not wise. So we need to make sure that we're adding gray into there. And we need to make sure that it's, it feels like it's rolling Elvis eyelid. So we wanna make sure it's slightly darker coming out with this hotline that we have done earlier. And the next. In this third and final section, think about this big shape, his, uh, there's a big shadow coming just them and then is lighter here because this is where the bone is protruding out of the eye. So again, I'm just going to push that Georgia. And then as we get into the section where it is darker and the image, I want to add a bit more depression. Think about that shadow. Does it come further than the edge of the islet? If so, put it in, it might feel unnatural because it goes way beyond the actual element itself. That remember, we're drawing what we can see. So if you can see it, draw it. He can't see it. Promise me you won't do it. Now I'm just going to push my eyelid. Slightly darker words, rolling into the socket. Okay, great. Now let's do the eyelid itself. So the brightest Paul is here just above that highlight because everything under here is one bull and this is where the light source is hitting. So the light sources coming from above. So we really want to keep that very, very light. We can probably leave it at the value that we drew it and shaded it in initially. But that means that just like this section, and just like this section, this part of the eyelid needs to be darker. So normal value, midrange value just in here. And then add a midrange value. Just inhale. And already you're getting the idea that this is protruding forward because we've got a lie, a section here and a highlight here, and then we've got a section in there. So of course we can work that in a bit more. So start to think about where is it darkest? Where is it lightest? So the darkest areas are where it meets that crease because that's rolling towards some shade. Imagine if you're stuck on this eyelid and you want to get out with a wind, you'll go into that cave. So that's going to be delicacy. And then we have a Docker section where there's eyelashes, uh, starting to come up. And when I put that in, actually makes everything I just shaded almost disappear. It looks very, very light again. So just make sure you keep that in the very soft edge is always fill it by that etching of the eyelashes. Let's just take that all the way down. We'll just stop where it meets that rim. And then less fed section. At that dog fit. Just like the other bit, Denise get Dhaka where it reaches decrease.
5. Stage 4 - The lower lid: Before we move on to the next stage, I just want us to look at refining the shading. So if you look at my drawing, you can see these tiny little pockets of white. And we really don't want that. So I'm just going to spend a few minutes just getting some lead into that. Now, I have changed my pencils. So I'm actually on the to hate. So this is a hod pencil and it's the dark is hauled pencil. So make sure the end of your pencil is sharp. And you'll basically just wiggling inside all of those little white sections so that the shading is just an even value. So that way you've pushed his dog is not looking lighter because the white paper showing through. Whereas in shadow. And make sure that evening the Alice was no longer this white, but a paper with some dark visit pencil on the highest parts of the paper. So it's completely up to you. If you wanna do that. I will now shade this in silence so you can either skip the timelapse or you can keep watching and he can just spend a few minutes during every yours too. So you can really see the difference between this area that I've refined and this area and this area that I haven't used to power. Okay, great. So that is the refining DM. So now let's work on the bottom part of the eye. So switch to your 2B pencil because this is our light to soft pencil. And we're going to start working on just underneath the rim. This are what we wanna do is just apply a little bit of Prussian too much. And we want to think about that shape underneath the eye. And how far does it come around? So to me, it reaches up first wrinkle, but there is a bit of a Shade difference. So I'll start with that dog value. And don't make it to dot because when you make it really dealt, it looks like the wrinkle is very deep. And then you accidentally age the modal and we shouldn't because she's clearly young, youthful, and she doesn't need deep wrinkles. Okay, so I've identified the shape of that shadow. And then I'm just going to make a slightly the same shade. Actually, I'm gonna put the same shade up there with a lashes. Oh. And then I'm just going to lightly put in a little bit of shade that just because remember it is not what. Okay? And then when we move on to the left, so that second wrinkle, again, you've got to be very careful. So I'm adding the faintest amount of pressure. And it just kind of the shape of the shadow wants to touch the other shapes. So it's basically following on because underneath the skin is a sphere. So there's no reason why these shadows would be in different places. Is just the darkness and the different types of darkness that we really have to look after. So in order to do a wrinkle, one side of it should have a big wide shadow, which is what we've done here. And then there's always a little highlight. So what I'll do is I'll just shade a little bit to the left of that so that the highlight becomes prominent. And that means there's no rubbing out necessary. Well, they're the end of the drawing. Mo I pick out a little bit of pencil, but let's see how this goes. So far, so good. So I just wanted to add a thin line that just said that that wrinkle is a bit more prominent. And then I'll do the same on this side slightly. And then there's not much of a high-low and this one, so let me do a little bit of shading on the left side of it. This includes mainly coming from the crease. The fauna Paul dissection is this bit here, the bridge of the nose. So let's just continue that bridge down there. And can you notice that there is a highlight on the skin of the tear ducts are just wanna leave that my pencil quite loosely and want to avoid that lighter areas so that I just have a chance to blend is softly. But first, let's just get this edge of the shadow we did in the last lesson. Blend that nicely. So again, by using the edge of my pencil rather than the tip, it just helps to blend things much easier so I'm not left with these harsh edges. And then a gently, gently you want to bring that very light shade into this areas is a little bit darker around the highlight. Just as Mitch. Okay, Excellence wall. So hey, let's just blend this in. The only thing we have to do. I think I've said that a second ago, but the only thing we should do now is just square this off because then it just becomes lot more easier to understand visually. Let's just keep that nice and soft. So then we have the bottom section of the eye. The next lesson, we will be looking at the internal pause. This video we've been avoiding a row in the middle, the iris, the eyeball, and the rim of the eyelid.
6. Stage 5 - Eyeball: The first thing I want to talk about is the eyeball itself. Now when we see an eye in the flesh, we can assume that it is whites by means of the word it is a white label. However, when we draw it in black and white, we can see that there are lots of different values within the eye. And then the minute what we have is a very, very pale ible. So look at the picture, have a look at the different grays within the eyeball. Don't look at the veins, were probably going to miss them out. But look at the curvature of a bull itself and how that translated in the Watson I. So this lesson, we're going to use 2B pencil. So we're gonna start off with the donkey section of the eyeball, which is right in the corner here. And that's because this is curved round and therefore is in shadow. And we can already see that this part of the bull is in shadow because we have a dog section here, an adult section there. So this has to match. So let's just start shading. And Joe go to fall to the left. We just want to contain that for now. We want to make sure that we're keeping it. Nice and document, not afraid to add the shading in because it's super important for the drawing. Again, keep refining your shape if you need to. And perhaps you've noticed there's a little highlight in here. So what I'm gonna do is just draw a little circle around it and I know that I'm leaving that alone. That is my highlight, that is where I'm going to keep it. What? Okay. So you can see that it's fairly Dawkins, pretty much the same value as the lid on the top. And that's good. That's what we want because we're going to add some black eyelashes coming down later on in the lesson. But for now, let's just spread that shading across. Make it show that it's not white. Asl. And I'm just going to take a second to refine the eyeball shape. So when we have any sort of saying overlapping another object, so for example, the eyelid is on top of the eye bull. They'll always be a shadow where opens up because it's casting a shadow onto the ball itself. So just make sure that you make the top of the eyeball slightly darker. Then I would get, and then just have a look at this line. What meets the rim? We've got a fairly dog outline coming down there, but not all the way because you'll notice that is gnaws doc when it reaches the iris. Excellent. And then let's move on to the left-hand side of the eyeball. So again, the darkest is area is where it hits the tear w because that is where the eyeball is curving back into the socket. So stall shading from the tear ducts and then make your way to the eye itself using the same pencil, the 2B. And then it dark of rot in the corner. And then just underneath that lit. And then again the small grey line. Just tiny gray line just above the highlight. Great. So the fauna thing we need to do is the tear ducts. Now there's a really dog area along the top and then we have the highlights on the tear ducts itself. So let's just isolate the highlight on both of the little sections. So it means that we're not going to add any. So a pencil in, just shade around it. Okay, great. So there's rarely pulping now is really getting the idea of full minute curves that way. And it curves that way. Micah probably be a little bit darker in this corner and then slightly darker in this one. Great. So the last thing I keep saying, the last thing, the last thing we need to do in this section is the rim that look really closely at the picture. And it can you see it's quite shaded in this area. And then in the middle is a dark line. So let's start off by shading the Raman want unison. So if value, now, not all the way because it does get lights it, then I want to go back and add this Dhaka section. Say you've just got to try and make sure that you don't forget way of putting eyelashes, which we will do in the next lesson. And then let's go from the left-hand side. Tiny bit shading and they're just going to add a little bit of blending where it comes out of the data set, that is ible. So what we want to focus on next lesson is the final details. So the iris, the eyelashes, and eyebrow.
7. Stage 6 - Iris & Pupil: Let's look at the iris now. Switch back to your eight b. And we're going to use this to start to soften the iris and the people. And we're going to look at adding some of the strands. Now, there's a lot of detail going on in the iris itself and we just have to decide what information we want to keep and what we want to get rid of. So first of all, let's start off with the people because it's nice and easy. It's a nice simple shape. And what we wanna do is make this a soft edge because at the minute is quite a harsh edge. So I just want to add less pressure. And I just wanna go round circle, almost making these little circles just to soften those edges. So can you see the difference there, how we made it a quiet, a sharp line initially and now it blends in very nicely. So we want to look at those shapes that come out of the people. So that aquatic view sort of triangles shapes. To work your way around and just think about, okay, where is there some sort of trail coming out of the people? It's like little explosions, like, like the sun when you get those rays bursting out of it. Great. Already it has loads more detail than what it started with. So now let's look at the iris. So really think about where is dog in the iris and whereas lie to me, I've drawn so many eyes and I just know that there's pretty much always adult rim around the iris. So just look at the picture and refer back to your drawing and just make it Dhaka around the rim, which should be, and then push it even Dhaka, where it needs to be. Think about the size of that rim as well. Is it thicker and one side is a thinner at the other side. And again, we don't want any harsh edges. So because this is a doc, a pencil, just want to gently, they wanna say caress, it sounds wrong but gently caress the edge of the iris. Boy, you can switch pencils 2A, 2B. But we are becoming a master of all craft. So I like to challenge myself with difficult pencils. Great. And then now let's bring it into this halo that we have going on in there. So what I'm gonna do is I'm just thinking about some of those shapes are coming out of the room at the circle. And then there's just a few strands at a going in and out of the eye going around those triangles. So this is about what information you think is important in the eye. And you get to decide how much you put in and how much you leave out. So spend a bit of time now looking at the eye and thinking about what you want to keep and what you want to get rid of. That for me, it's more about getting the shading right rather than the finer details because we'd be here all day is really hot. It's really, really hard to get all of those strands in there. And because our paper is quite small, maybe you've done no Senate. Maybe you didn't use bigger. Which will make things easier but work smarter. Not harder. Okay, excellent. So let's look at the reflection. So you can see that there are quite a lot of eyelashes go in on, in there. And you may also notice that I've left a little bit of a line y originally drew my eyes, I'm just gonna rub that out. Magic. And then using the same pencil, my 8B, I am going to draw the shape of the eyelashes and the reflection. This is where you can be really observe and think, OK, how long is this eyelash? How thick is the line? What kind of direction is Ago and perfect. So that is our iris and finished with the reflection and the eyelashes. So hopefully it should be really coming together. And in the next lesson, we're going to look at the eyelashes. So that's a really exciting stage in the drawing.
8. Stage 7 - Eyelashes: Okay, well, if we have the eyelashes and the reflection, we now need them on the actual i itself. So looking at the image, there's actually not too many eyelashes going up into the islet. So I always tend to start with one of the middle lashes. And I think about OK, where is it coming out of them? Which direction does it go? So let's look at this one just above that eyelash, the reflection so that a thick one that goes all the way through. And this eyelash kind of three strands going into one. So that means draw three fake eyelashes. And that is going to send end. And it falls into that line, that gray line that we did earlier. So moving along, let's find another one. Now here you can see a few the eyelashes coming out with that gray line. And again, fix up. And we have quite a nice deep. So based on this eyelash. Okay, moving along once more, makes sure that your pencil is incredibly sharp. Now. This one comes into that iris. And then we have a few, few strays. And then of course we've got a couple of the routes that we can see. The next one dips down into the eyes. You'll find that a lot of eyelashes do this when you look at them more closely. They dip down into the eyeball and then they flick up. And that's why we conic, are wrong in our portraiture drawing. We, we know that eyelashes go up like we know it is. We know that, that, that to protect our eyes. So we always draw them going up into the, into the islet dot. When you really look at it, they start to travel down first and then they go up to really depends on whether your model is wearing fake eyelashes or not. So this is a nice big wide one, this next one. And then we have quite a few going into the big wide world of the cheap. So you probably noticed that there's a lot of highlights on these eyelashes. But for me it's not really any of my concern because it's already surrounded by lighter areas. Make sure it gathers roots in them. And then let's move back to here. And I want to think about that one that goes the other direction. And then you can see there's a big eyelash that because through the pupil just pokes out. And then we just have a couple of tops. Them didn't really need to put too many in the corner because they're really difficult to say. Okay, we'll just make this a bit dopa, give it a bit more contrast. So there's the top eyelashes done. Now. Now it's done. Now. Let's get these bomb lashes. This is much simpler. We know they go downwards and we know that. So what we need to do really is just think about which direction they are curving. So let's take the first one on the left. Nice and easy. Not too much pressure because it's not black at this stage. And you'll be surprised at how long the eyelashes on the bone, actually all that garden, all sorts of different directions. They cross one another. They go straight down, they go the other way. So really look at it and really think about what direction they're coming in and how thick they also, I'm just about to reach a much thicker islet eyelash. And then at the end, that really thin at the end of the eyelash to thick rather route and much thinner at the end. Thinking about do they clump up to the clump up and one to o they on their own. Where does the routes? It should be a little bit higher. Eyelashes them. Next off, let's finish off the drawing with the eyebrow and some final refinements.
9. Stage 8 - Final Bits: The final stage of this particular drawing is the eyebrow. Now we've already got quite nice bass and a nice shadow of where the eyebrows dots. So what we're gonna do is we're going to ignore all of those little highlights going in there. And we're just going to start off by emulating the direction of the brow hair itself. The IV, hey, we've got some really thick jog heads. So we just want to pop those in individually. Now we're just going to add the same again, but they're a little bit lighter. And then again, those thick has layering on top. Now think about on the picture, was it Doc is section. So that's when we really want to add the Dhaka has so underneath is the duck is section. So that's where we want to do the darkest eyebrow has. And then on the top we can just have these little wispy as coming through them. And then we have a beautiful eyebrow. You can leave it at that stage, your eye is completely up to you. Or you can push it a little bit further. And you can go back to your H and you can start to refine all of the drawings. So just like we did in this area, we can then take it to this side and just start really getting into there's little sections. So really try make that smooth. They'll take a bit of time. But it's completely up to you as to how Fall you refine it. So for me, I really like to spend my time on this, but this is my favorite bit because I'm giving the drawings some life and I'm really given it some love. And I'm really looking at the picture. I'm always referring back to the Fed's graph. And I my Ok. So that tiny section could be pushed a little bit darker. That's lightly to light. Or maybe it's the opposite. Maybe I've done something to Doug and I need to make it look lightest by filling in all these little gaps and trying to remove the impression. Sketch genus. I'll just sit there for ages and ages, filling in the gaps and then I can see if there are any real problems. So I'm gonna keep the video playing and just keep referring back to what I'm doing. Going into all those nooks and crannies. And I'm I'm always looking at the photograph and maybe you can see something that I haven't seen. And that's great because it's all about your vision and you will saw in training yourself to see this thing that you from we know is that you wouldn't have noticed before, which is amazing as exactly what we're after. And even if you don't want to go to as vaunted detail as I am here. You still want to keep looking at the photograph, looking at your own drawing and making comparisons and thinking, what do I need to do to improve my drawing? How can I make it better? Hello. So there we have it. The end of our realistic ICD-10 ahead be bland so much along the way and I can't wait to see your artwork. Don't forget to share it in a project gallery. So all your peers can have a look and see what you've achieved. Well done. And I hope to see you again soon.
 China Jordan, Art Teacher