Transcripts
1. Intro: but okay.
2. Tools: I will be using this paper by five Brianna Bristol. It's a Ruth bacon smooth, high quality paper so you can try this one. I'll be using Castell 9000 by Faber Castell, UNAIDS be in to age, and I will be also using some co hein Nora pencils. Here I have a beat in an HB and this kind of eraser and pencil. Also by proper Castell and I will be using this blending stump Q tips and a white marker, but unique Bosco.
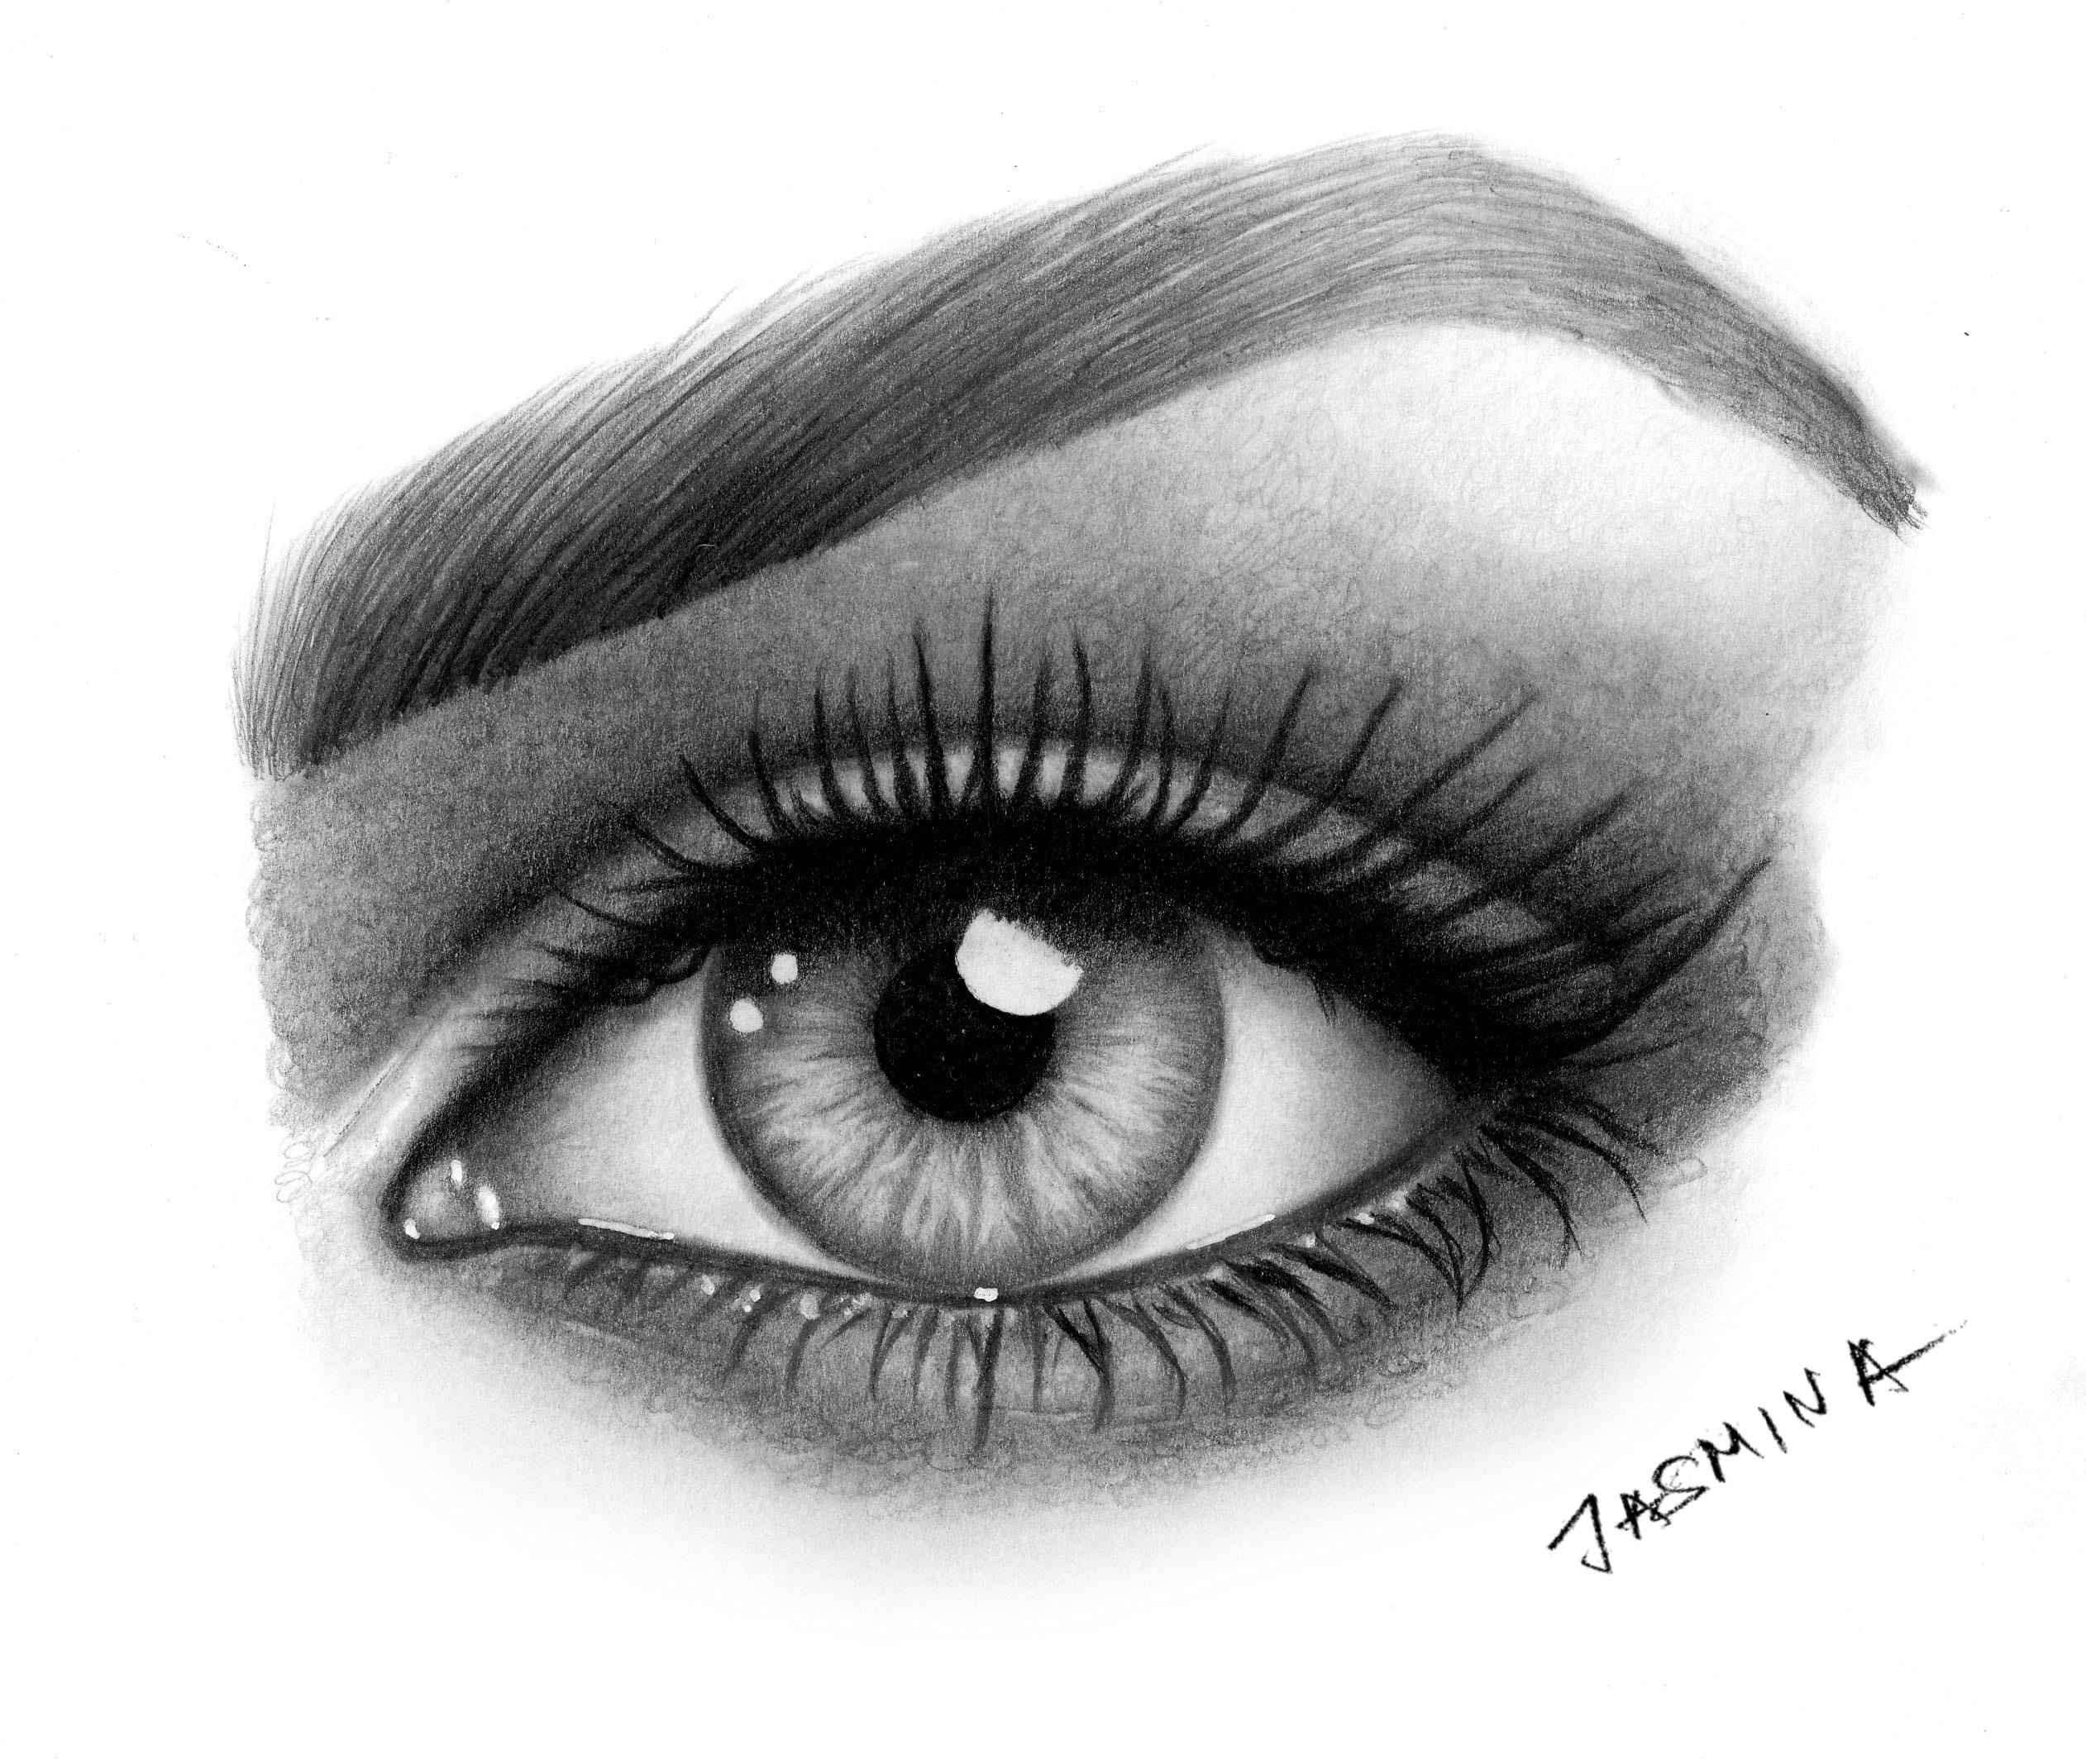
3. Sketching: Okay, let's start with sketching and let's great a circle in the middle of the paper. Eso us first, Let's Grady Iris boundary with the drawing compass to make the circle perfectly round like this. So the distance between the needle and the pencil lead on my drawing. Compass, as you can see, is two centimeters or 3/4 often inch so the diameter is a bit more than 1.5 inches or four centimeters. So if you want to draw the same size and now keeping the new and the same place just reduced the distance between your Nittel and mentally like this two did distance that you want to draw people boundary like this and just carefully. So in my case, it's about seven millimeters or 1/4 off it inches against C. And just keep the middle here in the same place and draw people wandering and just carefully like this. Okay, And now take a measurement that you used for the Maris boundary from the center of the IRS to the left or the right side like this, and just keep this distance in your drawing compass. So it's about two centimeters and place the new here, just somewhere into life. Side a bit under the horizontal line that crosses the center of the pupil and just make a short work online here. So mark this area here. So this is This is the edge with window white of the eyes and a tear docked ls that the same on the right side. And just give the same measurements on your drawing compass and mark right here like this. And now we can outline the I and I'm using an age. Be for this. And let's start with this lower outline here. Right? Honored it are respond Oring. And just follow along a bit of this Armagh. I respond ary horizontally like this and here start to divide from it. And so we should actually draw a dotted or dashed line first to see how it will connect like this. I'm just grating dashed line. And if it looks good, you just get draw the full line over it. And let's do the same on the left side like this as we just don't press too hard. And here we can draw the tear, Doctor Ryan now so it can be around. It can be ellipse something like this. And now let's all line the upper eyelid as it should be placed under the opera. Part of the I respond ary. So here's somewhere in the middle between the or a spotter and people boundary and just start here in the middle with a short horizontal line and start carving it downwards towards the tear duct like this and just connect it in the upper part of the tear duct. Okay, unless they're the same here on the right side, just curve it downwards towards the mark. Points right here. I thought you can always in pro day outline if you don't like it. And now we can erase the spark of the circle about the upper I'll eat under decrease. And actually let's great that increase. So it should be curved line Parlow to the offer. I lied that would just outlined and just followed the upper Aleph line of the I like this. It can make it a bit farther closer. You want something like this? Okay, and let's draw the I've wrote to and then will be finished with the sketching. So in this sketch, or are bro just grated dashed line less lines like this. So I want to create a female. I and I want to have an arched eyebrow role. So laying over the highlighted part here to pinch her so it can be any shape not getting We can change that later. For now, we just want to have determine the position of the IRA. And let's also just determine the position of the reflected light over the I. So I want to make a one that goes over to Iris a bit and over to people a round shape like this. Okay, something like this. And here I want to make one or two dots smaller like this. And now we can just raised this part of the pupil boundary that we don't want to have a word reflected light because it has to stay absolutely white.
4. Drawing the Pupil and the Iris: Okay, So first thing to do is to color the people. And I'm using an aide B pencil to feel into people like this, and I press very, very hard. So this pencil is very dark, and we can create an absolute like black color and just carefully next to the edge here, actually Iris. So just make sure to keep all life sharp. And because this circle has to stay perfectly around, I said, Don't be afraid of using Go very dark pencil. It will give deft to your drawing so and the life to your eyes, I said. You can't get this black caller with an age beat were a water shade. So it's very important to use at least four B or darker for the people. Eso just go over again and again and until those of white dots of the paper disappear. And now let's drop the Paris boundary and I'm using an HP for this here. I'm just drawing all around within the circle next to the edge like this, some about one or two millimeters deep. So I I'm using an HB, and I pressed very hard. I didn't want to use any darker Bensel. That might be too dark. So what? We should use an age be or brighter, Of course. In depends on the color off the I that you want to draw. What do you want to draw? Blue eyes on brown eyes. Also, if you have drawn any light reflections over the I responded, we just skip them just like this carefully. Okay, I'm almost done. But of course, you don't have to draw this fast. Just pause the video and take your time, okay? And always just blend this outer area with a blending stump. So just to make the edge blurry, like this American states blurry. I said the edge between this, uh, ariz bone during the whites of the eyes are so called Clara eso should be a bit blurry like this, and same here on the left side. Okay, OK. And now let's great a shadow that the upper eyelid casts over to Iris. And I'm using an eight be here because I want to draw female I that will have some makeup, and then it would can have, like, stronger cash shadow. So the shuttle will be darker because of the mascara. And so we just have to make it a bit darker here and operate area like this and also skip the reflected light and has to stay absolutely white and then just all along the whole with of the iris, which is covered by the upper arley like this and press very hard. So this will also give the depth to your drawing and it will make the skin. Actually the upper eyelids bob over did I. And the I will look three dimensional so the darker shadows will produce better results and more eye catchy drawing. And it's always better. The more volleys that we use in our drawings, that better try will be eso as I mentioned. Don't be afraid of using these dark dawn such a six p or darker. Yes, you can see my cash shadow is almost connected to the people, and the next thing to call her the RSO here against you have played the digital lines with arrows to show the direction of the strokes that you should draw within jars, analyst notice with an age be and just followed the direction of those arrows because so each spoke should radiate from the very center of the people, unlike this, each of them like this just make them radiate from the very center and skip the reflected lights was always and look impress a bit harder here in the upper area. Because this part, it's less eliminated. That then the lower area. Okay, And now we can start shading with less pressure. Or we can you and use it to age or age like this and just keep them radiating from the center to people like this. Just just don't rush and take your time. And if you hand hurts, you can stop and continue tomorrow. So you don't have to draw all this and one sitting, and I can see how it starts looking like rial iris. But we're not done yet just yet. So So as you can see, some of the spokes er free, dark so they're darker and the others. But it's OK. It's natural like this. So it's even better to have some variation than if everything looked the same in flat. Okay, I'm almost done. Okay. Are you know, just blend this all with a Q tip. You can see how it looks smooth now. Okay. And here, next to reflected lights. I want to use a blending stump because I can blend more precisely then with a Q tip. But if you go over to reflect that logic in always and raised that graphite powder okay, I know we can create a highlights over the iris and using an eraser. And so I want to erase the mid area of the virus and to create some patterns. And I don't press too hard just carefully and displace the tip. If you're a racer in the middle like this and just moved towards the pupil and towards the iris, pondering just a random wherever you want like this and just released, the pressure also embraced turns. The pupil and tourist are Sponder and here and Oper area, so the highlights should be a bit darker, so and the highlights should brie gradually disappearing into the shadow. So here press last and we're gently here. I could see I'm just hardly touching the paper, and it's not that bright. And here in the lower areas we go downwards. We compress a bit more like harder because the ours should be more highlighted. It's always more eliminated in the large area, so If you erase a lot, you can just go over with acute paper, pencil and dark and the highlight if you don't like it so you can always change something and improve its just Don't worry. And I just keep cleaning the tip of my eraser. But if you have needed a razor just getting I need it and get clean tip and destruct to create them into random like this and it escapes. Some areas could make diagonal lines cross hatches like this. So just try not to make all look the same because the randomness is what is going to make your eyes look more realistic and lifelike and okay, okay, for now, this is okay like this. Maybe I can add more highlights later, so see? - Okay , Now we have to shade this area between the iris and the people to make it look like it bent inwards. And so I use an eight b pencil, and I just place a tip order edge between the people and Iris. And I just dropped short lines towards the iris boundary. So inwards arms like this and some of these lines should be a bit longer, but they're all should be pretty sure and, of course, pressed hard next to the pupil and just less under pressure as you draw engorged iris. And here you can see it already looks last flat and looks bent. And sometimes it's enough. If you just staple like this, okay? And just keep doing the same thing all around. And, of course, keep reflected lights wherever you have them. - Okay , Now let's do the same thing, but from the opposite direction. So here, next to the iris, pondering and I'm using an HB and I press over the iris pondering, and I draw tiny short lines a tourist of people like this. So to make the iris boundary actually disappear into the iris to make the edge with wind them invisible and you can draw some longer strokes. There's a pupil to create patterns or the hours like this. Among the highlights that we created and just keep going all around like this. Okay, and as a measure, just great. Some lines all over the iris. So it is important to make something different for the sake of randomness. It will always look moralistic. - Okay , and let's blend it with a blending stump So when you have drawn a bit, you can blend a bit or you can blend it all on hand. Okay, let's go here for the highlights. Just a random without any order. And we're almost done with the iris. - Okay , I saw as I mentioned I want to draw female with makeup and I want to draw eyeliner here. So let's drop thick line here right about the outline of the upper I elite and here also above the tear docked. And I'm using an eight B. And so I just want to draw thicker line kind of what is called eye liner. But of course, you don't have to use on age be or b bounce over this if you don't have, if you don't want to make it too dark. So I just think it will be easier for you because Bill drawings are more difficult to draw and they look last realistic. And so you should definitely work with darker colors and try this just the way I'm doing. Okay, let's do the same here in the right side. And here I want to create a thicker line. Us. I'm working towards the outer corner because it's usually thicker than or had about it to your docked and just carefully next to the white of the eye to make that the edge sharp The outline of the upper I'll eat two preserved of and I can see how the reflected light appears even shine your as we have out of this dark area all around. Okay, okay.
5. Shading the Sclera: Okay, Now let's shade this Clara or device of the I'm and lets the color this tiny area between the tear duct and the whites of the eye. And I'm using an H B and I apply circular motions. I can say this is so called circle is, um when we're applying tiny or lopping circles like this. So this way we can create this most Dexter. And so I'm creating now cast shadows here to shadow cast by the operator. I lied. So there has to be quite dark. And here also extra teared up. And I just marked the highlight that I want to draw. The shades are on it. I wanted to stay white and it will suggest the wetness. The witness of the I answer would shading such delicate parts. It is important to use circle emotions, not cross hatches or Parlow strokes. Nothing like this, but it. So we're going to use this technique for the skin to, and you will see how it will make. The skin looks most okay and we can go all around the tier docked eso the whites of the eyes should be shaded in hold maybe a little bit next to the R. I respond. Er can stay white but, um, into corners. It definitely has to be shaded because think of the eyeball like a sphere just the way shade this fear. You have to shave the eyeball so it can stay absolutely white. It will look flat and last realistic. So we have to create a great in transition between the great Don's here in the corners to make darker tones and then lighter. And ladder was way shade towards the iris. And I'm still using HB and I press harder next to the highlights and extra the edges. And let's just blend it a bit with a Q tip. And I'm using good, clean new one Q tip for this and could see how it looks smooth now and here against see now these highlights that I left untouched and I said draw around them. They become broader and broader, and I want to blend with a blending stump next to the edge next to the highlights. Okay, now let's continue with lighter volley off, amusing to age for deaths, and now we're continue and we're shading towards the iris. And here we have to make Lotter and lighter areas. And and I'm also drawing tiny, overlapping circles. I was against see so very carefully and just avoid pressing too hard. And, of course, here, right under do cast shadow and just make slow progress because it's always either to add shade done to remove and as we work towards the iris breast last, unless to achieve that. Grady in transition, which will give around this to the eyeball. So that's very important. And just keep using circle or motion and take your time, - and that we can blend it with a Q tip. And now we can shade more. You can see even the age be graphite pencil is removed a bit after the blending, and I just want to apply that again. So at the end of the drawing, it just to go over the black areas again because you will be eliminating some of the graph I while you work and those won't be there's black, so just go over again and you can even add some imperfections. Dots wanes. So anything I'm just agreeing some ways that I mentioned and dots like this, and now we have this area left here and I'm using a five age to Cardiss Spark. That's all. Those should shouldn't stay white, but it should be much brighter than the previously shaded area next to it. So only the highlights can stay white, and I can see how it has depth already. This part on the left side and here. Also, you want to keep applying circle or motion, and now let's blend it with a Q tip. You can see that I use a new one that that I haven't used to use before it because this is a very light area and we shouldn't use Did a Q tip that we already use for the so furtively . They're cheap, and we can always use a new one clean one because we could dark and this area that has to stay very bright. And now we can shade again and blend again until we're satisfied with the values. ANAs always just pressed harder next to the previously shaded area and blend Tuvalu's to get her. And after blending, you can see what air you need to shade more, and you can also step away from the trying to see it from a distance because because only then you can see what are the Grady in transition is good or not. I know we can do the same in the right side. And let's start here with an age, be in the very corner and also circle or motion and press harder here next to this black area and of course, less and less as you work towards the iris and this area here, No rice. I should be quite darker than on the left side because we have denser and longer eyelashes here, so this area should be shaded more. And also the eyelashes are digger here. But we're going to to do that later to draw the eyelashes. - I use this one that has quite a lot of graphite on its tip to blend this, uh, edged between the this eyeliner and square. Um, and I just want to use a Q tip. And now I can shade more and using to be here. - And now let's continue the shade next to this area with a to age in the same manner that would did you know, the left side. You press harder next to the previously shaded area and then release the pressure as a shade towards the Paris, and when you have shaded a bit, you just blend it with a Q tip, - and here also can add some Wayne's any other imperfections. And here we can also have some shadow kind of cast bite eyelashes. But a group of eyelashes like this. Yes, I'm just pressing hard with the two age, so it's very delicate part of the drawing, and it's very difficult. But you should practice this Grady in transition, because once you acquired this skill, you will be able to draw anything in a realistic style, so it is very important. And when shading the textures like this or skin saw, I don't recommend cross hatches or lines strokes. So Onley this circle is, um, technique is what I see that brings and the best results, or you can even shade with graphite powder. It would also create a smooth texture. - And now let's finish this area with a five age so you can use four age or six age. It doesn't have to be the same, but I have five age and I just want to go over to Bruce was shaded area and bits and of course we here. Also a press harder and then less and less all sweet shea towards the iris. So just apply tiny or lumping circles, pressing very gently, so hardly touching the paper. And it will create just a right value. Five age. Okay, like this no can see Nothing is absolutely white, and it still looks pretty bright. And let's just blind it Look. How does smooth now to blend these Vollers to get her? That's it can add more shade later. It depends on the skin, and how it will really relate to skin will see that at the end of the drawing. For now, it's okay like this. I just want to dark in this area, but more here. So here, just a shade more and blend more until you create that smooth Grady in between the grey or values and OK, and now let's shade this area under the eye. So actually to color the thickness of the eye of the lower alit. And I'm using a B pencil here, and I pressed very hard because I want to make it like when the pencil eyeliner is applied to make it more spectacular, more visible, and I can see how these dark colors will give that to our drawing and house. Clara no, somehow comes to expression more and looks deeper in the paper and thickness of the skin is less visible here in the middle, right under the iris, and just want to blend it so it should be thinner. And then we have to make it thicker. Also, we draw doors, the corners now listen the same on the left side. So if you don't want your eye to have makeup, just use for age five age or even just a blending stump. But if you take a look at death from a distance, you will see how pale those shade R I mean, is not that enjoyable. And it's not that visible, and it's not, In my opinion, it's easy to draw, and nothing bad can happen can make mistake and then start a new drawing, and you can always erase something. If it's too dark, it won't be white anymore. The paper will be white, but it still can be quite brighter. And let's blend between the thickness of the skin of the lower I lied and this Clara with blending stump and now Let's make some improvements. Kind of finishing touches just strengthened what is necessary or dark in or lining up and blending edge. Just sort race what you don't like and so on. So I know it's a very difficult to when you draw from the reference for your things Clary's white. But it's not and should always shade that. And let me just show you something that you can help you to see what is wide, actually. So here I have one reference photos in Windows Photo Gallery, and I just reduced the brightness here in history Groom here, you see. And now here you can see what is actually white. So you see, only the highlight is absolutely white. You can see that the virus is not a white, only the highlights or what and what is what here is also white. But nothing else is white in the picture, so it has to be shaded. And this is how you can check it up for your future drawings when you dropped from reference photo and also let me show you what is actually blackened the image so you can you can figure it out, just increased the brightness and hissed a gram and you can see now on Lee the pupil in here, where the eyelashes are the dances. So here we have absolutely black areas, so everything else is just not black. So we should use only a B or nine B for days areas. So everything else has to be shaded with lighter volume. So this is a very good thing to figure it out. So always check up your reference photos like this before you draw.
6. Shading the Skin Under the Eye Lid Fold: Okay, So now Lalas shaved the skin around the eye, and the first thing is to strengthen this eyelid fold with a beep mental. So make one thick line on the top of our sketched outline. Because of this fall, part of the skin gets less light or it gets no light at all. Okay, so it depends on the ward delight sources going from. So it should be shaded completely, just like this back and forth. OK? And now let's divide this task into two parts. So the first spark is to shave the area between the I and I. A late falled here. And the second part will be shading about the island fall because these two points have different shapes. And let's focus on one area to time, and I'm using an age be here. And of course, circle is, um, a circular motion all the time. And I press hard here next to the eyeliner and next to the eyelid fold doing this. Just keep circular motions. And now I'm just releasing the pressure Asso. She'd throwers the meat area like this, and so just take your time. The circle is, um, technique. It takes a lot of time, but the results, it's worth it. Now let's blend this edge off the eyeliner here, this same manner and just breast harder here, I said, This whole area above this Clara here on the left side should be darker and about the iris . It should be highlighted. So we're going to press last women to use a ladder volume. Okay, I saw something like this. And now let's blend it a bit with a Q tip like this. See how small it becomes? And now let's just shade this edge between the eyeliner, understated skin again with an age be also and here under the eyelid falled. And now let's do the same under right side. And I'm still using an HB. So we're just going to skip this area in the middle and the shade just above the Clara. The winds of the I'm and, of course, circle emotions and press harder next to the island fold and next to the eyeliner was a while and in the middle press lightly. So maybe you're wondering, why don't we draw the eyelashes already? Well, we're going to draw them after the skin is done, because if we drove them. Now we would have to shade the skin around them, and it will be more difficult that that way so that we could mess everything up and end up drawing already eyelashes. So that would be good. So it's much easier to add them once the skin is shaded in completed. So us against see here I'm shading next to dilute ful and next to the eyeliner, and I press harder and I use an HB all the time. And here I'm just going to feel this area on the right side and to leave this area in the middle for the next step. For the lighter pencil about the iris, just tiny rural upping circles, and the texture will be smoothed off their blood ning and loves blood is with a Q tip. It's amazing how it becomes smooth ride for blending. And now let's Flender this edge again here next to the eyeliner and tried to create that great in transition between the black and this basic. The tone of the skin OK, and now let's shade this highlighted area in the middle, and I'm using it to age, and I pressed harder here, next to the age be area that's the same here, circle or emotions all the time. And now I just release the pressure as I shape here towards the center, I said This is important because the skin should also suggest the roundness off the eyeball , and here also start pressing harder elsewhere. Shade towards the age, be area on the right side like this. OK, and now let's just blend it with a Q tip, and then we can shade more with mental if necessary. And I'm using an age be again here next to the eyeliner just to make this edge blurry. And here, also under the islands, falls so this islets fall can be thicker or thinner. It depends on so many things, but just don't leave this island. Fall us. It's a dark line surrounded by the light time, so in some cases we do have a clear edge between dark and light tones. But most of the time we have to make them flow into each honor to create that radian tradition. So if you have shaded too much, just go over with an eraser, and if you raise too much to school with a blending stump this I feel it can be a bit lighter. You can always change anything and improve okay,
7. Shading the Skin Above the Eye Lid Fold: OK, and now let's shade this area above the Ali fall. But before that, let's strengthened it Lower outline of the IRA so that we can see where it is. So just like this, with an age be because we're going to shade this area too. And now I'm using a B pencil and circular motions, and I'm pressing very hard here next to the island. Awful. And I'm just going to release the pressure as a draw doors the the eye bro like this just brushed last unless to create a smooths Grady in between the darker and lighter tone and just keep applying circular motion. And I just want to work in this area above the islet. Fall all along with the B pencil and here we can make it a bit larger dis fold area. So here in the corner, okay. And let's just blend it with a Q tip and you can see how it becomes smooth. I know it can continue shading more here, next to the islands fold, and I'm using a B pencil and a person very hard. I can see how if this much darker now, Okay, now let's continue shaping this area here with a big pencil. So this area, right above the ear doctor, should be much darker than the area next to the temple because this area gets less life, sir. Bridges going to shade. This one with B pencil applying circle is, um, like this. So I hope that you can watch it on a be seen full screen mode to see the details. Well, im adjust strength in this. I brought more here and keep applying to same pressure all the time. And now, as we shade towards the left side, we have just to release the pressure of it. Okay, so I'm still using a B pencil throughout this whole step. I know it takes a lot of time, but it's really worth it because it would give the skin a smooth texture. And now we can shade towards the temple and start releasing to pressure. Or you can even use it f until nature be. And let's blend it a bit and express hard with a Q tip to impress the graph. I into the paper like this. But let's just draw a bit more here on the left side, using an age be so I'm not going to draw knows this time I would just stop here, but I want to draw this right above the deer docked. Actually, the skin are on the tier, doctor. So here, next to the tear Dog, this skin is very highlighted, so we have to press lightly. But it shouldn't stay white. And let's just blend with a Q tip and just blend this edge within the eyeliner and his skin . And, of course, this island fall. Okay, now we can continue on the right side to shade, and I'm using an age be. It's a continuation to this to be area I mean, the area drawn with B pencil and here a press very hard next to the B area. And, of course, I released a pressure aside. Draw throws to highlight, actually upwards. So here I really have nothing new. Just say I just don't want to repeat myself too much. Just I do the same all the time. Just a circle or motion on HB and releasing the pressure. Also a shade There is a highlight, so the highlight is the brightest under the art of the I'm Bro, - and let's blend it of it. You can use a dirty Q tip Former dark areas by. For the lighter parts, just use a new one, so make sure to use a clean Q tip. So you want a blind gratified to highlight areas, - and as a drop, it just blend of it. If you have an age mental, you can start using now one. Or just relieve the pressure on your HB pencil. You can see here how I'm pressing less and less to create that smooth, radiant so this gray and transition from the island fall to the eye. Bro is running for him because the skin off the above the islands fold has a round shape, usually, so you can always go back and shade more or raise something. Okay, now it's quite better, and I just want to shade more with the B pencil. It doesn't mean that you have to do this. Maybe yours look difference. I just feel it could be a bit darker, - okay ? And us. A. Continuation less strong, with a to age or three age here, next to the previously shaded area. Person. A bit harder, but not too hard. It's a circle or emotions, same also have been doing and then release the pressure of the work. There was the highlight, so it's much more difficult to create this bright areas. And also you can't press too hard because they can scratch your paper, these air very hard pencils and also what is important to tell it to use it. A rounded tip of the pencil and not this sharp like mine, but the round tip of a pencil. That one scratcher paper. You can cover the area faster and the texture wall appear smoother. So my tip is free. Sharp here, so to be and darker pencils, they are very soft and they're on out faster. But there's hpe Enzo's They like they last forever. Okay, so we want to make our great and transition US flowers as possible, and some imperfections are okay. But just avoid making lines and cross hatches because they're risible. So that's all good. Okay, and now we have to use a clean Q tip here to blend of it. So just don't use a Q tip that he used for blending to be or darker areas. So they used them. Don't use them over age rentals, and here it can even use a tissue like this. And just carefully don't go order dark areas, okay? And we can shade a bit more with with the two age I'm pressing. Worry lightly here as I use the Tszyu. Wanna blend the larger area? I mean for the skin such us forehead and cheek. But we here we don't have such a large area. Secu tippers are better. Q tips just enough. And I'm pressing very lightly. I know. Let's go to the right side of it like this. Here under the eye, bro. I mean, under the end of my bro next to the temple. So this area should be darker than here under the this area under the arch of the IRA. As that Now you can see that this area that is that I left out is actually the brightest highlight. Now let's blend it with tissue. And now let's finish this highlighted area with five age and press very lightly and use circular motions of always and here next to do to age area that we just drew compress normally and then release the pressure as you shade covers the Cairo it's This is a very delicate, and but it shouldn't stay wide. So we have to shade it and just take her time. Here. You can make your circles a bit bigger, so not so tiny and you can do faster. And so now, as on finishing, I press very gently. And as I mentioned, just take a look at your drawing from foreigner distance, and then you will be able to see if you're smooths. Grading is good or not. And what I say that I'm using a five age It doesn't mean that you have to use the same six age for age or even three age. This era can be even darker. Done. This the peasant a skin tone, but you want to produce and just changed the pressure and experiment with these pencils to see what they can produce. Okay, I'm almost done. I can analysts blended a base was a tissue, and I just want to shade more to improve this transition. And then I can blend again, - and I'm just filling these gaps now. So here you can just improve things before you draw eyebrows and eyelashes. But you don't actually have to dry eye, bro. I want to show you how to dry eye, bro. But I think that drawing of the eye is looks more complete. Deny, bro, and I'm using it to age again here just to make it a bit darker here.
8. Upper Eyelashes and the Eyebrow: Okay, Now let's Shadab it with Q tip here in this area that is reserved for the I broom. So we're adding some kind of shadow, so we won't place the lines directly over the white paper. So the skin under the eyebrow hairs will have some kind of shadow like this. Just make don't make it too dark, just shaded a bit like this and just cover the whole area that you want your eye bro to draw on. Okay, like this. And in this image you can see narrowed lines showing the direction of the hair growth. So refer to these directions all the time, and you will find this image attached so you can take a look at it. And let's start with the B pencil and draw here on this lower area of the eye, bro. Hair by hair, following the direction of their growth. And so go from the bottom to midway with quick, confident strokes like this. And so this lower area should be very dark. You can even use darker pencil, but I think of B pencil is just enough for now and try to make them different a bit to change the pressure us on this step. We're just grading these darker parts to split this work into more faces to make it easier for you. Well, it's still not dark enough to May. So I want to use an aid. Be here, you see, it becomes better. It's much doctor now and now I'm continuing with the B pencil again, and here they should be more horizontal. Also draw them towards the highlight. Just check up the image with our own lines is here dare even longer and also check up in the mirror. Look up reference photos if you want. So just starting in how the eyebrows look. Look before you start to draw and I'm using an aid. Be again, just a few hairs to make them darker. And let's blend it with a blending stump like this. Just this edge and let's do the same here on the right side. But starting like this and using a big mental and so here it gets less light than over the highlighted area, and we're still following the direction of the hair girl but would draw them and up was a direction here. You see OK, and now let's blend this with a blending stump. They should look soft like this. Okay, just a bit of B pencil and it's not enough for now. Here I know we can continue with an age be here and there's are short and not that bends so pressed lightly, or is a ladder pencil on age or her to age. And I'm using an HB pencil and I press very lightly. See, So these hairs are girl almost vertical vertically and now just are pressing harder as you draw towards the temple and also full of the direction off those arid lines that I showed you. So this is a continuation to the beep mental that we drew in the lower area and press over this area and drug aligns upwards following the direction of the arrows because this area gets a bit more light and it should be a bit lighter. Dender, lower area of the eye, bro. So even in the case of the black eye rose, it should be kind of gray, but not absolutely black, because it gets some light here. So here, just continue doing the same and keep using an age be and try also to fill the paper completely and also change the pressure a bit to make them a bit differently. Eso now here we can start creating almost horizontal lines. I don't want to make sort of typical shaped female I bro's I mean blocked or shaped I rose , which is easier to draw for the beginners. As always, you know, not blocked eyebrows have some hairs out of this outline, but you can drop them to, of course. So here's somewhere in the middle of a Shukri a longer I rose and make them more horizontally see, and now the same on the right side. Still using an age be and following the direction of the hair girls bought in opposite direction and release the pressure is a draw strokes towards the highlight like this. OK, and now let's just covered this highlighted here area actually with a two age to create a hair with the two age said. This protruding part is also highlighted, same as the skin, so the hair is also a lighter and here we have horse until the lines like this and some of them should be darker, some broader. So just change the pressure or change the pencil. It's enough. The eye bro also suggests the roundness of this part of the head and not only the skin, and let's blend it a bit with a Q tip. Okay, like this. - And now use an eraser like this one. Just a great some highlighted here's can use a needed a razor. I think this are just too high. Salama just erased this upper part and add a bit more under it. So you see, you can always change anything like this, and I'm using an age. Be here, so okay, I can see you can change anything that you don't like, so it's not a problem. If you want different shape, you just raise and draw some murrells like this. And now it's a bit closer to the I and let me just blended with a Q tip. We can make it thicker or longer, so anything goes okay, just a bit more to age here and thus now, a bit better. Of course, I could have left it like that, so it's not a problem, but I wanted to change. And so before we add eyelashes, looked a shade this a bit more because I have removed a lot of gratified by blending. Yes, I want to add a bit more shade, which doesn't mean that you have. And after that we can create or draw eyelashes. So you have to decide for yourself. What do you need, more shade or not? But you can also ask me, Just message me and I thought your picture and I'll see that and I can help with some suggestions so you can find me pretty much everywhere. I have a website and you can message me so I'd be glad to help and to say my opinion when your results. So before you applied the eyelashes, just make all the changes that you want and I'm using an aid. Be here. You can even go back to the pupil and darken it again if necessary. So if you are able to see your mistakes, it's a very good thing. I mean, you're under arrived bath because you will be able to improve, and I just want to blend these edges more. - And now we can finally draw the eyelashes in the direction of these airlines. So refer to this image why drawing eyelashes? So start here in the center above the iris. Here we have to draw vertical lines on Lee. So this is the simplest. And I'm using an aide beef council with the worry with a rounded points such a school like this and also creates some shorter lines too. And they'll make them same size and exactly in the same direction, just a random, because they might look fake just like this. And now, as you go towards the right corner, just make them more curved like this. My drawing is pretty big, so I have to press multiple times in order to create a thicker lines. But you see that I'm creating also smaller eyelashes, and also, when you draw towards the left corner, there's the deer docked also made them more current, so they should be shorter and shorter. Also draw them towards the tear duct and more curved and also thinner. Okay, now we can draw the tops off the hairs. With an age being like this, just a blend the edges the tops of the the eyelashes because they're usually very thin on their ends like this. And of course, there are Athene endear lighters. That's why we have to use a lot of pencil, okay? And no, we can draw doors. A tear duct, as I mentioned. Just make them more and more curved, emplaced them more horizontally as a draw towards the fear duct like this. So here I draw them just a bit over disc Lehrer downwards. Like this, ISI, and just make it Kirk and then turn it almost horse until in a bit upwards like this. See dollars bit curry and upwards. Okay, one more. And I want to donate to be here because there's eyelashes are very thin here and just draw them with random and they'll make them all the same. Okay, And now let's just blend them with a blending stump here like this. Okay? And here also over dis Clara to create kind of stronger cash shadow or just Clara like this . And now we can continue drawing the eyelashes on the right side. So heared eyelashes also become more and more curved as we draw them towards the right corner of the eye and they become thicker and thicker longer and longer. And also dancer and I was in the navy again like this. So here also it can go, but downwards creates shorter eyelashes. See, like this just orders, Clara. And here also just go bit downwards and then turn towards the temple and finished a longer part of eyelashes. So if you want longer on a luscious just shade a larger area so it won't go order Unshaded paper. This is what I'm doing right now. As it that way. You just continue. The Maidan were long here on the right side, and I'm using an age. Be here. Circle or motion. Just want to blend it to create a little bit more of the skin. And I want to shade a bit more. And this area is usually darker. This skin gets less light. And now just I'm just drawing toe long eyelashes. The longest ones here. Very right side like this, Andrew Strong with them with quick, confident strokes and blend. Of course,
9. Drawing the Skin and Eyelashes under the Eye: and now we can draw this area under the eye to so that we can apply eyelashes or it and I'm using age be here. And this area also has a little bit of makeup. Or actually, I wanted to to have. So, as I mentioned, it is easier to create a darker drawing, and it looks better. And it's more difficult to draw a liner drawing, so it always looks pale and last realistic. And just keep that circular circle is, um, Chlor emotions and covert this area here, under do thickness of the skin under the eye mental does we created, said this part actually get also gets less light. But of course it depends on light. Sources can be more illuminated. Dog, as you can see now that an age being it's this is not really too dark. So to age or brighter, that will be too bright. Yes, and now you can see how the whites of the eye or disc Clara becomes better and better and more riel and the eyeball has deft due to the shade. Appreciated this Clara, so it is important not to leave it. White Onley dio reflected lights over there I should stay white. I'm using an age be all the time, and I tried to apply the same pressure here. Okay, and now we can blend it with a Q tip and look how it becomes smooth and better after blending. So I also used circle emotions, my blending. That's what you can shade more if you want and then blended more. If you want a larger area, just skin, I know we can shape a bit more. All are on this lighter skin, the highlight of skin next to the nose. And so here you don't need to use an age be, but five age or so can just blind it with a T shoe. Eso here next to the age, be press harder and also draw downwards and will release the pressure as you go downwards. And I'm using it to age here. So this skin under the dear Doctor is bring highlighters. So it's illuminated pretty much in any circumstances, so we should get very bright and let's blend it with a T shoe. I didn't even use a condom pad. This is also good for blending. Now let's just shade the highlight of skin here under this shaded for So as I mentioned, you can draw bigger or smaller area or just enough for the eyelashes to draw over. I'm just going to add a bit of skin here using to age, and this area is also pretty much eliminated. And now let's shade this bar between the dark and a light shadow, also with a to age but breasts hard. I just want to dark in this area, but okay, my complained it cannot let shade this area under do thickness of the skin. So this ah protruding area under the lower I lied so called self shadow under the circular Moscow that goes all around the eyeball and use also circle emotions. And I'm using a beep mental here. So this area in the middle should stay highlighted and we have to draw under it like this. And now we just go higher us. We're approaching the right corner, and here also press harder and create darker shade, then on the left side, - and let's blend it with a Q tip. Now you can see how it gets shaped, and let's blend also this area on the right side, so this lets shade more here to be much darker because the eyelashes cast a stronger shadow here, and I'm still waiting to be pencil. And also let's shade this park under the roots of the eyelashes to enhance the edge between the thickness of the skin and the skin. Under the roots of the eyelashes, we're actually to creating shadow gas by eyelashes and not us. How the edge becomes more prominent this way and protruding, we're going to apply a white marker over it, so it will be interesting. You will see. So we used an aid be for the opera eyelashes. But here, B pencil is dark enough because these eyelashes are shorter and thinner, even with Moscow. So let's start here in the middle with article eyelashes, because there's are just symbols and just away with it with the upper eyelashes. Same here and connect the ends of some neighboring eyelashes like this so they'll make them the same all the same and going in the same direction. But just connect the ends like this, make them stick together, see, and also here the same rule also draw them towards the deer dog. They become smaller and smaller and thinner and also last fence and also some of them grow fart er under the edge. OK, and now let's go towards the right corner. And of course now make them longer and longer and thicker and dancer. And here also let's gonna bands of some neighbouring eyelashes and of course now make them curved. And here it can even use maybe or four b five b and just like this and random don't make all the same and here the eyelashes are very long.
10. Finishing Touches: Okay, Since we have the whole picture down, we can add some finishing touches. For example, here we can at some highlights in the middle like this with an array surge, stuck it within a razor here in the middle. So here we can change anything that's necessary. Also, orders edged disgrace. Some more highlights because this edges wet and we have to suggest it with with highlights and just keep order graphite, and he will remove to graph I with an eraser like this. So here in the middle, I want to make this area highlighted so we can create some wrinkles so anything. - And now we can use this marker. So I just want to place this tiny dogs here, which is suggesting that I what nests like this. We can also add a bit of highlight here to improvise some more wetness and or dis edge like this. You see, so you can always remove that if you don't like, it's just with a mental or which your nail. When it drives up, you can remove it easily. So just don't worry and create the thoughts and lives and anywhere you want. And if you want some of the dogs to be less bride and to make the edges blurry. Just stop on it with your finger after applying while it's wet and you can see it's not that white anymore becomes blurry. I thought. I'm not sure about other brands because I haven't used any. But this markers by uni Posco definitely work this way. So anything you can just eliminate what? Your nail. Sorry. Like working with them. And of course, I often implied them over my color pencil drawings, too. So it kind of blind more shade here or anything you want. Great wrinkles shade more so I still feel this is Bree Pale here. I just want to and more shade. So this way you can change the shape off anything if you're just and more shade or more highlights. And, of course, if you have removed some of the graph, I by blending, just add it back again so you can do anything here. Did your film two needs to be changed and and, of course, I want to see her drawing. I hope you will show me and just feel free to post it, and I will see it or message me. And I hope that you enjoyed this tutorial and that you have learned something and just keep practicing. If possible everyday Draw every day and you will become better and better. - So I have a similar tutorial. How to draw nigh with the color pencils. If you like to draw with colors, check it out and let me know if you have any questions or suggestions. Okay, So thank you so much for watching they care and see you next time. Bye bye.
 Jasmina Susak, Pencil Artist