Transcripts
1. Intro:
2. Tools: Hey, guys, this just mean a Let me show what I will be using for does drawing. And I was always all of using it this paper by for brand a Bristol. And this is a very good paper and I use it for both color pencils and graphite pencils. I'll be using Castell 9000 graphic pencils by cover Castell There's air, very high quality graphite pencils, and these are very good. It's so usually I have one HB and four B or a very dark pencil. I have eight b s, so it is important to have one very dark mental. And HB is also must have mental because you can create a lot of opted values with with this Spencer, by changing the pressure and also one to age, maybe you will need. But for the bright areas, I often use a blending stump, and I don't actually draw so But if I use four beat, you can use find B or three B. It doesn't really matter. Okay, I said, I have a lot of guys of erasers, this one simple plastic, and I have this mechanical pencil, a razor by Tom Boo and also needed eraser. Then I blend with the blending stomp and Q tips, and I use a white in jump and and a wide marker. But by unit Posca, this one is very good because this is opaque and eso we can apply highlights over there drawn area. And so this are very good for adding to highlights at the end of the drawing. And I will be using a simple drawing compass for sketching, you see, so let's get started.
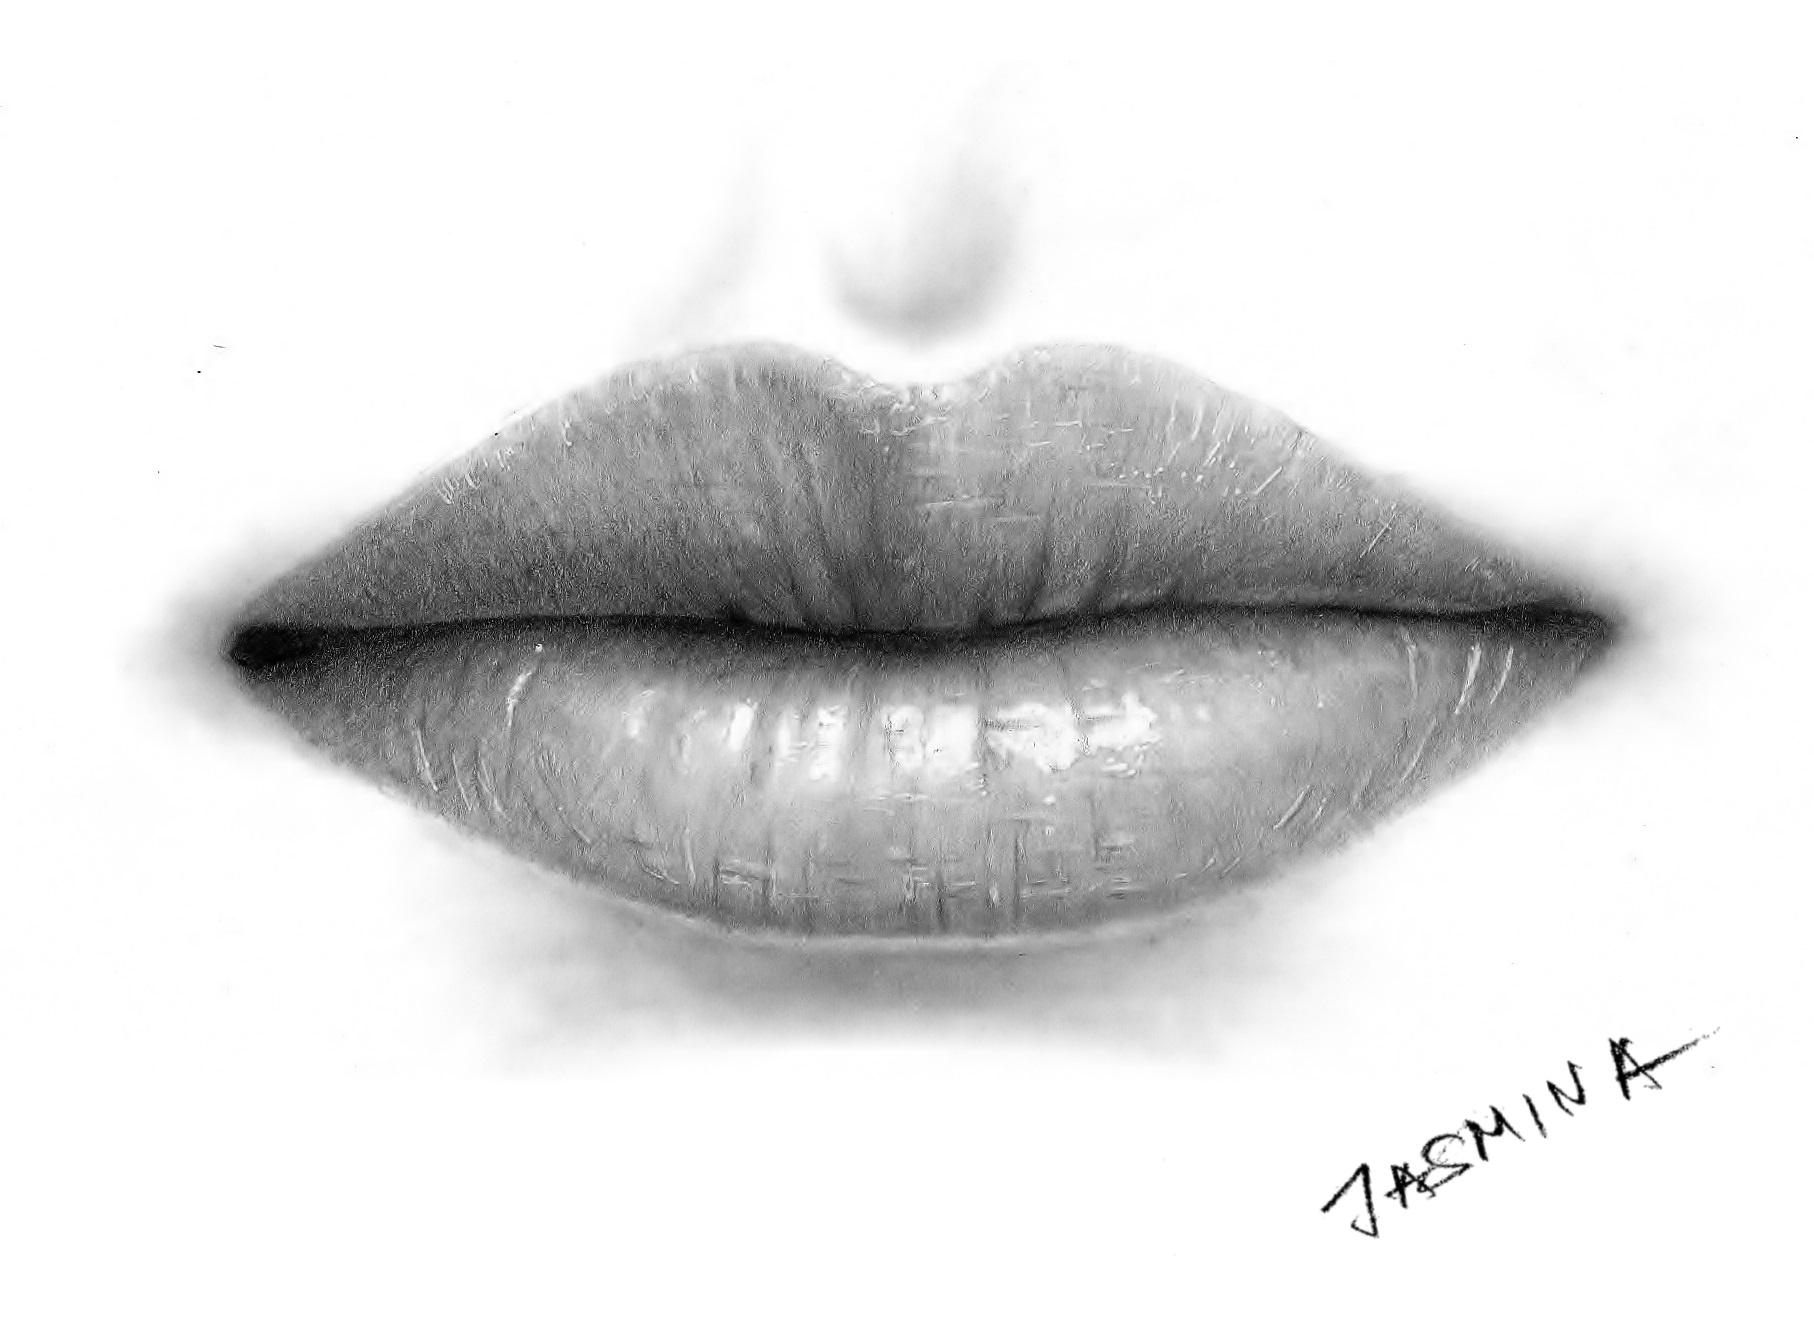
3. How to Draw Lips: okay. I want to start with creating degree. Teach a simple greed. And I want my great to be kind of 12 centimeter watch like this. That which means it's like almost five inches. Can I wanted to be five centimeters right like this. And just to create, to greet, to have it for orientation. And you also want to measure five centimeters and just to connect the dots. Okay, so if you want to draw the same servitude, can it used the same measures, so and then we have to create some horizontal line here almost in the middle. And if my hide is five centimeters, I want to make here, too. Centimetres five millimeters. Same here. And just to connect this so that I have one horizontal line here in the very middle. Okay, so now we can outline it Phillips and start here in the middle. And so the opera late is usually kind of a teenager for, uh, you can be creative. You can draw the shapes just the way one them. I just want to start here right above D cars off the line in the middle, to create the edge between two lips. I'm using an age pencil or sketching. Okay, something like this. So it's almost straight line, but yet it has to have some curbs. So you're here into corners. It can go off down works. Of course. It depends on the angle. And I guess truth. Everything I know we can all find the outer edge of both lips that you know, the Lord Labour's. It's a bit last complicated, so we can start with this one. And so here I just go over my grid line a bit horizontally. And then I started separated from the green line and drop it upwards. And towards here, dis corner like this and also less than the same in the life size. I tried to make this too, besides of semester course possible. Okay, something like this. And here we can start. Actually, we could measure the dissenter off this. Great. So I have 12 centimeters watch, so it will be by six centimeters here. So here, exactly in the middle, we have to drop that. Keep its bowl here, some rock star, tiny Kirby lion like this. So it also can be any shape. And then I just want to drop it over my bridge line like this. I said this A curvy barge can be Actually, you can have any shape. Doesn't have to look like this. And now I start trying. It tours through this corner. We can actually draw the dosh lines first like this to see how it will connect, and then it will connect. Well, then we can connect them with full, full line like this That same year, Discreet dodged line like this. So it looks okay. Just go over with four line. So okay, something like this. And now let's erase of the grid lines because we don't need anymore just carefully. I'm using this simple plastic, and I also want to use this one for here. Join your areas when I don't want to erase my ones. - Now let's color the lips, and I'm using an HB pencil, which is a shape, and I just want to follow the direction of, uh, Moscow's. And just to something like this, they go something like and direction and is directions. So we should actually try to fall days directions. Okay. And now, as I mentioned, we can call her. So if you want to see this line in between between two lips. You just pressed harder. Go over to outline again so that you will see it under the glare of age. Be after losing an age. Be put it dressed, the harder so on. HB is a very good pencil, and I must have pencil, because when you press hard, you can create very dark tones and when for us likely it's really creates a very bright values. So here I am, just following the direction of those wrinkles is a mosque close. So here we don't have to create smallest extra. Don't worry about that, because we're going to blend it so you can see that I have some different areas. I mean song dining areas, air darker, somewhere brighter. So it doesn't matter because we're going to blend it and reports to work. So for now, where applying kind of basic tone eso just carefully next to the address. But of course, if you draw out of the just, you can always erase that. I'm using a Jesus shape because I can covert areas faster done, for example, with a well sharpened, then deep that's not good. It would take ages. Let's go alertness. Floral E. You can split this work into two faces and draw the opera lately, separately and morally. You can try to approach the drawing process from different ways to see what works best for you. So you have to experiment with things with techniques with Muchas that this is a prince, them simple step. - So you concede. Do they have a lot of darker lines? Was I'm pressing hard? I create them. So that's why, for the direction of the wrinkles, even if they stay, I will be fine because they will look natural. So it's not okay to draw like this or cross hatches. So thistle is the best way to follow direction, direction of schools. And, of course, you can check out the reference photos or your own lips and mirror to see Jack Cooper do highlights shadows and detailers. Okay, OK, and now let's blend it all with a Q tip and just press very hard to impress the graph. I into the fiber of the paper and you can see already hard becomes smooth. The texture is smoother. Way way can use a blending stump for the edges, and we don't want to go forward background are empty areas, lips. But of course, we can always be raise one regarding me. Okay, so now you can see it looks gonna darker than before blending because I have impressed that graph. I entered a favor and I have spread to gratify, so that's why it looks darker. So no, we hadn't have our base or basic don't. And now we can create shadows or highlights and two days and I suggest started with the shadows and I use it for B pencil and I want to darkened corner here. Actually, the areas that get less lights so usually corners And of course, between two leaps these areas received always less light. Sometimes they received no wind at all. So this is a pretty dark pencil. Just carefully. You're afraid of using very dark pencils. And I said, just going likely. And then when you make sure that everything looks so good and you want line to be where it is, you just go over pressing harder. Wait here. We can also create a kind of over cast a shadow in the corner, the shadows cast by the upper lip. So this is very important. And also here in this corner. So also there's two sides get less light. And here in the middle, we have illuminated, highly illuminated area which is exposed to delight more than this and the corners. So they have to be darker. And now I just want to press Big Quarter because I see that this is the position of the the edge between the two lips that I want to stay. So that's why I can press very hard with a four B you can use to be or six B or five. It doesn't have to be for B. You can even use nine b you can even use on age beat. Impressive very car. They won't be absolutely black, but it will be pretty dark. So you can see that I want lightly over two areas. And, uh and I want to make sure that I like the position and everything. Then I just going now with a pressing very hard is that this is very important, particularly one drawing from scratch like this, because we never know how it will turn out. So I get this our darkest Florence trying, and now we have to create the values between this very black area and the basic tong off the lips of three created when an age B and after dot wiggin good highlights. And now we should use a bit brighter shade then for B or actually much brighter. So I'm going to use an age be and this time I want to press harder. You can use B or F or I don't know, even age and press harder or uses be or to being pressed slightly s o. I like to work with HB and eso this here this lover horizontal apart You properly always received last light so we can shade it and the upper part can actually had this scholar this volume so this lower horizontal half has to be shaded. This is so called self shadow and I still follow the direction of the wrinkles and I press very likely because I want to build the layers slowly. I don't want to make it too dark. And of course, here someone in the middle we have to press less in order to greet that Grady in transition between the dark dawn and bright own at which will make the leap appear around and I still use a teenage beaches, a shape dip. So it also that Ben is depending on the light source. If my source is coming from the top here in the middle, both left and right side will be the same. And if light source is coming, say from the top, uh, right corner than the left side would be much darker once again. See, as I'm using an age be I don't really progress too much. I really can make slow progress. But if I used to be, for example, that will be kind of too fast progress. And thus I good, particularly for the beginner. So you better practice to build in layers. So here, also in both corners, the upper lip receives less life than this area in the middle because the leaps are placed under around Blaine. I mean, face as Iran plane. So we have to make the lips horizontal into vertical e around other guns cm. Sometimes I'm going over the upper area also. But then I press very lightly and I'm doing this because I want to create that great in transition between this shadowed area and basic John of the literally but I actually breast harder and I go for the lover area much more off almost all the time. So it's a very difficult. It's very difficult to notice the changes when I actually draw in real time. But if you looked it, if you watch time lapse, you could see that it becomes kind of a rounder due to this shading. - Some people have some kind of boom protruding park here, protruding parts actually vertical part here and the very middle so you can shade out to something I miss. So I just decided to create at and now we can start creating a bit darker tones and I'm using to be here. But I press very lightly and, uh, so here, next to the edge to make it even darker because with an age be, no matter how hard I press, I can't actually create a dark Tom that I need here press for an lightly with this to re pencil because it can create a very dark areas and lines if we press harder. So just press quarter next to the edge between the two lips and release the pressure, your shade upwards and after we have drawn a bit, we can blend and then we can see whether we need to shade more and I against see howdy opera. I believe it's kinda around her tomorrow and now we can shade the lower lip with an age be so we shouldn't actually used to be for this Loralee because it's always more eliminated than it populate. So here on both left and right sized this, these areas have to be a bit darker. So start here in the corner, pressing good pre heart and don't express less unless off shade towards the center here and towards the I mean upwards. There was the edge between two lips to make a beer around or some totally. And who are you going or is this Oper area of the loverly also have to have kind of a round shape and we can achieve that by creating here next to the starting here, next to the edge between the dual lips, pressing harder and creating a short lines and then just leave all the pencil at the end of this short lines to make that great in transition and a great actually the shadow cast. Why operatively this and was always when you drop it just blinded with a blending stone for computed even used the shoes I just want to use a bit of still be here right next to the edge till lips I'm using an age thing and it's so now I want to go around or actually over the edge after Loralee starting here brought aboard edge and drawing a line by line upwards still following the direction of the wrinkles and I released the pressure which eat with each stroke. And this will make Jilib appear around. - Of course, you can use much darker values to gratify if you want to draw kind of the lips were in a lipstick, but I want to go just on with with the natural color. So you're saying on direct side I want you to be right under the tulips that I want to continue with. Need to be, you know, you're gonna see how do Loverly also appears round due to this come shading and his great in transition And of course we can. Planet of it, - as I mentioned, is to areas have to be darker using a to B. Okay, so this order shadows but we haven't created anything, does it? We're going to go much more into details because it still looks free flat, and I would've does. I mean, we're going to create wrinkles and saw tiny highlights and shadows, but the next flood secreted highlights. Now I just want to create the highlights in general, Was the needed to razor so here and offer area Just touched a thinker with your razor and concede becomes brighter so very carefully because we don't want to highlight it too much And, uh, here also and the upper area next to the edge because the edges kind of bent, there's a bent barks and here also in the middle of it, this protruding pork lightly just a gently touched the paper. And if you overdo, highlight and you just go over with a Q tip and you can darken it again, Okay, but in the lower area or actually the lower lip should be much more. I liked it. So here in the middle of particular, in the middle here again, press harder. The needed a razor like this. And here also the full of that arch like this. So the highlight is the brightest here in the middle. Often lower. Have to go but works. I also that's blend. - Okay , Okay. So now that we have created, uh, less bride highlights, we can create very brunt highlights that Which means that we have to create absolutely wide areas over the lips, particular here and the middle on the lower lip. And since no matter how hard we pressed with a razor, we can get the wide color of the paper anymore. We can see that I suggest using and something like a wide in job and or jelly rolls, or why Teoh marker to apply highlights. And so I want here two great them here and the middle because this area as illuminated the most. Okay, something really tips. And here we have to think about wrinkles. Eso the highlights will be shown over the protruding parts of the wrinkles, which means that we can't just, uh, colored area. But we have to think about wrinkles like this. Yeah, you can also that money And here also overdo cubits ball just a little bit. Because this area of this Cupid, it's ball. Actually, it's or is highly illuminated and is very shiny and I just stop on it with it with my finger to make it last wide and to make the edge. The edge is blurry. Okay, something like this. And now let's great do wrinkles. And I want to use a for be pretty operable, and we have to create a wrinkles and their natural direction. Eso here and a lover area. They should be darker. Why darker that and the upper area and just grade them at random reverie wants of. They don't have to it be drawn in some order. What's more, if we drop them in some order, trying can look kind of last realistic. At when you draw a bit, you just blend blending stump like this. So if you find four B, the four b will be too dark for the upper area, so I use it. Only here, next to the edge between the two lips, somehow actually weaken. Create some tiny details small DJs that are hardly visible from larger distance, but yet that we can actually you can stop here and finish your drawing. But I just want to and more the days tiny wrinkles and highlights. So now I'm using it to be to create wearing clothes here in, uh, the middle and also in the upper area. And I press for likely they can't see that they're still quite visible. But we don't want to make them to your so here into corners or actually next to the corners. We don't have to money wrinkles. We have them mostly here in the middle and, of course, in a or LORALEE. - Okay , So I here into corners. I don't really want to create any more inclined. Add a bit more shade. - But the tiny, very tiny rankles which couldn't be even called wrinkles about this is actually the texture of the skin. When you zoom in, take a look a dog See Ah, lots of tiny wrinkles. So it's not actually smooth it seems to be, But he had lots of bring clothes. I thought, if you want to draw hyper realistic drawing, you have to draw old China de Dios. That game was seen only when you zoom in. Okay, I know. I can't contend over to lower also a shade more and to create ring Clich? So here in development what we have, you know where to go wrinkles and I was. We draw down towards the corners. We have to make them curvy. I suggest starting in the middle because here we have very simple already go wrinkles. Also, you can just school a moldy Highlights like this also drowned. Um, don't make them the same or symmetrical something. Just a try. No, some of them should go over the whole A leap and some of them can be shorter. - I'm using a four B again. Here, Teoh, darken this gust rattle a bit more. After a lot of blending and drawing the graph, I would just get removed from the paper so we can find out again. I was always wherever you're drawn something just blend it to make it smooth texture and here in the corners, or yet gonna curry wrinkles. - I just want to work a big more on this opera lift and kind of to shave more dis lower area. But this time I leave out a next to the edge, actually next to the edge between the two lips for to create a reflected light which can, of course, be erased later. So I just shade right above the tiny edge or dining line to the left that I leave untouched here. As you can see, it creates during flight in life, and it will make the leap appear even more around. So you don't have to draw the wrinkles everywhere, just somewhere at random here , next to the edge. Some of the wrinkles are actually my daughter of the wrinkles are very short, and they don't go over the whole lip. So before I started drawing this drawing, I started some reference photos at my own leaps, which is something that you should also do. Check up short details and shapes and highlights law schools, that's all. So did your drawing can be life like here we have kind of bad. This edge should be a big event. Just to go toward only here in the middle here and the corners is already kind of eyes in the same level with the skin around it. - And also, when you zoom in, you can see over the skin that there some also some parts until wrinkles, so we can add them to serious to be first line. And here we have some, uh, Corby rain clothes like this that also left create some particle reckless orders. My lights did highlights here. I'm using an age fee for this. - I look into the same hoarded upper, make it super d dead. Still use on age Be here. Of course, That's one because they shouldn't look like lines Channels here. Awesome! So more we can create tiny tiny highlights which are not too brought and that can usually be found next to do rain closer. And, uh, I'm just needed a razor. And I have created very, very sharp the paper and I just want to go next to the to do wrinkles that I just created. So, so horizontal and vertical wrinkles. Both should be a bitch skyline, So just very carefully. And so these highlights are also also visible when zoomed in. That's why we but you don't actually have to create them. Just want to show you how to make it super detail you want. And here in the shadowed areas, this highlights should be a quite darker. But if we have to create a bit, so just gently touched the paper with tape, your razor just a pickup graphite. And here also between the wrinkles over the procuring area and should be quite Breiner, and that's just place the tip of the razor to eliminate a bit of the crab, but not too much because that this area still should be a very dark now if you remember the edge Ah, Bob D And between the two live that I left untouched when I shaded. I also want to broaden it off just a little bit. So this is the real of reflected lights that I was talking about. You see, I just touch it with a razor. It comes a bit brighter, but as I measure, it shouldn't be too bright. And of course, if you overdo, just go over with blending stump. You can darken it again. You're also next to the edge. Have some Reddick R and courts until rain clothes so we can just make some highlights are now. Don't just gentle touch paper. I'm just meeting razor Jamaican clear people. It you hear this area should be very highlighted, but not us highlighted as this one. So if there is a difference between the highlights, how lots of very dark candy absolutely wiped and not I want but still our bride so that it's a point is to learn to see the difference between the highlights and shadows. For instance, the most important thing. Okay, again. The same here, Over discreet. They're highlights. So here the wrinkles that I created vertical and horns onto the wrinkles they should have highlights their highlights. So that's why it is better to to draw bigger drawing, because then you can go much more into details on anyone. Struggle, because if you draw a very small growing, you can go into much. It is very hard. I just want to Brian on top here around it. The promise. High life, some of the side. - Okay . And also we can add some highlights with a wide and job. So it's sleep is very tiny, or you can use a being type white marker and also create some highlights and just stop find it too, right? Okay, you simply eliminated with your finger. So right after a flying it and even work when it drives on, you can see it's now quiet prior, So if you want some of these tiny highlights to be brighter, you just applying, wanting jump in so you can apply tiny dogs, vertical and horizontal lines over two areas that would be highlighted and, of course, next to do wrinkles. Otherwise, the wrinkles looks just like lines. But if we give them a bit of highlights, they look wrinkles. They get the third dimension. - And it's not just Scott. I prefer nated razor, so I don't move. I don't place a tip of a razor emojis. Just touch it. I don't want to remove too much. - No , I can do the same here. Or did up early. You're in the middle and here, over to ash that that's a bit bent. So did received more lights, just great dining, dogs and lines. Okay, and now, if you're satisfied with the it is which drawing with the lips, you can add some guest shadow. For example, here under do Laura Lee and I'm using the graph I Potter and Q Tip I just picked and High Potter, which will make a lot early for pop on the page, and it will make it appear around. So here, particular intimate way have not got shadow. And here India corns. We don't really have because, as I mentioned, this is in the same level as the skin around it and the cash shadow should be the darkest next to delete. You're gonna see I'm not going good. Exactly next to the leap. And this way I'm creating the reflected light over the edge of the lower lip. So this cash Adam should be a peach. Bigger. Of course, you can use a pencil and and just blended. But this way is faster. So the cash shadow should be the darkest here in the middle. And then it should gradually disappear towards the left and right sides like this, of course, it's already belongs to shading the skin of the face. We can also hear creates, um sunken areas by shading this park right above the Kupets phone. And this way to make cubits bowl even more prominent and highlighted. And this edge between two a leap and keep it shouldn't be this dark. - Yeah , and you're awesome in the corners. Shame it, because here we have the bend skin this next corners. This skin has bend inwards. It's like shaded a bit. And this also should be two darkest here next city, edge of the lakes and should gradually disappear into the background. All right. Basic core of the skin to the same. That's why a press last in the last few shade away from the lips and I again see, as I was planning around, I eliminated a bit of this darkest area and I just want apply it again with four B and of course, the blithe blending stone. And I hope that you enjoy this tutorial. I would like to see what you have created. Like the sea yours also afraid to show me and to ask me any questions. If I didn't mention something that you would like to know, I will be glad Transfer. And so you would an ex tutorial. Bye bye.
4. How to Draw Glitter Lips and Teeth: Okay, So this time I want to draw a slightly open, most with visible deep so you can practice, drawing, teach. And I want to drop the heavy lipstick, which I want to make glossy and and so not really natural color off the lips, but with lipstick. Okay, that's the first thing. Let's draw a circle. And I want my diameter of my circle to be about six centimeters, which means that I am setting that This does between the needle and Bensel leaders. You can see three centimeters. It is about one inch, 1.2 inches. Let's draw a simple circle here. Okay. Doesn't have to be beautiful as just for orientation. Okay, so this is the height of the open, most with both lips. But I want to make it a bit wider s 02 corners to be like maybe something like fan or 11 centimeters like this. Which means it's about 4.4 inches. And now we can draw the outlines off the lips and let's start with the upper lip. So here we have to create a Cupid bowl. Cupid's bow like this, something like this, and then we can go out of the circle it like this and start carving the line towards the corner and we can create a dashed line first to see how it will connect, and then we can draw full line. So this corner here had to be gonna have to have some high like this. False. And eso tried to make the same left and right sides. So first bash lines like this, and then you make sure that it looks good. It is in the right position. And did you like it? Just go over with a full line, okay? And now we can all lined the edge of the lower, so start here over to circle and then start kind of separating them and also draw to dash lions first. Like this. You're okay now we can draw the fault line. I'm using an age. Be for sketching always. Okay. Okay. So now we can draw the teat, actually, and, uh, the inner edges of the lips off that I want to love early to be gonna 2.5 centimeters think like this. And now I just want to connect it to the corners. It could be a big Carvey, but here we can go but downwards. 10 then here in the corner. Just make it a bit curvy here and in the same here on the left side. Just go bring darts and then upwards towards the corner. Like this. I saw the lower lip is usually a bit speaker, but it doesn't mean that it has to be speaker. So here somewhere we can make it elite separation of the labour here days can be stick together and but we can make a separation. And so let's make this old upper sleep also kind of two point five centimeters or so. This should be a bit thinner than the lower lip thought that we can have here space for the the about one sentiments in height you can see. And now I'm just going I'm just going to draw here for some time line in the very middle. And now we can start curving it downwards towards this. Uh, and this here. Awesome. Okay, I know we can actually erase this circle because, uh, we don't need that anymore. I want you to this every served. It's mechanical, so I can't go in between the lines. This is for more criticize everything when you don't want to raise anything around, I have this brush make up to eliminated ost. Okay, so now here we can change whatever you want. So no matter how you your shape, the shape of your lips turn out, it'll be good because gives so many shapes of the lips exist so you can actually fail here . And now we can draw the deep here. We can measure. Where is the middle off into it. So I have 11 centimeters, which means it's five 0.5. Here is the middle. So this is the space between the two front of feet, and I want to drop them here. It's so they can be wider. They can be kind of narrow, are smaller. I want to draw them like but speak can save. But 1.5 centimeters. And also let's make this one same with So it's zero point six changes. I'm not sure that this is no. So you call that 0.6 inches mind and just create this lower part of the feed we'll get which has gonna Corey corners And some cases, of course, some like this. You hear the same. Okay, and here, teat, Which next? It should be a bit smaller, actually. Not that wide. My purse, You should, like, kind of smaller. But this also the bends from person to person. And here we have also. Now we have to draw smaller and smaller feet. But the rest don't even have to be quiet. Risible. Okay. And we can also draw the lover girl retook choir smaller. You can check up for reference photo or you're on the end of mirror to see how they're placed s okay, something like this. And now I suggest starting with the teat. And so, as you know, the teacher are not actually why they are always kind of bride. Great. So I want to use a six age to color the tea particular dis and, uh, not the frontal teeth, but the's orbit inside. And I'm using a circle or motion because I want to create smooth texture. This and now, as I'm shading here, does inner. I want just a press a bit harder. And this frontal teat, we can also shade with six age and put a press a bit lightly. I'm impressed less than your pressed arresting the feet eso keep applying circle emotion. So this is so called circle is, um, which means that we are applying tiny, overlapping circular circles. It takes more time, but the result is always better. And no, I start with a single bee tartar you get also start using good, for example, four age for two age or something. But we're going to work on this a bit more later. And also let's cooler days still with using six after him now they looked very dark and scary, said there no white. But after we have drum the surrounding areas, they will be. They will appear bright, but they shouldn't stay white Onley this in the very middle and some circumstances. But since we have the opera leap in, which blocks the light, we have usually to shade. And now let's blend it with the beauty. So you have to use a clean one. So not the one that used for for blending. And you can see it's even darker now, but it's much smoother. You can go over the the surrounding areas because we're going to Koehler dumb, too, like this. Same here. Okay, The next thing is to create it shadow cast by the operas leap over the heat, and it can be kind of like here. Some are almost a hot off. The teeth can be shadowed like this. Self dispense. It's a big to darker than a six agents to use and just go over its like this. So here you can see the offer area. It's much darker and just school over again and again to you, Dr EDS. Enough. It's the same here, so this will make the leap that properly appear closer. To do yours. I'm And, of course, it will give the dimension that your dimension to the trying. So the cast a shadow is always important. Okay, something like this. And now there's inner that they can have kind of a bigger shadow because there inside and they receive less light so it can be something like this. I also go between the peak, so it's not good if we only have drawn a line. Eso this line have to have some grandee in transition between the line and basic colored feet, which means that we have to press the bit alas, every shade away from the from do space between city. Okay, I saw this inner t can be shaded completely was to age, and we can even use a page feed to create space between them. Like this. - Okay , last in the same period. So here we have a shadow like this, Kirby so possibly draw towards the corners. Or actually, in words, the teat received a nice and last light. Or actually, they the upper leak cast the longer shadow or them. - And I'm using an age be too dark. And is alliance between the team most okay, and the lower teat can also be bit darker. Somewhere, in some cases, the upper teeth with will cast a shadow over down. And now let's cooler here to inner area of the most with an eight B. So everything is accepted teat. Just just carefully, because this way you are outlining the teeth and you can change their shape of the teeth. But all of lining said, use carefully just very carefully with this pencil can be completely erased. This is a very drunk pencil. You can go over the area pressing line lead, and when make sure that everything looks good and just the way you want, then you go over and once again with an A B or nine B or seven B and then you press hard. So this is actually the inner part of the moans, maybe dong or some gum that receives no lights. It could be absolutely black. And I can see that the deep doesn't even look at dark anymore. If it looked dark, do that. I mentioned after we have drawn surrounding area to teach one look dark. So here we don't really have visible teeth democratique. Just a bit of the property, I guess, and you are delusion. Draw this fast. Just take your time at the speed will come with time and experience. And then you will be more self confidential that you can drop faster. Okay, I can see how duty it actually look kind of deeper into paper, and the upper and lover leaps look a quiet closer to the viewer's eye or actually in a different dimension. Okay, now we're going to see there's a sharp and between teach and the background or actually the cavity of the mode. So we have to salt in it a bit with the blending stumps that you use the blending stump that you haven't used before and with a very sharp deep and just go over the edge between the heat and the background. Soft in it. Eso que tips are very wide. Their tape is a wide for this, and that's why cute. The blending stump. It's quite better you can also go in between the teeth this so just blended edge Regulations state this sharp and now, after you have already some of the graph, I ordered the deep of your blending stump, and you don't have any other blending stump. You can also use piece of the shoot and just take it and just make like this, uh, sharp dip if it and just go over like this. So indicates that you don't have a lot of new because blending stumps it can do it like this, or just rub it around the pencil or around the old blending stump that used blending stump and you can do the same. It is important not to use Dick fold blending stunned that you used a lot that you have a lot of graphite on its tip, and now you can see how the edge between the teeth and the background is broken and looks softer. And because the teeth they don't have a sharp edge, They are kind of bent inwards. Their edges. Okay, Barnes, the lower teeth. Same just carefully. Okay. Can almost blend something do you want? So now that you have some graph I over on the tape off your browning stomp, you can go over some areas. This you can never pick up the graph I from the background or from the inner part of the most, and apply it. Overdo teat. You want to make darker if you don't like some from something it with, I needed a razor. You see some imperfections, and as immersion, I want to draw the lips wearing glossy lipstick. Very dark lipstick. So I just want to call her toe both lips with to be And, of course, to follow the direction of the wrinkles because, you know, they go something like this. So here in the very middle, they are article and they start growing like this as we draw them towards the corners. So this is just approximately to show you and which direction direction To draw the strokes off course, you can use an age be or even broader Bansal. But I suggest using pretty dark pencil because it will be is not still not too dark. You can even use a for B or five. But to be is just free some of somebody like this. OK, And now let's call alert to both lips and here next to the teat. Let's start with the off lining with the edge you get so here breast very hard, right? Both teats band. Just to carefully you can see that the most that I draw it Look kind of smiled, Rather smiled then slightly open most. But I can always change that by going over these inner teat. And I will show you that later. Because still, I don't like it here. We can see too much of the heat. So if you want slyly or open most Onley these frontal choir Izabal the rest. I'm not not done much and I'm using it to be for this. So the cooler, everything okay and same here Stick, operate edge off large only as a large and you don't rushed. Don't draw this fast. Just take your time and we can also hear blended And if you consider the deed actually look white a beer want Although they're not wide because I just want to apply some more under the shadow using an age be and sometimes with blending, we will remove a bit of the graph I So we just have to apply it again. Yes. Also, this deed kind of two visible to me. So I just want to go forward coming back to this. So when we draw from scratch, we never know how it would turn out. So you can always change something during the drunk. And it's always easier to now to go over the T Dent to erase the lips speakers. We used our pencils, but you can actually we can't erase them to make them absolutely white again. And now it looks kind of more like slightly open mouth, because before does they looked like, smile or something. And now we can shade these energy even more with an age and to go over the teeth. Of course, I used to be so I will be thing This all the time the lips falls, so now you can see that it looks like finally open more. And also this is due to darker inner deeps because I'm shading them now and they look more inside good farther from the viewer's eye, so to say. And of course, we can like Nick of it. No, you can see how did teat dot arch? And now let's colored both lips that we actually started moving the direction of the wrinkles here just carefully next to the edge. And so you don't have to breast very hard and texture. I don't have to be smoke, so visible lines and everything is our okay because we are going to blend it. I recommend using Jesus shaped keep of the pencil so it will make you the Colbert Areas faster. And it will make the texture more even even before blending. So it against the I don't press too hard. Otherwise, I could create even darker volume with this to be mental, as you can see, this there. So two sharp edge and two big difference between this edge, the lower edge of the upper lip and this basic tones that I'm flying now. But we're going to end to shaded more to make a granny in transition between this very dark . It's on and the basic tone of the lips. So for now, we're just applying basic color off the lips, wearing lipstick. And then we're going to make it glossy by adding highlights. So it's very interesting, Dan under drawing to some highlights. It's kind of difficult here to drop for me because I want you to see so I don't want to covert it, drawing with my hand. - And now let's cooler Loreley in the same manner just carefully here, next to the edges, - because we're going to see her drew a bit out of the and but it's okay. We can raise that. It is important not to draw defeat. So here is not good to use cross hatches and some horizontal. Those jokes on Lee followed the direction of the wrinkles. It's a major lips look natural. Okay, I'm done. Recurring. Okay. And now we can blend it on with the Q tip. I use this one that I was pregnant, so just go all around them area that you just drew and press very hard and blended. Goal. I used circle or motion here to spread to graphite. Evenly. Order paper. You can just carefully not don't go over the teeth. So for the area next to D to the teeth, we can use the planning stump so that I can see you can still see some of the wrinkles and lines that I initially created when I was showing you the direction and also when I was covering the area with the to be in the previous step. But it's OK because this is just how they look, so it's fine. That's why I say it's not good to use cross hatches or any horizontal lines on Lee this and only draw in the direction of the wrinkles because some of that was always stay visible and just first very hard and push that cross back into the fiber of the pace birth again. I can see how it looks smaller than it looks quite better once in the same you you can even use the shoe, but you could maybe go over the teach. It's quite good and blending stump. It would take a lot of time and texture wouldn't be even. Do tips are very good, okay, and we can use the blending stump Asai mansion to blend the edges. Havel Suppression very card and your next scare. I'm also here. Okay? And now we can create some darker shades Are values that here, next to the edges in the corner and also here to create a degrading transition between this black edge and this basic color off lips. And I'm using to be here. And I just blaze a peep of my Bensel over just a black edge. And I just did more draw away from it like this. And I leafed off the elite of my Bensel at the end of the when I finished the stroke in order to make the bread in transition secure the corners over his received last slide so they can be quite darker. And here we can implement here, we can draw some wrinkles. Also, is that some just a make some of the lines longer. Like this. A trend? Um, just don't make them, um, the same or predictable. Just random. - And here, this area should be gonna highlighted or s so we can keep this cooler. And we can just colored arrest with it to be Now this that so Here in the middle of the wrinkles, it should be murder, Kal. And then we have to make them career and as we draw them towards the the Corners weekend, awesome planet of it. So whatever you draw your just blend blended to draw and saying, here, this corner or actually the upper lip in the corner can be very dark should be very dark, but don't press too hard, but go over lightly and, uh, and then go again and again and again until you create the area. And it is dark enough because if you brush too hard, can a over to and then it's kind of difficult to erase. So it's always better to build up. Did values with layers done to rush and to breast car Okay, something like this and now lives with the same here next to the edge. Or actually, ah, under the edge here the upper and lower lip because they're going to see now I have the the the clear edge between this black line and the basic color off the lip. So I just want to break up this edge by adding tiny short lines. And here also, I just slimer lift up the lead of my planter as I finished these short strokes like this same here in the corner. The Libs should be a big darker. So we have to make the vertical and horizontal around this by creating regret in transition . So something like this. So the weekend highlight, we can have the highlights here in the middle. The brightness highlights here. Also, we can start grating some wrinkles This So here in the corner, we don't really have to money a ring close, but they're very tiny. And I just want you using for be here in a very corner like this. I don't know, I think is a drawing to darker things like this. I mean, it's quite easier than to draw pale objects or facial features, in my opinion. So I always recommend drawing the heavy makeup and lipstick and so on. So because they're drawing looks more spectacular and I catching better done a simple bailed drawing. It's the same here, lover lip. We have vertical wrinkles in the middle and day, become career and cover else. We draw them towards the corners. So I'm still using your to be. But of course, we're going to go into details later on. And here in the lower horse unwto half off the lower lip that the wrinkles are straight even here, and not only in the middle, but also here. So it's interesting that there curvy only the upper floors and 1/2 in here in the lower floors and 1/2 there straight. So you should study some photos or you're only before you start to draw to make your drunk look lifelike. So that your diab to suppose that when you make sure that some things in fact you can become more self confidence and here also and this school we have to shave a bit more and actually the fool with or actually hide the globally. Yet this, uh, lower lip, this left and right sides of the lower lip should be quite broad erred and that the left and arrive sides of the upper leak. So, yeah, we have to create a lot of values and therefore together after give shape to the lips so that I can look proportional around and so on and dan after dot would get her. And it does something that we can do the same. But next to the outer edge and and here, uh, on the lower lip, we have gonna bent edge. So the in my case, it's like two millimeters which is would should be gun brighter and then under it, we have to start shading like this. Same in the direction of the wrinkles like this. So just leave the edge on fashion, which also should have kind of colored, but not too dark core, but because that the edges spent in words and it receives more light after losing to be and same here. I pressed very hard here, right on her, Dag. And then I released the pressure with each stroke. And of course, we can draw the wrinkles. But here in the upper area, we don't have so many wrinkles, actually have tiny wrinkles, not that deep wrinkles. Plus, we have here in the lower area and just shake completely here in the corner. And same here. Crudo, Kupets, bull and same here just made Adi edge and start each strokes each stroke under death like this, I know I can do the same. But here, over the lower edge, off the more lip. So this here we have gonna bent area just bent inwards. Also, like two millimeters or free. This so it has to be quite darker. So here, only in the middle, because the into corners the skin is on the same level with the surrounding skin and here. Dismayed area shouldn't appear closer to the viewer's eye. But we're going to plan cast shadow, so cumin more around and more. Three D. But for now, let's just shade this, Um, Laura barked I'm still using to be and that we can also shade this, uh, lover horizontal. Half of the Lord also just plays the tip of your pencil here or to edge animal. It's upwards doors the thief. And here summer ended my look happy. Gonna stop. And of course, some of the lines should be shorter and saw them should be longer. And those longer again can represent a wrinkles. - Here we can use a bit of Fort Me three. This edge look event and worked like this. Don't breast so far, just gently and go or and over until you think it's dark enough. Sometimes after blending the areas against C become a brighter of course, when we use bright that until they become darker after blending so always after blending, we had sometimes to apply more the graph. But this way we're actually green. Very small structure. So and we're working in layers so very time consuming work. But if we want to make it good drawing, we really have to take our time, okay? And you see that I have draw some of the lines out of this edge, but it's OK because I'm going to apply some graph, I order, but we can always erase that. - Okay , - And now let's grated highlights. And here I think of two kinds of highlights. The highlights that we will apply with a winding jump in and highlights that we have to create with eraser eso I'm using needed a razor. And it's a here. The dimension that we have in the upper course under half off the low relief we have eliminated part. But since we want to draw the lips weren't lipstick. It won't be too white, actually won't be too bright. It it has to be going a broader than the surrounded area. So I just place the tip of mine. They needed a razor like this against C. It becomes broader but not too bright because we don't want to make it too bright. Just give it to round shape to the league and the the highlights that we want to apply with the whiting. Japan will make the lips beer glossy and this highlights will make the lives appear around . So if you over, do you just go over with Q tip and just gently touch big bird for needed brazier? You can see how broader it becomes yet is still pretty dark, which is what we need here and here. We have to create that arch large to highlight. So we created it towards the corner wrist. It have to become darker and and to go a bit upwards like this. So here we shouldn't move. I mean, it plays the razor over the paper and move because it would eliminate a lot of graph I and we don't want to hear. Okay. And we can do the same over toe properly. But here, somewhere in the middle or actually on the top of the a lover car isn't 1/2. So here, sorry here, like this. And here. Also it should be arch are highlights, which is the brightest in the middle. And of course, I do occupies toe larger raw, larger areas and the move here in the very towards the corner and become smaller and smaller. Somehow the leaps look kind of like a but wearing the Met lipstick. So we had Matt lipsticks, glossy lipsticks. We even have glitter lipsticks so it can even stay like this. And here, also the bent area are actually the upper edge opera late that I mentioned that it's gonna bent inwards that we could awesome brightening up it just very carefully. So the part that we think the shade in the previous step was to be that I said about two millimeters should be left untouched so we can just brighten it up. But the very carefully you missed against am just a good thing. I just touched the paper and don't move. The deeper my eraser we get So creativity harlots. So if you don't like the highlights that you create, just go over it with cute, cheap or blending stomp or was a rough dental, we can create some reflected lights, the light that is reflected from the teeth. It's here, right under the edge waken shade. More 20 highlights. Okay, now let's greater highlights which are make the lives a very glossy and I want to use a wide marker, this one by unit Bosco Eso about one millimeter thick and also wanting Jap and for tiny it highlights. You know we can create a highlights were actually the glossy Barts where day would be so they would be overdone. Lost the highlighted areas such as here in the middle, and we can create that arch like this. So here in the middle of can't go but dollars we create that porch. So just drop that lines and dots and less than the same here here summer ended. Middle used to be highlighted. Of course, it depends under life sores and someone who thinks. And now let's go around. There's a big highlights with a writing job that great tiny dots and lines and so also weaken. Go order next to do wrinkle wrinkles like this. So if you don't like, if you don't want it to be too wide to stop with your finger and it won't be, I don't want any more. - So here, around all around this very bright and something's a large highlights weekend at some tiny months. - Sometimes you're interested. It's enough if your drug dog and sometimes it after drawing lines. - Also , if you don't like some of the highlights, you can use an Exacto knife and removed. Um, like this when it drives are removed. He usually or with your nail knife designed to be this one, because you never know how it will look when you apply that there before reapplying up. So it's different when we draw from reference photo, but purge oddly weakened removed. You can see a caramel, this watch Jabin and a wide marker by unique Bosco. I don't really know, but order brands work, work. I use only days, and you can also blend the edges of this. This highlights and with the blending stomp like they're just used no one. So if you want to blend the edges between the highlights and a basic color of the lips just blending spoke. - I just want to create some more wrinkles. And then I'm done. And the only thing left that I want to do is to great guy shadow. - And of course, we can also apply some highlights over the teat. Like uh, because the deed turned absolutely white. It's gonna see we can apply some white dots to make them shine like this and to make them actually look what? Because they're what So it can be quite visible particular in and is interred eat When we were that we have shaded a lot. So this why dots apply it was whiting jump on. It can be quite risible there. - I hope that you find it interesting as much as I do and that you're going to experiment with these things. Can you go in between with mental? And this way we can remove the highlights that we don't want that we have apply with a watching job and that we don't like register illuminate them, removed them even with a pencil Bensel here we can shade more. So now we can shade more summer where we want to see em shooting this sparks to make this reflected lights. I mean delight reflected by the teeth Adele protein order Lar lip here and I saw to create that too. Report to make them separate to make this highlight for like, a light separate from this highlight. And this will us again say this will make the leap Look it even more around every year, we can add some wrinkles, some so many details. - So yet that reflected light from the operative here ordered lower leaps Onley in the middle. Because this deed are highly eliminating, illuminated and off course that there's are kind of closer to the leaps, then these energy so 31 relate. These energy won't really reflect light because they're not dub right, not that illuminated and they are found inside and I can see us. I'm shading this bar between the rooms like a light and highlight the legal, appear more around and really reflected light and highlighted become even more prominent this way due to disassociate. And we could also create to the wrinkles and probably you have removed them by blending. So it always happens just great them again particular here, next to the white lines that you just created with Whiting Jubba, because thes highlights are actually highlighted. Wrinkles are that parts of the wrinkles that are bent and they received more lights where you don't want to make too bright. Highlight that just go Oh, over just touches with the needed direct needed a razor. Now that I mentioned that we have two kinds of highlights here. The ones that we have to create, what they needed, a razor and these that we create with a wanting jump. And it will make Felipe look of glossy. So there absolutely different kinds of my life. Just the name is the same. So So these highlights that we created with a thinker marker will be visible from far away from larger distance and these tiny wrinkles and dolls that we created with a whiting job and those air visible like one zoned in. But these are also very important. Of course, it depends on what kind of how large distance we're looking at it. So I just wanted to say that you should check your drawings from like him when you stand far away from that, how it looks. So it has to look good when zoomed in and when zoomed out. So it was very important to make it. Who could begin also, Sometimes we can not as the things on Lee when we look at the drawing from larger distance and sometimes I go in another room and watch my drawing from there. So and then I see, for example, that my great in transition It's not a flaw lows, but I have to shade somewhere more or to highlight more. And it is also have helpful. If you take a look at your drawing into mirror, it's the same it would that you can not, as the things attitude can't notice when you look at it like because your eyes are used todo picture and you don't see some mistakes or something the to that doesn't look good. And Alice the final step. Let me just add some cast a shadow. I'm dipping my Q tip and into the graphite border, and I just want to create some guest shadow, the shadow cast by the lover Leap like this, so apply more here in the middle and then less and less associate towards the right and the left sites. This eso this cash shadow will make the lower lip pop on the page it and appear even more around, and also here a big too in the corners because the skin is kind of bent inwards of this. But this. But of course, all this depends under light source, and here involved a Cupid's phone can shade of it to go blending stuff and also all around but here and it offer area. I want to use a clean system, I think some because I don't want to dark in this year blended tissue and I was the last thing we can create. The reflected light here over the edge of the Lauren leap eso the light that reflects from the skin over dis bent part of the lake like this. It shouldn't be too bright, yet kind of broader than the surrounding area. I just want to use this one something like this. So I just want here, too, to I raise a bit more to show you that's what you can see better or but what I mean by reflected light. So this is still kind of part of the lake, and now we can go shade under it, and I'm using to be like this to create a cash shadow under Dulip and let's Blood. And now I just want to go up it or it because it tended to be too bright. But it actually can stay like this because the lips are glossy. They will reflect more light. So here you can add more details of change, something and I hope that you enjoy this tutorial, and I'd like to see what you have created. So just don't hesitate to ask me any questions, any questions and to show me your results. I would be happy to answer. And also, I'm open to your suggestions. So just let me know what kind of tutorials you want. Tow watch and see what an extra tutorial. Bye bye.
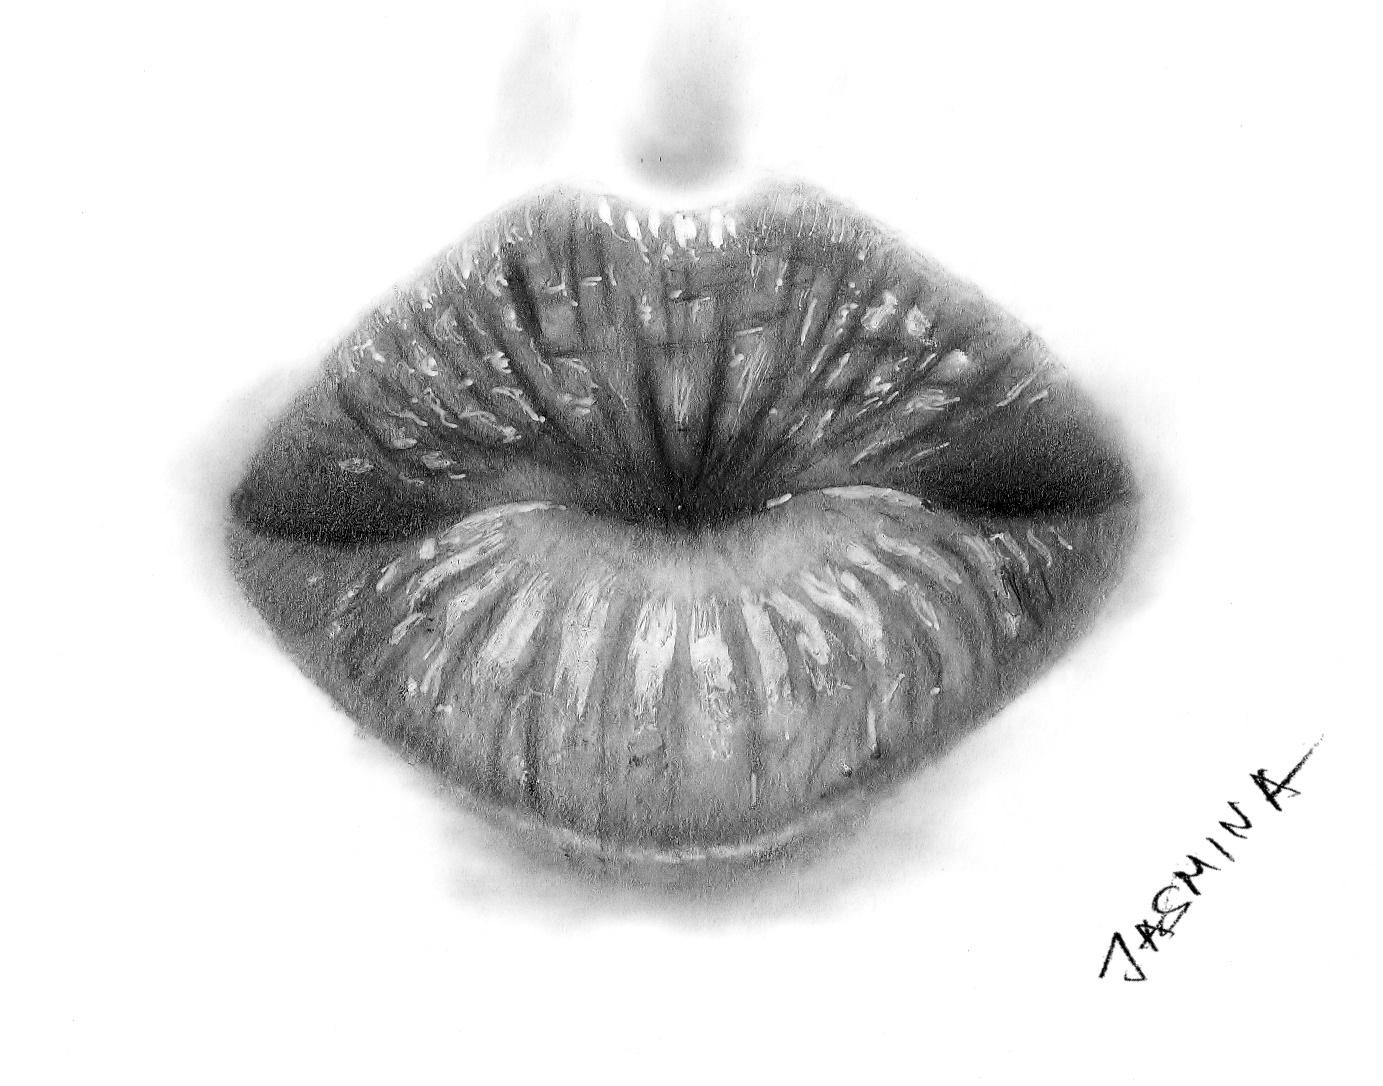
5. Kissing lips new 720: Okay, so now I want to draw kissing lips. And here also, let's start with a circle. And also, I wanted the amateur off, uh, kissing lips to be like a six centimeters. And I'm setting up a good distance on my drawing compass between the needle and pencil late three centimeters for 1.2 inches. And let's just draw a simple circle. Okay, so it doesn't have to be perfect. We need just for orientation. But since the shape of kissing lips is not actually a perfect circle, we have to prolong it here on the left and the right size. Just a goal order Circle like this, and as a continuation here, start separating from the circle like this and also from from the lower area. Same and just created corner here like this. And a list of the same here like this. And now we can erase this circle unless Grady edge between the two lips s. So here I am. I have to, and the whole of my natal. Also, I know that here is the kind of the middle, but we can measure it actually. So the highest fossil, six centimeter. So here is exactly the middle. But of course, the lower and upper early don't have to be the same thickness, but somehow approximately here we can start drawing the horrors until a line to divide two lips. And but, of course, this line should be a big Kirby particular. Here, next to the corner, it should Coke on a uh like this is start ordered corner next to the corner, and you just draw filmworks of it. And then, ah, ports here on some come to me to create longer group Chris, I didn't hear off liver and middle. I want to make a kind of curvy lines downwards. It's the whole line. It can be a bit wavy like this. It's in something like this approximately. It also lets a offline Cupid's bowl. It's just a dining program line like this kind of Farlow through this one here between the two loops and just very and now we can call her lips in the direction of their wrinkles. But first, let's determine the position of the wrinkles, so they are vertical here in the middle, and they should become curry kerber and curry sauce. We draw them towards the corners so like this, and here in the very corners, we don't really have too many wrinkles. Same here. But the longer life you can see now that even thes wrinkles make the lips look around. Now let's call her the whole area. I'm into both lips, and I'm using an age be. She's a shape Keep my council, which allows me to color, do areas faster and just followed the direction of the wrinkles and cover both legs. Still, with banks, you can choose any other pencil. It can be to be or be or age, but I work with the nature of this time, - so don't worry. It doesn't look smooth or a lot off lines are visible, so we're going to blend it. - Okay , now let's blend it all with a Q tip and apply it. Circle emotions and press very hard to impress the graph I introduced to pay for No, I can see how it looks most, and but the little A to create the shadows. And let's start here in the corners I'm using to be pencil, and I just want to shade the op early here in the corners because it receives last light and it should be quiet, darker like this. And this on also, I shade upwards. I will lose the pressure of my pencil because I have to agree that degrade in transition here do in the shadows and basic tone off the lips kiss uh, when we draw a little bit, we can blend it Thank you, cheap or the blending system. And then we can go over again until we achieved in the value that we need here. So here between the two lips, we don't have to creative too strong shadow because the lips are kind of connected in that kissing position. And there are three inner parts here in the middle. Also received pretty much light not and like in the normal position of the leap. So only here into corners and maybe a little bit here in the middle. I can shave here. I just draw short lines starting here over the edge between the tulips and when I pressed very hard and and just leapt off at the tip of my pencil, Asai shaped away from this edge. That's it this way. I am a cheating Graddy in transition, of course, and there's little same here on the left side. So the darkest board are next to the edge and it should be gone brighter, cause me shade upwards, and I'm using it to beat all the time we can dark and hear this areas of but I'm using for being here to make it a good talker. You ride evolved the edge 22 lips. So this is basically the darkest part of drawing. So here, here and here, of course, we'll just blend after drawing and after blending, you can see what are you need to shade more or a dust just enough because we're blending. We're going to remove a photograph. I and then we can see what do we need more? But the blending is important, so we have to blend it to make a smooth texture because these areas are bent inwards and they received less lights. I'm in the opera lip and disposition getting here also. - Okay , eso Now let's greater shadowed areas that are not this dark that we just created, but quite brighter. And he had darker than the basic value of the lips that we created. And so it's usually here in the lower area off the lower lip and lower area the upper lip where the leaps received last light so we can kind of shakedown obits. I'm using an age be here. Some Al Frist. It is important to create the shadows and highlights in general. And then Teoh created deep. There's and wrinkles us on here . We have to leave the edge, which have to be highlighted because it's bent and, uh, it gets more life. So right under that this edge shape and leave it untouched. Okay. And now here you can see how it under a different dimension this edge and the rest of the week and here, over to lower area. We have to Shadab it here in the corner. So right next to Dick offer because this area in the middle, like this part, is highlighted. And here this area should be shaded. I'm still using an age for you, Agnes. Of course, we have to blend. Thank you. We can create kind of tiny guess Shadow the shadow cast by the offer leap which shouldn't be too long. - So here also we had the edge. I've got a two millimeter. Think that is spent in words. And in this case and it receives last light here across on this corner on the right side, it should be shaded. Should be quite a record and here and leap in the middle. Because I know this guessing position to hear this area in the middle is highlighted. It is highlighted e also in the normal position. That's blend it. You know, Let's great the highlights. Eso We have two kinds of highlights to cut highlights in general and the highlights that we have to apply with a wider in just an which will make the lips will appear wet or glossy, and we have highlights and where we have to brought it up. The skin of the lips were just a little bit to make it brighter than the rest of the lips. I just want a raise this off line because it's too bright here and the edge depend and that I mentioned that we should shave under it. We can now highlight it with a needed a razor. Eso here just go around and gently touch the edge like this and just make it brighter like this. So here all around I'm in here Dick copper and think properly So here it's enough if you just touch the paper, which you're needed a razor. Here we have the highlights and the opera area of the lover. Look, something like this, And if you or do this highlight, make them too broad, you just go over with blending stump or thank you tip or with any pencils and canned dark and highlights. I know we can create some wrinkles because they are highly visible in a kissing position of the lips. And I'd say an age be And, uh, of course I want to draw them and and the direction of the rank list that I drew in Arabic in the very beginning. And of course, the wrinkles should be the darkest and very middle. And they, each one of them, have to have the great in transition between darkest part and basic caller of the tone on the lips. So just press hard in the very middle of the wrinkle and then just dress less unless to shade this wrinkle, that's all. Here you can apply any shapes they're coming that they don't have to have to be in any order. Some of them should go over the whole some of them can go only forward half to live of the upper half of this and also over. Driller, Huh? Assam mentioned here in the very corners, we don't really have wrinkles. And, of course, we have to blend them, even see. After blending, we always brighten up the dark areas. So, as I mentioned before, we have to go or again. And of course, the wrinkles ended. Shadowed areas have to be darker and then to be brighter and highlighted areas so they aren't different. - We also have some horizontal wrinkles with this, so just got them to let's grated wrinkles and overdose Lauren Lake. And they should be climbed brighter because there are eliminating. And here in the upper area, we don't have really wrinkles, - and I just want to shaded with more hidden corners. And I use an age beyond the time you can see. Now there's, ah, wrinkles look nothing like wrinkles, but, like just like a bunch of lines and so we don't highlights. They don't look like wrinkles. They actually look like drawn lines. So we have to create a hot light to hear among the wrinkles with the sharp tape offer needed your answer. So everywhere where you can see when we're have to, wrinkles of just the creative highlights between them and jump is touched a favor like this to eliminate just a big uptick graph I. So there's our first highlights that I mentioned one of the highlights of the skin. So this highlights will create the shape of the Ringo's and, of course, the labors. But the very bright highlights will made it Laibson wet and shiny. - Now we can blend the edges between the wrinkles and high life that we just created with an age with two a such a school next to the wrinkles between during coz and Highlight. And, of course, if you don't like something, the highlights again go over them. Now we can create it highlights that will make the lips appear. What glossy with a with the whiting job and a wide marker resemble here, ride between the lips. I think this, you know, and, of course overdue. Highlighted areas. I'm using this uni Bosco marker, the one millimeter thick, and I just don't. And after applying, I just stopped with my finger to make it a bit darker. Somewhere you just applied dots so worked on your lines. - And here, also on the lower area, I heard a lot. Here's summer Endemol order protruding area and between the wrinkles you could see How do you use highlights? Make this wrinkles protruding Parts of the wrinkles are actually between your wrinkles. Make them a beer closer to the viewer side. So if you don't like some of these highlights, you just go over the mental or the blending stump this wide marker and winding jump and can be easily eliminated. - Um , after this, we have to create a cast shadow, the shadow cast but loralee. And if we don't like some of the highlights or we want to make them a bit darker, it can just go over them with Q tip. And now let's greet the guests shadow that I mentioned. So here, under the lower lip, with the cute, cheap and graphite border and here, all sort of corner working had a great fit. Such a step your Q tip into the graphite border and fly here under death course we can blended with blending stump. Get also here. Create the sunken area about two cubits pool here we can create the The reflecting lines were the edge, the lower edge of the Loralee. It just removed a bit and then we can go on their names. And I hope that you enjoyed this tutorial. And I don't to see your results and let me know what kind of territorial you would like to seem and see what the next tutorial. Bye bye.
 Jasmina Susak, Pencil Artist