Transcripts
1. Class Introduction: Have you ever filmed food that looked amazing
in real life? But the moment you
watch the video back, it felt flat, dull, or just not appetizing. You adjust your camera settings, you move the plate around, you try again, and somehow it still doesn't
look the way you imagined. In this class, I want to show you why that happens
and how to fix it. This class is about iPhone
Food videography foundations. We're focusing on
what actually makes food look delicious on video, how light shapes food
how motion brings it to life and how simple intentional shots work
in real kitchens. Once you understand why
food looks good on video, you stop guessing and start filming with clarity
and confidence. Throughout this class,
I will be filming in my actual kitchen
using just my iPhone. You'll see practical demo
real examples and how all the ideas connect in a setup you can easily
recreate at home. By the end of the
class, you'll create your own short food video
using what you've learned. I'll also walk you through
my own class project as I film a simple presentation
of a fruity pancake, so you can see how these ideas
come together in a calm, approachable way without
needing to film a full recipe. Yet, this class is designed as the first
step in a series. Here we build the
foundation light, motion and intentional shooting. And in the next class, we'll take everything you learn here and apply it to filming a full recipe video where we'll dive deeper
into composition, food styling, and guiding
attention from start to finish. If we haven't met, hi, I'm Rose. I'm a Skillshare top teacher
and content creator. And I've been
teaching photography and videography for years, helping creators and
small business owners make visuals that feel natural, intentional and true
to their story. I created this class because so many people Food videography is about talent or
expensive equipment. It's not. It's about learning
how to see food on video, and that's a skill
anyone can build. Now, if you're ready to make food videos that
look appetizing, calm, and intentional, using just your iPhone,
let's get started.
2. Welcome & How to Use This Class: Welcome to the class, and I'm really glad you're here. This class is about
learning how to create food videos that look appetizing and intentional in real kitchens using your iPhone. We're not here to memorize complicated rules or
copy one set up forever. We're here to understand why
food looks good on video. So you can make clearer, more confident decisions
wherever you're filming. Before we go any further, I want you to know where
this class is headed. By the end of this class, you'll create one short food
video using your iPhone, focused on intentional light, simple motion, and
clean framing. You don't need to
do anything yet. You don't need to
plan it right now. I'll guide you through everything
step by step as we go. Knowing what you're working
toward will help you watch the lessons with more
clarity and purpose. This class works best when you don't try to fix
everything at once. Most people struggle
with food videography, not because they lack ability, but because they try to improve everything in a single shoot. So here's how I recommend
using this class. First, feel free to watch
the entire class once, not to memorize, but to see
how everything connects. Then when you're
ready to practice, come back and
rewatch one lesson. Try one idea, then film one
simple clip. That's it. This class is designed
for that rhythm. Watch, try, return. You don't need to
apply everything at once for this to work. Near the end of the
class, I'll walk you through my very own process as I create the class project because I believe in
practicing what I teach. When you're ready, you'll create your own short food video and share it in the
project gallery. That project is not about
showing perfection. It's about applying
the foundations you've learned and seeing
how they work for you. And yes, even one short
simple video is enough. I've intentionally
kept this class lean, not because the topics
are not important, but because clarity helps you create more than
overload ever will. We'll focus on the
principles that matter most. The ones that shape how
food looks on video and help your videos feel
intentional, not overwork. With that said, in
the next lesson, we'll talk about why food
videos sell better than photos and how video
changes the way people experience
food on screen. I will see you there.
3. Why Food Videos Sell Better Than Photos: Before we talk about camera
settings or techniques, it's important to understand why food videos work so well
in the first place. Once you understand this, food
videography will feel less intimidating and your
filming decisions will start to make more sense. The biggest reason food videos sell better than
photos is movement. When food moves, it
feels more real. It feels fresh, warm, and alive. Think about steam
rising from hot food, sauce being poured, or a spoon cutting
into something soft. These small movements activate the senses in a way
photos simply can't. Movement shows texture. Movement shows freshness. Movement makes food
feel immediate. This is why even simple
food videos often feel more appetizing than
perfectly styled photos. Food videos don't
just show food. They trigger cravings. When people watch food
being prepared, poured, cut or served, their brain starts filling
in the experience. They imagine the taste, the smell, the feeling of
taking that first bite. That emotional
response is powerful. It's why food videos make
people pause while scrolling, not because they look good. Because they feel good to watch. I actually saw this happen in real life while
filming this class. My husband and my
son were around while I was filming
the pancake shots, especially the honey
pouring over the pancakes. We ate the pancakes
after filming, but that didn't stop there. For the next two or three days, they kept craving
pancakes so much that the next day we
ended up going to pancake house and
ordering pancakes. Again, that's the effect
of a good food video. It doesn't just show food. I plants a craving. And here's the good news. You don't need complicated
shots to create this reaction. Small intentional movements
like a pure, a cut, or a gentle interaction
are often more than enough to trigger
that emotional response. A lot of us think our
food videos aren't good because they don't have the
right camera or equipment, but most of the time, the
issue isn't the camera. It's that the video doesn't include enough
intentional movement. Once you understand that
movement is the main driver, you can stop chasing
perfection and start focusing on what
actually matters. Again, even a short, simple clip with the
right motion can be more effective than a long
complicated video. If you think about food videos, you've stopped to watch online, they usually have
one thing in common. There's a pe, there's
a cut. There's steam. There's a hand interacting
with the food. In summary, food videos
sell better than photos because movement
creates appetite and emotion. As you move forward, don't worry about filming
everything perfectly. Instead, start asking
yourself one simple question. What part of this food would be most satisfying
to see in motion? That question alone will improve
your videos immediately.
4. What Makes Food Look Good on Video: In the last lesson, we talked about why food
videos work so well, how movement creates appetite,
emotion, and craving. Now comes the natural
next question. Why do some food videos feel instantly satisfying
while others fall flat? Even when they show movement, this is where most
people start guessing. They add more clips. They try different angles. They change settings, but the real shift doesn't
come from doing more. It comes from knowing
what to look for. Food videography is less about techniques and more
about perception. It's about understanding
what the camera needs in order to make
food feel alive on screen. Once you see this clearly, filming stops feeling random. Your decisions become calmer. Your videos start to
feel intentional, even with simple setups. So if there's one framework to remember from this
lesson, it's this. Food looks good on video
because of these three things, light, motion and depth. You already understand motion
from the previous lesson. Now we're going to
add the two missing pieces and show how all three work together to make food feel dimensional,
appetizing, and real. Let's break them
down one by one. Light is what allows
the camera and the viewer to understand
the shape of food. Without good light,
food loses texture. It loses dimension. It
starts to look flat, even if it tastes
amazing in real life. On video, food doesn't
just need to be visible. It needs to be shaped by light. Here's the part many
of us miss at first. Good light is not
about brightness. It's about direction. You can have a
bright kitchen and still have unhelpful
light for food. Light comes from the side, you can see curves,
shadows and texture. When light comes straight from above or directly
from the front, everything looks flatter,
almost pressed down. So if your food has ever
looked dull on camera, it doesn't mean you failed. It usually just means the light wasn't
supporting the food. You already know
that movement is what makes food
videos feel alive. But here's the
refinement that matters. Motion doesn't need
to be impressive. It needs to be readable. Food without visible change
over time feels static. Even in video form, that change can be simple, a drop, a crack, a pore, a generous pore, a small drop, mixing, more pouring, more mixing, brushing, pouring
again, flipping, garnishing, dropping
and drizzling. These small movements give
the viewer something to follow and something to
feel. Don't get me wrong. You don't need to
perform for the camera. You just need to let the food
do what it naturally does. Depth is what helps the
viewer understand space. Without it, food can feel like a flat image tucked
to the screen. Food looks better
when the camera understands space,
not just the subject. Let me give you a real example. In this pancake video, I could film the pancake filling the entire frame.
Nothing else around it. And yes, that can work,
but it feels flat, or I can place the
pancake within a scene. Something softly out of
focus in the foreground, something subtle
in the background. Suddenly, the food feels
grounded in space, more real, more
dimensional, more inviting. And no, depth is not
about fancy setups. It's about awareness, what's
in front of the food, what's behind it, and how the camera moves
through that space. So here's how to use all
of this in practice. Whenever your food video
doesn't look the way you hoped, pause and ask yourself, is the light helping
or hurting the food? Is there any meaningful motion? Does this feel flat
or dimensional? These three questions will guide your decisions more than any
camera setting ever could. You don't need to fix
everything at once. What matters is that now you are not guessing,
you're observing. And now that you
understand what actually makes food look good on video, light, motion, and depth,
here's the good news. Your iPhone already knows
how to capture all of this. The difference isn't
buying new gear, it's knowing which settings help and which ones
quietly get in the way. In the next lesson, we'll look at the best iPhone camera settings for food videos. Not every option,
not every feature, just a few choices
that matters most. So your iPhone supports the decision you're already
making. See you there.
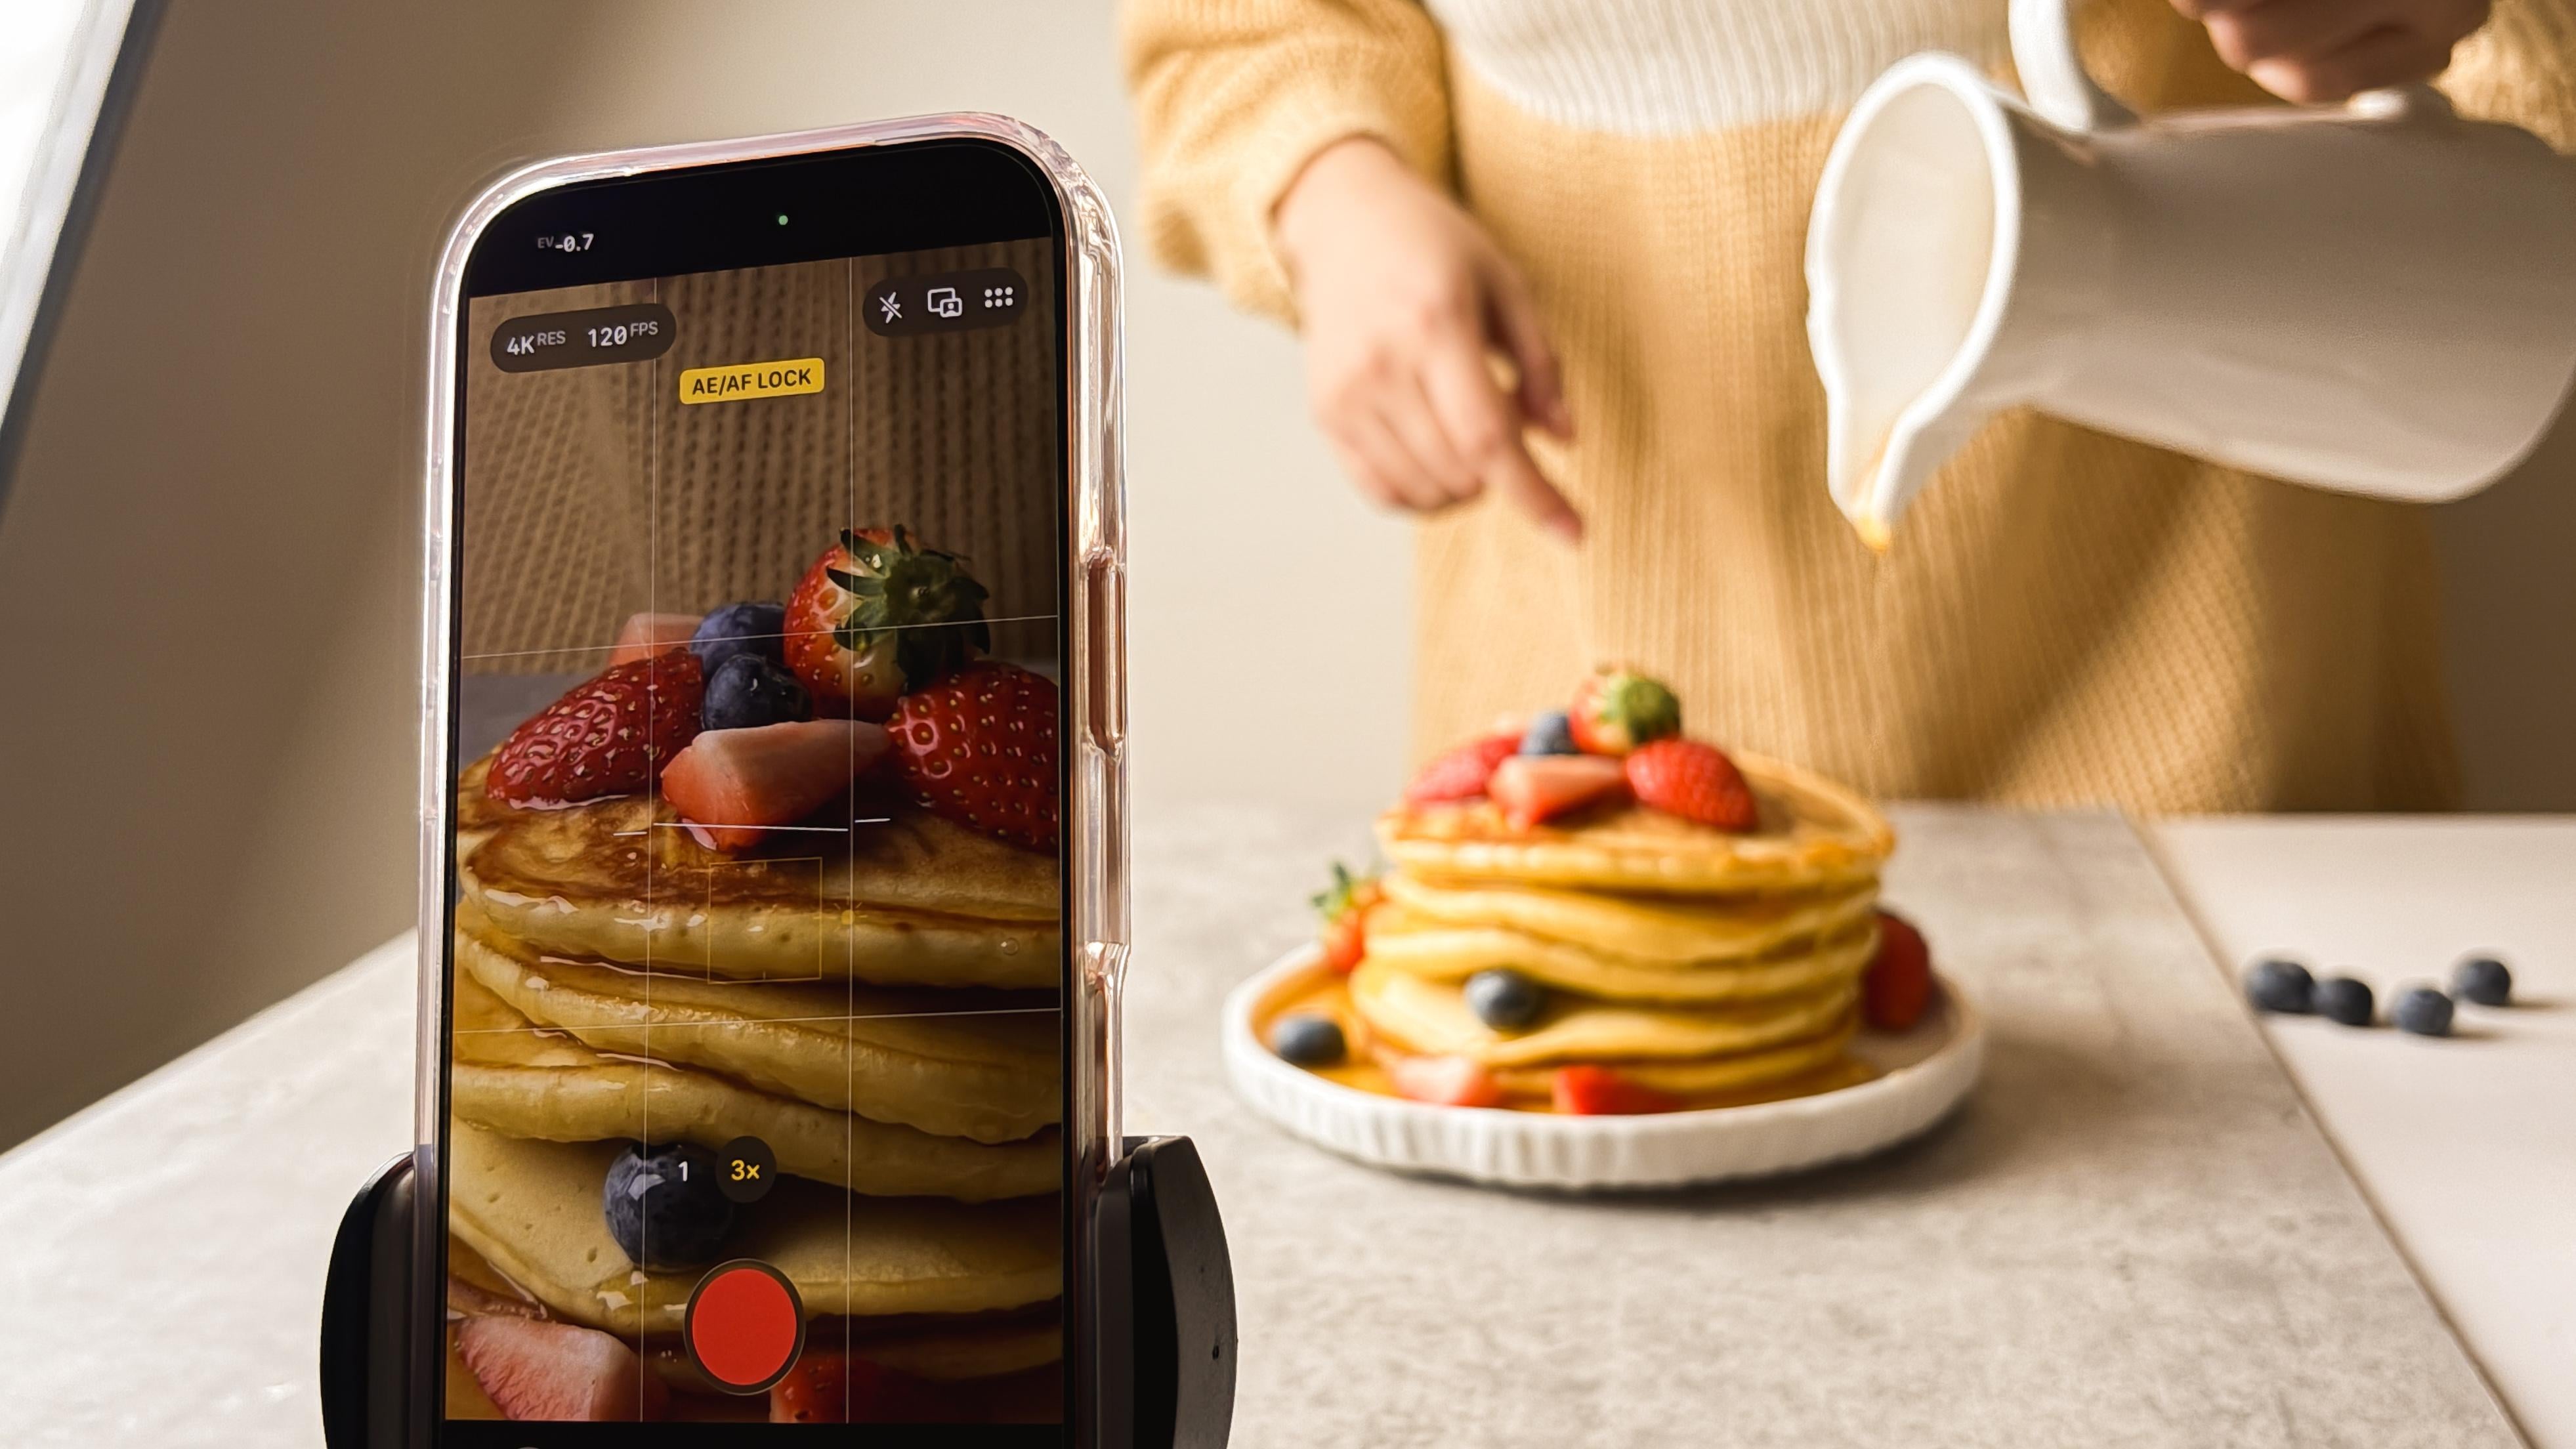
5. Best iPhone Camera Settings for Food Videos: In this lesson, we're going to set up your iPhone camera for food videography in a
very intentional way. Not everything your
iPhone can do, the settings that actually
matter for food videos. Camera confucian usually doesn't come from lack of ability. It comes from too many options. So the goal here
is simplification, choosing a setup that supports good food visuals without
getting in your way. Let's start with a setting that creates the most confusion, resolution and frame rate. For food videos, there are
three practical choices, and each one serves
a different purpose. If you want a simple
low pressure default, choose ten ATP at 30
frames per second. This gives you natural
looking motion. Smaller file sizes and fewer technical
decisions to manage. It's a solid choice when you
want to focus on lighting, framing, and movement
without worrying about storage or
processing power. If you want more flexibility with motion,
especially for pores, steam or soft movement, choose 30 or 60 frames per
second at a higher resolution. Filming at a higher frame
rate allows you to slow footage down slightly
later during editing. This is useful for moments
where texture and flow matter like sauces,
toppings, or batter. If you want very slow
tactile moments, you can film at higher
frame rates like 120 FPS, but only when your
lighting can support it. Higher frame rates need
more light to look clean. The key idea here is this, you film first, then
slow down in editing. Don't decide the final
speed while filming, that keeps you in control. For most food videos, a consistent setup
like four K at 30 frames per second or ten ADP at 60 frames
per second works beautifully when the
fundamentals are right. This next setting
is non negotiable. Before you record, tap
and hold on your food until you see the focus and
exposure lock activate. This locks both sharpness
and brightness. Without this, your iPhone will constantly
react to movement, hence entering the frame, steam rising or slight
changes in light. When the camera keeps adjusting, the video feels jumpy. Even if the movement
itself is gentle, locking focus and exposure
creates calm, steady footage. It tells the viewer where to look and keeps their
attention there. This single habit
alone can dramatically improve how professional
your food videos feel. Next, let's talk about HDR. HDR can be helpful in
certain situations. But for most indoor food videos, it's better to turn it off. HDR tries to balance very
bright and very dark areas. In real kitchens, this
often flattens textures, dulls highlights, and creates strange reflections on
plates or glossy food. Usually looks better with simple directional light and
not overly processed light. If your lighting is
controlled and soft, HDR isn't doing much for you. And in many cases,
it works against the natural depth you
want in your food. So think of HDR as optional
support and not a default. Stabilization helps reduce
small hand movements, but it's not a replacement
for physical stability. If your phone is resting
on a tripod or surface, stabilization becomes
less important. If you're filming handheld, light stabilization can help, but too much can make
movement feel artificial. What matters most is how
the phone is supported. Stable footage makes
food feel intentional, while unstable footage distracts
from texture and motion. Lastly, turn on the
grid end level. These settings help
keep shots straight, centers food intentionally and prevents drifting
or tilted frames. It doesn't necessarily
control creativity. It quietly supports composition, especially when filming food
from above or at an angle. The grid end level
helps you stay consistent without constantly
second guessing your shots. You may notice we
didn't talk about things like advanced
recording formats, cinematic modes,
manual camera controls or third party camera apps. That's intentional.
Those features don't matter if the
light is unclear. The focus keeps shifting or
the framing lacks intention. This class is about making
food look good on video, not turning you into a camera
technician, and that's it. Once these settings
are in place, you don't need to adjust
them every time you film. Consistency removes
friction, and less friction means you can focus on what actually makes food
look appetizing. In the next lesson, we'll talk about which iPhone
lens to use for food videography and how
lens choice affects texture, distance, and visual
intimacy. See you there.
6. Which iPhone Lens to Use (and Why): In this lesson,
we're talking about lens choice and why it quietly shapes how
food feels on video. Your iPhone gives
you multiple lenses, but more options don't always
lead to better results. Food videography actually gets easier when you understand what each lens does and stop
switching just because you can. Every lens changes three things
how close the food feels, how natural the
proportions look, and how clearly
textures show up. So this is not about specs. It's about visual intimacy. Some lenses make food
feel cozy and appetizing. Others can unintentionally make it feel distant or distorted. For most food videos, the one X lens should
be your default because it has the
strongest sensor, the best low light performance, and the most natural
perspective. This is why it works
so well for textures, pores, hands
interacting with food. The one X lens keeps food
looking real and proportional. If you're ever unsure which lens to use,
you can start here. The two lens is great
when you want a closer, more focused look without
moving the camera too close. You can best use it
for detail shots, texture close ups and moments you want the
viewer to really notice. And because you're zooming in, steadiness and
light matter more. Think of two X as
a supporting lens, not one used for everything. The four x lens can be very useful when
used intentionally. I used four x in
this video to really show the softness
of the pancake, the gloss of the honey, and the texture of the fruit. This works best when
your light is good. Your camera is steady, and the motion is controlled. For most people, four
x is the furthest zoom you'll regularly need for food videos. But
what about eightX? You can use Eightx, but it's
rarely necessary for food. At that range, movement
feels amplified. Light becomes critical and
footage can feel unstable. Think of eightx as something
to experiment with, not really rely on. Ultra white lenses fit
more into the frame, and that's exactly the problem. They can stretch plates, distort bowls and make food
feel smaller or farther away. For food videography, we
usually want the opposite. We want food to feel
close and inviting. Ultra white is better for
showing spaces, not meals. With all that said, here's the easiest way to think
about lens choice. One X for most shots, two X for tighter, intimate moments, four X for intentional close ups and
skip ultra white for food. When setting up a shot, ask yourself, do I want this
to feel cozy and natural? Or tight and detailed. Let that answer choose the lens. Now that you know how
to choose your lens, the next thing that makes the biggest difference is light. In the next lesson,
we'll talk about light direction and
how to use it to make food look more dimensional and appetizing without complicated
setups. See you there.
7. Light Direction for Food Videos: In this lesson, we're focusing
on one thing that makes a bigger difference than any camera setting
or lens choice, light direction, not
the type of light, not the brand of light, where
the light is coming from. Because once you
understand this, lighting stops feeling
confusing and food starts looking better
almost immediately. Light direction
determines how food shows its shape,
texture, and depth. When light comes from
the right direction, the camera can read
the surface properly. You see highlights, shadows, and small details that make food feel real and appetizing. When light comes from
the wrong direction, food can look flat or dull, even if it's beautifully cooked. So lighting for food videos isn't about adding more light. It's about placing
light intentionally. In this lesson, I'm using an
artificial light so you can clearly see what changes
when the direction changes. But the principle is exactly the same whether you're
using a window, a lamp or a dedicated light. Food doesn't care
what the light is. It cares where the
light comes from. Let's start with sidelight. Sidelight means the light comes from the side of the food, not from above, and not
from behind the camera. This is one of the
most reliable ways to light food because it
creates gentle shadows. Those shadows reveal texture, crispy edges, glossy
sauces and soft surfaces. Side light gives food shape
without being dramatic. If you're ever unsure how
to light a food scene, this is the safest way to start. Next is backlight. Backlight means the light
comes from behind the food, facing towards the camera. This works especially well for foods with texture
or transparency, steam, liquids, sauces,
anything shiny. Backlight can make food glow
and emphasize movement. Just keep in mind
backlight needs intention. Without balance, the front of the food can fall into shadow. Used on purpose, though, it can look really beautiful. Overhead light is very common in kitchens and rarely
ideal for food videos. When light comes
straight from above, it fills in shadows
instead of shaping them. That removes depth and
makes food look flat. It can also create harsh
highlights and dull colors, especially on plates
and oily surfaces. That's why food filmed under ceiling lights often
looks lifeless on camera. Even if it looks
fine in real life, Mixed lighting happens when more than one light
source competes. For example, a
ceiling light plus a window or warm indoor light
mixed with cooler daylight. When this happens, color
shifts unpredictably. Highlights look strange and
the food loses clarity. For food videos, one
clear light source is almost always better than
several competing ones. If something looks off and
you can't explain why, mixed lighting is often
one of the reasons. Before you film, pause
and ask one question. Where is my main
light coming from? If you can answer that clearly and place it intentionally, you're already ahead of most beginners. Start
with sidelight. Use backlight when you
want texture or drama. Avoid overhead and mixed
lighting whenever possible. Good food lighting isn't
about having right light. It's about choosing
the right direction. Once you control
light direction, food becomes easier to film and much more for
giving on camera. The next lesson we'll take these same principles and apply them to natural
window light. So you can set up in a simple, realistic way. I'll
see you there.
8. Natural Light Setup for Food Videos: In this lesson, we're applying everything you've learned
about light direction, this time using
natural window light. The goal here isn't to
create a perfect setup. It's to understand how to position food in
relation to a window, so light works for
you, not against you. Natural light simply means
light coming from a window. It doesn't require a fancy home, a big space, or a styled room. Once you find a window, you already have what you need. The first decision is simple. Where is the window in
relation to the food? The most reliable setup is placing the food
beside the window. So light comes from the side. Side window light creates gentle shadows that
reveal texture and shape. It's predictable, flattering,
and easy to control. If you want more
drama or texture, you can place the
food so the window is behind it,
creating backlight. This works especially
well for liquids, steam, and shiny surfaces. What you want to avoid is
placing the food facing the window with the camera between the food and the light. This flattens the scene
and removes depth. How close the food is to the window changes
the quality of light. Closer to the window
means brighter light, stronger contrast, and
more defined shadows. Farther from the window
means softer light, less contrast, and
a more even look. Neither is right or wrong. The key is noticing the difference and
choosing intentionally. If the light feels too harsh, move the food slightly away from the window before changing
any camera settings. If window light
feels too strong, the solution isn't
adding more light. It's softening the light. Simple diffusion can be
done with shear curtains, thin fabric, or a
light colored surface between the window and the food. Diffused light wraps
around food more gently, keeping texture while
reducing harsh shadows. When using natural light, turn off other light
sources in the room. Overhead lights and lamps
introduce mixed lighting, which affects color and contrast in ways that
are hard to fix later. One dominant light
source creates cleaner, more
predictable results. If something looks off,
check whether the lights are still on before
adjusting anything else. In summary, you don't need a dedicated filming area
to use natural light. You can move a table
closer to a window, rotate your setup slightly or film at a different
time of day. What matters isn't the room? It's the relationship between
the food and the light. Once you understand
that relationship, you can adapt to
almost any space. Whenever you're
using window light, pause and check three things. Where is the window in
relation to the food? Is the light coming
from the side or from behind or other light
sources competing. Answering these questions
will guide your setup far more effectively than
chasing perfect conditions. Natural light works best when it's treated like any
other light source. Choose the direction, control the distance, and
remove competition. The next lesson we'll move into shooting techniques
where we'll apply everything you've
learned about light to actual food shots and camera movement.
I'll see you there.
9. Essential Food Video Shots (Beginner Shot List): In this lesson, we'll simplify food videography by
focusing on a small set of shots that work
consistently and how to add motion without
making videos feel messy. You don't need endless angles. You don't need
complicated movement. Most effective food
videos are built from just a few intentional shots with clear controlled motion. Once you understand these, filming becomes
faster, more focused, and much easier to repeat. Let's start with a shot list. A shot list is simply a plan for what
you're going to film instead of turning the camera on and hoping
something looks good, you decide in advance which moments will
best show the food. This removes guesswork and keeps your videos
clean and purposeful. This shot list works
for short food videos, social media clips, and
simple promotional content. The hero shot
introduces the food. This is the clearest, most
stable shot of the dish. It tells the viewer what
they're looking at immediately. So keep it steady, well lit, and simply framed. You're not trying
to impress here. You're establishing clarity. This is where the
food comes alive. Examples are a poor, a drizzle, a stair, a drop. The goal here is to show
texture and freshness. Motion triggers appetite, but it doesn't need
to be dramatic. Small controlled
movement works best. Detail shots bring
the viewer closer. Use them to highlight
crispy edges, glossy surfaces and layers. One or two intentional
detail shots are enough. More than that
usually adds noise. This is where a hand
interacts with the food, lifting, cutting, and serving. Hands add scale and help the viewer imagine
themselves eating the food. So keep the movement natural. Something you do anyway, not something performed
for the camera. The final shot gives
the video closure. It's usually calmer, the
finished dish resting, plated, and ready to eat. This shot doesn't need motion. Its job is to leave a
satisfying last impression. How do we add motion without
making videos messy? Well, motion is powerful, but unmanaged motion is the
fastest way to create chaos. Here's the rule that fixes
most beginner food videos. Only one thing should
move at a time, that one thing can be the food, the hand, or the
camera. Not all three. Here are three motion options
you can experiment with. Option one is to
let the food move. This is the safest
place to start. Examples are sauce pouring, topping, sprinkling,
gentle steering. Here, you keep the camera still. You keep your hands calm and
let the food do the work. Option two is to
let the hand move. Use slow, purposeful actions like cutting,
lifting, and serving. One clean motion is enough, so avoid repeating the same
action multiple times. Option three is let
the camera move. Camera movement should
be subtle and rare. What works are slow push ins, gentle slides, and
slight angle changes. If the camera moves, everything else stays still. Avoid shaking the camera. Fast unnecessary movement and moving just to look cinematic. So before pressing record, ask, what is moving
in this shot? If the answer isn't clear, the shot won't feel
clear, either. Choose the motion first, and then let everything
else stay quiet. Good food videos aren't
about filming more. They're about filming
with intention. A simple shot list
paired with clear, controlled motion makes
food videos calm, repeatable and
satisfying to watch. Now in the next
lesson, I'll take you behind the scenes of
my class project. And show you how all
this comes together as I film a fruity pancake
presentation in real time. See you there.
10. Demo: My Class Project: Now let's put everything
we've learned into practice. In this demo, I'll be filming
a simple fruity pancake presentation using
the same shot list and motion rules
you just learned. As you watch, notice
how I choose my shots, control motion, and keep everything intentional.
But still fun. My hope is that this gives you a clear picture of how
all these ideas come together and inspires you to feel confident creating your
very own class project. Alright, let's start filming. So here's my setup. This is just our
normal dining table that I just moved here. This is a real kitchen,
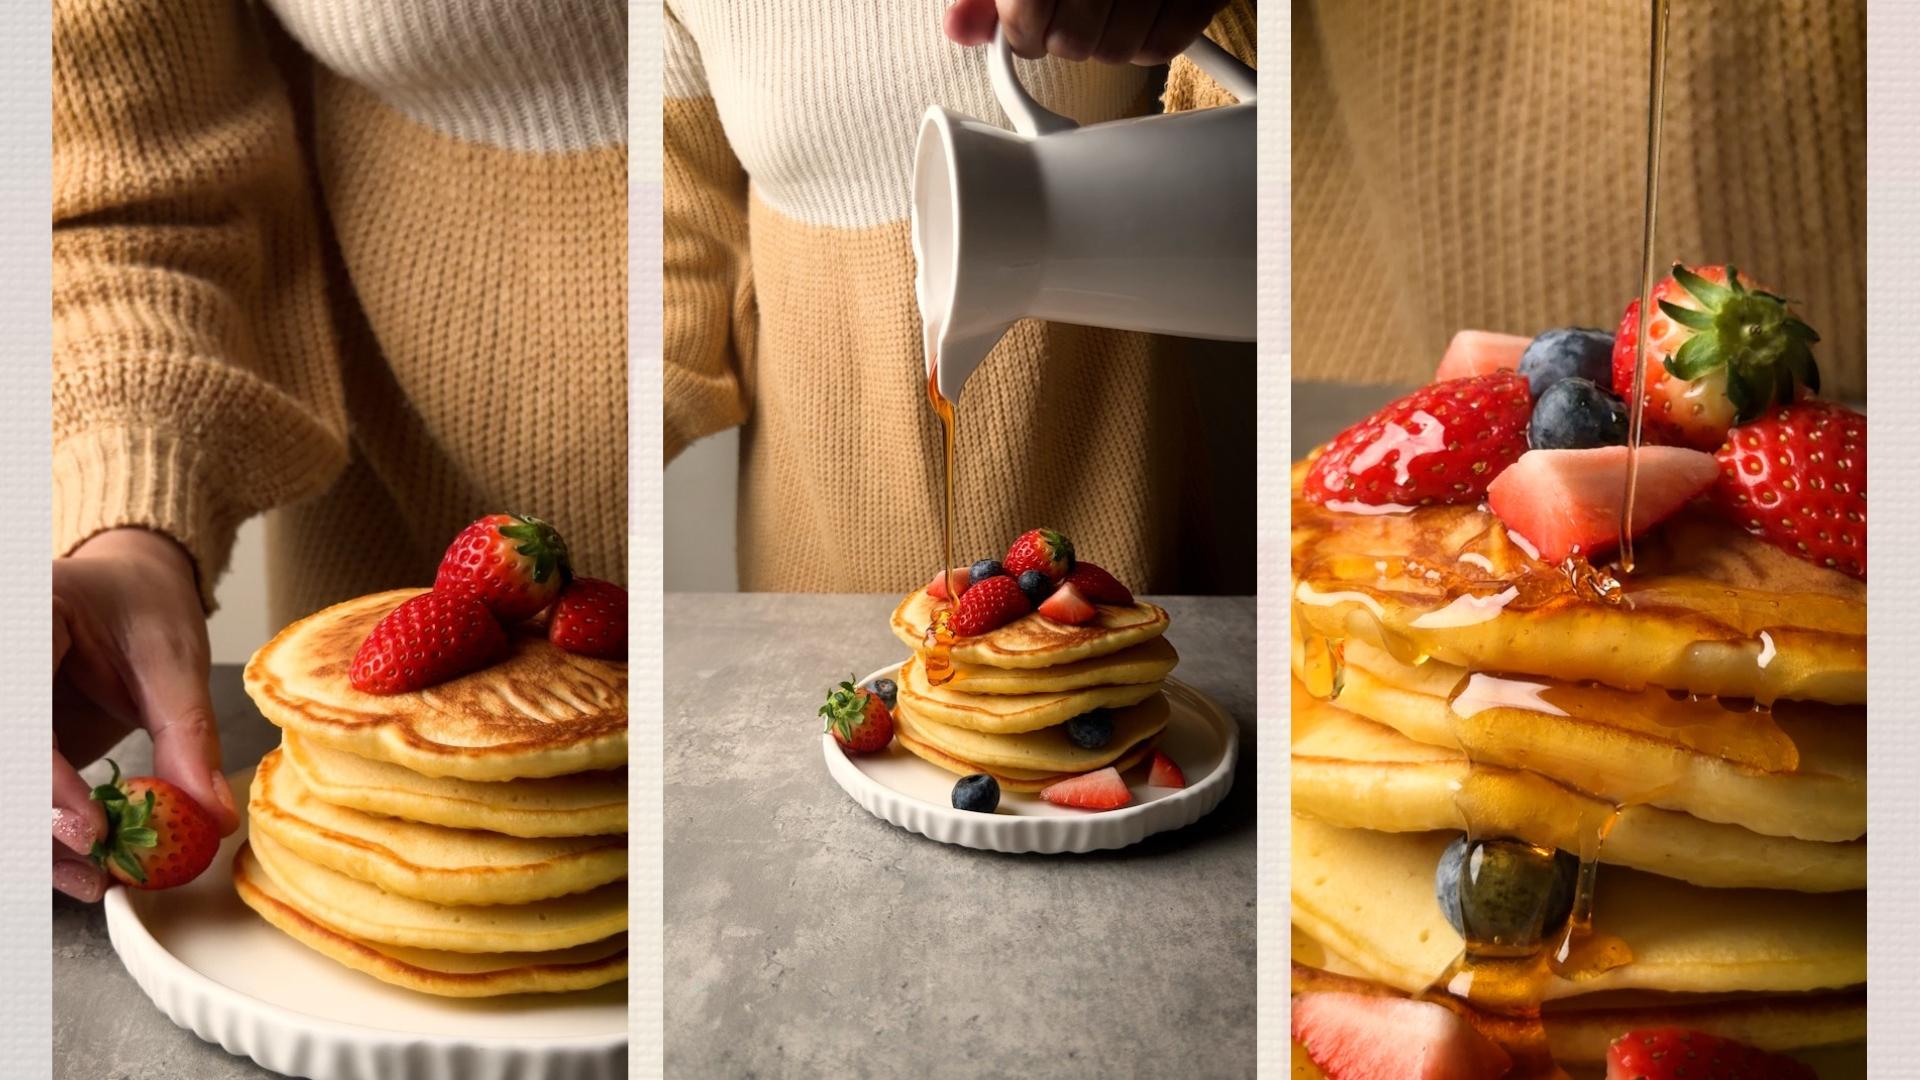
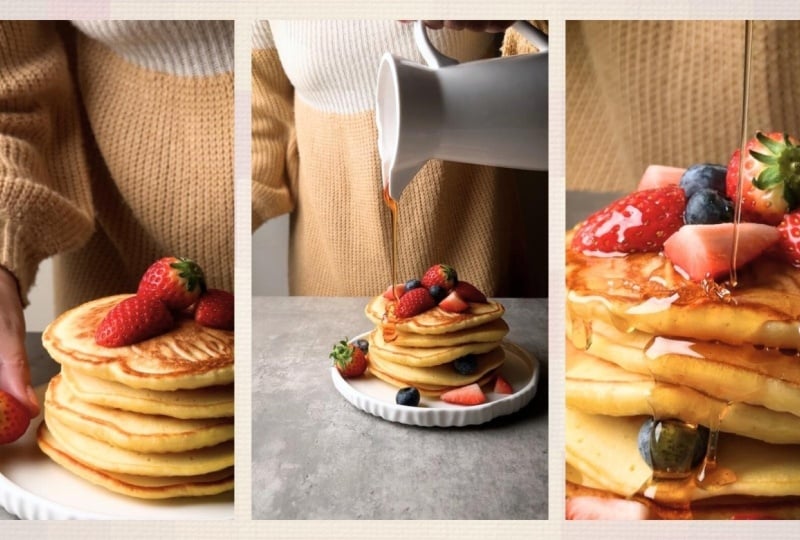
our real kitchen. The hero that I chose
for this class project are pancakes because they're easy to style,
they're forgiving. They've been sitting there
for a couple of minutes now while I'm preparing and
I have my garnishes, strawberries, and fueberries
to add texture and dynamic. I put the honey inside of this so I can take the foreshot. So you'll see all of that later. So this is my setup, and this is my lighting. So like I mentioned before, I did not have natural
lighting here in our kitchen. That's why I'm relying on
my artificial lighting. This is a G dogs SL sixtW. But again, if your kitchen
has natural light windows, you don't have to get this
and I've been using this for **** works and
for talking videos. This is not a mandatory year. I'm just using it
again because it's almost nighttime and I need light source
here in my kitchen. Let me just show you
how I will set it up. As you know, side lighting
is my go to direction. So I've positioned
my artificial light beside the table coming in
from the side of the food. As soon as I turn it on, you can already see the
shift in the setup. I'm just adjusting the
brightness slightly from about 10% to 15%,
nothing dramatic. Then I turn off the room lights
to avoid mixed lighting. It's very simple, but
this one decision already makes everything
look more dimensional. And I'm really happy with
how the lighting turned out. Next, let me show
you the settings that I will be using on my iPhone to take a presentation video of
this yummy pancakes. This is our subject. Later on, I will be styling it with strawberries
and blueberries. This is our lighting, so
it's coming on the side. As you can see, there
are shadows here, redness here and then
shadows here. That's good. Next, I'm going to set up
my iPhone first we'll go to settings and then we'll
go to camera in here, we're going to adjust the
record video settings. We have here the frame
rates and the resolution. Again, you can start
with 180 at 60 FPS, but for this whole
presentation video, I'm choosing four key at 60 FPS and then later on four
k at 1:20 FPS for the pouring of honey to really show movement and that
delicious detail. I'll also turn on
enhanced stabilization. Although most of the times
I'll be shooting on a tripod, HDR video of and then I'll
just turn on grid and level, and we're good
with our settings. And again, I'll be
using one X and the two X lines for taking videos of our
delicious pancakes. So let's get started. Before I start styling, I want to make sure my iPhone isn't just secured
on the tripod, but that my framing is already
set and ready for filming. This way, once I start
working with the food, I'm not constantly
adjusting the camera. I can focus on
styling and movement. Knowing the frame is
already doing its job. B for sofa styling, I will be replacing
our plate with this beautiful plate,
more presentable, and then we're going
to be What I'm thinking instead of just
putting the pancakes here, thinking of dropping it to
show a different effect or to add dynamic or a bit of excitement to our
shots or food videos. Let's see if we
can achieve that. First, I'm just making
sure that the plate where I'll be placing the pancake
is framed properly. Then we get our hands
dirty quite literally. So I start with just
a few pancakes, and very quickly, I realize this might not be
such a good idea. It's surprisingly hard to land the pancake right in the center when you're
dropping it like this. But, hey, maybe I'm
wrong. Maybe it's epic. So I review the shot, and nope. I was right. Bad idea. So I try another way of serving and
stacking the pancakes. This time, slower, calmer, and a little more ladylike. And, yes, that
already feels better. So, yes, this is me learning in real time through experience. So I hope this reminds you that it's okay to try something, have it not work, and
simply try again. Now a quick look at the shot, and I think we got it. Next comes a bit of garnishing to make our pancakes
more presentable. This is a pancake
presentation, after all, and for some reason today, I'm really into dropping things. So I decide to try a
blueberry drop shot, clearly influenced by
watching too much Tik Tok. To make this work,
I'll need two angles, a straight on shot and
a reverse POV shot. So first, I set the
pancakes aside, then remove my iPhone from the tripod and place it
directly on the table. I add a tissue
underneath just in case. I then hit record. And try dropping the blueberries while
aiming right at the lens. Woof. Catching
blueberries turns out to be both fun and mild
be panic inducing. I am worried they'll roll into every nook and
cranny. Got them all. Thank goodness. Now
let's check the shot. Nope, not the money
shot, so we go again. And three, two, one. Action. Let's see if
we got the money shot. Okay. Welcome. You got it? That definitely
took longer than expected, but now we're heading back
to our pancake presentation. So I put everything
back into place, fix the framing again,
and start recording. Just a quick side note
here that I won't go too deep into my
styling decisions at this point because
that's something we'll explore more in the next
class in this series. For now, my goal is simple. Make the pancakes look yummy, fun and balanced using
strawberries and blueberries. Once that feels right, we're ready for the next step, choosing one intentional motion. Before I press record, I decide one very
important thing what is moving in this shot. For this video, I'm
choosing just one motion, a gentle pour of honey
over the pancakes. I chose honey on purpose because it's thicker than maple syrup. It's glossy, rich,
and slow moving. And from experience, it's just
really satisfying to film. And no, we're not doing
the motor oil trick here. I actually plan on eating
these pancakes after, and I want my family
to enjoy them, too. We're done, setting up, styling, I'm so happy
with everything. Next is a preshot nervous
to help with accuracy, I face the honey ear
so it's easy to core. First before we do
the real thing, I'm going to practice. I'm going to record
so I start with a wide shot of the honey por just to get a feel
for the movement. Then I ask my son to tap the
two x lens for a tighter, more intimate version
of the same shot. This part is really
just practice. I am pouring the honey,
watching how it moves, then checking how it looks
when we switch to two x. When I review the clips, I notice the framing
is a little off. The plate isn't quite where
I want it, so I adjust. Slightly closer to the
camera and more centered. That way, when I
switch to two X, the honey pours right
along the rule of thirds and lands near
an intersection point. Of course, we're not forgetting to lock focus to ensure we get a clean shot instead
of blurry or jumpy. So let's try again this time
for reels with real honey. Lives under sabe two, one, and here's the result of our first poor shot. I am honestly really
happy with it. It looks satisfying,
calm, and intentional. But then I realize we forgot to capture one clear pore in two X. So the plan here is to do one more pore recording
in two X right away. And here's the shot. It looks great, but I can already see that I want
something a little closer. So I try one more this time
using the four X lens. I adjust my angle
and framing again, showing more of the pancake
and less of the background. And that's it. That's the
shot I was looking for. If you notice
throughout this demo, after I record, I always take a moment to
watch the clip back. And I'm asking myself
three simple questions. Does the light help the food? Is the motion clear? And does the food feel
soft, warm, and real? I'm not judging the clip.
I'm just observing. And if something feels off, I adjust one thing
and try again. That's exactly how we went
from dropping the pancake very chaotically to placing it on the plate in a calmer,
more elegant way. It took me a lot of tries to get that blueberry
reverse POV drop and definitely more takes than I expected to get the
honey poor chest right. And that's normal.
That's how confidence actually builds through
small calm decisions. With all that said, here's a final lightly edited
version of my class project. I'm really happy with
what we created here. This project took me about
a week of planning and yes, a bit of overthinking to film. There was prepping,
cooking. Don't worry. You'll see the full recipe and cooking process in
the next class. I even had my nails
done. Not to look fancy. They were just
very overdue and I didn't want my long dirty
nails stealing the show. But the best part is the finished video
exceeded my expectations. My husband, my son, and I had so much fun
doing this together. That's why I truly believe
you can do this, too. This project isn't about submitting something just
to finish the class. It's about giving yourself the experience of choosing
light intentionally, choosing motion
intentionally, and seeing how small decisions completely
change the result. This is where everything
you've learned becomes real, and this is also where you get the most out of this class. So release the pressure, just like I did when I finally stopped overthinking
and started filming. Let it be fun. Let
it be playful. Let it be creative. With all that said, in the
next lesson, it's your turn.
11. Your Turn: Create One Delicious Food Video with Your iPhone: For your class project, you just need to create
one short food video using your iPhone
that makes food look delicious on video using light, motion,
and intention. This project helps you
apply the foundations from this class in a simple
pressure free way. You'll create one
short food video, just like the one I showed
you in the previous lesson. Five to 15 seconds is perfect. Your video only
needs three things. One clear hero
subject, the food, one intentional light direction, and one controlled
motion moment. That's it. Nothing extra. If you want a quick refresher, I've laid out a simple step
by step guide for you next. I've also included a
downloadable PDF che sheet so you can keep it
handy while you film. So first, choose simple food. A plated dish, drink, snack or finished
recipe works best. Next, set your light
intentionally. Decide where your main light
comes from window light or one artificial light
as long as you avoid mixing multiple
light sources. Third is to film calmly
and intentionally. Use the iPhone settings and lens you learned in this class. 123 good clips is enough. The fourth step is to
choose one motion. Pick a single action, a poor drizzle, steam, stair or hand interaction. And remember that
only one thing moves. The fifth and optional step
is to assemble lightly. You may trim and combine
your clips using a simple app like
Instagram edits or Capcot. No heavy editing required yet. When you're done, you only
need to upload one thing, one short video, or even
one clip from your project. You can embed a link
from YouTube or your socials or even
share screenshots if that feels easier. However you choose to share your creation is totally fine. If you'd like, you can
also include a short note. What you focused on,
an aha moment you had or anything that
surprised you while filming. And if you want feedback from
me or from other students, feel free to say so in
your project description. I check the class
project gallery from my classes
almost every day. So, yes, I've got you. This project is about practicing how to see, not perfection. You can share this video,
save it as practice, or keep it as a reference. I can't wait to see
what you create.
12. Final Thoughts: What Comes Next: If there's one thing I hope you take away from
this class, it's this. Good food videos aren't
about having more tools. They're about seeing food
differently on video. Once you understand
why food looks appetizing on screen,
how light shapes it, how motion brings it to life, and how simple intentional
shots work, you stop guessing. And when you stop guessing, creating becomes calmer,
faster and more enjoyable. By now, you know how to set up your iPhone for food
videos with confidence. Choose the right lens
for the shot you want. Use light direction
intentionally. Avoid common lighting mistakes. Film simple,
effective food shots and add motion without
making videos feel messy. That foundation alone can already improve how
your food videos look. This class is the foundation. It teaches you how to make
food look good on video, how light works,
how motion works, and how to film
clean, intentional shots in a real kitchen. But this is only the
first part of the system. In the next two classes, we complete the picture. First, we'll go deeper into composition and food
styling for video, how to plate and frame food, so it holds attention, how to use negative space, and how to style food
specifically for motion. Not still photos.
Then we'll move into editing food
videos in more detail. So the clips you filmed
turn into smooth, satisfying videos that feel
finished and professional. These next classes
aren't extras. They're what turn
good footage into videos people actually
want to watch. If you only learn how to film,
you'll get halfway there. Composition and editing are
what complete the workflow. That's why this class
is part of a series. So before you go,
make sure to click the follow button
so you don't miss the next two classes
when they're released. If food videography
matters to you, you'll want the full set. Before you go, here are just
a few gentle reminders. If you haven't yet,
complete your class project and upload your food video
to the project gallery. Seeing your own work and
seeing how others approach the same foundations is a huge part of the
learning process. And if this class help you see food videography more clearly, I'd really appreciate
a short review. It helps other students
know what to expect, and it helps me to keep
creating classes like this. Thank you so much for
learning with me. I can't wait to see
what you create, and I'll see you in
the next class. Bye.