Transcripts
1. Class Introduction: You've ever filmed a dish that looked amazing
in real life, and then froze when it
was time to edit it, this class is for you. In this class, I'll show
you how to edit short, beautiful food
videos on your phone using CapCut in a way that
actually feels manageable, whether you're a creator, home cook or small
business owner, you'll learn how to trim, paste, add sound, adjust color, and export a video that feels intentional
and ready to share. This is not about
becoming an editor. It's about finishing your video without spiraling
into overthinking. Hi, I'm Rose. I'm a Skillshare top
teacher, creator. And a mom who believes creative work should
feel calm and clear. I'll walk you
through a real edit from start to finish
so you can see exactly how intentional
decisions turn simple footage into something
you're proud to post. If you're ready to
stop sitting on unfinished clips and finally hit Export, let's get started.
2. Welcome: Editing That Feels Calm, Clear, and Finishable: Welcome, and I'm really
glad you're here. In the first two
classes of this series, we focused on foundations, light, styling,
composition, restraint. In there, you
learned how to make food look beautiful on camera. Now we're stepping into the final piece of
the workflow editing. Now I want to reset your
expectations right away. This is not a class about
becoming an editor. This is a class about
finishing your video. A lot of creators think editing is where
you fix mistakes, rescue bad footage, or add effects to make things
more interesting. That mindset creates pressure, and pressure leads
to over editing. And that's not what
we're doing here. In this class, editing
means choosing. So choosing what stays, choosing what goes,
choosing what deserves a little
more time on screen. Editing is not where
your video becomes good. It's where your earlier
decisions become visible. If you filmed with intention, even if it wasn't perfect,
editing becomes calmer. Clearer and lighter. And that's the experience
we're building. We'll be editing a
short foot video around 30 to 40 seconds long. That length is intentional because short videos
create quicker wins, so less overwhelm and
faster confidence. You learn how to trim without
guilt, how to shape pacing, so the video feels satisfying to watch how to highlight
texture, motion, and sound. Without piling things on. When you can edit a
short video well, longer edits can stop
feeling intimidating. For this class, we'll use
CapCut on your iPhone, not because it's trendy, but because it's simple, free, and powerful enough for
everything we need. Our goal here is not
to master this app. The goal is learning how
to think while you edit. That skill travels
with you anywhere. By the end of this class, you will finish one
complete food video. You'll know why
each clip is there, you'll understand your pacing,
you'll export confidently. With all that said,
in the next lesson, we'll talk about
why CAPAT works so well for this workflow and how to approach editing
without spiraling into tech overwhelm.
I will see you there.
3. Why CapCut (Without the Tech Overwhelm): Before we begin editing, let's talk about the
tool we'll use and why. For this class, we'll be editing on your
iPhone using CapCut. I chose it because
it's simple, free, and powerful enough to
handle everything we need for a clean,
beautiful food video. CapCut allows us to trim
clips, adjust pacing, add music, make light
color corrections, and export properly
for social platforms. It gives us control without buying us in complicated menus. The goal here is
not to master this but to understand the process of shaping a video from
start to finish. So think of it this way. CapCut simply gives us a
shared workspace so I can demonstrate clearly and keep the focus on the
decisions that matter. Now, if you prefer another
editing app on your iPhone, that is completely fine. The approach I teach in this
class applies anywhere. You can follow along using
your tool of choice. So in this class, we will
build a clear first cut, refine pacing, use slow
motion thoughtfully, choose music that
supports the mood, make small color adjustments
that enhance texture and export your video so it
stays crisp when uploaded. Everything we do is
practical and intentional. So no extra complexity, just the steps you
actually need to finish your video confidently. In the next lesson, we will set up your project in
a way that makes the editing process smoother from the start. I
will see you there.
4. Setting Up Your Project So Editing Feels Easy Later: Before we open Capcat, I want to show you a step that makes editing feel much lighter. This is the part
most people ignore, and it is usually why editing starts to
feel overwhelming. So after filming, I sit down and calmly
review my footage. I am not looking for
perfection here. I'm just simply asking
myself whether I would feel good seeing this
clip in the final video. I go through my clips one
by one in my camera roll. When I see one that clearly
belongs, I tap the heart. That is my signal
that it is a keeper. At this stage, I'm not cutting anything or
adjusting anything. I am just deciding
what feels right. If I filmed multiple takes
or tested different angles, I do not stress about it. The ones that work get hearted. The rest stay where they are. When I finish
reviewing everything, I create a new album
in my Photos app. I usually name it
something simple like pancake video selex, final pancake video,
something like that. And then I move only the
hearted clips into that album. This small step makes
a big difference. Why? Because when you
open Cap cat later, you are not staring at a long, messy timeline, trying to
figure out where to begin. You are working
with a clean set of clips that already
makes sense together. It reduces overwhelm because the hard choices
are already done. It also protects
your confidence, since you are editing from footage you already
feel good about. Organizing first
turns editing into assembling something clear
instead of solving a problem. Once your Selex album is ready, your project is ready to edit. In the next lesson,
we will bring those clips into Capcut
and start building your first cut in
a way that feels steady and manageable.
I will see you there.
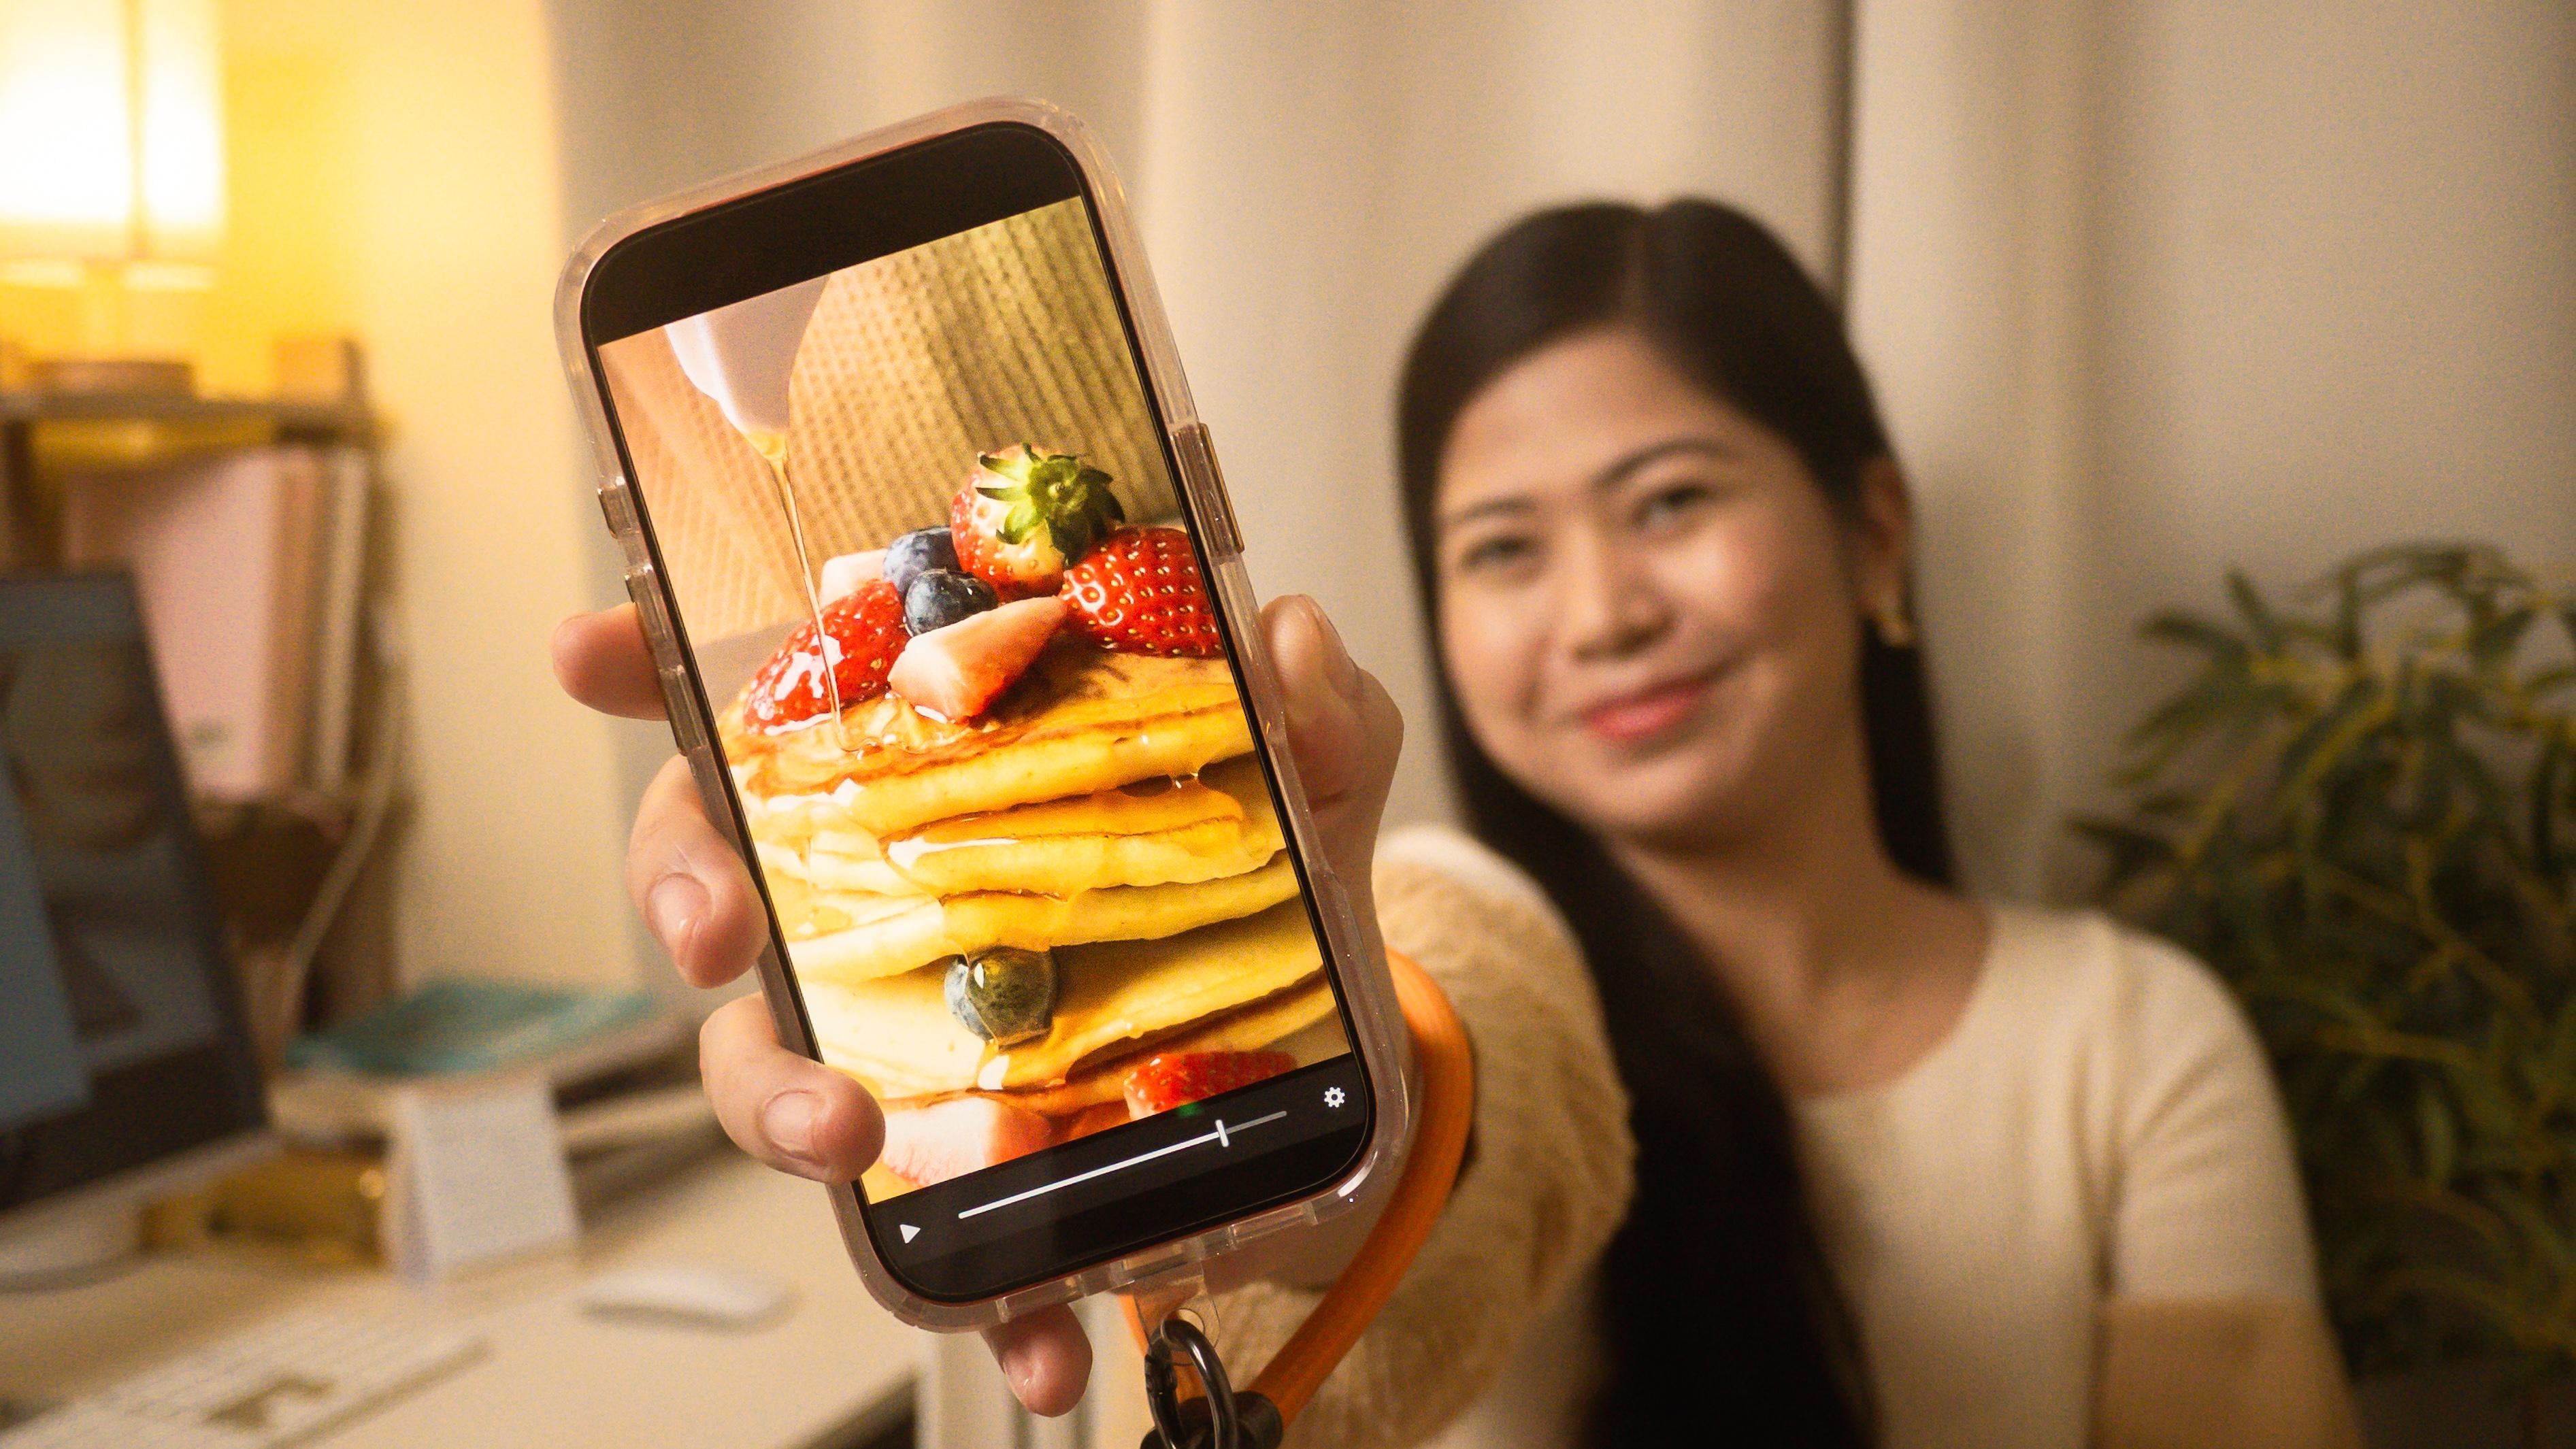
5. Class Project Demo: Part 1 (From Footage to First Cut): In this lesson, I am going to walk you through a
live demo of how I edited the pancake
recipe video from the second class
of this series. Step by step, using the footage we filmed
earlier in this class. Now, before we get
into the process, I want to show you the
finished result first. So you know exactly
where we're headed. So this final video is short. It's about 40 seconds long, and it's designed
specifically for short form platforms
like Instagram Reel, TikTok or YouTube shorts. I did that on purpose because short videos are
easier to finish, easier to replicate and much easier to feel
confident about, especially if you're
just getting started. In my first food videography
class here on Skillshare, we worked on longer
recipe videos. But for this class, I want you to
experience a quick win, something you can
do in one sitting, something you can
realistically create, enjoy and be proud of. So here it is, the
final edited version of our pancake class project. Alright. You've already
seen the finished video. That wasn't just to show off the result. That
was intentional. When you know when
you're headed, editing stops feeling like
wandering in the dark. You're not guessing anymore. You're guiding the footage
towards something specific. So as we go through this demo, remember this is not about
recreating my exact edit. It's about understanding how decisions are made
along the way. Now let's rewind to
the very beginning. So earlier, we were able
to put hearts on all of the footage that we want to
be included in our video. And as you've seen earlier, I've created this folder or
this album on my iPhone, pancake video selects,
and there are different ways that
you can import your footage to CapCut. So first is to select all of the footage and just share it and just select
CapCut from your apps. And that's it. Just
wait for it to load. Another way is from
the app itself. So when you open CapCut, you just create a new video. And then from here,
you can either grant access to all of
your photos and videos. I preferred not to
because I don't want CapCut eating
up my storage. So that's why I intentionally
select the videos that I want to be
imported here in CapCut. So either way, as long as your videos end up here in
CapCut, you're good to go. So now that all our
footage are here, I just need to select the ones that we're
going to work with, and I will select them in order, so it's easier for them to
edit. So let's do that. So this is the
footage step by step. And then we just click on Add. And this is our timeline or this is where we
will be editing. So no need to be scared
of all of the buttons. All you need to pay
attention to is this area right here and then the
edit. I think that's it. And then the split and the
delete and later on the speed. I don't think we will be using, like all of these
gazillion buttons. So we'll just pay attention
to the main ones. Alright, so now that we have
all of our footage here, we just need to check
whether it's complete. So I love that we're
editing a recipe video, so it's easier to
see the step by step process or if we're
missing any footage. So just reviewing everything and kind of thinking how
I will be editing it, because as you saw earlier, this is just a 40 seconds video. So I'm thinking maybe
just two to 3 seconds per footage or per step. Well, it looks like
all of our footage are complete because we
have our finale, the honey pe, the most
important footage for me or one of my
favorite footage. So we can start cutting. So what are the best
practices when it comes to cutting or
trimming your footage? You don't have to
show the whole thing. You just need to show, like, the most important action. In my case, I just
want to show that we're starting off with
the dry ingredients. And as you can see here, it did not record the rest of the dry ingredients,
but that's okay. As long as we have the
all purpose flower part. I think that's enough. So we can cut here in
this part until there. I won't be including
the part where I was out of the frame. So just a few seconds. So you can even cut mid action, if that's better.
Maybe here. Okay. So we just click on that area or that footage
and then click on split, and then just tap on this footage before that and just click on
delete, and it's gone. And then two to 3
seconds, right? Oops, and that's it. Okay. And then we can
click on split again. And then let's see the
rest of this footage. Okay, I don't think
we need anymore. We don't want the second cup, so we can just
delete all of this. And that's it. That's
your first cut. Alright. Next is the
wet ingredients. So as you can see, I will not be including this part where
nothing is happening. So that's why editing
is very important, and that's why editing
is fun because you can just choose
what you want to show. For the egg part, I didn't want to show this
where I cracked the egg. So I will just start here. So I can just click again on
that footage and then click on split and then remove
this part, clicking delete. So from here, then here, and then I just split
again and then cut it until so I don't want to show all of the
eggs because it's given. Okay, this is the butter part. So this one I will include. So again, here, if
you will notice, I am cutting just before
the action happens. So split, and then
delete this part. The ones that we don't
need. So butter. I like that movement
that could stay longer, so split, and then let's
find the next part. Again, I'm not including
that butter part. This is like a
whole recipe video, maybe intended for YouTube
or a long form video, then maybe including all of the accurate or precise
ingredients is beneficial. But for short form, you just want to show a glimpse
of your recipe, and that's why a
lot of creators use short form videos to funnel
into their long form videos. It's something to get
attention to just show, like, a sneak peek
of your process. So it doesn't really have
to be accurate or precise. So that's why we're not including that second
tablespoon of the butter. Moving on to the next
ingredient, the milk. Okay. We can start here. So fun, right? You start in
that middle of the action. That's why I love editing. Okay, again, we
remove this part. And then just 3 seconds. Two to 3 seconds,
so one, two, three. Just enough to capture that
dropping or pouring texture. And then split again. And then we find the next part. Ooh, I love this part. Dropping
of the vanilla extract. Okay. Oops, that one. So we split again, and then we remove this part. And then just the drop. Okay, two drops. And then we split again, and then we find the next
ingredient from the footage. Okay, so it's
already the mixing. Okay, so we don't need to include this part where
in I'm entering the frame. We can just start here. So split and then
remove this part. And let's take a look
of how it looks so far. Ooh. See? I love
it. It's so fun. Alright. So again, just 3
seconds of that movement, one, two, three.
And then we split. I hope by this time,
you're getting the groove and the
idea behind it. So you just really cut those important parts to
include in your video. You don't have to
include the whole thing. And that frees up your mind and removes that pressure
to include everything. I'm going to say it a lot
of times in this demo, but you just have to choose the best part of that footage. Okay. So going back
to our mixing, that's a lot of mixing. I actually changed the angle
here because a while ago, we're a bit tight. So I tried this angle
wherein I used the one lens. So I think I mentioned it in class number two
of this series, and I ended up loving this
shot more than the tight one. So with that said, I'll just
include 3 seconds of this. So split, and then
one, two, three. Okay, and then remove
this part or delete. Okay, okay. This one we need
to remove as well. So if I will choose between
this one or this one, I'll choose the second one
or that mixing footage. Not this one, so we
can just delete it. Okay. And then the next step I think the next
step is combining the dry and the wet ingredients. So we can just start
there. You can just remove this because, as you can see, we already took 3 seconds of that mixing action. So next is the mixing. Oops. Okay, we can start here. Alright, so fun. And then we can just
remove this part, the one before that pore. And we can start from
the pore, and let's see. Perfect. I love it. Okay? Not the whole thing. Maybe just until this part, and then we can split again
ready to remove this. Maybe include the mixing
part. Okay. This one. So split, and then let's remove this long unnecessary part. Click on delete, and then mixing and then split again
until we're done mixing. So removing that part again. So this is a tighter shot. So this is a good
variety to this video. So that's why I change
angles now and then. Just choosing that art
that I love, okay? I think we can end there. So maybe this part. So this long mixing part, I can just remove it when
there's nothing is happening. So let's see how it looks. I'm so excited. Okay, pouring over the dry ingredients, egg, butter milk, vanilla extra, mixing, combining,
mixing, tighter mix. I love it. Alright.
6. Class Project Demo: Part 2 (Finishing the Cut): So now we can move on to the
next step, which is cooking. Oh, brushing of the
oil or the butter. So we don't need to include this part. We can
just start here. Okay, so I will just find my favorite part
of the brushing. Okay. Split and then remove this part and just
include 3 seconds, one, two, three, and then split, and then remove the
rest until this part. So split, so we can remove
this long part, delete. Okay. And then split again. So we don't want I
don't want this part. So I can just delete this part again and then follow it
up by the bubbling part. Bubbling. So split. I just need 3 seconds
of the bubbling part. So one, two, three, and then split, and I can remove this part and the one
that came before that. And then followed by the flip. If you will notice, I always
choose to cut mid action. That makes it more
engaging for me and removes unnecessary
part of the clip or that footage. Right? We can just split that
and remove this part. So for this part, I have this crazy idea wherein I will
try to do some continuity. So after the flip, I want
it to land on the plate. So we'll try that. So I'm searching for that part,
again, mid action. Okay? There you go. And
let's see how it looks. Oh, I think that worked.
Let's see again. Or if there's a disconnect. Okay, I think that's perfect. So I can just cut that there. Now for the rest
of the pancakes, I didn't want the
dropping action. If you saw it in the first
or the second class. I actually wanted the
part wherein I used this spatula or whatever you call this to put the pancakes
because it's more ladylike. Instead of the dropping, I
just it didn't look clean. So here. Okay, so let me split
that or split and delete. And then for the serving part, later you will see why
I'm going to do this. So after the drop, we
were cutting there, so drop we'll remove this part. You know what? Later, we're
going to polish the cuts. But for now, let me just
show you all the cutting. We'll do the polishing later. Since you already have the
first pancake from the drop, I can just split here and then
remove the long part here. So from here, oops.
Not that one. Sorry. We can just undo if you accidentally deleted
something that you shouldn't have deleted. So first and second pancake, we want the second pancake. So mid action. So I can just
split and delete this part. So I can keep this
part. There you go. Okay, so first and then third, mid action again, split,
and then delete this part. So one, two, three. So I will just do the same
for the rest of the pancakes. So my technique here is
to just cut mid action. And then as soon as
the pancake is there, I cut it and proceed
to the next pancake. Again, mid action. So removing this
part. All right. And we are done removing
this extra part. Okay? I want to watch
it, and let's see if we were able to achieve
what I have in mind. So from the bubbling, the flip. Alright. Perfect.
Okay, this part because I think I
changed the pancake. As you can see, it's different. So maybe we can start here
where it's almost covered. There you go. So it doesn't show the disconnect because this one is a different
pancake from this one. So let's just remove that part. So that's called camera
trick or editing tricks. So let's see. There you go. That's better. Okay, and cut. All right. Next is
the garnishing part. So I think this is a
very long footage. So we'll just start here. Just when I put the
strawberries, again, mid action because again, it's given that I'm
putting strawberries, it means I'm doing
the garnishing, so I can just split
and remove this part. And then one, two, three. Sorry. One, two, three. And then we split
and find the part. Oh, okay, I did the
blueberry drop here, so we're going to
cut from this part. Split and then remove
this long part. Garnishing blueberry drop oops. We cut and then we find the best blueberry
drop reverse POV shot. As you can remember
from the other class, we tried to do the reverse
POV of the blueberry drop. So let's start here,
almost, mid action. So we cut, and we
remove this part. Oops, okay? We can just cut it here there. And then split and
remove this part. Okay. Let's see. Actually, we can
put this footage in front. So it's from here, we drop and then this one. But later, let's do that
later. We'll come back. Okay, next, I want to include a close up shot of me adding
this last strawberry. So we'll cut here. Cut and remove this part. Put strawberry and then cut and then I think the next scene is the there's no need for me
to include all of this. We can just proceed
with the honey pore. So I can just remove this
long garnishing footage. Okay, and start here. Okay. Oops. Okay, here. And then split and then remove this part by
clicking on delete. So as you can see,
I'm only using the split and delete
buttons for now. So it's very easy and
you'll get the hang of it. The more you do it,
you will really get the hang of it. So let's see. So strawberry. Oops,
I forgot this part. So strawberry. Sorry.
We'll just go back here. I hope I'm not confusing you. So we're just going back to that part wherein I
put the strawberry. Oops. Undo that. Oh, actually, I just forgot to cut
this part or to delete. So from the strawberry, drop, blueberry, strawberry,
and then the honey por. Okay. Now, I have shots of the
honey in two X and four X, so I want that included here. So that's why I cut it mid part. I didn't include
the whole thing. So we still have space
for the tighter shots. Like, it's a continuous shot. You'll see what I mean?
So let's just find that tighter shot. Okay? There you go. You can see here, I am cutting it at this point, so you will see how it looks. So let's remove this part. So you'll see the continuity. So putting the strawberry, pouring the honey, there you go. It looks like it's a
continuous action, but not really because I
shot this three times. So that's how you
do editing tricks. Okay? And before
I'm done pouring, I'm going to add
another tighter shot. Let me just delete this part
because we don't need it. We're now looking
for that tighter or the tightest shot the closest
or the most close up shot. Okay? When we cut again, we don't need this
part, so we delete. And let's see how it looks. See. Okay. I love it. It looks like a continuous
shot, but it's too long, so I'm just gonna cut here and
remove this part. Alright. And as you can see, we're done. And just like that,
the first cut is done. It's not perfect, not yet final, but for me, it's clear. The story is clear, and clarity is exactly what we're aiming for at this stage. The goal of your first
cut is not to impress. It's to understand what belongs. Because remember, editing is
not about fixing mistakes. Editing is choosing. In the next lesson, we'll take this first cut
and gently refine it, so we'll add motion,
sound, color, and final check so everything feels complete. I
will see you there.
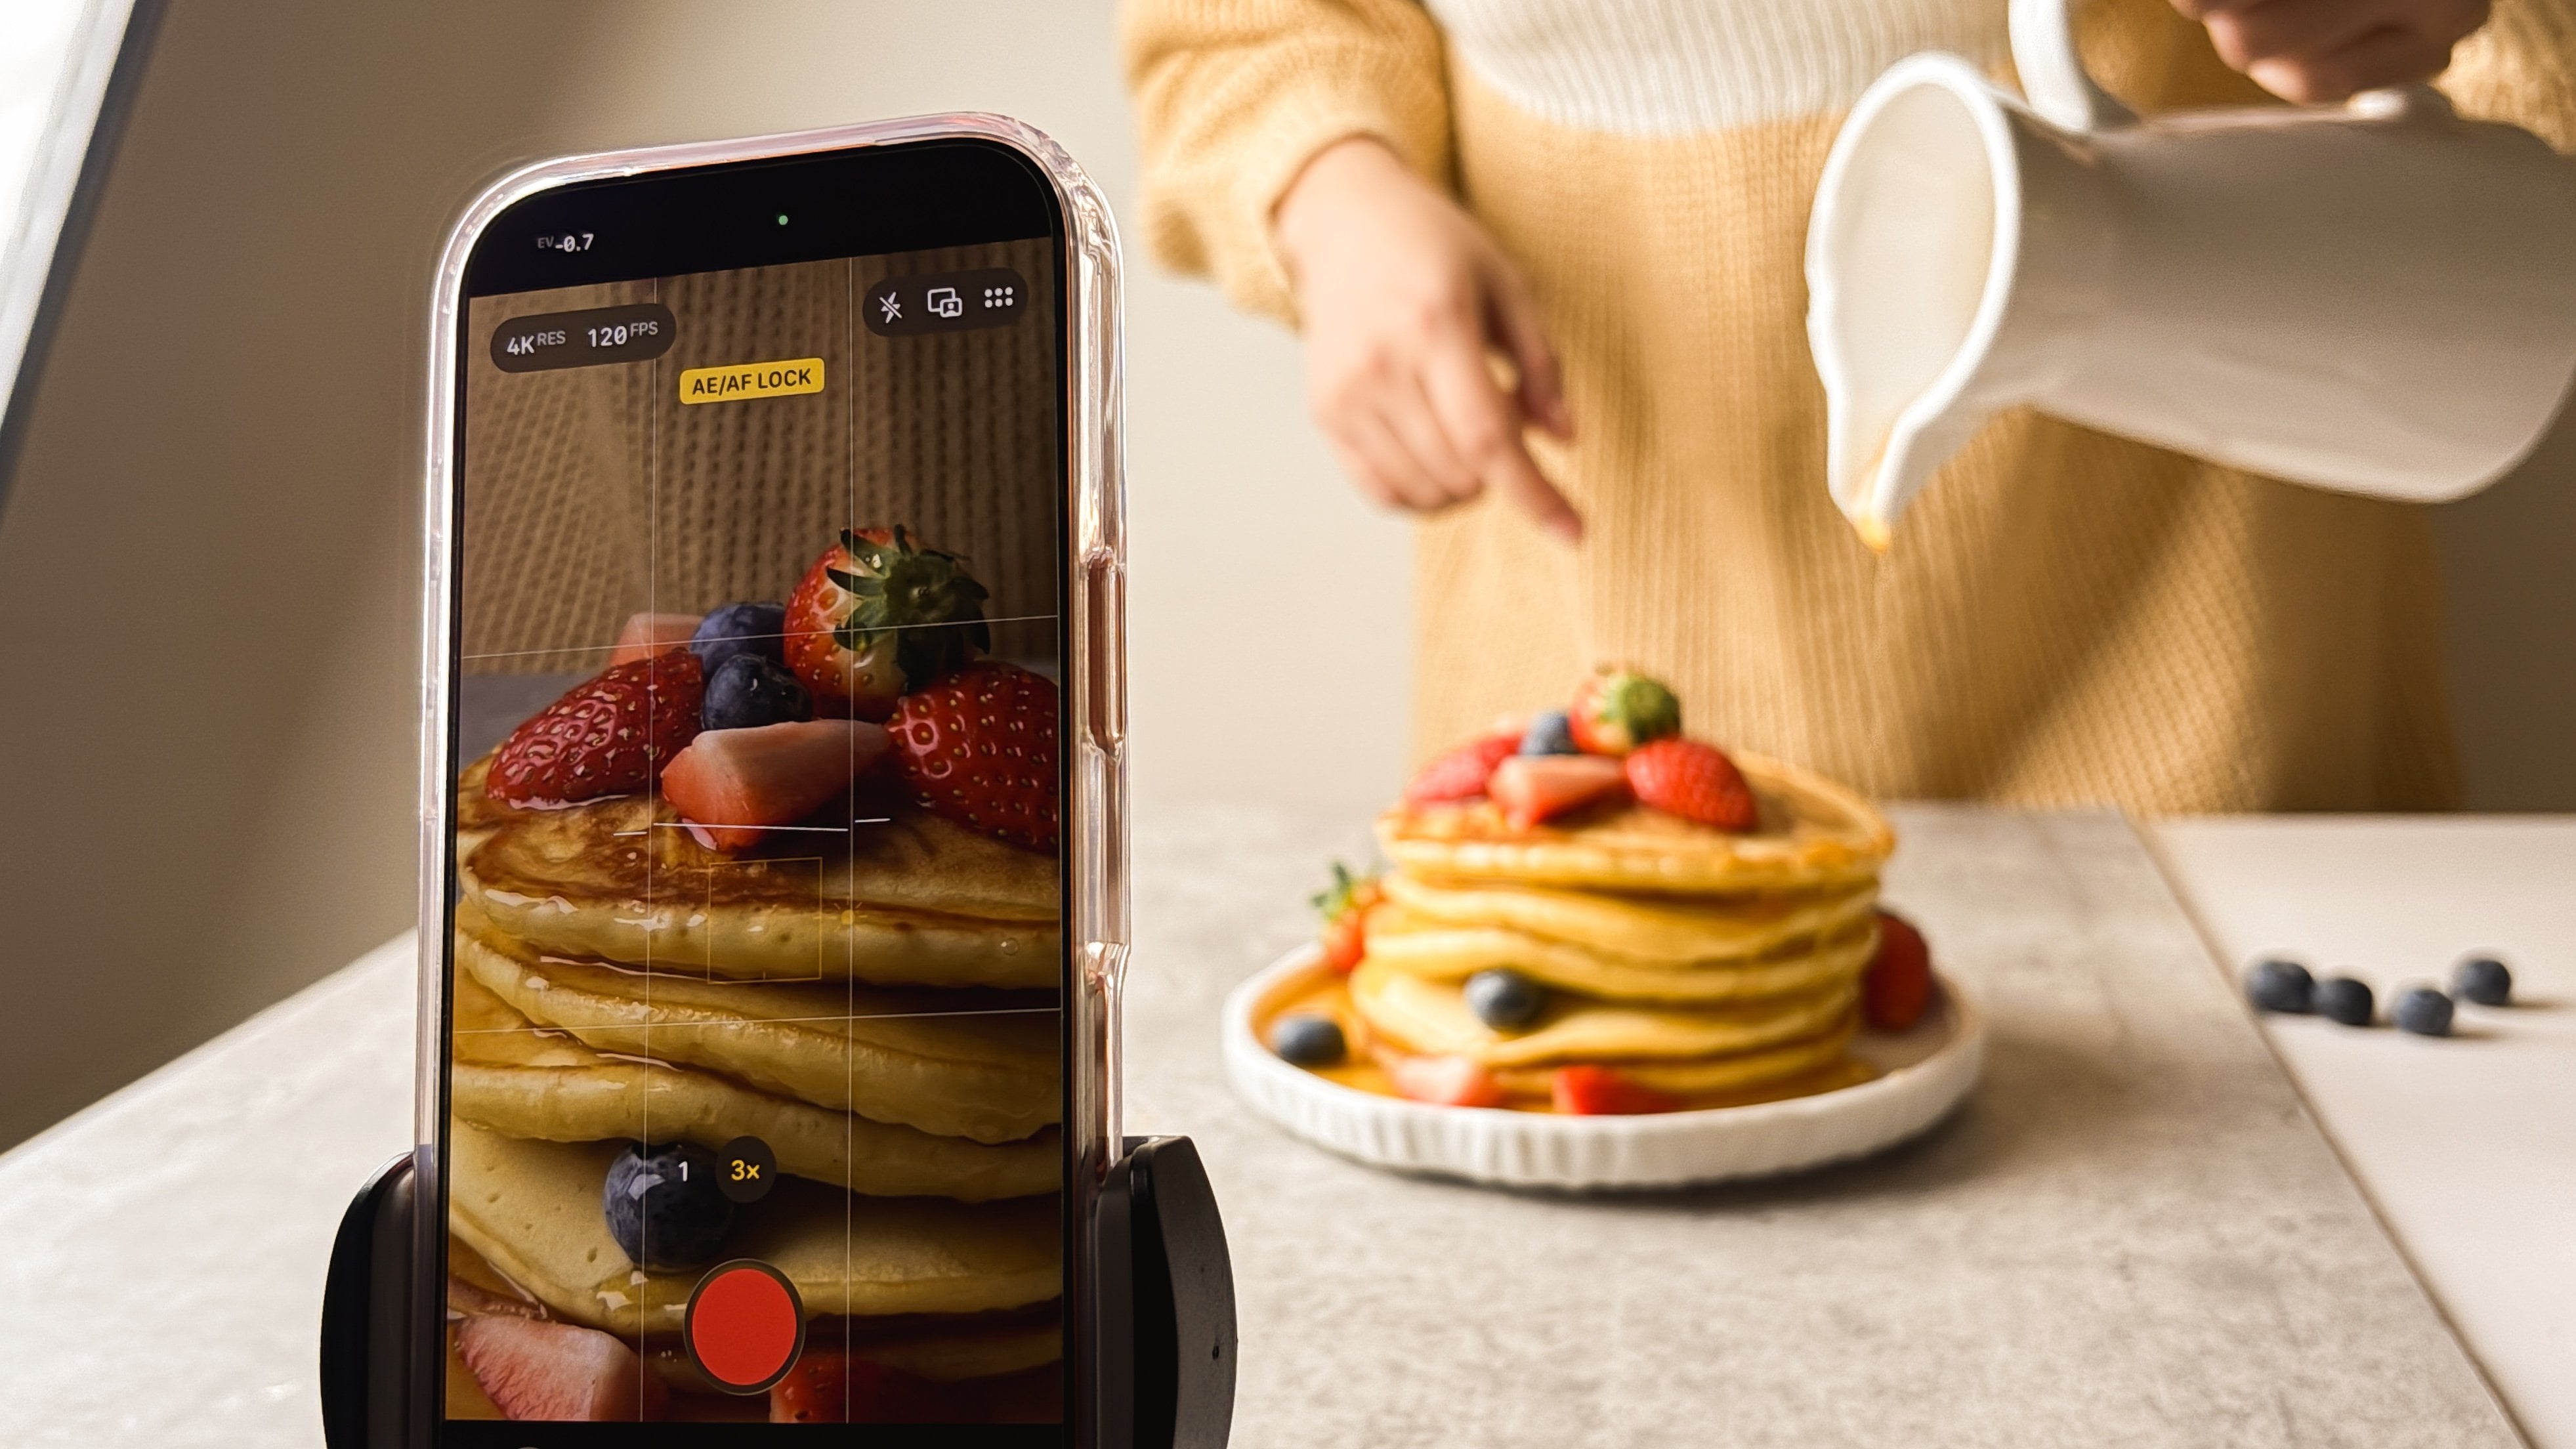
7. Class Project Demo: Part 3 (Scale and Music): Okay, now for part two, our next step is to
polish our edits, add slow motions, scale
to avoid jump cuts, add music, and a bit
of color adjustment, and then we will export. So we are almost done. So it's just polishing, so it's ready for final export. So let's just watch the whole thing after
our initial cut. So dry ingredients, egg, butter, milk, vanilla mixing, mixing of the dry and
web, mixing again. Okay, tighter mix. Oh, that's too long. I forgot to cut that
part. So, let's see. One, two, three, and we split, and we remove this part. Let's see. Love that. So a few things that
I noticed in here, this shot is too long, so we can maybe cut
it to this part. Sorry, I done. I can just remove
this part already. And then this part too. I can just remove this part. And and I can put the blueberry drop here. So there you go. So that's how you try to exchange the footage
or change the order. You just press and hold it and then just move your
fingers like that. Let's see if it looks better. So from here, drop. Okay, now we just need to polish that so it looks continuous. So this is how you do
continuity on videos. So from here, the drop Okay, I guess we can just cut it here and remove this
part, and then here. Okay, there. So it
looks continuous. Let's see. There you go. I love that. But now I feel like this needs a bit of slow motion because
it's too fast. So to add slow motion
to your footage, you just click on it,
and then click on speed. It's beside the leap. Click on normal and too slow
mo or to add slow motion, you just move your slider here. If you want it faster,
you move it to the right. So slower to the left,
faster to the right. So we want 50%, so 0.5. So let's see how it
looks with the 50%. Okay, I think that's good. I like that it's slow motion
here and then fast here. It looks engaging to me. Now, the next thing that I want to edit here that I
want to show you on this footage is that you can
see our water sprinkler. Is that what you
call it that one? And I don't want it to be seen. So here's what I'm going to do. It's very easy to scale your
footage here in CapCut. You just need to
use your fingers. You just do that and move it until you're
happy with the size. So I'm going to
be how do you say that zooming it out until that sprinkler is gone and
maybe just rotating it a bit. No, it's not letting me rotate, but I'm actually happy
with this framing. I'm no longer seeing
any distractions, so I'll leave it alone. Um, I think that's the
only part that I need to adjust the scale or the size of the frame or to
improve the framing. Everything else, I'm happy. So we were able to
add slow motion and change the framing. Actually, speaking
of slow motion, I want to add it
to another part. Let's go back to
the vanilla drop. I want to add slow motion
on that footage, as well. Okay, there you go.
So just tap on it, and then click on speed, normal, and then 0.5 again
for 50% slow motion. And then done. And at C. Oops. So if you want to watch,
you have to click this arrow and then play. There you go. I love it. Can you see
that drop? It's so cute. There. Alright. I think I'm
happy with those slow motion. So let me just rewatch
the whole thing before we add our music and
adjust the colors. Wow. I love it. Can you hear the sound?
I love that ASMR sound. But I might not be
able to keep all of it because you can also hear us
talking in the background. So just one thing here in our fun serving of
the pancakes here. I'm just gonna polish it. So from the flip, so bubbling and then flip. Okay. This to me is too
long, this part. So let's just cut,
remove this part, this part right here, so delete. And then second pancake, third, Sir, remove this part as well. So let's see. One, two, four, five. Okay. That's better. I think I'm happy with our cuts, our scale, our slow motion, so I think it's
time to add music. In CapCut, there are many
ways for you to add music. You can go to audio sounds and just search for the kind
of music you want to add. In my case, I want this
video to feel inviting. So the word that is
in my mind is sultry. But I'm nervous
because I don't know what kind of music we're
going to get here. Sensual. Let's see
if that will work. Not playing. Oh,
there we go. Ooh. Unfortunately, I did not like any of the sultry
music from Capcot. So I decided to check Canva, and I was able to find one. I think that best
fits this video. So I'm just going
to airdrop it so we can add it to our video. Okay, there you go.
Airdrop complete. So sultry fandango music. So we just need to share it. And then select CapCut and then import footage to
CapCut. There we go. And then from here,
all we need to do is just extract the audio. So to do that, you just tap
on this because this is just video or a
video file format. So you just select
it and then look for Extract audio option. Just click on that and boom, you now have your
audio, and then you can just delete this
part or the video part. And then we just press and hold so you can match
it to your video, and let's see if it works. I think it's working. All right. I think that's the perfect
music or audio for this video. So I'm just gonna cut it here. We're actually here
because I plan to put this part in the
beginning of the video. I'll tell you more of it later. So let's just delete this part. And we're done adding music. Next, I want to put this part. So from here to here in the
beginning of the video, because you know
how in short form, it works to kind of
start with a hook. So instead of starting
with the dry ingredients, I want to start with
a finished product. So we're just going to cut here. Alright. And then move this part,
so press and hold, and then move it in the very
beginning. There you go. So our video will start here in our most close up,
most tempting footage. And then that's when we're
going to start with a recipe. And if it's playing on
Instagram and Tiktok, it's gonna loop, so win win. And then later on, we'll just crop this part, the CapCut when we
upload it on Instagram. So we can just end
the music here. This part. Okay. Then split
and delete that part. So now that we have the music, next step is to add color
or to improve the colors.
8. Class Project Demo: Part 4 (Color Adjustments and Export): So to change color or
improve the colors, you can just go to adjust. In here, you can
adjust the brightness, saturation, clarity, and
then the colors is in HSL. So we're not going
to color grade. We're just going to improve the overall look of our footage. So let's start with brightness. We can add a bit of brightness, so it's more inviting
and mouth watering. Of course, contrast,
there you go. Maybe ten. Or it's good. Not too much. Saturation maybe
just a bit, five. Do we want to
sharpen? Okay, fine. We can sharpen just a bit. For clarity, we can also a
bit of clarity, maybe three. And then the HSL, the
pancake is color orange, yellow, so we can try to
manipulate those colors. For the reds, we
can add a bit of saturation to liven up
those strawberries. Not too much, of course,
because it will look unnatural. So just a bit. And those greens,
we can also just saturate it just a bit or not. So maybe just a
bit just five and just add a bit of
lightness into it. Okay? The orange part, we can just add a bit, not too much because it will look overdone
and we don't want that. But we want to add lightness into the orange or
into the pancakes, as well. So I think we're done. Do we want to add high
lights and shadows? I guess we can just
minimize the shadows just a bit to brighten up the
whole vibe of this video. Temperature, do we want
to add temperature? Maybe just a bit because food looks better when
it looks warmer? Okay, just a bit. As you can see, I'm not going
crazy with the sliders, just plus five plus ten, so you can definitely experiment with whatever food you're
shooting and editing. But that's just how I would edit a food video just to
make it pop, I know. That word is overused, but I don't have
any other word to explain this video
going from this. To this. It's more colorful. It's more inviting,
more tempting, and more mouth watering for me. So I'm happy with that. We will just click
on this X button. Oh, sorry. The check button. And then let's see. Oh, I forgot to apply the
changes to all of the videos. So let's just click
on Apply to A. So when you're happy
with your edits, you can just simply
apply it to all of the footage so
you don't have to repeat the same steps on all of the footage because
that is tedious. You can just click
on Apply to All. And it will say apply to all clips and your
work here is done. Now that we're done with colors, time for final checks
and then exporting. For the audio or the
music that I chose, it's currently at 100%, so I can just lower
it down to 70%. 70% and then check. And then I really
wanted this to be ASMR. However, my husband and I were talking in some parts
of the footage. So to be safe, what I'll do is just mute all clip audio. So
you can do that here. If you don't like the sound of your footage or the
sound attached to it, you can just mute all of it and just stick to your
selected music or audio. So let me just check real quick. Alright, so no background music, just the music that we've
chosen for this video. I think we're good.
Now for export, you just click here at the top. Beside Export,
there's this AIUHD. So there's no need for us
to export in ultra HD, but of course, you can try
that experiment with that. For resolution, we want
ten ATP for frame rate, we can just lower it down to 30. And then the bitr we
can maybe put it at 15. 12 to 15 is okay. And of course, we don't want Smart HDR as well
for our export. And once we have all
the setting selected, we just click on Export. So we just wait
for this to finish exporting and like what
it's saying on the screen, please don't close
CapCut or lock your screens or just
watching the numbers. And then we just click on Done, and it will automatically
be in your camera roll. So for me, it's recently added Now, to upload it on your social
media, for example, for me, let's say I'm uploading
it on Instagram, first, I need to
check my settings. So we go here on the upper right hand
corner and go to settings. In here, we look for media quality and make sure that upload at highest
quality is turned on. And once that's turned on, it's like telling Instagram to not change the quality
of your video. Don't ruin my pancake
photos, please. So we just click on plus, and then we upload this reel. For some of you, your video is already added here, but if not, you can just manage
and then select your video, and there you go. You just click on it,
and then you go next. And since we already
have our audio, there's no need for us
to put any audio here. But of course, if you're
uploading a reel wherein you want to add like a
Taylor Swift song, you can definitely
do that as well. You can add the audio here, and then you just go to next. You can edit the cover, add caption before you finally click on
Share, and that is it. Before we move on, I want you to hold onto one thing
from this entire demo. This video works because
of the decisions made before editing
even started. The lighting, the composition, the restraint while filming. That is what carried the video. Editing simply helped shape it. So no, nothing
flashy saved this. We just paid attention
and chose carefully. And now, it is your turn. In the next lesson,
you will edit your own short food video
using the same process, but with your footage
and your taste. This is where things
start to feel real, not because everything
is perfect, but because you
finish something. That is where confidence
grows. I will see you there.
9. Your Turn: Edit Your Own Food Video: This is where everything
becomes real. Your class project is to
edit one short food video. So keep it simple,
keep it intentional, but most importantly, keep it finishable aimed for
around 30 to 40 seconds. That length is intentional. It allows you to complete
this in one sitting. So you build momentum
instead of pressure. You can use the footage from this class if you
filmed along with me. Or any food footage
you already have. It does not need to
be a full recipe. One satisfying food
moment is enough. If you would like
extra practice, check the projects
and resources section because I added a link where you can download the
original pancake footage we used in this class, and practice editing
alongside me. I also included two
additional sets of clips for you to
experiment with. One is a pistachio crunch cake, and the other is the
viral Dubai chewy cookie. You are welcome to use those if you want
a starting point. Of course, feel free to edit your own delicious
food videos, too. As you edit, focus on clarity, choose clips that feel right, trim with confidence. Let pacing breathe. Use slow motion when it
truly adds something. Keep color adjustments
subtle and honest. Pick music that supports the mood instead of
overpowering it. You are not trying
to impress anyone. You are practicing, finishing. That is the heart of
creative momentum. Small completed projects build confidence faster than
big unfinished ones. Treat this like a
little art experiment. Notice how it feels to move
through the edit calmly. Notice what becomes easier. Notice the shift
that happens when your video goes from
almost done to finished. And when your edit is ready, upload it to the class
project gallery. It can be simple, it can be lightly polished. And if uploading a full
video feels tricky, screenshots from
your favorite frames are completely welcome. And if you would like, add
a short note about what you focused on or what surprised
you during the process. Seeing how others approach the same project is part of the learning and part
of the momentum, finishing something
and sharing it. I can't wait to see
what you create.
10. Final Thoughts + What Comes Next: Before we close, I want to zoom out with you for a moment. No matter where you
started in this series, what you learned here
stand on its own. You learned how to approach
editing without spiraling, how to organize your footage before touching the timeline, how to trim with clarity,
how to let pacing, motion, sound, and color support the video instead
of distract from it. Most importantly, you learn that editing is about choosing. If you follow the series
from the very beginning, you can probably feel
how everything connects. First, you learn
how to film food in a way that already
feels intentional. Then you learn how styling and composition guide attention
before editing even begins. And in this class, you shaped it all into something finished. That is the full workflow. Nothing flashy or complicated, thoughtful decisions
at every stage. And if editing felt
lighter this time, that shift did not come
from learning a new app. Came from understanding
what actually matters. If this is your first
class with me and you are curious about
filming or styling, you are always
welcome to explore the earlier classes in this iPhone Food
Videography series. They are designed to
support each other, but you can take them in
any order that feels right. Now, before you leave,
take one small step today. If you haven't uploaded
your class project, do it. Not because it has
to be perfect, but because finishing
something builds confidence faster than
almost finishing it. Project might feel small, but small completed projects create real creative momentum. And if this class help you
feel clear or more confident, I would truly
appreciate a review. Even a few honest
sentences about your experience helps this class reach the right students. And if you would like to
continue learning with me, make sure to follow
here on Skillshare. I share classes on iPhone
photography, videography, and practical creative
workflows that help you build your brand using the
phone you already have. Thank you again for being
here and for doing the work. I will see you in
the next class. Bye.
 Rose Nene, Photographer & Videographer