Transcripts
1. Intro: Hey guys, welcome to my
beginner modeling class. And this course, I will walk
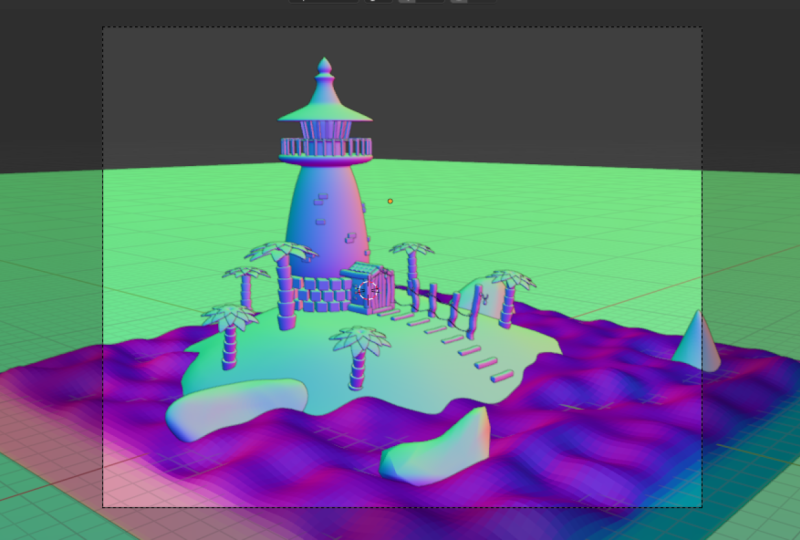
you through how to create this stylized lighthouse scene using beginner
modeling techniques. This course will
go at a slow pace so that any beginner
can follow along. I will cover basic concepts
such as using modifiers, editing our meshes
and edit mode, and much more as we progress
throughout the course, I will also teach basic
keyboard shortcuts to help speed up your workflow in
Blender without further ado. Let's get into
creating this project.
2. Navigating Blender: Okay, so the first
thing you wanna do is go into your search engine and go to blend this website and then download the latest
version of Blender. I currently have blender 3.2.1, but this course will work in any of the recent
versions of Blender. So when you first open Blender, you get this menu and you get your viewport and all
this stuff over here, which probably looks pretty confusing if you're
a complete beginner. But the first thing you wanna
do is just click away from that menu and you
have your scene open. Now, the big box
right here that has all these grid lines and this red line and
the green line. This is called your viewport. And this has everything
in your scene. So by default, Blender
has a point light, a cube, and a camera. And you're seeing up here
is your scene collection. And you can also see all
the objects in your scene. Up here. Down here are some menus that we will work with later
in the project. These can do tons of
cool stuff like physics. Over here, you can do
fluid simulations. You can do particle systems, add modifiers will be
using this tab a lot. And then other things like
your render settings, your output settings, which are important for rendering
your final image. So the way you navigate
your viewport is by clicking on your
middle mouse button and moving the mouse. And this will rotate you around
the center of the scene. Then if you press Shift and click on your middle mouse
and move them mess around, you will pan around your scene. And these are the two main ways that we move around our
scenes and blender. And if you want to
just pause the video right now and practice that, That's a really useful
skill to have if you can move around
quickly in your viewport. So the way you select things in Blender is by left
clicking on them. And then if you want to
select multiple things, you can either press shift
and then left-click again. And that allows you to
select multiple things. Or you can box select by left clicking and dragging over the
things you went to select. So that's pretty much it
right now for our viewport, the next thing I want to cover is actually up here are
some important things. This is just painting around, which if you don't have a mouse, I guess you can come up here
and pan around like that. The easiest way to pan. It's just by pressing shift and middle mouse button and
move it around like that. This is Zoom in, slashed out. But the easiest
way to do that in Blender is just to scroll
with your mouse wheel, scroll and scroll out
is zoom in, zoom out. Then you have this camera icon, which basically shows you
what's in your camera view. So if you click on that, it'll put you in the camera. And you can see that we have, the cube is in our camera view. And if I just press my middle mouse button,
I'm out of camera view. And up here you have
your different axis's. So these are really important for when you're moving
things around in Blender or scaling things
or rotating things, that's when these different
axes are really important. To have your x-axis, which is this red one. You have your green axis, which is the y-axis, and you have your z-axis, which is a vertical axis, but it doesn't show by default in the blender
seen over here, you have different tools
like move, rotate, scale, transform,
which has all of them, and then different
annotations and measurements and
stuff like this. You don't have to worry
about these down here, but we will be using
these funds right here. Then up at the top, you have your different
tabs and blender. You don't have to worry about
most of these, basically, the only two we'll be
using is our layout view. Actually three will be
using our layout view, our shading view, and
our sculpting view. But that's it for this
week in our course, you can get more
advanced and start doing stuff with compositing
and geometry nodes. But this is strictly
a beginner course, so we won't be
doing any of that. So another important
thing to note in your viewport are these
viewport shading tab. So by default, Blender
keeps you in solid mode, which is what you want to
use 90% of the time anyways, but you can click on
this wire edges mode, which can be helpful
modeling some times. And this makes your object see-through and you
can see the edges. Or sometimes material
preview mode can be useful. It shows you the materials
on your objects, but it doesn't
really show you how they interact with
light very well. Whereas with the rendered view, this kinda shows you
how light interacts with your objects
and their materials. In this gives you a really good idea of how your final scene will look
is rendered view, but we typically want
to stay in solid mode. One other thing here down at
the bottom is our timeline. We aren't animating the scene, so we won't really
be using this. But if you are animating, this is a pretty important
part of your workspace. But you don't really
have to worry about this for this course. Okay, so now that you understand the basics of how to
get around Blender, There's a few add-ons
that we went to enable that will basically allow us to model a little
bit easier and work with shading a little bit
easier later in the project. So what you wanna do
is set up to Edit, left-click and then
preferences left-click. And then you went to
go to your add-ons tab and type in auto mirror. Now I have all these add-ons
automatically enabled. But you wanna make sure that
this little check right here shows make sure
auto mirror is enabled. Then you went to type
in node, Node Wrangler. This is another add-on
you want to enable. This will allow us to work
faster with our shading nodes. So you want to make sure this
has that little check mark. And then the next add-on
you went to enable is extra extra mesh objects. This is a pretty useful add-on, which basically gives us a extra mesh called
the single vertex, which we will use a
lot in this course. Okay, so that's it
for our add-ons.
3. Ocean Modeling: Okay, so now we can move on to the fun part which is
actually modeling. Now the first thing I want
you to do is left-click and drag over everything
in the viewport. Select all of this. Then I want you to
right-click and come down to delete and
delete those objects. We don't need any
of that right now. Okay, so now what we want to do is come up to our Add menu. This is where you can add different meshes and
curves and stuff. Left-click on this, come down
to mesh and add a plane. And this plane is
what we will use to create our little ocean. Okay, So now that
we have this here, what we want to do is come
over to our scale tab. Right now, this plane
is super small, but we want to come over to
our scale tab right here. Left-click on that,
select this white circle, and left-click and drag that out and make it
really big like this. When you scale things
in object mode, the scale isn't uniform anymore. So what we want to do is come up to that little arrow,
left-click on that. So we are back in our selection
and we went to come up to Object, Apply and scale. And that will apply
our scale so that our modifiers behave
correctly when we add them. Okay, so now what
I want you to do is come up to this
object mode tab. Left-click on that and
change it to edit mode. Edit mode is where we make most of our adjustments
to our meshes. Now, right-click on our object and come down to sub-divide
and left-click on this. And as you can see,
it's multiplied the geometry on our plane. So now we have four faces
instead of just one phase. Then don't click
off of it just yet. You want to come down to this little subdivided
menu and change the number of cuts to
25 and click Enter. Now, if you did left-click
off of it or something, what you can do is
press Control Z, Z, which is the
control for undoing. So control Z will undo. If you're fine, you can press
Control Shift Z, Z to redo. But if you clicked off earlier, you can just undo that. Right-click sub-divide again. Make sure you don't click
off of it again and change the number of cuts to 25. So now we have a lot more
geometry on top of our plane. So the next thing we want to
do is make our plane thick. Right now it's just 2D, but we want to turn
it into a cube. So you want to come over to
this Extrude Region button. Left-click on that,
grab this little plus, and drag it downwards. And now we get this
sort of thick cubed. And then what you wanna do is come back over to
your select box tool. Come over to this little z. So what these do is it puts you into like some
sort of side view. So if you click
on y, negative y, it puts you in the
negative y side view. X puts you in the side view. And we want to come up to Z. And then we went
to left-click and drag over all of these
inside vertices. And select only the inside ones, not these ones around the edge. And then you went
to come down to this little green tab called
Object Data Properties. Left-click on that. And then under vertex groups, click this little plus sign. This will add a vertex group. And we can name this
to something like ocean or whatever you want.
It doesn't really matter. Then you went to press Assign. And then to make sure that these vertices are
assigned to this group, you can just press the
Select and then Select. And that kinda shows
you that all of these vertices are selected. Then we went to come
up to Edit Mode tab and change it to object mode. Okay, So the next
thing we wanna do is come over to our modifiers, this little blue wrench
icon and press Add Modifier and choose displace right here under deform,
choose displace. And then you went to press New, to add a new texture. And then you went to press
this little weird Slidy tab. I don't know what
she would call that, but do you want to
press this button right here to open your texture tab? And then you want to change
the type of this texture. Two clouds. And as you can see, it's
taking the vertices and it's kinda adding this weird
displacement to them. But as you can see,
it's doing it to all the vertices and we only want it to do it to
the top vertices. And so what we can
do is come back to our Modifier tab and choose vertex group and
our ocean vertex group. Now it's only doing it
to the top vertices. And then what we
can do is increase the strength by left
clicking and dragging. That are waves are a little bit more interesting like that. Then we can come back
to that texture tab. I click in here and maybe increasing,
decreasing the scale. I don't think it's
changing much, but if you wanted to,
you can change that. I'm just going to leave
it at this point to two. And then I'm going
to come back to my modifier properties
and I'm going to press Add Modifier. Left-click on that and choose subdivision surface modifier
here under Generate, and left-click on that. And as you can see, it's making our waves a little
bit more round, a little bit more stylized, which is what we
want in this scene. Right now you can
leave it at one, our render is at two. So as you can see, if we up the levels of the
viewport to two, this is what it will look
like in our final render, which is pretty smooth. But if we leave it at
two in the view-port, sometimes you can
get a little bit of lag Just because it is
a lot more geometry. So change this back to one. And then you can
press, right-click on our object and
choose Shade Smooth. And so now the top is
shaded as if it's smooth. And then right now our edges are kinda
looking weird around here. They're looking really around. And we want these to
be more straight. And so what you wanna
do is come up to Object Mode tab and change
it to edit mode again. And then you went
to come over to this loop cut button here
at the left and two on a left-click on that
and come over to the side of your mesh
and left-click there. And then you went
to come back to your select box, select that. And what this is doing is it's adding a loop cut around here, which is kinda reinforcing
these sides a little bit more. But to increase this effect, what we want to do is turn
it into two edge loops. And we want one of
them to be close to the top and one of them to
be close to the bottom. And to do this, I'm going
to use a keyboard shortcut, which is the bevel
keyboard shortcut. To do this, you press control V and then drag your mouse down. And as you can see, it's turning our single
loop into two loops. And what you can do
with this bevel loop is scroll up on the mouse
wheel to add extra segments. But for us we only need two segments so you can scroll back down. So it's just two. And then drag this down
somewhere around, maybe here. And then if I come
back into object mode, you can see our ocean
is looking pretty cool.
4. Beach Modeling: Alright, so now that
we have our ocean, we need to add some sand. So the first thing I'm
gonna do is come up to the Add menu and add in a cube. Now I'm going to move
that down a little bit. So it's below our
ocean like this. And I'm going to
come to the side, side view like this. And I'm going to choose
the scale button. And I'm going to scale
the cube down like that. Alright, and now I'm
going to scale it in the x-axis like this. And then I'm gonna come
over to the X side view. And let's move it over first. So I'll choose that Move
tool and then move it. And then I'll go back to the Scale tool and
scale it up like that. Then I'll move this side actually over again because
it's a little off center. I think I will actually scale this site down just a touch. And that is good enough for now. What's actually real quick? Move it up just a little bit. And then right now it
has super hard edges. So what we wanna do is add a subdivision surface
modifier up here. That is going to totally turn
it into this weird shape. But we'll fix that really quick. Had up to object mode and
change that to Edit Mode. Then come over to this loop cut button and left-click
on this side and change the number of cuts to 25 or
something around that number. And then add another
loop cut right here on this side and change
the cuts to 25 also. And this is basically
going to help fill out that geometry and not a
bunch of supporting loops. So it doesn't turn into
that weird polygon shape. Then let's add one more loop
cut on the side, right here. And now if we go back into object mode and we
right-click and shade smooth, we have a pretty good sand. For the final render, we need some Sandhills. So to do that, make sure you have
your sand selected. Head back into edit mode. Click on this little
vertex icon right here. Then make sure you have this little blue proportional
editing mode clicked. Then what you wanna do is click this little x-ray
button right here, which will allow us to
see through the ocean. And then we need to start
selecting some top vertices. Oops, press Control Z, Z. To undo that. I forgot I had my loop
cut button enabled, so I need to change back
to the Select button. And now if I start selecting some top vertices and
moving them by pressing G, we have this nice
effect where if we scroll up on the mouse, it affects more and
more of the vertices, which is basically how
proportional editing works. So you just want to
use the shortcut G to move and then move
this above the ocean. That's a little bit too much. But just select
different vertices, press G and then scroll in or out to affect the size of
the proportional editing. And then just keep rotating
around your object. Now, it is really easy to select the vertices on the other side of the mesh that you
don't want to select. So because it is x-ray view. So you just want to
make sure you're selecting the vertices
you want to move. And not an edge,
vertices like this where it'll move the
entire side of the sand. We don't want that. We want the middle to
be raised up a little bit and we want the sides
to remain relatively flat. And then just build it into
a shape that you like. Okay, so once you
have a decent bit of land above the water, You want to take off this x-ray view and then
change to object mode. So our mesh looks
pretty good on top. But if we come to the bottom, we can see that what are proportional editing
was doing was it was moving the bottom vertices up along with the top
vertices of the sand, which creates this weird thing. To fix this, what
you need to do is head into edit mode
and then select this negative z-axis button so that we are looking at
the bottom of the mesh. And then you went
to left-click and drag over all of the
inner vertices like this. Select everything except
this outer ring of vertices. And then you went to disable
this proportional editing. And press S, Z, and then 0. Then Enter, which will scale all of the vertices
to the same height. Then you went to come to
the side view and press G, Z to bring those vertices
down and bring them down until they're in line with the bottom vertices on the side. That should fix our problem if we hadn't into object mode. And now we have a flat
ground on the bottom.
5. Boulder Modeling: Okay, so now that we have
our ocean and the sand done, well we can do now is
start creating some rocks, some cliff rocks and stuff. First, what I want to do is press Add mesh,
then I ecosphere. And I'll move this up
a little bit just so that you guys can see what
the ecosphere looks like. And we will be using
sculpting tools to turn this into a cliff rock. Okay, so first, what we're
going to want to do is hide our ocean so that when we're creating our rocks
along the beach, we can see them better
what we're doing. So select your ocean. Then come up to the Scene Collection View menu up here and press
this little eye. And what that's gonna
do is hide the ocean. And so next you went
to select here I ecosphere and shift
select the beach. And then just shift
select the ICA sphere again so that the ecosphere
as the active object. You want it to be the
light orange object. And then you want to
come up to sculpting. And so now what we're
gonna be able to do is sculpt our ecosphere. First. Right now we don't have
enough geometry to really create a detailed mesh. Because if I come down
to this Grab tool right here and start grabbing things, it's only moving the
vertices we have. So I'm going to press
Control Z to undo that. And then what we
want to do is come up to Ramesh and bring that voxel size down
to something like 0.03 paid around here. Then press re mesh
and we want to increase the radius of our brush so it's a little bit bigger
than the crabs side, maybe something like 300 pixels. And then we also, we don't want these. We want this to be smooth. We don't want to see these
triangles like this. So we want to bring down
the strength to something like 0.015 and private, good. Then I want you to press Shift, hold Shift on your keyboard, and then left-click
on the ICA sphere. Then rotate around and
left-click again and drag. And what that's doing is it's smoothing out the ecosphere. And then you, and to
bring that radius down a little bit by left clicking
and dragging on the slider. The way all of these sliders
work is left-click and drag. And then you want to bring
the strength up a little bit. First, scope back
into layout view. Let's select the sphere and
let's move it into position. So again, I'm not going to be
using these tools anymore. I'm gonna be using keyboard
shortcuts for moving it. So I'm going to press G, which is the shortcut and just bring it over to
someplace like here. I think that might be a good
spot for it. Then G again. And then I'm going to
press S to scale it up to something like this. Then you can come up to object and then apply
and then scale. Or you can see this keyboard
shortcut right here, which is Control a,
and then choose scale. So that's the keyboard
shortcut for applying scale. But if you forget, you can
just come up to Object, Apply. And then you can see the
shortcut there or just do scale. Because when you're sculpting, you have to have uniform scale. So whenever you scale
something up and you want to sculpt that you have
to apply the scale first. So I'll come back in
the sculpt thing. And I'm going to use
this grab brush, but I'm not going to hold Shift. I'm just going to start
clicking and dragging and moving the mesh
around like this. Then I'm going to move you, flatten out that top a
little bit and kind of start dragging it into the sand. Like it's this big rock
that's just sitting there. Checking that out a
little bit like that. Then for the large rock that this is where
the lighthouse, we'll set this to
be pretty wide. And I want it to have a point, like have it points out. So I'm going to drag this in a little bit and drag the top
out a little bit like that. And just adjust
that a little bit. And then we can bring
the strength down again by left clicking and
dragging that down. Maybe a little bit lower. And just smooth out
this little bit. That's looking pretty good. But I think I went a little
bit more detail in it. So I'm going to come up to
this drop brush, select that. I'm going to be the
strength down a little bit. I'm going to bring the
radius done a little bit. And I'm just going to start drying a little bit
of detail on it. Yeah, that's looking
pretty good. Just so that the shape is a
little bit more interesting. And then I went to hold
Control and drag with it. And what this will do is it'll carve into the
mesh a little bit. You can just start making
this model a little bit more. More like a rock, because rocks aren't
perfectly smooth. And just drag, drag
and some details. You can change the radius, make a big radius. You now make a
really small radius and just adjust it like that. Then I might actually
smooth it out just a tiny bit by pressing shift. And we have this right-click
and shape right here. So this will be the main rock that are Lighthouse
will sit on top of. But we went other rocks like
Iraq around here maybe. And then some pointy rocks
somewhere around here. Just because a
lighthouse alerts ships and we want some dangerous
looking spike, Iraq's two. So let's come back into layout. And let's add another a sphere. And let's scale it up again. And I'm going to
press G to move it. I'm gonna do Control a
to apply that scale. I'm going to come
back into sculpting. And I'm going to go into that Ramesh tab and lower
the voxel account again. Then press re mesh. Then I'm going to increase
the radius of my Grab tool. Maybe all smarter than
that. That's overkill. And then make sure
your strength is low. And I'm going to start
smoothing this guy out. And then come over to this side and make sure
it's smoothed out. And then I'm going to decrease
my radius a little bit, bringing up my strength. And then let's
start dragging this into kinda like a bank rock, a flattish rock that's
just kind of sitting on the bank of our beach. So kinda want this to
go in a little bit. Then just start dragging that rock out a
little bit like this, make it flat on top. Bringing it in like this, maybe. Bring that bottom
in a little bit. Then I'm going to bring
down that radius so I can do some more fine
tuning adjustments. We have this interesting looking
rock shape asserts here. We actually, we might
have to bring this up if I unhide our ocean. But coming back up to the sink collection menu
and pressing that, I see it's not above the ocean. And we want to raise
it above the ocean. So bring up that radius again, bring down the
strength a little bit. We don't need it
super-strong to do this. And then just raise it above
the ocean a little bit. It doesn't have to
be perfect again, but we want it to show
a little bit there. If you drag it in a
little bit right there, and just start dragging
that up a little bit. And again, this is
where it comes down to your style and what you want
the scene to look like. You don't have to
have a rock here. You could put it somewhere else. You could sculpt it differently. You can make it pointy. You can do whatever
you want. This is just what I want
it to look like. And then I think I went
to hide that ocean again and just smooth it
out a little bit on top. So I'm going to bring
my strength way down, bring my radius up
on my crop tool. Not that big again. And then just, just
smooth it a little bit. And I like that. Bring my strength up and
make some final adjustments. I think that looks pretty
good for our second rock. So now we want a 3rd Rock. But instead of adding an ecosphere and doing
that whole process again, what I'm gonna do
is go into Layout, View, select, Make sure
this rock selected, and then right-click on it
and choose Duplicate Objects. Now again, if you're getting pretty comfortable with Blender, you can start looking to the sides of these
little menu things. And you can see there shortcut. So if I wanted to
delete this object, instead of right-clicking
on it and choosing delete, I could choose x. Or if you know how I
want to duplicate it, instead of right-clicking and
choosing Duplicate Objects, I could choose Shift D. But I'm going to
duplicate this rock. And then I want to move it over here a little bit and
then move it up a little bit. And I'm going to
start sculpting it. Let's go into sculpting view. And I want this to look a lot different than it
looks right now. I'm going to bring my strength
on my grabbed brush a lot and then bring up
that radius a decent bit. Start dragging it
down like that. So it's looking a
little bit weird. As you can see, the
Grab is really powerful and it's making this kind
of interesting shape. Sometimes which
you can do to fix that is just by
remeshing the object. I'm just going to keep bringing
it down until I like it. Now, when you get that kinda weird effect where it's got these
weird depths in it. Sometimes you can come up to the mesh and choose
rematch again. And that'll kinda
bring your topology a little bit more uniform. And then bring that
strength down a little bit and just start
trying to bring it back. I'm going to press
Shift to try and smooth it out right there. Shift to smooth out the rock. Let's look in better. Try and smooth that out more
and make it more round. And then start grabbing
it down a little bit. Bring this up a little bit at the sides and bringing
it down at the top, then shifts to smooth it out. Now we don't have to worry about making this super precise. This is just really good
practice for sculpting. We don't really have to
worry about anything under the ocean because the
way I shade the ocean, I don't make it translucent. So you actually can't even see
the rocks below the ocean. But if you did want to make the ocean translucent
and see-through, it's pretty important to
make these rocks look good. But this is just really good
practice for sculpting. And then I want to change my brush to my snake hook brush. And I want to bring that
strength down a little bit. And what this snake
hook brush does is it acts similar to
the grabbed brush, but it's better for making pointy looking things
and interesting shapes. So if you left-click and
start dragging it out, you can make this interesting
point on the ROC. And I think I'll try and bring out a point
right over here. Like this. Maybe use my brush to
start bringing it, bring up the strength, start bringing it up
a little bit more. Then again, the topology is getting stretched
right there. So I'm going to re mesh and I'm going to
lower the strength. I'm going to smooth
it out. And then again with the snake hook. Kinda bring it up a
little bit like that. And I'm going to use
my grabbed brush again and try and make
it a little bit thicker. Then I'm going to bring
my strength down again, bring my radius up again, and just smooth it
out a little bit. I think that's looking pretty
good for this point, Iraq. And then if we come
out to layout, right-click Shade Smooth, right-click Shade Smooth,
right-click Shade Smooth. Make sure all of
these are shaded. Smith. Let's unhide our ocean. We have a couple little
rocks peeking out. Actually kinda want
these to be higher up. So I'm going to
first S scale it up, and then I'm going to
press Z to scale it along the z-axis so that those
get a little bit taller. And then you can see it's kinda come through
at the bottom. So I'm going to move it up
along the z-axis like that. Again, we're going to have
to do some fine tuning right there to fix that. So I'm going to come
into sculpting. I'm going to bring
up the strength. I'm going to unhide my ocean. And let's drag it
in a little bit. And that's looking pretty good. Let's make sure that it's not
peeking through the ocean. And I think that looks
good for our second rock. Alright, so let's
hide the ocean again. Go into Layout View. Now, one thing to note is your computer might
start slowing down. If I go into edit mode, you can see there are a lot of faces and that may become
a problem for you. And one way you can fix
that is by coming over to the Modifier Tab and adding
a decimate modifier. And if I press object mode, go into edit mode again to view these faces and I
start bringing this down. You actually won't be able
to see the adjustment right now because the modifier
hasn't been applied, you can start seeing
weird shading because the geometry
gets really low. But if you bring it down
just before the shading gets really weird to something
like maybe here. And then you apply it. The faces become less. It is very triangulated, which can lead to
shading errors. But that's one way. You can bring down
your face count. I'm not going to worry
about it right now. As you can see, the
faces were a decent bit less when I use that modifier. Another way you can bring
down the face count is by changing the ramesh to
a higher voxel account. So right now it's at 0.03. But if I brought it up to
like point to and rematch to, the voxels are
going to be bigger, which is kinda hard to notice, but they're much bigger. So there's less topology. So those are a couple
of different ways you can try and fix that. For me. I'm just going to leave
it at a lower count. Like, I think 0.1 probably
works fine for most of these. And then I'll just shade
it all Smith right there. Then I'll go into layout. If you're getting some lagging, you can just try and
lower the face count, change the mesh so it's lower. There's a couple of
things you can do. And then let's see how
our oceans looking. I actually went to adjust
this rock a little bit more. So I'm going to go
into sculpting. Just bring that up so that the ocean is uncovering
that little section. Then I'm going to go
back into layout view. And right about now would be a good time to
save your project. We actually should
have saved it earlier. But it's really
smart just to press Control S every now and then, just to save your project. But it is especially really important to save your
project frequently when you're sculpting or using subdivision surfaces
because they add lots of geometry to the
sea and lots of faces. And you're at a higher
risk of getting crashes. Okay, so now that
we have this rock, instead of sculpting
a whole new rock, fall I'm gonna do
is press Shift D to duplicate and
move it over here. Move it down again. And then I'm going to
press S for scale, and then X to scale
it along the x-axis, just so that there's
some more variation. And then I'm going to
press R for rotate and then z to rotate it
along the z-axis, right to about there. And then I'll just G to
move it a little bit. Someplace like this. And we have some more
pointy rocks over here. If you really want
to make it look way different from these rocks, you can go into sculpting again and start making
some adjustments. Bringing up that strength, lowering this down,
bringing this up. Stuff like that. Making the shapes different. Stuff like that can
add some variation to the scene and make make all
the rocks look different. I think that looks
different enough. Make sure the rocks aren't pokey and so it's poking
through right there. So I'm going to move that n. And we have our second
sharp rock right there. And I think that looks fine. Then we can come back
into layout view. And then press Shift
D to duplicate it, or right-click duplicate
objects and move it over here. And then just press
G to move it up. So we add a third rock
over on this side. Maybe press R for rotate and then z and then
rotate it like that. And then cheetah move it again. Actually, I might just
go into sculpting. And where is it? I think this is the rock. Lower this down a little bit, just so we have a little
bit more variation. And that doesn't look like the same thing over and over again. Maybe you'll ever this guy
down a little bit like that. Make sure it's not peeking
through the ocean. And I think that is fine
for the rocks and RC, I don't think we
need to add anything else. If you want to. You can add more
rocks and stuff, but I like to keep my super stylized
scenes fairly simple. And I think this is plenty
of rocks for the scene.
6. Scene Organization: One other thing that smart to do is organize your scene up here. So right now none of our objects
are labeled or anything. So what you wanna do is
select your ocean object and double-click on the name and rename it to ocean or something. And then left-click on our
sand and rename this to sand. Then for our rocks, we don't want to have to
rename each one to Iraq. So what we can do is select one, then shift, select another shift and select another shift
and select another. Until you've selected
all the rocks. Press M on the keyboard to
move into a collection, and then press new
collection and rename this to rocks and press
Enter and okay. And now all of these rocks
are in the rocks collection. And you can minimize this. And this is a really easy way to keep your scenes organized, is moving objects
into collections.
7. Camera and Background: Okay, so now that we have
our scene blocked out, all the rocks, the
sand, the water. Before we move on to the
next phase of modeling, which is the lighthouse and
everything above water. We want to add a camera
in the background first. So I'm going to
press Add camera. And then what you can do
is press this camera icon. And right now we're
inside of an object. If we press N on the keyboard, we open up this menu and
you want to go into view. And then you went to select this button which is
lock camera to view. And then now if we zoom out
and move around our scene, our camera snaps to our view. And so let's just
move our camera out a little bit to
something like here. And let's actually
change the dimensions. So come over to the right, to the output properties and
change the y to something like 1536 or something. I think that looks nice. Because our lighthouse will be tall and we want to be able to fit the lighthouse and
everything else in the scene. So I'm going to zoom in
a little bit like that. Also. If you press Control, hold control and click your middle mouse
button and drag out, you can zoom in and out a
little bit more evenly, in continuously to
someplace like here. And then when you like
your composition, I think this looks fine. I'm going to unclick
this little check. And then now if I move around, my camera will not
snap to my, my view. I think this view looks good. And then we can press N to
hide that little menu again. And then now we want to add in a little background a
plane for the scene. So press Add mesh and plane. Then this will be what pretty much everything sits on top of. So just move this down. Let's go into our
side view up here and make it so it's
just below our sand. And then we can go to our
camera view and press S. And basically scale this plan really big,
something like that. Let's actually adjust our
camera view a little bit again. So that maybe it's a little
bit more pointed down. Then press U to bring up that
menu again, uncheck that. And again to hide it,
select the plane. And let's scale it
up even bigger, just so that it rusts above
our camera right there. So the entire background
is in the camera view. And then now we can select this, double-click on the name
and label it something like back ground, like that. And if it bothers you just having this giant
plane sitting here, you could press this
little eye again to hide it in the viewport if you
prefer the way this looks. It really doesn't matter to me. So I just leave this
enabled usually, but now we have our scene setup and we can move on to modeling the lighthouse.
8. Lighthouse Modeling Part1: Okay, so the next thing we wanna do is start working
on the lighthouse. And the first part of the
lighthouse that I want to create is that base that was like kinda
made out of bricks. And to do this, we
went to come up to the Add menu and add
an a mesh and a cube, and then drag that up. Then I want to come
into edit mode. And I want to press S on the keyboard to scale
it down like this. Then I want to
impress us and then y to make it a little
bit skinnier us. And why again? Then SMC, we have
this brick shape. And because we're
scaling it in edit mode, we don't have to
apply the scale. The scale is already
being applied. It's completely uniform. And then I want to
come over to this loop cut tool and select that and then add in a
horizontal loop cut right there. And then we can come back into object mode and press Control
S to save our project. It's important to save the
project very frequently. Then I'm going to come over
to my modifier properties, which is this blue wrench again. And I want to make sure this is selected and I want to add a bevel modifier and
regenerate choose Bevel. And right now it's
super extreme, so we can probably change
this to something like 0.075. That's a little bit better. And then you went to up the segments to
something like four, maybe five, and then
shade it smooth. And we have this
kinda stylized brick. And then let's press
G to move our break. Let's move it back up because accidentally move it
below the surface. Maybe bring it over close to this rock because this is where we went the
lighthouse to be. I'm going to just move
it over a little bit. And now what you
want to do is press Add curve and choose
a circle curve. You want to bring this up. You want to move it close to our cube and then press S to
scale it up a little bit. Maybe to something like here. Should be good. Then, because we're
not in edit mode, we have to come up to Object, Apply and then scale or use
that keyboard shortcut. Then let's bring it down
so that the edge of the circle is kind of
in line with cube. Like this is probably
pretty good. Then what I want you to do is press Shift and S and
then hold those two keys. And what this does
is it allows us to move that little red circle, which is our 3D cursor. And we went to choose
cursor to select it. Bring you, hover your mouse
over cursor to select it, and then release the keys. And it snaps the 3D
cursor to the circle. Then you want to select
your cube, right-click, and then go to set origin and
choose origin to 3D cursor. Now, basically what this
is doing is it's putting our cube origin at the same location as
our circle origin. Then you want to come up to add modifier while your
cube is still selected. And add in a array modifier right here at the
top of January. And then instead of
relative offset, going to uncheck that and
choose Object Offset, then you want to open this menu. And under object, you went
to choose Bezier circle. Or you can choose this little ticker icon and come over and select
the Bezier circle. And then you want
to change the count to something like maybe 17. Then you want to select the
Bezier circle and press R and C to rotate it along the z-axis and just
drag it out like that. Okay, so we have
way too many cubes. Let's press Control Z to undo that and change the count
to maybe something like 12. Now again, I'm just
switching back between my Bezier circle and my cube and adjusting
these modifiers. Then select your
circle again and press R to rotate it
along the z-axis. That's a little bit better. I still think I want a slightly bigger crack
in-between these cubes. So I'm going to press Control
Z and lower this count. Again, it's maybe
something like 12th. We already did 12, maybe 11. Then press RSE. I think that looks good.
And that's kinda how you get this circular
array along a path. Now what you can do
is you can select your cube again and
apply this array. So under this little
arrow right here, select that and choose, Apply. And then now all these cubes or one object and
there are applied. And we can select this
circle because we don't need it anymore and press
X to delete it. Now let's just move these cubes into a better
position by pressing G. Then I'm just moving around with my middle mouse button and getting a position that I like, maybe something like this. And then we can fill this space underneath with a
few more cubes. Now, we can select this right here and press Shift
D to duplicate, and then press Z on the
keyboard to snap it to the z-axis so that it's
right above those cubes. Then press shift D
again and then select Z to lock it to the z-axis
and move those up like that. If you want to, you can
kinda have this offset it. If you want it to seem like it's a little bit
more interesting. Not perfectly symmetrical. You can offset
these a little bit. It doesn't really
matter too much though. So it looks something like this. And then now what we
can do is press R z on this and rotate
it a little bit. And now they're all offsetted from each
other a little bit. And we have this
interesting looking shape. Now, all of these bricks
are very uniform. And if you want them all to
be the same shape and size, you can keep it like this. But for those of you that want a little bit more variation, what you can do is let's
select this bottom 1 first, and let's go into edit mode. And let's change this to our little select box tool and press a on the keyboard
to select everything. Pricing a, select all the faces, and then press P
on the keyboard, which is the shortcut
for separate, and then come down
to buy loose parts. So the shortcut
to switch between edit mode and
object mode is tab. So press Tab to go
into edit mode, back into object mode. And you can see all these cubes
are now separate objects. But before you
click off of them, what you wanna do is put
them into a collection. So press M on the keyboard, select new collection and type
in something like stones. And then press, Okay. Now all those cubes are
in the Stones collection. And then you can do the
same with these two stacks. So I'm going to press Tab
to go into edit mode, which is the shortcut. And then I'm going to
press a on the keyboard. And I'm going to press
P on the keyboard. And she's separated
by loose parts. And then I'm going
to press Tab to go back into edit mode and press, I'm on the keyboard and
select my stones collection. And now all of these cubes are also in the
Stones collection. Then, first I'm going to do a Control S to save my project. Then I'm going to select
these top stones. Press Tab to go into edit mode. Press a to select everything. Press P to separate and
choose by loose parts. It's really good to get the hang of these
keyboard shortcuts they make working in Blender so much easier and
so much faster. Now I press tab again
to go out of edit mode, press M to move it into a
collection and choose stones. Now, every single one of these stones is a
separate object. All of them have
their origin point in the center right here. As you can see, this orange
dot is not changing. That's the origin. If I right-click and
choose Set Origin, origin to geometry, the
origin moves to the cube. This is where we want
the object origin, because for instance, if I try to rotate this
cube by pressing R, it rotates around the
origin like that. So what I did right there I was, I right-clicked to
cancel that action. If you press S and
before you left-click, you press right-click, it
kinda cancels the action. I press R, I right-click
cancels the option action. But you can see that
it's scaling weird. Whereas with this cube that has the origin
and the center, if I rotate it, it rotates around the center,
which is what we want. I'm going to press
Control Z to undo that. And so the way we can transfer all of these object origins back to their cubes is we can come
up to the scene collection, select our stones collection, and then right-click on that collection and
choose, Select Objects. And then it selects all of the
objects in the collection. Then you went to right-click
on these objects and choose set origin, origin to geometry. And now all the cubes have
their origins back to them. And now what you
can start doing is just making them different
from each other. So scaling them a little bit, maybe you can rotate
them a little bit and start giving this brick
circle some variation to it. Make it look more interesting. Another thing you can do to give the cubes even more variation is press Tab to go into edit mode and move some of
these edges around. So you could select an edge
and press G to move that. Maybe cheat and move this one. And just make things look a
little bit more interesting. Another useful command is selecting if you want
to select a loop. So maybe all of
these middle edges, you can press Alt
and select them. And it selects all
those middle edges. And then you can move
those middle edges and make them look a little
bit more interesting. I'm going to come
tab into edit mode. Just keep making small
adjustments to these cubes. Make them look a little
bit more interesting. I'm tabbing into edit mode
to give them some variation. I'm just moving this center. You can also press three on
your keyboard or come up to here and select this
little face mode button. You can select faces and press S to scale
them if you want. Maybe select this face. There's lots of different
ways you can add variation to this
little brick cylinder. So I'm just going to
keep adding variation until I like the way
the scenes looking. And I think that
looks pretty good. You can keep
fine-tuning this and really get this looking
the way you want it. This is all up to
personal preference. And I think that looks
pretty good right there. If you really wanted to, you could just
duplicate these down. And then press R, z it or rotate them a little
bit and then move them over. Then this is the base
of our brick wall. Okay, So now what we wanna do is actually build lighthouse, the body of the lighthouse. I'm going to do, actually, I want this base a
little bit wider. So I'm going to select objects and press S
and then Shift Z. And when you press Shift Z, It's telling blender
you went to scale these on every access
except the z-axis. Then just make that
a little bit bigger. Maybe just scale it down
a little bit in general, and then move it over a
little bit like this. Now what we wanna do is add
in the lighthouse body. And so to do that, I'm
going to come up to add mesh and choose a
cylinder this time. And I want to move
this cylinder. So it's kind of in
the center like this. And then I'm going to press S to scale it up a little bit. And then I'm going to
press S C to make it tall. Then GZ to bring it
up a little bit. And then now I'm going to
choose Object, Apply and scale. And I'm going to press
Tab to go into edit mode. And I'm going to enable
this wireframe view. So you want to
enable X-ray view. And now we can see
through the model and you wanna press three
on your keyboard, see your face select mode, and then select
this bottom face. And then you would just
want to press G and then z to move it down along the z-axis so that it goes to the bottom of our
stones like that. Then we can turn off this wireframe mode and go
into Viewport Shading mode. And now it's Shauna
do is you want to come over to your loop cut tool, select that, and then add in a loop cut right around here. And then come back to
your selection mode. Analysts press S on the keyboard to scale
it up a little bit. And then now what you wanna
do on the keyboard is pressed G and then G
again, pressing G, G puts you into loop
cuts slide mode, and you want to move
this down a little bit, then press S on the keyboard to scale it
up a little bit again. Actually, I kinda went
a little further up, I think so I'm going
to press G, G Again. I'm actually made scale it
down a little bit again to only go back into
Wireframe View, select this bottom face. So I need to come up to
face mode and select this, or just press three
on my keyboard, select the bottom face there and press S to scale it
down a little bit. And then I'll come out of wireframe view
back into solid view, select the top face
and I'm going to press S to scale it
down a little bit. You can press Control S right now to save
the project again, I think I'm going to scale
this down a little bit more. We want to extrude this face up. And you can either
do that by using this Extrusion tool or you
can press E on the keyboard, suppress E, it will
extrude that up. You can bring it
up like this and then left-click to
set that extrusion. Then you want to press S to
scale it out a little bit. And then E to
extrude it up again. And then you went to press I. And what AI does is inset. You can also use this
inset faces tool. But if you press I and bring
your mouse and it creates a new face from your original
phase that's smaller. They can press E on the keyboard again to extrude this up. And you should
kinda see how this, this extrusion workflow works. I'm going to press G and C. Let's bring this down
a little bit more again. And now I'm going to press E right-click instead
of left-click. And that is going to make my extrusion stay
in the same place. And then I want to press S on my keyboard to scale
it out a little bit. Then I want to press E
on the keyboard again, S on my keyboard here,
V on the keyboard, again, E on the keyboard again, S to scale it in. And we're getting this kind of interesting lighthouse shape and we can make final
adjustments later, ie to extrude it
up a little bit, S to scale it out a little bit. E to extrude it up. Again. Us to scale it in a little bit. E2 extruded up. Then one final e
to extrude it up, left-click to set it. When we have this
nice little point at the top of our lighthouse. And I want to select all these faces and make this platform a
little bit wider. And then I think make
this a little bit shorter and make some
final adjustments. So what you wanna do to select all these faces and
scale them out. Make sure you're in
face select mode and press Alt on one of
these vertical edges. It'll select this
entire face loop and then press S to scale it, and then press Shift Z so that it doesn't scale on
the z-axis at all. Actually, let's make it
a little bit smaller. S Shift C again. And then let's do the same thing with this loop right here. Press Alt on one of the
vertical lines and press S and then Shift Z to scale
it out a little bit. And then let's press
two on the keyboard or come up to edge
mode right there. So I'm going to press two, and I'm going to press Alt
on one of these edge loops, allright there S
and then shifts. See, you bring that
out a little bit. Press three on the
keyboard to go into face mode and Alt to
select this face. And I'm going to press G and then C to bring it
down a little bit. And then I'm going to
press S and then shipped, see it's scaling on
every axis but the z-axis then GZ to bring it
down a little bit more. And then I went to go
into wireframe view. So I'm going to select
this wireframe view there. Select this x-ray
view right here, left-click and drag and select all of these
faces up here. And then I'm going to
change this to solid view. And I'm going to press
G and then z and just bring that down along
the z-axis a little bit. And then I'm going
to press three to select this top face, and I'm going to press G and then C to bring that
down a little bit. Another thing you can do is
add a loop cut right here, and then come back up to your
select tool and press G, G to slide that loop cut and S to scale it out a
little bit like that. And then tab out of edit mode. And I think that lighthouse
looks pretty good. I'm going to tab into
edit mode one more time. I'm going to make sure
I'm in edge mode. I'm going to press Alt and left-click to select
this edge loop. And then GG and slide that
edge loop down a little bit. And I think that looks awesome. Alright, I think we're ready
to add the subdivision. So I'm going to press Tab
to come out of edit mode. I may want to scale up the stones and the
lighthouse a little bit. So I'm going to come over
to the sink collection, right-click on my
stones collection, choose Select objects. Oh, and actually,
we accidentally put our lighthouse in the
Stones collection anyways, right here, the cylinder, which is actually useful for
what we're doing right now, but we will want
to move it out in a little bit less
press S to scale these up a little bit and press Control a to apply that scale. I want it to look a
little bit fatter. So I'm going to press Tab
to go into edit mode. I'm going to go into x-ray view to rotate a little bit down like that and select all of these top faces back into solid view. And I'm going to
press G and then C. Let's bring this down a
little bit like that. So it's a little bit
more cartoony looking, a little bit more stylized
Tab to go out of edit mode. First, let's press Control
S to save our progress. And then select the lighthouse, Press add modifier,
subdivision surface. And right now it looks
super weird because we haven't added any
supporting loops. And so what you wanna do is press forward slash
on your keyboard. And what this is
going to do is make it easier to edit
our lighthouse, if we press forward
slash on the keyboard, come into this view
and we can see our model a little
bit better and see what the
subdivision is doing. Press Tab to go into edit mode. And the first thing we'll
do is fix this bottom area. So press three, that makes sure you're on face
mode right here. Select this bottom face
and press I to insert it. And that will fix some of that weird shading
that was going on. You can press I again to really try and fix some
of those weird faces. Then the next thing we wanna
do is use our loop cut tool. Will add an elliptic here. We'll add in a loop, but here it's come
up a little bit. Let's add in another loop cut here right above our
previous lip cut. Let's zoom in a little bit
and add another loop cut right here and right here. And as you can see, adding in these supporting loop cuts
really helps keep your shape. And then let's add in
some more loop cuts. So adding one right here. I'll add in one under
the roof right here. I'll add in one right here. And then we can add in a loop
cut rate here, right here. So again, I'm in the loop
cut tool and I'm just left clicking where I
want to loop cuts to be. I'll add in blue, right here, right here, right
here, and right here. And now, let's go back
into Select box mode. And let's press this top face and press I on the keyboard, just so that looks a
little bit better. Press two on my keyboard
to go back into edge mode, alt on this loop right
here to select this loop. And then press GG and slide this loop down a
little bit like that. Then I want to press Alt
on this loop right here, press GG, slide this
lip up a little bit. And that's going to bring out this curvature a
little bit more. If you look at the
loop cut tool, you can see the shortcut
for it is Control R. So a faster way
to add loop cuts, instead of just selecting this
tool over and over again. It's just press
control and then r, and then you can add in
a loop cut right there. Let's press Alt on
this edge loop and press GG and slide this one up. Let's press Alt on this edge
loop and press Control B, and that will bevel
this edge loop. We can slide that, refund that shape
a little bit more. And then we can press Alt
on this edge loop and press Control B again to
bevel this edge, I'm getting a little bit of lag, but it's all good. I'm going to press Control
S to save my progress. And I'm going to press Control R to add an old fat right here. And the only thing about
using this control, our tool is it slides
your edge by default. And if you left-click, it won't be perfectly in the
center where you want it. But if you right-click, it transfers the edge to the center and then you
can press Control B on this edge to bevel it
a little bit and add some more supporting
edges to the model. And let's do the same with
this edge loop under the roof. Press Alt to select it and press Control and
then be bevel it, slide it out like that and
press Control S to save it. Let's see how this is looking. Let's tap out ahead of that
is looking pretty good. We can tab, we can select
this edge and press G, G to bring it up a little bit, and press S to scale
it out a little bit. Press Alt. Let's go into
our wireframe view so we can see this edge and
press Alt, not that one. Press Alt till you select
the circular edge. And then press S to scale
it out a little bit. Let's go back into solid view, back into wire-frame
actually in press Alt to select this edge and go
back into solid view. And then press S again. That's, that's pretty fat. Bullets press Shift
and then Alt. And that allows us to
select multiple edges. And we can scale this until
we like the way it looks. I'm going to press
S to scale it. And I like it right
about here I think. But I'm going to
press Alt and select just this flip and gt to
slide it up a little bit. I'll select this live and gt to slide it
down a little bit. Press Tab and we have ourselves
a nice round lighthouse. You can right-click
and shade this smooth. Press forward slash on
the keyboard again, will come out of local view and you can see how your models. Again, I'm going to
press Control S just to make sure I've
saved this so far. And it looks like
actually are Lighthouse is a little bit close to
this side of the bricks. So we can select it and move it along the
x-axis a little bit, bring it back like that. So thinking might be a little
bit closer to this side. So I'm going to move it
along the y a little bit. And I think that looks good. There are a few more details we want to add with
the lighthouse. So select your lighthouse press
Tab to go into edit mode, press Control R to
select this edge, bring it down a little bit. Press Control B and scroll
up on your mouse wheel, wants to add in one more edge, then press three on
your keyboard so that you're in face mode
and press Alt E, hold Alt, and then press E. And that brings us
this extrude menu. And then you can choose
extrude faces along normals. And you can bring that
out just really slightly. And then press Control R and add in a loop
cut right here, this little ring, right there, and then right-click
to set it in place. And then come down to
the bottom and press Control R. Left-click
right there, and then right-click
to set it in place. And now we have
this little segment that kinda separates where our windows will be versus the metal part of
the lighthouse. If you want to, you can
also add some loop cuts right here just to try and make this line right
here a little bit more defined in separate these two
sections a little bit more. And there is your lighthouse.
9. Lighthouse Modeling Part2: Okay. So there's a
few more adjustments I want to make to
the lighthouse. First of all, I want
to select all of these top faces and make
them a little bit wider. So I'm going to come into my side view and I'm going
to come into x-ray view. And I want to choose face mode. And then just left-click box, select all of these phases. And then I want to come
out of wireframe mode. So I'm going to change
this solid view. Let's also press Shift and
Alt and select this loop. Because I actually
do want to scale that out a little bit too. Let's press S Shift C. Let's scale this
out a little bit. What we can do to actually see our loops a
little bit better. Let's come over to our
subdivision modifier in turn off that this edit
mode display layer, then it's a little bit
easier to actually see the loops that
you're editing. And let's select this one. It's enabled it again so we can see what we're
doing and press Gigi. You just slide it up a little bit and just see
what that's doing. Let's slide it back
down a little bit. Press all its turn off
the subdivision there. Press Alt to select this loop. Trends subdivision
back on and press G T, GG to slide it
down a little bit. Turn it off again,
select this loop, turn it back on and press G, G to slide that
down a little bit. That's looking pretty good.
Let's do it one more time. Gge to slide this down, select this loop also
in GGE to cite that. And then let's press S to scale that loop out a
little bit like this. Let's turn it back on. Coming to our camera view. That looks great. Let's press Control
S to save it. Tab into edit mode one
more time because GG. Then we can also
check to see how it's going to look in the render. So I'm going to up the
subdivision once to see how the render will look and it
should look super crisp. I think this edge right here
is actually a little bit sharp for our stylized
look that we're going for. So I'm going to lower the
viewport levels a little bit. I'll select my model and I'll press Tab to go into edit mode. Make sure you're in edge mode, press Alt and select this loop. And then you went to press X for delete and
choose dissolve edges. And that will get rid of
that edge essentially. And then come down
to the bottom one, press Alt to select it, then press X, and then
choose dissolve edges. That, yeah, that helps round
it out a little bit more. And if it's too round for you, you can press Alt, select this edge, press GG, slide it down like that. Same with this one. I'll GG slide it
up a little bit. There you go. There's the basis
of your lighthouse. There's only I'm going to press Control S to save it again. There's only one more
adjustment I want to make. That is, I want to press Alt to select this loop
and press Control B, and scroll down on the mouse wheel
till you only have two edge loops like this. And I want to bring
this up like that. Press Tab to see how that's
looking, That's looking good. And I want to do the same with
this edge loop right here, control V, bevel it out like
this tab to see how that. So again, that's
looking really good. Let's press Control
S to save it. Now we want a few bricks
and our lighthouse also to make it seem like the lighthouse is made
out of bricks as well. So let's select this brick and press Shift D
to duplicate it. And just move that up. And let's press Tab
to go into edit mode. Select a to select
all the faces. Because a, and then press S to just scale it
down a little bit. And actually our bevel, you can see that our bevel stays the same as
we scale it down. It doesn't change with our cube. I'm going to press
Control Z to undo that. And I think I actually want
to scale it in object mode. Let's see how that looks. So the Bible says
uniform and object mode. We might want to actually up that bevel a little bit
and make it a little bit stronger Just because it is smaller and it looks less
round from a distance. So let's make this like 0.125 or something.
That looks good. And then we can press G to
just move it in like this. And then let's press shift D, scale it down a little
bit, add some variation. Shift D, scale it
up a little bit. Press R to rotate it, cheetah, move it in. And then we can
select these two or something and shift the, bring them up, give
them along the x-axis. Then our Z to rotate
them along with the z-axis G to
move them in again, we can just start adding in some bricks around
our lighthouse. You can just keep
duplicating random groups. So these cubes and scaling
them and rotating them so that they fit in the lighthouse until you get something
that you like. You can also rotate
them from the side here because as the
lighthouse goes up, it kinda angle sense. So you may want to
rotate your bricks like this so that they match the
angle of the lighthouse. Starting to look pretty cool. You can also just select all of these and mass duplicate them. Now, again, one thing
to note is we've had our stones
collection selected. So all of these cubes and stuff have been duplicated
into the stones collection. But I want all of
these bricks around the lighthouse to be in
a separate collection. So I'm going to
press M to create a new collection while I
have them all selected. And I'm going to call it bricks. Press Enter and okay. And now they're all on
their own collection. And we can select
this BRICS collection just so that we know that any more duplicates
while we're duplicating these cubes will go
into this collection. So let's select, it's
actually just right-click select objects on our bricks collection
and press Shift D. And then RAC. Then move them somewhere over
here until they look good. Let's move them over a
little bit more or z. Then we can just kinda play
with these a little bit. Just moving them, rotating
them, scale on them. I think that mostly looks good. I'm just going to select
few of these last ones. Shift D to duplicate them, RZ and fill up the
back like this. I think that looks fine. You can select some of
these that are inside the The Lighthouse and
just bring them out. And I think we are
pretty good on bricks. You can add some rotation and more variation and scale
and stuff if you want. This is all personal preference. Alright, so the last thing we wanna do with this
part of the lighthouse is add in that railing at
the top end to do this, first, we went to move our 3D cursor to the same
location as our lighthouse. So we're going to press Shift
and S and hold those keys. And hover over cursor to select
it and release the keys. And it moves the 3D
cursor to the lighthouse. Okay, so now what we
wanna do is press Shift a and choose mesh and cylinder. And we went to don't disliked
or move it or anything yet. We want to come over to the cylinder settings
and change this to 16. Press Enter. Then we can move this
cylinder press Tab to go into edit mode and press S Z to
scale it along the z-axis. Press Tab to go back
into object mode. And let's move our
cylinder up a little bit. Press tab again to go back
into edit mode and press S, and then Shift Z so that it doesn't scale
along the z-axis. And we can widen that
out a little bit. Then we can press
Control R to add in one loop cut
right about here. Press Alt and select these
edges and press G and C to bring them up just
a little bit more. Press Alt to select
this edge and press G, G to slide it up a little bit. Okay, so now what you wanna
do is come over to modifiers, click Add Modifier,
and choose wireframe. And so this takes all the edges, turns them into a mesh. And then you went to up the thickness to
something pretty high. I think maybe 0.75,
maybe even higher. Score 0.1. We've got some a
thick rail and like that. And then right now it's really kinda jagged and sharp looking. So we can add a subdivision
surface modifier. But the modifier
also does a bunch of weird stuff with kinda making everything look like circles,
which we don't really want. So what you wanna do is press
Tab to go into edit mode, press one to go
into vertex mode. And what we want to do is start
subdividing our vertices. To add extra efforts. And one thing we
can do to help is press Alt on this edge right here to select all
of these vertices. And then we can right-click
and sub-divide them. Then we can press Alt on
all these vertices and we can right-click
and sub-divide them. And then we can do the same with these vertices down here. I'll select these
right-click and sub-divide. One thing you need to do
is go into wireframe mode. Select all of these top
vertices like this, go back into solid view. And then you went
to, come up to, I believe it is Select and
then Checker Deselect. And it should select all of
these vertices in-between. These other ones that are vertical, if that's
what you want. You want these in-between
vertices selected. If they're not selected. And these ones right here are, you can choose offset by one. And then it should
fix that problem. But for me, it's selected
the right verts. So I can leave that as is. Now. I can press Control B and then
select V on the keyboard, and that will tell blender
to bevel the vertices. Then as I drag that out, It's beveling these
vertices like this. You can bring a pretty
wide like this. And then you can do the same for these lower
vertices right here. Come up to wireframe, select, all of these
middle vertices. Come back out of that wireframe, go up to Select Checker Deselect and then Control B and then v. And beveled is where
it's out roughly to the same position as
the last vertices. And then let's finalize
select the last bottom verts. Let's go into wireframe view. Let's zoom out a little bit. Select all these
bottom vertices. Go back in with Solid View. Go up to Select, checking the select Control B V, bevel, those words like this. Now, if we go back
into solid view, you can see that's
helped even more. But there's one last
thing we can do. We can select these
vertices right here. Let's go into edge mode, so it's a little bit easier. Select this edge and
right-click and sub-divide it. So I'm going into edge mode by clicking two on my
keyboard again. Then I'm just
selecting these edges, right-clicking and subdividing. Right-click, sub-divide until
I get back to this one. So see how these are two edges. Now you know you've come
all the way around. And let's go into solid mode. And Aurelian is
looking pretty cool. Now, one thing we can do
is up our subdivision. So first let's actually saved the project by
pressing Control S. Then let's up the subdivision. Now, it looks a
little bit smoother, and then you can select it, right-click and shade Smith. One other adjustment
I want to make to the lighthouse is I want to widen this top
area a little bit. Because now what
you want to do is make sure you're in face mode, press Alt on this edge
and select these faces. Then you want to press Shift
and Alt rate around here. You see how it's a little
bit orange right there. If I turn off the subdivision, you can see I've
selected this edge. You want to select that
edge faces right there too. Then you want to press Shift Z, scale it on every axis, but the z-axis,
nothing too crazy. And then you can press Alt and select these
top faces here, and press S Shift C to scale them on every
axis, but the z-axis. Bring that out a little bit and press Alt and
select this edge loop. Let's make this crease a little bit sharper
by pressing G, G to slide this edge loop
up a little bit like that. Let's press Alt on this
edge loop and press Shift Z to scale it on every axis but the
z-axis and just bring that in so it's a
little bit tighter like that. And then let's press Alt
right here and make sure that this loop is
selected by turning off the subdivision for a
second, it is selected. And then pressing Gigi to just slide that edge
down a little bit. Then press Tab. And that looks pretty good. So now that we've made the final adjustments
to our lighthouse, we can add in the window frame. So let's press
Shift a to bring up a mesh and choose cylinder. Again, you could
do the same thing by heading up to the Add menu, but I think using keyboard shortcuts is
a little bit faster. Then you want to make sure
the vertices are on 16. And then move this
cylinder up like this. Let's press Tab to
go into edit mode. And let's. Come up here and change the viewport shading
to wireframe. And then press three on your keyboard to
go into face mode, or just select this button here. And then select the bottom
face and press G and then see maybe a little
bit further like that. Then you can S to scale
it in a tiny bit. This is a little bit easier
to view and solid view. That looks good. Let's go back into wire-frame. Select this top face, and then press G Z to bring
it down a little bit. Then press S to scale it so
it's just past the window. This top part of
the window go back into solid view and see
how that's looking. Actually press G Z to
bring it up a tiny bit and then us to scale it
out a little bit more. Now what we can do is tab
back out of edit mode. And then let's press Add Modifier and choose
skin modifier. And by default, the
skin modifier is set to this massive cube size. So let's time in the edit
mode, go into wire-frame, press one on the keyboard, go into vertex mode and
press a to select all. Then let's come back
into solid view. And I want you to press Control a and bring your
mouse end like this. And this will scale down the
skin modifier a good bit. This is another way you could
make the rail in as well. Instead of using a wireframe, you could use his skin modifier. For example, if I
disable this wireframe and you can see the subdivisions just going crazy right now. But if I add an,
a skin modifier, whereas skin modifier right
here, plunder may crash. And then if I bring it
above the subdivision, like this, you can see the skin modifier
is huge right now. So I have to tab into edit mode, go into wire-frame, press a to make sure all the
vertices are selected. Go back into solid view. Press Control a. I can start bringing this
skin modifier down like this. Now you have this
really, actually, I personally believe that this looks better than
using wireframe. So now you can apply this skin modifier and then press right-click
Shade Smooth. And then now let's do
the same with this. Let's add in a subdivision
surface actually. First let's press Control
S to save our project. Now let's add a
subdivision surface. Slip the viewport
to one like this. That's looking pretty
good actually. Now let's apply
the skin modifier and right-click Shade Smooth. Now we have the frame,
the railing done, and our lighthouse is
looking pretty sweet.
10. Doorway Modeling: Alright, so now that
we're done with the main lighthouse part, let's add a door
to the lighthouse. So first of all, I don't really like where my 3D cursor is because
if I add an object, it's inside my lighthouse. I'd rather be back
in the center. So I'm going to press Shift S, hold those keys and goto
cursor towards the origin. And then hover over
that with my mouse, and then release the keys and the 3D cursor goes back
to the world origin. Now I'm going to add a cube. So I'm going to press Shift a go to Mesh and
then choose cube. I'll move this up and
I'm going to press R and Z to rotate it. Then I'll just move it
over here like this. And now I want to check out
my camera view because I want the door actually two points closer to the
direction of the camera. So I may have to
move some things. Actually, first of all, to
keep the scene organized, Let's select our
lighthouse, our railing, and are the frame
for Windows and press M to move into a new collection and we'll
call it Light House. Select. Okay. Alright, let's move this
cube over a little bit. That's a little bit better. Well, let's move to
the lighthouse itself. So I'm going to press
H to hide that cube, which is the same
thing as coming up in here and selecting
one of the eyes. Let's move this BRICS collection into the lighthouse collection, will tell us to move
the stones collection into the lighthouse collection. Then let's select the objects in the lighthouse collection
by right-clicking on the lighthouse collision,
choosing Select objects. And now let's press Shift Z
to move it on every axis, but the z-axis bring it a little bit further over here like this. Let's see how that
looks in camera view. Then we'll be able to put our
door somewhere around here. Let's press Alt H to
unhide the cube and press RZ to rotate it a little bit more and just move it
into position like this. And that looks pretty
good in camera view. Now, what you're gonna do is press Tab to go
into edit mode, and let's press S than y and then y again because we want to
scale it in the local, why not the global y? And so by pressing S y, y, we scale it in the local y. And then we want to add a
loop cut err on the side, loop cut on the top. And let's press
Tab to get out of that back into object mode. And I'm going to
press G to move it more into position like this. I'm gonna go back
into edit mode. I select them the cube
and pressing Tab. And now I'm going to hold Alt and select this
loop right here. And I'm going to press S Y, Y to scale it in the local y. And we're going to
actually press Control R and add another loop
cut on this side. And while this loop
is still selected, I'm going to press S to
scale this out a little bit. And we're trying to make this, this cube a little
bit more rounded, just to kinda stick
with that theme of a really soft looking scene. Just select this
top edge and shift, select this edge and press G, z. Well, I'm going to do
is I'm going to press, select my sand and press Tab. So I pressed one on my keyboard
to go into vertex mode. And I'm going to press O on my keyboard to enable
proportional editing. And I'm going to press G and scrolling on my mouse wheel so it affects less of the scene. And just bring this vertex up. And I'm going to G, this vertex down a
little bit like this. And then G to move this vertex
down a little bit also. So that's our, our door is not sticking
out of the ground. We should probably add the
subdivision surface modifier. So let's save our project
first by pressing Control S. And now let's add modifier,
subdivision surface. And of course, they mess it all up at first until we add in our supporting edges and stuff to make this
process easier, one thing we can do
is enable auto mere. So that's one of the reasons in the
beginning of this course, I had you guys enable the auto mere add-on and preferences because it makes certain things easier to model its symmetry. So what we wanna do
is select our object, press N on your
keyboard to bring up this little menu and go to Edit. And then you want to open
this auto mere preference. Press Alt R on the cube just to get
rid of our y rotation. I mean our z rotation
because the way auto mere works is it works sauce
off of our accesses. And so if we are turned
on an axis, it'll mirror. So you just want to press Alt
R to remove any rotation. And then we went to auto mirror it on the
y-axis, I believe. So. Select Y and auto mirror and then you want
to bring your auto mere before the subdivision. Now if we press tab, we can see it's
automatic like this. And so now if we
make adjustments on this side that they will
be mirrored on this side. So we don't have to add loops, loop cuts to both sides. Now press Control R while in edit mode and
squirrel up on the, on your mouse wheel once
to add in another loop. And then left-click and right-click to lock it
in the center like that. Now what we wanna do is add
in some supporting loops. So press Control R on this side and add in this supporting
loop right here. And let's press Control R on this side and add in a
supporting loop right here. Let's press Control R down here. Let's press Control R right here and add
a loop like this. To reinforce the
top a little bit. Let's select this loop
down here by pressing Alt and selecting the
edge and then press G, G to slide this up
just a little bit. Alright, now select
three on your keyboard. Select all of these
faces and press E, and then slide it in
like this a little bit. And then left-click to
set that extrusion. Then press E again until
it's a decent ways back. And then press E one more time. And now you can press I to
insert this last phase. And then once you
finish your inset, come down to this Insert
menu and tick off boundary. And now we have this interesting little
subdivision doorway. Now there are some more loop
cuts that we should add. We should add one right here. So press Control R and
add a loop right there. That's pretty good. Let's
press Control R up here also. And then slide this
up a little bit, just reinforcing the
edges of the doorway. Now let's up the Viewport
subdivision by one, and let's shade at Smith. Okay, so that's the
basis of our doorway. And then let's press RZ to rotate it along the
z-axis little bit, and let's press G and move it back a
little bit like this. Let's go to camera view
and see how that looks. And I think that
looks pretty good. You can press Control S
now to save your project. And now what we wanna do is select this doorway
and press Shift S, which will bring this pie menu up where we can choose where we want our 3D cursor
and we want to go to cursor to select it. So now our cursor is in here. Let's start adding the
logs for the door, right? So press Shift a to bring
up a mesh and choose cubed. Now let's press G and move this cube a
little bit. So far. See to rotate it a little bit, not just press Tab and then S to scale it down a
little bit like this. Let's press Shift X X, and now it will scale the
cube and every access. But the local x-axis
there is our basic log. Let's press G to move
it a little bit. Sexually press tab,
and then let's move it like this and
scale it up a little bit. It sticks out a little bit from the doorway. I
think that's good. Now, we can press tab and
add a bevel modifier. And by default
it's way too much. So let's change this to 0.075 and then we can up the segments to me,
sevenths overkill. Let's go with four, then right-click and
shade that smooth. Now another thing
you can do is select your log press Tab to
go into edit mode. Control R to add a loop cut and maybe add
two or three loop cuts. I'll go with three.
And then you can press Alt on a loop cut and
just start moving these around and add in some imperfections and making these logs look a little
bit more interesting. And now what we can do is add another modifier
to the slog. So come up to modifiers and
add in a mirror modifier. And instead of using axis, we're going to use
the mere object. So choose this little ticker
and then pick this cube. And we want to change the axis. The y-axis is the one we want, and then untick this
x-axis right here. Let's shift D this cube and
bring it down low like this, because we want another,
another lockdown here. Maybe bring it more
over like this. Maybe S to scale it up
a little bit and then SXX to scale it a little bit
less than that local x-axis. And then G XX, bring it back a
little bit like that. Now, we can also
shift the, this, maybe it down here
and press R, y, y, and rotate it along the
local y-axis like this. And now we can scale it
in the z-axis a little bit like this and
press G to move it, move it along the local
y-axis like this. Okay, so another thing
we can do to fix this overlapping is press
Tab to go into edit mode and hold Alt and select one of these edge loops and G to
move it out a little bit. I'll select this edge loop
and then G to move it out. Like this one
again, move it out, select that edge, edge loop. And then you can press O to turn off proportional editing and press G XX or I mean, why, why? And then just move it out
a little bit like that, just so it sticks out
a little bit further. Then what we can do is press
three on our keyboard. So we're in face select mode, select this bottom face, and then G YY. Bring that in just a
little bit like this. Just select this top face. And then Ci Wai, Wai, just bring that in a little bit. Alright, now we can apply
these mirror modifiers. So apply these on all
three of these logs. Now let's shift select
each of these logs, and let's press M
and move it into a new collection called
blogs or whatever you want. And then we can also press
Tab to go into edit mode, press a and then p and separate by loose
parts, tap out again. So now each of these logs
is its own, its own log. And let's select them
all one more time. And right-click and set
origin, origin two geometries. So all their origins
are in the right place. Let's select this slug Shift D and bring it to
the top like that. And let's scale it
up a little bit, so it's a little bigger
than the other logs. Let's also duplicate
this slug Shift D. Let's scale it way
down and then press S XX to scale it in the
local x-axis like this. And press Control a and scale. So you're applying the scale. Let's rotate it along the
z-axis, or pressing RZ. Then rotate it like this by pressing R and
then G to move it. Rotate it again, can cheat
and move it into position. Let's scale it up a little bit. Let's add a mirror
modifier to it. So we don't have to worry about being perfectly symmetrical. Looks pretty good. Let's apply this mirror. Let's tab. I select all P
separate by these parts. Let's right-click Set
Origin, origin to geometry. And then now we can
select this object, press three, select that face. Just kinda move it in a
little bit like that, and then rotate it a little bit. Then we can rotate this one. Now let's select one
of these bottom logs and press shift D, Then RMSE, and then S y, y, whoops, not that S XX. Then let's see to move it into position t again,
right around here. This will be like
a little footstep. If you want to, you can make these look a little
bit different, make them different
from each other. Move around some edge loops. I think this looks
pretty good though. So I'm going to press Control
S to save the project. I think the next thing we can
add in are some shingles. So I'm going to select
this top piece of wood. And I'm going to press
Shift S and hold those keys to bring up
this 3D cursor pie menu. And I'm going to hover
over cursor to select it. And then I'll release
the keys to snap my 3D cursor to the log. And then I'm just going to press Shift day and gets a cube. Then I'll tab into edit mode
and scale this down a lot. And then let's tap
back out of edit mode, press G to move it over here, I'm going to press R and Z to rotate it along the
c-axis a little bit. I'll press Tab and I'll scale it a little
bit more and I'll press Z to scale it along
the z-axis like this. I'll press S, Y, Y to scale it. And I'll add in one loop cut by pressing Control R
right down the middle. And then let's select
this edge and press G just to move it a little bit and make it a little bit
more interesting. It's also moved this
edge a little bit. Okay, so the next thing we wanna do is add an a bevel modifier. So come up to the
modifiers and add a bevel. And let's make this
bevel much less extreme. Let's go with 0.05. Try that. Let's just keep learning and AI. There we go. So it's like 0.03. And then let's up the segments
to something like four. That's probably fine,
right-click, Shade Smooth. And that'll be our
first shingle. So we can move over here to this side and move this
shingle down like this. And let's rotate
it a little bit. And let's move it over. Press Shift D to
duplicate it over. And then let's actually
just keep pressing Shift D to duplicate few more
shingles like that. And then let's edit
these a little bit. We can scale this and
a little bit shorter. We just want to add some
variation to these shingles. I'm also going to press
Tab to go into edit mode. Press T on my keyboard
and select this edge, and then just move it out
a little bit like this. If this edge in a
little bit and just add some variation to these
shingles right here. Then let's select
all four of them and press Shift D to
duplicate them underneath, like this from the side. And then we can make these ones different
from the top ones. That's more variation
to the scene. Another thing we
can do is actually move them kinda
underneath the cracks. So instead of having each shingle directly
below the one on top, Let's try moving them
over a little bit. Then they look a little
bit more different. You can have these also extend
over the word if you want. Whatever you think would
look good right here. I think actually
lowering these logs and then add in one more set
of shingles might look good. Now looks pretty
good on that side. And then I'll move this log
as well down a little bit. Now looks pretty good. And let's add one
more set of shingles. So let's duplicate these. Press Shift D to duplicate them. Let's X to delete
this first one. That looks better. I like it better with
three sets of shingles. And now what we can do is
just select all of these. We should actually create
a collection for these. So let's select them. All right, now they're in the lighthouse collection
and we went to press M to create a new collection and name it something
like shingles. Okay. There we go. And let's move shingles, shingles collection
inside the lighthouse by left clicking and
dragging it into it. And let's select the
shingles collection so that when we duplicate
these shingles over, it will be in the
shingles collection. So let's press Shift
D to duplicate our Z, to rotate them around, move them into position. And let's just tidy
this up a little bit. And now we have some shingles on ahrefs or press Control S to
save the project right here. Let's see how it's
looking in camera view. Looks pretty good. And now let's add a door for the scene. And to make a door, I'm just going to select one
of these logs right here, and I'm going to press
Shift D to duplicate it. And I'm going to press R
to rotate it like this. And I'll press S XX ZZ to
make it skinnier like this. Kinda like it's a doorway plank. And then I'll press
G to move it. And I'll scale it
down a little bit. Let's move it into the
doorway, kinda like that. Now let's go into edit mode and let's start making
some adjustments. Now press Shift D to
duplicate it over. I'll scale this one
up a little bit, tab into edit mode. And I want to add
some variation. I'm going to press two
to go into edge mode. All to select this edge, Let's start moving them around. Select both of these
and press shift D. Move them over here
and press R Z. Smith a man again, a little bit. Let's move this one
in a little bit more. I'm going to press Tab to
go back into edit mode. Now let's select one of
these pieces of wood and press shift D and move it
over here a little bit. Press R bar z. Let's move back a
little bit here. Press S, y, y, whoops, x, x, scale it in a
little bit like that. And again, press G to move it. And this will kind of be
like the back piece that holds the different
wood pieces together. Let's press Shift D and Z
to duplicate this down. Just press RZ and rotate
it all the way around. And let's press G to move it. Okay, so now let's add in a little lamp right here
on the White House. So I'm going to press Shift a to bring up the Add
menu, go to Mesh. She's single vertex and
add a single vertex. Now it puts you into edit mode. So you just want to press Tab to go back into object mode, G to move it over. And the single vertex is
this little orange dot. So move it right about here and then move it
to the center of blog. And then now you can
press Tab to go into edit mode and come
to the side of it. And then press one on your keyboard to go
into vertex mode. And then press E and
extrude this out like that. Then press E again, again, again and make
this kind of hook shape. We can move these
around a little bit. Press Tab to go
into object mode. Right-click on the
single vertex and come down to convert
to and choose curve. And then you want to
come down to this little green object data curved properties,
and select that. And then you went to open up this geometry tab right here, and scroll down until you see Bevel and come over to depth. Start left clicking
on this arrow. And as you can see, it
adds geometry to our hook, right-click and convert to mesh. And then you went
to come over to your modifier
properties over here, this blue wrench add modifier and choose
subdivision surface. And then right-click
Shade Smooth. You can press Control S on your keyboard to save
the project right now. Now you can press Tab to
go into edit mode, to, to go into edge mode
and press Alt on this top edge loop to select all of these edges and
press F to fill it. Now you can press
Control B to bevel this a little bit and
increase the segments. Maybe. Then let's rotate
it a little bit. Actually. Move it up again. And let's press Tab to go into edit mode, press Control R to add in an edge loop right here and
bring it out to about here. Now let's rotate
it a little bit. Press three on your
keyboard and press Alt on this edge to select
this loop of faces. And then you can
press Alt E to get the extrude menu and then choose extrude faces
along normals. Then you can add another
edge loop right here, and another edge loop
maybe right here. Now you have a hook
on the doorway. Alright, so now let's make the lamp that hangs
from the hook. Select the hook
and press Shift S, and she's cursor to select it. And then now let's press Shift
a to bring in a cylinder. You want to change the
vertices so something like 16. And then let's press Tab
to go into Edit Mode, S to scale it down, tap to come out of edit mode, CheA to move it into position. Now we just want to make
a lamp shape out of this tab to go into
edit mode again, three, to go into face mode, select the top face and
press cheesy and lower it. And then I'm going to press S
to scale it in like this e, and then press T on my keyboard
and Alt to select this, actually GZ to lower
it a little bit. Then I'm going to press three on my keyboard to go
into face mode, select this bottom face, and I'm going to
press I to insert it, GZ I to insert it again, and then E, S to scale that
extrusion up a little bit. And then E and S to scale it
down a little bit like this. Cheesy to lower this
down a little bit. Press T on the keyboard, Alt to select this edge loop, GC to bring it down, S to scale it out a little bit. You can even press Control B to bevel it a little bit too. I'll just bevel it
to one segment, I think, and then S to
scale it out again. And now let's press Add Modifier and shoes
subdivision surface. Now let's start adding
in our supporting loops. I'm going to tab into edit mode, press Control R to add
an old loop right here. Press three on the keyboard, and then I, to insert this face. I'm going to press
Control R right here and add an edge
loop like that. Then I'm going to
press Control R down here and add an
edge loop like this. And right-click to
set it in the middle. And then let's just keep adding in our edge loops,
one right here. And let's go with one down here. Then let's press three
on the keyboard. Select this bottom face
and press I to insert it. And let's see her lamps like and that's
looking pretty cool. I actually, I don't think
we need this edge loops. I'm going to press
Alt to select it x, and then dissolve edges to make this just a little
bit rounder on the bottom. And I'm going to press Alt and select that edge
loop, Empress chichi. I don't like how sharp
this is right here. So I'm going to press Alt
to select this edge loop, and I'm going to
press S to scale it up a little bit
G and then see, unless round it out like that. I'm going to press Alt to select this loop and press S to
scale it out a little bit. And then Gigi. Then I'm going to
press Alt to select this loop and press Gigi, slide it up like
that a little bit. Now let's right-click
and shade it smooth and press Control
S to save our project. And we can scale this
lamp up a little bit to maybe
something like this, maybe a little
smaller than that. And then Control a Apply Scale. Let's move it into
position under the hook. Now what we wanna do is add
in another single vertex. So I'm going to press Shift a, go to Mesh and then single
vertex and add a single verb. No press Tab to go
into object mode. Press G to move it
down here to the lamp. And then G to move
it over like this. And now let's press Tab to
go back into edit mode, press one on the keyboard
to go into vertex mode. And now let's extrude it in a circular pattern
around this hook. Doesn't have to be perfect. We can make some
adjustments afterwards. Okay, So as you can see,
that's super lopsided. So I'm just going
to start moving some of these vertices around. And then now we can
right-click on it and choose Convert
to and choose curve. And then we'll come down
to our curves settings. Go to geometry than depth. Let's up the depth. Now let's right-click convert to mesh and come
to our Modifiers, add modifier and choose
subdivision surface. Now let's right-click
and shaded smooth. And now we can start moving
some of these vertices around again so that they
contact the hook right here. So I'm going to press
three on the keyboard, Alt, select this edge. I'm going to press O to
enable proportional editing. And then G to move this down until it
touches right there. Then I'm going to press two on the keyboard to go
into edge mode, press Alt like
this edge loop and just G to move it down
and out a little bit. And I'll do the same with
essentially all to select it. And then move it a
little bit like that. Let's press Control S to
save the project right here. Okay, so now what I wanna do is create a handle for the store. So I'm going to press Shift
a to bring up the Add menu. Go to Mesh, go to single vertex and add single verb Tab to
go out of edit mode. Now press G to move it. Most prison G to move it over. Now let's move it into the door. Press the X-ray buttons so we can see where
we're moving it. And she's just move
it a little bit into the door and then come
out of x-ray view, press Tab to go into edit mode. And then let's extrude
this out a little bit and extruding a little
door like this. And then let's select
these vertices and press G to move
them a little bit out. Let's scale it in the x axis and press
Control a Apply Scale. Now let's right-click and
choose Convert to curve. I'm done to your curve
settings and up the depth, then we can
right-click convert to mesh and add in our
subdivision modifier. And then let's press Tab
to go into edit mode, control our select
the right there. And then let's
press Control R up here and control are down here. And then let's right-click
and shaded smooth. And we have a little door
handle for the lighthouse. And then the final
thing we want to do for the lighthouse is just add some of these little bricks
onto the walls of the door. So select a break and
press shift D, R, z to rotate it along the z-axis, G to move it. And then we can just scale
it down a little bit, Shift D to duplicate it. Then we can just select
all of these three. Press shift D to
move them over here, press RZ to rotate them, and then G to move them. And we have some bricks.
11. Fence Modeling: Alright, the next
thing we want to add is the path down to the ocean. And do this. I just duplicated
these bottom boards and moved them on
top of the sand. So what I'm gonna do is press Shift D to duplicate this and move it down a
little bit like this. Press RZ to rotate it a touch. Then you can move it up a
little bit and rotate it. And then press shift D again
to duplicate that stuff. Rotate it a little bit,
and then move it up. And then press shift D
again to duplicate it. And we're just duplicating these little steps and
moving them down the sand. Pretty easy and straightforward. Then this can be our
last step right here. And we have the steps. Let's actually
move this a little bit further into the sand. Now, let's just scale these and make some
adjustments to them. Using R loops and edit mode by pressing Alt and
selecting loops and then moving them and
then scaling them. Just add some variation to them. Okay, so the next thing we
need are the fence posts. So let's select
this piece of word, press Shift us hold those keys, and choose this as our
cursor to select it. Let's press Shift a mesh
and add in a cylinder. Then we want to press
Tab and then S to scale it out of edit mode, and then G to move it. Over here. Tab back and S Shift C to
scale it on every axis, but the z-axis, then a C. And then let's add in
a couple of loop cuts. So press Control R, Then scroll up once on the, on
your mouse wheel. Then left-click and right-click to lock them in the middle. Then press to Alt and
select this edge loop. And then you can just move
this around a little bit. Let's select this top face
and scale it up a little bit. Then press to Alt, select this and scale
it up a little bit. And we kind of
have a fence post. And then I'm going
to press Tab Alt, select this top bit
and press Control B. Then scroll up on my
num wheel a little bit. Just bevel this like that. And we can right-click
Shade Smooth. Ah, we have a little problem if you have some shading errors. So if I press forward
slash on my keyboard, it will put this
into our local view. And you can see there's
a little bit of a shaping error at the bottom. And to fix that, we
can come over to this little green
object data properties, open up normals and
tick Auto Smith. And that will fix our little shading there
down at the bottom. Then press forward
slash again to come out of that local view. And let's actually just
bevel these edges a little bit control B level. But these only need
like three segments. Loops Control Z. To undo that, we only, we only want this edge right
here and press Control B. Now let's Shift D
to duplicate this. Move it over here, rotate it a little bit, and then shift D. Shift
D again, duplicate it. Rotate it a little bit more, and then shift the hips, keep pressing Shift, Shift D and duplicate this
final one here. Then we want to rotate
this final one back a little bit and then scale it, suppress S and then z, z, scale on the local z. Then just move it up a
little bit like this. And this fence post, we'll have another lamp on it. Alright, so those are
our three fence posts. We can tab into edit mode, press to alt, press O to enable proportional
editing, and then press G. And we can move these
guys around a little bit. Just add some variation
to the fence posts. And the next thing
we can do is select this hook and press
Shift D to duplicate it. And just for now, left-click
to put it in this spot. And then what you wanna do is press Tab to go into edit mode, three to go into face mode. Select this face. Shift Alt, select this face, then move over a little bit and Shift Alt, select this face, and then come back around and press Shift Alt to select this
face and Shift to select, well there is no face there, so press Control Z to undo that. And now let's press
X and delete faces. We don't need this faces. Now press to Alt, select this loop right here. Whoops, we have proportional
editing and enabled undo that pressing O to disable
proportional editing, and then G to move this edge
up a little bit further. Now, let's press a tabbed out of edit mode and let's move
it to our fencepost. Rz. Rotate IT S to scale
it down a ton. Control a to apply the scale. And then let's G and move
it towards our fence post. Just keep moving it. And we have one
hook right there. Then we want to shift D to duplicate this circle and
bring it down a little bit. And you can scale this
one down a little bit and press cheat and move it. And then let's
select both of them. So Shift select both
of them and then press Shift D. And we just wanted to duplicate them to each fence post and then cheats
move it out a little bit. Key to move it over. And then Shift D again. And then shift the
one more final time. Two, this last 1 first. And that looks pretty good. Now let's just rotate
these and move them a little bit and
maybe scale them. So there's a little
bit of variation. I think that looks pretty good. Now, the next thing
we want to add is a rope that will connect
these fence posts. Actually first, let's press Control S to save our
lighthouse project. And then let's select these hooks and press
Shift D to duplicate them. And then RZ to
rotate them around. And then G to move them
into the sky over here. And this will be where the rope start and then they'll end at
this fence post over here. And so select this
press Shift S, and then cursor to select it. And then you want to
press Shift day and go to curve and choose
Bezier curve. And by default, it's
really big so you just want to press S
to scale it down. And then G to move it
over a little bit. Press Control a to
apply that scale. And then let's just rotate
it around a little bit. And then RZ and then press tab. And the way these
curves work, Ellis, the Bezier curve works is it has these little like control
anchors or something. And when you move these n, they have less of an
effect on the curve. And then when you
scale them out, they have more of an
effect on the curve. And so we went to
scale these ends. So select the middle one and then press S to scale in both. And then G to move
it over our hook. Just rotate it like this. And then press E to extrude it, R to rotate it. Now again, this is gonna be
hidden from the camera so you don't actually have to wrap
this curve around the hook. If you want. You can just leave it as is. But if you were to
wrap it around, you just want to stick to selecting these middle
points and using your rotation and move
tool and extrude tool. So e to extrude another curve, R to rotate it a little bit, and then G to move
it in like this. And then E to extrude one more, R to rotate it, G
to move it down. Then when we add
depth to this curve, it will look like it's
wrapped around this hook. Then you want to select this guy and G to move it down like this. And then let's actually come to this side and press E
to move it to the suck. And then you want
to press S so that this anchor has less of
an effect on the curve. Then G to move it
over from above. And actually, let's move
this guy over as well. And we're just going to drape this curve along these hooks. And so e to extrude
this one down, press S to scale this
guy up a little bit. And then E to extrude it over
S to scale this one down. E to extrude it over
S to scale it up. Then either extruded over and just keep repeating
this process. And we'll do the same thing
for the lower hooks also. So as you can see, they're kind of off the hooks so we can just come in and
move these manually. Oops, Control Z to undo that and rotate
them a little bit. Okay, and then this final curve, we just went to wrap it
around the hook a little bit. So press E, then R, and then S to scale
it down a little bit, cheated move it in. We can scale this guy
down a little bit too. Then E, R, and wrap it around. One time. We don't need to go
crazy with the wrapping. And then maybe just
one last extrusion. So we have a little bit of one last little light
dangle in the rope. And then let's move this curve off of the first one like that. And that is the first row. Now, the second rib
is much easier. All we have to do is just
basically press Shift D to duplicate this one down and then make some
adjustments to it. So go tab into edit mode. Just start, start
moving these guys up. Alright, that's
looking pretty good. We can also scale some of
these guys down a little bit. And we have our two fence ropes. Now the next thing you wanna
do is just select one of these fences and add
some depth to it. So come down to
the depth and then up this tell us something
like 0.5 maybe. Actually we could probably
even do a little bit more. Maybe 0.70.60.6. This is up to your
personal preference on what you think looks good. And then just come in and do some final tweaking so that it looks like a rests
on top of the hooks. Not super hard to do. Key making minor adjustments
until it looks good. And remember to
save your project, press Control S to save it. Then let's come
down to this guy. And up It's a 0.06,
like the top row. And just move these
curves around a little bit till they
look like they're sitting on top of this reps
pretty far from the camera, so you don't have to worry
about being super precise. Then if we go into camera view, we have a little
fence rip thing. And I think that
looks pretty good. So you can press Control
S to save the project. And we're almost done.
12. Palm Tree Modeling: Okay, so the next
thing we want to do is select this lamp, shifts like a little handle and then shift select the hook. Then press Shift D to duplicate it and bring it over to
this last fence post. And then just G to
move it into position. Now, scale it down a good bit. Suppress S on my keyboard
and just scale it down to something like this. This move it close to the
top of this fence post. I'm going to press Z
to rotate these along the z-axis and then G to
move them to the center. R to rotate it from the side. And then R to rotate these back, G to move them like this. So now we're pretty much done with almost everything
in the scene. The last thing we want to
add are the palm trees. And to do this, I'm going to press
Shift a to bring up the Add menu and
choose mesh cylinder. And I want to lower the vertices count to something like 16. And then I'm going to
press G to move it over Tab to go into edit mode and
then S to scale it down. Now what I wanna do is
select this top face. Actually you have to press 32, go into face mode, and then select the top
face us to scale it up. I don't want to
press I to insert it a good bit like this. E to extrude it down. And then S to scale it
down a little bit more. Actually, because
our scene is really big and we're working
with this small object, it's kinda hard
to zoom in on it. So what you wanna do is press forward slash on your keypad, bring it into local view, then it's much more easy to add. Now let's press Tab
DO out of edit mode. Let's choose add modifier,
subdivision surface. And again, it's doing
this really weird stuff because we haven't added in
any supporting topology. So press Control R to add in a loop cut and just
bring that down a little bit to like here. Then we'll press three
on the keyboard and select this bottom face
and press I to insert it. And then two on the
keyboard, and then Alt, select this outer
edge and press G, G to slide it up a little bit. I'm going to press
three on the keyboard, select this and I2 inset
this 11 more time. I think that's fine
for the bottom. Again, I'm just
tapping in and out of edit mode to see what my
adjustments are doing. And I'm adding in
supporting loops. So I'm going to add in
a loop cut up here, Control R, and then left-click and then right-click to
set it in that place. Then control, alright
here to add an, a supporting loop
right around here. Actually, we might not
need this edge right here. But first let's add a loop cut right here by
pressing Control R. Then let's press three
on the keyboard. Select this interface.
It won't show, but just left-click
there and press i. Now it's looking pretty good. I think. Press T on the keyboard, Alt, select this loop
cut that we made and press X and dissolve edges. Then right-click
and shaded smooth. And this will be
kinda what makes up the trunk of the palm trees. And then you can press forward slash to come out of local view. And let's press G to move it
somewhere like down here. Scale it up a little
bit, R to rotate it. And now you just want to press
Shift D to duplicate it, bring it up a little bit as to scale it
down a little bit, and R to rotate it a
little bit like this. And then do the same
thing with this next one. S to scale it down and
touch art or rotate it. And we get this kind of palm
tree trunk looking shape. Now we want to make some final adjustments and just kinda center everything up. Alright, and that is our
trunk for the palm tree. Next you can select this
bottom trunk piece and press Shift S to bring up the 3D cursor prior menu and
choose cursor to select it. And now let's press
Shift day and let's choose mesh and plane. And we just want to
press G and then C. Then we want to tab into
edit mode and choose us x, scale it along the x-axis
a little bit like this, then S to just scale
it in general. Now add in to loop
cuts, suppress control. Our scroll up once
on your mouse, and then left-click
and right-click. And now let's select, select this front edge. This will be the
front of the leaf and you can press S to scale
that down a little bit. Scale this guy
down a little bit. Maybe scale this one,
I scale this one down. Actually let's select
the whole thing and then Sx and scale it down and just make some
final adjustments. I think that's pretty good. Now we can just select
these edges and press G. And I think that
looks pretty good. Now what you want to do is
come over to Add Modifier and choose solidify right
under Generate. Then you want to bring
up the thickness to maybe like 0.05. We may even want to go
a little bit thicker, but we'll leave it
at that for now. And then you want to
choose Add Modifier and subdivision surface that
will subdivide the mesh. And then we can press Tab
to go into edit mode, control are and add a
loop cut down the middle. That'll be our supporting loop. I think our solidify can be a little bit
thicker actually. So changes to something
like 0.06.075. I think that's good because we want these to be really
cartoony looking. So I think that's a nice
thickness for our solidify. And then we can come to
this little arrow right by the camera icon on the modifier and left-click
on that and choose Apply. And now that apply to
our solidify modifier. And we can add in a loop
cut horizontally like this. Let's also add in one
more loop cut right here. Then we can select
these edges and press GG and slide them
back a little bit. Select these edges, GG and
slide them back a little bit. That is starting to
look pretty good. Then you can right-click
Shade Smooth. You have to have
it selected first. Actually, let's add in
a loop cut back here to select these
edges and press G, G to slide them in a little bit. And do the same over here. Now we can right-click
Shade Smooth, and we have kind
of a leaf shape. Then let's press cheat and
move it down R to rotate it. And actually I think we went much more of a curve in here. So let's press Tab to
go into edit mode, alt to select one of
these edge loops. Then press O on your keyboard to enable proportional editing
and choose R for rotate. Actually, that's not
helping very much. Let's select one of
these edge ones. Just select some of
these edge edges by pressing Shift and selecting
those edges unless press R. I don't think this guy
needs to be so extreme. Yeah, that looks pretty good. Then one thing we can do to
make editing and rotating these palm tree leaves around
a little bit easier is to move this orange
origin over here. So to do that, we come up to Options and
choose transform origins. And then you just want
to select it and choose g y. And then GZ. Kinda bring it to the
edge there like that. And that way when we rotate it, it will rotate around that point and not
around the middle. And then choose Options
and untick this now. And now if we shift D, right-click to lock in
that place and choose RZ, it rotates around that point, which makes it just a
little bit easier to edit. And then we can select
both of these and shift the lock them in place by right-clicking and choosing
RZ to rotate them. Okay, I think that's
looking pretty good. I'm going to move
this into clever, that little hole in the middle. And then let's select all
four of these and Shift D to duplicate them and
move them up a little bit. And then choose RZ. Then S to scale them down
a decent bit like this. Then you can just
rotate Tom Thumb, cheetah, move them
up a little bit, kinda put them like that. Then you can press Control
S to save the project. And now what we wanna do is
move these to a collection. So Shift, select all of these little pieces that
are part of the palm tree. And then choose. I'm new collection and name this something
like palm tree. And now these should be in
a palm tree collection. Also, we can kinda start minimizing some
of these collections. We don't need all of
these to be open. There we go. Now we
can press shift the, move this one over here. And then something
like RSE, R to rotate. It's more maybe S to
scale it up a little bit. We can make some of these
leaves bigger and smaller. I think that that's
way too big actually. But again, because our
object origin is here, we don't have to worry about moving these every
time we scale them. Okay, So that palm
tree looks good. And then we can choose
Right-click, select objects. And now we select both palm
trees and we can press Shift D. And then RZ. This kinda put them
around the scene, which is select all of these. And then one thing
we can do to make it easier so that we don't have to select them all every time. Is shift select this bottom this bottom piece of the trunk. And she's controlled p, select Control P, and then
set parent to object. And basically all
these other objects are parented to this object. So if I press G to
move this object, all of the other objects follow. And so now I can just
select this one and rotate it a little bit
and S to scale it. Now some of these, you may
want to add some variation, so like X to delete
one of the trunks, maybe we can select these
leaves and move them down. Just so that this palm tree
is a little bit different. Then I'm going to parent
all these other objects to the bottom object by selecting them all and
then choosing Control P. Then we can just select
this guy and just rotate them
differently from each other so that the scene
has some variation. Let's see how it's
looking in camera view. Yeah, that looks nice. And then press Control S to
save the project so far. And let's duplicate one
more palm tree over. So I'm just going to
select the original one. Then press shift D. Bring it over here to this
side of the beach. Cheesy. If you want to, you can
add more palm trees. But if think this is
fine for this scene, I like the way this looks. This is pretty much it. If you guys want, you can
make some final adjustments to the lighthouse or
the door, the fence. Maybe. One thing I noticed with the fence was I think these reps are a
little bit too low. So if you wanted to, you could raise
them up and raise these top ropes up as well and maybe scale up the
fence posts a little bit. But the next adjustments
are all up to you. Or if you're happy with
the scene like me, you can just leave it as is. But congratulations
for modelling the slight house scene and
sticking through the course. If you guys want to learn
how to texture and light it, I will have a course on that. So make sure that you follow me. But congratulations on
modeling the scene.
 Surface Designs