Transcripts
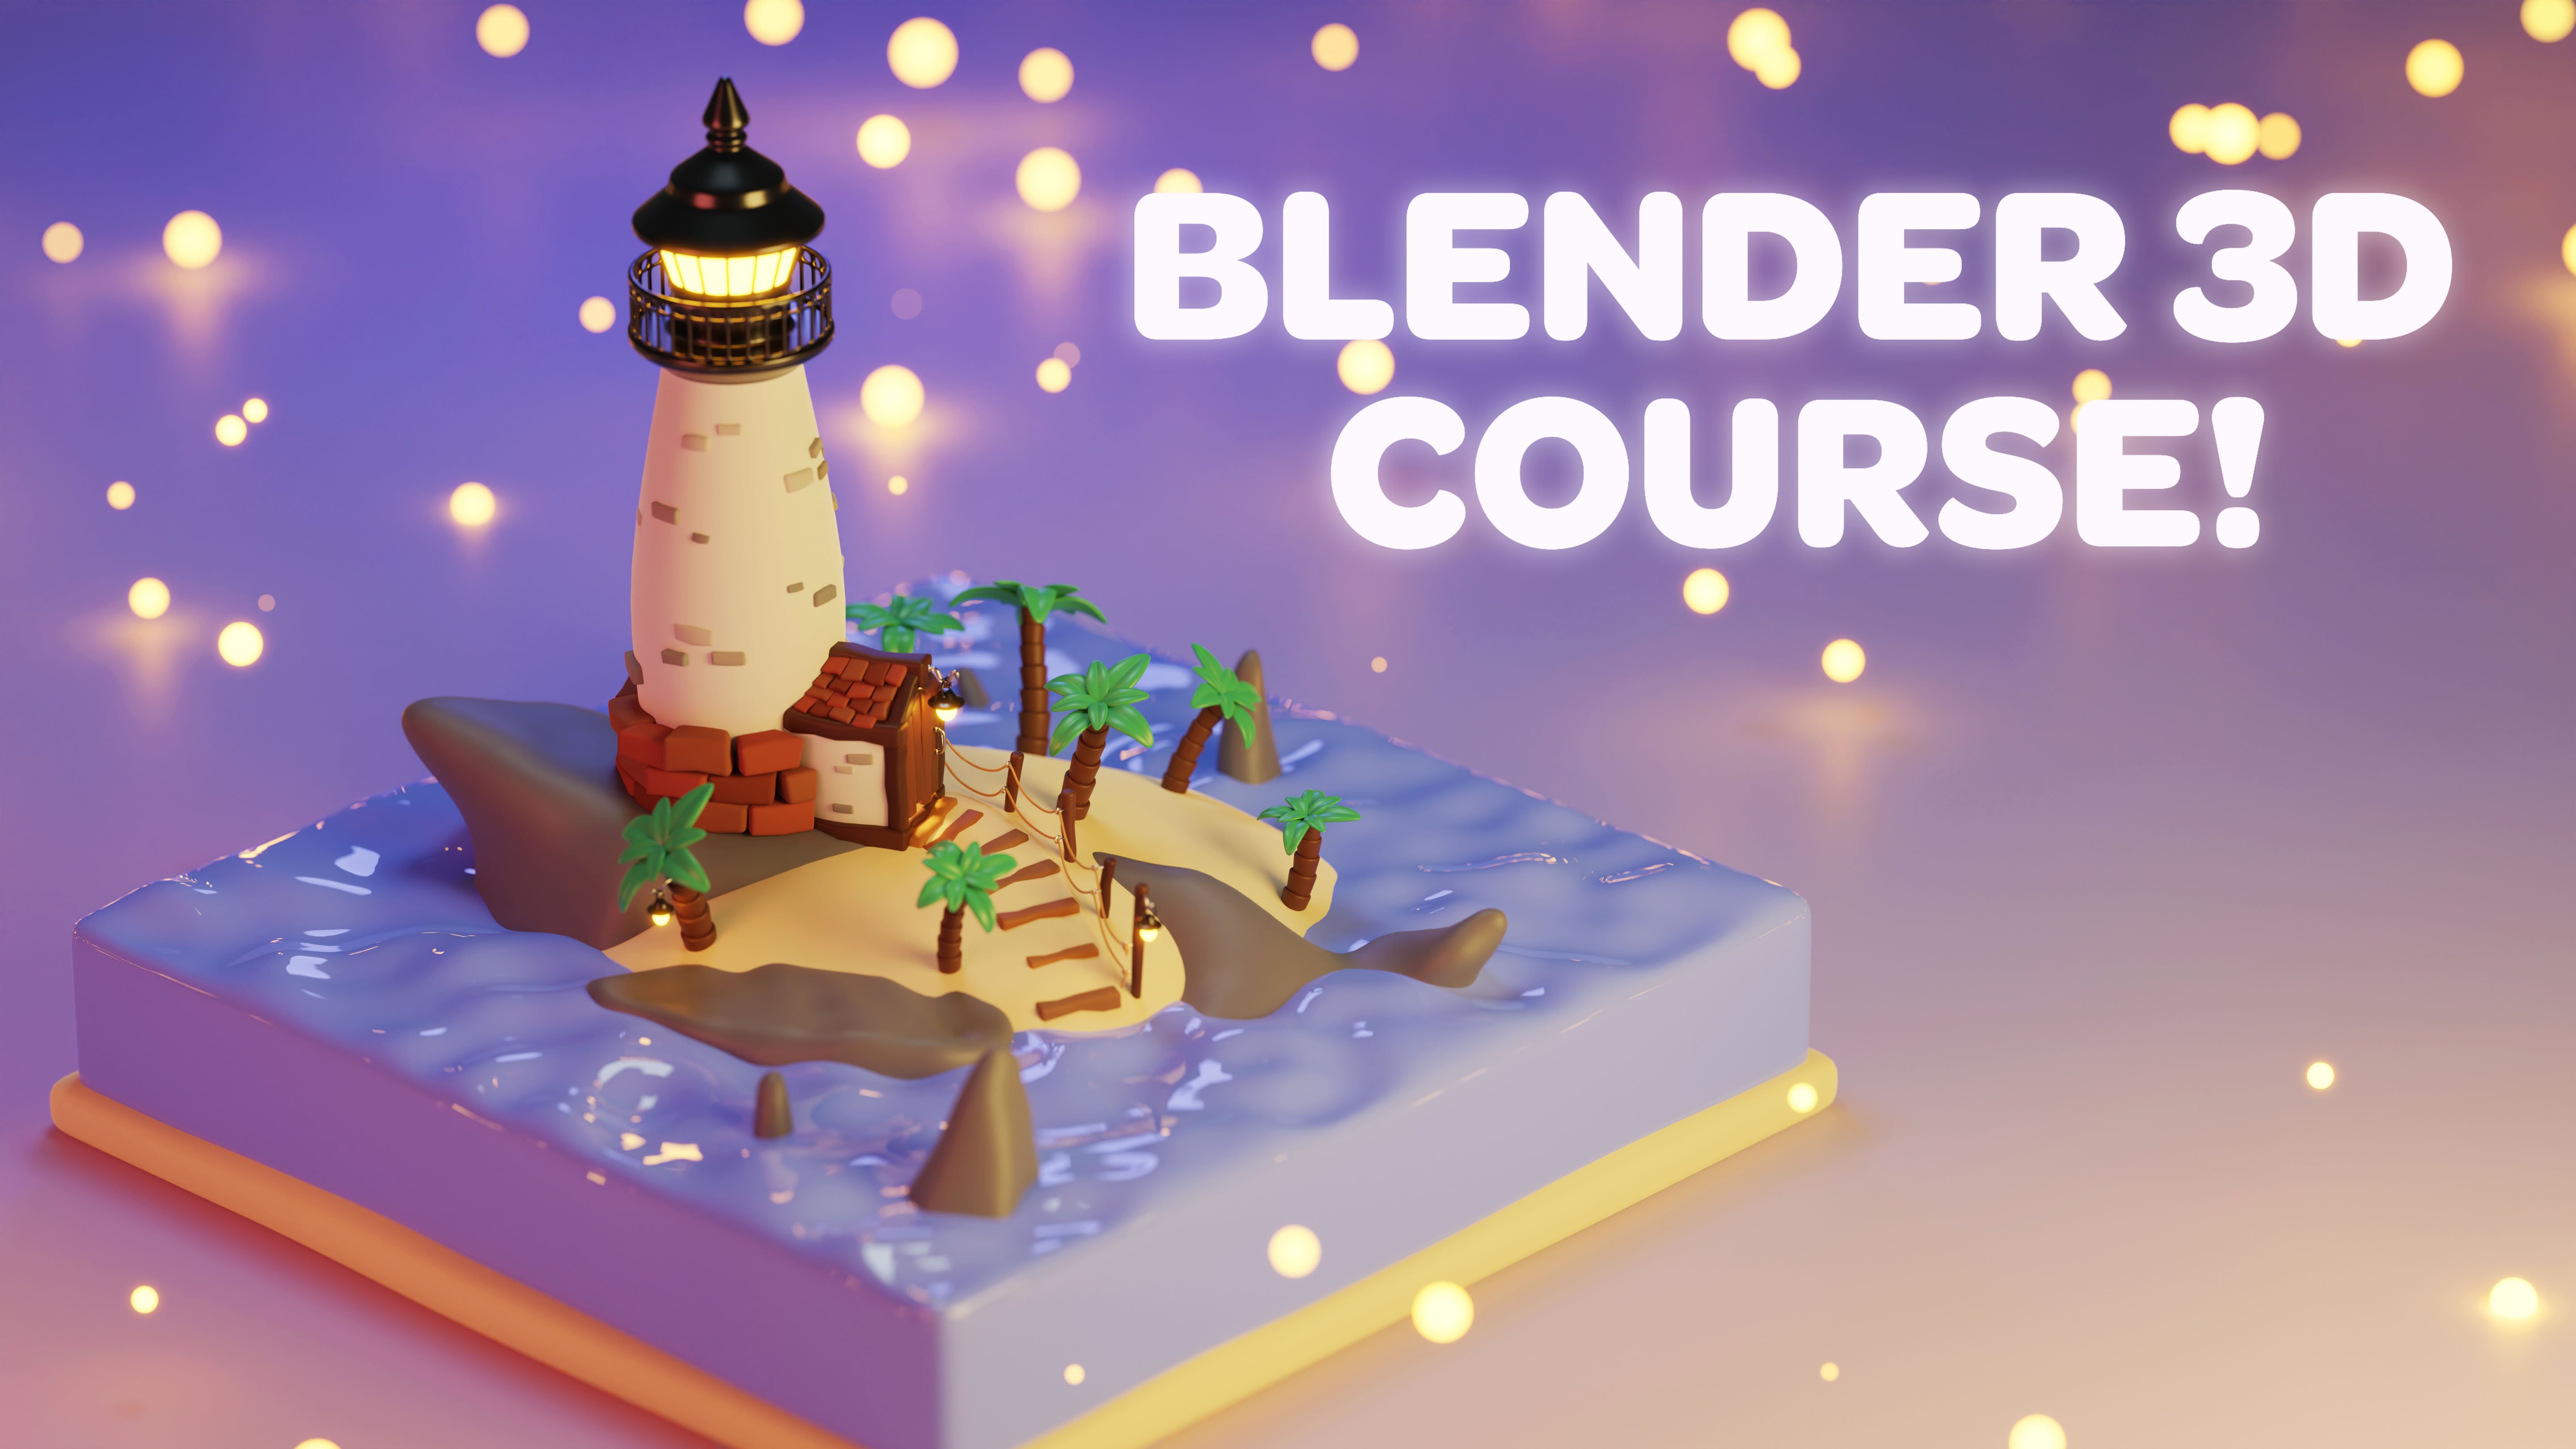
1. Intro: What's up, guys? Welcome to the second part of my stylized modeling course. In the first part of the course, I walked you through how to
model this lighthouse scene. In this part, I'll teach
you how to light the scene. How to create simple
procedural textures, how to add the
textures to objects, and how to render
out the final image. The course, we'll
also go through particle system settings to create glowing lights
around the lighthouse. Without further ado, let's get
into creating the project.
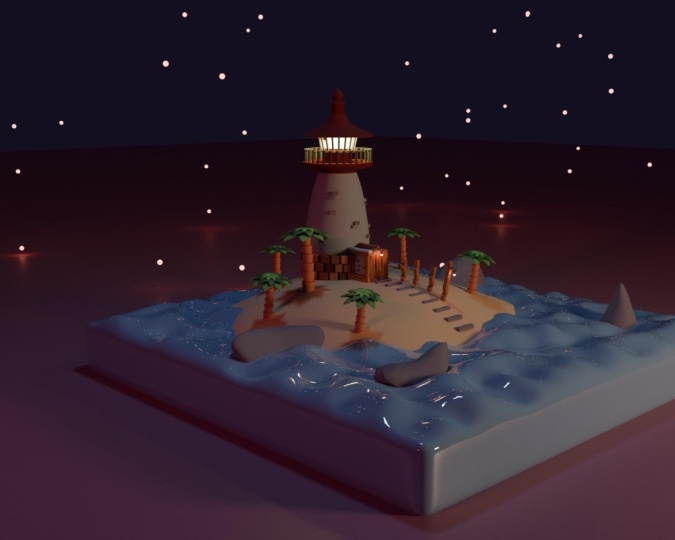
2. Lighting: The very first thing
you wanna do is open your project file
from the last course, where I taught you guys
how to model this scene. And then once you've
opened the file, you can head up to Edit. Preferences, go to
Add-ons and type in node and make sure that you have the Node
Wrangler enabled. And just make sure this
is a little check sign. So click that because
we're going to need this when we
move on to shading. Before we get into shading, what we wanna do is add
some lights to the scene. Now one thing to note is, I expect you guys
to remember most of the basics of Blender
from the last course. So things like going into camera view and basic
keyboard shortcuts like moving and scaling. I expect you guys
to remember those. If you don't, you may want
to look at the last course or just Google some
of the shortcuts, maybe watch a short
video on them. So what we wanna do is press Shift S and then go
to cursor to world origin. And that will just make
sure that our cursor, 3D cursor is in the
center of the scene. And then we want to press Shift a to bring up the Add menu, come down to light
and choose area like. Then we're going
to press G to move this area light somewhere
like over here. Because basically the
lighting setup we're going to want is kind of a
three-point lighting setup. So we're gonna have our
main light over here, which will be our key light. And that will point
towards the lighthouse. And this one will be kind of orangey to give the
CNS sunset vibe. Then we'll add a fill
light over here, which will be more of a red. Then we'll add one other kind of rim light up above
the Lighthouse, which will be more of a blue color to kind
of act as a moon. Then we might add
some other lights to help enhance the
colors of the scene, but that will be
later in the process. So you want to make sure
you have this light selected and press R to
rotate it at the lighthouse. Like this, G to move
it over a little bit. And then just press G to
move it along over here. And then RZ and pointed
at the lighthouse. Then you want to press S to
scale the light up like this. So it's really big. We want a nice big light, maybe move it up a little bit. Then come down to
your light settings over here in the bottom right. And we want to change the power
to something really high, like 30 thousand are
seen as really big. So we have to have a
really high power setting. Then you wanted to
change the color to a nice orangey
yellow color like that. Then if we go into our cameras view and then we change
to our rendered view, we can see our light. So one thing I forgot is that
we are currently in IBI. So if you go to your
render settings, you can see we have our
render engine set as EB. For this course. I'm gonna be using cycles. You can use Evie if you want, but you may have to tweak some settings signature
scene to look really nice. But if we change
this over to cycles, and then we change
it from CPU to GPU, which will make the render
a little bit faster. Now, it looks like our
light is too powerful, so we can start bringing
down the power a little bit, maybe to 20 thousand. And just move it around, rotate it along the local
z-axis by pressing R is easy. And I think this is starting
to look fairly good. And then what we wanna
do is go back into solid view and press Shift
D to duplicate this layer, and then press Shift
Z so it doesn't move along the z-axis and
bring it over here. Then press RZ to rotate it. Then g, x. And we want to change the power
to something like 7500. We want it to be lower
than our main light. Then we can change the
color to more of a red. We want to keep a theme of using sunset colors and maybe
move it in a little bit. It doesn't have to
be very far out. Then if we go into rendered
view, that's too much. Let's move it out a little bit. We want it to be a
little bit more subtle. Okay, that's a
little bit better. I think we want this light to be a little bit more
of a rich orange. We're going with a
stylized scenes, so we want the colors to
be nice and saturated. And then this color can be
maybe a little bit less. I think that looks a
little bit better. Now what we can do is go
back into solid mode. We went to press shift D on this slight shift
D to duplicate it. And we want to bring it
over our lighthouse. And we just want to
rotate it so that it points down at
the lighthouse. This slight can be a
little bit smaller, so press S to scale
it down a little bit. We may even want to scale
this one down of touch two. And then we want to change this color to more
of a blue hue. We can keep this a
little bit more subtle. Then let's go into
camera view and see what all this is doing. So I think that's
too much actually. So I'm gonna change
that a little bit. And I'm going to bring down
the power to 5 thousand. I think. We want it to be a
little bit more subtle. Just kind of add a little
bit of blue to the scene, like there's a moon, Let's
kinda glowing on the scene. Okay, so that is the main basic lights that
we want to use in the scene. So now we can move
on to tax-free.
3. Texturing: In the first thing I want
to texture is the ocean. So I'm going to
select the ocean. And I'm going to come up and
change to my shading tab. And you can come over here to the bottom
left of this viewport, and then left-click and drag. And you get this little
arrow and you just want to drag over to the left like that. And that will make that
tab over there disappear. And you want to do the
same thing down here, because we only need
these two views. Then you want to press
new on this material. While you have the
ocean selected. Let's left-click there
and name it ocean. And then we can change the
base color to violet, purple. But we want to keep it still in the bluish tones,
kinda like this. We don't want it too dark. And basically what
we're going for is a really stylized ocean. I don't want to make
the ocean transparent because we want to keep
the scene very stylized. And so it's not going
to be see-through. It's going to almost look
really glossy and shiny. And to give it this look, I want to come down to
the roughness setting. Just bring this down a lot. Either to something
like 0.1 or even 0. Maybe. We'll bring it down
really low like this. And then let's change ever to rendered view and
see how that's looking. Go into our camera. And that looks pretty
nice. I like that. I think the lighting looks
pretty good with her soon. And we can even make this
maybe a little bit more saturated and maybe a
little bit more violet. I think that looks good. And then let's go back
in the shading view. And let's select our sand and then move on to
click New right here, and then name this
material sand. Then we can change
the base color to kind of an orangey tone. Orangey yellow like that. And actually this is all we
have to do for our sand. It's a very simple texture. And then go into Render View, go into your camera view, and then go into
render view up here. And that looks pretty
good for our sand. Now let's go back
into shaded view. Let's select this rock and
let's create a new texture for the rock and name
it something like rock. And then change the
base color to more of a, a slight blue. And then we just want to bring the slider down so it's
kind of a darker color. And so we want like a
bluish gray for our rocks. I think that should be good. We can always check it
and rendered view to make sure maybe a
little bit more bluey. Then what we can do
to give all the rocks this color is select this rock, then shift to select this one. Shift, select this one, and shift select this one. Then we went to shift select our material one and
press Control L, which is the link shortcut. We want to choose
link materials. And this will give all
the rocks that material. If you want to add
some variation, you can adjust
these a little bit. But what you would
have to do is give each truck a new material
because if you adjust one, you adjust them all. So if I make this, if I make a change
to this material, it happens to all the rocks. So I'm going to press
Control Z to undo that. What you would do
to make one rock look different is come
over to this new material, which basically duplicates
it as the same material. And then if you change this one, it only changes that material
and not all the rocks. If I'm going to press Control Z, Z to undo that, because I think it's fine having them all
the same texture. And I'm going to go
into camera view. And I'm going to go
into rendered view. And that's looking pretty good. Now let's change back
into shading view. And let's start adding some textures to these bricks over here, the lighthouse works. So a brick is typically
a reddish color. So that's what I went
for with these bricks. But we do want variation
in these textures. So the first brick
will press new for the material and then name this something like rick one because we want to have
multiple brick textures. Then we can change the color to a red and then bring
the brightness down. Darken it a little
bit like this. So it's a nice reddish brick. And let's bring the
roughness up a little bit so that it's a
little bit more, it's less reflective because bricks are in super reflective. Something like 0.8
is fine, I think. Then let's select maybe
this Burke over here. Press New and name it brick to. And we want to give
it another texture. Maybe something a
little bit more, more saturated this time
and a little bit brighter, maybe a little darker than
that, something like that. And then we can bring up
the roughness like a 0.8. And that's our second break. And then let's grab
a third brick, press new name, this
one, brick three. Then change the base color
again to a red maybe, but less saturated this time. Darken it up a little bit. But actually it looks very
similar to the last break. So let's make it more orangey, more of a brownish color. I think that looks good. And then we can bring
up the roughness to something like 0.8. Then let's select
one more brick and press new name this brick for. And then change the base color to something a
little bit bright. And I think that's
fine for our bricks. And then we just want to start
selecting random bricks. Shifts selecting them. And then we can shift
select a brick. We went like this one and press Control
L and linked materials. Then let's start selecting
some other bricks. Then we can shift select this break and press
Control L link Materials. And then let's start
selecting some other bricks. I think that's good. And then let's select
another one of these and press Control
L link materials. Then Let's select
these final bricks and select our final
break right here. Control L link Materials. And then if we press Alt a week, these select them
all and we have some nice multicolored
bricks right there. And now actually are shingles are the same
colors as our bricks. So we can just start
shifts selecting the shingles and giving them similar textures
as the bricks. So I'll start shifts selecting
some random shingles. And then I'll select
one of these breaks. Control L and linked materials. And if you don't like the way one of these
bright colors looks, you can always just
change it a little bit. So this one I want to
be a little bit darker. This one a little
bit less saturated. Then let's select some
other bricks or shingles. I mean, then we have some bricks
and some shingles. Now, the next thing
we went to texture are these little bricks
on the lighthouse, on the lighthouse doorway. And so let's select
one of these, press New and we'll name
it something like stone one because these will be the gray versions
of the bricks. And then we can change the
base color to a bluish gray. Just barely slide it
towards the blues. Then bring the color
down a little bit. Then we'll select this
break right here, press New and name it stone to. And we can bring it to
the blue's a little bit. And bring down the color, make it a little bit darker. Let's make this one a little
bit lighter actually. That'll be the light stone. And then we have our
third stone up here. We'll name this one stone three. Change the base color this time. I'm not going to bring
it towards the blues. I'm just going to keep it as a gray and bring it
to a nice gray. And we have some
variation in color. Then what we can do is, actually, I forgot these
are a little bit glossy, so I'm going to
bring the roughness up on each of these materials to 0.8 like the bricks. And then I'm going to start randomly
selecting some bricks. And then I'll shift select the brick i1 and press Control
L and linked materials. And then I'll do the
same process over again. Then shift select
this guy right here, Control L and linked materials. And then now I'll select the last bricks
that are leftover. Then I'll shift select this dark gray press Control
L and plink materials. And now we have some stones that have some
materials on them. Then we can select some
of these ones down here and come down to this little
material slider right here, and choose one of
the stone materials. So maybe start at one. And then this one I can
choose stone three. This one can be stone to. Now I'll do the
same on this side. So this one will be step one. Step two, step three. Now all the stones
have materials. Now we can go to our camera view real quick just to see how the scene is starting to look
and go into rendered view. In the bricks are looking
pretty nice in rendered view. Now let's go back into
material preview and then select the railing
up here and we can start texturing the
lighthouse, this rail. And I'm gonna give
a metal material. So I'm going to press
New and name it metal. And the way I'm going to make it look like
metal is come down to this metallic slider and make
that completely metallic. And then I'll change
the base color too really dark
to make it black. Then I'll change the roughness down and make it less
right to something like 0.1 fibers are, so we want it pretty reflective. And then we can select
this right here, which is our window frame, and then shift select
the railing and press Control L and Lincoln materials. And then for the lighthouse, we actually don't have to
texture this white bit. We want to keep our
lighthouse white. So what I'm gonna do is press
New to add a new material. And I'm not going
to change anything. I'll just name it Lighthouse. I'll just leave the
default settings with the base color green bite. I may change the
roughness to like a 0.75 just to make it a
little bit more rough. But that's the only
thing I'll change. But then what I wanna do is come into my negative y's side view. Select my lighthouse press
Tab to go into edit mode. Then I'll change
into x-ray view. So I'll left click right there. And I went to left-click and drag over all of these
top faces like this. And I believe we went
to select this loop also suppress Shift Alt on
this edge to select this loop. And we don't want the windows, we want a different
material for the Windows. Suppressed Shift Alt right
here to de-select the windows. And then we can go back into material preview mode just
to see what we've done. Let's also press Shift Alt
Up here to de-select that. We also want this
slip to be window. We can come down to our
material and then we can left-click on this slot
one and click this plus. And that adds a
new material slot. And then we can press a sign that will assign all of these
faces to the new material. And for slot two, we want the metal material. So it's looking good. But we don't want all
of this to be black. So to fix this, we can press
Alt on this edge right here, come to slot to left-click on Lighthouse
and press Assign. And that will assign this loop To the
Lighthouse material. And then we can press Tab
to come out of edit mode. And we have the top of
the lighthouse textured. Now for the doorway, this is very easy. We just want to make some
brown textures for the word. So I'll left-click on
one of these logs. Now press New and name it
something like log one. And I'll give it a base color
that's kinda this brown. And I'll just bring
the brightness down. Then I'll left-click up here. Press new, name it log to. Now change the color again. This one will be less saturated
and a little bit darker. Then I'll left-click
down here, press New. And then that log three. In this one can be a little bit more reddish in saturated, and I'll bring the brightness down. Maybe a little darker. And we're getting some
nice log materials. And then from here we can
just start randomly selecting some and giving
them new materials. So I'll select these
shifts like this one, press Control L and
link materials. I think this is actually
too close, so I'll shift, select this press Control L, and make that, that color. Then I'll select this. Actually let's select
this and this shift, select this brown and press
Control L link Materials. And then these two can be
linked to this material. And that's looking pretty
good for the logs. If you want. You may not want to have
variation or as much variation. I think I'll make this
a little bit more similar to the other logs, just because we don't want a ton of variation in the logs. Just a little bit,
goes a long ways. Then for our doors, we can have similar
textures as blogs. So you may just want to shift, select the Log, press
Control L materials. Or if you want, you
can add new materials, but I don't think that's
really necessary. Then there's also a couple
of wooden planks back here, so we just want to select that
and then select this one. And finally select this leg, press Control L link materials. And our door is
basically textured. Now one thing we also want to texture on our door
is the roof bit. Because if we go
into rendered view, it's hard to notice, but you can kinda see the white that's peeking
through there. And just to fix this, what we can do is go
into material view, select the roof, press
Tab to go into edit mode. Press forward slash
on the keyboard to put it into local view. And then we can press New and name this
something like door. We don't really care. And then we can press
three on the keyboard. Select this, all of these phases of select all
of these faces up here. And then we went to click
on this slot button, click this little plus sign, and then choose one
of the brick textures that will just
make the roof red. Now the next thing we
wanna do is texture the lamp and the door
handle right here. So I'll select the door
handle and I'll press New and name this
one light metal. Because this will just be kinda like the dark metal
appear the black metal, but it'll be more of a silver. And so I'll bring up the metallic and I'll bring down the base
color just to touch. And then I'll bring
down the roughness to a really low value, like 0.05 or 0.10,
one's perfectly fine. Then what we can do is
select this took up here Shift to select the door
handle and press Control L. Then link materials. We have this slight metal
on the hook and the door. Now for the lamp, we went to use the dark metal. So select the lamp and
this handle right here. And then we'll shift
select the railing, press Control L and materials. Now what we wanna do is add an emissive
material to the lamps. So I'll select the lamp press
Tab to go into edit mode. Press three, make sure
you're in face mode. Select these edges. And then you went to come
over to slot the Press, assign, press New, and name this one something
like emission. I can't spell that
I might be wrong, but we want to make this
an emissive material. And the way we do that is
come down to the emission down here and bring
up the brightness. And basically now it's
emitted and light. And we can change the color to an orange to make it a
nice soft lamp color. And we can change
the strength so it's brighter to something like 15. And then just bring it a
little bit orangey again. I think something like
that's pretty nice. Now, if we go into
rendered view, we can start to see
how our lighthouse is. Starting to look pretty cool. I think I might change this color and make
it a little bit more saturated just so
it's more orangey. Something like here is fine. And then we went
the same material on the lighthouse window. So I'll go back
into material view. I'll select the lighthouse press Tab three on the keyboard. I'll select this face loop. Shift Alt, select
this face loop. I'll come down to slot. Click this plus to add
a third material slot. Assign, to assign these
faces to the material slot. And they'll choose the
emission material. So now we have a nice
emissive material up here and a nice
one down here. Then real quick, Let's just
texture this lamp also. So I'll select the hook, shift, select the door handle
Control L link materials. Then I'll select
these two and shift select this press Control
L and think materials. And then we can press
Tab on the lamp. Let's press forward slash to
bring it into local view. And then Alt, Alt
select these faces. Then slot new, assign and
choose the emission material. And then tab to come
out of that event and forward slash to come
back out of local view. Now let's give all of the
hooks, their own material. So now what I wanna
do is just select the hooks on these fence posts. So I'll shift select
all of these guys. And I believe there's
a couple over here. Select them to shift, select the door handle
Control L link Materials. And then I'll select the ropes. I'll select one rep, press New and named the material rope. And we went to make it kind of similar to the sand material, just kinda like a
yellowy rope material. Little bit orangey,
something like that. And we can bring the
roughness up a good fit. Then we can select
this row, shift, select the top one
and press hips, press Control L and
link materials. Then our ropes or textured. And now let's texture
these fence posts. And we basically just want to use the same materials
as the locks. So we can shift, select, select a
couple of these. Select one log press
Control L link materials. Select another log,
Control L link materials, and do the same thing with
the last right there. Let's go into our rendered view and our lighthouse scene
is starting to look Nice. Let's go back into
material view. And let's make a material
for our prompt palm trees. We want it to be a little bit
different than these ones. We want the palm trees to have
kind of a unique material, so oppressed, new on one of these and then name it
something like wood. We can just name
this would change the base color to a nice
rich kind of reddish. Bring the brightness
down a good bet. And then just select
all of these. We can select these as well. Then shift select this
control L link materials. Then we went a green
material for the leaves. So I'll select one leaf, press new name this material, we change the base color
to a nice green like that. Then we can bring
the brightness down. Nice and saturated because the scenes really
stylized and playful, so they can be very saturated. Then we can select the leaves. If you want. You can add some variation by using different beef materials, but I'm just going to
keep it simple I think, and select all the leaves and give them that one material. Let's select this last leaf, press Control L, and
clink materials. Now, pretty much the
entire scene is textured. The last thing we
went to texture is our giant background. So this material will be a
little bit more complicated. We're going to use an
additional couple of nodes to get the result we want. So what I'm gonna do is press New and name this
material background. And then what I'm going to do is press Shift a to
get a color ramp. So press Shift and then click on the Search bar
and type in color ramp. And we want to plug the
color into the base color. And real quick, Let's make the roughness a
little bit higher because we want our
background to be fairly flat, something like 0.9. Then what we wanna do is
press Shift a and add in a separate XYZ in. Basically this gives us
different axis outputs. Then we want to press Control T, which is a Node
Wrangler shortcut, which gives us a mapping
and the texture coordinate. And we want to select
the image texture and press X to delete it and move the mapping
and the texture, texture coordinate over and
change the UV to vector, two objects to vector. And then plug the vector into the separate
x, y, z vector. And let's plug the y
until the color out. And as you can see, what it's doing is it's
separating the color ramps, black and white values
using the y-axis. The y-axis friends this way. And it's separating
the white and the black using the color ramp. And what we can do is change these colors to an
orange and a violet. So I'm going to
change one to kind of an orangey color like this. And I'm going to
change the black to a medium violet color. And right now, the scale is very big and
it's not really what we want. Because if we go into
the camera view, we basically only
get the violet. So first I'm going to bring
the scale up to a five, which will kind of tighten that a little bit and
maybe a little less. Let's try three. And then what we can do
is rotate this along the z-axis until it matches
up with the lighthouse. And then we can move
it a little bit. So let's move it back
a touch on the y. Let's rotate it a
little bit more. So it kind of comes from the left-hand corner
of the screen. Then the spring the
scale back to like 0.5. Oops, I mean five. So it's a little bit tight. And then in rendered view
should look pretty cool. So if we press Shift
Alt Z, as you can see, we have some nice violet
and some nice orange, but we're not done yet. Now what we wanna do is start tweaking these
values a little bit. So this file, it, I want it
to be a little bit brighter. I'm going to bring
the brightness up. And I'm also going to
rotate it a little bit and bring the scale down
a touch to three again. I think it's good and I'll
rotate it along the z. Let's go into our
material preview. Let's rotate it along
the Zillow further. I think that's pretty close. And then let's move
it back a little bit. We can kinda adjust these values also
with the color ramp. So we can bring the
oranges and a touch like this and still maintain
that scale a little bit. Rotate it back a touch. Then if we go into
rendered view, It's looking pretty nice. It's got kinda
sunset, the vibes. I think the moonlight is
a little bit too bright. So I'm going to
go out like this. I'm going to come
into my shaded view. I'm going to press
Shift Alt Z to bring my lights and
everything else back. Select this light up here. And I'm going to bring the
power down a little bit, something like 3 thousand. And then just move
it back a touch. So it's really, I want
it to be fairly subtle. And I want to add
one more light. Because if we look foreground
is very nicely lit. It's very bright and purply. And I want the background to be bright, also fairly bright. It is sunset, so we don't
want it to be too bright, but I want the background
to be more eliminated. Oh, and we forgot to text
or something actually, you forgot to
texture these locks. So real quick, Let's
just select some of these and shift select one of these and press
Control L link materials. Select these two. Select a different color
Control L materials. And I think these leaves, I want to be a little bit brighter. I think that's fine. Maybe a touch brighter. Let's go into our camera
view, rendered view. That's looking good. Those
are looking nice and bright. It seems like in fairly nice. But again, we want
to add another light to help eliminate
this background. Let's select this top light and press Shift D to
duplicate it back here. And we want to change
this to a point light. So just come over to
the light options and change it to point. And we want to give it
a nice violet color that matches this color. So I think that's pretty close. We can change the power
to something like 7500 and G to move
it up and back. And this should help begin
to eliminate the background. Okay, so we're going
to have to make it a lot more powerful, I think. So let's make it more
like 1515 thousand. And then let's press G to
move it in a little bit. You just want the satellite back here that helps illuminate
the background a little bit, make it a little
bit more bright. Spring up the radius on it too, just so it has a wider
spread over the background. Then let's just
cheat and move it. So it kinda meshes
with the scene. If we press H to hide it, we can see then Alt H to unhide it kinda helps eliminate the background
a little bit. We can tweak the color
a tiny bit more. So it matches slightly better. Then again, H Alt H, you can see it helps
eliminate that background. I think one other
thing I wanna do is make this ocean a
little bit more violet. So I'm going to bring in more
towards the violet color. Not too much. Just a little bit like this. And if I press Shift Alt Z, we can see the scene. And it's looking pretty nice. We have some nice red
values on this side, which I think we can actually make a little bit
more saturated. Nice red values over here. And we get some nice orange
values on this side. And we have some nice
purple in the background. And now another thing I
told you guys I would do is teach how to add some
particles to the scene. And to do this, let's go into our
solid view real quick. Let's select our plane. And let's press Shift
D to duplicate it, and then right-click to
set it in the same place. Now we went to press Tab
to go into edit mode. Right-click sub-divide. Choose that, come over to this sub-divide menu and change the number of cuts
to something like 50. And then we can tap
out of edit mode, come over to our balloon
modifiers over here. Add modifier. And let's choose displays. Where is it? This place, right here. And then what we can
do is press New. And let's go into this
button right here, change the type to clouds. And right now it's
way too strong. So let's change the strength
and the Modifier Tab. Lower it down to something
like 0.2 is probably good. And now we have this
displaced plane. And what we wanna do
is add a particle that will be instances on top
of this displaced plane. So let's press
Shift a to bring up the Add menu and
choose UV sphere. And then let's
press G, Z to bring it down beneath everything. Right-click and shaded smooth. Let's press New on the material. And let's name it
something like orb Forbes. Because these will
be the glowing orbs. And let's change to material preview so we
can see the material. And I'll change the emission, bring the brightness up,
change to an orange-ish color. I'll bring up the emission
strength to like a 7.5. Maybe. It's nice and fairly bright. Maybe a little bit more orange. And then I'll select
this displaced plane. Go into shaded view to
my particle system. Down here. I'll click this plus to
add a particle system and click hair than
tick advanced. Then let's come down to
Render and change and change this from
rendered as two objects. Change it from path to object. And then we went to
come down and find our particle and choose the instance object
and choose the sphere. Now, it will be all
over this plane. And we can bring up
the scale a decent bit to something like 0.2. And let's change the
scale randomness up to something like 0.75 maybe. And so now the spheres have
a little bit of randomness. And then we can
choose Add Modifier. And let's choose wireframe. Then we want to bring
the thickness to 0. Now, all these orbs
look like they're floating and they'll look pretty cool in the
rendered view. Now, one problem we do have is their instance on
top of the lighthouse. So some of them might
peek through and stuff. And it seems like
we're good for now. But it's a good
habit to learn how to instance on top of specific
set of vertex points. The way we can do
this is come down to our object data properties. Press Tab to go into edit mode. And then we can press one
to go into vertex mode. And box select these
vertices in the middle. And then we can choose,
select, invert. And then under vertex groups, click this little plus. And we can name this
something like particles. And click Assign. And then if we deselect this particle vertex
group, they'll de-select. And then if we select
them, they'll select. Let's press Tab to
come out of edit mode. Let's come to the
particle system. And under vertex groups, Let's change the
density two particles, Let's change the length to particles that clumped to particles and that
kink two particles. Now the particles
will only instance on these vertices and not
the ones where lighthouses. If we had a ton of particles, they wouldn't be all
over our lighthouse. And then we can come to the modifier and up
the strength maybe. Actually I think the
strength is fairly good. One thing we can
do is press cheesy to bring it up a little bit. Some more particles
are above the ground. Let's go into camera view. And let's go into rendered view. And I think they're a
little bit too bright. So I'll change their material. I'll select first asked
to find the particle. Select the particle, and let's change the
material of that. So can I have a lot less
saturated and less powerful? So maybe at 2.5, maybe three. And the emission is good, but it looks a little bit flat. So one way we can make
the emission look a little bit less flat is by adding in a colorRamp
suppress ship. They type in color ramp. Let's click there to set it. Press Shift day, add
in a layer weight. Then you want to plug that
for now and to the factor and the color into the emission. And you want to change one of these values to more
of it, deep orange. And then one of these values
to more of a lighter orange. And basically, if we
zoom in on a particle, we can kinda see
what it's doing. And it's making the inside the lighter color and the
outside of the darker color. It's kinda hard to see, but it makes our admission a
little bit more dynamic. One way we can view this
a little bit better is by increasing the effect. So making this a darker color, like this will be
more noticeable. And I think that's fairly good. Now let's go back
in the camera view. Then what we wanna do is adjust some of our
particle settings. So let's change the seed. That we get some more
foreground particles like this. I think that's
looking pretty good. And let's change the
number to maybe 2500. That's too many. Let's do maybe 1500. That's looking a
little bit better. I think 1250 might
be the sweet spot. And now we have these
nice little glowing orbs plus also change the
strength of them. There. Let's select
that particle and change the strength so they're a little
bit more strong. So maybe a 7.5. Because we do want some
reflections off of the purple to help light the
scene a little bit more. And I think that's
looking pretty good. And then the last
thing before I go over render settings is I want
to select my camera, come down to the camera settings and enable depth of field. Then I went to change
the f-stop and lower it. And I want to change
the focus object to the cylinder which
is our lighthouse. And basically depth of
field will make whatever is close to the
lighthouse clear and whatsoever far away, blurry. And so if we go into solid, if you click this little arrow
and enable depth of field, we can see the effect. So if we lower the f-stop
to something like 0.05, you can see the background
is starting to get blurry. And if we go even lower, 0.01, pretty much everything's getting
really blurred out. So we don't want
it this extreme. We want something
like 0.03 where the the front of
the scene is just beginning to get blurry in the back of the scene as
getting a little blurry. I think this is still a
little bit too extreme, so I'll go to 0.04 and
see how that's looking. And then I will go
into rendered view. And as you can see, we
have these nice particles and some nice depth of field. And I think the particles
are a little bit too light. So I'm going to change
their color again. I'll make the one color a
little bit darker, orangey. And I'll do the same
with the other. One will be basically
completely orange. Maybe a tiny bit less
extreme than this. This is looking fairly good.
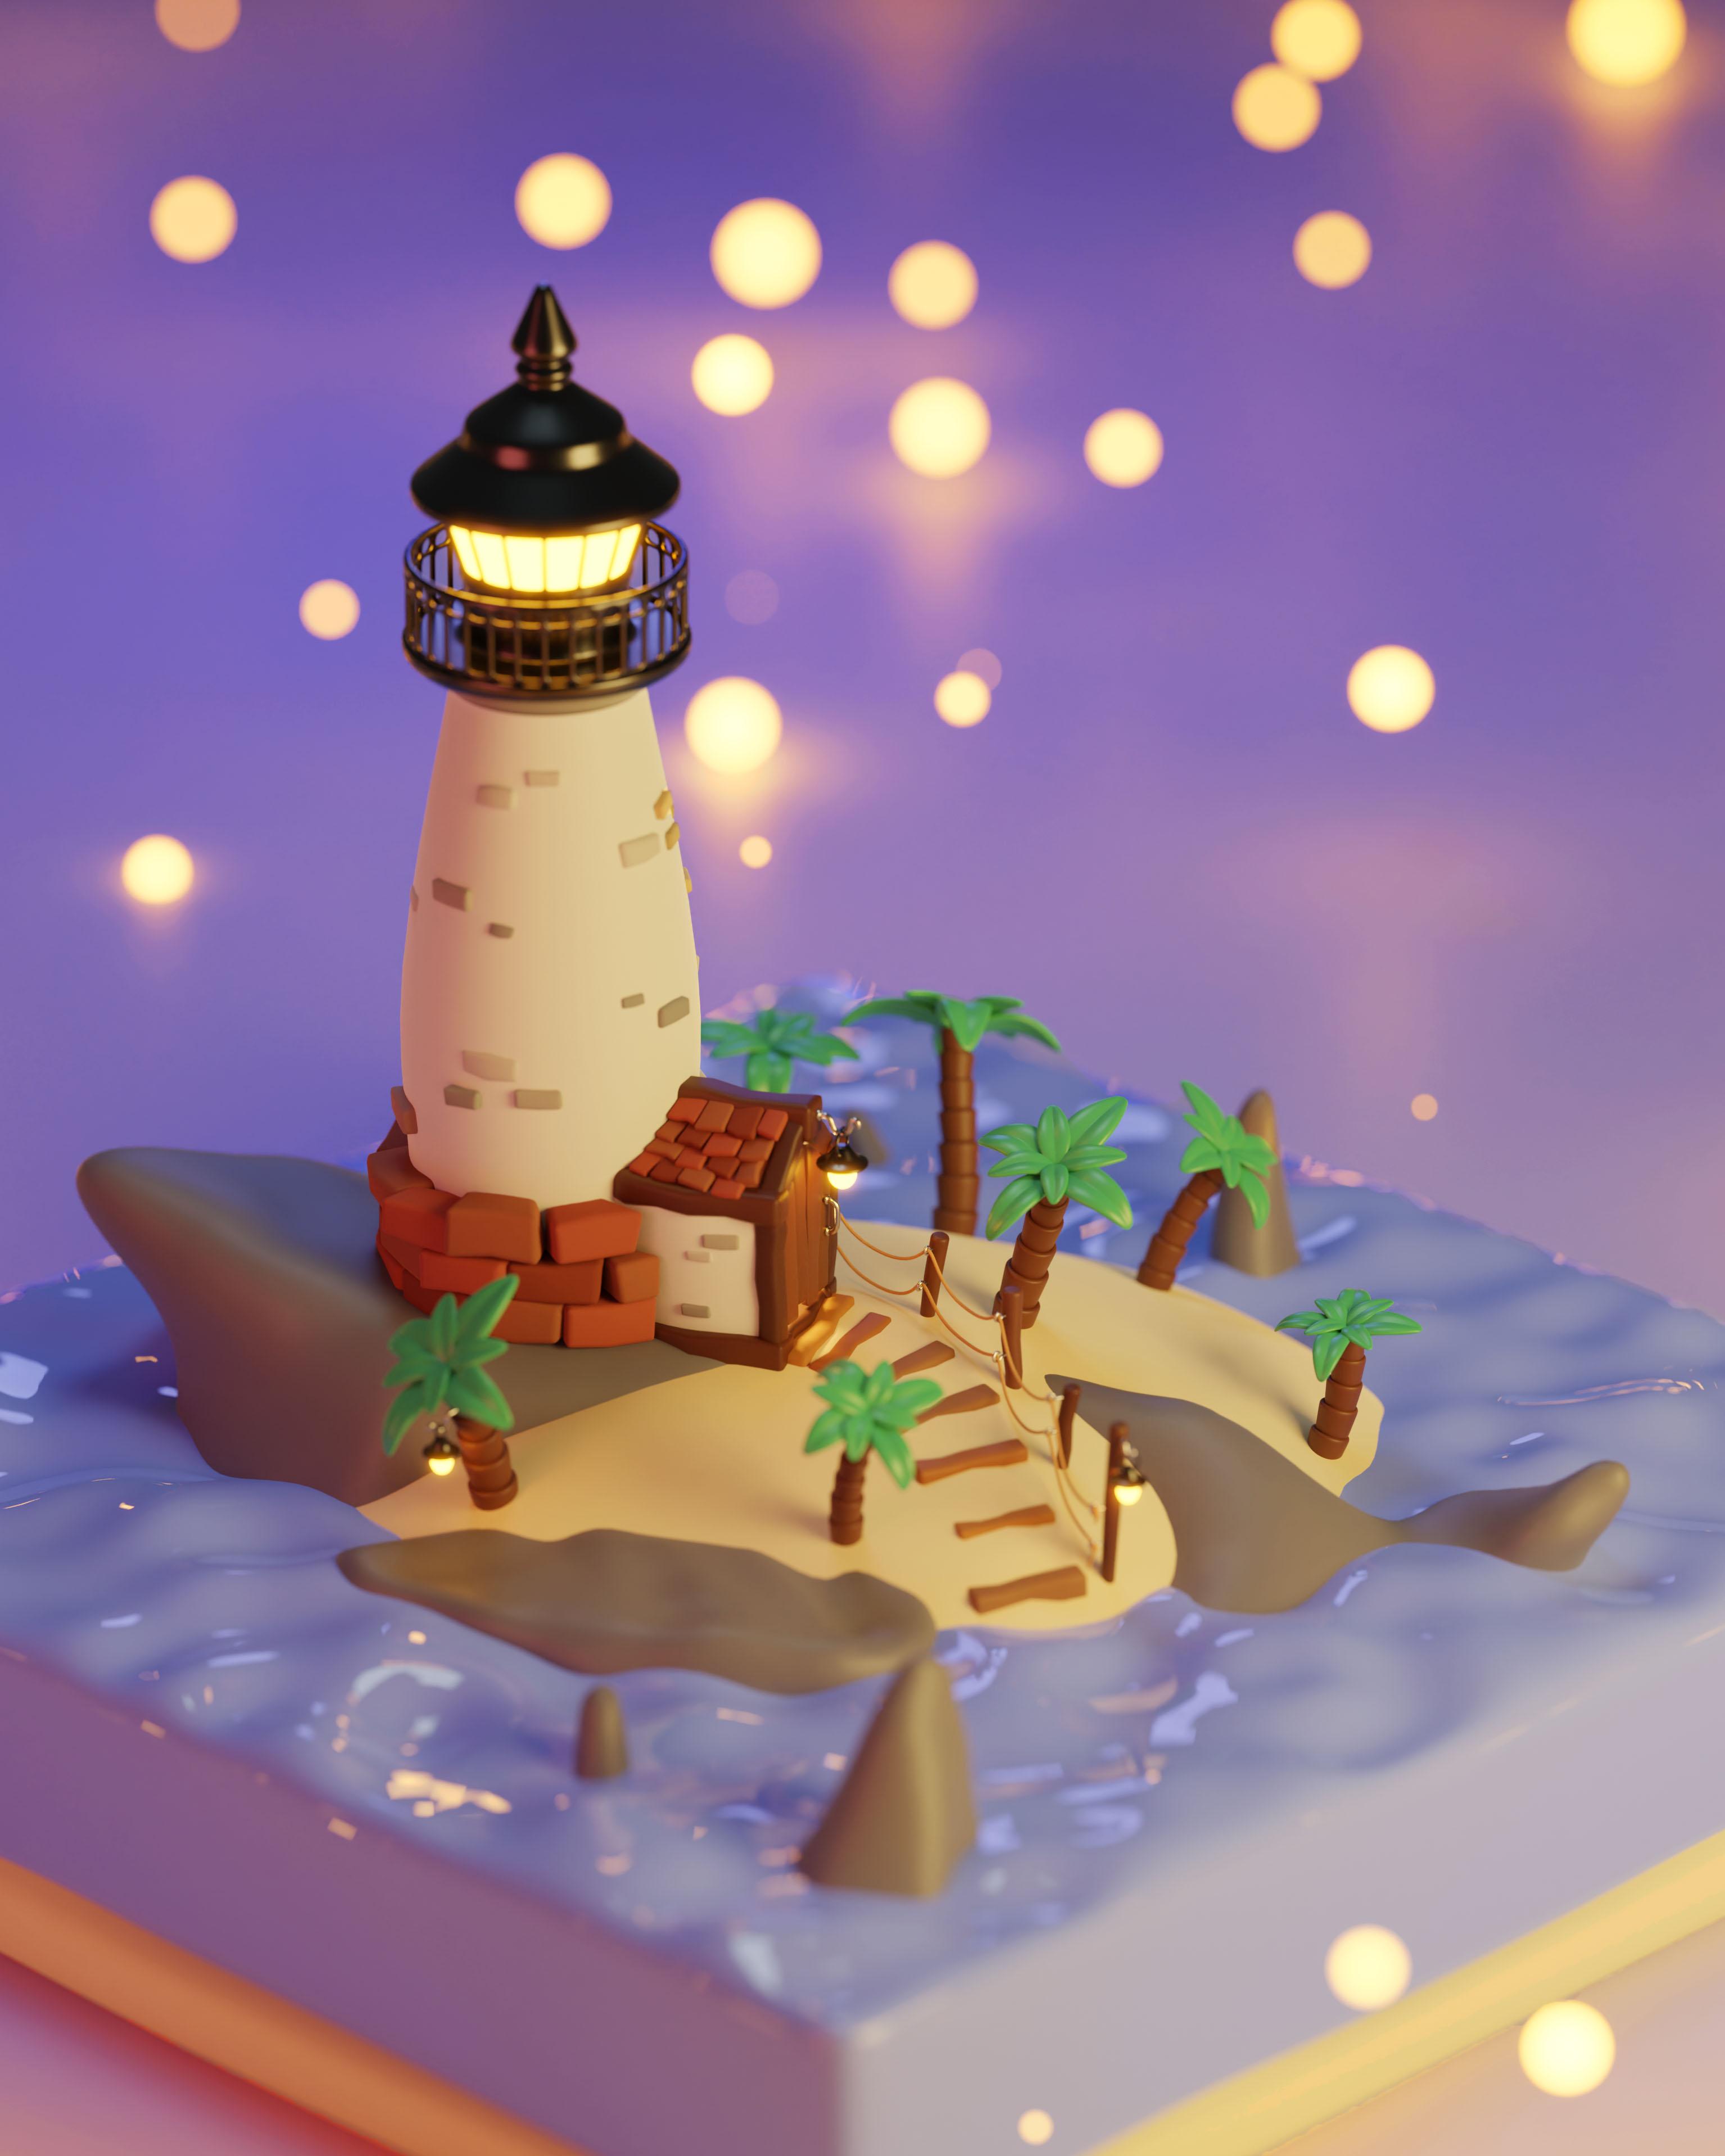
4. Rendering: And now it's time to render
out the final image. And to do this, we
went to come to our render settings and
tweak some of these. So by default, Blender sets the max render
samples way too high. It sets it to 4,096. And you almost never need to use more than
a thousand samples. I'm going to change
this to something like change this to
something like 500. And then I'll come to
my output settings. And I'm going to change the percentage to
something like 200. And this will just make the
image more high-quality. So it's going to multiply
these resolutions by two. And this is up to
personal preference. If your computer is
a little bit slower, you may want to keep it
at 100 or even lower it, lower it further to
something like 50 per cent, but 200s fine for me. And that's basically it
for Render Settings. Now, the next thing
I'm gonna do is again, I'm going to change my
part particle color. I think I'm going to make it
a higher strength, maybe 15. I do want these to
be fairly bright. Go back into rendered view.
That's looking better. I think 15, a good bit brighter. So first, I want to
brighten these values up, I think to a 30, maybe,
maybe a little less. Twenties, probably 25. Now that we have everything
set up the way we want and all the
render settings setup. We can render the final image. So I'm going to head into
the compositing tab. And you just want to
make sure that you have used nodes ticked. And you should get this
render layers box. In this composite box, you just want to click this
little button right here. And this will render
the active site. Okay? And now once you've rendered out your final image real quick, you can click this X and jump
into the compositing tag. Now the first thing that we
wanna do this ad in a viewer, notice that we can actually
see what we're editing. Suppress shift day, press
Search and type in fewer. Left-click there. And then just plug the image into the image. And then hold shift and
right-click and drag between these two nodes to
connect them like that, which just makes it easier to
add nodes in-between them. Now, what we can do to make
it so that our image is easier to see this come over
to view and choose Fit. Now we can see our image. And then the first
thing I want to add is a glow to the orbs. So press Shift a to bring up the Add menu and type in glare. And then left-click right here. In this **** add in a glare. Now this is not the
glare we went to add. We want to change
this to fog glow. Now we have some
glow in the image and we want to lower this to something like six, maybe seven. Depending on the look
that you're going for. I think six looks better. But what this does is
it adds a little bit of glow to the entire image. So without the glow, and then with the globe, it just makes the lights
pop a little bit better. And now what we want to add is a little bit of
color correction. So let's move our affects over a little bit
and press Shift a and type in a color palettes and
add that in right here. And this is where we can adjust some art, some of our hues. So basically what we wanna do
is just shift these colors that touch towards
the blues, maybe. Then shift the
highlights more towards the oranges and the shadows. We can basically just
leave in the middle. So the next node we want to
add is a brightness contrast. So let's press Shift day and
type in brightness contrast. And just add some
contrast to the image. So maybe something like two. And that just adds a
little bit more contrast between the colors too, might be a little
bit much. So 1.5. Then if we press M to mute it, that's without the contrast. That's with a little
bit of contrast. You want to be very
subtle with these because it's really
easy to overdo this. And now we can see
the before and after by selecting all of these nodes and pressing
N. So as you can see, it's much more grayed
out and less saturated. Now it's much more bright. Now we can press F2 to
re-render our image. And once this has
finished rendering or compositing nodes will
be applied to it. So all those color
corrections we did will be applied
to the final image. Okay, and as you can see, our final image is rendered out. If you want to make
any adjustments and re-render it, feel free to. This is just what I
think looks good. Then once you have this image, you can press Image, Save As, and then save your image and the
destination you want. Anyways, congrats on
completing this project, and congrats on modeling
the entire lighthouse. That was a lot of work. But I hope you guys
are happy with the result and I'll see
you in the next course. Make sure to follow me. So you get notified when
I release future courses.
 Surface Designs