Transcripts
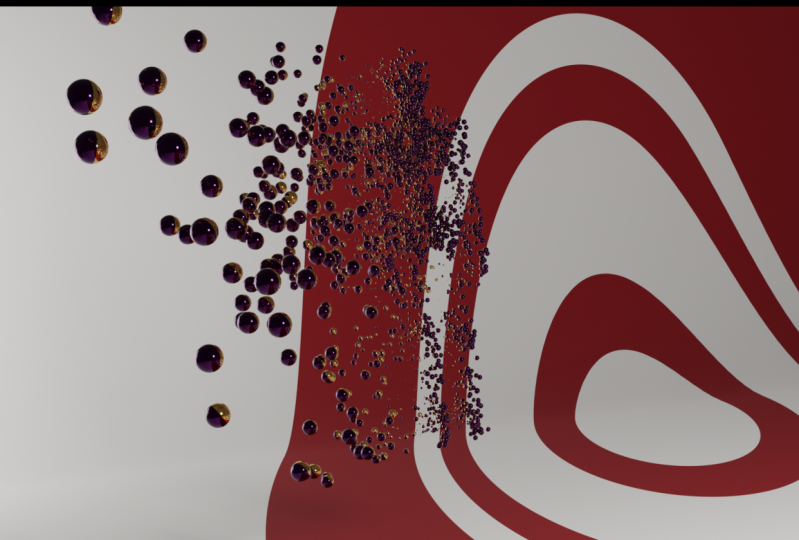
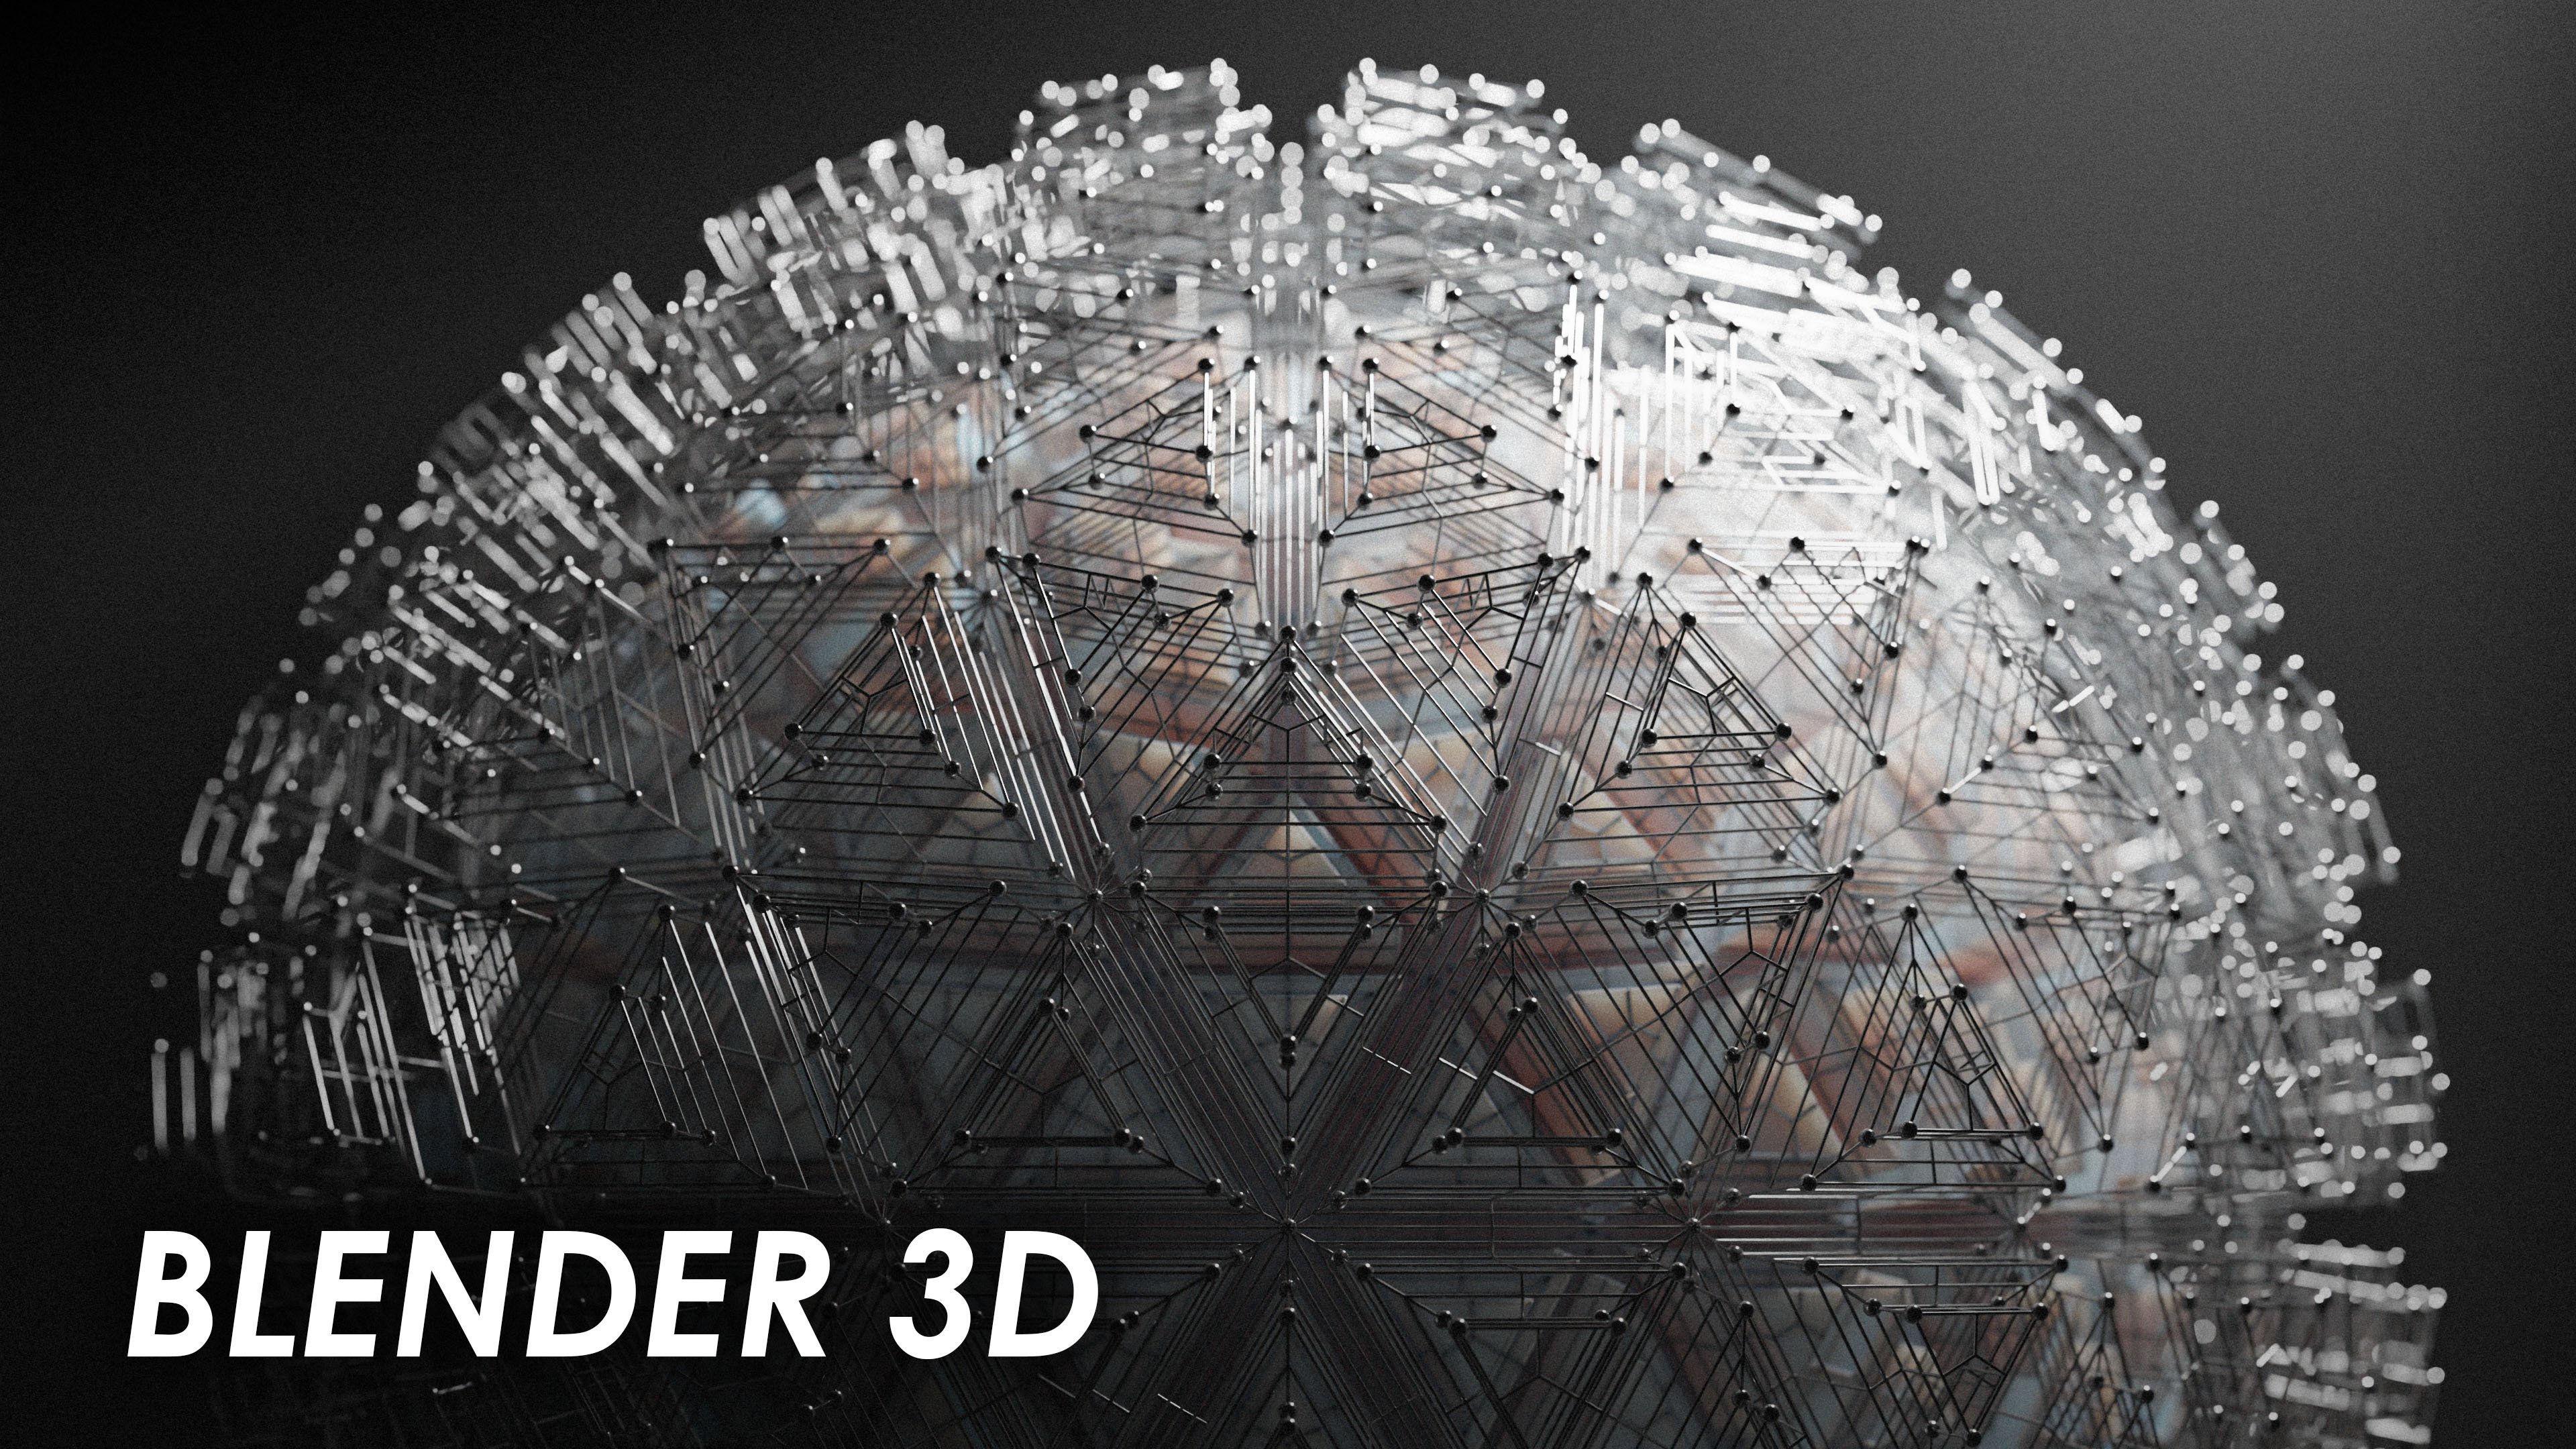
1. Intro : Hey guys, welcome to
my blender class. In this course, I will walk
you through how to create this interesting
abstract animation using geometry nodes
inside of Blender. The things that we'll
cover in this course, are Geometry notes, shading, lighting the scene, and my final render settings for
exporting the animation. Because geometry
nodes are procedural, every aspect of
the animation can be tweaked and fine-tuned
to what you want. This animation can also be
used on any object or mesh. I will be using a
humanoid figure that I sculpted and rigged. But you can use a basic
blender object such as a sphere or a cube if you
don't have a human figure. It is important to note that this course is not intended
for complete beginners. You must have a basic
understanding of the Blender interface
to complete the project. If you're interested
in Geometry notes, animation, and
procedural shading. This course is for you. Without further ado, let's get into creating this project.
2. File Settings: Alright, so I currently have
blender three-point to open, but you can also create
this animation in Blender 3.1 or 3 if you have
them installed. I'm not completely sure if this animation works in
earlier versions of Blender. If you do have an
earlier version than 3, you may have to change some
notes to get the same result. So this is the model I'll be using for this
project in Blender, I sculpted and rigged it
specifically for this project. You can also model something
if you know how to. You can just add in a cube and make some
crazy shape with it. And use that for the animation. Or if you're really
new to Blender, you can just set up to add mesh and then pick
something from here, like the UV sphere. The animation clip
looks super cool. And this also down here, you can see the keyboard
shortcuts I'm using, which can be helpful
if you get lost. You can just rewind and then see what I'm using right here. And there's a couple of settings I want to
change right off the bat here in my blender file. And I want to add a add-on. So I'm going to head up to Edit Preferences and then go
to my add-ons section. And then you just
want to type in node appear in the search bar. And then the Node
Wrangler will pop up. In this add-on allows us to have a couple of keyboard shortcuts, a few extra ones that
just make it faster to work with nodes in our shading tab and our
Geometry notes tab. The next thing that I want to
change is my render engine. Actually it's set to
cycles right now. But by default, Blender
has the set to EV. And you just want to
make sure that you change this to cycles, then change your
device to GPU compute. The next thing I want to
change is my max sample count. By default, Blender usually sets this to like a
crazy high number, I think 4 thousand and
blender through point O. That's really, really
overkill for this scene. And it will make a rendering, especially in
animation, a real pain. So you just want to
lower this to something like 200 worked
really well for me. You can go higher
if you went to, and if your PC is like
super fast, but 200s fine. If you're having trouble
with render times. You can also lower this
a little bit further down to something like
a 100, maybe more 50. Then you went to
enable denoising. The next setting you want to
change is under light paths. By default, Blender sets
this to 12, I believe. And I just like to lower this
a little bit down to six. This is another setting
that you can tweak. If you're having trouble
with render times, you can lower this even further. So those are the main
default settings that we want to change. Also under color management, this is something that's more
up to personal preference. But I like the high contrast
look inside my scenes. And so I just come down
to color management, go over to look. And then I like
to change this to high contrast for
most of my seat. And I believe it looks good in the finished
result of this scene.
3. Creating The Scene: Okay, Now that we're done
tweaking our settings, we can move on to actually
creating our scene. The first thing we need
in a scene is a camera, because you can't
have a render or an animation without a camera. So I'm going to press Shift
a to bring up the Add menu. And I'm going to find the
camera right down here. Click that. And by default it's set to
some weird rotation like this. So to fix that, I'm
just going to press Alt R to remove the rotation. And then I'm going to
press our y and then 90 to rotate it 90
degrees along the y-axis. And then I'm just
going to bring it down here along the x-axis, so it's pointed
at our character. Then let's see how
our view is looking. Okay, so right now
where rotated sideways. And to fix this, we can just press R and then 90 to rotate it 90
degrees along the x-axis. And we're still a little bit
too close to our character. So I'm going to press
G and then X to move it along the x-axis and just bring that
out a little bit. Then maybe GZ to bring
it down a touch. And then she acts again to bring it out a little bit further. I'm liking that composition. And then now we need an actual background
behind our character. Because right now there's, there's nothing,
there's emptiness. What I'm going to do is I'm
going to add in a plane, I'm going to press Shift a
and then add in a plane. And I'm going to
bring that down here. I'm going to do g, then c to move it along the z-axis and bring it right down to our
character's feet. Somewhere around here. If you're using like a
sphere or something, you may just want to
have the sphere float or you can actually have
it like rest on the plane. Like how I'm going to have my character be positioned
relative to it. Then our plan is
way, way too small. So we're going to do
S then x to scale it. Oops, not that. Just S to scale it and bring
it really big like this. That's probably good. Then we still don't have a
wall behind our character. We have this floor,
but we need a wall. So I'm going to press Tab
to go into edit mode, to, to go into edge mode and
extrude this along the z-axis, extrude this edge, and
bring that up high. And then I'm going to
select the edge right here. Because we don't want this
really sharp edge right here. That's going to look
weird in our render. So I'm going to
press Control B to bevel that edge and just bring
it really big like this, or really small depending
on what you want. I think really big
could look cool. I'm going to bring
it like that and I'm just going to scroll up with my mouse wheel to bring
up more segments like this. You can adjust the amount of segments and bring that
really high so it's smooth. Something like this. Maybe I'm liking the
way that's looking. And then tab back
out and I'm just going to right-click
and then shade smooth. And we have this
curved background that might look pretty cool. And our render, right now we don't have any
lights in the scene, so it's going to look
pitch black right here. There's not going
to be much there, but we'll get there eventually.
4. Adding Geometry Nodes and Animating : Okay, so now that we have our background created
and our cameras set up, we can move on to the
main part of this course, which is working
with geometry nodes. My favorite part. Basically what we're gonna
be doing is replacing our model's geometry
with a bunch of little spheres that are
going to vary in scale. They're not all going to
be one uniform scale. We're going to have
some really small ones and some big ones. And that's gonna give
us a much cooler look. And this will give us
that abstract effect, especially when we animate
it eventually to loop. So what I want you to do is
left-click on your model. Then come over down
here to the bottom left of the screen where
you get these crosshairs. And then left-click
and drag that out. And this is going to be our
geometry nodes workspace. And so bring it out to
something like here. Come up here to the top left, where there's this
Editor Type and change this to geometry Node Editor. Right now, this little
sidebar is way too big, so just left-click
and drag that out. Then. Press new. Make sure your model is
selected when you press new or else it'll put it on
something you don't want. You don't want your plane
selected or else it'll, the geometry nodes
will be on the plane. And then you want to come
down here to your nodes. And we're going to add in a
distribute points on faces, suppressed shift day, and then
come up to the search bar and type in this tribute
points on faces right here. We're going to left-click
that right here. And as you can see, what
that's doing is creating a bunch of little points
all across our model. These points are what? All those little
spheres are going to be instance on top of. Left-click and drag
your group outfit out a little bit and then press Shift a to add an
instance on points. This is going to
allow us to instance geometry on top of every single one of
those little points. But we have no geometry. That instance is
empty right now. So press Shift day and come
down to Mesh Primitives and left-click on the UV
sphere will be using that for this tutorial.
I'll be using this. You could use a different mesh if you wanted to like a
cylinder or something. But for this aesthetic, I'm going with a UV sphere. And I'm going to plug
that into the instance. And they're all crazy
vague right now, but we'll fix that
in a little bit. First thing I want to do is right now they're
not shaded smooth. And you actually can't shade
these smooth in layout view, you have to come over to
geometry nodes and add in a set Shade Smooth. And then as you can
see, all these fears are now shaded smooth. Okay, so now that we have the basis of our
node tree setup, we can move on to editing
some of the nodes. So the first thing that
I wanna do is increase the density of the
points on our model. So I'm gonna come over to the distribute
points on faces and increase this density
from ten to about 120. It still looks
super weird because the scale is way too
high on these instances. To fix that, we can, first of all, bring
the scale down. But this uniformly changes the scale of all of the spheres. We want some of
the spheres to be big and some to be small. And to get this effect, I'm going to add in
a random value node. So I'm going to press Shift
day and type in random value. This node gives us a minimum
and the maximum for scale. So plug this into the scale. I like to set the minimum
to something around 0.01. I think looks fine. Then the maximum is what
we want to animate. We want this to be
animated and our final at the end of the project. So what I'm going to do is
add an eight color ramps. So I'm going to press Shift day, search for color and then
click the color ramp. And this will allow us to
crunch the values and make it so that more of the
spheres are small than large. Then I'm going to add
in a noise texture, which will be the factor of what the animation
will be along. It will follow the path
of the noise texture. So plug the factor of the noise texture
into the factor of the colorRamp right here. And then plug the color of the color ramp into
the max value. Of the random value right there. Alright, it's doing
something kind of weird. In what we want to do is we want to bring
this black value in to something around here. I believe. I think
this looks good because now we have a bunch
of really small spheres, some medium spheres and
some really big spheres, but there's much less
really big spheres. So this will give
us that abstract look when we animate it. Then another thing I want to change is on
the noise texture. I want to bring up the
distortion to around four. Maybe. I want to change
it from 3D to 4D. The distortion will
make the balls scale in a more interesting way. And the W is what will change their scale
when we animate it. So by default the W is 0. But if you look at my model while I slide this to the right, it really doesn't take too much. You can see that are the balls and the CN
are starting to scale. Really interestingly. Then set this back to 0. Okay, So what we
wanna do next is add in a translate
instances node. So what I'm gonna do is
come up here and press Shift day to get
the Add menu and type in trans
translate instances. And I'm going to take
this node and drop it between the instance on points in the group output right here. In what this node
does is it will move our balls on an axis. So if I start sliding
this x value up, you can see the balls start
moving forward and backwards. If I start sliding the y-value, move left and right. If I slide the z value,
they'll move up and down. And this will be the main
aspect of our animation. So let's actually start
adding in some keyframes. Okay, so now before we
start actually animating, we want to make sure that our default interpolation
of the animation is set to Bezier had up
to Edit Preferences. And then under Animation, going to make sure
that this default interpolation is on Bezier. Next, what we want to do is hover over our
translate instances. The Press, I set a
keyframe right there. And let's select our model so we can end the instances node, so we can see the
keyframes down here. Then I want to bring my
timeline over to frame 125. And because I'm doing it on
the y-axis, I'm translating. On the y-axis. I'm going to type
in negative 20. And the spheres are going to move over to
the left like that. If you want to do
like up and down, have the spheres
move vertically. You can change the z-axis. And if you want them to move forward and backward
towards the camera, you can change the x-axis, by the way, changing
the y-axis looks. And then I'm gonna hit I again to set a
keyframe right there. Then I'm going to
bring my cursor all the way over to frame 250. And I'll select my
beginning frames and press Shift D
to duplicate them. And I'm going to bring
them over to frame to 50. That way our animation
will loop if we have the same frames at
the beginning and at the end. So now if I play this, you can see the spheres, me about like that. And then we'll move
back like that. That's the main aspect
of our animation. The next thing that we want
to change is the rotation. Right now. They're just moving horizontally, back-and-forth. And we want them
to move a little bit more swirly and
more interestingly. So first I'm going to move
my scale nodes over here. And then move these nodes up a little bit. So I
have some more room. I'm going to press
Shift a and I'm going to add in a random value node. I'm just going to plug
this into the rotation. And I'm actually going to
bring my timeline back to frame 0 right here. And I believe the way blender works to get a truly
random rotational value, you have to set your minimum
value higher than pi. So since pi is 3.14, I'm going to change this to 3.5. Since that's higher, then I'm going to send my max
to something like ten. And I'll set a
keyframe right here. So I'm going to press
it over the men. And I'm going to press i i
over the max right there. And then I'm going
to bring my timeline over to something
like frame 150. I don't want it to be on frame 125 where the translation stops. Because if I have the warbling stop at the
same frame right there, it'll look like the
whole animation stops Efraim one-to-five. I'm going to offset this
a little bit and press I on the minimum value.
The maximum value. And then, oops, actually I
forgot to change the values. I'm going to set the
minimum value to seven, and I'm going to set the
maximum value to 15. And I'm going to
press I and then I. So we have a
keyframe right here. Then I'm going to come
over to the end and I'm going to duplicate
the first keyframe, like how I did with a
translation that so I'm going to press select
the first keyframe, press shift D, and move
it over to frame to 50. So that this will loop as well. Then if we bring
our timeline over, you can see the walls are doing some crazy stuff right there. Then the final thing
we want to animate is our noise texture that the
spheres change in scale. So at the beginning
of the animation, I'm going to hit I on the WWE, makes sure your
timeline is back at 0. And then I'm going to move my timeline over to
maybe frame 140. So again, I'm
offsetting it from both of my other keyframes
in the animation. I don't want it to be
on the same frame as my Translate instances
or as my rotation. I'm going to change the w to something really low, like 0.05. It really doesn't take much movement in the w to
have a drastic effect. I'm going to hit I again over
the w to set a keyframe. And I'm going to
bring my timeline all the way back to 250. Select my first keyframe
like I've been doing, and duplicate it
over to frame 250. And now we should have a
pretty cool animation. If we come over to camera view. By hitting that
little camera icon, zoom in, we can
see the animation. So let's play that real quick. Alright, looking pretty cool. Now that's the main
aspect of our animation. We are officially done
with the geometry notes. So now that we're done
with Geometry notes, Let's close this window since we don't need the
geometry node editor anymore. So I'm just going to hover
till I see that little cross here at the bottom
left and then bring it over to the left like that. And now we have our
layout view again. And to animate this plane like I did in the original file. What I'm going to do is I'm
going to set an eye frame 0, make sure your buyer
frame 0, I for location. Then I'm going to drag the
timeline to the frame where the translation notes in the Geometry Editor stop
right up frame one-to-five. This one we stopped
the animation. We can see the balls come
all the way down here. And so I'm going to move my plane down below
those spheres, done to someplace like this, maybe, maybe a
little lower here. And I'm going to
press I for location. Then I'm going to move my
timeline over to frame to 50 and duplicate these keys again all the way
over to frame to 50. And now the plane should
animate along with the spheres. So if I play this animation, the plane moves down. So it looks like the
character is hovering. And then our animation rotates back and it
loops perfectly. Now that is it for animation. And we can start moving on to lighting and
texturing the scene.
5. Lighting The Scene: Okay. Now for lighting the scene, I like to keep things
pretty simple. I'm just going to add in to area lights and have
one mainly be focused on illuminating our character and one be focused on
illuminating the background. We can tweak the
lighting if you want. You could add a
third area light. If you want to add a
fill light or something, or a hair light up here. So first I'm just going to press Shift day to get a
light down here. And I'm going to
choose area light. And then I'm going to move this over to someplace like here, and then just rotate
it. The character. I'm going to move
it on every axis, except the z-axis part, pressing G, Shift Z. And then I'm going to move it so it's pointed at the character. I'm going to scale it up a
little bit by hitting S. And then I'm going to increase
the power of this light to something like 1 thousand. We'll see how that looks. Okay, so that's way, way too then we're going to
bring this up to something like 5 thousand quick. Then. That is looking
a little bit better. Let's scale it up again. That the lights a little
bit more diffused. Then maybe bring up this power again to something
like 6 thousand. Then let's Shift D to
duplicate this slide. I'm going to press
Shift Z so it doesn't move it along the z-axis, someplace like over here, and press RZ to rotate
it along the z-axis. So it's more pointed like that. G x and then g of y. And this guy is gonna be more
focused on the background. If we go into our camera view, this is what we're
looking at right now. So pretty simple light and set up the light in the background
and the foreground light. I'm going to actually move
this background light a little bit more and get the
lady and the way I like, alright, I'm like no
lighting like this. We get a little bit of shadow. This side of the spheres and our background
is eliminated. Again, we can fine-tune
this when we move into texturing because it's
really hard to adjust your lighting when you don't have any texts for some objects. But this is looking pretty good, so I'll keep it
like this for now.
6. Texturing: Okay, so now that we
have our lighting setup, the final step of the process
will be shading our models. Right now. As you can see, they have no materials on them, but we will change
that rate now. First, I want you to
select the model you're using for the animation
and then go into shading. And what we wanna
do is press New on the shader editor and rename this material to
something like instance. The way I created this material was used to color ramp and a
separate XYZ node. So first we'll press
Shift a to add an color. And we want to plug that
color into the base color. And we want to add a
separate XYZ node. Now, right now, this material is actually not being applied
to the spheres correctly. We actually have to go
into Geometry notes and add a node to change
their material. First, let's do the mapping
on the separate XYZ. So press Control T. This is where the Node
Wrangler comes in handy. Is it gives you that
control T shortcut to add a mapping in a
texture coordinate, distillate the image
texture, or pressing X, and then move these close
and plug the vector into the vector and the
object until the vector. Now we have this
instance material, which we will add
more things onto, but I'll just keep it
at this face right now and add it to the geometry. Let's head up to geometry nodes. Click there. And then let's move our group output
out a little bit and press Shift a to get
the Add menu and then search upset material. And this will allow us
to give the instances of material and then click this little material button
and choose instance. So now that material is being applied to our spheres, as
you can see right here. So first of all, we don't want black
and white base color. So we'll change that to get the effect of therapy in
a really like a line, a hard edge right there. You have to crunch these values. Then let's change
the base color. So what I like to do is crunch these values to get that
harsh line right there. Like you see there. Something
like 0.05 works fine. And then we went to
change these colors to a red and gold. And the gold will
be the metallic, and the red will be the last, like you saw in the
original animation. So first operating this
brightness way up, then I'll choose some reddish
gold material like this. And right now
there's no metallic, so it looks a little bit weird, but we'll fix that soon enough. Now, I want you to press Shift D on the color ramp and
bring this one down here. Let's actually move this
coloring up a little bit. And we want this guy to be
plugged into the metallic. So first, we might have to switch these values
around inside the colorRamp. But first, I want you to change this red to a black value to just bring this
all the way down. Because metallic,
these other nodes, such as metallic roughness
and transmission, which are what we're
gonna be using. All of these use Alpha values, which are blacks and whites.
To get the best result. You want to use a black
value and a white value. And then plug that same
separate XYZ to the factor of this color ramp can plug
the color into the metallic. And so I see there
the wrong way around. If you want the gold
to be metallic. Also, I forgot to
change this to red. So I'm going to bring this to a red value real quick,
something like that. So first let's press
Flip color ramp, and they're all
the way over here. But we can move this white value in and move this black value in life and set this
black guy that 0.05. And as you can see now, the red value is not metallic and the gold
value is metallic. That's a little bit
dark and saturated, so we can adjust that
color a little bit here. Let me make that a little
less saturated like this. We can do some fine
tuning in a little bit. But let's get the
main colors down. So now I want you to duplicate
the same color ramp. This next colorRamp will
adjust the roughness. So let's move these
ramps up a little bit. And there's this ramp up and
plug it into the roughness. And then we went to plug the z into the factor like we did with these
other color ramps. Actually, this is what we want, but we don't want our metal
to be completely flat. We don't want it to
be completely white. So click on that white value. We just want to bring this
down to like a mid gray. So as you can see that
metallic is getting reflected again, something like this. I think it looks
nice right there. But you can see the pink
is perfectly reflected, which is what we
went in the glass. Now let's duplicate this
upper node one more time. So press Shift D and
then bring it down. Oops, I connected it to a node. That's not what we
want to shift D, bring it down right below
the other three color ramps, and plug the z of the
separate XYZ into the factor, and then plug that color
into the transmission. And so right now, I believe it is trying to make the gold transmissive and the other material
not transmissive. And so we want to change that
by flipping the color ramp, bringing that black value and then crunching
and not white value. As you can see, it's
turning into glass, which is what we would set
that white value to 0.05, like we did with the
other color ramps. And now we're getting
there for sure. We've got the glass
and the gold. Let's set into camera view
to see how that's looking. And that's looking very cool. Alright, I do want the glass to be a little
bit less saturated, I think a little
bit more of a pink. So I'm going to bring
that more towards the pinks and make it a
little bit less saturated. Maybe something like this. Then this gold, I want it to be a little bit more saturated. Actually, I'm going to bring it more into the orange values. We're starting to
get something that looks, Looks pretty cool. This is where it really just comes down to
personal preference. You could make this a blue
back and look pretty cool. Or you could make it like
a purple or something. It all comes down
to what you like, what she went this
model to look like. So I'm just going
to keep like this. I think it looks fairly nice. Then. Now let's add a material
for the background. So I'm going to change the viewport shading and I'm
going to select the ball. So right now I have all the little guidelines
and stuff turned off. So I'm going to press Shift
Alt Z to bring this back. Select my wall if
they ever disappear, it's because they're
pressed Shift Alt C, which makes them disappear. So you can toggle between no guides or guides by
pressing Shift Alt Z. I want guys right now, so I
know what I'm clicking on. And then press New
and let's name this material back
ground like that. And for this material, I'm thinking of actually
using a gradient. We could use the
separate XYZ and create the gradient
along the z-axis. Or we could use a
gradient texture. This is up to
personal preference. This is where you get to do some testing and
see what you like. I'm going to add
in the color ramp. Can plug this into
the base color. And then I'm going to add
in a gradient texture. I'm going to plug the
factor and the factor. And let's do a Control T. We have some mapping. I'll click the object into the vector. And actually, I think the scale is a
little bit off for that. So let's select all
these scaled values and bring them down to
something like 0.3. Then let's move it
along the x-axis. We have something like this. Spring that scale down
a little bit further. It's like 0.20.25
is probably good. Bring it forward a little bit. Again, this is just
testing what you like. And then I believe I went to
the top value to be white. So I'm going to change
this black value to white. I'm going to change
this white value. It's maybe a pink or a red. Right now it's
really hard to see, but if I bring that color
and value and a little bit, you can start to see it more. Think we have the scale
a little bit too high. I actually, I'm going
to bring this back to 0.35 and then move it
forward a little bit. Then I'll bring this
to a brighter color, kind of a Reddy pink. So actually probably can't
really see it right now. So we're going to have
to move this gradient forward until we do see it
like right about there. We got to bring the scale
up also to like 0.5. So we get some of
that white back in. Let's look at the rendered view. That's looking kind of cool. It's simple, but it's
an effective design. I'm going to bring that
pink in a little bit. I'm going to move that
pink a little bit forward. I think there's something
like there. I'm liking that. And if that pink back actually bring it a
little forward again, bring up that scale to 0.6. Again, this is just adjusting. If you looked at that 0.5,
feel free to keep it at that. I am just going to keep working until I get something
that I like. I think 0.75. It's actually bring that skill back
down a little bit. 0.5. That's looking pretty good. Again, move it
forward a tiny bit. I'll bring this color a
little less saturated. So it's a slightly less
pronounced effect. I think. There we go, and I'll move it a
little bit forward. Bring that scale a
little bit further down. Again, I'm kinda
going back and forth until I get something
that I like. I'm starting to like this. I think I'll switch back over to my model and start
doing some adjusting. So we're going to
press Shift Alt Z so I can select my model again. I'll go back in the camera view, go into my render, and press Shift Alt Z so that nothing is in the way
I can see it clearly. Now, I do want to bring
down this red a little bit. I think everything's looking
a little bit reddish. So I'm going to bring
this orange more to a yellow value and a little
bit less desaturated. Because what's happening
is the light is reflecting around and it's turning the metal a little
bit further read. So to counterbalance that, I'm just making the metal
slightly more yellow. I'll select this red
and I'll bring it more towards a bluey color. Actually do like
that a little bit. It's a little bit
too much. I think. I'll bring it back to
the pink right here. And it's looking pretty good. I'm liking that a lot. In there. You have it. There's the scene
textured and lit up. It's looking pretty cool.
7. Exporting The Animation: Okay, so now that we've finished pretty much every
aspect of the project, the final step is rendering out our frames
for the animation. I'll show you guys some
of my output properties. My camera format is 1536 pixels on the x and
1920 pixels on the why. This is so that the
camera fits my character. If you have a different shape, you may need to adjust these values so that your shape fits better
in the composition. My frame rate, I keep at 25 FPS. The animation is
250 frames long, so it'll be at 10
second animation. You want to keep your frame
start at one and at 250. Then you want to choose a folder for your outputted frames. Then you want to change
the file format to PNG. And that's about it for
the output settings. Once you have all of these
changed to what you want, you want to press Control. And then F2 on the keyboard, or come up to render, and then Render Animation. Okay, now that you've
rendered all of your images, which you want to do is press File and New and choose general. And then you went to change your editor type two
video sequencer. And this editor will allow us
to take a bunch of images, PNGs, and turn them
into the animation. So press Add and
then image sequence. Then you went to navigate
to the folder that has your images and
press Add Image Strip. And for me, I only
rendered out ten PNGs. You guys should have
rendered out to 50. So you want to keep
your end at 250. I'm going to change mine to ten since I only
have ten images. And then in the output
properties, you actually, what we should have done is we should have changed this earlier to 1536 and then 1920, and then added the
frame afterwards. Because right now if I press
F12, that's all wrong. It's all weird. So let's press X to delete the image sequence and then add the image sequence again
with the correct format. I'm going to press a to select all my images. Add Image strip. Now if I press F2, I
get the image there, which is what we're looking
for in your settings. So you want to change your
frame rate to 25 frames. Again. Also, one more time. You want to keep
your frame start at one and your end at 2f0. I'm only changes my end to ten because we only
have ten images. Then you want to select a
folder for your animation. And you want to change
the file format to FFmpeg video and change
the encoding to MPEG-4. And that's about it
for our settings. Next, you can press
Control and then F2 to render out the animation. Now, it did a super-fast for me because only have ten frames. So it might take a
little bit longer to render out the
final animation, but it'll be a video in the
folder that you selected and congrats on making your first abstract
animation in Blender.
8. Outro : If you've made it this
far into the course, I want you to give yourself
a pat on the back, congrats on finishing
the project. I hope you enjoyed making it
and learn something from it. If you want to see
my future courses when they come out,
make sure to follow me. Thanks for watching and have
a great rest of your day.
 Surface Designs