Transcripts
1. About that class: If you're looking forward to expanding your knowledge
while having fun, welcome to your skillshare
class. Clear three. The illustration,
a course crafted for creative souls
at any skill level. Here's what you learn in
this exciting process. Well, first we'll master blender fundamental tools
such as navigation, camera placement, and many more. We'll polish our
skills by creating a three D version of the
famous character Pepe. We'll learn some dope modifier that will elevate
your final result. Also, we can expect to learn some cool techniques
for materials and textures that you can apply later in your
future project. Emphasize specific areas
via different sources of light and of course we'll gain confidence
in using blender. But what if you have
seria experience? Don't worry. This classes beginner friendly
and suitable for anyone interested in a three animation illustration
or design. No prior knowledge of blender or three D modeling is required. To get started, you'll
need a computer with Blender 0.0 that
you can install for free from Blender or G. So you'll have project materials
attached under that class. Skillshare is all
about creativity. So that's why for
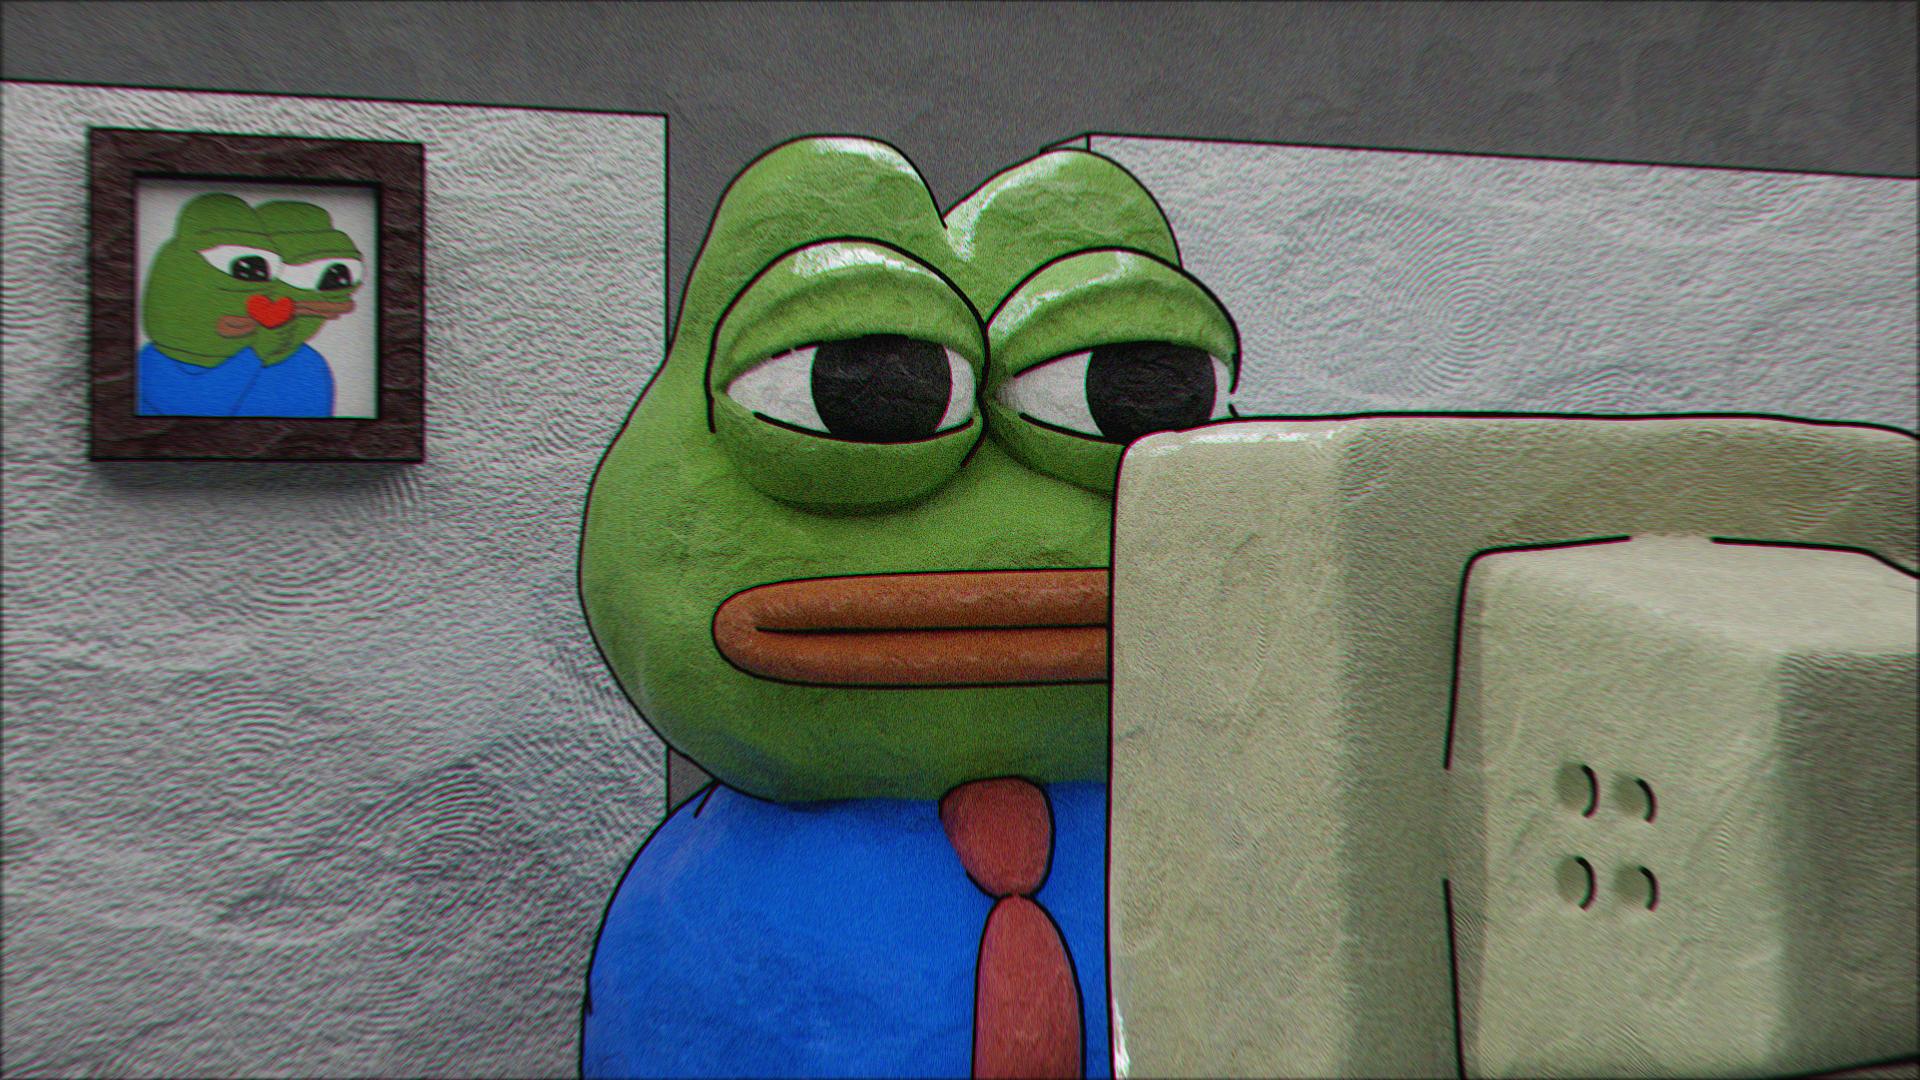
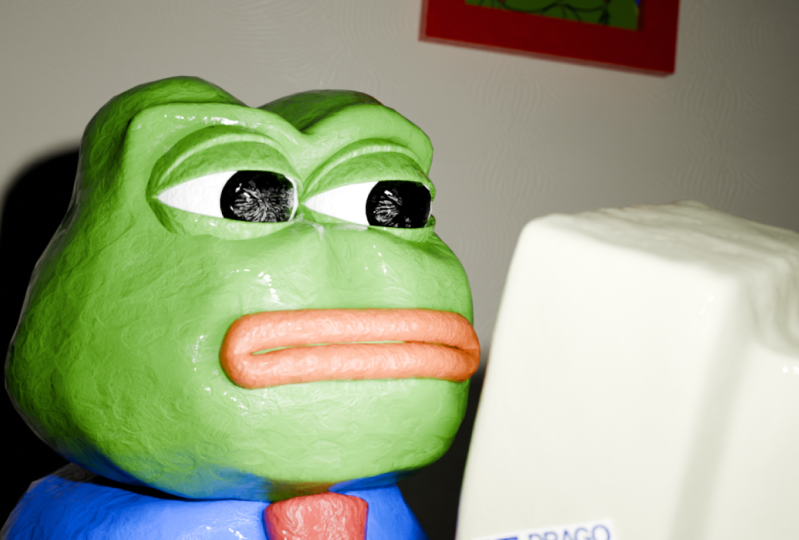
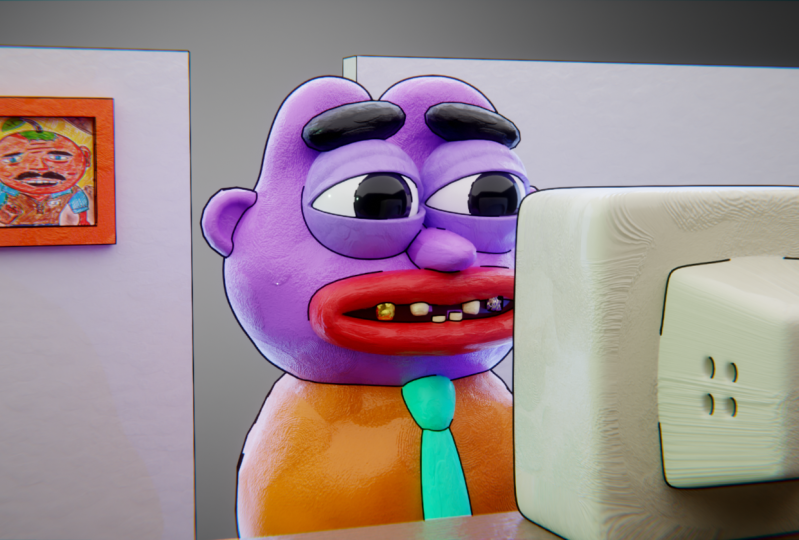
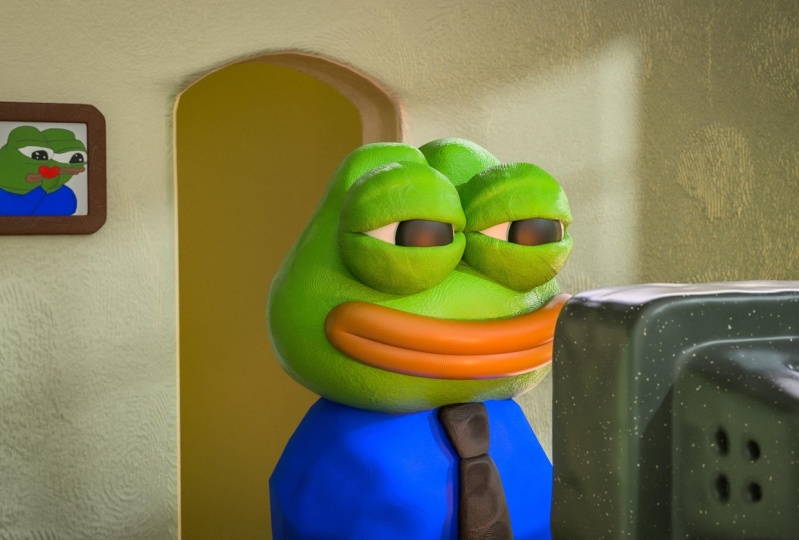
your final project, use your imagination and bring Pepe into your own environment. It could be a house
car or something else. In this class, we've placed
him in an office job. Now allow yourself to have fun and surprise us
with your decision. As you can see, your
next hour can be not only useful, but
also interesting. Join me in the
skillshare class today and let's open that
wonderful door together.
2. Lesson 1: Pepe's Head: Hello everyone and welcome. Before we start, I want to say that everything
that I press, you can see in the left corner. In case if you
have any question, just take a look right
there. The second one. Under this course.
Under this class you can found a zip file with some references which we're going to use just as
small inspiration. In our case, we don't need to transfer this
one into Blender. Just open and check
time to time. But let's start with our Pepe. I'm going to make this
lesson short just to make it more comfortable for you
to move through this class. Lesson number one,
we're going to create the head for our Pepe. Press on your cube
and press control to apply subdivision
surface modifier. Then we go here and apply subdivision
surface modifier in case if you don't know, like it's your
first name blender. To move yourself
around the world, you just hold the Maus wheel. Another way you can hold
shift and Ma wheel. In that case you can keep
the same angle and to move around one in an empt is another way how you
can change the view. 13 for the side view and
seven to look above. Let's go with one. Now let's go to the edit
mode, which is here. Edit mode allows us to
work with our object. There are three main
aspects of each mesh. There vertices which are these points or one
on the keyboard. There edges which are these lines and two
on the keyboard. There are faces, which is
three on the keyboard, and these are our faces. Press three faces and go a
little bit above of our head. We use this one and
then hold shift, left click, left click, left click, one empt, I suppose this is his ears. We're going to extrude
which mean press go up. Then we go with the air
for smaller rotation. To move an object around. We have for scale, for rotation. And to move now and
move this one more, close to the center, great. Then let's go the same
thing right here, up three, choose
this phase shift. Left click shift, left
click shift, left click, one in ped to
extrude. Let's go up. You don't need to make them
completely the same for rotation to move it more closer. Then back to the object mode
and press one more time. Qutrol. Good. But before
we're going to move forward, let's save our file control. Choose a folder, let's
call this one Clay Pepe. Save blender file. Great. Our shape have to be
little bit more thicker. Horizontal one. What
we're going to do next. Back to the edit mode. There is a cool thing like
proportional editing, which is O on the keyboard. Allow me to show you
what does it mean? I press one to choose vertices. Let's say if I'm going
to deactivate this one and I move on that point. But if I'm going to
press to activate then how you can see
we have a sphere. That sphere show the
area of influence. If I'm going to move with
my mouse wheel forward, I can work only
with the vertices. If I'm going to make it bigger, how you can see, I can
cover more points. It's a little bit more
comfortable to dit, in that case, what
are we going to do? We're going to choose
this one shift, left click, and then
make this one smaller. Erik, let's move
this one inside. Don't worry about the shape. Trust me at the
moment right now, probably it will look simple. Sometimes, not really,
but at the end, when you're going to
add the material, some modifiers, it's
going to be top. But at the moment, right
now just move them forward. Good, then go behind, choose these vertices and
bring him up like that. Then let's choose this one on the side and make it thicker. And the same thing right here, Choose this one from the side and make it a
little bit more thicker. I think this one is too much. Right Then we go below one Mp. Make this area a little
bit bigger and go up. Let's work a little bit with our ears because I don't
really like their shape. We go with the make
this one like that. Just play around. Just play around. You have your reference and that's going to be the
angle of our camera. I suppose it's pretty nice. I'm going to deactivate
just to work with this one X on the
right probably. I'm going to make them a
little bit more thinner here. Let's make this one together to activate or proportionally
ting choose this one. G here, choose this one. Greg, go like that. The same thing
here. Greg forward. Greg, behind that
one and that one. Okay. Control S, they aren't
similar, which is good. We don't have a purpose to
make them similar, probably. I'm going to move
this one a little bit more Greek and like that
I'm going to move up. This is going to be something
similar to let's know area and go like that. Okay. Right click, Shade
smooth at the moment. Right now it's
enough. It's enough. Or I'm going to make you a little bit higher.
Okay, now it's enough. Great, I know you
think what it is. It's far from our final result, but don't worry again, this is the most pleasant
part in blender. It can look very simple at the start and very
up at the end. The final touch is going
to be double click. And let's call this one under
line head control to save. Now we finish with
lesson number one. I'm going to see you in
the lesson number two where we're going
to create his eyes. Thank you so much and
let's go forward.
3. Lesson 2: Eyes: Welcome. Lesson number
two where we're going to create his Ice. Let's start. Did you notice that
usually the mesh, the object appear from this three dicursor where this
three dicursor is placed. To save a little bit of
your time, go one on an mp. Here will be our eyes. What we can do, hold
shift and right click. And that's how you
can set a new place for three cursor right now where we're going
to add the object. It's going to appear
straight from here. Shift A and this
time go to the mesh. And choose UVsphere
then and scale it toward that we have to fulfill that entire
area with our eyes. Then shift, then right
click, shade smooth. Let's go, Greg, a
little bit forward, I think something like that, wondering pet the second thing, let's go to the head
of our paper tap, which is the hot key to bring yourself into
the edit mode. And then let's choose
some vertices. There is a thing like
transparent mood which you can activate via Alt. Let's choose one that vertices and O to activate the
proportional editing. Greg, and move this one
inside. The same thing. We can go to the
vice versa, Greg, and move this one inside, then al Z to get out from
the transparent mood. Then deactivate
proportional Ting and tap back to the object mode. Now it's a little bit better. Again, the entire
work right now. Look, don't worry.
Let's call this one. Great. Right now we're going
to have to open that eye. What do we have to do, Greg? 19. We need to have this point on the left and
another one on the right. Then go to the face mode, which is the 300 keyboard. And let's choose hold. Let me show you, we can choose a few loops of these
faces. How to do this one. Hold out and go to this
edge in the middle. Out, left click out, left click, I forgot hold. Shift out, left click, 123.4 I think four
is more than enough. Then we go with the x, which mean delete
and delete pass. Then we have to clean
the four X faces. And the four, oops, I choose one more X faces, that is the final shape grade, then out of the edit
mode with tap. Good. The second thing I
want to make this, this border a little
bit more thicker. What we can do is
go to the modifier, search for solidified
and that's what we have. Then we bring ourselves, move the thickness
toward 012, I think. Then we can go with
the control to for the subdivision surface
modifier to make it more smooth in comparison
of how it was before. If we're going to move
subdivision above, it can be very sharp. Let me check one
thing in the way, How it was before is good. Bring the subdivision surface under the solidify modifier. Great, Let's go forward. Our Pepe have a thing above
of his eyes. I don't know. This anatomy of Pepe is
perfect. You see this thing. Let's make it, we go to the edit mode and in the
same way, choose faces. And let's go out shift left. Click here. Here,
here, oops, here. I don't know how many
of them I choose, and there is no
necessity to repeat. I think I'm going to
choose this one also. Yeah, that's all. Actually,
it's more than enough. We don't need to choose them. Then let's extrude, which we
did in the previous part, extrude and go up like that, then Greek, and move
this one a little bit forward and then go
a little bit down. That is the shape of our eye
looking good, I suppose. And very smooth, the very easy how we can put this on the second,
on that health. Just let's duplicate shift D for duplicate to move only on
the red one, on the x axis. Move on the right like that. Let me move this one a
little bit more closer. This one also control
to save coat. Let's go forward. The three cursor is
still in the same place. Probably I'm going to move
this one more in the center. Now it's time to make his eyes. How Of course, very easy
shift a mesh and sphere, then make an x 90. We need to have this point, this area in front of us. As for scale, and move this
one inside then right click, shade smooth, that what we
have at the moment right now, Greg said the shape
as for scale, Just said this one
under the eye again, remember this is what I
say in all of my classes. Feel confident, have fun. Don't repeat straight after me. Trust yourself and
trust your creativity. I set it, then we have a pupil. I don't know how to pronounce this one, but the black part. Very easy. Take a look. Once, let's call this one white. Then we go to the edit
mode. Take a look please. One for the vertices. I choose the vertices
which in the middle, then I want to
choose a few loops. The combination of
control plus plus on pat. You see then I'm
going to control, I need 12.33 is more
than enough for me. Then I'm going to
duplicate them. Shift D and left
click to accept. Then I want to divide
that part from our white. I press and selection now
back to the object mode. And now we have
two objects apart, the people and the white I. Then now repeat all
of these steps, and then when you're
going to finish, let's go forward modifier, Search for solidify modifier. Then I'm going to make it
a little bit more thicker, but I think the word minus 003. No, no, no, no. 0201
is more than enough. Shade smooth, and we go to
the normals and auto smooth. I don't like it. Okay, we're
going to keep it like that. Let's call this one
pupil, pupil then shift. Click on our white eye. Shift D, x and move
this one right here. Great, Let's set
the camera angle. Let's make this one
in that lesson. Let's first of all, let's call this
collection. Double click. Let's remove our
camera from here in another folder, New collection. Let's call this one sets. Great. Let me quickly
show you two things, How to move the
three cursor back to the center shift cursor to world origin now is
back to the center. Then we go in order to set the camera
angle, It's very easy. The combination of
control out zero on an M, you can make this one
from different angle. It's a very useful
and very great trick. I'm going to move myself a
little bit more farther. Control out, left click
then if you want to move in the camera out of the camera is the
zero on an Ped. Let's say you're here zero on an Ped and you're
back to the camera. If you want to set
an angle being in the camera for the side
menu view and camera view, now you can see the border
is red and now we can set the camera being
straight in the camera. That good, I think this
angle is good for me. Probably like that. Then check off and that's what we have. Back to the course
rich world region. His eyes are a little bit weird. It's look like that one
and that one have to be a little bit more x. There wasn't very centered. Good. Zero now is better. Now it's better
control as you say. Thank you so much for that. You've been on this
lesson. Let's go forward. Where we're going to
create his mouth. We can see there
is nothing hard. If you want something to repeat, repeat, and I'm going to
see you on the next one.
4. Lesson 3: Mounth: Lesson number three where we're going to create his mouth. Honestly, it took
me a little bit of time when I did this
one for the first time. But with you right now are
going to be way more faster. In case of your cursor
flying somewhere, just bring this one frustable shift S cursor to world region. Then we go seven and Pt. And move yourself a little bit forward and shift right
click somewhere here. Why? Because we need to
create to shift a mesh. And thus from here you
probably will have, first of all, you have this thing right
there on the left. If you're going to
click somewhere somewhere, it's
going to disappear. Let me show you one more time. Let's do this one together just to avoid all
of these questions. Vsphere, oops, mesh to us. Great. Then you probably
will have here 48. Like that, keep
it on 12 and here 122 and only then
left click, good. Right click, shade smooth, then x 91 in an Ped. As for a scale, and make
it smaller like that, Look very weird at the moment
right now, don't worry. And let's make it okay. A
little bit more bigger. I'll recommend to
watch one time. I don't say it's going
to be difficult, but it will be more clear if
you're going to watch one time and then you're going
to re watch and practice. I'm going to the edit mode to move myself in a
transparent mode. And I'm going to
choose this health, and I'm going to get
X delete vertices. Great. Then I'm going to choose the three loops of vertices. And I'm going to move this one on the right, somewhere here. Then I'm going to choose this
one above both of them, Z. Then I'm going to
choose this one. I'm going to move
them, both of them. Actually, I'm going to
move them in the middle. And take a look. There
is a combination. How we can see, they stay
on the diagonal one, I want to align them S x zero. That's how I change there. Form, Let me move
this one a little bit lower and this one
a little bit lower. Two here, the part where how
we call this one. Have fun. We just need to align not
in the same way as me, just something that's
going to be close to that type of shape as a scale. I'm going to make this
as for scale two. Here for scale also problem. I'm going to move them,
I'm going to make this one a little
bit bigger problem. I'm going to move that part. G and G. Okay. Control is to safe. Let me check that is your
final shape look very odd. I know what are we
going to do next? Control two for the
subdivision. Surface modifier. Okay. It's a little bit better. Then we go to the modifier,
search for mirror. Should I say something
more in case If you have some space
here or wherever, you can bring check in on
the clipping and you can, I mean, you don't see any difference at the
moment right now. But I just say for these of
you who are going to have this sum gap bring check in
on the clipping and merge, then X choose X. I'm going to move this one above the subdivision
surface modifier. There is one more thing that
we have to do is to align our mouth G here and then we go to the edit
mode control Alt for the transparent mode. In case if you don't know if you are in transparent or not, you can see this one tougle
x ray transparency display. When it's blue, that
means that you turn off, that means it's gray. Turn on and then choose
these vertices from the right Greek
here for rotation, a line around his mouth problem. I'm going to rotate
this one also G Rich. And that's what we
have at the moment. Right now he look
very suspicious. The last thing that we have
to add is solidify modifier and I'm going to make
it thicker like that. Let's go forward
where we're going to create this PC and
then the walls, everything else is going
to be way more easier. But remember that
your final project going to be your
own environment. I give you all the assets. I give you all the tools, and then you can
make him at home, a car, wherever do you want. But that is our paper right now. One thing that I would
like to do, first of all, let's call this one
month to month. The second thing, I want to make his head here a little
bit more thicker. I'm going to bring this one. I'm going to choose
this one also. Great zero mp. That is our pet
moment right now.
5. Lesson 4: Old Pc and walls: Hello again. Let's create the PC walls and
everything else. Let's create another collection of this one. I hope
you're doing well. First of, I hope you enjoy this class new collection via
right click, double click. And then let's call this one. I always commit mistakes. Environment, Probably I
didn't wrote this correct. But then let's go with shift, a mesh, make it smaller G.
Let's work in the solo. I didn't, I didn't tell
you about this one before. And an MP, then how you
can go to the solo mode. Ped, let's call this one PC. Then as Greg, make it thinner, let's go to the edit mode. Choose that phase, a back end. We have extruded yes control that because we don't need this one at the
moment right now. There is another way how you can create phase into the phase. It's a, you move this one
in the center, for example. If you're going to choose
more of them you can bring or like that. That's how you can play around with different shapes
at the moment. Right now, let me do
this one again with you. Choose the face A back and bring this one in
the middle like that. Now let's extrude via a, move it back for a scale and
we have this type of old PC. Then let's go here
to create a screen. Let's go here and then
extrude like that, that our old PC slash
empt to get out. But it's a s what we have to do. There is a bevel modifier, a very dope thing that can polish a little bit our borders. If I'm going to decrease
or increase the amount, you can see the differences between what it was
before and what we have right now and another
one which we use for a lot of times control
for the subdivision. Surface modifier.
If I'm going to move above the result
going to be like that, keep the subdivision
under the bevel, then I'm going to
decrease a little bit. I think like that.
Segments, segments, there is no necessity in them. I'm going to keep
this one on 02. For me it's good. Our next step, if you like the
bevel in the way, how it look right
click, shade smooth, then we can go like that. I'm going to keep it on 001. Then we can apply our bevel. Then we can apply our
subdivision surface modifier. And one more time control two
to make it more smoother. Then we go to the edit mode and choose these four phases
and take a look once. If I'm going to press one time, the result can be different. You have two modes in
the way how you can insert phases or like that, or one phase that's
going to be merged. Or if you're going to
press one more time, you can insert phase
in each phase. I hope it does make
sense, what I explain. That's why I'm going
to keep a part and I'm going to create
phase in each one of them. Then extrude, I'm going
to move this one in. That's how we create
a different shape. You can play around with
different of them, for example, like that here, for example, if you want to make some
type of your shape. But I'm going to
keep it like that. Then as for a scale, move myself into the camera, Greek, I'm going to move
this one a little bit aback. I'm going to make it a little bit smaller like that. Another thing we've done,
let's make the walls, because otherwise it's
going to be very fast. Let's create the walls. Shift a mesh cube, then Greg on the green
one and make it thinner. Then go above seven. Let's coach you the camera. Let's make it bigger and just set them like
the office walls. And then shift D X and move this one right here
like he's in his say zone. And then choose both of them. Let's call this one wall
left and wall right. Good. In the next lesson, I'm going to show you how
we can create this photo. But at the moment, right now we've done with another lesson. Thank you so much and I'm going to see you
in the next one.
6. Lesson 5: Background and photo border: That lesson, we're
going to create the photo with
border, then a wall. And we are very close to join the most interesting parts,
materials and modifiers. But at the moment, right
now, shift A pops, shift a mesh plane
x 90 for scale, that's going to be our
background and seven pet turn, this one like that
for scale create, let's call this one BG,
which means background. Then let's create our photo
border shift, a mesh cube. Let's go to the solo mode, and let's go with
Erik, make it smaller. And then the same
technique with PC. We choose the face in front
and move it like that, then extrude, that is then
out of the solo mode. Let's go 300 P, make it smaller. All our walls are very
close to our face. Let's bring them a
little bit back. The same thing with our picture. That gri somewhere here. Then G is here under mp. And then make it set
it somewhere here. Or if you want, you can
move this one there. Why not? Let me
keep this one here. When we're going to
create the materials, we're going to bring the photo, because at the moment right
now we don't need that. One more lesson where we're
going to create the body of our Pepe and let's call
this one photo border. Yes, let me move this
one a little bit here. Great, thank you so much. How you can see is very easy. Very quick. Let's go
to the next lesson.
7. Lesson 6: Body and Tie: Lesson number six, the body of our shift cursor
to world region. Then we go with the
mesh cube control two, go down, right
click, shade smooth. Let's go with 300 MP. Let's go with the Greek
and set it somewhere here. Back to the camera
review problem, going to go above that. Okay, it's great. Then Erik. Just create your own shape. Remember, apply one
more time control. Two, probably more bigger and that what we have at the
moment right now problem. I'm going to set
the PC a little bit lower or I'm okay with that one. Then let's create the tie. I suppose that thing
again, very easy. Shift, right click and then we go with the
mesh. Guess what? Of course, cube qutrol
two, make it smaller. Then we go to the solo mode. And let's play around. I'll set for the transparent
mode as right here. Let's add an additional
loop which I didn't show you before because we
don't have the necessity. But if you're going
to press control er, you can add additional
loop into your mesh. One time left click. Set it somewhere
here, for example, I'm going to move that one
above and when you like it second left click to
confirm the shape, then I'm going to keep it here. Okay. Right click,
shade, smooth, control. Let's get out from
the solo mode. Good, let's Greek
make it smaller, then rotate it and
bring it right here. Let me hide this PC
for a few seconds. Oops, let's move our body, which is called the body, to the pep collection. And the same thing with the tie above to the pep collection. Now let me hide the
environment X and shift D, left click to confirm x 180, then let me go and
make it bigger. Or what if enough, then three. Let's change the shape. First of all, G, this
is also a life hug. Sometimes when you change
the rotation, let me show, you can press, for example, Greek, and you'll make
smaller like that. But if you're going to
press for the second time, it's going to be
aligned independent. What is the rotation
of your shape problem? I explained this one very messy, but let me show
you, for example, I rotate one more Greek
igrek and how you can see the Xs right now is
on a different level. Just remember, you
always can keep double time x six igrek. I hope it is clear. Greek, Greek make it ther
then we go right there. And then I'm going to
choose transparent mood. I'm this one here. This one. I'm going to move it
here a little bit above that what we have. Good out, let me align, let me go a little bit
lower to the camera. Open the environment collection. Probably I'm going to make
both of them smaller. A little bit forward a now, finally we've done,
thank you so much. In the next lesson, we're
going to apply the lighting, then the materials, and then you're going to
see the transformation. But even right now, you can
see how in a few clicks, knowing only a few basic
things around blender, you can create a lot of things. I believe in you. And let's move forward to the next
lesson. I hope you have.
8. Lesson 7: Lighting: Well, in that lesson, finally, we're going
to add some lighting. Let's start with one of
my favorite technique, Shift a plane, then first
scale and move it above. Then we go to the render engine. And here instead of
EV choose cycles. Then we go to the
render display, Viewport shading, which is
the last one at the moment. Right now you don't see nothing. But let me show you what
we're going to do next. We go here, which is the
Materials properties. Press, Let's call this
one light underline plane instead of principle
is D choose emission. That's how you can, you can bring light
into your sin. Then let me go here. Let me move this one
a little bit there. I think now I'm better because before it was a shade
there, which I didn't like. Let's make the strength
a little bit bigger. For example, 1.2 What about 22? I think it is too much, but
1.45 is actually great. What if you want to make
it bigger on the x axis? Let me just check
how it was before. Too dark, How it is right now. Yeah, I think I'm going to
make it a little bit more bigger and I'm going to move
it a little bit more higher. What if I'm going to move this
one forward a little bit? Air, That is o our final
shape. Our final form. Great. One light, it's done. Let's move this light
into new collection. Let's call this one lighting. There going to be one
source of light here, one behind, and one under. In summary, we're going
to have for round four, or probably five,
we're going to see. Let's go with the next one, shift a light, let's go with
the point x somewhere here. What we actually can do,
let's create another view. Go here on that border, and when we have two arrows, right click, vertical split, and move this one in the middle. Then we're going to
keep this one for the viewpoint shading
for the camera here. We're going to play
with everything else also you want to get rid from all of this
cursor and everything else. Just turn off this show. Overlays. Great. Now
back to our lighting, which have to be in the
collection lighting. Good Greek. I'm going to move
this one summer here. What if I'm going to
move this one, G, X? Let's make the power there is another technique
that I usually use. Use the color red and then
make it very strong like that. That will help you to understand the area of influence
of, of your lighting. Now let me move this
one Greek a little bit. In front, it's too much, but if I'm going
to keep it here, okay, Now it's better. Now, let me keep this
one on 25 for example. I need, you see I need a small line of shading
right here, right there. Let's keep this one on. Something toward blue,
white, somewhere here. Okay, great. Then we go shift a light sun. Sun is very strong, you can clearly see that. I suppose the sun going to
have a color in the office, we don't have sun usually. That's why I need to
pretend like this is some overall overall lighting. I'm going to keep this
one in between of green, yellow, and white. Now it's time to play
with the rotation. Let me check what we can have. Oops, like that If
I'm going to move this one above. Not really. Not really. I liked in the way how
it was before when it was somewhere rich like that. Great. Let me move this one. What if I'm going to make
a little bit higher? Somewhere here? A
little bit lower. Yes, it's better. I want one more
lighting in front. I'm going to use the point. I'm going to ship. I'm going to move forward and
I'm going to move. Somewhere in front of our PC. I need to fulfill
this area X with simple I think 15 and I think
something toward white. Or probably now just it's
time to align that light. Okay. It's better even when
I have one more above three. Okay. The fifth one. We're going to turn
this one into area, then we're going to move
this one behind that. And then we can
turn this one on. The X, X, let me
move this one above. We're going to create a
small shading right there. If I'm going to move more
toward our Pre in front, I'm going to bring the red just to see the
area of influence. What if a little bit
more forward like that? Now It's better then
we're going to keep this one toward blue. I want more toward blue. Good, we have here of
the source of light. We need to move our tie
a little bit more toward our body because it creates this type of shading artifacts, which I don't like really. And the same thing, right? Oops. The same thing with
our tie a little bit higher. Now it's better. Probably one more thing, that I'm going to move our sun
a little bit in front set, I'm not very satisfied
with our sun. I found a perfect one because before it was some straight
shading right here, but now we have a
small gradient of color right there. I
think it's better. I think we can move
this point light more under our body. Great job. Now, I'm more satisfied
with our color. We can also bring some light under our PC
because it's too dark there. Let's copy this one. Greek. Move it, move it here. Move it more farther. If we going to keep this
one again more toward blue, just for a small difference. What if I'm going
to make this PC a little bit bigger
because I think it's too small and I'm going to
keep it more in the corner. Greek. Okay, Our sun. I'm going to make
it more towards 0.7 and I think the color is going to be more toward
white ladies and gentlemen, this is our lighting lesson. I hope you did enjoy it. Let's move forward toward colors and then the materials or not, because I don't like that part. Yes, lighting is
always a lot of time. It's not about 5 minutes, but I don't want to keep
this one very long. So that's why usually I
say choose to have fun. But probably I'm going to move this one a little bit higher, a little bit behind,
a little bit lower. And I'm going to
keep this one on 11. Just small, lighting good. Now I'm better and I'm going to see you in our next
lesson. Thank you so much.
9. Lesson 8: Dope Modifier: Let me quickly, let's
close this one. Go to, the two arrows
join a go here. Now, I'm going to show you one dope modifier
that's going to make your illustration
not so sharp, but it doesn't mean that
worster take a look. Let me choose, for
example, the paper head. Then we go to the modifiers,
take a look one time, and then you're going
to repeat ad modifier and search for
displace modifier. Do you like it? I suppose no. Let me move this one above the subdivision and
then we have to decrease the strength
toward 01 at the moment. Right now you don't see
any specific difference. Let me keep this one on
02 just as an example, The display modifier work
and do it with texture. Here we're going to create new, let's call this one texture
for underlying Pepe. Then you see this icon and this icon are similar because they share
texture properties. We bring ourselves here
instead of image and moves. You have a lot of options. Let me show you a few of them. Magic marble, there is no
difference because we can increase the strength. Now you're going to see
the difference clearly. Noise stucci and many more. What we're going
to use is clouds. Then I'm going to decrease
this one toward 0.1 and two and probably even 0.15
Then back to the Clouds. Let's play, for example, with soft or hard. No, we can also here
a lot of options. I'm going to choose the improved Perlin because it's good. Then let's increase the
size of our texture. You can decrease and
you can increase. Actually I'm going
to keep this one on 0.3 then back to the
displaced modifier and let's add some
distortion like 2.8 control. Say another thing that I did, this one with purpose, there is no pug difference
because it's very important which
modifier is above. If I'm going to move
the display modifier under subdivision
surface modifier, you can see that the difference
is completely different. A good option that
we can do right now is if you like the
shape of your head. If you trust your PC, then apply the subdivision
surface modifier. Now let's back to 0.12 and for example,
let's increase, decrease. I think I'm going
to keep this one on 0.4 If we're going to add
one more subdivision, surface modifier, we
can make this one even more smooth
than it was before. Again, I tell you about that because I think it can open a new door
for your creativity. But be always careful because sometimes
if your PC is weak, then you probably will
pay for that one. Now let's apply this
displace modifier for everything else
in order to practice, it's going to be very fast. Let's choose our PC and then we go to the displace modifier. Then move this one above here, Choose texture for pepe
and decrease towards zero. For example, 1.2 Then
we go with our eyes. We can do the same
thing, for example, above and 01, or even a little bit more
like. Let's go with 02. Then we can choose this
shift left click on that, the border of the right one have to be more
darker than that. We press control L and copy modifiers because they
share the same modifiers, it's easier you can apply on everything else because let
me show you, for example, we're going to choose
our wall and then our head control
L copy modifier. You see it didn't work properly, just in case if you have two
same objects it will work. But in the rest, let's
move forward and let's modifiers modifier
texture and 01. I actually don't think
that we really need to apply our displays on walls because they
are straightforward. There is no necessity
to work with them. Let's go to our mouth and to do the same thing di texture
above but under the mirror. Let's go with 12.2. I think is good.
Control two safe. Let's go toward our body. Displace modifier texture
for above 01 or 02. I think we can achieve
much better shape if we're going to apply our
subdivision surface modifier. Yes, the same thing here. Apply, apply, and
then we go with display texture for
Pepe 0.1 and two. Then shift left click control
L and copy modifiers. Great job. What about people? I don't really think
that we need that one. That was another quick
lesson where I showed you how a simple tricks you can turn your shape into something
way more interesting. Now you can play around
if you are interesting, to choose another
type, for example, of marble or magic, or wherever. Well you can, there
is no problems. But I'm going to keep this
one on clause. Thank you. Next lesson we're going
to create the materials, Then I'm going to show you how
we can create very simple, these black borders
like outlines. And we are very close
to finish our lesson. I'm going to see you
in the next one.
10. Lesson 9: Outlines: Lesson, we're going to create
outlines, which again, going to be very fast
because there is nothing so hard. New collection. Let's call this one
double click Outlines. My technique is very simple. Choose for example
the head shift A and choose grey
pencil object line art. Voila. Then we go here to the data of our line properties. And then you go to the
strokes and you can make it thicker or thinner. I'm going to keep this one
on 0.4 which is enough. Then with the same way you
go to the object line art, go lower thickness
0.4 Let me copy. Let's go toward each
one object line art. What if I'm going to
keep this one on 06? I think I like more on
our I to have 06, great. Then go to our PC Green
Spencil object line art. And then we go to
05 for example. Or 04. Let's go to our body where we're going to do
the same thing. Some of them love the
technique of freestyle. I think Gripencil offer more opportunities in order to see the result
from the start. Because with Freestyle,
you have first able to render only after you've
done with your render, you can see the results
which is not uncomfortable in comparison to when you
work with grey pencil, and can see the result
straight through the process. Then let's go here,
object line art. I'm going to keep
this one on 05. Same thing here. Spencil object line art 05 and not the last object
line art 04 to our. Is it hard? Tell
me? Of course, no. That's what I like, blender
because usually people have delusional idea that in order
to create something dope, in order to create
something cool, you need like years and years of practice and some
secret knowledge. Well, yes, it is from one hand, but also sometimes
is more than enough, the basics what we have
at the moment right now. Another thing that I
would like to show you, we can go here to
the render engine, go lower, and in the
color management we can play around with exposure. For example, I'm going to make extra medium contrast
or very high contrast. But usually I keep this one
on medium high contrast. In the next lesson, we're going to create
the materials. I tell you about that from
the lesson number one. And I promise you
in the next one, for real, we're going to
create our materials. Thank you. Let's go forward.
11. Lesson 10: Clay Texture : Final lesson that we're
going to do before our final render we're
going to create. Finally, our materials vertical split another window and then here choose
the shader editor. My recommendation is take
a look one time in order to understand the steps
and it will be way more easier for you in future
to apply this knowledge. Let me drag myself a
little bit some out and then you're going
to have materials with textures under this class. But before, let's choose our
Pepe and let's bring it, just drag and drop, why it
doesn't work very interesting. Get out from the
camera one more time, you have to get out
from the camera. Then all of this
one in the center, all x 90, make it
smaller x on the left. And we're going to use this
one just for our colors. Let's go to our head and
let's call this one, I'll already call this one
skin then the color color. Pick and choose that green. I personally will make
this one a little bit more brighter and a little
bit more toward that. I don't think that
there is something wrong with my desire to switch
a little bit of colors. Then we have roughness, which means you can
make it very shiny. Or if you're going to drag
this one on the right, the object will not
reflect the light at all. I'm going to keep this
one on 06 because I think frogs don't reflect
the light control to safe. Then we're going to
add a few more nodes. Shift a image
texture color, oops, Shift a search for color, ramp the converter,
and then we go with the bump
modifier right there. Our next step, we're going to connect the normal
with normal color, with roughness and that color of our image texture
with the factors. First, the color M,
because we bring this one to the roughness
means that we can now work also with the way how our frog going
reflect the light. How we can see right
now is very shiny. Let's direct this one more toward each other
and more toward the right side.
Something like that. Great. But the main magic is going to be with
image texture. Open search for our
course materials, folders, and let's
choose, for example, the first texture at the moment. Right now, you
don't see anything special because we
have to connect the color of our fingerprints
texture with height. One more time. Yes, now you can
see the difference, but of course it
looked very bad. Why? Because we have to make wrapping UV,
unwrapping, edit mode. My PC get slowly A to
choose everything, then we go with the
oop, Smart V project. Here, keep it 66 and press okay. Now the texture have
much coherent outlook. The next thing that we can do is to play with
our texture scale, which means choose the node. And first of all, in the color
space, choose a non color. And the second one,
press control, which will allow you to play around with a scale
location rotation. If you press control
and nothing appear, go to the edit preferences Ds
and here for Node Wrangler. Then bring the check in and one more time control and
you're going to have it. I'm going to keep this one
on 22.2 Another thing that we can do is to play with the strength right
now is very strong. But first of all, press
the invert and then let's go with, for example, 03. Now how you can see the
texture so emphasized in comparison to when it was
toward the value one, that why 03 I think
is more than enough, or actually we can play
with 35 like that. Great. Also, what if we're going
to make it like 2.22 point ops to much to 2.2 That is, if you'd like to make it even
more emphasized, probably. Great. Now we have this type
of let me hide our Pepe. Now we have this type of clay material that you're going to see on the skin of our. That is one thing
that you have to do alone right now is just to
play around and to have fun. We can drag this one
more toward each other, we can make it more stronger. But I don't want it, honestly, I'm going to keep it on 47, 47, which is more
than enough for me. Before you're going to leave me, I'm going to show you how
you can save a lot of time. Let me close the lighting, the outlines back here to the simple render and also the camera which
is in the Assets. Choose everything A, then
shift left click on our head, how you can see the
border of everything else is more darker than
the border of our head. Then we go with
the combination of control L and link materials. Now when you're
going to come back, press the lighting
outline assets, everything share
the same material. You can think that, well, it's not what I'm
supposed to do. Let's go with our eyes, Go to the materials. And here we have this icon
which means to duplicate. You duplicate, and now
it's Pepe skin 001. Let's call this one Pepe I. And bring this one to the base color saturation toward zero. This one up, now it's white. You don't need to to repeat this process of add new
node search for the image. You just can copy and then
just switch the color. Let me do this one
together with you. Shift left, click control
L link materials. Then let's go toward
our pupil duplicate. Let's call this one Pepe pupil. Let's make this one dark
Like that, same thing here, control L link
materials but I don't like and you probably
also that type of shape. We go to the edit mode then. Smart V projection 66. Okay, now is better. The second thing, I want to
make the texture more bigger. I'm going to keep this
one on 0,404.04 Great. Now I think it's
more emphasized. Let's go to our mouth, Edit
mode A, to choose everything. Then we go with the
My PC get very slow, I don't know why I'm going
to bring myself here. I'm going to go
to the solo mode. A good SmartV projection. 66. Okay. Out of the solo mode, I'm going to the render now. Duplicate. Let's call
this one pep mouth. Where is our reference
is a very good question. It is in the outline
collection empty, and let's color picker and
choose for that color. What is next? Let's
go to our body. Let's duplicate. Let's call this one Pepe body. Let's copy the color of blue. Great, let's go to our
tie and let's copy. Is it hard? No, but
is it look cool? Yes. Much better than the donut. I'm sorry, but I'm not big
fan of this donut tutorial. I want to be sincere with
you. It is what it is. I'm going to make it more
toward red and I'm going to share shift left click
control L link materials. Let's go to our PC. But first of all, let
me get out from here. Edit mode, a smart
V projection, Okay. Now now the texture is much better appliable than in comparison to
what it was before. I'm sure you can see
the difference clearly. Then we go to the duplicate. Let's call this one PC. I want to keep it for bash
just something because old PC, they usually call this type of color a little bit
more brighter. And that's what we have, probably 1.31 point 3.1 0.3 I'm going to make it
more shiny, more reflexible. Great our walls, Let me
hide the pepe, our walls. Probably I'm going to share the same SPC control
L link materials. Then come back to our walls. Duplicate. Let me call this one wall. Let me make it completely white. Saturation toward
zero, it's good. Duplicate control L link
materials, our wall behind. I'm going to keep this one
duplicate more toward gray, because the environment in
the office is usually BG, the environment is dark. So saturation towards zero. And let me keep it like that. Okay. The last one
is our border. Let me show you. Take a
look one time please, and then we're going to
do this one together. It is in the wall Greek. Let me move this one. Let me go here. Okay, Erik? Yes. Because of the materials, the modifiers, my PC
start to be annoyed. Okay. Great. So, what we
have to do right here, first of all, let's duplicate. Let's call this
one border border. Let me make it word dark, something more like brown. Let me check the color. Do I like the color? Yes. Now let's go to the solo mode, Edit mode, and choose this
phase that is in front. Great. Okay, then we go here
to the Materials, press Plus, Then we go
with a new material. Let's call this one
photo and then a sign. Now when we're
going to come back, you can clearly see that we have border and
the color apart. Let me out from here. Let me shift left, quick on our light, and
let's back to the solo mode. Good. Now let me
drag this one here. Choose the photo material
and let me go to the border. Let me shift D, sorry, control S to copy. Go to the photo and control V, then choose color with a base, with a base color. Then open, get out,
choose that one. The last thing we go
to the UV editor here, back to the edit mode. That phase how you can
see if, for example, if we're going to press
H to choose everything, we're going to see
all of our shapes. But we do need all of them. We need only this one in front. Yep. Then for scale, and just make it
bigger is too big. K. My PC gets low, slow. Then we go to the T
lower for a scale, make it a little more smaller
then I suppose Grech 90. No, Rich 180. Yes, and then we go
a little bit here, then we can make X a little bit thicker vola out, out from the solo mode
back to the camera joins. Ladies and gentlemen, I hope you enjoyed our tutorial
in a matter of, I don't know, probably going
to be less than 1 hour, or a little bit
more than 1 hour. We created this one. Do you remember
the first lesson? How everything starts? And that's what we
have at the moment. Right now, I want to
make our BG a little bit more toward good one
also, let me check. What if I'm going to
make the medium low contrast or base contrast? I think base contrast is a little bit more pleasant for me. So thank you so much. I hope you enjoy it. I hope you learn a lot we're going to
render in the next lesson, which is going to be very quick. And then I'll wait for your
final project where you have to create your own
environment for our Pepe. But at the moment
right now, thank you. One more empty, let's delete our reference
because we don't need it. Control S safe. And I'm going to see
you in the next lesson.
12. Lesson 11: Final Render: Welcome my friend.
Should the final lesson where we're going to
render our image, you'll be very surprised, but it's very simple. Usually you go to the sampling and here
in the render sample, if your PC is strong, you can keep it on high value. If your PC ain't, you can keep it on lower value. For example, I'm going
to keep this one on 44. Trust me, it doesn't mean that the difference is
going to be very high, like the quality will be poor. No, it isn't just a little
bit lower than, for example, with more samples, that number is more than enough for
that type of illustration. Then bring check in on
the noise and rest, I keep it on the
default settings. Then important thing,
very important, make sure that you didn't hide
anything in your Viewport. For example, just as an example, let me hide with a hash or PC. You set your image on render. When you're going to
render, your PC will be in your final result
because how you can see, we have an eye and
we have a camera. When the eye is off, that means that it's off
only from the viewport, but not from the render. Why? If you don't want something to be in your final result, make sure that you
turn off both of them. Now I'm going to keep
both of them on. Let's check if we
don't have anything hide everything is on
point control safe. And then we go to the render
and the render image, that's all. Yes,
nothing special. Don't worry thinking that
where is your outlines, they will appear at the end, but for now, I'm going to see you after the render
going to be done, my final render is done. I also thank you so much. I hope you enjoy
this course and I hope you found a lot
of useful information. Now you can save it
very easy, image, save, choose a folder
and call this one Pepe after Skillshare class. Great LGB, Color depth 16. And then you can bring somewhere like in Photoshop or wherever other photo editor to make
some small color adjustments. But for now it's all. Thank you.
13. Message for you: Congratulations, you
deserve the words. If you took this
class till the end, I hope you found it
useful and interesting. And if you have any questions, feel free to ask me here. Also, I want you to say that
in our friendly community, you can found other
classes about blender and after effects
that can improve your skills. And if you don't
want to miss them, you can follow me back
on my Skillshare page. I'm waiting for
your final project to be uploaded in
project gallery section. And I'll see you very
soon. Thank you.
 Sasha Luvr, Work in third dimension