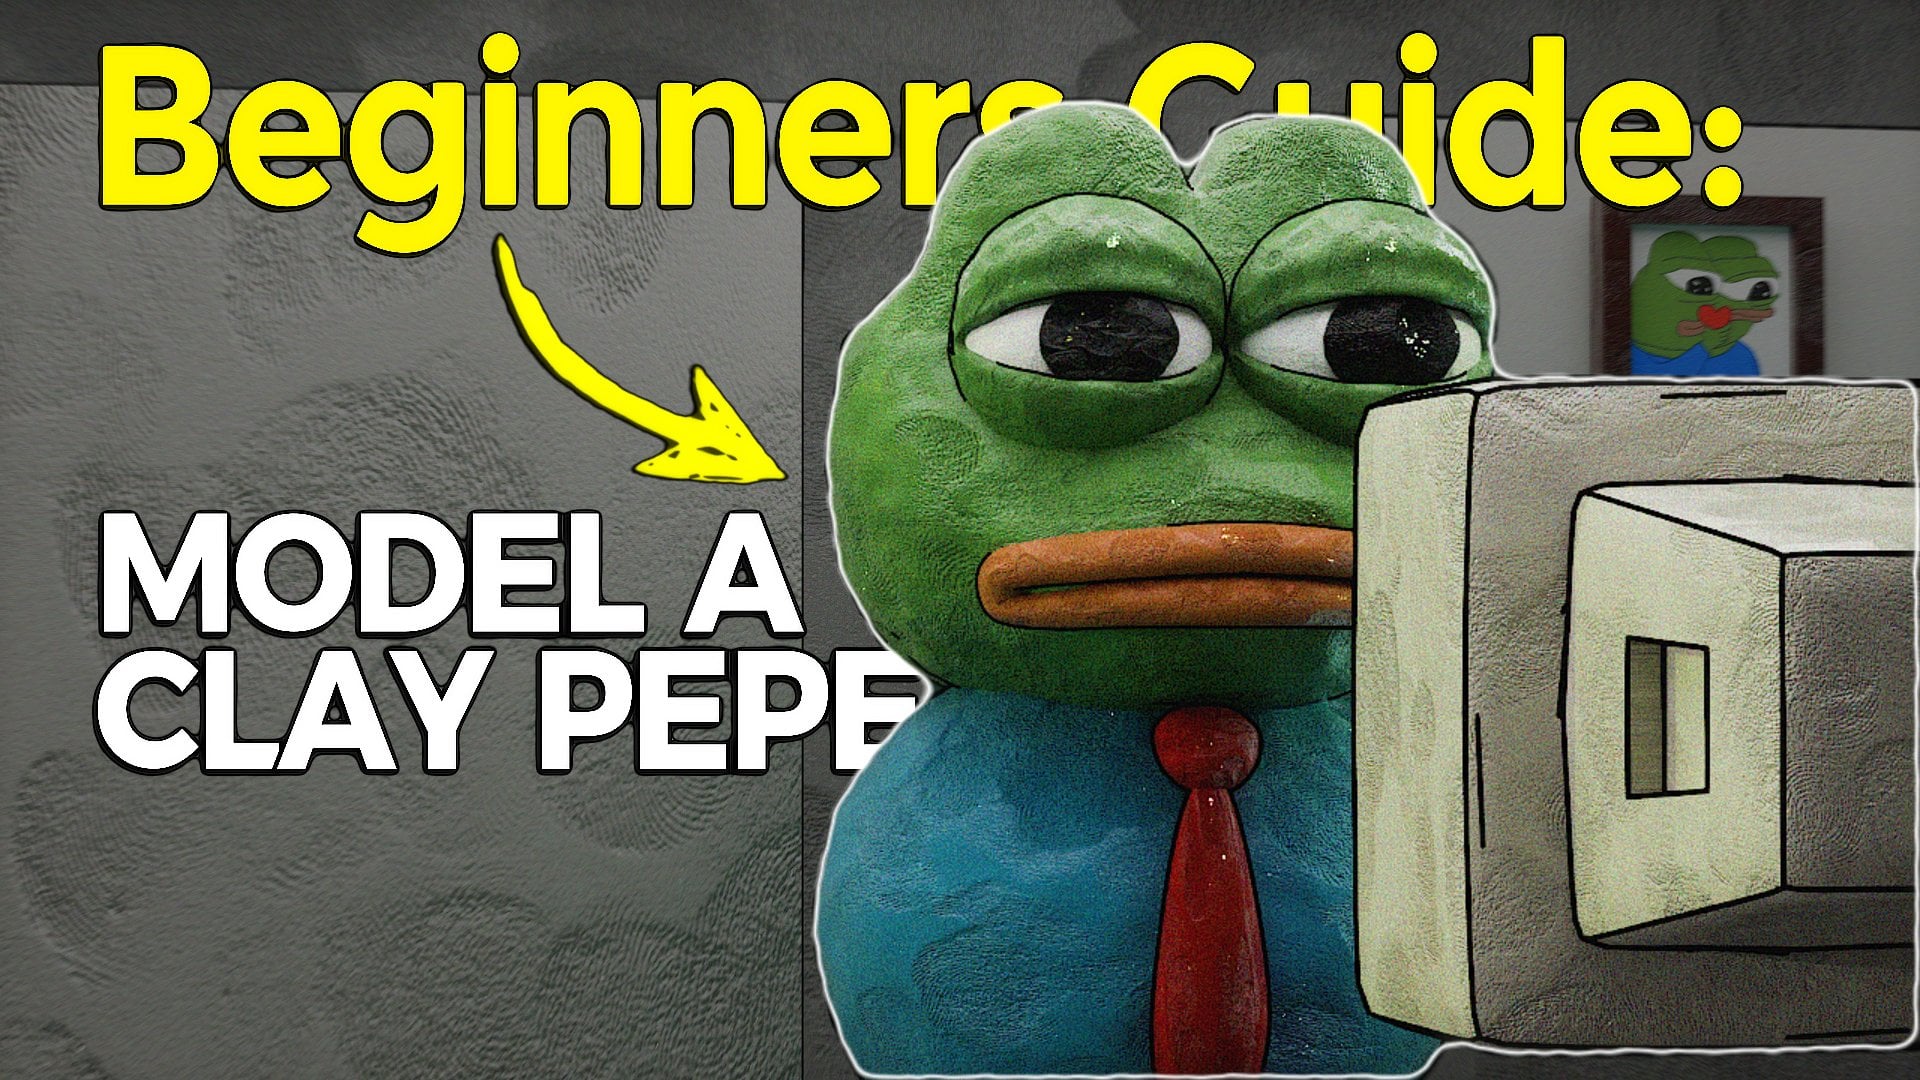
Transcripts
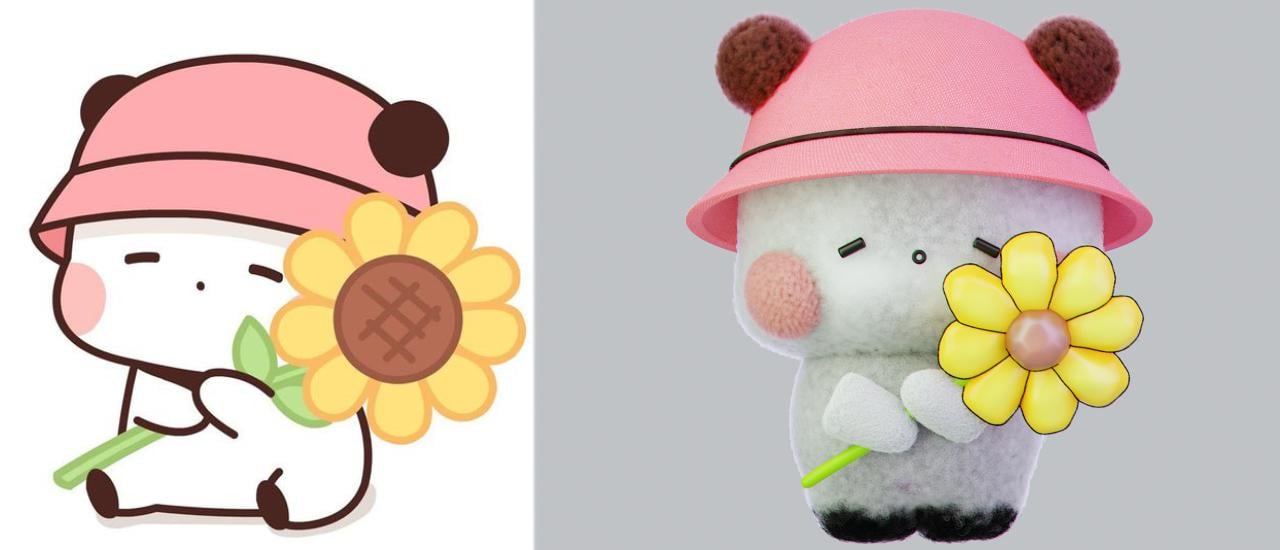
1. About that class: That class is
designed for everyone who want to boost not
only their skills, but also their confidence in creating wherever their
imagination desires. Have you ever seen an
inspirational two D image that you'd like to
turn into three D, but felt like you
weren't good enough? Well, through our lessons, we'll solve that you'll
learn skills and trick that you can easily apply in our future three D development. And for our class topic, I've decided to choose the
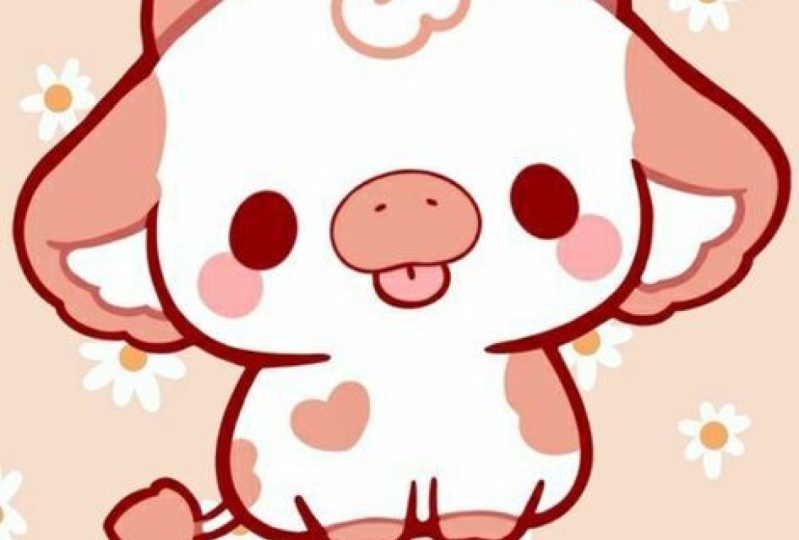
realm of Chibi animals, more specifically the famous
beer couple of Bobo and udu. Therefore available blocks.
In the first block, we'll model in using the basic
tools and dens of blender. Then we'll emphasize our scene by establishing the lighting. Texture painting is what awaits you in block
number three, and now you don't need any
painting skills for that. By uncovering that
side of blender, you lock and useful skill
for your future renders. Part four is my favorite
one particle systems, which create them big
before and after. I'll explain the basics that will make you
confident ensure in your future desire to create
realistic fear or hair. With each lesson, you will
gain valuable insights and practical experience
that will set you apart as a skilled
three D artist. After you finish that class, your homework will be to choose one of these
cute illustrations that inspire you and turn it into three D using the
new acquired skills. This class require
minimum knowledge and experience and lender, but if you never touch
it, don't worry. With a stubborn attitude and a little bit more time,
you'll get it too. At the end of the day,
what if not solving difficult tasks will
help us to grow. If you're ready to
have an enjoyable time while improving our skills, I'll be waiting for you
at our first lesson.
2. 1.1 Head and body: Hello, everyone, and welcome
in the last number one. How I said before, the point of this class is to give you all of the necessary tools in
order to be capable to create all of these
cute chibi animals, and actually even characters. I decided to take as an example, the famous couple of the
boob and Dudu beers. I love Jeff with them. They're very funny and
they're very cute. I thought that going to be a
great example for our class. Without wasting our
time, let's start. Open blender, let's go
in the edit preferences. Add ons, we need two add ons. First one extra objects, check in, and the
second one loop tools, check in, create. Then wait a second. Now, everything that types, we can see in the left corner. Let's delete our
lighting and up good. One and PDF here
under this class, we can found the folder
with some references, download them, and set's
go with the Shift A. Here we go the image reference, search for the folder, and
choose the reference one. Great, to make it a little
bit more bigger, nice. From here, we go
the shift A, mesh. Now because we check in on
the add on extra objects, we have some additional
things right here. We need a round cube, go in the settings and
press on the radius one. Now we go the control two in order to bring the
subdivision surface modifier, to make it more smooth, right click shade smooth, G. As for a scale, as for a scale. Let's go in the edit mode, and how you can see the border is sharp in comparison to
the shape of our object. Turn on this function, and now it is smooth also. Good. Now to choose
everything as x and make it a little bit
more bigger like that. Turn on the symmetry, which means everything that I'm going to drag on the right, going to be drag
on the left also. Turn the proportional dating
and choose the vertices. We call it the G this is
the area of influence. You use your mouse wheel in
order to make it bigger or smaller and drag this one
on the right, like that. At for the transparent mode. Let's bring this one a
little bit inside. Nice. Let's use this one,
this one great, and this one below
make it a little bit more bigger and move it up like that from here a
little bit on the left. Nice. I'd like to say that this is nice back
to the object mode, but first of all reference, GE, three pt and take a look. The shape iso three and an empt. Let's adjust this one tap
and choose these vertices. Proportional data is
on, and we go to the G, make it bigger and drag this one a little bit on the left grade, then choose this one
and we go to the G, and also bring this
one a little bit on the axis inside like that. Control seven and an empt
to take a look under. If seven we look above, control seven, we look under. Let's adjust the shape
because I don't like it. Get this one just move
this one like that. I want to make it more smooth. We are going here here and here, now let's go in front like that. Like that from
here and in front. Nice, 300 and now it's better, but I like what I would like. I'd like this one to drag a little bit down.
There's the thing. I want this one to move a
little bit more inside. But this one, a little bit
more in front, the mount. In rest, take this one, a little bit like that and
take this one a little bit. It's okay. Choose faces. Choose all of these faces three, and just bring them,
make it smaller, a little bit inside like that, and take these vertices, once again, rate Good. Let's recall this one phase. It is good. Yeah,
probably seven and PG, and a little bit like that. Great. You have two options. You can double click
right here or you can press F two
and give it a name one point he Let's save
our filet choose a folder. Let's call this one, do Beer underline beer,
Save blender file. How we can see we finish
this one pretty quick. Let's create the
body right here. We go the shift A, ops Shift A, mesh,
and again, round. But this time, we go the radius one and Rc going
to be two grade. Then where is my
screenshots. Wait a second. Okay, now you can see. Then
we go the right click, shade smooth, and then we press control two for the
subdivision surface modifier. From here, we go down, and then we are going
with the S x and probably Z and move it
up with a G Z like that. Great. Then we go
in the edit mode. From here, let's turn
on this function, and let's add an
additional loop, which is control error. Left click, go down,
and one more time, left click great and then we go the S is zero
to make it flat. Then we go the S to
make it bigger and take the vertices and also drag
this one on the right. From here, z for the
transparent mode. Choose all of them, this health left health
x and delete vertices. Out in the object mode, out from the transparent mode, modifier, search for
a mirror modifier. Move this one above
and press clipping on. Good. Then come back
in the edit mode. Let's take a look. It's
a little bit too big, and we go with the S x, a little bit smaller like that. One thing to say, I don't I don't want to
make this leg so thin, they're going to be a
little bit more thicker, then we have actually
in the reference. If you'll not like no problem, I personally would like to make them a little bit more thicker. We go with these phases and we press to insert and
move it like that. Then we go the x
and delete phases. One important thing to say, don't repeat, take a look. We bring on one adopts, If I'm going to choose
this entire loop, right click loop tool, I can turn this one
into the circle. But how you can see if
I'll try to make it small, we have a connection right
here, which is unpleasant. Why? Because we have a
check in on the clipping. Important thing
to do is control. Great. Check off on the clipping and now control seven
to take a look down. Then we go with the edges. Out left click to choose the
entire loop, right click, loop tools circle now we don't have any
intersection right here. Grereat Opt, make it a
little bit smaller, nice, one in ped Then we go with the Z Go down like that as zero. Nice. One more time that
Let's close this hole, but not with the f because we don't need it, we
can make it better. We go with the s, which
means extrude inside. From here, one and PD
go a little bit lower g and one more time s at center. Now the topology is
a little bit better, but not our legs. The, yes, we go with the, choose this loop, and
we go with the x and dissolve H. Now the transition
here is more smooth. Also, of course, we
don't like that part, choose the vertices and
move it up like that. Then let's choose all of
these vertices below, and let's drag them
on the G x like that. Drag these two vertices
G x on the right. Nice. Let's take this one and
also bring it here, one here, this one
here, where you are. Let's choose this
one also. Nice. Is it? I think yes. Again, they're a little bit
more bigger than the legs, but I personally like it. If you don't, you
can just adjust it under the reference
to make it smaller, to drag these vertices, how you can see no problem. But I'm going to come
back to that shape. Probably, I'm going to make
it a little bit smaller with S and g a little bit higher. Let's take a look from the side. I'd like to choose these
vertices vertices. Proportional editing on G, gre and move it
inside like that. The same thing right here. Three G Grich like that. All good. We can make also
this loop a little bit ops a little bit bigger. Hello, g S gre like that
for the transition. Nice. Problem. I'm going to
make it again smaller here. C s f two. Let's call this one two
point do underlying value. That it for our lesson, very simple, very quick,
ladies and gentlemen, how I say with that class, I want to give you the instruments which
will allow you to create many various B animals. Let's move forward for
the lesson number two. See you there.
3. 1.2. Eyes, Mounth, Cheeks: Hello, on the lesson number two, where we're going to
create the ice cheeks and mouth for our dodo very quick
and very easy. Let's start. Reference, turn the
transparent mode on. Then we go the shift
right click right here. Let's bring the second reference because this one was used
for the party and the head. We go the shift A image, reference, and choose the
second one with the flower. Great G Z S. How we can see the ice Ron around,
they're rectangle. We're going with a shift A mesh, and cube control tube for the subdivision
surface modifier, Gric Move this one in front, and then we are going
let's go in the edit mode. From here for a
scale, like that, and bring control for
one additional loop right here and one more
additional loop right there. Then click shade smooth. Make it even more smaller. Let's go in our reference, and for the rotation in our reference,
probably like that, Sx and make smaller, great Sx x, then we are
going with I need like that. F two, let's call
this one three point. Let's go in the modifier,
surge for mirror, move this one above and mirror
object to the head nice. Then we go with month, the easy shift right click. We go with the mesh,
and here surge for Taurus Major radius
is going to be 0.65. Then we are going to the right
click Shade Smooth Control two X 90 and make it smaller. And our reference is it is
without the cap in side. Okay. What we can do at modifier,
search for solid, drag this one above and move this one inside in
the minus, like that. I want to keep a small gap. I see no problem with this one. If you don't, you just
can instead of Taurus, shift A mesh and choose
UVphere for example. Als the position is great. F two, let's call this one four point month Let's go toward our chicks shift
right click right here, and then we are going
with Shift A mesh. Which one, which one,
which one round cube. Good. Keep it with one for
the radius, two for the arc. Right click Shade Smooth
Control two nice. Then we go in the three on
an pedal in the edit mode. Let's go in the solo
mode, which is slash. In case, if you don't
know what a solo mode is when you can work
with an object apart. Slash and the pet. From here, let's turn
on this function, and let's add one
more additional loop right here and drag
it right there. Control al z for the
transparent mood, choose these vertices,
x and delete them nice. Then choose this loop, S gre zero, to make it flat. From here, we are going with
the S to make it a little bit more smaller than S S, and one more time S at center. Nice. Now we have our cheek, but I would like to
make it more flat, so we go with the S Gricli that. Good, good F two,
five point cheek. Out of the sole mode,
let's adjust it. We are going firstly
one P T is the size. Yes, yes. Now let's
try to fix it. Seven to take a look above. G rich rich. Move it inside, one PD, three. Mm hmm X, and bring it in seven. Work apart. Don't look at me, just try to adjust it in the right position. Nice. Okay. Good. Let's adjust our GE. Greek seven GE. Mouth. Mood Let's go with our cheeks modifier Search for mirror modifier
above the subdivision, mirror object, our head
control sa goodbye. See you in our next lesson
where we're going to create the head and only after we'll
make ears. See you there.
4. 1.3 Hat and ears: Lesson number three. You can see how two lessons
we come very far. Now it's time to
create the head, which is going to
be also very quick. Shift S course or
to world orgion. Then we go to the Shift
A mesh and where is it? Circle go the S for scale. Let's hide this reference.
We don't need it anymore. Then we go the three
on an p to the circle. Then we go the G move
it up, x like that. Let's adjust it. That's a
little bit lower like that g, the reference also a
little bit on the side, and let's make the
head even more bigger. Like this. Good. Then we go. Then we go in the edit mode from here, a teaches everything, three on an PD then we go the Tetrod we are going
with the S for scale. Then we go one more time,
move it up for scale. Don't worry about this one, move it up for a scale. Let me take a look. Nice. Then we go the S, and actually
Actually, it's good. And then one more time
E S at center out, then we go the control two for the subdivision surface
modifier sheet smooth. I'd like to say
that this is good, but of course it isn't. Let's make that one a
little bit more weather, how we can see right here. Good. And what is next? To be go in the
transparent mood choose this sloop and then
we go the Control B. Without any additional loops, control B for the bevel. Let's take a look. Nice. This is how it was before
with very smooth transition, and now it's better. We'll create this
outline, don't worry. But for now, I think we can add solidify modifier in
order to make it thicker. Add sage solidify modifier. From here, let's go in
the positive value in order to add this one
inside, and we don't need. We can keep it on 0.04. Let me check. Yes.
Great. Then we can bring this one
above the subdivision. Because of that, in case if you don't know how
this hierarchy work, the modifier below influence
on the modifier above. That's why why it's important to keep the subdivision
under because otherwise the result
going to become Cosa Let's turn
this function on. Let's increase the
value toward 006. I think for me, it's
good. Let me take a look. Nice. Okay. Great. If you're
satisfied with your resute, we can go forward and apply
our solidify modifier. Now I'd like to make this one a little bit
more sharp right here. We go with the control. One loop, bring it here, control, one loop right there. Good. Then relatable
to that part. Very easy. We go
in the face mode, then choose out let's click
the entire loop of faces, and here we are going with
the ES and make it a little bit more bigger like that or
probably even S for scale. Nice. Now we have
this cute outline. I think don't repeat,
just let me try. We can add one loop
right here in order to make it more sharp and
one more right here. Now, you can do this one two. The outline is more
sharp than it was. F two, let's call this
16.6 point head nice. Ears, Ears are very hard to do, we go with the shift
right click right here. Then we go the shift A
ops shift A, mesh sphere. Then we go to the S
f scale right click shaft smooth control che for the subdivision
surface modifier. Let's open our first reference. One here, let's call
this one F seven point heard modifier ser
modifier mirror modifier, move this one above
mirror object head. Then let's hide our reference. Probably, I would like to move this one a little bit
more inside like that. How I say it's very hard. Shift S cursor to word origin. That's what we have at
the moment right now. I hope you're satisfied, always be our lesson. In the next one, we're
going to create flour and then hence y
hens at the end. Because don't ask me. I don't like it from the site. Grey that I check it. I don't like it at all. Sri. Let me make it more
smaller like that. G gre gre, good, and then S X Nice
because it was terrible. Now it's much better. Seven should take a look above. Relatable to that part. What we can do, we can
dissolve one loop. Now it's not so sharp. In rest, everything is good. Now I'm satisfied and now
I can tell you, goodbye.
5. 1.4 Flower: Welcome back my friends in
the lesson number four, where we're going to
create the flower. We're going with the Shift A, mesh, and UV sphere. Then we got the G
x on the right, right click, shade
smooth control. Then we're going with
the S for a scale. Create, let's call
this one F two, and we'll give this one point
flower underline inner. Then let's move this
one in a folder apart, which means new collection. Let's call this one flower, create as for a scale,
then the petals. Firstly, let's move our three
de cursor to our object. Emphasize the
sphere and we go to the shift Cursor
selected from here, shift A, mesh, and
serge for cube. Control two G that move it up as for a scale as like that. Add it mode, control, one loop right here, move it above and
second left click, S for a scale. Transparent mode,
choose these vertices, S, for a scale. Choose the vertices,
S for a scale, create, and probably this one, make it a little
bit more bigger. Right click, shade smooth. Three per make it a little bit more thinner like
that. Great. And problem. I'm going to move this
one a little bit above. And adjust under your
own preferences. Then the question is how
to multiply this one. There are many methods.
Mine is very, very simple. B what point, switch to the three Dcursor.
Select your petal. Let's call this one
actually two point petal and move in the
flower collection. From here, Shift D, rotate, va Sif D, rotate. Okay. Rotate, please. Then we can emphasize
all of the three, Shiv D, air rotation. And one more time,
Shiv D air rotation. Let me delete this one. Let me adjust. Okay. Not a problem. Let me make this sphere a
little bit more bigger, three P as gre that what we
have at the moment right now, but we can make it even more
better than how we see this. Let's go. Choose our sphere and apply the subdivision
surface modifier. From here, we are going with the modifier and search
for a displace modifier. Nothing special, you
think so we have to bring new texture. Press new. Let's call this
one flower sphere. Texture nice and decrease
the strength to word 0.3. You can see this icon
and this icon are similar because this
is texture properties, so press right here and how we can see we have our
texture, flower sphere, and you have here a lot of
types of what you can do, how you can distort it. I'd like to stop on the Voronoi, and there is one more
thing that we have to do is one more subdivision
surface modifier. Control two and make sure that it is under because if you're going
to move this one above, To sharp. I don't need it. Move this one under,
and going to be enough. Then from here, this
play keep it on 0.15 back here in our
texture properties. I'll a increase our texture
from 0205 toward 0.55. Now you can see this is
some type of clay shape. You can play with your own settings if
you want more or less. I personally going to
keep this one on 0.5 55. For me, it was good.
Intensity also we can decrease, increase. I'm going to keep this 1.9. That is my shape at the moment right now and I like it a lot. Control S two save. Let's go toward our petals. Firstly, I'd like to
connect them in one object, emphasize them, and then
we are going with control. Now it's all one object. Let's apply our subdivision
surface modifier. Take a look. Nice. Let's
go with Ed modifier. Search for displace modifier. Too much I know.
Let's go with an. Let's go this one petals. Let's decrease the
strength toward 0.2. A good. Let's go in the
texture properties and type. I'd like to stop on the marble, I suppose, or mas grave. I think mas grave. Let's go let's bring one more
subdivision control to you. Now the shape is more smooth. From here, we have
a lot of settings, and one thing that we also
have to do is to play around. Everyone can choose
their own site, their own preferences. I'd like to increase
my texture toward 0.85 and intensity to decrease
toward 0.5 or probably 0.8. What, if not most
grave, but marble? My setting is going to be from type going to
be multi fractal. From here size is
going to be 0.7, nabla going to be 0.01. Intensity, I'm going to
decrease toward 0.6 like that. One more thing is go to
the modifiers and strength decrease toward 0.1,
or probably 0.15. One more thing that I
want to do is to increase the thickness in case if
you don't need that grade. I'm going to go and search
for a solidify modifier, bring this one in the middle, and then decrease toward -0.006. That's how we turn, we make the shape of the flower a little bit more interesting
and creative in comparison to
what we got before. Let's emphasize it as
for a scale like that. We have one more thing. It's steam steam going
to be very easy. Shift A, mesh and cylinder. As for scale, make
it longer, nice. G, let's go lower. If you're going to
apply control to, you can see the
shape right here. It's comes. Let's go on the solar mode, which is slash and PD edit mode. Choose this phase,
and delete it. Then choose this H and we
go with the E S. Uh huh. Pivot point back to the
individual regions. Now, we are going
with the S E S, at cer. The same thing. Below, choose this
face, x deleted, choose this sloop of edges
with out left click E, E S, at center, and take a look. Our shape now is better. Right click, Shade Smooth, out of the sole mode one. As for a scale, G
that move it up. Let's go right here,
let's rotate it. One more thing that I
want to do re greek Nice. I'd like to distort a
little bit the team, but not using the modifiers, just go in the edit mode, add one loop right here and
go with the G on the side, one loop right here, G on the side and we
can go with one here, G on the side. Great g x. Let's call this one F
two, three point steam, and then we go the m and move this one in our
flower collection. Now, let's emphasize
everything. Why like that. We go to the median point
and move this one to our bobo G, smaller rotation. Let's try to rotate one. Nice, like that. I know that she seated
in the illustration. I decided to keep her standing. So I hope you don't have
problems with that. Okay. Let me check. Very cute. Adjust under your
own preferences like always Control
three. It's close. It's nice. In the next lesson, we'll create hands and we're finished with
our modeling block. Thank you so much for joining
me, and let's go forward.
6. 1.5 Hands: You'll be surprised how
fast will be this lesson. Hence, for our todo, and we finished with the
block number one of modeling control S to move our
cursor to the region, shift A, mesh, and cube. Then we're going with a
control two G on the right. Let's call this one F two, and this is going to be
eight point hence Great, and then as for a scale. We go with this one with
this phase under one, one thing that
we'll do right here is press one time extrude. Then, just a little bit lower and as for a
scale from here, for a scale click Shade Smooth, probably, I'm going to
increase it a little bit. I would like to I like
what? Well, good. I don't have any
problem as for a scale, and we are going
here and air for the rotation as for a scale that to make it a
little bit more bigger. Three on the MPG move this one in front and
one line with a flower. From here, probably I'm going to decrease
descend with this one. Yes, one, and we are
going with a SD. Duplicate air fat, air
feration one more right here, probably I would like to
make them a little bit more bigger and to
choose the flower also flower air fation a
little bit higher like that. Don't make it too big because remember
that we're going to cover all of that with the
particle system of the hair, we're going to be a
little bit more bigger than how we see at
the moment right now. That's why I am with the size. One thing that we can do probably to apply our subdivision
to make it more smooth. But let's keep this one for our next lessons
because we'll see. But in st, I told you
it's going to be very quick and very easy and we finish with a
block number one. I hope you're satisfied. I hope you learn something new, and I hope you feel the boost of confidence because
there is nothing hard, small thing basics
of the blender, and here we are with
our amazing result. I like it. Let's go in our
next block of lighting.
7. 2.0 Lighting : Block number two with
only one lesson where we're going to
establish the lighting. So let's start. Firstly, let's
create a collection apart. Right click New collection. Let's recall this
one studio great. Then we are going with a
shift A mesh and plane. This is going to be
general lighting. You'll see in 1 minute. As for a scale, make it bigger, G, move it up. Good. Then we are going
in the render mode. From here, switch in
the render engine, you'll have EV moved
toward the cycles. Then we're going
into the materials, here having your plane
emphasized press. Then we will call this one
plane underline light. Here instead of principle SDF, we're going to
choose emission and v. The first lighting is on. Then we're going with a 1.4
and three for the side. Let's move this one G gre
a little bit in front, for the smaller rotation. Toward our do. Nice. But we'll hide this one for some specific purpose
because we have to establish three more
sources of light. Let's start with the first one, which will create the
outline of our character. So we're going with a
shift A mesh measure, but light and area. Three and PD r x 90 x -90. Then we're going to the
G Grip behind like that. From here, let's increase
the power toward 300. Let's also create
a second window right click vertical split, and we are going right here. One in the first one, also render mode and
let's hide the overlay. From here, let's move into
the simple viewport. Good. Now let's see, let's see. Firstly, shape and seed of
square choose rectangle. Now we can increase
the size x and grec. The x one going to be five. Meanwhile, the grec
one going to be seven, we can see something, but still not good enough. We can make it even more
bigger with six and eight. Now. From here, the
color going to be D one, B F eight, then 300 p
and let's play around. Let's move it up. I think we can make it
even more bigger with S. For more stronger
outline that we can see right now on our character. Also, let's go in the
render settings, go down, color management, choose filming and look medium high contrast. Nice. Let's go with two
more sources of light. First, let's switch
the pivot point going to be the three D coursor
which we have in the middle, seven, Da above, and
we are going with a shift D and move this
one on the left like that. From here, G grigri two times and move it a
little bit more far. Very close, very far. But what if? You know what? Keep it actually more closer to our character and not far
how I say that start. Then we're going
into our settings, relatable toward the color
it's going to be F D five. Nice. The power going to be 333. The size g going to be the same. One more time, shift D air
move this one on the right. Let's try to move
this one a little bit more further Like that. Nice. The color going
to be here, one, nine, F, good, and the power going to be
300, a little bit lower. Now, bring the plane. Voila. This is our character that have the outline behind that also have a few different gradients from the point of the
colors on the right, and on the left,
everything is fulfilled. There is no sharp shadow. Everything is very smooth. Control S two save, that is for our lesson if we make some adjustments in future, but for now, it's
more than enough. Thank you so much, and I'll
see you in the next one where we'll create the materials
for everything by
8. 3.1 Materials for Dudu: Number three, probably one of
the most pleasant one where we're going to bring the
colors for our character. Let's start. We go in the
shader editor right here. In the first lesson, we'll create materials
only for our bobo. What I'd like also
to do is to increase the color of our world. Why not? Let's go for example to word to
something like that, but decrease the
strength toward 0.7. Okay, then let's
emphasize our ears. Go into the materials, press new and let's
call this one ears. Then we go in the base color. Our x is four F
two, A, two, four, v. Then the roughness toward 0.45 cheeks, also new material. Let's call this cheeks. The base color going to be f, A, seven, A, six n. Then
we go toward the ice. Let's call this one ops. Decrease toward black
roughness toward 0.4. Where the month, you can choose the ice material duplicate and
let's call this one month. Then we're going
toward our bobo. We'll keep it white, but we need to create a
material for that. Let's call this one bobo head. You'll understand why. Because in the next lesson, I'll show you how
we can paint we have here with our reference. You can see here
legs are black here. So we will paint
this black part, which is going to be also a
very useful skill for future. Let's go toward our body, and let's call this one
do underlying body. And that is for our hands, we also can keep Hands. Let's go toward the left one and choose the same to hands. That is for our lesson. I don't want to
keep it very long. Small, structured and
easy to comprehend. See you in our next one. Control is two safe.
9. 3.2 Texture Painting : Lesson number two,
where we're going to paint the legs of our D. How? Very easy. We are
in the do body. Yes, Shift A and search
here for image texture. Then press. Let's call
this one do underline leg. Then hold the left mouse button and drag it down like that. Then multiply on f, which means we increase the
quality, and the color, keep it on white, press, connect color toward
the color. Good. Then from here, If you go
on the texture paint, yes. Let's also switch right here
in the view par shading. If we try to draw something
over our body, we can't. Firstly, because we have to save our texture image,
go on the image, save S, choose a folder, and you can call this
one to do, save image. This is the thing number one, but we still can
draw B we have to make an Von wrapping
back to the layout, In the simple render. Let's create a copy for our D
body for insurance Shift D, and then hide it. Then choose our body. Go on the modifiers, apply mirror and
apply subdivision. Nice. Then we go let's
go in the solo mode, which is slash and PD three. Let's choose out click
this. We have to connect. Also let's choose this one ops, shift out left click to this. Now we have our entire
loop emphasized. Great. In case if you don't, you still have some space here. You just can hold shift and left click in order
to connect them. But the final goal is to have one loop like that.
Then right click. Mark then A choose everything, rap Now out of the sole mode. If we go in the texture paint. We have our texture and
if we like to draw, we can draw easy. Yes. One more thing that
we have to do is to apply the symmetry on the x one and also Gric which means everything
that we'll draw here, going to be behind
and on the left, which will save our time. Then here are your
colors. You can switch. Now the first one is white, that's why we can
see everything. Switch on the
black. Let's start. Everything that we
have to do is to draw small lines right here. Try to make it. In case if you want to delete it or you can keep control left click and that's how you can draw
with the second color, which in our case is white. If it will be, for
example, what it is, some of pink red,
so you understood. Back on white. Where is white. Now let me control click. Nice three d, let's connect it. Okay. Control seven
to take a look under. To get this point. Then let's go here. Kind ide to you. Let me fix it. Nice. One pad. Let me make it a little
bit more thicker. Here, of course,
you don't have to repeat strictly after me. You just have to draw V. I've done And what is what is important step that
we have to do at the end. How we can see our image here, we have a star, which means that we have to save our updates. So now press save. And we have our texture
back to the layout. Let's go under render mood and V. We have our
texture connected, which means our le have
that black part, easy? Yes. And this is actually This is your
space for creativity. You even can do the black belly or some sort of I
know hearts here. You can just draw
wherever you want. I don't say that we need it. Why we don't have it
because I forgot to save. Let me save layout alla. But I don't want it, with
all my respect. Mm hm. Let me quickly fix it with
white. That is my friends. We've done with that lesson, very easy, very simple
and very useful. Thank you so much,
and I'll see you in the next one where
we'll create the head, and then the flower,
see you there.
10. 3.3 Blender kit add-on: For that lesson and not only, we'll use a very useful don, which name is blender kit, so you can go to the
official website to the blender key.com, and here first of register, create your cabinet, then
download the blender kit. You'll have a zip folder. Don't unpack it,
keep it like that. Then we're going in our blender. We go in the edit preferences, addons, and here
you'll have install. Press on the install, search for the zip file, and press install addon. Then we're going in the
search step, press blender it, you'll have this
one and check in. After that, if you'll press, you'll have it on the
side, many right here. Here you have to log in again in your profile,
and after that one, you'll have access for a
lot of materials models and not only that we'll use in
our case for the Dhaat. That is, thank you so
much. Do this one alone. There is nothing, nothing hard. After that, come back to our
next lesson. See you there.
11. 3.4 Hat material: Hello. So after you
install the don, let's apply this
one on Practice. Firstly, we are going
for the sign menu, open the blender key, open the eye, which will allow
you to see the materials. Let me bring this
one on the right. And here, press fabric,
enter and search. Then this is the
page number one. Go on the second page, and there is a pink fabric, which I personally like it. So we have to have our head emphasized and then double click on the material
that we like it. Good, close the eye
and to close the menu. But the result is moms. We have to make an
UVM wrapping also. But before we have to apply our subdivision
surface modifier. Apply step number one D. Then
come back in the viewport. Let's go in the solo mode, edit mode, and three on an pd. Let's choose, for example, out left click this y. This one edge in the middle. Yes. Then we have two seven
to take a look above. Let's go here and holding
shift out left click. Nice. We have one loop around. Then we go to the
right click, Mark Sam, which will allow us to to divide the materials,
one from others, and then we go the He everything wrap nice out of
the solemn mode, and then where is
my screen case? Sorry, sorry, sorry. And then we go on the render
and hear what we have. So now, it's not so
stretched how it was before. When we go toward the scale and here let's increase toward 4.2, 4.2 and 4.2. Good. Now it's a little bit
better, but guess what? Always, we can
make it even more. Because this pink, it's actually already pretty
nice as the material, yes. But there is we feel open
our reference, where it is. This pink is a little bit
more brighter than this one. One more thing to do
before is shift A, no control, sorry,
to apply the scale. It's very important
always when you change the scale of something, apply because the result
might be much better. Let's bring one more
stab surface modifier in order to make the
shape more smooth, open the shader editor, and from here, how
you can see there are different images
for the normal, for the roughness,
for displacement, and for the base color. Let's cut this one with control right click and
that's how you can cut. Then shift A and
search for color mp. Bring it right here,
connect color with the base color and
color with a factor. Okay. Now let's establish the colors. Bring this one
more in the middle and this one more
close to the black. How we can see we have
here some type of squares. I want the main one
to be more darker and this whites to
be more brighter. For the black, switch the
hex on F f eight good. For the white, we are going
with something similar, F BF, nice, and the
transition between of them going to be not
linear but cardinal. Constant is very sharp. Everything else, you
can see even here. Everything else is
something more smoother, something less, Cardinal is
something in the middle. Let's drag until we
will like what we have. They're very small
the white one. I would like to make them
a little bit more bigger. So for that one, we have to
drag this one from the right, more toward the left. Let's drag them more
toward each other. No. Good. There is one more thing. I want to increase the
strength toward 1.3. That is our result right now. So just compare with let
me quickly show you. Let me quickly show you Yes, how it was before, very
pale, not the best one. We can do always better
and take a look right now. It's more brighter,
it's more cute, and it's more relatable to our probably our even is more brighter, but
it is what it is. I don't have problems
with that one. I personally like it a lot. But there is the thing in
the middle that we have to make in a different color. So Let's go in the simple layout
in the simple viewport. I hope everything is clear
to the moment right now, and there is nothing hard from the way how I teach
Control S two save. Press go in the edit
mode, choose faces, and from here, let's choose left click this
one in the middle. From here, control
plus on the 0.1, two, three, Okay. 456. Yep. Just make sure that this one is
completely emphasized. You can play around holding shift out click and
choosing every loop apart, or you can in the way how
I did control plus on the PD and this is how you
can have it emphasized. From here, let's go
in the materials, press on the plus material, let's call this one middle, let me show you the
magic, press sign, and va But Let's
choose our fabric, which we have above, and let's duplicate it. Let's call this one
head middle, a sign. Then from here, let's
out of the edit mode. Let's switch the colors. So we our reference. Choose this pink and
choose this brown. Good. Go here and also move towards some red
and then decrease like that. I'm not sure that I like it. Probably I would
like to increase the whiteness saturation down. Let's check right now. But probably I will also
increase the scale towards 5.2, 5.2, and one more time, 5.2. And now I have to play. I'd like to drag the brown
one more toward the red. But having this
one emphasized and probably this brown ain't
something that I like, I will increase a little bit the color of the so. Not really. Okay. Let me take a look like that. Good. Now, everything is good. Control as to save. Let's hide our reference. And that is, I hope that
lesson was very useful. We bring the new add, we create some top materials, and we create the head. What I can say, else, if not, that I'll see you
in the next lesson where we'll finish
this block and be creating the materials
for our f. See you there.
12. 3.5 Flower and Outlines: Lower the last one
from our lesson. So let's start. Let's use
our petals. Let's check. The amount of
polygons are cured. And let's go in
the shader editor. Let's bring the new material, and let's call this one petals. Oops. Nice. From here, let's start with the
Shift A color ramp. Then we'll add one
more gradient text, and holding the
gradient text control t for the mapping and
texture coordinate. In case if it didn't
work, probably, you don't have the addon
preferences addons, search for not wrangler and check in control t and
you'll have the same. Let's start, connect the color
toward the base color and this color toward the
color rump From here, from here, keep this
one on black and white. It's a very good
contrastical colors. We're going to switch from
linear to base plan for more smooth transition here linear going to
be quadri sphere. Then here where we have to play. Firstly, the scale
of ix going to be zero of Greek going to be 2.6, and of going to be
minus zero three. Good. I think now you get
it what I want to do. I want to have some
contrast of more stronger yellow and
more simple one. Then that is, what if I'm going
to keep this one on four, no on two, Probably, I'm going to keep this one -0.2. From the colors, let's choose. Let's keep them a little bit
more far from each other. The black one. Where
is the reference? Here it is where you
are. Here you are. Choose the white color
picker and choose that one. Choose the black
color picker and choose the border. Take a look. The changes aren't very strong because the
colors are very similar. But we don't need to
emphasize this very much. We can try to move this
one toward orange, but now it's more clear and now it's
probably more better, but don't try to make a big
contrast like this one. In my opinion, that looks. That's why I'm going
to keep the colors more relatable to each other. Okay, we finished
with the petals. Then we go toward
the middle part, and let's call this
one flower sphere. Actually, I'm sorry. Sometimes I rush myself. Let's back to the petals. Roughness, let's
decrease toward 0.25, to make it a little
bit more shiny. Then open the surface and wait, we're going to
increase toward 0.3. In order to make it a little
bit more heavy on the final, on the final render. Now I've done with the
petals and now we can come back to our flower sphere. Let's choose the color picker
and choose this brown. Then we go toward the
roughness, the same thing, 0.25 surface is going
to be weight 0.3. What if we'll copy
all of this nodes, back to the sphere,
control V, bring it here. Choose the color of the brown, x control C in order to copy and connect color
with the base color. Choose for this yellow control
V that brown also here, and let's make it
a little bit more darker like that. Great. Now we also have a small
gradient right here. Let's go toward our steam. Let's call this one
flower underline steam. Choose the color. It's going to be Color Picker, let's
choose this one. Probably I'd like to make it. I'd like to make it
a little bit more. Emphasize like that. Nice roughness toward 25. I don't see the necessity
to bring here the gradient. Let me choose the color. Good. One more thing that
I personally want to do, and I think it will make
the final image better. Choose the petals, shift a grease pencil and
object line art. If we will check it
right now, it's also. That's why because we have
to establish the camera. In the camera, it
will look right. Having our camera in our scene, moving ourselves a little
bit more far and we press control out
zero on the MPD. That's how you can easily establish the camera angle from whatever point do you want. We'll have a lesson apart
where we'll adjust it, but for now it's enough
and how you can see the line art now
is very beautiful. Where the line art. Let's
new collection, outlines. Let's call this one outlines. Then we go down where
is this data settings, strokes, and let's decrease
this one toward 0.45. Good, and increase the
car resolution toward 64. Let's check it right
now. Very good. What we also can do, there are some modifiers
for our line art, so we can go to the effect. I like the wave distortion,
Okay. Too much. I'd like to decrease
the amplitude towards five and the period toward ten or probably. I don't remember
exactly what everyone. What if I'm going to increase
this one toward 35 30. Okay. Nice. We have small
distortion of our line art. The same thing for our sphere, grease pencil, object line art. We are in the camera,
so everything is right. Go to the data, increase the curve resolution toward
64 and thickness toward 0.45. Nice, go to the effects, wave distortion, five and 30. Good. We can make the
same for our steam. Why not have our
steam emphasized, Shift A, grepencl
object line art. Data properties, 0.45
curve resolution 64. Let's go toward the
effects wave distortion. Here I'm going to keep
five and 25 like that. Nice. Control S two
safe. Well, good. We finish with
another block where we bring the textures
over our doo. I like it a lot. I hope
you're satisfied also. What if you're going to decrease the lighting of our world? Yes. Very nice. Let me check. Good. In the next
block in the last one, we will create four
for our character, which will make it ten from ten, if not even 11 from ten. But for now, make some
adjustments I fed so this block was very simple
but also very available, and see you in our next lesson.
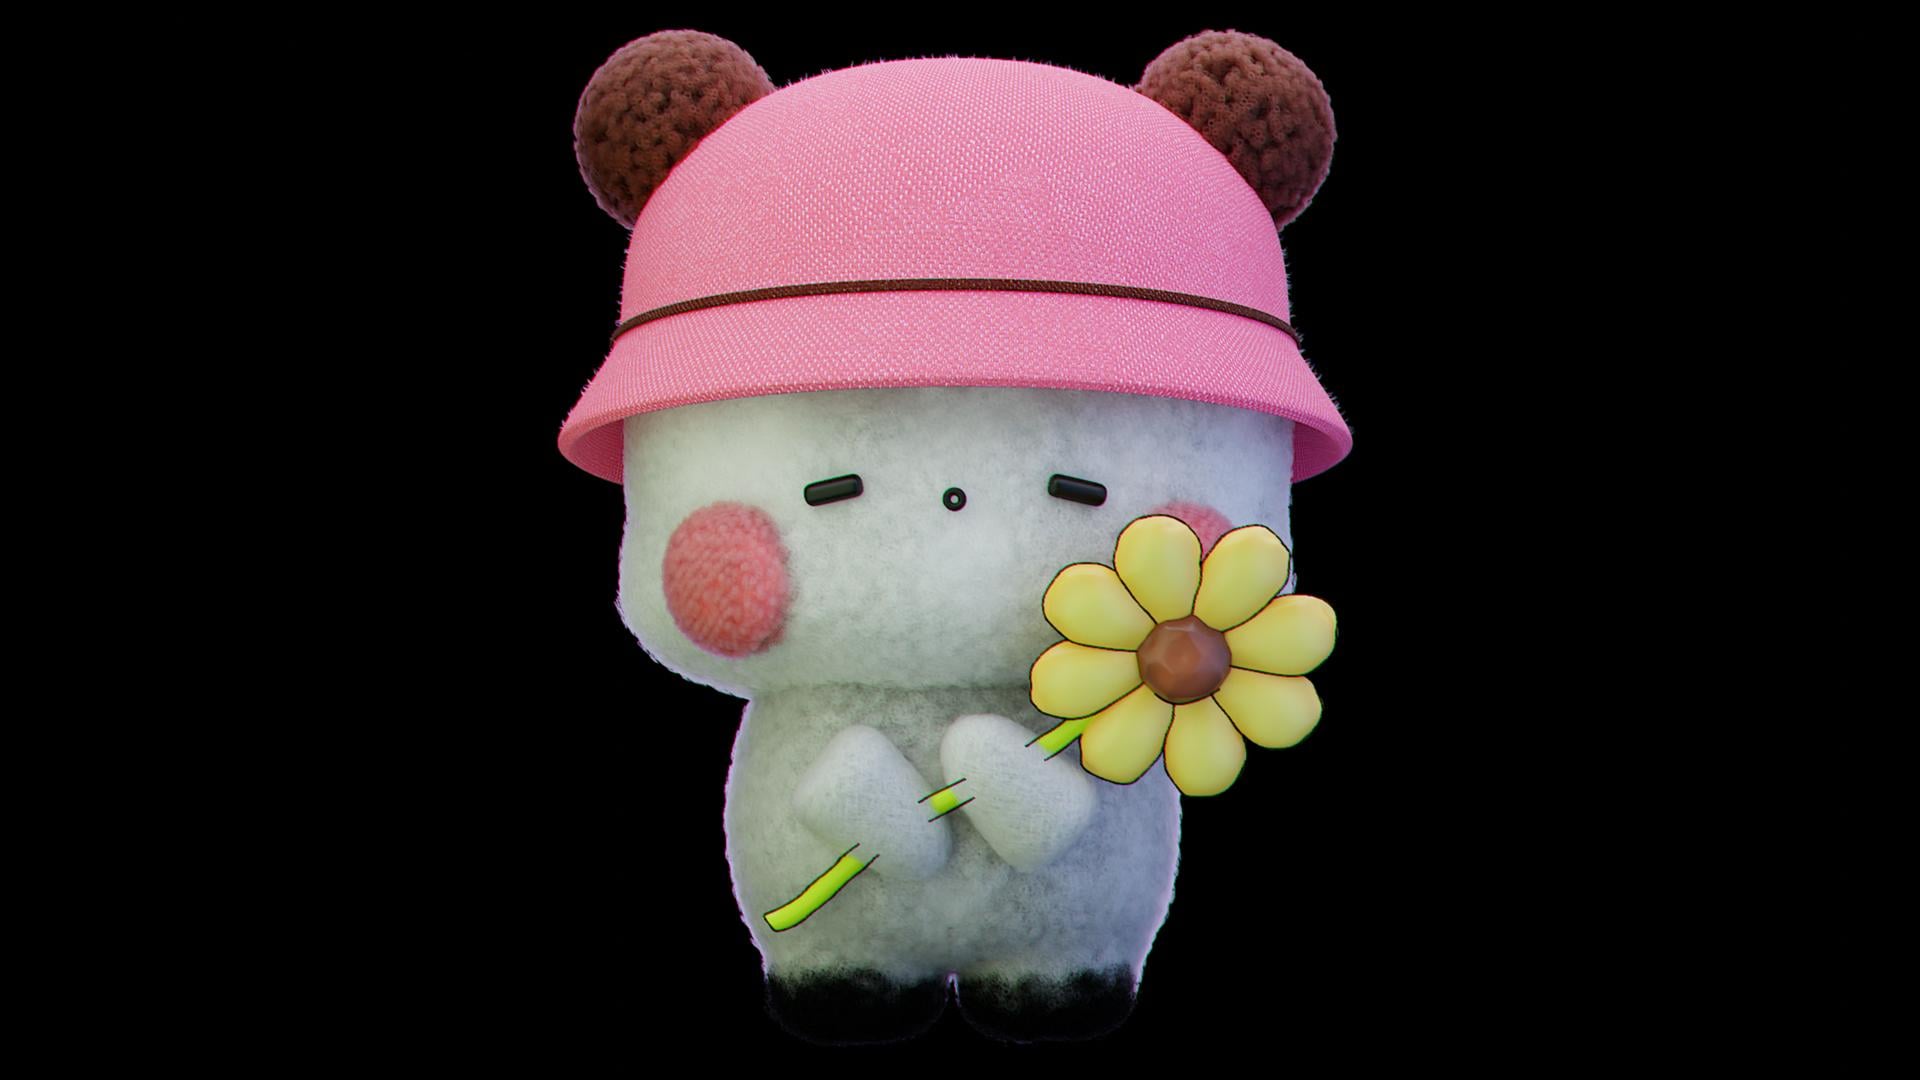
13. 4.1 Dudu fur: The less block,
where we're going to create four for our D do. I'm very excited,
and I hope you also. So I'm going to
keep the lessons. We're going to create
four for everything apart in every lesson apart in order to make
it easier to comprehend. Let's start. So firstly, turn on the overlay. Good. Let's choose our do phase, and the body and
the head going to share the same particle system. But before I do this one, I always create
shift A mesh plane. G, move this one on the right, why it's so hard, blender. Okay. Very weird. Let me hide the studio. Let me hide the reference, and where is our plane. Our plane was created somewhere
right here, I suppose? Yes. Let me go move this one at the collection
of Dudu and studio off. So I usually create
a Hrapart Yes, on some plane in order
to see the result, and then I very easily apply
this one on the character. Because in my opinion, that brings you more
freedom to experiment and to see much better what you
can expect. Let's start. I have a course part about where I explained in details about
the particle system setting, so that's why if you're a
complete beginner, of course, you'll achieve a great result, but don't expect to hear answer for
completely everything. You can check the other class. But for now, I'll try my
best to make it easier for you to understand
what we are doing. Plus hair a. Let's call this one underline. The number at the
moment right now, we're going to be the
number of let's say three for our
experiment purpose. The hair length
going to be 0.13, and let's go lower. Okay. Render. Check on the s plane, which will make our hairs more smooth and steps
increase towards six. The more steps, the more smooth going to be the
shape of each hair. Then you go in the view
paris play where we have to increase the strength
steps. This is the same thing. Only in order to see
also smooth hairs in our viewport throughout our
practice throughout our work. We're going to increase
this one towards five. Remember, the more
bigger that value, the more heavy it's
going to be for your PC, the last value is seven, and we will bring seven
before we render. But for now, five is enough. Go lower children, and
we will choose simple. Children are the amount
of hairs that are going to be around
for each parent hair. In our case, this is the
number of parent hairs, and this is the number of children hairs where one of them is always
for the parent, which means if we have ten here, that means one parent
and nine children. If you're going to have
50, it's going to be 49 for children and
one for parent. The display amount going to
be 45 and render also 45. The radius, I'm going to
increase toward 0.22, Great, a little bit more bigger. Let's go lower
toward the clamping. Clamping is something that
can group your hairs. Take a look. If I'm going to increase this one toward 0.45. Now it does make
sense what I said. Shape going to be 0.30. Meanwhile, the twist going
to be zero point also great. I want some type of groups of twisted hair that's going to be full around of our
to do head and body. Let's go forward
toward the roughness. Roughness is high always says, where the main cooking
is the main kitchen, let's say, for our hairs. Uniform is something that brings the common
distortion for our shape. So take a look if I'm going
to bring this one on one. The hair is very
distorted in general. So that why let's
keep this one on small value like 0.0 69. Good. Then we go to the
end point end point, show the direction of your hair, so you can move it
farther or more closer. Take a look if I'm going
to bring this one on one. Yes, the end point of each hair is going
farther from the roots. That's why we're
going to keep also on the small value, 0.0 ten. Random, I uniform distort
your hair shape in general, random distort every
hair in particular. The value here going
to be where is 0.0 68. Meanwhile, the size
is going to be 0.98. One more thing is k. K is where you can
choose the hair shape, the hair style.
Let's say like that. Like in real life,
someone have more smooth, someone have more
curly and different, we're going to choose the carl for our purpose. The amplitude. Amplitude is something
that allow you to see how big you can have
your hair shape or not. Let me show you on practice. It's going to be much better. This is the 0.2, and we're going to decrease
this one towards 0.03. Now, the amplitude
is way more lower in comparison to
what we got before. The flatness going to be 0.2. The frequency is the amount of spirals that if each
hair going to have. Let me show you
just for example, 22, now you see each hair
have a lot of spirals. So we're going to
have a value of nine and shape show you
let me show you again, if I'm going to draw
this one toward one, You can choose with shape the area of influence
of all of the settings. So if you're going
to, for example, direct this one more
toward the positive value, that means that the roots will not be influenced by
all of the settings, and they're going to
be sharp and smooth. Meanwhile, all of
the settings will go to the end of your hair. And the vice versa, if I'm going to go for
example toward minus -0.7, That means that the
end points going to have the settings
of the roughness, but not this of the curl, and all of the influence will go toward the roots
of your hair. I hope it does make sense, and our shape going to
be where is it 0.75. I want to have all
of the spirals at the end of our hairs, but you make the roots
more more straight. That is Contral S two safe. Before we'll apply this
one on our two head, let me hide the camera. I
don't need to right now. Before we going to apply it, we have to check the
phase orientation. So go here. Everything
have to be blue. But in case if something is red, you go to the edit mode, You press, to choose everything, and then you go with the out
and recalculate outside. In that case, it will make
it blue because otherwise, our sod can be very, very different and
you will not like it. The second thing
we have to apply our scale Contral A
and apply the scale. Now, there's one more thing that we can do in
order to achieve much better resod is to increase to apply the
subdividon surface modifier. But it also means
that it's going to be very heavy for our PC. Let's not do this one right now, but who know probably will
do this one in future. Bring plus and
choose our D four. Then let's increase the
number towards 2,500. Sorry, five, 400 and voila. We have our hair that means that we have to
make some adjustments also. But it's nice. It's nice. Let's go to the collection. Let's choose our head and ears, and let's make it
a little bit more bigger in order to
cover up the hair. Let me hide a little
bit of particle system. Oh, it's nice. Probably, I'd like
to do this one. Just a little bit more. Smaller. Okay. Then let's
check our ice and mouth, 300 p Gri move them
in front. Not so far. I don't know why my PC
started to legging. Let me hide this plane, hide it, and then
let's choose our ice. Let's go with the Gri The
same thing with our cheeks, 300 emp or even seven. I'll say for the transparent mode and I think we can go with the Gririk T go on
the diagonal one, and let's bring them outside. Great. Let me check. Nice. We'll cover our
cheeks with four also. That's why we don't have
that one and the thing. Let's go in the view per
shading and check what we have. We hide it. Let's turn on the studio, and there's one very
important thing. You think that we've done,
but we actually know. Because for air hair
that you create for fur, you have to create
a material apart. Now we can see the
color is flat. We don't see the outlines
of our lighting. The hair don't interact
with the lighting. How we can solve this one, we go toward our bubo head plus Okay. Let me go in the
viewport, press new. And from here, let's call
this one. It's Bobo Dudu. I forgot I always mislead who is Dudu who is
Bobo, so sorry. I miss it. I call
it Bobo, wherever. Let's go the Bobo,
underline Here, instead of principle SDF, how we can see we have
principal hair SDF. Let's turn it on. Then let's go toward the color of white, bring the saturation toward zero and increase this
one toward white. Let's go in the particle systems and here in the render material, choose instead of
Buble had Buble four. The third thing further you can atie is that we
have the outline. Now there's a few more
settings that we can bring studio Everything is on the roughness to make
the hair more shiny. So we're going to keep this
one on 0.35 and here also 35 C it's something that make it shiny but in the
way of how the diamond one. So we're going to
keep this one on 0.7. IO to make it more saturated. We're going to decrease
this one toward 1.250 and random
roughness toward one. Create Control s2s. Let's check what we have. Let's also increase the
lighting of our world. Good. And you probably
think that that is all. But no, there is also one very important thing that we have to do that we didn't
so in the viewport. Let me hide the flower. Let me hide the outline. The thing is that our hair at the moment right now
is pretty thick. If you go down, there
is one more thing like hair shape
where diameter root, you can make it or the
root of your hair. Tip the value of zero
is the thinner one, the more far you go, the ther
you're going to make them. If you make some
adjustments right here, we can see them in the viewport. You can see the adjustments
only in the render mood. So that's why we're going to decrease the diameter
root toward 0.3. Meanwhile, the tip, we're
going to increase toward 0.08. Now we can see the changes. Now our hairs are more thinner in comparison
to what we got before, and probably we finished, we finished with our first
particle system created. Unfortunately, it means
that your PC going to start to cry because
it's much heavier. You can decrease the
strength steps in the viewpoint display in order to make it a
little bit more faster, and at the end, we
will increase this one towards six or
probably even seven. What we have to do is also to
bring our fur to our body. So we press plus. We go toward the D four. But there is one
important thing to do is we have our
text right here. Yes, that, that means that we are going
with the duplicate DF, and let's call this
one under buddy. The same thing for the body, we go in the materials plus. Choose our fur and duplicate it. Let's call this one
also underline buddy. Then also we have to apply
the scale. Now it is better. Then open the shader editor, go to the Dudu body, copy the texture of the Dudlex, bring it here and connect
color with the color. Now, come back, and
enjoy your result, but probably let's go
in the particle system. Yes, we have in the
render material emphasize the bub body. Let's check it. Overlays. That is, for our first lesson, I showed you probably everything relative to how I
usually create the hair. We have the outlines
of the lighting. You can see the interaction of the hair with the lighting. You can see the small clumps that will be much better
on the final render. But at the moment right now, we've done probably
with the hardest part of this entire class. Now we can move forward to
create the hair for cheeks, ears, hands, and heat. Of course. I hope you enjoy it. You can enjoy you can zoom in for your
hair to take a look. You can play around with plane if you want to do something more specific in our settings of the roughness and the king. But that are my settings, and that's how I want to
see my final character. Interest, see you
in our next lesson.
14. 4.2 Ears Fur: Hello, and welcome in
our lesson number two from this block where
we're going to create four for our ears. So
that's what we have. I personally like
it, but I'll hide it because it's too
heavy. So that's why? I'm going to choose the body, and I'm going to hide
the particle system here and particle system here. Also, I'm going to
choose this outline and this outline and move them
in the outlines folder. Where is that plane
with the hair, I'm going to delete it because
I don't need it anymore. Let's go toward our ears. First thing first,
control A and apply the scale. Then we
go with the plus. Let's call this one ears. And choose hair, and there's one very important
thing to do is to apply our mirror and what about
the subdivision surface? I think we can keep it with
the same amount of polygons. Come back to the
particle system, the number going to be 1,200. The hair length
going to be 0.12. Let's go lower materials
will do a little bit later. Play and check in,
increase toward five. Ew part increase also
let's go five at the end, we'll increase this
one towards six. Then children this time going to be interpolated and not simple. The display amount
going to be 25 and 25. Then we go lower
clamping is 0.55. We created some type of
groups right here, two. Let's go toward the roughness, where the uniform
going to be 0.06. Great. Then you go
toward the end point, and going to be 0.0 25 and
the random going to be 0.07. Meanwhile, the size is 0.9, go lower king type chose curl. From here, let's play around. The ampitude going to be 0.0 35. Meanwhile, the frequency, which means the amount of
spirals is going to be 12, and the shape going to be 0.7 the diameter
root that ends for. Let me actually show you
how the Bs plan works. No base plan, but the amount
of steps in the viewports. If I'm going to decrease
this one toward two, take a look. Now, I hope you understand
that this setting is very important because
the bigger is value, the more smooth going
to be the settings. If you're going to
keep this one on two, this is the result that we have, and you definitely
don't like it. Let's go for example towards six and v. The spirals
are ma better. We can go towards even seven, which will be too much, but only for should I say something? There is a big before and after. If you go toward the five. Now it's more blurry,
now it's not enough. Let's keep this one on six. I think six will be better. Let's quickly take a
look what we have. And also, we need to
very nice, very nice. Except diameter root going to be 0.24 to make it more thinner and tips tips are 0.1 to make the end point of
the hair more thicker. Again, I hope everything that I explain is very clear and I hope you see the result
that that you enjoy. It's very cute the spirals to
have for our illustration. But the color is very flat, and let's make one
more before and after, be adding one additional
color so we go with a plus. Let's copy the base
color of the ears. Copy the heck, go
toward the materials. Here, go to the principle
to pay the attention. You know what, bring your
fingers of the keyboard and just pay attention how
everything will change. This is how the color
looks right now. I move toward the
principle hair base DF. I bring our color. Then I go toward the particle
system, switch here. We didn't give a name. Let's go this one
ears underlined for. Give a name and voila. Again, should I say something? No, I think the best
explanation is on practice. I even don't have words to see. I mean, the difference
is day and night. Let's go here and let's decrease
this one toward 0.4 0.4, the IO, which means the
saturation toward 20. Now you can see it's more saturated with a brown because if I want
to keep this one, for example, on
zero two, too much. Even want to keep this
one on four, very pale. That's why we go
toward 1.25 or 1.3. Code going to be 0.45 and
random roughness toward one. I probably all of the time keep the random roughness
toward the one, which means it makes the shiny
part of your hair the way how this word interact
with the lighting, more randomized, which in my
opinion, more better. Done. We've done with that lesson. Let's check one more time. Es simple. Yes. Ugly, pathetic.
I don't like it. Then you go to where the ears for the mood is
completely different. Also, I explained the importance
of the strength steps, and I hope you
feel that you jump on another stair of your
knowledge in blender. But for now, always goodbye. Enjoy your time, co tea and let's move forward
towards our next lesson.
15. 4.3 Cheeks fur: Very close to finish everything. So we go toward the cheeks and the same thing plus new
particle system here, let's call this one cheeks fur. And then you go to
where the modifiers, apply the mirror modifier. What about subdivision? Let's apply the subdivision
e because the amount is low. Then we go with
one more control. Grade and bring this one above. Then we go toward
the particle system, and here the number
going to be 1,300. Meanwhile, the hair
length is zero is 0.1. Boom, B playing on steps
six, the same thing here, six, for the viewportis play
and interpolated 25 and 25. Then I'd like to
randomize the length of our hair. Take a look. This setting, for example, this show the maximum
of the length that we established right here. If I'm going to decrease,
For example, toward -70. With that setting, we can
show the percentage of the length of the hair that's going to be
influenced, be this length, for example, if I'm going
to keep this one on zero three and increase
this one toward zero five. That means health of
the hair is going to have this value and health of them will be not
influenced and we'll keep the same length that
we established right here. I hope everything that I
told you does make sense. So let's go toward the length of 0.85 and threshold
going to be 0.4 Great. Then we go a little
bit lower toward the clump where we're
going to keep it on 0.7. Uniform is 0.02 point is 0.02, and random is 0.03. Great, then the king
type is, of course, curl where the
amplitude is 0.0 32. Frequency is eight. Meanwhile, the shape is 0.6, similar to what we've
did with our ears, but a little bit different. Diameter root is 0.3, and here like always
you're going to be 0.05. Let's take a look in the render mood the
shape is very nice. I like this clamping not probably. I'm going
to keep it like that. Always the color for our
materials plus and you Okay. And let's copy the cheeks
right here, the hex, go here, principal hair base
DF and bring it right there. Let's call this one
cheeks underline fur. Let's go in the particle
system and in the materials, choose the second one. Very pale, I'd like to increase toward thinking
more like that. The roughness is
going to be 0.35 0.35 0.701 0.2 random roughness
one like always. Let me take a look. I know what I don't like.
I don't like that is very, very thin, come back to
the particle system, and let's increase the
diameter root toward 0.6. Now, the roots are more
emphasized and now. Now, I'm good. Another lesson. I probably it was under
the 5 minutes, yes. But probably it's very dark. I'd like to switch the color a little bit more
toward the brighter one. Like this or even like that. No. Play around. Play around. All good. Now, it's good. Okay.
This is what I have. I like very much the hair
of the fear for our years. I forgot that belong to hands, beside the hands, we
have also the head. We'll do this one very quick. But for now, I
tell you, goodbye. Goodbye and see you
in the next lesson.
16. 4.4 Hands fur: So our limbs, not our sorry, the limbs of our to do. Let's go toward the subdivision. Should we add? Yes, of
course. Let's apply. Apply here and apply here two. Then one more time control two, and one more time control two. Nice, what is the polygons. Okay, now it's good. Let's go to the particle system
like always plus. This time is going to be
a little bit different in comparison to the previous
one, but not too much. 1,500 meanwhile the
hair length is 0.07. Let's call this one hand. Okay. Display, check in, step six, ten strength steps in
the viewport also six, Interpolate it 25 and 25. Then we go toward the clump, clump going to be 0.33. Roughness, let's go to the common distortion
of the uniform 002 and size to make it a
little bit more distorted 0.96. Then we go toward the end point, but you're going to be 0.01
and random going to be 0.07. Meanwhile, the size
is going to be 0.8. Good. I always before
we choose Carl, this time, I'm going
to choose bread. Which I thought will make it a little bit more interesting
control H, apply the scale. Come back and let's go
toward the brad settings where the amplitude
going to be 0.15. Meanwhile the flatness is
going to be 0.1 frequency, we're going to keep
it on two and shape going to be zero six. Diameter root, going to be 0.25. Meanwhile, the tip
going to be 0.05. Let's create the material
from the start plus u. And what we can do here, the do head and do body are
not actually, the do head. We can share the
same material of the fur as the head
of our character. Let's go toward the Who we
have a lot of things here. Not body Mm hmm. Very interesting.
Let me check for f. I suppose this one. Let's go in the particle system, choosing the
materials boo fur and let's take a look if
everything is good. Yep. The same thing right here. You can a tie that is gray, but that's what we have when I mean the real
life also, if you have, for example, the
white hair, yes, I will independency of the lighting around of
the environment around. The color might be more darker, more brighter, so that's
why it is more like that. What we can do, we can make
it a little bit more pale, if for example, we will
increase the IO toward 1.55, and now it's more pale Let's do the same thing
with our second limb, puse go in the particle
plus and choose the hands Let's also turn on
the flower and the line art. What if we'll check
the head, the body. Wait a second. If you want to open
the entire window, you can press control space bar, and that's how you can bring
it to the entire screen. Let me see. Close the overlay.
I like it a lot. I don't have
anything else to say this character C
animals are very, very cute, and don't forget that this is going
to be your homework. After that, you'll
go to the Pinterest, you'll you'll search
for some references, and you will apply your
knowledge that you acquired in that class in order to create
some other characters. But for now, Very cute. I like it, and I hope
you like it also. The head is the last
lesson from this block, and then we'll put
this one on render and you'll not hear
about me anymore. I promise you. But before bring
a little bit of patience, and let's finish our class. See you in our next lesson.
17. 4.5 Hat fur: Welcome back the last one before we'll render it so
Quantralspace bar, and then we go to the viewport. And control space bar. Let's go toward our head. Emphasize it. Let me hide the
particle system here, here, in order to make it a little bit more
easier for my PC. Well C. Then we go toward the particle system
plus and hair, and let's call this one head and the number going to be 200. Meanwhile, the hair
length going to be 0.03, not the segments.
Segments are five. Hair length. Great. But there's one very important thing to do. I want to have our hairs only on the outside part of our
head and on the inside. Let's go in the solemn mode. Let's go for this purpose, we have to create
the vertex group. We press plus, then let's
recall this one head, and then we are going
in the edit mode, and then we go to the seven
to take a look above. Choose this middle
point right here. And we go the control
plus the PD until you get to the final control
minus like this. Then you press a sine good, come back to the object mode. Now, let's just for the purpose, I'm going to increase
the length or zero three to make you
understand how it works. We go lower in the vertex
groups and in the density, bring the group that we
created of the head. Now we have only on the outside part and not
the inside easy, of course. Then Come back 0.03. Then we go or probably what if I'm going to make this 1405? Just a little bit bigger, great. Then be spline. Here we'll have five,
here we'll have five, Interpolate it going
to be 15 and 15. The length, it's
going to be 0.65. Meanwhile, the threshold, which means the randomizing
part of the length, going to be 0.45. Some of them going to be longer, some of them going
to be shorter. Then we go toward the clump,
it's going to be 0.05. Uniform 0.02 point also 000.02 random going
to be 0.0 35. Where I am random. Meanwhile, the threshold,
which also the percentage of the hair that going to be influenced
by the random part, going to be 0.4. Good. Problem. I'm going to increase
this one toward 0.58, the threshold of the length and decrease this one toward 38. Nice. Then I go lower. Let check check out
of the solemn mode. Let's check in the render. Very thick. They are very thick, so let's decrease this
one to 1.25 d meter root. Now they're very subtle, then we are going toward
the materials and we bring plus new Principle
base dF change in the principal hair base dF, I'd like to keep it more toward white saturation toward zero. The roughness going
to be 0.45, sorry 45. Yes, the random roughness one, the IO 1.2, go to
the particle system, material, and let's
give it a name. Let's give it a name underline
go to the particle system, one more time, materials
all then come back. Now I can say proudly.
They are very small. There's no big change, but they don't have to be shouldn't be the thing that you notice firstly when you look
at the illustration. This is for the common
compositing. Great. I like it. Let's go in our list and the next lesson where we're going
to prepare it for render, put it on render, and I'm going to see you there. Goodbye.
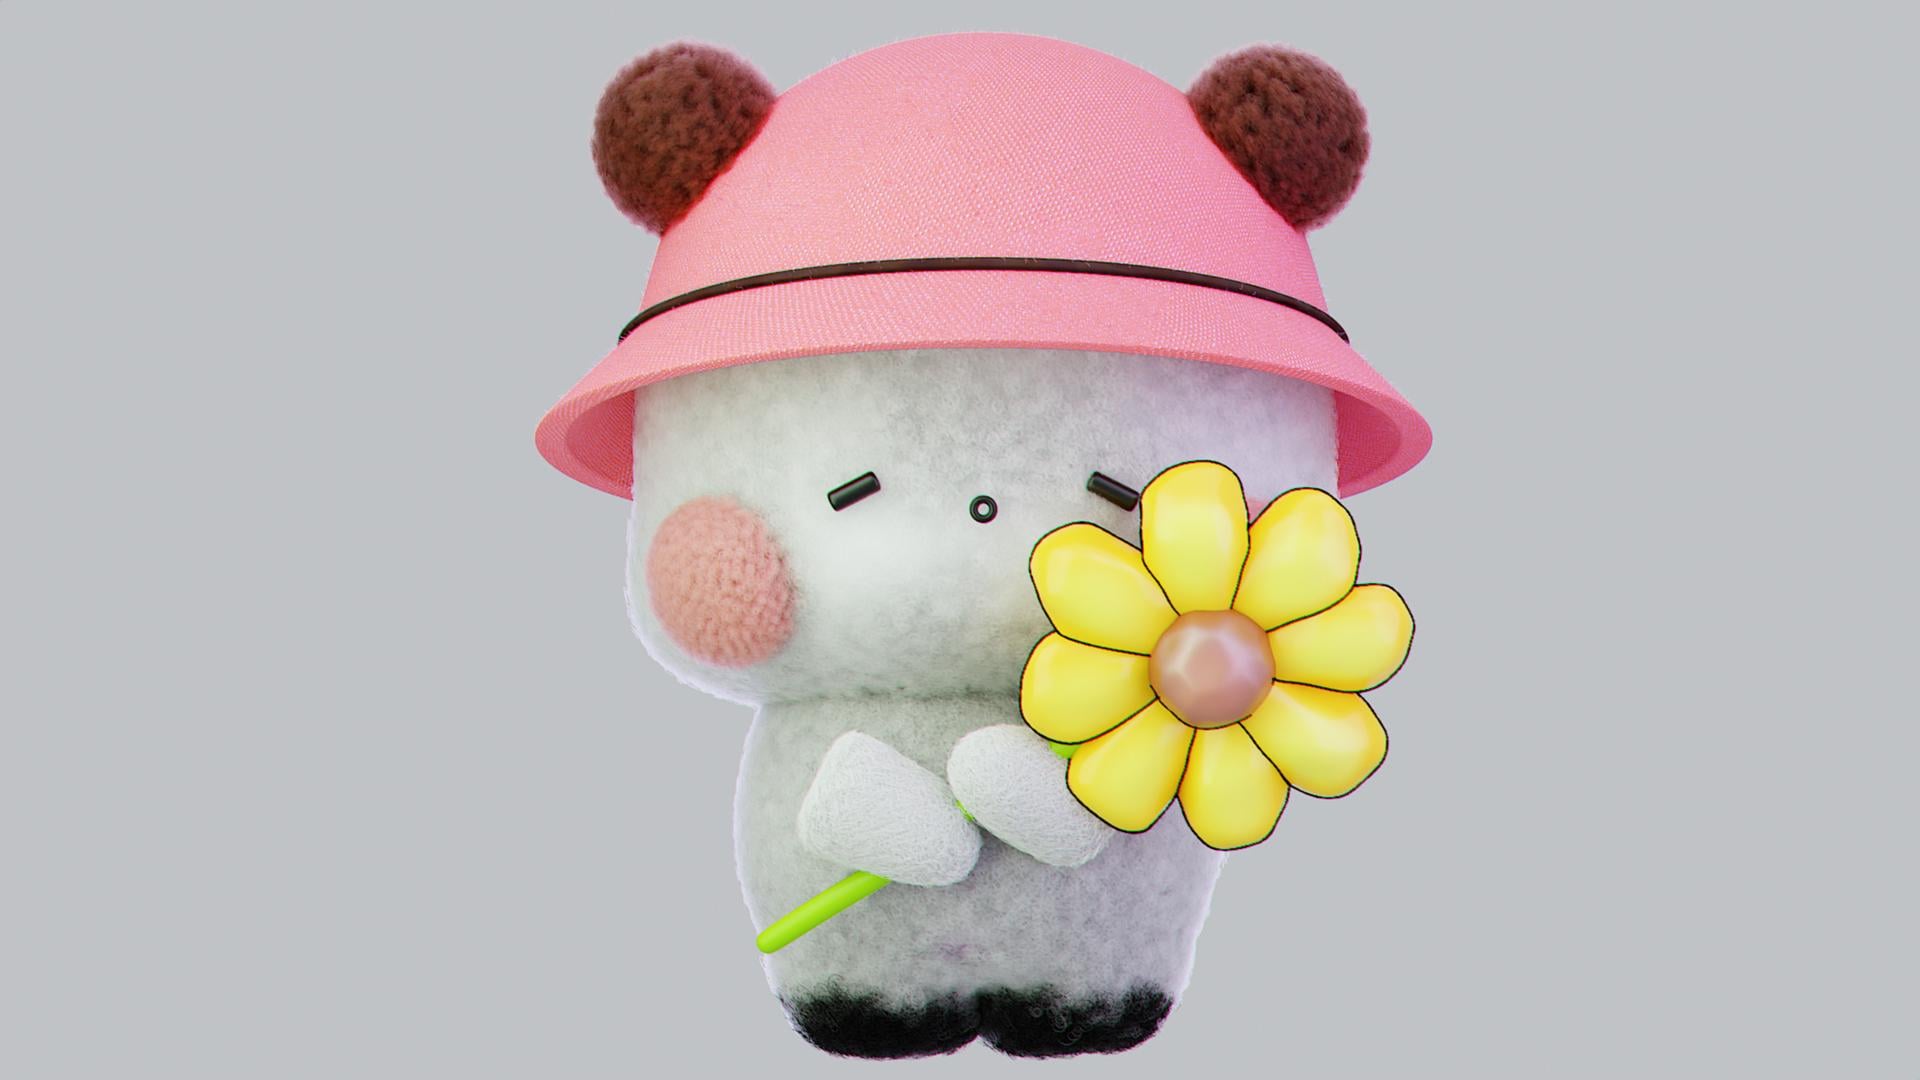
18. Render : Our last lesson where
we're going to render. There is no many things
that we have to do except what if I'm
going to instead of filming bring the AGXm
Interesting filmic GX. The contrast is a
little bit different, but I'm going to
keep this one on filmic I add more Exposure, I'm going to keep
this one on 0.1. Then I'm going in the world. I would like to
increase the whiteness. What if you want to
make completely dark? I make a render before where I keep it on
the white background, and this time, I'll like to keep it on the black background. There is no problem with that. There is no point to switch because the color
is already black. Then come back
toward our lighting. What if I'm going to make
the area from the right, this one, the right area, more a little bit toward blue? Going to be hundred 34. A little bit more stronger. The same thing with
the area behind. I'd like to make it 350. Good. Now the outline
is more stronger. Let's hide this two,
and let's take a look. Yeah, the outline is very great. Let me also check the
common general light. Probably, I'm going to
move this one a little bit above, so heavy. Okay. And I'm going to increase
the strength toward 1.7. Let me take a look. Okay.
And let me open the planes. Great. And that actually all, there is no many
things that I do. Let's check if you have
to hide something. Yes, in the collection
of the do do, we have the insurance
of the do body. We can hide this one. The y answer for what you
see in the viewport, the camera for what you
will see in the render. So that why they both have
to be or on or off turn on camera and the
references are off. Good. The flower, the
studio, the outlines, then we go in the
samples and quickly, the more samples
we have, the more better are going to
be the final quality. Actually, don't
forget that when we create the particle system
that we have to turn on. Yes. We have to increase the
strength steps towards six. But wait a second. Just
don't forget about that, that we'll increase
the strength steps. Also, let's go with a
particle system for our body. That good type of perspective. I like the orthographic
is the same as one on pt. One pet is very strict
with no perspective, not realistic, but our
characters and realistic either. Let's increase
orthographic scale toward 12 or actually 11. 10.5 size x -0.102. 15. Yep, and a little
bit on the left. Nice. Now, it's in the center, probably not zero but zero six. Now it's better.
Great. Let me check. Very saturated work. I like
the gradient of the colors. I like actually everything to
do where this right light. What if I suppose they
are low, and I'm right. For some reason, the
right light is very low. You can see that. G move it up. Now let's take a look. I just felt that there is
something not enough. The flower wasn't
enough saturated. Okay. What about
the second light? Okay. We can air
for the rotation. Nice. Good. Now I'm good. The thing that I do
always before I render. I bring the samples
toward three, for example, two,
three, very low number. Just to make a test render to see if everything
is on point, and if everything is on point, then I can increase
the amount of samples. Let's go toward a
particle system. Let's increase the
strength steps toward six for our fure body. Also the same thing
for our few head. Okay. Same thing here. Let's check the
amount of samples. Keep it on three and Control S to save just for some case
for our own insurance, and let's go to the
render and render image. Okay. So I can clearly see
that everything is on point. There is nothing
additional on our scene, and now I can come back. I can increase the samples. My recommendation is to
keep the lower one and 256. If you can go more
further, for example, for 801,000 2000, you're
going to be amazing. Probably, I'm going
to keep it on 1250. With that being said, I'm
going to put this one on render and I'm going to see you after my render
going to be done. So my render is done. That is what I got. I like, especially the
ears and everything else, probably, I could increase the quality because
sometimes it's blurry. But at the moment right
now it is what it is. The next step is very simple, go to the image, save S, choose a folder, give it a name, and save as image. After that, you can bring
that image somewhere in the photoshop or
other photo editor, bring some color correction, if you want so sharpness, contrast and many more. But we finished. We finished with our class. I really enjoy the
colors of our work. I enjoy I enjoy it. Just enjoy it, and I
hope you enjoy it also. Thank you so much, my friends, and I'm going to see
you in our lesson, but okay, let's keep it like a lesson where I'll
give you the homework. I'm going to explain
what you have to do and see you there. Goodbye.
19. Homework: So, my friends, your homework, and I'm very exciting
to see what he'll done. Go in the pinterest,
press chibi animals, or actually you can press
even chibi characters. Yes. Choose one of these illustrations that
there are many of them that look very cute and that I personally like to turn
into three D, our two do. Yes. Take one of them, use the skills and
knowledge that you acquire throughout
that class, and Do your own work? Yes. Having
a pleasure, having fun. This is this is like
the golden rule, and then uploaded under that class in the
project section. So thank you so much for
the fact that you joined me with that class that
you watch till the end. I have some other good
courses where you can get some new knowledge that will be very applicable
for your future projects. But for now, thank you one
more time, and goodbye. I'm looking forward to
see what you've done.
 Sasha Luvr, Work in third dimension