Transcripts
1. Introduction: The best three D
character animation starts with an appealing model. This class will teach
you the essential three D modeling
skills required to bring simple character designs
to life in three D. Hello. My name is John Knowles. I'm a character animator
and animation director, and I've been lucky
enough to work in children's television
for the last 15 years. In the second class of
my inter thean series, we're going to be exploring character modeling
for animation. This is a standalone class, and you're free to follow along using the provided design. However, if you've already taken my character design class, you may wish to use one of
your own designs instead. Character modeling for animation
can be time consuming, taken for many years to master. However, if you start out
with simple characters, then you can learn all of the essential skills
that you need, which will provide a foundation for all of your future projects. During this class, I will share my approach to
not only modeling, but also texturing, shading, and lighting a character. We'll also then go on to place this character into a simple
underwater environment. This is a beginner
level class using the 33d software
application blender. Now, if you're new to blender, you may want to check out
my Blender centrals class, which will teach
you everything you need to know to get started. By the end of this
class, you'll have all of the skills
necessary to model, symbol characters of your own. You'll also be ready to move forward to the next
class in the series, or you'll learn how to add
controls in the form of a character rig and finally
fully animate your character. So if you're ready to
dive into the world of character modeling for
animation, let's get started.
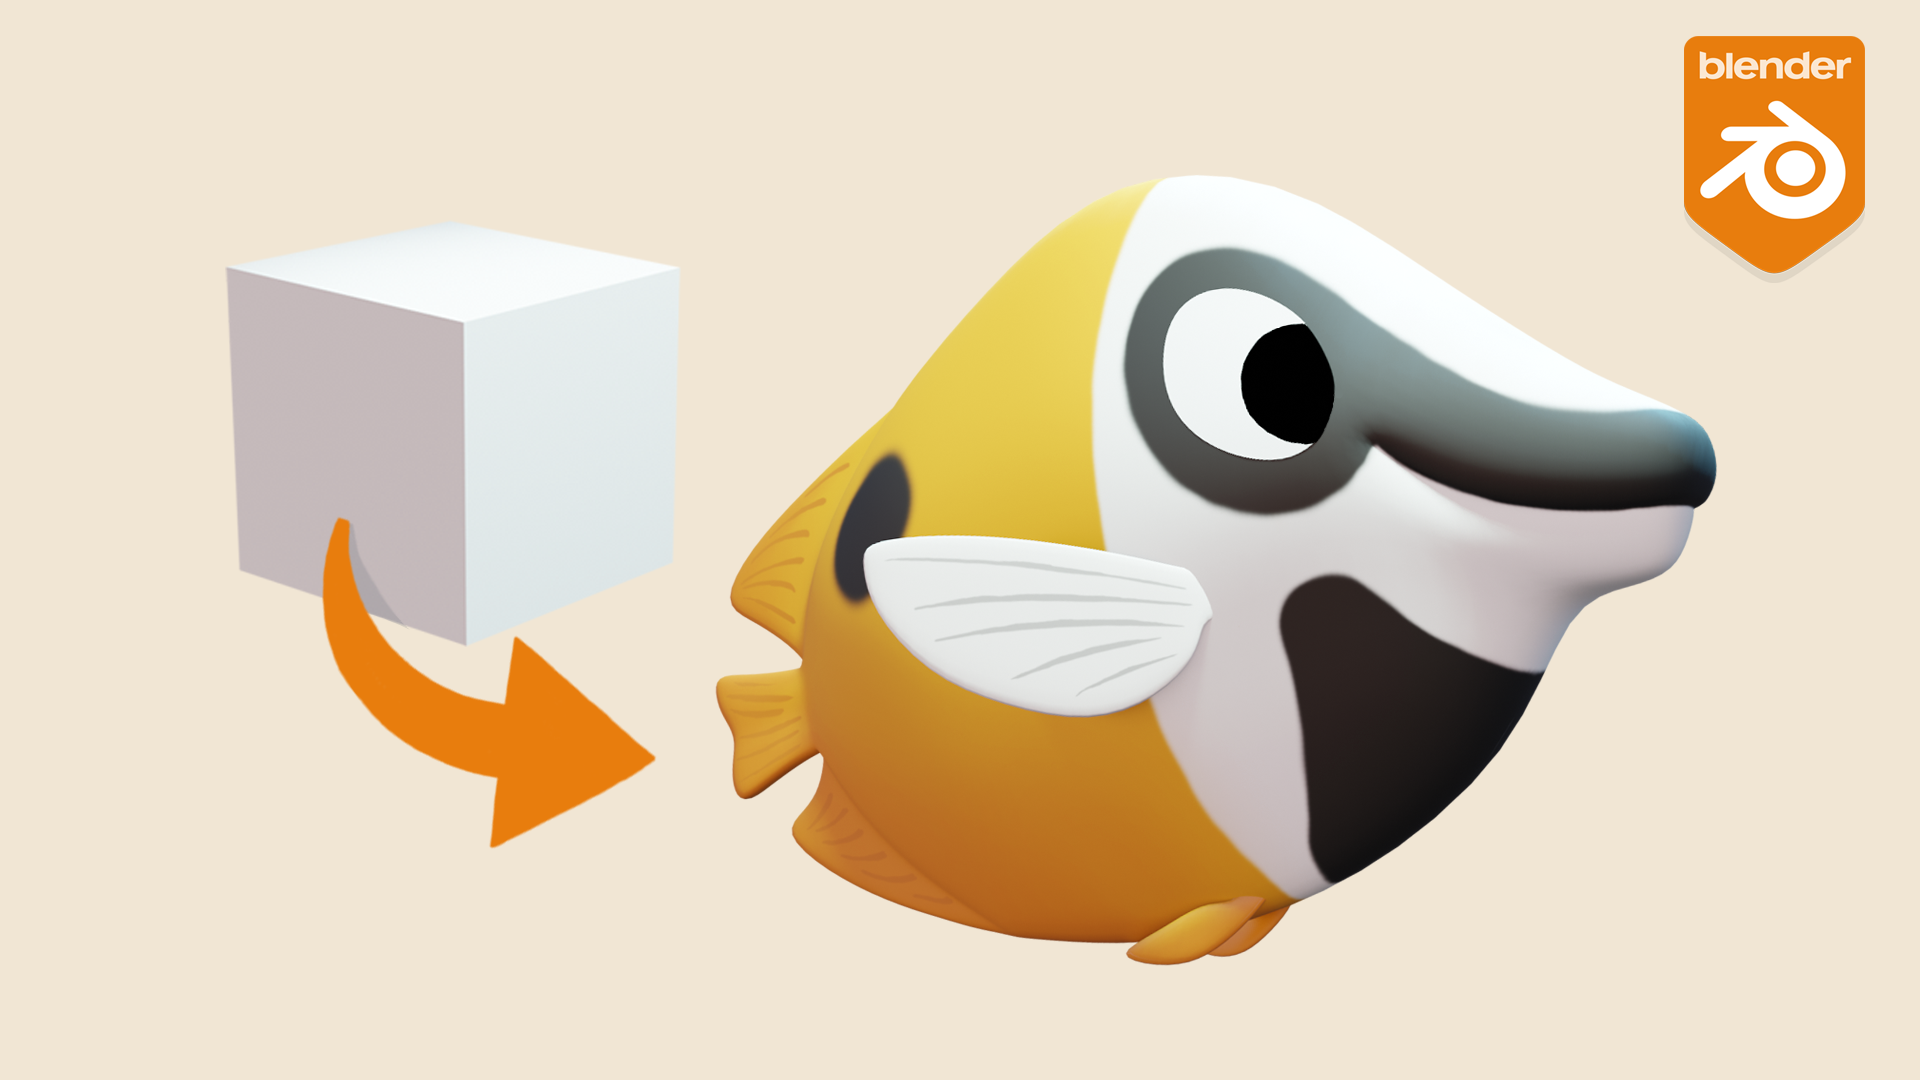
2. Class Overview: Hello and welcome to the class. In this class, you'll
be able to follow along as I demonstrate
how to model texture, light, and render this
tropical fish character. You can download my concept out from the class project page, or feel free to follow along using one of your own
character designs. There are several
different approaches to character modeling, but when it comes
to getting started, one of the easiest is
known as box modeling. In this approach, we literally start out with the 3D cube, and by subdividing it to
moving around the vertices, the points on the surface will gradually form the
shape of our character. Once a model is complete, we'll then move on
into texture painting. For this section of the class, I'd highly recommend having
access to some form of graphics tablet or pen display with a pressure
sensitive stylus. While this is not essential, it will make the texture
painting process both easier and more enjoyable. Once our textures are complete, we'll create a simple
environment and set up the lighting required to create a believable underwater image. For your class project, I'd love to see either
your version of my character design
or how you've applied the demonstrated
principles to modeling one of your own
original character designs. Once you're finished, just apply a rendered image of
your final project to the class project gallery for feedback and to share
with the other students. If you'd like feedback
along the way, feel free to upload
work in progress images too or ask questions on the
class discussions page. Now, if you're ready
to get started, let's jump into
the first lesson.
3. Class Updates: Blender is a powerful and rapidly developing
piece of software. Typically, there are
three main updates of the application each year, coming with new features and
performance improvements. This is fantastic for those
of us using the software, but it can be problematic
when searching for training. Rapid updates mean
that training can quickly become out of
date and hard to follow. To provide you with the
confidence to follow my classes, I will always check
new releases of the software and update my
classes where necessary. When Blender version
four was released in November 2023 introduced
several updates which do have a slight
impact on this class. Whilst the modifications
are minor, I've included lessons later
in the class to cover each of these changes and ensure that the training is as
clear as possible. If you do find
yourself struggling to follow the class
for any reason, please do leave a question in the class discussion section and I'll aim to respond as
quickly as possible. If you're ready, let's jump
into the first lesson.
4. Modeling: Defining the Scale: Before we start to model
anything in Blender, it's worth thinking
about the scale that we're going
to be working at. Now, with a default scene
and my cube selected, if I hit the "N" key, I can
open up this side panel. That shows me the dimensions of my cube are currently
two meters in size. I know that the fish
that we're planning to model is about 20
centimeters long. I can adjust that value to
0.2 meters, 20 centimeters, and obviously, I could go ahead, zoom in on that cube, and start working on
it and model a fish. The problem comes when we then want to add our
lighting to our scene. In Blender, if we work
with very small objects, you'll find that we
actually have to adjust far more parameters in order to get the lighting to
look convincing. That's because by default, Blender is setup to work
with larger objects. Now there are two ways
to approach this. Obviously, we can go ahead, model our object at
the correct scale, in this case 20 centimeters, and adjust all of our
parameters to work. Alternatively, we
can actually adjust the internal scale system
that Blender works with. To do that, if you head over
to the Properties panel, you can see the
scene properties. If we click on that tab, that will give us
a unit section. If you roll that out, you can see that we can change
a number of values here. To start with, because
we're going to be working in centimeters, let's change our length
from meters to centimeters. You can see now that this is updated up here in the
Transform properties. But in addition, we have
this Unit Scale option. The moment, that is set to one. What I'm going to do here
is change this value. I need to divide it by 10. We now have unit scale of 0.1. You see our grid has changed, and the dimensions
of our cube now show as two centimeters. If I hit "Alt S"
on the keyboard, that will reset my scale. So now, my cube is the
same as its default size, but you'll see the
dimensions are shown as 20 centimeters. By working this way, now all of our light
parameters can be used at their default values
and we'll get a far better result without
as much tweaking. That's worth keeping in
mind; if you intend to model multiple objects or characters and then bring them
together into one scene, you do need to work at the same unit scale across
all of those objects. For example, if I were to model this fish with a unit scale of 0.1 because that's the
easiest way of working, and then go ahead and
start to model a shark, I might decide that a unit
scale of one was more appropriate for that shark
since it's a larger creature. Unfortunately, if I
then brought this fish that we're modeling now into
the scene with the shark, it would be multiplied in
size by a factor of 10. Now it's possible to then scale that fish down to
the correct size. Simply scanning
it by a factor of 10 will bring it into line with shark that's been modeled in a scene with a
unit scale of one. It's just something that
you need to be aware of. As a rule of thumb, what I'd
recommend is that you use a unit scale which will work for the largest
objects in your scene. In this case, we know that our fish is going to be the
only object in our scene, so we can work with a unit
scale of 0.1 quite happily. As I say, if I was going
to combine this fish with a larger creature such
as a shark or a whale, I'd work with a
larger unit scale and just model this fish smaller because I know my
lighting is going to work for the larger scale
in the other scene. The other thing to be
aware of when you're adjusting your scale is that the unit scale value is specific to our
individual scene file. If we were to create
a new scene file, it would reset to one. So always check that value before we start
modeling something new. Now that we have our
units setup correctly, I'm just going to save my file. I hit "Control S", pick a location on your hard drive that you have to save your file, and give it a name and
then click ''Save''. We're now ready to start loading our reference in
the next lesson.
5. Modeling: Using Reference: When you plan to
model something, you can go ahead and do it
free from within Blender, but it's actually really helpful to have reference to work from. Makes the whole modeling process a lot quicker and easier. I've created some concept art
for this lesson which you can download from the
Project Resources section. Alternatively, feel free to
create something of your own. If we load it in, what we're going
to do is switch to the side view in the Blender. You can do that simply by hitting the number
3 on your numpad. Alternatively, if you
don't have a numpad, you can always use
this gizmo at the top here to navigate to
the different views. What I'm going to
do now is open up a file browser and I'm
just going to drag and drop my reference file
straight into Blender. What we can do, because this
has been dropped slightly away from the origin
is just hit Alt G, and that will reset its position
back to the center here. That my cube and hit the parakeet on the numpad
to frame everything up. Now, we want to
move this reference into roughly the right
place for us to work with. To help with that,
I'm just going to change into X-Ray mode. We do that with this little
icon up at the top here, alternatively, you can
use the shortcut outset. We can now see through our cube. Now, if I select my
reference object, which you can see
up in the outliner here is called empty
at the moment. First, I'm going to rename that. I'm going to hit F2 and
rename that to reference. Then, I'm just going to hit
G with the middle mouse, constrain it to the y-axis
and shift it along just until the fish is roughly
centered up with my axis. The next thing I'd like to do is duplicate this reference
so that we can have a reference
for the front of the fish that we're going
to see from the front view. With my reference selected, I can just hit Shift
D to duplicate it, I'm going to right-click and that will just leave
it back where it was. We can see we've got a new reference up here
in the outliner. I now switch my view with my notepad by
hitting number one, and move around to
the front view. I can now rotate this reference
by hitting R to rotate, Z to constrain it to the z-axis, and then 90 will
rotate it around, I can Enter to confirm. Then again with the
GK, I'm just going to drag that across. It's roughly centered
up on those axes. Now if I move
around my viewport, you can see these two references are right over the
top of each other. The other thing that
I'm going to do, I'm going to move these
back away from each other. I'm just going to hit G. Let's try this in y and just
move this out of the way a little bit and do the same
here with this reference. Move that along the
x-axis to this, out of the way of my cube. I can move around and see my references there
if I choose to. Again, if I hit the one key or the three key on my numpad, you can see I can move
to the different views. Now. Looks like I can move
this in the wrong direction. I'm just going to come back
here and move it again along the x-axis back to the
other side of the cube. To make it easier if we
jump into our side view, we can see the cube on
top of the reference. Now, with our two
references created, what I'm actually going to do is select the two of
them in the outliner, hit the MK to create a new
collection and then we'll name that collection reference. This allows us to quickly turn those references on
and off together. The other thing
that we can do is change our filters
for our outliner. I'm going to turn on the
selectability filter. You can see we now have this little arrow
check mark here. If I turn that off for
the reference collection, you'll see that
I'm now no longer able to select those
reference objects. I can only select
my actual cube. I can now hit Alt Z to
turn off my x-ray view, and we'll be ready start
modeling in the next lesson.
6. Modeling: Blocking the Form: So far we've been working in
the layout view and we can continue staying in the layout
view as we start to model. But we also have the
modeling workspace which we can switch over to. That will give us just a little bit more room to work with. The other thing you'll notice is we've jumped into modeling view is that it's automatically switched
us into edit mode. We can toggle that
back-and-forth still using the tab
key, which is two. For now I'm going
to start out by hitting three on
my numpad to jump into the side view and I'm
going to frame everything up. I'm also going to
have outset to enable x-ray mode so I can
see through the mesh. We're going to start out by mapping out the main
shape of this fish. Now, something that's
really important to understand is that
at the moment, we've only got a few points on this mesh that we
can move around. So we don't have enough
detail to model this fish. You might think that we
need to add in a lot of extra detail and we
could do that by selecting all of the points, right-clicking,
hitting sub-divide. We can keep doing that to
add in more and more detail. Then we can start
moving these points around to define the
shape of a fish. But you'll quickly
find if you start to move all of these points
around individually, it's going to take
a very long time to form the shape of our fish. It's not a very efficient
way of working. You will also found it very difficult to end up
with a smooth result, so instead, what
we're going to do is keep things as simple as
possible to start with. With our cube, we will hit A to select all of the vertices, then hit right-click
to sub-divide. We're going to start
out keeping things very simple with just
the one subdivision. What I'm now going
to do is start moving some of these
points into place. Now, you do need to be in x-ray mode in order to
select through this mesh. At the moment you can see as I drag select across that point, I've actually selected right
right through the mesh. If, for example,
I had extra mode turned off and I tried
to select this point, see as I rotate around the mesh I've only
selected that one point. I'm going to turn
x-ray mode back on and start moving some
of these points around. The first thing I'm
going to do is actually select all of these points. I'm just going to move
them across slightly. What I'm looking for
are main markers where the shape of the fish
changes direction. I'm moving these
points so that they're roughly at the top
of the fish here. These points are roughly at the low point of the
fish down at the bottom here and just move these points somewhere
in between the two. Then I'm going to select these
points and just shift them across so that they're roughly in front
of the mouth here. Drag that up and
these points down. For now, we're not worried about perfectly
maintaining the shape. We're just trying to move things broadly into
the right place. At the back here I'm looking
at the point where the fin start and that's where I'm going to move these points into place. Now, I'm going to rotate around. What you'll notice is as I'm
moving around the mesh here, this reference is actually getting in the way a little bit. It's not really all that helpful when we're not in one of
the orthographic views, either the side view
of the front view. First of all, if we hit "Tab" to change back into object mode, we can now select our reference
object in the outliner. Then if we go down to the
object data properties, you'll see that we
have the image here. Up above we have some attributes which define how this
image is applied. At the moment, we
have these check marks to show that it's visible in both the orthographic
and perspective views. I can uncheck the
perspective view. I'm going to do that on my
Reference 1 object as well. Now that that's been
unchecked I can't see the objects in
my perspective view. But if I hit either the
one or the three keys, I can once again
see my reference. That's really handy to work on the reference this way and then move around the mesh and not have the reference
getting in the way. I'm going to select
my cube again. I'm going to hit
"Tab" to go back into edit mode and I'm going to hit "A" to select
all of the points. Now what I want to
do is scale all of these in along the x-axis. I can just hit S and X to constraint along the
x-axis and drag them in. Now, I'm going to switch over to the front view so that we
can see how that's looking. For now I'm not
going to worry too much about the exact shape. I'm just going to scale
them in a little bit further on x to about here. I'm looking at this
point here on the top of the head where we get a little bit of a
change in direction. We'll flesh this out a
little bit further later on. If I rotate around this
again in perspective view, what we want to do
is select some of these faces and
extrude them out. To do that I'm going to
change into face-like mode, so I just hit the number
three on the keyboard. I can now shift select
each of these front faces. Now, if I hit the "E" key, that will extrude those faces and I can bring them
out a little bit. I'm just going to
drop them there for now and jump back
into my side view. We brought them out a bit
at the back here and I'm just going to bring
them a little bit further and drop them somewhere around the
root of the tail here. One to jump back
into Vertex select and I'm going to start pulling these other vertices into place. Again, just hit the
"G" key to move these down roughly into position. You can see here I'm not following the shape of
the fins at the moment. I'm only interested in
the actual shape of the main part of the body and I'm actually
going to bring them down to the root of that tail. I'm going to keep these
points roughly in the center. We can now rotate it around
and I'm going to select these front faces and again hit "E" to
extrude them out a bit. In this case, what
I'm going to do is drop them again at
this breakpoint here and hit the one key so I
can select my vertices again and move these into place. Now, I'm going to move
these vertices here so I'm roughly following the
shape of this mouth. You'll see why in
a little while. Again, I'll select
those front faces, so hit three for face select
and jump out to the side. I can then extrude them out
to the end of the rows. Again, we go back in
to vertex, select, and start moving these
points roughly into place. The other thing we need to do is have a look at this tail. Same routine applies. Select all of those
faces at the back there, go back to the side
and E to extrude. I'm just going to pull
them back to the end of the tail and then move the
vertices roughly into place. We'll add some extra
detail to all of this and that's one. Now, hopefully you can
see as we rotate around, I'm going to turn off x-ray. We've got the main
shape of our fish in. Then we can start to create the right volume and then
break it down even further. But before we do
that, I'm just going to hit "Control S" to save.
7. Modeling: Refining the Form: Now that we have a
main shape defined, we can start to add
in a bit more detail. But before we go
too far into that, I want to actually adjust
the volume of our fish a little bit so it's better
following the outer contours. The more that we do that with
a lower resolution mesh, the easier it's going
to be to create the final shape as we
add in extra detail. So to do that, I'm going to hit Alt Z to go back
into X-Ray mode. I'm going to start
out with this tail. So I'm just going
to step through and select all the vertices
for that tail. Now, I'm going to
hit S to scale and X to scale them
in on the x-axis, to get that fairly narrow. I can do the same at
the front of the fish, and now I'm going to
want this to have a bit of a taper
to it so again S, X, and bring that
intellectual bit. I'm going to leave everything up at the top here
button and select the central points because we're going to want to make
things a little bit wider. So I'm going to hit the one key to get
to this front view, again, S and X, to scale these points
and move them out to start defining the
overall shape of the fish. You can see also that we need to taper things a little
bit more on the bottom. So I'm going to select
through again all of those points and scale
them in on the x-axis. Now as we orbit around, you can see we're getting
a better overall shape. These two points here, we need scaling
out a little bit, just so that we're
getting a better flow of the shape around here. Now we'll further define
the shape as we go along. Might do is just taper
those two at the back, just bring them in also. A bit more so that we're getting a little bit of a
fall off as we dropped back. I'll do the same up
at the top here. Just scale it down a little
bit down at the bottom. There we go. We can now start to add in some
of the extra detail. So for that I'm going to
hit three on my numpad. I'm going to start to better define the
shape of the fish. To do that, we're going to
add in some edge loops. You can do that by
hitting Control R. As you move your
mouse pointer around, you can see this yellow line is indicating where you're
going to be adding a loop. So I'll start out just by
adding one in right hand. Once you click,
you'll be able to slide this edge loop
around or you can just hit the right mouse
button to drop it right in the center, which
is what I'm going to do. Now, I'm just going to
stick through the mesh again and move these points up to better define
this overall shape, again down at the bottom here. In another edge loop
pair, Control R. Again, hit the right mouse button
to cancel the move, and just move them into
place as I choose. At the back here, I think
I'm going to add in two loops along this section. So when you hit Control R, by default, it's going
to add in a single loop. While you've got this
yellow line up here, if you scroll your mouse wheel, you'll be able to
change the number of loops that you're
going to add in. So I'm going to add in two
loops there and again, right-click to
cancel the move and then move our points into place. Then I'm also going to sub-divide this tail
a little bit further. In the case of the tail, we know we're going
to want that to bend as we're animating it. So what we need to do is add in enough geometry to allow
this to bend successfully. So what I'm actually going
to do is add in a couple of loops and then hit right mouse button
again to cancel that. Then I'm just going to again, adjust that position
slightly to shape the tail, given a little bit of
a curved form to it, so nothing's too even. You'll see again as
we orbit around, we're starting to get a more defined shape
to our fish here. We obviously need to add some more detail
down the sides here, but the overall shape is
looking a lot better. Before we start to add
in any more edge loops, what I'd like to
do is add what's called a subdivision
surface modifier. We'll do that in
the next lesson.
8. Class Update: Modifier Menu: In the following
lesson, we make use of the modifier menu prior
to Blender version four. This menu open to show all of the available options
in one place. Whilst this made finding
the option you wanted easy, it didn't allow for
new additions to the menu without it
getting extremely bloated. In Blender four, the
decision was made to replace this with a
more conventional menu. This means that
individual modifiers are now hidden under sub menu. Whilst this may at first make things seem harder to locate, the menu now has a built
in search function. After clicking to open the menu, it's possible to
start typing and you'll instantly begin
searching the menu. For example, if we wish to
locate the Bevel modifier, I can simply start
typing the name and then select it from the
list that appears below. Likewise, if I
start to type sub, it will allow me to apply the subdivision
surface modifier, which is faster than digging
through menus to find it.
9. Modeling: Subdivision Modifier: So far we've been
adding edge loops to better define our geometry. But if I just jump out of
x-ray mode for a minute, you can see that our fish
still looks quite blocky. We could keep adding in
extra loops over and over, but the more geometry
we add into our mesh, the heavier scene becomes, and the more
complicated it is to deform the mesh ultimately, therefore, what we
can do is work with what's called a subdivision
surface modifier. To do that, I'm
just going to hit "Tab" to exit out of edit mode. Then we can move over to the modifies tab in
the property panel. You see here under
the modifiers, if we add modifier, we can move down to
subdivision surface. If I click on that, you
can see automatically a mesh has increased
in complexity. We've got two values here, a viewport level
and a render level. If I increase this
viewport level up to two, you'll see again our mesh
has been further subdivided. If I hit the "Tab" key, you'll see that we still
have our original mesh here, it's just been
subdivided within that. But if I were to select points on this mesh
and move them around, you can see it's moving all of those other points with it. At any point I can go
back and I can adjust this viewport level
right the way down and we're back
to our original mesh. This is a far easier way of
working with a high res mesh. We have this low res mesh
that we actually manipulate and then we can increase the detail and certainly
at render time, increase that detail
potentially even further to get a smooth result. The other thing
you'll notice is at the moment our mesh
is very faceted. If I jump back into object mode, I can just right-click
and hit Shade Smooth", and it will smooth
everything out for us. Now if I hit the three key to jump back
into the side view, you can see that, particularly if I turn
on x-ray mode our smooth mesh doesn't quite
exactly follow our concept art. To modify that, if we
hit the "Tab" key, we can actually select these vertices and
start moving them, a little bit above our concept
art so that we're actually creating a smooth shape that
better follows the design. I'm just going to take a
minute here and adjust some of these points until it's following a little
bit more closely. As we add in extra geometry, we'll probably need to
adjust this yet further. Should do us for now. Don't forget to save.
10. Modeling: Add Geometry & Mirror: The next thing I'd like
to do is add in a bit of extra geometry to define the shape of the side
of the character. To do that again, I'm going to use
the edge loop tool. I'm going to hit Control R again using my
mouse scroll wheel, I'm going to add
in two edge loops here. Right-click to confirm. Then going to do the
same at the bottom here, Control R, scroll up and add in to
actually to the bottom. You'll notice we now have roughly square faces
throughout this mesh. That's really useful
when it comes to both texturing and
deforming the character. You end up with
shapes that are too deformed from basic
square shape, you can end up with some
stretching within the mesh or within the textures
that can be undesirable. Wherever possible, work
with roughly square shapes. Now, throughout the body, you can see our geometry
is fairly even. But we've actually got
a bit more geometry down at the front hair
than I really want. What I'd like to do is
get rid of some of this, but still keep the extra detail at the back here
where we need it. To do that, what I'm
going to do is start merging some of these
points together. Now before we start
doing all of that, what we're going
to do is actually split this mesh in half. I'll show you why
in just a minute. If you hit the one
key on your NUMPAD, what we want to do is actually
select half of this mesh. What I'm going to do
is drag Select over all the vertices to the left
side of this mesh here. Making sure that I've
got everything on the left side but nothing
in the middle here. Then I'm going to hit
X and delete vertices. Is worth actually
checking out that you've not accidentally deleted anything that you
shouldn't have. That looks like I've got half
of the fish, as I'd like. I'm now just going
to jump back into object mode on the top key. Then if we go over into
our modifiers panel, we can add what's
called a mirror modifier, which
we did just here. If we do that, you
can see it's added the other side of the
fish back in again. That's because it's reflected
across the x-axis here. If for any reason your mirror
is not working correctly, maybe that your axes
are set up incorrectly. It's doing something like this. Well this, just adjust that until you've got the
correct axis selected. Now if we hit the Tab key, you can see that by working
on just 1.5 of this mesh, if I move the points around, anything I do is mirrored
over to the other side. Now that we've done that, set, I want to reduce some of
the geometry in here. What we can do is we can select some of these vertices and I need to select them
in the correct order. I'm going to select
that first one, the second vertex, and
then the third one. I'm going to collapse
all of these down into that single
vertex at the bottom. You can see that final one
is selected, it's in white. Now if I hit M, that will allow us to merge. We have a number of
different options here, but if I choose, At Last, I know that that
will merge down into that final vertex
that we selected. If I click that, you can see all of those
vertices have collapsed down and we kept the location
of that bottom vertex. I'm going to do the
same just here. Again, selecting an order M, At Last, let's
collapse that down. I'm going to the same
thing just here as well. M, At last, and let's collapse that down. Now, you'll see that we've reduced the amount of
geometry at the front here. We've evened that
out a little bit. But at the moment you
can see that we've introduced the star point here. It has a lot of different
edges radiating out from it. We actually have two faces
here which are triangles rather than the quad shapes that we've got throughout
the rest of the mesh. Now, because these
two are triangles, what can actually do is go into Edge mode and just select this
one edge down the middle. I'm going to right-click, and then I can choose
Dissolve Edges that will remove that edge
but leave me with one face, which actually has four sides. If I just go back
into vertex select, I can grab that one point
and just move it back a bit. You'll see that we actually
have a chord shape here. By doing this, we're creating a flow of faces that
comes around the bottom, comes up, and over the
top of the nose there. Then we have these separate
faces on the front here. This is something that
you want to think about generally as you're
creating your mesh. You can see here that I shaped these points here to follow
the shape of the mouth. Jump over here and you'll see
that a little bit better. The reason is we're
actually going to create extra geometry in here to define the shape of that mouth in more
detail as we go on. If we weren't paying any heat to the shape of these
underlying features, then it'd be very difficult
to add in the extra geometry. Now that we've reduced
the geometry in here, I actually want
to add in one for an alleged loop
around the nose here. Just going to hit Control R, to add that in click to confirm, and right-click to
stop that sliding. That just gives us a bit
of extra geometry to help shape this nose a
little bit better. Let me pull these
points forwards. These ones under the mouth,
I'm just going to drop down a little bit further
because as I say, I'm going to add in some
extra geometry here and as well pull that back
a bit to help to find that shape a
little bit better. Here we are.
11. Modeling: Refine Volume: Now that we have all of this
extra geometry in place, it's worth taking a look from the front and seeing
how things look. Because at the moment we haven't adjusted the volume
at all from the side. We're going to want to push
some of these points out. It's slightly easier to do that by looking at the
perspective view here. You see we've got quite
a flat side to it here. What we can actually do is
holding down the Alt key and clicking on one of
these edges will select the entire edge loop. With that done, we can actually scale these out from the center. What I want to do is actually just checkup at the top here, my transform pivot point. If I change that to
be the 3D cursor, which is right in the center
of the three axes there, then I'll be scaling out
from that 3D cursor. If I now hit S to scale an X, that will actually allow me to scale these points out away from that center point and better define the outside
edge to the fish. One thing I should
note here before we start moving things
around too much, if I select one of
these points along the top here and hit G to move, I can actually break
this measure part. If I just right-click
to cancel that move. If we go over and have a look
at this mirror modifier, we have an option
here called clipping. If I enable that, and now try to move that
same point by hitting G, you'll see it stays
stuck to the center. That means we can't ever introduce a break
into the mesh there. I'm just going to
hit right mouse button to cancel that move, but that's an option
that's worth leaving on. I'm now going to Alt-click
on this edge loop here, and again S and X
to scale this out, again, to introduce a
bit of volume into here. I'm just going to jump into the front view and
see what this looks like. Say S and X, I think I want to pull
that in a little bit, and then I want to just let my next edge loop real quick and scale that
one out a bit more. I'm just trying to
get this oval shape. I'm going to select some of these vertices at
the top here now, and I'm just going to
move them in and down a little bit to help
better define this shape. Again, moving around
can help with this. What we want to avoid are these flat planes
across the top here. I'm actually going to select a number of these
points and I'm going to just go into the side view and bring
them down a little bit. It will help to
round out the form. When you choose the
same at the back here, you can bring them down, doing in a slightly
more rounded shape. We'll do the same
along the bottom. You select each of these points. Of course, the bottom
here just shifts left, and then I'm going to nudge
them up a little bit. Just under the chin,
here again, same thing. That really helps to
round out the form. Now not seeing here one of these points feels like it's pushed in a
little bit too far, and this one is not
pushed in far enough. So anything like that then
you see you can go in and tweak the shape. We're looking around the form to try and create smooth curves, to define the shape
of this fish. The more you move around
in perspective view, easier is to see that shape. Look here from the
front, I think I can afford to select
some of these points, just nudge them in a
little a bit then create this shape that we've got
here in the concept art. I think what I'm actually
going to do is select all of these points down at the
bottom here, and again, scale them out in X a
little bit further, same as for this, gives us a bit more volume at the bottom here to better
match the concept toad. There we are. Rounding out that not slightly, I quite like the slightly squared-off but soft shape
that we've got there. I didn't want this to be
too square from the front, so bring some of these
points in a little bit. There we are. Don't
forget to save.
12. Modeling: Final Body Adjustments: We're almost ready to
start adding in the fins. But before we do that, there're a couple
of things that I'd like to address first. First of all, I just like to change the order of
the modifiers that we've added onto this mesh
and I'll show you why. If we rotate around the mesh. If I select one of these
points at the top here, you'll see as I move that in, we creating a really sharp
point at the top here. Now, the reason for
that is because the order that
these modifiers are applied in Blender affects
the end result for mesh. At the moment, because we're
working on half of the mesh, we're actually applying
this subdivision modifier to half of the mesh, and then we're
mirroring that result over to the other side. If we grab this
little icon here and slide our mirror
modifier up to the top, what we're now doing is we're mirroring our mesh over
to the other side, and then we're applying the subdivision
modifier over the top. What that means is if
I move this point now, we get false me the fall off on the deformation of our mesh. This better approximates
the end result that will get once we've removed
the mirror modifier, and duplicate our mesh
over to the other side. The other thing that
I'd like to adjust is the shape of the
mesh at the back here where the tail joints. You can see if we jump
into the side view that we really need a far sharper
crease just in here. In order to achieve that, what we need to do is add
in an extra edge loop. If I hit "Control R", I can actually then
slide this down much closer to the edge loop
at the end of the body. You can see by doing that, that gets rid of the stretching at the top, and
bottom of the mesh. I'll say, what we
were adjusting, the points on the top
and bottom of the mesh. We didn't adjust the
shape of the tail, so I'm going to do
that as well now. I'm just selecting these
points at the top here, going into the side
view, and just pull them down a little bit. We'll do the same at the bottom. We're going to lift
these points up, and where we're about it. We should do the end of the tail, just
preliminary squared. That would just better
round out the form here, give them more
natural feel to it. Actually just going
to adjust some of these points a little
bit here as well. Once again, just adjust
that shape of that tail slightly better matches
the concept. Here we are.
13. Modeling: Dorsal Fin: We're now ready to start
adding in our fins. If we go into the side view, you can see that
because of where we place this
geometry originally, we now have three faces on
the top here that we can actually extrude out to
create the shape of this fin. In order to do that,
I'm just going to rotate around and select
these three faces here. I'm hitting three and face select to just select
all of those faces. Now if we were to just
extrude these out, the fin will be extremely wide. What we actually want to do
is add in a little bit of extra geometry here through
the middle of these faces. But we still want
to obviously keep our quad shape faces,
what we do say. To help with that,
we've got a tool called the insect tool, which you can
activate by hitting the I key on your keyboard. When you do that, as
we slide the mouse, you can see it's adding
an extra face in the middle of the
existing faces. Obviously, we don't want
two fins side-by-side, we want this extra geometry to be added right along
at the center edge. What we can actually do with
this tool still active is hit the B key, B for boundary. That now means
we'll be insecting towards that central boundary. Now just be aware because of
the shape of these faces, if you move this too far, we're actually cutting through the mesh down at the bottom, close to the tail there. I'm just going to keep
this a little bit larger initially. I'm going to click
that so that we're not creating any bad geometry
down at the bottom. Having done that, what I can now do is going to
vertex select mode. I'm going to select
these vertices across the top
here, these three. Now we can hit G to grab, instead of just moving
them freely around, if we hit G the second time, that will allow us to slide
them along an existing edge. We can actually slide them
closer to the center there. Just let these to
the top and do the same with them and slide them
a little bit closer still. There we are. What we can also do is slide these
a little bit further down. With that done, I'm now going to head back
into Face Selection and select those three central faces
and hit E to extrude them. Just bring them out
away to start with. You can see because of
the angle of the faces, they're actually growing wider as we've extruded them out. To resolve that, I'm
just going to get back into Vertex select, hold down Alt and
click this one edge which will select all
of those vertices, S to scale, and X and we scale them in towards those
central points. Having done that,
I can hit three on the Numpad and we can
start to shape this fin. I'm just going to roughly
pull these points into place. I'm not going to get
it too tight just yet because we're going to
add in a little bit of extra geometry as well to help. With that done, I'm going to hit Control R to add in an edge loop, just drop
that in the middle. Then again, we can start
moving these points around to fully define
the shape of that fin. Looking fairly good.
Bring these points down in a little bit. Orbit around and
see what we've got. I'm just going to hit Alt Z, that turns off x-ray mode, we can better see the
shape of our fin here. I was a little bit pinching
down at the bottom here, so I want to move some of
these points around slightly. I'm just going to
hit Alt Z again so that you can see
through what I'm doing. I'm just going to
tweak those slightly. We have a slightly smoother
fall off at the back here. I think that will do it for now. We can nudge these points back ever so slightly. We have got a little dip in the mesh here that
we didn't really want. Always trying to keep
a nice smooth shape. [NOISE]
14. Modeling: Anal Fin: Now we can just go
ahead and repeat the same process for
the fin on the bottom. Again, we're going to select these three phases, of course, the bottom here, get back into x ray and side
side view here. Again, they nicely match
up with the base of a fin. That's why we're very
careful to put in those edge loops in the right
place, in the first place. Once again, we want to
insert these phases. Just I to insert. We still got the
boundary mode on. Again, B will toggle
that on and off. I'm going to click to drop that. Again, we'll go
to vertex select, I'm going to select
these three vertices, G and G again to slide. I just want to in
a bit further at the front, this one too. Again phase select and I'm
going to exclude this out. Click on the edge to select just those vertices and
scale them in on x. Then again, we'll jump into a
side view to shape the fin. General shape first, which we can then refine further once we've added in
the extra edge loop. Control R to add that loop. Well, what I might actually do, I'm going to undo that. I'm going to hit Control R
and add in two loops here. Because we ultimately
want to be able to deform these fins having
the extra geometry will be helpful as well as
helping us to better define the shape of
the fin just here. I'm going to pull
these vertices in, it's looking fairly
good as an oval shape as to get to lumpy
at the front here. I'm just going to pull some
of these vertices back, rotate around, see
how that's looking. I'm going to hit Z to toggle the x-ray mode and see this
is slightly pinched here. Sorry, I just want to
adjust this a little bit. This point, after that
all trying to get a smoother fall off of
the front of that fin. Helps a little bit. Then, what we'll also do is add
in an extra edge loop up at the top there, on that top fin. Then Control R is going to
drop that around there, then I'm going to only
click on the edge above, hit G and G again, and that will let me slide
that edge G up a little bit. Now we can, again, better define the shape just by moving these vertices
around a bit. That will give us an extra bit of geometry in here which will really help with that
deformation when we actually want to
animate the fish later on. Spacing these vertices
out a bit more evenly, move it around, that's okay. I'm feeling these points are a little bit high so I'm just going to
tweak them down slightly. What I want to
actually do is just bring them down the
back a little bit here. Getting a smoother
flow to the edge here. Slightly better
define that shape. Probably do the same at
the bottom here as well. Just note these back around a little bit bring this down
towards the backslash model. That should do it stuff.
15. Modeling: Mouth: The next thing that
I'd like to do is start to define the
mouth of our character. First of all, what
I'm going to do is slightly adjust
these points around the mouth to better
even them out, because we're actually going to add some extra geometry in here. I'm tweaking these down a little bit to give us a
little bit of space in here. Now, the next thing I'd
like to do is actually select all of these faces
around the front here. Setting right Right to the
front of the nose there, and then we're going
to insert these. Again, we're going to
hit "I" to insert. Again, just double
check that you've got boundary mode on this one to go right through
to the other side. Now I'm going to pull
this in quite a bit. Just click to create
the geometry there. We're going to move some
of these points around , tied it up a little. It's going to move some of these points around
a little bit. I'm trying to create the basic
shape of this mouth here. I'm going to keep
this fairly even. You can see here we're
creating a little bit of a lip in here, which is good. I'm going to pull these
points to the front, just back a little bit. To better define
that chin shape, I'm just going to nudge these
down a little bit as well, get a better shape to the
front, which is that. Now with that main
mouth shape defined, what we can do, and again, go back into our face select, and I'm going to
select these faces one more time and again to
insert them even further. Again, I hit "I| to insert. We go down, and we actually want to push these into the
mesh a little bit. What I'm going to
do is hit "S" to scale them in a little bit. Again, go in and
tweak this further. We can either use vertex select or we can actually
go in and select individual edges here as
well and move those around. Just trying to get a little
bit of a recess in here. Putting edges in, pushing
them up slightly as well. If I turn off our X-ray mode, you can see we've got
this nice crease shape here now defining our mouth. Now, it's a little bit
pinched around here like a little bit more of
a cheek shape around here, so we can try and pull some of these points
around again a little bit. Actually take this and lift it up and push
it out a bit more. Maybe take these points here. Just X-ray mode back on, and pull them in a little
bit further as well. Just moving around the mesh, having a look at it
from all angles. Turn that X-ray off
again to see if it's giving us the
shape that we like. I think overall that's
working fairly well. I might actually take couple of these points here and move
them out a little bit. Let's brighten up
our lips slightly. Maybe nose these out and down to round out the
top of that nose. I'm going to bring
these points on the chin in a
little bit as well, just to get a bit variety so slightly pulled in
underneath the chin here. I think that will do.
16. Modeling: Pectoral Fin: With our main body defined, what we now need to start to do is take a look at
the other fins. Whilst we could extrude them out from the main body mesh, what I'd like to actually do is build them as
separate objects. This will give us a
lot more flexibility when it comes to animation. Before we do that, I'm
just going to go up into the Outliner and
select our cube, which is actually our fish body, and hit "F2" to rename it, and we'll just call that body. I'm going to hit "Tab"
to exit edit mode. Now we're going to create
a new object for our fin. We can just hit "Shift A," and I'm going to start
out again with a cube. We can scale that right down to a slightly more
sensible size to work with, and I'm just going
to go back into our side view here for a
minute and enable x-ray mode. Now, what I'm going
to do is just move this cube until
that origin point is somewhere around the base of the fin, somewhere
around here. Then I'm going to
jump into edit mode. Now, you can hit "8,"
select all of the vertices, and I'm just going to move them of over here to start with. Next thing I'm going to
do is move these vertices to create the overall shape of the fin from the side here. Again, we're going
to add in a lot more geometry as we go. I just want to create a
basic shape to start with. I'll now hit "Control R"
to add in a net loop. Again, just use the scroll wheel to add in some extra edge loops. In this case, because
we're going to be deforming this object, I'm going to actually
go ahead and add in four edge loops. Right-click to leave
them in place, and now we can start moving these vertices around
to where we want them. I'm just trying to rough
in the overall shape of the fin and trying to keep my edge loops evenly distributed along the
length of this fin here. I'm also going to add him one edge loop
down the middle here, and just move these points
on the end of this part. Obviously we've been working
on the one side of it, so you can see it's far
too wide for a fin. I'm just going to
scale this down in x until it's much smaller. Around there should be fun. At the moment you can
see I'm leaving this in the middle of our
fish. That's fine. We can even turn off the visibility of our body so
it doesn't get in the way. If we jump back
to our side view, we can actually see
what we're doing. Before I go any further, what
I'm actually going to do is hit "Tab" to get
back to object mode. We're going to again add a
subdivision modifier to this. Now we can go out
through the menu and add our modified there, or just with the
object selected, you can hit "Control and
2" on your keyboard, and that will actually add in a subdivision modifier with
two levels of subdivision. Again, if I go back
to our side view, you can see this is squashed
it down a little bit, so we go back into edit. We can move these vertices round again just to better
define our shape. [NOISE] Now the other thing that
I'd like to do here is to add in some extra
geometry at the end here. I'm going to select this face on the front and
I'm going to extrude it out. I'm going to do that
a couple of times to give us a little bit of
extra geometry to work with. This geometry here
we're just going to bend round and
push into the body so that we have the impression that the fin is
actually connected. Again, just moving some of these vertices a little bit further. Creating a nicer
shape to our fin. [NOISE] The other thing
that we should do, just hit "Tab" to get back into object mode and
right-click and shade smooth just to get rid of that faceted look that we
had to jump through before. Now that I'm happy with
the overall shape, I'm just going to once
again hit "Tab," and then we'll select these
points at the front here. What I'm going to do is
just move these slightly in x to create this bend that we want here and
rotate those points. We choose medium point, rotate around z, you
can rotate those. Then I'm going to select
this edge loop just with clicking on the loop, then again and
rotate those in z, so we're keeping
up that volume as we bend around the corner here. I think I'll also do is just select that face
on the end there and just extrude it one more time, just to
short distance. Just to give us a
more solid end here, and subset, that sloppy. There we are. We tap back
out into object mode, and we can rename this object. I'm going to call this
fin_r, for the right. Let's bring up body
back into place. I'm now going to take this fin
and I'm just going to move it in x out to the
side here somewhere. It's roughly in position. Then what I'm also
going to do is just rotate this on the
z axis slightly. If we go to our front view we should be able
to see it here. Let's move this back in. Again, I can rotate that on z, better matches our reference. Now if we jump into
the side view, you probably see
here that our fin slightly shorter
because it's rotated. I think what I'm going to do
is just select everything. We rotate round to the top here. We can actually scale this along its local axis by
going to Local, then scale it, you can see I can constrain my scale
to the y-axis here. I'm just going to
scale it slightly on the y till it better
matches my reference there. Now we jump between
the two views, just go out of edit mode. You can bring it a
little bit closer, and can always rotate this slightly in as well to
help from the front view. There we go. We have our
one fin in place here. In fact, if I turn
off x-ray mode, what you'll see here is as it's coming into
the body here, the geometry has being cut off, extra pieces bent around inside. I think I'm going
to move this ever so slightly further out, and change back to global, and then move it on
the x-axis slightly. Then what I might actually do is rotate it slightly as well. Rotate it slightly on
the y-axis and that will better align it to
the shape of the body here. Here we are.
17. Modeling: Duplicating the Fin: I'm happy with that now, so what we can do is actually
duplicate this frame. To do that we can hit Shift D and that'll give us
another fin here. I'm just going to
right-click to leave it in place and go to the
outliner and rename it. We just change this to fin
on score L for the left. Now if you hit the N key, we can open up our
transform panel here. One nice feature in
Blender is that we can actually just roll over
one of these values. So in this case, its X location, and I can just hit
the minus key, and it will mirror it across. So we now have a negative
value for our X location here. The other thing we can do is to scale it on the X-axis
with a negative value. Again, I'm going to roll over X minus and we've scaled it in X. We also need to do the same with our rotation because we
rotated it around the Z-axis. So rollover there
and hit minus there, and that should pop it
out the other side. In fact, we also need to add a negative rotation on the Y because we'll
rotate it in Y as well. There we are, and
that should match. Now one thing you
might notice here is our scale values
are not set to one. We select our body mesh, all of our scales at one, but our fins are not, because we scaled that cube down initially and we didn't
reset the scale. Now that can lead to
problems later on, so it's always worth
resetting this. To do that we can
hit Control A with the object selected
and then apply scale. That will reset
everything to one, most leaving the
object as it is. We'll do the same
on the other side, Control A apply scale. Once you've done that,
you can save your scene.
18. Modeling: Pelvic Fins: We're now ready to add in
our two remaining fins. Before we do that, I'm just going to hide all
of our other geometry, jump into our side view, and we'll add a new
object to start from. Once again, let's
just add in a cube, we can S and scale
this right the way down and move it
roughly into place. Hit "Tab" to go into edit mode, Z for X-ray, and then once
select my vertices. Now I'm going to scale
those down still further. Move them roughly into place. I can just select these bottom
ones and skew them across a little bit to the
right basic shape, and then we'll add
in an edge loop, control R to the middle there, and one more across
just like that. Select everything,
and we actually want to scale this down again. S and X scale is right
in, it's quite narrow. Three again, and let's hit "Tab" to get
back to object mode and I'm going to hit
"Control 1" in this case, to add a subdivision
modifier with a single level of subdivision. Because this is quite
a small object, that would probably
be sufficient. I'm going to turn my
Render subdivision level down to one as well. I'm going to hit
"Tab" to go back in, and again, let's move some of these vertices
around into place. As we did previously, I also want to take this face at the top here and
extrude that out. I need to extrude, and I can just offset that a little bit
and rotate it around, and I'm going to do that again. We got a little bit more
geometry to work with. I'm going to hit "Tab" again and right-click and shade smooth so we can see
our shapes moving down. Now, it's looking
slightly faceted so I think I will bump that subdivision back up to
two. It's a little better. I can start viewing here. Just going to tweak these
points slightly further, just a Some bit
more. Volume here. Otherwise, it's
looking fairly good. I think that will do us. As we did before, I want to take these vertices and just move
them across a little bit. I'm just going to move
them along the x-axis. This is what's actually
going to end up poking in through the
main body of the mesh. I'm going to get
back to object mode. I'm going to enable both my other geometry and then we can move
this fin into place. Now, I'm just going to hit one and move this
across on the x-axis. Now, make sure we're in
roughly the right place. I think we can afford to
move that in quite a bit on the x-axis and will actually rotate it out
a little bit I think, so I'm better
matching this angle. I'm going to hit
"R" twice to free rotate it out a little bit. Move it roughly into position
where I would like it. Check from the side
again a little bit high, down and rotate
that a little bit. I don't want it to be cutting into the
geometry if I just hit Alt Z. It's clipping in slightly here. Let's just rotate it
a little bit further. Something more like that. Looks good. It matches
up very well that. I want it a little
bit lower than we were in the reference there. Not to worry. Maybe nudge it out slightly,
split the difference. There we are. Again, we need to apply the scale. Hit "Control A" to
apply that scale. I'm going to rename this. I'm going to hit
"F2" and actually rename this to overcome, to score R. These are
the pelvic fins of fish, and I'm going to
duplicate that, shift E, right-click to cancel the move, and let's rename
that pelvic left. Again, we can mirror this
across to the other side. Once again, we're
just going to roll over our X location value, hit the minus key, and then we can do the same
with our X scale. Scale it across, and
then we need to do the same with our rotation. Our rotation in Z
needs to be mirrored, and then our rotation in Y will need to be
mirrored as well. Because we've got this
negative scale value here, again let's just hit "Control
A" and apply that scale. Those are our fins complete. Just hit "Control S" to save.
19. Class Update: Principled Shader: In the following
lesson, we start to make use of what is known as the Principal Shader or
Principal BSDF node. This is the primary
shader that we use to control
surface attributes, such as color and
roughness in blender. In blender version four, this shader received a
significant overhaul, which makes its appearance
very different. Previously, all
of the attributes were exposed in one long list. In version four, the
attributes have been re ordered with only the most
used ones exposed by default. All of the other attributes
can still be found, however, by opening
the various sections. Whilst most of the
attributes retain the same names but simply
found in new locations, there is one more
significant change. The specular attribute, which originally could be found near the top of the list
of attributes, appears to have been removed. There is a specular section, but no simple specular slider. In fact, this has
simply been renamed to IOR level and it's used to modulate the effect of the
index of refraction slider, which is now found at the
top of the new shader. Whilst the changes
do make the shader appear different to the
examples in the class, overall it has been simplified
for day to day use, which can only be a good thing.
20. Modeling: Eyes: The final thing that we
need to model are the eyes. There are a number of
different ways of doing this. But for this stylized approach I've chosen for this character, we're going to actually
work with flat planes. I'm going to go
to the side view. Again for now, what I'm
going to do is turn off our body geometry so that it's not getting
in the way at all. I'm going to hit Shift A and I'm going to start
out with a plane. Now that's created
a very large plane. Let's scale that down, and
go back to our side view. It's also obviously
rotated on the wrong axis. We can just hit R Y 90, and that will rotate it
around the Y-axis 90 degrees. We can now move that up
roughly into position. I'm also going to
rotate it so it better aligns to the
orientation of the eye, hold Z so that we
can see through it. With it selected, let's hit
Tab to enter Edit mode. I'm going to need a
bit more geometry in here obviously to create
the shape of the eye. I'm just going to right-click
and hit sub-divide. Now I'm going to select each of these points
on the outside. Then just going to make sure
that I'm on median point here for my pivot point for
the scale and hit S to scale. That will scale them all in. Now I'm going to hit A
to select everything , just local orientation. Now, I'm going to
hit S to scale and constrain that to the Y-axis
so that I can squash it in. I'm going to scale out
everything slightly larger because once we
sub-divide this again, we're going to shrink everything down a
little bit too much. Now with all of the
vertices selected, I'm going to sub-divide
this one more time. In this case, I'm
just going to select these, points here. I'm going to scale
them in slightly, to round out that shape. Hit Select everything,
just get it up slightly. Nudge it slightly into position. Hit tab. Again with
this object selected, I'm going to hit Control 2, to smooth out when the
subdivision modifier. Now I'm not going
to worry too much about the exact shape
of this at the moment, and you'll see why
in a little while. With this object selected. Let me go and rename it
here in the outliner. I'm going to call it Eye_. Now what we're going to
do so that we can see this is we're going to add
a basic material to it. I'm going to go into
the materials tab. I'm going to hit New, to add a new material and I'm going to rename
this to, EyeWhite. For now, all I'm going to
do is change my base color and I'm going to move it up
just to a pure white color. What now I'm going to
do is duplicate my eye. Right-click to cancel the move. Now I'm going to hit G to move, and I'm going to move this over so it's centered where
the pupil will be. I'm going to hit S to scale
this object down a bit. It's overlapping with
where the pupil should be. Don't worry that
at the moment it's overlapping, I won't. We're going to fix
that in a minute. But what I'd like to do
now is with this selected, let's rename it first to Pupil. I should rename that to Pupil. Then here we need to actually
create a new material. This number 2 here indicates
that at the moment the eye white material is
applied to two objects. If I just click on that 2, we'll create a copy of that. We're going to rename
this to Pupil. I'm going to change
my base color here. Just click on the color and I'm going to change
that to pure black. Now at the moment, you'll
see we can't actually see those colors because everything at the moment is
flat-shaded in gray. What we actually need
to do if we want to see them within this viewport, is we need to change the
Viewport Display color. Down at the bottom of the materials tab here we
have Viewport Display. You can see our color here. Let's delete default. Let's move that down to
black for the pupil. If we select the eye
up at the top here, we can do the same
here and change that to be fully white. The next thing I'd like to do is select both of these objects. I'm just going to move
them off to the side here. They're away from the
body of the fish. Let's enable the fish body. What we're going to do is use
a shrink-wrapping modifier to actually stick these
onto the side of the fish. I'm going to move them so
they're relatively close, but not actually
touching the fish. I'm going to offset the two
from one another for now. We can turn off our X-ray mode. Now we going to select our eye and we're going to go
to the modifies tab. We're going to add
a modifier here. In this case, under
the deform section, we want to get down
to shrink-wrap. Then we need to target object. We can click on this
little eyedropper here, and then we can click on our body object and
you can see it's moved that mesh cross
and it's stuck it on over the surface
of that body. The moment it's intersecting
slightly. We can fix that. First of all, what I'm going to do is just select the fish, so that we can better see
the difference in the color. I'm going to change the
base color on this fish. For now, I'm just going to
change it to yellow color. I'm going to roll
over this color here and hit, Control-C, go down to our Viewport Display, and hit Control-V. Now we can better see the
difference and the colors. I want to re-select my eye. We need to change
the settings here within the modifies tab
on our shrink-wrap, so that it's no
longer intersecting. We have a number of
different options here which define exactly how our object is shrink-wrapped onto the main body of the fish. The ones that we
need to look at are the snap mode and
think for that, picking above surface will generally yield a better
result in this case. What we also need
to do is look at this offset value and we can
just increase this slightly. Number one at the moment is
sufficient to push that out. You can see at the
moment that we've got quite a faceted result. Now there are a couple
of things that we need to do to help resolve this. First of all, again we
need to apply our scale. Let's hit Control A
to apply our scale. We'll do that with
the pupil as well. We're about it, apply our scale. Now back to I worked here. Again, we've got the order
of modifiers to think about. At the moment our
object is being subdivided and then it's
being shrink-wrapped on. We can have a look at
the way we do this. If we switched these over and have a
shrink-wrapped first, you see we actually get
a far cleaner result to the edge of our mesh. But we're intersecting more. We can look at our offset again here and just by
increasing that slightly, we can move it out
of the mesh there. That's looking far cleaner. Let's also right-click
on here and hit shade smooth just to make sure
we don't get any faceting. Now we're going
to switch over to the pupil and do the same thing. Again, let's shade
smooth on that. We're going to add a
shrink-wrap modifier. In this case, we're
going to pick the eye white as our target. You can see it's now clipped it to the edge of the object, this Shrink-wrap tool
which is really handy. In this case, we can
leave on surface as our snap mode just once
again increase that offset. Now we have a slight
trade-off to make here, because with this shrink-wrap
after the subdivision, we've got this rather
jagged result. But we do have a
clean edge to it. If we drag this up above
the subdivision modifier, we get a far cleaner result but we don't get quite
as clean an edge. We increase the
offset on that again, so it's not intersecting. You can see the result. It's up to you which
way you want to go. We can actually have
a look at adjusting the number of subdivisions
within our mesh. Sometimes increasing
them can help us, but it's still not
resolving the issue fully. If we increase the subdivisions of the object it's
intersecting with. Again, that's given us a
slightly cleaner result again. Actually, if we're far
enough away from the fish, we're not going to notice any of those little
imperfections there. It's up to you whether
you want to keep that look or if you swap these modifiers
over and you just have a slightly
different look to the shape of your pupil. What I would like to do is adjust the shape
of these objects now because if we hit
3 and let's hit Alt Z, you can see that now that we've shrink-wrapped
our object, it's actually quite different
in size to the original. I'm going to select
my, EyeWhite to start with. I'm
going to hit, tab. Now, I can scale this to try and adjust the final shape that's shrink-wrapped
onto the surface. I'm going to scale
the whole thing up a little bit and move it around a little bit until
its more or less lined up. We can even rotate the object
itself slightly, to help. Let's have a look at our pupil. Again, we're going to need to, scale it a little bit. I'm scaling it out
on the Y-axis. Let's move it around till
it's more or less lining up. Again, if I move around here, you'll see that we are
inserting a little bit again. If I select that, again, have a look at my offset, I can push that out slightly
to resolve that issue. That's a little bit closer
to our original concept. Now, we can try swapping those modifiers over and you can
see how that looks. The benefit of using the
shrink-wrap modifier, is that now if I select this
pupil and I move it around, you can see as it
gets to the edge, it just cuts out wherever
it happens to be. Obviously, we can
see we're revealing that white and there's
a bit of a gap there so I need to select
that EyeWhite again and just push that a
little bit further still. That's giving a clean result. I think I'm going
to swap this back. I think that's going to give
us a better result overall. Jump out to the side. The one
thing I'm not so keen on is the shape of that pupil
isn't looking quite right. I'm just going to try and
modify that slightly. Just feeling a little bit
too square for my liking. Round out slightly more. There we're. When you're
happy just save your scene.
21. Modeling: Parenting Objects: The final thing that
we need to do for our model is to
duplicate our eye. So for that I'm going to
select my eye and my pupil. I can hit Shift D and then just right-click
to cancel the move. I'll select my eye and F2
to rename that to eye left. We can roll over its
x location value. Hit minus key, and that will mirror it over
to the other side. We're going to do the
same now with our pupil. So let's find our pupil, rename that to pupil left. Again, we're going to hit the minus key over its x
location to mirror it over. Now we have the
same on both sides. At the moment all of
these parts are separate. If I select my fish
and I move it around, everything else
gets left behind. The eye swims over the surface. We don't want that obviously. So what we need to do
is to parent all of these objects to
our main fish body. So what we're going to
do is we're actually going to parent our
pupil to our eye. We can do that by
selecting the pupil first. Let's shift select
the eye white, hit Control P to parent
and set parent to object. Do the same on the other side. Select the pupil, shift
select the eye white, Control P, Object. Now we want those
two eye whites. So we can select both of those. Shift select the body, Control P, parent to object. So now as we move our fish
around, the eyes follow. Do the same with the fins. I'll set all four of those fins. The final object that we select is our body and
we hit Control P, set parent to object. I have to make sure
that the final thing we select is the thing that
we want to parent to. Then as we move around, everything will follow with it. You can see up here
in the outliner, now we have our
body of our fish. If we roll that down, we see our other
objects underneath. We see our eyes and
all of our fins, underneath each of the
eyes there's a pupil. That shows the
hierarchy relationship between these objects. Then hit Control S to save.
22. Texture Painting: UV’s: With our fish model complete, there are a couple of
things I'd now like to do. First of all, to keep
everything tidy, I'm going to
right-click on my body and click "Select Hierarchy". That will select all of the objects within
our fish model. Now I'm going to roll
over the outliner and hit "M" to create
a new collection. I'm going to call this
fish, hit "Enter". What that means is
we can now toggle the visibility of our fish quickly and easily
if we want to. The other thing we're going to do is version up our scene. Let me hit "Save As" and
just hit this plus icon next to our scene file name or add version 2
and hit "Save As". That means we'll always have a version to go back to
if anything goes wrong. With that done, I'm going to
de-select my fish and hide it because I wanted to explain a couple of things
before we proceed. We want to paint an object, we first of all need to
define what are called UVs. Now this lets us
essentially unwrap an object to make it
possible to paint it. To help demonstrate that, I'm just going to add a
basic cube to the scene, and I'm just going to
move out a little bit. When we want to
paint this object, blender needs to know exactly
what we're painting onto. If we go over into the
UV Editing Workspace, we can see, if I, again, frame this
up a little bit. With our cube selected
let's hit the "Tab" key to select
all of the vertices. You can see here, our cube has been unwrapped, and this is done
by default for us with a basic objects
like the cube. This is a flat 2D
representation of our object as if it was a 3D
box that had been unfolded. For now, I'm just going to go back into object mode
and remove that. If we enable our fish
collection here, I'm just going to frame that
up again with a period key. Still in the UV editor here
with my mesh selected. If I hit the "Tab" key and "H" to select all
of the vertices, you can see this is
something of a mess in here. Because we started
out with a cube, and we extruded it and moved
all of our geometry around. This isn't giving us a correct unfold of
this particular mesh. What we need to do is to create a set of UVs for this fish. There are a number of different
ways that we can do this. To start with, with the
whole fish selected, we go up to the UV menu
up at the top here, we have some different
options here. We can create what are called
different projections, so we can project in different
basic shapes around it. We have this smart UV project. We have some other
unwrapping options. For now, I'm just going
to hit this Smart UV project and just hit "Okay". You can see what it's done here. We have the basic shape of
our fish from the side, but we have a number of
other separate portions. Now, we can paint onto the fish and the color will appear on all of these different parts. But with it divided
up like this, it can make it slightly more
awkward for us to work with. But given the
design of our fish, I'll just hit the "3"
key on our Numpad, you can see this texture, doesn't really require lots of detail up at the
top or the bottom. What we really want is
just to be able to paint one side and essentially
have it show through to the other side
and be a mirror image. We can actually do that
with our fish selected, and our view sets
the side like this. If we go up to the UV menu, we can actually hit
"Project from View". If we do that, you'll see
our fish appears here. If instead, we select
"Project from View (bounds)", you'll see it
expands out to fill the whole of this space here, but it does introduce some
stretching from top to bottom. Whilst that makes good
use of our space here, instead what I want to do is change it back to
project from view. Then I want to scale this up so that it fits
the whole viewport. We can select
everything here and just hit "S" as normal, and we can just
scale it up until it fits more or less
within this space, and that should be
sufficient for us. Now that our UVs for
our body are defined, we can take a look at
the UVs for our fins. I'm just going to hit "Tab" to exit it out into object mode. We don't want to duplicate work, so I'm actually going to
work on just one fin, and then we'll re-mirror that across to the other
side of the body. I'm going to select
my right fin. I'm going to hit "Tab." Again we can just project from view. A in this viewport and
S to scale this up, so it's about your size. Again, that should do us. Finally, let's tap
back into object mode, select our pelvic fin, hit Tab again, I
select everything, and again, we will
project from view. Let's just scale that up a bit. Tab to go back to object mode. The other thing
that we should do, and I'm just going to flip back to our modeling tab for now. Because we want to
duplicate these over to the other side, keeping those UVs that
we've just defined, what I'd also like
to do is properly set up the materials for each of these objects so that those materials are
mirrored over as well. For now, let's hit the
Materials tab. Let's hit "New". We're going to name
this material so let's call that pectoral fin, and for now we'll just give
it a white base color. Go down to the
bottom here, again, hit "New" and let's
call this pelvic fin. In this case, I'm going to copy the material color that we
had defined here on the body. I'm going to hit "Control
C", select my fin, and hit "Control V" to copy that in and will duplicate that onto the viewport
display as well. I'm just noticing my
main body material is just still
defined as material, so let's rename
that to fish body, and we've already defined
materials for the eyes. With that work done,
we can now actually duplicate these fins back
over to the other side. I'm going to select these two fins and hit
"X" to delete them. I'm going to select my pectoral
fin here on the right, Shift D to duplicate, right-click to cancel the move. We'll mirror that in X just by hitting the minus key
over the X value. We're going to scale this in X, and we're going to mirror
the rotation in Z and on Y. That should do and hit "Control
A" to apply our scale. Did the same down
at the bottom here. Shift D, right-click to cancel, or an X, scaling X, and then our rotation
on the Z and Y-axis and Control
A to prior scale. Now if we take a look
in the outliner, you can see that these fins have inherited the position in the hierarchy of the objects
that we were duplicating, so they're already following the fish if we move it around. All we need to do is
rename them. Hit 'F2". Just adding a left
on each of these. There we are. Now all of our
UVs are properly defined, and our hierarchy
is setup correctly here and save our scene, and we should be ready to start texture painting in
the next lesson.
23. Class Update: Texture Painting: In the following lesson,
I show how to assign a blank texture that we
can later paint onto. In Blender four, the
texture slots options, which used to appear
in the property panel, we moved to the top
of the viewport. Aside from the relocation, this still functions in exactly the same
way as it used to. Blender 4.3 introduced a new
selection of brush presets, which appear in the asset shelf at the bottom of the
three D viewport. Whilst these presets provide some additional options
to experiment with, you can follow the lessons without worrying
about them at all. If you wish to, you can hide the asset shelf by dragging its boundary down to the
bottom of the viewport. To re enable it,
you simply click on the small arrow at the
bottom of the viewport. Alternatively, the shelf can be turned on and off
through the view menu. Finally, I mentioned in the lesson the
shortcut for sampling a color under the cursor
is S. In Blender four, this shortcut was changed to the somewhat less
convenient shift X. This does, however, make a
certain amount of sense, since the shortcut
X can be used to swap between the primary
and secondary colors.
24. Texture Painting: Main Body: Now that we're ready to
start texture painting, we're first going to select
the body mesh for our fish. Then we're going to jump over
into the texture paint tab. You'll notice a
couple of things. First of all, our body
obviously looks pink. That is because no texture
is currently defined. We can also see on the left here all of the UVs that we
defined for our fish. That's going to be important
because that shows exactly where we're painting on
the fish in a 2D form. The first thing
that we need to do is to define a texture. This will be separate
image file that will save separate to our blend file. Not with a 2D texture that
is being projected onto the fish using the UVs
that we defined earlier. Over here on the right in our properties' panel
where it says no textures, we've got a little
plus icon there, so we can hit on that. We can start adding texture to affect different properties
of our material. The one we're interested
in is the base color. The name of our texture here is defined by default as
fish body-based color. We can leave that as is, then we can adjust our
size of our texture. I'm actually going
to double this. Take it up to 2048 for
both of those values, and we can pick a default color. For now what I'm actually
going to do is I'm just going to set a mid gray tone. This will be the background
color of our texture. Then we can just hit okay. For now you can see that
everything has changed to gray. Over on the left-hand,
nothing has changed. What we need to do is just click on this
little drop-down, click on our fish
body base color. We can now see that our
entire texture is gray and that is what is being
projected onto view over here. Now you can see as we move our mouse around in this
right-hand viewport, we have our brush
size defined here. We can still move around
our viewport as normal. With a color selected down here. We can then paint onto our mesh. You can see it appears in
2D over on the left here, as well as being able
to see it in 3D. Just going to hit
Control Z to undo that. That's our basic paintbrush. But we have other things that we can use
down the left here. To start with, I'm
going to define the overall yellow
color of the fish. To do that, I'm going to
first choose a color here. I'm just going to make
this a little bit darker. Somewhere around
there should do. I don't get to pick
this fill option here. You can see our color down at the bottom here hasn't remained. I'm just going to redefine that. Just reduce that a little bit. Somewhere around there
should do it, I think. Now if I click on
the fish's body, you can see it's all yellow. Over here on the left,
you can see that the original gray color that we defined remains on
the outside of the mesh. Everything within the mesh
has been colored yellow. To give us a better
representation of how our fish
is going to look, I'm also going to
change my view from the shaded view over
into material preview. That gives us some
better general lighting on our fish to see how it
might look in the real world. I'm going to switch back
to my brush tool for now. Then I'm going to define the
front section of the fish, which has that
white color on it. I'm just again going to
change my color here. Then we can adjust the size of our brush by holding
down the F key. That will interactively, let us adjust the size
and when we click, that will give us
our new brush size. Alternatively, if
you right-click, you'll have this pop-up appear where we can both
change our color, but we can also
adjust the radius of our brush or the
strength of it. For now I'll leave it
somewhere around there and I'm going to start defining the white area to the
front of the fish here. Now, if you only have a mouse, you can still paint with it. But you're not going
to get the benefit of any pressure sensitivity for control of its strength
or the radius. Now at the moment, I'm just going to undo this. Because you can see we're not
applying a full value here. At the moment our
pressure sensitivity is set to strength, and it's not set on radius. If I turn that off, you'll see as I paint, I'm getting a 100 percent
of my color laid down. If that's active and I'm using a pressure
sensitive tablet here, I can actually paint
on with a light color and I can press harder
to get more full color. For now, I'm going to disable
that because I want to paint fully white
at the front here. We can also enable pressure
sensitivity for the radius. That way I can adjust the
thickness of my line. Again for now, I'm going
to leave that turned off so that I'm treating this more
or less as a mouse at the moment and just
applying a solid color. Now let me just define
an even thickness of line and boundary here
to the edge of my white. Then we can just fit in
the front of our fish. You can see anything I paint on the one side is projected
through to the other side. We can rotate around our fish to make sure that we're painting
all areas of it. Paint across the top here. Make sure that we've got
an even boundary there. Again, making sure that we're getting everything
down at the bottom as well. I'm just going to make sure I've painted underneath the eye. You can see on the left here, this will show you clearly what has and hasn't
been painted. The other thing is you
can actually paint within this view as well. If you want to clean up a line, you can paint in there as well. This will actually
allow you to go outside of the lines
if you choose. Only any color that is actually underneath these UVs will
show up on the mesh. We can see just
here is we've got a little area that it's
actually hard to paint. Sometimes just
adjusting your angle will allow you to
paint that over. You can see also here,
underneath the lip, there are a few areas
there that also haven't quite being filled in. Sometimes you find it's
actually easier to move in on the 2D version. If we actually paint some
white in over this area here, then you'll see it's
colored in that area. Now the reason for that is because of our projection type, we've got a lot of vertices over the top of each other here. Sometimes it's harder to
actually make sure that everything is painted properly when we're painting
in this view. That's the benefit of
properly unwrapping your mesh rather than using the simple
method that we've chosen. But in this case, just painting over it in the
2D view will do the job. You can see here we've defined our basic splitting color here between our white
and our yellow. You can go in and further
refine that line if you choose. If, for example,
you want to select this yellow color
and paint a bit more back in over the white. You can actually sample a color by just hitting the S key. Any color that is
underneath your cursor at that point in time will be selected. You
don't have to click. See down in the
corner here where our color picker is that we've actually selected
that yellow color. I'm going to now go ahead and just paint a little bit of that yellow color back in again. I just want to adjust
the shape of this, just painting over the edges. It doesn't really matter. I want to bring this forward
a little bit. Where that pelvic fin
is, I'd like that to be joining into the
yellow part of the body. I'm just getting a bit of
an arc to the shape here. Going a bit too far
on the top there. Again, let's just hit S
to sample that color. Paint it back a little bit. We try and make sure
that's going to shape it. That should do is for that basic split between
the yellow and the white. I'm just going to save that now. Control S. We can start defining the black
areas at the front here.
25. Texture Painting: Eye Markings: I'm going to take my value
right the way down so it's not fully black but it's
getting very nearly there. Then we can start to define these areas around the
eye and above the mouth. You can see here we want
this patch around the eye. I'm going to lift it slightly
higher up at the top here. You can see with this
large brush we're getting quite a
soft edge to this. That can be desirable, but I think I want something that's slightly sharper here. Rather than being zoomed out, you see it as we get a
bit closer to the mesh our brush is smaller relatively and you can see
it's got a sharper edge to it. I'm just going to
undo some of that. I'm just going to work with a slightly smaller
brush on the mesh. What I might actually do is zoom out and just reduce
my brush size. I'll just hit F to make
that a little bit smaller. That will give us
the sharper edge, but I can still work zoomed out. We want to bring
this black color all the way around to the front here wrapping it over the
nose, somewhere around there. At the moment I'm going over
the edge of this mouth, but I'll clean it up again in a minute blocking in the
basic shape to start with. Bring this a little bit there. I'm trying to keep roughly
to the shape of the eye. Zoom in. I'm just
adjusting my brush size to keep it fairly consistent. I'm going to clean up the
edges a little bit here. Blacken underneath. Again, we can work in the 2D view as well. I'm just going to fill in that area behind
the eye in black. I'm going to make sure
that everything is black across here where
those lips are. Then I can sample my
white color again. I can go in and start cleaning
up where I've overlapped. You can see sometimes
again because of the overlap in the geometry, we get some of these
strange artifacts, which again, we can clean
up in just a minute. If we have a look at here, we can actually try
to work in this view, paint in the white a little bit. I'm just going to adjust
my brush size down, sample the black color. Just paint back a little bit back-and-forth to try and
get this working correctly. Part of the problem is
these points really are overlapping a bit
more than is ideal. We're going to have
a bit of a problem here trying to clean this up. What we might need
to do is go back and just tweak
those UVs slightly. I'm just going to
save that there. I'm going to jump over
into the UV editing view. What we can do in here, if I zoom in a little bit, these are the points that are causing us the problem here. If I select these overlapping
points in the UV editor, I can just hit G and move
them up a little bit. You can see here in the 3D view, they've stayed in
the same place but here we no longer
have that overlap. That should make it a lot
easier to do with our painting. I'll do the same
round at the front here because I can see
there's some points here overlapping a bit more
and it's helpful. That should again, make it a
little bit easier to paint this region and up at
the top here as well. Just tweak these
points slightly. Nothing is overlapping anymore. If we jump back into our
texture paint window, you can see that's all
been smoothed out. Now, if I just select
the white here, I can paint that in
to this area here. You can see we're getting
a much cleaner line. I can also just go back into
my 3D view at this point, adjust my brush size a little, and get back to painting in the 3D view
without any overlap. I'm just trying to keep it white below the mouth and black above. Getting as clean
a line as I can. Just going to clean
up this corner of the mouth so that it's clear and defined as possible and
sample the black color. Just get a nice sharp
corner in there. That would be the smile. Just lift this black up a little bit higher
here so we're keeping an even width to
this black band. Just float through into
the top of the eye there. We can further go in and refine
the shape if we want to, but that should do us
for now. Let us save.
26. Texture Painting: Body Markings: Then I want to define this patch that fits in at the
bottom of the body here. Again, I'm going to pick a slightly smaller
brush to start with. Roughly in the shape of it. Wraps around underneath
the chin here. That comes around towards
the back here as well. We lift that a little
bit higher too. Again, once we've got our
basic shape in place, I'm just going to
increase my brush size again and just fill
in this space. We can paint on either
side of the mesh. Really doesn't matter. It's mirrored across either way. The black has come a
little bit far back there. I'm just going to paint
white in across there again. I always find myself
jumping around between the 3D view and the 2D view. I think it's most appropriate for what
I'm doing at the time. The other key marking
that we need to add in obviously is the
blotch at the back. I'm going to place
that mark here. A little bit larger. Those are our main
colors in place. To give it a bit more interest, I'd like to add a
slightly darker tone to get a bit more
color variety in here. I'm just going to save
that where it is now. One thing to be aware
of before we do that is that whilst we might
be saving our scene, we have to remember to
also save our texture. At the moment, we
can see over here, our image menu has this
little asterisk next to it that shows us that our
texture has not been saved. I'm going to go down to Save As. Then I'm going to
create a new folder which I'm going
to call Textures. Then we can leave
the default name for our image file which by
default will also be saved as a PNG file
and hit, "Save As." You can now see the
asterisk has disappeared, which shows that all
saved and up-to-date, which means we're not
going to lose it. Anytime that we make changes
though to our texture, if we paint anything more, we need to remember to save
that image fall out again.
27. Texture Painting: Colour Variation: I'd now like to add some subtle
coloration to this body. What I'm going to do is pick
a slightly darker color than we have here at the moment. We get a little bit more orange here and I'm just
going to darken this down a little bit
too around about there. Some reason we got
onto the filter tool. Let me get back my paint
tool and select the color. We're going to adjust this down to slightly darker orange color. Somewhere around there,
that's pretty good. I'm going to increase
the size of my brush. It's actually quite
large, but I'm also going to decrease the strength. You can see at the moment it's
got this strength of one. What I'm actually
going to do is use my pressure sensitivity
in this case, so I can paint on quite lightly. If you're trying to
do this with a mouse, you could drop that
strength down to a low value and just
paint it gently in. But by using this
large soft brush, I can now just add
in a little bit of some color variation
across the bottom here, which adds a little bit to it. Adding a bit over
the end of the fins. Just gently brush it in over the bottom of the
body here making sure again, we've got it right
up to the edges so end of that tail and
touching on those fins. I'm trying to solidly
color them in with just hint a little bit of
a darker tone to it. There we are. I'm just going to zoom in on
my 2D view here. You can see as we zoom in, we're not necessarily got
right to the bottom here. So I'm just going to reduce
the size of my brush. Just painting across
the bottom edge here. Just to make sure that we're
getting more solid color in there right around the
edge of the fin as well. It looks like we've
actually missed some color there previously
so I need to adjust that we can actually see painting our orange color over the top of
that a little bit. Came around the edges here, filling in those gaps. You can see there we've got a much lighter color along this edge,
which we don't want. Again, I can just
paint it in here in the 2D form I can impersonate
on the 3D version. You can get gray that was peeking through there
for whatever reason. We don't want this bright yellow all the way
across the top here, so let's brush in
some of this orange. Fade it out of it but
at the top there. I'm very happy with that. Try to save. Final thing that I'd like to do on
this body is just adding a few lines to indicate
the detail of the fins. To do that, I'm
just going to use this orange color again. I'm just going to darken
it up a little bit more. In this case, I'm going to reduce my brush
size quite a bit. I'm also going to use a pressure-sensitive radius and I can turn off the
pressure sensitivity for my strength there. This way, if I zoom
in on the the fins, I should be able to
paint some strokes in here using the
pressure sensitivity. What I want to do is some strokes that taper out as they go towards the
edge of the fin. Now if you are trying to use
a mouse to paint this in, you'll probably find
it quite difficult because you don't have
the pressure sensitivity. but you don't have to
copy this exactly. Had some details down at
the bottom here as well. Now we'll just add a
bit into the tail too, setting a bit of extra
thickness to the end of some of these lines. Taper out nicely. It's going to do the same
down at the bottom here, we've got slightly wider lines. Tape around. I think I will do.
28. Texture Painting: Fins: The next thing I'm
going to do is to paint these pelvic fins
down at the bottom here. To do that, we need to
first select that object. At the moment we're in
texture paint mode, so we can hit "Control Tab"
to give us this prime menu. Let's just switch
back to object mode, and then we can go and
select our fin here, and again hit "Control Tab", and then go back into
texture paint mode. Now you can see obviously
we have no texture defined again for this object, so let's go and
add a base color. We just picked up on the fact
that it's the pelvic fin, I'm just going to
add our base color. We don't need this
to be 2,048 pixels, so I'm going to drop this
down in size to 1,024 by 1,024 because it will never be too
large on the screen. Default color doesn't
really matter, but again I'm just going to set that to a gray color for now. We need to also change
our display over here, because whilst we've got
our UVs for this fin, we're showing the wrong texture; we're showing off
fishbody base color so I need to switch back to
the pelvicfin base color. Now we'll be able
to paint on this. In fact what I'm going to do is I'm going to
switch to the fill tool, and then to define our color, I'm going to switch back to
the fishbody base color, as to pick that color, and then we'll switch back again to our
pelvicfin base color. I can now click on the fin
to fill it with that color, and I will get far better
match to what we got above. What I'm also going to do
is pick this yellow color. But you can see if I
pick it from this view, I'm actually going to
pick it with the lighting applied and I don't want that. So I'm going to switch
back to my fishbody base color and pick this yellow color from up here but I need to be in
Brush mode first. I pick that there, I'm
going to switch back to my pelvicfin base color and increase the
size of my brush. Now I'm just going to turn off pressure sensitivity and turn on sensitivity for my strength, and just lightly brush in
some of this yellow color, again, for a little
bit of variation. We might have a little bit
too much of the yellow there. Again, let's sample that orange, and brush a bit back in. That is reasonable there. I think that should
do it for that. Take it down at the bottom now. Again, we need to
save this image. Image, save as. We're now at textures location, so again, pelvicfin base
color, just save as. But what we didn't do is probably save our
fishbody base color, so I'm going to flip
back to that and just hit "Save" on that image as well to make sure
that's fully saved too. There we are, and
I'll save my scene 2. We now just have
the one fin to go. Again, control tab, lets us switch back
into object mode. I'm going to select
my pectoral fin, control tab, back into
texture paint mode. Again, we need to add a
texture to the base color, 1,024 by 1,024 will be fine, and we're going to
switch again up here to make sure we're on our pectoralfin base
color to match up. Now, at the moment, we have
a white color in here. I'm just going to
actually switch back to the fishbody base color just to sample the white
that we had here, just to make sure that we're
using the correct color, and I'm going to change
my fill tool actually first and sample that. Then let's switch back to
the pectoralfin base color, and then we'll
fill that fin just to make sure that we're
using the same white color. I'll go to my brush tool. In this case, we're
going to, again, go for our pressure
sensitivity on the radius, but not on the strength, and I'm going to
adjust my color. In this case, we want
a lightish gray, let's take our brush
size right down. I'm just going to add in some stripes here to again indicate some
detailing on the fin. Just tapering this out a little. Thickening them out
slightly in the middle. There we are, and
that should do it. Once again, we have to
remember to save this image, save as, same location as the other textures
and save as info. Now if we jump back
into our layout view, we can change to our
material preview, and we should see all of
our textures appearing.
29. Shading: Eye Shader: With the texture
is now complete, I would just like to
take a quick look at the materials that we're using. At the moment, we've used
the same default values for all of the materials, for the eye and for the
main body of the fish. This means that light affects
all of these elements in exactly the same way and
that's not what we want. At the moment, I'm
actually fairly happy with the look of the fish itself and the way
that light falls off on it. But when it comes to the eye, I feel it's catching too
much of a highlight, so I'm going to select the pupil here and go down to the
material properties. Now, there are lots
of different values that we can adjust here. In the case of the eye, really, I just want to get rid
of this highlight. We can do that by adjusting the specular and
roughness values. I'm actually going to drop this specular right the way down and increase the roughness. That means we now have this very matte black
look to the eye. I think the value
is here on the eye, whiter looking, generally
okay, and as I said, I'm quite happy with the look of the
highlights that we're getting on the fish here on
the main part of its body. I think we can leave
the rest as it is. With that complete,
before we move on into working on the
environment for the fish, I'm just going to version
up one more time. Say "File," "Save As,"
hit the "Plus" icon, and again, click "Save As."
30. Lighting: HDRI Lighting: We're now ready to add an environment for
our fish character. To start with, what
I'm going to do is just right-click on the boundary here and
click on Vertical Split. Because I want to add in
an extra viewport here, so we can actually
see our scene camera, I'm going to hit N that viewport
just to hide that panel, T to hide the tools, and then we want to jump
into our camera view. You can do that
just by clicking on this icon or hitting Numpad 0. We can hit the Home key within this window just to frame
up that camera nicely, and then we don't really
need to see all of these extra gizmos here. We can turn all that off by
clicking on these two icons. Now, if I move out
in this viewport, you can see that our camera's positioned over here behind
the fish at the moment. What I'm going to
do is just reset that position and
rotation start with, and you can do that just
by hitting Alt G to reset its position and Alt R
to reset its rotation. Then just going to
move it out a little bit along the x-axis. We actually want to rotate
that back into place. I'm going to rotate that. I'm just going to hit R Y 90 to rotate it back
towards the fish, Z 90, so we're now aligned nicely to our
fish from the side. Now to move around our camera, we can actually do that
within the camera viewport. I'm going to hit the N key here, go to my View Options, and turn on camera to view. If we do that, we can then actually move around
within our viewport. I'm just going to
pull back a little bit to frame up the fish
somewhere in the middle here. In the moment, we've been
using the material preview for our viewport shading, but I actually want
to switch that over and use the
rendered view now. We can see what
our final lighting is actually going to look like. At the moment, we have a one default light within the scene. That's casting some
light and shadows, but what I'm going to do is just select that and delete it. You see now that we still have some light
within the scene, and that's because of
our world settings. You can actually see that
over on the right here. If we select our
world properties, you can see we have
this color value here. If I set that all the
way down to black, you'll see we you can no
longer see our scene. Now we can add in
lights in order to define all of the
lighting in our scene. We also have another
method which we can use to control the overall
lighting of our scene, which is by using what's
called an HDRI image. Now there are a number of
different places that you can download these
images online, or you can actually
create some yourself. But for the purpose
of this class, we're actually going to use some of that ship with Blender. When we're using the
material preview mode, we're actually viewing
lighting that's created by an HDRI image. If we go up to the top right here and click on
this drop-down, you can see what that
image looks like. It's a 360-degree image which accurately captures all of the light from a
particular scene, and we can swap
that image out just by clicking on this ball here. We can pick different
lighting setups. What I'd like to do is make
use of one of these as the initial starting point for the lighting for
our rendered scene. In order to do that, we can go over to
the World tab over here and click on
our Color Input. From here, we can select
Environment Texture. When we click on that, obviously everything change to pink because we actually have no
texture input at the moment. If you click on Open, you can then navigate to your
Blender install directory. Within your install directory, you should have a folder
called data files. In there, we have studio
lights and then world. These were all the
different HDRI images that we were able to swap between for our
material preview. I'm just going to pick this sunset option
and click Open Image. You can see now in
our render preview, we now have lighting that matches what we have over
in the material preview. But we also have this
backdrop in here, and we don't want to see that. In order to control that, we're going to have to jump
over into the Shading tab. Here in the Shading tab,
I'm just going to adjust our viewports just a little bit to make it
easier to work with. I'm just going to right-click
on this boundary and join areas because we don't
need that file browser. I'm going to do the same
down at the bottom here. What I'm going to
do though is split this viewport, the
vertical split. Again, we can bring
in our camera. Again, I can just
hit Numpad 0 in this viewport and home
to frame that up. Again, we can just
turn off all of our overlays and gizmos
here in the viewport. Something that can also
be helpful if we select our camera over in
the outliner here, go down to the
camera properties. We have our Viewport
Display options. Here where it says Passepartout, we can turn that up to one. You now have these black
bars above and below, so we can clearly see exactly what will be captured
when we render our scene. I'm going to switch this
viewport over to render view, and we can see exactly what
our outputs likely to be. Down at the bottom here, we can actually change
from object mode to world. You can now see we have this sunset HDRI image that we dropped into
our background earlier. What we want to achieve
is making use of this lighting for the
character and the environment, but we don't want to see
the image as a backdrop. Instead, we want to introduce a new backdrop for our render. In order to do that, I'm going to start
adding some extra nodes within this viewport. We can move around
the node editor just by holding down the
middle mouse button here. I'm going to hit Shift A to add, and then I'm going to
click on the Search Box, and I'm going to
type in color ramp. I'm going to drop that
within the viewport. I'm also going to add what's
called gradient texture. Again, it's quicker
just to search for these things rather than digging around
throughout the menus. To start with, I'm going to take this gradient
texture output. I'm going to drag from
this color and drop it into the factor here
on the color ramp, and then I'm going
to initially take the output from my color ramp, and I'm just going to drop
it into the background. For now, that's going to
disable our HDRI image. But don't worry
about that, we'll bring that back in again later. Right now, once we're defining this gradient as being
between black and white, currently all we can see is
this black on the background. We need to control exactly how this gradient is being mapped
onto the background here. To do that, what we need to do is add in a couple
of extra nodes. Again, hit Shift A and search, and we're going to search
for texture coordinates. The quickest way to do that
is to actually type in coordinate, and it will pop up. We're actually going to take the coordinates of our window, and we're going to drop that
into the gradient texture. You can see now we
have a gradient applied from left to
right, black to white. If we adjust this color ramp, you can see we're adjusting the result that we got
on the background there. What I'd actually
like to do is to create a gradient
from top to bottom. In order to do that,
we need to find a way of transforming the
values that we're getting out of these texture
coordinates before we put it into our
gradient texture. We can do that with another
node called the mapping node. Again, I'm going to hit Shift A, search for mapping. You
can find that here. If we just drop that node
over this connection here, it'll automatically
be plugged in. With our mapping node in place, we can now adjust
these values in order to reposition our coordinates. The first thing that
we need to do is to actually rotate
these coordinates. We're going down to the
rotation section here. If I start to rotate
this around the z-axis, you can see that we're getting the result that
we're looking for. I'm not going to
rotate this around minus 90 on the z-axis. You can see we're now working from bottom all
the way up to top. But I don't really want a
black and white gradient here, and that's why we introduced
this color ramp node. This allows us to
remap the colors. At the moment, we have
our black and white, and we can change those values. I'm going to start out by
clicking here on the black. I'm just going to make
it slightly lighter, and I'm going to make a
dark blue color in here. Somewhere around
there should do. I'm going to click on this
little white checkmark here, and that allows me to
change the lighter value. I think we'll go
somewhere around there. We're getting this light
to dark blue gradient. I'm going to take
my dark value here, and I'm going to lift
it up a little bit. You'll see here we're getting this very harsh divide
between the two colors. We can actually change
this interpolation here from linear to B-spline. Now we're getting a smooth
fall-off between the two. I'm happy enough with
that, but you can see we've lost our
lighting on the fish. What we want to do is to bring
back this lighting that we defined with the HDRI
image to affect the fish, and we want to use this to
affect the environment. If I just plug this back
into my background, you'll see we just
switch between the two. We need to find a
way of blending sensibly between the two. In order to do that, we have what's
called a mixed node. I can hit Shift A
and search mix, and then we're going
to drop that in here, and then I can bring
my color ramp pin to the second color. At the moment, it's literally blending
the two together, and you can see this
factor allows us to blend between the full HDRI image
or the full-color ramp. What we need to do is
control this factor based upon what the light rays are doing within the scene. In order to do that, we
add in another node, Shift A, and search, and we're looking
for light path. I'm going to drop that
in just over here. We have a number
of different rays that we can make use of. In this case, what we
want to do is use this Is Camera Ray option and drop
that into the factor value. What that means is any of the light rays that
are bouncing around. If they're being used for color, then they're going to
affect the object itself. If they're just being
displayed to the camera as is the case in the
background here, then instead we're going to
make use of this color ramp. We now have a more
nicely lit fish, and we have this basic
gradient which starts to create the look of
our underwater scene, but we need to add some
more lights to make it appear a bit more believable. To do that, I'm just
going to jump back into the layout view
and save my scene.
31. Lighting: Light Beam: During the next few lessons, we're going to be
setting up our lighting, making use of both the EV
and cycles render engines. Rendering with cycles will give us the maximum possible quality. But if you're making
use of older hardware, you may wish to render
your final result using the EV render
engine instead. I'll be showing you how
to set up your scam for both different render engines to achieve the best
possible result. The EV render engine was completely rewritten
with blend of 4.2. So if you're following
along with the class, I would suggest making
sure that you're using at least blend of 4.2 or higher. The first thing that
we're going to do is to make sure that our
render settings are correct. To do that, I'm going
to head over into the render tab and we can set up our EV
settings to start with. Now, for EV, the only
thing that we really need to do is to enable the
ray tracing option. You'll see it when I do that, that it makes a significant
change to the look of the way that the light is bouncing around within a scene. The other thing that I
am going to do though is to disable this temporal
reprojection option. Whilst that can produce a smoother result as we're
moving around in the viewport, and can sometimes
interfere as we're adjusting settings for
lights or textures. So I prefer to work
with that disabled. I'm now going to jump
over into cycles. And assuming that you
have a compatible GPU, you can change the device
from CPU to GPU compute. If you're doing that, the
other thing to be aware of is up in your preferences, if you go to system, just
make sure that you've enabled your GPU here within the
cycles render devices. Having the GPU enabled will greatly increase the
speed of your renders. Next thing I'm going
to do is to reduce my maximum number of samples to 100 for both the
viewport and the render. We can always increase
this number later, and I'm going to enable de noising here within
the viewport. Then I'm going to scroll down
and under my light paths, I'm just going to increase
the volume count here to one, just to increase the scatter within our volume
when we add that in. Again, I'm going to leave all of the other settings as they are. I'm just going to note that
under color management, I'm making use of the
AGX view transform here. But that is the default
setting in Blender 4.2. Now, before we start
adding in our lights, next thing I'd like to
do is just adjust how things look in the
camera viewport. So start with, I'm going
to select my fish, and I'm just going
to rotate it around the Z axis So it's looking
at it a little bit more, maybe somewhere around
30, 32 degrees. Then I'm also going to just
just my camera slightly. So I'm just going to enable
the Gizmos for a second here. That way we can click
on this padlock icon and that will lock the
camera to the view, and I can rotate this around. I just want to be looking up at the fish a
little bit more. I'm just going to
reframe that slightly. Something like that
looks very good. The other thing I'd
like to do is just adjust my pupil
position slightly. So when that's
selected, I'm just going to jump over into the
modifiers, first of all. I think I'm going to
move this shrink wrap back underneath the
subdivision modifier. And you can see how that adjusts the shape
of the pupil here. I think that's going to work
a little bit better for us. Then I just want to lift
this up a little bit. I'm also going to temporarily disable the shrink rat option. That way we can see exactly how our eyes being
positioned here. And I can adjust it to get
the best possible results. So I'm just going to
rotate this around, move it up a bit. Trying to get it aligned better to the
actual fish itself. So that when it's projected on, it will hopefully look
a little bit better. So I'm going to re enable
that modifier now. Not it up a little higher. What I'm trying to do is create the appearance
that the shape of this pupil mirrors the shape that we've got with the
white of the eye here, and that we've lifted it
a little bit higher up, so it appears that
the fish is looking out to one side of
the scene here. So I'm much happier now
with that end result. We're now ready to start adding
some lights to our scene. Obviously, we have the
HDRI lighting in here, but it's quite flat
at the moment, and we want to create
something that has a bit more directionality to it. So we're going to start out
by adding in a spotlight. So I'm just going
to hit shift A. Move down to light and
add in a spotlight. Initially, we can just
move that up a little bit. And you'll see at the moment, it's not really having
any significant effect. If we go to the light settings, that's because we have an
extremely low power value here. I'm going to increase this initially to something
like 50 watts. We can maybe go a bit
higher, let's try eight. That looks okay. But I'm also
in to just the color here. So just going for something that's got
a hint of blue to it, which should look a bit more believable since the light is being cast through the water. The other thing I'm
going to do is just increase the radius
of this light a bit. You can see that up
at the top here. By doing that, that will help to avoid having any harsh shadows. When the light has
a radius of zero, it's being cast from an
infinitely small point. Just increasing that size will give us slightly
softer shadows. I'm also going to increase this blend amount
so that we have a nice fall off on the edge
of our spot beam here. Next thing I want to do is just move this off to one side. And angle it in
towards the fish. It's coming in from a
three quarter angle here. That will help give us the directionality that
I was talking about. Now, whilst we've got this gradient here
in the background, to create more believable
underwater effect, I want to add in volume, and that will give the effect of light falling off
into the distance, and light beams will also
show up within the volume, creating a more believable
underwater look. To create the volume, we're
going to first add in a cube. I going to scale
that down initially. I'm just going to move this back so it just covers the
fish here at the front. The reason we're doing
that is we'll have less of the volume between the
camera and the fish itself, which means the fish should
be fairly sharply in focus, whereas we get more light fall off as we go further
back within the scene. I'm also going to just scale this out on the y axis a bit, and that's just to
ensure that we're nicely covering the area
of our camera view here. And at the same time, I think, I'm just going to scale this
up on the Z axis as well. Now just to keep
things organized. I'm going to rename this. I can just hit F two
and let's rename this two volume, or at it. L's select our spot light here, and we'll rename that to key. Since that will be
our key light source. Then with the volumes elected, we're going to switch over
into our shading tab. I'm going to change from
world here to object. We can now add a new material. I'm just going to
rename that to volume. The first thing that
we want to do is just select this principle
BS dF node. We can x to delete that, and I'm going to shift a and search for a principled
volume node instead. Drop that in. This
instead of connecting to the surface connection here
on the material output, we're going to connect
it to the volume. You can see straightaway we have this gray foggy effect here. So the moment, I think this density is going
to be too much for us, so I want to take
this value down. So I'll drop that down to
get something like 0.3, and I'm also going to change
the color that we have here. I want to drop the
value right down, so it's quite a bit darker. I'm going to also introduce a little bit
more color to it as well. So, somewhere around
there is looking good. That can give us a bit more of a blue green kind
of tint to things. So we can now switch back
into our layout tab. One thing that I
didn't do earlier was to apply the scale
here on the volumes. So I'm going to do that now,
with the volumes selected, hit Control A, and
apply the scale. Always a useful thing to do to ensure that we don't get any
unexpected results later. So I'm now going
to want to create a light beam here
in behind our fish. So for that, I'm going to
add in another spotlight. Once again, we can just move that up on the Z axis initially. And maybe I'll move that just a little bit back
behind the fish. Once again, we're going to need to increase the power here, and I'm going to increase
this an awful lot. So I'm going to go all the
way up to 15,000 watts. You can see now this
big bright beam that we've got in
behind our fish. Now, this is one of the main areas that you're
going to start seeing a difference between the
cycles and EV render engines, at least if you're
using version 4.2. So whilst we're in cycles here,
we have this bright beam. If I switch this back to
the EV render engine, you can see whilst we can see a beam of light
there, it's far fainter. This is because of
some changes that have occurred
within version 4.2. Now this is something that might yet change again in
future versions, but if you are seeing
this discrepancy between cycles and EV, there are a couple of things
that we can do to help. So first of all, if we go
to the light settings here, Whilst you might expect that
increasing the power here would mean that we get
a brighter result. If I just add in a
couple of zeros here, the light seems to disappear. That's because when we increase the power of a spot light, beyond a certain point, inversion 4.2 of blender
within the EV render engine, our output of our light
actually decreases. So you can see that if I reduce this back to 15,000 watts,
we can see our light. If I reduce this yet further
down something like 2000, our light actually
gets brighter. Now this is something
that they may well fix in future versions. But for now, I'm going to use this lower power of 2000 when we are trying
to render an EV. The other thing because we can't increase the intensity
of this directly. Within EV, we have this influence option
under our lights, and we can change the amount of influence our light has on different elements
of the scene. Within this volume
scatter section, I'm going to increase this value from one all the way up to ten. You can now see that we
have a bright light in the background that's similar to what we had over in cycles. With that done,
I'm just going to head back into cycles again. You can see obviously because
we reduced our light power, who in cycles, we have
a different result. So I'm going to increase
this power again up to 15,000 while we're
working within cycles. As before, I want to add
a color to my light here. So I'm just going
to increase this, give it a bit of a blue tent. Something like that should do. And again, I'm going to increase the blend on the cone a bit here just so we have
a softer fall off at the edges here of
our light beam. Now I just want to
move this light off to one side and rotate it in behind our fish here. No. It's quite far behind
at the moment. I'm just going to bring
that forward a little bit. And then I'm actually
going to rotate this. So it moves back a bit. You can see we're getting
this nice shadow effect as the light hits the fish, but I don't want
to blast the fish with too much light here. So I'm just going to rotate this back a
little bit further. This is this sitting just
behind the fish there. Something like that.
That was very good. Clip the tail just slightly so we get a little bit
of break up there. And I'm happy with
that. Finally, let's that light to beam and save.
32. Lighting: Adjusting the Lights: The next thing that I'd
like to do is to add a bit more light as if it's coming through the surface
of the water here. To help achieve that, I'm
going to add in a point light. Shift A, and we'll add
in a point light here. Start with let's just move that up towards the top
of our scene a bit. And I'm probably going to want that to sit a bit further
back within the volume. And I'm also going to
move it off to one side. So it seems to originate in the same sort of area
as our light beam. Now obviously, we
need to increase the power here quite a bit, so let's try 500
watts to start with. You can see that the light is originating slightly
further over here, so let's just move
that in a little bit. That's looking a
little bit better. We can go a bit higher. Let's try maybe 800. That's filling our scene
with quite a bit of light. But you can see it's quite a lot of white
light at the moment. So again, I want to change
the color of that light. So I want to go up
into the blues. So go for something
around there. So that's looking a bit better. But at the moment, you
can see our light beam, whilst there is a bit
of fall off here, the light is scattering quite evenly around within the volume. So what I want to do is select my volume here and head
over into the shading tab. And on this principled
volume node here, we have this anestropy value, and if we increase that, I'm going to increase it
quite a way to start with, you'll see that that's
focusing the effect of the light around
the light sources. So we get a really nice fall off down into the water here. Decreasing it back down again, scatters things a
bit more evenly. So I'm going to bring that
up somewhere around 0.4, I think, gives us a bit more fall off
here with our lighting. So whilst our light beam
here is looking quite nice, it's not entirely convincing us coming through the
surface of the water. What we're going to
need to do is to break this light beam
up a little bit. So that's what we'll focus
on in the next lesson. Don't forget to save your scene.
33. Lighting: Using a Cookie: Now in order to break
up this lighting here, I'm going to make use of
something called a cookie. This is something
that's made use of frequently within live
action filmmaking, where some of object
or cutout is placed between the light source and
whatever it's illuminating. This can be used to create
particular looks such as lighting passing
through the leaves of a tree, for example. In our case, we want
to create the effect of light that's passing through
the surface of the water. So to do that, I'm going to
head over into my layout tab, and we're going to start
out by adding in a plane. I'm just going to scale
this down initially. So around 50 centimeters or so and hit control A
and apply that scale. So if we head back into
the shading tab now. What I want to do is to apply a pattern to the
surface of this plane, that will look similar to light passing through the
surface of the water. To do that, I'm going
to just hit new here, to create a new material. I'll rename that to cookie, and we can rename my plane here, pressing F two, and I'll
call that cookie as well. So, I am now going
to hit Shift A, and we're going to search
for a Voronoi texture. So I'll add that in
and I also want to search for a color ramp as well. I'll take the
distance output from the Varini texture into our factor and a color
into our base color. You can see that we already have this cellular pattern here. If I just move my black point
here on the color ramp, you can see we can
adjust things. Now I don't like the
falloff that we have here, so we can change this
from linear to Baslnd, and that should give us
a softer result there. As I move this up, we start
to create an effect which looks fairly similar to what you might see on the
bottom of a swimming pool. We're seeing the light rays that are hitting the
bottom of the pool. Over here within
our fini texture, we can adjust our scale. I'll increase that up a
little bit to start with. I'm also going to change
this from a three d to a four D texture here. That gives us this
additional W value here. As I adjust that, if I
hold down the shift key, to adjust it more slowly, you can see that
starts to create a fairly convincing
ripple effect. It going to undo that. Now, you can see
at the moment that this plane is blocking
all of the light from this light beam at the
moment. Solve that. What we need to do is
take our color output here and drop it into our Alpha. Once we do that, the light
can pass through the plane, and you can see that this light beam is being
broken up a little bit by it. Obviously a canal add
this scale value more, and you can start to see the
effect of those light beams. The problem is, we need to move this plane now up
and out of shot. But if I move this right the
way up closer to my light, just rotate it a little bit. Once I've got it up here
out of shot, can do. Just that a little
bit, so it's not interfering with my key light. So I just move that
off to one side. I want to make sure
that it's not showing up here within the camera view, down a bit, there we go, and it's not interfering with my key lights. That looks okay. But you can see that now our shafts of light
have disappeared. I can adjust scale a bit, and we can start to get a little bit of an
effect back in here, but it's nowhere near as
pronounced as it was. And that's really because of the way that the scattering is happening here when we're using
the cycles render engine. If I switch over
from cycles into EV, We just the scale value. I'm going to take
this up quite a bit. We should start to see some of those shafts of light appearing. Tweak my position slightly. There we are. Now we're getting
some nice break up here, when we're looking at
this here within E V. If I switch back into cycles, we're ending up with a
slightly softer result. Now within the light settings, we can adjust this radius at the moment we have
a radius of zero, if I increase that
radius at all, you'll see that here in cycles, those light beams blend
together completely. To see this effect
within cycles, we really have to
go right the way down to a radius of
pretty much zero. The problem is that can give us some harsh shadows where
it's falling on the fish. Whereas if I switch
now back into EV, we still have those
obvious light beams there. And it within EV. I would want to once again drop that power value down to 2000, which gives a slightly
stronger light source up at the top and also
reduces some of the artifacts that
we're seeing on the back of the fish with
a higher light value. If I take that
back up to 15,000, you can see that the
light seems to be bleeding through the
fins at the back here, which doesn't look
quite so nice. If I switch back to cycles, we have a different option
for breaking up a light beam. What we can do is actually apply this Voronoi texture
to the light itself. Now, this will only
work within cycles, so we'll still need this
cookie here for use within E V. What I'm going to do with
the cookie selected, I'm just going to
select my Voronoi and color ramp and copy those. I'm going to select
my light beam here, and we can click on
this U nodes checkbox, and now we have the ability to add a shader onto
our light here. I'm just going to hit
control V to paste in those two nodes that
I had already copied. And then p in the outliner. I'm just going to turn
my cookie visibility off both within the scene
and render for now. Now what we want to
do is to connect our color ramp here to
the emission color, but we're not seeing our
light beams at the moment. The reason for that
is that we also need to add in a couple
of additional nodes. So I'm going to hit shift A
and for a texture coordinate, and also a mapping node. I'll drop in there. What
we want to do is take the normal coordinates from the light and drop that into the vector input
on the mapping, and the vector output into the vector input on
the varni texture. Once we do that, we
can adjust our scale. We'll need to actually
adjust it down quite a bit in this case to start seeing the effect
of that light beam. And once again, we do
need to go back onto our light settings and
play with this radius. So we need to get
something there that we're happy with where
it's breaking up our light beam with a soft edge. So Something around that, 1.2. Looks quite nice. Now that we have this light beam set up, I also want to add
a little bit more scattering out to
the sides as well. The way I'm going to
do that is to just duplicate this mean light beam. Within the viewpoint here,
I can just hit shift D. I'm just going to move this
slightly up on the Z axis. And then we can
modify that beam. First of all, I'm
going to rename this. It's beam wide, and I'm going to take the
intensity right the way down, something like 100 watts. We need to increase
the spot size quite a bit. I'm going
to take this out. Quite wide around 80 degrees. This obviously inherits
all of the setup that we had added to the
previous light. So I think I can probably afford to increase that
power a little bit. Maybe something like 1,500, just so that we're
getting a little bit of scattering out to
the sides there. Thin I'm also going to
select that main light beam and just increase the
spot size over slightly. Maybe we take it up
to about 50 degrees. I think that so
quite good there. Now just going to do a
little bit of tidy up, select my two light beams, my cookie, the keylight, point light and volume, and I'm just going to hit
M, create a new collection. And we'll call that environment. With that done, we're now
ready to render out our scene. I'm just going to
save my scene there. Then we can hit F 12
to render that out. And there is our
finished cycles render. What I'm going to do is just switch to slot number two here, and I'm going to render out
a version from EV as well. I'm just going to
close down that render window and for EV. Let's first switch our
render engine back to EV. And what we'll need to do is enable our cookie to turn that on for
rendering as well. We need to select our beam here. And reduce that power right
down to 2000 watts there. I'm going to select
my wide beam here, creating a lot of extra light. So I'm going to drop that down. And what I also want to do here on this light
beam is change the influence because we'd increase that to a value of ten, obviously from our main beam, but it's way too high here. So I think I'm going
to drop that down, do something like two, and maybe we even go all the
way back down to one. So we're just getting
some of that light scattering around without
it being too intense. Now we can hit F 12 to
render out our EV render. Now by hitting the
one and two keys, we can switch between our cycles render
and our EV render. You can see that we're achieving similar results across
the two render engines. I certainly feel that the cycles render looks
a bit nicer overall, but the EV render engine certainly gives us more
than passable results. Once you're happy, just
head up to the image menu here and hit Save as to
save out your render. I to correct a new folder
here, called render. And we just call
this Bish render 01. And I'm saving our PNG file, but it doesn't need to
have an Alpha channel, so I've just selected RGB
here and hit save us. We can then close this window down and save our final scene.
34. Final Thoughts: Thank you so much for
joining me in this class. I really hope that you've
enjoyed learning about character modeling and following along as I share my process. If you've been following
along with the class, either using my
character design or one of your own, I'd
love to see your work. If you're happy to
share, then please do upload it to the class
project gallery. I really look forward to seeing all of the
class projects, and I can't wait to
see what you create. Finally, you may want to
check out my profile page, where you'll be able to find my other classes and learn
a bit more about me. If you'd like to, you
can also follow me to be notified of every new
class that I publish. Having the skills to
model your own characters can really add an extra
dimension to your work. I really hope that this class has given you the
skills and knowledge that you need to start bringing your own
projects to life. Thanks again for
taking this class, and I really hope to
see you again soon.
 John Knowles, Animation Director