Transcripts
1. Class Introduction: Interior sketching
is about shaping and communicating your
vision to the world. And the secret to
creating more realistic interior sketches is
perspective drawing. And it's important in any
illustration where you want to show a 3D
scene for objects. Hey, I'm Isaiah card donut, and I'm a creative designer
and Skillshare teacher. And I specialize in digital illustration using the
Procreate app on the iPad. And I have taught classes
on the illustration, storyboarding, and
interior sketching. Even though I've been working professionally for
several years, I still remember
the struggle I had when I was first learning
perspective drawing in school, which is why in this class, we'll explore the
perspective drawing possibilities in Procreate, and discover how you
can quickly bring to light your ideas for
an interior space. If you're a complete beginner who wants to dip
into the world of perspective drawing or your PRO, that wants to learn about
the features and Procreate. This class is for you. Throughout the class, I will walk you through, procreates, drawing guide features, as well as how a sketch
and interior seen. How to refine your interior
drawing to match your style, and how to add color and details to create
depth and realism. And by the end of this class, you will have gained
skills that will elevate your work
and can be applied to so many projects from interior design to
storyboarding scenes. I'm super excited to have
you join my class and learn about one-point
perspective, interior sketching. Let's get started.
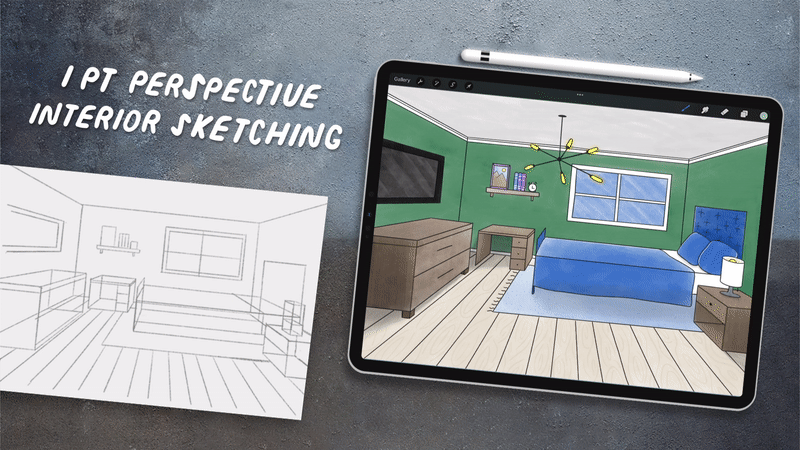
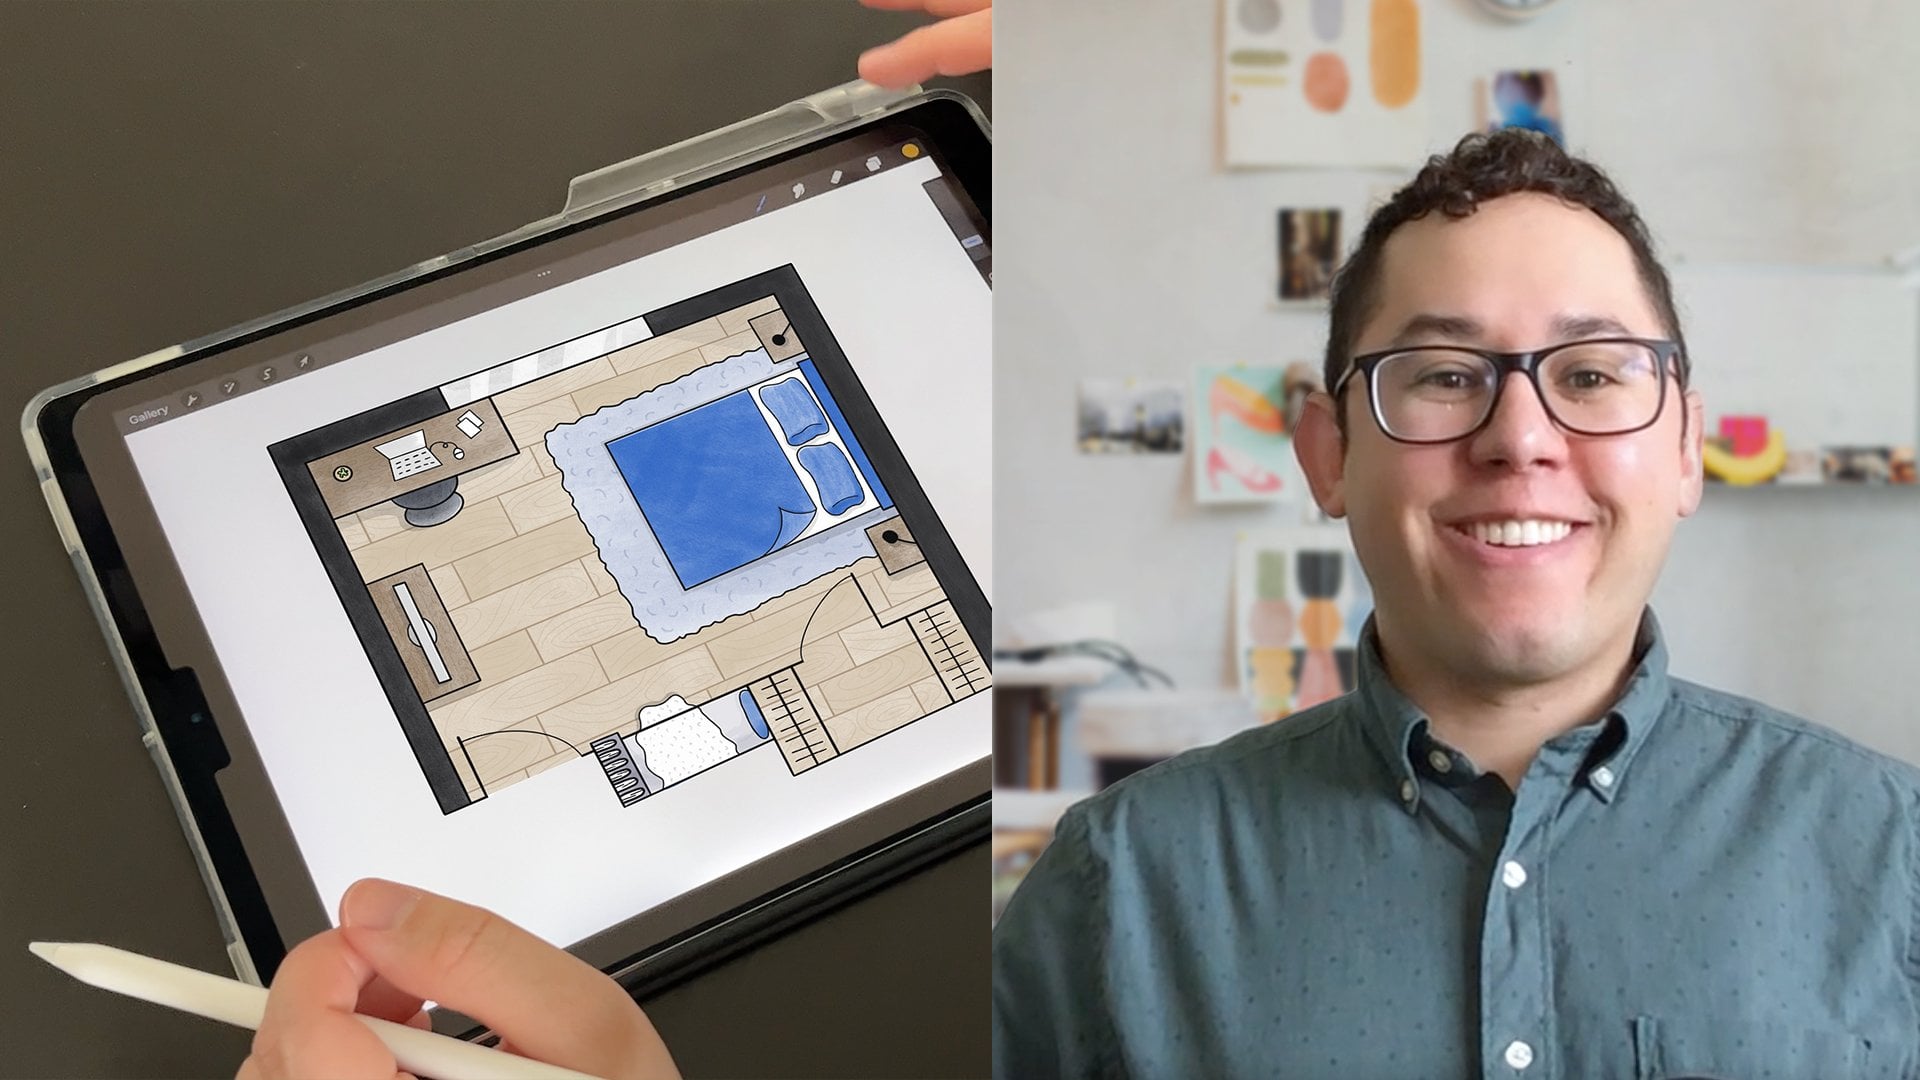
2. Welcome: Project Overview: Welcome to my class. I'm so excited that
you're joining me today for the class project, we will be using
Procreate to create a one-point perspective
interior sketch of a space. And the best part
is that you can draw any room that you want. So you can draw a
bedroom, kitchen, home office, just
have fun with it. In order to create your drawing, you will first setup a file and procreate using
a pre-made template. Then you will sketch out a
rough layout of your space and then refine your sketch
and add in details. Then we will color in your drawing and add
the final touches. Lastly, we will export the project and you can post
it to the class gallery. For this class, I
recommend using an iPad with Procreate
an Apple pencil, but you can also follow
along using paper and pen. I have also provided you with a Procreate file
and PDF template, as well as a useful
one-point perspective guide. So you can download from the projects and resources
section of the class. This guide will walk
you through some of the perspective drawing
concepts as well as breaking down some of
my drawing process and provide you some
really amazing examples. So definitely go ahead and take a moment to download or
print out the resources. Then the next lesson, I will walk you through one-point perspective and how it relates to
interior sketching.
3. One Point Perspective Basics: In this lesson, we
will break down one-point perspective and how it relates to
interior sketching. Before we dive into
one-point perspective, let's take a moment to
discuss some definitions. The first one is horizon line, which represents
the horizontal line that runs across a scene. And as my image shows, the line helps
divide the sky from the ground and it represents
the viewers I love, which is important interior
design and sketching, as that's going to help you establish how things
are laid out, especially on the wall. A great way to think about
it is you would want a picture or artwork
to be at eye level. And so this line is
going to be very helpful when we're
sketching out our spaces. The next one is the
vanishing point, is going to be the point in
which all lines connect. A very common example of a
vanishing point is a highway. The edges of the road
converge at one point, which is the vanishing point,
was one-point perspective. One-point perspective
and interior sketching is used
when you're looking straight ahead at a flat wall
that has no angle to it. This example, you
have a flat wall and all the lines of
the room converge to a single vantage point. Now, you may be asking yourself, what if the room was
at an angle that would actually make it a
two point perspective. This image, none of
the walls are flat. You're instead facing a
corner and then lines from the wall will actually have two separate vanishing points. To recap, a great way to
remember the differences between one-point perspective and
two-point perspective is that when you're
looking straight, flat wall, you have
one-point perspective. If you're looking at a corner, then you have
two-point perspective. In the next lesson, I will show you how set
up your file and share some powerful Procreate
features you will want to know.
4. Setting Up File: This lesson, I will walk you
through setting up your file using Procreate's perspective
drawing guide to start out, let's go into procreate and open up my perspective template. Tap Import over here
in the top right, and then select the
template procreate file from the location you saved it. Once it's opened up, you will see a frame with
a line going through it to represent
the horizon line. And since the line
represents the eye level, I've set it up two thirds
high in the frame. And if you open up
the Layers panel, you will see some layers
already set up for you. So all you have to do is start sketching on the
layer labeled sketch. That easy to turn on the
perspective drawing guide. First tap the Actions
icon here to get the Actions menu and then click Canvas and where it
says Drawing Guide, you will want to toggle that on. Once you do that, you may see a grid or an, another guide to change that
to a perspective guide, just tap Edit Drawing Guide. You will now see a brand new
screen with a few options. At the bottom, I want
you to tap perspective. And as you can see, nothing happens, No worries. That's because you
have to create a vanishing point to do that, all you have to do is tap
the pre set-up vanish point. And if yours ends up
being off like mine, you can just click on it and
drag it to reposition it. Next, you'll want to make sure assisted drawing is
turned on at the bottom. This feature will
assist your drawing by snapping everything to
the perspective lines. Now let's hit Done. To recap, I showed
you how to import the template and set up
the perspective guide. But if you run into any
trouble and need any help, reach out to me in the
discussion section and I'll be happy to help up next. I will walk you through my
process for sketching a room.
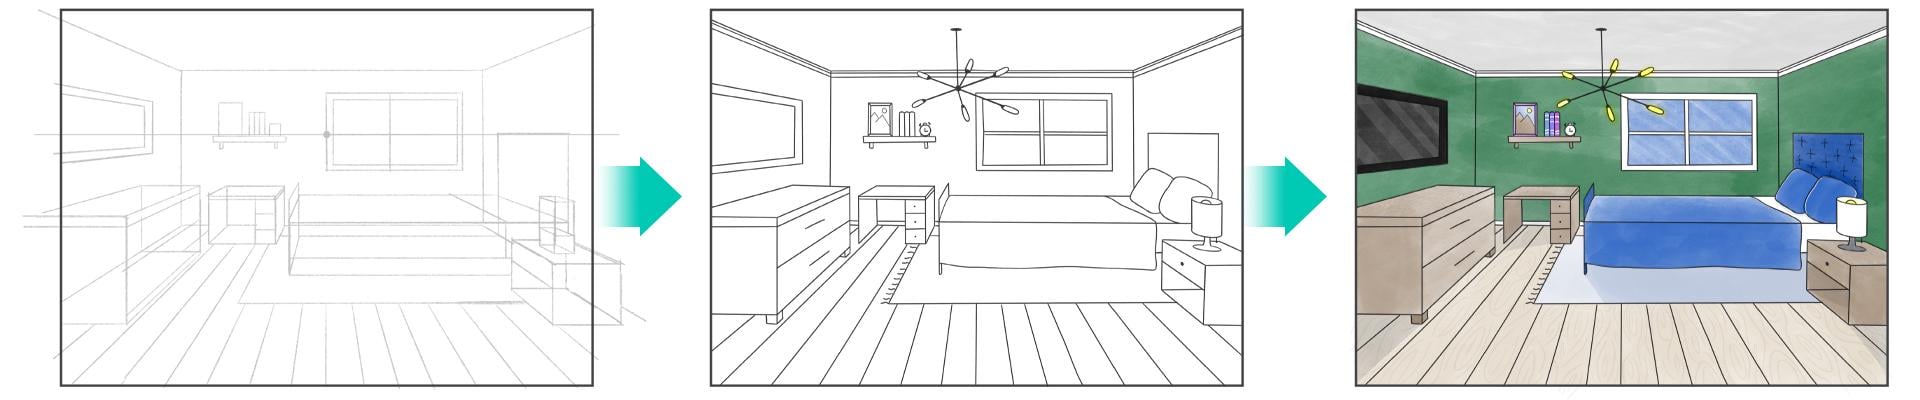
5. Sketching: In this lesson, I will walk you through my process for sketching a room and pulling together all the elements
of my composition. Before we start drawing, I want to walk you through some common elements
of interior scenes. The first one is the
structure of the room. Think of this as the
walls and floor. Next we have furniture. A room needs objects
to fill it in and give it purpose to create a sense of scale
and you're drawing, it helps to have different
sizes of furniture. Next, we have lighting. Lighting is another
important element. And something to think about when it comes to lighting is, are you getting
lighting from a window, overhead light, or lamps? This is so important as
it will affect how you depict shadows and
highlights on your objects. Last, we have the core, which could be house
plants, vases, and artwork. They may be small items, but it brings in a lot of personality into your
interior illustration. I recommend taking a moment
to think through all of these elements and
how you want to incorporate them into
your interior space. To start out, I'm going to make sure I'm drawing on
the sketch layer, which you will notice
has a cyst on it. This is important as Drawing
Assist will only work on layers that have it enabled during the
sketching phase, I like to use a
dark gray color and the native pencil
brush to help me stay in that quick,
rough mindset. I'm not going to worry about
making anything look clean. I'm just creating guide of
how I want my room to look. And as you may remember from our one-point
perspective lesson, every interior drawing is
going to have a flat wall. I'm going to start out by
drawing back wall of my room. And because the assisted
drawing is turned on, all of my lines will
be perfectly straight, which is especially awesome if you have shaky drawing
hands like me. If you're drawing,
traditionally, I recommend that you use
a ruler or straight edge. Next, I will draw the
walls by drawing the lines from the four corners of
the wall and going outward. And now my room is starting
to really shape up. See how easy that was. This is why I always
start my sketches with the back wall and then drawing the lines that
will create the walls, ceilings, and floors
with just four lines. Now that we've set up
our room foundation, it's time to add the furniture. When drawing in perspective, I like to draw the foundation
of the furniture shape on the ground of my scene
and then work my way up. I'll show you how this works. So first I'm going to draw
the footprint of where the bed sets on the ground
and then on the wall. I will draw the
height of the bed and extend up for the headboard. And as you can see here, I'm just drawing
the undersides of the bed to complete a 3D box, which will represent my bed. And as I'm drawing, I'm making sure my lines
all connect on the corners. This is important so
everything lines up correctly. And here I realize I made
my bed way too wide. So I'm going to create
new lines where I want the bed to end and then I
will erase the old ones. That's what this step
is really all about. Figuring out your scenes. You don't be afraid to make
adjustments as you sketch. Now, you may look at this and think this looks super
boring and boxy, but that's actually what
we want in this step, has its all about creating guides that we can
use to create fun, stylized illustration
later on, next, I'm going to draw a modular guide for a
nightstand by the bed. Now you might be
asking yourself, is everything a cube? What about round objects? Well, I'm actually
going to show you an example of that on
top of the nightstand, I want to add a round lamp which you can't do or
have Drawing Assist. So I will represent it as
a 3D box and my sketch. And since there will be
a lamp and a lamp shade, I create two boxes on
top of each other so that I can mark out where
the proportions will be. As you can see, the goal is to go through this room and create the guides for all the
furnishing as 3D shapes, 2D for elements on the wall, like here, I draw a square
for a window on the wall. And remember that these are just guides so it doesn't
have to be perfect. It's completely
okay if your lines extend out or
overlap each other. And as you can see, Assisted Drawing is
doing the heavy lifting, making sure all the
lines are going the right direction to achieve
the lookup perspective. On the other side, Live Room, I will draw a dresser, has a long 3D box. I will sketch in some
lines as guides. For rare the doors will go. And I'm going to also
draw a mount that TB on this wall to help balance
and fill out my scene. It's important to make
sure that you don't have one side be
really bear while the other one is completely filled with furniture is good to maintain some balance with your placement of the
objects in your room. Next, I'm going to draw shapes for a desk against
the flat wall. Above the desk. I'm going to draw a shelf and
add some decor items on it. Since we're facing these
items straight on, they will appear pretty flat as we can't
see much dimension. Last thing I will do is draw the carpet and
wood floor planks. I like to draw the
floor elements last so I can draw them around the large furniture and
won't have to erase a bunch of lines later
due to overlapping. That's it. To recap, I walked you through the components of an interior seen in my sketching process, starting with setting up the foundation for a
room by first drawing the back wall and then drawing the lines out of
the four corners, which creates all of
the walls of the room. We also talked about
how to draw guides, the furniture that will
go into your room. I also walk you
through my process for drawing elements of
interior space by starting on one side
of a room and then going around the room and
finishing with the flooring. This process helps you maintain proportions and
spacing of elements by working in a systematic
way versus just adding furniture
randomly to your scene. And it's also important
to mention that all of these skills
from this lesson can be applied to other things outside of just
interior sketching. This can be a great
way of drawing any objects that you want
to be in perspective. And in the next lesson, I will walk you through how
to refine your drawing.
6. Refining Interior Sketch: In this lesson, I will walk you through refining your
perspective drawing. Now that we have our
sketch done with guides for all of our elements, we can turn off the perspective
guide so we can tap on the Actions menu and go to Canvas and toggle
off Drawing Guide. Next, I'm going to go to the sketch layer and
lower the opacity. Then I'm going to work on the layer called
refined drawing. As you can see, this layer
does it have drawing assist on so you can
draw a free form. I also turned off
the horizon line and vanishing points since
I don't need them anymore, since the perspective
involves a lot of lines. So removing unnecessary
elements really helps. I'm also going to set up my color palette and
change my brush to the technical pen
as I want to have a clean stroke now that I'm
cleaning my refined drawing. And now we can refine the simple geometric sketches into a more stylized drawing. I'm going to start by
drawing the round lamp. As you can see, I'm drawing
a round shape within the box shape and
I'm using the box as a guide and it doesn't
have to be perfect. But if you have trouble drawing, you can use procreates
quick shapes feature by drawing
a shape or line and holding down
at the end to let the program v6 your
lines and shapes. Next, I will draw the
nightstand and then the bed. My process is that if I have overlapping objects
in a scene like this, I like to draw the top
item first and then draw the objects that are
underneath it or behind it. This saves time as you
don't have to constantly erased lines when you draw
a new object in front. As you see, I start adding in details like the knob on
the nightstand drawer. And as I get to the bed, I start adding in
curved lines to make it more like a
mattress instead of a box. I also add additional details like the blanket
that hangs down and the two pillows at the head of the bed that define the
bottom of the board. As I mentioned, this is the
stage that you get to really have on and bring your
personality into the drawing. So feel free to play around and customize your drawing and
furniture to fit your style. Then I will draw in my window. I like to draw elements
one wall at a time and move across the room
as I draw new elements. Next, I'm going to
draw the desk against this wall and continue
adding in more details. And then I will
redraw the rug and add in some tassels at the end. Next I'm going to
draw on the dresser. I had some lines and
my guides that I will follow to create my drawers
and we'll add in some knobs. I will also use the guides to add in some feet to my dresser. And we'll use the
selection tool to quickly delete the rest of
the original guideline. For this shelf in this objects, I want to make sure
to add in detail, since it will be a focal point, since we are facing the wall, I'm going to add a frame to the picture and then round
the tops of my three bucks. Lastly, I'm going
to turn this square into a round alarm clock. This is really simple, but it helps to flesh
out the room by having those personal items feel free to add in some
personal items you like. It could be house
plants or other decor. Next, I'm going to draw in
some overhead lighting. Lastly, I'm going to
draw in the lines for my floor,
floorboard and walls. I do this last so my
lines aren't overlapping. Any of the furniture pieces, as I mentioned earlier, I'm all about saving
time and effort and eliminating unnecessary
back-and-forth. My last detail will be to add some crown molding to
border the ceiling. Once I'm done drawing, I will turn off the
sketching layer and we'll erase any overhangs. So my illustration is
cleanly inside the frame. To recap, I have finished
my refined drawing with all my perspective
items fully realized, I used all my perspective lines from my sketch as a guide, which allowed me
to create a fun, stylized drawing that is
also incorrect perspective. And looking at the drawing, you can see how interior
sketching can be used to bring to life
interior design ideas, regime, and craft great
scenes for storyboards. And then the next lesson, I will walk you
through my process for adding color to your scenes.
7. Adding Color & Details: In this lesson, I will walk you through strategies and tips for adding color
to your rooms to bring personality
to your drawings. I like to break down the
color phase into three steps. The first step is to block out all the colors in
your illustration. The second step is to add
in texture and details. And then the last step
is to add in shading, cast shadows and
highlights your scene. As I walk you
through my process, I will dive deeper
into each step. Before you start
coloring in your scene, you will want to select
a color palette. If you're new to creating
color illustrations, I recommend that you limit your color palette to a
couple colors and then use shades of those colors to bring a variety in dimension
to your scenes. If you're struggling
with choosing colors, it can help to quickly create some color thumbnails
of your composition. To start out, I'm going to double-check that I'm
in the color layer, which is located
in a layer group. I like to start out by
blocking out my colors, by filling in shapes of
color throughout my scene. Feel free to color in
your preferred style. I like to get my illustrations
a hand-drawn look. I like to use a gouache
or marker brush. There's a nice texture to
the overall composition. To do this, I will use the selection tool
to select the area. Then I'll use my textured
brush to color in this space. This keeps all of your
color and a defined space. And I've had students
ask why I don't just use reference layer
to color and shapes. As you can see here, that with the line
layer as the reference, my brushstrokes still
go past the lines. For Athens layer is
best used when you're just color, dropping
solid colors. And a special tip for
you guys is that if you have multiple objects that
will be the same color, you can fill in all
of those objects at one time so you
don't have to keep going back and
forth with colors. You may notice that I'm keeping different colors on their
own separate layers, which is why my
template included a color layers group using
separate layers gives you the ability to go back
and layer and switch up a certain color without having a completely redraw everything. As you can see with the wall, I'm able to turn on Alpha lock for a
specific color layer, and then I can choose a
different color and click Fill Layer to change all
the color on that layer. I always try to work in
a non-destructive way, as in my professional work. There's been so many times
over the years when a client has wanted a change to
something later in the process. So setting up your file so you can easily go back and edit any aspect is going to really save you a lot of
time and effort. Once I've filled in
all the base colors, a MySpace, It's time to add
in some texture and details. This step helps you communicate materials and finishes
of your interior space. If you haven't,
definitely check out the class resources for some
really helpful material, examples of common materials you might want to
depict in your scene. For my room, I'm going
to add details to the headboard to depict
an upholstered headboard. I will also add a
wood grain pattern to the tops of all my
wood furniture pieces. Not sure what materials to pick. Try making a Pinterest board
and collecting images of spaces and furniture
that you like and use as a reference
when you're drawing. Once I'm happy with my
color and textures, is time to add
highlight and shadows. This step adds some form and
volume to the composition. And real life objects
are never a solid color. And as you can see in
this picture example, this couch has multiple
shades of gray. This area is very light gray where the sunlight
hits the couch. No, over here, this
part of the floor and the rug is a darker color
because of the cast shadow. As you can see in my example, the added detail from
the shading shadow and highlights add so much that I mentioned to my illustration, it makes my objects really pop. And it's important. And I mentioned that for me, I'm not trying to make any
element looks super realistic. I'm playing into the wonky Venus for a more stylized
illustration, but you can make your
shadows and highlights work more realistically
and subtle. And that folks is my final one-point
perspective interior scene. To recap, I just
walk you through several strategies and tips for coloring in
your illustration, some key takeaways include a crafting color palettes
with limited colors, color blocking one color at
a time and on its own layer so you can save time and have the ability to change later on, we also talked about
the importance of adding texture and details to elevate your illustration and communicate
different materials. And talked about
applying highlights and shadows to help create depth and show how your lighting interacts with those
objects in your scene. In the next lesson, I will show you how to export your project so you can
share it with the world.
8. Exporting: In this lesson, I
will show you how to export your
project as an image. To start out, I'm
going to click on the actions icon
at the top-left. They'll tap Share and then
go down and tap JPEG. I like saving as a JPEG, as this is a universal format that I can use for
digital or print uses. And now you're ready to export your interior sketch and upload
it to the class project. If you're running
into any problems exporting an image or
uploading your class project, please reach out to me through the discussion forum and I'll be happy to help you out
in the final lesson, we'll wrap up this class. See you then.
9. Final Thoughts: Congratulations you did it. And I hope that
you're excited to share what you've
created with the world. I'm very excited to see
what you've created. So be sure to post your work to the project section
of this class. Sharing your project with the Skillshare community
is a great way to continue growing and help inspire each other
through this class, you have learned
your way around, procreates drawing
guide features, as well as how a sketch
and interior scene. And how to refine your
interior drawing to match your style and add color and details to create
depth and realism. And finally, you learned how to export your final drawing. Perspective can be
really intimidating. But after taking this class, I hope that you've found these
techniques that helped you incorporate it into your work in a way that really
fits your style. And knowing how to
manipulate perspective, Gibbs your work, a greater
sense of realism and death, which can help you bring to life your interior design ideas, and even bring to life animation ideas
with storyboarding. And if you would like
more classes from me, then follow me on
Skillshare and check out some of my other
Procreate classes. And to help more students like
yourself buying my class. I would really appreciate you
leaving a positive review. Thanks again for
taking my class and I hope to see you in
a future one soon. Bye for now.
 Isaiah Creates, Art Director & Motion Designer