Transcripts
1. Introduction: Hi, I'm Brandon and welcome to the Inkscape hands-on
series of lessons. In this series, we're using entirely hands-on
project-based approach to learn how to create stunning digital art with Inkscape, a powerful, free and open-source
vector graphics editor. In the second lesson
of the series, or create a logo with a
whale and some waves. And the process will learn
about another type of object that we can create
an escape code paths and how we can create them with the pen tool and modify
them with the node tool and path operations will also learn how to import
images into our document. How to use the snap
controls to snap objects and nodes
together in various ways. And how to turn
shapes into paths, like with the shapes
that we learned about in the previous lesson. Knowing how to work
with paths is extremely important as we'll be using them in pretty much every
lesson from here on. Alright, if you're
ready to begin, go ahead and load Inkscape
and start up a new document. And I'll see you in lesson.
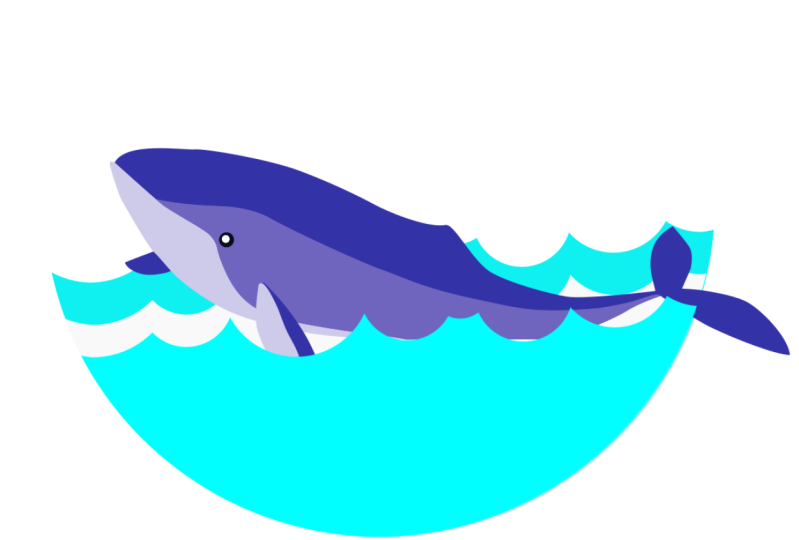
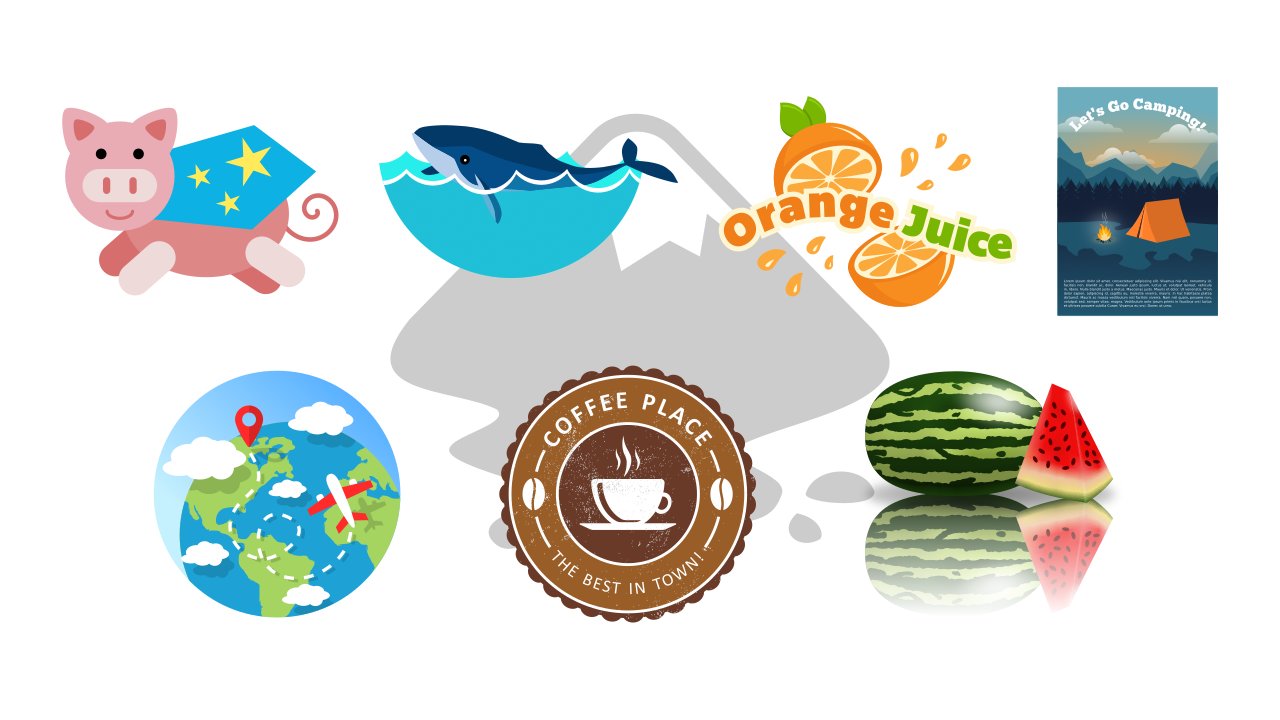
2. Whale Logo: We learned in the
previous lesson that we can create
shape objects in Inkscape using the shape tools. Another type of object
we can create is a path. A path is a sequence of line segments and/or
Bezier curves, and the most common way
to create paths is with the Bezier pen tool, or
pen tool for short, which is located here. To use the pen tool, we can
simply start clicking points in the canvas to create
connected line segments. If we hold Ctrl, it will snap the angle of the segment. If we click and drag
with the pen tool, we can create bezier
curves, or curve segments. If we hold Ctrl
as we do this, it will snap the angle of the
curve's handles. And if we hold Shift, we can create a sharp
point at that curve. To finish creating a path, we can either
right-click or press the Enter key to have an open path, or we can click
the starting point again to close the path. Now as we can see
in the status bar, paths that we create
with the pen tool by default have a black
stroke and no fill, but we can give it
a fill if we want. The segments of a path
are all connected by nodes. To see the nodes, we have to switch to the
node tool up here. Now we can see these
square and diamond shaped handles, which
denote the nodes. We can click and drag a
node to move it around. And we can drag a
selection box over some nodes to select
multiple nodes. The nodes with diamond
handles are called cusp or corner nodes and they
form sharp corners. Cusp nodes between curve
segments like this one have handles that
move independently, allowing us to
change the curvature of the segments separately. The nodes denoted by squares
are called smooth nodes. The handles of these
nodes rotate together, keeping the segment smooth. We can also change
the curvature of a segment by clicking and
dragging the segment itself. And if you do this
with a line segment, it will turn into
a curve segment. If we want to change a
smooth node into a cusp node, we can click this
button up here in the controls bar
for the node tool. The next button will
change the selected node into a smooth node. This button here will change the node into a symmetric node, which is a type of
smooth node in which the distance between
the node and each handle remain equal. The last type of node we
have here is auto-smooth, denoted by a circle. This will maintain
really smooth curves by automatically
adjusting the handles as we move the node around. We can also cycle
through the node types by holding Ctrl and
clicking a node. Another thing we can
do is add new nodes, either by selecting
two or more nodes and clicking this
+ button up here or by simply
double-clicking a segment. To delete selected nodes, we can either click
this - button here or press the Delete key. Okay, let's go ahead
and delete this path by switching to the select
tool and pressing Delete. And let's start working
on the whale logo by using the pen tool to trace
around an image of a whale. First we need to
import the image. To do this, we can
either go to File -> Import or we can
click this button in the commands bar The image we're going to use is this whale.png image. I've provided this image as
a downloadable resource so that you can use
it to follow along. After you've downloaded it, you can use this dialog to
browse to the location of the image, and to
import the image, we can simply double-click it. Next we get this bitmap
image import dialog. Here we can choose how we
want to import the image. If we choose embed, the image will become
part of the document, so it won't have any connection
to the original image file. If we choose link,
on the other hand, it will keep a connection
to the original image file. So if we change or
delete the file later, it can cause problems
with our document. However, we might do this
if the image file is very large and we don't want our
document to become very large, or if we want to be able
to edit the image file later and have the changes
also appear in the document. In any case, it doesn't
really matter with our current document,
because we'll be deleting the image
after we trace it, so I'll leave mine on Embed and click OK to
import the image. The image is now an object
in our document and we can move it around and transform
it like any other object. When we scale it, however, we have to hold
Ctrl if we want to maintain the aspect ratio. Let's make it bigger. That's also flip it horizontally
by pressing the H key and rotate it so it's
facing this way. Okay, to trace the whale, let's first switch to the pen
tool by pressing the B key, and let's zoom in on the head. Now let's start by
clicking up here and click and drag here until we have the curvature of the head. And do the same here. At this point, we want to
create a cusp node, so let's click and
drag until we have the curvature, then, without
releasing the mouse, let's hold Shift and
move the handle up here, then release the mouse. Now we can click drag here to get the curvature of the lip. Then here. We're going to
create the fins separately, so let's ignore them for
now and click drag here. We can also undo a node
by pressing Ctrl Z. And we don't have to worry
about getting it perfect, because we can always fix it
with the node tool later. Okay, Let's continue
clicking and dragging until we reach the tail. Since we already have the
correct curvature here, we can just click
at this point. Click drag here. Then here. Now let's click
drag at this point and without releasing the mouse, let's hold Shift
to create a cusp node, release here, click drag
up here, then here, normal click at this point, click drag here, then here, click this top point, click drag down here, then here we want
to hold Shift to create a cusp
node, release here, click drag in here, then here, then over here,
click drag up here, then up here close to
the top of the fin. Now let's click drag
at the top point of the fin, but because
it's curved here, we don't have to
create a cusp node. Now let's click drag
in here, then here, then over here. Now we can
click drag the starting node, then release to close it off. Now if we want, we can
go in with the node tool and adjust some things a bit. Let's turn the starting node
here into a smooth node, either by selecting it and clicking this button
in the controls bar bar, or by holding Ctrl
and clicking the node. Okay, that looks pretty good. Next, we want to
create some more paths for the bottom fins, as well as for the parts of the whale where
it changes color. Let's start with this
middle part of the whale. Let's begin down
here near the tail. Okay, so what we want
to do is start at the position of this
node right here, then go up and work
our way around. However, if we switch to
the node tool right now, we can click somewhere
near the node here, but not exactly on the node. If we want to be
able to click at the exact position of the node, we have to enable
the snap controls, which let us snap
objects and nodes together in various ways. To enable them, we
can either click this button at the top
right of the window here or we can click this
arrow next to it, then check enable snapping. This, by default,
enables some bounding box snapping and
some node snapping, and we also have the option
to enable alignment snapping. However, there are many
different options for each of these categories, as well as other
categories for snapping, and to see them all, we have to
click advanced mode here. We can now see that we're currently able to snap to things like the edges and corners of
an object's bounding box, we can snap anywhere
along the path of an object, and we can snap cusp nodes and
smooth nodes. We'll be discussing many of the snap controls throughout the lessons, but for now, because
this node that we want to snap
to is a cusp node, we just want to
make sure we have cusp node snapping enabled. Okay, so if we click
up here somewhere to hide the snap controls dialog, now as we move the pen
tool over an object, it will let us know
next to our cursor if we can snap to that point.
For example, we can snap anywhere
along the path, we can snap to smooth nodes, and if we go down here
to this cusp node, it lets us know that
we can snap to it. This is what we want
to do, so let's click the node to snap to it. Now we want to create
a path following along this lighter blue
part of the image. Snapping is just going to get
in the way at this point, so let's turn it off either by
clicking this button up here, or by using the
keyboard shortcut, which is the % key. And let's create a path
for this part the same way we did with
the main part of the whale. I'll speed this up a bit. All right, after we create
a node at this point, let's click over here
outside the main whale path, then let's bring it all
the way down around here until we get back
to the first point, then click the first point to
close the path. Later, we'll see how we
can easily get rid of this extra part of
the path down here. Okay, now let's do the same
for this bottom piece here. First, we want to snap to
this cusp node at the lip. So let's turn snapping back on with the % key
and snap to the node. And now we can
turn snapping back off and create the
rest of the path. When we get to this part, let's click outside
the main path, then bring it back around
to the starting point, making sure not to go
inside the main path, then let's bring
it up here above the starting node,
then close it off. It might seem weird
to create the path this way at the moment, but it will make
sense a bit later. Now let's work on the
paths for the fins. Let's begin with this one by
clicking at this top point, then click drag here, click drag at this point, then hold Shift to
create a cusp node, release here, click
drag here, then here, then click drag the
starting point. We also want to create this
inner part of the fin here. Let's turn snapping back on and snap to this
cusp node up here, then turn snapping back
off, click drag here, then here, then click down here outside the
fin and bring it back around to the first
node. For this fin here, let's begin by clicking here
inside the main whale path, click at this point,
click drag down here, click in here, and close it off. Okay, We're finished
creating the paths. Now let's add some
colors to them. Let's first switch to the select tool, which
we can do easily either by pressing the S
key or the spacebar. And we can go ahead and
delete the image now. Then select the main whale path, and let's open the fill
and stroke dialog. We actually don't want
a stroke for our paths. So let's switch to the stroke paint tab and click the X here
to turn it off. Then in the fill tab, let's give it a flat fill color, and let's make it a dark blue. Now let's select
the next path here, turn off the stroke, and give
it a lighter blue fill. For the next path,
let's turn off the stroke and make it a very
light blue, almost white. For this fin here, let's
turn off the stroke, and let's use the color picker tool to make it the darkest blue. For the outer part of this fin, we can turn off the stroke, and let's make it the
darkest blue as well by simply clicking the flat color
button in the fill tab. For the inner part, let's turn off the stroke, and use the color picker tool to make it the lightest blue. Let's now see how we can
go about getting rid of the unneeded parts
of these paths. For this, we need to
use a path operation. The path operations are all located here in the Path menu, and they let us do
things like combine paths together and cut paths out of other paths.
We'll be discussing most, if not all of these
throughout the lessons, but the one we're looking
for at the moment is Intersection here. If we have two or
more paths selected, Intersection will
leave only the parts of the bottom-most path that is being overlapped
by all the paths above it. So if we only want the part of this middle path that is
within the main whale path, we first need to go
to the select tool, and let's select the main
path and duplicate it with Ctrl D. We have to create a
duplicate because this whole path is going to be deleted when we do Intersection. Now we can hold Shift and
select the path we want to cut and go to Path -> Intersection. Now we have just this
part of the bottom path that was being overlapped
by the top path. We can do the same with
this light blue path here. First select the main path,
and duplicate it. Then Shift-click the other path, and we can do Intersection with the shortcut Ctrl *. And let's move it above
the middle path. Let's do the same for this
part of the fin here. Let's duplicate the
main fin path, Shift-click the bottom path, and do an Intersection.
For this fin, Let's select it and click
the lower to bottom button up here to put it below
the rest of the whale. You might not be able
to see it on the video, but if you're following along, you can probably see
that a tiny bit of the bottom paths are showing
along the edges here. I believe this is due
to anti-aliasing. If we want to get rid of this, we have to remove the parts of the bottom paths that are being overlapped
by the top path. To do this, we can use another path
operation, Difference. Difference will
use the top selected the path to remove any
parts of the bottom selected path that
it's overlapping. So we can duplicate this
light blue path here, then Shift-click the middle path
and go to Path -> Difference. Now we're left with just this
part of the middle path. Let's do the same
for the main path by duplicating the light
blue path again, Shift-clicking the main path, and we can do a Difference with Ctrl -, leaving us with this. Now we don't see the darker blue parts at the edge anymore. Let's also do this with the fin. Duplicate the light blue part, Shift-click the main part,
and do a Difference. Alright, the only
thing missing on our whale now is the eye. So let's switch to
the circles and ellipses tool by
pressing the E key, hold Ctrl and create
a circle in here. Let's make it black. Then let's switch to
the select tool, duplicate the circle
with Ctrl D, make it white, and scale it down while
holding Shift and Ctrl Let's move it off
center just a bit. Okay, we're finished
with the whale for now, so we can select it all and group it with Ctrl G. And let's move on to creating the waves. Before we start
drawing the waves, let's switch to the squares and rectangles tool really quick by pressing the R key and
create a random rectangle. If we switch to
the node tool now, which we can do with the N key, we can see that we
don't have access to the rectangle's nodes. We still just have
the handles for resizing it and for
rounding the corners. That's because the
rectangle isn't a path and we only have access
to the nodes of paths. However, we can change a
shape object into a path, either by clicking
this button in the controls bar for the node tool or by going to
Path -> Object to Path. Now we can see and
modify the nodes. We can also drag out the line segments to create curves. And we can add new nodes by
double-clicking a segment. It's important to know about
the difference between paths and other types of
objects in Inkscape, because the path operations
will only work on paths or objects that can
be turned into paths. Some types of objects, like the ones created
from imported images, can't be turned into paths, so we can't use the path
operations on them. Okay, with that in mind,
let's delete this path we created, then switch to the circles and ellipses
tool, hold Ctrl, and create a large
circle that we'll use as the main shape for our logo. Let's give this circle
kind of a turquoise fill. For the waves, we're
going to use a bunch of small, overlapping circles. So let's go ahead and
create one a little above the center line
of the big circle. Let's make it a different
color just so we can see it, and let's create another circle overlapping some of the
right side of this one. As you can see, we now have this wave shape at
the bottom here. Let's create some more all the
way across the big circle. We also want to cover
over this top of the big circle because we want to cut off all
but the bottom part of the circle and give it a wavy top. To cover
the top area, we can simply switch
to the squares and rectangles tool and create
a rectangle starting above and to the left
of the big circle and bring it down inside
the smaller circles. Next we want to cut
this rectangle and all the small circles
out of the big circle. As we learned with the whale, we can do this with the
Difference path operation. The only problem, however, is that Difference only works correctly with two
selected paths. So we can't just select
all of these objects and do a Difference because it won't
give us the result we want. Instead, we want to
turn the rectangle and all the small circles
into a single path. And that's exactly what the
Union operation here does. And by the way, most of
the path operations will actually convert
shape objects into paths automatically. So for the most part,
we don't have to change them into
paths ourselves. Okay, so let's switch
the select tool and drag a selection box over the rectangle and all
the small circles, then go to Path -> Union. We can see that this
is now a single object because of the single
bounding box around it. And if we go to the node tool, we can see it's
all one big path. Okay, now we can go back
to the select tool, shift- click the big circle, and
go to Path -> Difference. And now we have the
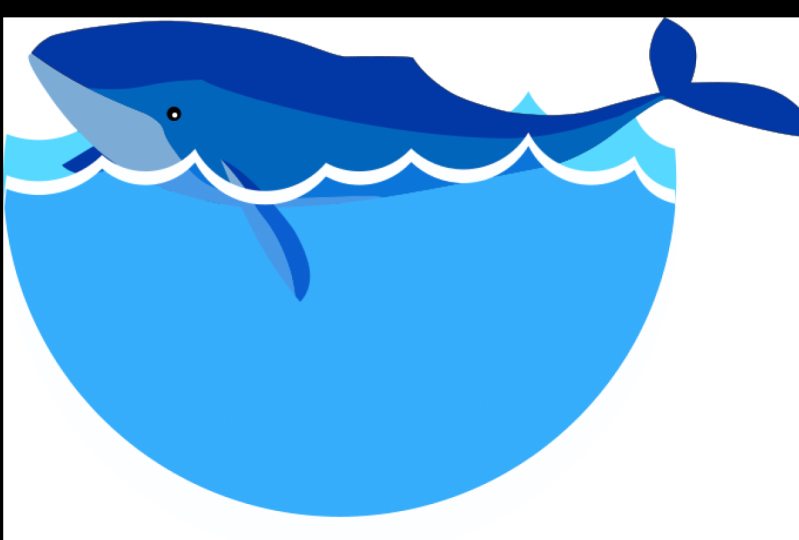
result we want. Let's next create a front layer of waves and give it a
white border on the top. First, let's duplicate
this path with Ctrl D, make it white, then let's hold Ctrl and
move it down here. Now let's duplicate this one, give it a cyan fill, hold ctrl, and move it
down just a little bit, so it looks like it
has a white border. Next, let's use duplicates
of this bottom path to cut out the parts of the top two paths that we don't need. So first let's duplicate
the bottom path, Shift-click one of
the other paths, and let's do an Intersection
with Ctrl *. Let's do the same
for the other path. Now we can move the
whale onto the waves. Let's click the raise one step button to put it just above
the bottom wave path. We can also resize and
rotate the whale a bit. The last thing we want to
do is make it so we can see the parts of the whale under
the top layers of waves. Let's first select this
topmost path and make it partially transparent so
we can see through it. To do this, we have to change
the object's opacity, which we can do either
by changing the value in this box labeled O
on the status bar, or by using this opacity slider at the bottom of the fill
and stroke dialog. Around 50% should be good. The problem now is
that the white path is blocking us from
seeing the whale. So what we can do is get
rid of all of the area of the white path that's within
the area of the top path. To do this, we can
duplicate the top path, Shift-click the white path, and do a Difference with
Ctrl -. There we go. Finally, we can select all of the logo objects and group them together with Ctrl G. And that should do it
for our whale logo. Thank you very
much for watching, and I'll see you in
the next lesson.
 Brandon Grant, Game Developer and Graphic Designer