Transcripts
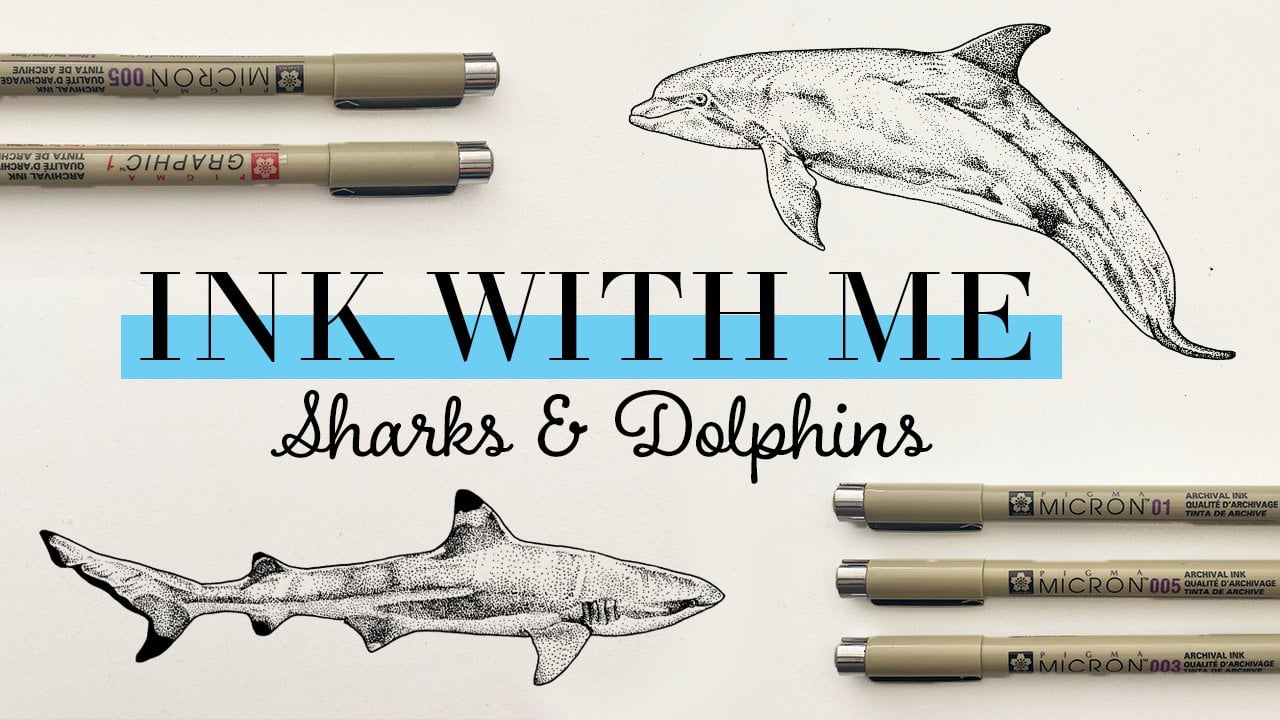
1. Intro: Hi, my name is Elizabeth
leg line and I'm an ink illustrator of loosely
mermaids and marine life. Today I'm starting a brand
new Skillshare series and I'm calling ink
with me to share the different ink techniques
that I use so that we can apply them to different
marine life together. I love illustrating using
stippling techniques in this flash sheet
style of illustration. There's so much you
can do when you illustrate in a style like this. I've done pieces like my
under the sea flash sheet. This stop with the plastic one. I've done one for my
home state of Maryland, my current city of
Philadelphia, and many more. Today we are going to be
kicking off this series with inking some jellyfish. You can choose to
follow along for the full series if you want to create a complete flat sheet of different marine creatures, or we can just ink
some jellies today, I marked this course
as intermediate, but if you're a beginner,
don't let that stop. You were going to ease into these techniques and then move towards more complicated
marine creatures as the series goes on. In this course, you'll
learn about where to find great reference images, different materials to use, and the various stippling
and techniques and styles that we can apply to
our subject matter today. Also as little bonus, I'll be including some
tips about how to monetize the work that you
create in today's class. Don't forget to follow
me here on Skillshare to know when the next
course will be released. And let's get started.
2. Class Project: Let's talk about
today's class project. There's going to be two
parts to this class project. The first one is if you
just want to follow along with this
class, the jellyfish, I want you to upload a
picture of the jellyfish, the linked into the
class project gallery at the end of the course. If you've decided that you
do want to follow along with the full series and
complete a whole fleshy, I want you to see here
a sketch of what you've done with those first couple
of jellyfish inked in. Here I have my sketch
for my full flash sheet, which I will share in the project resources
tab so that you can, if you want to copy
the exact layout and images that I've used, you have that option. Also in the project
and resources tab, I have linked all of the jellyfish
images that I'll be using for today's course. I've sourced all of
these reference images from Unsplash.com, which is a great
royalty-free resource that you can use,
reference photos, and then you can still sell
your artwork without having to pay royalties
for those creators. But really great
reference images. So if you want to use
different images or just want to use it in
your general art practice. Great place to find
beautiful images. Along those same lines. I really just want to
encourage you to use your full creativity in
today's course, like I said, if that means finding
different reference images using slightly different
colors or materials, putting out a
different flash sheet. You have a lot of options
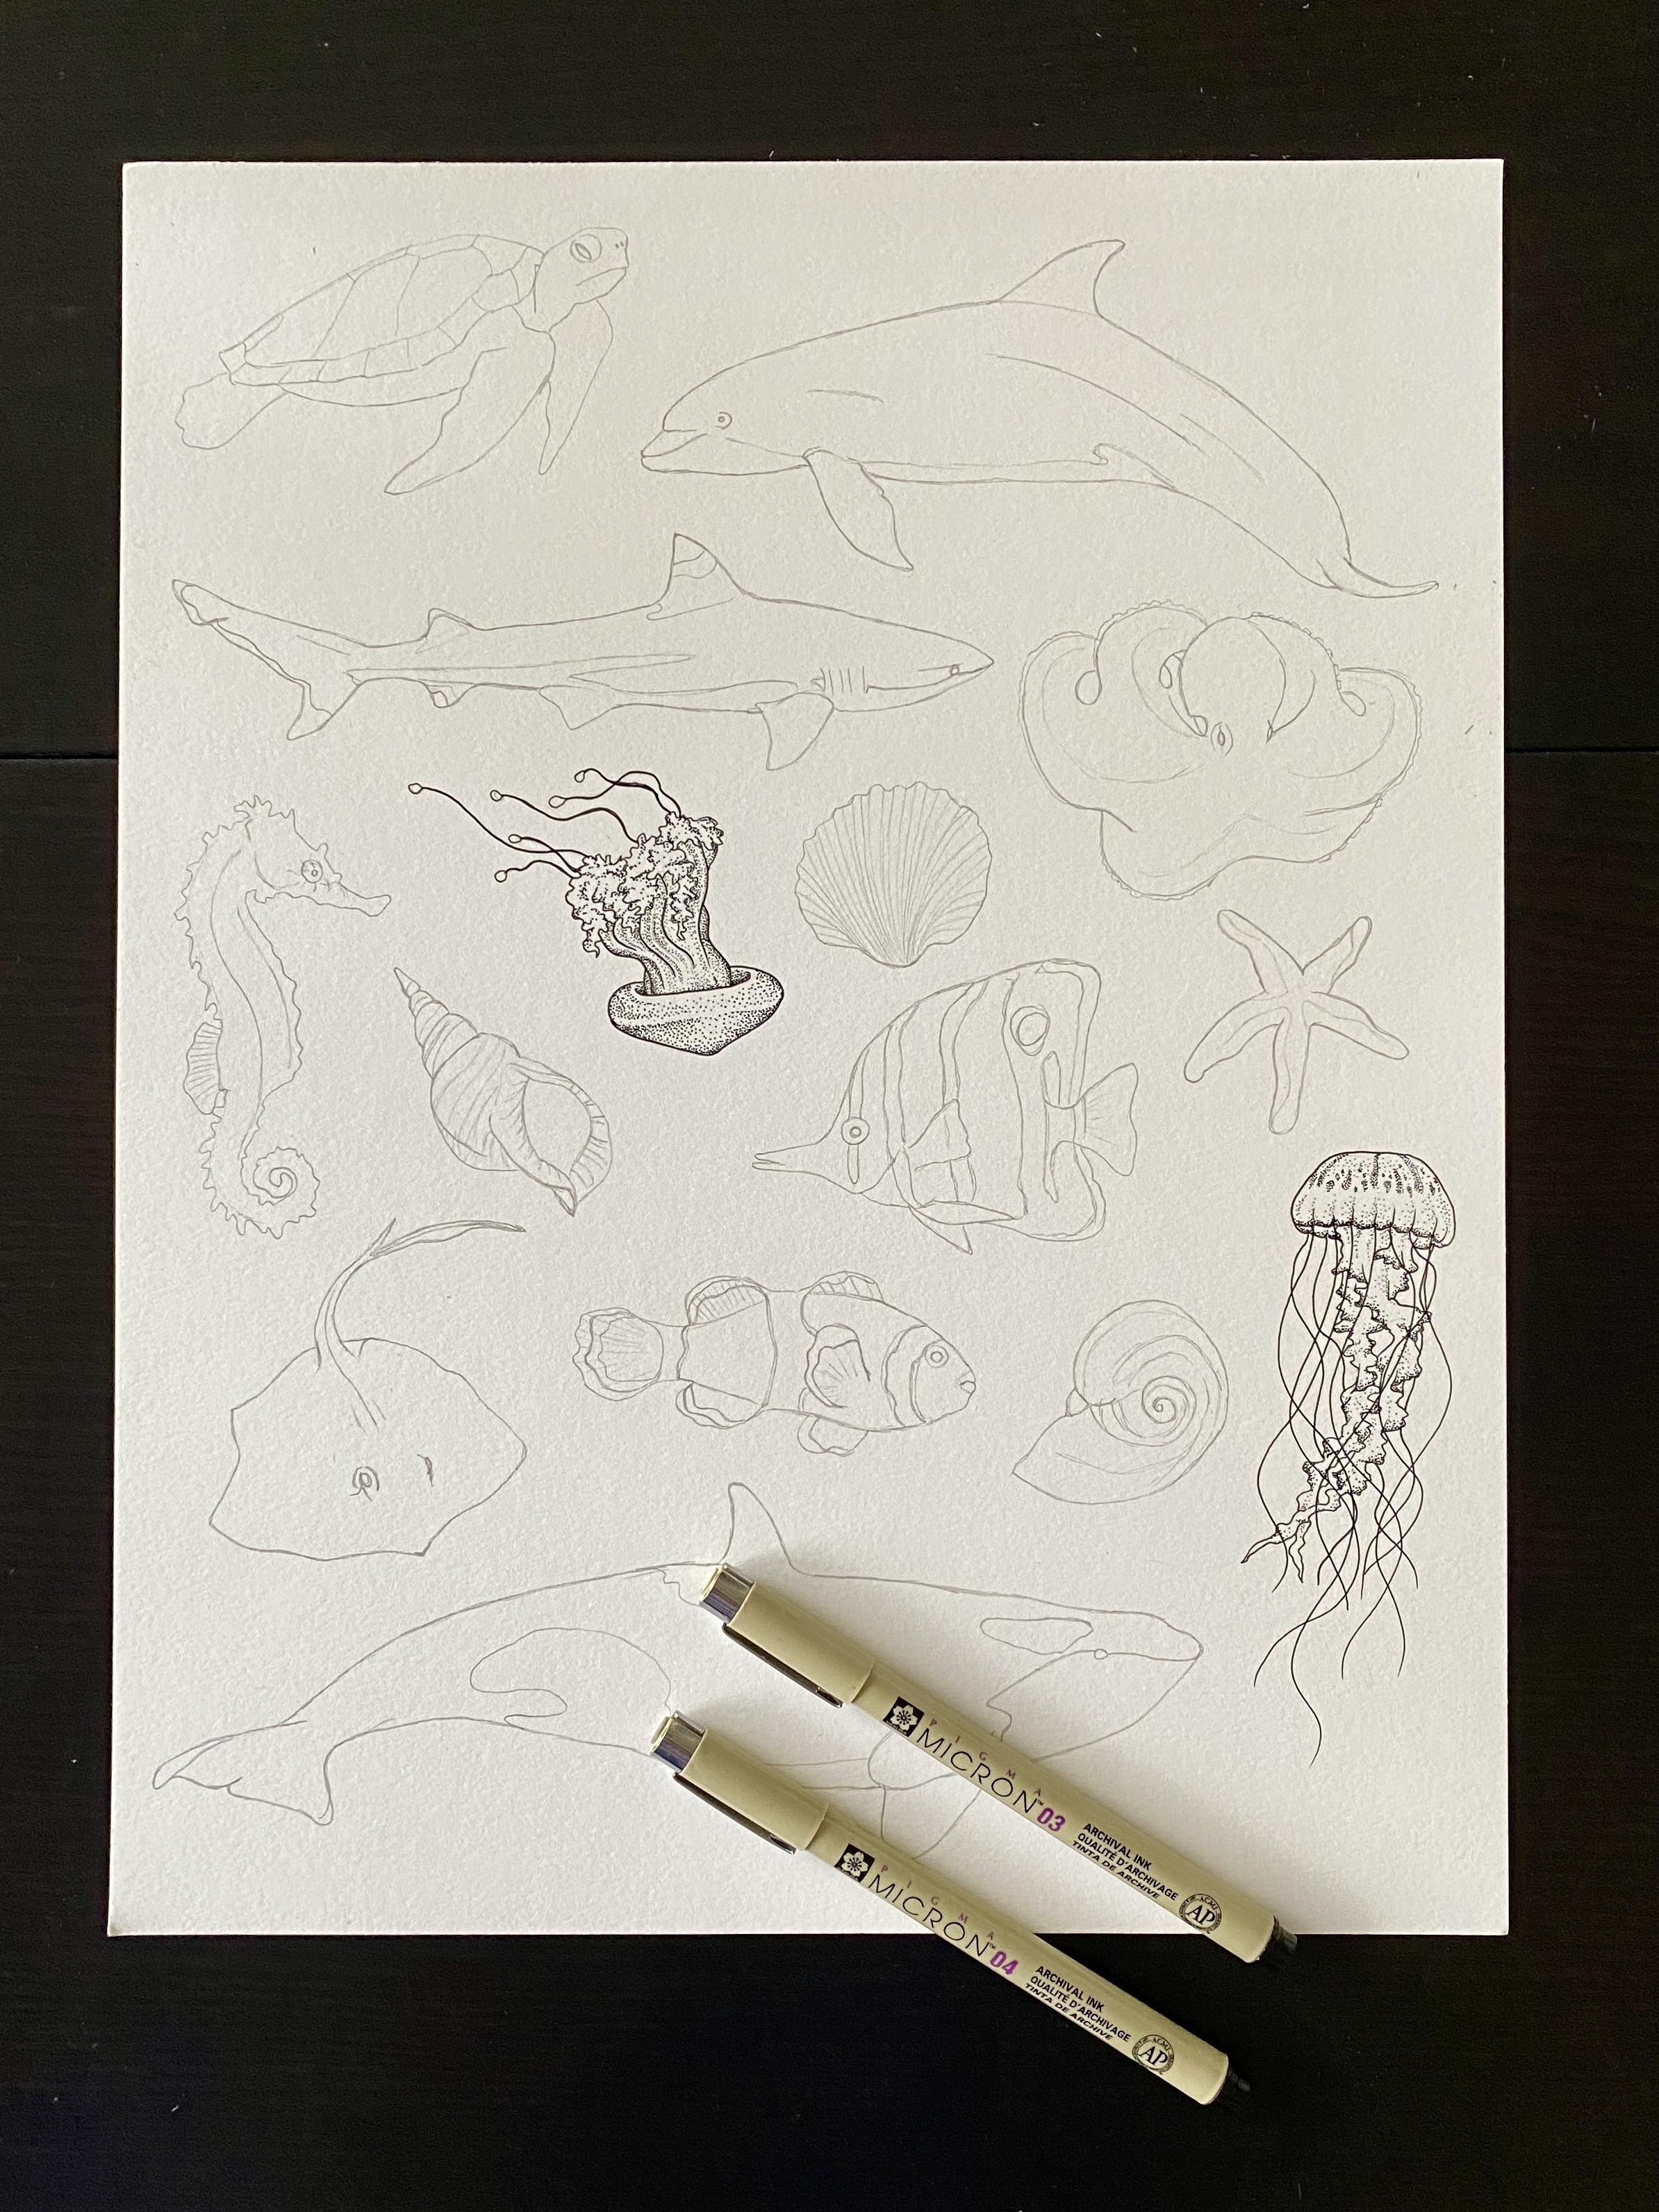
on what you wish to create. These are the animals
that I have sketched on my flash sheet that I will
be inking in this series. But there are certainly many
creatures under the sea, so you have full
creative control to do whatever animals and we use whatever techniques you want
to create your artwork. So with that, let's
get into materials.
3. Materials: Let's talk about materials
for today's course. First thing, let's
get into paper. There's two types of paper
that I tend to stick to and I'm doing my
ink illustrations. The first one is going
to be marker paper. This is Strathmore brand. I use them a lot super
easy to find that most art supply stores and these pads come in a
bunch of different sizes. I've used Copic paper in the past and a couple of
other brands as well. I love marker paper
because it is super smooth and your ink won't
really bleed or anything. It's also great because
I do some of my pieces. I color them in with
Copic markers afterwards, the marker paper
is great to have your piece laid down
on because then those colors will blend
nicely but won't bleed. So it's great option.
Second option for paper that's a favorite is
gonna be Bristol paper. This one is obviously
seen some love. This is what I tend
to use when I'm doing my final flash sheets. So this is the load by 14 size. That's will be the size of the full flat sheet that I'm inking throughout this series. And it's pretty much my choice
for all of those projects. It's a little bit
thicker and sturdier, which I like for a final piece. So either of them are
going to be group B. Great options today. Like I said, I'll use
this for the final one. I'll probably use the
other marker paper for some different technique
exercises that we do. All right, Now let's get
into the pen options that are out there for fine
liner and ink work. My favorites are
the Micron pens. I use these pretty
much exclusively. I have this travel case that has a bunch of
different sizes in it. There's a bunch of different options and
they even do like thicker chunky markers or
brush markers as well. This set is all black, but they also do come in
different colors as well. So maybe you want to
make your flashy all blue or green,
totally an option. I also use the Copic multi
liners in the past as well. These guys are great,
pretty much very similar to the micron ones coming all the same sizes come
into different colors. And these guys are
great as well. Also, if you want to
make an investment, I have this whole box of
different Micron pens. And this has this super-helpful
little key that shows you all the different
sizes and colors that are available and they
come in this box. So I use this all the
time in my ink practice. But you can really
use any brand. There's lots of
different ones out there for varying levels of investment or whether you're
a beginner or more advanced. So there's tons of options. The Micron pens are
usually pretty easy to find art supply stores. You can usually just
buy them one at a time. Or if you want to invest in some different packs of
them, that's great too. The sizes that you
will use will depend on your own style and artistic
practice that we'll get into next talking about
the different options and sizes because
that's really just going to depend on your style. And then sometimes
you know how big your subject matter is. Not they have a little
preview on materials. Let's get into some inking.
4. Stippling Techniques: All right, so in this lesson
we're going to start getting into stippling
techniques and styles. We're going to practice
some different ways to stipple and go over some different ways
you could choose to illustrate your jellyfish today. I have my marker paper here. I have my Micron pens laid
out and a pencil as well. I have lots of different
sizes of the Micron pens. Whatever size you choose to
use is really going to be up to the subject matter
that you're doing, how big your illustrating it, whatever your style might be. It's really up to you on
what size you want to use. I figured I would
just go through a quick test of all
the different sizes so you can kind of see how they compare and align
and in some dots. So you get an idea as we start
getting into our inking. The size I have here today are
the zeros, 05010203405081. This is gonna be a
pretty good selection of sizes for no matter what
you're illustrating. If they're going really big, you might want to
use different pens, but this is pretty
much has to be covered in all of my illustrations. So just kind of go down
the line here and show you how big and small
these different ones are. Like this zeros 051 is
definitely super tiny. So this I pretty much used for just really, really
fine details. Or if I'm illustrating something
that's super-duper tiny. This O1, I use a
pretty good amount. But again, pretty much
still for just details. Or if I'm illustrating
really small 0 too. This one has been
pretty heavily used. I'll probably should
replace it soon. I do wear out depending on how hard you're doing your stippling and you know how
much you've used it. They do have a lifespan. You can see it with the 03, we're getting a
little more bold. This is a pretty good one
that will probably be using throughout this
flash sheet series. That's the 0458 is cool because it really
starts to get into the folder, look quite a bit. Then this graphic one, I pretty much just
use four outlines. If you want to do some bold
outlines on your work, this is a great option to
kind of give it that log. And you know, sometimes I
go over it again and it really just creates
that graphic quality which I really love. That's kind of the
different pen options that you have in
different sizes, whatever you choose to use for your final piece,
totally up to you. We're gonna go
through and use some different sizes here today. Let's get into that. Here I've just drawn a bunch of different boxes
because we're gonna be trying out some
different techniques and processes and
the different boxes. And I will go through
that with you. You can draw whatever
shape you want, totally up to you. I just have the pencil
outlines here right now. All right, So now we're
gonna get into inking. I did ink out some examples
just so you have something to look at as we get
into these techniques. But in these first
two squares here, we are going to
practice working from light to dark and
then dark to light. Whichever way you
decided to do it, it is completely and
totally up to you. It's just a process thing, whatever you're more
comfortable with. I am going to use
the 08 micron pen for this, for a little bit. Bolder dots. That's what I did for
all of these as well. So for this one you're going to start at the bottom where it's lighter and then kind of go
towards more dark at the top, just like these guys. So you are going to start
with just some random dots spread apart at the bottom. Your dots can be as random or meticulously placed
as you would like. It's really again, just up
to style preference for you. Then as we get
towards the middle, Let's start putting them
a little bit closer. Kind of having that
distance between your dots. Also totally up to you and your process how
quickly you staple. Some people are super-duper, slow and meticulous, and some
people work really fast. Lay in all these dots down. I feel like I work
somewhere in the middle. It also depends on
what I'm inking. It'll probably take
some practice to see what works for you. At least for these first two, I won't speed up
my video at all. So you can really see
real-time what I am doing. As we get towards the top here, we're going to start
getting darker. Having that distance
between the dots again and laying them
closer together. It's also up to your
style and preference, how close you end up putting the dots together for
your darkest areas. If you want your drawing to be more of a light and airy look, even your darkest areas, the dots aren't gonna be
super-duper close together. If you want this kind of more
bold, dark graphic look, you'll end with your dots
super-duper close together or even color and
a little bit of it all-black that you really
give it that darker look a little bit later with this one and
some of my other ones. But that's a good example
of light to dark. Then the next one we're going
to go from dark to light. I prefer working from dark to light just because I
feel like then you get all the close together dots
out of the way and kind of move to the more open look that moves a little bit faster. Another thing that
I like to do is if I'm starting with an
area that's really dark, I will start with area that's either a
little bit colored in or just outlined to kind of serve as a reference point
for that dark part. And then you can start with those dots really close
together and you feel like you're dispersing
that black area. Then how quickly you disperse the dots is really
going to be again, up to you, up to
your subject matter and whatever it is that
you're illustrating. Kind of get more into practice with that
throughout the series and throughout the different
subject matter that we're going to explore. You really start to Perth
dispersing those dots and you get to cover the
area really quickly. Just like that,
you're all finished. Alright, so like I said, that's light to dark
and dark to light. I'm going to be
totally up to you. For the next part here we're
gonna be talking about working with an outline
versus no outline. Let's get into that. I'm going to pick out a
different marker size, right, For the next
part here I'm going to try the O4 marker. Like I said, we're
gonna be going into, if you choose to outline
your work or not. I love to outline, but I also totally appreciate
the artists that don't outline gives it a very
different quality, quality. It's really beautiful. I'm going to start with
my preferred method. So we're going to
outline R-square here. And I think what I
like about outlining is it just feels like then the dots are contained and you know what you're filling up. For this. I think instead of doing these gradients,
we'll start with, this is a darker corner and then move to lighter
around here. I am going to go from dark to
light since as I mentioned, that is my preferred
way to work. I just feel like when
you have an outline, you don't have to worry about how clean the
edge of your dots are. Which I think is
just y like that. But again, totally
up to you and you'll probably want to try some
different techniques. About how new you
are. Just a blank. All right, I'm going
to speed this up a little bit as I finish the rest of the square
so you don't have to totally watch me in real-time. That is stippling
with an outline. So not much different. Just having that outline there
makes a little bit easier. All right, and then this
next square here where you're gonna go with no outline. And what you want to think
about if you're going to a inc without using outlines as you really want to meticulously
place those outer dots. Because that's
really going to show the boundary of what
you're working on. And if it's a little
bit jaggedy and messy, I'm your pieces are going to have as clean of a look to it. I'm gonna do the same kind
of design that I did here. Just with no border or making
a dot border to be exact. I'm just going to go around and place these
dots along the boundary. You are outlining it
just in a different way. Again, totally a process thing. If you want to do
this at the end, you totally could. It. It's just up to your
techniques and preferences. I'm going to let that
dry for a second just because the ink sits on top
of the paper for a minute, I don't want to
smudge all of it. And as I start working, as you can see what
this technique, I'm gonna go a
little bit slower. It's because I'm not used
to working this way. Now I'm going to speed
this up a little. You don't have to watch
as I go super slow. Alright, so you can see
the same kind of look. I'm just keeping that
border kind of open. And it would probably
look better if I erase those pencil lines. So I'll erase that off
for the next frame. And then I'm gonna
draw some more squares and we'll get into some
more different techniques. All right, so here I
have erased that border. So you can really see now you
still tell that it's a box, but it doesn't have
that bold outline here. Again, it's going to be up to
you on your style on as we get more into our jellyfish
and today's course. A couple of more things
that are gonna be stylistic choices for
you is going to be, we talked about using
different sizes of pens, but there's different
ways that you can express that creativity. Some artists will do their entire drawing
with one pen size, which is really cool. Then some artists like
myself, for the most part, I use different sizes and different parts of
my drawing or even combine different sizes
shading the same object. So I figured I'd show you that
in just one more box here. Otherwise, we'll just
have to explore as we get into practicing inking
some jellyfish. So what this one, I am going to start as my
darker part with the OH, that folder marker again. Start with that up here. So once again, pleasing those
dots super close together. Giving it that dark look. I will start to disperse this boulder marker like that. And then I am going to
switch down to the O5. For some finer ones. Just kinda start working
them in organically. Pull in some higher up as well. Once again, dispersing
these guys. Then what you can
also do is you can jump down again if you want to. I'll jump down to the start placing a few of those in there. I'm just finishing up with that. So again, just gonna be
totally up to your style. You can use different
sizes to illustrate different parts of your drawing wherever you may be doing. Like for instance, in
my mermaid drawings, I typically use one size
for maybe hair and body, and then I might use a boulder
dot for her mermaid tail. Socially is going
to be up to you and up to some exploration. So again, if you're
new to sibling, maybe try a couple more squares. The kind of test out how
you want to do things. But next we will get into
sketching our jellyfish.
5. Sketching And Outlining: Alright, now we're
gonna get more into the process of actually
inking our jellyfish. This lesson is
gonna be all about sketching and
starting to outline your jellyfish are provided six reference images
from Unsplash. So you can choose to whichever ones you
want to or you can go find other reference
photos if you'd like to. The reference photos
that I provided, I'll be inking onto
my final flashy. I'm going to save
those till then. And then throughout these
next couple of lessons, I may be inking at three of the other one that I provided. The first step is to
grab your pencil. This is an old one. It's starting to get
a little bit shorter. But I typically
use an HB pencil. They have a harder
lead and that way you can sketch really lightly, which makes it really
easy to erase. Going to be using a
little bit darker lead for this lesson so
that you can see it. And then I also have my
little clicker eraser and then a larger
eraser as well. If you want to
trace your images, feel free to do that. No judgment at all. Jellyfish are a
little bit simpler, so I'm just gonna go ahead
and start sketching here. I'm gonna do three
different ones. For practice. You can sketch them
whatever size you like. I keep my sketch is
pretty simple with ink. And I try to then do a more
detailed outline and then I will go through and erase
all the pencil marks. Again, you can
have your Is be as complicated or as simple
as you would like. It looks pretty good. And then this one has some
little tentacles up here. What I'm not going
to sketch those in, I'm just going to
leave them as is. Jellyfish are so cool.
I love watching them. Aquariums, things. Not my favorite thing to see while I'm swimming
in the ocean, but very cool nonetheless. This obviously has
all the tentacles, but I'm just going to leave
that because there's gonna be some quick strokes with
the pen at the end. I'm gonna do a little
moon jelly is a well, I'm going to be a moon jelly. It'll probably pull
some tentacles down on the end as well. There we have three
really simple sketches. I'm gonna try and do each
jellyfish and kind of a different style just to show the different ways that
you can do your sibling. But I know I'm gonna do
this one with an outline. So I'm going to
choose that 1 first. I think I'll go for me of O4. Print outline. Go back and
look at that reference. Start with it's bell up here. I got if you do decide to do outline and they can
be as complicated or not complicated as you would like with ink or just try and go home with
confidence and not overthink. Things do not have
to be perfect, especially now as we
are just practicing. Drawing these a kind
of crazy squiggles, show some other tentacles. Looks good, and then they
go outline this one too. Jellyfish are also
different and unique, which is cool too. There's so many different types really do a lot with this motif. If you're creating patterns
or kind of artwork, you might be thinking, right? So then once I completed, if I do always go in
and erase because I want those pencil lines gone
as quickly as possible. Because if you wait until
the end after you've done all those dots and erase, it can kind of pull a little bit of the ink off that surface, make it a little bit lighter. A little bit less graphic
which has no, we want usually. I sludge that one a little bit. That's okay. Alright, so now we've done
some sketching and outlining. So let's get into
the next steps.
6. Inking: All right, So let's
get into actually doing some stippling
on our jellyfish. Jellyfish are a
little bit tricky it just in that some of
them are transparent. So that's something to take into consideration when
you're inking. But let's just dive
right into it. I'm going to start with
this one over here. Like I said in the other video, I outlined it in the O4. But I think I'm going to ink, I'm going to start with the
darker areas as this O3. So it's really up to you
wherever you want to start. You can start with
the tentacles, you can start with the
bell completely up to you. I am going to start
with the bell. I the darkest part
is going to be in here and then around up here. So I'm going to start
right down here. And then what you can do is
I'm actually going to create a little dot border for the areas where it's
a little bit lighter. Then I'm going to
go back in here and just staple in
those darker areas. The great thing that I
love about stippling is I find it a little bit easier to start then some other mediums. Because I think
sometimes when you're painting or working with markers or something
you're like, Am I going to pick
the wrong color? Am I going to do
the wrong stroke? Kind of ruined the
piece, but with dots, you just have to
start putting down single dots and you're
able to build on that. You can hide your mistakes. Find it to be a pretty
forgiving medium. All right, so there's that half and then we're
gonna do this half again with this jellyfish. I'm going to keep everything
in real time so you can kind of see exactly how long it's taking me to ink
different pieces. Then for the other two,
I'll probably have some parts for it
sped up a little bit. Same thing, want to create their border up here where
it's a little bit later. Again, you have the
option if you do want to sketch in anymore detail, I'm just going to sketch in
these are the darker areas. Up here. You see I combine different techniques. So yes, I've outlined the
jellyfish on its borders, but inside the jellyfish, I'm still using that kind of dark border technique that we practiced in the previous
video, two videos ago. Those are darkest
parts of our jelly and then some other darker areas. And then I think I'm going
to switch pens sizes. Looked up. I wish
I had some morally jellyfish fun facts to share. Those are kind of a
darker parts of my jelly. Then I think I'm going
to bump down to the OH, from little bit more detail. Again, these can be absolutely. It as simple or
detailed as you want. I used to be super
obsessive about detail, but I'm trying to let go on areas
that are just too complicated and
just let it flow. Detail here. Right here is the
top of our jelly. And then I'm going to
do the tentacles next. I'm going to keep
those pretty light since they're transparent. Then they looks like they
have a white outline where there like ruffled is not the right word
but squiggly edge. I'm going to continue to
work with this 01 size. But again, totally experiment
with different styles, especially if you do want
to ink the full flashy, that way, you know, kind of how you want to lay
it down for your final piece. I'm trying to keep
this pretty quick, not get too hung up
on the small details. Right? And that is going to
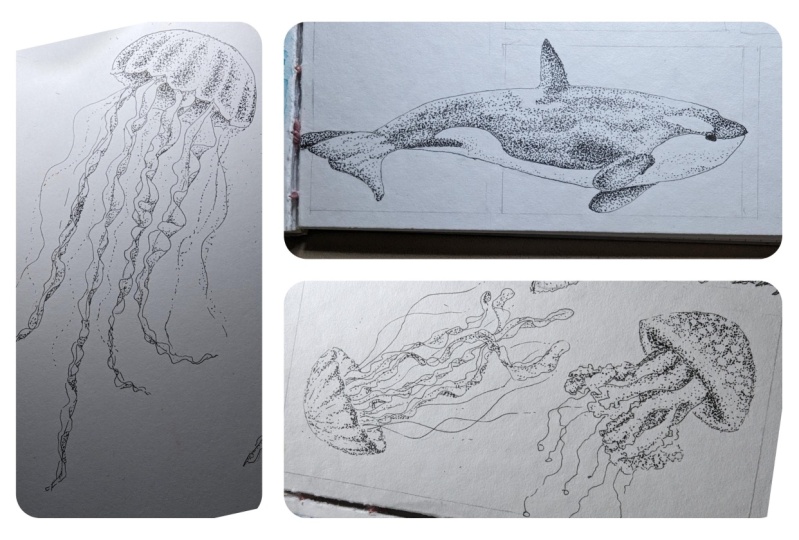
be our first jelly. This next one is a
little bit darker. So let's move into that one. Schedule a little bit more here. Kind of transparent. I'm just going to sketch
that outline in a bit. You want to keep the dots on this one a little bit smaller, but I don't want to
start with the one. I'm going to start
with a two here. Then again, since I
liked to go from dark to light star with these
darker areas here on them. Unfortunately, I
started recording the next one and then apparently my phone Stop Recording
and later the video. But I have started
the next jellyfish. I am using the O2 micron pen for a little bit
more finer detail than I did with this one. So right now we are
tackling the tentacles, just kind of working on
this ruffled effects, creating these little dot
patterns to show the texture. Keep going through here. I'm kind of alternating like
adding some to the edges, adding some to the center. The reference photo for
this one is pretty dark, but you can make the tentacles as light or dark as you want. Keeping them a
little bit lighter just so that I don't spend too much time in
King at the moment. There we have a general idea. And then the next
step is going to be adding those little tentacles. I think I'll probably stick
with the O2 pen for this. That way I've kind of done
the whole thing except for the outline in this same size. So what you want to do for the tentacles is
just really quick, simple strokes starting up here and kind of finishing out. Pretty much the tentacles
come from kind of in-between this little shape on their tentacles just kind of
move where they want to go. I'm not going to follow the reference too
closely on this. I like really long tentacles. Can also add some that go behind to give it a
little bit more depth. We are set with
another jellyfish. All right, the last
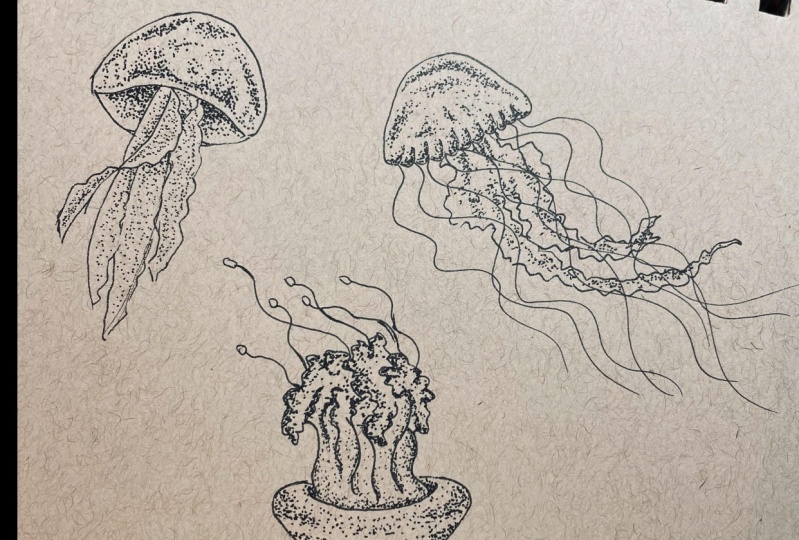
one to do here is this moon jellyfish. So we are doing this
one with no outline. And so we got to think about how we want to do the border. I think I'm going to come
in with this O2 size again. Just start with It's got a pretty light border
all the way around. So I think I'm just
going to create a pretty regular
border of dots here. I think I'm going to add a
little bit more to my sketch. There's kind of this
halo effect to it. And then some areas
that are a bit darker. I'm gonna do the same
thing by outlining these lighter shapes
in the middle here. I'm going to do a
border around them. Inside as well and warm
in here I might as well, Inc. in that center. Moon jellies are so cool, partly because I think they're the most common Joey that I
see when I'm at the beach. Then I forget what a
query him that I was at. I was at one where I
pretty sure these were the ones you could
touch lightly. Alright, so now we have these lighter or halos that they have inside of their bell. And then now I'm
going to go around and fill in the outside area. Might actually start
from the center here. All right, For the
rest of this, I'll speed it up a little bit so you guys don't have to
watch me in real-time.
7. Adding to Your Flash Sheet: Now that we have practiced some difference
stippling techniques and practice inking some
different jellyfish. It is time to ink our official jellyfish as
part of our flash sheet. If you choose to follow along
with this project, if not, you can just ink a
couple of more jellyfish that is totally an
option as well. As you can see, I have two jellyfish that I put
on my final flash sheet. These are the two reference
photos that I'll be using. And let's dive in. I'm so excited to
start inking on this. I have it all sketched out, so it is time to start
bringing it to life. I am going to start with this
jellyfish up here first. And as I mentioned, I do like to outline my pieces, so I am going to
start with that. Go with this O4 to start with. Over here. I have never seen a
jellyfish like this before. This one's pretty cool. Start by laying
down those edges. That way we can erase the pencil and then get into stippling. This area, of course,
is pretty complicated, so you can choose to simplify
it however you would like. I am going to add some
smooth lines in here. Then go in and add some of
this more textured area. Again, you can choose the
outline as much as you want to. If you just wanted to
outline this part, you totally can and then
do these areas as dots. It's really whatever works
best for your style. Don't hyperfocus
on getting all of those details exactly
like the reference image. Then you just end up
hyper focusing on making sure every little thing
looks just right. And it's really not
that important and I've totally gotten hung up
on those things before. So just let it flow the outline and then this has some kind of unique tentacles. So I think I'm going to
switch to a smaller go with two for these kind of little
areas at the end here. Now, these in we have a start to our jelly, going to give that
ink a second to dry and then start erasing here. You can leave a little bit
of pencil if you want. If that's showing
where your light and dark areas are and if
that's helpful to you, you can totally leave that. Leave a couple of my
pencil lines in here. Right? Now we have most of our pencil lines gone a
little bit more here. Now it is time to
get into stippling. So again, I think I'm
gonna start up here. I think I'm going to ignore
the dots on that jellyfish, even though they're super cool. But I think it's just gonna be a little bit easier
if we just treat this as just a solid
surface to just shade in. You can always go back and add those with white
ink if you want. So I'm going to go with
the O3 to start stippling. I am going to start with
this area right here. Again working dark to light, dispersing those dots
from the darkest area. Then you can kind
of see there's, this area is lighter close to the edge and then this
area is darker again, I'm going to create a
dark border to give Myself an idea of where that
kind of starts and stops. Shade all that from
the corners where it's darker. It's pretty dark. This top point here as well. Home right now we're gonna shade in this lighter area as well. I'm gonna stick to
the same pen size. Now that the bell of the
jellyfish is complete, we're gonna move into this area. And these kind of have two different textures
like this part is very smooth and this part
is very rough and textured. Great way to kind of
show that contrast is by using two
different pen sizes. I think what I'm going to do
is do some finer detail with a much smaller marker for the smooth areas and then
kind of add some rough, bigger dots to the other areas to kind of show that contrast. So I'm going to start with
those smoother areas. I'm gonna move down to the O2. Orange, just want to make it
look as smooth as possible. And just worry about the shading dry for a second so
we don't smudge it. And then we'll move
on to the side and then into the
middle. Or it's lighter. Again, as we talked about
before, it's really up to you. You can use the same marker size throughout your illustration
or you can change up really excited to see the different qualities that you can kind of show with your style and how you
choose to illustrate. So definitely upload
those class projects. We can all take a look. All right, almost
finished with this apart. Also really hope a
lot of you guys stay on so that we can do this
whole flashy together. I think it'll be
really fun to see how far you come
throughout this project. I think it's a fun
project anyway. I'm excited too, because for the last class in this series, I am hoping to do a whole
course on actually digitizing artwork that you've
created throughout this series and how
you can monetize it, selling on society six and Redbubble and all the
different things. Issue with your flash sheet. All right, now let me finish
this smooth area here. We're gonna move on to the more textured
areas and I'm going to bump back up a marker size or
to market sizes to the O4. Let's start working
on some texture. One of the best ways to kind of incorporate the texture is just extending some of those lines into the
piece with the dots. Set that 3D look without
rougher texture.
8. Final Thoughts: All right, thank
you all so much for joining me for today's class. Don't forget to
upload the jellyfish. See you in today to the
class project gallery so that we can all take a
look at what you've created. And also don't forget to follow me here on Skillshare so that you know when the next course in this series will be released. The next course is going to
be all about inking orcas. So I'm very excited
for that next course. As I mentioned in
the introduction, I wanted to quickly share
some different tips for how to monetize the
work that you created in today's class through
print on-demand like Society six red bubble
and lots of other sites. So just from, from what you've
created in today's class, you can scan those
different jellyfish and do a little bit of
clean-up work in Photoshop. You can upload on each jellyfish individually to
these sites which might look cute on
different pillows, tote bags or pouches. You can also do a little
bit more work and create a seamless pattern of the
jellyfish you created. For example, I have this outdoor floor
cushion from society six, and I created this pattern
a couple of years ago. And then this navy
and white colorway specifically is one of
my most popular ones. I just added the blue
background in Photoshop and re-color the jellyfish
white instead of black. Just a couple of clicks. There's so many different
things and do with your work. Also, for example,
this tapestry behind me is also from society six and all of these seashells and starfish that are
in this pattern I actually pulled from my under the sea flat
sheet that I created. I pulled those elements off
of that artwork in Photoshop, created this seamless
print and then I've recolored it into a bunch
of different color ways. This colorway is brand new. It actually has my
brand colors in it. But this blue and white
version that I created is my best-selling
pattern of all time across my print-on-demand
platforms. As I mentioned, I'll be sharing more tips about how to monetize your work in the last course
of this ink with Me series. I hope you'll stick with me and create a full flash
sheet of your own. So stay tuned for my next
course. See you there.
9. Ink With Me Orca: Intro: Hi, my name is Elizabeth
Kline and I am an ink illustrator of
mermaids and marine life. This is my tenth course here on skill share and the
second in my New Ink with Me series where I'm sharing different stipling
and ink techniques that I use to create
my illustrations. In the first class
in this series which was inc jellyfish, we started exploring these different techniques
and trying them out, illustrating some
different jellyfish. We also started an
overarching project to create a full flash sheet
style illustration of all different marine life. Today we are diving into the second marine
animal in this series, which is going to be Orcas. If you are continuing to
follow along with this series, this is where we left
off on our flash sheet. I have illustrated two different
jellyfish on my sheet, and today we will be adding
this Orca down here. I love illustrating in this
flash sheet style and it's become one of my
signature styles over the last few years. Here are a few examples of the different flash
sheets that I've created, and I'm super excited to be creating one along with
all of you guys here. All right, now let's talk
about today's course. I marked this as an
intermediate level, but if you're a beginner
and you want to try it out, absolutely go for it. I do recommend going back to the age with meat
jellyfish course. If you are a total beginner, we are going to ease into these stippling
techniques throughout this series and it
will get a little bit more challenging
as it goes along. I would recommend starting
at the beginning. Today in this course, I will be sharing where to find
great reference images, what materials you
should be using. We'll go through some various different stipling
techniques so you can try out what style you might
be interested in pursuing. Then we will go through
sketching, outlining, and inking your Orca as part of your flash sheet or just if you want to
follow along today. I will also, as a bonus, be sharing some different tips of how to monetize your work. And I will share that at the end after we have finished
our illustration. Don't forget to hit the Follo up button here on skill share, so that you know when my next
course will be released. And I will always post it in the class discussion for
the previous courses, so that you know there's a brand new course in this series. Let's get started with
some Orcas today.
10. Class Project: All right, let's talk about
today's class project. Your project is going to be
to upload the Orca inked into today's class to
the project gallery so that we can all check
out what you've created. If you do want to follow
along with the full series, I would love to see the progress that you've made on
your flash sheet. That should be the sketch that you've completed along with the jellyfish that you've with the Orca from
today's class. Added in for your reference under the Projects
and Resources tab. Under this course,
I have uploaded the reference image
that I will be using for the Orca
on my flash sheet, which I found from
Unsplash.com which is a great source of royalty free images that
you can use as references. I uploaded that for your
resource, and then as well, I have uploaded the sketch for my full flash sheet
so that if you didn't join us in our previous
course and want to catch up, you can do that and create out your whole flash sheet exactly the way that
I'm doing mine. I also want to encourage your own full creativity
in this course. If you want to find other
Orca reference images, you are totally free to do that. If you also want to create
your own flash sheet, totally up to you as well. These are the
animals that I have included in my flash sheet. These will be the ones that I'm talking about
throughout this course. But you can use different
reference images for them or you can do different animals altogether and just apply the techniques
that we're learning. Stay tuned if you want to
be part of the full series. Don't forget to upload to the class project gallery
when we are all finished.
11. Materials: All right, now the next thing before we get into
actually practicing some stippling
techniques and inking today is going to be to
talk about materials. First things first, you are
going to need a pencil. I recommend using a pencil
with an H lead so that it draws very lightly and is much easier to erase instead of a B. The pencil I have here is A, it draws super lightly, really easy for sketching
and everything. You'll also need an eraser. I really like these
click erasers because you can
erase very easily your lines without having to use a big eraser and smudging
everything everywhere. I also recommend getting a
brush that you use just for eraser bits so that
you're not getting your hand oils all
over your piece. It's a lot easier to just
brush those little bits of eraser shavings right off your
piece with a clean brush. Start with that,
then the next thing that you'll need is
your fineliner pens. I highly recommend
the micron pens. They are my absolute favorite. They pretty much are
what I use exclusively. But there are tons of other
fine liner brands out there. Cope makes their own. There's tons of house brands at different art supply
stores as well. You have tons and
tons of options. You do need to replace them relatively frequently
when you're stipling. Just because no matter how
lightly you're doing it, eventually those tips
get pushed down. You can see some of these
have been very well loved as the ink is starting to
rub off of the pens. But this pack is
great because it has a whole bunch
of different sizes. We'll get into that with
the techniques video next. But whatever size
that you choose to use is going to be totally
up to you and your style. I like to just have
a pack that has all of the different ones
so I can choose what I want to use for that
exact subject matter or that piece that I'm doing. We will play around with
some different sizing and I'll show you all of that
in the next video as well. All right, and then next we are going to
talk about paper. My two paper recommendations
for today's class is either to use marker
paper or Bristol paper. I use this Strathmore
marker paper a lot. It's really easy,
super smooth surface. The Strathmore brand
is pretty easy to find at any art supply store. Definitely recommend
picking this up. This will be what
I'm using to show different techniques and do some practicing in
today's course. For the Bristol paper, this is a little bit thicker
with a heavier weight to it, but it is still pretty
nice and smooth. This is what I'm using
for my final flash sheet. I use this 11 by 14 size for most of my pieces in
my flash sheet style. I highly recommend
picking this up if this is something that you
want to pursue as well. I just like the weight a
little bit better and it feels a little bit nicer
for a final piece. Those are the materials that we'll be using in today's class. I will put some links
and info also in the projects and resources
tab under this course. If you have any questions,
also ask them in the class discussion
and I'm happy to share more about what I use.
12. Stippling Techniques: Okay, I have all of my
materials laid out for us to start practicing some different
stipling techniques. The first thing that
we're going to get into is a little pen test, which is always a
good idea if you have a brand new set of pens and you just want to practice and see what all of them look like. We are just going to go down the line from
smallest to largest, And then I'm just going to do a couple dots and a
couple of lines just to test out the size of
each one to give us an idea. Before we get into some
different technique practices, I am going to start with
this 005 right here. I'm just going to go
up in this corner, lay down a bunch
of different dots and just draw some
different lines. And then I'm going to write down next to it what size we have. I have that little reference. Then onto the one size, I will do the same thing. Most of these are
newer, but this 21 has been very well loved. I just finished a
new drawing that I mostly used this size. It could probably
use a replacement. It is looking very
similar to that one size. It's just been smashed up. All right. Now up to three, four, five, whatever sizes that
you choose to use in your drawing is just
completely up to your style. I tend to use the
smaller sizes A, but I am challenging myself to work with some
of the bigger ones. We'll see what I decide
to do in today's. This is all the way up to eight, which gives you a
nice bold line. Then last one is this graphic one which I
don't really use for dots, but it is great if I want
a boulder outline or to color something in just
a little bit with black. I'm just going to
do a line there. This is our little key just showing all of the different
marker sizes that we have. All right, the next
thing we want to do is grab your pencil and
then I'm just going to draw a couple different
boxes that we're going to use to practice
some different techniques. You can really draw whatever
shape that you want to. You'll probably want about six boxes or maybe a
little bit more, depending on how much
you want to practice. I'm just going to draw a
couple of these real quick. Does not have to be
perfect in any way. All right, now we are
going to work through some different stifling
techniques and processes. You can just work, however
works best for you. I want to share some
different options. I am going to start
with this three size. It's a good idea to try out some different sizes as we go, especially if you
are newer to this. I'm going to be probably trying a different size in
each square that we do. But in our first
two squares here, we are going to practice working
from both light to dark, and then from dark to light. It is totally up to you
which way you want to work. I typically work
from dark to light just because I like
starting with those darker, more concentrated areas with
the dots and then being able to just disperse them
into the lighter areas. But it is going to be
how it works for you. And sometimes it does depend on the subject matter and the
area that I'm working on. In this first square here, we are going to go from light at the bottom up to
dark at the top. I am going to start with
the lighter areas here. You're just going to start placing some
different dots here. And you can start out with them as far apart
as you would like. Then it will also
depend on your style, how you want to do your dots. You can make them as absolutely regular or random as you want. It will just depend on
what feels best to you. Once you get about a
third or a halfway up, you're just going
to start decreasing the distance between
each of your dots. That is what I am doing here. And then keep going up
and then do it again. Just get those dots a
little bit closer together, closer that you get to the top. I am showing this to
you in real time. I will let you guys know before I speed any of my videos up, just so you can get an idea of the real speed that
I'm actually working. Speed is another
one of those things that it's totally
up to your style. You can be as incredibly meticulous and
slow as you want to be, or you can work
randomly and quickly. Again, for me, it depends on the subject matter
and how I'm feeling. Like I work at an average
pace, totally up to you. And just depends how much
you've practiced as well. You can see our dots are getting closer and
closer together. I'm just running back and forth. That's how I do it in
the box like this. Again, you can make this
as dark as you want. You can make this go
to just absolute black at the top if you want to. I'm not going to
go quite that dark for this just
because it will add quite a bit of extra time to get that really,
really dark look. All right, that
gives you an idea of working light to dark. All right, now for
the next square here, we are going to
work from dark at the bottom to light at the top. I'm actually going to
start with this graphic, one at the bottom, to create this dark
line to just show where we're starting and give
us a real dark spot. I am going to use the
eight pen for this one. When you're working
from dark to light, you are starting with your
dots real close together. If you want it really dark, you obviously don't
have to start it as dark as I'm doing it here. But I just want to show you as many varying different
options as I can. That again, if
you're a beginner, you can find whatever style you like and what
feels best to you. If you are a beginner,
you might want to do like three times the amount
of boxes on your sheet just to try out different sizes and everything before
you actually get started on your official Orca. Today. As you can see, I am keeping these dots
very close together, that really dark edge. Then as I go up, I am starting to give them a little bit
of breathing room. Just starting to disperse
them a little bit. Again, when you're
actually working on a subject matter or you're
following a reference image, how quickly or gradually you disperse the dots is just going to totally depend on
what you're working on. We are pretty much
just simplifying it down as much as we can to do these practice
little squares. Again, here we are, opening
it up a little bit more. You can already see how
big of a difference is, just using the two different
pen sizes and seeing how that plays with the
effect as well. I also highly recommend
that if you're new to this, like look up some different
stipling artists and just study how people apply these techniques into
their own unique artwork. There are so many
cool artists out there doing very
different things with the same techniques as pretty much it is
with any art medium. But this is my favorite. I love looking at it. All right, and here we
are almost at the top, really spreading it out. All right, and there we go. That is, working in light to dark and then from
dark to light. All right, the next technique
I want to explore is whether or not you want to work with an outline
to your piece. Again, my personal choice is I love to outline the elements
that I'm working on. I just think it makes it pop and gives it a little bit of
a more bold look to it. But it is also
totally up to you. You can just use the dots
as your border and that gives you this really nice
airy look that I also love. It's just not how I choose
to do my illustrations. I am going to use these two to show the difference between the two and we can
explore that a little bit. I'm going to choose the four pen to do the outline
on this first box. Again, this is where you'll want a more defined
shape to work with. But if you want to work
with a circle instead or a triangle or who knows what else, that is totally up to you. For me, working
this way makes it feel like more of like
a coloring book page. Like you're just coloring in the dots and you already
have that border. I guess that's just how
I like to work for this. I'm going to do it a
little bit differently. I'm going to work from dark in this corner to light over here. I'm going to stick with
the same pen size as I go. Again, starting with those dots, nice and close together. We're just going to work
it diagonally this time. All right, for this next part, I will speed it up a little bit just so you guys don't
have to watch me do every single.in real
time on this square. All right. There is
kind of a reference for doing your stipling with an outline doesn't
really change how you work. It just gives you that kind of ink bounding box versus just those pencil
sketches that you have. Now let's move on to
working without an outline. All right? When I'm working
without an outline like this, I actually still like
to create an outline, but I just do it with dots instead of with a
solid line like that. We are pretty much just going to do the exact same thing in this box just with no outline. I am going to use the
five size for this. What I am going
to do is start in the corner and then
just space these out just to give
us a rough idea. Where we are going with this. I'm actually just
going to do those two sides just because this is our darker corner
and this is where it's going to get
lighter over here. Again, we're pretty
much just going to do the exact same thing
that we just did there. We just don't have
that dark outline. I feel like this is one of the techniques that
you don't totally appreciate as much until you actually see it on
a subject matter. I will see if I can find
some examples that I can add in here to show you guys a little bit more of
what I'm talking about. Again, as you can
see, I'm really just not focusing on
perfection at all. We are just practicing
techniques, getting a feel for them and everything and see
where it's lighter. You probably won't have more of an exact outline
like we did over here that I feel like part of the magic
of the whole thing, I'm going to give
that a second to dry and then I'll
erase the pencil line. And I feel like that gives you a better idea of this
technique as well. I will say as a quick note, be mindful of erasing
when you're inking, especially on marker paper. Just because marker paper allows the ink to
sit on the surface, wet a little bit longer
than a regular paper, that would just suck
that up immediately. You want to give it a little
bit longer to dry before you erase because you can end up
smudging what you've done. You really don't
want to do that, which is part of the reason I outline inc usually and then I erase all of my pencil lines before I go in and
actually do my dots, but I will talk about that in
our other lessons as well. Hopefully it has
been long enough. And again, it's just a practice. So if I end up smudging it, it is not the end of the world. I waited long enough
so we are all good. Not quite use this, you get the eraser shavings off, but as you can
see, you can still see that I've
created a box here, but you don't have that heavy outline like
I do right here. All right. The last technique
that we're going to get into in our last boxes here is actually using various
marker sizes in the same area as you saw as I did each
of these boxes here, I just stuck to one marker
size the whole time. Varying different sizes can create different
textures and give you a little bit more flexibility in creating lighter areas
and more fine details. Typically, when
I'm illustrating, use lots of different sizes
throughout the piece. For this first box here, I'm going to go ahead and
start with an outline again. And since we are doing orcas
as our subject matter today, they are generally all black and they have
some white areas. So I'm going to start
with this bold outline. Again, this is not
about being perfect. I know that's not beautiful, but I am going to start with this eight bold marker again. And I'm going to
work from dark at the top down to
light at the bottom. But instead of just using more space between my
dots and dispersing them, I'm actually going
to be switching to smaller pen
sizes as I go down. And again, this is one that
you'll kind of see and understand more as we actually get into our subject matter. All right, so I've done the eight and now I'm
going to go down to five and start dispersing some of those in
here in the middle. You will have to go up
in there to put some in, because if you just have a
line where you switch it, makes it pretty obvious. Although sometimes
making that obvious line is part of the texture that
you're trying to create. Again, depends on what
you're working on. Oops, I smudged a little bit of it in the corner role
isn't quite dry yet. All right, But now I've been
dispersing the five and you can see the
size differences. Then you go all the way
down to the one size, start dispersing those in there. What's cool about this technique
is that you'll see for most of this I'm actually not dispersing my
dots all that much. But because the dots are becoming smaller and I'm
using a much finer tip, it is giving the impression that we are creating a lighter area. That's one example of using varying pen sizes to
create different effects. See, I'll do one more in this
last square here as well. All right, that's
another precursor to what we're going to
be working on today. Great outline here. Then I'm just going
to randomly put a line in here on this
side of the line. I'm going to keep it with
the bolder, bigger dots. Then on this side,
we're going to shade it with just lighter dots. I'll show you difference
there of how you can use varying sizes on
two different areas instead of like dispersing it to color one object or
to shade one object. I will speed this up a little
bit for you, so again, you don't have to watch every
second of it in real time. All right, so I just created this like totally
arbitrary shape, kind of left it
darker at the edges, lighter in the middle. And then we are just going
to go down to the three, and this area here, all right there. As you can see, this is a great way to show
different areas of maybe different colors or
different textures by using different pen sizes to highlight the differences
between those elements. And that is definitely
something that we are going to be using today. Again, if you're new to this, I recommend probably doing
a couple more boxes, playing around a
little bit more. But in our next lesson, we will get into sketching
and outlining today.
13. Sketching & Outlining: Okay, once you've practiced
and feel good about the different
techniques and what you might want to use to
actually ink your Orca. It is time to get into
sketching and outlining. As you can see here, I have
my finish flash sheet, I have my sketch
all ready to go. If you want to participate
in the full project, I have this sketch uploaded
in the project resources. You can just completely trace this entire design if you
want to follow along with what I'm doing or just take a couple minutes to either use the reference photo that I've provided here or a
different reference photo of an Orca that you might
want to do for today's class. Um, as I mentioned, I usually use my four H
pencil to do the sketch. I did it a little bit darker here so that you guys can see. But I have my Orca
all laid out here, so I'm just going
to be getting right into inking the one that
is on my flash sheet. Once you've established
your sketch, as I mentioned, I'd really
like to outline my piece. I am going to go ahead and
get right into that outline. You can also not do an outline if you want and
just do at outline. The only thing with doing
a dot outline is you have to think ahead and think
about what size pen you want to use to actually
do your dots because you want to use that same size
to do the outline. But I'm just going to start with a simple just black outline
around the whole thing. I am, I do want to do this
one a little bit bolder, saying I'm going to go
with five for the outline, so you can really just start
wherever that works for you. Start right here. I'm also going to outline the fins here. And you can go back
and find that later. And you can be as detailed or simple with your
outlines as you want. It is totally up to
you in your style. All right, there we have
our basic outline and I'm going to grab an eraser and start erasing some of
those extra lines. Now remember to wait a couple seconds
to let your ink to dry before you get to racing, especially on your final piece. But this is Bristol paper, so it absorbs a little
bit faster than that marker paper does.
I should be good to go. I'm going to start
by eliminating all those outlines
that I had done. I'm still going to use some
of the ones where that indicates the different
parts of the Orca, like the black and white areas. Again, I would have
drawn this so, so so much lighter if it didn't matter if it showed up on screen for you all. Again, using my brush to get rid of all of those eraser shavings. All right. And then I
do also want to add in, I'm going to do that
a little bit smaller. I'm just going to leave
that simple right now and we'll go back
and add that in. But then I'm also going
to add the border between the dark areas and the
white underbelly here. In some areas that's
a solid line. I will treat it just like an outline like
that, but you again, could just do dots along
that edge if you want to adding that in. And then again,
it's still pretty, pretty clear solid line, throw in a couple dots
just to soften that up. I did switch to the three
size here just to make it a little bit
smaller, not so thick. All right, and then we have
some areas on the tail here. Actually I'm just going
to leave that there's some black right
around the edge here. But I'm going to do
that in dots and I'll start working on
that in the next lesson. As here, this is a harsh line, but then this is
just a dot outline. I'm going to leave
that for the moment, but then this is a pretty
clear outline as well. Again, I'm going to
give all of that a couple seconds and then
hit it with the eraser, and then we'll be ready to
get into our next lesson.
14. Inking: All right, it's time to get into inking and actually
filling in our Orca. Today in this
series I mentioned, I'm making the classes go from easier to more difficult
as we go along. We started with these jellyfish, which is just some
simple gradients. They're a little bit lighter.
Then the reason I did Orca as a second one is because basically there's
just two parts to it. Either the very dark area
and then the white area. That will just require a
little bit of shading. The first thing that we're
going to start with here, as I mentioned, I like
to work dark to light, but totally up to you, you could do the opposite
and start with all of the white parts here
and everything. The first style choice
that you can make is you can either fill in
the entire dark area with dots or you can use
your thicker marker to just color in a little bit
of it so that you have that couple areas that are
just the absolute black. I think that that is actually
what I'm going to do. I'm going to probably
start with this fin up here just because we can section it off and treat it as
its own little area. Before we get into
the full body here, looking at the reference image, it is darkest at the top. What I'm going to
do is just fill in just a little bit at the top so that it's
just all black. Then we're going to
get into dots for, I think pretty much all
of the dark body here. I'm going to use this five size. We'll get into that then again, because we're treating this
as like being cut off here. You can even draw a little
pencil line just to give yourself a little bit more
reference. Totally up to you. But I'm going to start up here keeping those dots
really close together because we don't want there to be a harsh line where
you see that colored in black area getting
into the dots, keeping them very close together and keeping
it nice and dark. Then it's also at
the bottom here. I'm just going to create
that dot border there. That is going to be the boundary for where
we are inking this fin. So you can see I've kind
of got the two ends here, and then I'll pull them closer together and kind of
meet in the middle. I'm excited, I
actually haven't inked an Orca in a very long time. I'm excited to be
working on this. And this will be something
new I can add to my portfolio and create some different things
with that I'll be sharing in our
last lesson today. All right. It looks like it's
latest around right here. It's going to keep it
pretty dark in the middle. The other thing that's easy
about Orcas here is that you're basically just worried
about creating gradients. Orcas don't have
any crazy texture like sea shells do or some different tropical
fish or sea horses do. That's another reason why it's towards the beginning
of this series. It's a little bit simpler if you're new to this technique. All right, and then go
into this lighter area. All right, we have pretty much finished our
first ill area here. Shu can see it is
certainly like it does look a little
bit harsh at the top. So I'm going to pull that
darkness down just a little bit more from where we just color
that area in the all black. All right, we have done our
first little fin there. Now that we've done that
little top dorsal fin, as a little warm up here, I am going to do these
two fins up here. As you can maybe tell, I
like to break up my work into different areas and makes it feel a little bit
more manageable, especially if I'm
working on something quite a bit bigger
like this Orca here. I'm going to start with
this one down here. Again, you can choose to
color a little bit of it. You have a few less to fill in. I'm just going to do that there. And then go back
in with my five. Then this one looks like the lightest areas
are around here, but it is pretty dark. Since it's underneath the Orca, you can go as quickly
or take your time as much as you want with this. This is pretty much the speed
that I do most of my work, but sometimes I do slow
it down a little bit more if I want to be a little bit more meticulous
with what I'm creating. And also if I'm working
on an area, like I said, that has more texture than
I'm trying to create. Whereas I'm just
creating flat gradients, it's a little bit easier
just to vary the distance between my dots and create
those light and dark areas. We'll speed this up a little bit here while I finish this fin. All right, and then that
is another fin finished. Now we are going to let that dry for a second so that I don't smudge it with my hand as
I get into the next one. All right, now let's
get into the other fin. So you can see I kind of
saw my outline there, although that fin actually
kind of comes up like this, where it actually attaches
to the orcas body. Again, I'm going to start with
my pen to do a little bit of filling in here. Looks like the darkest spot. Then actually the darkest
spot of the whole Orca is right around here
and bordering this fan. I'm not going to color
in any of the areas here because we'll have that
contrast over here. When we get to more of the
body going back in my five dispersing from that
darkest area there, I find just the best
way to go about it written and I'm just
going to leave it there. And then we'll
connect that in as we start to work on
the rest of the body. Now I'm just going to go
in with the fin again, it looks like darkest
around down here. That's where I'm going to start. A couple more dots over there, leaving this area a
little bit more open. I think I might fill it in with a smaller size pen just to give the top of
that fin a highlight. As you can probably
tell if you're working off the same
reference image. I'm making the lighting
a little bit more dramatic than it
is in that photo. Just stylistic choice for me
and how I like to do things. You can follow a reference as religiously or as loosely
as you choose to. All right, there
is the other fin. All right, now let
me finish the fins. My next thing is to keep chopping this up into
more manageable portions. I'm going to start
down here at the tail where it's darker and do
this whole area here. There is a little bit of a border here that
I didn't sketch in, but I'm going to do it with
dots for the most part. This part of the
tails out like this then look something like that. Now that we've
created that border, we can go in and again create
those darkest areas here. It's going to be a
little bit different because it's not
going to be an edge. I'm just going to create
a little bit here. Again, you don't have
to do this at all. If you don't want to, you
can stick to all dots. This feels like shortcut
but I wouldn't. You want to shortcut sometimes? All right, those
are my dark areas. Then again, back to the five, there's a high light along
the top of the Orca here because that's
where the light is coming down in the ocean. Then it's real dark underneath. I'm going to start there and work a little bit lighter
along the border here. And again, make
sure you don't drag your hand through your fresh ink and ruin your original drawing. All right. Kind of filled
in the bottom here, but I'm going to go in and
kind of create a little bit of border stuck in that up a little bit and then continue
up in this area here. Right, a little bit more then. Don't be afraid to go back
in if you don't like. If something like I feel like down here is not
quite dark enough, I'm going to go right back
in and add some more dots. Close those gaps a little bit. Sometimes you need to do it to smooth it
out a little bit. You end up with like
a little bit of a harsher line than
you anticipated. It needs a little, a
little extra love. Again, just be conscious
of not going back in and putting your hand right
over all that wet ink. While it's still drying, I already feel like I was dispersing these dots
a little bit too much. I want to keep it
pretty dark for like this whole area in here. Again, definitely easier to go back in and add more
dots to make it darker. You can't really take the
dots away to make it lighter. Always better to go in a little bit lighter
at the beginning, and then you can always
darken it up a little bit. Sometimes you just got to step back for a second, take a look. See how it's looking. Again, I still want it
a little bit darker. Also, totally, like I said, challenging myself
with this piece to use a bigger pen size. I feel like usually I'm crazy. And I would have
gone in with one or two to do all this dark area, which you can totally do. It gives it a different look. But I'm trying out to see if I like a little
bit of a bolder style. Again, if you're very
new to this technique, you do a couple different orcas and do them all differently. It's crazy how just some
small subtle changes make such a big difference. This is the point
where it's setting in of how large I
decided to do this. Orca, what was I thinking? That's okay. Always good
to challenge yourself. It's actually how I
started stippling. Instead of doing little
stippling doodles, I actually did this really big. I think it was 14, 17 inch mermaid piece. That was the first piece
I had done all in dots. It took me a months and
months and months to finish. But that is just
how I like to roll. Once I learn a new skill, I pretty much see how
far I can take it, which is sometimes
very rewarding and sometimes
extremely frustrating. All right, now, before
I keep going this way, I'm going to keep
going up a little bit. Again, this is where there's
a high light at the top. I think I'm going to stop with this size dot as it gets
a little bit closer. And then I might go
down to the three size, but I think I might
wait till the end, until I've done all
of this to decide how I want to approach the lighter highlight area. All right. I think I'm going
to take a break from this section and go in a little bit over here and kind of keep
pushing towards the middle. Bigger darker area A right. Then for the head here, the eye is pretty easy. I'm just going to go
in and color it in, but leave enough room for a
little bit of a highlight. Then if you accidentally
color it all in, you can always go
in with a touch of white ink to add there. All right, now it looks like it's like nose and where its
mouth is is the darker area. Fill that in there. I'm actually gonna
add a little bit of a boulder outline up top too. All right, let's fill that in. Something is one of
those things too. You sort of have to
step away for a second, look a little bit further away before you
get back into it. If you've been doing
it for too long, you get too close, and sometimes you
just need a step back to see what you're doing. All right? And that's
up to you kind of how far you want
to take it over. I think I'm just going
to kind of go to the end of this white spot. All right. So we kind
of finish the head. And now maybe we'll swing
around to this area over here. All right, And it's a little
bit lighter through here, although not too, too much. Okay? You can make those subtle changes as
dramatic as you would like. Now, this white area blends
like super seamlessly into the black along this edge to keep it pretty light
and spaced out here. And then we can always come back in again and
make it darker. Then here's where it gets darker again, right
at the bottom. All right, so now
we almost met in the middle and I'm going to go in and color in a
little bit there. We'll get into that. All right. As I mentioned, we're
working on the fins. This area right here is
where it is particularly dark in the center
of the Orca. Here. I am going to again start with boulder pen
to fill that in. Again, you can fill in as big or small of an
area as you want. You can also not
fill it in at all. Keep the edges of this kind of loose so it's easier to
go back in my thoughts. But I'm going to have this
as my dark area here that a second to dry and once again we'll be back at
it with our five pen. In the meantime, while I can
keep my hand out of the way, I'm going to go up here and this white area
fades out a little bit. So I'm going to do
it with this size. And then I'm probably
going to go in with a smaller size and fine
tune that a little bit. But now let's get into
this darker area. I think I'm going to
go down here first, and then I'll start on
this larger area up here. One of the challenges
with having an area like this filled in is
just smoothing out the area at that line and
making sure you don't have a harsh edge where you
can really see where you stopped completely filling
in versus doing dots. I think I've smoothed it
out pretty well there to keep working this way. All right. Now I'm going to try over here and then
go back and forth. Sometimes it just
helps to just break up where you're working
on it if you have a big area to cover so you
don't get too frustrated. Also, take plenty of breaks
if your hand gets tired. This can be exhausting. I'm pretty used to it
at this point, but. I'm going to take a couple
minute break for my hands. I will be right back. All right, got a couple
minute break from my hand. And now let's get into finishing this last
bit here that's dark, and then we'll get
into the lighter areas which shouldn't take
too long at all. So I'm going to finish up here. There's a darker area,
a darker streak. All right. We are almost there. I know this is a long process, but that is actually the
reason why I love it. I feel like taking a flat
surface and then creating something kind of
come alive with dots is almost even
more satisfying than, you know, layering
paint markers or colored pencil or
whatever it might be. Just I don't know,
there's something I just love about this technique. All right, so we have pretty much finished the
hard parts here. Now we're going to do a,
there's a little bit of black on the tail and then we
will get into the rest. All right, let's get
into the last bit here. So there is some black border along the tail that we're
going to fill in first before we get into shading
the white parts of the cat again with a
filling in a little bit. And then fill in
the rest with dots. Oops, again, I almost smudged, so another reminder
to pay attention. And there's basically just
kind of a small border here. I'm just going to leave it
as a dot border just because it also doesn't have like
a super regular border. Gives it more of
an organic look. All right, and that is our
last bit of darker area here. Now as we get into the white, this is another
area where you can make a big stylistic choice. One of the ways you
can do this is you can continue to use the
same marker size. For example, I use
this eight or five the entire time
coloring in the black. You could use that same size to do the white
areas, just again, space them out a lot to give the impression of
that much lighter area. Or you can choose to move
into a smaller pen size, which is what I'm
going to choose to do. I am going to move down, I think all the way to the one just to really show kind of how light this area is compared to the black areas
of the animal. I'm going to start with
the tail because that is actually the area
that's most shaded. That's the white area. I'm going to start
up here again. This is going to look
so different than what we've been working with. These areas are
going to be pretty quick just because they require a lot less docs than all of the areas
that we just did. But again, that doesn't
necessarily mean to take as much time as you need to, right? You can see that was so
much quicker just to create some easy
light shading here, But makes a huge difference
in that final piece. Now we're just going
to shift over. Do the rest of the animal
going to start with this spot, I should say? That's pretty much
all we need there. Now I'm going to go down into this area where it's a little
bit darker around here, and the highlights are up
along this border here. Again, you don't
necessarily have to have gone this small. If you want to move
down a marker size. I almost went with three, but I wanted to make
it really dramatic. I went all the way down to this one just to show
you the difference. A great and then shifting
over underneath here, This is another area
that's definitely darker but you
definitely don't have to make it too too extreme. All right. And then again, careful not to smudge that as we move
on to the next spot. We are going to go up here. I'm going to work in
a little bit with the border just because
as I mentioned before, this is one area where the
border is not super defined. I want to play into
that for sure. All right. And then
just this last area over here. All right. And I think that about does it, we have finished inking
our full Orcha here. Yours might look totally different depending on
what style you went with, But I'm super happy with
what I created here. Now I will get into some tips for how to monetize
what we've created today.
15. Final Thoughts: Thank you so much for following along with today's course. I hope you had fun and
learned some new ink and stipling techniques that you can apply to your own
creative practice. I hope you stick around for the full series and complete
the entire project, creating a flash sheet
of marine life together. And don't forget to upload
your class project to the gallery so we can all see the progress that
you've made. All right. As I promised, I wanted to get into some tips about how to monetize the artwork
that you created in today's class and
throughout this series. Unlike the old days where
if you were an artist, you are selling
original paintings or drawings or whatever it might be in galleries and splitting that money with
them and everything. There are so many
different ways to make money as an
artist these days. One of the big ways that I
make a living as an artist is selling my work through different print on
demand platforms. What this means is you
have your artwork, you take it, digitize it, and upload it to different platforms like
Red Bubble Society, six public, and there
are tons and tons more. You are able to customize how your artwork looks on
different products. You can create
different color ways and customers can order
different products. Those companies print
the products as they're ordered and you collect a royalty
for those sales. It's great because you
don't have to hold any inventory and
you don't have to deal with the customer service or anything that comes
along with all of that. It's great to be able to
just keep being creative, creating more work and just uploading it and
doing some promotion. For example, the tapestry behind me is actually one that
I ordered from society. Six, all of the seashells and starfish and everything
on this piece are ones that I pulled off a flash
sheet that I created in 2019 of all of these different mermaid
and ocean themed elements. I pulled off all of these
different seashells. I turned it into
this pattern and I have it in tons of
different color ways. It is actually the best selling pattern that I've ever created. And creating seamless
patterns like this is another big part of being on
print, on demand platforms. I know we just inked one
Orca in today's class, but you can use those
skills if you want to ink a bunch more and create
some different patterns. Or you can just
use the one piece that you've created today. At the end of this whole series, I'm actually going
to be showing you all the different
things that you can do with your flash
sheet as a whole, but there are lots of
different things you can do. In the meantime, with
some of my artwork, I do things like creating
stickers with it. You can always sell
prints as well, or just upload that
single Orca image to these different platforms. Stay tuned through the
end of the series. As my last course,
I will share lots more info on what you can do with the artwork
that you've created. And I will be sharing some more tips along
the way as well. So thank you so much
for joining me and keep an eye out for the
next course in this series, we will be talking about
Dolphins and Sharks.
 Elizabeth Weglein, Artist and designer