Transcripts
1. Introduction: Dyeing can be a fun way to add
personalisation to our clothing I am Harshavardhan and this is
my wife Cloudia Join us in this class where we explore natural indigo dying. we will dye commonly used clothing items like T-Shirts and Scarfs. We will be starting
with the basics from the extraction of indigo
and how it works, the correct vat making process we will learn the
resist techniques, with some tips and
best practices. we will also explore a resist
method that allows you to add custom
design to a tshirt, which will be great for gifting. Apart from personalization, Indigo dyeing can
be a great hobby. All the lessons are beginner friendly and you can
get started right away. Watch now and personalize
your clothing.
2. Indigo and its extraction: Indigo needs to be understood properly before we get to die. In this video, let's take a quick look at some of
the basics of indigo. Indigo is a naturally occurring
chemical compound that is found in the leaves of a plant called indigo Farah tectorial. It is an oldest
dying method that dates back to around
4 thousand years ago, used in the Indus
Valley civilization and the Ancient Egypt. In ancient times, evidence shows indigo that was
extracted from snails, give it a bromine
component which resulted in purple and
red sheets of indigo. Other studies suggest
that in the code was used in many other
parts of the world, making it a widely
known technique for dying in various cultures. Indigo for writing
Doria group best in hot climates and need
a lot of sunlight. They are sown and
harvested after 90 days. The produce is collected
and put in a water tank in a ratio of one parts are
produced to ten parts of water. Wooden poles are used to exert pressure and to immerse
the produce underwater. This is allowed to ferment
for about three days. The color of the water
changes to green. This liquid is collected
in a different tank. This liquid is edited by using
paddle wheels to oxidize, or in other words, mixed with oxygen to produce
a blue colored liquid. After vigorous agitation, the oxidation process stops and the liquid is
allowed to settle. The top layers of the
liquid is drained to reveal blue sediment which is deposited at the
bottom of the tank. This sediment is collected and boiled in a
couple of boiler to reduce moisture and to kill microbes to stop
further fermentation. Now, it is pressed to
remove excess water. Indigo may be pressed into
moles to form blocks, or it is simply sold
in powdered form. In this video,
let's look at some of the basics of an indigo vat. Is a tank or a system
for dyeing fabric. In this case, it's
an indigo vat. Vat dyes like indigo, or not soluble in water, and alkaline or basic
medium is required. In this case, we use
sodium hydroxide or light. Fructose or fruit sugar is
added as a reducing agent. The role of a reducing agent is to remove oxygen
from the wet. This turns the insoluble
indigo into leuko indigo. The color of the rat changes
to an amber green color. When a fabric is immersed in
this wet and let you try, it comes as a green color. It consists of oxygen. The oxygen molecules in the air react with the leuko
indigo and oxidizes it. On oxidation, indigo gradually
shows the blue color. After it turns blue, it is converted back to indigo, making it water insoluble. Again, that's interesting. We saw how indigo
gets its color. But what about the
shades of indigo? How do we achieve dot
and light sheets? The solution to this lies on how indigo binds to the fabric. Indigo binds to the
fabric physically at a microscopic level without
forming chemical bonds, the weekend get dark
colors by layering indigo. By increasing the number of
depths into the bladder. A dip is calculated
from immersing the fabric into the
rat and removing the fabric from the
wet and letting it oxidize for a while and
finally washing the fabric. We will learn more
on this later. These swatches explain
the color intensity based on the number of
deaths indicated on the top. The left side shows one dip. On the right shows stand-ups. This shows how number of depths affect the intensity
of the shade.
3. Working of indigo: Indigo needs to be understood properly before we get to die. In this video, let's take a quick look at some of
the basics of indigo. Indigo is a naturally occurring
chemical compound that is found in the leaves of a plant called indigo Farah tectorial. It is an oldest
dying method that dates back to around
4 thousand years ago, used in the Indus
Valley civilization and the Ancient Egypt. In ancient times, evidence shows indigo that was
extracted from snails, give it a bromine
component which resulted in purple and
red sheets of indigo. Other studies suggest
that in the code was used in many other
parts of the world, making it a widely
known technique for dying in various cultures. Indigo for writing
Doria group best in hot climates and need
a lot of sunlight. They are sown and
harvested after 90 days. The produce is collected
and put in a water tank in a ratio of one parts are
produced to ten parts of water. Wooden poles are used to exert pressure and to immerse
the produce underwater. This is allowed to ferment
for about three days. The color of the water
changes to green. This liquid is collected
in a different tank. This liquid is edited by using
paddle wheels to oxidize, or in other words, mixed with oxygen to produce
a blue colored liquid. After vigorous agitation, the oxidation process stops and the liquid is
allowed to settle. The top layers of the
liquid is drained to reveal blue sediment which is deposited at the
bottom of the tank. This sediment is collected and boiled in a
couple of boiler to reduce moisture and to kill microbes to stop
further fermentation. Now, it is pressed to
remove excess water. Indigo may be pressed into
moles to form blocks, or it is simply sold
in powdered form. In this video,
let's look at some of the basics of an indigo vat. Is a tank or a system
for dyeing fabric. In this case, it's
an indigo vat. Vat dyes like indigo, or not soluble in water, and alkaline or basic
medium is required. In this case, we use
sodium hydroxide or light. Fructose or fruit sugar is
added as a reducing agent. The role of a reducing agent is to remove oxygen
from the wet. This turns the insoluble
indigo into leuko indigo. The color of the rat changes
to an amber green color. When a fabric is immersed in
this wet and let you try, it comes as a green color. It consists of oxygen. The oxygen molecules in the air react with the leuko
indigo and oxidizes it. On oxidation, indigo gradually
shows the blue color. After it turns blue, it is converted back to indigo, making it water insoluble. Again, that's interesting. We saw how indigo
gets its color. But what about the
shades of indigo? How do we achieve dot
and light sheets? The solution to this lies on how indigo binds to the fabric. Indigo binds to the
fabric physically at a microscopic level without
forming chemical bonds, the weekend get dark
colors by layering indigo. By increasing the number of
depths into the bladder. A dip is calculated
from immersing the fabric into the
rat and removing the fabric from the
wet and letting it oxidize for a while and
finally washing the fabric. We will learn more
on this later. These swatches explain
the color intensity based on the number of
deaths indicated on the top. The left side shows one dip. On the right shows stand-ups. This shows how number of depths affect the intensity
of the shade.
4. Indigo resist methods tying: A whole different
patterns can be achieved through simple
resist techniques. Direct assistance
can be achieved through mechanical
and chemical methods. The mechanical resist methods that we will be exploring are paying stitching and using
objects as blocks to mask. Let's begin with a simple
time method to illustrate. I have taken a square
piece of fabric. I'm going to use accordion
folds to fold this fabric. I'm using clock flips to temporarily Foster
and the fabric. Now I'm loading the
fabric from one, moving the clips and necessary. Once I complete the rolling, I use clip again
to free my hands. Now I use it to tie
around the rule. I'm making a few notes here. Make a final note
before I cut the twain. We get a rule piece of
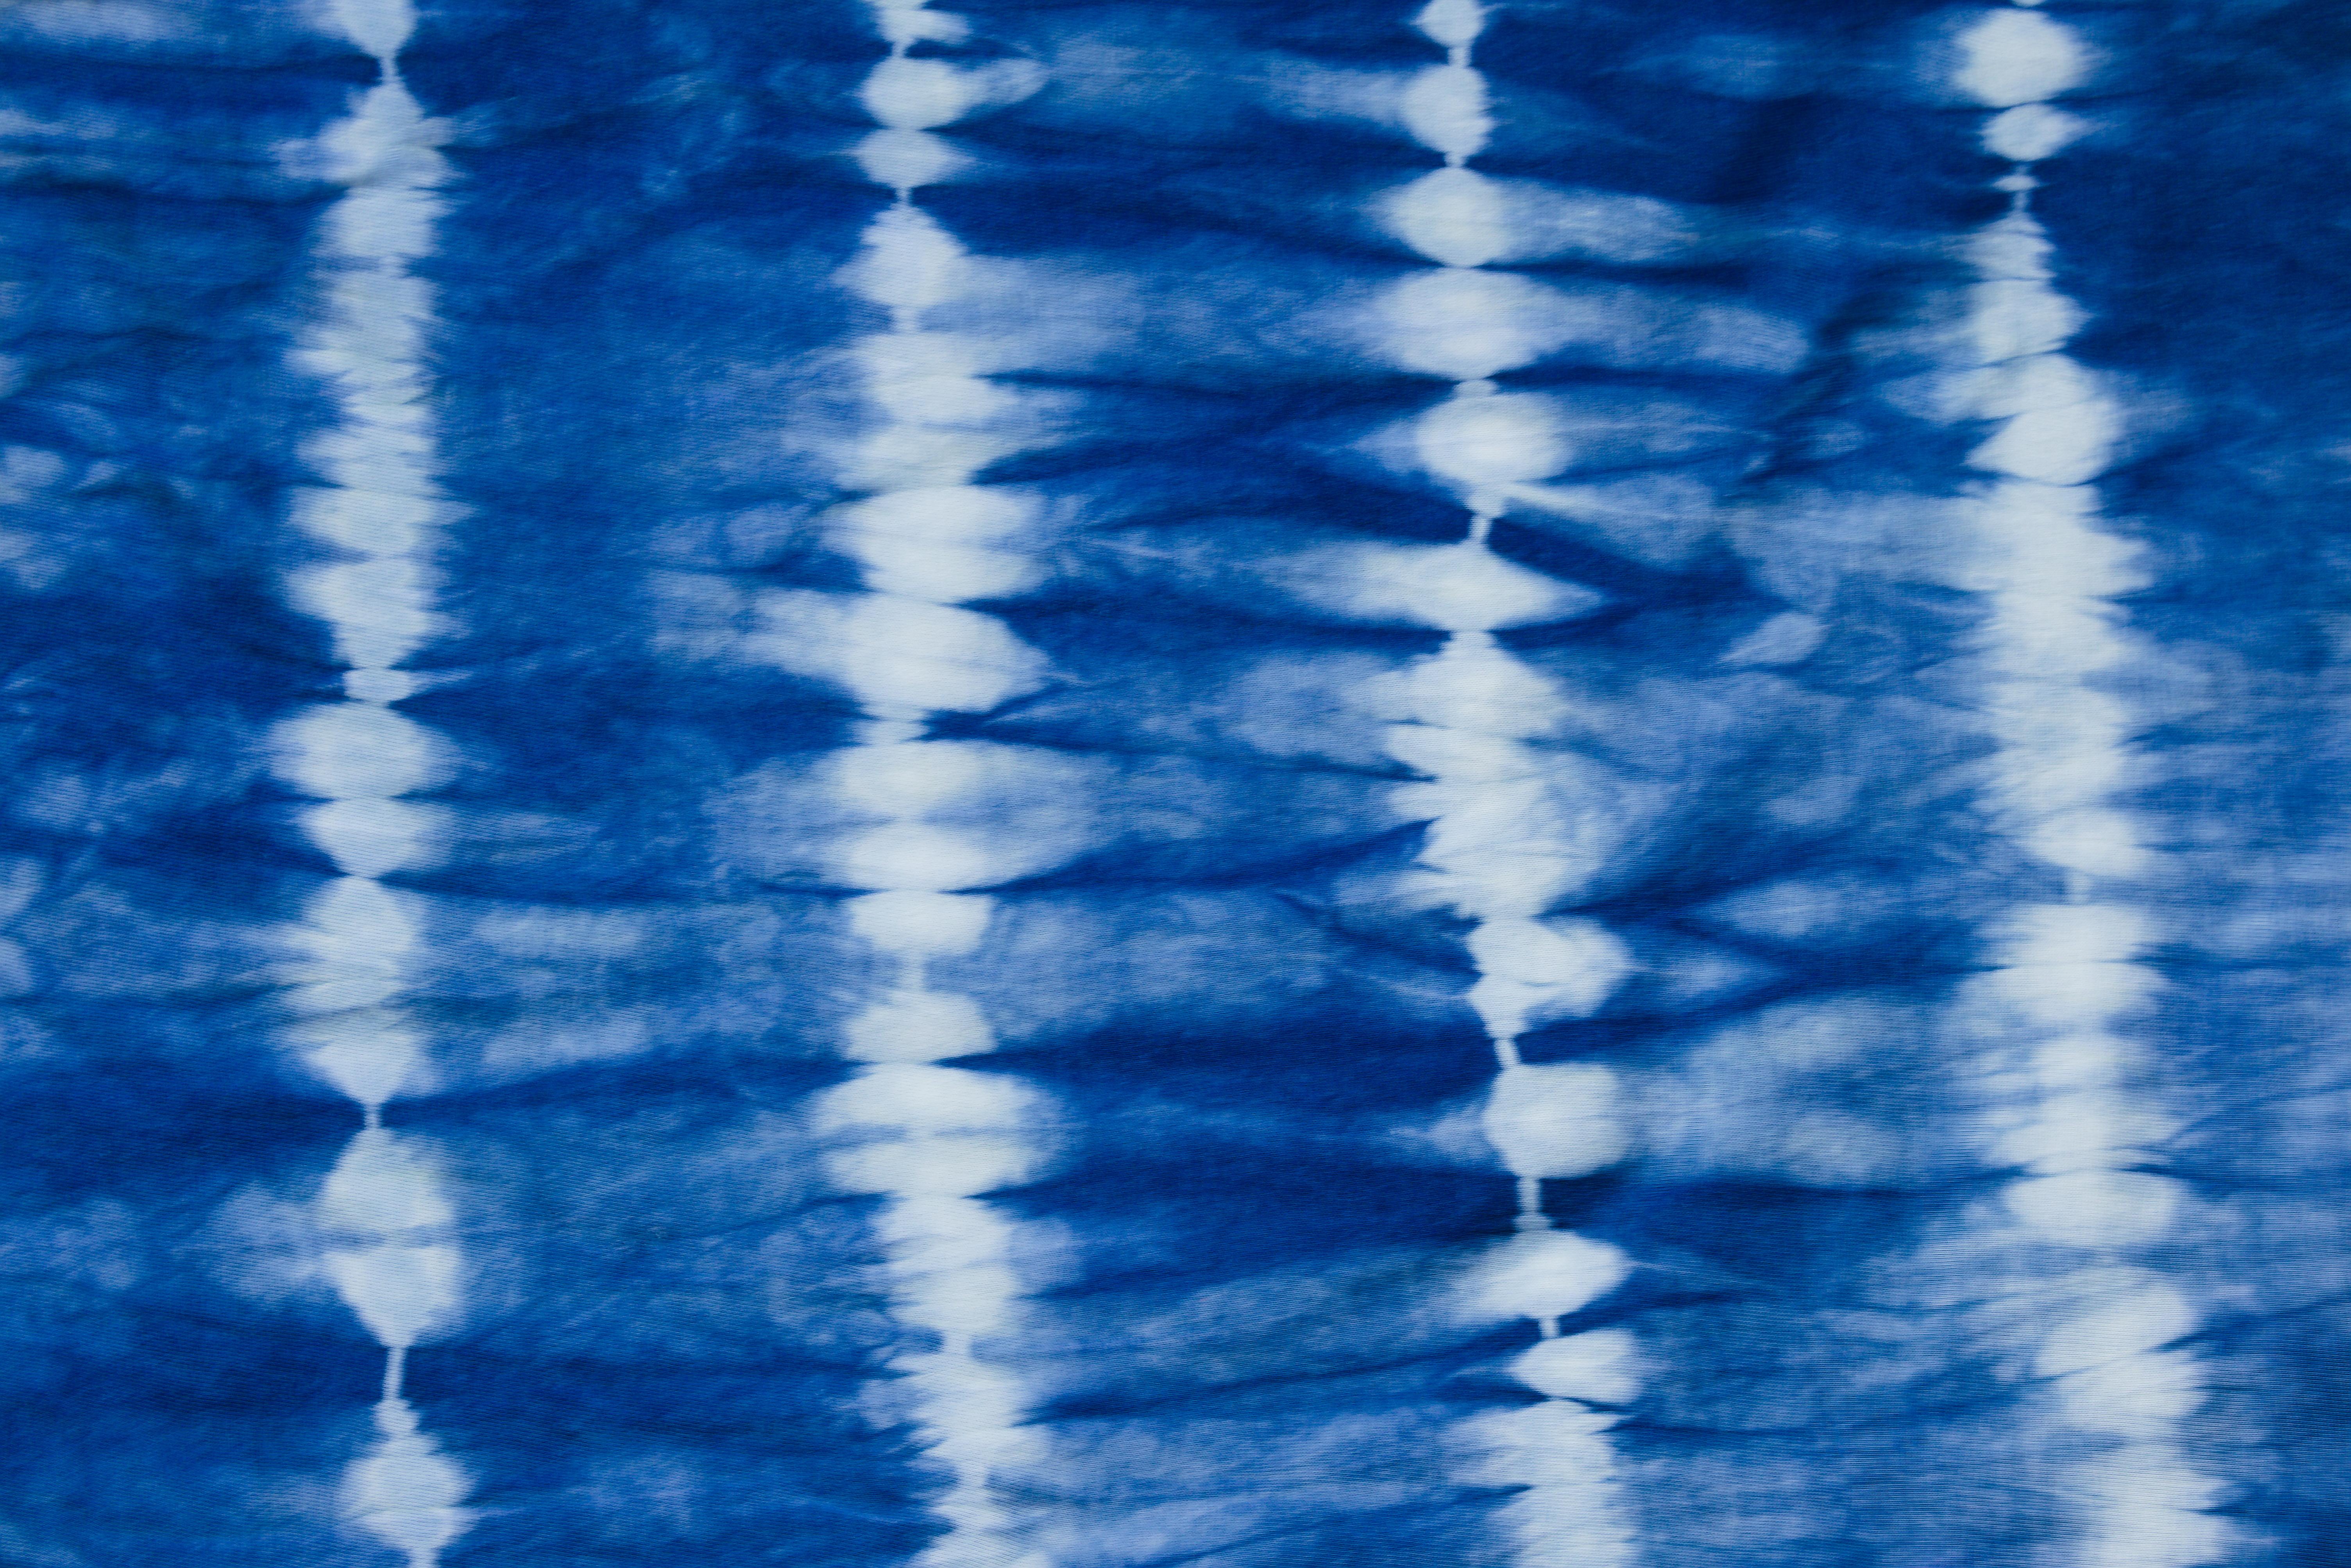
fabric ready to be dyed. This results in organic and slightly wavy stripes or lines. You can also see a gradient
between light and dark. Blue sheets.
5. Indigo resist methods stitch: The next resist
method is stitch. This works exactly by making stitches on places where
we do not want the diet. It is a very powerful technique. Acid gives a great
sense of control as one can exactly control the
resist areas by stitching. To demonstrate, I have
taken a square piece of fabric and folding the fabric
indoor accordion folds, amusing cloth clips to temporarily hold the
fabric in place. Now, with the help of ruler, marking points that are
equidistant from one another. There is a distance of about one inch
between each points. As you can see, I have removed the clips
for stitching purposes. I will begin stitching
through the market points. I'm making a stitch
at the same point for multiple times to get
a thicker resist. In a similar way, I stitch the other
points as well. As you can see, it's a simple stitch technique that goes from one side to the other. I will cut the thread.
I'm Dan stitching. You can see how some
areas of the fabric is locked by stitches and the other sites is
exposed to the type. One state. We can find interesting patterns like
dots on the stitched areas.
6. Indigo resist methods color blocking: The next method is
color blocking. This kind of method involves
using other objects to make her assistant as usual, and starting with accordion
folds on a square plot. The eclipse OCT as
temporary holders, using a ruler and marking
equidistant points. Now, I will use a
pair of mad sticks, please, one on the top and one on the bottom
of the fabric. I'm using one off the mark
the points as the reference. Now, I will formally tie both states together
and make a knot. Similarly, I will repeat the process on the
other side as well. This creates a pressure between the fabric layers
and produces LSST. I repeat the same on all
heap at that points. One state we get
a zigzag pattern. This is due to this slight slant while we tie these
sticks together.
7. Project 1 preparation of square scarf using tying: In this video, let's see how to prepare his car for
a simple design. We want a pattern,
something like this. This, the design avoids
from the center. Let's quickly take a look at the process to
achieve this design. First, we will grab the
center of the scarf and lift the scarf by pinching
and finally tired. Let's get started
with the process. And media that are grayed out. Ceases. Ruler, pencil. This square scarf. First, I will unfold this scarf. I have also watched the
scarf in hot water to remove any fat salt starch present on the fabric
while manufacturing. Once unfolded the fabric, I folded it into half, then grab the center
of the folded scarf and lift the scarf by
pinching it on the center. You wouldn't be able to
get bleeds and folds. Ran your hands
through these fabric, check for neat bleeds and folds. Once you get neat,
fairly looking forwards. Please deep fabric down
using a ruler marker point. We will be using this point as reference to tie off scarf using a Twine tie and make a nod at the topmost point,
security node. Then its form and date. Start winding the flying
around the scarf. Make sure to wine formally. This force and pressure from the twine will
meet goddesses. Now let's continue to wine
deadline till the mark, the point of reference. Once we reach the
reference point, start winding it in the
opposite direction. Bottom to top. This will create an
additional layer of data either assist weekend, now cut the Twine. We can make due
with the first two. Weekend security or not
by adding multiple notes. On completion, weekend C addresses night
structure like this.
8. Project 2 preparation of square scarf using blocks: In this video, let's
prepare the fabric for the scarf using an
object SSRS color block. I would like to have a grid like design with organic
clients like this one. Let's quickly take a look at the process to
achieve this design. After we make accordion
folds on both of these, we place to color blocks over and under the fabric
and tie them together. The materials required, Dwayne, cardboard, square
blocks, scissors. I have used tape to cover the cardboard for some
water resistance. You can even use
codeine blocks instead. Let's go ahead and make
horizontal according false. I'm matching the folds to
the size of the block. Using a nine box. Press the fabric to get
to meet and crisp fold. Let's continue making
folds one by one. By using your fingers, go through the folds. Ensure that the folds
are neat and clean. Once I feel satisfied
with defaults and pressed them to
make them crisp. We can continue to
complete the accordion folds and pressing the
fabric wherever required. Once we are done with
the horizontal folds, weekend, go for the
vertical folds. Check the size of the
block with the fabric. The Ford size should match
with the size of the block. Let's continue making the
accordion folds this way. They're seeing what necessary. Let's complete the
folding process by pressing one, lost ten. Since we have he
pressed the fabric, we have achieved neat
and crisp folds. Using the blocks, please, one on the top and one on
the bottom of a piece. Using a client. I don't the piece and meet
the first knot. Start winding our own DPS. Make sure you wind farm
leap with y1 pressure. I'm making a note here
before cutting the twine. Let's repeat the same on
the other side as well. Secure that wine by
creating multiple knots. We haven't got a color
block structure. Met is ready to be paid.
9. Project 3 preparation of tshirt for organic stripes: In this video, let's prepare
the T-Shirt for using tying technique we wanted
to design that has organic lines like stripes. This can be achieved using
simple dying method. Let's quickly take a look at the process to
achieve this design. First, we mock equidistant
lines along the t-shirt. Then we simply tie
them together. The materials required, ruler, pencil, tight or Duan, seizes up, Caught and
plain white t-shirt. I have washed and
dried the T-Shirt wants to remove any starch
from manufacturing. Using a ruler mark
equidistant points. Here, I'm marking
the points that the distance of n centimetre, these lines will become the stripes after
we die the T-Shirt. Using the fingers, I'm making micro bleeds
on the T-shirt. You can see I'm
gradually bringing one side of the t-shirt
closer to the other. After a while, you
should be able to grab the t-shirt with your
thumb and index finger. Security T-shirt in the position with the help of a zip tie. Or you can also use
a line to try it. The hold as much as possible. Using the mark the
points as reference. We have two repeat
baking micro bleeds and tie them together. We have to repeat the same process for
all the marked points. Cut the exists zip type. We have a striped T-shirt design that is studied to be dyed.
10. Project 4 part 1 preparation of tshirt for custom design: In this video, let's prepare a t-shirt for using stitches. This method I have made this T-Shirt for my
husband has ever done. I have created an alphabet
catch on this T-Shirt stitch resist methods of our grid control
over the design. This is a great way to
personalize clothing. Let's see how to do this. First mark the guides
for this stitch. Simple runnings to just needs
to be made along the lines. Now the stitches are
pulled to create a resist. The materials required. A ruler, pencil, gotten
plain white T-shirt, printed paper cutout
of your design. Board. Needle and thread four. So I have washed and dried the t-shirt once to remove any
starch from manufacturing. Since this design, that
alphabet which can be mirrored, me can fold the T-Shirt and
paper cutout into half. Notice that one needed
a friend decided of the t-shirt is
folded into half. Match the shoulder seams to make sure that we have
folded into half. Please, Steve, paper
cut on the T-shirt. Here. You can notice
that the paper cut is also being folded into half. With the pencil mark the
gardeners of the design. Once we mark the gardeners, we can simply join them by drawing straight
lines with the ruler. I'm drawing straight lines here, joining all the
math two corners. Now let's start mocking
the inert stitch ninths. I am plotting equidistant points with distance of five MM. These points will be
the reference for stitch lines marking
the same number of points with the same
distance on the other side. Now, these points can be easily joined by straight
lines with the ruler. The purpose of these
points is to ensure that we get absolute
bleed street lights. Now, I'm plotting points on
the middle of the alphabet, mocking the same points with the same distance
on the other side. Now, we can simply connect them together with
straight lines. You can now see the finished good reference
lines for these teachers.
11. Project 4 part 2 preparation of tshirt for custom design: Before we start stitching, Here's a quick tip. We need to make multiple
running stitches to complete this design. The threats will be
used up quickly. So you use multiple needles
with threats to save time. Since we are modeling
the design on both sides by folding methods, it's crucial that the fabric
doesn't slide or move. You safety pins to pin the
surfaces of the t-shirt. Now, both sides are secured
from accidental movement. I'm using under the safety
pin on the other side. This will completely restrict movement between
the two surfaces. Now, let's get started with
the stitching process. I'm just going to follow the marked reference lines
and make a running stitch. Metcalf, little finer stitch. They had been better resistance. Pulling the needle out. Do not pull the
thread completely. Bought ten centimeter of threat. It's going for the next line. Here you can take a closer
look at did Stratford. This might help and pulling
and tying the threats later. In a similar way,
I'm going to make stitches on all the
other friends lines. Now leaving some extra thread, I will cut off the thread. I'm making a note at the
end of the cut thread. Let's repeat the same technique on the other reference lines. Complete filling our shape. Making, handling stitches can be very calming and relaxing. Experience. Don't funny, if your
thread gets over, you can always put a new thread, the needle and continue. Since we have folded
the fabric into half, we have actually
measured their design. This enables as
to meet stitches, we're only on one side, cutting the stitching time
and effort into half. You can see how it
strike threats handled. All the threads needs
to be disconnected from the adjacent line so we can
cut all the joint threats. Now, each line is a
separate running stitch with extra trick at the
beginning and a the end. Now the stitches need to be
not, according to Paris, the first stitch
line needs to be noted with the second stitch
length at the beginning. Now will be free ends of the first and the
second stitch line. This will pull the fabric
together, making fine bleeds. After a form pull the
fabric comes closer. Now not the free
ends of t first, second stitch line together. Secure the threads in
place by another node. Now, we can cut the strike
threats to avoid confusion. Repeat the same
process by knotting the constitute two
pairs of stitch lines. The bearing and not in
sequence will be stitched line 123456 and so on. Here, we are not able to
bear the last stitch. One limb, one stitch exist, which is so odd and
cannot be paired. In such cases. We can always pair the stitch
line with the I just sent bed making a set of
three stitch lines. I'm pulling all
the three threats. As a first step. I'm not saying the
two traits together. Now we can finally
not the lasted thread with denoted pair. Remember to remove the
safety pins before dying. Now we have got a
stitch resist in the shape of alphabet letter
hedge ready to be tight.
12. Project 5 preparation of tshirt for gradient shade: In this video, let's prepare the T-shirt for a
gradient descent. As you can see, this T-Shirt has multiple
sheets of indigo. This is based on the concept of layering in vivo by weighting
the number of flips, more tips for a darker shade and lesser depths for
the lighter sheets. Now let's discuss
the processing, what lines are marked I spread the shade
divisions while dying. The number of flips are varied
according to the sheet. Material is required. Our ruler, pencil, cotton,
plain white t-shirt. I have washed and dried
the t-shirt wants to remove any starch
from manufacturing. With the ruler, I'm marking
two points on my t-shirt. These points divide my
t-shirt into three sections, repeating the same
on either side. Now I can simply join the
points to get a straight line. These sections denote the
boundaries of each sheet. Now, we just need to vary the
number of bibs while dying.
13. Important safety precautions while handling lye: Important safety precautions
while handling light. Light is a very
caustic chemical that will create burns on
contact with the skin. Always use extreme caution
when working with it. Poison, danger, corrosive
may be fatal if swallowed. Harmful if inhaled causes
burns to any area of contact, reacts with water, acids, and other materials,
but it can be used safely following precautions
and lie usage guidelines. Precautions always wear goggles, gloves, and protective
clothing when handling light. No short sleeved shirts, short pants or sandals. Always work with light
in well ventilated area. Remote contaminated
clothing immediately. Cleanups, spills immediately. If you have any
respiratory health issues, completely avoid using it. Keep away from kids and pets. Always go through disposal
guidelines of light depending on where you
stay before disposing it. Please follow the waste management guidelines
of your country. Usage. Always add light to water, never water to like. Use only heat resistant
plastic container for mixing. Always seal the light container, airtight properly
after the usage. Store in an area
that is cooled, dry, well ventilated, separate
from incompatible materials. Once the materials like containers stood
up or any objects that are used with
light should not be used for any other purposes.
14. Preparation of vat: Let's get started In preparing for the
purpose of dying or fabric will be making a
six liter indigo vat. And as we discussed before, indigo vat contains
three major components. The indigo dye itself, alkaline medium, and
a reducing agent. Natural indigo vat can be prepared in one institute
to three ratio, where one stands for the indigo dye to for
the alkaline substance, and three for the
reducing agent. The quantity of the
ingredient depends upon the quantity of water and the
indigo dye concentration. For our purposes,
we will be using seven gram of indigo
per one liter of water. That leaves us with seven gram indigo into
six liters of water, which is equal to
42 grams of indigo. 42 grams of indigo into two, which gives us 84 grams of alkaline substance aspect
one to three ratio. We use sodium
hydroxide or light, but we increase the use of calcium hydroxide as it is
easier to handle than light. The quantity of reducing
agent fructose in this case, will be 42 grams into three, gives us 126 grams of fructose. In this case of using lay
use only cotton fabric. Protein-based fabric
like silk or wool, is not recommended for lay wet as strong PH will
damage the proteins. With that being said,
let's get started. We have got all the
required materials here. We have taken a
plastic container with hot water for mixing. When handling
chemicals substances, it is always recommended
to use hand, eye, nose, and mouth protection. Please choose a well
ventilated area, finite dipole operation. Let's add the indigo
dye to water. Give it a gentle stir to distribute the
particles in water. We use warm water because it accelerates the
chemical reaction. Now, let's add delay. Give it a stub for few minutes till the light
completely dissolves. Always follow the safety
procedure when handling light. Finally, let's add fructose
as the reducing agent. Continue stirring the rat. While doing so, a
wide making splashes as they can add excess
oxygen into the rat, will be small lumps of
indigo stuck on the walls of the container to dissolve
them as much as possible. As you can see, we use a
bamboo stick to stir the wet. You may also use a plastic stub. After a few minutes of studying, you will be able to see
some oxidized cluster of indigo floating on the top
along with some bubbles. This is what is called
as indigo flower. Now cover the lid of the wet and allow it to react
for about one hour. We have opened the lid. Let's check the
consistency of the diet. As you can see, the color of the dye beneath
the surface is yellow green. With an important,
this means the rat is reduced and the
indigo is dissolved. No, Let's take off the
indigo flower from the wet. Remember that all the
materials used once format, rat making like
container, spoon, etc, should never be
used for other purposes. The indigo flower needs
to be completely removed because it will stick to the clot and may
produce uneven dying.
15. Soaking the prepared fabric: Before we start dying, we need to get our fabrics
are ready for dying. In a container. We have taken warm water to soak the fabric. We will soak all the
fabric in this container. Allow it to soak in warm water completely for
about ten minutes. Soaking the fabric will make the fibers are adsorbed
the day better.
16. Dyeing: Before we get to dying, we need to squeeze
out water from our soaked fabric as
much as possible. We don't want to add water into our wet as it can
dilute the wet. Let's gently immerse the
fabric into the vet. While doing so, a
wide making splashes. Immersed the fabric as
gently as possible. Splashes can add
Oxygen indoor wet. As you can see, we immerse the fabric
one-by-one gently into the vat. Being very careful about
not making splashes. Make sure that they
are immersed properly. No, let's close our
VAT for one minute. After a minute,
Let's open the VAT. Remove the fabric from the wet. We can see a yellow green
color on our fabric. Again, we need to
be gentle here, not making any splashes. We can squeeze the excess dye from the fabric while doing so, make sure you squeeze the dydt a little
about this office. This elides the excess day to get in contact with the air. Now, let's allow the
fabric to get oxidized. This may take about a minute. You can notice the
change in color. The yellow green color
will turn into blue. As the dye reacts
with oxygen in air. You can turn the fabric
to expose it more to add. Here, we're just exposing the fabric to air by
gently turning it. Now the fabric is almost blue. Now let's watch this in water. Oxygen in water oxidizes it
and removes any excess day. Now the die has got
its blue color. You can squeeze the water
out and place it outside. Now this is ready
for the second dip. Let's take a look at the diagram for a
better understanding. We first dip the
fabric into the vat, then allow it to observe the
diet for about a minute. In step three, we take
the fabric out and place it aside to let it
oxidize by air exposure. At this point, the color of
the fabric changes to blue. Then we wash it in water and squeeze it well
before the next step. Now we get the
blue indigo color. We need to repeat the same
to get darker sheets. When we talk about
the number of flips, all the steps shown here constitute to one dip of
the fabric into the wet. We will be depending the
tee-shirts for about nine to ten times and the scarf
for about six steps. You can go for lesser
depths for lighter shades.
17. Dyeing gradient shades on tshirt: In case of gradients,
It's fairly simple. We just vary the number of dips in each section
of the t-shirt. Watch this time-lapse
to see how we do it.
18. Setting The Dye: We have come to the final
step of dying in a container. Take a small amount of vinegar. We use cooking vinegar here. Add this to a container with
water at room temperature. Wash the dyed fabrics
in this water. Because of the
acidic properties, this will neutralize the
pH of our fabric and the date. Let it wash. What about a minute? No, squeezed the water
as much as possible. The dyed fabric is now
ready to be opened.
19. Pattern reveal: Let's start cutting the
twain of color block. For Linda scarf reveals
a grid-like pattern. This square shape
of the color block and the folding has
resulted in this design. Let's start cutting the
tie off our next cuff. This results in a
rounded diamond design right in the middle
of this cuff. Here. A closer look
at the details. Now, let's cut out the
zip dice on leaky shut. This results in horizontal
organic looking stripes on the tight areas. Now let's cut the stitch
resist on the T-shirt. Being very slow and gentle. Shouldn't accidentally
cut the t-shirt. Let's clean up and
remove all literates. Our alphabet is getting
revealed slowly. As you can see, the stitch
has an assisted well.
20. Conclusion: Hope you have enjoyed the class. I wish to conclude that we have covered the basics of
natural indigo dye. The next step is to
explore the graft with your own ideas for resist technique and
achieve unless designs. I would recommend
you to document your resist methods by teaching
pictures before dying. You can always experiment the resist method in a
small piece of fabric. Here I have used eight by eight inch fabric to experiment and documented
assistant methods. Apart from clothing, you can always try dying for
home deco purposes. Like Pushinka was tabled
or nurse gardens, etc. I have made an earning with diet indigo fabric and some
hand embroidery on top. Here you can see I have
a stain on my white top. Dying is a great way to
uptake stained plots. Using stitches. His technique, I have made the cleanest and running stitches along the top. I'm simply pull the ends
and not add them together. I have chosen this type
of technique as it will organically hide the
steam after Indigo dying. For our own six-fifths. You can see a new version
of Mac discarded top. I have also died as stall
using dying techniques, please share images
of your work. I would really like
to go through them. Thank you for joining
this class. Jesus.
 Cloudia David, Co-Founder | Entrepreneur | Designer