Transcripts
1. Intro: Iceland is known for
its natural beauty, from volcanoes to glaciers, to northern lights, but
it's waterfalls are some of the largest and
most magnificent in the world. Waterfalls are a pleasure
to watch and delight to paint, They are a challenging subject. But if handled properly, painting a waterfall, it can be very satisfying experience. In today's class, we
will be painting one of the most spectacular and
beautiful waterfalls in Iceland, which is Skogafoss. You can paint this
beautiful waterfall and about 20 to 25 minutes. Isn't that amazing? We will learn how to make
waterfall looks soft and misty. We will see the
brushes to achieve the rocky look around
the waterfall. By the end of the class,
you will be able to, to paint Rocky Mountains
waterfall and so much more in Procreate
confidently and easily. I have also included
a bonus class for you to try where we will be
painting the same waterfall. You will be surprised to see a complete different painting using the same brushes
and techniques. So if you're ready, let's get started and paint this majestic
waterfall landscape.
2. Tools Required: Now let's quickly look
at the tools that is required to start the projects. We need an iPad and Apple Pencil and
procreate application. I am using seventh generation
iPad for the project. I'm using the latest version of Procreate application,
which is 5.2.
4. Canvas Details: So let's the first project where
we will be painting. One of the waterfall of Iceland, and that is going to be
Skogafoss waterfall. Open the Procreate
app and tap on this plus icon that you see
on the top-right corner. And you will get the
list of canvases here. And I will go with this, A4 canvas for this project. Now, I'm going to turn
it around like this. And we are ready with a
canvas for the project.
5. Painting the Sky and Clouds: Now let us look at
the color palette. So I have this project one
color palette ready here. I've uploaded this
resource section, so I hope you have
downloaded it and imported them to the
Procreate application. So now if you're
ready, let's start The project. Go to
the color palette. and pick this 1st color from
the project one palette. Tap on the Brush Library, airbrushing, and go
with the soft brush. I'm going to set the opacity
of the brush to about 100%. And I will set the size of
this brush to 30%. And I am going to
fill the top section. That is this sky section
with this color. I've filled about half of
the canvas with this color. By applying horizontal strokes. Now, tap on the layer and
rename this layer one. And I'm going to
rename it as Sky. We are ready with the first layer. Now tap on the plus icon
and create a new layer. And I'm going to rename
this layer 2 as clouds, where we will be adding some
clouds to this blue sky. And go to the color
palette and pick this second color from
the project one pallet. Go to the brush library. I'm going to the
cloud brush set. So I'll go with this
cloud 3 brush, which I have included
in the resource section. I'm going to set the
opacity of the brush to a 100% and size to about 22 23%. Let me set it to about 25%. I will add the
clouds in this area. So if want the
entire cloud, brush set, you can check
out my other class of clouds where I have
included the complete set. So this is how you
add the clouds .Tap on the screen and drag the
tip of your pencil on the screen and add some
random clouds like this. Now go back to the color
palette and pick this last but one color
which is white color. And go over and add
some white clouds. Don't worry about the shape. It's just random shaped cloud so that we have
clouds ready. And don't worry about the
bottom section as well. It's going to be covered
by the mountains. So this is the layer of
sky and clouds ready.
6. Adding the Mountain: The layer of sky and clouds. Ready now let's go
to the next layer. So tap on the Layers
and create a new layer. And I'm going to rename this
layer three as mountains. Go to the color palette and pick this black color
with just a fifth color from Project One palate .Go to the Brush Library, calligraphy and select this mono line brush. Set this opacity of
the brush to a 100%, and I will set the
size to about 15%. I'm going to add a curvy line which is going to be
the outline of the mountain. I'm going to start somewhere
from this section and I'm going to fill in
this area covering the bottom section of
the sky and the clouds. I'm going to draw a
curvy line like this. And now I'm going
to drag and drop this black color to
this mountain area. There we have the
mountain area to d. Now let's add some details. That is, add some texture
to this mountain. layer. Tap on the layers
and apply alpha lock on this layer so that
whatever texture you apply stays within this mountain layer and doesn't go to the sky layer. Now go to the color
palette and pick this brown shade with just the six color
from the palette. Go to Brush Library, organic
and use this Spires brush. I'm going to set the
size of this brush to about 15 per cent and
opacity is set to a 100%. And I will add some texture to this
mountain area like this. This is going to give
it a nice rocky look. So there I have applied
a layer of texture, the mountain layer.
7. Adding Texture to the Mountain: Now go to the color
palette and pick this green , 3rd color
from the palette. And I will use the same
brush and I will add some green texture to this mountain layer by
going over like this. Adding some texture on
the other side as well. Now go back to the palate. And pick this 4th color, the other shade of green. Now go to the Brush Library, organic and go with this
mountain ash brush. I will set the opacity of
this brush to about 60%. And I will set the
size of this brush to about 35
to 30 %, set it to around 32%. And I will tap on the
screen like this, add some texture to this
rocky mountain area. You see some really cool texture on this Mountains,
those green patches. The gives
really cool effect on this rocky mountain like
the mosses . So there it is. So I'm going to add some more texture and add in some more depth
to this mountain. So go to the color palette
and pick this black shade. And if you think it
looks too greeny or add in some black texture, again, using the same brush. We'll go back to the color
palette and this green. Go to the Brush Library and organic and use this Spires brush. I will reduce the
size of this brush to around 10% and
opacity set to a 100%. And I will add
some more details. to this mountain layer like this at some random spots of this
mountain layer like this. Giving it some lighter
and some darker shade to this mountain area,
creating more depth. So you can already see
a lot of depth and this mountain layer keeping some areas dark and
some areas where you have this greenish
moss like effect. Now go back to the color
palette and paint this black shade from the palette
and go over using the same brush and
darken some areas. You can keep repeating, changing the colors
between green and black until you're happy
with how the mountain looks. Again, I am changing the size of this
brush and going one, adding some more details.
Like I mentioned. Add in the details
until you're happy with how realistic
the mountain looks. This will be the area
where we will have the waterfalls when keeping
in dark or hills can see. I will go back to the
palette and I will darken few ares going with
this black shade. I'm pretty happy with how
realistic this already looks. So I'm going to stop
adding the details here, and let's move on to the next section of
adding the waterfall.
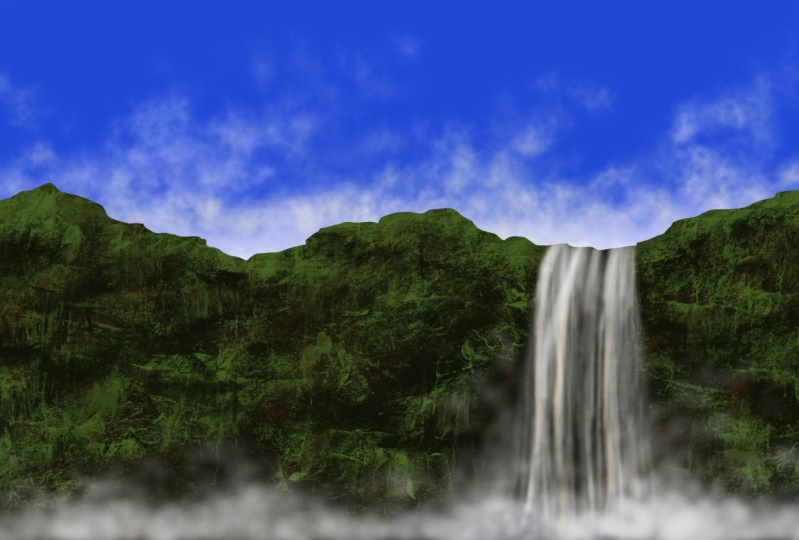
8. Painting Waterfall: Tap on layers and
create a new layer. And I'm going to rename this
layer 4 as waterfall. Go to the color palate. And pick this white color, which is the last but one color
from Project One palette. Go to Brush Library, airbrushing, and go
with this soft brush. This will be the brush that we will use to add the waterfall. So I'm going to
set the opacity to 100% and size to
about 25%. And I will add the
waterfall like this. Before doing this,
you can see that the details are going outside this mountain layer
to this sky layer. So I'm going to undo this layer. I am going to the
layer and applying clipping mask so that it
follows the mountain layer. Mountain layer is going
to be the parent layer Now, using the soft brush, I am going to add in the
waterfall detail like this. Now, just by adjusting the pressure on the
tip of the pencil, you can get the brighter shade or very light shade by just adjusting the pressure
on the tip of the pencil. And this is how it looks. Let me undo and start
from the beginning. I've increased the size
to about 30 per cent. Now start from the top of the
fall like this by applying very gentle strokes as the
waterfall touches the. ground the fall gets wider. So I'm widening the
area here by again, applying very gentle strokes and widening the
fall at the bottom. I'm adding one more here. The repeating the same step. Apply very gentle
strokes are applied very little pressure on
the tip of the pencil and add this soft strokes
for the waterfall. Now, if you apply a lot of
pressure, the fall will go flat. Now, the decrease is still
size to about 15%. Now, using the
smallest size brush that does the same
style of brush, I am going to make this top section of the
waterfall area more brighter by applying
more pressure on the tip of the pencil. Like this. At the starting
point of the waterfall, it should look brighter
or more white. So I'm applying more
pressure on the pencil. And towards the
end it is going to look because the water
is going to spread. It will look more like fog. We will apply a
little pressure or towards the end of
the fall like this. Now, make sure that you leave some gaps in between
that is that the mountain layer as visible
and you're not filling this complete area with
this white strokes. So that little color
variation makes it more interesting and makes
it look more realistic. The hard edges of the rocks in contrast with the soft edges water makes the looks very pleasing, I'm going to zoom in and show
you meet the edges softer and that it doesn't look
like a definite white line. So you can play
around the soft brush to create the soft
realistic effect.
9. Adding the Mist: So keep thinner strokes, at the starting
point of waterfall and make it thicker
towards the bottom. By just adjusting the size and the pressure on the
tip of your pencil. So this is how it looks. By applying gentle strokes, you can see different
variations. Or varies colors
of the water. And it does not look like
a patch of white stroke. Now I'm going to increase
the size of this brush to about 40% and I
going to add mist. here in the bottom section by going with circular
strokes like this. And again, keep changing the pressure on the
tip of the pencil. So this has to be like really
soft, very gentle strokes. circular strokes Adding the mist where the
waterfall meets the river will enhance the illusion
of water in motion. We can also depict
mist in the background to increase the depth
of the painting. Increasing the size further, and adding circular strokes in the other side of the canvas. Make sure that you are applying very gentle strokes to
achieve that misty effect, showing like shades of gray. I'm going to fill this
complete bottom section, with the mist using
this soft brush. We'll now go to the
color palette and make this gray color from
the palette and add some grey mist in-between
this white mist. Now go back to the
palate and pick white and just add some light
mist and the top. Making some more adjustment
to this waterfall area
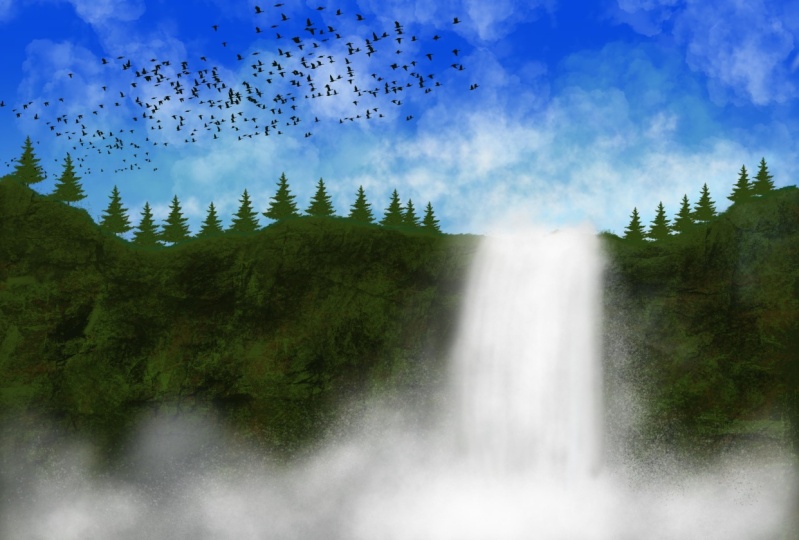
10. Final details: Now reduce the size
of this brush to about 18% and make some
final adjustments. And the top section
of the waterfall, using the same soft brush. Making this top section
really soft and smooth. This as the final result
of our first project. I hope you enjoyed creating
this beautiful landscape.
12. Painting the Sky and Mountain: Now let's start with the
bonus project where we are painting different version
of the same waterfall. So we will be painting the same Skogafoss
waterfall in winter. One amazing fact
about this waterfall is that the water does
not freeze in winters, so you can still see the
waterfall in the winter and we are going
to paint that now. I will be using this
project 2 color palette, which I have included in the resource section as
bonus project palette. This is the one that
we will be using. It that's very minimal colors. Let's start the project. I will pick this first
color from the palette, which is light blue. We'll do the brush library, airbrushing, and
select the soft brush. Set the size of this brush to about thirty-five percent
and opacity is set to 100%. And I will fill the top section of the
Canvas with this shade. About 1/4th of the canvas. Go to the adjustments icon Gaussian blur and set the blur to about 30 to 35%. I'm going to set
it to around 30%. tap on the layers and
rename this layer one. I'm going to rename,
it as Sky. Now tap on + icon and, create a new layer. And I'm going to rename
this layer 2 as mountain. Go to the color palette
and pick the second color, which is the black color. Go to the Brush Library, calligraphy and select
the mono line brush. I'm going to set the
size of this brush. to about ten to 15% or
I'll set it to 10%. And opacity is
set to 100% and draw a curvy line for the top section
of the mountain like this. So it is similar to the one
that we did in the project. Once that is done
and drag and drop the color to the mountain area. Now it's time to add the
details to this mountain layer. So we will be adding texture
to this mountain layer.
13. Adding texture to the mountain: I will go to the color palette
and pick this 3rd color, which is white color. Now go to the Brush Library. Before that, to apply texture, go to the mountain layer
and apply Alpha Lock. Now go to the Brush Library, organic and select
this Spires brush. I'm going to set the
size of this brush to about 20-21 per cent and
opacity is set to a 100%. And I will start
applying texture to this mountain layer like this. I'm going to fill in
the top section of the mountain with the texture. Now go to the color palette and pick this 4th color from the palette, which is a kind of dark gray. I'm using the same Spires brush. I'm going to add some texture to the bottom section
of the mountain. Now go back to the color
palette and pick black color, second color from the palette
and go over this texture. White texture that we
applied previously. Now, again, this brush works great to show the mountain
covered with snow. So you can make it
lighter or darker. Like it can be more white, covered completely with
snow or you can keep it dark, showing the rocky
area of the mountain. So it's up to you
how you want it. So I am going back to the
palate and picking white. And I'm going to add some more white texture to show the mountain
covered with snow. So it's up to you
how you want it. You can cover it entirely
with snow or you can leave more rocky texture
to the mountain. I'm going to reduce the
size further and adding a few more details or
texture to this mountain. Applying very little pressure on the tip of the
pencil and adding some light texture to
the bottom section of the mountain using
the same color. So now this looks almost ready. I'm going back to the black color and the
areas that look more white. I'm going to darken it by adding some strokes
using the same brush.
14. Painting Waterfall: Go to the color palette. Before that, let's create a new layer for
adding the waterfall. So I'm going to create
the layer three and apply clipping
mask on the layer. Go to the color palette and pick white that is 3rd
color from the palette. Go to airbrushing and
select the soft brush. Soft airbrush. So this is going to be the same process that
we did for our project. I'm going to set the size
of this brush to about 18%. And I will start from
the top section. And I'm going to widen the
waterfall as it reaches to bottom by applying, vertical strokes like this, I'm going to reduce the
pressure on the pencil and keeping it more light as
I reach the bottom section, that is, I'm going to keep the colored grey and dull towards the
bottom of the waterfall. So I will add one more Waterfall here and repeat
the same process. I'm widening it here At the bottom. I'm going to
increase the size to about 20-22% and adding some smooth strokes here
at the bottom sections. I'm going to reduce the size down and I add one more here. Let me just zoom
in and show it to you. So this is how smooth
you need to keep it. I'm smoothening the edges. Keep adjusting the size
of this soft airbrush to add soft strokes and
crisp strokes like this. It does pretty much the similar process that we
followed for our project. To add this waterfalls.
15. Adding Mist: I am thinking about adding
one more small fall here. I will add one more here. I'm not going to take it all
the way till the bottom. I'm going to stop at
somewhere in the middle. This looks great now. So that is a dot
here I am gonna erase it. Now it's time to add some mist. So I am going to pick
the same color that is white color from the palette. Go to the Brush Library, we Spraypaints and select
this ultra fine nozzle brush. This is the brush that we
will use to add the mist. I'm going to set the size
of this brush to about 10%. And opacity they
said 100 per cent. And I will start adding
circular strokes. Make me increase the
size for though, I will set it to about
twenty-five percent. And I will start adding the mist in circular
strokes like this. I'm going to fill in this
bottom section with the mist where the waterfall touches the ground or the river or lake
or whatever it is. I'm leaving some gap in-between
and keeping it dark, so that it is not
entirely white. the mist, area, is not entirly white. We can add some more
adjustments later on. So this is what it is, so I'm happy with that. Now go back to the
color palette and pick black and add some black
in-between this white mist.
16. Painting Iceblocks: Now let's move on to
the next section, Tap on the Layers and create a new layer where we will
be adding the ice blocks. I'm going to rename this
layer as ice blocks. We will be adding on the left
and the right side .go to the color palette and pick white that is 3rd
color from the palette. Go to Brush Library calligraphy and select this mono line brush. I'm going to zoom
in and I'll show you how to add the ice block. So I'm going to add a
curvy line like this. And I will draw one more
line from the bottom. So it need not be
straight again, I'm adding a curvy line. Now. Similarly, I will add
one more on the right side. Then join and draw a bottom
line for this ice block. Now, drag and drop the color of this blocks on the
left and the right. Now I'm not happy with
the one on the left, so I'm going to erase it. And draw it once more
using the same brush, the mono line brush. I'm going to zoom in and start
somewhere at the bottom. add the bottom section first and now draw the top section of this ice block and join
it with the bottom line. And now drag and drop the color. So make sure that there
is no gap between the top line and bottom line so that you can drop the color. Otherwise it is going to fill the completely
layer with white color. Now apply alpha
lock on this layer. Go to the color palette and the pick this 4th color
from the palette. Go to Brush Library charcoals, and select this burnt tree brush. We will add some texture
to this ice block. So I'm going to set the size
of this brush to about 8%. And I will add just a tiny amount of texture to this ice
block like this. You need not make
it too dark and just keep the texture very minimal. Add it at some portions of this ice block mounting it
on the other side as well, so that's it.
17. Adding the details: It's now done. Now go
back to the color palette and pick white,
and lighten the area. Now if you think it is too dark, the texture that to apply, you can pick white from
the palette and go over the black area
using the same brush. Now go to the color
palette and pick white. Now go to the layers and
go back to layer three, but I forgot to rename it as waterfall and create
a layer above it. Go to the Brush Library, airbrushing, and select
the soft airbrush. Now I'm using this brush to
soften the bottom section as well as the top section
of this ice block. So I'm going to set the size of this brush to about 15% and opacity is set to 100%
and I will soften edges. So similarly go to the top section of this
ice block and soften . These edge or the
curvy line as well. I'm just going over are going over that
line and softening it. So since we are
using a soft brush, so it is going to have
a really soft look. Similarly repeat
the same process, for the ice block
on the other side. I'm adding the soft edges on the layer below the
ice block layer. Repeat this same process on
the bottom section as well. And we had this soft ice
blocks on both the sides ready. This is how it looks. Adding some more final
adjustments to this block. This is now done and looks good. Let's move on to
the next section.
18. Painting water ripples: Now tap on layers
and as you can see, I have forgotten to rename
this layer three and layer 5 So layer three is going to be the waterfall and
mist and layer 5 is going to be that soft
edges for ice blocks. So I just erased that extra wide portion that
was there on Layer five. That's it. Let's move on
to the next section now, go back to the color palette and pick white from the palette, tap on layers and go to the layer three is
this waterfall layer. Go to the Brush Library, airbrushing and
select Soft Brush. Select soft airbrush. I'm going to set the
size of this brush to about the 40% and opacity is set to a 100% and I will add some more mist because
it looks too dark. So I'm going to lighten the area here and give it
more misty look. This looks Bette to now go to color palette and pick this last
color from the palette. Go to the Brush Library, organic, and select
the sable brush. Now I'm using this brush, I will add some
ripples to this area. That is the bottom section of the mountain layer or
the waterfall layer. So this is how it looks. Now, I will go back to the
color palette and pick black, and using the same brush, I'm going to darken the area because it
looked too light. What does with that gray colors? So I'm going to darken
it with the black color. I'm doing all this, in the waterfall layer, that is layer three. This is how it looks. Now let me just zoom
out and show you the final result of this
bonus, this project. Now, I think the mist
area looks too white, so I'm going to go back to the color palette and pick
black color from the palette. Go to the Brush
Library, airbrushing. And select this soft airbrush, and go back to this layer three, that is the waterfall layer. And I'm going to lighten, or basically darken
few areas of this mist layer. Keep adjusting this size
according to how you want it. You want a mist to be. And darken few areas. So as usual, I'm going
with the circular strokes for adding this mist or
darkening the mist area. This looks pretty good now. And now we are done
with this bonus project of Skogafoss
waterfall in winter. And I hope you enjoyed
creating this one.
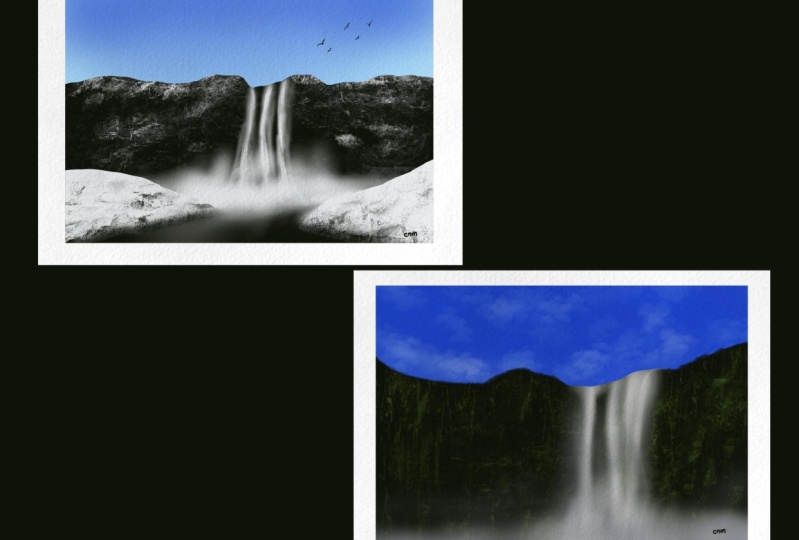
19. How to export the projects: Now let's see how we
can export projects. So I'm first, I'm going to
rename these two projects. That is project one. I'm going to rename
this as project 2. You can rename it as bonus project so that
is project 2. Let's see how we can
export these. Tap on Select and select
these two projects. Now, tap on Share. And you'll see the
image formats in JPEG,PNG,PDF or animated GIF, I'm going to select JPEG
and you get this options. on how you want to share
it. We can see it. Save it to gallery or you
can save it to your files. I'm going to save
it to my gallery. And this is how we do. If you go back to the
gallery and check, you will have the
projects in your gallery. And this is how we
export the projects.
20. Conclusion: Thank you so much for
watching the class. I hope you love painting this beautiful project of waterfall, landscape
and procreate. You can pay more such waterfalls using reference images from sites that offer free majors
like Pixabay and Unsplash. If you have tried
this projects to upload them to the
project gallery. And do not forget to drop off feedback about this class
when you finish it. Feel free to reach out for
any doubts that you have. Have a nice day and
happy painting.
 Sheetal Shetty, artjauntwithsheetal