Transcripts
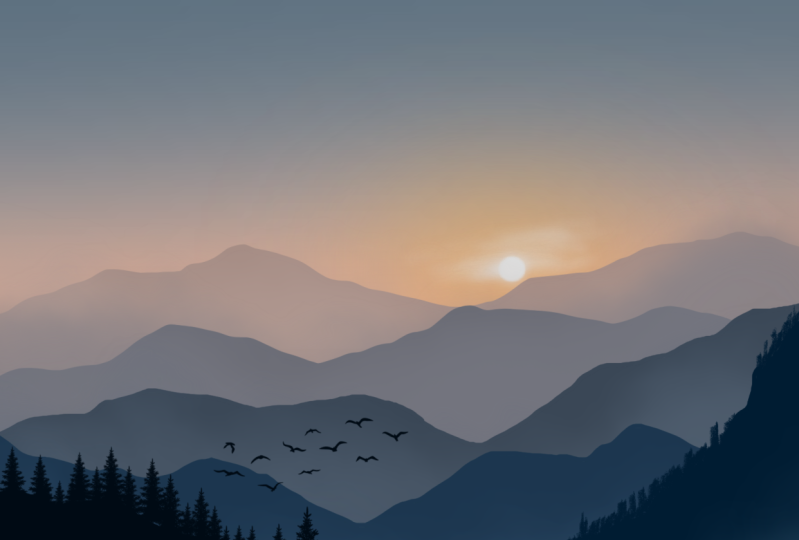
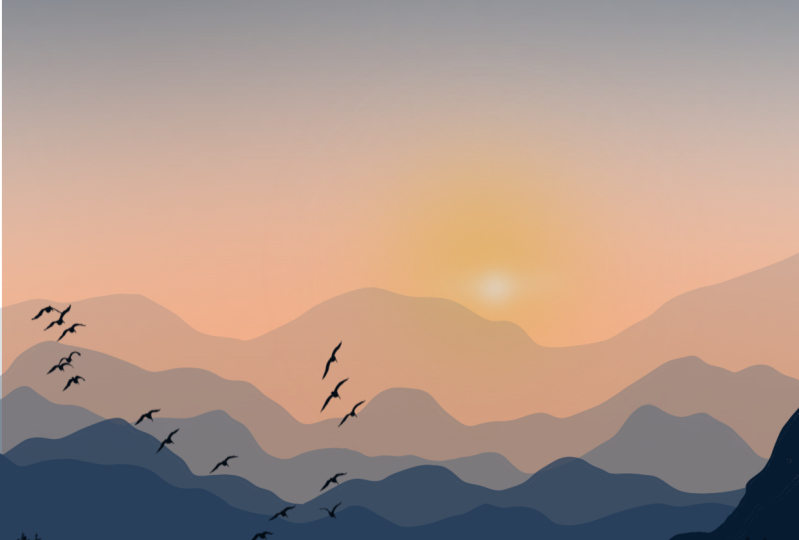
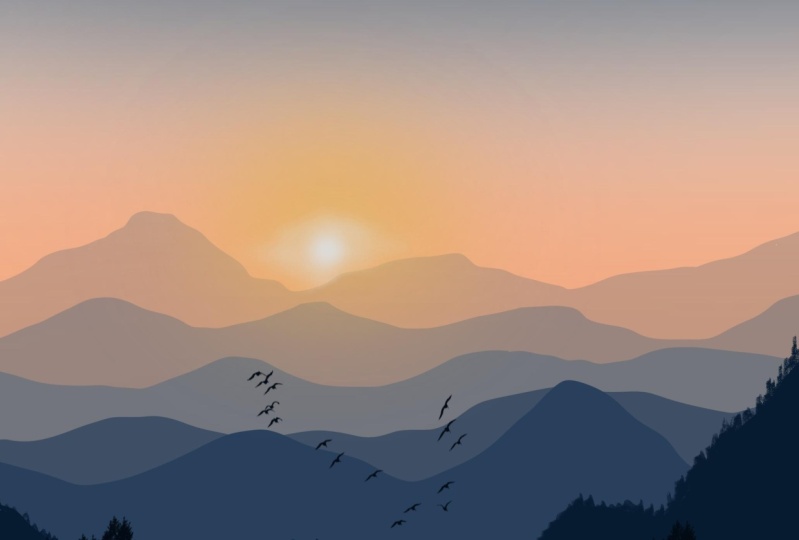
1. Introduction: Hello everyone and welcome
to my Skillshare class. I'm, she'd been
attest from India. And in today's painting lesson, I will explain my process of painting or misty
mountain scene. Rising sun and pale blue
shining through the tendinous. You will learn how to
paint a beautiful scene. That is a beautiful painting of a misty mountain shining
bright and sunrise. Using minimum procreate brushes. The class is divided and simple steps so that even
if you're big enough, you can follow along the
instructions easily. It is easy to follow and a suitable for all
artistic abilities. Now, let's see who
is this course for? Anyone who wants to being quick and easy landscape
and try to create projects. So if you find this interesting, Why not grab your iPad and
your favorite drink and snack as we paint together to recreate
this lovely painting.
2. Materials,Importing Swatch and Stamps: Let's quickly look
at the things that you would need to
start the project. You will need an iPad and Procreate application to get
started with the project. I am using seven generation iPad and Apple pencil that is
compatible with the iPad. And I'm using the
latest version of Procreate application
in both the swatch, swatch that we are
using for this and two stamps that we will
be using for the project. So I have this three files
downloaded on my iPad. You can download these files
from the resource section where I have included the color swatch
and the two stamps. Once you have them downloaded, just tap on them
and the file will be automatically imported to
your Procreate application. Go to the Color
Swatch and you will find the misty mountain. Tell us what's important. Similarly, just tap
on the stamps and it will be automatically imported
to your brush library. It's very simple. All you need to do is
download and step on them. And it will be available in
your appropriate application.
3. Canvas and Palette details: Let's start the project now. Open the iPad and Procreate
application to get started. Procreate app, which is for digital drawing
and digital paintings. So you can download this
application from App Store. Once you open the application, you will see the list of
paintings that you have done. Now, tap on this, procreate and you will see the app version that
I'm using currently, which is version 5.2.2, which is the latest version. So I recommend you to use the latest version of
Procreate application. Now, let us look at the
Canvas that is available. This procreate
application that on the plus icon that
you see on the right. And you'll see the list of
canvases that are available. I am going with the screen
size canvas for this project, which is of the size
1620 by 0 pixel. You can also go for your own custom canvas by
specifying the details. Let me quickly adjust the canvas here we have the Canvas 3D. Now, let's look at
the color palette. Tap on this color palette that you see on the
top-right corner. And I had this misty
mountain color palette. So I have included this palette in the resource section
for you to download. So before you begin
with the project, make sure to download
this palette from the resource section and
just tap on the file, read, you'll have it
downloaded and it opens up automatically in the
Procreate application. We are going with very
minimal color palette, which includes shade
of gray, beach, NO white, darker shade
of blue and black. So that's it. So these are the
only colors that we need to create this
beautiful project. The colors that you see
in the first row are the colors that we will
be using for this guy. And the ones in the
next row will be the colors that we are going
to use for the mountains.
4. Painting Sky and 1st Mountain layer: I am going to pick
this gray from row one and go to the Brush
Library, airbrushing. And I will go with
the soft brush. I'm going to set the
size of this brush to about 15 or 16%, exactly to 15%. Opacity set to a 100%. I will start applying
horizontal strokes like this. I'm going to fill about 1
fourth of the canvas with this great allowed by
applying horizontal strokes. Now go back to the
color palette and pick this peach color that is second color from first true, and fill the rest of the canvas, leaving a tiny white gap between the gray
and peach color. Fill in the canvas
with this peach color. Once done, that bone adjustments,
icon caution though, and set the float to
around 50 per cent for that seamless gradient of
this to color for the sky. Yeah, that we have
a very smooth, you should know if these
two colors in this guy. So this is now done on the Laos and I am going
to rename this layer one. I'm going to rename it as dy. Once that is done, that all the layers and tap
on the plus icon that you see on the top-right corner
and create a new layer. I am going to rename this
layer to as mounting one. As you know me are going to
have multiple mountain Leo's. So I will be renaming them as montane 123 and so on, so forth. So this will be the
first mountain layer, so I'm going to rename
it as mounting one. Who did the color palette
and pick this gray color. That is the third
color from blue one, which will be the
color that we will use for the farthest mountain. So go back to the Brush Library, calligraphy and select
this mono line brush. I'm going to set the opacity
of this brush to 100%. And I will set the
size to around 15%. Yeah. And I will start around this. No, that is still
left side corner. And I am going to draw a line for my first
mountain layer like this. Draw this line somewhere in the middle of the
canvas. As you can see. Make sure that you join
the line to the edge of the canvas so there are
no gaps and you can draw, drag and drop the
color to this layer. This will be the
first mountain layer. We are going to reduce the
opacity of this layer. So go back to the layers, tap on the N that you see here, and reduce the opacity
of this layer. I am going to reduce it
around Thirty-five percent. I will set the opacity of this mountain layer
around, be poisoned. So we have this furthest
mountain, one layer already. Now, we're going to increase
the intensity of each layer.
5. Painting Mountain layer 2 to 4: Now go to the layers, tap on the plus icon
and create a new layer. And I am going to rename
this layer three as mountane to each mountain layer is pretty much similar process. That is, we use the
same mono line brush. And using this mono line brush, we are going to
draw a curvy line again for the second
mountain layer. You can either overlap
the mountains or you can keep it a different
mountain layer like this. Now makes sure the line is failed on both the sides so that you can drag
and drop the color. Go back to this layer, tap on the N symbol and reduce the opacity and
set it to around 45 person. We are now ready with
the second molten layer. Let's move on and
create the next layer. On the Layers and
create new Leo. And I am going to
repeat the process. I'm going to start
from this left corner. No, before that, let's go back to this layer and
rename this layer. I'm going to rename this
layer full as long thin tree. It does pretty much
the similar process. Again. So we're going to
start adding up Kobe Line. You can overlap this moon pains
or if you do not want it, you can keep it one
below the other. Like how I'm doing it. Show on this line to the edge of the canvas
and drag and drop the color on the layers and tap on the N
symbol that you see. And reduce the
opacity and set it to around 70, 65 per cent. Me, I'll set it to
around 65 per cent. So you have three different
layers with different colors. Then you can see for
the mountain now that only Laos and
create a new layer. This is layer five, which I am going to rename, rename it as moon painful. Now it's time to intensify
the color of this moon thing. So go to the color palette. This first color from root to a is more like a
bluish gray color. Make sure that you are
on one layer four. And repeat the same process
of adding a Coby, mounting. My drawing of the
line like this. Now, if you want, you can
leave more gap between each mountain or you
can keep it Ready. Minimal distance
between the mountains. Now, drag and drop the color. So we have a darker shade here. Again, go to the layer and reduce the opacity
of this layer. I'm going to set the opacity of this layer to
around 70 per cent. The mountain. Layer
four is now ready. Let's move on to
the next section.
6. Adding mountain layer 5 and 6: It's time to add the next layer. So tap on the layer and
create a new layer. And I'm going to rename this
layer six as mounting five. Now, if you find this
step very repeated, you, or if you find it really
boring to add so many layers, you can skip this adding
multiple layers and keep it minimal that I don't
feel four layers. But I personally prefer more delayers better
as the reason. We are going to have to
do lobe seven Leo's with Enbridge order of which the last one is going
to be the trees. Again, I'm going to add all Gabi wavy line like this
for my fifth mountain layer. I'm going to drag and
drop this color here. To also notice that
each mountain, the shape of each
mountain as different so that it keeps more dimension. I'll mix it looks realistic to keep the same shape for
each mountain he bought, changing the shape
of each mountain. Go ahead and create a new layer. And I'm going to
rename this layer seven as mountains sex. And we're going to change
the color of the small thin. So I'm going to color palette. And I'm going to pick this
second color from row two, which is a shade darker
than the previous one. I'm going to my last
set of mounting here. So I'm going to
start somewhere from this bottom left
corner like this. And I'm going to add the Gobi line and take this
point to the top here. It is overlapping the
previous mountain. Now I'm going to drag and drop
this color to this layer. And it is ready. Let's add two more
details to this layer. Go to the Brush Library, calligraphy, and select
this shale brush. Using this brush, I am going
to add the tip of the trees. I'm going to set the opacity
of this brush to 100%. And I will set the size of this brush to around 18 to 20%. Using the tip of my Apple Pencil to add
some zig-zag patterns like this to create or
to show that those are all the trees
and this layer. So as we come to the nearest mountain we
can see though are trees. So I am using this
shale brush to show the tip of the trees here
and this mountain layer. So all I'm doing is adding
this zigzag pattern. Since there's pretty much
two similar process. So I'm going to speed
up the process. When I am adding this
zig-zag patterns. You can adjust the
speed of this video and the settings and keep it in the pace that
you would like it. Once you are done
filling or adding this detail to this
last molten layer, Let's move on to
the next section.
7. Adding the trees and sunlight glow: It's time to add lastly, which is going to
be the tree layer. Tap on Laos up on the plus
icon and create a new layer. I'm going to rename this
layer eight as trees, where we will add
buying, treat stamps. Now go to the color palette
and make this black color, which is the third color
from root to go to the Brush Library and select
this mono line brush. I am just going
to add an outline where I want to
place my trees just to know that when I
want to add the trees. So this is the outline
that I am drawing. Again, it's still go BBB line. So I'm going to drag
and drop the color. This is done. Now, let's
add the pine trees. Tap on the Brush Library and
select this pine tree brush, which again, I have included it in the resource section
from him to download. I'm going to set the
size of this brush to around 10% and opacity
is set to 100%. And I will just tap on the screen like this
to add the pine trees. You can also adjust
the size to add some smaller and
some bigger trees. And just adjust the placement
of the trees in this layer. That's it. We are done
adding the trees. Now it's time to add the sun. So I'm going to create a new layer on the Layers and create a layer
just above the sky layer. Now go to the color palette
and pick this color. Before that, let's
rename this layer nine. I am going to rename
it as sun rise slide. Name it as sunrise. Tap on the Brush Library
and airbrushing soft brush. I am going to set the
size of this brush to around ten per cent and
opposite is set to a 100%. And I'm going to
add some local law, making us moles, so good
kind of thing here. Let me just undo it and show
it again. I am just kidding. On the screen using
the tip of my pencil and just creating a
small circle like this. It looks really light, so I'm going to redo it
again by just adding o, going over and adding
the circle again. Using the soft brush. Dab on the adjustments. I can go Schindler
and save a lot about what I'm going to
set it to around 40%. Just to show that little
glow of the sunrise. Then negating Florida down, I've been said the Gaussian,
around thirty-five percent. Let's add the sun in
the next section.
8. Painting the sun and flying birds: Time to add the sun tab only. Go to the color palette
and this white color. And using the same brush. Go to the Brush Library and
select a soft airbrush. I'm going to set the size
of this brush to around 2, 13% and opacity is set to 100%. And I'm going to draw a
tiny circle like this. Good to increase the
size spot though. So I will set it to around 20%. And I'm going to make the
circle bigger by going. So glad strokes like
this and add this sun. Now using the same brush, I am going to add some
horizontal strokes, very light, very gentle, and not applying a lot of
pleasure very lightly. Add this body is on two
strokes around the sun. Now tap on the adjustments
gaussian blur and said the blood around 6% or 7%. Then we have this
nice glowing sun. We are done adding
this nice sunlight and the glowing
mornings and dries. We're almost ready. I think it needs
I'm flying birds. So let's do that now. Go to the color palette and big black color
from this palette. That is third color
from second law. We'll do the layers and create a layer just above
the trees layer. And I'm going to
rename this layer, and I'm going to
rename it as birds. Make sure that you have black. Now go to the Brush Library
and select this stamp, which I have included in the resource section
for you to download. So just tap on the screen
like this to add this. But I'm going to adjust the size of the stamp to around 15%, opacity set to a 100%. And I'm just going to tap
it on the screen like this. Now, tap it where you
want to place it. Let me just undo it and
add them here. Yes. We are now ready with this beautiful misty
mountains and rice. I hope you've enjoyed painting digitally in
Procreate application. And if you like the class, please don't forget that the
glass can reach more people. So until next time, take good and happy painting.
9. Thank you!: Thank you so much for
watching this class. You can always learn to
pay more similar painting using reference images from the sites that
offer free images, like Pixabay and Unsplash. Share your final artwork and
progress shots by uploading your work to your
project section so that I can share them. If you have any questions or
need any help or more tips, please let me know.
I'm happy to help.
 Sheetal Shetty, artjauntwithsheetal