Transcripts
1. Introduction, Understanding How to Use the Pen Tool in Illustrator: Welcome everyone to this course, understanding how to use the Pen tool in
Adobe Illustrator. Hi, I'm your host, Elianapls. I've been an educator
over the past 28 years, teaching in universities and social platforms
covering vector design, page layout, animation
techniques, and prototyping. In this Illustrator course, we'll learn how to draw
open and closed paths. How to combine curves
with straight lines. How to create multiple curves, and how to draw more
complicated curves with corner points. In addition to further understanding the
functionality of the pentul, we'll practice step step
drawing, two ornamental designs. Combining all techniques
with tons of tips and trix. By the end of this course, you will have a
firm knowledge of how to use the penrul for any platform and get you ready for your o vector projects.
2. How to Use the Pen Tool Setting Up: All right, everyone
inside Illustrator, and before I start
drawing paths and curves, a couple of things to
bring to your attention. Inside the preferences panel under the selection
and anchor display. And all the way at the
bottom where it says enable rubber band for the Pentrlll. Go ahead and disable that. Would disable the
show path preview. While drawing, I'm going
to click okay on that. Then under the View menu, I'll check if the smart guides are on which this should be. By default we can
have object snapping. Smart guide helps
us align, edit, and transform objects or artboards relative
to other objects.
3. How to Use the Pen Tool Straight Paths with Open Path: Now looking inside
the layers panel, I have created a
bunch of examples to help you understand
the different concepts of using the Pentrol. Beginning with the
first example, we have straight
lines with open path. So inside the layers panel, I select this layer
from the T bar, I grab the Pro, I will click right here to
add the first Eq point, then go right here to
add the second Ek point. As I move to add
the next Ek point, I get the smart guides, magenta line indicator, which helps me to
align things up. I will continue adding more
K points with the help of the smart guides to complete
this straight segment. As you can see here, things get covered with the white field color
assigned to this layer. To remove that inside the property spanel and
under the appearance, I will click on the
Field thumbnail and then select None for color. Now we have an open path, straight segment indicated by a separate anch
point on each end.
4. How to Use the Pen Tool Straight Paths with Closed Path: For the next example, we have straight lines with closed path inside
the layers panel. First, I would toglef the
visibility of the first layer, toggle on the visibility
of the second layer, Select the layer
from the tool bar. Once again, I grab the
pencil and I'll make sure that I only
have a stroke color. Then right here I'm
going to click once to add the first point. Now moving on to the
second point, right here, I'll press and hold
the shift key on the keyboard to make sure
the path is a straight path. And click once with the shift
El still pressed and with the help of the smart guides indicated by the magenta line, I'll go ahead and
continue adding more straight segments
to close the path. I'll mass over right here
on the first icy point. Now a small circular pierce right next to the penul pointer. All I have to do is just
click once to close the path. Now we have a close path where all c points are
connected to each other.
5. How to Use the Pen Tool Combining Curves with Straight Lines: Next up, we have combining
curves with straight lines. Once again, I will talk a the
visibility of this layer. Talk on the visibility
of that layer selected, Grab the petrol, make sure
that only have a stroke. We click and drag upboards to create the first smooth point. A smooth point is made up of
two linked control handles. That's why we're going to
create those score paths. Now, in the event
that you misplaced the smooth points with
the mouse held down, I'll press the Space part
on the keyboards and move the smooth point around and place it to the
desired position. Release the Space bar and then press the shifty on
the keyboards to constrain the tool movement to multiples or 45 degrees,
in this case, the score. Keep it right here and
I'm going to release, then I'll go right
across right here. With the help of
the smart guides and the magenta line indicator, I will click and drag downwards and also press the shifting on the keyboards to constraint
the movement and release. All right, now we have a curve
followed by straight path, which means we don't need
this outgoing control handle. I will have her over
the last points. A convert point icon appears
next to the pentrol. I will click on this K points to convert the smooth point
to a corner point. All I have to do is just
hover over right here and click on to create
the straight segments. Now a curve path is coming, which means this last
K point needs to have a control handle to be able to create this
upcoming curve path. Once again, I will have her over this last Kpoints convert
point icon appears. We'll click hand drag downwards
and pressure shift key on the keyboard to make
sure this is straight. I'll release that.
I'll go right here. And then click
hand drag upwards. As I press the shift
key on the keyboard to constraint the movement,
I release that. Now from the curve path, we have a straight segment, which means we don't need
the outgoing control handle. In this case, I'm going to
hover over this last K points. A convert point icon appears. Click on that to convert the smooth points
to a corn points. All I have to do is here is just click once to create
the straight segments. Once again from the
straight segment, now we have a curve
path following, which means we're going to
need a control handle coming out out of these anchor
points we'll have over here. And then click drag upwards, and press shift key
on the keyboard. Release that, and
then go right across, Click, drag downwards,
press shift key. Here we go. We have combining
curves with straight lines.
6. How to Use the Pen Tool Multiple Curves: For this next example, we have multiple curves, which means we are going to need smooth points all around. I grab the pencil, I make sure
that I only have a stroke. And then right here
I'm going to click and drag airpods to create
the first smooth point. I'm also going to
press shifting on the keyboards to constrain
the movement and release. I'll go right across
and with the help of the smart guides and the
magenta line indicator, I will click and drag
downwards and press shift on the keyboard to
constraint the movements. I'll release that.
Go right across, then click upwards
and press shift on the keyboards to create
this curve path. I release that right
here, right across. Again, with the help
of the smart guides, I will click downwards
and press shift on the keyboards to create
this curve path as well. Now I have an open path
with multiple curves.
7. How to Use the Pen Tool Curves with Corner Points (A): All right, here we have the first example of
curves with corner points. Once again, I'll
grab the pencil, I'll make sure that
I have a stroke. Then right here, I'm
going to click and drag downwards to create
the first smooth point. As I do, I'm going
to press Shift on the keyboard to constrain
the movements and release. I'll go right across. And with the help of
the smart guides, I'm just going to click once
to create a corner point. Now a curve is coming up, which means we're going to need a control handle coming
out of this anchor point. I would have over till I
see the convert point icon. Then click and drag
downwards and press shift on the keyboard to constrain
the movement and release. I'll go right across here and click on to create
the Conner points. Once again, a curve
is coming up, which means we're going to need a control handle coming out
of these anchor points. I will hover over till I
see the convert point, then click drag downwards and press shift as to
constrain the movements. Release that right here. Just click on to create
the Conner points. Here's the first example, curves with corner points.
8. How to Use the Pen Tool Curves with Corner Points (B): For this last example, we have rather more
complex curves with corner points. Let's
see how that works. I grab the petrol, I make sure I don't
have a stroke. Then right here I'm
going to click, hand drag up parts to create the first smooth point with
two linked control handles. I'm also going to press
Shift on the keyboard, constrain the
movements and release. I'll go right across here, and with the help
of the smart guides and the magenta line indicator, I'll click and drag downwards. And also going to
press Shift key on the keyboards to
constrain the movements. Here is the extra technique, still with the mouse held down, still with the shift key press. I'll add the alt key or
the option key to the mix. That will be a
shift option shift. As I do, I can break the pairing of these two
linked control handles. Position the at go handle
right on top here. Release that. Go right across, click and drag downwards. As I do, I'm pressing the
shift key on the keyboard to constat the movements without
releasing the shift key. I'm going to add the
out key to the mix. There will be a shift option, shift position, the at handle, right here, right on top. I release that. Go right across, right here, click
and drag downwards. As I do, I'm pressing
the shift key on the keyboard to
constate the movements. Then shift option shifts
to create the last curve. I will position the control
handle right here on the top. Release that, then
click and drag downwards pressing the
shift key on the keyboards. And here is a more
complex example of curves with corner points.
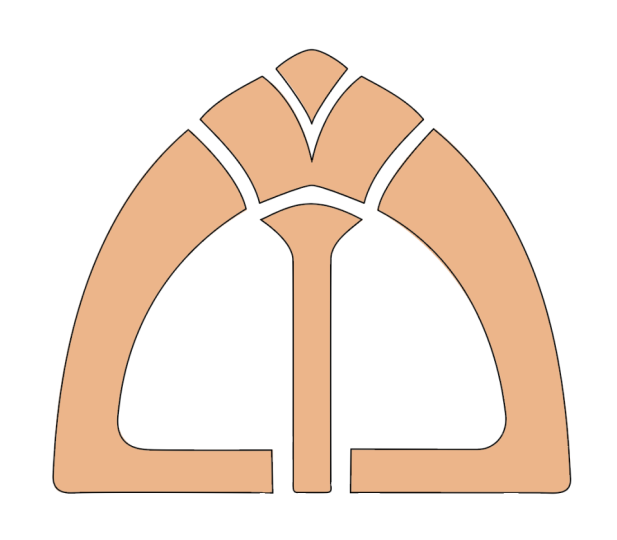
9. Illustrator Pen Tool Drawing an Ornament Setting Up: All right, before I start
drawing the first ornament, some things to set up inside the preference spanel under the selection and
anchor display. All the way at the
bottom I will check off the enable rubber
band for the pentel, which will disable
the show path preview while and then click Okay. In addition, under
the View menu, I'll check if the
smart guides are on, which should be by default. So we can have object snapping under the Fun
menu, I'll click to place. I will click to select
the first ornament. I will place this as a template layer and
then click to place. Now looking inside
the layer spanel, the template layer
is a locked layer. It is a non printing layer that I can use to manually
trace the image. In this case, I
will double click on the template layer thumbnail. Inside the layers options, I'm going to dim the
image even more. I'm going to bring this down
to 30% and then click, okay, I'm ready to go to the next step and start drawing the ornament.
10. Illustrator Pen Tool Drawing an Ornament Drawing Shapes (A): To start drawing these
ornaments from the tool bar, I'll grab the pen thru, I'll make sure that I don't
have a field color, I just want to a stroke. I will click none or I can also use the keyboard shortcuts. I'm using a stroke
of one point and I'm also going to make sure that I'm inside the ornament layer. I'll start this by creating the first smooth
point right here. I'm going to click
and to create that. As you can see, a smooth
point is made up of two linked control handles. I'll release that for
the next smooth point. The key thing here is to
cover a distance as possible. Avoiding this way
multiple anchypoints, which they can be hard to manage for the next smooth
points. I'll go right here. I'm going to click and drag. I'm also going to pressure
shift key on the keyboards. I'll Zoo for the
next smooth points, since I want to cover
this distance here to create this curve right here, I'm going to click and pressure shift key to create
the next smooth points. Now as you can see, I
get this extended path. And that's because
Illustrator tries to cover the distance between
this anch point, this key point, which
is quite short. The fix here is to press and hold the control
key, or the command key. I will click and
drag, and as I do, I'm also going to
press Shift Key to understand the movements. I'll release that
for the next point. Since this is a
straight segment, all I have to do is just press
shift key on the keyboard. Click on, press the shift
key on the keyboard. Click on right here. I'm going to click and
drag and pressure shift key to create a smooth point because a curve is coming up, We'll click and drag. I'm pressing the shift
on the keyboard as I do to create this
nice curve here. I'll admit the right here. That will be the
next smooth point. We'll click drag that. Now, with the mouse
still held down, since I want to follow
this image path, I'm going to change the
direction of the control handle. I'll press the Lk of
the option key and I'm going to break the pairing of the to link control handles. I'm over right here,
since I'm following this image here,
I'll release that. Then I will have it over
on the first key points. I'm just going to click once, close the path
from the tool bar. I grab the direct selection two. Now I can smooth those curves nicely since I have
the control handles. Same thing for this right there. And then I can just bring this
up. Let's go ahead a zoom. See what's happening
here. I'll mark you select with the
direct selection to, let's see, this actually
can be right here. There we go. That looks good. I can also bring this out
just a bit or bring this in. As long as you can see
this is a smooth curve. All right, on this
one right here, well we have some options. I can just click and dark on this handle, that looks good. I can do the same here, can leak out this one
right here, I believe. Now I have a nice
transition here, perhaps a little bit here. I can also bring this up a bit. See, as long as you
have a nice transition, there we go, that looks
good on this one. I can just bring this in
just a tad. There we go. All right. I like
what I see now. This is the first shape and
this is identical to this. I will mark you select
with a selection tool, then click hold to get
to the reflect tool. I will tap click on that. I will leave everything as I'm just going to create a copy. Back on the selection tool, I will click and drag to
move this to the other side. I'm also going to press
shift on the keyboard to contrate the
movements and release.
11. Illustrator Pen Tool Drawing an Ornament Drawing Shapes (B): Continue drawing the ornament. Once again, I grab the pencil. I'll make sure that I don't have any field colored as the stroke. It's going to remove that
using a keyboard Shockut. I'm going to zoom in here and just click to create
the first smooth point. I'm also going to press the
shift key on the keyboard. I release that, Go
right across here, click to create
another smooth point. With the mouth still held down, following the image path, I need to change the direction
of the control handle. I press and hold the Lk of the option key and
I'm going to break the pairing of these two
link control handles. I'll release that. Go right across, click and drag to create a
nice smooth point. Once again, I need to
break the pairing of these two link control handles
option on the keyboard. For that I'll release that. Go right here at the bottom, click and drag a
option, then Nlm, going to hover over till I get the magenta line indicator
coming from the smart guides, I will click and drag and pressure shift on the
keyboards and release. I'll grab the direct
selection tool. I'm just going to fix my curve sum to have a
nice transition here. This one to this one. I'm just going to move this there and this one
here, All right? I believe things looking great. Maybe this one I can make was
just a little bit smoother, something along those lines. All right, we'll select the
selection tool. Select that. Since this is symmetrical shape, I'm going to double
click on the Reflecto. I'll create a copy, Grab
the selection tool, click and drag to move this to the other side and release. Now I need to join those
two shapes together. So I have one shape. I'll grab the direct
selection tool. The first I will
select the two points. Now to join first I need to make sure
that those two points line perfectly in
relation to each other under the Obsc menu path. Average both, then Obs
menu path and join. I'll do the same one here. I will mark select two end point with the direct selection tool. But actually I can use
a keyboard shortcut that will average both of these paths and
join them together at the same time.
That will be control. I'll shift J. I'm
going to click, okay, great. But that shape. And we can also double check our work inside the layers band. Here's the path.
It's a single path. All right. I'll do
the same on here. I'll select the pento. I will click and drag to create
the first smooth points. I'll release that click, Add option to break the pairing of these two
link control handles. Then right here
I'm going to click and drag and press
Shift on the keyboard. As I do, I'll grab the
direct selection tool, and I'm just going
to have a nice curve here. I'll release that. Grab the selection
tool, Mark selects, double click on the reflector, create a copy, grab
the selection tool, click and drag as. I'm also going to press
Shift on the keyboards. Move this right
across and release. I grab the drag selection tool, Mark selects two end points. I'm going to use the
keyboard circut to average both join them at the same
time. Same thing here. I'm going to use the keyboard
circut to average both join them at the same
time, then click okay.
12. Illustrator Pen Tool Drawing an Ornament Drawing Shapes (C): All right, so to
complete the ornament, we have one more shape to go. I'll grab the pencil. I'm also going to make sure that I
don't hand in field color. I'm going to zoom in
a bit here and then click and drag to create
the first smooth point. As I do, I'm also
pressing the shift key on the keyboard and release that. I go right here. Click to
create the next smooth point. With the mouse still held down, I'm going to press the
Alk of the option key. Change the direction of
this control handle. Release that. Go right here. Click, press
Shift key and release. I'll go right here
at the very bottom. This is a straight segment, but we also have a
curve coming up, which means we're going to
need another smooth point. Right here, I'm going
to click and drag. Press Shift key to create
another smooth point. Release that click and drag to create
another smooth point. Then go right here. I'm going
to slowly hover over till I get the magenta line indicator coming from the smart guides. I press Shift key and click once to make sure that I
have a straight segment. All right, I'll grab the
direct selection tool. This looks good. Maybe I can just bring this
down just a tad. Then right here, I'm
going to bring this up a bit to have a nice
transition that looks good. I will grab the selection
tool, Mark you select that. I'm going to mirror
this to the other side. I would double click
on the reflect rule. I'll create a copy back
on the selection tool. I'll click and drag
to move this to the other side, right there. And then I grab the
direct selection rule. Select those two end points. And I'm going to
use the keyboard circut to average
both and join them. I'm going to click okay here. I'll do the same one right here. Will select those two
points around the keyboard Circut to average both and
join them at the same time. There you go, the whole ornament using the very
powerful pen tool.
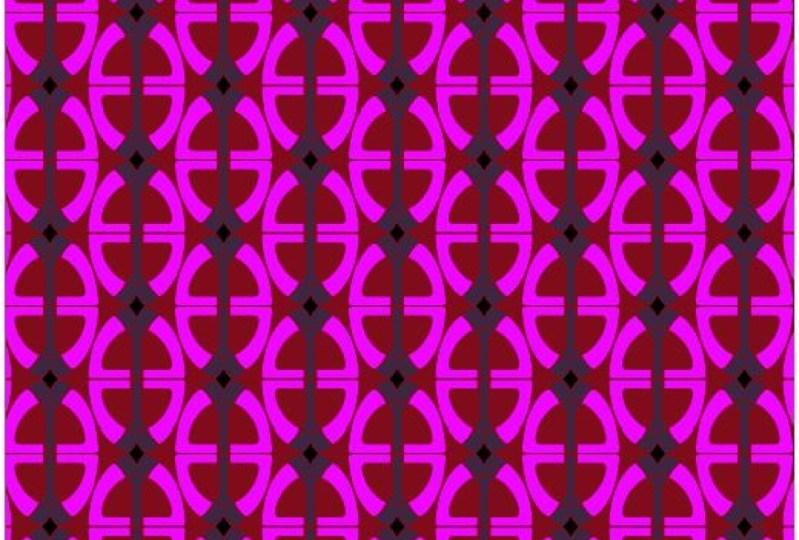
13. Illustrator Pen Tool Drawing 2nd Ornament Drawing Shapes (A): To draw the second ornament. Once again I'll grab the
pendrl from a tool bar. I'll make sure that
I don't have a feel, I just want to have a stroke
inside the layers panel. I'll click to select
the ornament layer. The very first smooth point
it will be right here. I'm going to click
and I'm also going to press specifically
on the keyboards to constrain the movements. I'll release, let's
say around here. I'm going to click and drag to create the next smoothpoint. I'll release that right here. Click again. I'm pressing the shift key on the keyboard to constrain
the movement and have straight control
handles here, right there. Click drag to create
another smooth point. While I'm pressing
the shift key, release that, Then right here, I'm going to click drag to
create another smooth point. Before I release, I'm also
going to press the L K of the option key to
break the pairing of these two link
control handles In order to follow
this image path here. I'll position it right there. I'll release everything
and click once. All right, now I can continue
actually with the penol, but this one here
looks like a circle. At least some of
it in this case. I'll go ahead and get the
help of the ellipse tool. Then right here I'm
going to start drawing. And as I am going to press Shift option shift to create a perfect circle
from the very center. Now with the mouse
still had down, I'm also going to add the
space bar onto the mix. Reposition this,
release the space bar, continue drawing from the
center, and release everything. All right, now I need to
create a cut right here. In this case, I'll grab the S tool then nice and carefully I would place the mouse
right here, path. I'll click once to create a cut. I'll grab the direct
selection tool. I'll select this path here. Press delete key of the
back space on the keyboard. Select that, press delete key, press a delete key
again, the marquee. Select this end points
and delete that as well. Now I have, as you can
see here, two open paths, which is quite correct, but I need to combine
them as a single path. With the direct selection
tool, our marquee, Select two end points under
the object menu select path. Then I'm going to average both
to make sure both of these aligned perfectly in relation
to each other. Now they do. Then back on the object
menu path, Enjoy. Great, now I need
to continue this. Once again, I grab the pen tol to join
on to an open path. You see this is an open path. I will have over right here, the end anchor point. Now the tool shows
a forward slash, that means I can click
and drag upwards as I do, I'm also pressing the shift key to drag out a
directional handle. Now in addition, still
with a mouse held down, I'll try to keep both of these opposite handles
equal in length. That will help me to create the upcoming curve path
with a nice transition. I'm going to eyeball
this one here. Let's say around there, I think both of them
are equal in length. Then right here I'm
going to click drag. And I'm also going to press
the shift on the keyboard. Now I have a very
nice transition between those two points. I release that, go right
here, click Shift. As I do, I release
that click and drag. I'm also going to
press the Alta of the option key to
break the pairing of these two link raw
handles and to be able to follow the image
path right there. I'm going to click once
the nice and slow, I'm going to hover
over till I get the magenta line indicator
coming from the smart guides. In this case, I'll press the
shift on the keyboard and click once to have
the perfect segments. Now grab the direct
selection tool. I'm looking at the overall shape here, actually looks great. What can I improve? Maybe I can bring this one down a bit. Again, I'm looking for the
perfect transition here. You need to spend a
little time just in case you need to
improve certain things. Maybe I can bring
this up a bit tad. We have to do the
same one here too. See very nice transition in the curve overall.
I like what I see. I can also move this one in
altogether to the left side, and I'm pressing this
swiftly as I do. There you go again. Very nice transition. Now I need to
create a duplicate, a mirror. This to
the other side. I grew up the selection tool. I'll select that, then I'll click and hold
to get the reflect tool. I'll double click
on that. And inside the reflect dialog box I'll
keep everything as is, but I'm going to click
to create a copy. I grab the selection tool
and then click and drag. And as I do, I'm also
pressing the shoot key on the keyboard to
contain the movement. And this is going to snap. I release that. Grab the
direct selection tool, mark you select two endpoints. Then under the object menu, first I will average
both to make sure both of these aligned perfectly
in relation to each other. Now they do, then back on the object menu path
and then join this one. I'll do the same market, select those two end points of the direct selection tool
and then object menu path, average both the object
menu path and join. There we go, we've
got the first shape.
14. Illustrator Pen Tool Drawing 2nd Ornament Drawing Shapes (B): To complete drawing
the second ornaments. Once again I grab the pencil and I'm also going to make sure that I don't have a fill color. I just want to have a stroke. I'm going to zone in a bit here, and the first anchor
point will be right here. I'm going to click and
drag upwards as I am. I'm also going to press Shift
on the keyboard to constant the movements and then release the next booth
point will be right here. I'll click and drag before
I release the mass, I'm also going to
press the out key of the option key and break the pairing of the to link control handles in order
to follow this image path. Here I release, go right here. Click and drag again.
Out or option. Change the direction of
this control handle. The right here, I'm going
to hover over till I see the magenta line indicator coming from the smart guides. And then click drag downwards. And I'm also going to press the shift key on the
keyboard and release. I grab the direct
selection tool. Now that I have both
of these handles here, I can just go ahead and drag
this out. There you go. Maybe for this one I'll click on that to be able to
see the handle here. I'll try to split the distance
between those two handles. There you go, to have a
nice and smooth curve here. All right, that looks good. All right. Now I'll go ahead
and grab the selection tool. Mark. You select
that because this is asymmetrical path here. I'm going to create a
copy and then join them. I'll double click
on the Reflectol. I'll keep everything as is, create a copy, Grab the selection tool and
then click and drag. And I'm also pressing the
shift on the keyboard to cons the movements
and then release. I'll zoom quite a lot here. Grab the direct selection tool, mark selectors to end points. Instead of using the path
average both of the join. I can also run the
keyboard shortcut to to do both of
these tasks together. That will be the control. I'll shift and J
at the same time. I'll click to join. I'll do
the same one right here too. I will run the keyboard shortcut to join this two,
and then click. Okay, look inside the
layer spanel. Here it is. This is a single path. As for this one, I'll
grab the Penrol. I'm just going to click once because a straight
segment is coming up. But then we have a
curve coming up. We'll click hand upwards. And I'm also pressing
the shift key. Before I release, I'm also
going to press the Al key on the keyboard or the option key to change the direction
of the scuptroal handle. I'll move it right here. Click and drag out option,
and then right here, I'm going to close the path by clicking and drag into the
Tads and release that. I'll grab the direct
selection tool. Let's see, I'm
going to first have a nice smooth curve
here. This one too. There you go. That
looks fantastic. All I have to do now is just
select that close path, double click on
it, create a copy. And then move this
to the other side, this one right here,
press Shift key and to constrain the movement. All right, now to color these, since all of these
are actually strokes, I'll mark you select
with the selection tool. I flip between the stroke and the field and then
double click on it. Perhaps use a color of my
choice here, any color. And then click okay, like so.
15. Elias Sarantopoulos Thank you: Thank you so very much for
spending time with me, understanding how to use
the Pentrol in Illustrator. Reach out if you
have any questions or feedback about the course, it would be a great
help to hear from you.
 Elias Sarantopoulos, Helping You Develop