Transcripts
1. Course Introduction: Build amazing three D scenes directly inside After Effects. Throughout this training, we'll explore the native
three D features to create stunning graphics
without third party plugins. Welcome, everyone. I am Bon
instructor Elias Ataplos. I am a motion designer and
educator over 30 years of experience helping students to master the Adobe ecosystem. I'll guide you through
the technical steps so you stay focused
on your designs. We'll use the new mesh
drawing tool to create cylindrical geometry
and substance materials for a professional
and polished look. I'll show you how to bring
Illustrator vectors into After Effects and transform them
into native three D shapes. We will use a high
dynamic range image for elastic lighting and at node camera rig for those
smooth cinematic shots. Whether you're
looking to level up your skills or impress
your next client, I'm excited to share these
techniques with you, so let's dive right into it.
2. Environment Light: Before I start applying textures and materials
to the three D shapes, I would like to
light up the scene as realistic as possible. So a couple of things here. I'll click on the timeline, and under the learn menu, I
create a new three D light. For the light type, I'll
choose environment. I'll set its intensity to 100%. We're going to unable to
cast the shadows and set the shadow darkness to 100%.
And then I click Okay. Here we go. The
scene has been lit up with very nice
dark shadows here, which actually we can control inside the light options.
This is totally up to you. I'm going to stay with 100%. Now, to make it more realistic, we're going to actually
use image maps that they have high dynamic
range information. These HDRIs are free
to download from Adabi Stock and have included a link below
the video description. So inside the project panel, Ada Booklik and inside
the texts folder, I'll import the Sierra Mantra, CRI, and then click to import. I'll click and drag
this into the timeline, target the Environment Light, and for the light
options and the source, I'll choose the Sierra andre. And now our three D
scene has been lit up with a much more
realistic light source.
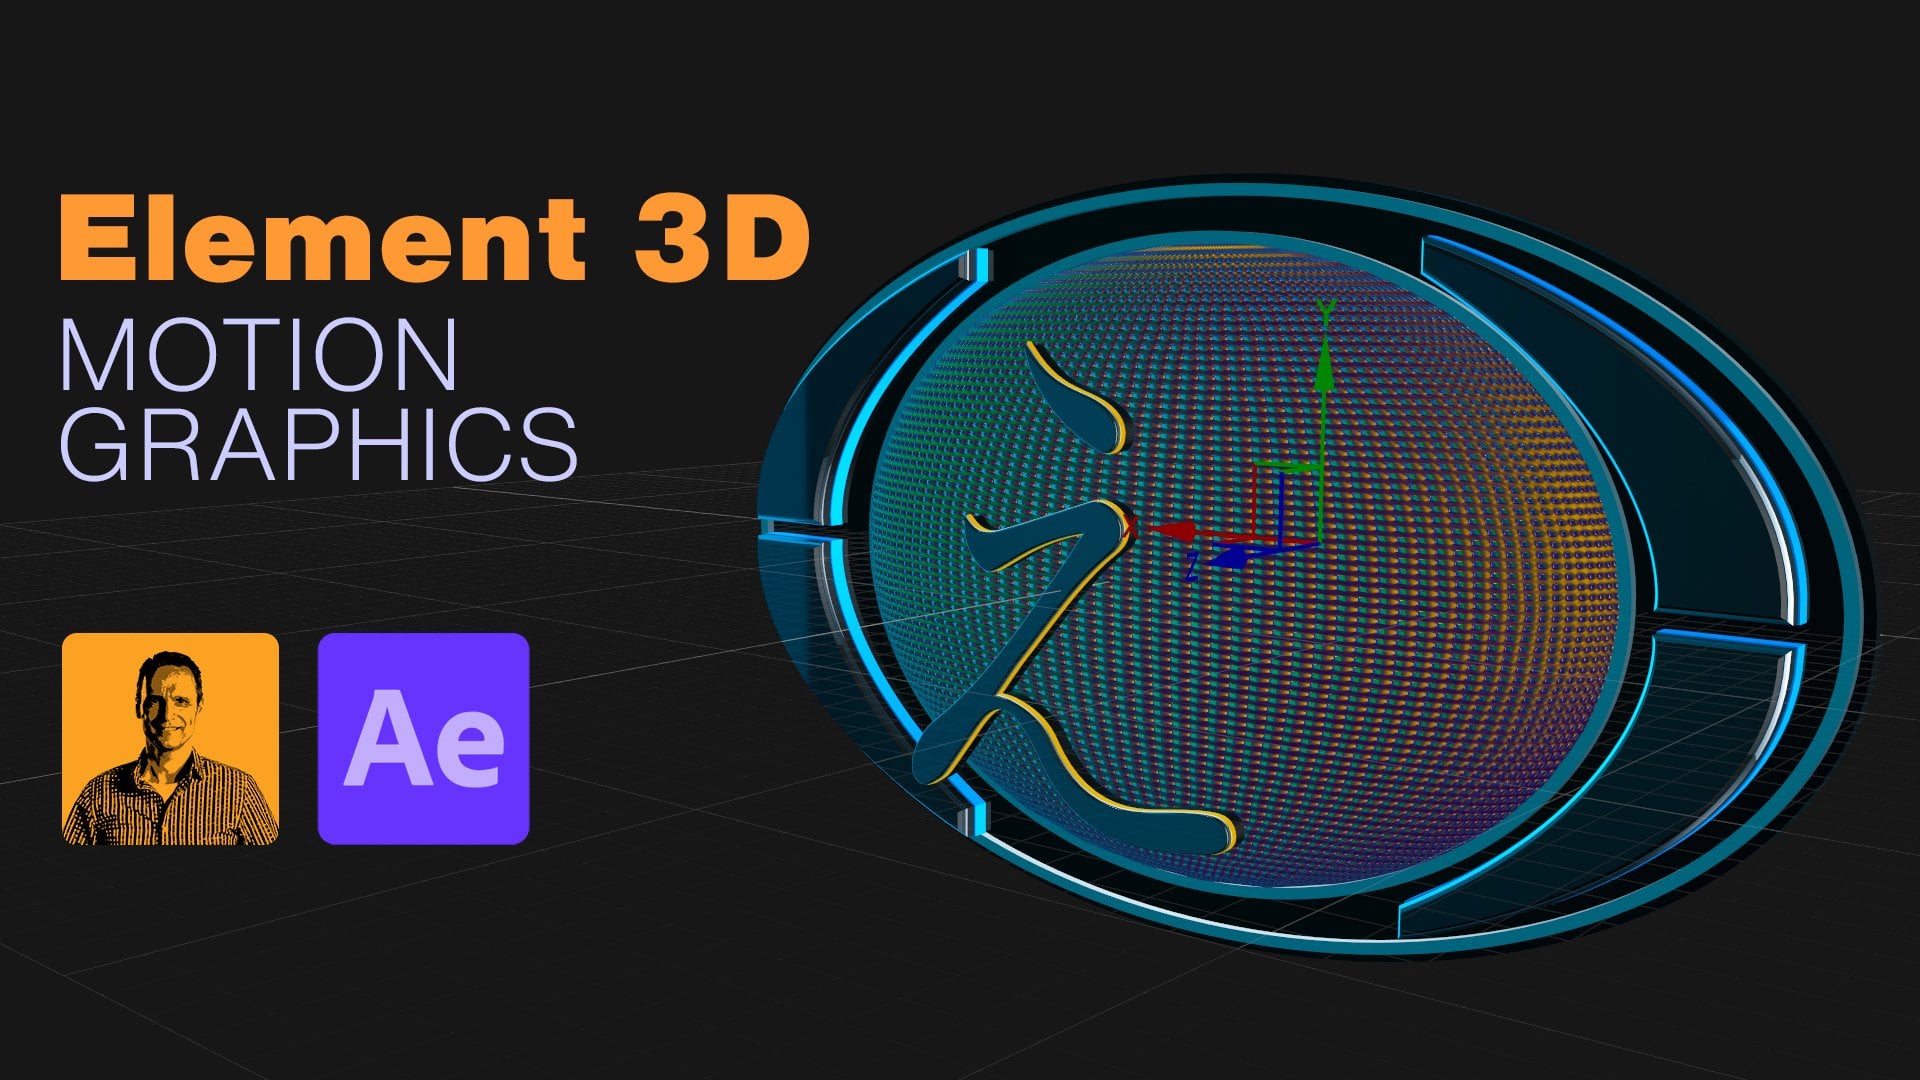
3. 3D Objects: Working inside
Adobe After effect, we've got a new composition
named three D Logo. And from the tool bar, I grab one of the
Mesh drawing tools, and that would be
this cylinder tool. And then I click
drag a shift key to create a cylindrical
shape and release. Couple of things I want to
talk about before getting into the mess options is
to press Enter return and rename these
two, just Cylinder. And since we use a
three D mess object, After Effects automatically sets the renderer to the
advanced three D, which allows us to work with
geometry like this one, depth and complex materials. One important feature
when working inside the Advanced 3D renderer
and its options is to reduce the render
quality and the smoothness while we are working so we get fast preview times. Also for the casting box center, we're going to click
to fit the scene, and that would include
all visible layers in the composition that
can cast shadows. And then I click
Okay. All right. So for the X rotation, I set one to nine degrees and just a negative value on the
zer rotation to be able to see the changes inside
the mess options. So for example, we'll
set the radius, which is the width
and the thickness of the cylinder to 300. The height, this controls the length of the cylinder
from top to bottom. That will be set to 30. And actually, instead
of a cylinder, I would like to
have a wedge shape. So for the slice end,
instead of one X, I sets 1210 X. I'll up the sides to 100 and now we
have a nice and smooth shape. And to have those
edges a bit smoother, I will offset this two degrees. Alright? Alright, so
things are looking good. I'll reset the
zero tase to zero. And inside the project panel at the Bklck and inside the
main folder and the icons, I've got the triple logo
and the triple text. Both of these can be
found on the web. So I will import that as forage and also import
the triple text. Also as forage. I'll shift select and bring
them into the timeline. And then right click to create
shapes from vector layer. No need to have those visibles. I'm just going to delete
them in the timeline, and then press Enter return, and we name this just dribble and this one to
just dribble text, just for organization purposes. Since we are working
with three de layers, that means we also
need to convert those two into three layers. And let's start working
with this one first. Once again, since we are
working on three D space, instead of one view, I'm going
to set mind to two views. This one here is the left view, and you can change the views right here on this
drop down menu. All set mind to left view to be able to see the
relationship between all of these three D meshes
and for the dribble text, a press stellar S
on the keyboards, scale this up to 300%. Center this in relation
to the wedge shape, and for the geometry options, I'll set the extrusion
depth to 20. A some in a bit and on the Z, I'm going to bring the in so
there's no gap between those two and s. Like so. We'll do the same
for the druple text, press S on the keyboard. I'll scale this up 230%. I'll center this. And for
the geometry options, also the extrusion
depth set 220, and on the Z, we do the same. There's done gap between
those two and sum. All right. All right, so things
are looking good, let's go back to the one view here and to be able to see
things a little better. And under the later menu, I create a new camera. This is going to be
a two node camera, preset to 35 millimeters for the lens, and
then I click, Okay, so for the camera one and
the camera control tools, I'll use the orbit
around the camera, which basically
is going to orbit around the point of
interest of the camera. There we go. I'll
pan this a bit. I can also dolly the sin to be able to see the changes that
we're going to make. So, for example, for the dribble here and the geometry
options and the bebl style, I'll set this one to angular. And as you can see
here when I zoom in, that created a flat diagonal
slope at the edges, less to the same for
the drible text. Set the bevel style to
angular, rotate that. Here we go. We can
see the edges here. All right. One more thing for the cylinder shape and look at the mes options
and the radius, I set this one to three, and now we have a bevel edge
around this wedge shape.
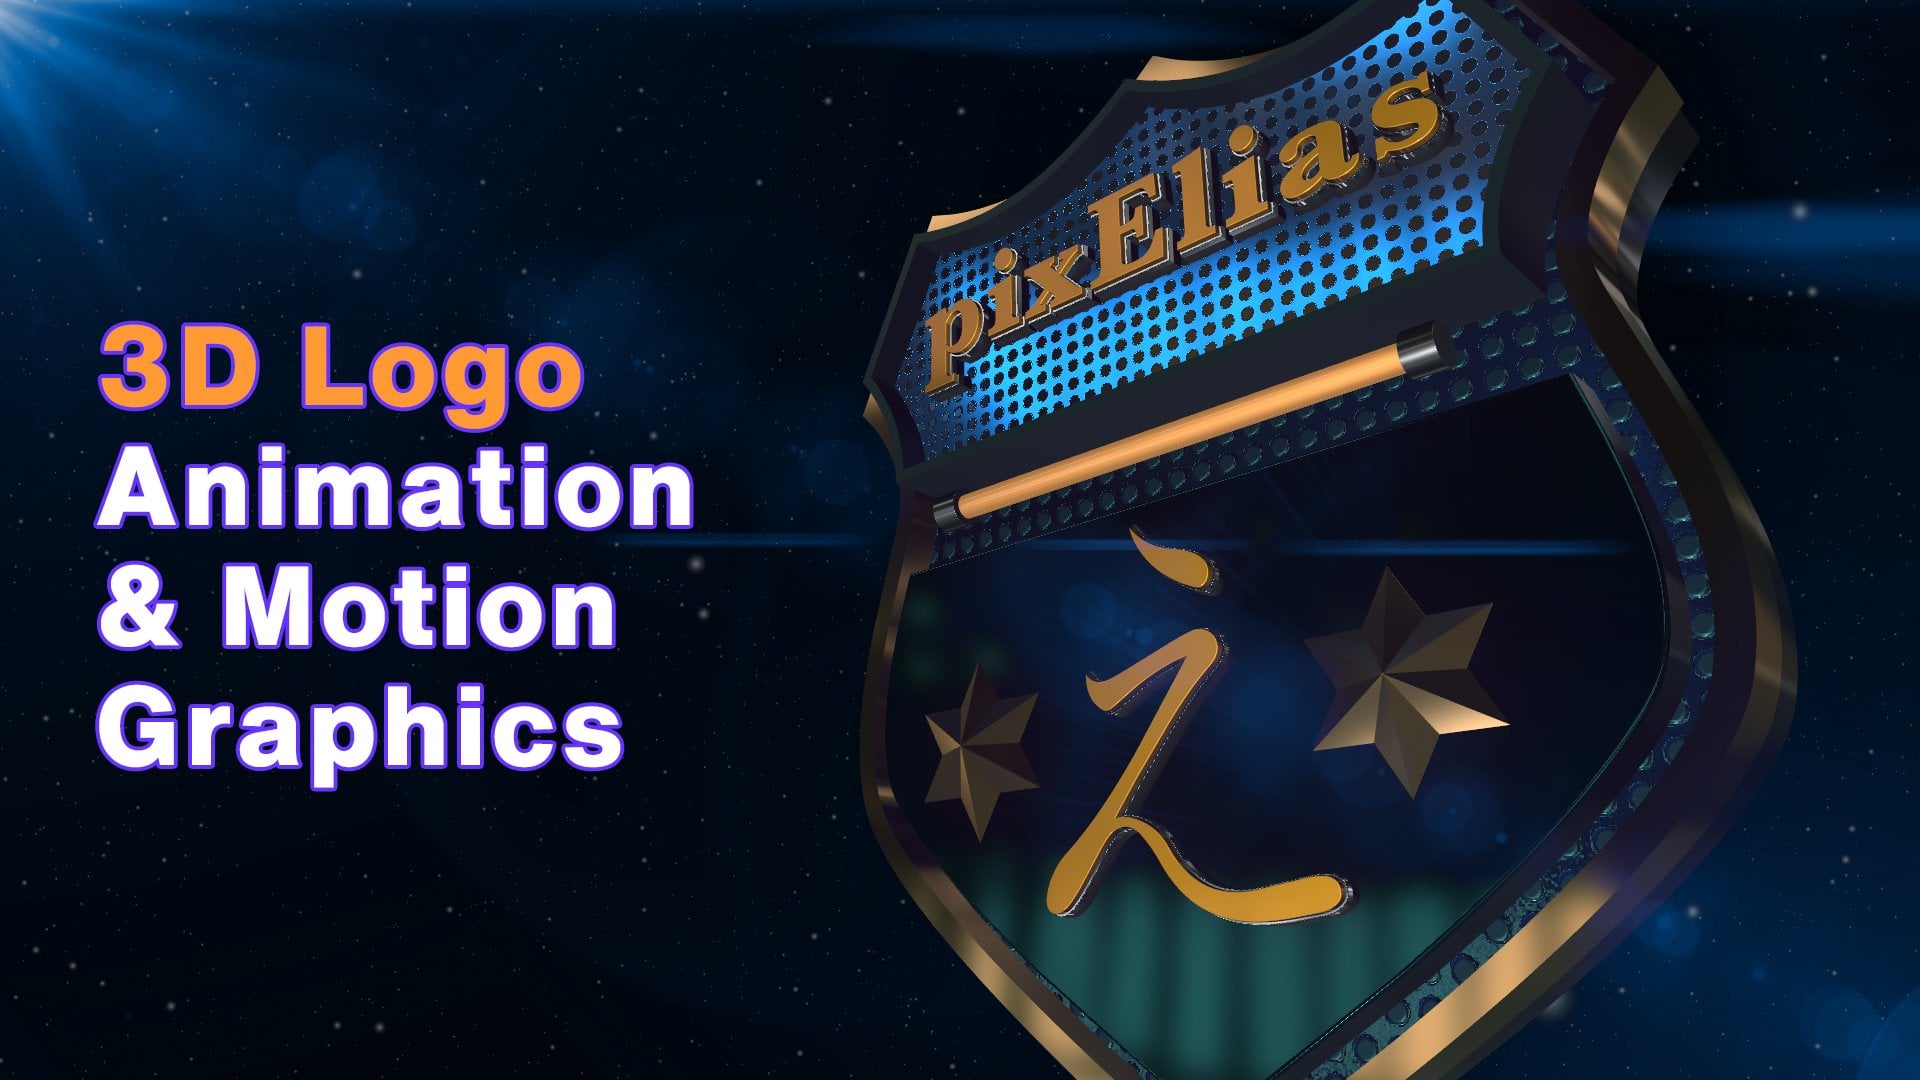
4. Texturing 3D Objects: Moving forward,
next we're going to texture the dribble and
the dribble text layer. So for the dribble
and look inside the materials options
and the s properties, we've got the fill color. In some labraes I've got some colours that I
would like to use. So I grab the eyedropper
for the fill color, sample this color of my choice, and for the shadow color, I'll sample this
color of my choice. The cast shadows, the accept shadows and
the accept lights, they're all going to be enabled. We're going to increase
the specular intensity, and that is how bright the
specular highlights are. I'll set mine 200. That means I also
have to increase how shiny is the surface. So I'm going to set mine also to 100% and reduce
the metal to 70%. And looking at the end results, we've got nice shiny beble
edges with highlights. We'll do the same
for the dub text, which means I'm going to just rotate that so I can see
the changes taking place. And for the dribble text, materials options,
and the fill color, this is the color of my choice. The same for the shadow color. I'll up the specular
intensity to 100, the shininess to 100 and
reduce the metal to 70%, and things are looking
the same in both sizes. I like what I see.
So I'll keep that.
5. Cylinder Texturing: The last thing we're going to texture is going to
be the cylinder. So inside the project panel, and ablick inside
the texts folder, I've got another folder, the Substance folder, which
has substance materials. I select the iron brrust. I'll click to imports,
target the cylinder. And from the material section, I'll choose the Aaron Brush. We can see the change
already taking place. But I also want to
talk about where you can find these materials. So inside the material section, click on the Burger menu, and then select Get
Substance community assets. This opens up the asset
library free of charge. So in this case, for the
three D logo animation and for the type, I'll
click on the metal. Score down a bit, and I believe this is
the one that I used. So back in after effect
for the metal color, I get the eye dropper and
select this colmer choice. I set the resolution to 2040. For the brushing intensity, I'm going to set to 0.1, and the brushing direction
set to 45 degrees. And this is just a
personal choice.
6. Background Gradient: Before we get to
the animation part, it is a good idea instead of
having a blank background, is to have a gradient. So click on the timeline, and under the learn menu, I create a new solid. I'll give it a name of solid. I'll make sure it has the
same size as the composition. Color doesn't really
matter. Just click Okay. Then I'll click and drag
this at the bottom of the layer stack
inside the timeline. Now, under the effect menu, generate I'll bring
up the gradient ramp. And basically, we've
got two color stops. For the shape, instead
of a linear ramp, I'll go for the radio ramp. Or the end color will
be set to black, and the starts perhaps a
darker tone of this brown. Now, I can define the start and the end.
So click on that. And then click on the end, Alzomnabt define the
ends, define the starts. I can make this just
a tad a bit brighter, bring this a little lower. This one towards the bottom, kind of center it and
look like a glow. I like s, so go
ahead and keep that.
7. Aligning 3D Objects: The Environment Light has an HDR as a light source and the same for the cylindrical
shape which is going to take so much of my
system resources. So temporarily, I'm going to disable the environment light. And for the cylinder
and the materials, I'll set this one
to default and also change the previous
resolution from full to half, and that will help
to speed things up. I'm also going to remove the
camera one that I previously added for viewing the three D
objects into three D space, and replace it with a new one
using different settings. And right off the bat, we can see that the dribble text is the one that sits up front. So we need to swap the
position of these 23d layers, so the logo becomes the one facing the front of
the cylindrical shape. So I will unlock the two
layers here. Have two views. Right now, I am on the
left orthographic view. I click to select
and target the logo. I'm going to position
this upfront and position this
one at the back. I'll change the left
orthographic view to the back orthographic view, as you can see now, the dupletex actually is facing backwards. So I'll click on that and inside the layer transformation
and for the orientation, I'll set one on the X axis 280 degrees and the same for
the Z axis, 280 degrees. I'll change the view from back to the left orthographic view. Zone a bit here and make sure
this sits right here right on top of the
cylindrical shape and s. And I'll do the same
for the three D logo, position it at the back. L. Alright. That looks good
back to one of you. And the last thing I want to
do is make sure that all of these three D shapes are aligned to the center
of the composition. So I'll click on
the choose grids and guide options and bring
up the proportional grid. Shift selector of
three, three d shapes. And right now, I'm just
going to eyeball this and center it to
the composition. I think that looks good,
perhaps a little higher up. And as for this one, let me go ahead and disable the
proportional grid. Maybe I can just slide
this to the left on the X, just a tad.
8. 3D Camera & Null Objects: To animate those three D
shapes into three D space, we're going to
need three things, a new three D camera, and
then two Null Objects. A null object
enough to affect is an invisible point of data
that does not render, but its coordinates matter when it becomes apparent
to other layers. It has the same
transform properties that a regular layer has both two D and three D. With the timeline selected
and under the layer menu, I create a new three D camera. For the type, I'll
choose one node camera. And for the preset dropdown
menu and the lens, I'll choose a white angle lens of 24 millimeters,
and then click Okay. Still with the timeline selected and under
the layer menu, I create a null object and
then create the second one. I'll shift selectors
to Null Objects, and under the layer menu, transform ascent to the che
point in layer content. And for the alignment, I
will align the layers to the composition horizontally
and very clean. Since we are working
on three D space, that means both of these
Null Objects need to be converted from two D
layers to three D layers. I
9. Animating Scene Part A: Now that we have
the null object, I will parent camera one to Null one so I can control the entire camera rig
through the null, which gives me far
more flexibility. That means we're going to need the parent and link column. So right click columns
parent and Link. And for the camera one, I grab the pick whip and parent
camera one to the null one. For the null one, I'll press the letter R on the keyboard to bring up the
rotation properties. I aim at the beginning
of the timeline and click on the stopwatch
for the wire rotation. I'll set this one to 45 degrees, and then I scrap the
current time indicator to, let's say, past one frame. And for the second keyframes
for the war rotation, I'll set this 12 -45 degrees. I'll mark selectors
two keyframes, and under the animation
menu, keyframes, I'll use EZ is, and for the second keyframe, I'll click to bring
up the graph editor, and for the second keyframes,
I'll tab click on that. And for the income velocity, I'll set the influence
200% of the netliko. Let's press space bar for the round preview.
That looks great. And now for the camera, I'll press the letter P on the keyboard for the
position property. I'll scrap the current
time indicator to the very beginning, and here I'm going
to need two views. For the second view, I'm using the custom
O. Also mana Bit. For this one, make so that I can see everything kind of 100%. And to be able to see
the three D gizmos, I'm just going to use the orbit around this is not going to
change the animation here. We do this so we can
see the three digismos. For example, this is the
three digismo for the Z axis. I'm in the beginning
the timeline. I click on the Stopwatch
for the position property, and then bring this backwards. I press the letter K
on the keyboard to go to the next visible
keyframes Zoom out a bit. And with the Z axis again, I'm going to bring this closer. Not too much, let's
say around here. Market selects two keyframes, and under the animation
menu, keyframes, easy, click on the second keyframes, bring up the graph editor, double click on the
second keyframes and set the keyframes velocity
to 100% than I click. Okay. So back to one of you. Let's press space bar for
the round preview that looks great. So I'll keep that. Moving forward, we're going to parent Null one to the null two. So I grab the pick whip and parent null one to the Null two. I'll go back to the
very beginning of the timeline and
for the don tool, I'll press the letter P on the keyboard for the
position property. Here I'm going to create
the first keyframes by clicking the stopwatch
and then press the letter K on the
keyboard to go to the next visible keyframe and create an
additional keyframes. I'll go back to the very
beginning of the timeline, and for the first keyframe, I'll bring this whole thing up all these three d shapes
outside the composition window. And let's press space bar for
the preview. There we go. Let's fix the interpolation
from linear to easy is, and for the second keyframes, I'll bring up the graph editor. And change influence
to, let's say, 100%. Press the space bar further
on preview, and we have that. I can actually slow
things down just a tad by selecting those three keyframes and increase the distance. Strike again. Very nice. I like what I see,
so I'll keep that.
10. Animating Scene Part B: So far, we have animated the three D logo about
the three D text. So we're going to continue
working with the null one. I'll mark you select the
second keyframe, copy that. The curret decato
is very close to the second keyframe.
I'll paste that. Scrab the current
decator just a tad, paste that, scrub
again, and paste. Now, this keyframes,
the third one, and under the animation menu, we're going to convert that
to a togo hole keyframes, which means there's going to be no animation between
those two keyframes. The animation will resume from
the key frame and onwards. So for the last keyframe, I'll change the wire rotation to specifically 260 degrees.
That looks great. But also, I would like to
have some kind of an angle. So I press the letter J to go
to this visible keyframes. Click on the stopwatch
on the rotation to add a keyframe and then
press the letter K to go to the next visible
keyframes and set the angle two -25 degrees. Mark selects two under the animation menu,
keyframes, easy. And for the second keyframes, I'll bring up the graph editor and double click and change the incoming velocity influence to 100%, then I'll click Okay. Let's play that by
pressing this space bar. That looks good.
But in addition, I would like to zoom in a bit, so we can see the text. So that would be
on the camera one. So for the current
time indicator, I press the letter J and J to go these two
visible keyframes, and then right here on
the side of the timeline, I click to add a new keyframes. I press the letter K to go to
the next visible keyframes, and on the Z, I'm going
to zoom in a bit. And just a tad on the
Y, I'll bring this up. And let's press space bar for
the on preview. Very nice. Now, I'm going to mark you
select all of these keyframes, space them out so I have
a slower animation. Press the space bar. So far, looks very organic,
so I'll keep it.
11. Animating Scene Part C: The three D text
has been revealed, but now we need to reverse the animation and reveal
the three D logo. That means we're going to
be working inside the null one with the X and Y rotation. So I'll begin with
the Y rotation. So I click to copy the last keyframes scrap the current time to
get a close to it, paste that scrap again. Past and scrub one more time, just a little further
and pay studs. The ski frame is going to
be a tocohol keyframes, which means there's going to be no animation between
those two keyframes. The animation will resume from
the ski frame and onwards. So for the ski frame, I'll set the wire
rotation to 25 degrees. And for the rotation, I'll press the letter J, J and J, copy the
last keyframes. Press the letter K to go to
the next visible keyframes. Base that, K again, pase that, K again, and pasts. This keyframes also is going
to be a tocohol keyframe. Once again, there's
going to be no animation between the two keyframes. The animation will resume from this keyframes and onwards. For this keyframe
and the exhortation, I'll set that to 25 degrees, and then press space bar
for the round preview. I like what I see. We've
got the weight here. The animation is very smooth and organic, so I'll keep that.
12. Final Touches & Trimming: The three D logo animation
has been completed, so it's time to enable
the environmentt light. And for the cylindrical
shape and the material, we're going to
bring back the iron brushed substance texture. Now, looking at the
overall composition, I can definitely
brighten things up. So for the varnment lights, I dopoglcont to bring up the light settings and increase
its intensity to 110%. And for both the dribble
and the drible text, and looking inside
the matos options, I'll up the diffusion
from 50% to 100%. And basically, this is
going to absorb and reflect more of the light so
the surface gets brighter. I'll do the same for
the dribble text layer, up the diffusion to 100%
like so. All right. So for the duration
of the movie now, I'll scrap the current
time togeto past the last keyframes and a bit further to give a
bit of a buffer space. Let's say around six frames, and then press the letter on a keyboard to set the
end of the work area, R click to Trim
Comp to work area. And under the composition menu, I'll add this to
the render queue, and all I have to
do is just click on the reden button to
render this out. And
 Elias Sarantopoulos, Helping You Develop