Transcripts
1. Introduction: Hello dear students,
my name is Jessica. And as long as I have been painting and doing
illustrations, which is a lifetime now, I have been selling
those paintings and illustrations as greeting cards
as well as the originals. There was a scary time. Awhile back when
online greeting cards hit the market and
everybody said, Oh, no one is going to buy
a greeting cards anymore. Well, the market has just continued to grow because people love real greeting cards
and real mail coming in. And so it's something that
if you're jumping it today, you're not really
going to worry about too much competition
because it's still such a popular delivery
system for your art. Making occurred company, especially on a
shoestring budget, is not necessarily simple when you're starting out and you don't know where all the
potholes are in the road. Fortunately, I've been
doing it for so long and through so many steps
of sophistication in technology and
printing and so on that I do know where
the potholes are and I know where the
access road is two and things that you can do
to get around the problems. Most people who think I should
turn my art into cards. And they do some research. They get very discouraged
because you know, how many do I have
blueprints it to begin with? And then how many do
I order of each one? Because how do I know which ones are going to sell all yeah, I could test market. I'll get to local a
little gift store on the corner to put some in and then we'll see what sells and then I'll know what it gets. Yeah. And what paper and what size and how
do you package it? And the list goes on and
pretty soon it is quit. So what this class is about is used starting a green
card company from a shoe string from
scratch and not getting discouraged because
I'm going to tell you every single step of the way. And then by the
end of the class, you're gonna be
able to just create some greeting cards and
get started right away. Our project for this
class is obviously, and hopefully that you create a greeting card company
because that's a big project. And so there's a small 12. We are going to create
the beginning of your first line of
greeting cards. You will create three cards on a theme using your own art
that you already have, or are that you wanna make
up during this class. But this class is not about teaching you how to do the
illustrations for your cards. This class is about
teaching you how to use the illustrations that you make to make a product that can
bring you income. These cards, these
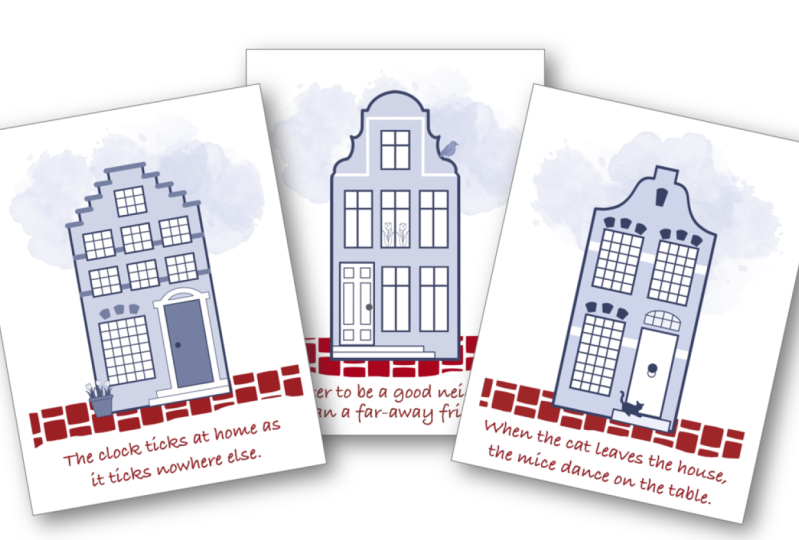
three cards are going to be created on a theme. So they are the beginning
of a line of cards. Greeting cards are usually not just helter Skelter
all over the place. They usually are created in lines that have a
relationship to each other. And that may be the theme
or the style or the humor. But the three cards will obviously go
together and harmonize. And so I really encourage
everyone to upload your set of three cards into the project section
at the end of class. And we will look at
each other's sets and give feedback and comment. And I certainly
will give feedback. And so with the big project and the little project in
mind, let's get started.
2. 2 Supplies: There aren't a lot
of supplies that you need in the beginning here, except what I want you
to have as a notebook. And I want you to take notes, even though I will be, I'll show you things
on the video, the sizes and measurements and tricks and all these things. It's a really good
idea for you to end up the class with a little
textbook and how to assert this kind of
business because there are numbers
and measurements in it and there are
facts and figures in their manufacturers
and their tips and hints and it'll all
just fly out of your brain and you
won't remember which video it was in and so on. So supplies for right now and I will introduce
anything else you need as we go along or a notebook and something to
write with is all you need. So let's start from the
very, very beginning. In the next video,
I'll see you there.
3. 3 Images for Greeting Cards: So what things are appropriate
to put on a greeting card? Most classes that I've
seen that talk about a greeting card
business say that, let's sit down, let's
study the market and let's see what's the
best selling card? Birthday cards are always
the best-selling cards, followed by every other
occasion of the year. But there's a huge
market for creativity and four cards that
are inspiring, uplifting, or make you laugh. So as far as the artwork goes, it can be a lot of things. This is an older card of mine, sorry for the glare, but it's in the packaging. I'll be telling you about. This is a photograph. In the olden days. You got your photograph printed as a four by six print from the local photo lab and you mounted it on the
front of a greeting card. Now, the papers that are made in the printers that are made
for home use are good enough that the photograph
can be printed right onto the card and have
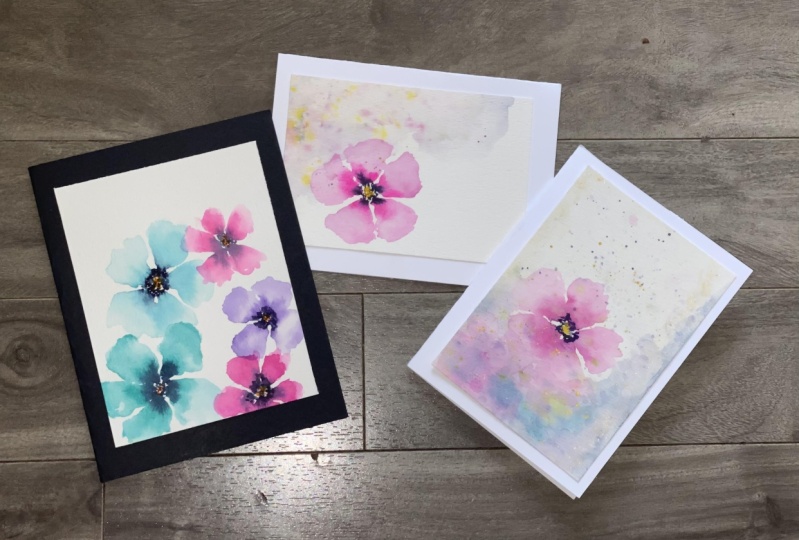
the same quality. Know if I do that, you won't see the Reflection, so that's good. So that's what happened here. This is a photograph as the art. This is a petroglyph
illustrations, just a line drawing with a background and I
did it in Procreate. But over the years I've sold
nice same set of rock art, petroglyphs, artwork
on all kinds of things and all
kinds of style. So there are many, many
renditions of this illustration. So this was created
in Procreate. So it was already nice
and clean and it was digital and could be put
on, printed on occurred. Okay, sometimes I start
with my original paintings. Sometimes with painting,
sometimes I would call these illustrations
more than paintings. But these are the
originals and reproduced, scan and clean in Procreate, which will be a class that I will be publishing
in February is the other part of
making cards is getting the artwork here
which looks gorgeous. But when you scan it, it doesn't look gorgeous. Getting it to look
gorgeous when it prints. And so, but that is a big topic
and that's another class. But anyway, here's what
happened with these two. Is there a scan and
cleaned up and they were printed on greeting cards. And now I've pretty much, once you figure out
what you're doing, I would pretty much the same. Color shift will always
happen, but not bad. Humor. This is a really
simple illustration and childlike and all that. But the thought basically
calmed down, makes it humorous. So it makes it very syllables. One of my best-selling
in this wine of cards. Sometimes only type. And you have to, you have to either
do lettering or you have to know how to use fonts in order to do type only cards because you have to
do things like this, like use different fonts
that have a contrast anyhow to have the right size and you have to line them
up and you have to, yeah. So it isn't as easy as just type something in
your word processor. But this is no art work. This is all graphic design. So you can do that
if you know about fonts and Page Layout. Okay? This one is really interesting because wasn't really an
illustration that started it. It was more like I
paint in watercolor, I illustrate with watercolor, and so I wipe my brush off
all the time on paper towels. And this particular,
I forgot what it was. I think it was a line
of botanical art. And the colors
were just amazing. And I looked at those paper
towels when I went to throw them away and
I thought I can't. And so I scan them and I use them with some
really brilliant quotes. And this line is called
stroke of genius, because the genius is in the quote systems
by Thomas Edison. Edison. And the brushstrokes are
by me and they just make this really beautiful
abstract illustration. So you never know where your card design is
going to come from. And you always have
your mind open to what can be a card and look good. So these are some of the ideas for the artwork that
can go on cards.
5. 5 Card Stock Weight and Grain: So eight-and-a-half by 11 is the standard form of what they
call a letter size sheet. In the United States, it's close to the size of an A4 and adjustments will need
to be made with this class. If you're in Europe, because the A4 is, is a little bit
different in size. So I'm, I can't do numbers
and so I org translate that. So I'm going to leave
that part up to you because you probably understand
it better than I do. Card stock is not letter stock. With the business stationery
paper that you would get for a letterhead is
usually a 24 pounds, sometimes luxuriously a
little more than that. But that is just way too light to make a
greeting card out of. So there's a whole
different family of papers called card stock, also called covers stock. So if you see that, that's
exactly the same thing. And they come in several weights and they have the body that you need to make a
greeting card hold up. Alright? The lowest weight that could be called a card stock is
the cheapest as well. 65 pound. I don't find that it is
significant for a car. Some people do. I think it is too light weight. And if you want to know what
this pound thing is about, you don't even need to. But what it's about
is that that's the weight of a regime or whatever packaging
and I decide to do of a parent sheet coming off
of the big paper presses. I'm a parent sheet of
that kind of papers. So apparent sheet, big pile of them would
weigh 65 pounds. And that's how you
come up with this, but you just get
to know this and you know it by feel and so on. So that's 65 pound and
you see how bendy it is. The most common cover or
card stock is 80 pound. This is an 80 pound and that is very sufficient for
making greeting cards. And the next one, the heaviest one is 110 pound. And so that is kind of the top of what you can force
through certain printers. And that's a different video in this same class is we're
going to talk about printers and which ones
there are that can run card stock through
in the first place. And then we'll figure out what is the best weight for you, for what printer you have or
how you're gonna do this. Okay, So besides the
weight of card stock, we have to talk about the grain. When paper is made, it's made a little
fuzzies, fibers. And they, as they're done, they align according to the movement of the thing
that's shaking them and so on. And so when they're all, they're next to each
other like little short, little as soldiers, it's easy to make a fold between them. And so conversely, if you're going to try
to fold against that, you're folding all
those little dude ads in half and they don't like it. That's what green
is about in paper. Now, in manufacturing
papers like these, it's almost always true that
the grain runs lengthwise. And that means that
they're easy to fall between those little
grains going along. And they are not as
easy to fullness. See that you can
see it right here. Even in the 6051, you see, yeah, I can fold that pretty easily, pretty small, but
watch this way. Lot more resistance, a
lot more resistance. And so this visual
will give you probably a pretty good idea
to remember this. But what you probably
should do in your notebook, sketch a rectangle, which
is a piece of card stock. And you can make
notes at the side, 65 pound, 80 pound, hundred and ten pound. And you can figure out
which one we're going to choose later for your situation. And you can draw an
arrow with two heads here to tell you that the grain runs vertically on
these pieces of paper. And that wherever
you draw that arrow, would that line with
arrowheads, that's a fold. Fine. Okay. So it tells you two
things at once. Because it runs vertically. Polls easiest vertically. Alright? Now when you get to
80.110 pound card stock, they're not going to
fold easily anyway. Okay? So that brings us to the
whole idea of scoring.
6. 6 About Folding Cardstock: What scoring is, is a method of printing a
crease in the paper. And I don't know how you're
gonna be able to see this, but I think if I hold it still, you can see this. So there is a score worn down
the middle of this card. And if you look carefully, you see that this side of the paper is the mountain score. In the mountains score
is on the inside. And that doesn't seem to make
sense because I'll show you the valley score was
on the other side. And when you score or something, it would increase in
it, you would think, okay, that's crazy and I'm
going to fold it that way. If you do that, it will never fold flat. Analyze how about kind
of a proof to it. Okay, So after we get done
talking about this scoring, it's good to remember that the scoring folds toward where
you don t think it should. So now that we've talked
about folding and scoring, what you should note is that when you are
doing your two ups, which is what that's called, you put two cards up on a sheet and you're doing
that for the A2 card, you're in business pretty much because when this
sheet is printed, you're gonna do two things. You're going to
make a score along the center at the
foreign a quarter line. And then you're going
to cut it in half on paper tremor at
the halfway mark, which is five-and-a-half folder and you have your two cards. This is going along with the fire or the
grain of the paper. So that's really cool, but it's 80 or 110 pound. If you even folded it like this and managed
to get the corners together and everything fold
is going to look kinda bad. It's going to crack on
a lot of card stock, but it's still going
to look bad anyway. So scoring is the thing
that we always do. Now on a five by seven card printing on
an eight now FY 11 page. You can see right away I think what the
problem is, right? So this has to be scored. All things have to be scored. But this particular way, because what's happening here, the fold is gonna go across
the grain instead of with it. And so on a five by seven card, that's another reason that
the scores is more critical. And that's another
reason why people find it easier to produce
those smaller cards. So let's go learn how
to score or something.
7. 7 Elementary Scoring: Here is where we're going
to need her first supplies besides your note-taking
notebook and your pen or pencil? This is called a bone folder. This one is actually bone. It's very old and
it's very messed up. But they are made very
inexpensively now, you can get them on Amazon. They're actually
made from plastic. But what you want to look for is a nice round, smooth tip. The nice thing about
the old bone folders, you can file them to smooth them out after
you use them a lot. But people will say, Oh, you can do a score using
a spoon and everything. Yeah, well, aside from the fact that it might make
metal marks on your card, that's not a real good idea because this is
made for the job, so it doesn't cost much. So if you're going
to make cards, you want to get this stuff
that it's going to make it easier in metal ruler. And it has to have a Corp or some kind of backing on
it that it won't slide. That's really important
because you're going to be running this along that
ruler with some pressure. And so you're not going to want to be
halfway down and then, oh dear, because
then you're done. You're proud is over with. You score after you
print in most cases. So you've just made
this beautiful car and now you just wrecked it because
this wouldn't hold still. And so I just saw that
my injury got in here. I just got a new puppy. And you don't want to see
what's under that bandage. So I thought I would spare you. The third thing is a grid. And you noticed that
I've been doing this whole class on a grid. This is a very big one
that I have on my desk. But you don't want
a very big one for card making. You want one. This just bigger than the biggest sheet of paper
you're going to have to score, which is just a letter shapes. So it's important that you
want to see your measurements. Get one that has
measurements on the side. They come in all
sizes, all colors. They're called cutting mats. Usually there's some
other words for them. But you want to have your rulers outside
of the space where your paper is going to
go so that you can see the ruler in order to do the
scoring makes sense, right? So this is a really
good size here, and I think it's an
11 by 14 If I'm no. Well, oh yeah. Look at the measurement on it. Hello. Nine by 12 is your
middle area here, okay, and under that I have rotary mass are called
sometimes this one is a bigger 11218, nothing. But if you don't have a lot of desktop working
space and you really don't want a really big one. And I reason I'm not using
the one that's in place here is because you
can't see the eye, can't see either the ruler
on the other side of it. And it's just too
big. So this size right here is really great. And I want to get the
other one out of the way. I'm going to put this
one center chair. And we said that we were
going to score this, we're going to cut it this way. And I'm working
with A2 right now, okay, We're going
to do it with A2. And so our score is
gonna run vertical. And we are going
to want to do that at 4.1 quarter inches. And so if we put her
paper all the way to one side for a quarter
is right here. So we're lined up on our paper, on our cutting mat. I'm not actually
lined up very well, but there we go. And we have it at
four and a quarter, which is halfway on the shoot. And you want to place your
ruler just so that you can see the marking of
four and a quarter. Because obviously
this is not nothing. And so there's going to be, your score is going to be
moved over a little bit from the foreigner quarter because of the thickness of
this bone folder. So okay, starting up, they're applying pressure and running down along your ruler. Now you can't see this
very well at all. But trust me, I just
made a dent in here. So the mountain is
on the backside, the valley is on the front side. I'm going to go cut this
in half so it can fold it. Okay, So I cut this in half on a paper tremor
and we're going to talk about paper tremors too. But right now we're going
to finish with our scoring. This is the most rudimentary, the most inexpensive
way to score. It's not the one I'm saying. It's going to have you
smiling all the time. But we have to start somewhere. And if that's really have to start this where we'll start. So this side is my indent. I can feel it. It's a little ditch
running along there. That means it's the
outside of the card. The mountain movie in the middle and we fold against
the mountain. When you, even, when
you have scored something to make a good fold, it's really important
that you align your corners as perfectly as you possibly can
and hold that in place while you press
down along your score. And say this did not, this particular sheet
of paper did not even score and fold nicely enough, but all depends on the paper you have and
how much of the grain. But anyway, then
you smooth over it. There you have it. Hey, perfectly folded card. Okay. They make scoring machines. They used to make a great one. And I will tell you
about it because if you can find it on
eBay or anywhere, get one, they're not expensive in their last a lifetime
and they're wonderful. And it was called score it, SCO are no e, hyphen it. And it was a concoction
with a kind of a padded rubber
surface and then a metal things standing up in the middle and you
placed your card, it was a centering ruler. And you placed your
card on there. And they had a little
scoring tool that kinda fit over that piece of metal. And so it did a perfect score every time they stopped making
it went out of business. But I recently still find one online and so
just keep your eye open or if it ever comes up at a local garage sale
or anything, grab it. They do make scoring tools now and they're
different and they have a bunch of plastic
and a bunch of grooves and I'm not I'm not
sure how they work, but they would be
worth looking at and seeing a video maybe
of how they work. Because they are,
those little tools make this so much easier. You have so much margin
of error here because, or probability of error
is what I should say. Because your ruler can slide, your pressure cannot be enough. And in paper can crack
with this kind of score. Because it's not, if you
score with a bone folder, it's not a very deep score. It is now because I folded it. But you see how it's, it's not clean when it
folds because this doesn't really make the kind of
valley that you would need. This was all there was though back in the day. So
that's how you did it. But if you are wanting to build a successful card company and keep doing your own
scores on your cards. You're not always gonna
be smiling about it. Just saying.
8. 8 Upscaling Your Scoring Procedures: This lesson is going to be about upscaling your
scoring procedures. So what we did last time with the bone folder and the
ruler and the cutting mat. That's the bottom
rung of upscaling. That's what you do when that's all you've got
and you're just making your first few cards and checking out whether you
even like the procedure. So it's all fine. You'll always be able
to use your ruler and your bone folder and your mat. Okay? But the first
little step upwards is a Teflon bone folder. It's not obviously
may have bone, but it's got a great
feeling to it. It's got a little thicker. I can I can I do that? Yeah. It makes a thicker
score a little bit. And it's also more more uniform. The bone folders are great, but like I say, used to be able to send them. They can get rough spots and the tip is really,
really pretty narrow. Okay, So sometimes a little
thicker score is better. The other thing about
the Teflon folders, the other end of it too. Is it like when you're
doing this to your fold, you're burnishing your fault. It's very smooth, nothing
gets caught on anything. So that would be your
first step up is to not get a plastic
bone folder, but to get a Teflon one. These are on Amazon and handmade book supply
sites and so on. The next step up would be a
scoring board tool like this. This is the older one. I told you that it's
been discontinued. It's called the score. It SCO are no e hyphen IT board. It comes in two sizes. I'll show you the
other one in a moment. This is a size you
want to get if you can get your hands on
it because this will do the larger A7 cards
and the smaller A2. The way this works
is that there is, this is a stand-up ridge
of metal right here. And this this, these are
rubber pads and they're placed just perfectly so
that a scoring tool. Well, there's your
brand name right there. So there's a slot in
it that fits right over this metal. Okay? And then the other
really cool thing is this is a centering ruler, so it's really easy to make sure that you're in the center of
your paper, if you remember, we're doing it in the
basic way that you had to have your bone
folder offset a little bit. So this does that
for you already. Okay. This is not available
on the market. The company is out of business, but these do show up on eBay. The last time I looked, there were three
or four of them. There are around with
$35 price point. I have had mind for 20 years. They're just awesome. They never wear out. And if you keep them, don't put them in the sun and
let the rubber dry out. And if you're careful
with your scoring tool, they'll be with you forever. There was a model also that had a metal scoring tool
and it was pink. And you might see that
had the same brand name. So how this works is that you
were going to pretend that you've printed out
a letter sheet with two A2 cards on it. And so we're going to
put this on this table. So it goes to the foreign, a quarter mark on each side. That's a wonderful
way to center. And then you get the
hang of this over time. But you basically hold this
like you would a pencil. And you want to hold it right, straight up and down, and you press on it. There's some there's
some pressure here too, just like with a bone folder. And then you slowly bring
the scoring tool down. Reason you don't go fast, you can slip off of this. And then your pieces room because your score
is going up Bus. So if this were to A2 card, all printed, all you'd
have left to do is to cut across the
center, then fold them. Now, look at the
difference in this score. You can see it even
on the camera. I mean, it is
pretty substantial. Right? And you can tell
that this is an indent. Okay, So this had
been like this. And the mountain score is
here because of the fact that this metal part popped up and made decreasing the
paper and you pressed it down, you press the card
stock down with this tool over that mental part. So it makes the same kind of a score as a scoring machine
at a print shop mix. So it's just invaluable. There is another size and
it's called the scoring mini. And there are many more minis on eBay and the resale market. But this is the Mini. Now, if only they had
made it just a little bit wider and a
little bit taller, we could have we
would've been able to do an A7 card on it. Okay. But you can see here that
that is not going to happen. However, if you decide
that the way for you to go is gonna be an A2 card. This is a perfect fit. But only if you cut it in half first and
then do your scoring. So it's two scoring times
instead of I'm the big one. Do your whole sheet at once
and then cut it in half. And this one, if this is all you can get a
hold of, it's still worth it. You would go through
and you would cut all your sheets and half across the middle like you're supposed to him
and score them one by one. And it can be fun. I mean, you can just sit at your desk and it's
like beatString, it's stress reducing, and so on. There is a current
tool for scoring. A scoring board that is out
there on the market right now has got a lot of
five-star reviews. I can't speak to having
used it because I have these and no reason to invest
in one of those again, around in the 30, $35. Some of them I've
seen ever been $25. And it's a plastic board with grooves that
every eighth inch. And so the idea on
that one is works. It comes with its
own tool that is very similar to a bone folder. And you are, instead of
making your mountain score, you are making your indent, your Valley score on
those because you're pushing a paper into
these grooves that are between hard
plastic grooves that are at your ruler markings. And so there's a lot of, a lot of people that loved them. And if that sounds like
a better idea to you, then take a look at that tool. But this is as far as
at-home card making. The scoring board tool is the
highest level you can go. That's the best score
that you're going to get, the most accurate score and the most uniform
score on your cards.
9. 9 All About Card Blanks: You notice that I said that
that was the high end of the scale for you doing
you're scoring at home. And the reason I said that is because there's a higher end of the scale and it's
where I am now. I really, I make some miniature cards
for little sets and stuff. I still score at home
using the scoring board. But the A7 card, which is like 90% of my line. I just got tired of
it, To be honest, I got tired of printing
the card stock. I got tired of the
two trams I had to make and then to score
every one of them. And so what I do, and the best scores are coming from not
doing it yourself. And so what I'm showing
you here are pre-made A7 and they are pretty
scored as well. So there's a whole level of types of card
stock and pricing. But I will tell you
that if you start, you get beyond your first
ten cards and you go, You know what, I like this
and I'm going to do it. Then. Think about this as
an option as well. I still keep the score boards
around because sometimes the A2s are just easier to do
and I just do it that way. Sometimes I buy those also. But at places like
envelopes.com, you can search for A7 card blanks and they
come to you already. The right measurement. So
you're not printing on a letter sheet and then
having to do that term, they also come to you with a really beautiful
machine score. Okay? Look for pricing differences. Amazon is not
necessarily the least expensive and it's not
necessarily the best quality. If I had to recommend a source, I would I would
recommend envelopes.com. You can get your
matching A7 envelopes to go with your paper. If you buy only 50 of these, they each cost is high. But when you're first
starting out and you want to make
your first 50 cards. It's not a bad caused at all, and it saves all this time. So it's like, are you
into time or money? Most people are into both. But as you're purchasing goes up and these are blanks and
so you can buy a bunch. And they're not all going to
go for one style of cards. So you don't have
to know ahead of time what's going
to print on what. You can buy. More and more of these. And as the, as the
amount goes up, the quantity goes up, price goes down
quite drastically. Actually, until you get a
card costs that's done around $0.50, maybe even less. It really depends
on the numbers. But when you consider
that you're going to sell that car for five or $6, It's totally worth it. The envelope is going
to be a little bit and also the envelopes
do the same thing. As you go up in quantity, go down and price at
places like envelopes.com. And so your cost factor, your real cost factor that
you went out and bought something is very, very small. Then depending on your printer, all you're doing is
putting some ink on here. And then you have a product
and the product is worth, like I said, five or $6. Okay? The only problem with this, can you set your printer up
at different papers sizes, then letter, that's
really important. And we're going to
talk about printers. But this is not
much good to you to print unless your printer will
run a seven by ten sheet. Most those, it's more important
about whether it runs card stock or not. And that's gonna be part
of our printer discussion. Now, if it won't, Let's just say the
printer you currently have and you don't want
to afford another one. And let's just say that it
won't adjust to do that. Okay, Your other option, and it's a really
good one is to take this beautiful card blank and
then take a letter sheet. Do a four up of your art. Okay, so you've got a
sheet with four on it. You cut it into quarters. And then using a
double stick tape, you mount that artwork on this beautiful card and it enhances the
price of the cart. It's now a handmade card. And so it's really
beautiful thing to do. And I, I think the
only ones I have here are walking around them
so they got credit up. But you can see the concept. Okay. These are from, I have a line
of succulents that I love. I painted them in here. And they got warping. Dance and everything. But this is an A7 card and it is made on a blank
that was machine scored. You can see that mountain
really clearly there. And I printed this piece is the size of an
A2 card, I think. Yes. So I printed for pieces of artwork on one sheet
of letter card side, letter size card stock. And then I cut them on my paper trimmer is
cut them this way, cut them that way, and then
use double stick tape roller. I'll give you a recommendation on my favorite of those also, to mount this on the top. Now, when the person
buys the card, they're not looking
at just printed card. The perceived value goes up because the artist
has touched this, you know, they've made it hands-on and probably signed it. I do because why not? You know, it's easy to do and
everybody loves that idea. And when you take a card
that's made like that. And I call those handmade
cards when I do that, you take a car that's made like that and you put it in a map. It's kind of almost like
it's double mounted. So that is really cool too. So to recap that, okay, we have our down and dirty
ruler and bone folder. We have the option for
a Teflon bone folder. It's going to work
a little better. I'm going to help you with
the after you fold your card, you burnish it, and that's good. It just slides so nicely. Okay. The next step up is
your score at board. I'm not going to hold
that back over here, but that's the next step. In the highest step, home scoring is to use a tool like that that's
going to keep you accurate. Then the tops of the scale
for scoring is don't do it at all and buy
it already done. And if your printer
can print this, it's also makes it easy to
put something on the inside. That out of there.
It also makes it easy to put something
on the inside because you're not trying to place this somewhere on a letter size sheet and reverse it and
figure out where it is. Okay, so that's another
benefit to buying these and having a printer
that will print them. You just have two little
setups, one for the front, one for the back.
And you're all set. If you don't have a printer
that wants to cooperate with you about using
pre-cut blanks, then you can use the pre-cut blank as
your base card and print your artwork out four at a time on a letter size sheet and mount it with
double stick tape. What about the
information on the back? In that case, you could do
that with a business card. You can make a special
business card for your cards. And you can just mount
that on the back. That's also handmade
and seem special. You can have a
rubber stamp made. There's a place called rubber
stamps.com that for $4-6, you can have that size of a rubber stamp
made out of any art. And it's really
quick and it's easy. And you could just damp
the back of your cards. You could just sign the back
of your cards like with some real artistic signature. I mean, the sky's the limit. One more thing that I wanted
to add to this video. You might have been able to see that there slight
color difference and a not so slight
color difference in the cards I was
handling here. For all of my cards, I almost always choose what's
called a natural white. Okay, that's a natural white. This is a bright white. These common 1 million things,
milk colors, everything. But you're basically going to
be getting white print on. The bright white is very
bright and it's good for your illustrations that are really color pop
illustrations. Okay? And this, what's mounted
here is an unnatural, it's actually from,
well, not really quiet. But anyway, this is a natural white
different manufacturer and this is a warmer painting. I'm going to bring
my wolf back again. This is on white. I wanted this, this is very graphic as
colorful. It's ink lines. If I wanted this to really
contrast with the paper, this, I wanted to have a warm, harmonious, kinda
blended feeling. That for that, I use natural white instead
of bright white. Okay, you can try both
and see what you like. Now, this is actually a cream. So there's a big
difference between cream and natural way. And cream, I think
does a little too much of the warming
blending harmony thing. I think you don't have
enough contrast with cream. And so my recommendation to you is white or natural light, depending on the kind of
artwork you're doing and how, how soft you want it to feel. That is just
personal preference. You make your art, you
know how it feels, you know how long
you want it to feel. One more time since I
have this in my hand, I'm going to reiterate that you can tell this is an indent. It would seem they want
to fold it this way. Which you don't.
This is a mountain, this is sticking
up and you want to fold toward the mountain.
Trust me on it. And you'll find out it's
a really great thing.
10. 10 Using a Paper Trimmer : What I'm showing you here
is the world's best, most wonderful paper tremor
when I move it forward. And you see how beat up it is. You're going to understand
that these things never die. Okay? We're at that one of those places where
you have to have two, you have to have a good paper tremor if you're
gonna make greeting cards, trying to do it with
scissors and things, just never, ever
going to be right. And so you want a paper tremor and they
come in different kinds. The best kind is
called the guillotine. And that's this off
with your head, right? And you'll want the best
one that you can afford. But you can start out with
very inexpensive ones and you can get there to
heavier duty one. Okay, so we're going
backwards here. I'm showing you the Besser is, the brand name is premier. And it's made by the
Martin Yale company, like as in, as in Yale. And they have been making
these green paper cutters for, I don't know how many,
hundreds of years. That's exaggerated a little bit. And now I have one
that I am looking at across the studio
here that's like a 25. 25. And I have had that one
since the '70s, I think. And I use it those
run six to $800. I use it to cut
parents sheets of watercolor and
Kelm paper for my, my glass and stuff
like that where you have big things
and you've got to cut them into small things. And so it's totally worth it and it is still
around as well. So when you get these, ever have to get another one. Just saying, so
this is the best. Okay. This cost $25, I think Office Depot and it's
plastic and it's lightweight. Has a good blade. And it does the job. I bought this to cut
aluminum flashing, believe it or not, It comes
in rolls and it's silver. And there were some
metal weird projects I was doing and I originally
bought it for that. Cut it like a dream. I didn't want to use my
grid paper cutter for that. Then I, when I got into
glass about seven years ago, there's a thing
called fiber paper and it's actually
made a ceramic. I thought, well, I'm not
going to try cutting that on my code one either. This has been my gosh, this is at least seven years old and it cuts eight years old. And it cuts right through that fiber paper which is
full of ceramic fibers. So it's a good one. Okay? What neither of these have
that you really gotta have is a guide
shield thing here. Okay? If you don't have one, then you're going to fake it. When you make your cuts
with your cork back ruler. What it does is if you have
set this on your paper, I'm just grabbing anything here. So I grabbed this
rule into card, which is not totally disposable, but oftentimes, especially on that really
good paper cutters. The cut begins beautifully. When it gets here. It shifts the paper enough so
that you get a crooked cut. Alright? And especially in making cards, you're going to come
up sometimes with the fact that you have
scored and folded your card, and it is not even I
don't have that here, but I don't know
why I didn't do. Not very much. But you might have the
back more than the front, the front more than back. It might be a little skewed. And you want to, you don't want to cut
away much of the card, but you do want to clean it up. So in that case, you would be trying to take
like an eighth of an inch or a very small trim
off of something. Now, doing it like this is almost impossible
because when it gets down here you see how loose that is where
you can't see it. But let me see if I
can make you see it. When you get down here. This is loose, this is
going to stay there. Were not come down with
this good team cutter. This is going to shift
so the cut will not be even or nice. However, if you can
manage somehow to hold your piece of paper down evenly along the cutting edge is going to be cut
out here where the blade is going
to hit it obviously. But then when you put
your two fingers down, you're holding the whole sheet down and then when
you do a clot, it's going to cut evenly. Ok. Oh. Well, not quite. It's got a little
little shift there, but I think that
was in the card. And this is not a
good paper cutter, but that is what you do
with any paper cutter. That's a guillotine
cut or when you want to make a nice even cut. And even if it's not small, even when you're
making your cuts on your letter size paper. For your Etudes, you want
to hold that paper's still. So the shorter the better, the more even it's
going to be doing this. If you have to do this, if you're making an A7 that you printed
on a letter sheet, ah, it's gonna be
really important to do this because this is 11 " long. And by the time
the cut gets here, it's no longer gonna be aligned
like it's supposed to be. Unless you have held
it down while you cut. It can be in about
an eighth or yeah. A little more in from the edge, but it's going to hold that. And see on this
bad paper cutter, you see what's still happens is that I didn't
make it all the way. So this is why you
want a good one. Okay, Now I'm going to talk about another kind of cutter
that's not a guillotine. As soon as I get
this out of the way. Okay. I'm going to put it this way because it doesn't
say it the other way. So this is called
a rotary tremor because what is in
here is a round blade, like a razor blade circle thing. And your paper goes in. This goes up. And
to cut the paper, you push down and bring it down. I don't know why it is, but I am not as good with these. I don't like them as much. A lot of people love them. So the best name in this
type is filmmakers. And filmmakers makes a very
good large rotary tremor. But they make a small desk size getting cutters and
they're not that good. Because of what I was
just showing you. They it's very hard to cut card stock on them and
to get a nice cut. So this is called for desktop
use, is called sunlit. And here's why I really like
it for a desktop cutter. Okay, I don't have to use a ruler on here because
it has already the plate. And this can be irritating
sometimes, you know, when you're when you're putting
your paper under there, that you gotta put your paper under there and then line
it up and blah, blah, blah. But once it's under there
and you are holding this, you're gonna get a
nice straight cut even on card stock on a small. This is very
inexpensive to Amazon. The other reason I got this, and it was the only
one I found like this is the size because even though it's on your
desk and you can use it on all your small things. It has a measurement
that will take the eight-and-a-half side
of a letter size sheet. So not the 11. I already cut this apart, but it will take the eight-and-a-half your
letter size sheet. So in the case of you sitting at your desk to cut
before you score, let's just say you have a
mini score and you have this, you sit at your desk
and you are able to put that whole letter sheet in here to the five-and-a-half
where you have to cut it. You're able to hold it
down all the way and make the cut down here is not
gonna be as good ever. So my suggestion for that is that as you bring
this blade down, put the slightest amount, and this is on any
inexpensive cutter, put the slightest amount of pressure toward the paper as you cut and you're not going to
run into as much trouble as you saw On that last one
where that didn't get cut. Alright, so I'm
gonna try that here. And it did it. That didn't sound so good by
the time we got down here. But it did it, it didn't bend the paper, it cut the paper. So you can sit at your
desk having printed out a bunch of your
A2 cards with this. And you're a little
scoreboard many. And you will be able
to just sit and produce your cards with
your pile of prints. You'll be able to cut them in half because this
isn't going to fit. Your whole sheet. But this will, so I'm going to run
through this with you pretending that you're, you're A2 cards are
already printed on here. Alright, so we can't do anything
with this until we have caught or A2 card sheet in half. This will do that, even though it won't
do it this way, it will do it this way, and that's the way we
need to have it done. Alright, so I'm under
my paper guard. I'm going to five-and-a-half, which is halfway up this sheet. Okay. I'm going to
hold this down. I'm going to put a little
bit of pressure and cut. All right, so now let's pretend
there's pictures on here. We have C, This is why
this is a pain sometimes, but hey, that's life
isn't perfect, right? Alright. So you wouldn't have
to put it away. I'm just doing that
because of the camera. So then here we are. And we're gonna make our score. And then this just fits. So here's your
foreigner quarter, here's your foreigner quarter. If your paper is a little
weird for some reason and it's not quite to four and a
quarter on the other side, make it not quite to
fourth-quarter on that side too. Centering. Alright,
and here's our tool. We're going to mount it there, and we're going to go slow. Okay, that score is done. This is reminding me that I
am totally out of little, little tiny cards at the local gallery and I better sit down and start
doing a bunch of this. Anyway. Here we go. And another score. Okay, now our mountain is
up on both of these, right? The next thing is we're going to fold against over the mountain. Okay? We're gonna do that by
going corner to corner, as close as we can get it. And then bringing our fingers
back to make our fold, take our Teflon bone folder and make that crease
nice and sharp. And that C is perfect. And that's 100, 110
pound cover stock. Nice. Okay, one more time. Folding across the
mountain corner to corner as perfectly
as possible. Backup this way and
see if this way, if, if the score is
a little bit off, your corners aren't,
and it's gonna be your score that's going to adjust rather than your
coroners be cricket. And then your bone folder. And there are two cards, put them in your A2 envelopes to match. And you're all set. You can sit and do
millions of these.
11. 11 Let's Go Printer Shopping: Let's go printer shopping. One of the, there are two
pretty difficult things to overcome in making a greeting her company out of your art. And one of them is finding the printer that
will do the job for you. The other one is finding the right page layout
situation for you. Something that's easy and that has the essentials that we need. And we're going to
talk about that. As soon as we talked
about finding printers. I'm going to say right up front, I have absolutely no affiliation with any printers anywhere. I have used so many
printers and brands over the years to try and fulfill what I think
are the requirements. I used Kodak printers
for a long time, but they're no longer made. I used absent in early times and then they went through some things where the
printer would run out, break before your
first ANC ran out. And it has been really the most difficult part
of this whole thing. Unless you want to
spend $1,000 or $1,200 and you can
get these tank fed. Really great printers. But I didn't have
the room for that or the budget for that ever. So. The reason that the search
is a little difficult is that there are certain parameters
that you have to have. The first is that I think that an inkjet printer is
absolutely necessary. If you care about
color matching, color laser printers are also excellent and some of
them have rear feeds, and they will feed
card stock and so on. But your color will
never, never match. It'll never have
the vibrancy when. So if you're doing graphics, if you're doing type
that kind of card, you're not going to
care about that. But if you are doing
illustrations, photographs, things that it matters that the color looks
like your original. You're going to care about that. Okay, So our first preference is that you find in
ink jet printer. The next really
important thing is, maybe the most important
thing is to find a printer with a rear
feed paper tray. It's rare as teeth on birds, but I don't know if birds
have teeth are not. Anyway. It's rare to find. But it's really
important because if the paper goes straight
through the printer, it will come out the
front without having to go through any rollers
and bend around. And therefore, it can
be thicker paper. That's really the whole
game plan, right there, is that most printers have both the in and the out on
the front of the printer, meaning that your blank paper
goes in and it goes around a whole set of
rollers and twists and turns and comes back out. And card stock almost
always will get stuck in there and you'll be on doing paper jams until
the cows come home. So that is one of
the things that really limits our choices. And because of what I said, because it can feed
card stock through. Another requirement for
me is waterproof ink. Now, this is not totally
necessary thing for you. If you're going to
professionally saw cards, you're going to be packaging them with a protective sleeve. And so water is likely not going to spill on them
and ruin the image. I just really prefer waterproof ink because I know that nothing is
going to happen to it. It's going to look and feel and behave as if it's a card
printed at a print shop. And so I feel that
that's very important, but if push comes to shove, then you can skip that part and just be real careful in the
handling of your cards. Separate ink cartridges is really important from
an economic standpoint. Ink is probably your biggest
printing expense you, by the printer and the printers
surprisingly affordable. And you say UP until you see the ink cause is
as high as it is. Now the AIM does
last a long time, particularly if you
buy the XL cartridges. But some printers have a
black ink cartridge and then one cartridge that has
the other three colors, the other three primary colors. And in that case, every time one of
the colors runs out, Let's just say there's
a lot of yellow in your artwork and so
the yellow runs out, but you still got plenty of magenta and cyan cartridge
is still no good. And you need to buy a new one. Now when they're
separate cartridges, obviously you buy just
a yellow cartridge. And it saves a lot of money, and it wastes a lot less ink. Your yellow and your magenta
are gonna go faster than the blue and even done the black
when you're printing cards. Okay? The other important
thing entrepreneur, is that you are
able to set size. You know, that might
not be a letter sheet. Now, that's not a deal
breaker totally because we, we are looking at how to lay out our cards on letter size sheets. But if your printer allows a seven by ten
card stock to go through, you're all set, you can use
card blanks and there isn't any problem about cutting
or anything like that. Allowing that is
about two things. It's about set,
being able to set it up in the front dialogue
when you say print. And it's also about having
movable guides that you can squeeze in smaller to guide a piece of paper that's
not eight-and-a-half. Why most printers
have that capacity. So it's not a big worry, but those are what I consider
the really important things about a printer
that will do well by you making greeting cards. I'm not one of those
people that fools around about what the answer to things is because when people
do that drives me crazy. And I'm not under obligation, like I said to anyone to try to push any
brand of printers, I'm going to jump right to
what I use and what I love. And what I paid
more than this for. This printer goes up
and down in price and I got mine at Office Depot
and I paid $300 for it. And now today when I
looked it up on Amazon, is $249.99. So that's awesome. This printer has
every thing and very, very few things to worry about. And I'm going to tell
you those Everything's and I'm not saying this is
the only printer to have, but I am saying
this is the best. It's got everything that
we need and this is how I print all of
my greeting cards. And so the only drawback
to this printer really, is that it's big. You can look it up on
Amazon and look at the, you can't pick it up
yourself if you're like me. And it's got a big footprint. What I did, I didn't have
desk space for that. I bought a printer cart. It has a plug-in it and stuff
and I can roll it around, get it out of my way. But it is not a regular
sized desktop printer. The reason for that, the really great
reason for that. It's, it's a wide
format printer. Now, that means that
it's not limited to two to 8.5 wide sheet of paper. This is 13 by 19 is
is it's big limit. I got it. For that reason originally
because I was making prints that were bigger than letter size sheets of my art. But it's also turned out to be a great card printer for me too. Okay, so it's big, but it's substantial and
it's very affordable. So we don't care about it's big. Now it doesn't show that here, but a tray pulls up
This house, by the way, a big scanner and it
has a document feeder, as you can see, I don't
actually ever use that, but I do use a scanner. It's a great Epson scanner. Behind that top where you
see the the document feeder, a paper tray pulls up back
there and it's 13 " wide and tall and it has those little
adjusting side guideline. Please don't mind. My dog is snoring. I have a few minutes ago and I is that we're
going to ignore that and maybe nobody
will notice it. But anyway, there is a
rear feed paper tray. Okay, And another
great thing is that the ink for this printer
is waterproof dura. Bright ink has been around for many years made by epsilon. Um, you don't want to use compatible inks in
Epson printers. That is, they warn you on every one of their
product descriptions, but they mean it not only
are they not waterproof, but they also just really
mark up your print heads. And that's, you know,
death to a printer. So it's not something
that you want to do. The other thing
I'm going to point out is you don't let
this printer sit for months without running
a print because that also will dry up ink in your print heads
and make trouble. So if you go on vacation, you need to have somebody run
a copy or something every week or so to keep it alive. But in all fairness, I have, I have been bad at that a couple of times and the
printer was still fine. And you run cleanings every
once in a while to make sure. But anyway, this ink is great. It's pretty true in color
and it is waterproof. So I'm gonna go back for 1 min
and give you another look. This is the workforce 78, 40. It has a great big screen
for doing all your do dads. And it has a keypad and it's just could not
be a better printer. So there you go on that. And is there another brand? There are other Epson's but they don't have
the rear feed. One does, but it's just as big as this and it's
more expensive. So never mind about that, right? But the smaller workforce
printers for the most part, do not have a rear
feet if you find one that does and takes
waterproof ink, Hallelujah, That's
a great thing. But anyway, this is
the end-all be-all. The other printer that I own
is not this one as someone. I'll show you in a
minute, but Canon pick SMA printers or the
other printers, inkjet printers that will have a rear feed and that will feed a heavier
paper through them. And this one is
particularly inexpensive. Of course, there is a downside
and the downside is that the ink is not waterproof on
the Canon picks my printers. And so you're going
to have to protect your cards from any moisture
damage of that kind. The inks are pretty
true to color. Like I say, I don't
own this one, but I do own this one. This is a portable and I take it on all my
road trips with me. It's just really
easy to transport. And it doesn't show right here. But you can see in the
small pictures on the left, the paper feed does
pop up from the back. Well, actually it's the cover
when you put the cover up. And so it will feed card stock. It makes a beautiful print. And the other thing
I really like about this printer and My Apps, and both of them will
connect to your WiFi signal. But that is a pain. If you're going motel, motel and having
different signals and passwords and all of that. And so what both of these printers will do is
called a direct connect. And that means they will put
out their own Wi-Fi signal. And you, when you
go to print from your iPad or your laptop, you go up to your
network connection and you choose the signal
coming off of this printer. And then you're all
set and you print. The only thing is of course
your eyes then tried to go online and you forget why you
can't because she's still, you're still on the Wi-Fi
signal coming from the printer. Anyway, that is a
wonderful thing, especially on the
traveling kind of printer. Or if your Wi-Fi network at home is located far from where
your printer will be. Or just a lot of nicety
about that fact. So I think I have covered what I have to cover about printers. And the other thing that we
have to deal with that is one of the difficulties is
setting up to print. And the reason I say it's difficult is because
there are not a lot of apps out there
that give us what we need. And what we need is a set
of rulers top and side, and the ability to pull
guides out of them. And that way we can
set up our art and our type in the right place so that when it goes
through these printers, it will be where it belongs. There are a lot of
apps out there. Most of them are very expensive. Indesign, of course
his top of the heap. Indesign is for any platform. But the affinity, there's an
affinity set of programs, it's up against Adobe. And Affinity Publisher is a really good page
layout program available for both
iPads and Macs. Apple only though, and
that costs 60 or $70. There are apps that
are less expensive, but you really have to
check whether you can pull guidelines out of the
rulers top and bottom. Now, I have a Skillshare
class for you, which I made for Procreate, so that you can make letter pages and
layouts in procreate. And you can find that on Skillshare since that's
where we are right now. And you can do this
layout on your iPad. But as far as computer programs, there is a program called pages, also, Mackintosh
only, but it's free. It comes with the Mac. It's been around forever. In the early days, it let you have a blank
page so you could put pictures and text boxes
and move them around. Then it went through a period
of time or it only let you do a word processing thing, like when you make
a blog post and the picture has to
be part of the type. And now in the newest
version it's back that we can have a blank
layout page and so on. In our next lesson, I am going to teach you about page layout for greeting cards. And I'm going to
be using the pages app on the Macintosh for that.
12. 12 Page Layout in Pages App: I'm going to be doing my sample layout for
you in the pages app, the newest version
on Mackintosh, it's an app that comes
with all the max and the earlier versions
were wonderful. They gave you a blank
layout page and then there were a bunch of
interim version that did not. Now the newest version
allows it again. And so I'm going to
ask for a new document and I'm going to get
a template chooser and there's everything
under the sun here. But what I'm looking for is
a blank page for layout. There's a blank here
that would give you a word processing
kind of format, which means your pictures
are stuck inside the type. That is not what
we're looking for. A blank layout means just that it's a page that you
can do anything with. When I get it open
for your sake here, I am going to view it. The whole page here, fit page. There we go. We have an eight-and-a-half
by 11 under view as well. I'm going to go to rulers. Was this thing jumps around. It's brand new. It's
a brand new laptops. Show Rulers and now I have a
horizontal ruler at the top, 8.5 " and I have
a vertical ruler, the love for love in inches. Okay. And then I want to
make sure that my guidelines are on and they are because
I'm not hiding them there. To make a page layout, to make cards of whatever
size you're making. You want. You have a page here
that's the letter size. It's going to go
through your printer and you want to
put your things on it so that they land in the
right place on the sheet. So when you cut it
and you fold it, everything is all lined up. So to make a ruler guide, you go inside the ruler with your mouse or your finger,
whatever your pointer. And you pull out a
guide and there it is, and it will move anywhere
across the page. And so the first layout
we're going to do is for our A2 cards on a
two up per sheet. I'm gonna divide
this sheet in half both ways and there's
four and a quarter there. And if you're not
sure where you are, which I can't see for squat
and this little screen. You can move and watch the numbers on this
guy we want 4.25. So we know now that we're
exactly in the middle. Now we're going to pull down a horizontal guideline and we want that to be at
five and one-half. And again, I'm
watching the numbers, which are little tricky here, but it's better
than having to see, which is also very tricky. So what we have now is
we have a layout page for two A2 cards. One is going to be here, and one is going to be here. I'm going to move my window
out of the way a little bit. And we'll click
on the background in order to get my Finder. And I'm going to open
a new finder window. And I'm going to go
where I know I just downloaded a couple of
photos into downloads. And there they are,
right at the top. And for this card, I'm going to start
with how to be a princess as my artwork. And on the Mac you can
just drag that into place. Other programs may have
you go out, browse for it. But there's pages here. Let you just do this. So now that's my art. And it's not coming
in at the same size. Now, even if you have
this sized correctly, it for some reason
pages doesn't bring it in at its actual size. And so what we need
to do is resize it so that it fits nicely on
the front of our card. And we do that in pages. You don't have to hold the
Shift key down or anything. We do that by just
pulling on a corner. So now that fits, but I kinda want it in the center of the
front of my card. And then when I click away
from it, there it is. Now I don't know what this is. A demo and I think that this
gray line is on here because the picture I brought in was a screenshot to use in a shop. But you don't care because we're not really printing this. So you just pretend
this is your artwork. Now, what we can do here
is do the same card twice. Like say this is a popular one. And you want to print
two of them at a time. In which case we could click on this already sized
picture and Command D or go under the File
menu to duplicate it and drag it to the
front of the second card. And there's that. If you don't want to
do that, you can make another current in
the same sheets. So here's what I'm gonna do. Deleting that, moving
back out so I can see my, my graphics here. And I'm going to bring
in this other graphic. These are actual cards of mine, but they're, they're
screenshots for the shops. So alright. I can just as well
cited Sam right up here because it's
all the same size, all four sections here. So I'm going to pull it in
until it's going to fit. I'm going to drag
it down here so it can be the front
of this card. We go Now the back of the card. I don't know what
you want it to be, but I know that it's
going to be words. And so we're going
to need a text box, and those are up here and pages. And you click the
Text Box and you get a box with little tiny
types that you can't see. So first of all, we're
going to change the type. And when it still says
typed enter text, you don't have to select it. If you have something
typed already, I want to change your font. You do have to select it, but we're just going
to say this card is illustrated by Suzy. Okay? It's very small and we're
going to want it bigger, so we're gonna select that. And we're going to come over
here to where it says text. In here is this size 11 point
in by hitting this arrow, you can just make it size up
as much as you want it to. Now also, we have our
arrangement here. This is flushed left, centered is always a good idea. And then let's find a font that's a little more
interesting than that. Helvetica. Heavens. Okay, I'm gonna make
that Jennifer Sue. Whoops, that's a slow one. Small one again. So I need to go back but still highlighted and
make this larger. Now perhaps I want to make the Susie artists larger
and this smaller. So I'm going to take
that part down some. In the Susie artist. Now I can with my
mouse or your keypad, whatever you call that thing. I never use the touchpad. And I'm going to place
that about there. Now suppose that you want
your website down here too. You can save time by going
and keeping the same font. Go up here, click on this
Command D duplicate it, pull it down here, swipe over the whole
thing and type www. You don't need that
anymore. But anyway, Susie artist.com or whatever
information you want, I think that's a little bit
small since you want people to come and contact you if they liked his card when they get it. Just something like that. And now this is centered to make sure it's centered on the section that you want
to be in to one corner, out to the other guideline here. And now we'll make
sure that it isn't. We're gonna do this to
take it over to the edge. And we're going to pull the
box out to the guidelines. And then we know it's
centered on the back. Now this card has got
a different picture. However, you probably
would have the same back unless you had
titles that you changed. And so we're gonna go up
here and we can either Shift-click this to get both of them or we can scrape over it. But anyway, duplicate it, command D and just bring
the two together down here. And we are all set to print to A2 cards with your
artwork on them. And when this piece
of paper comes out of your printer and you cut it
in half right across here, and you score it
right in the middle. This should be
centered on the front, and this will be
centered on the back. And everything will
look like you're professional and you knew
how to do it the right way. Now I'm going to add
a page here because we're going to try and A7 card. So, um, we don't have any guidelines
carried over for this. Before I do that, I wanted to say that you
could save this document with just this page as a file that you will
open to make new cards. You can save it as a template that you can open on purpose. I get confused when I do that. So I just save that
file and I might call it cards start or A2 or
something like that. Because I can go in, I can open that file, I can delete these pictures, put in other ones. I might want to keep the
type that I've been using. It's already there. And I might want to
change anything else, but the setup is all set up to make text boxes anymore
or do any of that. Okay, so now on our blank page, and this time we're gonna do use a letter size sheet for
occurred that's an A7. I told you that I
often would set this whole pages
document up to be an A7. And therefore, I
wouldn't be doing this. But if you're not using
pre-made card blanks, that you would use
a letter sheet. And so we want to
have a card that's ten by seven by seven, so that we end up when we
fold it with a five by seven. And this time I'm going to do a horizontal format,
a landscape format. So it's gonna be this
direction that it prints. And I'm going to pull a line
out of here and go to 7, ". Close enough, it
was heaven or wine. And from the top ruler I'm going to bring one down to ten. And then I'm gonna
divide that in half so I can tell what
I'm doing in my layout. So I'm gonna pull
another horizontal down to half of
ten, which is five. Again, I'm just letting go because I'm not going to fiddle with this
in front of you. And now what we have
is one A7 card, but we know where things
are supposed to print. This is when you are
going to have to take an inch and a half off of a cut, off of one side and an
inch off the other. End. Score it, and have your card if you're not using
the pre-made blanks. Okay. So I'm going to again, I'm going to go out and get from my finder window a piece of artwork that shaped
correctly for this, this is a photograph and it
is a horizontal photograph. It's a photo that I took in the countryside in
Illinois and I put it on Instagram and they
liked it so much that the state asked me if
they could use it. I would leave more
whitespace here. So I'm going to make
my photograph just a little bit smaller. Okay. This time I'm going to want to put that same type
from over here, but there's going to
have to be a change. I'm going to come back
to my first page. I'm going to click that and I'm going to
Shift click that. And this time instead
of duplicating it, I'm going to copy it. And you can do that
under the Edit menu, but I'm doing a command C, and I now have a copy of it. And I'm going to
move to this card. And I'm going to do a Command V, which is the key
command for paste. So now I can make that
centered on the back. I might, because
it's a wide card, I might change
this a little bit. I might make the discard is
illustrated by all one line. So it doesn't look so funny. Okay, and then I'm going to have the website information
down here too. I go like that. But what's wrong here? If you think about
it, you're gonna know it's gonna be upside down
on the card prints, right? This is the front of the card. You're going to fold
the card in half and the type is going
to be upside down. So in pages this is an easy fix. Because if you come over
here to my range over here, there is a rotate. We're going to rotate one at a time because we don't want to rotate the entire block or we'll have it in
the wrong place. And here I'm going to type 180 and hit the Enter key to make that happen,
to see what happened. We got upside down there, but we are in the wrong place because that's the
bottom of the card now. Okay, so we're going to do
this, and we're gonna do this. So now this is going to
print on the bottom back. And now this one, we also want to rotate. And so we're going to put 180. They're also turn
it upside down. And then we're
going to place this about a third of the way down and the back is
a nice-looking thing. Alright, and this is a
card that is set up now for an A7 print and everything will land
in the right place. These lines won't show. So you will know that the
first thing you do is you cut an inch and a half off of
one side of the paper, off of that side of the paper. Then you're going to
have something 7 " wide and you're going to cut an inch off the
bottom of the paper. And then you're going to
have something 10 " long. And that you'll be able to
score right in the middle. And make your greeting card. If you want to make a, if you, if you want to make an A7 card and a portrait format like this, you need to start your
whole your whole pages file with a horizontal
blank page. And then you would
have the room. You'd have this set
up the same way. But everything would
be right-side up because you'd be looking
at a wide sheet. I hope that translates because
this video is getting too long for me to do
a sample of that. Anyway, all the layout
programs are different. I do provide you with
a class actually in Skillshare about doing
this in Procreate, which is a wonderful thing, just everybody who's an artist almost and has an
iPad has procreate. And it's just so much
easier than finding the right program to make it on your computer unless you have a Macintosh and you
get this for free. The other programs InDesign
and affinity is not bad. There's an Affinity Publisher
and that's not bad. That's a 60 or $70 program. Indesign you have to subscribe to and
it's very expensive. It's made by Adobe. There are some, you
can look for apps. There are some apps
like, I don't know, called publisher
to or publish it, or what kind of more clunky
setups of this same thing. But as long as you
get a pair of rulers and you can pull guides out of those rulers, you're all set. And as long as you can
set the dimensions of your page so that you can
have a letter size page. I hope this has been a
little more clear than mine. I'm sorry. It's a pretty
complicated subject.
13. 13 Selling Your Cards: Before we can talk about
selling our cards, we have to have
some cards to sell. So use your class project over the three cards that
you made that all have a matching style and create a line of six cards
in that style. And then it would
be smart to create two or three more sets of cards of six each to put together a portfolio
of your cards. And the style, the feeling of your cards
when you show somebody, there'll be able to see kind
of what your card shop, If we might say it that
way, would be like, package the cards beautifully and then put them
into some kind of a case or a box or something lovely that you could
use to take them out, to show them or sell
them somewhere. So that's, the first step, is to make the cards exist. When you're ready to show
your cards to someone, you start at the source. This seems kind of obvious and maybe not too
sophisticated either. But show your cards
to your family and your friends and
watch carefully for reactions and tell
them that you would like some real feedback
that you're thinking of selling your greeting cards and avoid anyone in your friends and family who already
has been telling you to get a real job instead of
being an artist and so on. You know what I mean? You
don't need hurt feelings, but you are looking
for actual feedback. Oh, I like that. I like the way that
said or, or whatever. You are also listening for. Anyone's saying, you know, I don't get that. I don't understand the message. And the reason is because greeting cards or communication, you are helping someone to say
something to someone else. And if the something is
not very understandable, the greeting card is not
going to be very successful and probably will not
sell well either. After friends and family post your cards on your social media. I'm not sure how I feel about
the validity of likes and so on and social media,
but they're there. So if you were to put a picture
of one of your cards on your Instagram and it
got a lot of likes, then you'd say that's
probably a pretty good card. It has a sense of you have
a sense that it might sell. So that's pretty good feedback. Ask for feedback. If you have to, if everybody's
just going to, oh, nice. Asked for feedback and
then appreciate it. Tell people that. I really appreciate that you
told me that I, you know, that you didn't understand
the message there because now I can fix that and that opens up
communication so that people would give you
more meaningful feedback. Take notes on the
feedback so that you can go back to your line of cards and make the corrections
that might have come up. Use the feedback
is the next step. Take those suggestions,
dislikes and of your, of your first audience to heart. And go and make the
changes to your line of cards that you feel
makes them better, makes them a better product. The next thing is
to test market. That's a different
thing than asking for feedback because test marketing is about whether somebody is
going to take money out of their pocket because
they liked the card. There's a difference there. It's easy to like things
when they're free, just like they do
on social media. You know, nobody even
wants to pay a comment, but they can hit a like button. And so you need to
test market someplace. And the most obvious place
is if your community has any small arts and crafts shows that are inexpensive or free
to be a part of. Sometimes they're through
schools or through a churches, or through little
shopping centers. Little, little farmer's
markets that you can get. Farmers markets are good if they have arts and
crafts as well. You can get a table for
not very much money. And when you get that table, you can lay out your cards
beautifully and you can stand there and watch what happens. The best way to find out which designs are going
to sell is to try to sell them to a live
buying audience. And so you've got to put your arm or on if
nobody buys any, nobody else knows and
nobody bought any but you. And so you don't have
to tell anybody either. But if they do buy your cards, then you're going to know
which ones are more popular. And that is a great
thing to start finding out even in the very beginning. And so look for, I'm not talking about your big art shows where
you're going to pay hundreds of dollars
for a booth That's for Wade later if it's
something you choose to do. But just small things, small local things
are gonna give you a whole lot of feedback
about what is salable. And one isn't. The second possibility
for test marketing or selling your cards
is local shops. All kinds of stores sell cards from supermarkets
to dog rumors, florist, or especially fond of selling cards because they go with the flowers that they sell. Gift shops of course, are given because Cards go with the gifts people are
buying for other people. If you approach an
actual card shop, It has the benefit of
already having card racks and displays and other
stores don't always. And that's something that you're going to have to make a plan. As we spoke about before, about how your cards
will be displayed. But visit every kind of local shop in your
neighborhood or in your town. And most of them
will sell cards. So the next thing you want to do is figure out what kind of cards and what price range
they're selling them at. So when you visit the shops, see the feeling of the lines of cars that they
sell like a dog groomer. The card rack could be full of dog and cat cards or
a pet food emporium. We'd be like that of Flores. There might be a lot of floral
cards are still lifes or, or things of that ilk. Some stores sell funny,
insulting humerus courage. There's a flavor. And you need to pick
up that flavor. And then you have to
figure out whether your cards would
suit that flavor, which your cards fit
in, in that shop. And if so, you might try
to chat with someone, a clerk, or whoever is there about whether you
could have an appointment. Just show them your cards. Be sure to mention
that you make them yourself and that you
are a local artist. Because a local
store can appreciate local shopping and having
goods that are made locally. Always make an appointment. Don't ever stop in to a store and think that
the ulnar is going to stop what they're
doing and sit down and pay proper attention to
what you have to show them. A shop owners are very, very busy people and you
have to respect their time. They appreciate that. And they might give you an appointment just
simply because you are respecting them enough to ask for one and not just come in and shove your
cards in their face while they're doing
something else and saying, do you like this, I'm
trying to sell them. You just don't wanna
do it that way. It's just much nicer and more professional to make an
appointment to show your goods. When someone else
is going to sell your cards and you're
not selling directly, add a little show
locally or anywhere. You are going to be in a
wholesale retail situation. When you saw your cards
that someone's store, they will get 50%
of the sale price. Now this can happen in an actual sale to the
store in which they will buy a certain number of cards from you and they
will pay you for them and they will pay you half of what the
selling price is. But more often
you're going to be dealing with something
called consignment. It's easier for
the shop owner and especially on a product
they haven't tried before. And so what that
entails is that you put your cards in the person
shop at no cost to the shop. And you don't get paid for your cards until after they have sold and usually a month
after they have sold. In most cases, store will sit down every
month and they will add up all the things that
are sold and make-up checks to the artists who have their work,
they're on consignment. And there's probably
a certain date for that and every store
will be different. Now you want to understand all that very clearly in
the beginning and then you want a written
agreement doesn't have to be a big old contract
or anything complicated. Just what you in the store
owner shop owner have agreed to regarding your cards
and both of you sign it. And then there aren't
any like arguments later about what you
said this or you said that verbal agreements are difficult in camp or
can become difficult. And so you always want your business contract
to be a contract. As part of your research, looking at the prices of the cards sold in the
shop you are considering. We talked about pricing. The usual range is from
$4 to about 06:50. With most common landing right around $5 for printed cards. But some places like
supermarkets might have mass produced printed cards
for as little as $1.99. That wouldn't be what you
would want to compete with. Your five-dollar card. Handmade cards can
be as high as $16. And a handmade card is
one that looks like the artists made it
totally by hand. In other words, they
printed out the parts that they got the Ryan
Stones or whatever. They put the car
together by hand. They're usually
three-dimensional. I'm not I'm not talking
about hopped up cards here, although that would
fall in that category, but usually there's a layering of stuff on the front
of the card and so on. And then it looks like it's real art and then it
can solve for more. But if you were looking
in a shop where all the cards are $5
and none are handmade, you'd be in the wrong shop for selling your handmade cards. In other words,
your cards need to fit the shops pricing profile, as well as the shop
style profile. Selling online, My goodness, all brand new, all
unknown really. But the best place to
learn about it is to visit successful online
greeting cards sites and see what is popular, and see what bestsellers are. See the sizes, see the pricing. There are very tiny
mom and pop shops. You can start looking on Etsy. I'm on Instagram, search,
hashtag, card shop, all one word, and plan to spend some serious
time discovering how people sell cards online and what kind of cards
they're selling. Some card shops online or
just terrifically successful. And they're run by very
energetic people who go out and learn a lot about
marketing and who work their tails off on
their business. And it can happen. It all depends on what
you want to put into it, what you might get out of it. There are also successful
entrepreneurs and the card business that offer
classes free and paid. How they started it. I'll look on YouTube as well, how they started
their card business and what they did
to make it succeed. And you can learn lots
from things like that. When you are ready to
set up an online shop, there are a lot of
choices there as well. Etsy is the obvious
answer of where to start if you don't have your
own following online. Because people can
find you there by using the Etsy search
for certain products. Now that is a really nice perk. However, the downside is that not that many people
find you because of how many artists are on actually the competition is just
really incredible. And another part to Etsy is that to set up a shop is free. But the downside to
that is that Etsy charges hefty fees
for listing an item and for selling and item and low priced items take a big
hit because of these fees. So it has to be weighed, but it might be a
great place for you to start if you're
starting from nowhere. Because you won't have a chance of building
a new audience. You won't have to bring your audience with
you like you will. On other shops, there are several sites where you can
pay a fee for a shop website. If you don't have a
website of your own, these can be a good deal, but you have to do your own promotion to drive
traffic to your shop. Some examples are
shopify.com and Squarespace. Wix Weebly. The cost per month ranges
from about $15 to 40, and there may be
additional fees, transaction fees, credit
card fees, et cetera. The concept here is
that templates are offered for you to set up the look and feel that you
would like for your shop. And then it's very easy
to plug in descriptions and photographs and
set your shop up. But you have to look at the cost first because
they're greatly varied. If you do have a website or social media accounts like
Facebook and Instagram, you may be able to use my
favorite solution, which is, I don't know how
they pronounce it, but it's E CW id.com. They offer a shop that
you can park anywhere. The shop actually
resides on the server, but to your customers
it looks like it is on your site where your
social media page. There's a free plan to try. It is as easy to
set up as Etsy and the paid plans are
affordable from $19 a month. You hook up your own PayPal
or square accounts for direct payment and equity does not charge any additional fees. You can connect your shop to
as many places as you want, even putting single items in
blog post with a buy button. Everyone's perfect
solution will be different according to
individual circumstances. But with enough research, you will find the approach
that works best for you and for your card line.
14. 14 Packaging and Display: Here's where we talk
about the packaging and the presentation
of your card line. Part of that is very easy. Part of that is very,
very difficult. The packaging is great. And then I'm going to
demonstrate this card of mine. And I'm going to go
in reverse order. I'm going to reverse engineer
so that you can see that the end result here is
wider than 5 " by 7 ". And it's important
to know that is because of the envelope and
the outside envelope that when you are doing
the hard part of this and looking for
displays that you might offer to a store or use an art show is going to really matter that a lot
of them are only 5 " wide on each pocket. Well, 5 " wide, It's how wide the
current is, That's true. But when you have your cellophane envelope on and the envelope inside
with your card, you are out at
five-and-a-half inches. And so that is really pretend
this is the vertical card. And that's another thing too, is that you're going to
have to decide between vertical and horizontal racks. All of that part is really hard. But we're not going
there quite yet. We're just talking about
how we package the card. So it's good to know that the fully packaged card
is five-and-a-half inches wide and about seven
and three-eighths. And that is on an A7 card that is
different on the A2 card. It is smaller, but
it's still not. Your card measurement of four and a quarter
by five-and-a-half. It still has to
add a half an inch for an envelope Anna
and outer sleeve. So anyway, this is a picture I took some years back
of a CloudFormation. I did not Photoshopped this
this is not played with. This is actually an angel
and paid out of the cloud. So anyway, this is very
professional looking because it is put inside of a
clear cell envelope. And we'll talk about how to
put it inside in a minute. But I'm going to take this
apart to show you this. So this comes from
clear bags.com. There are other sources. Amazon sells them as well. I liked the quality here and
the range of size choices. These come with
what you just saw, the fold-over sticky flap, and those are good there. It gives you a higher-end look. The car doesn't
fall out the end. Yes, there's a little bit more plastic involved and adhesive. And so if environmental things
are more important to you, you can consider that
because these also come with just an open top. And a lot of people
use them that way and the card slides out. If the person wants to slide it out to look at the interior, they never put it
back in correctly. This is one of the reasons why cards with messages
on the inside. A lot more trouble. But anyway, a card without
a message on the inside, it can be put in a solo envelope and it will still
look shiny like that, but the n will now
look finished. Tip number two, I think
it is your envelope. Okay. Many people would just put
it at the back of the card, put it in their envelope. And then when a person
turns a card over and store to see who made it or anything else
about it or the price. They would do this and
they would just be seeing an envelope back there. And so what you'd want
to do is you want to put your envelope
inside your card. Let us show this tells the person There's
an envelope with it. But when it's in this cell
asleep and you turn it over, There's all the information
that you printed on the back of your card that
you want people to know. Now, this card was
printed some time ago and so that price was printed on it. That's a very old price. I can't use this card
anymore because of that. So that's why I was telling you it's a really good idea not to print your price
the back of your card, unless you plan to charge same thing for it
your whole life. And the cost of
materials does change. So anyway, this would be inside the envelope and I
think I will put it back in there to
give you an idea is it's more difficult for me to do this now because
I have already opened it. And what that means
is that there is an adhesive strip right here. When you buy these, this is lying flat. And there is a cover paper, relief paper on the, I love when I make an
idiot of myself on video. There's a relief paper
on the adhesive. So it isn't doing things
like this to you. But for the sake of showing
you something okay, resealed. So what I do when my
cards are in a gallery or a store is I use a
price sticker on here. It's good to remove that
price sticker because people sometimes give the cards as gifts and don't want
the price on there. But we stick a
little price sticker removable one on the
back of the card, on the plastic envelope. Nothing with price on it
is on the actual card. When you start looking
at card displays, you're going to find
out that there are ones that are revolving racks and they have hooks coming out to hang cards on and you go, how would I do that? Well, the same people
clear bags.com, make aversion of these envelopes with a hang tag on one end. And they make him for this type of card
and disorientation, and they make them
for this orientation. So you take your choice
depending on whether you do mostly horizontal cards
or vertical cards. And that, that hang tag is going to make that
impossible to use it in a regular slot card display
because it's going to add some width to
it or height to it. And so these are all choices. This why I'm telling you that, how you're going to display
your cards in a store or at an art show is a really
big project to figure out. I am not gonna be able to
tell you my solutions on that because my card racks
and my systems are well, they're not made anymore. And I've been selling cards
since the early '90s. And so I've just
kept them all these years and put them in different
configurations because, um, I could and they had to, but I can't tell you
where to get them now because they basically
don't exist. Now. I can tell you where to go
to look for what does exist. So there's a popular
thing going on right now. The environmentally speaking, a lot of card makers
are saying all, all we have to do really is just put the envelope inside of it and put a washi tape is, it's a low tack decorative tape, but they're making and
marketing Now a little card. Tabs, maybe your color, but basically it's
low-tech tape. You just stick it on your card and it goes
over the edge of the card and the edge of the envelope over
here, over here. And then no Solow is used. Now. Yes, that's better
than using plastic. But when you're talking
about a retail marketplace, that card is vulnerable to handling and it will be handled. And there's nothing
you're gonna be able to do to stop people. They pick up a card
to look at it and say put that down because you're
getting fingerprints on it. If you're using a printer
that is not waterproof, That's going to obviously be a situation where a
disaster can happen if anything wet gets
spilled or a wet hand or even oily hands, which is a natural condition, will put fingerprints and so on. So I highly advise
against that kind of a of a trick unless you are just handing someone
a card as a gift. Because handling
in the marketplace that will be erect
before you know it, store owners prefer
for obvious reasons, packaging so that they can know their inventory
is not going to look like a bunch of wrinkled and
bent stuff and not sell. In fact, they would call
you in and have you replaced the inventory
at your costs. So it's just not
something you want to do. So we have these in a little bag with the
flap or without the flap. The other thing is
transporting your cards. If you don't really have
a flap on this end, the Kurds likely to slide
out of the envelope. And that's another
thing for you to watch. So my best recommendation
is that clear cell, the best grade
recycled, whatever, if you can get it with an
adhesive strip, fold over. Sometimes you want to
sell cards in sets. This same clear bags.com cell
boxes and they come flat. They're not inexpensive. I can't think what are the current prices because
I'm not using them currently, but they come for
all sizes of cards. They are great for holding about six cards with
their envelopes. And then you, I
have friends that saw their cards only
this way, only in. So what's inside
can be all of one. This happens to be a
six of this one card, but it can also be a collection. It could be your whole six
card line sold in a box. When you do that, however, it didn't happen here
because it doesn't have to. You have to do something
that inserts on the back. You have to print something with a miniature of all the images on it so that people know what's
in this pack of cards. And then this package console, individually at $5, that was
six cards would cost $30. At a price of $5 to
six would cost $30. And so anything under
that is a deal. And the buyer will
respond to that and more readily by a set of cards. Maybe then to pick up six if all six were
in the same pack, if they liked a variety of images than they
would pick this up. This also makes it
really good gift, a set of box two cards. There are also cardboard
boxes sold from companies that
sell jewelry boxes and they're big
enough for cards. You can go that direction. That again, is more
expensive than this. Anyway, these boxes come flat and they're all
scored and ready. And so you put you fold them
and they come for the A12Z, A7, A6 is any size
card you want. These boxes are made for it. Okay, We're going to move
along to the idea of displays. And I'm just going to go
to some screenshots that I picked up of different
kind of card displays. The idea about a
display is that you walk into somebody's store, you've got a handful of cards. And unless they are a
current store already, they're gonna say, what am
I supposed to do with them? How am I supposed
to display them? Now, the least expensive option is that you sell your
cards in a basket, that you get from some nice basket craft
store or something. And your cards all
stack in that basket. And what the store owner
has to deal with is just a basket footprint
that she can put on a shelf and people
can go through your cards, people like that. It's not great for
great numbers of cards. It doesn't show the
fronts of all your cards, but people like to
fiddle with things. And so whether in an art show or at a
current job or whatever, it is, one option and the most inexpensive option
to have a container. And I've seen people use corrugated cardboard containers
that they've decorated. I've seen, like I said,
baskets, wire baskets, galvanized steel baskets,
the whole country, modern farmhouse look thing. So a container in which your cards can stand up
together and the person will only see the one
that's in front and have to go finger and through
to see the rest of it. But generally they will like a print rack where you buy prints from an artist
at an art show, you gonna go, go through them. And then it's particularly important that these
are protected because all of that handling is bound to give you
bent corners and very corners and fingerprints
and every other thing. Some people sell sets of cards rather than
in a box like this, tied with ribbon or a
raphe around the set. And that's interesting too, but obviously your tie is gonna get in the way
of seeing your image. You still have to somehow show all the cards that
are in that group. The back, just like
you would do here, because otherwise people
are going to untie that bundle to see. You can tell I've been in
retail for a very long time. People will undo
the whole package and leave the raphe
in the string all over the place does
so they can see the back or the rest
of the current design. So all of these things
have to be kept in mind. And then when you go
to try to shop for a display to offer to the store along with
your line of cards, or to display your art show
that you're going to do. You're going to just see such
variety and you're going to see such a
variety and pricing. You're not gonna get much under $50 for any card display rack. And you can go up to $300 depending on the quality and the number of cards
that it holds. And the types are really
all over the place as well. So all I'm gonna be able
to do here is to show you some screenshots that I did and send you in
the right direction. In your choice of
display is going to be all about your choice of shop. It's like what are you doing? How many cards do you have
to display in that store? And you go from there.
15. 15 Choosing Card Displays: So we enter the huge world
of reading card displays. What I did up top here is greeting card displays
is my search in Google, and this is on regular search. So you get your images
in a row across the top. And this is going to show you already how many types there are and how much
price range there is. And we're not even
now looking into what the size of the pockets, these are called
pockets on racks. And so That's where we're
going to have to be careful about the actual width of our package greeting
card fitting in them. But let's just as an overview, look at this and look at
it from the standpoint of a person who owns a store where every square
inch really counts. That's a real good
place to look at it. And it's really good thing to bring in a picture
and discuss it with the store owner before investing the money to buy it. If you're going to do your own farmers markets or a booth, or you're your own art shows, then it's up to you how you're
going to make a display, and how large of space it takes. And it also depends
on how many cards you have and how many
lines you have, and so you get the
picture is pretty crazy. So this is a spinning rack here. And these common
all kinds of sizes and shapes and they turned
so people can see the cards. The height factor on
these right here is just as important as
the width factor. Some of these are made for CDS, and if you try to put
an A7 card and one, it'll stick up too far. To go under the next pocket. These are all called pockets. Each display will tell you
how many pockets there are. And then if you research
it more carefully, you will find out what
size those pockets are. This is a stack shelf display. This one has different
size things on it here. Bigger footprint, as you
can see, the spinning rack. So this is a more expensive, this would be an
interesting display GPUs on your, on a table. Because it shows a lot
of cards right up front. You have to be careful because sometimes the cards
will fall forward in these because there isn't very much of a guide
on the front of it. Here's another one
holding many more cards. Here's a tiny one
holding just nine cards. Here's a Walmart, a mounted
version, more spinners here. Here's one with all the
individual slides instead of just the cards
sitting on a shelf. Okay, here's a floor standing card rack may come in all
kinds of numbers and sizes. These these wooden
ones that you put together with a mallet I hear
tell are pretty difficult, so I would avoid those. There are leukocyte versions. There are. That's another
loose sight version, but there are metal like
black metal wire versions. Just gonna, I'm not
gonna go too far here. On your Google search. If you to say images instead
of all in the front, you're gonna get a whole
page of these with a little bigger picture to
figure it out a little more. But you're already
getting the idea that the choices
are just limited. All of this will
totally depend on your personal card line. How many designs are in it, what size are the cards? How do you want to
show them? And so on. Another place you will
like to check is Amazon. And here's one of those wouldn't want to put together
with the melon. You notice this guy like
two-and-a-half star reviews and mostly that's because well, for one thing I read
the reviews just to see and is because
these pockets are too narrow for your five by seven or 5.1 " or something that doesn't
do a thing for you. And the other thing is
people said they were almost impossible to put together
even with a mallet. I would avoid those
press board versions, but lots and lots of variety. And if you're a prime
member on Amazon, that shipping can make
a big difference. I think this is it.
Yeah, this is one that I saw on Amazon that
holds 12 cards. So it would hold two of your six card lines in pockets that are wide enough
and tall enough, okay? So you can see that your
package card will fit across, but also it's important that it fits below the pocket, above it. And this is a small
footprint, just a circle. This is a wire rack. It shows your cards off. There's nothing at
the bottom or sides. It's really hiding your image. And that's another good thing. But the price is a
little hefty at $94. But if I had to pick a display
that I would go out and take an original
order of cards to a store and offer to
have my own display. This would be something be under serious consideration for me. Okay, so let's try Etsy. So quite a few
racks here already you see a wide range of price. Here's a three-tier
birch ply greeting card display with a
five-star review. There must be something
good about it. So this is an affordable
looking nice display. Looks to be handmade. Pocket width. You don't have
individual pockets and so you need to go down. You see what the width
in inches is 19375, your card is 5.5 wide. And so you'd have 16.5 ". You'd be okay. In the height is 12 ". That's this whole
height right here. But you would be okay with
your A7 cards and this because at a 19 inch
width across the front, you're gonna be able
to get three of your packaged five-and-a-half
inch cards there. So that's pretty good. Let's see. They saw solo sleeves there, there's the one
without an E-flat. Other wooden cases. Here's a four tier and so on. I'm not going to
spend your time doing this on here because
you're going to spend your time going and getting all your information and making
the best choices for you. When you first start out, try less expensive things. Make sure that you know
what the dimensions and parameters are and you can always move up to
something else. I might, if I were you, I might try this $38.01. If I was going to do a show, I had 27 cards and
I was going to do a show in at a farmers
market or something. I might get like three
of these and that would make a really nice
display on a table. The price would not kill
you right out of the gate. So just lots of choices. And I wish you the best on choosing the best
choice for you.
16. 16 Card Lines and Styles: I have left our
lesson on style and creating lines of
greeting cards to last, because you can't promote
yourself on Skillshare. And except in your first or your introduction or
your extra reduction, your last video. So I saved it for this. This is a close-up shot of the card section of
my online store. It's in the process of
being changed right now. I will provide a link in resources so that you can come back and look at
this more carefully. So the idea of what we're
talking about here is creating groups of cards that
has something in common, and that's called
a line of cards. There's something
in common might be that maybe it's all of them have quotes on them or all of them have illustrations
in the same style. The best way to tell you about this is to
show you about this. And that's why I'm
using my own card shop. For that reason, all my cards
are not in this shop yet, but several are in. You'll be able to get the idea. So this first section over here, hummingbirds in the garden. Over the years, I take a lot
of photographs in my garden. And so hummingbirds
are very popular. And so I collected them in, I put them into a set
of greeting cards. And this particular
set has an extra as well just because there
was an extra Very cool shot. Several of these are one
hummingbird who decided to stay around one fall until
she actually scared me. This one right here is her in the morning,
choose very cold. She'd be puffy
like a teddy bear, and this is the
same hummingbird. Later in the day
when she was warmer, she finally did fly
away to safety. She buzzed my head
to say goodbye, but it wasn't in
November by the, wow. Anyway, several are her. One is I love this hummingbird,
hummingbird thing. It was such a lucky photograph because I just happened
to be standing there wanting to take a picture
of how that marble I looked on this
hummingbird Stan, and a hummingbird came and
jumped right in there. Okay, Now I'm also going
to take this opportunity to show you how a
shopping cart works. This is an equid and it's
actually on their site. But on my site it
displays this way. So it looks like the
shop is here as well. If a customer was
interested in that image, they would click that
image and ever come to the product page. And I have a photo. I usually just do one
photo of the cards because having it in a
in an envelope is like, you know, not really necessary. I sometimes put a gray outline, sometimes not this heavy, just to show where the
perimeter of the card is, overhears the title of the card, the price of the card, the buy button, product details. You would fill out this again. Who did the art? What the sizes? And here we have five by seven, which is A7 size as we know, that it's blank inside. I put some information about where my photograph in
this case was taken. With the quality
of the card is all of my cards are printed on museum quality paper with archival inks because I
also consider the imprints. So that is what
your product page and description look like. And using. But using any shopping cart, you'd probably be the same. This is what a line
of cards that are all related to each other
might look like. So let's go back again and
let's look at another. These are illustrations
of Southwest doors. These were all
paintings of mine. And so you see that
they're all different. But they're all the same style, because they're all
watercolors done by me in this particular
illustration style. And so that is a six
card line of cards. This one is interesting
because it, I bought the art, I actually licensed the art from the artist and the right
to make cards with them. And then I combine these beautiful
watercolor paintings with quotes that I really loved. This again, this is a
thinner border showing you the size of the card and
how it actually looks. Okay? If you do put quotes on your cards and
it's small like this, it is a very good idea. In your product details to put that entire quote,
people won't always, if they're looking on
a phone or an iPad, they won't be able to
read just from what is on the card picture. And then you don't
want titles that long. And so it's a real
good idea here. I have to me, every hour
of the day and night is an unspeakable
perfect miracle. And that's a Walt Whitman quote. That's just one more
tip about descriptions. Descriptions are important. People read them. Actually. You, you wanna do it now this
is two lines of six cards, or in other words, this
line has 12 cards in it. This is the best-selling
line in the gallery and online because it's just, you can use it for any
occasion, any emotion. Some of them are
similar looking, but it doesn't matter. It's more about the feeling. The mood is a very
different mood than my Southwest doors were. But everything in this particular
line matches that mood. So let's see what
else we have here. Here's another illustrated line. These are, take it as a sign. They were all based on signs. And you'll see it's a
very different style than I had on the
Southwest stores, even though it's me
and I'm doing I'm not painting as much as sketching here because I'm using
ink with watercolor. And it's a, it's a style. It all hangs together. But it's not the same style
as some of the other sets, but some artists don't have. I was an illustrator for a
long time and I developed a bunch of styles from
photo realism to cartoony. But they all are still meet. People can still
tell that I did it, but they are different. And this plant line
will show you that too. I did these in response to
a class on Skillshare by a lovely artist whose name I can count does not come
to mind at the moment. But for the assignments, I would do the plants very
differently than she did. But in a much more
realistic style is still not realistic. This is kinda half
painting and half sketch. There are some ink lines, but a lot of them are
obscured by the watercolor. But again, you would know as you looked at
this line of cards, that they were all done
by the same person. They have a style that
absolutely matches. So I'll just, I'll
let you look at these for a moment
while I finish up saying that I am eager to see the three cards that you create for your project
for this class. And I'm willing to answer any and all questions that you want to post
in the discussion. And you can also
contact me by e-mail, by contact information
in my I'm in my profile and I will respond
to email questions as well. I would really love for you
to post your three cards that you make together
in the project section. And that way we'll
be able to all see what you consider
matching style. And I wish you the best
of luck in this endeavor. It is fun. No matter whether you
become a big company, maybe that's not what you
want, but maybe it is. Whether you do it big
or you do it small. It's a wonderful way
to get your art into the world, into people's hands. As we talked about earlier, the frame ability of A7 cards is a real
boon because people can Matt and frame your
art on their wall to that, of course, this is all a very inexpensive
way to have art, but I think everybody
should be able to have art. And sometimes they can't
afford it and it is expensive. But anyway, I hope you have learned everything you
were looking to learn. And I hope that you have
the best of success in turning your art into
a greeting card company.
 Jessica Wesolek, Artist/Teacher