Transcripts
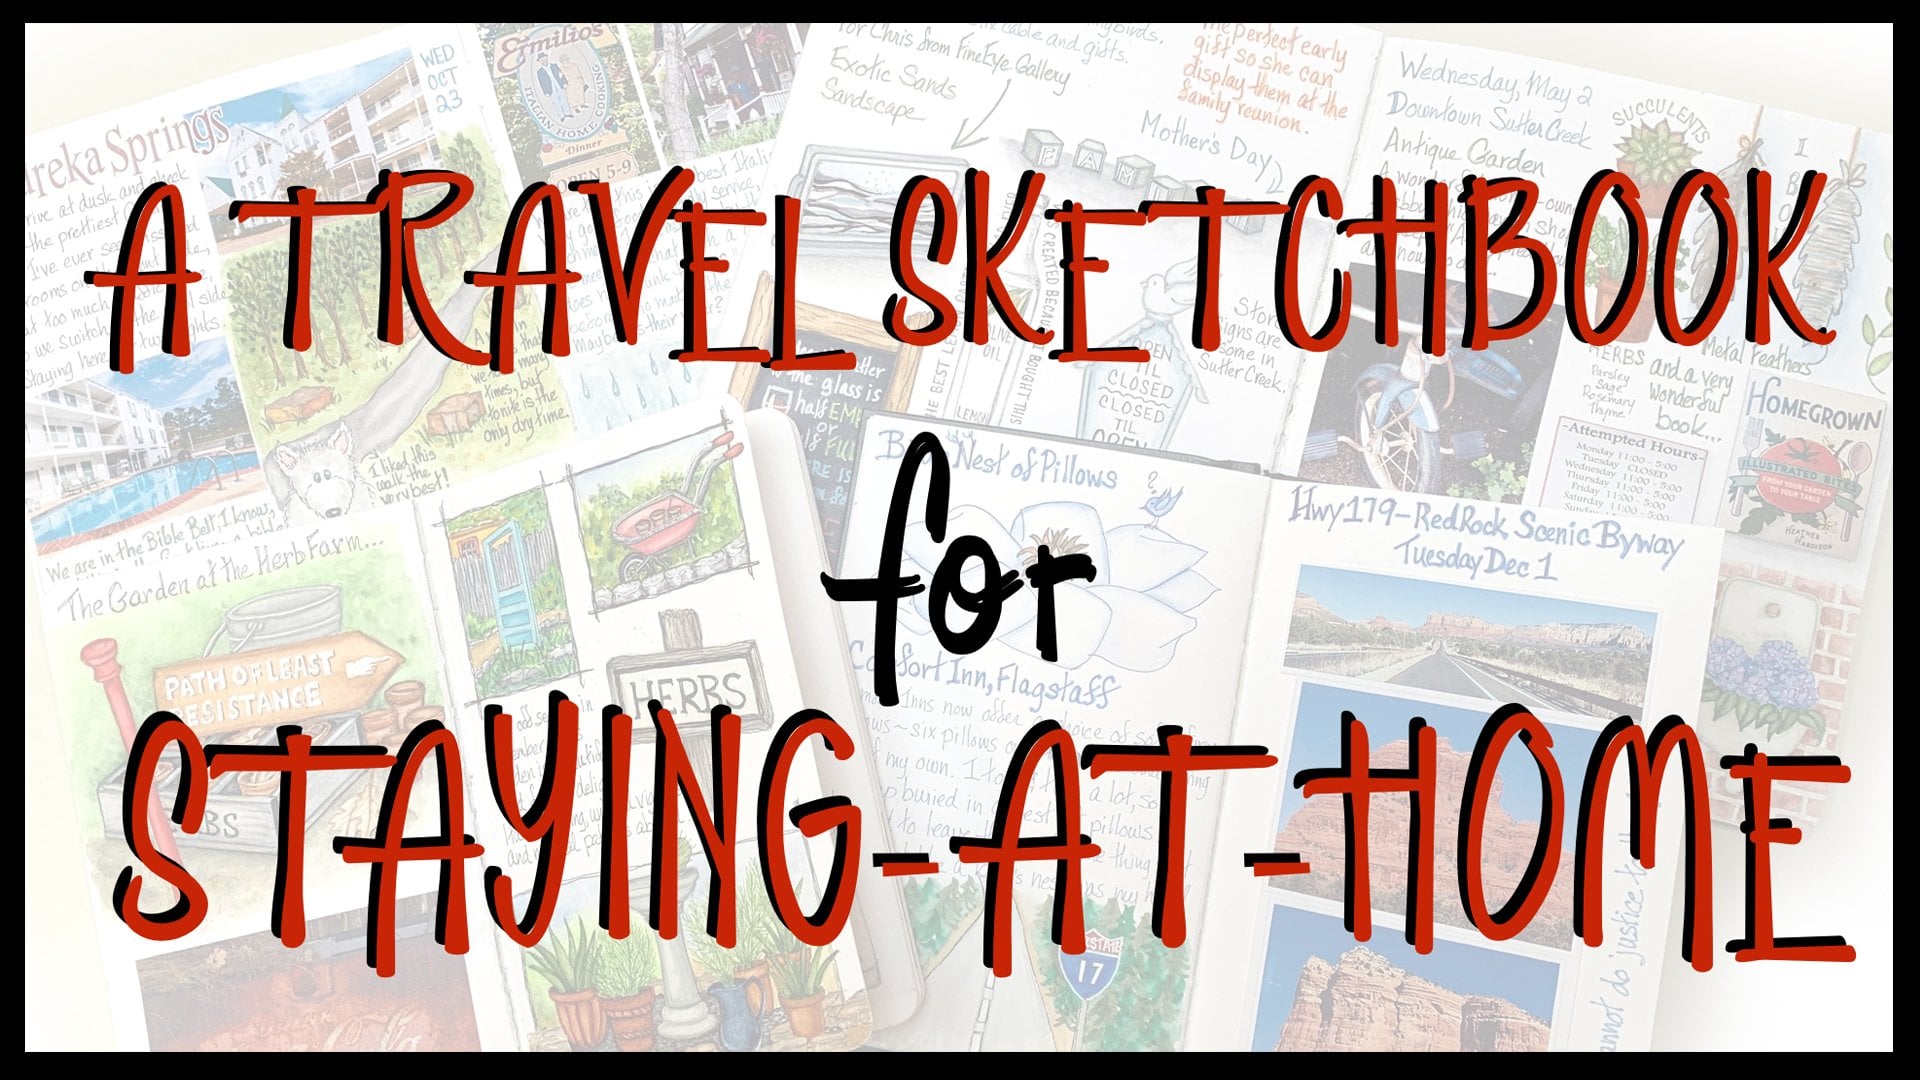
1. Introduction: Hello everyone. My name is Jessica. I'm an artist and illustrator, teacher, photographer, gallery owner. But one thing that really stands out in my life and as a grand passion is the idea of the sketch book as art form. And I've been involved in it for a long time. I've created 21 classes for Skillshare that most of them are on this topic. In this class is about the idea of keeping a sketchbook digitally on an iPad. In my real life sketchbooks, I do handwriting, I do watercolor. I experiment with mediums. I include photos. This is a photo of an illustration. In my digital sketchbook. It looks almost the same, and I do the same thing. I do handwriting. I illustrate things now with watercolor. But it looks like watercolor. I use photographs. And it's, it's almost, even though real and digital seem to cancel each other. In this case they don't. So you're going to learn how to create sketch books in your iPad that are almost the same As on paper and have extra added benefits. What you're going to need is an iPad and Apple Pencil that works with the iPad and an app called note shelf, which is very affordable and is available on the app store. This will be a lot of fun. The class is for everyone because this information is new. I don't care how much experience you've had. Digital sketch books to date have been thought of as collecting a bunch of Procreate pictures in a stack or something. This is a real sketch book IF functions just like the ones in real life, your project for the class will be to create a digital sketchbook. And we're going to do it in a way that we demonstrate to ourselves everything we can do. So there's something here for everyone and it is going to be a lot of fun and let's get started.
2. Comparing Digital Sketchbooks to Real World Sketchbooks: For a long time, I have wanted to create this workshop and I finally gotten around to it. I have been keeping a real digital sketchbook since well, ten years, since 2011. And I have been using the same app to do that on the iPad for all that time. And it's an awesome app called note shelf. In 2011, I was really intrigued by the iPad and of course there was no pencil then, but there were so many apps are absent, does app and that app. And, and so I set out to do a year-long online seminar called the iPad studio. And there were no manuals for any of the apps, of course, and so I had to write them. And I explored every creative app I spent a whole year 2011 doing not well. One of the apps that I found was the note shelf app, which I could make sketchbooks in a nicer to do that then. And I have a 114 sketch books in my notepad app, I think now. And I started to keep a digital sketchbook and a real world sketchbook. I'm of the same trips and experiences and I started that long time ago. I loved it because in the digital sketchbook, everything goes. And then I curate the physical sketchbook from that. This is a real life sketchbook, 2017. And I will show you what my real way of sketchbooks are like whatever is happening in my life, whatever moves me, goes into my sketch books. This was a study of a magnet and I was trying to draw from the magnet and then realize a magnet have really horrible perspective and had to redo it and blah, blah. And just playing. I do love watercolor admin or watercolors for 40 years, so I better love it. And so a lot of my work is done in watercolor. Some of it isn't finished. And I still go back to this and add little sketches someday. I'm going to sit down and paint all these knots and then that page you'll be finished. Sometimes I use a sketchbook in a traditional manner where I am going to create a real painting from it. This is one of those and I did, and it's long gone, but I have this. And this is actually a sketch in my sketchbook with all the unfinished ideas sticking out. And this is an unfinished page, of course, because I have those, these are pretty finished. They're just things that occurred to me. I started to do some coppery Natalie and had a fire brick and add a little blue pod. Then the story went on from there. I love watermelon. This one never even got anywhere. Yeah, it's page about measurements and this is a succulent. Did I bought and killed with too much water and love and another one, you know, ways to cook eggs. So, okay, so this is what I do in a real-world sketchbook. I want to show you that it's not very different from what I do in a digital sketchbook. This is in the note shelf app. And so I want to show you a little bit of, of this catch block in it. It's like this is one that's just daily thoughts and 2017 poses ER 2017, look at that. And they're not the same, but you will see some things look the same. I am just doing handwriting and I am just putting in photos and I'm putting in drawings. And this is, I was reading Peggy Dean's wonderful book and little botanical drawings and so I did a page of them. Those are in there. And here you see this was also and the real book. But here I was talking about something else. When I was working with Ross, I was trying to figure out whether I liked the whole look of the because I did make a print to sell out of this. But I was I was seeing too, I like the black on white or white on black or wherever. And this is like basically not much. It's just a page. The I started to work on something and for driving, there was a bleach bile and came back and did it, I guess. And here, this actually is all done within robots or phono, obviously of my watercolor palettes. But this is sketching is done right here in North shot off and I'm going to go in so you can see better. And these are rudimentary sketching tools that we have pens and highlighters and a colored pencil or a pencil. But you know, hey, not bad, right? But anyway, not a lot of difference between this and this, and that is what this class is about. It's not you do want a steady the other necessarily you might do one and then do the other because it's fun. It serves a different purpose. It's faster. For travel journals. It's awesome because you get everything in here. And I never get everything in my real life book. And so this class is about creating a real digital sketchbook.
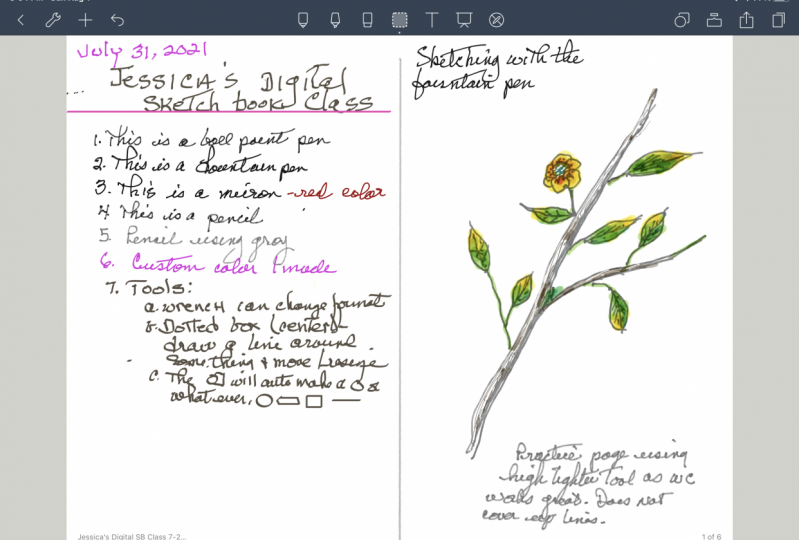
3. Creating Your Blank Digital Sketchbook: When you have your note shelf app all purchased and downloaded, the icon will be on your whatever page on your iPad. And to launch the program, we're just going to tap it. And what you get is not going to look like what you're seeing on mine. And the reason for that is that I have 90 for sketchbooks on this particular iPad. And you're not going to have any probably if this is new to you. And so you will have a Quick Create box right here, I'm pretty sure. And we'll talk about that later. That's a I'm in a hurry. I need to make a note kind of situation, so we're not going there right now. You may have some kind of a demo or help sketch book. I don't know what they do these days. I've been using this app for ten years now. So in all of its updates and so on, I no longer can even give a new copy in order to tell what's happening. So whatever you have here, we are going to go up here and touch this plus sign. And then we are going to choose to create, not quick create. But one was choices. We're going to create a new notebook. And we get a window like this. And the first thing that we wanna do is name this notebook. And right here it says Untitled Notebook. That's the title right now. And we're going to tap it. We get our keyboard. And you can name this whatever you want to name it. My first digital sketchbook. I'm just going to call it learning book for now. And you can do that too if you want to. But this is going to be the sketchbook recreate that tells us how to create a digital sketchbook. So anything that makes sense under those auspices you go for. Okay, and so we've got our title n. And then right here, we're going to want to cover. And again, I have downloaded all the choices that they have and they have a lot of them. Your new app comes with some. Most of them are free. You just, you join the note, note shelf club on the website and you get access to download any of these that you want. And they have like, Wow, they plan and they have knee and you can also, we won't talk about that now you can add your own custom photo to the cover of any of them. But I'm going to just stay a bit generic and I'm just going to choose this blue one here for now. And then in this spot we can choose what kind of pages we want. Now, a word here. When you are a real life sketchbook, or you may use a landscape format, or you may use a portrait format. But you may work across the spine and have, you know, an artwork that is a spread rather than a page. Notes show off to date. We'll do a lot of tricks, but it won't give you the two page layout look. But we've found a way around it. I've found a way around it. I created a page, I created it in Procreate because we're going to want to step outside the simplicity of sketching in our digital note shelf book. We're going to use Procreate. And when we bring in illustrations from procreate, we're not going to want a line because the background's a different color. So what I did and just save you from having to do it, I went into Procreate and I made a page for a double spread. And I even created the spine as a guideline. And I made it a custom page and to choose, and we will talk about that too. But so I'm going to hit choose for the type of page that I want. And you have, again, if you join their little note shelf club, you get all these choices free of all kinds of different pages. But I want to choose custom because I have put the custom page here and I have provided it for you to add as a custom page. So I already have it, but I'm going to point out to you how you put it into your notes shelf bark. And that is by hitting this, create custom import photo. And go to your photos and choose the page I provided for you. The JPEG, that is the landscape was spine, the Procreate or pro white, I call it landscape was mine. So I don't need this or this. And I already have it here for a White was spine and I'm going to choose it for my page. So I have my title, I have my cover, I have my set page template, and now I can hit Create Notebook. And it's created and it opens for you. How exciting is that, right? And so this generally upfront as a letter size page. And unless you know, you have like legal pages or something, but we won't go there either. And so we can work in does exactly as if we were working in a portrait sketch book open to a spread.
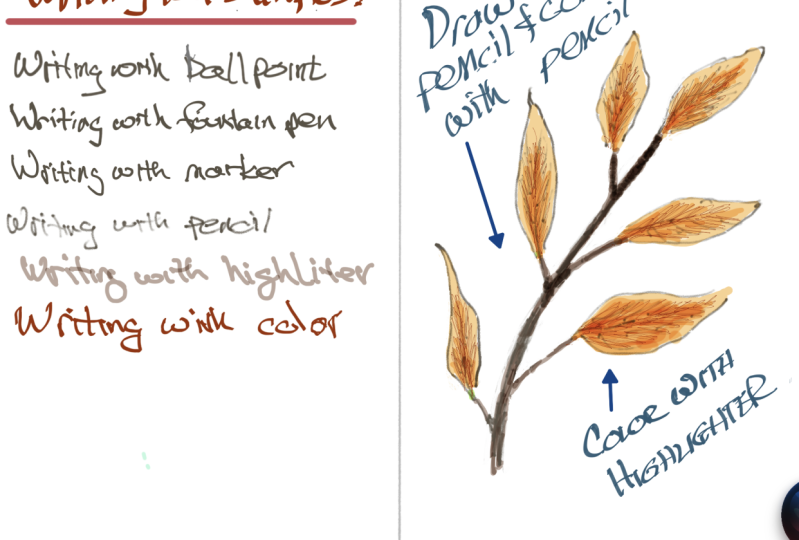
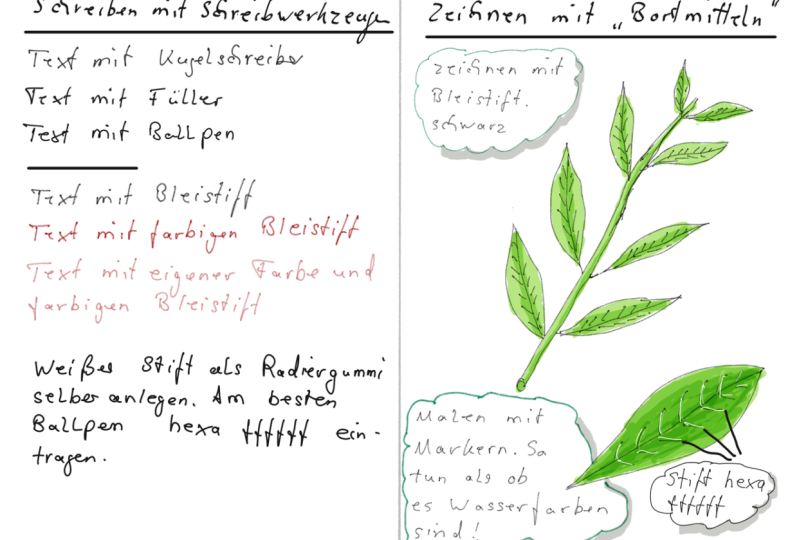
4. Making Your Marks: So we have blank pages and we're all excited. And so the very first thing I want to explore is the mark-making aspect with the Apple Pencil. And under settings stylus. If your iPad is not automatically chosen, the Apple pencil for you. Hit this button so that it is the Apple Pencil as a stylus that's chosen if you're using something else. And I don't know how that would be set up. But anyway, choose the Apple pencil as your style is by doing this. Okay? So the first thing that we see in this little area of tools at the top is something that looks like a pen. And so if we tap it, we're gonna see it looks like a pen. For good reason. It is our mark making tool, choice box. What we have, we have a ballpoint, we have a fountain pen, we have a fine tip marker, and we have a pencil. For any of these tools. This slider up here chooses the size of the stroke and it gives you, as you touch it. There's a little example there of how big the stroke will be. And you'll get used to that and choose, you know, something. You don't usually go really big like this unless you got a special kind of project going on. But, and so keep it in the middle or a little below it. We have chosen our color as black here. We're going to start out really simple. And I'm going to just start with the ball point with about is center size. And I want you to do the same thing. And we're going to write a sentence on our left page here, writing with the ballpoint. Now, that's a really good example of what the ballpoint looks like. When we write we have a varying pressure and you can see that this response, and this is pressure sensitive, the Apple pencil. So you can see that there's some response here. There's not a lot. It looks a lot like your handwriting might be using a ballpoint pen. So if you like that, that may be your tool of choice. Let's go back. Let's choose the fountain pen. Keep it around the same setting so that we have to change that at all actually so that we have like an like to compare, tap back on the page and this time writing with a pen. Now right away you'll see a difference because you do have, is the thin happening with the fountain pen. And that is pressure sensitive. And I'm just going to check something here before I say it because I don't really know that it seems to me that an Instagram should get another hair. It seems to me there could be more seconds, 10. Aria. So using a larger size, you, those of you who love to use come for lettering are going to be real happy. I don't generally do that, which is why I didn't know the automatic answer. I'm going to not explain all about it, but I'm going to go to the Eraser tool, and I'm going to just choose a size in order to erase these marks that I just made that are not part of our little test. Now if you are a lettering brush lettering person or a fountain pen lettering person, you do that test nicely here and say writing with a larger point size. And then that would be part of your examples. So next we are going to go and move to the third tool, which is a fine tip marker. I'm going to bring my size bag down to something normal. And I don't particularly find that there's a very big difference between the ballpoint and the fine tip marker. So we'll see because we will make a test here. And it gives you compare. It looks pretty much like the same thing. This is thinner. So those three. Are your major writing, mark-making pens, and you can change the color. I'm going to change the color of my marker here to launch. Just to show with orange marker. So in this, obviously can be any color at all. In order to make a new color or choose something that you don't see here. First of all, choose something that you don't see here. If you hit this little arrow, you can barely see right here to the left of the colors. It runs through palettes that are provided a few of them. If you hit this arrow, when you get to the end of it and hit it, you get an Add button. If you tap the Add button, you get into the color choosing tools that are the same ones that show up on all apps really. And you can make a custom color. And you can, this one happens to be based on the orange. But you can watch this box right here. You can darken and over a whole spectrum, you can lighten it. You can gray it all the way until there's a potter's pink ligand color there. I like that. And if I go back, I have added that color. And let's see how different it is from the orange that we started with. And by the way, the orange is still there. So Sean, you, so we're going to choose this now. And so you have a whole different feeling with that color because it is more subtle and more grade back. So obviously, with that Add button, you can add a lot, a lot of colors. I'm going to show you. Every time my wrist hits the screen and it goes off because you get rid of this every time you hit the screen. I don't mean to do it, but it's happening. So when we have our added custom color, that was custom, we got to play around in and find them. There's also a box if you know about hex colors, mixing colors for Photoshop and for digital work, you can put any type in there and you're going to get keyboard choice. And so you can choose any hex color that you have picked out, you know, when you know it from I don't know, a palette and procreate or something. Okay, but the other thing that we can hit here is called palettes. And they have a bunch of them for you and they have names. And it's kind of like overkill. But you can choose any kinda palette that you like. And if you're doing a sketch and you don't have a pallet. So a great way to choose something mental go together. But they do have names and there is a search box at the top of this. And so if you can't find it by scrolling or it was way down, you can search for it by name. So like this as giant goldfish here, go figure. Anyway. So that's the pallets choice and that's the custom choice. And we can go back to our regular colors. And we can go back to whatever pellets we were using. Just by hitting these arrows back and forth. We now come to my, what I think is the best, at least for sketching the best tool because it is a pencil. And I just loved this pencil. I'm going back to a black color. And I'm going to not make it too big habit in the middle somewhere. And show you what that is like writing with the pencil. Fun. See the light and dark. That's about pressure, is like a real pencil. So if you are really light with it, it's going to be light. If you apply more pressure, it's going to be darker. I'm going to erase that, get the eraser. Get rid of these, and continue to write with the pencil. So there we have examples of R for mark making tools used for writing, and a little bit of color information.
5. Making Changes With the Selection Tool: Now what we have done here is on our very first page of our learning book is that we have created a sample for ourselves of the look and feel of the four writing tools. We're drawing tools. We'll talk about that more, lots more. However, right now I'm going to show you a couple of things. One of them is that this doesn't have a title on it and we don't have room for a title for it. And so I'm going to show you the selection tool neuro, lots of things can happen with that. But for what we're gonna do right now, we are going to get the selection tool. We are going to draw a box around all of our type here. And then we get a bar across the top giving us these choices of what we can do, what's selected. And this is a little bit not intuitive. I want to move it and I don't have a move choice. I have a cut copy, a dual, eat, a resize color, convert to text. And if I hit that arrow, I have a bring to the front or send to the bag. This is all just really, it's wonderful to be able to do these things. But what I want to move this down. So under resize, you get a frame around your writing. And obviously you can re-size this because it's called Resize, right? But the other thing is if you put your, your pencil or your finger right in the middle, you can move that text block around to wherever you want it. And so I am going to move it, leave enough room to put a title at the top. Now, this little business here lets you do this to it too. But I mean, that's not something that we want to do right now. But there are times when you might want to do that, because this works with something you've drawn as well as with something you have written. So when we have this, where we want it, now I'm thinking that's pretty good. We're just tap anywhere and now it's located in its new spot. So I want to put a title on this. I'm going to choose, I think I'll choose the fountain pen, I'll choose a bolder version. And I am going to choose my custom color because I like it. And then we're gonna come up here. And my title is going to be writing tools. Look like. And now we have a title for this list. And it's a little more bold. And I might even put a colon here, but you know what? I don't have room. So I'm going to go to select, and I'm just going to select this line now. Don't have to worry about the mark in the middle because that's part of the page. And I'm going to say resize so that I can move it over enough so that I will be able to put a colon here, which makes it more like a title. Let's suppose that we don't think the title is set off enough by just having columns and we'd like to put an underline under it. And we don't have room. So we know what we do there. And I know I'm repeating this stuff on purpose or going very slowly. And we're doing it more than one time because it's going to stick and become intuitive when you're making your sketchbooks in note shelf. So this time I got to be a little bit careful as I go under that tail of that y or g, I mean. Okay, and again, I'm going to hit resize in order to just move this down. Now, tap, leave it. So go back and get my fountain pen and my color, actually a hat on there already selected. And if I went to draw a straight line across here, that is very easy to do. And I might want it thicker than that too. I'm going to say on do I don't like that line. And if I made it thicker, one big fat line. Well, so kinda creepy and corrupted doesn't enhance things at all. It makes it look worse. Okay, I'm going to undo that. But over here is what's called the shapes tool. And a little circle on Box icon. With that turned on. When you draw a straight line, it becomes a straight line. When you draw a box, it becomes a nice box. When you draw a circle, it becomes a nice circle. You draw an oval, becomes a nice oval. And it's thick and thin because of the fountain pen, but that's even cooler, right? So I'm going to undo those because we don't need them right now. And I'm going to come back over here and I'm going to make an underline for my title and just let go. And there it is. Now, gee, I wish it was a little higher. Well, the selection tool works with any mark that we make and so we can change where our line is. By doing this. Resize and push it up to where we want to move it sideways or whatever you want to. And now we have a line that looks like a heading. And since we're on the subject of lines, I'm not sure, I tip my iPad this way to write this straight is line that I can if I had it lined up with the camera like this and I was trying to forget it ever be up and down and all over the place. And some people, that happens no matter what, in so many people make guidelines in their sketchbook that the race later. And we can do that here in a, so much easier. So in order to get some guidelines to write on, we are going to go to the wrench up here in this corner. And we're going to change our page template. And it's only temporary. We're going to change for a page template and we're going to choose under reasons are based on yours. It'll be basics because you don't have reasons. Yeah. You're going to choose underlines and we'll get that. So now we have lined paper. We can't see our middle line anymore, but we can know where it is enough to not cross it. Now makes sure that you're you're drawing assist over here of the shapes is off because you can't write with the shapes on. And you'll be able to come over here and choose your pen and write. Just like on school paper, write a very straight line. Now I don't want to keep this page background obviously because if I'm going to be drawing things and everything, I don't want a bunch of lines in the background, but that's as easy as it gets because you go here again, you change your page template. Again. You go down to your custom and you choose your PRO right? Pro, white with the spine again. And the lines are gone, but your words are still here and there straight. So it's the same kind of a trick as drawing guidelines and then writing on them, then erasing them. And I think it's a very fine trick. Now we write in sketchbooks like crazy. But the other thing we do in sketchbooks is Sketch. And so in our next lesson we're going to look at what is possible sketching in note shelf. It's rudimentary, but you would be really surprised about how useful the tools are.
6. Sketching and Painting in Your Digital Sketchbook: Our favorite tool for drawing as, as sketching is going to be the pencil tool. And I'm going to return to the black color and bottom middle size here. I think it will work for us. And the pencil tool is just read when you don't put a lot of pressure and you use it to make your sketches. I am going to be very simplistic here is for the sake of simplicity. And I'm really use this very lightly. I get all the eraser. I'm going to use this very lightly to make a sketch of a branch. And I'm doing my thing that I do. And I don't just draw with a line, line. I draw with this sketchy line because I like to look and correct my shapes as I go. And let my inner guide guide my hand. Now, did you know that you have two choices when you're drawing leaves on a branch. That some plants are called opposing. And their leaves occur at the same spot on either side of the stone. Other plans are called alternating and they would show up. I'll show you because it doesn't occur on the same plant, but we're not in real life, so it doesn't matter. Okay. They show up in between instead of right across from each other. If I had that leaf there. And this one here, rather than there being a leaf here. And I leave here, there would be a leaf here because it would alternate It's spacing between those two on the other side. Sorry, it would be like this. And if we're alternating, there would be one here too. Now I have an extremely weird plant because they don't do both of those things. With the same pencil tool. You can go back and you can refine. And the Apple pencil makes little softer line if you use it on an angle. And you can shade a little bit, you're deep in your lines here. Can shade a little bit. You can erase what doesn't work. Now one thing I will warn you about is the eraser is big and there isn't very much to be done about it. They have three sizes and they have an auto and the ATO is supposed to adjust itself to the size you're working at. I don't personally find that to be very true. So erasing is tricky and just know about it so that you don't get caught with a surprise like I just did. Okay. Alright, so I'm going to put back my file, a tree here. In the sketching that I do in my digital sketchbook that I do in note shelf is very rudimentary. Anything, the end I'm going to do is again, I'm going to start this eraser out. Always it is somehow not hitting at the point. This is a brand new version here, and I think some of this has to be reported. So here's a little weird things that are happening. That their eyes iron it out. So really good company, they really support their app. Okay, so a little refining. And now it sure would be nice to color, right? So obviously right away you think I'll just go in, I'll change my color of my pencil and I'll go back. Why this is orange, I don't know, instead of green with a really light touch, I'll add some color in. This is a great thing to do. And it gives you some really subtle control over you very light touch. You can go back and you can get like let's say our darker color hair. And you can have a really nice effect of shading. Can you just going to go over only part of it? So this is similar like working with dry code pencil. Now the only downside to using colored pencil is that it is writing actually over your other pencil line. So you can zoom. Note shelf 2, which is awesome. So in using your colored pencil, you want to be really light and really selective because you're going to obliterate the pencil line that you put down first. Watercolor paint, which is real commonly used in sketch booking. When do that, the line would show through on. So what do we have that could be like watercolor paint. We have the highlighter tool, which is right next to your pin tools. And the highlighter, you can choose a color for that. I'm looking for your normal highlight colors. Here's a yellow, and we have two points to choose from. We have a round bullet point and we have a chisel point and a bunch of size to choose from. So I'm gonna go right about there. We've got a 43 or something. I don't know what that said. Okay. And as a highlighter, this works just like a highlighter and you can go back and mark any of the writing that you have done. You can mark up PDF documents that you bring into your sketch book. We'll talk about how to do that. But the other thing that you can do is pretend it's watercolor paint. Because it's going to act like watercolor paint and go right over the pencil lines and not obliterate them. So here we go like this. Now, you can fake shading using this Highlighter tool. We'll get there's a pink. And you can fake shading. We're blocks of watercolor. By doing things like that. I could be a lot smaller here on my size for the shading. I'm going to say and do a couple of times just to show you how that would have more control. All right. Nice. And it sort of seems blended. At least when you back from it a little bit. It does. Now, can you go up pretty easily? Yes. And then you go, I wish I didn't make that. So D right there. But if I erase it, then my least going to be gone, I'm going to have to draw it over again. That isn't true. And that is a good thing about the C race or that we don't know what size it is ever is. I'm gonna take it off of auto and I'm going to put it back on the smallest size. But down here, you have some choices for your eraser. I'm going to recommend, unless you are really on top of everything, that you do not push this button for auto selected previous tool. Because if you are erasing and you lift the pen for just a second and you go back, you got the paint tool or the highlighter, the pencil, whatever you are using and it really drives you bat if you're not totally concentrating on no, it can be useful for certain people, for certain things. So I guess, but it drives me nuts. I say, I don't think you should do it. Anyway. Here is erase the entire strokes. So on this one, it takes away everything. That's what we didn't want to do. That's what we were afraid of. Okay, undo. But there's another choice and it's erased highlighter only. And so when you choose that and you come in, you can just take back the highlighting part and start that over again. Your lines are all going to still be there. Even your pencil lines are going to be there. Anything that was done with the writing tool will still will not be raised. And anything done with the highlighter tool will be. And that's a really good choice that gives us a lot of mileage. And so why don't you take a break from watching? And why don't you make yourself your own little doodle and painted and get some practice drawing and painting with tools that weren't even made for that.
7. An Eraser Work Around and Faux Watercolor: Because the size of the eraser tool has driven me crazy. And I have written to the publishers of the app of bounded, but they'll sing sake time. And I needed a fix it in a workaround in so what I did was I went into the writing instruments. I chose the fine tip marker. I made a custom color of white. I'll show you how that works. Okay, a plus color. White. The hex number is six, f's. Okay, so what you would do a, you can go up into this very, very top corner and sometimes that'll get you the white, pure white, but you don't know unless you check this out. In white is number f, f, f, f, f, f. And if you have that, then it will add. When we go back, it will add the white to our palette. It's right there. And so this marker in a white color and a size about in the 40 something here is going to make a delightful little tiny eraser for us digitally, just like the little tiny ones that you can get from Tombow and such. I loved them. This is a digital version, so on the favorites, you hit favorite, it becomes a favorite. What do you do about favorites? If you hit this button? So it shows favorites, you turn that on. A little. Pinpoint is going to show up in the corner. And some corner could be up here, whatever the cool thing is that you can move it. When you hit the favorites icon, it opens up. If you don't see the favorite you're looking for, it's slides, just like your colors in here. I have my latest, my white pen in the size and the color of the marker in the size and color that I want to pay. So now I'm going to tap back here and I'm going to use this as an eraser. And you can zoom in here to do a better job. But now I have a small controllable eraser because by putting white over the top of this, I have the same effect. So you're white marker eraser will erase everything and anything. Now, it can erase. It can also go in here and you get a real tiny with it. And you can put in little highlights. That works better than any of the white ink pens that retry using, right? In real life. So make a white pen. The marker works really well for this. And save it as one of your favorites in your favorites bar. And you'll be able to grab it. And anytime that you need an eraser. And you can change the size of that eraser just by going up to the regular pens and using that slide bar. So if I needed a bigger eraser, because I had to get rid of something huge, that would work too. This isn't huge, like the eraser is huge, but you can erase a big area in a fine way. I didn't move that up as much as it could have. Remember that you have your Undo here. Wonderful little tool that if you erase too much, if you didn't like a change, you just make it a step backwards. There are a large number of steps here to go backwards and undo what you were doing. And you zoom back in. And there we are. And this leaf is starting to look kind of painted. Now I've drawn one more leaf here to demonstrate one more thing about painting with a highlighter. And that is about picking up your pencil. Are not doing that. A lot of apps used for art work this way. But we'll just point out how this does too. And so we're going to put a base color of a yellow green here just because it's here on this leaf. And bring the size up so I can fill the leaf with color. So if I do not pick my pencil up, once I put it down, I am able to fill the shape with color of one value. No streaks, no difference in value. Just fills it in. This is what the highlighter tool. Now that won't work necessarily with the other ones because pressure sensitivity. But we now have this pale green in here. And I want you to see that when I pick up the pen and pencil and put it back down, I now have a darker value. See how that is going in there. And so I had to keep the same value over the base value. I'm picking the pen up and making single strokes over the background with it. The third time around is going to be darker still. This is a way that you can kind of fake shading by continuing to do this using the same color choice, but layering, just like we do in watercolor. And I think the order adjectives needs to be just kinda light, but we're going to keep going in here. I'm going to get a narrower pen point even so that I can be enclosed to the stem and add even a darker value. And the more times I put the pen down in the same place, the deeper the value. And you see that. So you can play with this till the cows come home, you almost get a blended look. Not quite in a takes practice. It takes fooling with it to see how the tools respond. But remember this is all preliminary sketching there. We can do a whole lot more by taking this in and out of Procreate. And so which we will, and I will show you how to do that. But just in here with these very rudimentary tools, you can start to get a blended look. I want, I would give anything if they would put a blending tool here, but I don't know if that's forthcoming because I just nobody's thinking sketch booking digitally with this app they're thinking note-taking. But they certainly have, they've given us a lot of tools to play with. But anyway, that's fake painting with values, with overlays, just like you would do with watercolor almost. And it gives you that same kind of look.
8. Adding and Editing Photos: Because this is our learning book about making a digital sketchbook. And it's our first digital sketchbook. I went ahead and I labeled what was going on here. As we're sketching with a pencil tool, painting with the highlighter tool. Now before we talk anymore about further things that we can do in, in our light sketches and so on. We're going to talk about something I really believe in. I believe that when you're doing a life kind of sketch book, like the story of the moments of your life. They're using photographs as well as sketches and drawings is really, really valuable. Sometimes a photograph is just better than you can draw it if you don't feel like just spending like a 100 years on every single thing that happened on a trip. If you took my foolproof traveled journal class, we talked a lot about that and photos can fill in. They look nice on the page with drawings and writing and they can make sure that you cover everything on your trip. And also, I didn't go into a too much on in that class, but I keep a digital sketchbook. When I travel. I do this as I'm going along on the trip, as well as my loose notes in my travel journal and whatever I can do in real life. Now I love real life watercolors, sketching and so on. However, I've learned over the years that I will come back without everything that I wanted to include or that. And the other thing is, my sketchbooks are kind of public because of the teaching and because of other things. And sometimes I have feelings like this hotel socks. And that's not something that I put in a real life sketchbook. For one thing I don't like any bad thoughts and my real life sketchbooks. And for another thing, if I if that page was ever seen online, I don't know, bad mouth things in a public way. So I keep one of these and every trip that I go on and I put a lot of photos in. So we're going to turn the page to a new page. Now, you can go under this plus sign up here and you can add a page, or you can take your finger and turn this page. Well, that didn't work to it and we'll go look at that later. You can take your finger and turn this page slowly enough that it's going to bring a new one and behind it, that is easier even though it didn't look like it because I grabbed the wrong thing over here. So here is the second page in this book. And on this page, we are going to look at how photos can be included and what you can do with them when you do include them. So in order to bring in a photo, we're going to hit the plus. And instead of it being on page here, we're going to click photos. And it'll take us to the camera to take a picture or it will take us to our photo library. And that's where I want to go. And I have just come back from just a very tiny trip up the taus. And I took this with me and I took a lot of pictures and it was only like a 24-hour trove or something. And I haven't had a time d even do this, but it gives me the opportunity to show you how I would do it. So one of the things that I really enjoyed was a breakfast at a farm house restaurant in town was one of the top ten restaurants. And I'm going to bring that photo in just for fun. And it's the entrance of the restaurant and it's very raw steak and there was a lot of lot of cool stuff around What just happened. So yours the photo, and it's pretty darn small. It's also highlighted. It has corners for sizing, it has it this little blue circle for tilting. And up here, if we pick the wrong photo, we could delete this. There is also an edit function, which we will look at in a minute. A lock function, a brain to the front and the brain to the back. So the first thing that you would probably want to do, you don't do a lot of real editing in this, you know, do it in your photos app or if you're fuzzy, do it in one of the millions of wonderful editing apps. But I know that I want this bigger. And to get this photo bigger, I'm going to pull the corner until I get to the size that I would want it if I were doing this page about this breakfast while it is still in this state. Right here, don't hit the background because this state will go away and you'll have to long press it to get it back. You can put your pencil in the middle of it. You can move it to where you want it. You can also do things like if it was fitting your layout, you could put it in an angle, put another one on top of that angle, whatever. I'm not gonna do that right now we're sticking to simplicity. And I have it about the size, I want it on the page. And I'm going to just tap out here and there it is. Now, if I change my mind and I want it down here, what I do is I just hold, touch and hold it and sometimes your finger works a lot better for that. Then the pencil, Apple Pencil, I don't know why, but here I am. I'm back in the state where I can make this bigger and I can move it around. And if I wanted it bigger and I wanted to get down there, that would be all I'd have to do. And just hit in the background and it's in place again. What is this edit function? All right, each time that we wanted to enliven activity with the photo, we press long, press it, and then it, this stuff all comes, comes up and we will see how useful some of this is in a minute. But let's look at we don't want to delete it yet. So let's long press again. Let's look at Edit. Alright, this is pretty rudimentary, but I mean, there is a cropping function. So I happened to have some black on this edge that I don't want to be there. And what else can I do? I cropped it. I can bring up not quite as much tile in the front. I can move here to what I like to apply the changes before proceeding. Yes. If I click on this, it's an eraser tool. It erases to transparency. So let's just suppose I'm going to undo this because I don't want to erase that. But let's just say that you wanted to do something like have a picture only of a section here. You would be able to take this eraser tool and you would be able to erase everything but that. This third option over here is a selection tool. And what this selection tool then do the move and then all the stuff to the copy paste and all that that we would like it to do. It only really does one thing. And it is a quick way to get rid of all of the picture except for certain part. So see how this goes in then on do it. But so Vygotsky selection tool and I drew around this section of stuff right here. And I hit apply. It takes away the whole rest of the picture and it blows it off. So it's blurry. If it wasn't a good picture to begin with, you can then move to the eraser tool and you can be a lot more exacting. And if you've got a high resolution photo or you know, this won't even look bad either. And when you get done isolating the element, then you would say Done. And we're not even gonna do this, we're going to undo it, but I'm going to show you, and now if I enlarge this, what I have is that cutout area and I have transparency in the background. No one is on there. Yeah. So Mark. Okay. So if I have other art on the page, you'll notice that long press this. I can move this right onto it and there is no white background. And so what you've done is you have removed the unwanted part of the photo and you have created a transparent background so that you could nest photos, put them on top of each other, do a whole bunch of stuff and not have the whitespace. So I'm going to just delete this. And I'm going to clear the page by going under the eraser tool. And the eraser gives us a clearer page option where everything is gone. If you've been messing around. And I'm going to run through these steps again for not the editing part because they hardly ever go there. But for bringing in the photo, and I'll bring in a different one. So in my photo library, in my old photos, I have I have some eggs that were at this restaurant. And that's what I had, but it wasn't exactly like this. I picked this up from their menu on their website. There was sausage and toast on there too, but that was a farmhouse breakfast. So I said add photo. I went to my photo album. I chose a photo and said Don and you can choose several photos. We will do that in a moment. I have the photo on the page. I now have the possibility of sizing it to whatever size. So if it was a photo I loved and it was a scenic or something, I might just make it the whole page here. And this is also tough because if you notice when it gets sized, it's going in both directions. It's not that helpful, but it can be worked with. Okay. And so there we are there. We would have the photo touch on the background and now photo would be a bleed on 1.5 of our spread there. Okay, Now next thing that we're going to try, I'm going to long press this and delete it. We're going to bring in a few of them and work with a little composition.
9. Designing Photo Collages On Your Page: And so we're going back to the Add, we're going back to the photo library, all photos. And I'm going to choose sled, see a little combo of something that would make, that would make a fun composition I'm looking for, for photos I've edited already in there. I'm not very far on that, so I'm going to go back to the farmhouse breakfasts thing. I'm going to choose their logo, their entryway, the eggs, and the dining room. I've got four photos chosen and now I'm going to say done. And they're in a stack here, now white. So we're going to long press on the one is in the front and move it off the stack. So then we can place it. I'm going to put it up here. That's a picture of the dining room. I'm going to kinda leave it at that size for now. This is the egg breakfast. And what I'm gonna do is move these off the pile so I can look at them separately. This is the entry way and this is their logo. Okay. And you can't just long press and then movie usually you got to pick your finger up and put it down again and move it. So there's the dining room. I'm doing a little layout my head now, and I'm thinking that the output, the eggs over here, so long Krauss. And do that. I'm going to overlap this a little bit. And I might just rotated maybe like we could have something like that. And then I'm going to bring over this logo and make it bigger. So you make in your little collage thing happened here, you see. And maybe I'm going to tip that a little bit because that's kinda fun. Make an arrangement like this. Okay, and lastly, we'll bring this photo over and make it bigger. And you see how the roof line here is like this. And this is like this seems to me that this would be kind of nice if that was like matched up some kinda how? So all my good to do that, because this is on top of these. I'm going to do that by selecting it with the long press and then choosing Send to Back. Now I get it using the back now and I can long press it and I'll see the whole thing. I can move it a little bit and then send to the back again. And I have that's kind of a little match. Now I'm gonna go back to this one. And I'm going to bring it to the front. And I'm going to long press it and I'm going to make it a little smaller. And I'm going to make its angle a little better, floods out that better. I'm going to make its angle kinda match that roof a little bit and then I'm going to move it down. So see that line and that line or kind of of good. And the dining room slipped in front of the eggs. I think that that's good actually because we were covering up the table part of the dining room. But I'm going to bring this down a little bit because it suits my layout a little bit better, down and over a little bit. And I'm going to change its angle to all. Not that much though. Anyway, these choices are all yours of course. And now this does not seem adequate to everything else. So I'm going to select it and make it larger. And it will keep, if just tapping on the background, you will keep its place in the stack of things. In other words, it's in the back of this is going to stay in a bag of this, even though when I law and precedent comes forward so I can work with it. But it was not in the back of this. So this one, I now am going to make it smaller and I'm going to bring it to the front. Now I hope I'm not confusing you. You get the idea that once you're working with is a bunch of photos, you can size them, you can tilt them, and you can stack them in whatever kind of a layout works for your sketchbook page. And that is except for locking. That is pretty much everything that you can do with these. And if you like, I'm now looking at this in this arrangement and this looks weird to me now, this dark area right here. So remember you can lawn for us and you can add it and you can crop in that edit. So I'm going to bring that over and get rid of that edge. And then hit Apply and then hit Done. And it's back in here as not as big as it's supposed to be. That is just a glitch. I'm going to make it bigger again and center it again. And there we go. Zoom back out to regular size. And that is how you can make photo collages on your page.
10. Tracings From Photos and Re Coloring: Sometimes you want something to hold still for you. And here is one of those times. There is a rooster in there. And maybe I start thinking that I would like a little picture of that rooster. And when I can't see it well enough to really sketch it and I don't want to make up a rooster. I want their actual logo. Rooster. Here is what I can do. I can long press this logo and I can make it very large. Like so. I can lock it in place and now it isn't going anywhere. So what good does that do me? I can trace the rooster or right over the top of this picture. Now, obviously I don't want to use a white line and it gives a won't show. And I have a black line, will probably not show very well. But I'm going to try my orange line. And I'm gonna do it with the marker and not that big of a line. I can zoom in here. And even though the pixels are horrible, this is going to give me, I'm going to go a little faster than that. And I'm going to undo the skinny line. This is going to give me enough of a visible line to know that I have the shape of this rooster here. Okay? And then he goes like this, It's not perfect, but you get the drift. Okay. So I have a rough outline. It looks enough like a rooster I think. And what I wanna do now is I want to long press on that photo again and I want to unlock it. And once I on lock it, I want to put a backward went. Or if this wasn't in my already in my collection, I would delete it. But I'm going to bring it back over here. I'm going to tip it again, line it up with that roof a little bit, hit a certain thing, it's going to snap into place. That's why that's going on. Camera lose out there. And look at what I have here. I have a rooster outline. Now, I'm kinda wanted to solid shape of the rooster. And to this point, there's not a way to fill a shape, not one that I know about any way except the tedious way in which you would make your, you would choose your color. And you would choose a fat or marker, and you would just fill it in. And that's a way to do it if we stay in place here. So I have painstakingly filled my rooster by using a larger marker for the middle and then making the size of the marker smaller and going in and going around the edges. And I now have a solid rooster logo that I can do many things with. And one of the things is that I can select it and then hit resize. And I'm going to have one of these boxes so I can make it any size I want it and take it and put it any crazy place I want it. Which I wouldn't want it there. But you have this little unit now is totally Ready to go anywhere. Now let's step back a little bit until we get to where we had the outline of the rooster logo before I spent all the time filling it in with the little marker pen. We can auto fill a shape, but we can't really do it in here. And so what we're gonna do is we're gonna take a little side trip over to procreate. And we're going to do it in the simplest fashion that we can. I have a workshop on Skillshare called Procreate kindergarten. And I go through in my most simplistic manner. How to use Procreate. And there are such wonderful class is just everywhere to carry on with those skills, but is not in the scope of this class to teach you completely how to use Procreate. So I am going to show you how to poke in and use it as a tool to do something to part of what we're putting in our sketchbook and then bring it back. Because Procreate, we'll do some things that know what shelf on that too. So in it goes without saying that any artwork that you make in Procreate and any other art-making, ah, from colored pencil app to all of the big-time once art studio, on and on and on. All of those can save the artwork you did to your photos section, your photos gallery, on your iPad, and anything in your photos gallery can then be brought into your sketchbook. So that goes without saying that's an, that's a resource for us. But when we're doing our more simple sketching and little things, little tricks like this, but we don't feel like sitting around and coloring and an outline of something we traced. What we can do is take it over to Procreate, to auto-fill it. Now, we are not going to output a photo of it and then go to procreate and open the photo. We're not gonna do all of that stuff because these are sophisticated enough apps that what we can do is we get our selection tool right in the middle there at the top. And that is a drawing kind of things. So we go around our rooster outline. And then what we're going to do, this box will pop up for us and we're going to copy it. And so we don't see anything really happening here, but we're going to leave here and we're gonna go to procreate. And we're going to ask procreate for a new document. And it can be anything, it can be screened size, whatever is there for you to choose. And we are going to do in Procreate other little trick, which is you take three fingers and you quickly swipe down. And this gives you a copy and paste command in Procreate. And we are going to choose Paste and look at that. There is our rooster outline selected everything the way that we want it. And so you can size it to make it a little bigger before we do anything to it. So we can get rid of the selection box by hitting the little arrow here. And now we just have our outline and it's not selected. We would like to fill this with the same color that we drew it with. So it'll just be a solid silhouette. And so I am going to go large like this so that we can, we have some room to do this. If we hold our finger down, keep it there, and we move it so that the center of the circle is over the color that we're looking for. And let go. You see what just happened here. Is that our color in Procreate turned to that color. It's a little tough because you're holding it with your finger and it makes it hard to see the crosshair, but it can be done. And when you see this little circle will change the color you want and you know that you were successful. So I'm going to make the rooster a little smaller. Before I do though, I'm going to just check that there are no breaks in the outline. If if we fill this with the Procreate trick of filling a form, there has to be no break because if there were goes out and it fills the entire document and I don't see any breaks. I think we have a closed shapes. So now what we do is we take our finger, we put it on the color dot up here and we pull it into the rooster shape. And you see what we get. We get a completely perfect quick fill so much faster than the way that we had done it in no shelf. Now what we want to do is take our filled shape back on the return trip to note shelf. And to do that, we're going to choose the selection tool in Procreate, which looks like a little ass up there. And we're going to draw in pretty close with the select our shape. Until we join where we started. We're then going to hit the arrow next to the selection tool. And the rooster is still selected. But now we can do things we could. Changes size a movement or rotate them and all that. But that isn't what we want to do, what we want to do. I'm going to move them a little bit out of the way. What we wanted to do is our three-finger thing again, to get the Copy Paste box. And we're going to copy him. And we are going to leave, procreate and go back to note shelf. And in nutshell, if you don't do the three finger thing and nutshell, you hit the selection tool again and you get a paste command. And there it is. Sorry. And it can be moved, it can be sized, it can be done whatever we want to do with it. Now what if? So, we have a Red Rooster silhouette, we have a kind of a burn orange rooster silhouette. We have an outline silhouette. What if we wanted to change the color? Now that is something that can be done really easily right here, a nutshell. Now, there is a color changing trick, but in note shelf, and it will only work on the artwork that we create a n naught shelf. So if you wanted to change the color of your rooster outline, Let's say you wanted it to be black. Do it before you go over to procreate and fill it with black. Because while you are here, it's a simple thing to change the color. So you get your selection tool, you draw are around and you can do this with writing to any mark that you've made in note shelf. In this bar of things to do comes up and we choose color. And we choose what color we want this line to be. And I think that was black and white had been a dark dark green. But anyway, you see that it changed this online. Now, this will not happen with what we brought back in from procreate. I'll show you because it now does not a native thing to note shelf. So if we say color and we choose that color again, nothing happens. And that is because this belongs to know its shelf that was done in no shelf and this was not this was taken over to procreate and filled it. So, you know, it, it, this was time-consuming to fill my outline with a pen from here and stay in note shelf. But in this case I can change the color of this rooster, whereas the one I auto filled over in Procreate. Not so much. So I'll show you that this one, even though it's a solid, it's going to let us change its color with color. A rooster duoyuan, do you think? I'll blue one would be fun. Or press and hold, you can choose again. And maybe we'll make him black. So I've got a red rooster, black rooster and an O line rooster. And it was just so easy to do. And they were all traced from the logo that was in the photo that we brought in from the Internet.
11. Blending In Procreate and Understanding PNG Files: Again, because this is our learning book. I have gone in and taking little notes and what this was all about. And so this says making a photo collage, and that's what this is about. Use marker to fill with color and select the color to change the color. That's what happened with this rooster. Trays, something from a photo. That's how we got this outline rooster in the first place. And copy paste to Procreate, to auto-fill. But once paste it back here, you can't change the color. You could paint over it. I mean, if you wanted to choose another color and then just color over this, that is totally possible. I've got the fountain pen, but anyway, you got the idea. You could do that. And you can bring it in closer to do it more accurately. So you could, you know, if you're stopped and that's the only image of God and all j's, it needs to be a new color. You can do this, but you're back to the little tedium of coloring something else. Okay. I'm going to leave the blue there as a demonstration of that for my learning book. I'm going to go back a page because we're going to look at something else that we can do with a little trip over to procreate. And you saw when I turn to page before, that I accidentally hit this gray area and that doesn't work. You have to put your finger right on the page and then pull it. And that's how you turn your pages. Sometimes I like to blend color in my sketches and so Can't, you don't have a blending tool in here. And although you can fake things this way, sometimes you would just like to blend it because it would be prettier. So we're going to do they have a real taken to procreate in order to do that and to take it to Procreate, we're going to get our selection tool and I'm going to take my branch. I'm going to leave this one right here. But I'm going to get my branch, my selection tool, and I'm going to take a copy of it to Procreate. Now this is going to copy with our background. So we don't have to be up against the edge or anything like that. So now that it's selected, we have our little choices up here. And we're going to copy it. And now I'm going out of here. I'm going to go into Procreate back to the gallery. I was working in a still-life there. Back to the gallery. Get a new I'm just going to say screen size, get a new document. And then three fingers pull down and get the copy paste, control and procreate and going to paste. And that brings in my branch from over n Note shelf. And I like this size that it's at. And I'm just going to click that arrow to let it be settled in. And now I want to zoom in and I want to show you about one of the tools that you can use in Procreate. And that is this little finger next to the brush right here. And that is a blending tool. And it's sizes just like other brushes in Procreate. So over here, you have a size that would be huge. Then you can go down to little dot sizes there. This is opacity with most tools, but in this case it would be called maybe strength of the blend. And I'm going to soften out a little bit. And then come over here. And I'm going to go along my edge here of my leaves and see if I can make that look less sketchy and more finished. And if I've got the wrong size, I will be changing that. But I can't like this because it's subtle. And I'm not gonna do overkill right out of the gate. And I'm going to blend that orange and red together. And do a little blending on my sketch or my sketch lines here. And you see what this does is it makes it more like paint. Because that's what you do when you paint with any kind of paint is pretty much it except for Gua. So I guess pretty much you blend it. And unlike if you had an area like over here on this one, you can work that color out into that white that you had. Whatever color you start and when you touch, that's what it spreads in to the other ones. So see if I started in this orange, are there I hit the black. I'm going to undo to show you if I started in orange and came up, see how that goes into the yellow blends. Over here in orange into the job. But if I wanted the yellow into the orange and I start in the yellow, so that you can do as much or as little as you want to get your illustration looking like you want it to look. I'm not going to do the whole thing because we don't have time. But I'm going to show you how to take this back out of here in a different way than we did last time. When you paste something into Procreate. It does not paste onto the base layer of the document. It paste it on a new layer on top of the white background layer. So if we hit the Layers button right here, we're going to see that we have two layers in this document. The one that our art pasted onto and the background layer, and this one I tap the background layer brings up that you can choose a color. But this is a background layer and this is where the white is in these little boxes or how you turn off the visibility of a layer. So if I turn off the visibility of the white layer, we see something interesting. We have our plant. And you notice that we have these little weird white lines in the reason for that is that, if you recall, my eraser workaround was not really an eraser. It was a white pen that we were obscuring marks with. Now that we're here in procreate, we can get rid of those. And it really will be raised and it's up to you when we take those back and pasted on our page. These aren't going to show because of pages white. But I just feel like I would like to get rid of these. And so I'm going to make my eraser kind of small. So I have control. And I'm going to have it high up here. And then when I go in, I can get rid of the white. And then I'm going to have a much cleaner illustration of a certain kind. And that is why we came over here to teach you about that. But first I'm gonna get on my white out. That wasn't that good stroke. I can, I'd like I said earlier, I cannot work straight on at a flat angle is just not intuitive for me. But I think that that's good enough. I think I now have to get rid of this errand to yellow here. I now have my branch all by itself. Now I can copy this and I can paste it like we did before. Or I can output this to my photos as an illustration. Now, why would you make one choice or the other? Do you think there's any other page that you might use this sign? Do you think there's any other app you might use this in? Would you like this to be a free illustration in your photos? And this might be more operative when you have actually created art in Procreate that you want to keep in your photos to use in your sketchbook. I just want you to know about what a ping file is. You see it in the choices for saving a file and a lot of apps and programs. A ping file has a transparent background. It's the only one that does. And so if you save as a JPEG or you save as a tiff, you're going to get the background. And even if there is no background, like if right now we turned off the color of the background, the white. And if we output this photo as a JPEG, it'll put a white background back in. And you don't really always want that because how cool would it be if you could stack this illustration up and flip it and make a whole tree or something. And there would be no background to block out, you know, what was behind it. So what we're going to do here is go to this wrench and we're going to go to Share. And under share, you have a choice of what kind of image you want to share. And right under JPEG is paying. And we now have a ping file and procreate wants to know what we want to do with it. And what we wanted to do with it is Save Image. Okay, so what is true now is that this little plant will be in our photos. And it looks now like it has a white background, but it doesn't because it's saved as a ping file. So we're going to go back to our notes shelf book. We're going to turn this page and then to a new page, which I saved a black rooster on for my own purposes. I will copy, paste them over here at some point. But anyway, we are going to go and get our planet rather than last time we copied it over in Procreate. And we hit the selection tool here and we had a paste option. But this time we're going to bring in this photo. So we're going to hit plus over here, our photos library here. And all photos. And there it is. And done. And now I have brought this in. It's got a big box around it, but it is a ping file. So you can size that. I get back to the size that we liked it and move it. And then I think I'm going to use my rooster with it just for the heck of it. I'm going to copy paste him though, because I, once he's combined with another one to be tough to separate from there. So I'm going to copy him and I'm going to paste him. Paste. Oh, yeah, he is. He's paste it on here. Okay. All right, so now I want to resize my rooster copy. And I'm going to put him right here. And then I'm going to go and select this guy again and move him. Now you might notice something and I'm going to talk about it and move him. This is not a good sketch or anything, but I am just playing with the fact that this illustration is now going to go over top of the rooster. And I'm going to turn it off as if the rooster is, talk into it and it's coming down out of a tree, fat as ink, then I'm gonna make it even bigger if I can get away with it here. Okay? And so we're going to have a leaf go over him a little better. So this is a demonstration of how a ping file works. When you save it with no background. You can stack these guys up in front of or behind each other. Once you have done a combined illustration like this, and you're no longer going to be able to grab just this leaf or just reversed, sir. So when you do it and get it all set and you want to select it and move it again, it's going to have to be the entire illustration selected. And then they go together because they're stuck together because we stuck them together. So when you do this overlap thing and note shelf, then you have basically pasted those two together to make an object. And I mean, you could still select one or the other, but goodness gracious that you'd have to be in here, you know, being so careful, but I mean, there might be times it'd be worth it to take them apart. I don't know. So this is our little lesson in the ping file. So we're going to put in our book here a reminder. A p in G file does not have a background. And that There's a really good thing to know and it goes across all the apps. I mean, it's not just about this, it's about anytime that you have made an illustration and it doesn't have a background and you save it as a ping, it still will not have a background when you use it. So that's our note about learning this. I'd like to add right here that these things are not intuitive necessarily. But they get to be when you've done them a number of times, you're going to stumble. I've first, and that's why we're making little notes about What the heck did we do here? Because when you begin something and said, Where was that button and why and why did it go backwards? And then of course, when we take our side trips over to Procreate even the copy paste, everything is different over there and there are layers and, and so on. And so it just takes getting used to. And once you have doughnut for walls, kinda automatic. And it doesn't feel as clunky as it might when you begin.
12. Using the Text Tool: And now speaking of clunky, we're going to make a new page and talk about a tool that I never use, hardly ever use and not shelf. Because it's not a part of what I do in a real sketch book probably. And I'm trying to have the closest relationship. We're going to make a new page. And we're going to do that by touching our page and pulling up, laughed and we have a new blank page to work with. The tool in question is the Type tool. The type tool creates typed text that you make with your keyboard and a font. And I just, I find it counter-intuitive how it's set up here. But what I'm going to do in case you wanted to use it, I sometimes use it for a big headline and I use a fancy font. And speaking of fonts, note shelf, we'll use any font installed on your iPad. Now the iPad comes with a set of fonts. They're not awesome. There is one called noteworthy though, that at least gives you a handwritten style. But for those who work with the iPad and are comfortable with it, it is good to know that you can bring any font that you own into the fonts on iPad. It's a little bit of step through, you know, go to Settings, push this, push that, download this, and it's not going to be a part of this class. But I will tell you that if you go and get an app for the iPad on the on any other kind of tablet, I have no idea what to do, but there is an iPad app called any font. Any font. And it will direct you, it will allow you to go to like say my fonts.com or Etsy or wherever you purchase fonts, Creative Market, I don't know. And it will allow you to go there and to download and install the font into the iPad. And so then you have any favorite font. I have a favorite font that I use a lot. And so when I bring it in here, it's a handwritten fancy thing and I may do headlines with, but that's about all I do with this tool. To activate the Type Tool. We tap the T up here. And then we just tap anywhere on the page where we want that text block to be. It's tiny when it shows up, it has a little blue corner that you can pull to make it larger, approximating the area that you're going to want your type in. Now this can be changed later, but this is just a good way to start. And then you tap anywhere in there to bring up a keyboard. And just to make things confusing, they have auto sizes here, headline things that are used on the web and makes it totally not intuitive for most sketch booking people. And so we are going to type something here. Hello, that's really inspired, isn't it? And I'm going to say headline. And then two. So to change anything about this default, you have to actually select the letters themselves. And you can do that by just drawing a line through them. Now that is completely selected, the keyboard has disappeared. But down here we have a little paintbrush. And that is where you're controlling what font it is, what size it is, what color it is, whether it's bold or italic or underlined. And the things that you always do with fonts. So we are going to make that bigger by hitting the plus sign here. It's 18 points there, but we're going to hit the plus sign a few times. And we're going to choose red just because and I'm not going to stick with Helvetica. I am going to tap on that and get a list of fonts that are available to, available to me in here. And You can scroll it will put your recent ones at the top, and you can scroll down to choose anything that is installed on your iPad. So I'm going down to get no worthy so that you can see it. I do like it. It's not as corny as a lot of things. And it looks handwritten. So it's a nice one to set as your default instead of Helvetica for this notebook. Now it says here updated successfully for this notebook. Would you like to apply the same for all future notebooks? And I'm going to yes, because Helvetica, that small just bugs me the way to start out. So now we have this headline and because it's still selected, we could tap on it. And we can bring up a keyboard and we can back up and write something else. And so I am going to do that just to show you somehow I got a little apostrophe at the beginning of it. Okay. I'm going to put learning, learning. So we've changed what was in there, but we kept the color and the font. So this is a good thing. So now we tap outside of here and the box disappears, and we just have the words. That's not big enough to be a title. I don't think. And I want to I want to tell you at this point right here that if you wanted to change the type, the word, what it says here, that you tap on it and you get to do that anytime is stays alive like that. So you can always go back and change the file in this style, the words that you wrote and so on. And remember, in order to change its right here, it'll take on from here and do something. But in order to change what you have, you're going to have to just draw a line through it. And it will not make a line, but it will select your type. So now I'm gonna get rid of that again. Now what if we want to move and resize and all of those things? We don't use the type tool. We leave the type tool when we go to the selection tool. And we do what we would do with any other mark on the page selected. And we're going to hit resize. And we got a box now that we know how to deal with the sparks. And so to resize our type. So I should maybe shouldn't have resized by original thing I typed in. Okay, and then that would make a nice headline on the page at that size. You can also do the other staff you get to do when you select so you cut it, copy it, can resize it. You can take a screenshot of it which just makes a picture that goes to your, you can save to your wall. I'll show you, rather than say it, I may as well show you take a screenshot and see what we get. Okay, we now have this learning book. We have a Share button. So if we hit the share button, we will be able to save the image to our photos. So why you would wanna do that? I don't know, unless maybe you had a headline that you want to use over and over again, but you can always come back and copy it and paste it on another page. Two ways to do it. Okay, So and you swapped. Really, that is all I can say about using the type tool. And again, it's not something, you know, I don't have typed words in my real sketch books in life, so it's not something I think of. I usually just write many headlines myself. But if I wanted a fancy, if I wanted that themed sketchbook with fancy thing going on, type wise, I could use the. Now another interesting thing is that you can write something by hand. I know I'm not being original, but it's better than brown fox is and stuff like they always do as a test for funds. All right, and you can select what you just wrote. And then read carefully on the top of this. One of your choices is to convert to taxed right there. And what it does is it comes up with this window and it has Convert to Text box down here. So if we do that, we now have something that in It's good at doing. It can make a mistake once in a while, but it's pretty good at doing this. So if we tap in here, and if we select all of it, well, I'll just select by hand for the moment. And go here. We can change things like change the color. We could change to a different fun. It would be kinda stupid, but we could, we can do all the things we can do. Wonder that works, yes, noteworthy has a bold and it does work that way. Anyway. The point being that you can write something by hand and you can turn it in to typed copy. Now I'm going to tell you about something and we are not going to do it. But one of the benefits when people use this, this app for note-taking, one of the benefits is that you can search is a search function and you can search your handwritten are your aunt, it's goodness as a greenhouse, right? Go buddy. You can search for words when they are in a text form like that. I have added a written version of all of those steps for reference. Because we will download this as a PDF, which can be your learning manual to go with the class. So that is my dog being impatient and I'm going to have to pause for a minute.
13. Adding Audio to Your Sketchbook Page: For most of this class, we've been talking about the comparison between a real life sketch book and a digital sketchbook. And we've been really emphasizing that the differences are, are little. They are that they're almost the same thing. But there are certain things that a digital sketchbook can do. The, a real-life sketchbook cannot do. And one of those things is to add an audio recording to your sketch book page. To do that, you go to the plus sign where we always go to add photos and so on. And you hit record audio. As soon as I hit this, I'm going to have activated the recording. It's already recording. So as soon as you tap that, you can start recording your your message, your extra piece of information, something that came to mind while you were making your page. Whatever, we're just gonna do, a little test to show you how this works. You can record audio right here in notes shelf. And that's what we're doing right now. And when you want to stop recording, you can hit this x right here. And now the recording is here, this button on the page. And you can play it by just tapping it. You can record audio right here in notes shelf. And that's what we're doing right now. And when you want to stop recording, you can hit this x right here. How about that? Try that with your real life sketchbook. So how is this useful and what can we do with it and how fiddly and where it is it as some of these features are when they're first Junior reduce a lot of it doesn't make sense. And that's true of this too. When you make a recording like this, you can move it. You long press and drag. So if it rent with a particular sketch, particular place on your page, which we're going to run through, something like that in a minute. You can move it to that area. In the future when you come back and you're reading your book, that recording will be there and you can get the sound effect from it or the extra info or the whatever it is that you wanted to make an audio recording of. An also, you might notice the quality of the recording is pretty awesome. And a lot of that has to do with the fact that the recording quality of the iPad is pretty awesome. And then the newer they get, the better they get at that. Under the plus sign, you noticed record audio and then audio recordings. I have studied the dickens out of this and I can't see what it's used for. And maybe I'll come across some facts that makes sense. But this is our recording that we made. And every recording we may well end up in hair. But I don't know what the point is because you can't rename it and I can't figure out how you can pull this into a document. What you can do, however, is if you tap it, you get this. And at the bottom is continue recording. So you would be able to add to that recording using this function in here. If you long press on the recording on your page, it does the same thing. So again, that feels redundant to me. This would be if it made sense to me, it would be where all the recordings that you made in this notebook resided and that you could take them from there and add them to another page if you wanted to. You don't seem to be able to copy and paste. But I have found a way to work with this where we can keep these somewhere, give them names and bring them in to the page. Again, it is not set up according to this little business here. To do that. Long press your recording. And you have an Export button. Tapped the Export button, and you get a chance, just like pops up and everything, you get a chance to save it to your files. And that's what we're gonna do here. And it says, in this case in a mine and yours as well, it's going to save to untitled photo, which is in your files app. And so I think that's fine. But I wanted to I mean, I in the future I want to know what recording this is. And so I'm going to tap on this name. And you see here, it allows me to give it a new name. And I'm going to say test too, because I think I have another test audio in here, Test2. And of course you could say nodes on this or the sound of the waterfall or whatever it is that you record it. And so I'm done saving this. And it is nine now resides in my file's app on my iPad in the folder that's called Untitled right now, how do I bring that into another page if I wanted to use that recording again, another page of my sketchbook or another note shelf sketchbook. So let's look at that. To import one of our recordings from our files app. We go over here to the plus again, at the very bottom. Insert from when you tap that, you usually will land on Browse. And this is a function of the iPad to not so much, no shelf. But where do you want to get it? From iCloud or other locations or from what you reasonably deleted, whatever on my iPad. When you tap that, you're taken to your your files app on your iPad. And it's full of folders and that's about other classes. Other times, I'm not, I'm not all that wonderful with figuring out my file's app either. But I can figure out if there's something called untitled folder, which is where no shelf decided to put that recording. So if I open that, I see tests to here is one of my recordings. If I tap on it, it comes into I doubt my currently open notebook to get rid of a recording long press until you get your little black box of choices here. And choose Delete. And I'm gonna do that on both of these. So this audio recording is a wonderful trick if you happen to be out with your digital sketchbook and Uranus seen in, let's say you're looking at a waterfall or something, and you can record right into your sketchbook. However, that's not always how it works out. And a really good thing is that you can import other audio files into your digital sketchbook as well. Let's look at how that can go. The other morning, I had a very interesting adventure. I went out to the garden to do what I do in the morning, the dead heading in the watering and so on. And I heard the strangers bird song I've ever heard. I didn't recognize it. It was coming from up in my tree. I could not see this bird no matter how hard I tried. And I thought I want to really remember this. And I also want to be able to ask experts if I ever meet them. Who was this bird? Because the song was really amazing. So I ran out there with my phone, my iPhone, and I used voice memo and I made a recording of the bird song. I wanted to put it on the page of my digital sketchbook. So I took the marker pen and the highlighter and I made a little drawing to kind of show what happened that morning, although I'm a bird and this one too, but up here, some mystery bird. And I wanted obviously to include that sound that was so wonderful and mystifying. And so luckily, because we have that file's app on our iPad, we can insert from and go to our files app. And I had saved this, I dropped it over to my iPad into that untitled folder that same place, and I called it mystery birdsong because you can name your recordings in here. And so that is the one inherited is well, I would like to have that recording actually overwrite where it was coming from over in the tree. It's the mystery bird. So to move the recording from where it landed and I'm going to tap it and move it. Put it right about there and it caused it to play. But I want to just give that a minute. Sorry. It's like this little bird is sitting right up here. And like that you can move these because it's part of the story. And now I'm going to let you hear this little bird sing because he's really, really incredible. It's got the bird songs, got a whole bunch of different words in it. And it's going to be a quest for me to figure this out. The other birds and sounds are out there to the water that you hear is my fountains. And I think the dog was right there. She couldn't figure out what birds that was either. Okay. So is that not fun? Right? So something that can't really happen in a real life sketchbook, that's a gift of a digital sketchbook. And this is the reason not just audio recording. This is the reason that I keep to sketch daily. And when I go on a trip, there are two of them. The digital one catches everything, the rough and ready and finished product in the sound and so on. And the real life one, I pick and choose from the digital one and kill myself doing overproduced sketches in it. So they're all behind and they have blank pages and half finished pages and sometimes they get done and sometimes they don't. If you want to see that process, my foolproof travel journal class is interesting.
14. Using Unsplash and Pixabay from Inside Your Sketchbook: Okay, So it's not the only unusual thing that we can do here that we can't do in a real-world sketch book. We can also add reference photos or use photos from Unsplash or Pixabay. Both of which are websites that offer photography and illustration that you can use for personal and commercial reasons. And nobody comes after you for anything. So let's look at that by dragging a new page. Going to add, coming down here to stock images. And what we have here is a choice between Pixabay and Unsplash. And then featured images they have for that day. Recents, which would be ones that you have used or animals. This comes up animals again. But anyway, you can scroll through and suppose that I didn't sketch a bird for the, for what I did on my other page with the sound here. I could bring this in. I could put it over here. I can resize it and edit it. So I can crop it because I can edit it. Pencil doesn't want to work on that. I don't know why. Probably is a reason. My fingers are working to all either. Okay, there we go and Apply. Done. And so this is a great way to add photos to illustrate something, some story that you're telling. If you don't have the time to draw the thing, or if you just like a picture and wanna keep it there. And so that is not severe. You can do in a real life sketchbook either. You can also use these obviously as references to sketch Fromm. So, you know, you would get your pencil in and you would look at the photo while you try to sketch the bird. And I'm not going to continue all the way through this, but you get the idea. You know, that your reference pictures right here, not only that, it can be zoomed in to see detail. Okay, I'm going to erase that. The other thing we can do, of course, we did with our rooster. I'm going to bring him, give him a little bigger, put him here. Suppose you don't know how to draw a bird in it. You'd know how to draw a lot of other things. So it doesn't bother you that you don't know how to draw a bird. You can do it, we do with the rooster. And you can lock this bird and get your sketching pencil in black. And you can just sketch rate over this bird to give you the right proportions and the right shape. And then you can go from there and coloring and adding. You need to couple of feet there. This is not a great bird, but long press photo on locket. And then you can shrink it and move it. And you can go back and you can work on them, on your sketch some more. And kind of make it, improve it and make it better. You could also, depending on, if you wanted to use this again as a reference. And then am doing this as a run through of stuff, you know, so anyway, you can select it and move it over here where you're going to draw it. And then you can long press this, bring it back over here, make it big again. There's your reference while you draw your bird. Now I want to go back to the import of the stock images to point out that it wasn't just animals. That you can slide through this like you do with your colors and such on your tools. Like it's not so wild flowers. That's what's something that we're looking at, are looking for. And that's wallpapers. Just happened here. Start over. I want to go back to the placer reimported stock images to show you that this menu up here, that's odd, that offered us animals. It goes through a number of topics up here. Animals, animals and nature. Business. Film. I thought I saw wildflowers and hair and, but I don't see it now. Travel in places. Textures. I mean, wow, her nose when you might want something like that. To put behind your bird. Let's see about just to be funny here. And we're going to go to Edit and crop this to more of a rectangle. Like so. Apply, Done. And now we have this and trying to put it over here, make it bigger and send it to the back. And then I can draw the finished painting, my bird, right on top of a background that warps. A wonderful feature that who would expect to have it available in your sketch book that you have, you know, backgrounds and reference photos and illustrations and photos to use to tell your stories. It's really magic.
15. Using Emojis In Your Sketchbook: So let's go back to the Add menu one more time. And this time we're going to choose emojis. And I don't know what you use them for. And I sometimes use them in comments on social media. But what I think is fun is to use them as a drawing or sketching source. So I am going to choose the avocado. And if you sit here and you go, what happened? Where is it? Well, it is right here in your list of ads, I guess so you could have picked more of them. Let's see. Let's see. Doesn't look like multiple pack, but we're going to have the avocado dominant for the apple there. No, one at a time. Anyway, then you tap on the page, you get the emoji, your tap on the page a bunch of times, you get a bunch of them. If you wanted to populate an apple tree, you know, anyway, this is just, you know, they play, I don't know what emojis just bring out the kid and people. However, you can resize them so they can be a little more useful to you. And by selecting them and then hitting resize and then pulling them. Is that it's acting just like an imported photo at this point. And it's just interesting what you can do because you could use your sketching tools, use this as a guide photo and sketch an apple. And if you want to Japan it with a highlighter and such, you could very much follow the shading because emojis are good for this, because they are just so simplified to the nines. You could trace it and you could use it, say if you were going to make a recipe. So let's go get my avocado. Ok, and it's just little. And I'm going to resize it, make it bigger. So, you know, this would make a nice little illustration by itself or, you know, if you sketch it or drew it and you could make your little recipe for your special guacamole or your special avocado toast. And this would make a really nice picture to illustrate that. And there's lots of objects as well. And you can get to the different subjects by scrolling this menu right here. Travel and places. And where do we want to go to a volcano maybe. I don't know. I can't even so small, I can't even really see what it is. It's not one that I've used before, but we'll find out in a minute. Yes. A volcano. So something like this. Since you can size it and use it as an illustration, it could be, you know, be talking about a really, really hot day or you could be talking about something that basically exploded and erupted in your life and your story for that day. So this is really a fun thing to be able to use these. And that's really all it's above, is just to have fun with them. We have done a lot with the Add menu. And I've gone back like I had been doing and made little notes in our learning book just to remind us that consists of a lot of information. And you're going to open this up in a couple of days ago. I was asked. So having this in your library is going to be a really good tool. And I have the notes here that I've sketched done with the marker and highlighter can happen. And that you can add. We already talked about adding photos before. You can also add sound with recordings. This birdsong recording was imported from the file's app. And this one recorded here, right on this audio is recorded right here on this sketch book page. Okay. And then we went over and we added stock images from Pixabay or Unsplash. And it's wonderful. And you can use them. Just use them as an illustration, use them as a reference photo and sketch them freehand. Trace them. And you can bring them in and put them in the background because some of their images are really good for that. Or you could do an image or bring in an image of the sky or. Or the ocean and that could be a background to even writing send to back. I did that by accident. If you lock this and you won't have to worry about that. Even writing your, you know, your journaling for the day, uh, your thoughts for the day. On the top of a beautiful, you know, maybe you had a really serene day or maybe you spent at the beach. So you get a beach photo and you put it in and you're locked in the background and then you can do all your journaling right on top of that, add seagulls and add an audio file, record on your phone or are in your digital sketchbook the sound of the ocean waves. And it would be really an awesome page or spread. And emojis just for fun. And they give a really colorful illustration to your pages. Make it look fun like a kid's book. But there are also good drawing lesson, Joe. If you don't feel that you draw very well and you need more practice in seeing basic shapes and interpreting them. Or more practice and seeing shading, highlights and shadows. I'm not shadows on the ground in an emoji, but they're just really well done for that. And you could set, you could make a whole notebook in North shelf about learning drawing. Because you could just bring in the images one after another and draw them. Free hat right next to them and try coloring them in with your highlighter tool and get it as close as you can to that. These are tremendous drawing lessons. So anyway, I have used in the recipes and illustrate how your day was emotionally and resized by selecting or you could populate like a whole apple tree or something if you wanted to with the little ones. And then I'm just going to add drawing lessons because that is a fabulous resource and you would never think of it are narrowly, because usually emojis are on screen into small, right? Okay. Let's look back here again. And the assert insert from takes us to our files where we can bring anything in. Now, this was all under the Images tab of the add button. That's not all there is in the Add button. So if we go over here to the Pages tab, we can add a page this way. We can add a page from a template, this way, a page from a photo this way. And we can import documents and we can scan documents. We're not going to go deeply into all of that, but we're going to look at a bit of it.
16. The Add Menu for Images and Pages: If we tap pages from template, we get the templates that we had originally. And this is just not a good idea. No child is capable of throwing a ruled page in by itself and a different kind of a format. We'll just test this and then we're going to throw it away. But it's going to mess up what's going on in your book. And the thing to remember is that we made in a weed, we'd use the wrench tool to change your page, page template real temporarily and we had no effect from it because we put it into lines and we wrote and then we changed it back to our page like that we're working on to that format. And so it was all good. No, it was clean, it was quick. The problem with adding a template page using the page from template is that it changes. All the pages are going to come after that so it can make a mass for you. And I'm going to have to take out two of them because I'm going to show you. So when we go to the next page, It's not back to our format that we were working in. It's on whatever the last page was. So I trashed those two additional pages and I'm going to tell you how I did that in a moment because it's in a different place that we're going to go. I'm back to the Add menu. So I advise against page from template. I also advise against page from photo unless there's a specific reason to do it, which I don't know what that would be. But you can choose a photograph and it will make a whole page of that photograph fits not shaped correctly, you're going to be missing some of the photograph, and so on. So a much better way to do that is to import a photograph and crop it in size it how you want and if you want it to be the entire size of the page, you're going to have the same effect without changing things to a different page template. Because when you import a photo as a page, it changes to just a plain template, either plain basic one and when you add pages, you're getting that and not this. So it's just you have to figure it out and you have to back out of it. Then you have to do it again. You know what, It's not worth it because we want a full page photo, we know exactly how to do that. Now, import document is little different because it's about bringing in a PDF. This can work well in strange ways because if you don't have a PDF that matches the aspect ratio and the format of your book, you're gonna get that same thing that you're going to have all these pages that are vertical and you know, and that's okay because no nor child can handle it, but it kind of makes a mess when you go to print, when you go to export a real life copy of your digital sketchbook. So again, note shelf makes a wonderful PDF reader. But if you import a PDF document, you get asked whether it should be its own. And you do that from the, from not here inside of a book, but from the other place you get to ask if it should be its own notebook. And it's a really good idea to make it its own notebook. If what you're doing is using it to say, read a magazine or note and make notes. Pdf file. It's not a digital sketchbook thing, so it's not something we're going to explore here. And you can also scan a document. So let's say you are in a coffee shop and you have, you know, the receipt or something and you want to take a scan. This is also something that I find not useful because I would take a 40 if I was in the coffee shop with my my sketchbook, my digital sketchbook, where I would do to, you know, of anything that I wanted. I would go over here under Import Images or add images and I'd use the camera function. And here we go, you know, and and I would take a picture of whatever it is. And I don't know what I have here to take a picture will take a picture of my computer mouse just so that we can see use photo. And there you go. And so why scan? I don't really get it, but not a part of what we do. So I'm going to delete this lovely picture and we're going to leave the Add menu for images and pages.
17. Rearranging Your Pages: Now we're going to visit a part of the app where we haven't been. And there are some very useful things, but we're going to sneak in and sneak out without trying some of this stuff that can really get confusing and mess you up. There is a great feature in here which is being able to rearrange your pages. And we're going to look at that because that is something you can't do in a real life sketch, but your RIP Ahmad I suppose, and rearrange them, but this, you don't have to worry about which page to start the next thing I'm one of the biggest problems that I have always had is that all finished pages and then I will want to do a page for the next day and the other one is done and I don't know if I need to leave, leave an extra page or it's ridiculous. So the good thing about a digital sketchbook is that you can do any page that you fancy doing. And, and it'll be fine because you can move it around. So this little icon up here that we've site pages is a Pages icon. And what it does is it shows us all our pages and we can scroll up and scroll down. These are all the pages in this notebook. And to move them as kind of a little careful thing. It's like a tap with with an adjustment level or something. Because if you just tap a page, it's going to open the page for you. And if you long tap a page, you're going to get this menu of things you can do. So to move the page is between a tab and add along tap and there isn't any better way to explain that unfortunately. So you want to just basically reach in and grab it. I'm going to demo how weird the fifth, because it's going to happen to you. So I may as well show it to, you know, a little bit hard her and then you can pull us was kind of like funk and move. Instead of a tab. Tab will open a page long tab will open that menu. And so that is how you rearrange your pages. And if you have patients, it can really work out because you can put them in any order that makes sense. If they don't make sense in the order that you did them. So that long press thing, it gets us a menu in the menu has good things and bad things. Because some of them just are going to confuse you to pieces. And I don't use them because I'm making a sketch book, so, you know. So anyway, and this app is used for a lot of serious note taking by students and scientists and I kind of stuff and, and I don't do that, but what we might be able to use it, we can make a copy of the page and that goes to the clipboard. And that means you could open another sketch book of yours and paste it in other ways to do that too. But you can copy it and paste it. You can duplicate it. And that makes a second copy of a page and keeps it right here in this sketch book. And why would you ever wanna do that? Well, sometimes, or you want to test out a layout, maybe you know, you did it one way and you go, Boy, I wish that was over there. Thank would look fatter. Well, you make a duplicate copy and you can select and move the pieces around and see if it does look better. And if it does, you can throw out the first layout and keep the second one. And sometimes you have a little thing in your sketchbook where maybe you put the weather every day or you put the date and the day. And sometimes people make a page with that in the corner, you know, blank to be filled out. And then they duplicate that page to add pages rather than doing it from the Add menu or doing it by swiping. So that's a choice as well. You can have all your pages have that little thing on them. Insert page above. So if we wanted a blank page and we wanted it to be, this is our first page in this book. We want it to be above our first page. We would long tab and then get this menu and then say insert a page above. If we wanted to insert it below that page, we would. We're not going to look at rotate because rotate puts like portrait and landscape pages in the same book. And I guess first song note taking people that are going to keep it all always digital. That my work for us, we want to maybe take it out of here and make a real Sketch book on paper. And so that isn't going to, that's going to make trouble. So I skipped that. Tags we talked about over in the other side in the Add Column way to put a search tag, you can bookmark the page and forget the move until you get very accomplished. And it's not going to let you move to anywhere but a notebook you have made that you have put in a folder category that you have made in the in the bookshelf area. And so that's for down the road and you can play with that and do it when you want to. But I'm not going to put it in this class. And share is here, but we have another share button that we're going to use to share. Rather than, you know, there are too many ways to do things. We get confused and we don't remember any other ways. So we kinda wanna pick the favorite way and stick to it and move to the trash. If you had a page that was just basically useless or ugly and you didn't like it. Or if you had made a duplicate to make a different layout Newton like it. This is how to get rid of it, is to long press and then choose move to the trash. Okay, let's talk about making our digital journal, a real life journal. In real life, I'm going to close this. And right next to that Pages icon is a Share button. And while we're here, I'm just going to say that here is another icon. Forget about it. This used to be, you didn't use to be 10 years ago in this app, you were not able to just write on the page and have your hand on it and all of that. And this thing is a window and it makes an enlargement. The part of the page or you're going to write, people got used to that because it was the only game in town and it was always clunky. And so when the app got upgraded and you didn't worry about your hand resting on here because of the pencil and you could just write like we have been pretty much people abandon that. But the people who were used to doing it that way didn't want it gone. So the developer kept it and it's fine, but we don't want it. And if you fool around that you'll get really confused and that'll be fun. Another icon that we did not talk about, the only other one is this right here. This is new, and this is for using this app as a white board and being able to outputted as a presentation and not have the toolbar and so on there. Okay, Again, not something we can use. I thought, oh yay, you know, we can get rid of this or reading our, our book. But so far that doesn't work just on the screen. It only works in output.
18. Printing and Exporting Your Sketchbook: So back to our Share button. And this is important, This is wonderful because we can take this out to real life. What we have done in our learning book as we have used a landscape format, we have used a custom page template which I gave you and I'm Made in, I put in the project section that gave us the look of an open book that is 5.5 by 8.5 because the page is coming out of here or letter size pages. So when we share, we can take our whole book, just a page or select Pages and basically publish them is what we're doing when we're sharing. So for the sake of simplicity, let's choose All Pages. Now the next thing that happens is we choose the format. And we can output this as Ping images as a PDF publication. Or as Ping images are what you have in your photo gallery. And we can output it as a note shelf format fork. And when we do this, we would be saving it to the file's app on our iPad and be able to open it up. I don't know. Maybe we can share it from there to other iPads. You got another iPad or phone or something that has no shelf on it and you want this notebook from here over there, stuff like that. But, and the important thing for this is backup. So what I do is I will an important journal that's done or a sketch book that's done. I will save it all. I'll save it in a note shelf format and then in my files, and then I'll airdrop that to my computer backup drive. And so if somebody stole my iPad or are you could you could share it up to Cloud to anywhere, you know, but you've got a copy of it somewhere in case your iPad got stolen and you didn't have it anymore because these are sketchbooks and we love them in another way, to keep them in a real-world format, but not one that you can bring in and change very much. See the difference here between saving this as a PDF and saving it as a note shelf format document, is that in this note shelf format, when you open it up here or on another iPad, you're going to have all that functionality and be able to move things and change the type and search and all of it. Okay, when you save it as a PDF, It's a pretty much static output. Now, can you bring it back in and make it into a note shelf document again? Yes. Because as we said, we can import a PDF into note shelf and it will make its own book of itself. And we can write on top of that annotated, do things like that. But the, the parts of it won't be live like we won't be able to press on a photo and make it live so that we can add it or, or resize it and so on. But the cool thing about outputting a PDF copy is that it's now totally printable on your computer, on other devices. Everybody nowadays knows what a PDF refers. Started teaching digital stuff. Nobody even knew what a PDF was except people in the business of, you know, commercial design and software design and all that. And so that was challenging. But nowadays everybody knows that the PDF is the thing. That's a document that anything and everything will open and will print. And so to output to a PDF, we choose that for a format. And we go back here. And if we want to change the name, you can do that right there it says file name. You want to rename it for some reason, you can do that. And once you tap that, you're going to get a keyboard to change the name. Okay? Do you want to hide the page template? So in this case, I'm going to get out of here. If we hide the page template, we won't have this dividing line showing. So that's going to be really up to you if you want to print with your or print or keep the PDF without your gutter marker there. Then you return that are okay. And so then you would hit your share Now button. And you get the same old, same old Really, this is in all apps and all sharing. This is kinda choices you have. You can send it in a text message and you can AirDrop it to your other devices or your computer. Copy kinds of stuff and see this little print guy here. That's fun. You can print using air print, which is resident in an iPad, to any printer that is on your wireless network. This print command, you select a printer. And the only thing that mine is seeing right now is a brother laser printer that I have. And I'm not going into the reason for that is just that my other printers are are direct Wi-fi saw. To use them, I have to sign in to their Wi-Fi signal that this one is just out there on my local network. So in that case, I could choose that printer, one copy or more copies. Double-sided, blah, blah, blah. But anyway, I can print directly from note shelf. And that gives me a paper copy of my sketch book. So besides printing out of node shelf itself, we can in the share box, we can, like I said, move it to our computer and then we can print it from any prone do anything we want. We also can save it to our files on our iPad as a PDF because we have it set as a PDF. And then we can put it anywhere. You can put it in iBooks, and you can put it into note shelf on another device, all kinds of things. Zoom notes is not something I use. You can save it to Pinterest. And this is added actions and that, I don't know, turn off or on what's on that list. Okay. So that's it because then you have made a digital sketchbook and you have now made it a real-world sketch book as well.
 Jessica Wesolek, Artist/Teacher