Transcripts
1. Introduction: Hi guys, Welcome. My name is Miriam would renew and I am so
excited to bring this cost to you
where we're going to learn how to make
our own abroad. Yes, in this course
we're gonna be focusing more on
drafting the pattern, taking our own
body measurements, and the types of fabric
that you're going to need to complete this project. And yes, of course, guys, like I said, I can
read for us to start. So let's go ahead to lesson one where we take our own
body measurement. See you there.
2. Body Measurement.: Hi guys, welcome to
the first lesson where we're going to be taking our
best round measurements. So before I do that, we will also go, we're going
to need a measuring tape. And of course we're
going to need a mirror. So I haven't married next to me. It's very important
for you if you're taking your own
body measurement, it is good to stand
in front of a mirror to take accurate for
body measurement. So I am going to
be using inches, which are these bigger numbers. And I'm not going to be using centimeters because when
we're drafting the pattern, I am going to be using
more of the inches. So when we take your body measurement or
your past circumference, you want to make
sure that you place your measuring tape
accurately around you passed. So as you can see, I placed my thumb
right at the back of the measuring tape
and I'm moving it around to see that
it's very comfortable. So you want to also
make sure that it sits straight on this
side as you can see. And also it sits
straight at the back. If not, please do
check on the mirror. If you're measuring tape is sitting correctly
around your best. The last thing that you want is your measuring tape to the
sitting lower at the back. Because if it sits like this, you are actually going to
get the biggest brush. I'm gonna get the accurate
biased measurement. You're going to get the bigger your brain is going
to be very big. So that is why it's
important for you to take accurate and
bust measurement. So guys, this is how we take
our bass drum circumference. And mine is actually, let me check my
notes to six inches. My ink is actually 36 inches and it actually moves
comfortably around my bust. So guys, let's go
ahead and draft a pattern using a robust
round measurement. See you on the second lesson.
3. Sewing Material.: Okay guys, I'm going to
go through the materials that we're going to
need for this project. And the first thing is
going to be a power mesh. So it comes in different colors. And take note that it doesn't
have a stretch at all. We're going to use this
material or this fabric to stabilize the
cups of our brown. Then you went to get
your fabric of choice, the lace that you want. And it does have stretch. It has have one-way stretch. And on the opposite side
it has unlimited stretch. The next thing we're going
to need is a P-code elastic. And I actually have mine here, which is almost
half an inch wide, and also have a
fold over elastic. So I'm going to use
different types of elastic for the brow. Then we're going to
need our strip elastic. So mine is actually mounted on one side and shiny
on the other side. So that is what you should look for for this trip elastic. And another thing
is it doesn't have much stretch compared to other elastic that
I've shown you. It's very important to know
the width of your strip. Mine is half of an inch as
they come in different sizes. So the next thing
we're going to need is rings and sliders. And I've got mine, which is two rings to sliders. And another tip is when
you do by sliders, make sure that they're the same width as
your brush strips. The next material we're
going to need is, of course the hook and I in
mind comes belong like this. It's actually a who can I tape? So if I want to show it, I can go ahead and resize
it, make it shorter. So this is the material
you also need. Another one is also a
channeling for our brand. So it comes in different
colors also in this is how it looks once
you attach your wire. But of course we are going
to be making a wireless bro, you still need a
channeling for the brand. This is all the
material you need. See you on the next lesson.
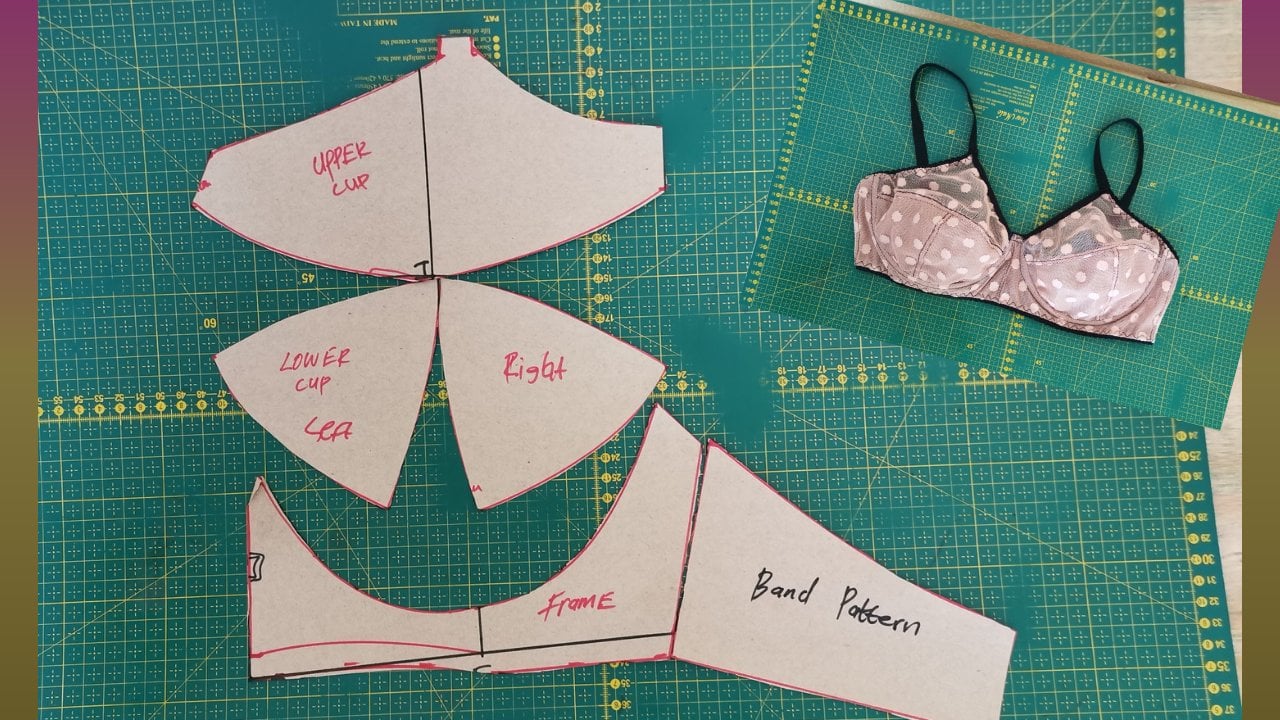
4. Bra Cup Drafting.: Okay guys, well,
we need to start by drafting the broad cups. So what we'll need is quota
of pastureland measurement. And then we draft a square. So mine is actually paid
to seven divided by four, which is going to be nine. So I'm going to mark a square root of nine
is to nine inches. Once we're done doing
so is time for us also to divide the
square into four parts. So I'm going to
take nine inches, which is the CTO of my
bus run measurement, divided again by
four, which is 4.5. And as you can see
that I'm making 4.5 on each side of the square. Now once we had done, we need to identify the top, the bottom, the side,
including the front. Now it's time for us to
create the bottom cap. So I'm going to find the center point of
the bottom squared, which is going to be
2.2 inches for me. And then I'm going
to mark the point on both sides for the front
end, for the site. On that center line, I am going to connect it with a curved line all the way
to the point that I marked. Once you're done
creating these lines, you need to connect again from that point to the center line, again with a curve ruler. Now creating the top part. We will also need to
find the center point of the top square. The center point is going
to be again 2.2 inches. And then I am going to mark 2.2 and move my measuring
tape a little bit up and create a
marking right there of around 2 to then
connect the two points. Now once I'm done, I'm going to go down on this
side by half of an inch. Then connect the two points
with a straight line. Now the next thing
that we need to do is on the bottom cap, we will need to also mark to point to just
measure that line, which is going to be
2.2 inches for me, then take it out or move your measuring
tape on this side, like it's shown on the screen. So if you wanna know how
the distance between the two lines is
half of an inch so you don't have to
move it bec too much. For the top part, it
was actually one inch. So now once you're done
creating this line, is time for us to
create an Amoco, which you need to connect these two points
with a curved line. This is your arm hole. So now moving on to the
point that I'm showing you, connect the upper cup
with a curved line. Now we are done
tracing the cups, so it's time for us
to label our pattern. But before I do so, I went to lower the
neck line for my brown. So I'm going to go down on that point that
I'm showing you. I'm going to go down by
one inch or 1.5 inch. It all depends how low you want your brand to be. An underside. I'm going to go down by half of an inch and then
connect the two points. And then now from
the whole site, I am going to mark half an inch. But before I do so let me
first highlight my lines. From the whole side. I am going to go down
by half of an inch. Take notes, guys,
this is optional. If you want full
coverage on your past, you can leave it like this, but if you wanted to show a
little bit of your chest, you can go down by
half of an inch. It all depends how long
you want your brand to be. So I'm not going to
use this other part. I'm just going to cut
out the part that I am marking with a zigzag line. Once we're done cutting
out our pattern, don't forget to label
all your pattern pieces. So now I'm going to
take the top part and just smooth or the sharp points because we don't
want our brand to be pointed around the apex area. For the button cap. Make sure that you create some
notches so that to make it easier for us as we're
going to cut on the fabric. Now guys, we are done drafting
the caps for our product. Let's move ahead to draft
the frame for the product.
5. Drafting Bra Frame.: Okay guys, in the
next part is to create the frame
for our capsule, which is going to be very easy. We're going to take our quarter of the bust want measurement. And in my case is nine inches. And I am going to mark a straight line
connecting the points. Then the next thing is
I'm going to take that nine inches and
divide it by two. Once we are done, we are going to connect
the point and it's going to create a rectangular shape. So the next part is, I am going to take
the bottom cap. But before I do so, I need to find the
center point of the rectangular
shape, which is 4.5. Then we are going to place the bottom cap on
the center line, then trace at the
bottom of the cup. As soon as we're done, we want to do the same
thing for the top cup. So what I'm going to do is to place them together
the bottom and the top and trace the center
front of the top cap. And as you can see that on top it has left one centimeter. Then you want to do the same
thing for the center front. You went to go out of the
box by one centimeter. The next thing is, you want to also shape
this side or the, um, whole side of the top cap. And once we are done,
as you can see, the tub for mine, it has left one centi meters. So the next thing on this side, you want to make one centimeter
going out of the box. Then at the bottom
of the triangle, you want to go in by one
centimeters or half of an inch. Once we are done,
we want to connect the two points and it is
going to be a slanted line. Now, on the center front
though, half an inch, we went out, we went
to extend it all the way down to the
base of the frame. Now I am going to add
half an inch or one inch. This all depends on the
elastic that you are using. So my elastic is around one inch and this is going to
be for the elastic casing. So the next thing is, I want to mark the center
point of the elastic casing, then connected
directly to the frame. And I am going to do so with a curved line that goes inward. So moving on to
creating the band, I am going to take quota of
my past around measurement. And then we're going to subtract half of an inch because we're gonna be using a stretchy
material for the band. So on that point, I am going to Mach 8.5 inches, which is quota of my
bus driver measurement. Subtract half of an inch. The width for the band is
going to be three inches. Then you went to
connect it all the way to where the frame
actually starts. So guys, don't forget
to label your pattern. Then when we're done, it's time for us to cut it out. Now, once I'm done cutting out my pattern on that slanted line, I want to measure one inch to separate the band
from the frame. So I'm going to
measure one inch and extended all the way down. Okay guys, So once we are
done cutting out or pattern, this is how it should look. So far. As you can see, the bottom cap, the top cap intruding the band. So now it's time for us
to add seam allowance. So adding on seam allowance, I'm going to add 0.501 centimeter on the
inside of our frame. And our bottom cap, including our top cup, we are going to add 0.5 or one centimeter
of seam allowance. So guys, this is how our
pattern should look. The purple part is where
actually edit seam allowance. I did, as you can see
on all my pattern. Now for the band, please make sure that
you do add on top, on this side except the bottom. Now, let's go ahead and cut
this pattern. I'm fabric.
6. Cutting Pattern On Fabric And Sewing Bra Cup.: Okay guys, I'm
going to be cutting out my pattern on fabric. And of course I've got
the laser material, which is actually
one way stretch. And I'm going to fold
it in half of which the stretch will be
going around the body. So I'm going to fresh
start cutting out the band and I'm going to cut four
layers for the band. For the cups. I did
for my fabric in half. And I'm going to be cutting the tub PopCap and
the bottom cap, including the cradle
on this fabric. Now that we are done
cutting out our pattern, this is how everything should
be all the pieces together. The next thing that we need
to do now is to go ahead and cut the same pieces on the line. So this is a non stretch lining, as you can see, it
has no stroke at all. So I'm going to be
cutting the upper cap, the bottom cap,
including the credo. And we're not going to cut
the band for this material. Now that all the
pieces are complete, it's time for us
to show the cup. So I'm going to start
with the right side of the cup and take the open
apart and the bottom cap, place them and right sides
facing and go ahead and sew half an inch seam allowance. I did put my machine
on a straight stitch. So you also want to
do the same thing. And don't forget that our needle is actually a stretch needle. So I have sewn up
both of my cups. As you can see. Now, the next thing
that is left is two. So the lining, I'm going to do the same thing like
I did for the nice. I'm going to place the naming
rights sides facing and go ahead and solve 0.5
seam allowance. And we are going to be sewing
with a straight stitch. Once we are done, this is
how the lining will be, including also the lace. So now I want to attach the
lace and aligning together. So right at the scene, I am going to match
them right at the scene. When you do though. So you want to make sure
that everything matches. So I'm going to be placing
the two together and so is straight
stitch on the scene. Now needs to create a new scene, but just saw right
where you actually had already sewn the cups. So once I've placed them
together on that seam, you want to go ahead
and do another scene. So guys, once you are done, this is exactly how they
will look together. And you went to go
ahead and open it up and see that everything
matches together. Then we went to cut all the excess fabric
so that you should avoid any bulking
on the apex area. Then when you're done, we went
to open up all our layers. And you will notice that all the scenes I
actually hidden. So as you can see on the inside, no seams are showing, including also on the outside. Now one thing that we need to do again is to go ahead and do a top stitch to flatten up
the same on the inside. And this is how the
cup actually look. The inside, it's very neat. Also the outside, the seams
are not showing at all. So now you want to
go ahead and do the same thing onto the other.
7. Sewing Bra Cup On Frame.: Okay guys, so this is the
continuation of sewing algebra. So the next thing that
we need to do now is actually open up our
frame or cradle. And I am going to place the cranial and then lining the lesson
the lining together. And so right there in the
middle with a straight stitch. Now as soon as we're done, I did do a stitching just to
make sure that the mining doesn't move around as we are going to be
attached to the cups. So in the way we attach
the caps is to make sure that the right
sides facing. And we're going to paint the cap following the curve shape. Once we're done
painting the cups, we are going to
go ahead and sew. It happened at 0.5
seam allowance. And I'm going to be
using a straight stitch. Once we are done, this is how our brand is actually
looking at this point. So I went to go ahead now
and attach our channeling. So this channeling,
it's going to be placed on the inside
of the cup is you can see and it's
going to be sewn right at the scene when we were joining the cap,
including the frame. So I'm just going to make
sure that I saw right on the edge around the cup. Now, this is how our channeling will look
so far as you can see. This is how it will
look on the inside. So before we actually
saw it flat, we want to go ahead now
and attach our band. I've got two layers of the band. I am going to take one band, place it under the BRI
and the other band right on top so as to
sandwich the frame. And then you went
to go ahead and sew around half of an
inch seam allowance. So this is how it will look
as soon as we're done. As you can see that
the same is actually concealed inside and it's
not visible on the ad side, including the inside
of the browser. Now what we want to
do is to go ahead and do a top straight stitch. Once we are done, this is how our band is attached
and how it looks. So the next thing
that is left for us is to attach the elastic. So see you on the next part.
8. Attaching Elastic And Bra Channeling.: Okay guys, so welcome again
to this part where we are touching the elastic and
I have a P-code elastic. And I am going to make sure that I place it right on the
waist of the brown. So the way to attach the
elastic is to make sure that it's a little bit shorter
than the actual waste. So it can mine. It's actually two
inches shorter than the actual waste off the
bright as you can see, is two inches short tags. I'm going to cut
the elastic out. Once we're done doing so, I am going to take the decorative part which
is going to be facing up. And I'm going to be placing it from one edge or pinning it from one edge to the
other side of the brown. Once we're done doing so, we are going to go
ahead and take our bright and so it zigzag
stitch on the elastic. And when you do so you
want to make sure that you pull the elastic
and not the product, but only the elastic so
as to spread equally around the waist or
the band of the brand. Now, once we are done, this is how our proud would
look right at the bottom. As you can see, there's
some excess lays that is showing down. So I just want to trim
it off so that we can have a neat finishing on
the inside of the brown. So I'm just going to cut
out all the x's pieces that is hanging
from the elastic. So the next thing for us is two, so the neck line. So for me, I am going to
attach the folder realistic. You can use any type
of elastic you want. We can also use a
picker to elastic like the one I used at the
bottom for the neck line. But the key thing is when
you place or when you saw the elastic
on the next line, make sure you don't pull as you would when you were
touching it at the bottom. Now is I'm going
to be sewing the elastic and make sure
you use a zigzag stitch. So once we are done, this is how our neck line
would look on the ad side, including on the inside, as you can see, I didn't so
on top of the channeling, I did paint them
down so that they shouldn't get caught
on the elastic. The next thing that
you want to do is to attach the elastic right? On the whole. So moving on to attaching
the elastic on the whole, I am going to leave just a
little bit hanging at the tip. Then another point is, as we saw our elastic, we want to pull it
just enough for it to sit closer to our
skin around the hall. And I am going to be
using a zig zag stitch. Once we are done attaching
the elastic on the whole, we want to go ahead and mark
four inches from where? From the center
seam of the credo. And they banned from that
seem you want to mark, will measure four inches. And then in that four inch, we want to place a strip
of around 5.5 inches. And I'm going to
cut two of them. This trip is the length
is actually 5.5 inches. So once we are done
cutting out this trip, you went to pin it down
and insert the ring also. On this trip, make
sure that the ring fits perfectly to this
trip is the perfect size. And then once we do that too, and to fold this drab and saw a straight stitch
to secure the ring. So once we're done, we went to go ahead
and place this trip. This is how it looks. As soon as it is sown
the ring its own in. And then we went to go ahead and pin this drip onto the band. Then go ahead and do a top straight stitch to
secure the strip to the band. Once we are done, this is how it will look or how it looks. So the next thing is now
to fold in the band. Remember that we did attach the band or the
frame or the waste. So now we went to turn or flip the elastic in and
make sure that this trip that we did
attach is also tucked in between the
strip as you sold. So as you can see, this is on the inside. I'm flipping the elastic in and I'm making sure
that the elastic, It's also attached or the strip is attached in-between
the elastic. Then once we're done doing so, we went to go ahead and
do a top zigzag stitch. Okay guys, Now I am done. So in the elastic, this is how it looks on the inside, including
the outside. But take note that I didn't so the channeling
of the prior it. So now we are going to
go ahead and press it down by sewing a straight
stitch right on the edge. The next thing
that we need to do is to cut out the straps. So I am going to
cut the length of around 18 inches and I'm
going to cut two of them. Once I'm done cutting
out my strips, I am going to go ahead and insert the ring and the slider, of which we're going to
start with the slider first, I'm going to insert
this trip from one opening to the other. Then once I am done, I'm going to go ahead
and reinforce the strip, as you can see by suing
a straight stitch. Now once we have
done is time for us to complete the
rest of the strip. So remember that we did inside the ring on one
side of this trip, so we need to pass
it through the ring. And then this is
how it will look. Now to complete the
rest of the strip, we need to also
pass the strip and the one opening to
the next opening. So this is how this
trip will look so far. Now, what we need to do, again is to attach it
on the actual cup. So I am going to actually make sure that when you attach
this trip into the cab, there is no twisting
of the strip. So as you can see
that I'm going to go ahead and so a straight stitch joining the tip
of the cup just join it. So a straight
stitch right on top onto a dense sowing,
a straight stitch. You want to flip it
on the inside of the brown and then go ahead and do another tub stay
straight stitch. So guys, this is how it will
look as soon as you're done. I'm going to go
ahead and just cut out the tail that is showing. And this is how it will
look also on the ad side, if you want, you can
use a different thread. I'm just using a blue thread so that you guys can
see what I'm doing. So this is how our
brand looks so far. You also want to go ahead
and attach the other strip. So guys, we are almost reaching to the end of this project. So this is how your brush
should look. So far. The next part that
is left for us is to attach the hook and I.
9. Attaching The Hook And Eye.: And we add done guys, as you can see, this is how our brand looks. So the next thing for us is to finish it off by
attaching the Who can I. So as you can see,
my hook and I, it's a long channel
and I am going to place it on one
side of the band. So before we do that, we will need to measure
the width of the hook. As you can see, my
needs around 1.5 inch and you're going to cut
it out from the bend. So I'm going to mark
1.5 inch and then I'm going to remove it from
one side of the band. So as you can see, that it has an opening
at the back of which I am going to pin it
together with the band. As you're going to
attach the hook. You want to make
sure that they are aligned together so that when you put on your bright it can sit comfortably at the back. So I am going to place the hook together onto the other
side of the bend. Cut it out so that it can
be aligned and then go ahead and attach it onto
the other side of the band. Hello. Before I saw it on the machine, I am going to go ahead
and hence digit so as to not to move around as I
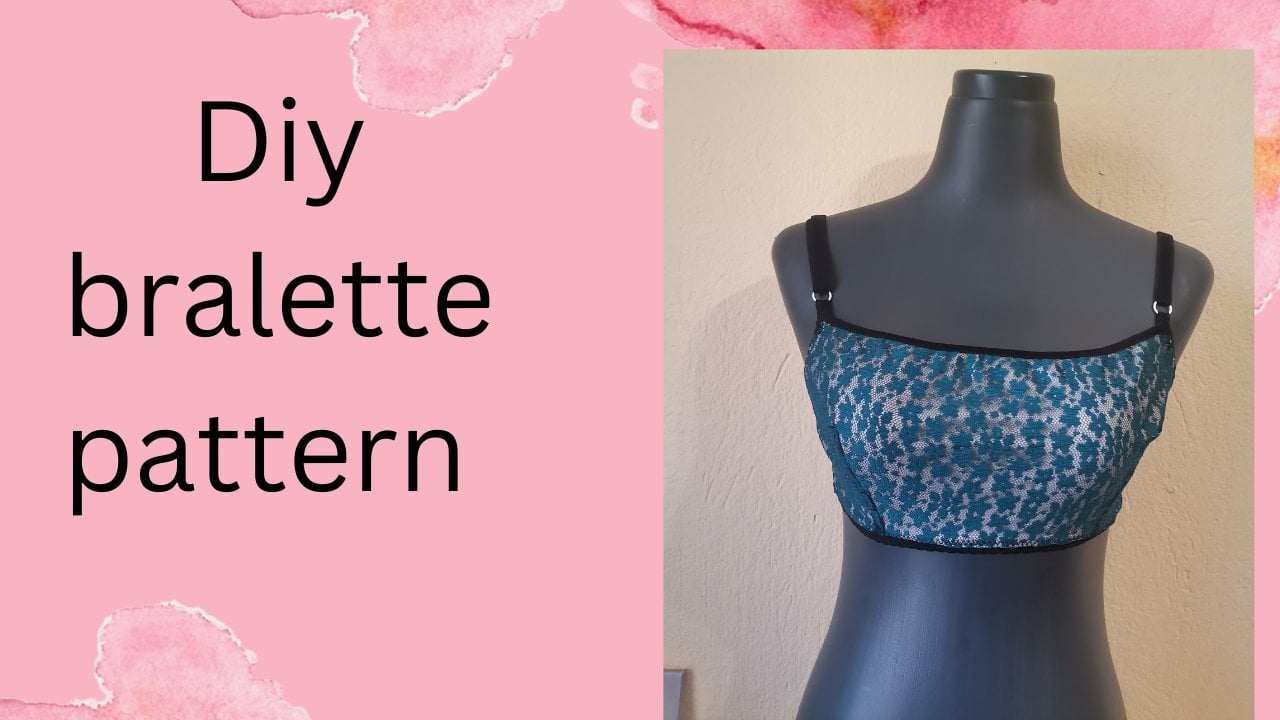
am sewing on the machine. And we are done, guys
are making this bra. I really loved the
way it turned out. I hope you also enjoyed making this project as much as I did. As for me. See you
on the next one. And yes, do not forget
to rate this course.
10. Conclusion.: Guys, we have reached the end of this course and I
hope you enjoyed making this project as much as I did enjoy making this brown. And I can't wait for you guys
to try on this pattern and tell me what you think
about it. Please. Again, don't forget
to rate this course. It will really help me a lot. As for now, it's a good way.
 Mary Murinyu, Fashion Designer