Transcripts
1. Introduction : Hi. My name is Mary Marino and welcome
to Trasa Making Course. Most people find it very intimidating to create
their own pair of pants. But you don't have to. Whether you're a beginner
or you're looking to refine your serving skill. This course is actually designed to guide
you every step of the way in creating a
stylish and fitting pants. So what is the main
focus of this course? The first thing is taking accurate body measurement
to get a good fit. Then we're going to move on
in drafting our pattern. Whether you're looking for
shorts or long legged pants, that's exactly what we're
going to cover in the lessons. Then we're going to move on
in selecting the types of materials that we're going
to need for this project. Once we're done doing that, we're going to
move ahead and now construct the whole
trouser together. By the end of this lesson, you will definitely own your own tailored trouser that
fits your personal style. So what are you waiting for? Let's go ahead and
unleash your creativity and begin with the first
lesson. See you there.
2. Tools and Materials. : For the tools, I'm going
to start with the needle. This is a universal needle. The first one is 100 to
16 for heavy fabric, non stretch, and
the other one is 80 to 12 for a light weight
non stretch material. Depending on your
fabric you're using, you can pick one of the two. Then you're going to
need a measuring tape, and I've got this two foot, this one is the blind foot, and we also have a
button foot also. You're going to need your pen as you can see and your needle. You need a scissor. This is a fabric scissor, and you're also going to
need a paper scissor. Then you're going
to need your ruler, and lastly is the
sewing machine. For the materials,
we're going to need a button that will
actually match your fabric. I am going to be using a 20
centimeter long zip here. I am going to be using a
facing for the waist band. As you can see, this
is a hard facing. It's got a shiny part, as you can see, and
the side it's matted. We're going to need this
for the waist band. Fabric, I've got two
types of fabric, I've got Gabdin, which
is a non stretch, and it's light weight also. I also have dy, which is a heavy weight, and it's non stretch. Lastly, you're going to
need your pen and notebook.
3. Body Measurement. : The first thing, you're going to place a string around
the high waist, which is right
under the rib cage. Now, I am going to take
my measuring tape. At this point, I am going to use inches to take
my measurement. I'm going to place
my measuring tape around the waist and make sure that it sits
parallel towards the floor and it's not
too tight or too loose. The next measurement is
hip round measurement. Make sure that the measuring
tape sits parallel towards the floor and you place the measuring tape on the
highest part of your hip. Then we're going to
measure from lower waist, which is right on the hip bone to the widest part of your hip. Usually this measurement
differs from person to person, yours can be 9 ". Mine is actually 8 ". Then we need to take
your crotch depth from the highest waist to
the surface of the chair. This measurement requires
you to sit on the chair. Then the last measurement is the full length of your shorts. Now you need to measure from the highest waist to
the desired length. Let's go through
the measurement. High waist, crotch depth, heap round, lower waist to
hip and trouser length.
4. Draft Front Short Pattern. : So on a new pattern paper, you need to mark a
horizontal line. This line will form
as a waist line. Then again, on the edge
of your pattern paper, make sure that you leave enough space for
crotch extension. I left around five inch right on the edge of
the pattern paper. Now, the top line, it is
going to be a waist line. From the waistline,
you need to mark your crotch depth plus
half of an inch of ease. Then extend this line
across the pattern paper. Then again, on the waist line, you need to measure
lower waist to hip, which is around 8 " in my case. If you're on the larger side, you can mark 9 ". I'm going to label this line. This is a hip line, and the other line is going
to be a crotch line. Now I'm going to mark
the trouser length, which is going to
be around 22 ", and then mark the line
across the pattern paper. For horizontal measurements, you're going to
take a quarter of your waist round measurements
and add 1 " for dart, right on the waist. Then going ahead to the hip line, you want
to do the same thing. Quarter of your hip
round circumference plus half an inch of ease. If you don't want a
tight fitting shorts, go ahead and add the ease. Now when you done, connect these two points from
the hip to the waist, and then extend the line
to the crotch line. Then from the crotch line to the full heaving
length of your shorts. Now, to calculate the crotch
extension for the front, you're going to take your hip
measurement divided by 20. For example, if
your hip is 45 ", you're going to divide it by 20, and the answer is
2.2 in my case. I'm going to mark 2.2
inch crotch extension. Then right on this line again, I'm going to mark 2 ". Then I'm going to mark 1
" in a 90 degree angle, then connect these three
points to form a curve. From the crotch,
I'm going to now extend this line
to the hem line. Now, I'm going to find the middle point in
the crotch line, find the center point
of the crotch line, and then extend it all the
way down to the hemline. If you want to this is optional, if you want to shape
your trouser on the leg, right on the in seam, go in by 1 ", including on the outer seam, go in by 1 ". Again, this part is optional if you are going for
a wide leg shots. For waist shaping,
right on the waist, you want to go in over here in this line by half of an inch. This will avoid the
trouser to be a bit gapy around the mid section. Going in by half of an inch, it will be really helpful. Also going down by
half of an inch from the waist back to the
waist line again, so it's half an inch
to zero on the waist. Now, to create the dat right
on the new waist line, I'm going to find
a center point. Then once you've marked
that center point, that's where you're actually
going to take in your dat. The dat length is going to be around five inch for
the front pattern. Then remember we took
in the 1 " of the dat, you want to replace it back to half an inch on one side and half an inch onto
the other side. You might ask yourself
why we're not adding any seam allowance on
the front pattern. This is because we're going to later do that for
the back pattern. For the front pattern, no seam allowance that is included. The front pattern is complete. The next thing that we
need to do is to head, have 1 " of hem
right at the bottom. In order to cut this out, make sure that you
fold in that 1 ". And then go ah and cut out your front pattern in order
to trace out the back. Now, take note how I'm cutting my front pattern right
on the crotch line. I'm going to cut out
the black line first, and then also on the waist. I'm also going to cut out
the black line first. And our front
pattern is complete.
5. Construct Front Dart And Side Pocket. : In this lesson, we
are going to focus on actually the front two
panels of the trouser. First, we're going to close the dot and then make sure that you do keep with the on in an ny board close by because
we're going to need that. Then once we're done doing that, we are going to construct the side pocket.
So see you there. So once you are done cutting
your pattern on fabric, I am going to start
with a front pattern. Over here, I'm going to place a pin because you
want to transfer this dat onto the other
side of the front panel. So this pin here, I'm just going to make a
marking with my chalk. And then once from that marking, now I am going to
highlight the dat. The next thing you want to
do is to sew in the dat, so I am going to take it to the sewing machine and
sew a straight stitch. To finish off the dt, you need to separate the two thread and then
tie them right at the end, and then make sure that
you take this into your ning board to press the
dt towards the side seam. Now, while we are at the
pressing or the ning of the, make sure that you also
iron around the cro. Now, doing this, it will
actually help the crotch to relax when you
wear your trouser. Make sure you do this
for both the back and the front panel. Right here, I'm working with the fabric that phrase a lot. I'm going to use my serger
to surge around the crotch, the in seam, and the side seam. If you don't have a
serger or in overlog, you can use a zigzag
stitch. Now we're done. I'm just going to highlight
that this side is actually the in
side of the fabric. The next thing that
you need to do now is to the side pocket. For the side pocket, I am going
to take my pocket lining. I wished I used a
different fabric at this point so that you guys can see so that
you can see what I'm doing. I'm going to mark this is actually the wrong
side of the fabric, and I'm going to face
right side facing the pocket lining with the
trouser right side facing. Then I'm just going to sew on the side using half an
inch seam allowance. Now, to finish off this pocket, make sure that you
push the seam towards the lining and then
do a top stitch. So this is how it turned out. The next thing is to attach the pocket bag with
the pocket lining. I am going to take
the pocket bag, place it right sides facing. This side is actually
the wrong side. I am going to mark an x with
my chalk and want it done, make sure that you pin it down, take this to the
sewing machine and sew half an inch seam allowance. If you don't have an overlog, these are the stitches you
can use on your machine. I am going to actually
saw one of the stitches. I chose stitch 16, and this is how it turned out. Over here, it was a wide stitch and this side it was
a narrow stitch, so it still look good. So you can try to use this exact stitch
also on your machine. So once you done, sewing
the pocket lining, make sure also you
press in your work, so as to look beautiful
and professional. I am going to go ahead and
sew small stitches right on the side to make sure that the pocket
doesn't move around. I'm also going to do the same
thing right on the side, just a small straight stitch. And this is how it turned out. Your pocket is complete
at this point. I hope you will really love the way it turned
out and try it on. So see you on the next lesson.
6. Draft Back Short Pattern. : Now, to draft the back pattern, go ahead and take the front
pattern and trace around it, make sure that you also
transfer your dts, including the horizontal lines. Now, the dt leg for the back, it's going to be 6 " long. And then once you were done, you also want to transfer
your dt over here, which is around 1 " wide. On the waist, you want to raise the or the w at the back by 1 ". This is to cover the back side. So by increasing it
by 1 " or 1.5 ". Now we're going to
add seam allowance. We're going to start here by
the crotch crotch depth ne, and I'm going to add
around 1.5 " over here. Then connect these points. Now, once you were done,
you want to go ahead and calculate the back
crotch extension. For example, if your hip is
45.5 divide that by ten, and it gave me around 5 ". So I am going to mark the 5 "
from that line I just drew. And then the remaining,
which was 2.5, I added it as the crotch
extension for the back pattern. So I'm going to f with a pencil. And then from that line, I'm going to go down
by half of an inch. By marking it half
of an inch now, I need to connect it back
to the crotch depth line. But first from this line here, I'm going to mark 1 "
in a 90 degree angle. That's where I'm
going to mark 1 ". Then connect this point
in the curved line like this to form the crotch. And there we go, you have
created your crotch line. On the in seam here, you're going to add 2 ". Remember here on the
crotch dep, we added 1.5. But here we're going to add 2 ". This includes the seam for
both the back and the front. And then we are done
with our back pattern. Do make sure that you do
cut out your back pattern, label it and you are complete.
7. Waist Band, Pocket And Zipper Fly Pattern.: If you're just like me and
you like a trouser with a feted waistband pocket
and also a zip of fly, that's exactly what we're
going to do in this lesson. So if you want to know
how that is done, go ahead and grab
your front pattern because we're going
to need it to draft all those pattern pieces. So see you in the lesson. Now, to create our pockets, we first need to trim off that half of an inch on the front pattern
that you've marked. So we're just trimming
off that half of an inch. Then now right on the ways
to create the band first, we will need to mark
1.5 inch of the band, that's the width of the band. Then before we cut
out this 1.5 inch, make sure that you do close
down the d, you tape it down. And then you cut out
this piece first. Make sure that you do
label your pattern. This part is going to be the
center front of the band. Then once you're done,
make sure that you also fix your dot leg. For the front pattern, we're done creating
the waist band. Now for the back pattern, you also want to mark
1.5 " from the waist. Then once you were
done doing that, you want to connect
these points. Then to cut it out, make sure that you do the
dot or you tape it do. Then you do the same
process that you did for the front pattern
by cutting it out. To label your pattern, make sure that this pattern
here is going to be side. As you can see,
this is where we're going to join the two patterns, and also don't forget to fix your dart leg for
the back panel. To add the seam on the band, you want to first trace out both of your pattern
on your new pattern p. Then you want to take
this opportunity to actually correct your lines if there are any pointed edges. And also label for
the back pattern, the band be pattern, right that it's going
to be cut on fold, and then all around it, make sure that you do add one half of an inch
seam allowance. Including the front pattern, you want to add half of
an inch seam allowance. Now for the front pattern, right it's written center front, because we're going to
be having a zipper fly, I am going to be
adding a zipper fly. The width of the
zipper fly is going to be around 1.5 inch. Go ahead and do the same thing, add 1.5 inch of zipper fly. Once you're done doing this, make sure that you do
create some notches. This will make it easy when we cut this
pattern on fabric. Make sure you identify the
1.5 inch with your notches. Then we cut out both patterns. And we are complete
with the waistband. Now, remember we did cut out the waistband on
the front pattern. Make sure that you do add your half an inch seam allowance also on the waist because we are going to connect the
waist to the trouser, so we will need some
seam allowance for that. Right here, you can
see the reason why you should close the
dt when you cut, we need this triangle. For the pockets,
you need to take your front pattern and
right on the waist, you can mark around
2.5 " or 3 ", and then you just need
to it right on the line. Then on the side, you need to mark the length
of your pocket. It's going to be around 6 ". Now you need to connect
these two points like this. Now, you need to identify or determine how deep you
want your pockets to be. So next to the dart leg, I am going to mark the length of my pocket because
I like them deep. I'm going to mark them 10 ". And then extend this ten inch
mug to the side like so. Then this will actually allow me to be able to shape my pocket, and I'm just going
to do a free hand. Once you're done doing this, you're going to take a pattern
paper and trace around the pocket bag first. As you can see, I'm
tracing around the pocket, this line, including
also on the side. Right on the side here, I'm tracing the first one. And now I'm highlighting all the points
that are done with the tracing wheel
and make sure also you transfer your lines
to create some notches. Then the next thing,
you're going to trace out the pocket lining. For the pocket
liner, I'm going to trace this line and then also around the
shape of the pocket. So now before we cut
out that extra piece, make sure you add
half of an inch next to that line over here. And then once you were done, this is half of an inch is
going to be seam allowance. And then you cut out that piece. And your front
pattern is complete. Then you also need to add seam allowance on
the pocket aligning, which is half of an
inch seam allowance. Then right on the
side, don't add, but there around
it, you need to add half of an inch seam
allowance also. Including the pocket bag, make sure that you do add seam allowance on the side only. And both of your pocket bag and the pocket
lining is complete. Do make sure that you do
transfer your notches. This will make it
easy when we do attach the pocket
on your trouser. This is the easiest part
to create a zipper fly. Right on the crotch curve, I'm going to go up by 1.5 " and then just trace
the crotch depth line. Then from here with the width of my zipper fly is going
to be around 1.5 inch. So once you're done,
you make sure that it matches with the front bend. And now the next
thing you need to do is just to shape it
right tail on the edge. And your zipper fly is complete. Don't forget to add half
an inch seam allowance, which I've added, because
it's going to make it easier when you do
at it on your panel. And now you were done
drafting all your patterns. A
8. Long Pants Pattern And Transfer Pattern On Fabric. : So adding the length
of this pattern, I am going to you're going to
need this measurement from your waist to the desired
length of your trouser. I went ahead and I
stepped on top of my measuring tape and I measured from waist
to the full length. Once you've measured, you need to add a new pattern paper on your ter pattern and measure from the
waist to the length. Then mark a straight line. Mine is around 41
plus half of an inch. Don't forget to add
hemming allowance. So right on the
side. I'm going to extend my legs over there. Then once you're done again, also transfer the center line. This center line is basically for shaping if you want to shape your ankle or you want to
shape around your knee. So I'm going to go in by half 1 " on both side of the ankle, and then make sure that
you blend this line from the crotch because you
needed to bland very well, and also do the same thing. You want to blend
this half of an inch from the crotch line. And then you want to
blend it to the 1 " mark. The front pattern is complete, go ahead and just cut
out the axis paper. For the back pattern, we're
going to do the same process. You need to attach
a pattern paper, measure from your w to the desired length
of your trouser. Again, mine is 40, 41. Don't forget to add
1 " for hemming. You want to do the same process like you did for
the front pattern, extend from the leg to
the desired length. So at this point, you have your short pattern and also
your full length pattern. I went in by half
of an inch by 1 ", sorry, like I did for
the front pattern, and then blended from the
crotch to the desired length because you want these
line to move very well, and from the crotch also to the full length of the trouser. And just like that, you have
added your desired length on your trouser and the cut out some axis fabric or paper. Now when you do place
this pattern together, make sure it still maintains
the 2 " on the side. Remember this is
the back pattern. When you place the front
pattern together with the back, make sure it still
maintain the 2 " on the in seam, and you're done. As you can see, you'll notice that I did cut out some dat, it will make it easier for
dat transfer on the material. So here, the band, I did attach it weights on fold. So you want to make sure
that you do attach it on the fold and also have attached the front waist band and also the pockets and
including the zipper fly. So over here, I did
transfer my dots. And when you do fold your
fabric, as you can see, I folded it into half, so this is how it looks. So these are all the pattern
pieces that have cut. Make sure you do
transfer your notches if your pattern say
does have notches. So I did cut times two on both the pocket lining
in the pocket bag, and also the waist
band for the back. I did cut times two, and also zipper
fly, I did cut two. Make sure your that. You cut two layers. And I did cut the back in
the front panel pieces. And that's all you will
need for this lesson. See you on the next one.
9. Sew Back Darts and Construct The zipper fly. : Now, to finish off
the back panels, we need to first
close out the dot like we did for
the front pattern. Now, the next thing
you need to do is to take the both back panels, place them right sides facing
and saw around the crotch. And I'm going to use half
an inch seam allowance. And just like that, the
back panel is complete. For the zipper fly,
I'm going to take the two front panel pieces, and I am going to first place
them right sides facing. I'm going to take my
zipper fly and mark where it actually end on
the crotch line. Then once I've marked
where it ends, I'm going to take it
to the sewing machine from where I've
placed the marking and so right on this
point, 0.5 seam allowance. Then I'm going to take
my zipper fly on. I'm going to attach it on the right side of
the front panel, right sides facing
with the front panel. Then I'm just going
to pin it down, take it to the
sewing machine and sew half an inch seam allowance. Once you're done, this
is how it will turn out. Flip the fly in and saw
a top stitch again. I am using a 20
centimeter zip over here. To attach the zip, I am going to place it right
sides facing on the zip fly. Make sure that you
align it to the seam. I am going to pin it down and saw on the left side of the zip. Oh. Once you're done,
this is how it will look. I'm going to flip it in
again like so and take the zipper fly pattern and fold away the seam from
the zipper fly pattern. Then I'm going to
place it right here on top and trace around
the zipper fly. From this tracing,
this is where we're going to sew a top stitch. As you saw this top stitch, make sure that you push the zip right up like this so that you don't
sew on top of it, as you're going to sew
around the zipper fly. Once you reach the end, make sure you also
do a backstitch. Now, this is how
it will turn out. The next thing we need to sew
the other part front panel. I am going to place it like
this right sides facing, and to the other side of the ip, that's where I am going to actually sew or attach the zip. I'm just going to
pin it down first. And then so is straight stitch. So you want to make sure
that this straight stitch aligns with this seam over here that we've
made previously, and you saw from
here all the way up. Now, you are done attaching
your zip and your zipper fly. And this is how it will
look once it is attached, as you can see, I'm opening it. So now we want to attach
the zipper guard. So right at the back
on the seam over here, I am going to place
it right sides facing like this and then
just do a top stitch. And then take it to
a sewing machine and sew a straight
stitch over here. And is complete. Now you want to
open up your zip, and this is how it will show. And this is how you
attach a zip or fly. As for me, see you
on the next lesson.
10. Assemble Waist Band. : For the waistband, I am going
to use the hide facing, which, as you can see
this side, it is shiny. This is where the glue is, and the other side
is actually meted. So I've went ahead and ironed
one layer of the waistband, both the front and
the back panel, and I'm going to join them right sides facing
here on the side. Take this to the
sewing machine and sew a half an inch seam
allowance on the side. Once you're done, you want to press open the seam like this. I went ahead also and I did the same thing for the
lining of the waist band. Once you're done
doing this, you're going to take the two pieces the lining and the one with the facing, join them together. Then take them to
the sewing machine and sew right on top. Once you're done sewing
them together like this, you're going to open up the two layers of
the waistband and push the seam towards
the lining of the waistband and
do a top stitch. Once you're done
making a top stitch, you want to take this to the pressing iron as you can see. You want to take this
to the pressing on. But first, I want to search the lining because if you are working with
the frame fabric, you might as well go ahead
and search your lining. And now it's time to take
this to the pressing on and your waistband
is complete. And this is how it will look. Now, once you done
with your waistband, see you on the next lesson.
11. Assemble Trouser, Attach Waist Band And Belt Loops. : To assemble the trouser, you will need the back and
the front right sides facing. The first thing that
you need to do is to actually saw the side seam. Before I do that, I am going to take the pins and
just pin on the sides. Once you're done, take this to the sewing machine and saw
half an inch seam allowance. Once you're done doing this, you want to go ah
and saw the in seam. Before we saw the in seam, make sure that you align
the crotch seam first. Then I am going to
first attach the pin. What I like to do most of
the time is to first saw the first leg and then go ahead and saw the
other leg on the in sea. I'm going to saw half
an inch seam allowance. Now, once I done sewing
the in and the outer seam, this is how it will turn out. Now, to create the belt loops, I went ahead to cut a strip
of fabric of around 2 " wide. And I did go and fold it
into half on both sides, and then I folded
it again. Like so. The length of this strap
is actually around 26.5 ". Once you're done doing this, I am going to go ahead and saw a straight stitch on both sides, and this is how it turned out. Then I'm going to cut this
into six equal parts. H. Each of these loops, they are going to be 3 " long. I am going to cut five
pieces of this loops. Now once you're done, this
is how the loops will look. It's time to attach
them onto the trouser. I'm going to first
attach the first loop on the front dt on both sides. Then you want to go
ahead and attach the loops also on the back dts. Then also on the center
seam for the back. To attach the band, I am going to first
make sure that I mark the center
point of this band. I am just going to attach a pin. Make sure that the sides
seem they're well aligned. Now the next thing,
I am going to attach the band right on
the trouser waist. Make sure that it's
right sides facing, as you can see here
on the screen. Once you have aligned the back seam on the
band or with the band, make sure you pain
all around it. And then take it to
the sewing machine and sew a straight stitch. Now, this is how it will
look on the inside. What do you want to
do now to take it to the ning board and push
the seam right up like so. Then to finish off the band, the waist band is to flip
the lining right sides facing like this right
here on the zipper fly, and so a straight stitch
up to that opening. Also this side on
the right side, I am going to face it right sides facing and so a
straight stitch over here. Now, once you're
done, you want to go ahead and turn everything
the correct side, and this is how
it will turn out. And also this side, you also want to cut
out some axis fabric and turn everything
the correct side. Now, this is how
your band will look. It's not done yet, but this is how it will look
so far once it is attached. Now, to finish it off on
the inside, I am going to, as I said, push the seam
right on the inside, right here on the seam, I am going to plan the lining on the inside from
this existing seam. That's where I'm going
to place my seam, which is actually attached
to the lining of the band. I'm going to do this for
the rest of the waistband. A I am going to
use a blind foot, and this blind foot is
going to actually help to be able to sew
right on the inside. And as you so,
make sure that you actually saw on top of
the waistband lining. And this is how it looks on
the inside and the outside. Now, to finish off
the belt loops, I am going to fold them like
this and pin this down. The next thing is
to take this to the sweing machine and
sew a straight stitch. So once you were done at
touching your belt loops, this is how they will look. So see you on the next lesson.
12. Heming And Button Attachment. : So right now it's time to ham
the bottom of the trouser. So I went ahead and I hammed
half an inch seam allowance, as you can see over here. So I'm going to go ahead now and fold another
half an inch seam. Once it done, pin this
down and take it to the inning board to flatten
the sea or the fold, and then once it done,
pinning it down, take it to the sewing machine
and sew a straight stitch. Once you're done, this
is how it will turn out. The next thing you need to
do is to attach your button. Right here, I am going to
place them together like this and just to decide where
exactly I want my button to be. I'm going to use my pen
and I'm just going to mark right on the
side of the button. This is how it looks. I'm going to take this to
the sewing machine and I've changed my sewing
foot to a button foot, and I'm going to open
up the button hole. First thing is I'm
going to attach the pins on both side and use my sy ripper to open up
the hole. There we go. I am going to now on that line. I'm going to mark a point here. It's going to be very easy
to attach the button. And once I'm done, I'm going to hands
stitch this button. At this point, you can use
any button of your choice, but make sure that it does
match with your pants. I went ahead to use a black button because I just love the
contrasting colors. So once you're done hand
stitching your button, this is how it will look, and I'll show you how it
looks once it is complete. I can't wait to try on this pans and show you
the final results. Over here, I am going to
attach the hook and I, and it will be done.
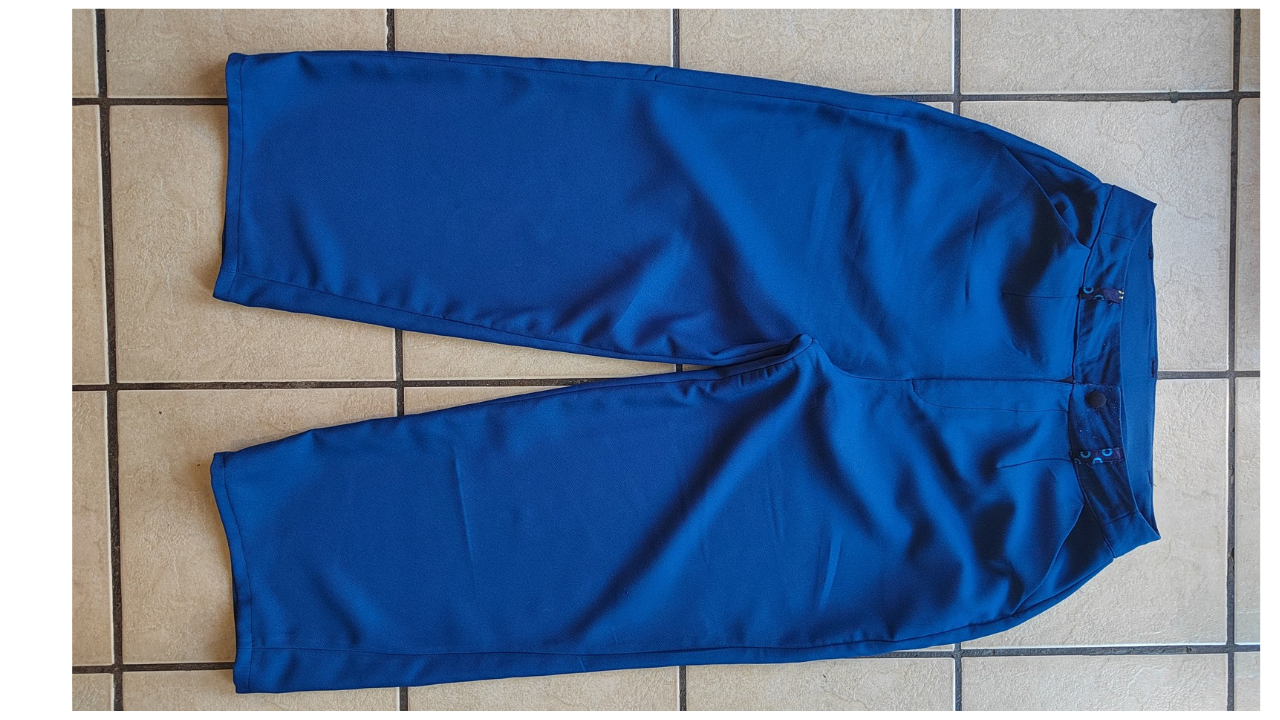
13. Conclusion. : And there we go. This is
how the trouser turned out. I love the length, and this is how it fits at the
back, including the front. I'm loving the pockets also. And again, the waist band, it's not gaping at the back. And this is how the trouser
looks, and we're done. I would really love to see
how your t turned out. So don't forget to
take a good picture and send it on a project
section down below. So see you on the next one.
 Mary Murinyu, Fashion Designer