Transcripts
1. Introduction: Hi, my name is Marie Marina, and I am so excited because I'm about to share with you
how to make a tie pattern. A tie is the most
important accessory that one can have
in their closet. Not only because of its beauty, but it says a lot about
one's personality. In this lesson, I'm going to share with
you on how to draft a tie pattern and how to cut
the pattern on the fabric. And then you're going
to learn a skill on how to construct
the whole tie. By the end of this lesson, you will definitely be able to bring about the
project that you've made. Also, you might be able
to gift someone with something special that
is handmade guys, I'm so excited to start
the first lesson with you. See you there.
2. Materials and Tools: Over here I've got my material, and this is a non
stretch satin fabric. Also, I'm going to use this one with the print on the
outside of the tie. Then I've also got
my lining here. It's also a non
stretch material. You guys can go ahead and pick any non stretch material
as long as it doesn't. As for the tools, I've got
my measuring tape and we're going to be using inches when
we're drafting our pattern. Then the next thing is a straight ruler followed
by a universal needle. Then we need our pins
and a pair of scissors. Of course, we are going to need a pattern paper where we're going to be
drafting our pattern. Lastly is our sewing
machine guys, these are all the tools and materials we're going to need. See you on the next lesson.
3. Front and Back Pattern Drafting: Guys, we're going to
start by drafting our front panel for the tie. The first thing that
I am going to do is to mark a guideline right on the top and which is going to serve as the
width of the tie, which is going to be 7 ". From that starting point, I am going to mark 7 ". Guys, from this starting point, I am going to mark the
length of our tie, which is going to
be around 35 ". Basically, what we
are marking here is a rectangle of around
7 " by 35 inch. Now that we are
complete, I am going to, from that line of there on top, I'm going to mark 1 " going in. Then also I'm going
to mark 1 " going in onto the other side
of the rectangle. Then I am going to
drop only on one side, I am going to by 2 ". Then I am going to connect
this two point over there and then
connect it going up. Moving on to the
bottom of our tie. I am going to mark from
the bottom going up, I'm going to mark 10 ". And I'm going to do
so on both sides. Now from that ten inch mark, I am going to extend it all
the way up to that 1 ". We went by right on the top. Also on the opposite side
from that ten inch point. I am going to connect it to that two inch marking
that we went down by. Now we're done
with the top part. We're going to go
right at the bottom of this rectangle from
this seven inch line. I am going to mark
a center point. Once I'm done, I'm going
to drop it by 3 ". Then I am going
to create more of a triangular shape
right at the bottom. Now our front panel piece
for the tie is complete. The next thing we
need to do is to create the back panel piece for the tie guys on the
same pattern paper. I'm going to measure
the distance, not to this one, but
between the two points. I'm going to measure
the distance. And it's going to be around 5 ". I am going to mark a
rectangle of around 5 ". Now the length is
going to be 27 ". That's going to be the length of the back panel
piece for the tie. Now once we are done creating a rectangle for our back
panel piece of the tie, we want to go ahead now, right on the top,
mark 2 " going down. And then just connect it
all the way to the corner. Now right at the bottom, I am going to find
the center point. I'm going to create the
center marking over there of 5 " and then go down by 2 " and
then create a triangle, just like we did for
the back pattern. So guys, once we are done
drafting this panel pieces, the back in the front, it's
time for us to cut it out. Now guys, to add seam
allowance on this pattern, I'm going to go ahead
on a new pattern. Paper and trace of the front panel piece of
the tie and also the back. Then I'm going to
add M allowance of around half an inch or one
Mm allowance all around the back and the
front panel piece of our tie guys, I am going to mark on my pattern that these
two panel pieces, the back in the front, are going to be cut on
the bias when we cut it on fabric guys. Once we're done adding
seam allowances and also identifying that this
has to be cut on a bias, the next thing is to cut
this pattern on fabric. See you on the next lesson.
4. Cutting on Fabric: Guys over here, I've got my lining fabric and it is actually a non stretch material. As you can see, when I'm pulling it on the
opposite direction, what I'm going to do is
to, we're going to cut our pattern right on a bias
where I'm actually marking. And as you can see, when I
pull in an opposite direction, it has an amount of stretch. I'm going to first place my, my front and back
panel on a bias like, so the front panel is
actually facing up. Take note how I'm going to be placing the back panel piece. It's going to be placed on the opposite side
of the front panel. Please make sure not
to attempt to place this fabric across the material, but only on the byers. Also, take note that the back
panel piece is facing down. Now once we're done
pinning it down, you want to go ahead and cut
out the two panel pieces. As you can see, our
two panel pieces, they have stretch because we went ahead and cut
them on a bias. I'm going to place them
right sides facing and pin them right on the seam. You will see that the
back panel piece tend to move towards the
side which is okay. I'm going to go ahead and pin
it down right sides facing. Then this is where
we're going to take it to the sewing machine. Once we're done, it's
going to be one panel. If you are going to be
using a printed fabric, you can cut it out the same
way as I did with the lining. Make sure that the back
panel piece is facing down, the front panel piece of
the tie is facing up. And place them on a bias
as shown on the screen. The next thing is you want
to cut out the panel pieces. Once you are done,
you want to remove your pattern and then join the two panel
pieces of the front and the back right side facing. You will notice like the lining, that the back panel piece tends
to move towards the side, which is parts of sewing the tie guys. Over here I've got my lining and also the main fabric of the tie. On the next lesson, I am going to share
with you how to construct it. See you there.
5. Tie Construction.: Guys, on the previous lesson, I showed you how to join the
two panel pieces together. Now we're going to start by sewing the lining together
with the main fabric, and we're going to
sew a straight stitch to join the two panel pieces. Once we are done
right at the seam, you mind to go ahead
and open up the seam, then this is how it will
look on the outside. We're going to take the lining, make sure that they are right
sides facing on the seam. Then right on the tip, I'm first going to go
ahead and pin it down. Once we are done, we
want to take this to the sewing machine and
saw only at the triangle, you want to do the same thing also onto the other
side of the tie. Pin it down together with the
lining and the main fabric. And so only at the triangle, if you notice that there are some fabric on your tie
or in the triangle, go ahead and trim it off, guys, to get that nice pointiness right at the
tip of the triangle. You want to place the pin down and pivot your
fabric like so. And then continue sewing a
straight line by doing so. This is how it will
look and it will allow the tip of the tie
to show. Very nice. Once we are done, you
want to go ahead now and cut a little bit or creates
a notch right at the tip. Make sure you don't
cut through the seam. You want to do this on
both sides of the tie. Then once you're
done, you want to turn the triangle
the right side, pushing the tip of the tie. This is how it will look
once you're done with this. I want to take this
into the pressing on and flatten out to the seam. Now the next thing
we need to do, guys, is to close
the side scene. I am going to make sure that the right sides are
facing together. As I do this together
with the lining, I am going to fold it right on the side because we cut
this tie on a bias, it tends to move around. When we saw the sides
right on the machine, I will advise that
you carefully pin the tie before you take it
into the sewing machine. Now, once we are done pinning, we want to take this to
the sewing machine and sew a straight stitch guys. Once I'm done sewing
a straight stitch, I'm going to take this
into my overlok machine because this fabric can fray for a neat
finishing on the inside. You also want to
do the same thing. Take this into the
sewing machine. If you don't have a surger, you can use a
zigzag stitch guys. This is how it looks
on the inside. Once you are done sewing
it with our overlok, please make sure that you
do not cut out the thread. I'm going to take my needle. I am going to pass the
thread through the needle. And then pass the needle through the sewn seam or
between the seam, and then cut out
the axis thread. Then you want to
do the same thing also onto the other side. The next thing that
we need to do guys, is to turn this tie
the correct side. There we go, guys.
As you can see, no seam or thread
is showing at all. The next thing we
need to do now is to take this into
the pressing ion, There we go guys. This is
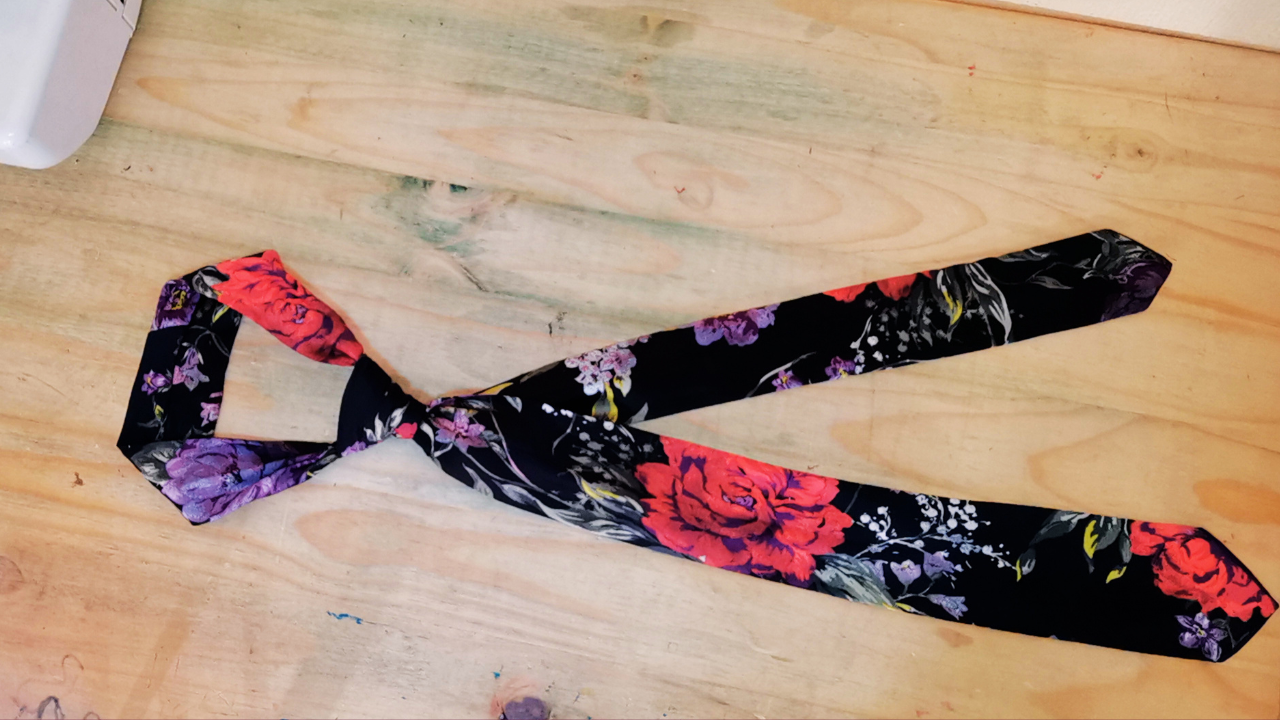
how it looks on the inside. As you can see, the same, no thread is showing whatsoever. I made this tie out
of a certain fabric. You can use any fabric of
your choice that you love. And as you can see guys, it came out so beautiful. I really cannot wait to see some of your
finished project. Please tell me guys
what you think. As for me guys, see
you on the next one.
6. Conclution: Congratulations, if you have reached this part
of your lesson, I'm already wearing this tie
and I love the way it feels. I hope you will enjoy making this project
as much as I did. Please do not forget to
send you finished project. I'll really love to
see it as for me. See you in the next one.
 Mary Murinyu, Fashion Designer