Transcripts
1. Introduction.: Hi, my name is Mar Marino and welcome to the exciting
world of Bra pattern making, where creativity
meets a comfort. In this lesson, we are going to cover some basic
skills on how to draft the pattern to fit you and also the types of
material we're going to need. Let's not forget the parts where you add your personal touch. Get ready with me to create and make something
uniquely yours. See you on the first lesson.
2. Body Measurement.: For the measurement,
you are going to need your measuring tape. The first one is going to be your bust around circumference. Over here, I'm going to place my measuring tape
around my bust, make sure that it's not
too tight but comfortable and the measuring tape sits
parallel towards the floor. The next measurement is going to be the under bust measurement. You also want to place your
measuring tape right on the under bust and make sure that it doesn't
drop at the back, it sits parallel
towards the floor. Followed by strip measurement. For the strip
measurement, you want to place in measuring tape across your neck and measure from
one apex to the other apex. And mark this number down. These are all the measurement
we're going to need.
3. Drafting Lower And Upper Cup Pattern.: In this lesson, we
are going to be drafting the upper cap
and the lower cap. We are also going to be using the best round measurement
for this lesson. Before waste any time, let's start with
the first lesson. The first thing you're going
to do is to mark quarter of the bust round circumference
and then mark a square. A quarter of a bus
round is 24 CM, marked a square of
around 24 M by 24 M. Then the next thing you
need to divide the square into four equal parts
as shown on the screen. The next thing is
don't forget to label your lines in an
alphabetical order. Now, once you're done doing so, it is time to draft
the lower cup. Now for the lower
cap on point D, going down I'm going
to mark four M. Then on point, going down again, I'm going to mark four M. I'm going to connect
this four M to point I. I'm going to be doing
this using a curve ruler. Now, once you're done
doing this on point, I am going to mark 2.5 CM on one side and then 2.5
M on the other side. In this point we're
going to connect this 2.5 CM again to point I, and we're going to
be creating a dot. Once you're done doing this, we want to close the bottom
part of the lower cap. And I'm just going
to take a cave ruler and just connect
these two points, the 2.5 with the four N points. Just like that, the
lower cap is complete. The next thing you need to do
is to draft the upper cup. For the upper cup, I am going to mark four CM on
point H going up. I'm also going to mark this
fom on point D going up. Then I'm going to connect
these points back to point the 4.2 letter I. Now once you are done, this is how it will turn out. We want to go ahead and
create the neck line. On that four CM mark, you want to move up by 2.5
M. Then on that 2.5 CM, you want to go in by 1.5 M.
As you can see there are 2.4 M. You want to connect it to the 1.5 M point with
a diagonal line like so. Then on point D, you want to first
mark one CM away from D. Then from that point you also want to mark
another one CM. Now on point, you
want to mark 4.5 M or four M. This is where we're going
to create the arm hole. You want to make sure
that you mark four CM or 4.5 M. Now we want
to connect the point that 1.5 to that one M point
to create the neck line. Then you're going to
take a curve ruler again and mark the arm hole. Take note that the
hole is a bit deeper, or shallower compared
to the neck line. Now over here, I am going
to mark or drop this point by one M so I
can create a hook. I'm going to go back and
mark one CM going down. And then take my curve ruler and retrace the line back
on the neck line. Then I'm also going
to do the same thing also on the hole. I am going to go down
from that one C, M point. I'm also going to
go down by one CM. Retrace this hole line. Now I'm going to take my
black marker and just remove the first lines because I'm not going
to make use of them. And our upper cup is complete. Don't forget to label
or your parent. See you on the next lesson.
4. Drafting Frame And Band Pattern.: Again, in this lesson, we are going to be drafting
the frame or the cradle, same call it, and also the band. I am going to be
sharing some tricks and tips on how to get a
good fit on your band. And also the frame, There is going to be
some calculations that we're going to be doing. But don't worry, it's not
going to be complicated, it's just going to
be straightforward. Let's get to the lesson now. To draft the frame, you need to measure a quarter of your bus
run circumference. Mine is actually 23 M. I'm
going to make a line of 23 M. Now to find the
width of your frame, you need to measure
from point G to point h. And mine is 11.5 M. Now you're going to
draw a rectangle, okay? And my rectangle is 23 M by 11 M. Then I'm going to mark the center point
of this rectangle. It's going to be 11.5 M. Again, don't forget to label your lines in an
alphabetical order. Now, right on point B and E, I am going to mark nine M.
Then moving along to point C, I am going to mark 2.5 CM
from point C, going down. Then I am going to mark another two M on the
top line on point C. Then connect these two
points in a diagonal line. This is to shape the frame. Now on point D, you
can mark 2.5 CM again. And then connect
these two points of 2.5 with the 2.5 again point. Now we're going to go
ahead and create an curve. I'm going to connect
this nine M with the two CM point with
the curved ruler. Now you need to go ahead
and measure the curve. And then go ahead
now and measure the lower cap of your pattern. As you can see, I'm
measuring the lower cap of my pattern and I'm also going to measure the side
part of my upper cup. Now I'm going to take
this measurement and make sure that it actually fits on the
curve of my frame. After measuring, I noticed
that my curve is a bit less by one M. I'm going
to make those changes. On the upper cup I
went ahead and I removed right on the
arm hole around one CM. Then I reconnect it back to the point B as you can
see on the screen. This line, I'm
going to scratch it out and we're not going
to make use of it. If yours came out the same, make sure that you
make some changes, right on the upper cup. Now moving on to creating
the bridge of the bro. I went down on point A by 1.5
then I went in by half M. Then what you want to do again, the same thing you
did on the right. You want to go ahead and measure the lower cup and also the
upper cup on the side. Then continue on creating the curve on the left
side of your frame. Then take those measurements
and then make sure that it, both of the cups will
fit inside of the frame. Once you're happy with that, then it's time to move on. The next thing on point,
you want to go up by one M. Then you want to reconnect it back with a
curved druler to point. This will help that bright doesn't cause any gaping
right on the center. Then again, if you feel like the bridge is very wide
right on the center, you can go in by 0.5 M, then make it narrower by 0.5 M, and then connect it back to
point as shown on the screen. Then this is how your
frame will look. The other thing that you
need to do is to add the band casing right
on the under bust line. I am going to mark one M
for the elastic casing, so it depends on the
width of your bend. Yours can be two CM wide, mine is actually one M wide. And that's why I'm adding one M bend casing right on
the under bust of the frame. There we go. This is how we
draft the frame pattern. Now for the band, we're going to do some simple calculation. You're going to take a quarter of your under bust measurement, subtract three M because we are going to be using
a stretch material, that's why we're subtracting
three M. The length of my band is going to be around 16 M after all the calculation. Now you need to measure
the width of your frame, because this is
where we're going to attach the band to the frame. Mine is actually around 17 M. Then that's going to
be the width of my band. And the length, like I said, is going to be 16 CM. The end width of your
band depends on the hook. The width of the hook and
I that you'll be using, Mine is around five M. And that is going to be the
end width of my bend. I'm going to mark five CM. And then take my
curved ruler now and connect it to the
edge of my bend, like So that is
the band pattern. These are all the pattern pieces that you're
going to need.
5. Adding Seam Allowance.: Once you are done
drafting your pattern, of course, you will
need to add allowance. In this lesson, I'm
going to share with you where exactly you can add m
allowance on your pattern, depending on the type of
elastic that you'll be using. Let's go ahead to the
lesson and add allowance. For example, over here
I've got a picker elastic and I've got this white
fold over elastic. It comes in different colors when you want to
add seam allowance. I'm first going to
discuss the upper cap. If you're going to be
using a picker elastic, you need to add seam
allowance on the neck line, including the arm hole, because once you saw it, you're going to
need to flip it in. That flip will actually
need seam allowance. Then also on the
bridge and the bend, you will need to also
add seam allowance right on this area that I'm
showing you over here. Now if you're going to be
using a fold over elastic, there's no need to add seam allowances on the areas
that I have shown you. Also, now I went ahead and I added M on both
of the lower caps, which is 0.5 As you can see, I add M allowance all around, both of the pattern. Now for the upper cap, I am going to add
0.5 also allowance, I'm adding here 0.5 cm
allowance, right at the bottom. On the side, on both
sides except the top, because I'm going to be
using a fold over elastic. The most important
thing again is don't forget to
transfer your notches. Now, adding m allowance on
the bridge and also the band, I am going to add
0.5 m allowance on the inside of the band because we're going to be
a touching the lower cup, also on the sides for both
the band and the frame. I'm also going to add
0.5 m allowance here. Remember it depends on the
elastic that you'll be using. Don't add seam allowance
on the bottom, also on the center front. Don't add seam allowance. These are all my
pattern after adding seam allowance and also
creating some notches. And as you can see right on my patterns also
right on the frame, make sure you create
that center notch.
6. Materials and cutting pattern on fabric.: Now we're going to go through
our materials Over here, I've got all my fabrics and we're going to start with
the share cup lining. As you can see, it doesn't
have stretch at all. We are going to use
this material to give maximum support
on your cups. Then I've got a lace, you can pick any
lace that you want. Mine is actually 20% stretch. I'm going to use both of the fabric materials
and I'm going to use my lace to overlay or
cover the share cup lining. Then we're going to need
a stretch material. It could be Liqra or Spandex. This material is going to be
used to cut out the bend. It should be cut on
a stretch material. Then of course, you're going
to need your stretch needle. As for the elastic, you're going to need
fold over elastic. Also, I've got two types
of pickered elastic. I've got the narrow one
and also the wide one. The wide one, I use it to attach it right on the under
bust as you can see. Then the narrow one, I'm going to use it to
attach on the hole. You can also use fold over
on the arm hole over here. Again, I've got my strip
elastic and as you can see, it doesn't have much stretch. And you're going to need the
two rings and two sliders. Again, you're going
to need a hook. And lastly, you're going
to need a wire channeling. Now, I took a piece of lace fabric and I'm
going to fold it in a half as the frame or the cradle pattern said
it should be cut on fold. And I'm going to place
the center of my cradle on the fold and cut
out the pattern. Then I'm going to take
another piece and cut the two lower pieces. Also, I'm going to cut two
of the upper cup piece. Now I've cut all
my pattern pieces. Right here on the lower cup. I did cut two pieces
of shake up lining, including the lace,
but I didn't add a shake up lining
on the upper cup. And also I went ahead to cut the shake up
lining for the cradle. And also I cut the lace. This will provide
support for the band, of course, we need to cut
it on a stretch material. And this is Spend X. These are all the pattern
pieces we'll need. See you on the next lesson.
7. Assemble the Bra cups.: Now you need to
assemble the lower cup. First I'm going to take
the shake up lining of the left side of the
lower cup and also the lace. And place them together like so. Then I'm going to take
the right side of the lace and place it under
the left side of the lace. And then I'm going to
take the left side of the shake up lining
and place them together. Now these are all
the four layers that we have and
we're going to go ahead and so a straight
stitch to join them together. Now this is how it turned out, all the seam is taken inside. I'm going to cut out the lace layer so that it's not so bulky
right on the center. Now when you're done doing this, you will notice that all
the seams are tacked in between all the layers. Now you want to go ahead into your sewing machine and
sew a top straight stitch. This is how your lower
cup will turn out. Now it is time to arrange the upper cup
for the upper cup. Make sure that you do
match the notches that you did transfer from the
patent to your fabric. And now we're going to place
it the right sides together, take your pins and then also to the sewing machine and sew
your 0.5 seam allowance. Now once you are done, this is how it will look on the outside. Now you're going to take
your scissors and cut out one layer right
on the scene. Make sure you don't cut
through the scenes. Once you are complete, you want to go ahead now and do a straight stitch
right above the S. This is how you will now to assemble the frame. I am going to place
them right side facing, right on the bridge. I am going to pin
it down and then take it to the sewing machine
and sew a straight stitch. Now once you're done, cut out the excess fabric and then
turn it to the correct side. Now when you're done doing this, you want to go ahead now and do a straight stitch
right on the center. Once you are done, this
is how it turns out. The next thing I am going
to sew a straight stitch. First I'm going to
turn my machine on the widest straight
stitch so that I can just attach the share cup lining with the lace so that they don't move around as we attach the cups. Once I'm done sewing the straight stitch
around the frame, that's how it turned out. Now the next thing that
you need to do is to attach the elastic
on the neck line. I am going to be using a
fold over elastic over here. In order to attach this
fold over elastic, make sure that you
use a Zi Xi stitch. Another thing is take note
when you do attach it, Don't put too much
tension on the elastic, but just enough so that it can sit comfortable
around the neck line. This is how it turned out. The next thing is to attach
this cup onto the frame. See you on the next lesson.
8. Assemble Bra cups, Band and under bust elastic on frame.: I went ahead and I touched
the left cup on the frame. I'm going to now do the same
thing on the right side. In order to do that,
I am going to take the frame pattern so that
I can mark the center. I'm going to fold
the frame pattern right there on the notch. I'm going to place it on
my fabric and place a pin. This is going to mark the center point
right on the frame. I'm also going to take the cup. The cup already has a
center line of which I'm going to align
it on the pin. Take note how I'm
placing the cup on the frame which is
right side facing. Then I'm going to go
ahead and pin the cup on the inside frame and I'm going to pin it down all around. Once you're done doing this, this is how it will look. You want to take this to
the sewing machine and sew a straight stitch of
around 0.5 seam allowance. Once you were done
and you're complete, this is how both cups
will actually look. The next thing you need to do
now is to attach the bend. At touching the bend, I am going to take
both panel pieces and I'm going to place them right sides facing with
the frame in the cup. And I'm going to pain
right on the side. When you're done doing this, take it to the sewing machine
and sew 0.5 seam allowance. Now when you're done
sewing the bend, you want to go ahead and cut out one layer so that
it's not so bulky. Then you want to
make sure that you push the seam towards the frame. Not towards the bend, because the bend
won't stretch enough. You want to push the
seam towards the frame. And then go ahead now and do a top straight stitch
right on the outside. This is how it turned out. To give it a neat finish, you want to cut out
some excess fabric so that it looks professional
and neat on the inside. Now the next thing is to attach the channeling right on the seam that is connecting
the cup and the frame. This is how the channeling look. You will notice
that the channeling already have a seam
right on the center. When you attach the channeling, make sure that you
attach it and you leave one CM right on the top where I'm
actually placing the pin. And then go ahead now and sew a straight stitch
right on the seam, basically just
placing the channel on top of the existing seam. This is how it looks. The next thing, you
just want to also trim off this excess.
9. Assemble Bra Cups, Band And Under Bust Elastic On Frame.: The previous lesson
I have shared with you how to attach an
underpass elastic. To attach the strip, you need to take
the band pattern and I am going to fold it in half right on the
crease on the pattern. I am going to place a pin. This is where we're going
to attach the bottom. You need to take your strip. Right on the strip.
You need to measure how long you want to
bottom strip to be. Mine is around ten M. I left a little bit piece hanging because I'm
going to fold it in. I'm going to cut two
pieces of this strip. I went ahead to place this lower band closer to the underbt
elastic, as you can see. Then I'm going to just
place a pin right there so that it doesn't
move or shift around. We're going to go ahead
now and flip the underbust elastic and a top
zig stitch as we do. So the lower strip is actually sandwiched in between
this underbust elastic. As you can see, this
is how it turned out the strip is
not moving at all. So now the next thing is to
sow the armhole elastic, attaching them hole elastic, I'm using the narrow one and this is actually
another picker elastic. When you do attach this elastic, make sure that you do not put too much tension on the elastic, But just enough so as to sit comfortable
around the mhole. As you can see, I
left a little bit of a piece hanging
right on the tip. When you're done doing this, make sure that you do cut out some excess fabric and then
flip it in again and do another top zizag
stitch. There we go. This is how it looks To attach the ring
on the bottom strip, I am going to take my ring and I am going to
place the ring on the bottom strip and
then fold it in like so. And then go ahead now and do a straight stitch
to secure the ring. Then the next thing
you want to go ahead and finish
off the channeling. Now you want to make
sure that it sits flat. As you can see, it still
opens up at the bottom. You want to take this to
the sewing machine and right on the edge using
a straight stitch. Now once you're done, make sure that you cut out all the axis fabric to give your a nice finish on the inside
and you is half way. Do see on the next lesson where we're going to
attach the strips.
10. Assemble Bra Strap And Hook And Eye.: For the strip. You need to measure how long you will need. You need to place a
measuring tape around your neck and then measure
from Apex to Apex. Then once you find the measurement record,
this number down, you're going to take
that measurement that you found and cut this strip according to the number that you found
on the measuring tape. The next thing is to cut
this strip again into half. We will need two pieces of this. Now, you're going to
need your sliders. In order to assemble your strip, you need to place or insert the strip on one
opening of the slider, then you pass it through
another opening of the slider. And then go ahead and
saw a straight stitch. Now the next thing
you're going to attach this strap onto the brow. In order for you to do that, you're going to place
the strip behind it. You can see the way
I'm placing it. And then you're going
to fit it on the ring. Then the other, take
the other end of the strip and insert
it on the slider. Back into the slider. Then you're going to insert it again onto the other
side of the slider. Your strip is complete. Now to attach the strip
on your bra or your cup, you need to place it like this, right sides facing, and then place the strip
right on the tip. And a straight stitch. Now once you are done,
you want to flip this part right at the back and then go ahead and do another top straight stitch
to secure the strip. To attach the hook
and eye of the bra, I'm going to make
sure that I turn my bra the inside facing up. And the hook should be on
the right side of your bend, and the eye should be on
the left side of your bend. And I'm going to take this
and do a hand stitch so that it doesn't move around as I saw it on the
sewing machine. Once you're done doing this, I'm going to sew it
using a straight stitch to attach the hook and eye. This is the exciting part where you get to see how
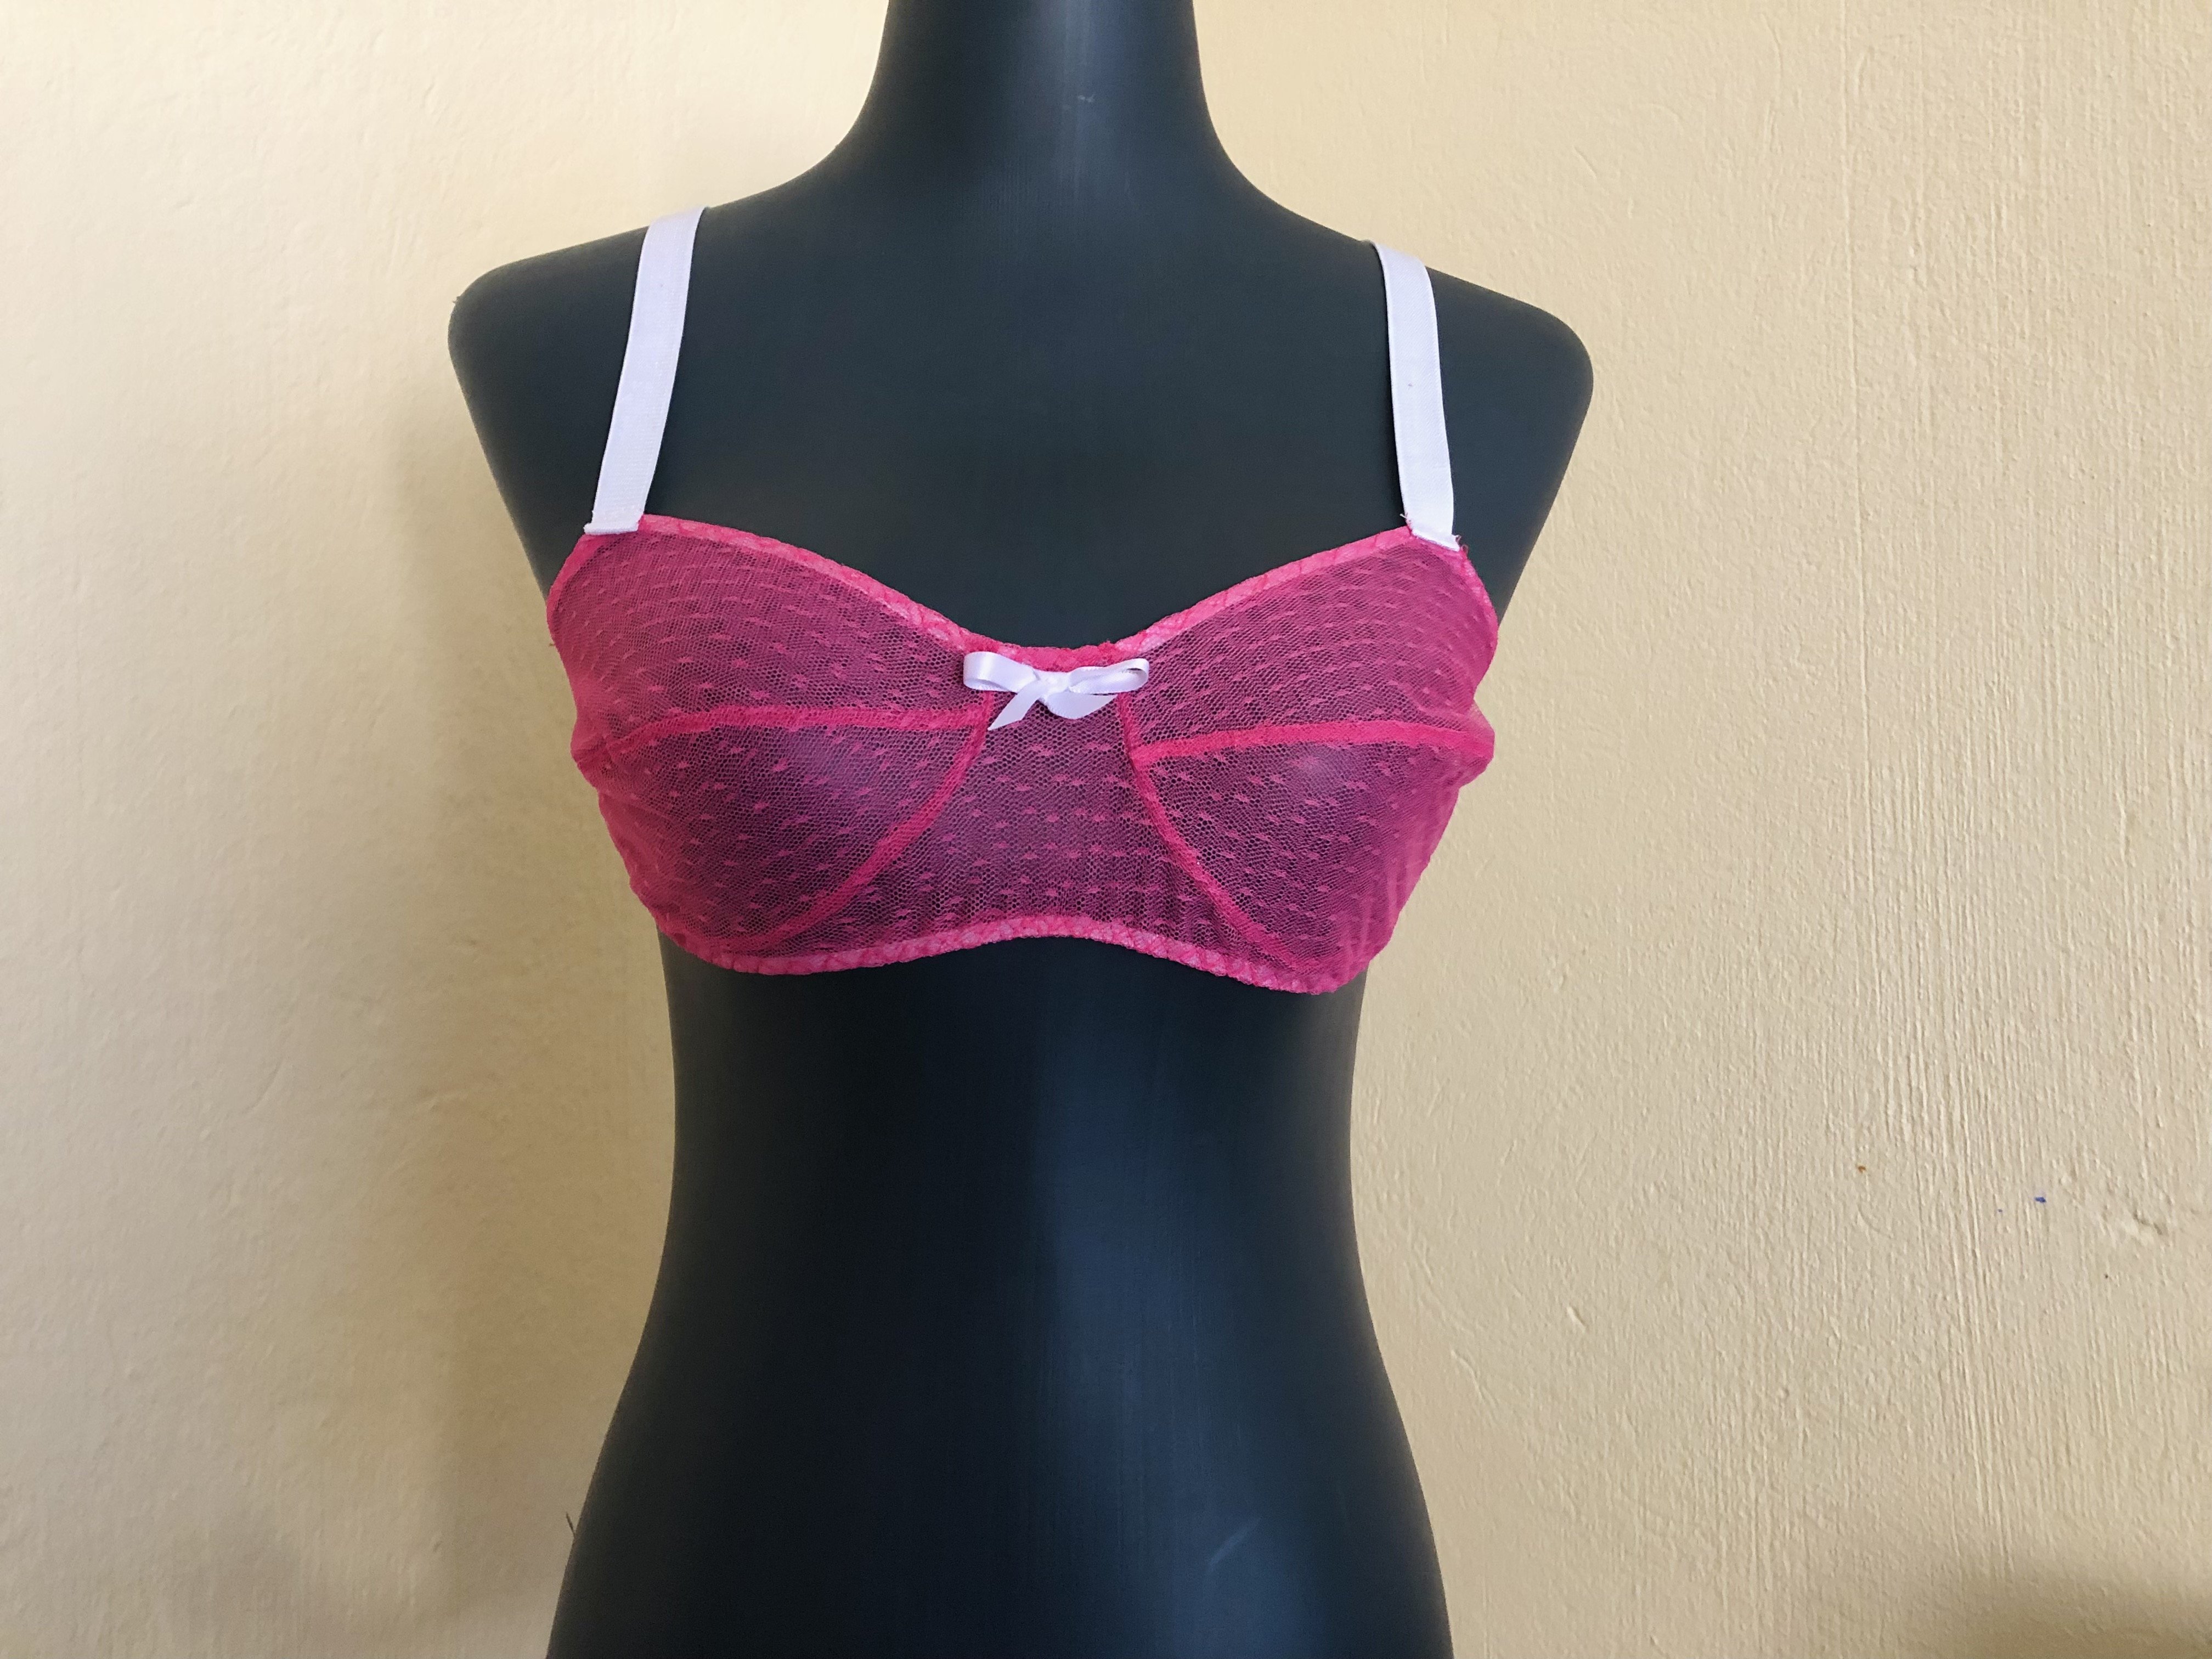
the bro turned out. This is how it looks on the inside and this is how
it looks on the outside. I went ahead and I tried it on. I really must say, I love the way it sits on me. As you can see, this is how
it looks on the underbast. I love the way it
fits on the cups and how it looks on the
side, including the back. It's not lifting. I really love the way it's
so comfortable. It's not lifting right on the center, including
the bridge.
11. Conclusion.: Congratulations,
you have reached the end of this
lesson and let us celebrate your hard work and also your masterpiece that
you have brought to life. This course was
all about joy and also sharing your work
that you have done. I will really love to see
your finished project. Please do not forget to shape that you have completed
in our class for me, see you on the next on.
 Mary Murinyu, Fashion Designer