Transcripts
1. Introduction.: Hey guys and welcome. My name is Mary Marino and
I'm so excited guys to be here because I'm about
to share with you how to make this
graph, Let's graph. So in this class, we're going to focus on taking our own body measurement
because it's very important to get the perfect fit
forwards by the types of materials that we're
going to use for this project,
including the needle. If you are a beginner or you've never really drafted a
Brad Pitt in before. Don't worry. I got you. By the end of this class, you own your own
pair of bronchi, then has your own
sense of style. So guys, let's not waste any time in jump to
the first lesson. Shall we?
2. Tools : Okay, so these are some of the tools that we're
going to need, which is a pair of scissors. I prefer if we have 21 for pattern paper and the other
one for cutting fabric, then we're going to
need a siem repair. Followed by pins. Then we're going
to need the array. And of course, our marker when we're
drafting the pattern. And a pencil, when we
are going to be writing down our body measurement
onto a notebook. Then we are going
to need a ruler. You can use a ruler or a straight ruler and
a measuring tape. At this point when you're
taking body measurement, we are going to be using
more of the interests, which are the bigger number. Then we are going
to need, of course, a pattern paper and
a sewing machine. I've got here my sewing needles, which is stretching it
or make sure we use Stretch needle for this project. And a sewing machine, normalised domestic
sewing machine. So we are going to be
using two stitches, which is zigzag stitch
and a straight stitch. These are all the tools
we're going to need. So see you on the next lesson.
3. Body measurements : Hi guys. So I'm just going
to show you how to take your own best measurement. So I do have a mirror
or escape her mirror, especially when you're
taking your own body measurement on the
measuring tape, who are going to be using
this bigger numbers, of which is interests. And later on also
going to use it, well drafting the pattern. So now when you taking
your body measure mental, your bossed around
circumference, you want to make
sure that you place your measuring tape
nicely around your best. And as you can see
also on the side, you actually get
yourself in the mirror. Measuring tape seeds have
straight right at the back. You don't want to
measuring tape to sit lower at the back like this, makes sure that it
doesn't sit lower, doesn't drop at the back. Like so because that will
actually affect the, when you are
drafting the pattern later on and also the fitting. So you want to make
sure that you place your measuring tape
comfortably around your best. And when you move it
around your best, it doesn't also fall. This is how we take our
own bust measurement. So let's move on to the other lesson of
drafting the pectin. See you there.
4. Materials : Hi guys and welcome. So I'm just going to show you the materials we're going to need and we're going to
start with a strep elastic. This is the one that we're
going to use for the strips. Followed by a p could
Elastic of which it does have a little bit
of Mount of stretch to it. And we're going to use
it around the home, followed by a fold over elastic. And this one, we
are going to use it also onto the neck line. And then we have
another picker elastic. Now this one, it
has a wider width, is a bit wider compared to the first one
that I showed you. So it's like half an inch wide. So it's also called picker
elastic and we are going to attach it on the underpass. Now also, I've got rings and sliders and we need two of them. This one are the rings, will also need two of them. The next thing we
are going to need is the Who can I of
which is going to relate to be attached
to on our band as we saw the pro guys, these are all the materials
that we're going to need. So now let's move
on to the fabric. So I've got a cotton fabric. It is a one-way
stretch and this is going to be used
inside as a lining. So it does have
stretch in one way, but on the other side it has
a limited amount of stretch. Now moving on to delays, I am going to use
a stretch lace. And it's also a one-way stretch. As you can see that on the other side it
has limited stretch. But on this side it
does have stretch. So it's going to be
used to further caps also, even the bend. Now that you've got
all the materials, Let's move on to
the next lesson.
5. Pattern drafting.: Welcome again guys. So now we're going to go ahead and drafted the cups
of our product. So the thing that
we're going to need is a quarter of our past
runs the conference. Mine is nine, so I'm
going to take that nine and MC squared of
around nine by 9 ". Once we had done a
drafting the square, I'm going to go ahead and divide the square into
four equal parts. And mine is going to be 4.5. Once we're done doing so, don't forget to
label your pattern. The first line is chest, then the bust point line, and the other one is
going to be the best. Now, on the other side is
going to be the center front. So on the top, on
the top square, I am going to also divide that square into
four equal parts. The next thing on
the under bust, I am going to measure 1 " on the other side and
1 " on either side. Then I'm going to
the bust point line. We are going to go down by 1 ". Then we're going to connect all the three points
to create a debt. Now, again, on that line, I am going to extend
it all the way to the center front line. This is going to
be the neck line. Now, again, on that point I want to go ahead and the
bust point line, I'm going to mark
down half of an inch. This is to create an AM Hall. That point I'm going to
create a curved line. This is going to be
again for the, um, hall. You can use your free hand. Don't forget to enable
your pattern is going to be cut on fold. Now on the bus line, I'm going to extend that line. Then I am going to measure quota of my past circumference, subtract half of an inch because we are going to be
using a stretch material. Then to determine the
width of our band, you need to take
your hook and I, and my hook can either
length is around 3 ", so I'm going to make, or the bend is going
to be 3 " wide. Then from there, I'm *****, I'm going to connect
straight to the band. The next thing is to measure
the width of the who can I and mine is around
one-and-a-half inch. This 1.5 inch is going to be
subtracted from the bend. And m is later on going to be replaced by the hook and
I when we attach it, later on when we saw the brand. So please note that the
band should be cut on a stretch material and write
it also onto your pattern. Now we need to separate
the band from the curb. So what we're going to do, we are going to mark
on the bank side, we're going to mark 1 " at the top and 1 "
also at the bottom. Then connect the two points. Now it's time for us to
cut out the pattern. Since we have cut out the cups, the next thing is
to remove the data and then go ahead and
trace out the Cubs, then trace the bend also. Now once we are done tracing, we need to add seam allowance. So see you in the next lesson.
6. Adding seam allowance and cutting on fabric.: Okay guys, so now
it's time for us to add some seam allowance
onto our pattern. As you can see that I
have centimeters here of which I'm going to be using
to add around the Amhara. And also the reason why we
adding similar in tone to the Amoco is because I'm going to be using
a P-code elastic, as you can see, when
we saw this picture, elastic relate to or
need to flip it in. And that flip will actually
need its own seam allowance. But then on the next line, I'm not going to
add seam allowance because I'm going to be
using a fold over elastic. So if photo valence
ticket do not need any seam allowance. But then if you are going to
be using a piglet elastic, you will need to add seam
allowance onto your neck line. Now let's go ahead and
add our similar ones around the pattern
even into the band. Now guys, once we are done, please don't forget to
create my kings and I'm going to mark that I
did add similar ones, which is half of an inch
or 1 cm seam allowance around our pattern. Now inside of the data, I'm also going to
add seam allowance, since I'm going
to be closing it, which is going to be half
of an inch seam allowance. Or you can use 1
cm seam allowance. Once we are done drafting, it is time for us to
cut out the patterns. Now guys, we need to cut our
pattern onto the fabric. And over here I have
a stretchy layer, which is one-way stretch. And when you place your pattern, you went to place
a pattern where the stretch goals
around your body. So I am going to fold the
lace or the fabric can have in place the pattern
where it's actually unfold. Also guys, when you
do cut the band, please make sure that
you do cut it on a strange material as it was
indicated on to the pattern. So guys, this one
is the lining of which is going to be
placed onto the cups. And I'm also going to
fold it in half and then place the pattern
way it's unfold. So over here, I've cut
all my pieces out. So the first thing
that I'm going to do is to attach the band. For the band, I did cut for
layers two of each side. So I'm going to take one and
place it under the caps and take the other layer and
place it right on top. Then the next thing I'm
just going to pin it, pin all these four layers
together and then go to the sewing machine and
so a straight stitch. And this is how
it will turn out. The next thing is to just
cut out those x's fabric. Now this is how it will
look on the inside, as you can see, all the seams
attaching between the band. Now we went to go ahead and
sew it straight, stitch. There we go, guys. The next thing we
need to do is to close the dads are for the cups. So see you on the next lesson.
7. Sewing the dart.: Welcome guys. So now
I'm going to show you how to close the
data onto the caps. So underlining this
is the inside, I'm going to turn it and close the data using a
straight stitch. Then I'm going to do the same
thing also to the lining. I'm going to close them. I mean the main fabric
which is the maze. And I'm also going to close the data using the
straight stitch. Once we are done,
this is how it looks. So I want to now so this
seems right sides facing. And I'm going to go attach the two layers using
a zigzag stitch. And this is how it looks. So the next thing I'm
just going to trim off all the excess material
that is showing. So guys, if you can
not use all this seems attacked in
insight and this is how our brow will
look on the inside of the lining in
feeding on the outside. The next thing that
is needed is to do a top straight
stitch on the duct. Now, once we are done, we need now to go in
and touch the band. I'm going to use the
same method like I did for the previous one. Now, as you cannot
use all the seams attacked in between
the two bands. So I'm going to go ahead and
do a top straight stitch. Now, this is how our brand
looks at once we attain, the next thing
that we need to do now is to attach the elastic. So see you on the next lesson.
8. Elastic attachment.: Welcome. On the previous class, I did share how
to sort the data. So in this class, we are going to learn how
to attach the elastic. And I am going to start
on the next line. I'm using a fold over
elastic at this point. And I am going to just saw
the elastic or past the elastic onto the machine
first using a zigzag stitch. Then I'm going to
insert the lining or the neck line onto the elastic. Please note that when you
saw the elastic pool, the elastic only not
the main fabric. This is how it will look on the outside,
including the inside. Now the next thing we
need to do is to solve the arm hole using
a picker elastic, I am going to first
make sure that the decorative part or the
wavy part are facing down. And I'm going to
leave a little bit of elastic hanging
right at the tip. Now sewing the elastic, I am going to be using
a zigzag stitch. And please take
note that I'm also putting the elastic
just a little bit, but not too much. This is how it will look
around the, um, whoa, the next thing now
is to just cut out all the excess fabric that is showing so that we can have a neat finish on the
inside of the product. Now the next thing
we need to do is to flip the elastic n. I'm going to flip the
elastic in and then go ahead and do a top
zigzag stitch. There we go, guys.
This is how it looks. So you want to go ahead and do the same thing onto
the other side. So we have attached, or I have attached the elastic on both side of the arm hole. The next thing is to attach
this wide elastic also, it looks like it is a
picket elastic also. It is around half an inch wide, so I am going to attach it
on under the underpass. And now what I'm going to
do is also make sure that the wavy part or the decorative
part is facing down. And then you want
to go ahead into your sewing machine and
so is the exact stitch. And also when you
do so this elastic, make sure that you
pull not too much, but just enough for it
to sit comfortably, comfortably, around
or onto your past. So as you can see that there
is some fabric showing. So you want to also go ahead and just cut the excess fabric off. So guys, this is how it looks once we have attached
all the elastic. The next thing is to
attach the strips. So see you on the next lesson.
9. Attaching straps and hook and eye.: Okay guys, so once we are
done attaching the elastic on the underpass to
want to move ahead and create the strips
for our brand. And the length of my steps is
going to be trained to 2 ". So if you want, you can go ahead and buy those chips that
are already made. But as for me, I
prefer making my own. I'm going to take the
sliders and I'm going to instead the strap from one side, then inserted also
to the other side. Go ahead into your
sewing machine. And so a straight stitch
to secure the strip. This is how it looks
once we are done. So the next thing we need to now attach the strap onto the bra. But first we need
to attach the ring onto the tiny bit of
elastic that we left out. So I'm going to insert the
ring onto that little piece and then go ahead and so a straight stitch to
secure the ring. The next thing we need to do, guys, is to attach the strip. So I am going to take the
ones that we've already made and pass it
through the ring. And then once we're done, I'm going to now take the stripe and pass
it over or under, and then pass it over again. The slider is how it looks. It's attached now we need to attach the strip
also on the band. So from the paint, I am
going to measure 3 ". And I'm going to place my
paint right on the bottom, and also at the top of the band. I'm also going to measure
3 " to place my strip. Make sure that you do place
your strip correctly. So now I'm going to
go ahead and pin done painting the strip. Go ahead and saw a straight
stitch right on the top. For look on the other side, which is the outside,
including the insight. Now we need to attach or reinforce the strip
also at the bottom. So what I'm going to
do is on the inside, I'm going to make sure that
the strip is tagged in. As you can see, that
I'm flipping the robust elastic on the inside. And I'm also making
sure that I'm taking in this trip in-between. So now I'm just going
to solve the end of bust elastic with
a zigzag stitch. And as I'm doing so, I'm making sure that my
strip is tagged in insight. Okay guys, so we are reaching
the end of a project. The next thing we need to do
is to attach the hook and I. On the left side
of your browser, you need to attach the eye. As you can see that I'm
attaching it onto the band and I am going to use
my pen to attach it. And I'm going to just try to fit the band onto the eye and
then go ahead and pin it because it does have a tendency to move around
on the sewing machine. And I'm also going to
do the same thing also on the other side of the bend. And this is how it will look. As you can see, I'm
going to go ahead and, and so a straight stitch first before I do a zigzag stitch. This is how our
brand looks guys. I cannot wait guys to see
some of your major project. I really enjoyed making this project and I
hope you guys will enjoy the feet of the product and making
this bra for yourself.
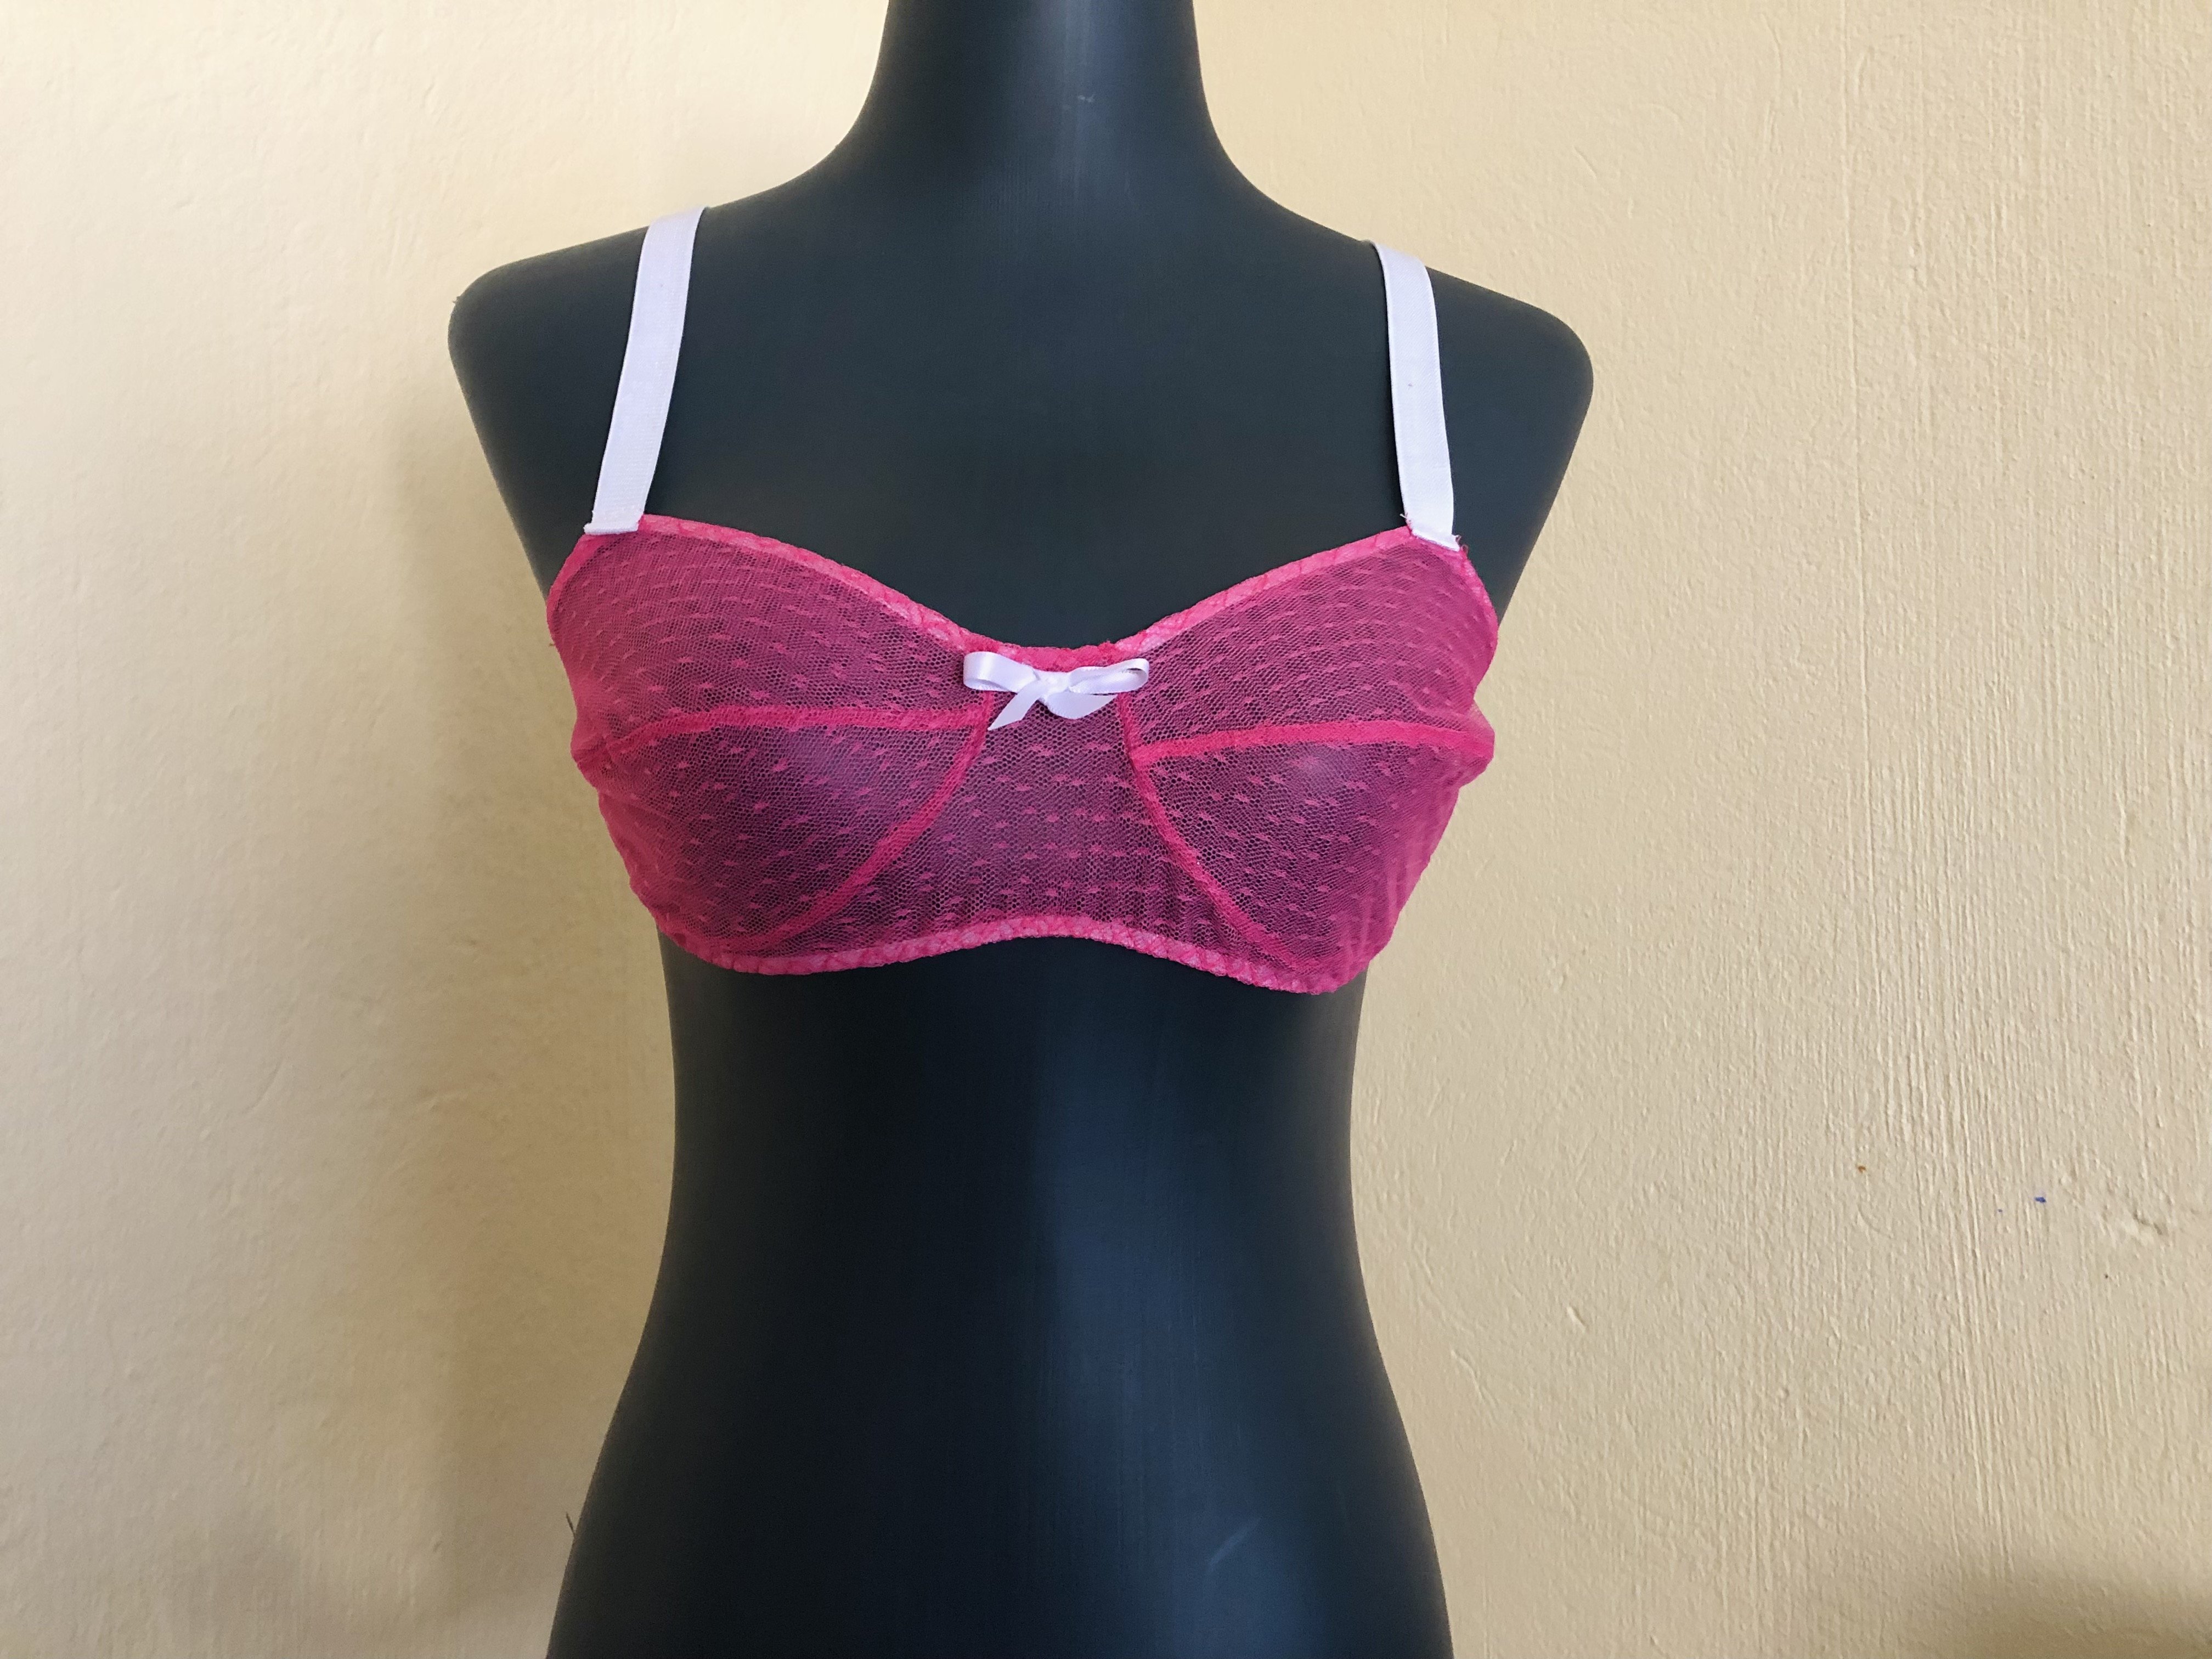
10. Conclution: Congratulations if you have reached this part
of your lesson. And over here we've got
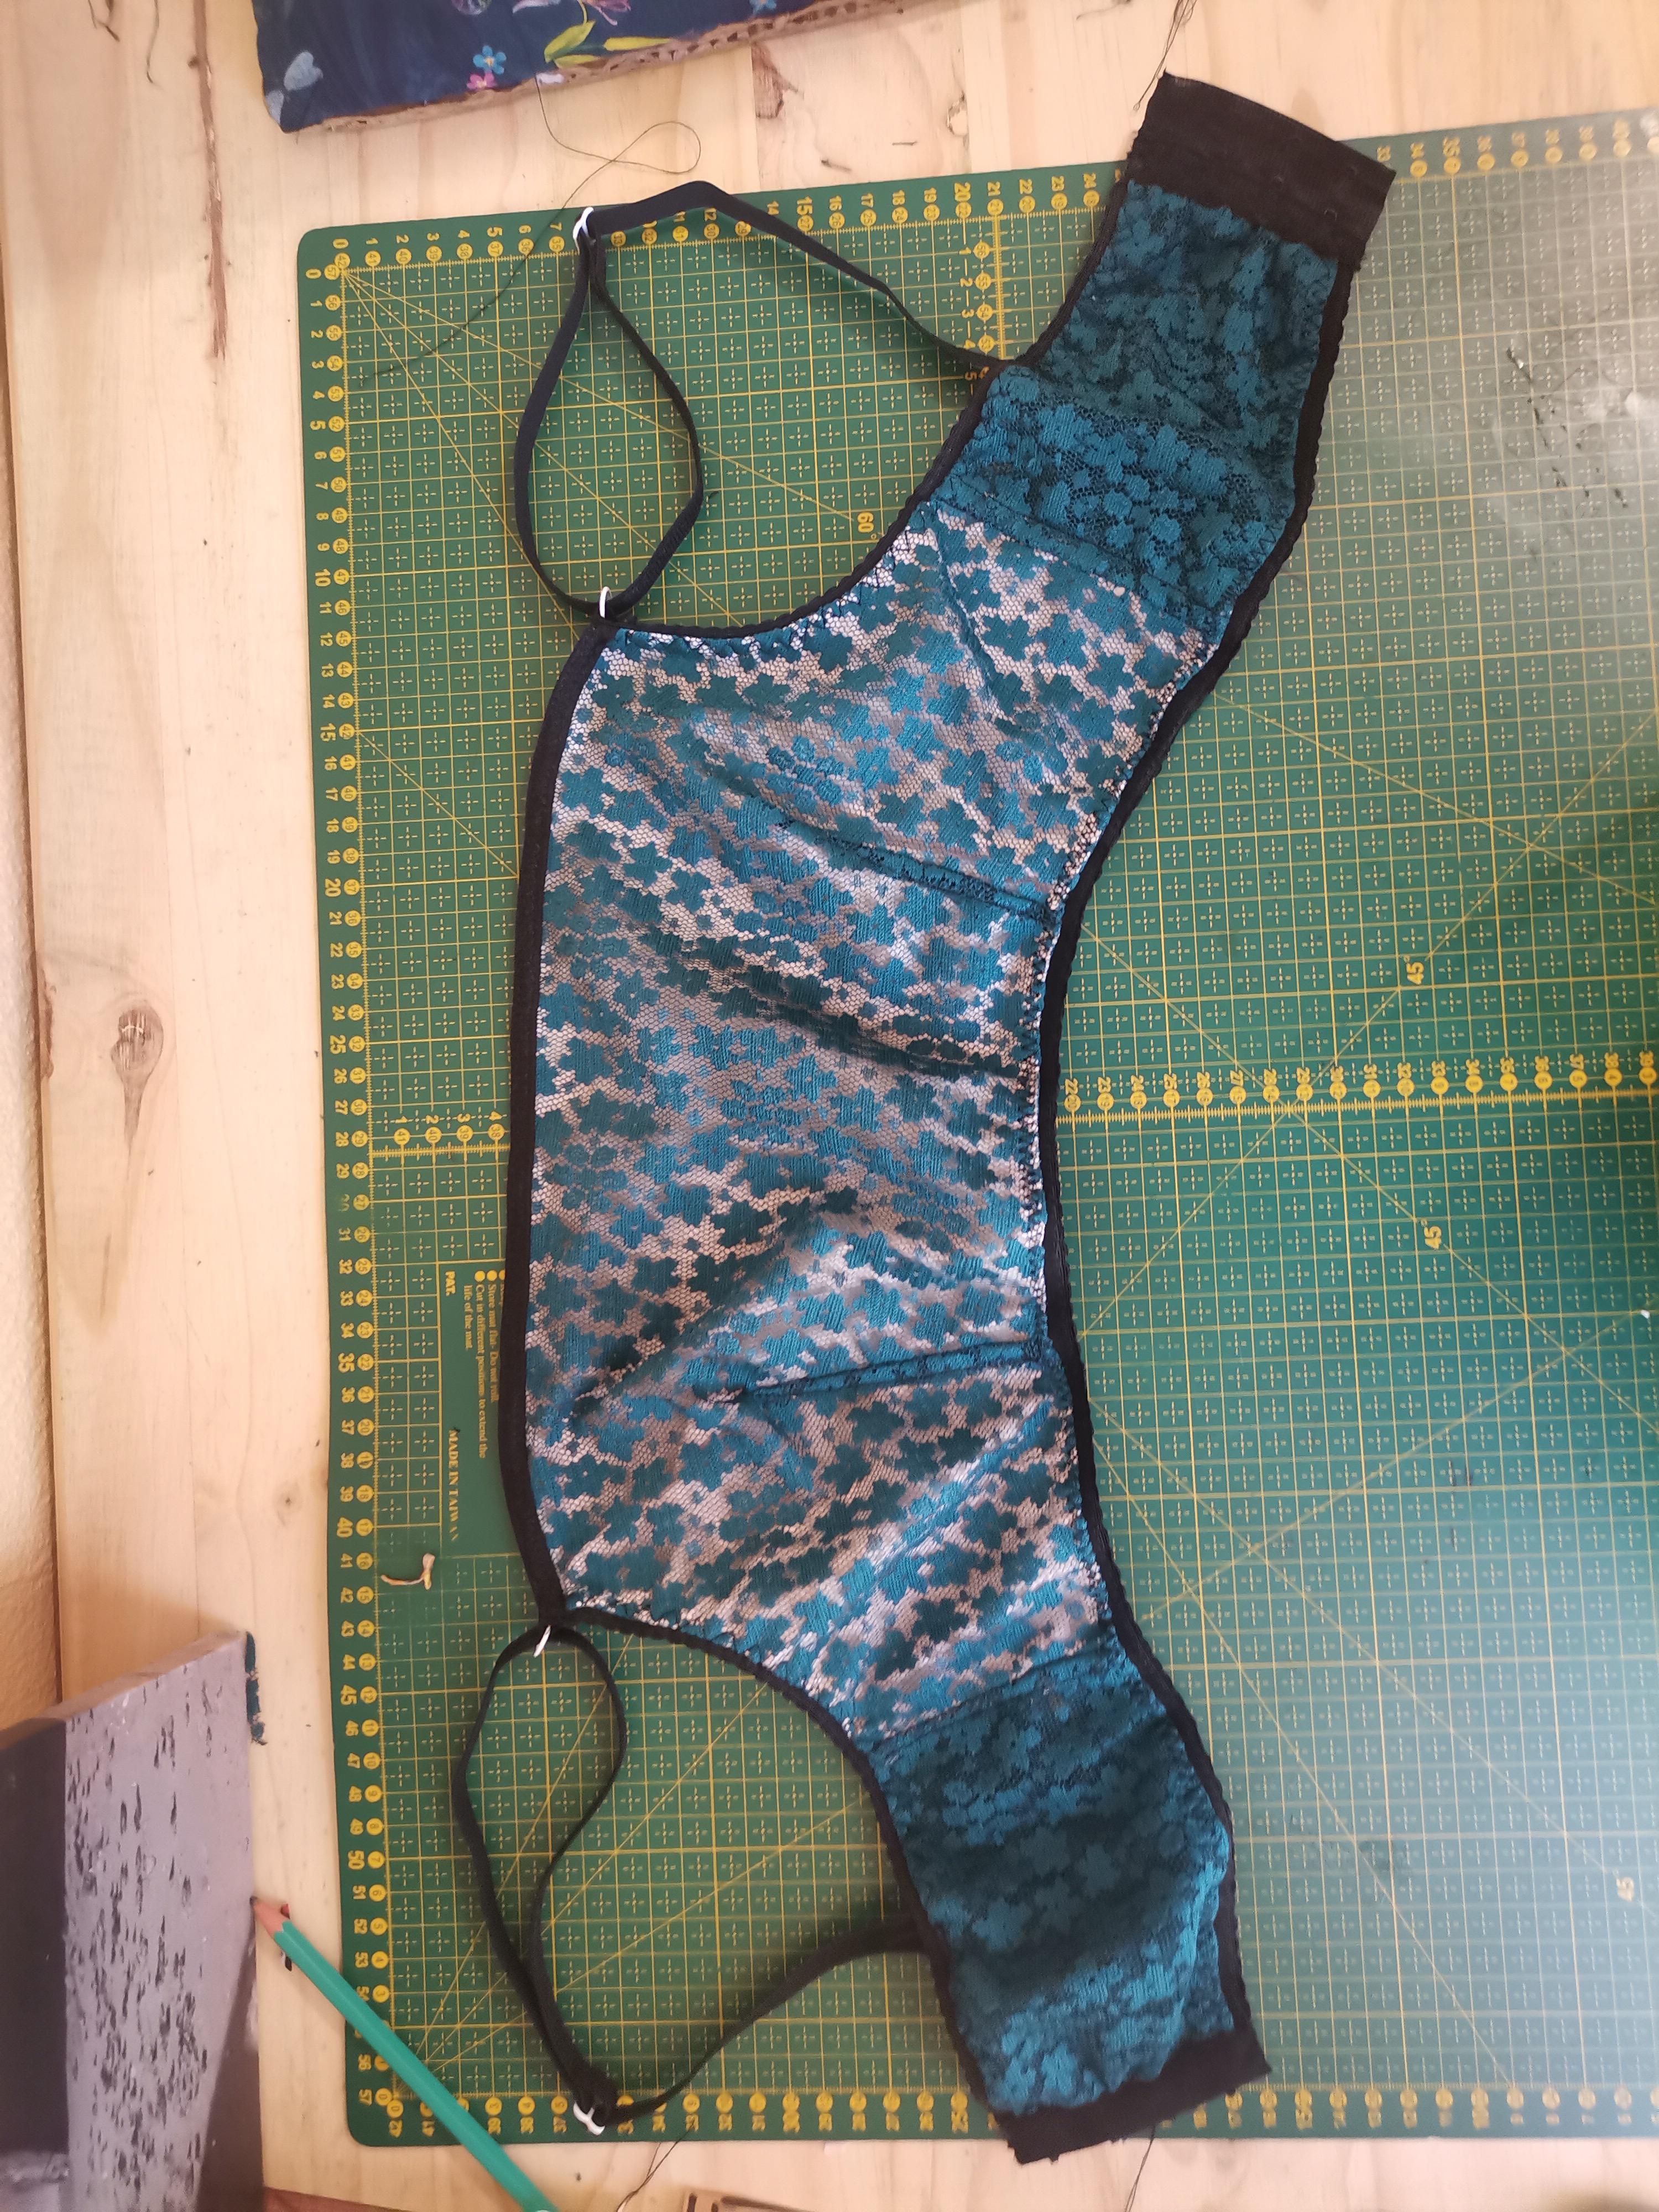
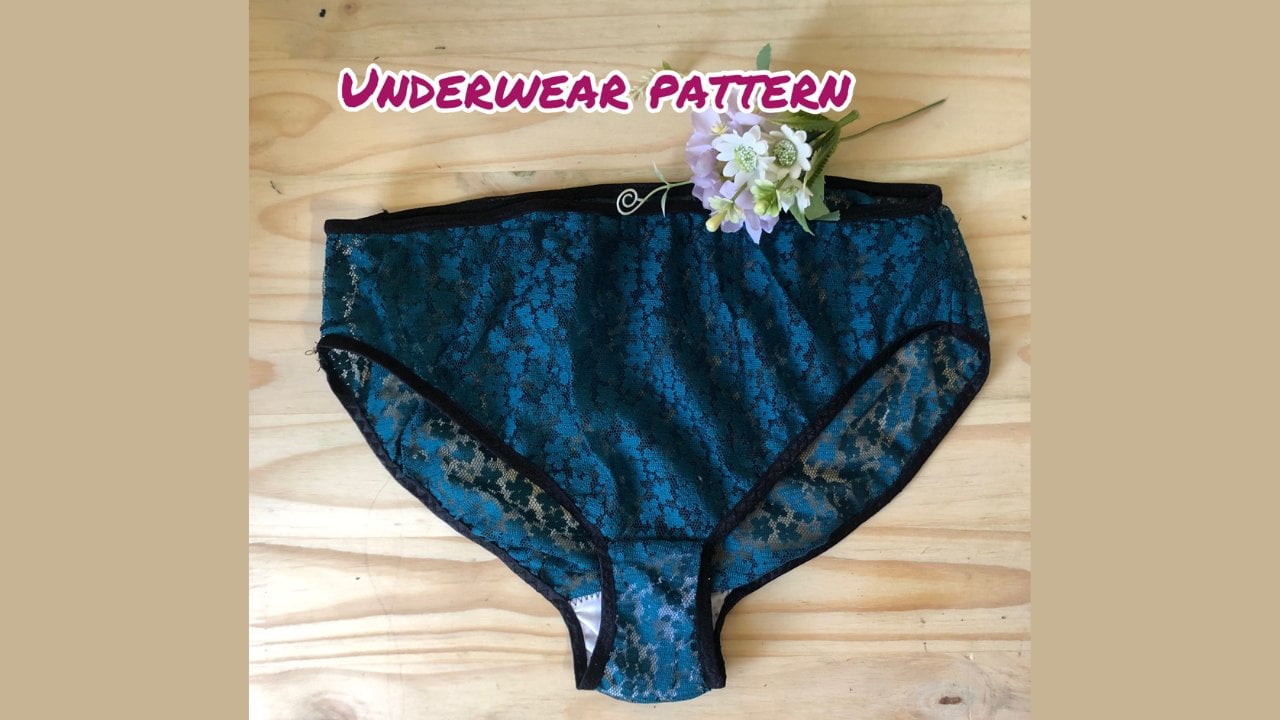
our finished project, which is the brain. And this is how it
looks on the mannequin. I did try it on also. I really must say
I love the fate, even the feeling because
of the lining inside. So this is how the front
view looks and also this is how it looks on
the side and also at the, at the bank and this
is how it looks well, as we have attached
our Who can I so guys, I really cannot wait to see some of your
finished projects, please guys, tell me what
you think about the pattern. As for me now guys, it's time to say goodbye. See you on the next one.
 Mary Murinyu, Fashion Designer