Transcripts
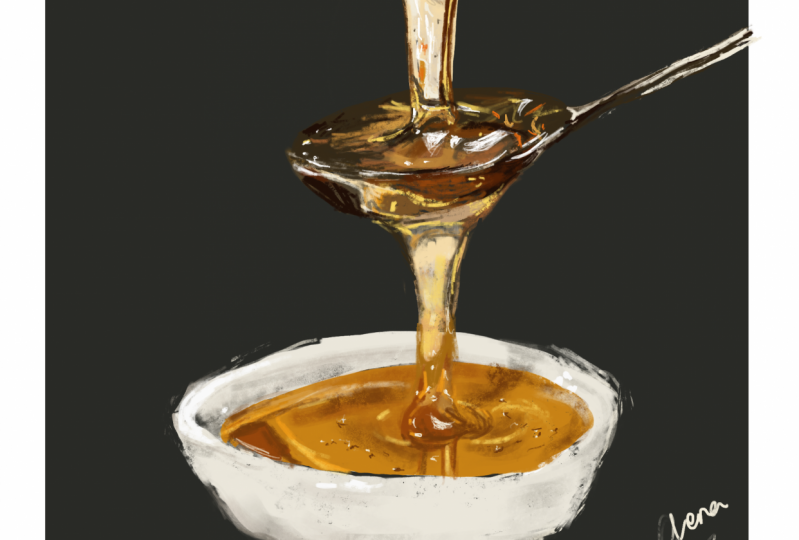
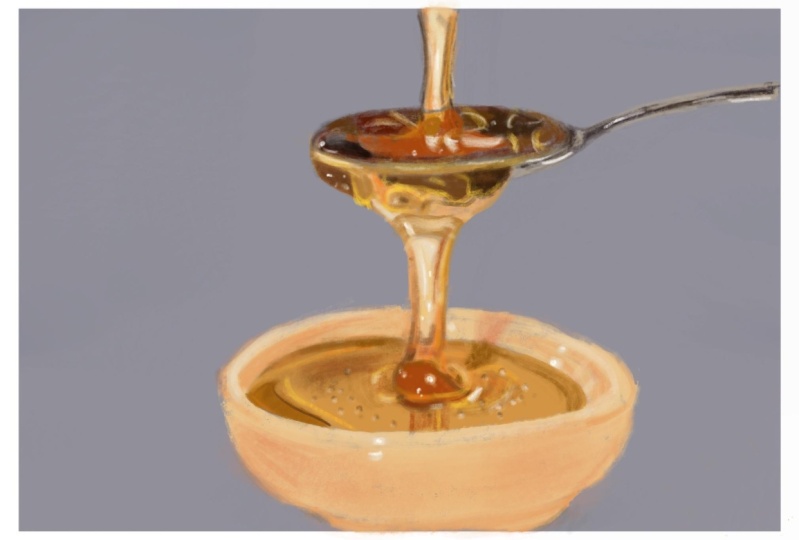
1. Introduction: Hi and welcome to this class. My name is Jenna and artist based in Kenya. In this class, I'm going to be taking you through the process of how I drew this dollop of honey. It is our precursor class to another class or shall be coming up in a few weeks on how to draw a portrait combined with honey dripping on someone's feces. So in case you're interested in drink something new, something that you might never have thought of drawing. Pick up your iPad and your pencil, and join me in this class.
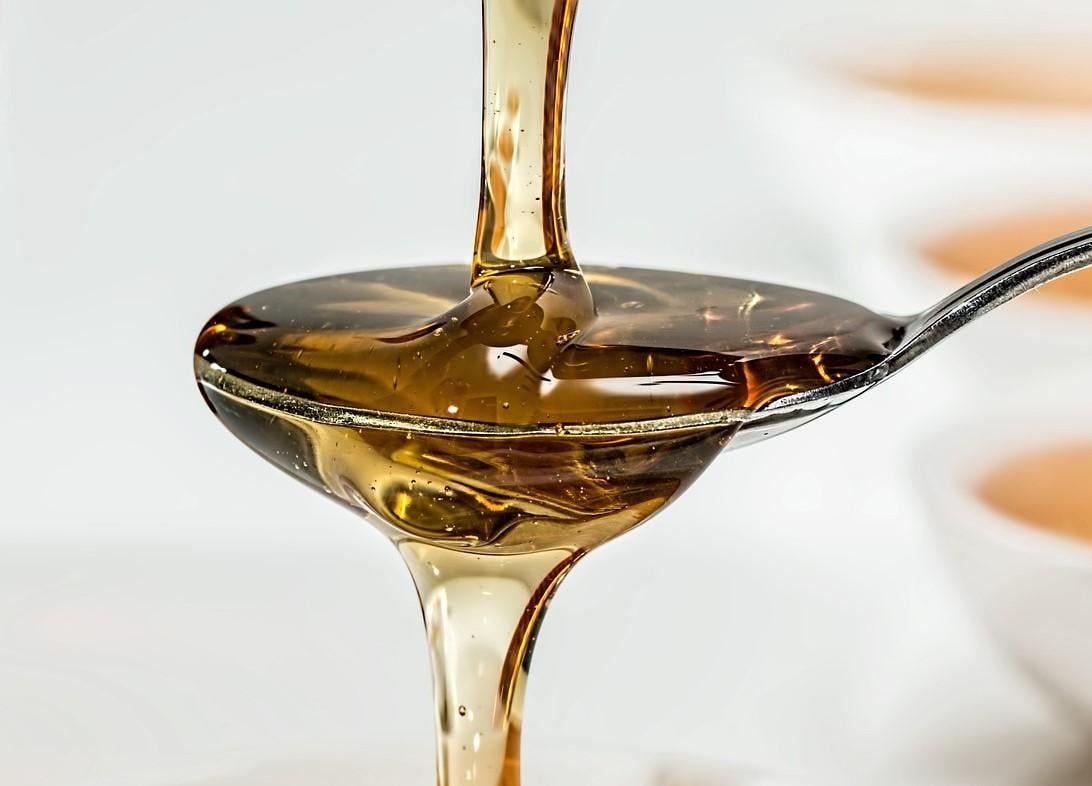
2. Materials and Class Project: So for this class, you will not need a lot of items. All that you need is an iPad together with an Apple pencil or whichever style us that he sensitive to pressure in your iPad, you'll need to have procreate installed, which is our given. I shall link below the reference image. And all you need to do is to download it and save it to your photos on your iPad. Because we shall import it into our kind of and use it as we are drawing for this class, we shall not, using the eyedropper tool, shall be focusing on how to pick colors from our color palette. And to make it a little bit easier, we're going to import our reference image into our color palette section so that we can have the range of colors over there to pick from for your class project, I'd like you to follow along to the painting as I paint along and we need to make sure that he did not speed up anything so that you can see each and every color that I pick. Because it's a little bit more difficult in comparison to using the eyedropper tool directly from the reference image. Feel free to slow down the lessons as you drive along. If you need to, take some time to see what I'm doing as I am drawing along. I had tried to make everything as clear as possible and I hope that you have fun painting along with me. So if you're ready, let's get into the class.
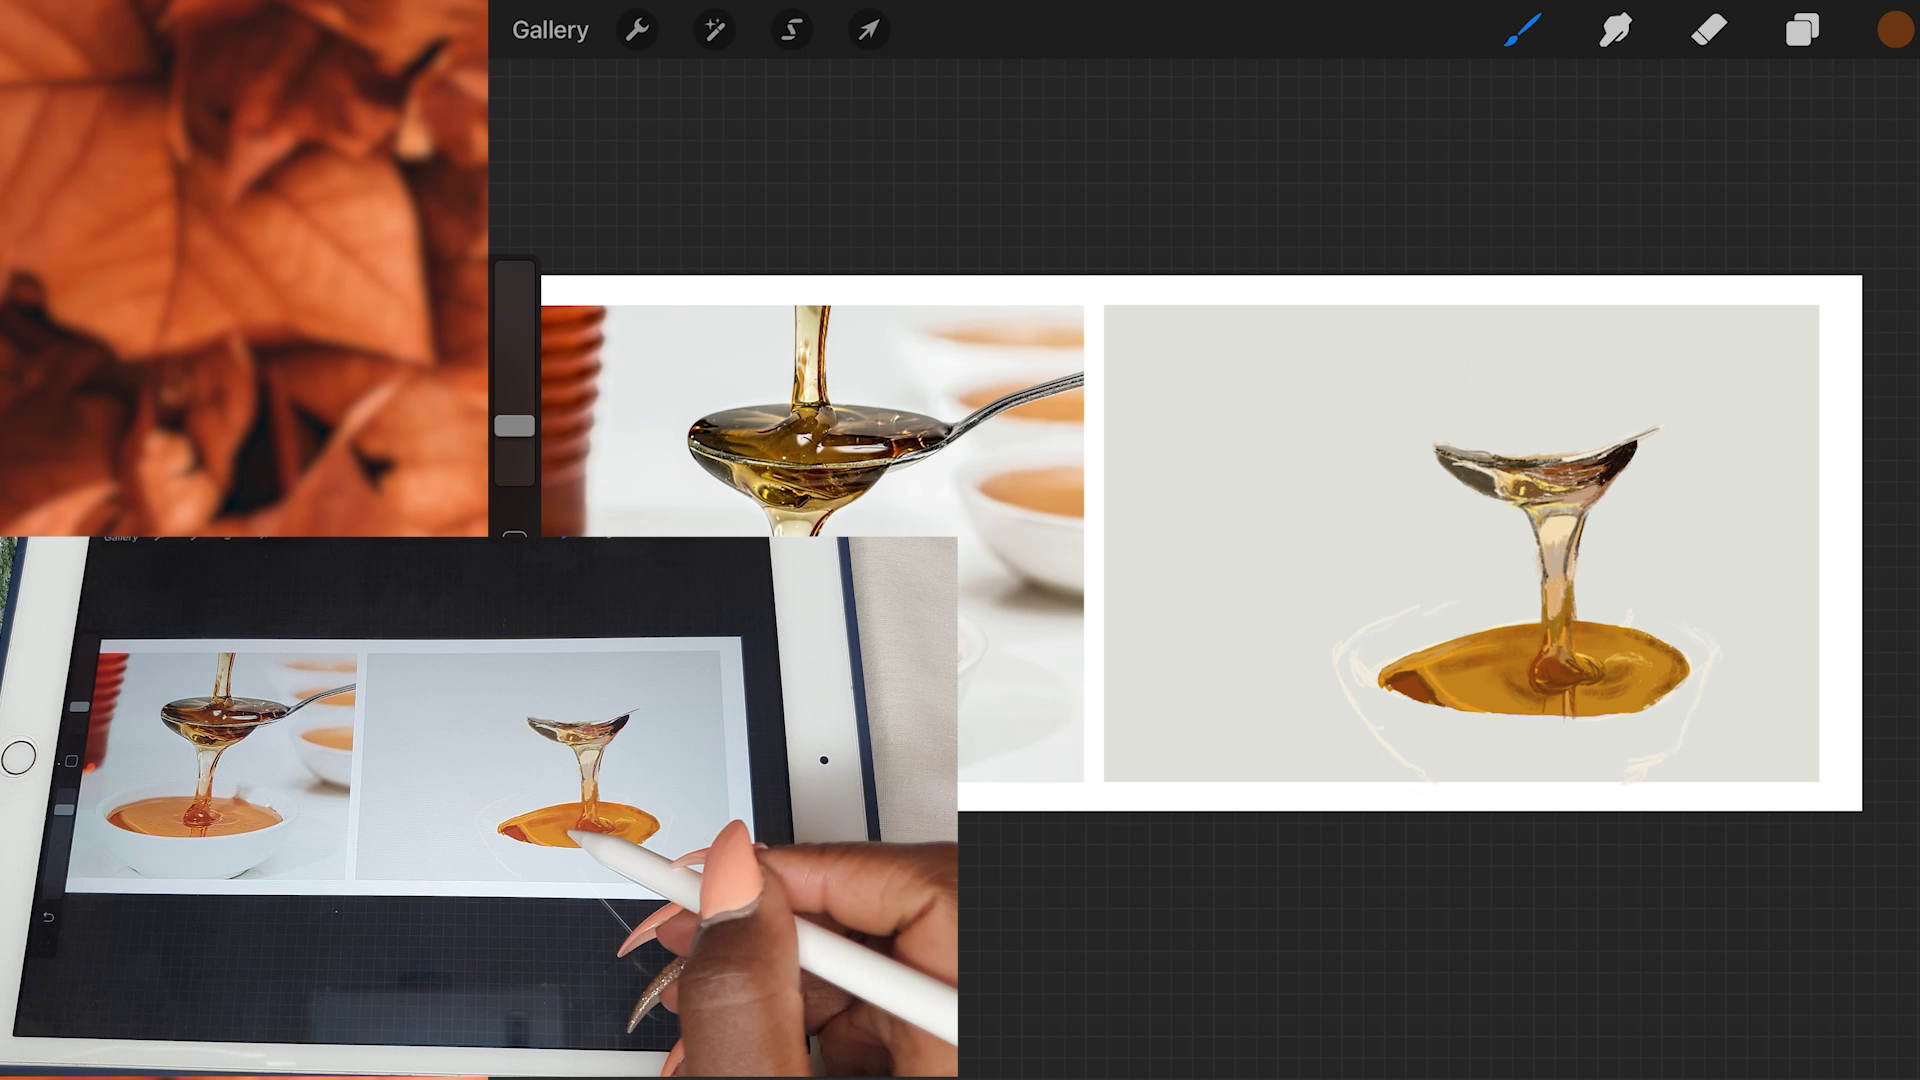
3. Preliminary Basics: So we're going to start with a preliminary B6, one of which is setting up your canvas. So I would like you to select the screen size because you're still going to change the dimensions of our campus liter on. So we're going to start with importing our photo into the canvas. So to do that, just click on the tool icon and then click on Add photo in case you saved it as a file. Just also click on Add file instead. This method is used for people who'd like to use the eyedropper tool as a wacky. So after you have imported it, the next thing that we're going to do is to adjust the canvas size. Boston's past is to change the DPI to 300 increase later on you'd like to print it out. Then I also like to change my dimensions into inches just so that I can visualize how big the image would be once I'm finished drawing. Going to expand my canvas to the side so that it gives me the space to duplicate that reference image towards the right. Once it's done, we're going to duplicate the layer on which we have the image. Then click on the selection tool, which is the arrow at the top. And then now we move that duplicated in there towards the right. After doing that, we're going to go back to adjusting our Canvas. Then we now scale it down a little bit to the level we like. Next thing is we're going to import the pilot of the reference image. Because this time I'd like you to challenge yourself and not use the eyedropper tool as you draw. So to import the reference image, you go to the color section at the top, then you click on pallets. Then you click on the addition frame, which means importing the color palette. Most likely not all the colors will be brought in, but it would bring in the basics and the rest of the colors can be selected, adjusting with the color wheel. So now I'd like you to look at our reference image over here on the side. What I've done is I've just created a new layer on top. And then I've lowered the opacity of the layer on which the reference images on. Because I'd like you to look at all the different colors and shapes and shapes that are in the reference image formed by the honey. When asked the question, What color is honey? Most likely the answer would be that it is orange. But because honey is translucent, it interacts with the different colors through reflection and refraction. When you see the talus through the honey. For example, when you look at the honey-like is on the spoon, you'll see that in some sections it's quite black, and in some sections It's a deep brown, light brown as other paths, even a bright white. That abstractions are where the spoon telling it is in shadow. And adult sections where the honey itself is in shadow because of the shadow cast by this point. The brightest sections I, because you can see the brightness of the spoon in those sections. And because it is bright, you can also see the richness color with the white sections are there because of the reflection of the light in the studio. So you can see some bright white sections, those highlights. Then. Now what defines the honey is the dark edges on the side. Take some time to do this step so that you can identify all the different shapes that you can see with the honey. I feel like it's such a liquid. It's just so interesting to draw because it's never just one thing but you're seeing on the screen or that you can imagine in your head, you have to look through what you can imagine it is and see what it actually is, because the two will likely never be the same. Even going down to the bowl, you can see the different shadows that are cast by the piling of the honey as it drips into the bowl. And the different indirect reflections that are caused by the light in the background and even the shadow, the dripping Jaime to the side of the bowl. This is why sometimes tracing is important as much as it may be a controversial topic, especially when you're learning it because it helps you to learn to see what is in an image. But as a learning tool to use, don't be afraid to trace on the side and just aligned to see what is there after you're done with this. But the next thing I'd like you to do, going to the Brush selection and select the soft air brush. After which, I'd like you to go onto the layer that we had duplicated to the side and then tap on it twice so that you bring up the menu, then select the Alpha Lock Selection. This makes it so that when you paint over that layer, it does not go anywhere to the side, only what color was already put down. And now we have a good base to start with. So just go back to your original reference layer and raise up the opacity back to a 100 percent. And you can hide the layer on which we were practicing our ships and colors.
4. Laying the First Layer of Colour Part 1: Now I'm moving on to link the past layer color. This will be Patreon because it will also be patched too. So start by making a new layer over all the other layers that we have. We're going to start out by drawing the outline of our bull at the bottom. So it's the electron white color from my color palette. And then for the brush that we will use it as a nickel round brush. That is another painting section in the brush library. It comes default to procreate, minimize the size of the brush so that it's a little bit smaller. And then now you can start sketching out the bowl. This patch requires you to look closely at your reference image and sketch what you see. Because we're not going to use any guiding lines as we draw that. But in a future class, I'm going to show you how to draw by using guiding lines when the dream portraits or whichever other item that you'd like to draw. So take your time with sketching this bowl. And once you're done, create a new layer on top of this bowl. I start painting out the honey that is inside the bowl. To do this, ideally, I'd like you to just select any major plain color, but you can see that it's in the bowl because I started out with a dark brown at the corner because we can't see there is a dark brown at the corner. But for the rest of it all, I just finished it off with a plane orangeish color. I see this because we end up adding all the different shapes and shades and colors that you can see in the honey as we move along. Once you're done, erotica, start adding the little shadows and highlights that you can see in that sea of honey. Judging from the original base color that you have, you can go a little bit darker or a little bit lighter by looking at the colors that you have in your color palette. We're still going to use the Nicaragua brush. Whenever you need it to be a little more diffused in color, just raise up the brush size a little bit. And then when you need like a really defined line or color, just know at the brush size as well. I'm now shooting out the shadows that have accumulated at the bottom due to the drooping of the honey into the bowl. Sometimes I keep on forgetting to tap on the Color dot at the corner and tap on the layer section instead. And that's my mistake. There's no particular reason why I'm doing that. The next thing that we're going to do is you're going to start sketching out the keeping of the honey directly from this point. Again, just by starting with a base color, that is a general color dodge can see from the reference image, I chose a light peach color. And that I drew that light peach color. That's when I started using different lighter colors and dark colors to define. But a penny, don't be afraid to zoom in as much as you need to zoom in because you'll see so many small different colors like criteria at the top you can see there is a light gray color and it never imagined to use green whenever you're painting honey. So I hope this five-year following along to the video, and let's move on to the next section.
5. Laying the First Layer of Colour Part 2: Still moving on with laying the fascia color pasture. We're going to continue picking up colors that we can see in the reference image. And now we're going to move to the dollop of honey that is gripping at the bottom of the spoon. This part of the honey is in shadow because of this point, but it still has some highlights through the light that is in the studio as it came at photo and even reflected light from the background. So again, just started with that basic dark color, as you could see at the corner, which was a dark, dark black. And then moving on with the other Kawasaki can see this class requires you to look at what am doing closely and see the colossal actions that a mic. Because each different section requires you to select a different color from the color palette. Moving slowly and methodically image to the right side and painting back dark black color we can see there. And then filling in the gaps with the brownish color we can see in the reference image. You'll even see some bright yellow colors. And that is just because of the light interacting with the honey. Sometimes you'll find that the colors that you have in the color palettes that you imported do not exactly match what is in the reference image. In that case, you can end up either go into the color wheel and adjusting to a color that you'd like. And luck with it because you're painting is yours and it will be individualized to watch you can see. So it's about being free with it. Just choosing which cappuccino colors that you bill would get. 11. Notice that the rim of this point still shines through the honey as a bright strip of light. Not worry too much about having completed image at this point because we shall still end up adding the bright highlights and some deeper shadows, which will make your image becomes even more realistic and life-like. Exactly know to speed up any part of these lessons. So that if it's like you just watch along to which colors I'm picking and pick the same as Utah. Speed to slow it down even more if you feel like I've gone too fast. Another going to move on to the next step. I hope you followed along this path.
6. Adding the Details Part 1: We are now going to start adding some details. This will make our painting look a lot more lifelike. So moving back down to the bowl rather see a penny is, we're going to now start defining the shadows of web that I need pulls at the bottom. To do this.
7. Painting the Bowl: Now we're going to work on painting our bowl. So we're going to start by creating a new layer on top of a layer above which we had sketched out our bowl. Then we're going to select plain white color. And she'd Alibaba. Don't chatbot the shadows yet. Just she'd that bright white color ANOVA. If you go outside the lines to use the eraser tool. I'm still using the Nikola Russia at this point. You'd think that the bowl is only white, but it is not just buy. It is a combination of so many different sheets of Greece because of the shadows that are cast as well. So just take your time and sketch it out. You can ignore the notification that popped up on my screen. I always forget to charge my Apple Pencil. Danny, that in that whole B's color, we're going to now start adding in the shadows. You can see on the inner rim of the bowl, that part is in shadow because it is on the interior part. So we're going to use a light gray color and shade it out. I'm still using the same year to do this, but if you'd like, but also create a new layer on top of this to put in now the shadows that we're doing right now. I don't usually the mind is in the celiac or some of these pins. Remember when you want a modifying point, just know your brush size and when you want it to be a little bit bigger and I used, you can read that brush size. I keep forgetting vegetable for the color palette. That's why you see me Still tapping on the layer palette. Just instinct for me to keep on changing the labs instead of changing the colors. So you'll see at the bottom left corner of the bowl, it's in shadow. So that's the Chateau de la putting in at this point. But the shadow isn't as deep as I've done it. So if you make it to be a little bit too much, you can just again pick up that white colorway, use before It's append it out. And now I'm adding the shadow on the bowl. And you can notice that my brush size is quite big so that the color is diffused. I'm still using a bright green color. One thing that you can also do is to lower the opacity of your brush if you feel like the Colombia, Chile is a bit too bright. The other good thing about what you're doing right now is that we are avoiding using the smudge tool when trying to blend in our colors just by changing the brush size. An easier way to do this is by switching over to the Smudge Tool and then smudging all the colors that you've laid down before so that you can have an even layer of color on the ball. But I feel like it's also important to have the skills on how to blend without depending on the smudge tool. Take your time with this because I know we are not going to depend on the smudge tool. So you need to take your time to blending those colors that you're laying down right now. We're also going to add a little shadow that is cast by the dripping honey on the right side of the bowl. And to do that, I'm just using a dark gray color over on that side. And then also noticed that in the previous section, I also already put dark shadow in as a dark brown color on the sea or honey. Now we're just extending that color on the rim of the muddy color, but the shadow on the rim of the bowl. In this next part, I decided now to select a bright white highlight directly from the color wheel so that I could add the highlights onto the bowl because I could see that I did not have as brighter McCullough as I wanted directly from the palette like I've inputted. So I just went over to the color wheel section and then select some bright white color. I'm just adding in a little bit of highlights that defines the rim of the bowl. Once I was done with that, I went back to the palate and continued adding some colors in some sections. And then I still need a tourist. Another section where I had drawn a sketch of the bowl. Feel free to take a photo of your whack at this point was teaching the class project section. If you have any problems with painting and let me know and I will assist you.
8. Painting the Spoon: Now we're going to start painting the dollop of honey that is on display. To do that, we're going to create a new layer over the other lever trend paint at the bottom part of the honey. And then we're going to start with a dark brown color. To just pastor will outline the shape of the dollop of AMI. Still using the Nicaragua brush all of this. If you go too big, just feel free to erase. After I was done doing, but I decided to start shooting with that dark brown color. A brush as big as I needed it to be. Don't try too much about the highlights are the brightest sections of color because we can still add them in later on. And now taking a lighter shade of brown and shedding a 10 as a top. Consider this party so rich with different colors. Don't worry too much. If at this point the colors that you're selecting do not match. You will continue to get more perspective as you continue to paint and the colors interact with each other as are next to each other. And it gives you an idea of where you should go lighter or revenues go DACA. Again, still changing the colors. As I see in the reference image. I'm picking colors that seem too much to me. And to my eye. It's an exercise in patients in learning how to paint what you see and not what you imagined should be. Now for the honeypot is dripping from the top to display, I'll start with a base color. Then I shall end up adding the shadows to it. Solving by outlining. But JPL honey. Adding in the highlights that I can't see as well. Just like the other Anita was dripping from the spoon to the goal. This honey is also interacting with the colors that are behind it so that it gives it that translucency. You'll find some sessions to be Doc, Brown, especially around the edges and those plants on sections to be right. And it also has some little air bubbles in it and make it even more lifelike. So we just slowly go along as we add in even the highlights such we can see and Java doc sections. Remember that the honey but his dripping from the top also pulls on to this point. So you'll find there is a small little sheep or any other center where the stream, it's the discipline. Hi. Now you've started defining the shape and the colors of the honey on this point itself by adding in little highlights that are there. But you'll notice that the more you add in the it highlights, the more faster seem a lot more realistic. You also need to define the shape of the rim of this point and how light interacts with the HaMeR back point. Now, adding another layer on top and selecting the bright white color directly from the Hallowell. And then now starting to add the highlights, the bright highlights on that section to that section of honey that you have drawn. You'll notice that it also has some small, tiny little bubbles of air. And now you can also define the rim of this point really, really well with this bright highlight. Mmr not make it a bit too thick. Make sure that the size of your brush is quite small. This section of the Jaime had a lot of bright highlights due to the studio lights where they're taking the reference image. So I don't know. You can also choose now a dark, dark black color. I had a little bit of a shadow surrounding those bright highlights to make them make them talk more. Now going back to the layer that was below and adding in more color in some sections. I see I haven't actually done it as well as I could have. Take the time with all of this and be patient so that you're not frustrated. It may be a little bit frustrating to just use a color palette directly instead of depending on the eyedropper tool. So again, as I said before, feel free to slow down the video so that you may see exactly which colors I used at which points. And that you may land from my process as well. And now they're ready to move on to the next section. We're almost done with the painting.
9. Adding the Details Part 2: We're now going to continue adding more details to our painting. We're close to the finish line now. So fast things past, we need to draw the extension of the spoon. To do that, we're just going to use a dark color. Then outline that dark color with a little bit of light. Agree? Because that indicates the reflection of light onto the spawn. To do this, just make sure you zoom in as much as you need to. The rest wherever you need to erase, because you will likely need to erase and make it a lot smaller. Your brush size needs to be quite small as he doing this. So just erase down and then continue defining the shape of that spawn. Teacher time defining the shape of the spoon. Sure. And we'll talk to you too much through this path. I'd like you to just watch along as I paint it. And now after I'm done with that, we're going to go back to the Yana to adding highlights to the top part of the honey. And continue using the bright white color directly from the color wheel to add in some highlights. Also as well with the bright yellow color that was from our color palette. Even lower, the opacity as low as it needs to be to make the highlight a bit more soccer. Also still using the dark color from the color palette to add in the shadows. The interaction of shadows and bright highlights is what brings life to your drawing. And whenever you see you've not added enough color to the bees, just go back to that layer and add that color. And now I'm moving on to the last video. I hope you're painting looks a little bit like my, or even better than my kids go speech was in the class project section. And let us know your progress.
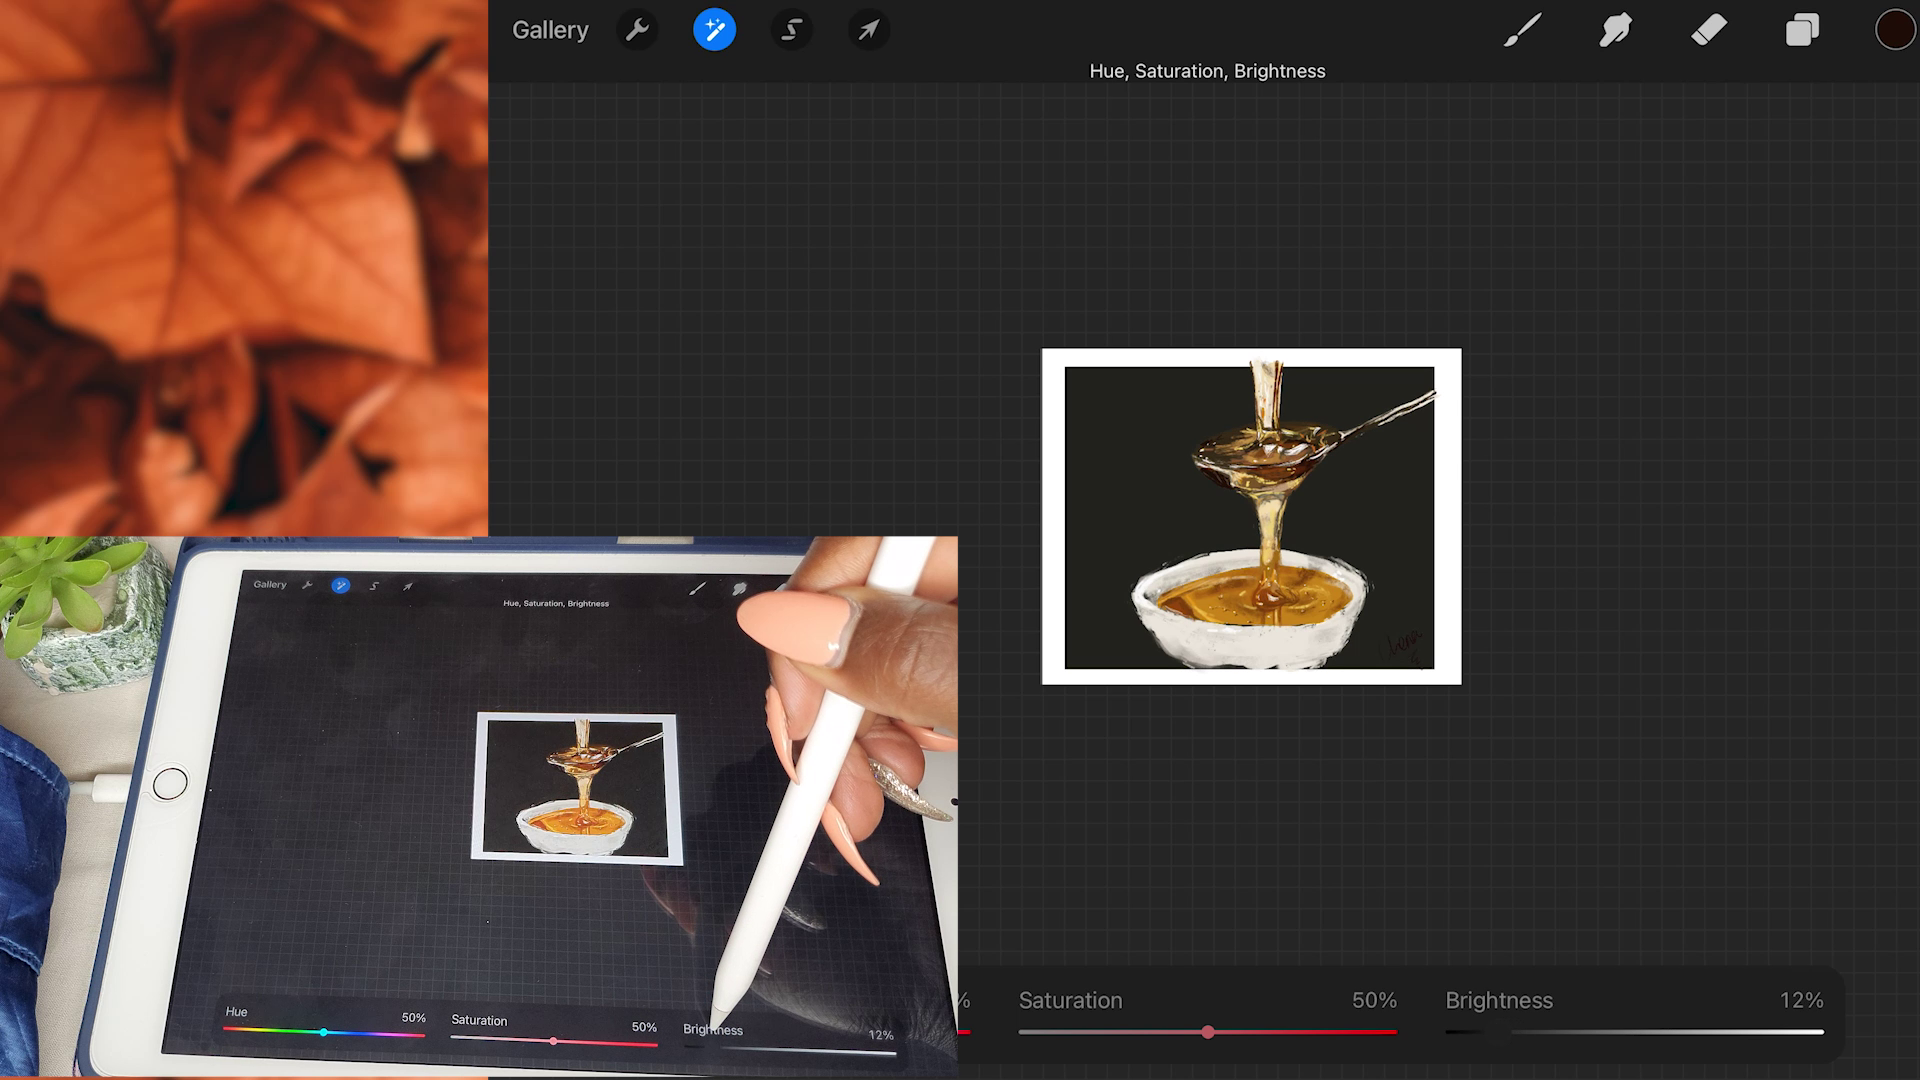
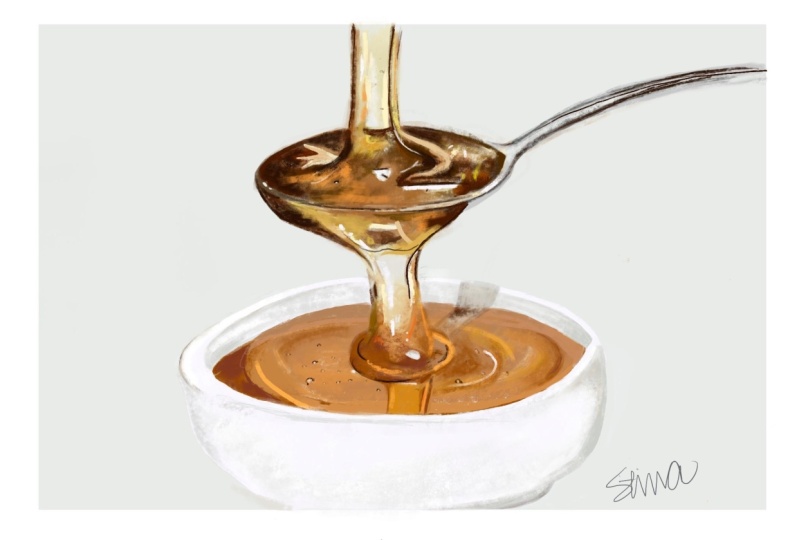
10. Final Thoughts: And now we've come to the final lesson. All that is left is to do any kind of adjustments and little additions that you need to do. Like I started with erasing some sections of my sketch where I feel like it sean through a little bit. Then I also wanted to make my bowl to be a little bit brighter. So enter Y to the adjustments section and choose Hue Saturation and Brightness. So I bumped up the brightness a little bit and lo at the saturation also, just a little bit. I hope you really enjoyed watching I long to this class. I know it's quite different from the other classes that have done before, but I wanted this to be a precursor to the class that shall be posted next. I hope you've enjoyed during a long and if you have any questions as usual, feel free to post them in the class discussion section. If you have any adjustments that you need to make, make them at this point. The adjustments that you need to make to your painting may be different from mine. In case you're interested in learning how to draw different kinds of subjects, from what shapes to animals to different still-life objects. Feel free to follow me on Skillshare, because by policy is that as an artist, it's good to explore all different kinds of subjects and mediums that inspire you. Need to stick to just one kind of subject, our media. Especially if you feel like you're a lifelong learner and you'd love to learn new things. The final thing that we're going to do is to delete the layer on which we had our reference image. And then I'm going to go back and adjust the size of our campus. Usually like my canvases to the hub, a bright white border all around. And I also like the brushstrokes of my image to go onto that bright white canvas for you to look just a little bit messy. But if you'd like to trim it to exactly the level of the gray background that you have, can also feel free to do that. Now, after I was done with this, I decided to go back to my background, change it a little bit, adjusted to be a little bit smaller. Then I crop my canvas again and still added some more adjustments that I could see that I wanted to add. Finally, I signed it, but then afterwards decided to change the color of the background a little bit to play with it. And I really liked the dark background more than the gray background. If you'd like to leave you as as great, feel free to do so. But that meant I had to erase out my signature, use a brighter color to sign it. I really hope that you've had fun drawing along with me and watch out for the next class where we shall be incorporating honey with portrait drawing. I really hope you've had fun. Feel free to post your projects in the class project section. And if you have any questions, I'm always here ready to help till next time. See you.
 Chena, Artist