Transcripts
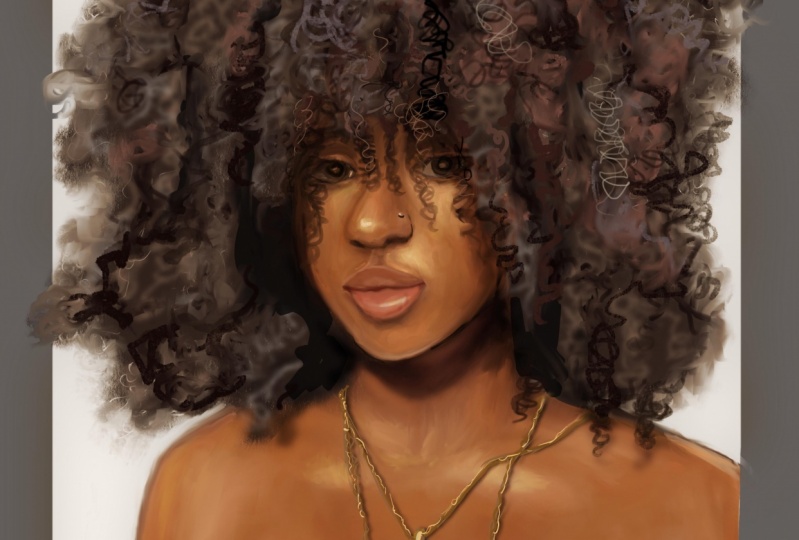
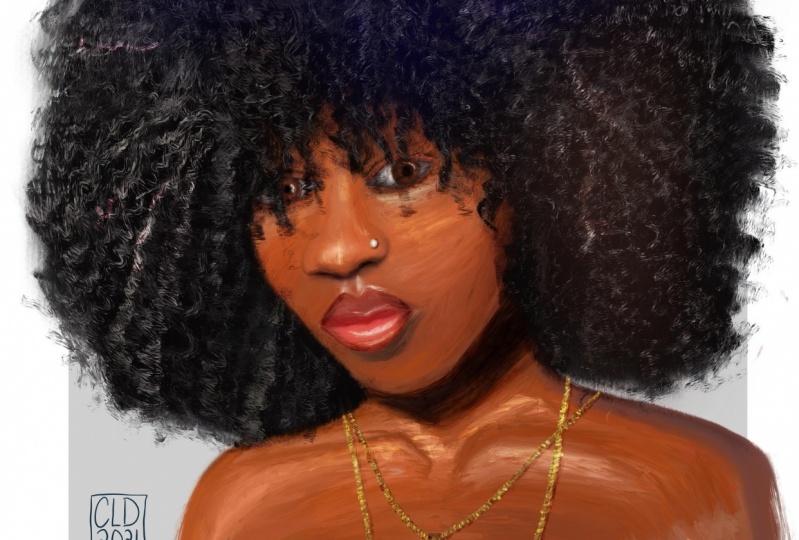
1. Introduction: Hi, Welcome to this Skillshare class. In this class, and we're going to be taking you through my process of how I drew this portrait. I'm going to show you everything that I did from how I sketched it out and locked in the colors, as well as explain the concepts that I had in mind for this portrait. So I hope you are ready and let's get into this class.
2. Materials and Class Project: So for this class, you will need access to an iPad that has Procreate 5 installed. Other than that, you also need an Apple pencil. It doesn't really matter which type of iPad that you have. As long as you have the app installed on their tablet. Personally, I use what could be called one of the cheapest iPads from Apple. The 128 GB Apple iPad that came out last year, as well as a first-generation Apple pencil. When they, of course, I hope to have one of the bigger and iPads, but this is more than enough for my current needs. And it has always had me very well. As for the brushes that you're going to use for this class, I'm going to leave them linked below. I mainly use two brushes, with one of them being a default brush that comes pre-installed in Procreate. The other brush is from a free brush puck from Gabrielle. Tricky. And I'll leave a link to where you can download them below. So clearly you need very few things for this class. So if you have all of them at hand, we can move on to the stage for your class project. I'd encourage you to follow along in the class as I drew and then feel free to post your finished portrait in the class project section. You can also post your portraits at different stages during the drying process. A country to see what you come up with.
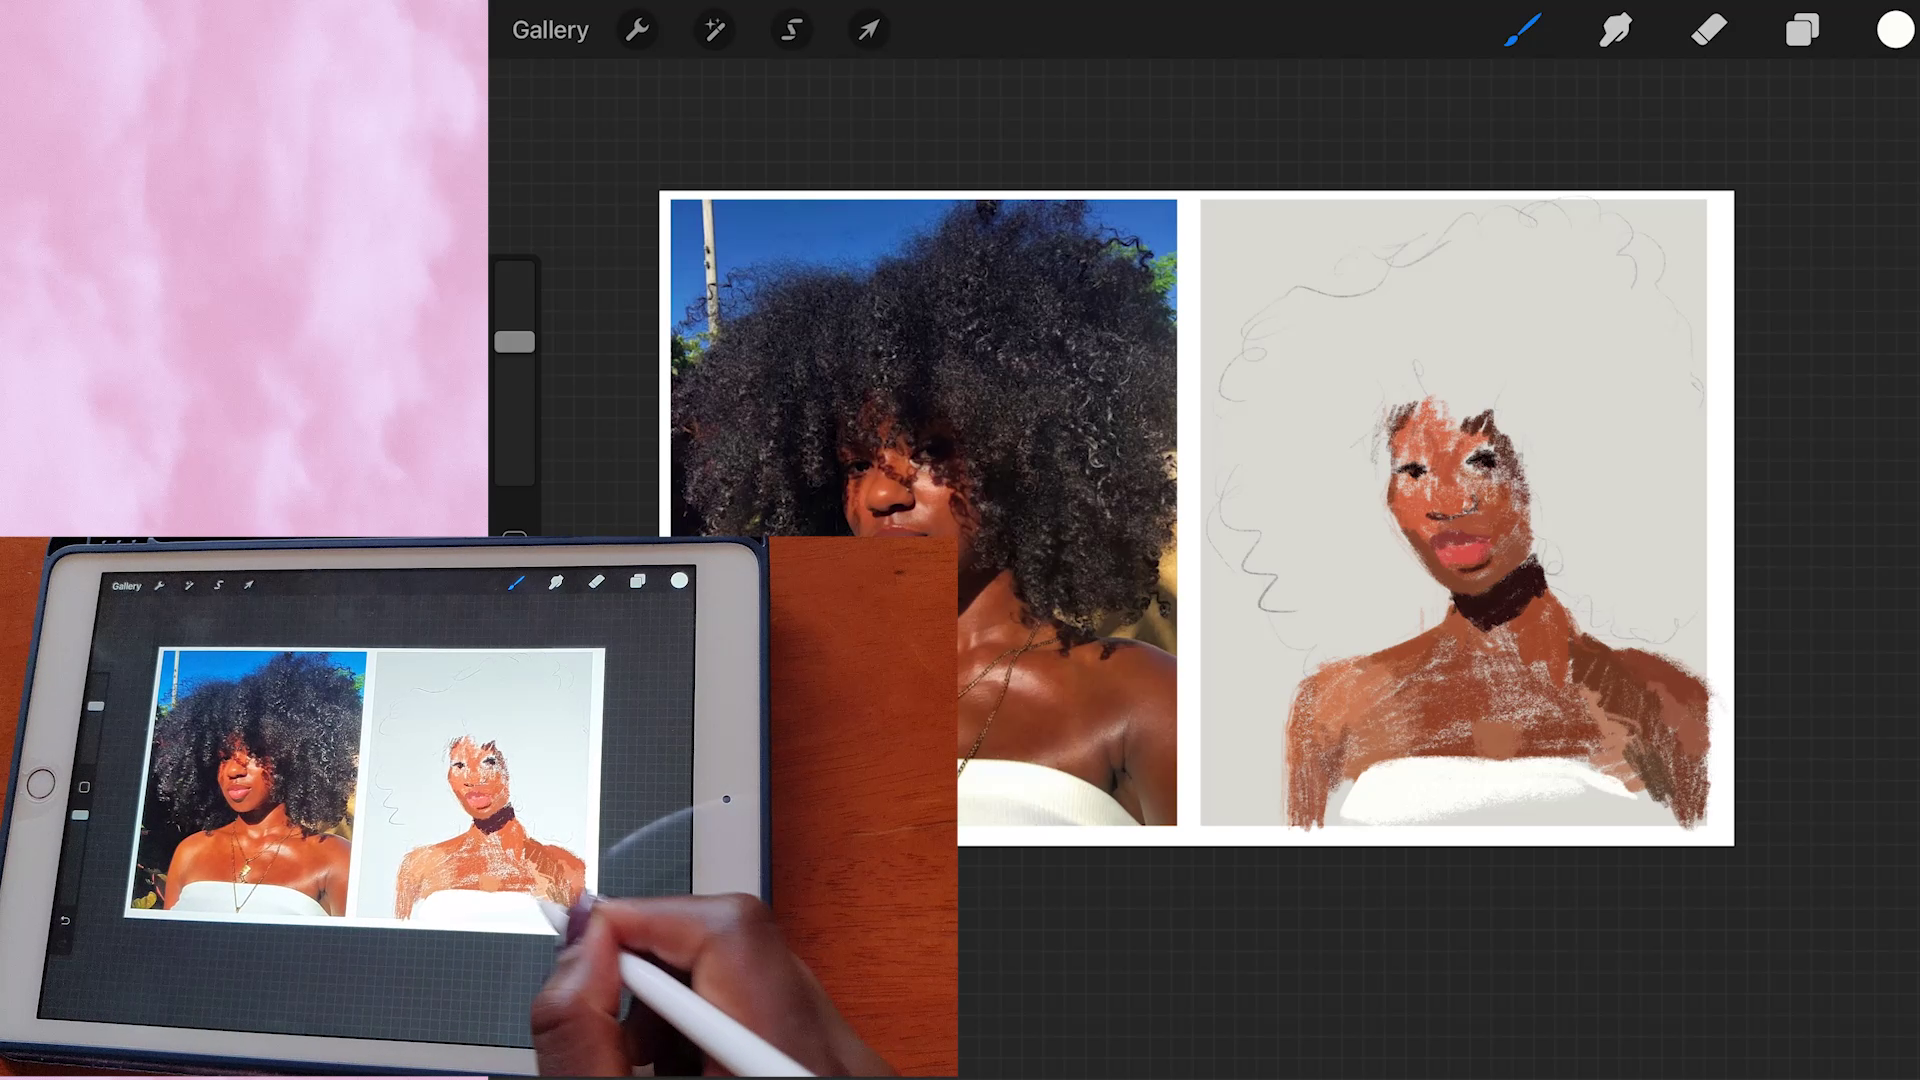
3. Setting Up the Canvas: The past part will be selecting our Canvas settings. So you will just open up, Procreate. Then you can select as the square screen size for the canvas. It doesn't really matter because you're going to edit it, moving applied. You're going to then open up your settings and select Crop and Resize. And the thing that you're going to change is the DPI. We're going to change it to 300 dpi if you'd like. You can also change it to a higher DPI such as 600. But the caveat to that is that you're going to have less layers to work with. The next step is going to be importing our image into the canvas. Next, I'm going to duplicate that layer and then select the image using the arrow at the top and move that duplicated image to the side. You'll notice that it is going to be cut off on the edge. So we're going to redo that part and just go into the crop and resize section. And then we're going to expand our canvas to the side. This way, when we move that duplicated image to the right side, it is not cut off. After doing that, we just then resize the canvas back down to fit the dimensions of the original image and then the duplicated image as well. Next you're going to double tap on that duplicated layer. And then you're going to alpha lock it. That way when you paint over the duplicated image, none of the paint is going to go elsewhere on the canvas. We're going to use a soft airbrush on a large size and just select a gray color from the reference image and paint over but alpha locked layer. After doing this, the next step is going to be sketching out the reference image. The sketch that we are now drawing is on a different layer from the alpha lock layer that we did before. Sometimes they normally go straight in and sketch out each and every feature. But most times I just sketch out a rough outline of what I can see and then go in straight and start blocking in the colors. We're going to be using the pencil for this linked to the brushes in the resources section. This brush was provided by a Gabrielle gritty and she's a teacher here on Skillshare as well. Then I'm going to move on to the next stage.
4. Placing the First Layer of Paint: The next step is enabling the fast layer of paint on the skin. For this, we're again going to use a different layer, not the same layer that we sketched on. We're going to use the 6 me pencil to lay on this pass level paint. This painting Shall require you to use the color picker quite extensively. I left in this step to show you a mistake that I was making at this point, which was painting in the top that she's wearing on the same layer that I was painting on the skin and ended up and doing this so that I could literally put the top on additional layer. So using the pencil, just pick up color from the different points in the skin as you paint along. You'll notice that there are different subtle variations in the color of the skin, depending on the way that the sun is hitting Haskins. The main aim of this step is just to lay on the beans colossal. And later on, we'll end up blending it over and then painting over it again. Take your time with this step and make sure to pick up the different colors in the skin in different sections of the chest, then moved up towards happiness. Equity in the dark shade that also indicated the shadow cast by a happy face and the neck. You do not have to exactly match the color of the ellipse at this point. It's just to show and indicate where the lips are going to be placed. I also used a slight shadow to indicate to have a nose is even though Patel half bases covered by haha. We're going to paint all these sections so that when repeat the hell, it'll run on a different layer because still see the skin picking through. This is also the advantage of painting the different features on different layers. That way they're not affected by different blending and tricks that you may later on use on the different layers. At this point is where I also created a different layer to paint her that she's wearing. I just used a white color. And then later on I'm going to add in the shadows. And now erasing the edges of the top to make the talk more defined. Now I'm back to the layer on which I'm painting the skin. And then adding in more color to not focus on adding the highlights at this point because we shall do that later on. Now I've created a different layer and I'm painting the hair. I put the layer on which I'm painting the hair to be on top of the layer that I am painting the scan. This is because the hash of the overlapping of other fees. So we need that LED to be on top of whichever layer that we have painted the skin on. The layer on which the top that she's wearing is painted on as well, is on top of the layer that the skin is on. This is because it is an item of clothing and it covers her skin. So we shall have to put it on a layer that is above the layer on which you have painted the skin. I'm now back to the layer enrich the skin was painted on and I'm continuing to add more color. If you'd like. You can also separate the layer on which you're painting the chest and the layer on which the fees is. It all depends on your WACC fuel. Remember that I'm still using the pencil over here, and I'm using the color picker to pick up different colors from Haskell. This stage is really important because it leads down the foundation for the rest of the paints that you're going to end up painting later on. Remember to completely cover the area where the face meets the hair, because the skin shall still be peeking through the layer of the hair. When it comes to the face, it's really important if you already have the foundations on knowing where to place different features on the face so that you may know the different planes that exist on the piece because some planes shall be in shadow, clean, shall be highlighted. Remember to always make sure that you're painting on the correct layer. If you're painting the hair, make sure you go to the nail and which are painting the hair. Do not mix it up. If it makes it any easier for you. You can also label the different layers by double tapping and selecting remain. I tend to not zoom into my paintings that as I paint. But if it's easier for you, make sure that you zoom in so that you can get into the tiny little nooks and crannies. When it comes to the piece. I sometimes use the fingers on my left hand to select the color picker. And other times I just tap on it using my pencil. The different shortcuts that you can configure and the procreate app so that you can access different commands. So each depends on your workflow as well. Don't forget to put the shadow that indicates how armpits. At this point, I was almost done with link, the first layer of paint. So make sure before we move on to the next stage that you duplicate the layer on reshaped painted the scanner. I shall show you in the next video what we're going to do. A batch duplicated layer.
5. Smudging the First Layer: Now we're moving on to smudging the skin. They're going to be walking on the duplicated layer that we made in the last video. So we're going to select this much tool and we're going to be working with the soft pastel brush given by Gabrielle bricking. Make sure that you have selected an adequate size for the brush and that your opacity is on a 100 percent. Now we're just going to walk slowly through the entire lives can starting with the chest, along the shoulders, and moving consecutively just through the whole layer of skin. With a method of painting that I'm going to be showing you in this class. It doesn't really matter in which direction that just munching. But you shall noticed that you smudge in a particular direction may be from light to dark. You'll pull in that lightness into the dark areas and vice versa when you smudge from the dark areas to the light areas. If you plan on completing a painting by just using this much took the direction in which you smudge will really matter. Because you do not want to end up Medina your painting in different areas. But in the method that I'm going to be showing you wish I'll be painting over these modulators. So it does not really matter which direction you smudge to ads. But just keep in mind that it has an effect. Capitalist much the areas on the face and the nose and around the eyes. This much tool, it really is an effective tool when it comes to painting skin. Depending on the type of field that you want your painting too hot. You can just use this much to the alone and finish up your skin with it. Once I'm done with smudging on daphnia, What I'm going to do is I'm going to merge the two layers of skin together. Then I'm going to select my eraser and I'm going to clean up the edges. You'll notice that whenever you duplicate a layer, it makes everything stand out a lot more. So now once we are done cleaning up this lecture, we're going to move on to the next stage.
6. Laying More Paint: This is the point where we're going to make our painting stand out and stylize it a lot more. We're going to be laying down more paint on the skin. So we're first going to duplicate the layer of the skin. I usually like to use the brushes that come in the painting puck. And most of the time, I usually use either the knee corral brush, the dry brush, or the old brush. Then now we're going to test out the brushes and see which look we liked the most. So we are still doing the collapse kicking that we did before in the previous stages. I like these painting brushes because they give a feel of an oil painting to the finished painting. It's up to you which brush you like the most. But the majority of these paintings have been done using the old brush. At this point, I was still testing out the different pressures to see the one that I liked the most. Now I'm trying out in the corral brush. You notice that I always have a piton and start off with a chest before I go to the piece. Because I find the face to be quite intimidating and I'd prefer to start testing out faster while on the chest. And if I go to the area that has the most impact, I didn't like the look of the Niko Raul brush, so I abandoned it and try it out the old brush. Never be afraid to try out different brushes on your painting. And it will come a time that you know the brushes that you like using them most. How did show you the look that can be achieved using the different pressures? Finally, I settled on my favorite brush, which is a dry brush. At this point, you can start adding in the highlights that you see on the reference image. We shall still add in more highlights at the end. This, and also be very time-consuming. So just take your time with it and try to meet the different changes in shading and color, but gradual and smooth transitions in a pinch and zoom in as you meet. Just keep on color picking as you move to different sides of a skin. Or 20, use the dry brush up the color that you really pleased on the canvas. That is a characteristic of the brush that can walk to your EVA when it comes to painting stylized portraits. Now I'm moving on to the most intimidating part, which is half East. Just keep on picking colors from the original image and leave it on your painting. If you need to take a break, make sure you do, then come back to it. I loved this reference image because her skin looked so sad, cast and had so many highlights. I shall also make a class. In each, I'll show you how to paint without having to use the color picker. And explained, I temporarily switched to the six B pencil so that I could add a shadow on the nose. You can pull it along to how I pick up the different colors. You'll notice that you can still see a tiny section of the whites of her eyes, but they're not white because they are in shadow. Whenever you please paint where you don't think it should be, you can always undo. That's one of the advantages of painting digitally. Sometimes I find myself trying to tap undo whenever I'm painting traditionally. Then I remember that I can't do that. I really liked painting her lips. Can be done just by picking up the different sheets that are on the original reference image. You'll find that sometimes you need to pick up color from different sections that are not under reference image just to deepen up the Colonia painting. Don't be afraid to do that. You're painting doesn't have to be an exact match of what you see on the reference image. That's always my policy. Don't try it, but putting the shadows that are cast on her face at this point. We shall do that later on. I tell you I've already painted the hair. Sometimes I went to my highlights to be much brighter. So I just pick up a white color from the top that she's marrying. Now that I mean, close to the end of this stage of painting on her skin. Remember, you can always zoom out to see if there's anything that you've done drum.
7. Painting her Clothes: Now I'm going to show you how I defined the top that she's wearing. I first of all, started by picking up some gray color from the reference image. Then by using the brush that I was using before, that dry brush, I did that shading to the right because of their top that had really put before. This gray shading against the white background is what indicates the material of the top that she's varying. It may be subtle, but these small changes, I want to mix your painting, end up looking three-dimensional.
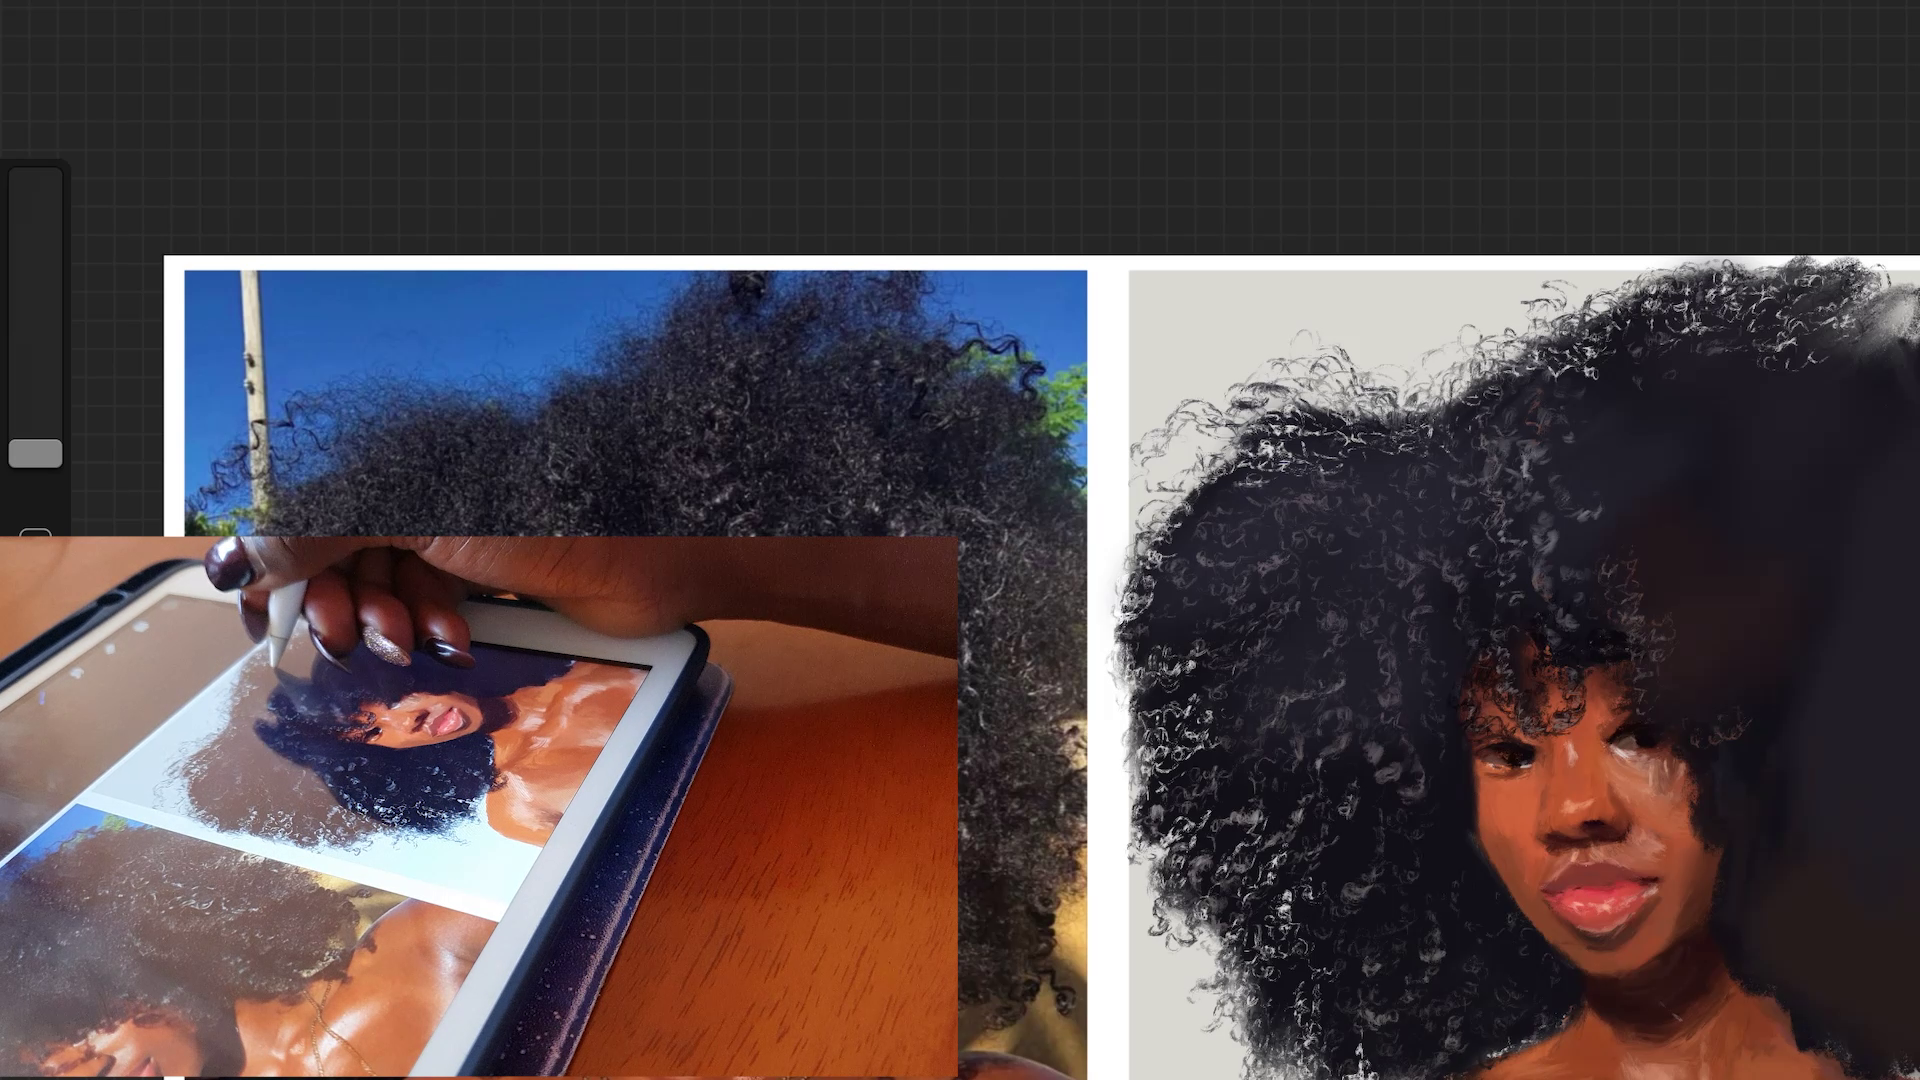
8. Painting the Hair Part 1: Now we're starting one of the longest path, which is painting haha. But first of all, going to start by switching to the layer on which we had been to the half. Then we're going to use the smudge tool, set on the soft pastel brush. Then we're going to smudge the hair or yoga. Make sure to only smudge over the areas where you painted the hair. Don't push the paint over the face, otherwise, you'll just need to erase it again. I always really enjoy painting her and I hope that you do too. After a damaged smudging it, we're going to duplicate the layer of the hair. And you'll just notice that it instantly makes it look a lot darker. Then we're going to switch back to our dry brush. You're going to pick up highlights from the hair and draw small squiggly lines that represent her hair. Which is that for a, for B, Afro texture. What defines the hair is by drawing the highlights. But here's what you're going to define, the different colors that are on the hair. Make sure the opacity of your brush is correct. Otherwise, you're going to run into troubles as I did before. So we're just going to pick a pilot on the hair and then we start to drain the different cards. I also switched over to the areas are set on the dry brush setting so that I could outline the edges of the hair by erasing the areas that adds matched. That way the background can pick through the hair isn't always dense straight from the roots up to the nth. You'll notice that you can always see the background through the strands of the hair. So by erasing using the same brush that I'm going to be painting the highlights on the head. It makes it look a lot more cohesive. Just keep on using the lighter color that you picked in the reference image. To draw the cause of the half. At some sections, you can switch over to the eraser and define the edges of the hair. And that other piece is you can just use the highlight color and draw the cause. Remember that the current spot in a particular direction. So go in the direction that the cards are piling. I decided to pick up the soft brush and add some variation of color because they had looked to pin with the black color that had originally selected. So I just use the soft brush and picked up a little bit of mu and a little bit of brown and paint it over the areas where I had it defined the cows. Now we're going to move on to Part 2 of defining the half.
9. Painting the Hair Part 2: We're back to using the same tricks that we were using on the previous video. Just pick up the highlights from the reference image and draw the Carlsbad. Other types time-consuming. But truly the head can be a very time-consuming task. Lpi, It's a good book to listen to. Good music to listen to as you keep on drying the hair. But the edges of the hand remember to switch over to the areas are set on the dry brush. To define it. I decided to add a cute Lowery's by picking up the dark color. The dry brush and drain leaders squiggly lines representing the diaries. Again back to using the highlight color to define the codes. Whenever you need to just drag these and just select a dark color of the hat and then drew them. Then again, whenever you need to define the edges, just select your erisa and squiggly lines. Now back to using the highlight to draw the colors. Use a dark color from the hair to draw this trends of habitat budding of a half of a high notes that we haven't yet gotten into the plane to drink the shadows cast by the hair on her skin. You can also use the eraser to define the hair that he's falling over. Remember that with all these moves, all you need to remember is that you use the same kind of random, small squiggly lines that define the colors of the hair. For the areas where the Highlight Customer hair is much brighter and use a brighter color. And for the answer tab cults, but I need to be tin shadow. I use less of a bright color to define the cards. Decided to leaving all the poses that haemolytic as a draw, trying to think through what I'm going to do next. Now that we have free to take a break and then come back to your painting liter because you end up looking at it with fresh eyes. Still using the areas are to define the edges of the half to the right. Then again, still drink the little flowery has. I hope you're having fun painting along with me as we are doing the hair. Now. If you need a really bright color to draw the highlights of the colors, you can even pick it up from her skin, from the top that she's wearing. Don't be afraid to do that. Don't limit yourself to just picking a color from the hair. Now again, it ties to, and you're going to move on to part three.
10. Painting the Hair Part 3: We are almost done it by now, just going to finish up on the right side of the hair using the same techniques that I talked about in the previous videos. I'm going to leave you to watch along to attempt doing questions still defining the edges using the erisa set of the dry brush in order to remove any excess paint that had been moved to the edge of the painting when our smudging the half, I just changed the setting of the erisa to a different brush so that I can remove it all. Then I go back and do the same steps that I was doing before, using a highlight color with the dry brush setting to define the colors. I also defined the little cause of habit or flooding over her shoulder. Finish it all off by adding the little flowery has to the right. I hope that explains that your hair is looking like mine or even better than mine, and that you picked up a few tricks on how to draw after a half. Now we're going to move on to the next digits. We're almost done with this painting.
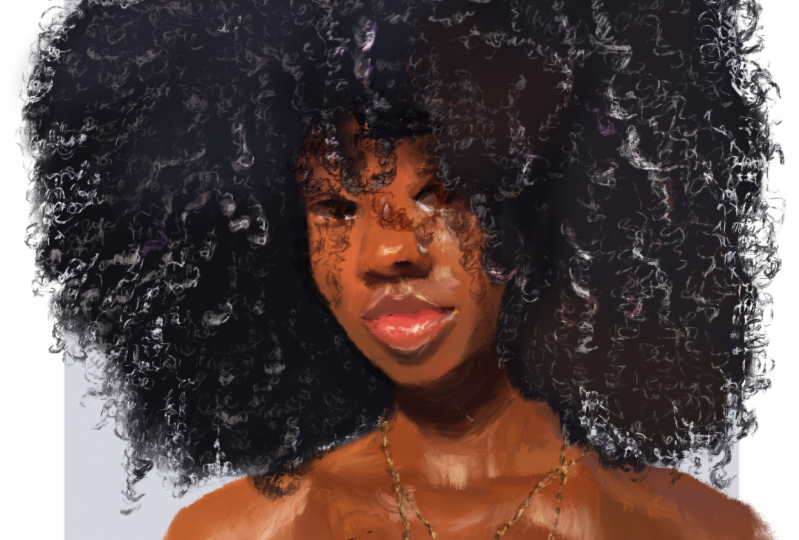
11. Adding highlights: Now moving on to the time of adding another scan. We're going to do this on a new layer. And I decided to try and change the Blending Mode to Color Dodge, to make the highlights of the head to undo a few times to make sure that the size of the brush. So just pick a bright colors from the image and add a few highlights wherever you see, you want to add them. Adding the highlights to high from before moving mind to escape. Doing this, I'm going to add a lamp just above the natural way I drew the hat. And I'm going to add in the cast shadow of the hat on Haskalah to ID. I'm just going to use a dark brown color as it is indicating the shadow that is customer has skin may have had just adding those shadows as you can see them on the reference image. And you can even add in extra shadows that are not bad. And I go back to the analogy. I was drawing the highlights, highlights on her skin. That whichever is on top is the one that is going to be a prominent. So if you find that some of the features that you've added cannot be seen, you can play with the arrangement of the lens. In the initial highlights next, two, unknowns and unhighlight. Zooming in and zooming out to see what else you need to carry around with. You can add as many highlights as y1 and x2, y2, high-latency want. I personally love? In future classes, I'm going to also show you how we can add effects to your portraits. Next, I decided to make a new Yazid could add sketching out to us during that she had just picked up some white collateral top that should vary. Then I placed that on the news. And then to make the nose ring stand out, you also have to put in a dark shadow around data and the bees. Really quick, simple thing to do. What does any of that? I wanted to crop out the reference image that I hadn't decide. So I deleted that layer, then cropped my combustion. Then I wanted to resize the gray box that I had at the bottom. I wanted it to be kind of smaller than half. So that half went over to the white edges. Then I added a few more flyways. And I also added any other edits that I wanted to add to decide. I wanted this painting to have a really painterly feel. So I did some Payne's trucks to the sides of the painting just to make it look a lot more messy. So in the next stage, we're going to identify a few final details.
12. Adding Jewelry: So this step is optional, but it's produced, would like to learn how to add Geology. I'll show you how to do it. For I to be willing to me the reference image that he had removed before. And we're just going to put it to the side and then select a bright yellow color from our color wheel. As always, make sure that this jelly that you drain is on a different layer. The family, the level at which we have joint Daniel string. Before. Then I'm going to start out by painting the liter pendant that she has on her neck. Who did the dependent task? Different shades of color, depending on how the sun is hitting it. So you'll need to pick different colors from the Columbia. Alternatively, if you don't want to do this, which is the more difficult, you can use, the easier way, which is just using the color picker tool to pick up the colors from the reference image. Remember to do that, you'll have to have the reference image on the Canvas. But since I had already removed the reference image from a combustion, I have to use a color wheel right from the top. But I believe it's an important exercise to do. So as you may learn how to colors directly from the kinda wielded without depending on the color picker tool. In some future classes, I'm going show you how to paint portraits without having to use the color picking two for the chain that is around her neck. I said it out by just drawing a small black dots that indicate the chain. Then later on I'm going to add in the highlights between those black dots. And that just gives already there all of the journey that she has around her neck. Remember that the contrast between the dark and the bright is always going to give the indication of the pituitary that she has. Just be patient and take your time as you get around to the different shades of colors in the color wheel and pick whatever you see as suitable. After drink the geology, I decided to add a little bit of highlight to scan. Whenever you see that it's a bit too bright or that you've done the wrong thing. Remember, you can always undo as what a gray square in the background. I decided to play around with the color of the square a little bit. Just to find a sheet that I liked better. You can even completely change the color of the square by just moving to that layer and dragging a different color into it. You can sign, you're trying. Hope you've enjoyed watching it and a country to see whatever you come up with. The class project section.
13. Final Thoughts: And now we've come to the end of this class. I really hope that you've enjoyed following along to it. And they can't wait to see what you've come up with in the class project section. You can find all my details on my profile page and a country to see you in the next classes. Chairs.
 Chena, Artist