Transcripts
1. PROMO: Do you like to spend
time in nature? Do you like drawing? What if I told you
that you can improve your drawing skills
only by drawing trees. Trees are like people to have their own bodies
and structure. Except they're not as
complex as people. In this course, I'm going to
teach you how to draw trees. So let's have some fun. This will train your
eye to see proportions, structure, shape, details,
and everything else. And it will improve
your drawing skills.
2. MATERIALS: Hi there. Before we start, I want
to talk about materials. And this is going to be short. You just need a notebook, preferably something that
you can put it in your bag, or something easy to carry. A bolt. That's right. If you want to have
a pencil, okay, but I would suggest for this lecture you really
take a ballpark. And why is that? It's because I don't want
you to have any safety net. That's right. A part of this exercise
of learning how to draw. And by drawing trees is that you need to get it used
to just scribble, to draw without
having an eraser, without having to think
of making clean lines. So just that notebook, preferably something
that you have winds on or something that
fields temporary for the same reason as I'm choosing the bulk been
something that you don't want to hang
up on the wall or having these serious
business going on. I want you to feel relaxed. So this methods of having
about them and just the normal notebook
will release you from the pressure of having to make the best drawings
of your life. And that's how you learn to make the best drawings
of your life. So that's it. Now, let's go.
3. DRAWING LINES: Before we go to drawing trees, I want you to start with
a very simple exercise. We're going to one of
how to draw lines. And this exercise is
important because I want you to know how
to hold your hand, how to loosen up. The main idea,
withdrawing traits, is that you can freely move your hand and draw
whatever you want. And in this occasion, trees, because no one can recognize the right or the wrong tree is the tree will not be insulted. So to do that, I want you to start, just make sure you pan new
bulb and it's working. Just draw lines like that. Move your arm freely, like that. Just down and just scribble
something very easily done. Press it. Don't do
this pressure thing. Just easily make it
slide on the paper. Just make controlled lines and make long lines on top of each other
due to the mouth, like grass or trees
or something. So this is one of the wines that we're going to use when
you start drawing trees. Another thing is that I want
to just start drawing small, small lines next to
each other like that. In this way, we are going to describe the structure
of the bark. So maybe just unify them. Do another one. Just try to draw them
quickly, easily. Not just a lot of pressure. Make them just going one direction or
another, not too many. You can release your
hands after awhile. But just make a couple of these. One next to another. I think in the beginning, what you're going to
experience is the line are not going to be
just as even as mine. Maybe you'll maybe do
something like dots or doubt. I mean, I don't know, but the thing is that you should not be
conscious about it. Have to be easy about it. I'll just do a couple of them. Open your notebook
and doodle them out. And this is how we are going to draw the structure of a tree. And these lines are not only good for the
structure of the tree, these are also going to be useful for you when you
draw anything else, a face or a human. These are basically how you shade in black and
white when you use, just want to just pencil or a bolt bank
or something like that. So that's it. These are the other lines. Now let's do the other exercise. Let's do though like that. Freely, just due to
freely lines like that. This can be, this can look
like nonsense really. But believe me, this is how you're going to build
your structure later on. Just do those some hearts, maybe total sum, tier
alike, things like that. And this is going to be how you build the crown of the
tree or your leaves. And when you practice
these doodles, this is also how
you free your mind. Are doing. Doing things that
are not concrete. Believe me, your mind
is fast as fast and in structure is something
to be pretty in something to be precise. This is not how you draw. You draw by summoning
components together, and you draw by freeing
your mind and your hand. For doodling. This is how you draw people. This is how you
draw anything else. So when you start
just doing that, when you will see that we
already have a bush kind of like thing here.
In this bush. If you want to have,
for example, shading, like if you want to have
this bunch of leaves, for example, sticking out, well, just do use these lines and just place them around a counter that you
decide like that. And you see that it
looks like there is a bunch of leaves coming
from coming upfront. And it feels like
the illusion of this space here being
behind that space. This is just an
illusion of course, but that's what drawing is as being able to create
an illusion of that something that
is two-dimensional is actually real and
it's three-dimensional. So these are the other set
of lines that you can do. So they're not around
that like that, but they are straight and
that is how you shade in graphic, graphic art. And maybe sometimes
you want to put another set of lines like that. Believe me, when I
started drawing this took me a while to get
this done like that. And we had a particular lecture
on how to do this line. So please take your notebook
whenever you can and practice this lines because
they are going to be the basics of your drawing. But enough of that nonsense. I know you're eager to start drawing and to learn something. And this is the shortest I
can be with this lecture. And keep your patient's going. So let's get out in the nature and start
drawing some trees.
4. HOW TO BEGIN: Start with finding a nice
place to sit in the nature. Choose a tree. Take your notebook and a pen or pencil, and start observing. Just get comfortable. Well, that's basically
all you need. Oh no, I forgot to mention
a bottle of water. Now, it's not for drawing, is just for drinking. They hydrate it.
5. START DRAWING: When you choose a tree, notice the structure of it. How big is the trunk? How big are the largest? And how much leaves to the half. Remember, you won't have to draw on the beach and all
the branches of the tree. It's like you don't draw all
the hairs on the human head. But let's start and
learn along the process. So just start with a
roughly drafting the trunk. Draw with loose strokes. Don't try to pressure
it too much. Just likely draft and sketch. The lines. Doesn't have
to be on the right spot. You're looking for
the shape here. You're experimenting
and exploring the tree. What is important
here is to find the proportions of the trunk towards the biggest branches. Trees are like humans. They have lamps and they
have bodies like the trunk. So now we have drafted
the tree approximately. Now, let's remember, we want
to go from this to this. Such rough sketch is all
you need to start with. It doesn't have to be much more. Now, let's continue
with the next lecture.
6. REFINING AND DETAILS: So we have this basic Judo, basic outline of our tree. Let's continue refining
and adding more branches. As we talked about before, we're going to focus on
the trunk of the tree and the branches that are
more visible or obvious. Now you can even start
adding smaller branches. Trees are like people. They have their own structure. Their trunk is like their body, and their bronchus
is like their lamps. Drew with the sketch and lines. Don't be afraid to
just doodle that out. Move from one place of
the tree to another. Draw everything
at the same time. Don't just start with something and then continue
with that thing. You need to have an overview
of what you're doing. So drafted out even
with the bullpen. To increase the feeling that I can make all the mistakes
I want to make here. And I'm not going to
freak out about it. I'm going to just have
fun with this tree. So sketch roughly. And if you don't have to have
everything in the right, Exactly the same position. What you need to do is try to find approximately the
proportions of the tree. And from time-to-time,
start adding even structure of the tree. And you can add the
structure of the bark alone, the length of the tree. And most details
you add alone the place where the branches are starting in main
branches starting. So that's going to give a
solid structure to the tree. And now we can even
add some leads. What kind of leaves
you want to add. I'm just roughly
draw them like that. They don't have to
look like leaves. They have to appear to have
the structure of the leaves. Scribble them like that. Very likely. Just to give some character. You can then take out
some leaves and make them even more precise. Just to see what kind of
leaves us this recap, you don't have to draw all, but just a few will give your viewer a hint what you
want to convey here. So let's continue with
the rest of the tree. This is a process that goes
for from bag for from that. Between adding details,
looking at the whole picture, how you trees looking, looking like, and
adding details. It is an enjoyable process. You see you're in nature. You can probably hear
the frogs around. I decided to do this video in the nature because you
see how easy it is. You're going to
enjoy this process. This is not supposed
to be torture. And the older trees are nicer to draw because they have very characteristics
branches. It's also like a
drawing all people, they have these wrinkles
and the more interesting to draw while maybe you
don't appreciate it now, but the more you draw, you will find these
juicy details of life on trees or people
being very interesting. We really live or live on
our faces, our bodies. And it is interesting that is
what life is about reading. So if you don't have the
spot for all of the tree, just as a few branches so the tree doesn't look. Leaflets. Just to add some texture, to add some life to it. And yes, feel easy about it. While you're drawing. You can either listen
to the nature, the frogs or when you're
hearing here and backgrounds, you can have a nice music
for you to listen to. And sometimes your gum and you
have bugs crawling on you. That's a part of it. Part of the meditative. Thing about drawing trees. Learning to draw. By drawing trees. Sometimes you can get carried
away when you start drawing just a part of the
leaves and they will lead you and you just
forget what you're doing. So go back, see the whole
picture at something more. And you see if you follow me, how light the strokes or even just repeating them
do these wavy lines. No one will know what kind
of Theresa I'm drawing. I'm drawing it to
learn about structure. I'm drawing it too long
about how the lines are behaving on top of the
structure of the tree. And also to enjoy the process. Trees can teach us a
lot about proportions. Because branches have
their own proportions. Mean septum branches
are biggest. Chunk of the tree
is also larger. And we can define
proportions of this branch, for example, compared
to this branch. Just needed. And now we're starting to
this meeting process here. Yeah, just drawing
lighting fixtures, finding interesting
things on this tree, interesting texture
tree, and adding some. You don't have to add this texture all
along to knit it out. Now, it is going to be boring. Your drawing will be
more interesting, the same as life when
you have contrast to it. When you have parts which
are darker and more developed and other
parts are lighter, that you can just assume that the shape is
continuing there. So that's why it's
actually not even goods to draw all the leaves and everything on the tree you're drawing will
look more interesting. It will lead the
eye to the viewer, to something that has a stronger
contrast like this area. And we'll give it more flavor. And this is good for
them because think, if you have to draw
all the leaves, I mean, forget
about work, right? You will be drawing
leaves for a long time. No. No. You don't have to do that for something to look go
to look like a tree. And especially
when it's drawing. Because you have access
to just these two. Don't have colors. So you have to make
a difference between one element and the other. Sorry. This should look like a branch and this
should look like a tree. And this should look like
it has a thicker texture. While the branches and the
crown should look like to have a more airy,
spacey texture. And it should also look
as if it is a Coca-Cola because it is a whole thing, because the, the crown
is composed of leaves. But it looks like it
has a body of its own. And that's how you can even summarize it that
some parts you can just add shapes like that. And outer line, this is something that
is behind this tree. There are leaves just
maybe to some wavy lines to express that this behind the tree is actually
a part of the crown. The crown has many leaves. You will, you will do it many
times and you will see when you like the tree and you'll find a good spot and
you'll enjoy the process. You are going to
experience of law. And some trees that to draw will look better
than the others. Here, when you sketch a tree, it is actually up to you to decide at what stage you
wants to leave the process. Now, this tree
looks but already, you can just leave it at that and continue it started
drawing another tree. Or you can just explore more. And in exploring from here on, why do you need to
do is balance out, where is the darkest place I want to have part
of the tree now, it appears to be here. Why these two branches? And over here, when there
is this interesting. Branch coming out where the leaves is like a
naught of the tree, like our hands basically. So you maybe add
some texture here. Tree, where the tree meets the air so it
becomes more solid. And you always add more
details around the branches. The branches start like that, and this tree is pretty old, so the crown is much higher up and I'm sitting
pretty close to this tracer. One thing you want to
do if you want to draw the whole tree or take a spot that is
further away from it. Otherwise it will just, you can draw the whole tree, but you don't really have to. Now around the tree, there's so many other things. There are the bushes
and branches. You'll get tempted to draw them all because sometimes that, well, it's not like in the reality. You
want to draw them. You don't have to really
just balance it out. You see that maybe here you
want to have some leaves because the leaves of this
tree are so much higher up. I wanted to have more accidents. I wanted to have more variety, more life of texture
to this tree. So I'll just put
another one here. And you see, I'm just
doodling basically, I'm drawing in defined lines and here I want to make it clear where the
tree meets the ground. You see the spots
where something needs another shape
or a ground is basically the most significant
and important places. And to do, the grass
has this texture. The grasses, Strauss
standing up. So I'm doing strokes along
the shape of the graph. And I'm not going to
draw the whole graph. Also. I'm not going to
draw the whole woods, just the part of it where the tree starts from
and make it darker. And even in this spot here
which is already dark, I'm just going to increase that and add even more details. Now, these little
lines here are kind of signifying the
structure of the tree. Being them a little bit on some spots where
I have more details. And then I want to enhance
the structure of this tree. And not too much. Well, actually, you can consider
your tree kind of done. And you can go on
with another tree. But look how fast this gulp
and the tree came to life. The process was enjoyable and
I hope you enjoyed it too. Now let's go have some coffee or conquer oral wine and
just enjoy being in nature. So I hope you had fun and
go out and draw some trees. Here you go. You
have a nice tree famished for about 15 minutes. Now, I hope you continue
this process on your own.
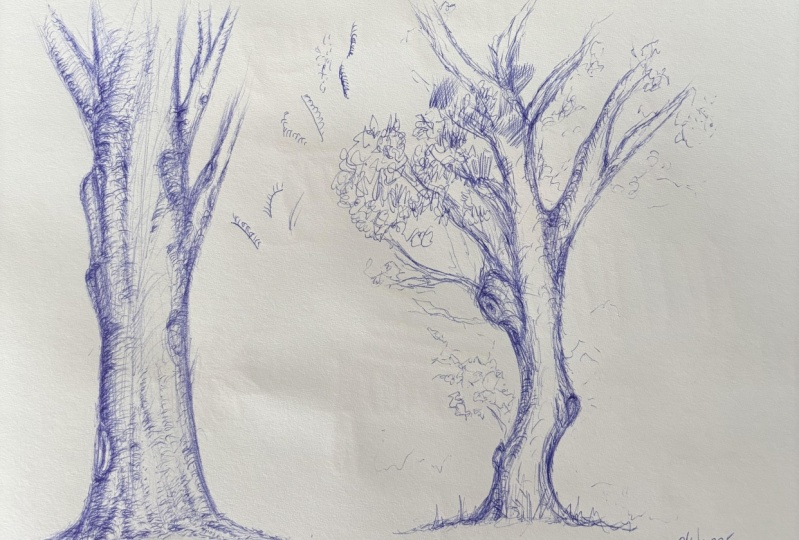
7. LET´S DRAW ANOTHER TREE: So low we're at it. Let's draw another tree. So let's start with the trunk. Starts with the loose lines, the lines that I showed you, and try to find now, again, the trunk of the tree. And it doesn't have
to be precise. Just with those lines, discover, discover
and explore the tree. This is going to help
you with the market. Women, drunk, people. Basically that you'll
do the same thing. But then you will have gone over your fear of drawing
up, making mistakes. And that will help you
a lot in your drawing. So here I see that it's
a proportion wise. There is a branch starting from here and it's hidden under some just gonna doodle out a curvy line here
for this branch. What else do I say? This is more simple
than the other tree. There is a clean spot over here and there is a branch
coming from here. So I'm just going to draw the
legs again and wavy lines. And it changes direction here and there is
a curve over here. There is one small branch here, which I'm going to add because
this tree doesn't have as much branches around
the trunk area, this area. So I need to add
the most branches that I can to give the
structure of this tree. So I'm just going to do the out. Even this branch here, maybe some small
branches on top of them. Even if you don't see them, you can add those branches. This is your creativity
talking here. You're the artist. You can choose what to
add whatnot to add. It. Don't be afraid if you
sell out what it is there. Well, now wonderful night. You are her long here and no one will see this tree unless you meet some branches. I'm sorry about that. So it's not really that tree. I cheated. I missed some branches. Well, that's what artists do. We cheat. We tried to convey reality in
two-dimensional space. Reality that is not there. So we are trying also
to make it look pretty, to make it look
balanced and products, you have to choose some things out and you have to put
something that I'm not there. I'm just going to add this
branch that is further away. There is a nice structure
here and you see how lightly I don't even
press the Bolton lightly. I go over these
branches just like it. Like that. Well, this is our new tree. Now. Basically is enough. Okay, let's add some
branches over here, which are at the
bottom of the tree. And let's add some of the
grass that the solvent, they're very loosely,
just like a sketch. That's all it takes. It took us three minutes digital this out
without thinking. Now, let's continue. I went I didn't want details.
8. ADDING DETAILS: So welcome back. We are ready to go
for the details. And as it's up before now started doodling on
top of the bark, finding the dark areas. Now the light is
coming from here. We see from this plot. So we're going to try to add the shading and around
the core of the brand. Just want to branch to start. We're going to add more detail. And it's going to be
a little bit darker than the other areas. Here. We're going to
go from these kind of shaped lines to other
more loose lines. Just play with it for awhile
and discover your own style. Discover how you're
comfortable doing that. Let's add some leaves just to be to make the tree
come to life more. And there's some shading here, some lonely lives here that are describing some
kind of a silhouette. Find this juicy details to add
more life to your picture. And it may not come
from the first time. Every tree would be different. There is no rule that says you have to add these
details and D status, but there is a matter
of balance really. And you find this
balance by mixing up brighter area with
some darker areas. And as a rule of thumb, you add the darker red areas
around the beginning of the branches where they
kind of step into the tree, the trunk of the tree. But please feel free to make
all your mistakes here. No one is watching, there is no competition. Luckily, your passion is to become an artist
and not becoming, for example, a surgeon's. I mean, that would be devastating
if you're trying out, you're forced up your
writing skills on a patient. And so while there is
always another patient, that would be devastating, well, no one will die here
and you're free to make all the
mistakes you want. There is always another
paper and it's safe. It's safe to make mistakes. So just please go
ahead and try it out and make your mistakes
freely and enjoy it. So this method of doodling is basically to help you
get rid of your fear of failing and get rid
of the voices in your head saying that you can't do it and you're not an artist. And do you think that artists
just have talent and they just have this talent all their lives and don't do
anything about it. It is really about
exploring your talent. Every picture is different. And you'll see how much
this do those look like, these totals and how they
apply to basically this tree? You can sneak in some
branch with the inside here and continue with
the dark doodles. And now you now how
to add shading to them item made some
doodles darker like here, signifying that there is a shade on this
part of the tree. Something is darker. Just apply those lines here to make the
spot go into shade. And continue with the
structure on the bark of the tree where
those curvy lines, small ones and usually add them around the
edges of the tree. That's why, that's how you get much clearer
silhouette of this tree. And it will look much
more expressive. So we're just going to continue with the
rest of the tree. And when you know
how to draw trees, when you know
basically how to do. This is the most important
of this lecture. Freeing your arm
and your mind to do this in the first site,
mindless genitals. But they create shapes. So that's how you
draw even people. But when you keep yourself, when you have this
notebook and you say, Oh, I can make mistakes here. This is only me. No one is watching. I don't have to prove
anything to anyone. I don't have to show it to you, to my mom and say, look, I'm an artist and
I succeeded here, but then fail and say, Well, I didn't succeed here. This is just for you. This is just for
your exploration. And that's how your
creativity will grow. And you say, well, why can I just do the
louder the things that we did on this piece of paper and explore my
creativity there, instead of just trying to draw this tree and having the
possibility even to fail. Well, because we humans, we like to do things when
we're successful at it. So if you have something
that you can draw this tree, and even though it is
not a copy of this tree, you'll feel satisfied that
you have accomplished a nice drawing and it will look up and it will give you
motivation to continue. If you don't have a motivation
to continue drawing, you will never
continue doing it. And if you don't
continue doing it, you won't learn because
practiced is the basics. Getting good at drawing. But to practice, you
need to be motivated. You see how everything
comes together. This simple exercises, even though they're
just on the notebook, will free you to
draw anything else, anything else you want to drop. And besides, you draw some
pretty good **** trees here. And you have a notebook with this amazing trees and plants. If you want to draw
maybe some truth, some graphs and some plants and maybe use that
as a note book. I mean, this is really my
notebook and write impressions. Right? What you feel and when
you're out in the nature, this is so giving you see how it jumped from
one place to another. Now, there's nothing really
more to what I'm doing. I did this in the first sketch. Whatever I'm doing now
is observing this tree and deciding where
to put more accents, where to put more darkness, basically, that's
what it's called. Accents. It's like you have speech and sometimes you raise
the voice a little bit, so that's in them in a drawing. That's an accent where
you, when you're intimate, stronger and make the drawing darker and that
gives you more life. I mean, if I talk like
you can draw trees. Going to teach you this. I mean, you're not going
to be excited about it. And this is exactly the
same with the drawing. If I draw this and never
really changed style, you will just be bored
of this drawing. Believe me, that
even though you have the urge to draw
absolutely everything, even there'll be a struggle
for you as an artist. Maybe there is already
in the beginning that you want to be fair to what
you've seen in real life. You want to say, well, it has to be exactly
like I saw it. But the thing is that the more you actually not draw
it exactly like it is, the more like it is, it looks, the more
real it looks. So this is really
contradictory and really very interesting thing that I have
observed from my career has that the more real things
they're a little bit made up. And if something is real, real, It's kind of like
something feels wrong with Isn't that funny how things are about
that, that's who we are. I mean, we perceive the
world through our senses. Proprioception really, what the perception is more
important than the census. Used up three advantage, whatever you decide to draw. You see here, we've drawn
another tree pretty quickly. And now it's up to
you or to finish. And how long you
want to take it. If you want to draw some more, again, I stopped too
close to that tree. And when you sit too close, you can see the hall and
you're not going to tend to draw the upper part of
the tree. That's okay. That's not a big deal. And we had another pleasant
experience out in nature. And yet another tree. Tend to your collection. I hope you enjoyed this class. You'll see how easy it is. Now. Grab your notebook,
grab your ball pen. You see we've never
needed to erase and enjoy some time in nature
and draw some trees. Practice your drawing things from me and I hope
to see you around. Bye for now.
 Maria Avramova, Illustrator/Animator/Filmmaker